#what is css classes
Explore tagged Tumblr posts
Visit Tumblr Blog
Explore Tumblr blogs with no restrictions, modern design and the best experience.
Last Seen Tumblr Blogs


Fun Fact
If you dial 1-866-584-6757, you can leave an audio post for your followers.
Text

hyperfixated on this game so hard i tried to recreate ac syndicate's animus database using html css and js👍
i will make this responsive though, i've only started doing the frontend but i'll also start doing the backend as soon as i finish this
basically this is gonna be a website that will allow you to create a database of your assassin's creed OCs (btw this was inspired by @gwen-the-assassin's idea <33) and help you with worldbuilding and making AUs (i know the ac fanon wiki already exists for that but i wanted to make the experience of keeping a database more immersive u know....)
this might take a while to be completed, but I'll try to post updates on it as much as possible! if there are any programmers/web developers in the ac fandom that want to contribute to this project plsplspls DM me!!
actual pic of the database for comparison:

ik it's not entirely accurate but this is the simplest database in the game that i could recreate lmao
also code snippets just cuz (+ me crashing out)


#u know what#i might just pass this for my database systems class#assassin's creed#assassin's creed syndicate#ac syndicate#animus#video games#gaming#programming#coding#codeblr#web development#ui ux design#html css#javascript
161 notes
·
View notes
Text

Web design is my passion
#shitpost#wobbledog#just 1#as you can see my programming class is going very well#html#i know a lot more than i did about html but i can barely do ANYTHING with what i know#fun fact i actually had to put in MORE effort to make it look like this m#quick image tutorial incoming#when you alter the image size in css you use the string img { width: 400px; } (or your desired pixel number or percentage)#and this scales your image accordingly. however.#you can also add a second value of height or width depending on what you started with and the image WILL stretch#so my code looked like this:#img { width: 100%; height: 400px; }#also ☝️ the colour of the title is dodgerblue and i think its the best blue. followed closely by aliceblue
39 notes
·
View notes
Text
i have no idea what the things im reading say
#txt#my brother confirms this is one ofthe most uncomfortable ways to learn html/css idk what this shit says man#may luck protect me this class amen
3 notes
·
View notes
Text
((Things I said in the replies that I want to add as a caveat while reblogging this:
Your interaction in the new layout is almost definitely still being logged (as opposed to being considered the old dash) for analytics purposes (the A/B testing they’re doing to see how people interact with Tumblr differently with the new layout), so if you care about what they’re seeing in the analytics, note that they’ll probably still see it because there’s basically no way either XKit or a CSS style could do anything to touch that kind of logging. (EDIT: XKit probably CAN send information that causes an A/B test to disable (because apparently JS is capable of doing that under certain circumstances), but its settings probably DON'T here. CSS, on the other hand, is basically completely incapable of doing something like that though.)
The number of people in the reblogs and replies calling this a script are making me want to pull my hair out. It’s a user style, which uses CSS and is basically the web equivalent of rearranging furniture (special code that’s active all the time but doesn’t really “run”), rather than Javascript (what userscripts use, special code that usually only runs on page load (unless you do some funky stuff), the web equivalent of... IDK, running a Roomba?). It’s a semi-important distinction: Stylus cannot run JS user scripts (only user styles), and most user script extensions (TamperMonkey, ViolentMonkey, etc.) cannot natively run a CSS user style (AFAIK) without it being converted to a script that does nothing but implement the CSS code slightly differently.
The More You Know, and all that nonsense.))
i got the old tumblr dashboard back T_T
i got the old tumblr dashboard back T_T i used the xkit rewriten options in this post and installed the firefox application called stylus and installed this script through it for the old tumblr layout <3
(psst reblog and spread this so it can get to who needs it )
update :hi besties both xkit rewritten and stylus are available for chrome too!
#props to the person who coded the style though#i attempted writing CSS myself (with no special XKit handling) and I only got it partway adjusted#it looked ugly and had severe bugs i hadn't figured out how to fix yet#and just a few hours later one or more css classes had changed just enough that THE ENTIRE STYLE BROKE#so i gave up T_T#my version would have been the UserCSS protocol and provided options to hide the buttons that got pulled from the user menu into the header#(the domain and ad free options)#it also reordered the items visually to match the old order#looking at the current version of the style some of the code seems really similar to mine#makes me wanna take another crack at figuring out what screwed up (also because i like my reordering solution slightly more but#that one is just preference on my part so if i can get it working then...)
16K notes
·
View notes
Text
So i did finish the lab. Pretty damn late, but I finished it.


This should be testament enough to my general state of mind by this point. Yes, I did turn it in like this.
#speculation nation#there was 0 styles required for this lab bc it was all just building functions in javascript and connecting it to html input/output#so the left column are the buttons & One input field for the five functions i wrote#and the stuff on the right is what it spit out with various clicking and paaaaaaauline#the footer was just me adding shit onto here. as is the header. idk i doubt theyd actually count points off for it#bc the thing clearly still works with the input/output that was required.#this is essentially equivalent to me drawing on my homework. html and css style lol#i also have some rapport with the TA for this class bc he is my TA in my C programming class too.#and i was literally the only person who showed up to lab earlier this week for web coding class#and we laughed together a bit about how 6 people signed into the iclicker attendance thing. despite there only being me and One person#who walked in briefly to ask him about something.#so i hope he finds some amusement in me fucking around like this. 🫡 we are all at the ends of our ropes here.#(i also know from my other class that he's pretty chill about shit like this so long as the program works. very much not the stuck up type)#anyways yeah. i really should be getting to bed already lmfao
0 notes
Text
i FINALLY figured out how to attach links in my Tumblr description LMFAOOO I didn't know it was just basic HTML 😭
(is this the way I'm soft launching the fact that I'm now accepting commissions? maybe >;D)
#jo thinks#this is what happens#when an idiot loser#doesnt pay attention in her IT class#doesnt know basic html css#actually painful#but we laugh through the pain#we ball#the struggles really never stop do they
0 notes
Text
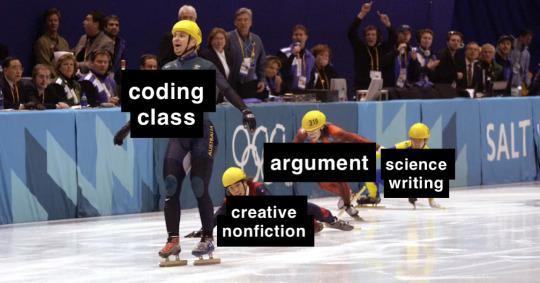
how i think things will fall when it comes to my favorite class by the end of the semester
#creative nonfiction had been doing so well recently too after such a rough start#what happened [professor]#coding is just html and css so it's not so much and the professor's really sweet. it's just not really my thing#web design didn't make it bc not enough guys and i have no beef with that prof (who is my favorite tbf)#i just find it INCREDIBLY boring and confusing and i look forward to never doing it again even though i don't hate the class#science writing has been the biggest travesty though
0 notes
Text
fun? update on my neocities i've been figuring out how to implement modals the way i want them which means a little pop-up post type thing ^ both for information about each individual piece that isn't utilising alt text (not what it's for) and also to separate the thumbnail image and modal's image to reduce loading time issues.
which means i've finally learnt css! initially i implemented the pop-ups solely using html but that doesn't work very well in the end ^^". significantly faster this way and different images simply use different class tags (? what is this called) to set them in correctly.
this whole thing has so much of me butting my head against little issues in the code and digging around for solutions (nightmare!) but it's a lot of fun. the modal itself needed adjusting the same way as the pop-up for it to sit in the centre of the viewport but that i sorted out first thankfully.
i still have to figure out how to get the images in the pop-up itself to sit centred and have them take into account the fact that none of the images are exactly the same which is... hopefully possible. it's also incredibly broken with any screen on portrait mode (or at least phones....) but there's not much i can do about that (for now?)
#gryph.txt#this might be the most amount of words i've written in a post bar like. one.#coding has turned into a fascinating interest of mine... using scraps of code and coding things entirely myself out here#fighting for my life trying to get things working the way i want#(ie. why the hell does neocities appear to ignore anything with right settings... why only left i don't want it there?)#coding is a nightmare but an incredibly fun nightmare#doing this with css was the best solution because it means i can use one card/pop-up and have tags for the img class to adjust those#which makes it faster because i only have to add the images text and whatever tag is needed (using portrait/landscape to indicate this)#whereas previously i had to manually adjust the entire card to get it to sit correctly at all. help#this took me like a month of going back and forth because. i coded it in toyhouse initially. decided there had to be a better way then used#cards instead. had to find script for neocities to actually display the cards correctly and open/close#implemented that. came back to it going hang on now i could do this is css like the modal so i don't have to adjust everything. set that up#Did Not Work especially on anything outside my laptop. went back through and fixed it all up to what it is now#< pretty much. probably missing things.#oh i have so much more to say but i won't
0 notes
Text
.。*♡゚ A/n: totally not trying to learn html (which technically isn't a programming language, for what I had read), and well, if Idia was teaching me I would learn everything so quickly tbh. Or not. He would start explaining and I would have the sudden urge to kiss him, oh well it happens ig

"Uh... I think I have an error in my code." You break the silence, tone soft as the computer screen lights up your eyes just the right way for Idia to lost himself in the reflex. He love your eyes, your concentrated face, the way you stick out your tongue without realizing.
And he loves the way you timidly look to him, as if he has all the answers to your questions - which, about this subject, he have, by the way.
"Ah~ your closing array is missing a closing slash. Here, Yuu-shi." He pointed your error with a soft tone, blue nail hitting the screen, and a surprised pout grew on your lips.
He wanted to smother you in his arms, to pick you up and hold you till his arms fell off and his corpse rot - that was how bad he yearned for you, your skin, you smell. He breathes really hard to refrain from doing it, though. You wouldn't want that. He was just a mere R card, a lonely gamer, a-
"Thank you, Idia. You're the best." You giggle to yourself, feeling yourself warm under his eyes and lousy smile. Unbeknownst to you, the only things that were going through his head were about you.
Your smile, the way your eyes lightened up, your laughters and giggles, the messages you passed each other in class (when he was there in person), your secret handshake. Idia loved you. He loved your very dearly.
He loved you so much that he could cry.
"Uh... it's no big deal," yet his hair was getting hotter, rosey tone starting to burn brightly. "Don't forget the closing stash, and everything should work properly. This programming language is not that used anymore, but most can learn useful things learning it anyway. I think."
Idia had half of his mind to know that he was rambling again, talking so fast that he could make Eminem cry. But he couldn't stop when you looked at him with such big eyes filled with curiosity and wonder, taking notes of everything he was saying.
He noted then that you had hello kitty stickers on your page. A few drawings that Ortho made of him, Idia and you; that almost killed him right then and there.
"Ah... HTML uses elements, tags, and attributes to organize text, images, links, and other multimedia elements. It can be combined with CSS for styling and JavaScript for interactivity."
#twst idia shroud#yandere idia shroud x reader#idia shroud x reader#idia shroud#idia x reader#idia x mc#yandere idia#twst idia#twisted wonderland idia#yandere idia x mc#yandere idia x reader#idia x yuu#idia x you#yandere idia x yuu#yandere idia shroud x yuu#yandere idia shroud x mc#yandere idia shroud
94 notes
·
View notes
Text
How I added "instant translation" to the non-english text on my fic: a very easy 3 step guide
Hello!
I recently posted a Wolfstar fanfic called Instance of Happenstance and received a lot of compliments on a small piece of code I used. Both @marigold-hills and @leavesthatarebrown suggested I share how I did it, so here I am, finally explaining it in a Tumblr post!
Before diving into the details, I want to clarify that I didn't write this code myself.
Initially, I tried following this tutorial, but I stumbled upon a better solution in the comments of that post. The code on the tutorial itself does work, but a) it's harder to use and b) it doesn't work as well if you're planing to have multiple paragraphs that you need to show the translation on the same fic.
The solution someone presented on the comments, however, is very simple and easy to use for as many paragraphs as you need, but the explanation there wasn’t too clear, so I decided to expand on it to make it easier for others to implement.
All credit to Ao3 users La_Temperaza (who wrote the orginal post) and Nikkie2571 (who posted this code on the comments).
What Does This Code Do?
This code adds an interactive feature to your fanfic, allowing readers to hover over a specific paragraph (or tap on it if they’re on mobile) to instantly change the text to something else — also set by you.
While this can be used for various purposes, I think it's particularly useful to display instant translations of non-English dialogue/text directly in the story. The code offers a much smoother alternative to the clunky “see end notes for translation” thing—which, let's be honest, can be a pain for readers, especially in long chapters.
For example, in instance of happenstance, Sirius discovers an old journal written entirely in French. I wanted to maintain the sense of mystery and intrigue that would be lost if I simply said the journal was in French, but wrote the text in English.
This solution let me keep the best of both worlds—retaining the authenticity and the immersion of the French, while still making the story easy to follow for the readers.
Now, I know this sounds complicated, but I assure you, it's not!
Down bellow is a quick, 3 steps tutorial on how to do it. I hope this is helpful! (:
(I'm doing this on the computer, if you're doing it on mobile, the layout of the website might be different from my printscreens)
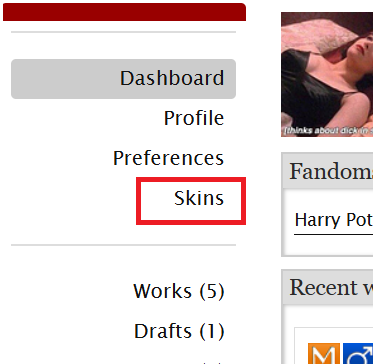
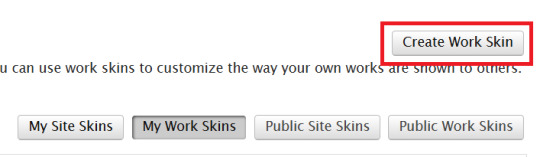
Step 1 - Create The Work Skin
I'm gonna go right to the point here, but if you want to know about Work Skins in detail, I suggest this Ao3 Article.
On your Ao3 Dashboard, click on the fourth link on the sidebar, which is "Skins".
Then, on the page that opens up, click on "My Work Skins"

Then, on the top of the page, select "Create Work Skin"
Now, you'll see the form to create your skin, which looks like this:
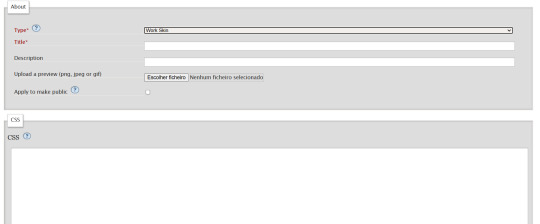
Leave the "Type" as "Work Skin". On the Title, you can give any name you want to your skin, but I suggest you choose the same title as your fic or something like "instant translation", so you'll know what it's about later.
You don't have to worry about any of the other fields, except for the CSS one, where you should copy and paste exactly what I'll put bellow:
#workskin .change_on_hover:not(:hover) .on, #workskin .change_on_hover:hover .off { display: none; }
So, now, you'll have something like this...
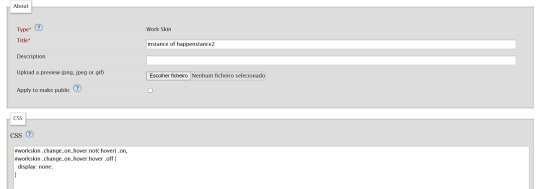
... and you just have to click "save" on the bottom of the page, and this step is done.
Step 2 - Apply the Skin you created to your fic
For a new work, click on "New Work" as usual. If it's a fic you're already posting, you can add this as well, just click the "Edit" button.
Now, on the form of your fic, on the "Associations" tab, right under the menu where you select the language of your fic, you'll see a "select a work skin" option.
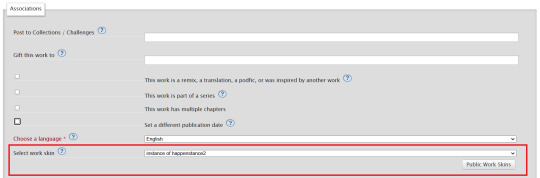
On this field, you should select the workskin you just created on the previous step, searching by the name you gave it on the "Title" field.
Step 3 - Insert the text
The code we're gonna use is this one:
<p class="change_on_hover"> <span class="off"> paragraph in foreing language </span> <span class="on"> paragraph in english </span> </p>
If you have no idea what this means, hold my hand, we're gonna get through it together!
First, copy your fic’s text into the AO3 text box as you normally would. Then, switch the text box to HTML mode so you can see the underlying code.

Now, scroll down until you find the paragraph you want to translate. After pasting, it will likely look something like this:

Note how each paragraph in HTML starts with <p> and ends with </p>. These tags indicate where a paragraph begins and ends.
Our goal is to modify that first <p> tag so it tells the browser, “Hey, this paragraph is different from those other ones. It should change when hovered over or clicked.”
To do this, we’ll change <p> to <p class="change_on_hover">. This marks the paragraph as special—one that should switch text when interacted with.

Now note how instead of having a single paragraph, we need two versions of the text:
In blue, the original (non-English) text, which will be shown by default.
In red, the translated (English) text, which will appear when the reader hovers over or clicks on it.
For the original text, wrap it inside a <span class="off"> tag, ending with </span> like this:
<span class="off"> insert here the whole text of the paragraph in the foreign language </span>
For the translated text, wrap it inside a <span class="on"> tag, also ending with </span>. This will replace the original text when hovered over or clicked:
<span class="off"> insert here the whole text of the paragraph in english </span>
And don't forget to end the whole thing again with </p>
Again, here's how it looks on my fic:

With the paragraphs that come before and after the translated text, just leave them as they are. They should still start with <p> and end with </p>. No changes needed!
You can use this method for as many paragraphs as you want, whether in the same chapter or across different chapters. As long as the Work Skin is active, the effect will work seamlessly throughout your fic.
#fanfiction#ao3#ao3 work skins#work skins#translation on text#ao3 fanfic#ao3 coding#tutorial#step by step#fanfic#wolfstar#marauders
79 notes
·
View notes
Text
Idk if you are all following whats going on in the Gravity Falls tag rn but I was curious bcuz my sister was going nuts and so I got involved.
Anyways... I think ive figured out the issue with the countdown.
Looking at the css for the website and basically:
The code is meant to fetch a file to determine if the countdown should end. If the file is populated with a link, it will redirect to that link. If it is populated with a new date and time, the countdown will change to that. However, if the file is populated with 'NO' like it currently is, the countdown will continue and update every second until there is a change.

This is what that looks like btw:

You can see this by going to files.thisisnotawebsitedotcom.com/is-it-time-yet/well-is-it.txt
.

While on this topic:
Some people have been looking at this snippet
And interpreting it as meaning the countdown will end at 7pm, or when the timer hits -07:00, but this is also false. That is there to adjust for time zones or whatever. This is basically saying it should have ended at 12:00 pacific time... which is why the countdown is now in the negatives.
The class for the Soos image and textbox are labelled as "error", so I think these may actually be honest error messages because theres been some delay. This may all be intentional, who knows?
.
.
.
So in short:
We will probably be waiting an indefinite amount of time, because the events at the end of the countdown arent triggered by an actual time value. The end of the countdown is triggered by a file being updated with a link, and the file is still populated with the word "NO".
#gravity falls#the book of bill#idk if this makes sense or if im 100% right but i know at least a little html and css#take this with a grain of salt
149 notes
·
View notes
Note
Hi!! I wanted to say that I loved reading about your journey of creating a personal website. I'm still unsure between Vercel and Netlify. I have a small question to ask. See, one of the reasons I want to make a website is to archive drawings and journal/sketchbook. Would you have any tips for creating an area on my website just for the diary/journal, which has tags, files for each entry, etc.?
Bello!

Really happy to hear about your interest in websites! I want everyone to make their own site so I don't have to log into social media and get instant tummyaches ♥
Vercel vs Netlify: I think I settled on Vercel for absolutely no reason whatsoever. I just made a site on Netlify, then tested on Vercel, and now I have like 5 websites on Vercel so I just kept using it LOL. I'm sure a more tech-savvy person would know the difference - I think they have certain integrations with specific programs.
Creating a diary or journal with tags:
There's a couple of different ways you can do that, with different levels of work needed.
you got me yapping again:
This sadgrl tutorial might be outdated and may or may not work, but explains the process better than I can.
Easiest: make a journal on Dreamwidth, or another blogging site (wordpress??) that allows easy tags and RSS feed, and embed that RSS feed onto your site.
This requires almost no HTML set-up, and the easiest to organize tags, but you don't truly have the data on your own site since it's just embedded.
When I snuck into a web design class at college, this was one of the methods that the professor used for a blog within a portfolio site LOL.
Shit like wordpress is what a LOT of ~professional~ sites do for their blog section. They code it separately from the main site haha. It's the most popular thing, but not necessarily the best. And wait til you read on what the CEO of wordpress has been having meltdowns about... he owns tumblr too!
It's made with a tutorial for Neocities if that's what you use.
Medium: Set up zonelets.
It will require some HTML and JS editing, but will help automate making headers/footers for each page of a blog.
I've never used it myself, but I see other people speak highly of it.
HARD FOR ME CUZ I'M A GORILLA: I believe a lot of professional web devs will slap your face with their coding cock until you use a static site generator (SSG) to make your site.
You will need some coding knowledge to set up the tagging system since it doesn't come with it enabled by default. But it's made explicitly to be an alternative to big Static Site Generators which are...
It requires some more intimidating knowledge, because it's a lot of scripts that turn files that are not HTML/CSS/JS into plain HTML.
Also you have to use the command line, and that doesn't come with buttons that tell you what you can do. You have to copy/paste all that shit or memorize the code to 'dev build astro' and it all looks silly.
I've used Eleventy, and now am using Astro. Other people use Hugo or Jekyll or some other stuff with crazy names like Glup Shitto. I hate all these sites cuz none of the words mean anything to me. This is a common theme for me and tech. I don't know what NODES or CONTENT or ISLANDS are!!!
I had the most success attempting to learn how to use a SSG by downloading a template and altering it with github + VScodium. Here's the template page for Astro. You click on a theme you like, and it takes you to its github page. (If you don't want to use evil Microsoft stuff sorry. Skip this entire section.) Follow the instructions on the page for "forking" the glup shitto. When it tells you to run commands, I run those commands through the terminal window in VScodium. These tutorials never tell you what these commands do cuz they assume you already know. Usually those commands automatically install the files you need onto your computer, and create the final files.
You can see my wip here for a "tag system" that SHOULD show members of a web listing haha but I don't know what I'm doing and I have a reading disorder AND don't know cumputer good.
THEORETICALLY this will be the simplest and easiest way to maintain tags and files, because after you set it up you just have to write the "content" of the blog page. And you don't have to set up the header/footer ever again. I see the vision, and potential, but I am not there yet when it takes me 5 hours a day to figure out what any of the words in the documentation mean and I don't want to ask an actual tech person cuz they will be like 'obviously just press the Blip on the Repository and then Suck My Ass in the command line".
(side note I haven't updated fujofans in like a year cuz I'm struggling with this part to make updating easier).
Con: the final HTML/CSS code is really ugly if it's "minified", and a lot of themes use """"""professional"""""" CSS libraries like Bootstrap and Tailwind that I honestly think are ugly cuz that's what every fuckin' tech website uses to style their pages and make them look Professional and Minimalist with stupid code like style="500-w dark-gray-balls D-cup-bra" on every single element. Even Toyhouse uses Bootstrap. Eugh!
But maybe you're smarter than me and can wrangle these things better!
That was really long. Woops. I hope you can slug through this wall of text and find something helpful. Feel free to email me if you have any more specific questions. I may or may not be helpful.
If someone else sees this and has better suggestions for making BLOGS, please chime in. I'm begging you.
64 notes
·
View notes
Text
Dark Mode Work Skin for the fic To Be a Dragon Among Men

This is the code and urls for the custom dark mode work skin I made for my fic To Be a Dragon. Feel free to use it for your own works or for site skins, just remember to credit my user if you do.
[EDIT 25-03-18: Fixed padding for .frameborder class]
[EDIT 25-06-12: Added formatting rules for .poetry class and <p>]
Additional Resources
A Step-by-Step Guide to Work Skins from AO3 News - A great basic guide to what work skins are and how to make one.
How to Apply Work Skins to Others' Works by classygreydove - This is a guide I made on how to make a work skin into a site skin. You'll need to know this if you want to apply the work skin to any fic you want to read.
How to Change Work Skin Font by classygreydove - Don't like the font I use for the work skin? Don't worry, I'll show you how to change it.
Light Mode CSS - You can find the code for the Light Mode work skin here.
Light and Dark Mode Backgrounds - You can find the background images for the Light and Dark Mode work skins here.
Other Background Options - Here are a few mid-tone backgrounds that will have a lower contrast to the text.
Line Breaks (for Phone) - Do you like the custom dragon line breaks? Here's the phone-sized ones.
Line Breaks (for Wide Screens) - Do you like the custom dragon line breaks? Here's the laptop-sized ones.
[Code begins under Keep reading break]
#workskin .userstuff .hr, #workskin .hr, #workskin hr { height: 36px; width: 178px; background: url(https://64.media.tumblr.com/f19653c8c877dbe7a14e78434f1d0df6/d0f8688c32033f2d-b3/s250x400/6edcdac1e5614693d10491cff0725fd3633de77e.png); background-repeat: no-repeat; background-position: center; border: 0; }
#workskin { background: url(https://64.media.tumblr.com/f20ef324c5117a56d7dd2c8aa7e45151/4dcdf7c3c32cb0d1-68/s2048x3072/10c1120c78cd66a99c1067e6ed8b1addcd52ef57.png); background-repeat: repeat-y repeat-x; background-position: top; color: rgba(255, 255, 248, 0.85) !important; font-family: 'Georgia', 'Lucida Grande', 'Verdana'; }
#workskin a { background: linear-gradient(135deg, #b4853f 0%, #edc967 40%, #b4853f 80%, #705103 100%) !important; -webkit-background-clip: text !important; -webkit-text-fill-color: transparent !important; border-bottom: 0px; }
#workskin a:hover, #workskin a:active { background: linear-gradient(135deg, #b4853f 10%, #edc967 60%, #b4853f 80%, #705103 100%) !important; -webkit-background-clip: text !important; -webkit-text-fill-color: transparent !important; }
#workskin h2, #workskin h3 { line-height: 1.25; font-variant: small-caps; }
#workskin .userstuff blockquote { display: block; border: 2px solid #b4853f; border-image: linear-gradient(135deg, #b4853f 0%, #edc967 40%, #b4853f 80%, #705103 100%); border-image-slice: 1; padding: 15px 15px 15px 15px; margin-left: 1.5em; margin-right: 1.5em; }
#workskin .goldborder { display: block; border: 2px solid #b4853f; border-image: linear-gradient(135deg, #b4853f 0%, #edc967 40%, #b4853f 80%, #705103 100%); border-image-slice: 1; padding: 15px 15px 15px 15px; }
#workskin .frameborder { border: 2px solid #b4853f; border-image: linear-gradient(135deg, #b4853f 0%, #edc967 40%, #b4853f 80%, #705103 100%); border-image-slice: 1; padding: 0px; }
#workskin .mobilebreak { width: 178px; max-width: 100%; max-height: 100%; display: block; margin-left: auto; margin-right: auto; }
#workskin .textlink { font-variant: small-caps; }
#workskin .notesheading { font-size: 120%; font-variant: small-caps; font-family: 'Georgia', 'Lucida Grande', 'Verdana'; line-height: 2; }
#workskin .triggerwarning { color: rgba(240, 240, 240, 0.9); border-radius: 5px; background: rgba(128, 0, 0, 0.8); padding-left: 2px; padding-right: 2px; font-weight: bold; font-variant: small-caps; }
workskin .userstuff p { margin: 0; }
workskin .poetry { margin-inline-start: 1.5em; }
#ao3 skins#ao3 writer#ao3 fanfic#ao3 work skin#dark mode#the untamed#mo dao zu shi#To Be a Dragon Among Men
26 notes
·
View notes
Text
This is THE single largest milestone in my entire 7 year game programming career.
I don't think I've ever gone over my history with moving platforms before, but basically. Back in my sophomore year of highschool I had a programming class! I hadn't chosen to take it, but the class I wanted got cut so I got this instead. And I already knew how to program, and the teacher was chill so I was like "can I like just work on whatever?" and she said sure. The rest of the class was doing an online html+css class.
Anyway I was like "yo I have an entire class period to program! I am gonna make a game!" That game was the first version of ThreeEye, and it's scope was very small. My plan was some like 8 levels, and the only mechanics were movement, spikes, and moving platforms. Spikes were extremely easy.
But there are no words for the difficulties I faced trying to impliment moving platforms.
I spent... Every. Single. Class period.
For. A. Semester.
Trying get them working.
I tried making the game in Gamemaker and Godot.
In Gamemaker I had a strange issue with the player sorta hovering above the platform, instead of cleanly moving on top of it. And also sinking a pixel inside of the platform when moving up. I never fixed it.
I then tried Godot, and I continued to struggle.
Oh I struggled, I struggled and struggled and struggled.
And was it worth it? No.
I found the bug, and it was caused by my refusal to actually read documentation and instead follow tutorials. The tutorial I was reading had the arguments for a 'move_and_slide_with_snap` function out of order.
So I fixed the bug.
And immediately found another bug that was even more dramatic and hard to debug.
And I quit.
I quit game dev for 2 years, and never looked back. At that point almost all I had done was watch tutorials and ineffectively debug. And I was so hyper focused on fixing this ONE issue that I never grew. I burnt out and I declared that programming wasn't for me.
2 years later I discovered a video of someone making a game without a game engine, but in C. And I thought it looked fun. So I decided that I would try programming again, but I wouldn't focus on trying to FINISH something. I would program as a hobby, and try to enjoy the act itself.
And I got that spark back, and now, 2 and a half years later. I solved moving platforms with the following 2 lines of code.
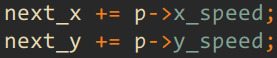
And it's not these lines specifically, my skills as a programmer and EVERYTHING surrounding these two lines is what brought me here. My code structure was good enough, such that actually implementing the moving platforms took 5 minutes. I copy and pasted some code, cut some stuff out, and added the above lines.
I know I am technically a better programmer than when I first faced this challenge, but after having actually beat it. I feel like I have made it further than I ever had before.
Also that means this game is also further along in progress then anything else I've made before.
Yippie!
160 notes
·
View notes
Text
Hey you
all of you complaining about tumblr live

Seethe and cope 😎
Okay but seriously
Get yourself the Stylus extension For Firefox users: https://addons.mozilla.org/en-GB/firefox/addon/styl-us/ and for everyone else: https://chrome.google.com/webstore/detail/stylus/clngdbkpkpeebahjckkjfobafhncgmne
Get the Old Tumblr Dashboard Style: https://userstyles.world/style/11286/old-tumblr-dashboard-2023
You should get this stuff even if you don't plan to remove tumblr live :3 Now here is where the magic comes from:
Stylus allows you to add custom css styles to websites, and you can edit themes made by other people to fit your needs!

See that little fucker? How about we fuckin g kill it?
Press f12 to open the Developer Tools (or however it is called lmao)
Click on this little guy

Now you can select an element on the website, and it will show where it is in the html!
3. Point
Click on it, and now we will see something like this in the inspector!

Collapse a bunch of this stuff, since here we only care about the list items, or <li>
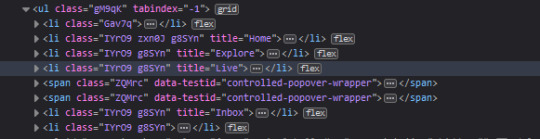
These are the different buttons in the banner
Now, how do we fucking kill that guy?
There are a number of ways to do this, so let's start with the simplest one
Delete
Just select the list item that has the title "Live" and press delete!

So it is gone now, right?
Well... not really. If you refresh the page, it is back. Which makes sense, since the only thing we did is remove that part of the "code" (if you can call html "code"), but when we refreshed it, the server gave us a version of the site that obviously had the button still there.
So what is a smarter way to get rid of it?
While you can't really delete a specific part of the site with just css, you can hide it! To do that, all you have to do is apply the style display: none;

Like that! While it doesn't fix the problem with the refresh, it brings us closer to the solution.
Remember when we got Stylus? yeah!
Go inside of it (😳), and inside the Old tumblr dashboard theme (😳😳), and now we just need to apply the css style of "remove that fucker" to the specific list item. How do we do that, since we can't add it directly into html? We use the attribute selector, and we look for title="Live"!
Where do I write this????
Well, css applies the styles from top to bottom of the style sheet (usually, this post is already too long), and you see how the list item has a few classes assigned to it? It so happens that they also modify the display property, so we have to override it by putting our selector after those in the css sheet... so basically you can just write the thingie at the end 😅
Here is how the attribute selector works!

the .IYr09 part is that specific class, so that if there is ever something on this page that has the title="Live" but isn't what we are looking for, it won't apply there (You don't need to do this, but whatever). The attribute selector is written in the square brackets, and you just... write the attribute that you are looking for there ;P
(I also did the same for the Explore button, but that can be an exercise for the interested ;P)
And now, BEHOLD

(How am I so popular that I got dms during the making of this >.<)
And it will stay like this, forever*
*except if something happens to the addon, theme, css of it or whatever, but you get the point!
#this post is too long#I could've just given the solution immediately#but this is funnier >:3#(am I on the autism spectrum? I kinda feel like it is the case tbh >.<)#Like this isn't how you write tutorials I think#whatever#css#tumblr live#fuck tumblr live#removing tumblr live#get stylus#get firefox too#idk at this point#196#pin
259 notes
·
View notes
Text
Anyway should mention this here:

I fell in with the Website League, an island of federated social media websites that's mainly spun off old cohosters, run partially by consensus committee of various stakeholders and intended to be a relatively sustainable form of non-commercial social media.
If you like what you see, you can sign up to one of the open-access nodes.
Official launch is today, since it's the last day of cohost, but this has been in the works for a few weeks.
The Website League is based on ActivityPub software, mainly GoToSocial and Akkoma, running in allowlist mode, so we only federate with other League members. This keeps moderation load lower and simplifies management.
We're explicitly not federating with the broader fediverse, which among other things should allow us to experiment with patched versions of the software to support more advanced and interesting post formats, e.g. actual interleaved text and images as a first class citizen, cohost-style CSS fuckery.
If you're interested you can join the (ugh) discord or just try and join an instance. I'm hosting weague.awful.cloud.

It's early days so things are likely to change fast, but hey.
48 notes
·
View notes