#which is Not the best animating video editing software BUT
Video
undefined
tumblr
I HATE YOU PIERCE [sob] I HATE YOU SO MUCH
#yippee!! yahoo even!!!#community#troy barnes#six seasons and a movie#intermediate documentary filmmaking#kinetic typography#typography#nbc community#dryersheetvids#this was fun actually#i used vegas pro#which is Not the best animating video editing software BUT#i refuse to touch after effects ever#i am too familiar with vegas pro i will die with her
112 notes
·
View notes
Note
how did you do LttM's voice effects for the Sliver of Straw animation i need to know i need to voice act moon for the funnies pls north
I edit the audio in my video editing program for the simpler UI, but I'm pretty sure you could use most software for this.

I start out by making two overlapping audio tracks with the exact same audio, and then fiddling with the pitch shift settings until I have something that sounds moon-esque enough. Typically I pitch up one of the tracks and pitch down the other. This time I asked egguca to make moon sound like she's having some trouble speaking, which led to a bit of a deeper voice, so I left one of the tracks with the original pitch and pitched up the other one.

Overlaying two of the same audio with different pitches is what gives the audio the robot-like quality. I also added some additional effects (chorus, distortion) to the track with the normal pitched audio.

Subtlety is key. All of these effects could easily be overdone, which will make the lines difficult to comprehend. They're at their best when they're barely audible. (Or you could just skip them, too.)
After doing all this, I manually adjust the audio to add a stutter effect.

I'm trying to make it sound like how moon's voice stutters in the game. Practically I just sometimes duplicate the beginning of a word or sentence. It sounds more fun if it's slightly different on the two tracks.
This is how it sounds in practice:
But I don't do the effects the same every time :D I basically just fiddle with the settings until I have something that sounds nice. For contrast, when I was voicing moon myself, I gave it some reverb and pitched one of the tracks down.
Hope this helps!
141 notes
·
View notes
Note
I think SVSSS as a 2D cartoon would be the best moving medium for it imo.
I mean, personally, yeah, that's how I'd enjoy seeing it as well! My ideal slightly pretentiously artsy SVSSS screen adaptation would probably look only a little more detailed than linograph prints (2D or shaded 3D?) (someone hit me up in like two weeks to draw an example of what I mean, if I don't remember on my own, I don't have access to art stuff right now), very stylized and vibrantly colorful, because that's one of the art styles that I particularly enjoy.
I'm not a personally a fan of the 3D SVSSS show because I find the characters a little too doll-like and same-facey for my tastes? It's fine! It works! It's serviceable! It's just all, backgrounds included, a little... safe? I tend to like over-the-top bright colors and intricate details and impractically weird shapes and yet also coherent world production design in my fantasy, which is a lot to demand of any production, perhaps especially with animation productions, which are always squeezed for time and money.
(EDIT: I know the SVSSS show was under heavy constraints and the results are impressive considering their resources; it doesn't change the fact that I just don't like the art style and nevertheless find the results underwhelming. I don't like a lot of "realistic" modeling / rendering styles, not just "anime" ones, even if they are extremely technically impressive. Believe me when I say that I know the vast majority of the entertainment industry is overworked and underpaid and creatively restrained.)
Slightly tangential general note: I don't think 2D is inherently superior to 3D (EDIT: NOT trying to imply asker is saying this, just having some general thoughts), especially because, with the realities of production, each have their advantages. 2D has a lot of stylistic advantages still, but 3D shaders are catching up and doing some incredible things these days! More advanced puppet controls and particle effects and such are doing some beautiful things for 2D shows as well these days. A lot of stuff has been subtly mixed media as soon as 3D became possible. It is potentially possible (note: not saying any studio would actually greenlight this) to do an equally slightly weird and artistically stunning 3D SVSSS show, given the freedom to work. (Good boarding and writing is also sooooo important in both mediums, obviously, it's not just about the art design. You can get away with incredibly limited animation with good boarding, writing, and art design.)
Another slightly tangential ramble: both 2D and 3D have the potential for stiff animation and poor character acting, which also comes down to production limits and animator skills? (I often think of character animators as a type of actor!) There are a lot of 2D shows that I don't really like because I find the animation incredibly stiff, both puppet and handdrawn (there's great 2D puppet stuff out there these days), which pretty much always comes down to production limits (deadlines and budget and software, saving up their animation for the coolest scenes). One of my favorite things about Studio Ghibli films (which as features get a lot more space to focus on art compared to the demands and restraint of television) has always been the squash and stretch in otherwise relatively realistic action, making things like hugs look SO nice for example. But 3D stuff is getting better at that these days! The ways characters slumped into each other in "Nimona" for example was great. And it's just fascinating to look at the elasticity / stylized sculpt of expressions in "Puss in Boots: The Last Wish" compared to the technical limits of the models / rigs in "Shrek" or "Shrek 2".
Adding these side notes because I want to be clear about my respect for both 2D and 3D artistically! A lot of video games are doing cool stuff in 3D that looks very close to 2D with stylized shaders, which you can sometimes spot by the large or small rotations in character action / acting, which is difficult (and therefore often expensive) to do in 2D with all of those extra drawings / angle poses. Also, I think the current push towards funky shaders in 3D is so cool and it's hard not to gush about them!!!
73 notes
·
View notes
Note
Idk if anyone's ever asked you this but how do you go about animating? i.e. what program do you use and what's your process?
I really wanna start animating but it seems like such a daunting task lol
okay lots of words so. under the read more lmao
toon boom harmony is industry standard 2d animation software so thats what i use for freelance work and more finished things like that antibodies animation (though i did the bg painting in procreate) – but totally not the ideal software for just starting out with animation lmao not to mention the fact that its a subscription :///
small sketches like that gif of bones i posted i'll sometimes tackle in procreate or procreate dreams, which are wayy more affordable and user friendly, even if theye a bit less robust.
if youre looking for a combination of robust software with the best price, blender is free and has 2d capabilities that ive messed around with a few times – its super cool, but the interface can be confusing if you've never worked in blender before and it has a bit of a steep learning curve
BUT theres also always always always good ol paper and pencil, and nowadays most people own a camera and can access video editing software to stitch things together
the best things to start out with are the basics, like a ball bounce animation, different weight objects falling, walk cycles – once you get an understanding of how timing works with animation, then tackling how characters move is the next step. just going into complex characters right off the bat is an easy way to get frustrated FAST lmao starting simple is always the way to go
also a lot of cartoons and stuff move A Lot Less than you would think, a 10 second animation at 12 frames per second is almost never going to be 120 different individual drawings – sometimes you can just get away with a few blinks and a bit of lip sync to really sell an animation, so while animation does take a lot of time and effort try not to be too intimidated!!
#also there are a lot of youtube tutorials out there if that helps#im not too experienced with rigging and im hoping to give myself a crash course in harmony rigging sometime soon#maybe after i finish learning html+css lmao i gotta finish that video first#ask#ghostfrog81
48 notes
·
View notes
Note
Do you have any tips/useful information for people who want to start making audio rps?
(Also love ur content sm!!! Mitch is the most lovable little guy)
Aw thank you so much! Love him too!
This is a great question, had to think about it for a bit;
If you want to dabble with making audios, feel free to start off with public scripts! I think there's subreddits like ASMR script haven (IIRC?) that has public scripts that can be filled by anyone. Just be sure to read the author's conditions carefully i.e. credit, terms of use, what can be changed etc. Right at the start I recorded a public script to try and get started, it's a great way to just jump right into making something to learn the ropes of it without also first having to write an entire script for it too. Filling public scripts is a fantastic way to start off, however I reckon writing your own stories is a major part of the fun!
You don't need an expensive mic, but audio quality is a very important factor. Do some test recordings and listen back to them (with headphones!) and see how it sounds. This is especially important for whispered scenes (DO NOT get too close to the mic or breathe on it!) or loud scenes (DO NOT peak the mic!). If your mic has a gain / input dial, play with that before recording! Just start with mono to begin with, play with stereo if your mic supports it after you become familiar with it. Aim for your recording to be no louder than -6db at the highest, if you can keep your voice roughly between like -20 and -6 that tends to sound reasonably natural.
Do your best to eliminate external sounds! If you have AC or anything like that on, turn it off. I have to shut down my main PC and record with only my editing Mac on because the PC fans are much louder and my mic is very sensitive! There'll pretty much always be background fuzz, some mics will just have some, but try to make your room as quiet as you can. Your software may have some background noise removal tools, I use filters for that (expensive so I can't recommend them), but DO NOT use the noise removal tool in Audacity! It's terrible!
Speaking of, Audacity is decent to get started with. It's good basic recording software, plus multiplatform. For a while I preferred recording on Windows with Audiodope, also very simple, plus I liked that it asks me whether I wanted to record in mono or stereo first in case I forget to switch, I currently record on Mac with ocenaudio which does the same, while Audacity won't ask, you have to go into settings. Anyway Audacity is okay to start with for editing, it's free, but from what I understand it's a "destructive" editing software in that after you make a change like adding a filter, you can't then go back in and change it other than just undoing, which I really don't like, plus changing the timing of things looks fiddly. I don't know what to recommend to move up from, I've heard good stuff about Reaper but it looks very complicated. Avoid Adobe unless you have a free subscription from somewhere else. I edit entirely in Final Cut Pro so I can't recommend that unless you're on Mac, plus it's my old work software and expensive! If you need sound effects, I use freesound.org, there are other great free resources as well, but make sure you check each individual sound effect's license before use.
Once you've edited the audio and want to turn it into a video, I've heard good stuff about Da Vinci Resolve and Kden Live, both are free! Make a video canvas of 1920 x 1080, FPS doesn't especially matter if you only have a still thumbnail, 25 or 30 is fine, and render it out as a h264 mp4 if you're not sure what to select! Good compression for internet video, good for streaming. Try to record and export your audio as wav if you have enough space, wav is uncompressed audio so it maintains full quality but they can get large.
I also make my thumbnails in-edit but you may want to use external software like Gimp to make them. Avoid getting random stuff of google especially anime boys / girls, and definitely don't ever use an artist's stuff without asking for permission + giving proper credit. Using pre-built generators like Picrew is totally fine, just be sure to credit where you got it from, but 100% avoid AI generators, obviously. Be careful with Adobe stock images, apparently there's AI slop in there too. You don't need art for audios though, they're a nice to have bonus, but many of my most viewed videos have no art at all. If you need background images, I like unsplash.com because it has a free license! Read over it yourself but basically you're able to use pretty much any image they have in your videos!
Just jump in and try making something small, never start with your magnum opus! I started with the introverted incubus character because I'm a very shy person myself, it was an easier role to get started with! If you want to start writing your own scripts too there's a lot we could talk about there as well, just try to picture the scene from the perspective of the listener, what they may be thinking or feeling at any given moment, not just the perspective of the character you're going to be playing!
This was a lot and I don't think I covered much, I hope some of it helps though!!
30 notes
·
View notes
Text
someone sent in this ask and I spent literal hours putting together this tutorial but then it wouldn't let me post it and when I went back into my inbox the ask was gone?? good thing I copy and pasted it, so here it is in its own post
I'm not sure if this will work with programs other than photoshop, but this is how I do it. I know @shinobi-bacon has a tutorial here on how they do it which is pretty different from the way I do it, so if my tutorial is confusing maybe theirs will click with you better lmao. I stole the greenscreen idea from them anyway
SO FIRST, you want your villager on a green screen background. to do this, go to harv's island and use a custom pattern to make the walls and floors bright green. If the villager you're using has green in their design, you'll have to pick a different colour that isn't in their design, but for most villagers green is fine.
if your villager has every colour on them like pietro or stiches then rip you're gonna have to do some manual editing frame by frame. try to choose a colour that doesn't touch the edges of their silhouette too much in that case because it'll make life easier for you
so once you have them in green purgatory, record them doing their emote or whatever. I just use the built-in screen record function that the switch has. press and hold this button to record the last 30 seconds that your switch displayed:

next send that video to your computer and trim off the start of the video so it starts right before a recognizable part of the animation. for this emote I cut it off right before the blink. if you have a slow computer, you'll probably want to trim the end off too so the video is only a little bit longer than one full animation loop
(you can use the video editing software of your preference, I just use quick time player Edit -> Trim)
okay time for photoshop. go File -> Import -> Video Frames to Layers
for "range to import" select "from beginning to end" (or you could skip the last step about trimming the video and select a range here, but I find it kind of finicky), and make sure "make frame animation" is checked
once imported, if it doesn't pop up on it's own, go Window -> Timeline to get your animation at the bottom

click through those frames at the bottom until you find an easily recognizable frame (I chose the first frame where her eyes are closed) and delete all the frames before it. in the layers panel, the layer from the frame you've selected should be the only one turned on. delete all the layers below it
now go through the frames to find the next identical frame. this is where the animation loops. delete that frame and all the frames after it, as well as all of their corresponding layers (note in the picture, frame 121 is selected, and it's exactly the same as the frame from the start of the animation)

hit the play button on the bottom left to double check that it loops properly
next, make sure both THE FIRST FRAME AND BOTTOM LAYER are selected, and crop and reduce the image to your desired size. you can do this step later if you want, it's just that doing it now will reduce the load on your computer and make it run a bit faster. just as long as the first frame and bottom layer are selected, you can do this at any time
SAVE HERE because if you mess up this next part it's a pain to fix, but it's easy to quit and start over if need be
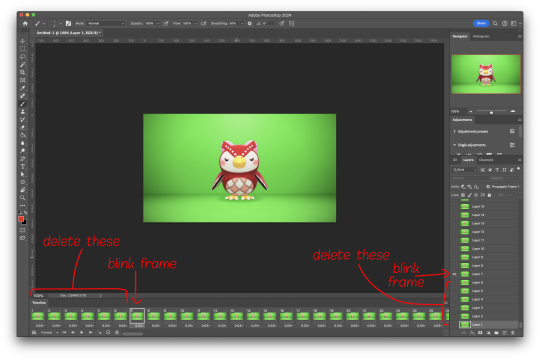
now it's time for my best friend the actions panel !! say hi actions panel !! (Window -> Actions). what the actions panel does is record your steps so you can quickly automate repetitive tasks.
in the actions panel, click the folder and name it whatever you want
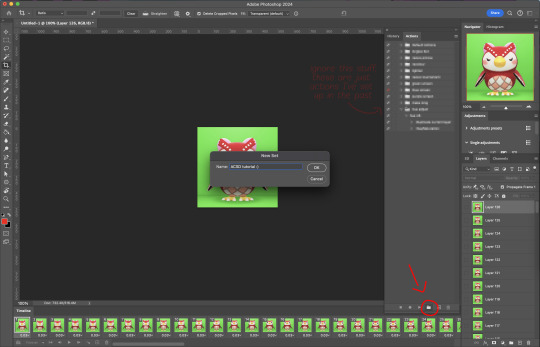
then click the little plus and name that whatever you want and hit record. You'll see the dot turn red to indicate that your actions are now being recorded
now with the BOTTOM LAYER AND FIRST FRAME selected (ignore that I have the wrong layer selected in the pictures, I fixed it after), go to Select -> Colour Range

click on a part of the canvas that would be green

shift+click on the rest of the green background and adjust the fuzziness until just the character's silhouette remains
hit OK, now the background should be selected. go Select -> Inverse so that the character is selected, and click on layer mask.
click the next frame button (you MUST click the button, not the actual frame. you need the recording to recognize "go to next frame" and not "select frame 2"),
then keyboard shortcut option + ] to select the next layer up (again, you MUST use the shortcut so it knows to move up one layer and not just "select layer 2"),
and then stop recording.
now just repeatedly click the play button and it will do all those steps we just did for each frame :)

this part is usually where it gets messed up for me. if it did something weird like duplicate the same frame or layer your animation over a static frame, just quit and reopen that save I told you to make earlier. the action recording you just made will still be there when you reopen photoshop, so just select the first frame and bottom layer and repeatedly hit play again. if it STILL doesn't work, you probably did something wrong
the recording is now saved in photoshop forever until you delete it, so you can reuse the recording for other gifs! but if they use a different colour background, you'll need to make a new recording (you can see I have separate ones for blue and purple screens). also if you were working with one of those colourful villagers and parts got masked out that shouldn't have been, you'll have to go frame by frame and manually fix them. that's why we masked out the background instead of deleting it.
now it's time to make it into a gif! go File -> Export -> Save for Web. make sure Matte is set to "none" so you don't get those weird white flecks. colours and dither you want as high as they can go, but you can lower them if you need to make the file smaller (though I'd recommend resizing the image smaller first). the bottom left shows your file size. currently as of January 2024, tumblr allows gifs of up to 10MB
and there ya go! gif! :)
60 notes
·
View notes
Text
a comprehensive guide to custom villagers
when making my custom villager it was very difficult to find good tutorials as many of them would point to deleted pages or only cover things i already knew, so i have decided to make my own complete tutorial. please let me know if you need any aditional help! i will try my best to keep this tutorial up to date and clarify it if needed.
it's important to note that these villagers will NOT show up in online play and dream towns. since only your game is edited, other players will see whichever villager you've replaced instead of the one you've made unless they also mod their game.
first things first, you will need a hacked 3ds with luma3ds and an SD card for this. you can probably play in citra, but i dont really know how using mods in citra works so i will focus on luma3ds for this tutorial.
if you haven't hacked your 3ds yet, do not follow a video tutorial: they can become outdated very easily with no indication of it and following outdated guides makes it a lot more likely that you'll brick your console. follow the guide on 3ds.hacks.guide instead.
other software you will need:
hackingtoolkit9ds to decrypt and unpack the rom
kukkii to extract the textures and put them back in
a drawing software (can be anything, even mspaint) to edit the textures
blender or another 3d editing software to preview what you're doing
010 editor to edit the bin and .umsbt files
step 1: getting a rom
if you're simply downloading the rom online, you may skip this step.
for those who wish to dump the rom from their console, you must first turn it on while pressing the START button to enter godmode9's menu. click the HOME button to see more options, then select "Title manager", then select where you've installed the title (SD card or the console itself). a list of all your installed games will appear. scroll down to Animal Crossing New Leaf or Happy Home Designer depending on which game you want your villager to be injected into.
once you've chosen the game, select "Manage title..." and choose either "Build CIA (standard)" or "Dump CXI/NDS file". you may then shut down the console and insert the SD card into your computer. the rom will be in the folder \gm9\out on the root of your SD card
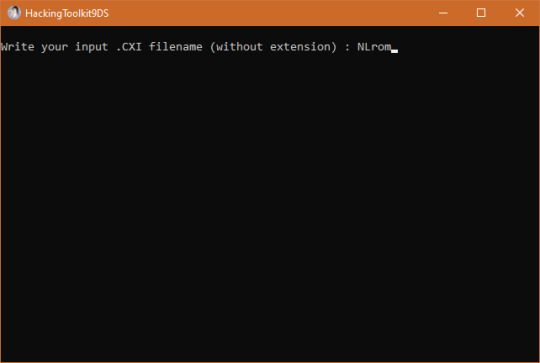
step 2: decrypting/unpacking the rom
drag and drop your rom to the "PackHack" folder that hackingtoolkit9ds is in. rename it so that it doesn't contain any spaces or special characters.
open up hackingtoolkit9ds and type either CE (for .cia roms) or CXI (for .cxi files) in the window that appears depending on the format of your rom. it will ask you to write the name of your file without the extension. type it and press enter and wait for it to do its thing.

step 3: making your textures!
you'll find your extracted villager models in the folder \ExtractedRomFS\Npc\Normal\Model
the first three letters in each .bcres file name represent the species. open up one of the files of the species you want to make yoir villager be. it doesn't have to be the file of the specific villager you want to replace as we can rename it later, but do be careful that certain villagers have slightly different models than the rest of their species (tucker having tusks or étoile having hairpins, for example)
since i wanted to make an elephant with tusks, i've picked tucker as my base. he uses model elp09.bcres

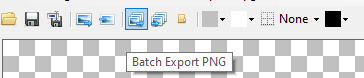
click the "Batch export PNG" button and choose the folder you want the textures to go in. you may then edit them as you wish. your textures do not need to be semi-transparent like the extracted textures are.
i like seeing the way things look as i work, so i get a copy of the model as a .dae file to open it in blender. you may get those from models-resource.com or you may extract them yourself using ohana 3ds rebirth, though ohana can be a bit unreliable at times. blender's "texture paint" tab also allows you to draw directly on the model, though i don't find it precise enough to my taste so i mostly use it to lay guidelines for me to draw over.

once you're satisfied with your model, make sure to draw the different expressions as well.
eyes 0: neutral
eyes 1: half-blink
eyes 2: blink
eyes 3: angry
eyes 4: sad
eyes 5: happy closed (think ^_^)
eyes 6: surprised
eyes 7: >_< face
mouth 0: neutral/smile
mouth 1: half-open
mouth 2: fully open
mouth 3: frown
mouth 4: half-open frown
mouth 5: fully open frown
you do not have to follow those expressions exactly: for example, being a plush elephant, tusker's mouth moves up and down as he speaks instead of opening and closing.
once everything is done, open the .bcres file in kukkii again and import all of your textures in the right slot (i've found the mass import button does not work for me), then save the file.

step 4: editing names and catchphrases
note: if the villager you are replacing is already in your town, editing the catchphrase in the game's files will NOT change it in-game. similarly, if you are putting the villager in your town with marc robledo's save editor, they will have the catchphrase of the villager you've replaced unless you change it in the save editor yourself.
editing a villager's name or default catchphrase is quite simple, but the new name/catchphrase cannot be longer than the old one. if it is, it will mess up the names and default catchphrases of all the following villagers in the game files.
since you can edit the villager's personality in the game files, simply pick a villager with a long enough name and the right gender. you may also look at the villagers' favourite colors and styles on nookipedia to find one that most closely resembles the villager you wish to make.
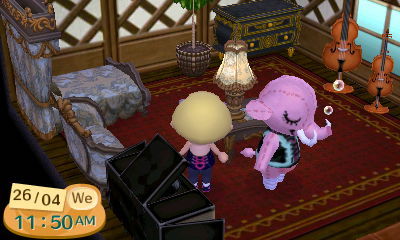
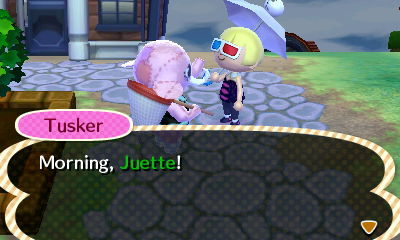
since i want tusker to have the sisterly personality, i looked at all the sisterly villagers and i found that pashmina's tastes were close enough, so this is who tusker will be replacing. since her id is goa08, tusker's model needs to be renamed to goa08.bcres
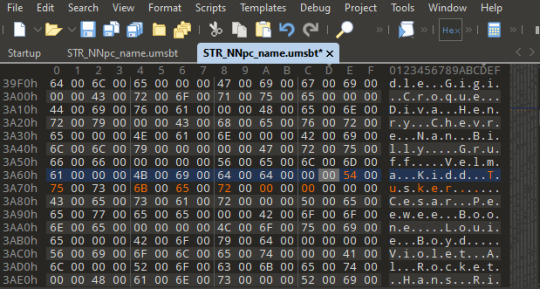
you will find villager names in \ExtractedRomFS\Script\Str\STR_NNpc_name.umsbt and \ExtractedRomFS\Script\Str\STR_NNpc_name_ASR.umsbt
scroll down until you find the name of the villager you wish to replace and change it. the dots between each letter are NOT periods! make sure not to delete them. if you do delete one, or if the villager you're replacing has too many letters in its name, you can copy a dot from another name and paste it between the letters or in place of the extra letters.

catchphrases are found in \ExtractedRomFS\Script\Str\STR_NNpc_habit.umsbt
step 5: editing birthdays, species and personalities
you may skip this step if you only wanted to edit the villager's name. as far as i know, this does not work in happy home designer.
first, download this template.
then, open up \ExtractedRomFS\Npc\Normal\ConstPack.bin in 010 editor and click View -> Line Width -> Custom Width... and enter a value of 34 to make all the villager IDs align.

next, click Templates -> Run Template and select the template we've downloaded. a list will appear at the bottom of the window. scroll through it until you reach the villager you wish to edit, (it will be highlighted in the top half of the window) mine being goa08.
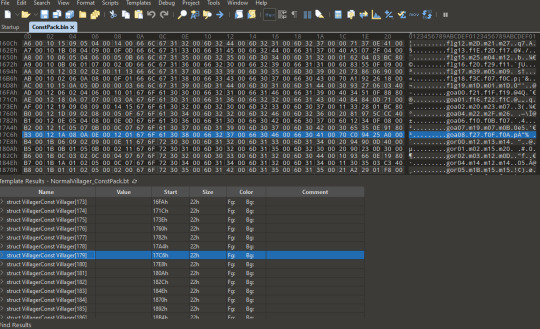
clicking the arrow to the left of struct VillagerConst will reveal a list of all the data this line contains. i will show you how to change birthday, species and personality.

the page we downloaded the template on shows a list of "cases" for each field . for example, for the species field, we want tusker to be an elephant, which is case 0x01 on the page. we will thus type 0x01 in the u8 Species field of 010 editor. the same thing goes for the u8 Personality field. sisterly is 7.
the birth month and day simply require the date. tusker's birthday is may 1st, so i typed 1 in the u8 BirthDay field and 5 in the u8 BirthMonth field. leave everything else alone.

step 6: putting them in the game
luma3ds makes it really easy to put your villagers into the game as long as you pay attention to the folder structure of the original rom.
on the root of your sd card, there should be a folder named luma, and within it a folder named titles (if there isn't, you can create it.)
within that folder, create a folder named with the title ID of your animal crossing game. that title ID will depend on the region of your game.
you can then create a folder named romfs in which you will place your mod files while respecting the path of theoriginal files. for example, the path for the models will be \luma\titles\<game title ID>\romfs\Npc\Normal\Model
when all the files are in place, pop your sd card back into your 3ds and open the game. if the villager isn't in your town, use wisp and an amiibo card (or wumiibo) to see if they show up properly.
and that's it! enjoy your new villagers <3 feel free to tag me in your custom villagers, i'd love to see what you make!
did you find this tutorial helpful? you can buy me a ko-fi as thanks!
#animal crossing#acnl#acnl hack#animal crossing new leaf#animal crossing happy home designer#achhd#3ds#tutorials#nintendo 3ds
108 notes
·
View notes
Note
How do you get such nice shots in captura? I wanna get better at it could you share some tips? Been trying to figure it out but I admit I'm not the most knowledgeable in photography etc.
Well.... It's a bit of a complicated process and it relies very very much on personal preference. Much like with any type of art there are different styles that each individual artist will gravitate toward. I can only show you how I do things, so I'd recommend asking other Captura folks on here about their own styles to see where our processes and preferences differ.
I'll also include some extremely helpful videos at the bottom, they go extremely in depth as to best practices and technical exploits.
Alright, lets get started with the background stuff... the tools!
ReShade: Shader injection, a MUST if you want to take dynamic and customized captura without using a program like Photoshop to do everything in post.
SRWE: Simple Runtime Window Editor.... the god among programs... It's an upscaler, allowing you to increase the resolution of the game beyond the bounds of your monitor. It's how I was able to get 15K panoramas at one point in time.
Any image editing software. Since I rely mainly on compositing to get the lighting I do, I need something to overlay and mesh the images with. I use GIMP cuz it's free, but even Microsoft Paint will work as soon as it add the ability to layer images.
Those are the tools... what about the tactics?
Well, I generally prefer moodier shots with the Warframe being the central focus (though, that's also the side effect of me cropping the image). Just a note! Moody doesn't mean dark, moody is the enigmatic space between dark and light where there is more dark than light... but there's still a good amount of light to be had. Occasionally you can have overexposure in a moody shot even.
Important to note, the overall exposure level of the environment, even is the scene lighting is low, will effect how brightly your Warframe can be lit. Both the Scene Light and Exposure sliders need to be fine-tuned otherwise you won't be able to light your Warframe at all.
Now, for shot composition I prefer low angles with either a cluttered but familiar/recognizable background, or a simple but abstract background. The Subject, be it a Warframe, an enemy, or an NPC, reside in the center with their feet out of shot.
Like so:
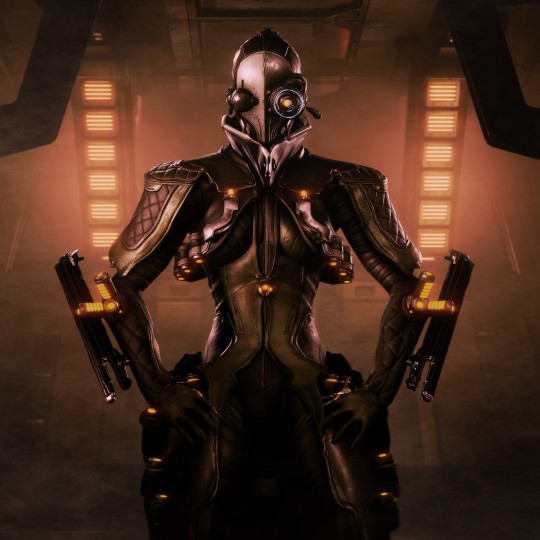
Each of these shots also demonstrate well the way I like to pose my subjects: Symmetry and.... not... not symmetry. The official term for this is Contrapposto, which is Italian for Counterpoise. Basically, even though the Wisp is sedentary, her body is still giving off the impression of movement based on how her waist is curving and hips are tilted, forming a loose 'S' shape. There's a handful of animation sets, Khora (Urushu) Noble, Mesa Noble, and Wisp Noble are excellent for this.
Some examples:
But... what about the lighting?
This is where things get technical.
So, the standard Captura's three-point lighting system is generally inadequate at properly lighting the entire Warframe. This is where compositing enters the picture, in a very literal sense. Each of these shots, shown above, are composites of between two and four separate images, each with different lighting angles. I actually have an example I made for an earlier explanation made already (thank goodness)

Getting the different lighting angles is really simple, just rotate the 3-way lighting without moving the camera. Then you overlay them in some photo editing software and just start going layer by layer, erasing bits of the topmost layer to reveal your desired highlights or shadows from the shot underneath.
Don't feel obligated to do this compositing process though! Sometimes the 3-way lighting works perfectly well for a shot or environment, don't feel obligated to complicate this process.
And this segues in nicely to the final part of the shot-making process, post-processing and fog layers.
Now, fog layers are important to the overall appearance and vibe of my Captura. They add texture the image that the game doesn't impart naturally, removing large swathes of solid color from the background and foreground. An added bonus is that the added texture makes the image look somewhat better (imo) when compressed, or when viewed at lower resolutions.
The same image with and without Fog
This shot contains two individual fog layers, one in the foreground, washing out the foliage, giving the general uniformity of it texture and implied depth, it also serves to cover up the manual blurring I did (poorly) around his legs. Then there's the background Fog, which is the deeper blue you see in the sky. It adds a more dynamic air to the generally dour set of greys. And, again, the fog is just something I personally like to add, even if it doesn't serve a practical purpose in a shot. No shade if someone feels the fog ruins the shot, I almost always keep a fog-free version about.
After the fog is added, blended, and blurred slightly, I will apply a few gentle blurring filters to remove any jarring or jagged pixelation from the shot, giving the Frame a somewhat smoother appearance and reducing the file-size dramatically.
That's just how I do it though, it's not a particularly popular style, but it's how I do it and how I love to do it! :3
Remember to ask around, I'm sure there's lotsa Captura Artists out there willing to explain their methods and processes.
Helpful vids!
How to Captura by Vash Cowaii
Hotsampling in Warframe for High Res Shots by PurpleFlurp
good luck, and happy snapping!
#warframe#captura#warframe tag#warframe captura#sorry for writing an essay... sometimes I don't know when to shut up#-_-
13 notes
·
View notes
Note
Heyo! Question, which program do you recommand for doing an animatic? Searching rn, and i am kinda handling everything with drawing each piece in krita and then transfer to movivo XD
Hello! I personally use Clip Studio Paint, and dont really know any alternatives, unfortunately
Before i was using CSP i used to do the same thing, just draw the frames in sai and then edit the video with any editing software i had at the time, and thats probably the best way to do it without an animation software
Its really tough to find a good alternative, and one that is also free
Hope you manage to find a good one at some point tho :]
12 notes
·
View notes
Text
I recommend becoming a wizard
How does one not like wizards.
They're silly old men who go around casting incantations with the most devious after effects to other silly old men cause their cylindrical residences which they share with other magic men in training aka people below the age of 300 years old, were threatened by some eldritch force that they conjured up in about two seasons worth of anime.
I love every form a wizard comes in. Not just the traditional old guy who gives wisdom to a traveler passing by aka our isekai main character but also every member of the shadow wizard money gang because the cognitive dissonance is truly astounding. The possibilities are endless
You can express anything you'd ever need via wizard, shadow wizard money gang or not.
Extreme confusion?

Gender Dysphoria?

Cool as shit?

Who needs art as a medium self expression when you have photo editing software and pictures of people doing wizard stuff online
This is TRUE art.
Their dialogue is also just so exquisite. People turning normal behaviours into wizardspeak has become my incentive to do anything productive cause if i dare as so try anything with future payoffs and no instant gratification i will instantly lose focus.
An example of wizardspeak would be

or even

Studying becomes so much more fun when you interpret it as

Transferring everyday mundane tasks into wizardspeak has made life so much more fulfilling. for example i can just watch youtube all day and label it as "consolidating the wisdom of the ancient ones who bring enlightenment to all."
people might think you're weird but it sounds more productive than binge watching minecraft args with about 500 views per video. which could also be reworked as "continuously engrossing myself into convoluted and unseen realities of excavation and creation"
You no longer feel bad that you did nothing the entire day with wizardspeak. Wizards are literally the solution to all of your problems, you just havent seen it yet.
If you don't feel wizard-y enough you could always go to your local fast food chain in a complete set of spellbinding attire. The best part is that wizards dress fairly simple but the REAL showstopper is in the hat.
You cant have a wizard without a pointy hat, its criminal. With or without the brim a wizard is nothing without their headwear. No spell will ever come close to the magnum opus that is their wizard hat.
Speaking from another random possibly twitter or tumblr poster's experience is that cool air can be kept in that little pocket of pointy cloth so your head would never get extremely sweaty.
If you become a wizard and hate social interaction you can just hide under your hat brim for concealment and if you live in a country with strict social rules nobody's coming to talk to you ever.
I'd say the one downside about being a wizard is that you're going to be CONSTANTLY perceived because you dress like a rogue church pastor with cult like tendencies hence the hat.
To a good chunk of the world (including i) negatively or positively, being perceived is like having 3,543,876 tiny medical syringes stabbed onto all parts of your body and you can do nothing about it until the person or people decide to leave. Its a horrendous experience which makes me wish i could grab my brain and smooth it out permanently so i can remove the aspect of shame and live a peaceful life.
however
If being perceived is your thing and god made you lucky to skip out on this feature i totally recommend wizarding sometime.
In conclusion, or a TLDR, if you are okay with being seen and judged be a wizard, its fun.
Thank you for your time ദ്ദി(ᵔᗜᵔ)
#i love wizards#someone invite me to a community of full wizards i want to become one#like its not strange they're magic men why cant i (a non magic non man) become a magic man#i love these funny little guys (i say little like they're not grown men that could be my grandfather's ancestors)#wizards#wizard shit#wizardry#I should probably play dnd if im THIS into wizards but every time someone says so i have the largest urges to just violently not do it#self expression via wizards is cool#wizards are cool#wizard propaganda#become a wizard today#WIZARDSWIZARDSWIZARDS#I've said the word too much now it doesnt look real
3 notes
·
View notes
Text
2d character art
There’s nothing like the simplicity and charm of 2D character art. Just think back to all of your favorite animated features, cartoons, comic books, and video games. It all comes flooding back, doesn’t it? Something about the immediacy and evocative quality of two-dimensional drawings goes straight to the heart and turns us into children again. If you want to know a bit more about this art form, this is the article for you. As a bonus, you’ll learn where the best 2D artists live and how to hire ’em for your projects!
I mean, sure, you may be one of those 3D purists who always sing the praises of 3D modeling. I get, I really do. But trust me, 2D isn’t going anywhere just because technology is moving full-steam ahead. In fact, 2D character art remains popular, engaging, and fun as ever. Therefore, even as we get swarmed with Pixar clones and newfangled graphical marvels, we discount 2D at our own peril.
what is 2d character art
As you might expect, it's been around for a while. We may say that the seeds were planted when we began painting on cave walls. Of course, we can't truly argue that style and the ones that followed in art history classify as 2D character art, which is a modern technique.
So, what has changed? What is the distinction between simple illustration, sketching, and two-dimensional character design? In a nutshell, it's intentionality. Purpose is everything in life, as it is in most things. As a result, even superficial similarities can be misleading. The same thing occurs in the field of design, which is rife with subgroups and classifications. We humans are an odd bunch.
The first 2D character art dates from the early 1900s. Winsor McCay, an American cartoonist and animator, was the first to develop a 2D character, Gertie the Dinosaur, who featured in an eponymous picture. McCay's pioneering spirit, however, had previously produced two short animated pictures, Little Nemo and How a Mosquito Operates.
What distinguishes these two from Gertie? As I already stated, intentionality. Gertie the Dinosaur is largely considered as the inspiration for the subsequent animation boom. In some ways, it's the first time someone set out to build a character with a personality and an identity in a genre that's still in its infancy.
Of course, as time passed, 2D character art grew increasingly popular in cartoons. As we all know, the dam burst when Walt Disney released Steamboat Willie. Then all bets were off, and it was time to shine the spotlight.
2d character art in polydin
2D character art is essential in many creative undertakings, such as video games, animation, comic books, and advertising. 2D characters that are well-designed may attract the audience's attention, convey a variety of emotions and expressions, and give depth and personality to the project. Polydin Studio is a professional game art studio specializing in 2D character art for a variety of projects. Polydin studio has the expertise to develop characters that are adapted to the project's objectives and aims thanks to a team of skilled artists. Our artists create every character in your projects a memorable experience for your audience by focusing on quality, attention to detail, and meeting deadlines.

6 common tools that 2D character artists use
There are a variety of tools, both digital and analogue, that character designers can use in their work, depending on the nature of their project. Skilled, successful artists take the time to study, train and become proficient across a wide range of technologies and programs. Some common tools these professionals use include:
Adobe Creative Cloud
Character designers use a number of popular Adobe products. Adobe Photoshop, for instance, is a widely used image editing software for touching up and refining digital images. Adobe Animate, a successor to Adobe Flash, is a simple tool for creating interactive animations and animated website elements. Adobe Character Animator allows you to animate still images and can create real-time animations that mimic your real-life movements and voice using your webcam and audio.
Toon Boom
Toon Boom has a number of software packages that are popular with professional 2D animators. Harmony 21 is a comprehensive solution that many animators of well-known TV shows use to create high-quality characters throughout a project's production cycle. It allows you to create artwork and add animation elements, audio and special effects all within the same software without requiring you to export your work to different tools. You can even scan and manipulate hand-drawn animations. The software functions on all major computer operating systems and has robust support options, including community forums.
TVPaint
TVPaint is a hand-drawn animation software tool that several animated feature film productions have used, allowing artists to create animations that look like paper-drawn characters more quickly and efficiently than traditional animation techniques. This software launched in 1991 and has become an industry-standard tool, receiving support and updates with new, improved features for users. This software is also available for all major operating systems and requires a one-off licence purchase.
Pencil 2D
Pencil 2D is a free, open-source 2D animation software that's available on all large operating systems. It's ideal for traditional pen and ink type animations and has a more minimalistic, easy-to-use interface. Artists who use Pencil 2D benefit from its pre-set animations and effects and can sketch ink and paint simultaneously and export their work in a number of formats. Because the software is open source, the user community can access the source code to continually support and update it.
CelAction2D
CelAction2D is a relatively simple-to-use software that has many features and tools that are popular with TV, film and commercial animators. You can import designs from other software applications and even scan hand-drawn characters to animate. The software splits design and animation functionality, and animators can create skeletons and manipulate them to simulate a number of moves. You can rig character designs to these skeletons and create high-quality animations quickly and effectively.
2 notes
·
View notes
Note
desi im startin commisons and i needa make commision sheets and i need editing/animating software recomndations help meee
Okay okay, calm down hun XD
First, ask around about prices, and start with small sheets, like the basics. ( Icons, doodle pages ect. )
List the rules, like how payments are set up, what you will and won't draw, what kinda references you need, that kinda stuff.
It also helped to decorate you commission sheets so they stand out, look at how other artist who do commissions do theirs for reference and ideas. Presentation is key :33
And I'm not the best to give recombinations on software, the apps I use are Ibis paint, which recently had some interesting updates, Kinemaster for video editing and some animation, RoughAnimator for frame by frame, and XRecorder for Speedpaint footage.
And I think all the bases are covered, but feel free to ask more questions
6 notes
·
View notes
Text
Animated films, television series and advertisements are a mainstay in 21st century digital culture. They’re one of the most popular types of media on the internet right now with numerous forums, websites and YouTube channels dedicated to animated storytelling.
People who want to create their own animated movies know they need some kind of software or Hire an Animation Studio. To help aspiring animators choose which is best for them, we’ve put together this blog post detailing the best animation software programs that are currently on the market.
Adobe Animate CC
After a 12 year absence from the market, Adobe is back with the premiere of its new version of the software it originally released to make animated movies. The first new feature since the relaunch is Storytelling, a totally revamped tool that lets animators tell their stories using more complex animation techniques and adds support for more types of media alongside updating other features such as Skybox tools and stabilization tools.
The updates to other features include improvements over the camera tools like stabilizing cameras, enabling multi-cam editing and adding control over zooming in close to shots to adjust the perspective and angle.
Changes have also been made to the paint tools and how they work, a totally revamped engine, a new animation panel, enhanced audio editing features and a total of 70 new effects. One thing that Adobe Animate CC has over other software is its tight integration with other Adobe products such as Photoshop and Premiere Pro. This makes it easy to export videos, pictures and audio to the program from these other Adobe tools and vice versa.
Toon Boom Animate Pro 2.1
Toon Boom is currently the most used animation software in the world for creating traditional animated content for television, film and the internet although it’s also capable of creating 3D animations. It’s used by schools and individuals alike in order to create content with relatively easy creation tools and a big variety of different elements such as colours, music, backgrounds and characters.
The software comes with a wide range of tutorials and help guides to assist animators who are new to the software while it’s also capable of integrating with other programs like Photoshop using Toon Boom Export so you can use the program to create traditional animations while also using it alongside other Adobe tools.
This program is currently only available on Windows systems but there is a version of the software for Mac called Toon Boom Storyboard Pro that you can purchase if you want to do animation on Mac.
Autodesk Maya LT
Autodesk Maya is widely regarded as the best 3D animation software around with it being used for animation in hundreds of Hollywood blockbuster movies. There’s a long list of features that set this program apart from its competition including new additions to the program such as enhanced modelling and lighting tools, a new interactive curve editor and UV editing tools.
The most interesting new feature about Autodesk Maya LT is its price point which makes it extremely affordable for both individual users and studios alike. This makes it a great choice for animators, illustrators, game developers and architects all of whom may need their software in different formats.
Sony Vegas Pro 12
Sony Vegas Pro 12 is currently the second most used software for animation with around 250,000 users in the United States. This has made it one of the most popular software programs to use for video editing and is also used by professional DJs and music producers to create music videos, trailer videos, short films and commercials.
Final Words:
Animation is one of the most popular forms of creating media online with users utilising a variety of tools to achieve their goals. If you’re someone looking to become an animator, we’d recommend Adobe Animate CC as a great starting point because of its ease of use and the ability to integrate with other Adobe products such as Photoshop, Premiere and After Effects.
However if you’re interested in 3D or making games, Autodesk Maya LT is recommended because it’s currently one of the most powerful 3D animation software suites on the market.
2 notes
·
View notes
Text
Edit a Career Boosting Sports Highlight Video
Looking for Edit a Career Boosting Sports Highlight Video?
This is the perfect place.
Click this link below :-
Editing a career-boosting sports highlight video is a crucial step in showcasing an athlete's skills and abilities to potential recruiters or teams.
To create an impactful highlight reel, it is important to carefully select the best clips that demonstrate the athlete's strengths and talents.
This includes showcasing key moments such as goals scored, impressive plays made, and exceptional performances.
It is also important to ensure that the video is visually appealing by using high-quality footage, incorporating slow-motion effects when necessary, and adding appropriate music or commentary.
Additionally, organizing the clips in a coherent and engaging manner will help keep viewers interested throughout the video.
Editing software such as Adobe Premiere Pro or Final Cut Pro can be used to refine the footage, add transitions, and create a polished final product that highlights the athlete's potential and skill set effectively.
Ultimately, a professionally edited sports highlight video can make a significant impact on an athlete's career prospects by grabbing the attention of recruiters and showcasing , the abilities in the best possible light.
Looking for Edit a Career Boosting Sports Highlight Video?
Click this link below :-
The description of this video contains affiliate links, which means that if you buy one of the products that I recommend, I’ll receive a small commission without any additional cost for you. This helps support the channel and allows me to continue making videos like this. Thank you for your support!
career boosting sports highlight video,game footage,games,gaming,sports,play station,video games,gameedits,video gameedit,cinematic,drone,ads,instagram stories,tv ads,podcast,intro and outro,color grading,sound mixing,animated titles
0 notes
Text
How to Add Voice Overs and Sound Effects to Your Animated Videos
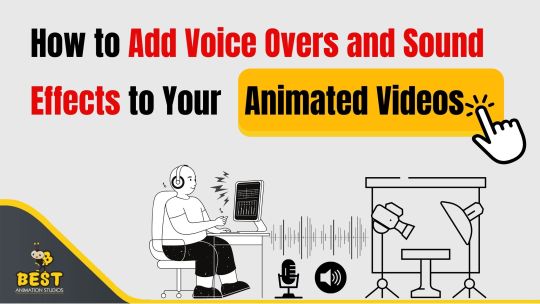
Digital graphics, drawings, and motion design are used to make animated videos, which are dynamic visual presentations. They are an effective technique for engrossing audiences and explaining difficult concepts because they use movement and storytelling to bring concepts to life. Animated videos are a great way to grab viewers' attention and deliver messages, whether they are used for marketing, training, or amusement.
Although making an animated video is an exciting process, you need more than just eye-catching graphics to fully capture your audience. Sound effects and voice overs are essential for making your animation come to life and making an even bigger impression. This short article will assist you in efficiently incorporating these components into your animated projects.
1. Plan Your Voiceover Script
Think about your voice-over script before pressing the record button. Ensure that your script aligns with the visual narrative of your animation and highlight the key points. Make it interesting and brief as good communication is important.
2. Choose the Right Voice Talent
Choosing the right voice talent is crucial. Whether you're using a professional actor to do the voice over or recording your own voice, make sure the tone and manner corresponds with the tone and target audience of your animation. For a better sound quality, consider recording in a soundproof area.
3. Record the Voiceover
It is necessary to use an excellent set of headphones and recording software in order to perform the voiceover. At the same time, it should be heard loud and crystal clear. Audacity or Adobe Audition software can be used for audio recording as well as editing works.
4. Sync the Voiceover with Your Animation
After having recorded your voiceover, bring it into the animation program used for creating the animations. Fix the audio vis-a-vis the animation to ascertain that they are in harmony with each other. As an example, you can adjust the timing from there so as to ensure that graphics correspond with the narration in Adobe After Effects.
5. Add Sound Effects
Your animated film can have a more real feel if you include sound effects. Choose audio effects that go well with your animation without drawing it. Websites like Freesound or SoundBible offer a huge variety of free sound effects. After importing them, position these sounds in such a way that they will do more good than harm in your animation work.
6. Mix and Balance Your Audio
Keep the voiceover and sound effects in harmony for better performance. Ensure that you can still hear the voice above the background noise. Employ audio editing tools to insert filters and change the levels of volume in order to achieve a perfect compact disc.
7. Review and Refine
Before completing your animation, watch the movie to check that sound effects and voice overs go along properly. Make any necessary improvements for better quality.
Conclusion
Your animated movies' interest and efficacy can be greatly increased by adding voice overs and sound effects. You may make animations that genuinely connect with your audience by carefully drafting your script, selecting the best voice actors, and harmonizing audio components.
Don't forget to share this post!
#animation#voiceover#artist#animationstudio#bestanimationstudios#explore#voiceoverartist#soundeffects
0 notes
Text
Video Editing: Mastering the Art of Crafting Compelling Visual Stories.

Video enhancement is a critical factor of contemporary media production, encompassing the system of manipulating and arranging video pictures to create a very last product that communicates a story, message, or idea effectively. From amateur content creators to professional filmmakers, the art of video editing plays a pivotal function in shaping the narrative and emotional effect of a video Orbixcode.
This complete manual explores the essential standards of video enhancing, key techniques, software program alternatives, and best practices that will help you create attractive and polished films.
information on the fundamentals of Video modifying
Video editing entails more than simply cutting and splicing pictures; it’s about crafting a narrative, improving visible and auditory elements, and making sure that the final product resonates with the target audience. right here are the middle components of video modification:
Pictures review and selection:
Organizing photos: before you start editing, arrange your uncooked photos into potential sections. Label and categorize clips primarily based on their content and relevance to the mission.
choosing Key photographs: evaluation all of the photos and select the high-quality photographs that contribute to the tale or message you wish to carry. cognizance on choosing clips which are visually appealing and decorate the narrative.
modifying strategies:
Slicing and Trimming: Use cutting and trimming strategies to do away with pointless parts of the photos and refine the pacing. This involves getting rid of awkward pauses, redundant scenes, or any fabric that doesn’t serve the tale.
Transitions: practice transitions to easily pass from one scene to every other. commonplace transitions encompass fades, dissolves, and wipes, which help hold the glide of the video and decorate viewer engagement.
Audio editing:
Syncing Audio: make sure that audio tracks are nicely synced with the video pictures. That is important for preserving clarity and coherence in speech, sound consequences, and historical past music.
Audio Enhancement: Use audio modifying equipment to beautify sound, cast off heritage noise, and stabilize audio stages. powerful audio editing contributes drastically to the overall professionalism of the video.
Color Correction and Grading:
color Correction: regulate the shade stability, contrast, and brightness of your pictures to correct any inconsistencies and ensure a cohesive look throughout the video.
Color Grading: follow color grading to provide the video a selected temper or fashion. this may consist of improving certain shades, applying filters, or growing a regular color palette.
adding visible consequences:
Images and textual content: include text overlays, titles, and pix to offer context, emphasize key factors, or beautify the visual attraction of the video.
Special effects: Use computer graphics to add factors which include gradual movement, time-lapse, or animations. computer graphics can decorate the storytelling and make the video more engaging.
selecting the proper Video modifying software
the selection of video enhancing software can drastically effect your editing workflow and the excellent of the final product. here are a few famous alternatives, ranging from amateur-pleasant to professional-grade:
Beginner-friendly software:
IMovie: perfect for Mac users, iMovie gives an intuitive interface with fundamental modifying equipment, transitions, and consequences. It’s a first-rate place to begin for those new to video orbixcode modifying.
Home Windows Movie Maker: although discontinued, Windows Film Maker remains an easy alternative for fundamental video-enhancing duties on home Windows structures.
Intermediate software:
Adobe Choicest Elements: A step up from basic editors, Adobe Optimum Elements affords extra superior features inclusive of audio enhancement, results, and transitions, making it appropriate for more special projects.
Filmora: Filmora gives a person-pleasant interface with several effects, transitions, and audio gear, making it a popular choice for intermediate editors.

Professional software:
Adobe Most Suitable Pro: A widely used professional editing software, the most efficient seasoned gives a complete suite of gear for enhancing, color correction, audio blending, and consequences. It integrates seamlessly with different Adobe Creative Cloud applications.
Very Last Cut Seasoned: exclusive to Mac customers, Very Last Reduce Seasoned is an excessive-give-up editing software program regarded for its advanced features, powerful overall performance, and intuitive interface.
Nice practices for powerful Video editing to supply movies that captivate and tell your target market, bear in mind these high-quality Practices:
Plan Your Edit:
Storyboarding: Create a storyboard or a tough outline of your video to visualize the go-with-the-flow and structure orbixcode. This helps in organizing your pictures and making plans for the sequence of scenes.
placing objectives: outline clean targets in your video. recognize what message you want to deliver and how you intend to engage your audience.
This helps in organizing your pictures and making plans for the sequence of scenes.
placing objectives: outline clean targets in your video. recognize what message you want to deliver and how you intend to engage your audience.
Preserve Consistency:
Visible style: make sure that the visual style of your video stays consistent. This consists of color schemes, fonts, and photograph elements.
Pacing and Rhythm: maintain a steady pace and rhythm to keep the target audience engaged. avoid abrupt adjustments in tempo that could disrupt the glide of the video.
Attention to high quality:
Decision and aspect Ratio: Edit your video inside the highest possible decision and make certain it meets the perfect component ratio for the intended platform (e.g., 16:9 for YouTube, 1:1 for Instagram).
Sound first-class: Prioritize clean and crisp audio. suitable sound complements the viewer’s enjoyment and makes the video more professional.
Overview and Revise:
evidence watching: Watch your edited video multiple times to catch any errors or inconsistencies. search for troubles along with mismatched audio, abrupt transitions, or visible system defects.
feedback: seek comments from others to gain specific perspectives and make vital revisions. positive criticism can assist improve the general pleasantness of the video.
Rising tendencies in Video modifying the sphere of video enhancement are usually evolving with technological improvements. Staying up to date with rising trends assists you in decorating your editing skills and staying competitive:
AI-powered enhancing: artificial intelligence is an increasingly number of being used in video enhancement to automate obligations which include scene detection, color correction, and even producing content material. AI gear can streamline the modifying procedure and decorate efficiency.
Digital truth (VR) and Augmented fact (AR): VR and AR technology are developing new opportunities for immersive video stories. Editors are exploring methods to incorporate those factors into storytelling, providing viewers a more interactive and engaging enjoyment.
Social Media Integration: With the upward thrust of social media systems, video content is more and more tailor-made for specific structures. know-how the necessities and options of different social media channels assist you to create films that perform well across various systems.
Conclusion:
Video enhancing is each an art and a technological know-how, concerning the meticulous method of shaping uncooked pictures into a compelling narrative. whether or not you're a hobbyist, a content writer, or a professional editor, learning the fundamentals of video editing, choosing the proper software program, and adhering to high-quality practices are critical for producing motion pictures. orbixcode By staying knowledgeable approximately rising tendencies and constantly refining your talents, you could create engaging and polished films that captivate audiences and efficaciously communicate your message.
1 note
·
View note
Last Seen Blogs

heavenscentz
Heaven Scentz 'N' More
shellylisaphotos
Shelly Lisa Photography

ayuvihealth
Ayuvi

coloradostonie
✌🏻👽