#windows 11 android emulator
Text
wine 9.1 windows 11 on winlator windows emulator android
youtube
1 note
·
View note
Text
Android emulators are software programs that act as virtual Android devices, letting you run Android apps on your PC or Mac without needing an actual smartphone or tablet. Since the emulator mimics the actual device, all of the apps will behave just like they would if you were using them on a real Android phone or tablet. Here’s everything you need to know about using an Android emulator on your computer!
0 notes
Text
An Introduction to Emulation
There are a lot of really cool old games, but actually playing them can seem quite difficult. Fortunately, there are tools available that make old games much more accessible. The most powerful, by far, is emulation. If you have ever wanted to learn how to play classic video games that aren't available on modern platforms, this post is for you.
TLDR: Emulation recreates old hardware (like game consoles) using software, allowing games to be played on modern systems. It's an incredibly cool technology that, while it has some minor downsides, is overall an important tool for preserving game history and enabling new game experiences.
What is the issue?
Game companies don't always make their older titles easily playable on modern hardware. There are so many important, influential, and fun video games released on older hardware that can't be bought on any modern platform. In fact, game companies sometimes go out of their way to remove their titles from modern storefronts. After Bandai Namco released Dark Souls Remastered in 2018, the original version of Dark Souls was removed from Steam, presumably to encourage people to buy the newer, shinier, more expensive release. Game history is important, and it's incredibly rewarding to engage with. Unfortunately, if you limit yourself to what is only available through official channels like Nintendo Switch Online, Steam, GoG, Xbox, Playstation 5, you will miss out on a lot of cool games.
Games are often designed to operate on very specific hardware. Games made for the N64 can't run on a Sony Playstation, and vice versa. Even on PC, a platform which is generally much more customizable, games can be made obsolete through software updates and new operating system releases. Software's dependency on hardware makes it harder to access as technology progresses. Because of this dependency on specific hardware, it takes a non-trivial amount of effort to keep games "up to date", and often companies decide it isn't worth the effort. I can still read books from the 1500s because fundamentally, they are just words and those are easy to bring to modern formats. Film too is relatively easy to keep functional. As long as you have a device that can run mp4 files, you have a lot of options with regards to how you watch a movie (even if those files have to come from an unofficial source). This isn't to imply that lost media and preservation challenges don't exist for books or movies, but the fact that I can easily access books that are several decades old, but many influential console games released even in the past few decades aren't playable on natively modern hardware says a lot. Fortunately, we have a solution. Emulation
What is emulation?
Emulation is software that performs the same function as hardware. Put simply, it lets games designed for one platform run on another. For instance, Dolphin is an emulator designed to play GameCube and Wii games. Dolphin runs on Windows 10 and 11, and allows you to play GameCube and Wii games on PCs. Emulators can be designed to recreate pretty much any piece of hardware. There are emulators recreating handheld devices like the Game Boy Advance, Nintendo DS, Java phones, and Playstation Portable. Other emulators are designed to run old PC games designed for Dos, the Amiga, or Commodore 64. There are even emulators designed for modern systems like the Switch. It should also be noted that emulators aren't exclusively used on PC. There are emulators designed to run games on Android phones or modern consoles. Every emulator is different, coming with its own set of features, requirements, and drawbacks.
It should be noted that most emulators also require ROMs or ISOs. ROMs and ISOs are the file type most commonly used to store game files. If emulators are a virtual recreation of hardware, ROMS and ISOs are virtual recreations of the software that would be inserted into the actual hardware.
What all can I do with emulation?
Emulation is a powerful tool that could be used for a variety of things. Most obviously, emulation is excellent for playing older games. While they certainly can do that, they can also do so much more. For instance:
Emulators make it much easier to play old games on the go: I can't carry a SNES with me everywhere I go. It's big, requires a bunch of cables, and I probably won't even have a TV to play it on. However, I can always bring my laptop with me. I have a SNES emulator installed on my laptop that lets me play SNES games anywhere. If I have a few moments in between classes I can boot up Front Mission, Tetris Attack, or any other SNES game I want. As if that wasn't enough, I also have NES, GBA, and DS emulators on my laptop, taking up very little hard drive space. Convenient!
Emulators let you customize your control schemes: Most emulators give you a lot of choice in how your controls are set up. For my laptop emulators, I simply use my keyboard because I don't want to carry a controller around with me. But, if I wanted to, I could plug in my Switch Pro Controller, or any other controller to play these games. This feature alone has some non-obvious advantages, such as...
Greater accessibility in control schemes: For people with physical disabilities, who might be unable to comfortably use a SNES controller, emulators allow them to relatively easily substitute the original controller for one they find more comfortable to use. This makes the emulated versions of classic games far more accessible than they would be on original hardware. As with all disability infrastructure, adding considerations for disabled people helps everyone, and a great example of that is...
Customizable controls are great for challenge runs: All sorts of interesting challenge runs become possible with emulated controllers. Have you ever wanted to play Link's Awakening with a Dance Dance Revolution pad? Well, set up an emulator and map its controls to the dance pad and you are good to go! You can't do that on an original Game Boy!
Save States let you bypass unfair nonsense: Old games sometimes have a reputation for having a lot of cheap deaths, and some definitely live up to that expectation. Some emulators come with save state features that essentially take a snapshot of the current game state that can be returned to at any point. If an upcoming platforming section has a lot of precarious jumps with impossible to dodge enemies, you can make a save state to go back to that challenge instantly, instead of having to replay the whole level again. Very nifty! Also, some emulators have rewinds, which serve a similar purpose.
Fast forwarding saves time: Some emulators let you increase the game speed, allowing you to bypass slow sections of a game. My friend Harry who runs the Video Games Are Bad YouTube channel recently released a video talking about how the speedup feature on his Seam Deck GBA emulator that made the experience of playing classic GBA Yu Gi Oh games much more enjoyable because he could skip the opponent's long turns. For JRPGs, games with cutscenes, or many other games, this is a great convenience feature
Emulators bypass region locking: Many classic console games were only playable in consoles from the right region. Japanese Playstation games could only be played on Japanese Playstations. While it's certainly possible to bypass this restriction on original hardware, it requires you to modify the console's internals in a very technical and easy to mess up process. Emulators bypass this entirely, making it easy to play games from other regions and see all of the differences between versions of the game.
Romhacking and Translation patches: Beyond playing games in their original form, emulators make it possible to play romhacks, mods, and other alterations. Translation patches allow players who don't speak a certain language to play games that didn't receive official translations. Famously, Mother 3 was never localized for a North American release, and to this day hasn't seen an official English translation. Fortunately, the game's very passionate fans translated the entire game to English, allowing tons of Mother fans to finally play the third, and best, entry in the series. Romhacks are similar, but instead of being used for translation purposes, entire game mechanics are altered. With romhacking, designers can create fan campaigns, edit game balance, create jokes, and many other things. Romhacking is a world of possibility that lets games be experienced in new ways that would be difficult to experience on original hardware.
Speedrunning: While the rules surrounding emulators obviously vary from game to game, some speedrunning scenes (especially those for handheld games) use emulators for their runs. Without emulators, some games would be much harder to speedrun, and would have smaller scenes as a result.
And more!
What are some Downsides of Emulation?
Clearly, emulators have a ton of advantages, even if you have the original hardware. However, for as great as they are, and they are pretty great, there are some downsides worth considering when using emulators.
System requirements: Emulators function by recreating hardware through software. Doing this takes a certain amount of the host machine's CPU power. For older systems this usually isn't a problem, but the more recent and complex an emulated machine is, the better your machine needs to be to smoothly run the emulator. Naturally, it's a lot easier to emulate a Playstation 5 than a Playstation 1. If your computer isn't powerful enough, there might be some emulators it can't run. I personally haven't run into this myself, but its something to keep in mind.
Finding ROMS and ISOs can be tricky: While emulators themselves can usually be downloaded easily, ROMs and ISOs are a different story. When searching for ROMs, some people come across sketchy looking websites that are filled with ads and give the impression they could give you a virus, and some of these sites very well might. This isn't to say that there aren't ways of safely obtaining ROMs and ISOs. In the past, there was EmuParadise, a quite extensive ROM library that was safe, however following a legal threat from Nintendo the site had to remove the ability to download ROMs. MyAbandonware is a pretty safe site and is my go to for PC emulation, but doesn't have much in the way of console gaming. The Internet Archive also is pretty safe, but might not have everything. In the future I want to make a post detailing ways of safely obtaining ROMs and ISOs as that is a nuanced issue, but for now know that there are safe downloads online. ROMs and ISOs NEVER come in the form of EXEs, so never run an EXE downloaded from online. Beyond that, it never hurts to do a quick google search about the site in question to find other people's experiences with the site in terms of safety.
Emulators aren't always 100% accurate: Because emulators are recreating hardware with software, it isn't always perfect. Some games don't run exactly as they would on original hardware. Textures might not appear properly, in game mechanics might be a bit wonky, and there might be some visual issues. For older systems, these kinds of problems have been largely ironed out and these emulation issues are extremely rare, but they pop up from time to time when emulating more modern systems. In my years of emulator experience, I have only encountered serious emulation errors once. Fortunately, most emulators are in continuous, open source development so visual issues often eventually get fixed. Even if the game does have some problems, a flawed, visually imperfect game is better than nothing at all.
Isn't emulation illegal?
Some people might be hesitant to get into emulation because they feel it is illegal, or that it's essentially piracy. This technically isn't the case. In 2000, Sony sued Connectix, who had recently released the Virtual Game Station, a commercial emulator for the Macintosh. The Virtual Game Station was designed to only play legal games. Players had to insert the Playstation game they wanted to play into their computer in order for the emulator to work, meaning the emulator didn't inherently enable piracy. Regardless, Sony sued Connectix, arguing the emulator infringed on their copyright and stole Sony's Playstation code. However, the court ultimately sided with Connectix. While their software did recreate the function of the Playstation, it did so with its own code which had been reverse engineered from Sony's hardware, meaning that Connectix didn't violate Sony's copyright. Sony v. Connectix established the legal precedent that emulation was entirely legal, and this has born fruit for modern game companies. Many PC games released on Steam and GoG run off DosBox, an emulator that runs Dos games. These releases come from the current rights holders and are entirely legal, even though the games use emulators. For more evidence of legal emulation, look no further than the Wii Virtual Console or Nintendo Switch Online service, both of which are commercial emulators.
While emulation is legal, the sharing of ROMs and files without permission from the copyright holders is illegal. As such, downloading ROMs from the internet is technically illegal. However, there is certainly a case to be made that, while it isn't always legal, it can be ethical to emulate classic games. If I wanted to legally play a GameCube game, I would have to go online and buy a used copy online. Depending on the popularity and rarity of the game in question, used game discs can cost anywhere from dozens to hundreds of dollars. Buying used games and the hardware to run them can be extraordinarily expensive and would put many games out of the financial reach of many individuals. It's also important to note that none of the money spent going to buy these used games is actually going to the developers who made the game.
In general, I'm actually not a huge fan of piracy, especially for indie games. My rule of thumb is that if a game can be purchased on modern hardware, I won't use emulation to play the game. I only use emulation to play games that are out of print and impossible to buy legally in a way that supports the developers. Unfortunately, there are tons of games that I can only realistically experience through emulation, and in that case I feel no guilt for doing so. I can't deny the developers a sale if they aren't selling the game. Further discussion of the ethics and legality are interesting, but might be best approached in a post of their own.
Conclusion
Emulation is an incredibly cool technology and one of the most powerful tools in the fight to preserve gaming and its history. Emulators can be complex, and in the future I hope to write further blog posts detailing the intricacies of emulation in more detail, laying out emulators I recommend and discussing other emulation and game preservation topics.
If you have any questions about emulation, game preservation, or any related subject, feel free to ask.
Have a good day.
11 notes
·
View notes
Text
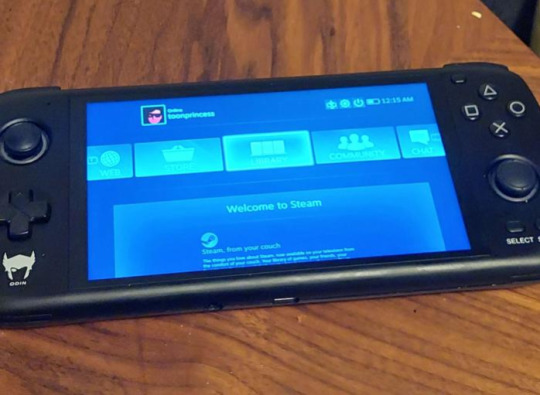
so i dual booted windows 11 onto my AYN Odin, which is like my android emulation console thing. Works well, im limited to 32 bit games and compatibility isnt the greatest, especially with newer games but it plays some games from 2015 and earlier decently as well as indie games of course.
Hackerman
4 notes
·
View notes
Text
HEY HEY HEY!!
So!
Are you interested in joining a SMP but the ones you seem to be the ones for you end up being Java and you're unable to get it? Or maybe you do have Java but some things don't work out and you aren't able to join?
Well, regardless, we've got a SMP for Bedrock players! It does have limited space(at least for the first season) and is allow-list and invite only, but you can try your hand in luck and apply!
If you don't get accepted, don't get bummed out! There is plan for at least two(maybe three) seasons in which players will be accepted!
Here is the application form!
And if you're interested yet iffy, then consider reading below the cut!
Voidfall is a bedrock only SMP that's got plenty of lore opportunities. With 9 players* within the world of Voidfall, who knows what could happen?
If you're confused what bedrock edition is on:
-Windows 10/11
-Xbox One
-Xbox Series S/X
-Playstation 4/5
-Nintendo Switch
-iOS
-Android
-Windows Mobile
{If you play on a laptop:
Install an iOS or Android emulator(Smartface, Appetize.io, Corellium, Bluestacks, LDPlayer, Nox Player)
You can either use an APK(version 1.19) or pay from the play/app store!}
While there are 9 players within the world(for season one), there will only be 8 people accepted from the form. Don't get bummed out if you end up not getting in for this season! Who knows, maybe in the season that'll change!
With plenty of chances for exploration, building, lore, and excitement - you should consider applying! While the player count begins limited it doesn't mean you should turn away from the chance to make new friends!
And guess what! You don't need to publish anything on media if you're uncomfortable with that, if you don't like that idea, or if you're not able to for any reason! All that's asked of you is to record any lore that you do - for sake of the story making sense and for the sake or putting things together correctly.
None of your clips, recordings, or findings will be put out on the internet without your consent. The only thing of yours that will make it to the internet is your amazing character creating skills and your voice.
It'll be asked that you use VC if you're able to. It isn't directly required, but would be appreciated, especially during the opening of the SMP, server-wide lore moments, and whatever the closing of S1 may be.
Now, besides the obvious of Minecraft basics, lore chances, and possibility of friendship... what do we have to offer?
We have the offer of a safe space! You'll be allowed regardless of disorders, disabilities, sexuality, preferences, identity, etc! A safe community for amazing people!
Not only that, but we also offer the chance to step out of your comfort zone. If this is your first time being interested in a multiplayer server outside of your friend group, then we welcome you with open arms!
Whether this be your first SMP or not, we welcome you and invite you to apply to the Voidfall SMP! We'll be waiting!
#Voidfall SMP#Bedrock#Bedrock Edition#Minecraft#Minecraft Lore#Mineblr#Lore#OC Lore#Minecraft Bedrock#Minecraft SMP#Vanilla Minecraft#Video Games#Echo Post
2 notes
·
View notes
Text
4 May 2024, 11:00
Today, I consulted with Michael regarding the camera issue in the build. As it turns out, Vuforia only supports Android builds. This is an oversight on my part and I should have checked earlier when I was first developing the initial idea. Regardless, we have discussed 3 different alternatives to this problem during presentation.
I build it as an APK and run it on an Android tablet. Michael will bring an Android tablet next week for us to test if this will work.
I build it as an APK and run it on an Android emulator, such as Bluestacks, on my laptop during the presentation. Michael suggests Bluestacks, MEmu and NoxPlayer
I present it as is on my Unity Editor.
The last alternative is the worst case scenario, so I will be attempting the first two.
As there is plenty of time before I can try running the build on Michael's tablet, so in the mean time I have attempted to download different Android emulators to get it to work.
With Bluestacks, I am unable to run it as it does not support my laptop nor PC which both use Apple M1 chips.
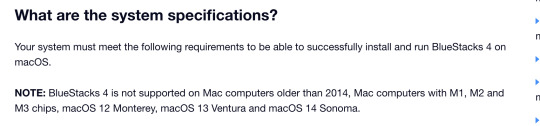
Bluestacks specifications (source).
With that, I tried another popular emulator, MEmu. From the get go, it seems like this is a Windows only application. So it immediately disqualifies as a possible alternative.
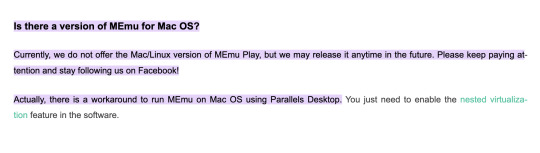
MEmu specifications (source).
NoxPlayer was downloadable, however I could not get my laptop to authenticate it properly. The usual system preferences privacy pop up was not there so I was unable to download it.
Unfortunately, I will have to wait and see if Michael's tablet works. If not, then I will use a classmate's laptop a week before presentation to to run it as an application and see if it is a possible workaround.
Again, worst case scenario is using the Unity Editor as the final presentation method.
0 notes
Text
How to Install Mobile App in Laptop
Introduction
In today's digital era, the versatility of technology continues to amaze us. With the increasing popularity of mobile apps, the need to access them beyond smartphones has become apparent. Installing mobile apps on a laptop opens up a world of possibilities, providing users with a larger screen and enhanced functionality. In this comprehensive guide, we'll walk you through the steps how to install mobile app in laptop effortlessly.
Understanding the Need for Installing Mobile Apps on Laptop
Mobile apps have become an integral part of our daily lives, offering convenience and efficiency in various tasks. However, relying solely on smartphones for accessing these apps may not always be ideal. Laptops, with their larger screens and more powerful hardware, offer a superior user experience for certain apps and activities. By installing mobile apps on a laptop, users can enjoy the best of both worlds, combining the portability of a smartphone with the functionality of a computer.
Choosing the Right Method for Installation
Before diving into the installation process, it's essential to choose the right method for installing mobile apps on your laptop. While there are several approaches available, the most common method involves using an Android emulator. Android emulators are software programs that simulate the Android operating system on a computer, allowing users to run Android apps seamlessly. Popular emulators such as BlueStacks, NoxPlayer, and Andy provide a user-friendly interface and robust performance, making them ideal choices for installing mobile apps on a laptop.

Step-by-Step Guide
Among the various Android emulators available, BlueStacks stands out as a top choice for its ease of use and reliability. Follow these step-by-step instructions to install mobile apps on your laptop using BlueStacks:
1. Download and Install BlueStacks
Visit the official BlueStacks website and download the installer for your operating system (Windows or macOS). Run the installer file and follow the on-screen instructions to complete the installation process.
2. Set Up BlueStacks
Once installed, launch BlueStacks from your desktop or start menu. Follow the initial setup prompts, including signing in with your Google account or creating a new one if you don't have an existing account.
3. Search for the Desired App
In the BlueStacks interface, use the search bar to find the mobile app you wish to install. Click on the app icon from the search results to view more details about the app.
4. Install the App
Click the "Install" button next to the app's icon to initiate the installation process. Once the installation is complete, the app will appear in the "My Apps" section of the BlueStacks interface.
5. Access the Installed App
To launch the installed app, simply click on its icon in the "My Apps" section of BlueStacks. You can now enjoy using the mobile app on your laptop, just as you would on a smartphone.
Alternative Methods for Installing Mobile Apps on Laptop
While Android emulators like BlueStacks are the most popular choice for installing mobile apps on a laptop, there are alternative methods available as well. Some app developers offer web-based versions of their apps, allowing users to access them through a web browser without the need for emulation software. Additionally, certain operating systems, such as Windows 11, now support native installation of Android apps through the Microsoft Store, providing users with even more flexibility in accessing their favorite mobile apps on a laptop.

Tips for Optimal Performance
To ensure optimal performance when installing mobile apps on a laptop, consider the following tips
1. Allocate Sufficient Resources
Adjust the settings of your Android emulator to allocate an adequate amount of CPU and RAM for smooth performance.
2. Update Regularly
Keep your Android emulator and laptop's operating system up to date with the latest software updates to ensure compatibility and security.
3. Close Unnecessary Programs
Close any unnecessary programs and background processes running on your laptop to free up system resources and improve performance.
4. Upgrade Hardware
Consider upgrading your laptop's hardware, such as adding more RAM or switching to a solid-state drive (SSD), to enhance overall performance when running Android emulators and mobile apps.
https://youtu.be/LLoH1VjEbAg?si=0rctrfpLjUgDKEbl
Video by Website Learners YouTube Channel
Conclusion: How to Install Mobile App in Laptop
In conclusion, installing mobile apps on a laptop provides users with a convenient and versatile way to access their favorite apps and games on a larger screen with enhanced functionality. By utilizing Android emulators like BlueStacks, users can enjoy a seamless experience that bridges the gap between mobile and desktop computing. Follow the steps outlined in this guide how to install mobile app in laptop effortlessly and enhance your digital experience.
FAQs
1. Can I install iOS apps on my laptop using an emulator?
No, most emulators are designed to run Android apps, not iOS apps.
2. Are Android emulators safe to use?
Yes, reputable Android emulators like BlueStacks are safe to use and regularly updated to address security vulnerabilities.
3. Can I run multiple Android emulators simultaneously on my laptop?
It's possible but may require significant system resources and could impact performance.
4. Do I need a Google account to use BlueStacks?
While a Google account is recommended for accessing the Google Play Store and other services, it's not strictly required to use BlueStacks.
5. Can I sync my mobile app data between my smartphone and laptop?
Some apps offer data synchronization features, but it depends on the app and developer support.
Read the full article
#AreAndroidemulatorssafetouse#CanIinstalliOSappsonmylaptopusinganemulator#CanIrunmultipleAndroidemulatorssimultaneouslyonmylaptop#CanIsyncmymobileappdatabetweenmysmartphoneandlaptop#device#DoIneedaGoogleaccounttouseBlueStacks#howtoinstallmobileappinlaptop#installation#laptop#mobileapp
0 notes
Text
Title: Optimizing Development: Leveraging Android Emulators on VPS for App Development
App development is a complex and time-consuming process that requires a lot of resources, including hardware and software. One of the most critical tools for app development is an emulator, which allows developers to test their apps on different devices and versions of Android.
However, running an emulator on a local machine can be slow and resource-intensive, especially if you need to test on multiple devices simultaneously. One solution to this problem is to use a virtual private server (VPS) to run your emulators.
A VPS is a virtual machine that runs on a remote server, which you can access over the internet. By using a VPS, you can run your emulators on a more powerful machine than your local machine, which can significantly improve performance and speed up your development process. In this blog post, we will explore how to optimize your development process by leveraging Android emulators on VPS for app development. We will cover the following topics:
Setting up a VPS for Android development
Installing and configuring Android emulators on VPS
Testing apps on Android emulators on VPS
Best practices for using Android emulators on VPS
Setting up a VPS for Android development The first step in using a VPS for Android development is to choose a VPS provider. There are many VPS providers available, including DigitalOcean, Linode, and Vultr. When choosing a provider, consider the following factors:
Performance: Look for a provider that offers high-performance servers with fast CPUs, plenty of RAM, and solid-state drives (SSDs).
Operating system: Choose a provider that offers the operating system you prefer, such as Ubuntu, CentOS, or Debian.
Cost: Compare the prices of different providers and choose one that fits your budget.
Once you have chosen a provider, you can create a new VPS instance. Most providers offer a simple interface that allows you to choose the operating system, CPU, RAM, and storage options for your VPS. After creating your VPS instance, you will need to install the necessary software for Android development. This includes the Java Development Kit (JDK), Android Studio, and the Android SDK. Installing and configuring Android emulators on VPS Once you have set up your VPS and installed the necessary software, you can install and configure Android emulators. To do this, follow these steps:
Open Android Studio and create a new project or open an existing one.
In the toolbar, click on Tools > AVD Manager.
Click on the “Create Virtual Device” button.
Choose the device configuration you want to use, such as a Nexus 5X or Pixel 3.
Choose the Android version you want to emulate, such as Android 11.
Click on the “Finish” button.
After creating a virtual device, you can start the emulator by clicking on the “Play” button in the AVD Manager. Testing apps on Android emulators on VPS Once you have set up your emulators on VPS, you can start testing your apps. To do this, follow these steps:
Connect to your VPS using a remote desktop client, such as Remote Desktop Connection on Windows or Remmina on Linux.
Open Android Studio and open your project.
In the toolbar, click on Run > Run ‘app’.
Choose the emulator you want to use from the dropdown menu.
Click on the “OK” button.
Your app will now be installed and launched on the emulator. You can use the emulator to test your app’s features and functionality, just as you would on a physical device. Best practices for using Android emulators on VPS Using Android emulators on VPS can significantly improve your development process, but there are some best practices you should follow to ensure optimal performance and efficiency. Here are some tips:
Use a high-performance VPS: Choose a VPS with a fast CPU, plenty of RAM, and SSD storage. This will ensure that your emulators run smoothly and quickly.
Use the latest version of Android: Use the latest version of Android for your emulators to ensure compatibility with the latest features and APIs.
Use multiple emulators: Use multiple emulators to test your app on different devices and versions of Android. This can help you catch bugs and issues that might only occur on certain devices.
Use headless mode: Use headless mode to run your emulators without the graphical user interface. This can save resources and improve performance.
Monitor performance: Monitor the performance of your VPS and emulators to ensure that they are running smoothly. Use tools like top and top to monitor CPU and memory usage.
Optimize your app: Optimize your app for performance and battery life. This can help ensure that your app runs smoothly on emulators and physical devices.
Conclusion
Android emulators on VPS can significantly improve your app development process by allowing you to test your apps on different devices and versions of Android. By following best practices and using high-performance VPS and emulators, you can optimize your development process and ensure that your apps are of the highest quality. So, if you’re an app developer looking to improve your development process, consider using Android emulators on VPS. With the right setup and best practices, you can take your app development to the next level.
0 notes
Text
i hope that the new ayaneo DS type handheld proves to the modern emulation handheld market that the format of "nintendo DS with an HD screen and all the buttons that a modern controller should have" is commercially viable and that a more affordable alternative gets made. ideally a windows 11 type gamer like the ayaneo but if it means getting it cheaper, i'd take it in android
1 note
·
View note
Text
Hit Subscribe Links Jan 2024
Some of our fav links and products
Architect transforms development with on-demand environments, speeding up coding, automating tests, and expediting approvals. Shared, production-grade environments empower teams, delighting product managers and QA. Build fast. Test fast. Deploy even faster. Ready to try Architect?
Learn the significance of data fabrication, why it's crucial, and its benefits. No need for masking or data subsetting – fabricate your test data effectively.
Master the art of setting up a proxy server on Windows 10 with this step-by-step WinGate tutorial. From installation to management, learn seamlessly
Demystify the testing world with this guide comparing xUnit and NUnit. Dive into their fundamentals, histories, and features. Clear examples and a head-to-head comparison make it a must-read for developers navigating the testing landscape
Explore Tricentis Vera, more than just e-signatures. Ensure 21 CFR Part 11 compliance with a central portal, tight qTest and Jira integration, and auditable electronic records. Simplify approvals for automated tests. Seamless integration into Agile and automation tools. Learn more about Tricentis Vera.
comparing emulators to real device testing. Learn about the advantages, features, and critical variables to consider while making testing options.
This post will show you how to get started with Android testing. Learn about many sorts of testing, including unit, integration, and user interface (UI). Follow these steps to set up your testing environment, create effective test cases, and increase the stability of your software.
Want more links? Check out our monthly digest
0 notes
Text
windows 11 on winlator windows emulator android
youtube
#Windows 11#Android#Winlator#Wine#Wine hq#Windows#Windows emulator#smartphone#vivid otg#64bit#Youtube
1 note
·
View note
Text
Android Emulators for Windows 11
Android Emulators for Windows 11
Android emulators for Windows 11 have become increasingly popular due to their ability to simulate an Android environment on a Windows PC. These emulators allow users to run Android apps and games seamlessly on their desktop or laptop, providing a convenient way to enjoy mobile experiences without owning an Android device. Here's a detailed overview of some of the best Android emulators compatible with Windows 11:
Bluestacks: One of the most well-known Android emulators, Android Emulators for Windows 11Bluestacks, offers a user-friendly interface and excellent performance. It supports both AMD and Intel processors, making it compatible with a wide range of Windows 11 devices. Bluestacks provides a smooth gaming experience and allows users to customize settings for better performance.
Nox Player: Nox Player is another powerful Android emulator optimized for gaming. It supports various input devices, including gamepads and controllers, enhancing the gaming experience. With features like root access and macro recorder, Nox Player offers advanced functionalities for users looking to tweak their Android emulation settings.
LDPlayer: LDPlayer is gaining popularity among gamers due to its focus on gaming performance and compatibility with Windows 11. It supports a wide range of games and offers features like multi-instance, which allows users to run multiple instances of the emulator simultaneously, enabling multitasking and smoother gameplay.
MEmu Play: MEmu Play is known for its compatibility with both AMD and Intel chipsets, making it a versatile option for Windows 11 users. It supports a wide range of Android versions and provides customizable settings to optimize performance for various apps and games.
Genymotion: Genymotion is more geared towards developers and offers advanced features for testing and debugging Android apps. It provides a high level of customization, allowing users to simulate various device configurations, Android versions, and hardware specifications.
Andy: Andy is an Android emulator that offers a seamless connection between a Windows 11 PCand an Android device. It supports features like multi-touch support and provides a virtual machine-like experience, enabling users to access the complete Android interface on their desktop.
Xamarin Android Player: Developed by Microsoft, Xamarin Android Player integrates well with Visual Studio and is ideal for developers working on Android apps. It provides a fast and reliable emulation environment for testing and debugging purposes.
When choosing an Android emulator for Windows 11, consider factors such as system requirements, performance, compatibility with Windows 11, gaming capabilities, and additional features like customization options or developer-centric functionalities. Users should also be mindful of the hardware specifications of their PC to ensure optimal performance while using these emulators.
Furthermore, it's essential to download emulators from reputable sources to avoid potential security risks or malware. Regular updates from the emulator developers ensure compatibility with the latest versions of Windows 11 and Android, as well as improved performance and security enhancements.
In conclusion, Android emulators for Windows 11 provide a convenient way to access Android apps and games on a PC. With a variety of options available, users can choose an emulator that best suits their needs, whether it's for gaming, app development, or general usage. By considering factors like performance, compatibility, and features, users can make an informed decision when selecting an Android emulator for their Windows 11 system.
Visit This Website: https://thetechnik.co.uk/android-emulators-for-windows-11/
0 notes
Text
Short Cut Keys: How to take screenshot on Windows, iOS, Chromebook, Mac, Android
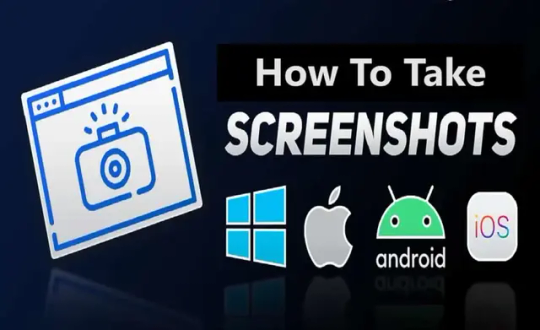
Screenshot is one of the best features in our devices, it allows us to capture important details at any time. In different devices, there are many ways to capture screenshots. Devices such as Windows, Mac OS, iPad, iPhone, Android, and even Linux have different ways to take screenshots. On different operating systems of devices, there are different ways to capture screenshots.
How to take screenshot on any device?
People use this feature to capture important documents and useful information. Mobile and laptops have different operating systems. Therefore, both devices have a distinct way to take screenshots. In this article, we will go through the details regarding this topic. So read this article till the end.

(Image Source: MySmartPrice)
How to Take Screenshot on iPad, iPhone, Apple Watch?
If you have an iPhone or iPad that doesn't have a Home button, then you must hold down the side button and volume up button together to capture a screenshot. If you have an iPhone or iPad that has a Home button, then hold down the sleep/wake button and press the Home button to capture a screenshot. Captured images will go directly to the Screenshot album.
Once you capture the image, the device's markup tool will appear at the bottom of the screen where you can edit the captured image. To capture the entire web page, follow the simple steps.
- Open Full Page Tab
- Done
- Save PDF to Files
The file will be accessible via Apple's Files app. If you have an Apple Pencil, then you can easily take a screen grab with a drawing tool. If you are recording your screen through screen recording, then you can easily take screenshots, you can pause the video and take a screenshot this way.
You can also use some software to emulate your screen onto a computer screen. Further, you can capture the screen on your computer. Software such as LonelyScreen, and AirPlay allow you to do such things.
To take screenshots on the Apple watch follow the steps
- Go to the 'My Watch
- Go to the General
- Click on Enable Screenshot
- Hold the Side button and Digital Crown together
The Screenshot goes to your iPhone, Yes, you heard it right, the captured screenshot appears on your connected iPhone.
How to take Screenshot on an Android device?
There are many Android devices available on the market. Therefore, the screenshot command may be different depending on which brand you are buying. However, most Android devices have the same ways of capturing screenshots, holding down the power and volume buttons together. Nowadays many devices have a screenshot button on the pull-down shade. You can easily take a screenshot by clicking on it. On Android 10 and 11, you get many screen recording options as well, you can record the video and capture the desirable portion of it.
If you have Google assistance, then ask it to capture the screenshot. In Samsung devices, you can edit the captured image, just open the Air Command menu, then tab 'Smart Select' to choose the desired size and shape. In Samsung devices you can also take screenshots by just Ninja Chop game, just swiping your hand from left to right. Before doing it you have to bring change in your setting.
- Go to the Setting
- Go to the Advance Feature
- Go to the Motion and Gesture
- Select the Palm swipe to capture
How To Take Screenshot on a Windows 10 PC?
To capture screenshots on Windows 10, you must use the print Screen button. You can easily perform this task by just pressing the upper-right side. You just have to tab PrtSc once to copy the full screen. You can then paste it anywhere you want by just pressing Ctrl + V.
If you have a big screen, and you want to capture only the window part, then press Alt + Print Screen. Use the Shift + Window Key + S keyboard shortcut to launch a small toolbar at the top of the screen where you can choose between capturing the full screen, a custom portion, or a specific window.
There is another option available for those who prefer the snipping tool on Windows 10. Yes, you have heard it right, this app can be located at the start menu which has the same capturing functionality as Snip and Sketch.
The Xbox Game Bar also gives a feature to capture the moments, it allows you to record gaming sessions. You have to start screen recording, Use the screen grab by pressing the Window Key + G.
How To Take Screenshot on Windows 11?
On Windows 11 there is a different way to capture screenshots. You just have to tab Alt + PrtSc to perform this task. Your screenshot is placed in the Picture folder in Screenshot by pressing Window Key + PrtSc.
You have also another option using Onedrive. Follow the steps.
- Go to the setting
- Backup in OneDrive
- Check Automatically Save Screenshots
After applying these steps, your captured screenshot will go into the cloud.
Microsoft provides you with a combined version of the Snipping Tool and Snip and Sketch tool, the Shift + Windows Key + S shortcut to get options for fullscreen, custom, and window capture.
In Windows 11 you can easily assign the Snipping Tool to the PrtSc key
- Go to the Settings
- Go to the Accessibility
- Keyboard.
- Use the Print Screen Button to Open Screen Snipping
The Xbox Game Bar gives a feature for screen recording too. You can do it with Window Key + G then tap on the camera button in the capture section to save a screenshot.
Tablet users can capture screenshots by pressing the Volume up and Power buttons together. Captured screenshots will be placed in the screenshot album.
How to take Screenshot on Mac?
To initiate the screenshot tool, you have to either press Command + Shift + 5 or Launchpad - Other - Screenshot.
You can do it from a keyboard shortcut because it preferable and easiest way to capture screenshots on Mac. To capture the entire screen press Command + Shift + 3. If you want the captured part just press Command + Shift + 4, then select the part you want to take. For specific window press Command + Shift + 5, if you have Mac with a touch screen, then press Command + Shift + 6.
How to take Screenshot on Chromebook?
Some model of Chromebooks has a screenshot button that looks like a camera. If you want to use the shortcut, then press Shift + Ctrl + Show Window, and select Screenshot to capture part of the window, full screen, and a specific window.
If you are using an external keyboard, then the shortcut key changes a little bit, for the entire screen press Ctrl + F5, for the part of the screen press Ctrl + Shift + F5.
In 2021, Google introduced in Chromebook a new feature that helped users capture screenshots very easily, Just pressing Screen Capture, you will be able to capture the entire screen, part of the screen, and a single window.
How to capture Screenshot on Linux Device?
There are many ways to capture screenshots on Linux devices. You can do it all by opening the Activities menu and selecting Screenshot. You can select your desired portion of the screenshot whether the whole screen or a single window.
Linux operating system also allows you to do print Screen button, just press Alt + Print Screen shortcut for the specific window. Press Shift + Print Screen which allows you to select a custom area to capture.e
Many programs can help you with it, for example, the GIMP program allow the user to capture screenshot you just have to perform the following steps.
- Go to the File
- Go to the Acquire
- Press the Screen Shot button.
FAQs:-
How to use snipping tool in Windows?
Use short cut key: Windows + Shift + S, to enable the snipping tool in Windows. Afterward, you need to select the area to take a screenshot.
How to take a screenshot on Chromebook?
Press Shift + Ctrl + Window to take a screenshot on Chromebook. If your keyboard does not have Windows button, use short cut key: Ctrl + Shift + F5
How to take a screenshot on Windows without Print Screen?
If you do not want to use or do not have a "PrtScn" button to take a screenshot, you can use Fn + Window + Space Bar.
Read the full article
#Howtotakescreenshot#HowtotakescreenshotonAndroid#Howtotakescreenshotonanydevice#HowtotakescreenshotonChromebook#HowtoTakeScreenshotoniPhone#HowtotakescreenshotonWindow#HowtotakescreenshotonWindow10#HowtotakescreenshotonWindows11
0 notes
Text
How to Fix BlueStacks Problems
Error 1: Incompatible Windows Settings Error Message
While using the Android 11 (Beta) or Nougat (32-bit) versions of BlueStacks 5, you will get the “incompatible Windows settings”pop-up message. Also, you can get an error message that reads; your Operating System is not supporting Nougat 32-bit/Android 11 (Beta) when creating a new Instance. This happens on the Windows system with Hyper-V, which has enabled Microsoft’s hardware visualization product.
Solutions to Fix the Issue
The first method is to utilize a different version of the BlueStacks emulator. Move to the official BlueStacks download page and hit the Download a specific version tab. Choose either Nougat 64-bit or Pie 64-bit; these versions support Hyper-V.
If you wish to use the latest version of Android (Android 11 Beta), you must disable Hyper-V on the system. Launch the Control Panel, hit the Programs tab, and pick Turn Windows features on or off. On the menu, untick Hyper-V, Windows Hypervisor Platform, Virtual Machine Platform, Windows Sandbox, and Windows Subsystem for Linux. You should restart the PC. Launch BlueStack to check if it works.
Sometimes, users might also need to disable Memory Integrity. Move to the Setting tab, choose Privacy & Security> Windows security, and tap the Open Windows security button. Next, navigate to Device Security, hit the Core isolation details tab, and turn off Memory Integrity. Note that this service helps stop attacks via malicious code, so turn off this service at your own risk. If you do not wish to take a chance, choosing a BlueStacks version compatible with Hyper-V is best.
A quicker method to turn off Hyper-V on your device is through the Command Prompt. Write “cmd” in the search box and tap the Run as administrator button in the menu. Then write “bcdedit /set hypervisorlaunchtype off.”
BlueStacks emulator also eases the procedure by offering a .exe file that users can download and use to disable Hyper-V.
Error 2: Device isn’t Compatible with this Device Message When Installing Apps
Sometimes, users may get a “device is not compatible with this device” message while downloading apps via the Play Store in BlueStacks.
Solutions to Solve the Error
The best method to solve this issue is to change the device profile. In the BlueStacks emulator, launch the Settings menu under Predefined profile, move to Device, and select another device from the list. You can try different options until you get a device profile where you do not see the incompatibility error.
Also, you can clear the Google app data to solve the problem. Launch the System apps on the home screen and hit Settings (note: these are Android settings). Hit the Apps tab and launch the Play Store. Tap the Storage button and choose the Clear app data option. After confirming the selection, you can install the problematic app.
Error 3: Installation Failed or BlueStacks not Opening Error
Users may get error codes when installing or running a game on BlueStacks or launching the app. A few users also encounter a problem when installing BlueStacks.
Steps to Fix the Error
If you have issues downloading or launching BlueStacks, confirm that your computer fulfills the lowest requirements of the app. This includes an Intel or AMD processor, Windows 7 or higher, 5GB of free storage, 4GB of RAM, updated graphics drivers, and computer administrator access. Of course, the lowest requirements might not provide the best experience. BlueStacks suggests a computer with Windows 10 or higher, an Intel or AMD multi-core processor with a one-thread benchmark score of more than 1000, SSD storage, a Broadband Internet connection, and 8GB of RAM.
Confirm that you have enabled Virtualization on your computer. A straightforward method to check is by utilizing the Task Manager. Write Task Manager in the search box, or hit the Ctrl + Shift + Esc keys to open it. Move to the Performance tab, and you will see Virtualization: Enabled. If you have disabled it, you must enable virtualization to utilize BlueStacks. The procedure relies on your computer manufacturer.
If you cannot open BlueStacks, dedicate more RAM to the app and CPU cores. Launch the BlueStacks Multi-instance Manager and hit the Settings tab. Navigate to the Performance tab and choose High (4 cores) under the CPU allocation tab and High (4GB) under the Memory allocation tab. BlueStacks suggests the settings for the graphic-intensive games. If users can open BlueStacks but have difficulty launching a game, they can switch the allocation within the app. Launch the BlueStacks setting, move to the Performance tab, and select these settings. Also, you can pick the Custom option and allocate more RAM and cores, but confirm that you do not allow all the RAM and CPU cores to BlueStacks. Also, choose the High-Performance option from the performance mode list. Hit the Save Changes tab and relaunch the app.
The anti-virus program of your device can also interfere and create installation issues with BlueStacks not launching.
Error 4: Error 2318 When Uninstalling BlueStacks
A few users obtain an error message (error 2318) when uninstalling BlueStacks. This issue generally pops up due to corrupted registry keys.
Solutions to Resolve the Issue
BlueStacks provides a dedicated Uninstaller program you will get in the installation folder. It may be better to utilize this program to uninstall BlueStacks instead of doing this via the settings menu on Windows.
The Windows Installer program may be a problem, but users can restart it. Write “cmd” in the search box to launch Command Prompt and hit Run as administrator from the menu. In Command Prompt, write net stop msiserver to stop Windows Installer, then write net start msiserver to reboot the service. After this, try uninstalling BlueStacks like other Windows apps and check if it has fixed the issue.
If the issue is due to corrupted registry keys, users can remove them. Launch the Registry Editor (write reg in the search box). You may need to backup the registry to avoid the problems. Choose the Files options and hit the Export tab in the toolbar. Give the name of your backup file and choose the All option in the Export Range box. After this, hit Ctrl + F to launch the search window and write bluestacks. Delete every visible BlueStacks registry key.
Error 5: Hardware Decoding isn’t Accessible on BlueStacks
While utilizing hardware decoding, the GPU of the computer is essential to provide compressed textures and typically offers a better gaming experience. However, some users encounter the grayed-out hardware decoding option and are unavailable or do not utilize the dedicated GPU even when chosen.
Remedies to Fix the Issue
This could be an issue with hardware compatibility. Users of AMD GPUs report issues when using hardware decoding, while users of NVIDIA GPUs do not face this issue as much. Contact BlueStacks customer support to ensure whether the dedicated GPU will permit hardware decoding.
Settings issues can also be why the hardware decoding is unavailable.
Confirm that you have set up all for BlueStacks to utilize your dedicated GPU. Move to the BlueStacks settings, choose Graphics > GPU in use, and turn on Prefer dedicated GPU. Once you relaunch BlueStacks, you will see your dedicated GPU in this section.
Also, you can change settings via Windows. Look for Graphics settings in the search box or hit Settings > System > Display > Graphics and choose the Browse option under the Graphics performance preference tab. In the location search section, look for the folder where you have installed BlueStacks, choose HD-player.exe, and hit Add. When added, select BlueStacks on the menu and tap Options. Choose High Performance (with a dedicated GPU) and save the setting.
Hardware decoding is not accessible with DirectX. Move to the BlueStacks settings tab, hit Graphics > GPU renderer, and choose the OpenGL option. Select the Hardware decoding option from the ASTC textures menu on the Graphic setting screen. If your dedicated GPU is incompatible, you will get a “Hardware decoding isn’t available” error pop-up in this section.
Error 6: Google Play Store Login Problems
Users encounter some problems when logging into the Google Play Store on BlueStacks. While a few login errors have particular solutions, the best way to solve this issue is to clear the app cache. Launch the System Apps folder in BlueStacks, move to the Settings tab, tap Apps > Play Store > Storage, and hit Clear cache.
Solutions
Having a problem on the loading screen when logging in or a ” Could not sign-in error: The anti-virus program in your device may interfere with BlueStacks running properly. Configure the program utilizing the right settings.
Black/white login screen: This occurs when your graphics setting on BlueStacks does not match the system specifications. Navigate to the BlueStacks settings tab, choose the Graphics option, and change settings such as Graphics engine mode, interface renderer, and Performance mode to other options. Reboot BlueStacks and check if the issue goes away.
“Authentication required/Validate it’s you” issue: If you get this issue, clear the Google Play app cache and delete the Google account before signing in again. To delete the Google account, move to the System app tab and hit Settings > Account. Choose your account and tap the Remove Account option. Return to the previous screen, tap Add account, and specify the login credentials.
“This device is not Play Protected” issue:This issue generally shows if you use a custom device profile. Navigate to BlueStacks settings > Phone, move to Select a predefined profile, and choose any of the phones from the list.
How to sign in without a Gmail account: You can access BlueStacks with a non-Gmail account but must open a Google account connected to that email address. Move to the Google website and hit the Sign-in tab at the top. Tap the Create Account button. Specify your information and choose the Use currency email account instead option. Provide the non-Gmail address and follow the validation procedure. After setting up the account, you can sign in to BlueStacks with this email account.
Error 7: BlueStacks is Slow
BlueStacks might be resource-heavy, based on what applications you are using, and there are situations when you find it laggy or slow.
Tips to Solve the Problem
Users can enhance the performance of BlueStacks by allocating more RAM and CPU cores to the app. Hit BlueStacks settings > Performance and select High (4 cores) and High (4GB). Also, you can choose Custom to select more RAM and cores, but do not allocate all RAM and CPU cores to BlueStacks. Confirm that you have set High performance in the Performance mode list.
Anti-virus programs can also create performance issues.
Ensure you have enabled Virtualization to get the best experience.
Also, you can enhance performance by empty RAM. Launch Task Manager by hitting Ctrl + Shift + Esc and close the idle or unwanted apps in the background. Apps such as Google Chrome are a notable issue in this regard. Choose the app you need to close and hit the End task button.
Error 8: Can’t Install APK Issue
You can get a “Can’t install APK” error message if the app or game you are installing is not compatible with the Android version of BlueStacks you are using. It will happen if you use the older versions, such as Android Pie 32-bit.
Tricks to Fix the Error
The way to play a game or utilize an app that is not compatible is by opening a new instance with the latest version of Android. Launch the Multi-instance Manager ( a three-layer tab at the right, two above the gear icon), hit the Instance tab, and choose Fresh instance. Select the latest Android version from the available list, like Android Nougat (64-bit) or Android 11 (Beta). If you haven’t installed these, you must download a few additional files and choose settings like memory allocation, CUP allocation, performance mode, resolution, and others for this new instance. Tap Download to generate a new instance, then hit Start on the Multi-instance Manager page. Now, you must be able to install the APK with issues.
Some Common BlueStacks Problems
BlueStacks features a weekly running list of issues and bugs that it solves so that users can check to see the solution for their issues.
Advertisements
about:blank
REPORT THIS AD
Users with Mac can encounter the “System extension blocked” error. Older Macs with M1 processors, MacOS 13 Ventura, and Macs running MacOS 12 Monterey do not support BlueStacks. Users can report an error by tapping the “?” icon in the BlueStacks app window and choosing the Report a problem option. Choose the issue type, specify other information, and hit the Submit a Report button. Also, you can download the BlueStacks 5 Log Collection Tool to offer an issue log if you encounter problems with BlueStacks not downloading or launching.
Source:https://hariguide.com/how-to-fix-bluestacks-problems/
0 notes
Text
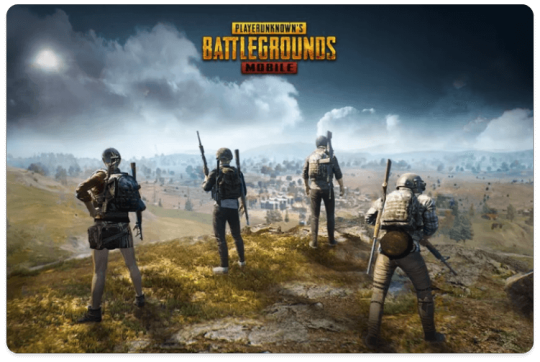
How to Play PUBG Mobile on PC and enjoy this game to the fullest
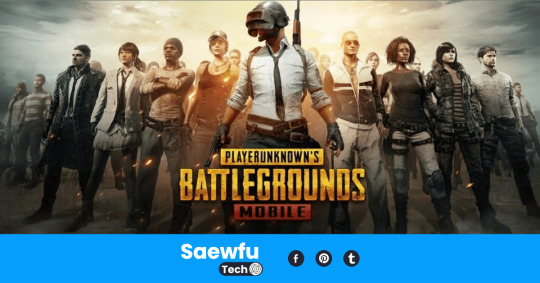
Hello,and today I’m going to talk to you about one of my favorite games: PUBG Mobile. You probably already know it, it’s the most popular and successful Battle Royale game in the world, with more than 100 million downloads and millions of active players every day. In this game, you have to survive a battle royale against 99 other players on an island full of weapons, vehicles and objects. The last one standing wins. But did you know that you can also play PUBG Mobile on PC? In this article, I’ll explain how to do it and what benefits it can bring you.
What is PUBG Mobile and why play it on PC?
PUBG Mobile is the mobile version of PlayerUnknown’s Battlegrounds, the game that popularized the Battle Royale genre. It’s a free game that is constantly updated with new modes, maps, weapons and events. It also has a ranking system, rewards and season passes that motivate you to keep playing and improve your skills.
I’ve been playing PUBG Mobile since it came out and I love it. It’s a very fun and addictive game that tests you in every match. You never know what you’re going to find or how you’re going to end up. Every match is different and unique.
However, playing PUBG Mobile on a phone or tablet can have some limitations, such as a small screen, a limited battery, imprecise touch controls or low performance. That’s why many players prefer to play PUBG Mobile on PC, where they can enjoy a more fluid, comfortable and competitive experience.
I’ve tried playing PUBG Mobile on PC and the truth is that you can tell the difference. The graphics are better, the game runs smoother and the controls are more precise. Plus, you can play on a bigger and more comfortable screen. You feel like you’re playing the original PUBG.
What do you need to play PUBG Mobile on PC?
To play PUBG Mobile on PC, all you need is an official emulator that lets you run the Android game on your computer. There are several emulators available, but the most recommended ones are GameLoop and BlueStacks, as they are the most optimized and compatible with PUBG Mobile.
GameLoop is the official emulator of Tencent, the company that developed PUBG Mobile. It has a simple interface and offers various customization and configuration options. It also has a large community of players and technical support.
BlueStacks is another very popular and powerful emulator that lets you play thousands of Android games and apps on your PC. It has a more complete interface and offers advanced features such as real-time translation, macro and script support or GPU acceleration.
Both emulators are free and easy to use. The only thing you need to keep in mind is that your PC meets the minimum requirements to run them smoothly. These requirements are:
- Operating system: Windows 7 or higher
- Processor: Intel or AMD with at least 2 cores
- RAM memory: at least 4 GB
- Disk space: at least 5 GB
- Graphics card: compatible with DirectX 11 or higher
I’ve tried both emulators and they work very well. I haven’t had any compatibility or performance issues. However, I recommend that you adjust the graphics parameters according to your PC, so that the game doesn’t hang or go slow.
How to download and install PUBG Mobile on PC?
The process to download and install PUBG Mobile on PC is very simple if you follow these steps:
- Download the emulator of your choice (GameLoop or BlueStacks) from its official website.
- Run the downloaded file and follow the instructions to install the emulator on your PC.
- Open the emulator and access the app store (Play Store or App Center).
- Search for PUBG Mobile and install it as if it were a normal app.
- Open the game from the emulator and wait for it to load.
That’s it! You can now play PUBG Mobile on PC with the emulator of your choice.
How to configure the controls and sensitivity of PUBG Mobile on PC?
One of the advantages of playing PUBG Mobile on PC is that you can use the mouse and keyboard to control the game, which gives you more precision and speed than the touch controls. However, to make the most of this advantage, you need to configure the controls and sensitivity according to your preferences and needs.
The emulators usually have a default configuration of the controls, which you can see and modify in the settings panel. Generally, the W, A, S, D key is used to move, the mouse to aim and shoot, the space bar to jump, the C key to crouch, the Z key to lie down, the F key to interact, the R key to reload, the B key to change the firing mode, the G key to throw grenades and the M key to open the map.
However, you can change these keys for the ones you want or add other functions such as quick weapon change, object use or angle of view adjustment. To do this, you just have to drag the corresponding icons from the settings panel to the position you want on the screen.
Sensitivity
In addition to the controls, you also need to configure the mouse sensitivity, which is the speed at which the cursor moves when you move the mouse. The ideal sensitivity depends on each player and their style of play, but in general it is recommended to use a low or medium sensitivity for more precision and stability when aiming.
The emulators also have an option to adjust the mouse sensitivity in the settings panel. You can try different values until you find the one that suits you best. You can also adjust the sensitivity separately for each type of sight (general, red dot, holographic, 2x, 3x, 4x, 6x and 8x).
I recommend that you try different settings until you find the one that best suits your way of playing. There is no perfect setting for everyone, so it’s best to experiment and see what works best for you.
What are the advantages and disadvantages of playing PUBG Mobile on PC?
The advantages are:
- Better graphic quality: when playing on PC you can enjoy more detailed and fluid graphics than on a mobile device. You can also adjust the graphics parameters according to your preference and capacity of your PC.
- Better performance: when playing on PC you avoid the problems of lag, FPS drops or overheating that can affect a mobile device. You also avoid interruptions by calls or notifications.
- Better control: when playing on PC you can use the mouse and keyboard to control the game, which gives you more precision and speed than the touch controls.
- More comfort: when playing on PC you can enjoy a bigger and more comfortable screen than that of a mobile device. You can also play for longer without worrying about the battery or the posture.
Some of the disadvantages are:
- Less portability: when playing on PC you can’t take the game anywhere like with a mobile device. You need to have a PC available and a stable Internet connection.
- Less compatibility: when playing on PC you may encounter some compatibility or error problems with the emulator or with the game. You may also find that some functions or events are not available or are different on PC than on mobile.
- Less fairness: when playing on PC you may have an unfair advantage over players who play on mobile, as you have better graphics, performance and control. This can create imbalance and frustration among players.
Conclusion:
PUBG Mobile is an amazing game that you can play both on your mobile device and on your PC. If you prefer to play on your computer, you only need an official emulator that allows you to run the Android game on your PC. This way you can take advantage of the benefits of playing on a bigger screen, with better graphics, performance and control. I have also given you some tips and tricks to help you improve your skills and strategies in PUBG Mobile. Now you just have to practice and enjoy this exciting game. Are you ready for battle?
I hope you liked this article and that it was helpful to you. If so, don’t forget to leave a comment, share it with your friends and subscribe to my blog to stay up to date with the latest news about PUBG Mobile and other games. See you next time!
Read the full article
1 note
·
View note
Text
How-do-I-install-Android-Studio-on-Windows-11
Installing Android Studio on Windows 10 is a straightforward process, but it can be a bit tricky if you're new to the Android development ecosystem. In this article, we'll guide you through the steps to install Android Studio on your Windows 10 machine.
Before we begin, make sure your computer meets the minimum system requirements for Android Studio:
Microsoft Windows 7/8/10 (32- or 64-bit)
3 GB RAM minimum, 8 GB RAM recommended (plus 1 GB for the Android Emulator)
2 GB of available disk space minimum, 4 GB recommended (500 MB for IDE + 1.5 GB for Android SDK and emulator system image)
1280 x 800 minimum screen resolution
With that out of the way, let's get started!
Step 1: Download Android Studio
The first step is to download Android Studio from the official website. To do this, visit https://developer.android.com/studio and click on the "Download Android Studio" button.
This will take you to a page where you can select the version of Android Studio you want to download. Choose the latest stable version and click "Download" to begin the download process.
Step 2: Install Android Studio
Once the download is complete, open the downloaded file to begin the installation process. If you're prompted to allow the app to make changes to your device, click "Yes" to continue.
The installation wizard will guide you through the process. You can choose the installation location, set up shortcuts, and configure other options during the installation process. Once you've made your selections, click "Next" to continue.
Step 3: Install the Android SDK
After the installation is complete, you'll need to install the Android SDK (Software Development Kit). This is a collection of tools and resources that allow you to develop Android apps.
When you first launch Android Studio, you'll be prompted to install the SDK components. Click "Next" to proceed and accept the terms and conditions. Android Studio will then download and install the necessary components.
Note that this process may take some time, depending on your internet connection speed.
How to Import Project in Android StudioTo import an existing project into Android Studio, simply click on "File" in the menu bar, then select "New" > "Import Project" and follow
Step 4: Configure Android Studio
After the SDK installation is complete, you'll be prompted to configure Android Studio. Here, you can choose the theme, select the type of installation you want (standard or custom), and configure other options.
Once you've made your selections, click "Finish" to complete the configuration process.
Step 5: Launch Android Studio
Now that you've installed and configured Android Studio, you're ready to start developing Android apps! To launch Android Studio, simply click the desktop shortcut or find it in the Start menu.
Conclusion
Installing Android Studio on Windows 10 is a straightforward process that can be completed in just a few steps. By following these steps, you'll be up and running with the Android development environment in no time. Happy coding!
#android studio#how to import project in android studio#Project in Android Studio#Import Project in Android Studio#Android Studio Project
1 note
·
View note
Last Seen Blogs

kvarvkv
İsimsiz

mollyculez
Idk

biliyordumvera-blog
kelebek.

caothanhly
Blog Dinh Dưỡng & Sức Khỏe - Dược sĩ Cao Thanh Lý

rkbhati-blog
Indian Textile Market