#you know one adobe program you know them all... kinda
Explore tagged Tumblr posts
Visit Tumblr Blog
Explore Tumblr blogs with no restrictions, modern design and the best experience.
Last Seen Tumblr Blogs


Fun Fact
Tumblr has been providing a Korean-language service since 2013.
Text
every once in a while i go through all my old photos and videos on my various cameras and edit together a little video with them timed to a song I really like and not to brag but I think I just finished my best one yet. you're not gonna see it because it's all photos of me and my friends and family and weirdly personal but just trust me bro
#usually i stick to just videos but honestly I don't really have enough accumulated clips to make a satisfying video#at least one's that the entire length of a song#BUT#this time i mostly used images (of which i have MANY) that flash by really quickly with bits of video interspersed#and it's timed to 'Danielle (smile on my face)' by fred again but it's the version he performed in his boiler room london set#GO LISTEN TO IT IT'S REALLY GOOD#listen to the whole set while you're at it it's incredible#also i used premiere pro for this bc apparently i get it with my adobe student account#honestly was pretty easy to use#you know one adobe program you know them all... kinda
0 notes
Note
love love LOVE your The Sign gifsets. im still a newbie in giffing lmao and your gifs are like reaaally pretty so i was wondering how you do your gifs? i really like how it's sharp and the colors pop up beautifully (only if you don't mind sharing ofcc <333)
bun this is the kindest thing you could have said to me, thank you so much <3 i wanted to write down my giffing process for a while in case anyone would find anything in it helpful, so thanks for giving me a push!
guzhu-furen's photoshop gifmaking process (kinda oriented on saving up time)
from

to
1. Downloading a video. i prefer to download video files instead of making screen recordings because the latter usually leaves watermarks/captions and makes image quality lower. i will not be linking the downloading websites themselves directly, but they are all easy to find through search engines if you know what to search for! i download ql dramas from:
youtube:
if the video you need is above 1080p quality, search for youtube4kdownloader
if the video is age restricted, search for 9xbuddy
both these websites work for normal videos too!
mkvdrama usually has 1080p episodes of most asian dramas.
dramacool also has downloading options in case the show is not available on other websites!
2. Screencapping (i learned it through this tutorial)
i screencap using KMPlayer. here is the installer i used, but you can find versions of this program on various websites and torrents too! install the program and proceed.
screencapping steps: open KMPlayer > press "CTRL + G" to summon the Frame Extraction window > set identical settings to these:
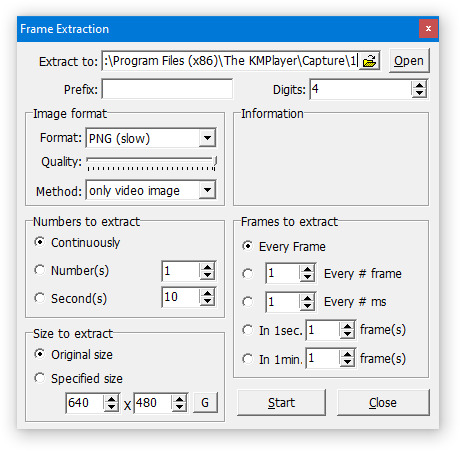
note which computer folder the screencaps will go to (it has a label "Extract to") > go to that folder on your computer and create a bunch of numbered folders there, for example ten folders named from 1 to 10, these would be our separate folders for ten gifs > write "1" or a name of another numbered folder after the backslash in "Extract to" bar in kmplayer > go the timestamp that will be the beginning of your gif in KMPlayer > press "Start" in the Frame Extraction window and press play on the video > when the moment you need to gif is over, press pause on the video and press "Stop" in the Frame Extraction window. great, you now have your folder of screencaps!
3. Importing screencaps to Photoshop
i use Adobe Photoshop 2023, but had used Adobe Photoshop CS5 for a long time before that, so you can use any version you have or find! it's available on various websites and torrents.
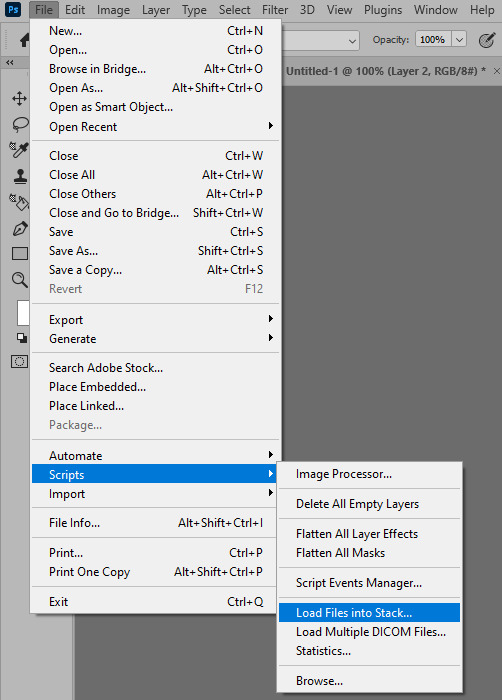
open Photoshop > Scripts > Load Files into Stack > press Browse in the "Load Layers" window that was opened
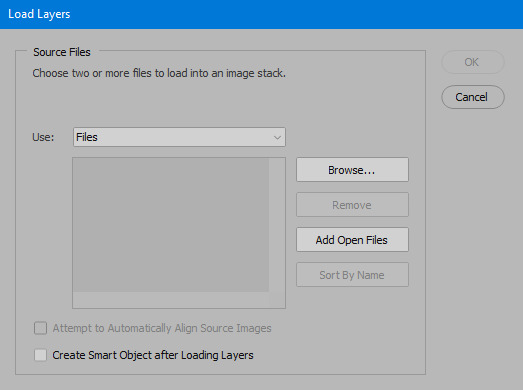
open your screencaps folder (and pin the KMPlayer Capture folder for faster future access) > pick the screencaps you want for your gif by clicking on the first one, and then clicking on the finishing one while pressing Shift on the keyboard > click OK and let them load for some time! i have 65 screencaps loading at the moment
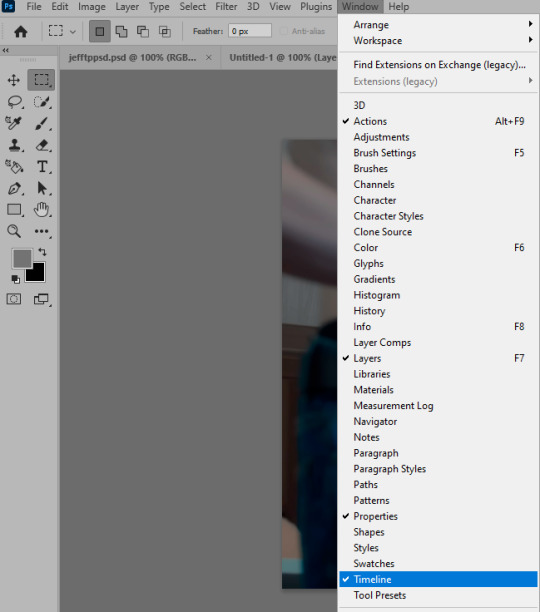
when the screencaps finish loading go to Window > press Timeline > press Create Video Timeline in the opened sidebar > press three dots that will say "Convert to frame animation"


4. Sizing & making the base of a gif
next part will be automatic. i use actions for almost everything from this moment. download the basic action pack here and my additional action pack that we will need here. load them in your photoshop actions window (Actions > Load Actions).
play the Script action to create frames.
now onto sizing your gif. these are tumblr's width dimensions for 3 types of gifs
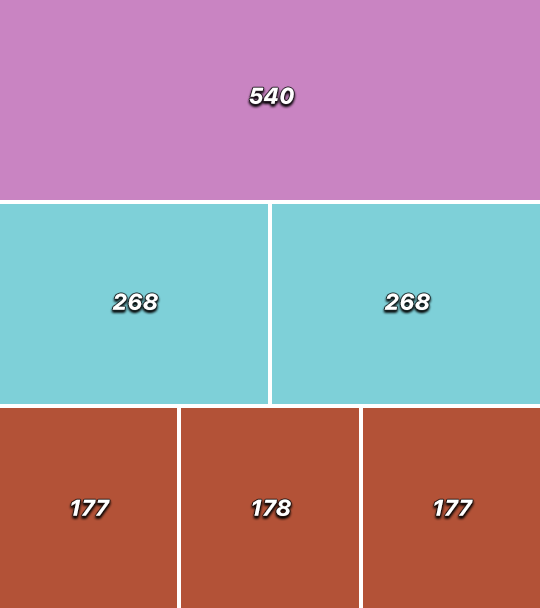
my gifs are usually 540 px in width and 640, 400 or 345 px in height. i added a 400 px action (Sizing 400) in the action pack, you can use it! or you can follow the steps by hand:
Image > Image Size > put in the height you want and add 4-6 pixels there (mine will be 406 for a 400 px high gif) > OK

now we need to crop the gif for it to fit tumblr's dimensions:
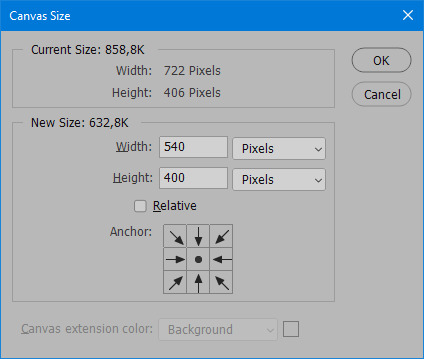
Image > Canvas Size > change Width to 540 (or 268 or 177) and take away the 4-6 pixels that we left in the previous step in Height
when you figure out which gif dimensions work best for you, record an action and use it to save up time!
after sizing use the action Smart Object. now we have the base of our gif!

you can move your gif left or right if you want! i will be doing this because i would like to show more hips in the gif.
press Ctrl + T > move the layer however you need (not in height though) > press Enter to save
i moved it to the right and my gif looks like this now:
5. Sharpening (i use Tan's sharpening settings explained here)
i added two sharpening actions in the pack, they are called Sharpen Spicy and Sharpen Spicy 12. you can use one of them or you can sharpen your gif by hand, i will explain how to do it below.
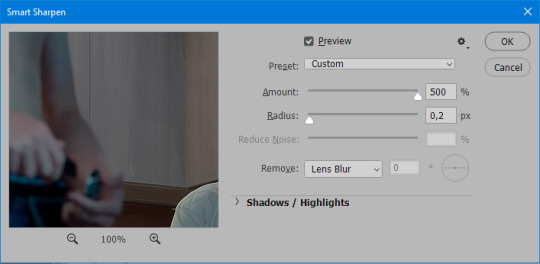
Filter > Sharpen > Smart Sharpen > 500% amount, 0,2 px radius > OK
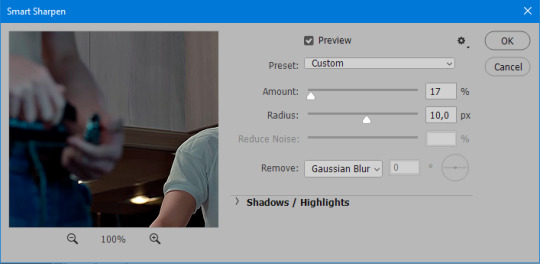
Filter > Sharpen > Smart Sharpen > 17% amount, 10,0 px radius > OK (you can change 17% to lesser or bigger, depending how intense you want your sharpening to look. i use 17% for 4k footage and 12% for 1080 px or less videos)
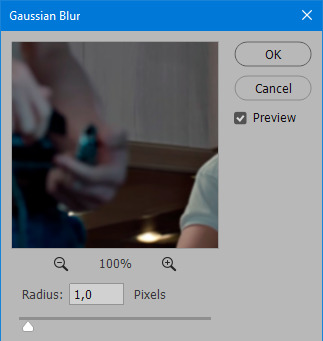
to smooth the sharpening a bit i use Gaussian Blur (this is optional, you can leave the sharpening as it is if you want your gif to be sharper).
Filter > Blur > Gaussian Blur > Radius 1,0 pixels > OK
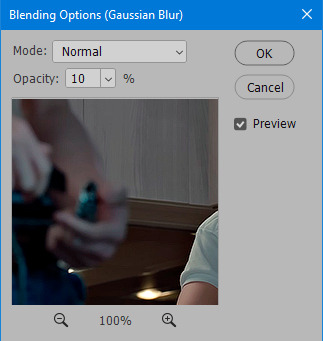
now change blending intensity to let only a bit of the blurring effect stay (you need to change this by hand if you used the sharpening action also).
press Blending Options (the highlighted place) twice > change Opacity to 10%

this is what my gifs looks like with sharpening now!

6. Colouring (i learned how to colour the way i do through this tutorial)
to make it easier for you to learn i will share my blank colouring file. i created it to save as much time while giffing as possible, so whenever i need to colour a gif i simply duplicate all the blank adjustment layers to the base of my every gif and start colouring! once you figure out which adjustment layers work for you best, i recommend creating a blank colouring file too to save time.
if you want to go the easy way, open my colouring file and duplicate selected layers to your gif file by Layer > Duplicate Layer > insert gif's document name

if you want to learn by hand, create the adjustment layers that i will be naming in the process on your own, you can find them all in Layer > New Adjustment Layer
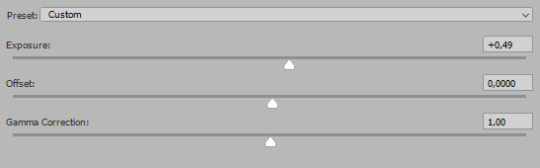
now we will use adjustment layers for our colouring from the bottom to the top! first, Exposure layer to add a bit of light to the gif. i don't always use Exposure because sometimes shots are bright enough on their own. i will, however, use it here. don't use it on your gif too much, because in the next few steps we will also be brightening the gif with other adjustment layers. i added +0,49:
next, Hue/Saturation layer. i use it in gifs with neon lighting to color correct overly bright colours. for example if your characters are standing in neon pink, you might want to lessen Saturation in Magentas and Reds to make the final gif less pixelated, and etc. i will not use Hue/Saturation on this gif, cause it doesn't need it.
proceed to the layer Levels. this layer usually does most of my colouring. click on the lowest white dropper in your Levels window:
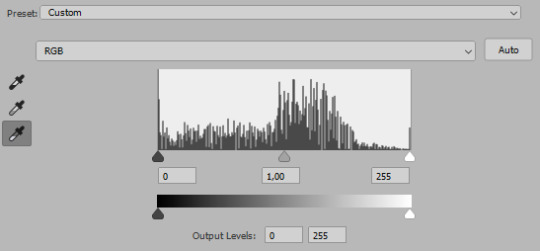
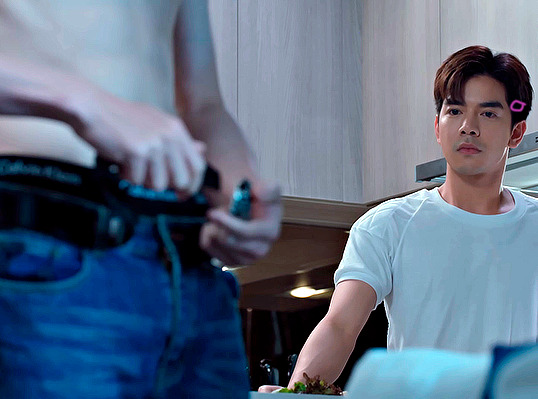
now choose a light place on your gif and click on it with the white dropper. it works especially well if you use the white dropper on the lightened parts of face skin. you can play around by choosing different bright spots and seeing what works best. here is the spot i chose and the resulting colouring:


this is too light, so now we need to balance it out with the black dropper:

choose one of the darkest places this time and click it with black dropper! once again, you can play around and click different spot to see what works best. i will be clicking the highlighted spot and you can see what my gif will look like with this Levels settings

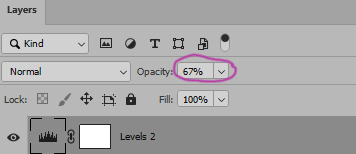
as you can see, darkest places became darker and other colours were corrected a bit! now, this is still too bright, so i will be decreasing the opacity of Levels layer from 100% to a smaller number:
i will have to continue in another post because tumblr only allows 30 pictures per one post in the new editor now and i'd like to explain everything in visuals. click to continue
100 notes
·
View notes
Note
i demand the 3D objects thoughts
Well I put it off to the absolute last possible moment. If you're reading this it's already too late. Paint 3d is dead

You will not be able to download it from the Microsoft store, and let's be honest, it's too shit for anyone to actually archive it (not that I'd even know how given it's a uwp distributed through the store and never offered as a standalone exe)
But let's not dance on paint 3d's untimely grave. As the world's first ever Kafkaesque photo editor it gave something very special to us all. I've come to love it, even if every time I use it I feel a deep and unending desire to become the joker. So let us Eulogize this beautiful mix failed start of a future we were promised but was failed to be born. Let's pour one out for Paint 3d, and explain once and for all what it really means to paint 3d.
What is paint 3d?
Before you can understand Paint 3d, you must first understand ms paint. Microsoft paint, often just referred to as "Paint" is one of the oldest standard programs to come with any windows installation. It's a bitmap editor that was begun long before most tiktok users were even born. It holds a special place in a lot of 90s and 00s kid's hearts for two reasons.
without fail, it will be installed on every windows machine. You will always have paint. It's dependable, fast, easy to get into, and will open corrupted or mislabeled images. It's the notepad of images, quick, dirty and gets the job done. You can copy and paste screenshots into there to quickly crop them
It's a little bit shit. It doesn't support transparency (well it does now but lets not get ahead of ourselves) so if you tried to make a minecraft skin with it you'd get all these solid color blobs. It doesn't support layers, so anything made on it is going to have a level of earnest shittyness to it. Text can't be rotated, bounding boxes have to be predefined shapes, and once something is on the page it's on the fucking page. MS. Paint will put pixels on the page for you, but after that point it won't hold your hand.
Point 2 is really a larger part of how ms. Paint is remembered. Ms. Paint is synonymous with youth, it's synonymous with limited computer time, with ignorance, with having nothing better. The spectacle of doing anything in Ms. Paint lead to the selling point of ms paint adventures which became homestuck. If you want to strawman someone's political opinions, you draw them in MS paint. The early, edgy, ugly look of the 00s web was defined by MS paint just as much as it was defined by adobe flash. The limitations of this piece of shit software defined a generation's artistic identity. We love it because it is shit. We would not have it any other way
Okay but you didn't explain Paint 3d!
Well, gosh, don't interrupt me. Yeah, so what is paint 3d? In 2017 Paint was added to the deprecated feature list. A special update was pushed so if you opened up paint it would ask you if you'd rather switch to paint 3d
Paint 3d put a fresh new stab at the utility, redoing it in the new UWP format and dressing it up in the company's then standard design language. The refresh also added a whole host of nice, modern features such as:

An updated set of tools, some but not all of which are pressure sensitive when used with tablets/touch

The ability to use transparency!
Hurray those are great new features wait what do those other buttons do?

Yes paint 3d lives up to it's name, you can add stock 3d models to any of your drawings and they're all kinda awful

3d text, 3d models, go ahead and place them in your scene. They put the whole project spark asset library in there last year, if you can think of it it's probably not in there but hey there'll be something and it may or may not have a texture because the model may have been intended for 3d printing
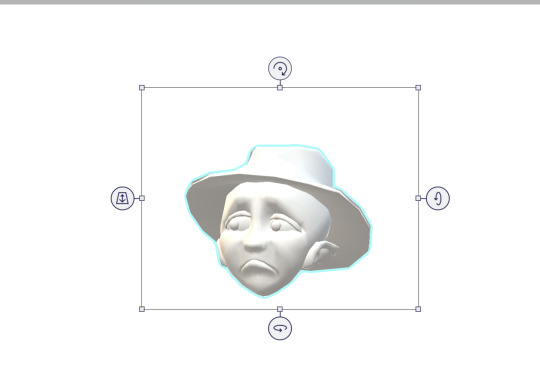
You can manipulate these objects with a slick interface that's completely non industry standard but hey it at least looks nice.

Models can also be painted on and you can pick from these options to decide the albedo/metalic values. No I don't know how to set the custom values, sometimes it's there and if you click off it's gone forever. Good luck


Oh and also when you're painting you're given a very convenient gizmo to rotate the object that isn't available in normal mode. You can multi select objects and group them together but beware it doesn't always work and using the undo key sometimes spawns a new copy at the wrong position and scale but don't worry this is a small bug in a new program and certainly won't be present in the final version on November 4th I promise.

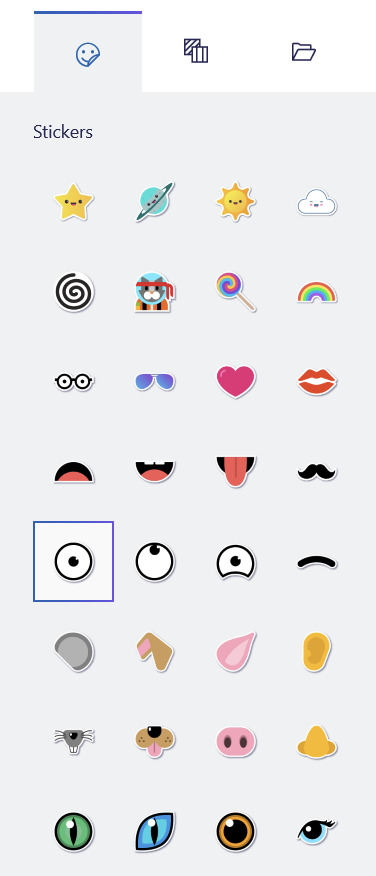
You can put stickers on models and there's a nice little UI to stamp it if you want to put multiple here are all the stock standard stickers
You can also use these pretty tiling textures

Or you can add any png from your hardrive

Those are the only options you'll ever get or need. You can also spawn arbitrary shapes, like cubes and spheres

And in a post launch update they even added the fucking TUBE BRUSH

Look how many tube there is. So many tube You can also edit the points individually after they're created but each tube has a maximum number of points that it can contain and you have no way of knowing until it's too late.
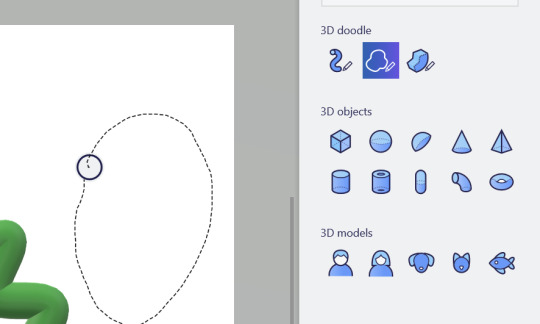
You can also use the 3d doodle to make a shitty potato looking thing, but if you browse the #paint3d tag you'll see a lot of people more talented than me using that tool to it's fullest

As you saw you also have the option to round or point the corners.

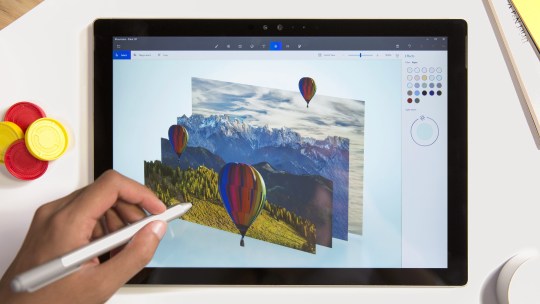
At any point you can click the 3d view button and suddenly you're no longer head on, you can orbit the camera and view the scene from any angle. Is it actually good to work with 3d scenes in this program? God fucking no

This scene nearly killed my computer to make, and that thing had okay specs for the time. Placing objects with the non standard (but touch friendly) controls is a pain and the camera cannot be oriented in any meaningful way. There is no frecam, there is no camera scale, you can orbit, you can pan. If you want more go learn blender.
You can also change the time of day

Go ahead, rotate the sun or change the filter, some of them are even minecraft specific. Most of them are objectively worse than the default, but hey you get a lot of options
Okay yes these are all cool features, but I've been dancing around paint 3d's one actually cool feature, the one that drives me mad... because it's a good idea
great even...
...too bad it's shackled to this program.
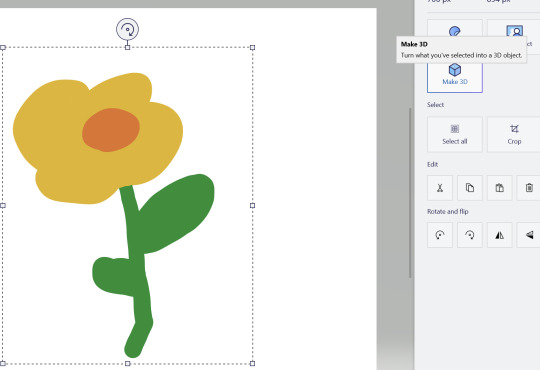
Oh this? This? yeah we can fuck with this. Now we're fucking talking

Now I can move my objects around in 3d, scale them, reorent them and make all kind of cool 3d compositions out of cut out pieces of my 2d artwork. If you look at any cool marketing material this is by far the feature they're most proud of
The possibilities are endless... unfortunately they're also frustrating.
See that flower I made has a white background, and there's no magic eraser so I'd need to manually cut it out with the eraser... or use magic select

If you're in a video call while this UI is active and you're sharing your screen it will only show the gif and not the program itsself
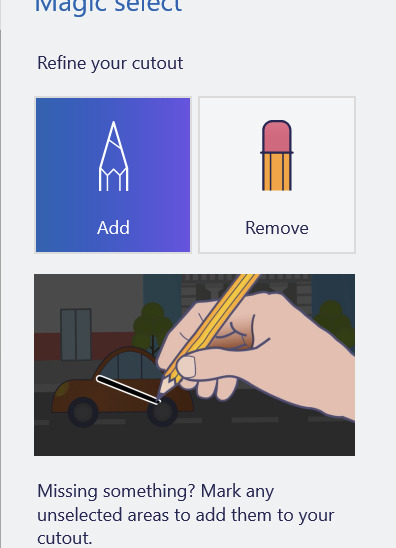

With the add and subtract tools you can provide hints about what should and should not be included. That's fine for something as simple as this drawn with a pen tool, but... well if you like to draw with the pencil? Get ready for pain buckeraroo. You can't manually slice out what you want, you just have to get the AI to guess and it will never guess perfectly. Part of your bat will be left behind on the canvas or it'll start picking up a few extra white pixels
but hey, it's 3d now, sometimes it works. You can choose to content aware fill whatever was behind on the canvas, or leave a weird white empty space behind

But now I have a field of flowers I can move however I like, okay but I think I want to add an extra leaf to one of them
Get fucked. Idiot. Once you cut it out, it's like paper. These 3d canvasses can never be grown, only shrunk and only by the eraser tool which carves in a perfect circle like a bull in a china shop. Now, it's actually very cool how you can recursively create new 3d canvasses out of existing ones, and I'm sure you could do cool stuff but any time the canvas shrinks that's as big as it'll ever be it can never grow
Also, yeah you can't just make a canvas in place, you either have to reserve space on your main canvas or clip it off of a second canvas you make earlier and just... I don't know stash it off to the side out of frame? this is how you use layers and if you want to re-order them put them in literal 3d space? Want to hide a layer? Put it behind your canvas.
This is what experts are calling: "technically a workflow, I guess"
This would be a really cool feature, unfortunately it's just not finished. It's missing that extra 20% that would make it at home in real software versus just a toy. Just like paint you have to sort of plan ahead and make all of your layers. In order... but in reverse bob ross order. See you need to make all of your foregrounds first, then and only then can you start working on your background canvas, and should you ever change your mind and want another foreground you must destroy a space of your background to create it. Oh, also, once it's 3d it can never be re-projected back into 2d... well you can turn it into a sticker, which kicks ass, but that will be flattened, if you wanted to retain the 3d rotation of it too bad. Also, making something into a sticker physically consumes it, so you'll need to copy and paste it first just in case otherwise it's gone forever
oh yeah and sometimes copy and pasting doesn't work, creates extra clones, or places them at the wrong space.
Okay let's save our work

You can actually save it as a project folder. You heard me right, folder. Paint 3d stores projects as individual folders

And they're all just called checkpoint, there's no association with like, which project each one is

And they're all full of undocumented binary files, with the exception of a png thumbnail at the very bottom.
So uhhh, why? You can't send project files to other people, at least not easilly. Is this some library that I don't know about? This all boggles my mind. I mean a .docx file is just a renamed zip file was it too much to ask to make these all renamed zips? Why would you leave it half finished like that and just not make a "new" file type?
Okay sorry I got lost in the weeds. Also I hit the image limit for this post so you're just gonna have to bear with me and use your imagination. You can do this I believe in you.
You can export as a .glb file that goes to your 3d objects folder (put a pin in that), or you can export it as a video/gif. There are few pre-canned animations like bobbing back and forth or rotating on a turntable. They can be sped up or slowed down, but that's about it.
Okay but why 3d?
God damnit I'm going to need more images for this so I'm gonna post this as is and hope I can add more photos on the reblog...
8 notes
·
View notes
Note
Hi! I'm thinking about making a podfic of one of my favorite fics and I wanted to ask for a couple of tips because I adore your podfics and I have run into a couple problems very early on.
how do you do deeper voices? my voice is fairly high (I'm a soprano that can occasionally deep down into lower alto) and most of the voices in the fic are male. I also always sound about twelve in recordings lol
how do you make distinct voices? again, I have a lot of different voices (probably 5-7 that talk the most, with many many other reoccurring characters).
pacing of reading. I tend to speak/read very quick and in my practice recordings, it sounds like I'm talking much faster than I felt I was. any tips on that?
what recording programs are best? currently I'm using voice memos on my phone. which. is clearly not going to give me the best sound, regardless of the app I use, but I don't have many options.
I am living in a dorm right now and live in fear of my suite mates hearing me (my roommate not quite as much as she likes to dub and does a lot in our room--though she does it in mandarin so I cant understand it). not to mention background noise of doors opening and whatnot. if you have any tips on that as well, that would be great!
I love your podfic, you put so much soul into them, and I hope that I could do that too!
Hello fellow podfic-er! I’m so excited for you to make a podfic!
The nice thing about podfics is that I usually don’t have to create characters from scratch, they already exist in the TV show. If I’m struggling with a character, I just rewatch some clips of them talking and imitate it!
Deep voices: I, too, have a high, childish voice and struggle with deep, Manly Men. I guess the main tip I have is to...give up. What I mean is focus less on pitch and more on tone. If you speak too low, it’ll be less expressive and will probably hurt your throat. It can work for minor, 2D characters, but don’t do it for main characters that have a wide range of emotions (you may notice that my Mighty Oaks Fire Sage Zuko voice swings higher when he’s emotional oops). Instead, use your normal pitch, and make a character sound adult by using an authoritative tone. Another thing I do is play up the childish and feminine voices. We might not be able to make the adults sound adult, but we can make the kids sound extra kiddish by comparison.
Distinct voices: I’m a tactile learner, so for me, it’s all about the physicality. Every time I do Azula’s voice, I make a pinched face like I’m eating a lemon. When I record Ozai, I sneer. For Sokka, I jut out my chin and flail my arms. It looks silly, but no one is around to see. There’s lots of YouTube tutorials about how to make different voices by varying speed and tone and nasal quality, but I get kinda lost in the sauce with those theory lessons. The only way I can really get myself to do different voices is if I’m working off of a reference. I just watch videos of other cartoons and live actors and then copy them.
Pacing: Pacing is hard. I especially struggle with the editing and often end up cutting things wonkily. Audiobooks tend to be slow because you’re less likely to get tongue tied that way. If I have a big hunk of text that I find myself racing through, I slow myself down with physicality again. I’ll lean in on important words or mime out the actions. For example, on the line, “Zuko turns, grabs the bar at the side of the ship, and throws himself back over,” I'll turn my body on the word “turn,” grab an imaginary bar on the word “grab” and then lurch forward on the word “throw.” Adding in movement can bring variation to those big blocks of text.
What recording programs are best: I don’t know! I use Audacity because it’s free. Adobe Audition is great too, but it’s expensive. I am very lazy with the podfics. I don’t have a professional set-up. Basically, I make a comfortable nest of pillows in bed or my closet, use an iPhone VoiceMemos app to record straight into the phone mic, send the audio file to my computer, convert the audio to a WAV file, put it in Audacity, add a Noise Reduction effect, and then cut it down. Once I’m done editing it, I export the Audacity file as an mp3, upload it to archive.org and Spotify, and then embed those links into Ao3. Feel free to DM me if you have other tech questions. I am not particularly savvy, but we can Google it together? If any voice actors on Tumblr have professional advice, please chime in.
Silence and privacy: Background noise is a big headache for me too. I live in a noisy area with lots of planes and a squeaky elevator. I usually record now in my closet surrounded by pillows and blankets, so it’s fairly soundproof. If there’s a noise, I usually wait for the sound to stop, record the line again, then edit out the mistake in post. At the end of the day, though, sounds will slip in. It’s just a podfic; we’re doing this for fun not professionally, so it doesn’t need to be polished. I think most listeners’ attitudes is that something is better than nothing. If you’re in a school dorm, there might be music practice rooms, a radio recording booth, or empty classrooms you can use instead.
Storage: Something I didn’t realize going in was how much storage the audio clips take up. Make sure you save and delete projects as you go. One time I finished editing an Audacity project, but it wouldn’t let me save it because I ran out of storage and I had to start over.
I’m so glad you like the podfics I’ve done and that it could help inspire you to make one too! I started making podfics because I fell in love with @pixieinthesky’s fantastic Salvage podfic (it's an absolute gem). Keep the chain going!
Have fun!
66 notes
·
View notes
Note
Oh it was only 3 actually, counting that one animatic on YouTube (that BTW i had no idea was yours! I was pleasantly surprised <3)
And I found it so funny that you have somewhat an idea of who I might be PFFF you can throw the guess, it would be funny if you get it right (don't have to say my name if you don't remember it, you can just go for something you remember NFKDSJ)
also time for an actual question since i'm already here, what program did you used for the animatic? I've always wanted to get into animating but most softwares cost money or are free but really bad so I could use some recommendations 👀
Good to hear there is no imposter lol. I should probably start using the false pfp so people know it’s me but I’m too lazy to change them all 💀 also my guess was right as to who you were but probably mainly because I put on my Aziraphale detective hat and you were the last notification before the ask inbox notification and your icon had a red beanie. We meet once again.
As for the animatic I used procreate for drawing and capecut for composting. Not the most efficient method but I liked it. I ended up segmenting off each camera angle into a different canvas and making any animation for the shot that way. I love capecut because the free version has every editing function you need for an animatic and the watermark only appears as a black screen at the end so it’s so easy to crop out. It’s probably the best free editing software I’ve found. (I also used a screen recording device to record the audio cause even if you buy a song it sometimes doesn’t allow you to put it in the program.)
I honestly recommend procreate if you have a device that supports it. I think it’s still only a 10 dollar onetime purchase. But if you don’t have a device that supports it, I have used things like flip a clip which is free, and the paid version is pretty cheap. I have also dabbled in an app called rough animate, also free (you don’t have to pay for the onion skins) which was also okay. I got frustrated cause of the lack of brush choice but other than that it’s not bad at all. If you can’t pay anything at all I’d recommend this because, unlike flip a clip, you don’t have to pay to unlock the a lot of the really helpful features. Ibis paint also added an animation feature I think so that’s an option. Idk if you need the paid version for it, but I remember only having to watch ads for a minute to unlock all the brushes so maybe it’s the same for the animation feature lol.
If you have a computer set up, I’ve also heard nice things about Krita for animation. It’s free and from what I remember it had a really good timeline set up. I actually tried to use it, but my computer at the time was old and slow and it lagged to much, and then I had a shitty no screen tablet and my hand eye coordination when it came to drawing and writing is quite bad, so it just wasn’t a good set up for me personally. But I know people make it work. I mean, people make this kinda shit in MS paint, if you’re dedicated enough you can technically do it in almost any program (though you may not be able to make it as polished as you’d like.)
Then there is Clip Studio Paint, which does cost money but is way less expensive than like, harmony or adobe. The EX version which gives you a second of free animation per project is a $5 monthly subscription for once device, PC MaC IOS, and the Pro version (which is more expensive) gives you unlimited animation animation access for I believe around 10 -15 dollars a month (still less than most streaming services lol). There’s also a one time purchase version that is $50 dollars, but it goes on sale A LOT for $25! Although I don’t think it gives you more than a second of animation. CSP also has a very long free trial period, for EX it was legit like 3 months. so if you try it out and like it, I’d definitely suggest finding a way to pay for it. It’s actually used in some professional studios in Japan, so if you have any professional aims for your work it’s a good starting platform to get into industry software. However a lot of the nice things CSP offers for animation are not needed in the story boarding/animatic stage, so if that’s as far as you wanna take your animations it maaaaaaay not be worth it unless you love it.
If anyone else has other cheap or free recommendations feel free to add on. I have attempted to make animatics on procreate, rough animate, and flip a clip; all of which I have uncompleted projects on. It just so happens that procreate is what I was using when I finally made an animatic I liked enough to see until completion. Whatever software you do use, just make sure you learn how to use it before attempting a big project. Do some smaller stuff before you try anything big.
Edit to check the comments! We got other good recommendations for computers!
8 notes
·
View notes
Note
Can you talk more about your time as a film extra? It sounds very interesting
Sure!
It started in winter 2020, during my second year of uni. I studied graphic design and prinmaking, both are expensive af (Adobe programs for design + special papers and ink for prints, one sheet of said paper can cost up to $20/80PLN). I was born in the city that I went to uni in, so there was no need for me to pay landlords or even buy my own food, but still, the materials were bonkers costly, so I decided to earn some money for them. It's really easy to become an extra, all you have to do is find an extra studio (Wrocław has two, I'm signed to ABM to this day), record a scene straight from a shit pseudo-documentary (ukryta prawda, Polacy wiedzą), which isn't published, it's just for them to see if you're ok for speaking roles. Then you sign a paper and they send you emails with movies or shows they need people for. It doesn't pay well, but it's ok if you just need a tiny, tiny bit of money.
My first show was Pierwsza Miłość, it was an episode about some guy getting spiked during a party? I never watched this series before and had no idea what was going on :) But turns out the medical people in Polish TV are actual medical pros and the equipment (like defibrillators) is 100% real! On my first shooting day it was freezing cold, around -8 C, but we could eat and drink everything that was on the tables during the fake party we were filming. I went for that show a few times, since they were making an entire season.
The main event of this job happened last autumn, when TVP (we hate TVP here I hate the government I hate homophobia I hate sexism <3 I want them dead) was filming a (kinda crap) historical drama Kordian. The source material is a classic of Polish romanticism, but they took it let's say liberally. I went because I like the book and it's a historical costume film. A few days before shooting, me and the other extras had to go to the main TV and radio building to get our costumes fitted. I had no idea who was about to play the important speaking roles, and when I found out I was literally shocked? Some of my mutuals know that I'm into Sienkiewicz's trilogy (a book series from the 1880s), which got adapted into movies when Poland was a communist country. I love the films a lot, the most known one is The Deluge (which happen to be the movie with the most historically accurate saber fight in film history), starring some of the most well known Polish actors of that time. And they were about to be in the movie I was in IN THE SAME SCENES? We had mr. Olbrychski (Kmicic), mr. Teleszyński (Boguś) and mr. Nowicki (Ketling z Pana Wołodyjowskiego). And Pazura but I found out he's an awful dude, and he didn't have a role in Trilogy movies, he's just famous. I got my makeup done right next to Pazura and I wanted to punch him in the face because of all the sexist stulejarz stuff he was saying <3
99 % of extra work is waiting, so we did that for like 7 hours (legit) and then played a few scenes by the Wrocław cathedral. It was brutal since I was in a historical outfit and heels on a renaissance pavement :/ I talked to some fellow extras, tbh it was slightly intimidating to be next to mr. Teleszyński, dude is like 2m tall and very, very proud and stoic. Mr. Olbrychski on the other hand is such a walking meme. He's like a million years old, yet I wish to be as fit as he is. Bro literally run off into the churchy distance because he was done with the film crew, smoked a cig and came back only because he was excited to see a horse he was about to ride. (he likes horses a lot and I think rescues horses on his own or somethin??) When he met the horse and befriended him (just a disclaimer, I know nothing abt horses), he got on it and escaped the set yet again, to have a ride around the cathedral. The street wasn't closed off so it was pretty funny watching pedestrians be like "o kurwa was that Olbrychski on a horse rn?". He played his role, it took two takes, his voice is as loud as a whole ass Rammstein live show, pyro included. Also he uses a flip phone from the 2000s. I got a picture with him. I was sitting on the pavement, scrolling on discord, while he just materialised out of thin air right in front of me and talked to some coffee people I believe? So I got up as quickly as I could and screamed CAN I SNAP A PIC into his unimpressed face. He just murmured "yea", and we got a photo. I have a pic with all the actors, but I'm an average young (1970s-1980s) Olbrychski enjoyer and my pinterst board is impressive. Mr Teleszyński I met maybe after 30 minutes of being on the set, as I said he was very stoic but much less done with everything.
I must admit, I expected these actors to be just kinda normal, but they're such unforgetable personalities! Can't say much about mr. Nowicki, because I didn't notice him in the makeup camper :)))) I didn't move my head much since I didn't wanna piss off the makeup artist, it was a different extra that told me we even were in one place together.
That was my last time on a set, but I'm willing to go back once or twice, if they do some other historical movies.
#asks#movie extra#trylogia#chyba#na moim ig thebreslanvampire jest wyróżniona relacja z filmowania Kordiana i są tam wszystkie foty
4 notes
·
View notes
Text
This post touched on physical media for drawing which is good but I want to add my ramblings about physical drawings as well because these days there's a lot of emphasis on drawing digitally, to the point where I think it's been an actual decade since I've come across a tutorial where someone has drawn things physically on paper....Like, don't underestimate the power of drawing on paper and learning to use physical media. Yeah it's not going to do anything in terms of your popularity 👀👀💧 but at the moment, you've also got an extra layer of protection between you and AI since the best physical art AI could probably do with current technology is something akin to "printing" out a picture with a writing utensil of some sort since mimicking real physical technique from photos of paintings or drawings is quite a bit harder than weighting pixels and outputting them into a file.
I'm also telling you this for corporate reasons. The way the world is going, there's going to come a day when there are no free programs for drawing, and certainly tablets and computers won't be free or cheap, and they're going to demand all your personal information to even boot up. You'll be locked into selling all your data and locking yourself into subscriptions just to have some artistic expression. Do you want that? Adobe and apple can do a lot but they can't fucking take away your paper and pencil. You should learn to use them if only to take back power from corporations. It's why even though I do use digital tools a lot for comic color because it's faster and I'm just one person, I still do almost everything else physically (ink/pencil/layouts/etc). I have a box the size of a large coffin with all the comic book pages I've drawn in my adult life, and the only way Adobe is getting their hands on them or removing my access to them is by banging down my front door or burning my house down.
Sure, technology makes our lives easier, but if you learn to use physical mediums, no one can ever take art away from you or keep you from creating it (at least not EASILY without some seriously oppressive changes) and it's going to be a very long time (maybe not even in our lifetimes) that the corporate ability to do so is finally nerfed.
And yeah you don't need fancy shit. I do all my rough sketching on printer paper with a mechanical pencil, or with a cheap ass sketch book I carry around. Especially if it's just for you practicing and no one is going to see it, you do not need fancy things. Your ancestors ground stuff up and dipped their hands in it and smacked a cave wall. This is your RIGHT to make shit by whatever means necessary whether you think it's instagram worthy or not. (I even outlined what you can use for animation from dollar tree if you're broke in a series of posts if that's a thing you want to do https://www.tumblr.com/featureenvyproductions/752966738522619904/my-thoughts-on-how-to-do-basically-kinda-cel?source=share)
And that's another thing too, don't worry if it sucks. I promise it doesn't, because you made something. And also even if you think it does because you're not meeting your goal or whatever, you have to shake the 10000 bad drawings out of your wrist before you get to the good stuff. Even someone like me who's been drawing [seriously anyway] for 25+ years has to warm up a bit before churning out something serious. Just do it I promise it's fine. (And also if you have the ability to take a figure drawing and/or life drawing class do that because in my experience it helps)
(Also not that I'm that great at art still compared to a lot of artists, I have been at it for a long long time, so if anyone who sees my stuff ever wants to know how I did something, please ask me, I will tell you free tips, I love info dumping, there is no such thing as a stupid question,,,,the greatest compliment is being asked how I did something,,,you do not understand,,,,to me democratizing art means ensuring YOU no matter who you are, can make some of it)
Can't afford art school?
After seeing post like this 👇

And this gem 👇
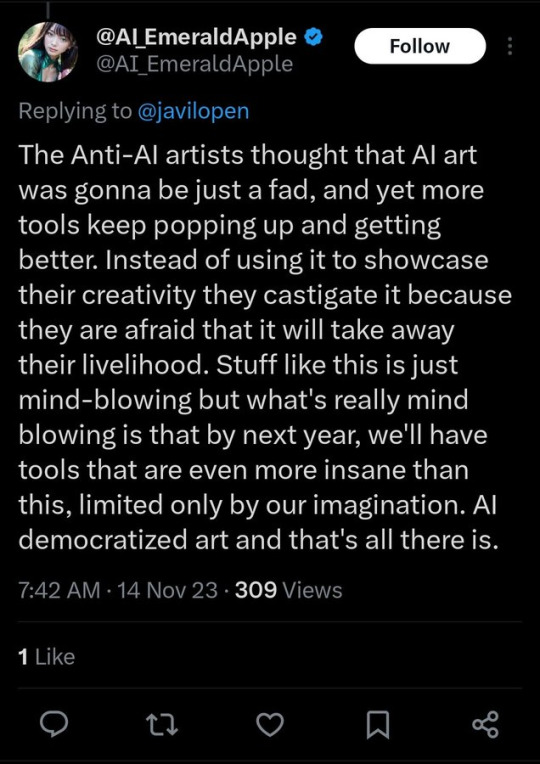
As well as countless of others from the AI generator community. Just talking about how "inaccessible art" is, I decided why not show how wrong these guys are while also helping anyone who actually wants to learn.
Here is the first one ART TEACHERS! There are plenty online and in places like youtube.
📺Here is my list:
Proko (Free)
Marc Brunet (Free but he does have other classes for a cheap price. Use to work for Blizzard)
Aaron Rutten (free)
BoroCG (free)
Jesse J. Jones (free, talks about animating)
Jesus Conde (free)
Mohammed Agbadi (free, he gives some advice in some videos and talks about art)
Ross Draws (free, he does have other classes for a good price)
SamDoesArts (free, gives good advice and critiques)
Drawfee Show (free, they do give some good advice and great inspiration)
The Art of Aaron Blaise ( useful tips for digital art and animation. Was an animator for Disney)
Bobby Chiu ( useful tips and interviews with artist who are in the industry or making a living as artist)
Second part BOOKS, I have collected some books that have helped me and might help others.
📚Here is my list:
The "how to draw manga" series produced by Graphic-sha. These are for manga artist but they give great advice and information.
"Creating characters with personality" by Tom Bancroft. A great book that can help not just people who draw cartoons but also realistic ones. As it helps you with facial ques and how to make a character interesting.
"Albinus on anatomy" by Robert Beverly Hale and Terence Coyle. Great book to help someone learn basic anatomy.
"Artistic Anatomy" by Dr. Paul Richer and Robert Beverly Hale. A good book if you want to go further in-depth with anatomy.
"Directing the story" by Francis Glebas. A good book if you want to Story board or make comics.
"Animal Anatomy for Artists" by Eliot Goldfinger. A good book for if you want to draw animals or creatures.
"Constructive Anatomy: with almost 500 illustrations" by George B. Bridgman. A great book to help you block out shadows in your figures and see them in a more 3 diamantine way.
"Dynamic Anatomy: Revised and expand" by Burne Hogarth. A book that shows how to block out shapes and easily understand what you are looking out. When it comes to human subjects.
"An Atlas of animal anatomy for artist" by W. Ellenberger and H. Dittrich and H. Baum. This is another good one for people who want to draw animals or creatures.
Etherington Brothers, they make books and have a free blog with art tips.
As for Supplies, I recommend starting out cheap, buying Pencils and art paper at dollar tree or 5 below. For digital art, I recommend not starting with a screen art drawing tablet as they are more expensive.
For the Best art Tablet I recommend either Xp-pen, Bamboo or Huion. Some can range from about 40$ to the thousands.
💻As for art programs here is a list of Free to pay.
Clip Studio paint ( you can choose to pay once or sub and get updates)
Procreate ( pay once for $9.99)
Blender (for 3D modules/sculpting, ect Free)
PaintTool SAI (pay but has a 31 day free trail)
Krita (Free)
mypaint (free)
FireAlpaca (free)
Libresprite (free, for pixel art)
Those are the ones I can recall.
So do with this information as you will but as you can tell there are ways to learn how to become an artist, without breaking the bank. The only thing that might be stopping YOU from using any of these things, is YOU.
I have made time to learn to draw and many artist have too. Either in-between working two jobs or taking care of your family and a job or regular school and chores. YOU just have to take the time or use some time management, it really doesn't take long to practice for like an hour or less. YOU also don't have to do it every day, just once or three times a week is fine.
Hope this was helpful and have a great day.
#also yeah watch drawfee#I just started going through all their YouTube videos and I love these people#This is exactly what art should be like#You know like they're really good artists and it's obvious and you can learn a LOT from even their goofy speed drawings#their technique is very good and they show drawing and colorization as an iterative process#but in a way I think anyone can comprehend#good technique but approachable#And they have fun with it and don't take themselves to seriously#If I was going to get someone to watch a drawing channel this would be it#To be honest it's not even that I give a supremely large fuck about AI art#What I care more about is corporations suffering#as in I love to watch them squirm#i am acespec but physically attracted to the feeling it gives me#when a corporate entity can't milk cash from something or get their grubby hands on things they have no right to#and you exercising your human right to make art without them makes them suffer#it's also better for the environment#this is an anti-capitalist/anarchist thing for me#this is why I will tell you art things if you ask
105K notes
·
View notes
Note
ALSO 1, 3, 5, 7, 14, 16, 27, 28, 30 for the artist asks? :)
1. Art programs you have but don't use
mmm krita and... well I have the entire adobe creative cloud at my disposal but I just. don't. honestly nowadays I've been doing a lot of my stuff traditional with just like. my sketchbook and my favorite pen but for digital I will use csp.
3. What ideas come from when you were little
...so I had this character. Merivette. right. she is like. the archetype for most of my focus characters for most of my stories and her original thing was that she was an scp doctor that did dimension fuckery (like 507) but then she just became like. idk she became part of the vivienne character archive mythos ig
5. Estimate of how much of your art you post online vs. the art you keep for yourself
OMYGOPD FUCKING. I'd say a good 70-80% I don't post ??? maybe upto 90-95% ??? that'll probs drop down to like. 35-50% if I start learning how to use insta but since I can't exactly work easily at fucking school I barely post stuff I would think looks good enough for my tumblr. ye I mentioned insta but that is specifically gonna be like. doodle dump
7. A medium of art you don't work in but appreciate
FIBER ARTS!! fiber arts, 3d modelling and traditional painting. god. what I would give to have skills and knowhow for 3d modelling. this is reminding me to get back into bookbinding and scrap booking sajosdf
14. Any favorite motifs
... stars. I mean obviously with my current brainrot being like. about the skies and the stars and the things beyond and b elow the earth of course stars. eyes too ig but like. kind of a given
16. Something you are good at but don't really have fun doing
landscapes and comics. comics I can't will myself to drawing something over and over and having to make it look decently polished. landscapes I just fret over the details too much. getting more used to comics and the likes specifically cause. yknow. I wanna make animatics
27. Do you warm up before getting to the good stuff? If so, what is it you draw to warm up with
OKAY SO I love just. doodling random shapes as warm up. and then also I will like. doodle a bunch of stuff related to said character on a separate page and maybe some small doodles of the character. specifically for the shapes I'll do different directions of hatching for them and in areas where shapes intersect I'll make it kinda like a cross hatching thing
28. Any art events you have participated in the past (like zines)
uhhh not really ? They're usually around the time I get burnt out or am buusy. like you know I tried artfight but that literally started around the same time as my school year. and then the school is also hosting a zine but they started it during fucking hell week so they extended the deadline but I do not have any full illustrations at the ready so maybe like. next year or maybe I rush something up idk
30. What piece of yours do you think is underrated
with all the art I am currently proud of rn I think just the character design refs that I have up for asotfs. you can see a change in how I draw in the ones I have but I like them. I do not post art often .w.
1 note
·
View note
Text
Introducing... The Tattooer!
[This version is OUTDATED! Please, check the new version here. I updated the workflow, skipping a lot of unnecessary Photoshop editing. It's way faster! I'll leave this old version and files up though, for archiving purposes. But yeah I still totally recommend you use the new version!]
Finally! I’ve been working on this for so long and I couldn’t wait to share it. This is a series of Blender template files already set up to quickly bake textures from The Sims 4 to The Sims 2. Really neat for cc creators! The different Blender files will allow you to:
-Bake body textures from TS4 to TS2 (Female) -Bake body textures from TS4 to TS2 (Male) -Bake body textures from TS4 (Female) to TS2 (Male) -Bake body textures from TS2 (Female) to TS2 (Male) [Bonus!] -Bake head textures from TS4 to TS2 (Face + Scalp) [Experimental]
Check the file names to see which one is which, and the resolution of the baked texture it will give. Download! SFS / GD
Everything you see in the render above was converted using those Blender files. I only did a couple tiny edits to the eyes and lips to fix them. These templates were made mainly to bake and convert tattoos, but there’s more you can do with them if you get creative. I have to say, these are NOT perfect. Check out the eyebrows on the render above. They look a bit wonky compared to the original, don’t they? I left them as is to keep your expectations with these as realistic as possible. Results may vary depending on what you are trying to convert, so! With that in mind, this is all the stuff you will be able to convert almost seamlessly from TS4 to TS2:
-Tattoos. -Other body details such as body hair, scars, freckles, supernatural/occult details… -Body painted underwear and swimwear, as well as some other clothing that’s mostly painted on the body. -Socks, stockings and maybe leggings. -Even skintones! In some areas they will look weird, so I recommend editing and blending them with other existing TS2 skins. -Makeup. Kinda bad but hey it works! Eyeliner and anything that is around the eyes looks terrible for now, but other stuff like blush may look just okay. -Eyebrows and maybe beards. A bit of hit or miss with those. -Hair scalps. Very useful when converting some hairs! Although keep in mind part of that texture might also need to be baked on the face mesh, you know, that hairline makeup stuff.
Got your attention? Nice! Editing some of the textures from TS4 to match the UV mapping in TS2 using a 2D editing program can be incredibly hard. That’s where texture baking in Blender comes to the rescue!
It is recommended you download Blender version 2.91.0, which is the one I use. Don’t worry, it’s free! There’s also 3 Photoshop actions you will need to set up the textures for baking and then putting them back together, because unfortunately Blender doesn’t support transparencies in that baking process, so that takes a couple extra steps to make it work, but I think it’s still pretty fast and easy. And just in case Tumblr manages to blow up or something, I decided to include a pdf with the upcoming tutorial that will guide you step by step with all this process, so if this post gets deleted somehow (I really hope not!), you will still have that pdf as a backup archived.
You can download Blender here. Personally I recommend picking the fourth option, “blender-2.91.0-windows64.zip”, which is a portable version and doesn’t need to be installed. You will also need Sims 4 Studio to extract the original Sims 4 CC textures you want. As for Photoshop… I’m not going to tell you to buy that subscription service and give Adobe some undeserved money, so… yeah, there might be some other options out there to get it (very legit, yes yes).
So, before we begin, let’s clear out some questions you might have. What the heck is this texture baking thing and what does it do? Well, let’s imagine you have a projector and point an image into a blank wall. Then you pick up some brushes and start painting and copying that projected image in that wall. Texture baking is kinda like that when it comes to 3D models. You align two models and match them as closely as you can in shape and form, and once you adjust some parameters and values, Blender does the rest for you: it will give you a new texture for a new model with a different UV map. These files I’m sharing have everything already set up, so it’s a matter of plopping in that Sims 4 texture and you will get that new texture for TS2 in just a few clicks.
This tutorial assumes you know literally nothing about how to use Blender, so if you feel uncomfortable with it, worry no more! This will guide you with pictures showing where you need to click and explaining what is happening. For Sims 4 Studio and Photoshop the process might be a bit less detailed, but still this should be pretty beginner friendly. For this tutorial, I will use some tattoos as an example. Alright, enough with the rambling. Let’s get started!
·EXTRACTING TEXTURES AND EDITING THEM WITH PHOTOSHOP: First things first, you will need to extract as pngs all the textures you want to convert from TS4 using Sims 4 Studio. Once you’ve done that, open them up one by one in Photoshop and run the “No transparency” action. This will remove the alpha channel from the image, getting rid of all the transparency. Go ahead and save a png copy of it. Then run the “Make Alpha” action on those same swatches (from the beginning, make sure you’re not running the action on an already edited swatch!), which will only show the alpha channel of the image in black and white, and save another copy of that. You should have 2 textures for each tattoo swatch. For the “No transparency” action I like to name it BASE (And your swatch number or name), and for the “Make Alpha” action I usually name it ALPHA (And that same swatch number/name). I recommend saving them in different folders named BASE TS4 and ALPHA TS4 respectively to keep it organized. If you want to make this much faster in Photoshop, there’s an automation option in it that allows you to run an action through a batch of files in a folder and then saves it all. I won’t cover how to do it in this tutorial, but you should be able to find it easily on Google by searching something like “Photoshop automate batch”. It’s really powerful and will make your workflow with actions much faster. Definitely recommend learning about that!
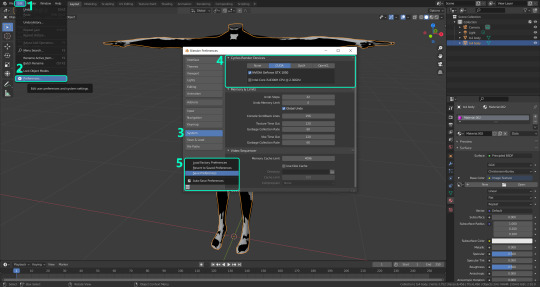
·BAKING THE TEXTURES IN BLENDER: PRELIMINARY STEP 1: CONFIGURING BLENDER’S GRAPHICS SETTINGS: Open your preferred Blender file depending on what you’re going to bake and the desired resolution (in this example I’m going to use the AF-body-4t2-1024 file). Before we start messing around in Blender, there’s one thing you should set up. It is a onetime step, and once it’s done, you won’t need to do it again. So, does your computer have a dedicated graphics card? If you don’t know or you’re not sure, just skip to the next step. Configuring Blender so it uses your graphics card instead of your CPU will make the baking render much faster, so it is recommended you set it correctly. If your computer has a dedicated graphics card, click File (1) > Preferences (2) > and on the window that pops up click System (3) > and select CUDA and make sure your graphics card is there and tick it (4). I have an Nvidia Graphics card but your case may vary. Once you’re done, click on the tiny button on the bottom left corner and Save Preferences (5).
PRELIMINARY STEP 2: CHOOSING THE RENDERING DEVICE: Click on the tiny camera button on the right, called Render Properties (1), and on Device (2) select GPU Compute if it’s not already selected. If you’re not sure if you have a graphics card or not, just select CPU. Then select the Material Properties tab (2) and Save your changes, either by pressing Ctrl + S, or clicking File (4) > Save (5). Okay, time to get into the good stuff!
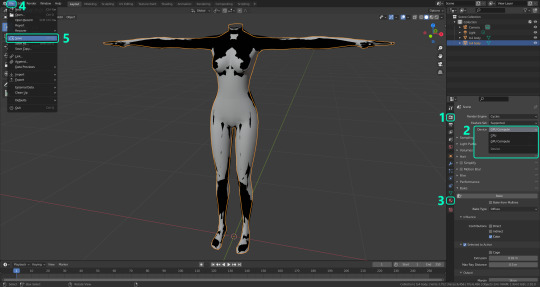
·STEP 1: LOADING YOUR TS4 BASE TEXTURE: In the Material Properties tab, click the folder icon that says Open (1) and on the window that pops up, navigate through your folders and select your first texture. For now we’re going to bake the BASE texture, so go to that folder where you saved the edited “No transparency” image. To navigate easily, the 3 buttons on the top right (2) are for the display mode. They will show your files in list mode, vertical and horizontal, and the one on the right will display the file thumbnails, pretty useful if you want to easily see your images. And the icons on the left side (3) will let you go one folder back and forward, go to the parent directory, and refresh the folder in case you just dropped something new in there. Double click on the image you need and that will load it into the Sims 4 body model, named “ts4 body”.
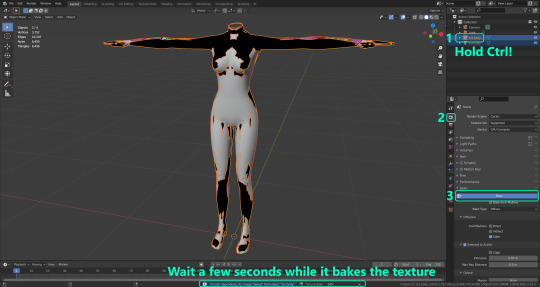
·STEP 2: SETTING UP YOUR SELECTION AND BAKING THE TEXTURE: On the top right of the screen, you will see the names of the 2 models in the scene. Hold the Ctrl key in your keyboard and left click on the “ts2 body” model (1). If you did it correctly, you should see “ts2 body” in a yellowish orange color, and right down below, “ts4 body” should look more like a red orange. If not, try again by clicking first on ts4 body, and then while holding Ctrl click again on ts2 body. Then switch to the Render Properties tab by clicking the tiny camera icon (2) and click Bake (3). Depending on your screen resolution, you might need to scroll down a bit with your mouse to see the Bake button. Wait a few seconds for it to finish. You will see the progress percentage down on the bottom of your screen. Don’t panic if you notice your computer fans start ramping up, that’s completely normal! As I said in the beginning, using your GPU will bake the textures much faster than the CPU.
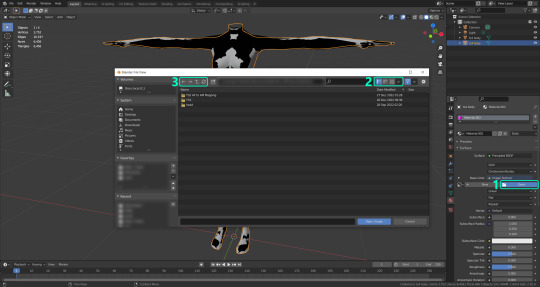
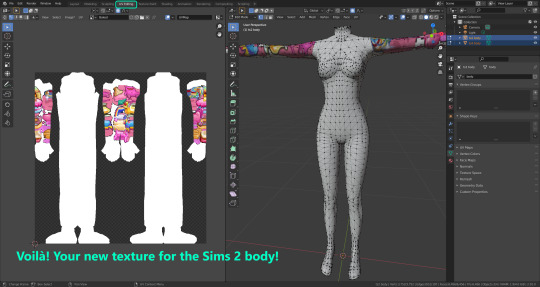
·STEP 3: SAVING YOUR NEW TS2 TEXTURE: Once it’s finished, switch to the UV Editing Mode by clicking “UV Editing” on the top of your screen. And there it is: your new texture! You might have to scroll up your mouse wheel a bit to zoom in and see it in all its glory on the left side of the screen. We’re still not done yet though. You need to save it to yet another new folder (always try to keep your stuff organized!).
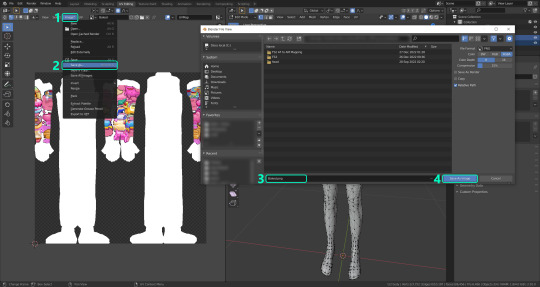
You can save it by pressing Shift + Alt + S, or clicking on Image* (1) and then Save As… (2). That will pop a window where you’ll need to navigate again and save it somewhere. Give it a proper name (3) and hit Enter to save it… well, Enter doesn’t always work for me for some reason, so if that happens just click Save As Image (4). In this case, I personally like to call it something like “BASE TS2”.
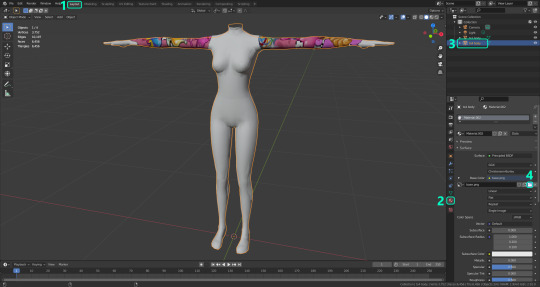
·STEP 4: GOING BACK TO STEP 1: Alright! So you have your new baked base texture, but we still need to bake the alpha channel to give it its transparency. In order to go back to step 1 and start the process once again, click Layout (1), go back to the Material Properties tab (2), select “ts4 body” (3) and click on the folder icon (4) to open and load the alpha texture you did in the beginning in Photoshop.
Then it’s just a matter of repeating the process from step 2: bake the alpha channel and save it again as a new image (watch out, don’t overwrite your previous image!). This one I like to name “ALPHA TS2”. When you’re ready to move on, close Blender without saving. If you see a small check telling you it will save some images, make sure you uncheck it, so you will be able to use it again in the future from the starting point with no issues. I don’t think it really matters if you accidentally save your progress in these files, but I like to keep it clean and fresh so I can do the process where I left it from the beginning the next time I open it. And in case you mess up and save somewhere, you can always just delete the .blend file and download the template files again.
·FINAL STEP: PUTTING EVERYTHING BACK TOGETHER IN PHOTOSHOP: We’re almost done! Open Photoshop and drop in both your 2 new baked textures, “BASE TS2” and “ALPHA TS2”. Keep both layers on top of each other and aligned. For that you can enable the snapping in View > Snap to… > All. Rename these layers so the Alpha layer is “ALPHA” and the Base is “BASE”, and make sure ALPHA is on top.
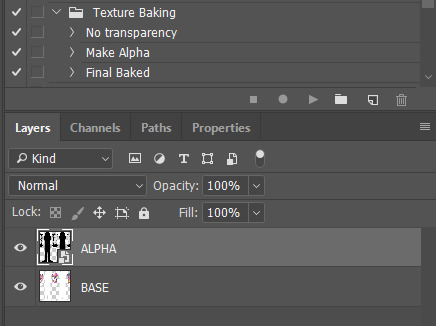
Then run the “Final Baked” action and now for real, it’s finally over! You just fully baked and converted these new textures. Congratulations!
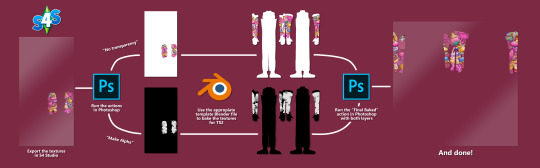
So, to summarize, here’s a small guide with all the steps of the workflow I developed. Once you get the hang of it, baking and converting one swatch of a texture just takes a couple minutes. It really is that easy!
One small note though, some of the baking blend files save the textures with a resolution of 2048x2048 pixels, as clearly stated at the end of their file name. That’s way too overkill, because TS2 only properly supports up to 1024x1024 for most of its textures and you should always resize your final product to that max resolution. I just made those 2048 versions because there might be some really tiny and slim details on some tattoos that may look a little too blurry when baked into a 1024 resolution, so for those cases use that if you want and then resize them in Photoshop. In the Resample mode of the Image Size menu, there are a few options to choose. For the fine details, I like the Nearest Neighbor (hard edges) option, which, even if it looks a bit pixelated, it still preserves most of the texture and quality.

For anything else, I would just directly bake them using the 1024 versions in Blender.
And for the folks who feel comfortable playing around in Blender, this is just the beginning! Texture baking opens a LOT of possibilities, so feel free to move stuff around and edit the models to your liking! If you notice the baked textures look warped or stretched somewhere, or don’t like where some textures are placed in the S2 body, poke around that area moving stuff and then give it another try. The main objective of the baking process is keeping both overlapping models as close in shape as possible. You may also edit and save new copies of the templates, or make new ones from scratch using mine as a reference (keep a close look on those Baking settings and values, I think they work pretty well) and share them if you want to. Go ham, do whatever you want with them! I have plans on making templates to convert body textures from Sims 3 to Sims 2, but for now it’s not on my priorities, so we’ll see when that happens.
Whew! Hope none of this was too confusing. Need help or have any issues with these? Please ask/message me and I’ll be glad to help when I’m able to!
Credits for the CC used in the render demonstration: -Skin by Sims3Melancholic -Eyes by Northern Siberia Winds -Eyebrows by PeachyFaerie -Tattoos by xtc -Top by SerenityCC
And the Tattoo I used for the tutorial can be found here, by ValhallanSim
Last but not least, a huge, special thanks to @elvisgrace for all her help testing this for me. I’ve never shared Blender files, so hopefully everything works as intended and everyone can use them with no weird issues. Fingers crossed! And thank you for reading! Hope you have fun playing with this new toy hehe.
#ts2 tutorial#ts2 resources#ts2 blender#ts2 overlays#ts2 texture baking#4t2 conversion tutorial#i swear blender is the coolest thing ever#yes you can consider this post as blender propaganda
319 notes
·
View notes
Text
i was gonna draw tonight but i dropped my tablet pen and the barrel of the pen broke off and flew somewhere underneath (??) my bed (?) and now i cant find it so I’m just gonna answer asks before bed instead. just some art asks and more mentions of infinity train LOL
What program and brushes do you use when making your art?
@ravki hi! part of this is in my FAQ but i’ll say it again anyways LOL: I use photoshop CC and have used photoshop for pretty much....my whole art career. I’ve dabbled in clip and paint tool sai in the past but photoshop is my true wife, we eloped away from her awful father adobe many years ago and are very happy together.
as for brushes... I should prob put this info in my FAQ too lol,... my default brush set is actually free to download here! Tho I will say I also use steve ahn’s storyboarding brush sometimes and lately i’ve been using shiyoon kim’s brushes A TON. Shiyoon’s cost a couple bucks but they’re super worth it imo
How do you choose colors?
This is kind of a difficult one to describe from scratch but hmm.... I’ll put it this way. Generally when I go into coloring or painting something I already have some colors in mind. Like for a certain piece I know I want a bright green, or a magenta, or a dark blue in certain areas. A lot of the time I know a mood I want. So I’ll start with that core color tone and build around it. I’ll use an example from a recent piece
So you can see here that the first color I accessed was that bright cyan. So I start with that bright cyan and then bring in its “friends” in the form of analogous colors (shown below on the far left)

greens greys etc. THEN I know I want the characters to stand out against all the blue so I start laying down warm contrasting colors for them (middle group). the mat under them is orange, skin tones are warm, ryans flannel is red etc. then to get them to work together I work more cool colors into the shadows and slightly warmer (not too warm because its a cool img overall so in this case, greener LOL) colors into highlights.
hope that makes sense? for me choosing colors is a lot about story and composition. If you know what you want to say, the mood you want to create, where you want to go, the path to get there becomes a lot clearer imo.
Have you ever considered making an art book?
I have! But I don’t think I currently have enough...original illustrations for one LOL? Not that an art book has to be all original work but if I were putting fanart in an art book...at that point I’d just make a fanzine. I’m making more original work lately though so maybe this year....? Who knows. For now, I do have a sketchbook up on gumroad. Hoping to do one of those next year too.
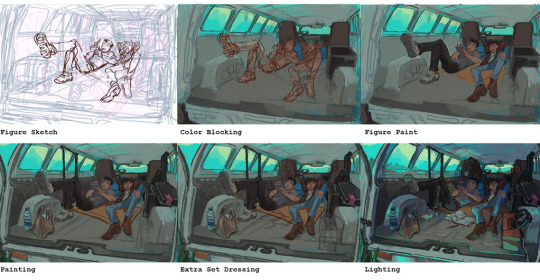
Any tips for keeping background drawings from getting super stiff, especially since things like interiors have a lot of straight lines?
This is a really interesting ask. Really great question that I don’t think gets asked enough - forgive me if I get a bit art school here but I drew up some examples.
First I think we have to investigate the assumption that straight lines make things stiff. That seems true on an instinctual level and certainly proves to be true very often But I don’t think its actually the straight lines themselves but the sort of arrangements and compositions they tend to dictate. Take this for instance.
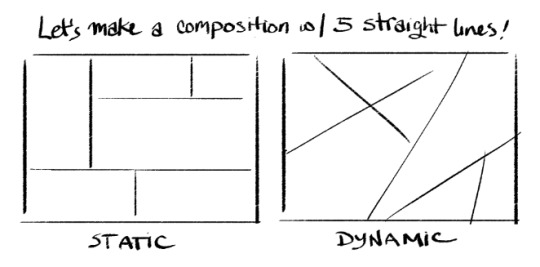
pretty big difference, right? there’s a couple things that make a composition feel stiff and one of the most significant is lines that are perpendicular and parallel to the frame. it feels locked in and solid, like bricks. but the moment you shift these angles even a little the composition instantly becomes more dynamic because our innate senses of weight, gravity, and directionality can sense movement.
But it’s not just diagonals let’s take this one step further
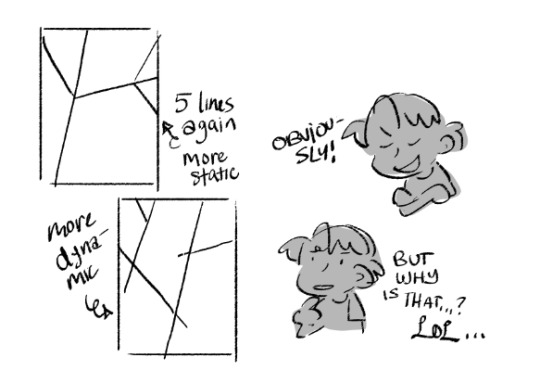
when lines meet and terminate together those tangents can flatten and lock space so the best way to solve this is with overlap and complete intersection, forms continuing past or behind each other feel more layered and less like a flat mosaic... again, even in the simplest line drawings. So how do we apply this to a background?
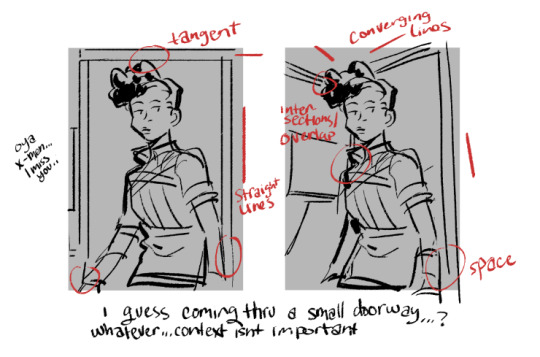
ok I drew this really fast so its potentially not the best example but I think the idea is there. This space isn’t even particularly deep, it’s basically a room, a doorway, and a hallway behind it, and we’re not seeing that much of any of those things LOL. but when you draw an environmental object like a doorway in a way that lines up with the perpendicular and parallel lines of the canvas you’re automatically flattening it and making it look rigid.
and when you create tangents with objects and characters you flatten the space around them and make it difficult to tell what is actually in front or behind or if they’re on the same plane.
GOD I HOPE THIS MAKES SENSE. Anyways. avoid those things and you’ll instantly have less stiff bgs no matter what kind of bg you’re depicting.
I wanna mention however that this isn’t to say a stiff bg with flat space doesn’t have its purposes.

sometimes you want to create parallels and tangents. it can make characters feel closed in, trapped, regimented, part of a routine, etc. it’s also great for making a composition look ornamental (especially combined with symmetry).
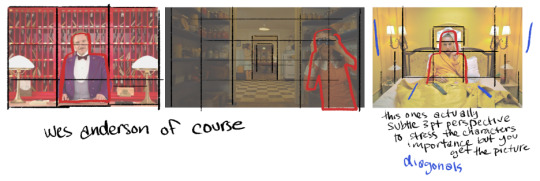
directors like wes anderson can even use these compositional elements to make images feel uncanny or harrowing! its very versatile. I think the important thing is to just be aware of when you are making something rigid and when that’s the last thing you want to do. conscious choices.
Can you speak Tagalog?
@lemuelzero101 I can! BUT NOT VERY WELL LOL ;;; both my parents are from Visayas! but they met and had me in the states lol so I’m pretty American born and raised. We go back to visit family on occasion but not regularly. My tagalog is mostly absorbed from listening to relatives at parties lol and my parents speak bisaya at home so I’m marginally better at that. Sorry to any filipinos out there hoping I’d be better educated, I’m like a little baby...
I do love meeting and talking to other filipinos online though, I grew up in an area that was relatively diverse but the asian population was small and the filipino population basically non-existent. I was like one of maybe 2 filipino kids in my highschool of 2000.
Apart from infinity train what shows are you watching now? Have you seen jujitsu kaisen?
Man this is gonna sound so boring but I haven’t watched a lot of tv lately. It’s not really part of my daily routine. Let’s see... I was sort of watching Amphibia, Craig of the Creek, and the new Digimon Adventure 2020 but I keep falling off watching those for one reason or another. Also there’s a lot of episodes, it doesn’t feel like something I can just binge and be done with.
The last thing I binged was Succession. I want that show and Euphoria back so bad, when I’m done forcing all my friends to watch Infinity Train im cancelling my HBO subscription until Succession and Euphoria return so they know exactly what I’m on their list for LOL.
I have not watched jujitsu kaisen but I’ve kept up with some of the sakuga news (I keep up with anime industry news and production info like x5 the amt i keep up with actual anime) for it and their compositing/editing looks dope. I’ve read the manga actually LOL or at least part of the beginning. I wasn’t super keen on the whole finger eating thing. Also to be honest I kinda feel like its the new Bleach and I never particularly cared about Bleach. Characters look nice enough tho. I wholeheartedly support jjk fans.
Thank you! Thank you @keznodzieja! <3
And thank you anons who don’t watch infinity train LOL...it’s always nice to hear when people enjoy my fanart despite not knowing the source material because it lifts a little bit of the “oh god am I being annoying???” fear off my chest. But also I think you should watch infinity train because it’s really good I have no reservations recommending it.
231 notes
·
View notes
Note
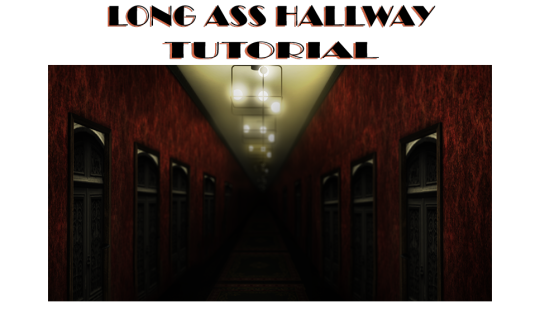
hey bestie quick question how the FUCK did you make that hallway look like it goes on forever please and thank you
Firstly this is the only way i will ever accept small tutorial/explanation requests from now on secondly it's actually easier than you'd think, bestie. This can be done in pretty much any editing program that you can layer in but i will be using photoshop 2021 (because adobe updated without me knowing) but that's besides the point
{Tutorial under the read more}
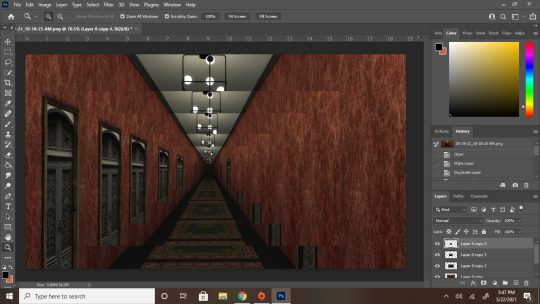
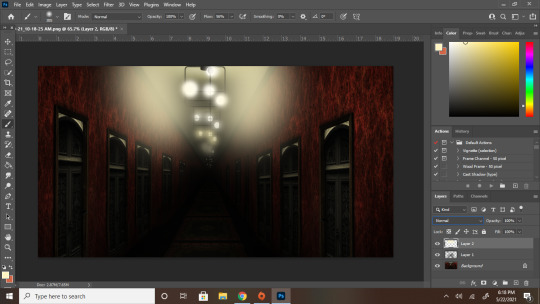
Alright step one: Make your hallway
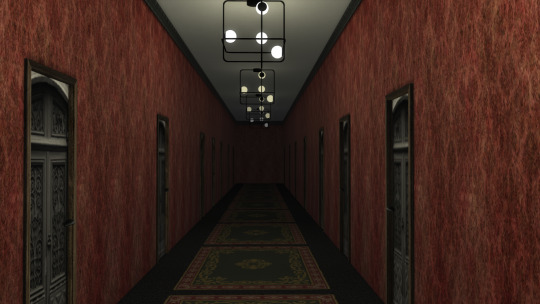
Still kinda long, but nothing dramatic as this was done on a small lot in a basement...but i digress. When adding lights make sure the farther the light is from the "camera" the darker you have the light set too. Like in mine the first light is about half of warm white, and after that it is a third, then a quarter, then a little bit higher than nothing, while the last one is off. Add doors to get some more depth, and space them out a little better than i did if you want the door vibe. But if not, then just make a long and narrow hallway and [IMPORTANT] Make sure you get a SOLID V SHAPE FOR THE CIELING AND FLOOR! This is what makes it feel like it goes on and on and on...
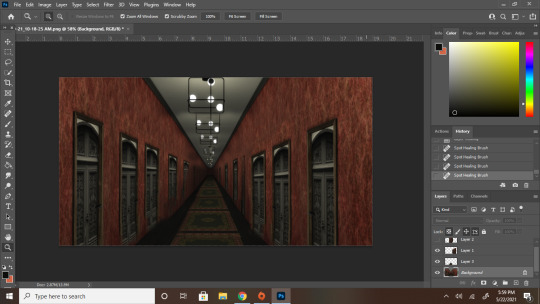
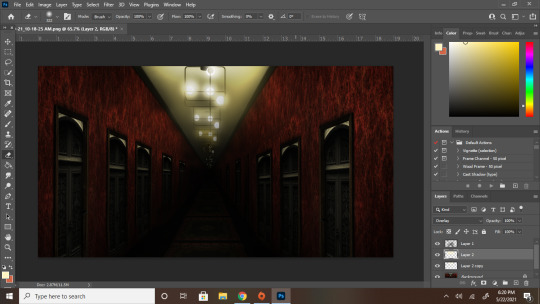
Step two: Take it into your editing app of choice and make it a layer.
Then duplicate that layer 2 or more times. With each layer, make the picture smaller and smaller. Make a very solid effort to line up the Vs of the ceiling and floor (but if the floor doesn't quite line up then just focus on the cieling as that will be what really sells it)
In this example, i had 5 layers. You can see where the next picture begins by the banding of the lights. You can kinda see what I meant about the floor thing hear
Step three: BLEND FOR YOUR LIFE
This part involves a LOT of erasing and little spots of correction as you go. Focus on blending the walls the most. Although the cieling and the center point are what really sells it, the whole wall give it away because that's what makes if very obvious that this is just a screenshot you made gradually smaller and smaller. What i've done in mine, because i like making things easier on myself, was i just copied one side and mirrored it with the other. And for the floor i just copied the bit with the smooth lines and made them bigger.
Now you're probably looking at this and thinking "Hey bestie...that looks a bit crap still" And you'd be right because i'm rushing and also have like 5 more steps HOWEVER if you're keeping the hallway fairly well lit then this would be your final step and you'd clean all the obvious flaws way more. But to me the fun part is always the mood lighting
Step four: LIGHTING
Merge your layers together (If you trust yourself like that. If not then merge everything into a folder if possible and do everything else I'm about to say on adjustment layers.
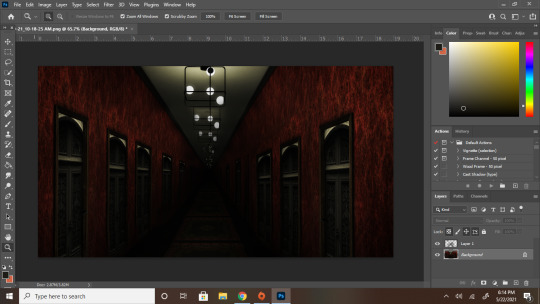
4a: Brightness and contrast make it a bit more moody and darker so the flaws become a little less noticeable. After this i also used curves to make it a little darker and the red richer. But that was more of a me thing than a necessity so i didn't capture that part

4b. Now make a new layer and go HAM on the shadows with a soft brush with zero hardness. Imagine an X where it is the darkest where the cieling and floor Vs connect while the ones along the wall are a little lighter. After make that X go into Filter > Blur Gallery > Field blur and mess with the settings of the shadow layer until you feel its as harsh/soft as you want your shadows to be, I personally went for 103 while my shadow layer was at 83% opacity
Before blurring
After blurring
She a little smoother now and is coming along nicely YOU'RE PRETTY MUCH DONE!
4c. High lights! Follow the lines of where the little lights are and blast them with some light yellows or full white depending on how heavy you want the lighting to look IN A NEW LAYER. Once you're done with that layer, change your normal setting to overlay and blur it to your hearts content as stated with the shadows. You usually won't need to blue highlights as much as you need to blur out shadows. For example I only blurred mine to a 25 px for the lights as opposed to the 103 for the shadows
Highlights in normal layer
Highlights in overlay and blurred
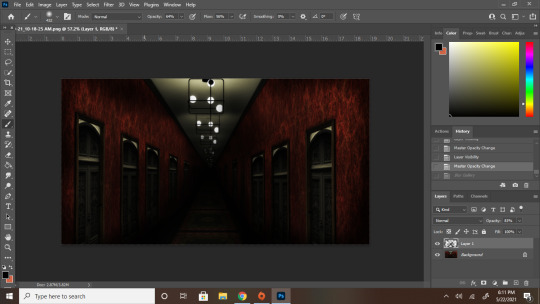
Step 5: The final touch, Depth of field
To get the deep look for this i'd reccomend going into blur gallery one more time and creating a t with your blur points and each 2 less than the last. For example, in my the center point was 6 px blurred. The four points around that were 4, then 2, and then 0
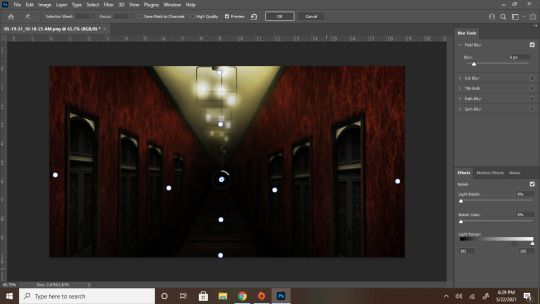
And YOU ARE ALL SET! After all of that your deep and spooky hallway is complete! Now go forth and cause chaos, bestie
#ts4#simblr#ts4 edit#ts4 tutorial#tutorial#ps tutorial#hall posts#hall tries to edit#i know i said i had another post to edit and yeah i still absolutely do but i wanted to make this first so i went back and reedited#the hallway so it looks...better#better for the tutorial at least#hall tries to help
56 notes
·
View notes
Text
Take a Break, Dumbass
A few days ago I was literally crying over an Adobe program for class, and was talking to my friend about it. And all I could think about was how much I needed someone to just hold me and tell me it’s okay. And if you know Adobe programs then you know learning them is kinda hard.
So now that I’m kinda over that, I wanted to write about it~ This will be more self indulgent, and what I kinda do when I study.
[Pro-Hero Bakugo Katsuki]
----------------
You didn’t know what to do anymore. You had tried to figure out the stupid program for the last hour and to no avail- you still didn’t know what you were doing wrong. You had rewatched the tutorial your teacher had sent over five times in one sitting- it was hopeless.
You had taken multiple 5 minute breaks just trying to calm yourself down, but nothing helped. Sitting in you old desk chair, you put your hands over your face and tried to calm down once more so you could try to attempt it once more.
“It’s only 2, almost 3 in the morning. I can do this and still be able to get some sleep before I have to do any more assignments.” You mumbled, rubbing your hands over your face once more before setting your timer and getting back to work. Putting your headphones on, you began to focus once more.
*
Bakugo had just gotten off work, having been caught up with an annoying villain until early in the morning. He was annoyed, hungry, tired, and just mentally drained. He couldn’t wait to get home and wrap his arms around you.
His glare was a lot rougher than what it normally would be, but the people at his agency and the still opened shop owners knew that he didn’t mean it. Well, at least not all of it. Taking his phone from his jean pocket, he looked to see that it was close to 3 in the morning. Sighing, he returned his phone to where it was before starting his short walk home.
“That dumbass better be asleep.”
*
Closing your eyes and reseting your head on the back of your chair, you sighed heavily as tears began to fill your eyes.
Why couldn’t you get this right?
You had done everything that they did. Pausing after each step to make sure you were doing it right, even rewinding to make sure you were.
So what were you doing wrong?!
Breathing in a shaky breath, you reopened your eyes and started to dab around your eyes with your hands. Not really wanting your sleeves, or more accurately Bakugo’s sleeves, wet.
“Why can’t anything go right.”
“What are you doing, dumbass?” You jumped at the sound of his voice, knowing instantly who it was due to the name he called you. You tried to hide your sniffles and wiped the remaining tears away.
“Oh... hey, Tsuki.” Your voice was quiet, trying to keep it even. But you went to school with him, he knew you were hiding something- having spent hours with him, not only trying to help him with his costume but also as friends and lovers.
“What’s wrong?”
“Nothing’s wrong,” you were quick to counter knowing that he was up past him bed time and tired. His glare only worsened as he stepped closer to, gripping the back of the chair.
“Tell me.” You sniffled again and yelped when he suddenly turned the chair to face him. Him instantly trapping you between him and the chair. “See, your eyes are red and puffy- so what’s wrong?” That one question, and his soft eyes made the tears come back to your eyes. You lunged at him, him barely have time to catch you before you started to sob into his chest.
He only let you cry into his chest, rubbing you back until you started to calm down.
“Can you tell me what’s wrong now?”
“I’m sorry.” Bakugo raised a brow.
“What are you sorry for? You haven’t even said anything yet.” You shook your head as you wrapped your arms around him, pushing your head into his chest. You mumbled something into his chest, but it was to incoherent for Bakugo to understand. He gentle pushed your head away from his chest and forced you to look up at him.
“What to repeat that, Princess?” You blushed at the pet name.
“It’s a stupid reason.”
“If you’re crying over it then it’s probably not stupid.”
“I just can’t get the hang of this assignment- this program- I’ve been trying to do this for the past hour.” You glanced back at your desk, the glowing screen mocking you as the program played your project over and over. You heard Bakugo sigh and began waddling over to your bed.
“What are you doing?”
“You need sleep, and so do I.”
“But-”
“No buts.” You both plopped on the bed. You landing on top on Bakugo before he turned you both to the side so you were facing him. “You can’t over work yourself or else you can’t get anything done.” He said, his eyes closed as he pulled you a bit closer. You remember saying those exact words to Bakugo himself when he was stressing about final exams in your third year.
You smiled at him and hugged him tighter, burying you face into his chest again. You mumbled a quick “I love you.” before you felt sleep over come you. Bakugo smiled before kissing the top of your head and saying those three words back to you.
“I love you too, dumbass.” And of course, he had to add his own personal touch to the saying.
87 notes
·
View notes
Text
“Should I use InDesign to lay out my books?” - A Passionate Guide
Ok, if you are like me, you recently stumbled upon @armoredsuperheavy‘s brilliant blog about bookbinding and fanfiction, and now you are excited to throw yourself head-first into bookbinding.
This also means that you are about to invest a fair amount of time into figuring out how exactly to lay out books. What you end up getting comfortable with will most likely be what you end up using long term, so it is worthwhile giving it some thought. The question really comes down to this: who's name will you be cursing for the foreseeable future? Adobe? Or Microsoft?
Full disclosure: I only started using InDesign because I was forced to. I worked as an editor at a newspaper, and that was what we used. The beginning was hell. I won’t sugar coat it, it sucks. In the end it was worth it. Once you figure it out, InDesign’s potential far outstrips Microsoft Word (in my opinion).
That encouragement means very little when you open this treacherous program for the first time and see THIS:
“What?! I will literally give you $100 if you guess what all the buttons on the left are for. How the fuck do I make the margins disappear!?”
So, if using InDesign means figuring out what at least one third of the tools on the left are for, lets talk pros and cons.
Let’s get the cons out of the way.
It is expensive. Adobe is not fucking around. This puppy costs 20 bucks a month (Canadian) to RENT. If this is out of your price range, do you still have options? Yes. Do they range in legality? Also yes. I think I could potentially get in trouble for telling you to find your friendly neighborhood torrenting site and steal this software. I will say, outright, that no one should steal software ever. Got it? I would be very upset if someone were to message me for specifics. As you naturally wish to be law-abiding, there is also the quasi-legal option of repeating the 14-day free trial. My friend works at a professional print studio in Russia, and this is the tactic they use: every 14 days they uninstall all of the software from all of the computers, and reinstall it with a new trial. Every 14 days! At a professional operation! My friend hates working there.
It is not initially intuitive. I’ve covered this, but it bears repeating because it is a serious hurdle. Keep in mind, that with time, InDesign becomes more helpful than other software. Now when I use Word I find myself reaching for keyboard shortcuts automatically, and feeling bereft at the lack of my favorite tools. Nonetheless, expect a time commitment up front learning how to harness this glorious and confusing computer program.
It can run kinda slowly, depending on your computer. Up until two months ago, I had the world’s most precarious laptop. I bought it for $200 in 2015. It once took half an hour to restart. Inexplicably, when it got stressed, it would switch to Spanish. It was literally and figuratively falling apart. And yet, it ran InDesign. Granted, it worked slowly. If I asked it to process too many images at once it would panic (again with the Spanish), but for the most part, it worked. If you have a slow computer and are patient, then InDesign will probably work fine on your computer. If you are not willing to suffer, stick to Word.
You will also need Photoshop (sometimes). Part of what makes InDesign glorious is that it is professional software that is designed specifically to work with print and anything text-heavy. I love that about it. It even manages to do some handy things with images! But, inevitably, you will need to learn some Photoshop to punch up your graphics. I have, admittedly, only learned the bare minimum Photoshop in order to feed my InDesign addiction. It was a pain in the butt. For example, inexplicably, Adobe has not standardized keyboard shortcuts across the suite. As with InDesign, now that I’ve learned the tricks, I adore it. But you should go into this knowing that with Adobe, the fun never ends.
Printing signatures is the WORST. Adobe, please explain to me, in front of God and everyone, why the hell you would make this software specifically for laying out books etc. and not include a method of printing signatures?! I’m livid. This is absolutely where Word wins the day. It is almost worth using Word just to print the signatures so nicely and easily. I’m not kidding. Me—a person who has used InDesign professionally—almost wanted to switch software entirely just because of this. Hands down, InDesign’s biggest goof. Despite this crime against bookbinders everywhere, you have options. You can export your design to a PDF and literally print each signature separately (I am fucking livid) or you can complain enough to your friends that they offer to buy you a lovely program called BookletCreator for your birthday. It costs $20 bucks USD and it was worth every penny. However, Adobe, FOR THE AMOUNT THAT YOU CHARGE FOR YOUR PROGRAM, I SHOULD NOT HAVE TO PURCHASE ANY ADDITIONAL SOFTWARE IN ORDER TO PRINT MY BOOK. Did I mention that I am livid?!
But InDesign must be worth something, right?! Otherwise why would I be writing a long post encouraging people to use it? Let’s talk pros:
The horsepower on this baby will blow your mind. Forget what I just said about printing signatures; imagine using software that was literally made for this. You wanna do a thing? InDesign has got you. Are you a perfectionist? This software was designed by people as pedantic and obsessive as yourself. It gets you. Dream it, google how to do it, and InDesign will deliver. This is really the main reason to use InDesign; it is the professional standard for a reason.
There are so SO many resources available to help you learn. Almost everything I’ve learned about InDesign I learned from Google or YouTube. Honestly, if you have a question, I promise that other people have already asked and answered it. The advantage is that because this software is specifically for laying out books, there is lots of information available specifically about how to do what you want to do. (This may also be true for Word, but I’ll be honest, I only used Word for a book layout once, so I can’t say for certain either way.)
Once you figure it out, InDesign will give you back hours of your life. Things like master page spreads, clipping paths, tint, the eyedropper tool, and the one-hundred-percent adjustable text are just... lifesavers. My experience with Word is limited, so my frustration using it was probably due to my own ineptitude, but honestly, when putting together my thesis, the tears I cried trying to get page numbers to format correctly were some of the most bitter text-related tears I have ever shed. I can take care of the whole operation in InDesign in a matter of minutes. Hours. Of. My. Life. Saved.
This is an actual marketable skill. Ok, bear with me here. I have used InDesign for every single job I have had since I worked at the newspaper. That includes working as a bookkeeper and a kindergarten teacher. Hell, I even made my resume to get those jobs in InDesign. There is no job that I forsee in my future that doesn’t include some form of text-based design. Even when my work has absolutely nothing to do with layout (see: kindergarten teacher) I still found some way to use it. My previous boss was actually so thrilled about my InDesign skills that she had me run a 101 seminar for the other employees. (Did any of them end up using it? I suspect not. Did they look at me strangely for being so enthusiastic about design software? Absolutely.) I’ve even managed to use InDesign to branch out from freelance editing to take on design projects as well. In short: if you learn how to use InDesign, put in on your resume. You will be surprised at how much mileage you get out of it.
With Adobe, the fun never ends. I know I joked about it before, but really, I love seeing what this program has in store for me next. For example, thanks to bookbinding, I discovered that InDesign will do a lot of things that I had previously assumed were the domain of Word, such as spell check. I literally stumbled onto a measuring tool today that I wish existed irl to help me glue my covers together. Part of the beauty of this software being so intricate is that there is always something new you can do. I love learning how to harness a new feature, and then watch my design improve over time. Using this program you really get the feeling that the sky is the limit. Look, just the fact that I’ve now resorted to saccharine platitudes about computer software tells you that InDesign is remarkable. Considering that this program has made me suffer so significantly, I have either seen the face of God, or I have Stockholm syndrome. Take your pick.
TL;DR, at long last:
How complicated would you like to go? Either way, for bookbinding you’ve got to learn to use software in a new way.
Do you just want to get your book laid out reliably with little fuss? Word is for you! Are you interested in delving into the details? Do you have the patience of a saint? Try InDesign!
Both work. Both are good. But you can pry InDesign from my cold dead hands because I adore it.
#Honestly#No shame towards Word or anyone that uses it seriously#Like I said I have little experience actually using it for laying out books#But InDesign is very good.#Bookbinding#fic#fic binding#If people want I can start putting together tutorials about how to do all of this stuff#And all of y'all can learn from my mistakes and hopefully learn faster than I did.#Аня есть что нибудь здесь про тебя#заметишь?#InDesign
183 notes
·
View notes
Note
Hi can I ask what programs you use? I would love to use something thats not as pricey
hi !! for art or gfx? if its art ive sold my soul to clip studio paint. i think its normally around 50usd to buy a pro license, but i got it on sale so it ended up being 20usd.
if you want something free i tried autodesk's sketchbook between making the switch from firealpaca to csp. it has a really great interface, v high quality, good brushes, etc. iunno why autodesk made it free but it certainly (to my knowledge?) didnt downgrade the quality. i still have some wips where the sketches were made in sketchbook hah. i rly.. need to go thru that folder more.
im saying all this as a mac user, so if you have windows, while i think all these should work? on windows too?? another one ive heard tons about and recently had a chance to try myself is paint tool sai. its another more complex drawing program like csp except. for windows. i rly love the brush options sai gives you, esp for custom ones. always trying to emulate them in csp but theres jus something not there, never adds up well. sai has like a month long trial version thats free, off the top of my head iunno how much it is but its NOT expensive at all. maybe around the same as csp.
(i jus realized sai 2 recently released this year so all info i know is for og sai. sai 2 might be more costly)
sai i think is also what ppl use as a low-grade gfx editor. supports animation?? should at least??? but ye there is a lot to do there.
if you like ps but dont wanna pay for it photopea is a browser emulator of ps. kinda weird to work in a browser + does require internet but it does function exactly the same. can open up an existing project. can export things. jus. thru google. magic.
i used gimp for the longest time to edit stuff. its still lurking around here somewhere. the bad thing abt gimp is the more you add to it the longer it takes to read thru everything and load. i had a tonnn of assets installed so it always took a small eternity to even want to start up. past that i still think its a good program. if you want something thats smaller but functions better try seahorse!! that might be dated actually lmao. does anyone still own seahorse.
tbh my computer doesnt support the latest cc updates at all lmao so all my adobe software i have is ripped 2019 cc stuff. if you like an adobe program n wanna use it do yourself a favor and download an older version. better/free/less time-consuming/easier to deal with. if its not a cc version you dont even have to rip it. jus download that bitch n start it up. (if it is cc you gotta key it so you can use it after trial period, but its not that hard, jus an extra step rly)
thats all i got haha hope that helped some. if anyone wants to add on go for it.
#ask#absolutely 1000% thought this ask was gonna be an adobe voucher SO GLAD it wasnt ty anon#was mentally prepared to read this and feel my soul rip in half#actually i shoulda added but since i have an ipad for school this semester#ive downloaded procreate for drawing and its so much fun!!#its like 10 bucks but if its on your acct you can reinstall on any device you want#meaning when schools over n i get a new ipad next year i can download it again for freeeeeee
2 notes
·
View notes
Text
how I make my gifs: a tutorial
Hi everyone! Just in case someone asks in the future + for those curious, I'm here with a tutorial on how I make gifs! If you have any questions whatsoever, please do send me an ask! I’ll be glad to help! The gif I made with this tutorial is the one right here!
So... let’s start this tutorial with the programs I use.
Adobe Photoshop 2020 - To make the gifs, majority of the work is done in this program.
TopazLabs (Topaz DeNoise 6 and Topaz Clean 3) - To "denoise" and "clean" the gifs, as the names would suggest. Links for download: Topaz DeNoise 6 & Topaz Clean 3
KMPlayer (an alternative would be PotPlayer, or any other video playing program that allows you to capture the frames) - To capture the frames. - I use an older version of KMPlayer, though I don't know which exact version that is.
Now let’s continue onto how I use these programs to create gifs!
Step 1: After you’ve downloaded the necessary programs, download your video. The way to get the best gifs? Quality videos. That’s the first step. For K-pop performances, I recommend this website (the hq files are in .ts form, KMPlayer should be able to open these). Bookmark it! It’s really handy :) Get the video you want to make a gif from and open it in KMPlayer (or PotPlayer or any other program, but for this tutorial I’ll use KMPlayer). Open your video in said program and look for the part you want to make a gif of. Then press CTRL+G (I apologize because I cannot for the life of me remember if this was a standard shortcut or not)
Step 2: After pressing CTRL+G, you’ll be met with this screen:

I’ll briefly explain the numbered parts, but before that, these are my standard settings and just make sure you have them all the same and it should be good!
1: This is where your captured frames will be extracted to. I have them extracted to the standard folder, but you can change this if you want to. You’ll need this folder later when opening the frames!
2: Like it says, this is the image format. I use PNG in the highest quality, as the name would suggest, for the quality.
3: These are the amount of frames the program captures. Say you put in every 2 or 4 frames, you’ll get more choppy gifs. To get the smoothest gifs, put “every frame” (this in turn will increase the gif size as the amount of frames will obviously be bigger).
Once you’ve put in the correct settings and you’ve put the slider where you want the capturing process to start, press “start” (now, before you do this I recommend putting the video on mute as the audio will start to get kinda demon-y the longer you record lol save your ears pls). Then, when you’ve captured all the frames you need, pause the video, press CTRL+G again and click “stop” and close the pop-up/program.
Step 3: It’s time to open up Photoshop! Then go to File > Scripts > Load Files into Stack... (for older versions/another version I used in the past this one didn’t work and I had to use the “Load Multiple DICOM Files...” instead. It should work similarly though, if I remember correctly).
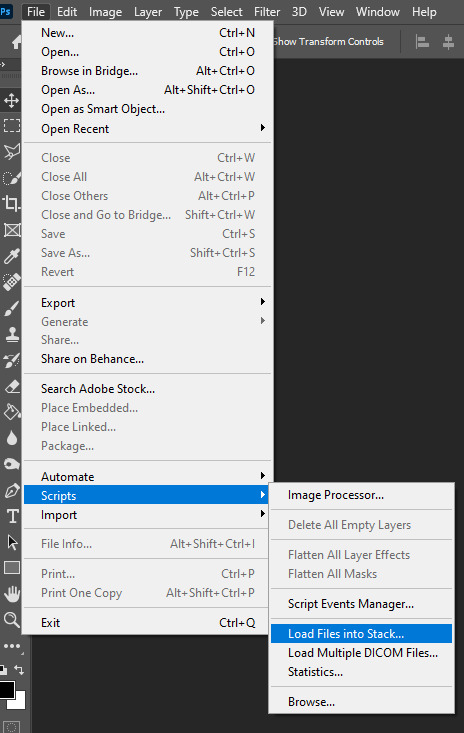
You then get a little pop-up that looks like this:
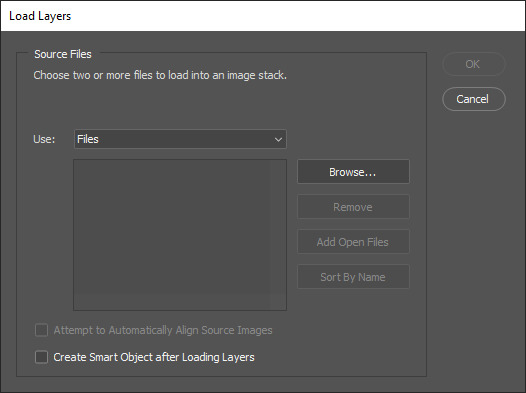
All you have to do here is click “browse” and navigate to the folder where your captured frames have been saved in. Select all the frames you need, wait for them to load in and then click “OK”!
Step 4: Depending on the amount of frames you’ve selected to load in, as well as the beefiness of your PC/laptop, the frames loading part might take a little while. Photoshop is importing every frame as a separate layer into one file, so just... grab a drink or something and wait a bit! When you’re done waiting, if you haven’t already, go to Window > Timeline. This will show you the animation timeline. For older Photoshop versions this is slightly different (I believe it’s called animation). Then click “Create Video Timeline” and click the 3 squares on the left bottom side (in older versions it’s on the right bottom side, not sure).
Step 5: After you’ve done all that, you’ll want to select all your layers. You can do this by pressing ALT+CTRL+A or going to Select > All Layers. With all the layers selected, you have to go to Layer > Arrange > Reverse. You only have to do this if you used the “Load Files into Stack” option!
Step 6: After reversing all your layers, you’ll want to go to the three lines you see in the following screenshot, and click “Make Frames From Layers”.
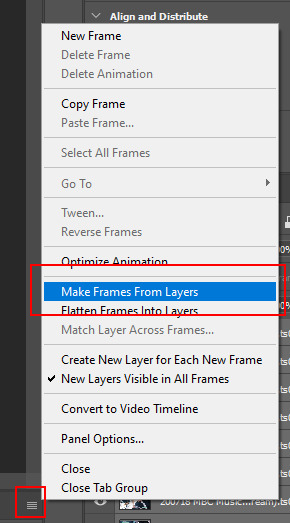
As the name suggests, this turns all the layers into frames. I don’t know why but the first frame will always be 5 seconds long, so to make it easy on yourself when you want to check your gif while editing, just put that on 0 for now. You can do that by clicking the seconds under the frame and clicking “No delay”. After this, check to see if you have the right frames and if you need to delete some (you can do this at any point in the process but I didn’t know where to put it in the tutorial oops).
Step 7: Time to crop the gif to the correct size! For this gif I’m using as an example, I’m making it specifically for Twitter, so the sizes aren’t that obvious (for Twitter I usually use a width of 850 px to keep it sharp, for long size gifs (more height than width for example), I add a background so that it eventually still becomes 850x850 pixels). There’s many posts on Tumblr about the correct sizes for gif/photosets, but a brief rundown of my most used sizes: one gif spanning the entire width of the post has to be 540 px in width. Two gifs next to one another need to have a width of 268 px. I use these dimensions the most! For others, you can Google!
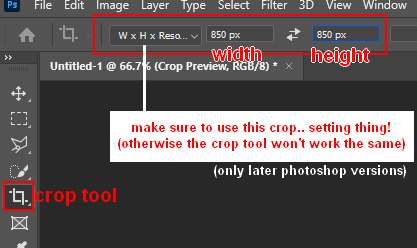
Step 8: After you’ve cropped the gif, you can do either of two things: either you first add the coloring of your choice and then sharpen the gif OR you do it the other way around. I usually switch these two around depending on how sharp the gif already looks before sharpening because I can’t stand looking at 2 pixels while coloring (lmao). For this one I’ll do the sharpening first.
The whole sharpening process is actually quite simple but you need to make sure that you do the following little steps in the right order or else it won’t work! Select all the layers (CTRL+ALT+A or Select > All Layers) and then click this little thingy:
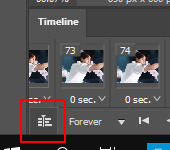
Then you’re going to Filter > Convert for Smart Filters
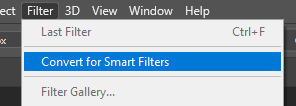
If you don’t do it in this order, your gif will end up... well, not being a gif and not moving. If that happens, track back in your history to see if you did it in the correct order! :)
Step 9: The actual sharpening process! After clicking the “Convert for Smart Filters”, you’ll want to go to Filter again and find the Topaz Labs tabs. Personally, I usually do it in the order of DeNoise first and then Clean, but this is a personal thing, really.
I recommend playing around with the settings to see what fits the gif but here are my go-to DeNoise settings (tip: save these as a preset so you only have to click that for faster giffing!):
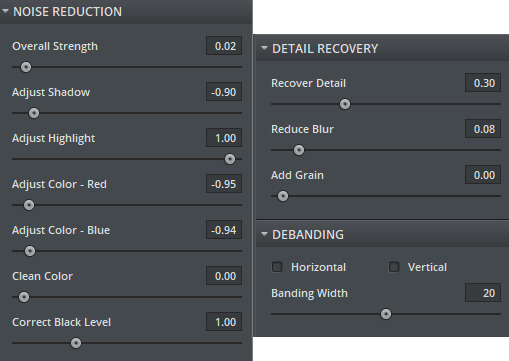
And my Clean settings:
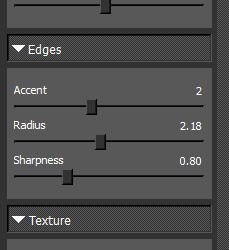
Press OK when you’re done with these and then go to Filter > Sharpen > Smart Sharpen. These are my SS settings (just copy these, and again, save as a preset!):

Depending on how sharp you want the gif to be, you can input the same settings or go to this in the layers and change the percentage.
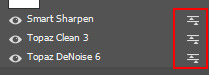
Now that we’re done with these... it’s time to flatten it! Just follow these little steps:
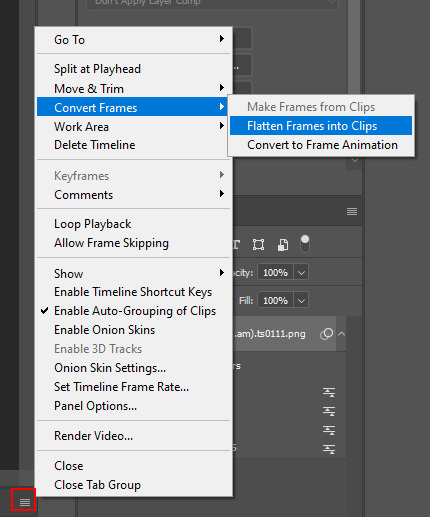
And then you wait. Again. I know.
Step 10: After playing the waiting game, you’ll click the three little squares again and do the same thing you did earlier: “Make Frames Into Layers”. Delete the first frame. Add a coloring of your choice (can be a PSD, can be your own coloring, etc. this is honestly just... playing around with things and see what it can do). After you’ve done coloring, select all your frames (same lines as previous screenshot except now you’ll see a “Select All Frames” option, click it!) and change the time to whatever you like (I usually go for 0.05, 0.06, or 0.07. Again, just play around with this!! Try different things!)
Step 11: Final step! Saving :) I use shortcuts a lot to make things faster so either press ALT+SHIFT+CTRL+S or go to File > Export > Save For Web. Not much to do here, just copy the following settings and save the file!
!!! NOTE: After making a new gif today I realized there’s a weird dotted border on the top of my gifs, it’s a bit difficult to explain but I had no idea what it was. Turns out that the reason why this showed up was because, as shown in the screenshot below, I had “Transparency” selected. If you’re experiencing this too, UNSELECT the transparency and it should be all good!
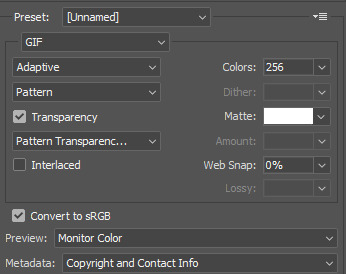
Also make sure that the “Looping Options” is set to Forever, or else your gif will play only once and then stop!
Tip: While making gifs for Twitter I at one point noticed that if I added in a white background, no matter what I’d do, it’d show up as yellow-y in the preview box. After googling I found that going to the options (1 in the screenshot) and then clicking “Sort by Luminance”, then double-clicking the lightest color (not the transparent one, 2 in the screenshot) and selecting white (or FFF) will get rid of this! This likely won’t be that useful for Tumblr gifs but just in case you ever want to have a white background...!

Then just... save, and upload to Tumblr! :)
Final note: Tumblr has a mix gif size of 3MB. If you have a gifset of 4 gifs you want to upload, all 4 gifs can be max 3MB each. Keep this in mind! If you’re over 3MB, delete a few frames and try again, or resize/crop your gif!
As it turns out, Tumblr has increased their gif size to 8MB, however, the quality tends to get compressed with larger gifs like that so per recommendation: keep them below 5MB! (thank you @yeoli for letting me know!)
I hope this helped! If you have any questions, feel free to send me a message and I’ll try my best to answer them.
76 notes
·
View notes
Text
Elliot, Just a Tech
Summary: Plagued by not having Admin rights on your work computer, you contact the IT department expecting to talk to your usual guy. However, you are greeted by someone new.
A/N: Consider this post-show
WC: 2596
Warnings: None

You looked over the icons on your desktop for the eleventh time, dragging the old version of Adobe into the trash for the tenth time, and growling with frustration as the error message appeared for what felt like the hundredth time.
Please enter an Administrator’s Username and Password.
After the great email phishing scam the month prior, the IT department had been directed to revoke all employee’s Admin rights to their computers. It wasn’t your fault your colleagues were too dumb to realize that you should not click on email that has been flagged as spam, even if it is a version of your boss’s name: Mattthew Whitman has scheduled a meeting with you at 9 pm!
As if Matthew spelled with three ts wasn’t enough to deter someone, scheduling a meeting at 9 at night should have been, not to mention the exclamation point to top it all off—no one ever enthusiastically scheduled a meeting. Ever.
Alas, no less than 13 people had opened the email, severely compromising the integrity of the network.
You needed to get rid of the old version of Adobe in order for your network’s cloud to allow the download of the updated version, so you were left with no choice but to submit a ticket to the IT department.
You and Matt, no relation to Mattthew your boss, had had several Zoom sessions since the start of the quarantine, mostly thanks to your need to actually get some work done. With so many more people on your network, the IT department was doing the best it could to make sure everyone was achieving basic functionality.
Opening a new work order, you quickly filled in your information and snapped a screen shot of the error message. In less than a minute, you had an email inviting you to a Zoom session.
“Matt’s really on it today,” you said while opening the link and waiting for him to start the session.
You had just glanced away to check your To-Do list when someone opened the Zoom session and you paused, staring at the downturned face of someone who was definitely not Matt.
“Hi,” you greeted awkwardly.
“Hi,” he answered, still not looking into the camera.
“Where’s Matt?”
The stranger looked into the camera, clearly caught off-guard.
“Uh, he’s off today.”
“So they finally unchained him from his desk—good for him!”
The stranger’s eyes widened a little in amusement, but he didn’t smile which caused your grin to quickly fade.
“Are you . . .” the stranger trailed off as he glanced at his other desktop monitor. “Y/N?”
“I am. And you are?”
“Elliot.”
“Are you the new Supervisor they were hiring for last week?”
“Nope. Just a Tech.”
“All right. Well, hi, Elliot, just a Tech. I’m in dire need of installing an update, which I cannot do because my colleagues are dumbasses.”
This time Elliot did smile, and you found yourself reaching up to fix the wild bun on the top of your head, wishing you had actually taken some time out not to look like a troll who had crawled out from under its bridge.
“I see that you can’t install Adobe’s update without administrative permission.”
“Yup. That’s my issue, I think.”
“I want to try something first,” Elliot said, concentrating on the task at hand as he looked away from the camera and to his other monitor.
“Can you locate your system preferences? You can find it by clicking on the appl-“
“Done. What do you want me to go into?”
Elliot looked back into the camera, then gave you a series of steps which you quickly followed.
“I am only semi-illiterate when it comes to technology,” you said, trying again to get him to smile and this time it worked.
Elliot adjusted his headset and lowered his eyes as he grinned. “You wouldn’t believe the things I’ve had to explain over the past few days.”
“Oh, I would absolutely believe them. I’ve talked three people in my department off a ledge just by explaining the magical powers of “Command + Z.”
Elliot chuckled, and the sound of his laughter filtering through the mic on his headset made you want to stay on the call as long as you could stretch it out.
“It looks like the program is not responding. I’ll need to take remote control of your desktop.”
“Have at it.”
You watched as Elliot worked, waiting for your mouse to start moving across the screen, but nothing happened.
“Uh, do you have any error messages on your end?”
“Nope.”
“Let me try one more thing,” Elliot mumbled, his eyes narrowed in concentration.
You sat quietly, letting him work, which gave you an excuse to just look at him and the more you looked at him, the more attractive you realized he was.
Elliot had a stylish haircut, although it looked like his fade had grown in quite a bit thanks to the lockdown. Tufts of straight black hair stood up on either side of his headset and you wondered if they’d be stiff or soft to the touch. His eyes were large, clearly the most enticing of the features of his face, except for his angular jaw that made you softly smile in appreciation of its masculinity. Elliot may consider himself “just a Tech,” but he was a damn good looking one.
“Do you have a girlfriend?” you blurted out, forgetting all of your manners thanks to the lack of social interaction.
Elliot fumbled as he was typing and looked into the camera, his lips parted.
“Oh, lord. That came out . . . blunt. I asked because Matt’s been loving working from home. His wife just had a baby and even though he’s chained up in his home office at all hours of the day he still gets to spend time with the people he cares about. Which is what I was trying to ask you—if you were enjoying working from home.” You finished with an awkward laugh, and a barrage of mental curses to yourself.
Elliot’s lip turned up with a quirk. “My sister stops by to bring supplies, but I live alone.”
“Oh—well, that’s nice you have someone to interact with. I still see my sister, too.”
“I like this. Not having to interact with people.”
“The only downside is the verbal vomit you spew when talking to someone new because you no longer understand social protocol.”
Elliot laughed again, that same breathy little chuckle that upgraded from drawing your attention to making you shift in your chair.
“I’ve never been particularly adept at social protocol. Hence . . . just a Tech.”
You laughed and Elliot must have liked the sound because he stopped to watch you, his eyes flicking over your face through the camera.
“You need to update the Zoom app for me to take over your desktop. I don’t know why yours seems to have this glitch, but are you ready for the steps?”
You grabbed your pen and a fresh post-it. “Lay it on me, Tech.”
Elliot smirked, then listed the steps. “I’m going to close the call, but as soon as you’ve completed the steps, click on our Zoom link again.”
“Got it!”
Your eyes connected and lingered for just a moment before Elliot closed out the call.
You missed him immediately.
“Oh, Matt. If I had known Zoom calls could be like this, I’d have dumped you long ago.”
You shook your head to clear it and began to go through the steps Elliot had listed for you. You wanted to get this right to prove to him that you weren’t incompetent.
Having successfully, and quickly, completed all of the steps on your Post-it, you reinitiated the Zoom meeting.
“You’re quick.”
“I’m sure you’re much, much faster,” you said.
“I can only go as fast as the web connection, unfortunately,” Elliot replied, staring into his other monitor again.
“Let’s try this again—remember the steps to give me remote access?”
“I think so . . .” you said, trailing off as you began to click.
You paused, then your mouse began to move without you.
“Excellent job,” Elliot praised and you knew you wanted him to praise you again . . . preferably away from a computer, maybe in a bedroom—
“All right. So I need to delete, reinstall, and wait for an error message that’s been popping up making this a little harder for people to do themselves.”
You watched Elliot control your computer, and once he got to a point where the app was updating, he paused and turned back to the camera.
“About that girlfriend thing you asked me earlier. Are you seeing . . . anyone?”
“I was . . . about six months ago. By the time I was ready to get back on the horse, the plague struck.”
Elliot chuckled. “Not exactly the best time to start dating.”
“No,” you said softly laughing, too. “I agree with you, about the whole nice not seeing people thing, though. For me, it’s more about setting my own schedule. I get so much more done without constant interruptions just to chat.”
“Kinda like we are now?”
“Hey! We are waiting on a signal to go to space and come back. It’s only polite to give it some time so it doesn’t feel like it’s being watched—like a watched pot never boils kinda thing.”
Elliot smiled, his eyes meeting yours and lingering as you smiled back.
A new box popped up breaking your eye contact and Elliot went back to work.
“Fixed. You shouldn’t have to worry about the next update. We’ve been reporting this glitch regularly so the developers should have it fixed by then.”
“Thanks, Elliot. I really appreciate it.”
“It’s my job,” he said with a slight shrug.
“Well, enjoy the rest of your afternoon,” you said, wishing you had a reason to stay connected.
“Yeah.” Elliot replied, looking at you again with those hypnotic, grey-blue eyes. If they could impress you through a screen, imagine what they looked like in person. “You too.”
You smiled at each other and when neither of you closed the call, you both laughed, Elliot looking a little shy and you looking a little embarrassed.
“I’ll close it. Don’t forget to fill in your survey so big brother knows I did my job.”
“Five-star service, all the way!”
Elliot chuckled again, and you shivered this time, the sound of his voice working its way through your entire body, filling you with a pleasant warmth.
“Bye,” he said, tucking his bottom lip between his teeth as he ended the meeting.
When the session closed out, you began to think of ways to break your computer so you needed to talk to him again, but before you could pull a purposefully dumbass move like downloading a virus, a sticky note popped up on your desktop.
212 555 0179
Probably breaking work protocol, but text me sometime if you want.
~Elliot, just a Tech
“Oh my god!” you gasped, glancing up at your camera to make sure you really were disconnected, unable to shake that feeling like someone was watching you. You reached for your packet of stickers and placed a fresh one over the camera of your computer—better paranoid than sorry!
“Should I text him now? Is that desperate? Or is it mean to make him wait? Fuck, fuck, fuck,” you said, pacing around your small office space.
“Just a simple hello,” you decided. “First, gotta find my phone.”
After walking through your apartment, you found your phone in the kitchen, unsurprisingly because snacking had become your favorite hobby since the lockdown began. It was a blessing and curse to be able to eat whenever you wanted.
You took your cell back to your computer and smiled again at Elliot’s virtual Post-it note and typed in his number and contact information.
Hi, Elliot ☺️
Hi, Y/N. I hope your emoji means I didn’t creep you out
That’s what this one 😱 is for
Lol. Got it. I don’t really do the emoji thing. They kinda confuse me
Well then! Maybe that’s why we met? You know all the real techy stuff, and I know all the silly techy stuff. I can teach you to emoji like a boss 😎
Sunglasses = boss? Shades? Because bosses are shady?
🤣more like the shades mean you’re just too cool to care. Like a boss attitude. But actually 🤔that’s a really great analysis!
See? Confusing 👽
Confusing as in no one knows what’s really “out there” huh? Wow. I like your way of emojiying (new word, just go with it)
Lol really?
I do!
Can I ask you something?
Sure
Which emoji makes you think of me?
👀🦋💬🧸🧨 😰📱😃
You stared at Elliot’s text, a goofy grin on your face as you tried to puzzle out his emoji story. The eyes, okay, but the rest was sort of a mystery.
Lol! I need to do this in pieces so you can tell me if I’m right or wrong
Ok
So, you saw me and thought I was nice? Pretty? Delicate?
Lol pretty
Ok. Thanks, btw. We talked and then, oh boy, this is tough. An exploding bear? Talking to me made you feel like you were going to die? This is not good.
🤣 Poor choice of the firecracker, clearly, but take them as two separate things. What do you associate with a teddy bear?
Um, childhood . . . safety? Protection?
Close! Warm, safe. You seem like a warm, safe person to talk to.
I am grinning like an idiot right now. You are so sweet. But on to the firecracker? Wait! Like sassy? Like I have a firecracker personality?
Yes! You’re funny in a forward, witty way. I guess the “She’s a real firecracker” thing might be a bit outdated.
I LOVE IT. I gotta keep going now. This part is easy, I think. Sooo even though you felt nervous, you took a chance and left me your cell, and now you know it was a good choice because you made me happy.
Almost—when you texted, it made ME happy. Hence 😃 and I have big eyes so I used the big eye happy face.
I.am.dying. That’s the cutest thing anyone has ever done over a text in the history of the world!
Lol. Is there a dramatic emoji because I don’t think anything I’ve ever done is that great.
This WAS great. I’m serious
Do you wanna maybe have dinner over Zoom? God how lame is that?
You respect the quarantine—not lame at all. I’d love to!
They let me unchain myself around 6. I’ll send you a link at 7?
Perfect! But what are we going to order? Shouldn’t we order from the same place to make it more authentic?
Do you like Chinese?
Who doesn’t?
You looked at the location Elliot sent and laughed with the irony that it was your favorite take-out spot.
How did you know that was my favorite take-out spot?
Lucky guess 🤷🏽♂️
Well, lucky Elliot who is just a Tech. I’ll “see” you at 7. If we order the same dinner, I’ll consider it a sign that we are meant to take over the world together by eliminating one dumbass’s access to a computer at a time 🦸♀️🦸♂️
Lol except that would leave me out of a job
We will find you something more meaningful, I promise
Make me a list 😃
You got it! Can’t wait for 7 ☺️
Me either
* * * * *
Tags: @ramimedley @clumsybookworm18 @r-ahh-mi @aboutthatmelancholystorm @alottanothing @sherlollydramoine @txmel @diasimar @hah0106 @flipper-kisses @rami-malek-trash @ramisgirl512 @dancing-disco-deacy @just-a-queen-bee @eightiesriot
Maybe a Part II?
#Elliot Alderson#elliot alderson x reader#female reader (but it is pretty ambiguous)#elliot alderson fanfic#elliot alderson imagine#fluff#for now#Rami Malek character#rami malek fanfiction
177 notes
·
View notes