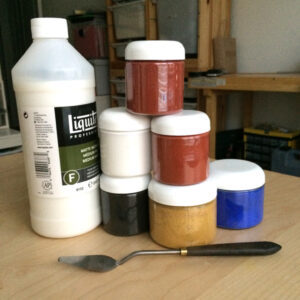
#Air Dry Clay Tutorials
Explore tagged Tumblr posts
Visit Tumblr Blog
Explore Tumblr blogs with no restrictions, modern design and the best experience.
Last Seen Tumblr Blogs


Fun Fact
Forty percent of Tumblr users are between the ages of 18 to 25.
Text
I made a 30s video (kinda tutorial) of how the heart shaped trinket tray turned out!
I used air dry clay. I'd recommend punching all the air out and using A LITTLE BIT of baby oil/any oil for your hands and surface, to make it easier to handle.
Also, I painted it with acrylics and then added a cost of white glue for protection (it becomes transparent no worries)
Please, reblog to support and keep the inspiration rolling! 🩷🌸
#craft#clay#air dry clay#ceramics#heart#trinkets#rings#jewelry#jewellery#diy#diy projects#diy tutorial#diy tips#diy craft#craftblr#tonbane#video
14 notes
·
View notes
Text
DIY Art Supplies: Getting by on very little as a beginning artist
I’ve been on this kick lately about making my own art supplies. I mean, we all know how pricey those art store trips can get, right? Plus, there’s something incredibly satisfying about using tools and materials you’ve crafted yourself. It’s like adding an extra layer of creativity to the whole process. Let me share a few of my favorite DIY art supplies with you because I don’t think we have…
View On WordPress
#air-dry clay#art supplies on a budget#budget art supplies#craft your own art tools#creative art supplies#DIY art projects#DIY art supplies#DIY art tips#DIY art tutorials#DIY brushes#DIY collage supplies#DIY paintbrushes#eco-friendly art supplies#homemade air-dry clay#homemade art materials#homemade art tools#homemade crafting supplies#homemade ink#homemade journals#homemade paint#junk journaling#make your own art supplies#natural ink#recycled art materials#sustainable art supplies
6 notes
·
View notes
Text
Hello folks if tumblr! I was wondering if you could help me out a lil 🥺👉👈 I’m trying to put more effort into my YouTube channel by posting a bit more consistently. I mostly work with air dry clay but I do wanna start making art videos in general.
I’d be suuuper grateful if you could give me some feedback, what you liked, what you wanna see more of? and if you do like my content maybe even subscribe? Thank you! ❤️
#clay creations#air dry clay#pottery#ceramics#tea light candles#tea light holders#artists on tumblr#my art#artwork#clay#clay tutorials#pottery tutorials
0 notes
Text


♡ agere crafts༅
paw print: i tried to do some crafts you can do alone n some with a cg! and im pretty sure theres tutorials online for most of these things if needed!༅🐾

♡ clay ──୨ৎ── air-dry clay is wut j use! and you can use colored air dry clay or paint it when its dry!༅
✂ - - - - - - - - - - - - - - - - - - - - - - - - - - - - - - - - - -
♡ sticker making ──୨ৎ── draw or print cute designs, then laminate them or use sticker paper to make your own stickers! there lots of tutorials online!༅
✂ - - - - - - - - - - - - - - - - - - - - - - - - - - - - - - - - - -
♡ make a wand ──୨ৎ── but howw? well first pick a base for your wand like a stick, dowel, or anything that works!! then paint it if you want before adding maagic details like wrappin' a ribbon round the base, gluing on tiny gems, or drawing lil designs! then lastly...the top! glue a big star, heart, charm, etc. to the top! and if you wanna do a lil extra you can make up a fun spell for your wand, like “this wand brings happiness" or whateva you wan! or im pretty sure ive also seen already made star wands at places that you can just paint and add details to!༅
✂ - - - - - - - - - - - - - - - - - - - - - - - - - - - - - - - - - -
♡ sensory bottles ──୨ৎ── fill a clear bottle with glitter, beads, charms, whatever you wanna add!! and then add water to finish the sensory bottle!༅
✂ - - - - - - - - - - - - - - - - - - - - - - - - - - - - - - - - - -
♡ scratch offs ──୨ৎ── i mentioned these in my tips for littles without a cg post, but im mentioning them again!! they can be used as a reward system for yourself or you can put positive messages on them, whatever you want!! to make them you outline your scratch off on a piece of paper, so a star, circle, heart, box, etc!! and write what you want inside! then you put tape over it before mixing paint and dish soap together to paint onto the tap afteer youve placed it down! thats all! if i didn't do a good enough job explaining, there are lots of tutorials online too!!༅
✂ - - - - - - - - - - - - - - - - - - - - - - - - - - - - - - - - - -
♡ make a fish ──୨ৎ── get a paper plate and then cut a triangle out! then glue the triangle on the opposite side for the fin! you can get paper to make more fins to glue on as well! then color your fish!༅
✂ - - - - - - - - - - - - - - - - - - - - - - - - - - - - - - - - - -
♡ finger painting ──୨ৎ── prettyyyy self explanatory and already pretty well known but i still thought id mention it! id recommend getting an outfit you don't mind getting messy before though ofc, and then paint to your hearts content!༅
✂ - - - - - - - - - - - - - - - - - - - - - - - - - - - - - - - - - -
♡ mini garden/terrarium ──୨ৎ── get a bowl or a flower pot and you can paint it if you wish!! then add some soil in grass or moss and thennn add cute lil decorations! you can add fairys, just lil characters, a mini house, anything! and even a real flower or smth! you could also do it in a mason jar and make it like a terrarium!༅
✂ - - - - - - - - - - - - - - - - - - - - - - - - - - - - - - - - - -
♡ juice popcicles ──୨ৎ── anotherr popular one, get an ice tray, pour juice in, and then add a popsicle stick, put in freezer over night, n boom!! juice popsicles!༅
✂ - - - - - - - - - - - - - - - - - - - - - - - - - - - - - - - - - -
♡ pom-pom popsicles ──୨ৎ── you can look up how to do this one too, but you just get a card, pom poms ofc, a popsicle stick, and some double sided tape, and cut out the card into a popsicle shape, glue it to the stick, then use the tape to add the pom poms! you might need some help with this one! but you can use your favorite colors, your flag colors, whatever you wana do!༅
✂ - - - - - - - - - - - - - - - - - - - - - - - - - - - - - - - - - -
♡ paint a rock ──୨ৎ── another self explanatory one! you can look up some ideas for inspo though if you wish!༅
✂ - - - - - - - - - - - - - - - - - - - - - - - - - - - - - - - - - -
♡ paper bags ──୨ৎ── you can use paper bags to make puppets or lil houses! if you're confused on how, you can again look it up!༅
#sfw agere#age regression#agere blog#agere community#age regressor#sfw little blog#sfw littlespace#littlespace blog#age dreaming#sfw agedre#agere#agedre#agere resources#agere regression#agere crafts#sfw age regression#agere tips#agere positivity#safe space#agere safe space#agere diy#soft agere#lulu's library
243 notes
·
View notes
Text
summer activities WITHOUT screens⋆.ೃ࿔*:・🍹

this post is inspired by THIS ask from my inbox and all about activities that u can do this summer that dont include staring at a screen…💬🎀 (@aanglebones)


ON UR OWN ;
start a coloring book
find a craft tutorial on youtube and follow it
try thrifting and flipping clothes
buy urself some books and read
currently im reading crime and punishment, psycho cybernetics, and madness and civilization…💬🎀
learn a new skill (like doing ur own nails)
try ur hand at writing a book/poetry
use air dry clay/arts and crafts in general
WITH COMPANY ;
if ur trying to stay off ur phone, do so with company! doing things with ur friends is such an easy way to stay off ur screen because you guys can interact with each other and you won't feel the desire to get on ur phone/computer because u have their company.
have a picnic with ur friends
do any sort of challenge with ur friends (for example the deaf, blind, mute baking challenge)
go places with ur friends (trampoline park, the beach etc)
#honeytonedhottie⭐️#it girl#becoming that girl#self love#that girl#it girl energy#dream girl tips#dream girl#dream life#hot girl summer#honeysinbox✉️#ask🎀#self improvement#summer reminders#summer activities#stay busy#hobbies#self care#dopamine detox#self care tips#hyper femininity#hyper feminine#girly#girl blog#girl blogging
309 notes
·
View notes
Text
I've gotten some requests on how to make my trash terrain for 6mm sci-fi or modern miniatures. So I made a little tutorial. Enjoy!

The stuff you'll need: - Plasticard - Brass rod - Air drying clay foam - Bits of 6mm miniatures

Start by making a plasticard footprint, cut into an organic shape. Can't go wrong with kidney bean!

Gather some miniatures to use in our junk pile. We're not gonna cover the whole pile with them, just sprinkle them throughout. This is a good use for your misprints and broken minis, so don't throw them misprints away; use them for terrain.

The trash pile needs a "spine" of brass rod. Attach the brass rod with some glue and let it dry. If you don't give the plasticard a sturdy spine, the plasticard will bend and curl as the glue dries and you'll be super sad.

This is the kind of clay to use. Its super light and dries rubbery, not brittle like regular clay.

Attach some clay blobs onto the plasticard with glue and smooth them out. You'll need less clay than you think because the miniatures are gonna go into it and make it expand.

Sink your miniatures into the clay. I like to add cut up rectanlges of platicard to help cover the edge where it isn't smooth. Let the whole thing dry overnight.

Prime it black.

I usually paint it in sections. Base coat with a dark color. I'm going with purple, but you could brown or blue or gray too.

Free hand some geometric shapes with black. The shapes should be of very irregular. You can let the lines be messy at this step, we're just mapping out the freehand portion. Color in some of the shapes with black to imply negative space.

Base coat the shapes between the black lines in a couple different colors. I mix a little orange into the purple to make a warm brown. I base some of the shapes with a gray blue. A few others I pick out by mixing green or grey with the purple. This is the step where we want our lines to be (relatively) neat and tidy. Let the shapes expand a bit beyond their black line borders from the previous step.

Add another layer to the shapes to raise the intensity. Some shapes get more coverage than others, to make it more random.

More layers, mixing in more orange into the purple. I brighten the slate blue by adding a light pink.

Finish with some highlight layers. This is done by adding light pink to the blues/oranges/greens.

Add some dots of random colors in the remaining black space.

Go around the whole pile like so, until you cover the whole dang thing.

Then paint the miniatures in it. I paint the miniatures a bit brighter and with different colors than the freehand to make them stick out. And there you go. Trash time! Thanks for reading!
255 notes
·
View notes
Text
*throws my key tutorial at you and runs away*
22 notes
·
View notes
Note
how did you make that ken puppet!
Hello! It was a very long project because i dont really have experience in making dolls, but it was very fun and ive learned a lot!

Its going to be a pretty long post though. First i drew the Roy siblings in the style of moral orel, that's where the idea came from. (i kind of want to make the rest, including Connor)

Then i printed out Ken's drawing on a4, and i think i made him 20 centimeters tall...?( i think its ~8 inches) its 15 without the head. Okay, then you have the carcass. All i used for his body was soft copper wire, thick thread and air dry clay!
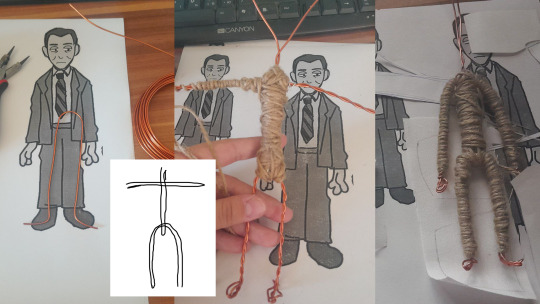
I looked up how to do this from looking at youtube tutorials! I wanted to make a stop-motion animation for my 3rd year,but didnt finish it. So if you want to make a more complicated/fleshed out puppet carcass, i suggest you look there! I cut out 3 pieces of this wire,and you have to fold each one in half. After that i twisted each one to make it sturdier. The tricky part is wrapping the one for the "spine" around the ones used for the arms and legs. After that i just wrapped the thread around him, to make him more dense, but dont make it too tight or the puppent wont move! and youll waste material.

I changed my mind about his clothes and thought that l to the og outfit would be cooler. This is the first pass haha! I had to re-sculpt his face because i didnt like it. The polo shirt was the first thing ive finished.


Here how it looked! I suggest to sew on top of the figure because when i made his shirt the first time, it was too tight and 1) the sleeve ripped out when i put it on him. 2)the polo shirt looked awful on top, they stuck together. Also i dont really have much sewing experience and im cannot make sewing patterns! I had my grandmother help me with figuring it out, im sure if you can sew this will be easier!


Here how it looked assembled, i added hooks to the shirt and sculpted his legs/arms. The mic is detachable. Attaching the head was TRICKY😭 The hole in his neck was made while the clay was still soft, and i made it bigger after it dried by like....drilling it with a wire. I thought i'd be able to sculpt the neck on top of the piece that stuck out but no. So i just superglued his head on it and put some clay at the back to resemble his neck, i think it worked out.
Oh also i didnt take pics of making his face....but like in the style of the show his mouth is just a piece of paper glued on, and the eyes and brows are from clay. It was a nightmare to do though, because theyre small and i kept messing it up.

Aaand i think thats it!! It was super fun , and i really liked it......honestly it makes me want to start making dolls and puppets, we'll see. Thanks for asking!
36 notes
·
View notes
Text
sometimes im caught in a doomscrolling feedback loop and then i stop and go Wait. why am i doing this. and then i go look up air dry clay tutorials instead
14 notes
·
View notes
Text


A fearsome Storm Dragon from this post - it's time to show you how its lightnings and eyes glow in the dark!⚡ The sculpture is handmade of air-dry clay, painted with acrylic colors and covered with protective matte varnish. Here's a little tutorial on how to charge the glowing elements on my sculptures. Turn on the sound! ^^
#silentkimiya#dragon#dragon sculpture#dragon art#handmade#sculpture#figurine#figure#dragon figure#night fury#light fury#httyd#night fury oc#storm dragon#lightning#glow in the night#glow in the dark#art#ooak#tutorial
27 notes
·
View notes
Text

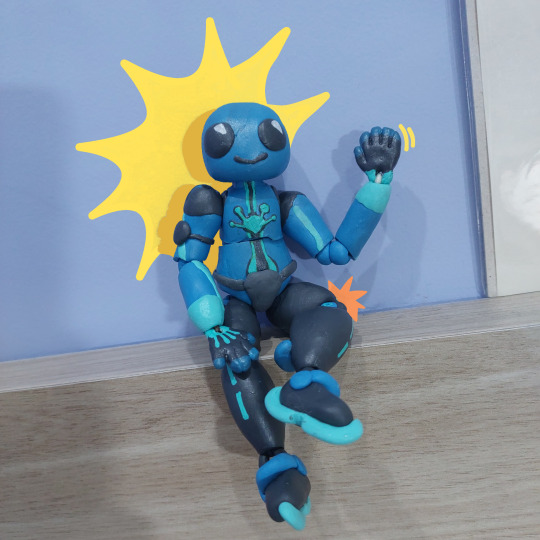
HEY GUYS LOOK
since Blizzard doesn't make Lúcio merch, I make my own ! so here it is: a BJD doll of Poison Dart Lúcio !!! it was hard asf to make because it was my first attempt on making an articulated doll in air dry clay :D
also just to say, I watched Teeny Thinkers tutorials on sculpting a BJD doll !! I recommend them, it helped me a lot lol

15 notes
·
View notes
Text


Mixed media doll out of air-dry clay. Made with the help of tutorial by Chertoh.
#SDaboutstuff#solas#dragon age#dragon age the veilguard#fenharel#dread wolf#solas dragon age#the veilguard#da veilguard#fen'harel#da4
26 notes
·
View notes
Text
5 Fun and Easy Clay Projects for Beginners
Welcome! Here on this blog, we talk a lot about art, crafts, trash to treasure, art Masters, art mediums and more. If you would like to check out any or all of our previous blog posts, you can do that here. In the mean time, let’s talk about clay. Working with clay is one of those magical things that makes you feel like a kid again, no matter how old you are. There’s something so satisfying about…

View On WordPress
#air dry clay projects#beginner clay ideas#clay beads#clay crafts for adults#clay gift ideas#clay projects#DIY clay bowls#easy clay crafts#handmade clay art#homemade clay decor#oven bake clay projects#pinch pot tutorial#polymer clay crafts#simple clay sculptures#small clay animals
0 notes
Text


MY PIECE FOR MY BASIC DRAWING FINAL !!!
this one was a doozy to finish, staying up the night before doing the final touches and only getting one hour of sleep :'] BUT i'm very happy abt it and my classmates and professor loved it as well which ultimately is the best feeling !!
our prompt for this was to do a mixed media piece with a minimum of two different mediums and the theme was to do something that dealt with a personal concern so i went with my identity and how i'm perceived by the outside world. i ended up using both acrylic paint as the base and background and oil paint for my fursona with air dry clay for the 3D elements !! this was definitely a fun thing to explore as it was my first time using oils ( definitely need to follow a tutorial for practice next time i mess with them ) as well as just being slightly vulnerable abt how i feel as a trans latino in this country, im very proud of how it came out and it made me happy my peers understood where i was coming from and how i felt.
i am actually in the process of editing a vlog that goes through my process of this piece so if yr interested, pls keep a look out in the future for the video!! :]
7 notes
·
View notes
Text
diy spikes for my noise cancelling headphones out of random trash

materials:
air dry clay
one old can of sprite
elastic string from broken bracelet (at the ends to tie onto headphones)
dental floss to tie the fabric together (i dont have needles so i had to improvise)
old worn-out green shirt with a few rips
uh if anyone asks i will drop a tutorial
23 notes
·
View notes
Note
If you don't mind—do you have any tips on making masks? I can't find much for owl therians
yeah!
so i used a plastic (NOT paper) cat-base mask. a friend of mine got it off of amazon and gave it to me. i chopped off the ears and smoothed it out by putting foam clay in the divots and curves. for the beak, i also used foam clay. i didn’t use nara air dry clay because my friend says it tends to melt easily in hotter natural temperatures. then i hot glued white felt on. then i cut off two strips of white long fur. make sure they ~mirror each other! i attached those to the edges of the mask.
for the eyelashes, i used thin black foam (theres a specific name for that foam that is currently eluding me. it’ll come back to me later. i’ll edit this when it does. EDIT: IT’S FUCKING EVA FOAM HOW DID I FORGET). make sure you use a good, sharp pair of scissors.
i colored the fur and eye mesh using ohuhu markers! i might be able to find the exact colors if you want.
this is kind of a bare bones tutorial, so let me know if you want any more info.
tl;dr - use a cat-base mask, cut off the ears, smooth it out with clay, use clay for a beak, felt, color.
22 notes
·
View notes