#Component 3D Models for Projects
Explore tagged Tumblr posts
Visit Tumblr Blog
Explore Tumblr blogs with no restrictions, modern design and the best experience.
Last Seen Tumblr Blogs


Fun Fact
12.7% of mobile users access Tumblr.
Text
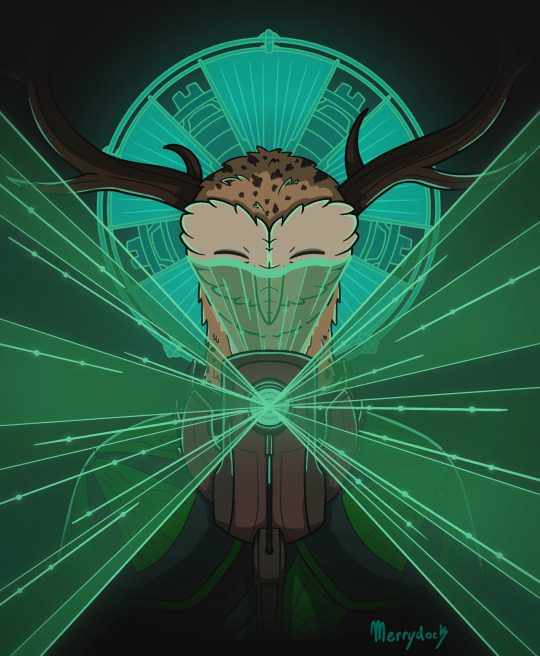
Some old art of my Owlk engineer, Eris, designing the Stranger's solar sails! Enjoy a big ramble about him and his job because I love this silly man:
Eris works on the design team for the Owlk space program, specialising in energy and propulsion technologies for the ships, satellites, and probes. Having a design philosophy of functionality and beauty, Eris enjoys going all-out with his work. He has received special recognition for his solar panel designs in particular, which borrowed from the unparalleled efficiency found in photosynthesizing plants.
When designing the Stranger's solar sails, Eris took inspiration from plants, but also the opening of insect elytra; the ballooning behaviours of silk-producing invertebrates, in which they sail from tree to tree using electric fields and air currents; and how flying creatures will use thermal updrafts to soar higher while expending less energy. Already familiar with how solar energy impacts technology from his work on solar panels, he proposed the use of this energy to propel the Stranger through space.
As travelling the distance between stars presented the major roadblock in the plan to reach the Eye (regarded as the Interstellar Propulsion Problem), Eris was lauded for his contributions, promoted to being one of the main engineers overseeing the Stranger's design.
More information about his general design process below!
When designing for a project, Eris uses all of the tools at his disposal. His first weapon of choice is always his pencil, and he will sketch out potential sources of inspiration on paper until the design concept begins to take form. Based on the initial project parameters he's been given, he drafts up a blueprint for his components.
Next, he must further conceptualise his designs. This is where the most valuable tool of the trade comes into play—the Vision Torch! Vision Torches serve many purposes for Owlks, from allowing them to nonverbally communicate to creating photographs from memory alone. Owlk engineers LOVE Vision Torches for how easy they make effectively communicating ideas. They allow concepts to be visualised in 3D, basic functionality to be shown through animations, and are even able to interface with computers. Eris might even 3D print a model using a Vision Torch to help him visualise his concepts as he works.
The space program is extremely collaborative, and Eris works on just a small part of the overall project, so being able to easily share ideas with others and see how all the individual components of a satellite or ship interact is vital. When discussing with more than a single other Owlk, Eris can use a Vision Torch linked to a holographic display to present concepts to a crowd. Concepts can also be tweaked in real time this way!

[Here's an example from the game of Owlks building the simulation with Vision Torches and a holographic display!]
With a Vision Torch, concepts can also be directly uploaded to a computer terminal. This is where a lot of the real work gets done - calculating weight, materials needed, stress testing in simulations, calculating trajectories, making precise tweaks to finalize the design, you name it. This also allows other Owlks working closely with Eris to access the most current design for their own tests.
This is an iterative process - as other Owlks finalize their components, as weight limitations are further restrained and material needs are calculated, Eris often has to go back to an earlier step and rework his concept. Fortunately, he thoroughly enjoys getting to be creative in his work (and doing math) and treats every project as a puzzle that needs to be solved! The only time when he's not excited to go back to the drawing board is when a last-minute adjustment from his peers means he needs to work long hours to get his work done in time for launch.
#outer wilds#outer wilds spoilers#echoes of the eye#echoes of the eye spoilers#outer wilds oc#my art#eris#my workaholic son#someone needs to tell him to take a break#please
68 notes
·
View notes
Text
SPOTLIGHT ON: Murderbot Fanimation Project Backgrounds!
(Part 3 of 3) (Jump to part [1] [2])
They may be the literal background of the finished product, but the backgrounds done for the Murderbot Diaries Fanimation Project deserve their time in the spotlight!
Part of what makes the Fanimation stand out as much as it does is the love, care, and attention to detail that the artists poured into the backgrounds. The team stuck closely to the source texts when designing the spaces, producing some beautiful pieces of art that deserve appreciation on their own.
You can watch the Murderbot Diaries Fanimation Project here.
In this final part, we look at some of the backgrounds that we animated to give them that extra wow factor. Some of the shots in the Murderbot Fanimation have backgrounds completely made in 3D - the opening shot and the post-credits scene, for example. But the shots in this post are mostly 2D imagery, with some 3D components and clever editing that bring them to life.
Deltfall Habitat - Background art and motion editing by @broken-risk-assessment-module , habitat model created by TechnicalToad and rendered by @theash0
"I climbed the ladder up to the roof hatch and popped it. The armor’s boots have magnetized climbing clamps, and I used them to cross over the curving roofs to the third habitat and then around to the second."

Milu Storm - 3D model of the corridor by TechnicalToad, storm effect created by @theash0 using, among many other elements, an effect created by @chimaerakitten
"Swirling, towering clouds, filled with electrical discharges, obscured any view of the surface. [...] It was immense, and wrong, and terrible and beautiful all at the same time. I stood there for what I later clocked as twenty-two seconds, just staring."

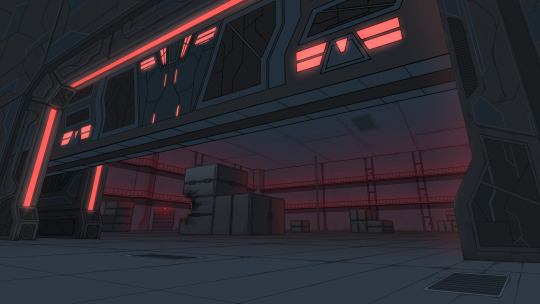
Docking Bay Door - Background, foreground, and door textures illustrated by Vanessa. 3D door composited and animated by @theash0
"Gurathin knelt beside an open maintenance floor panel next to the gate, tools scattered around, and Ratthi held a light for him. The panel was painted with an emergency feed marker label that in a selection of different languages read 'Manual Release.'"

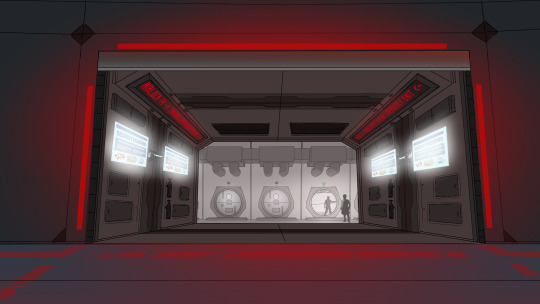
Docking Bay Corridor - Illustrated by @nirelaz , motion editing by @theash0
"Our shuttle slot was six locks down, glowing emergency lighting showing me Mensah standing beside it holding a small energy weapon."
Bonus higher-quality stills of those last two to appreciate the detail:
(Docking Bay Door by Vanessa)
(Docking Bay Corridor by @nirelaz - you can find more of the backgrounds Nirelaz did for this project here)
#murderbot#the murderbot diaries#mbfanimationproject#behind the scenes#murderbot fanart#all systems red#rogue protocol#exit strategy#background art
88 notes
·
View notes
Note
I just saw that you were making a Hubba Bubba fightstick, but I didn't see any pictures of the finished result. Did you ever finish it? I would like to see pictures of it if you did :]


XD oh god, took this pic when i was at the old house, i made this project before i moved to a blue state and changed my life! that chapter of my life feels like it wasnt even real and it ended LAST DECEMBER IN 2024.
;w; anyway yeah, i got quite sidetracked for a number of reasons
basically, i found a really dope joystick enclosure thingy on a free 3D model thingy for 3D printing
so naturally i rhink to make a stick! i get the model, and i buy some components, and i make a cool dustwasher for the stick in adobe-free-photoshop-clone, and it SEEMS like ill make some headway.
but then i decide i wanna modify the model to make it into smaller puzzle pieces cuz my printer is p small, and then i notice the enclosure is under a licensing agreement so even if i make it how i want i cant recreate it and sell it on etsy if i want, and im SUPER a copyright abolitionist so i wanna make my OWN model
;w; and then im hit with the realization that freecad is hard to use and scary to my dumb babybrain and so is 3D printing itself cuz its a skill i dont know yet
and now im moved and all my components have yet to be sent up here and my printer isnt up here either
;w; and at this point i dont think this thing is happening the way i planned it....
:3 so obviously the next step is to find the time to re-buy and re-build some parts, then maybe hire a 3D designer to make a proper enclosure under a creative commons license, and THEN finish it
XD so you know... neurospicy brain kinda just subjecting itself to the eldritch horror of creativity and executive dysfunction, and we kinda just gotta see what happens.
:3 anyway i miiiiight consider re-working the concept into a legally distinct version based on a fictional candy in my book which itself is public domain, and make it a Bubble Topz controller
XD i mean why not? the expiration date on that washer was already a reference to the year that story takes place in, might as well make more references to the lore and fandom in my brain, art is insanity, Hastur is god, and i am head of the Theater of The Mad, WHY NOT????
#insanity#neurospicy#creativity#joystick#fightstick#arcade controller#hubba bubba#strawberry#watermelon#candy#gum#bubblegum#gaming#video game#fighting games#king of fighters#executive dysfunction#3d printing#copyright abolition#fuck copyright
10 notes
·
View notes
Text
The Art of Asset Reduction: VNConf 2024 Write-Up
youtube
This is a write-up for my Visual;Conference 2024 talk on asset reduction: presentation of scenes with reduced art labor.
I will discuss how to reduce production requirements via various methods of asset presentation and staging, walking you through case studies of existing visual novels. This talk will guide you to answer the question: How do I fulfill my project scope without asset bloat?
This is an art talk that assumes you have already scoped down your story and have created a list of scenes that you need. This is not a talk about scoping down your game's story.
You have scenes you need to make. How are you going to make them (and with style)?
Abstraction
Cut-ins
Reduce
Reuse
-
I. Abstraction
I start off with abstraction as a reminder that visual novels are a combination of visual and novel (amongst other aspects)
Abstraction
Abstraction is a strong tool for bringing focus to the writing, highlighting ambiguity and setting the mood with colors.
Examples I mentioned in my talk include:
Black screen
Solid colored screen
Sky BG
Of Components
The mood-setting power of abstraction also extends to scenes with characters, especially CGs.
As again, abstraction draws focus to what you choose to emphasize: the characters.

(FLOWERS -Le volume sur ete-)
They are gay. Thank you for coming to my VNConf talk.
-
You can similarly abstract characters.

(Lachesis or Atropos)
Consider representing irrelevant characters (e.g., NPCs) as silhouettes. The reader can fill in the details within the shapes themselves.
Silhouettes are especially great for crowd scenes where you want to draw focus to the main characters.
This will be a recurring theme:
What do you really need to draw?
-
II. Cut-ins
One common not-quite full screen piece of art you'll see in many visual novels is the cut-in.
The cut-in typically consists of the:
Item/focus
Frame
And is often for topics such as objects or small animals, which may exist in the scene but may not be within the same frame of reference as the background and sprites.
The separate framing informs the players that the item is "separately framed."

(Who is the Red Queen?)
For example, this small bird is not huge and would not be the size of a character's head even had a sprite been on screen.
The Foreground-Backdrop Heuristic
Cut-ins make strong use of what I refer to as the "foreground-backdrop heuristic."
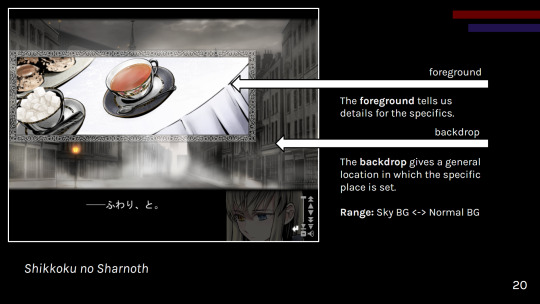
(Shikkoku no Sharnoth)
A general backdrop informs the reader of a broad location or scene (especially if characters are present). Then a more specific foreground (the cut-in) informs the reader of the specifics.
As the foreground cut-in is in a different frame, the pairing of the two helps create a mental model of the space in the reader's mind.
Cut-ins can be used for:
Backgrounds (mix and match foregrounds with a backdrop)
Reduced CGs
Presenting existing assets in a different frame of reference
CG variants
Try tackling your visual presentation in a layered, comic book-esque fashion with cut-ins!
Just be careful about clutter.
Whether you want to go for the layered cut-in style, the 3d stage cinematic style, or a combination of the two, make sure you have a vision before you jump in.
SD CGs
I had to make an obligatory mention of SD "super deformed" CGs in this talk, so here it is in the write up as well.
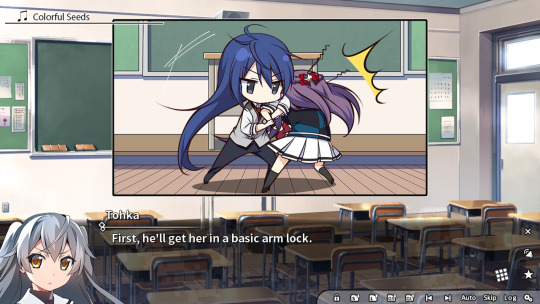
(Grisaia: Phantom Trigger Vol. 1)
SD, chibi. However you call these, they're great for playful scenes that might require more art than your classic sprite-background combination.
What SD CGs do best is that they:
Fulfill the role of a CG
Are easier to draw than fully rendered non-chibi art
Can be distributed to different artists to reduce artist workloads due to style difference
Just keep in mind that a simplified CG is still a CG and thus may lack reusability.
Consider what scenes really need a CG.
-
III. Reduce
Now, consider asking yourself: "Does what a player does not see need to exist?" (mostly applicable for games with opaque UI)
Yet, what you need to draw is what you need to draw. How can you reduce the work in what you need to draw?
One option is:
Palette Limitation
You've heard of gray scale games, but don't forget about other ways of limiting your palette to reduce workload.
Dramatic, mood setting color power
Less rendering work
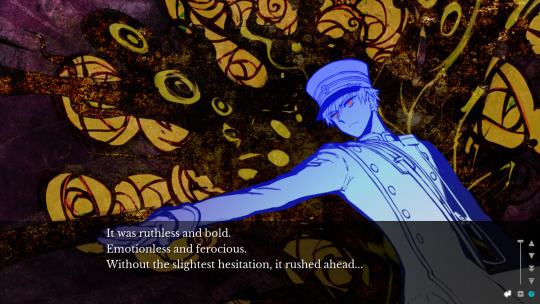
(Sona-Nyl of the Violet Shadows)
A similar idea can be applied to NPCs for a more detailed take on silhouettes.
-
IV. Reuse
Lastly, please remember to be economical and reuse assets as necessary. One of the great joys of cut-in BGs, for example, is reusability.
I had to give an obligatory mention to CG variants in my talk, such as:
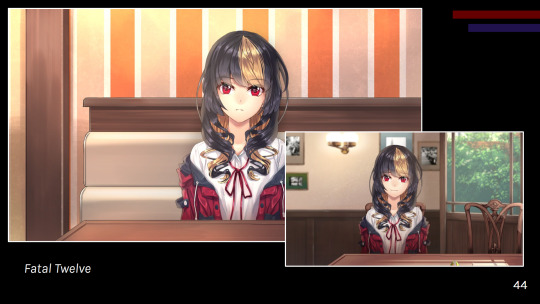
(Fatal Twelve)
However, overall, you never know when you'll want to use various components of your art elsewhere such as intermixing CG and sprite art.
Please keep your working layers if possible.
Other reuse examples:
UI (especially in episodic games)
Gameplay (e.g., Kogado's rhythm game)
Consider asking your programmer to work on a framework to reuse, reducing repeated code work.
-
Conclusions
All in all, you can make your game.
And it doesn't need to be hellish on your budget or timeline.
If you take anything away from this talk, let it be to:
Prioritize reusable assets
Maintain aesthetic; avoid clutter
Display important scenes
Do not scope up; aim for a set goal
A scene can be presented in many stylish ways, some of which will suit your workflow better than others.
So, go on. Make your game!
-
Interested in my works? Find me on itch:
And check out my newsletter:
-
VNConf 2023 Talk Write-up:
#visual novel development#vnconf#visual novel#vn#vndev#development guide#devlog#game development#talk write-up#gamedev#indiedev#this talk is also a yuri visual novel recommendation (kind of)#lachesis or atropos#shiei no sona-nyl#fatal twelve#grisaia phantom trigger#shikkoku no sharnoth#flowers visual novel#who is the red queen?
55 notes
·
View notes
Text

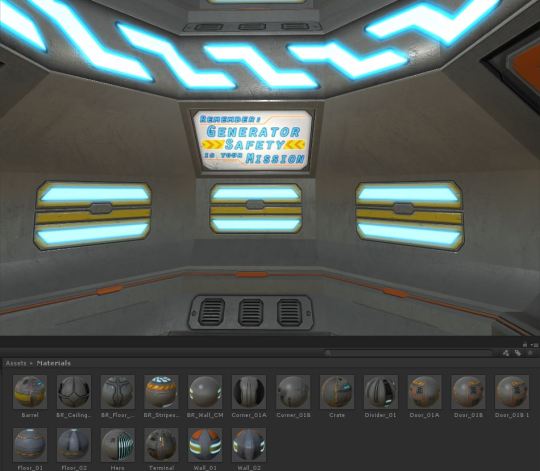
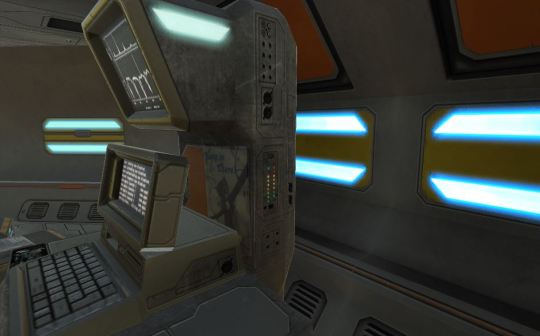
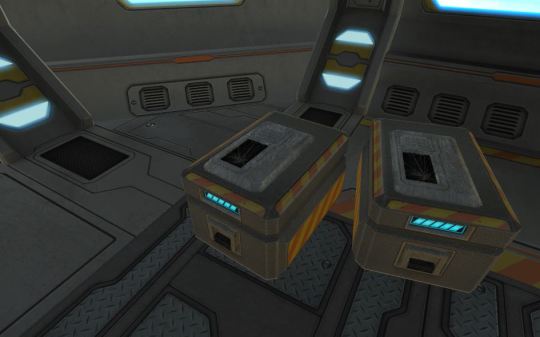
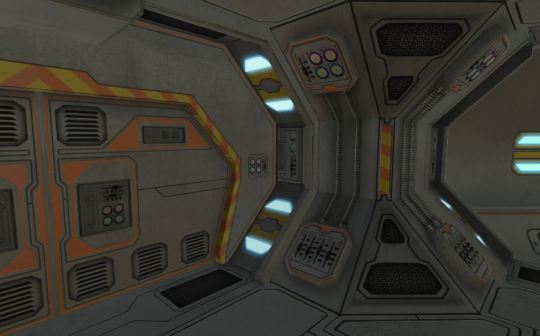

more 2015 vintage 3D work! This class project was fun-- we had to design, model, and texture some props and modular environment parts to create a sci-fi interior. Mine came out pretty busy, but ehh I had to pull this together in a week so you get what you get lol. I'm still proud of the props and the modular parts and very sad I didn't save out the 3D scene or its component parts at all (at least not anywhere I've found yet). I think I crammed some nice details into this environment-- I'm fond of that chunky computer terminal thing especially. It's hard to see, but I put a grunged-up "Hang In There!" kitten poster on it, to help motivate whatever stressed-out employees work in this place.
This was also the project where I learned how to make emissive textures! I went absolutely bananas with them. As was my right.
#sci-fi#low poly#3d art#my art#LMAOOOO haha you can see a seam where I didn't snap a couple modular room pieces together properly in the last screenshot
128 notes
·
View notes
Text
roadblocks i've encountered so far in my planning out of my falsettos cube project:
- the two tiny little extra pieces tossed up to whizzer in march of the falsettos. do they fit into the original cube or are those just extra?
- how hollow is the cube? like i don't think it's filled completely because of the black hole in the cube once whizzer's gravestone is removed but it's not entirely hollow so??
- the little piece with a hinge on it that trina opens in making a home and gets three pillows from. what the fuck
- the cylinder piece (most notable when marvin punches the pillar in marvin hits trina). how did they fit a cylinder in that fucking cube
- nancy reagan. i know that the gray thing they stuck her on is probably not part of the cube, but you can't know for sure
- the camera angles. most of the moving around of components happens off screen and god i can't take it. that and the dark lighting. did not notice how dim falsettos is lit until now
- overall the quality of the proshot. like in a good way. the cuts and angles and camera movements really make for a better watching experience but trying to piece together the cube mentally using it has been hell. might try to find a slime tutorial recorded from the back of the theater to see if i could cross reference some moments
- act two doesn't really rebuild the cube, there's just a bunch of spare parts floating around. how do they fit together?!
- depth is not captured very well on camera. so unless i actively watch a piece get rotated i have no idea how thick anything is
- the cube is basically gone for a good chunk of the last half of act 2. help me
(side note i have gone through the entire proshot once. idk if i really want to spend another several hours scouring the musical for extra details, but i definitely still am very confused. it does not help that i struggle significantly to think in 3d for some reason?)
gonna try building a model in blender first (i have never used blender) to plan everything out before i actually start carving. will continue updating as i go
#falsettos#if overambition was a person it would be me#for the love of god if someone finds a blueprint i would pay money to have it sent my way#i almost failed high school geometry why am i attempting to do this#pray for me
31 notes
·
View notes
Text
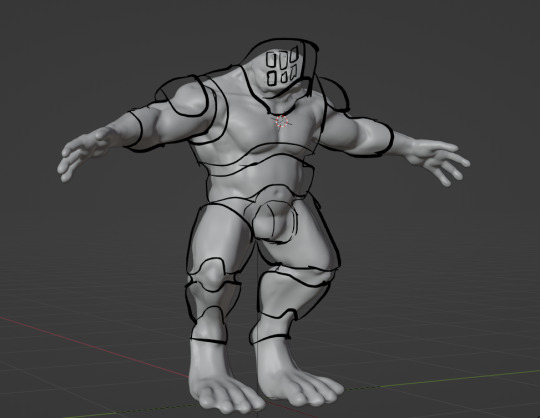
Guh learning things is hard! This is my first time doing actual character design (I don't count making like 3 orcs, those were pretty cliche.) I sculpted this guy, then redid the legs to be digitigrade, then I made a completely new head cause I didn't like the old one. This is why you figure out the final design before you start making the high effort models, but oh well, we learn as we go. He's shaping up to look like a generic sci-fi mook, but I'm happy enough to move on.
Now for the armor. This is going to be the complicated part, as it needs to be able to be disassembled. It'll have a bunch of layers, a top protective alloy layer, a shock absorbing gel layer underneath, hydraulic/electronic actuators, a skintight cooling suit, maybe more? The story is this guy gets hit by an avalanche, and his suit breaks bad enough he can't take it off. You need to take it apart and fix various broken components on it.
You'd use a bunch of different tools, like a plasma torch for the big armor pieces, pliers for the gel, screwdrivers for the electronics. And then it turns there's a hydraulic fluid leak on the chest, so you gotta take off the codpiece to clean it up!
I'm finding it a bit hard to conceptualize this, as it's got so many moving pieces to design and fit together. The art and 3D models of the armor pieces, the interaction system with all the different tools, the animations, it's a big mess of bits and pieces I have ideas about. I'll do a bunch of sketches and hopefully it stops being just a big soup in my head.
And I want to do a backstory comic on top of that, because the scope of this project wasn't big enough already. Did you know this was supposed to be small and simple at one point?
2 notes
·
View notes
Text
National Institute of Fashion Technology - [NIFT], Bangalore
Overview
The National Institute of Fashion Technology (NIFT), Bangalore, is one of the most prominent and renowned fashion design colleges in India. As part of the NIFT network, the Bangalore campus is known for offering high-quality education, advanced infrastructure, and a strong reputation in the field of fashion and design. The institute offers a diverse range of undergraduate and postgraduate programs that equip students with the skills and knowledge necessary to thrive in the dynamic and ever-evolving world of fashion.
NIFT Bangalore has carved a niche for itself in the field of fashion education, nurturing future leaders, designers, and innovators in the global fashion industry. Its emphasis on creativity, innovation, and industry-relevant skills makes it one of the top choices for students aspiring to build a career in fashion and design.
Location and Infrastructure
NIFT Bangalore is located in the heart of the city, offering easy access to the vibrant and evolving fashion and retail industry. The campus itself is equipped with state-of-the-art facilities that cater to the practical and creative needs of the students. The infrastructure includes:
Design Studios are equipped with the latest technology and resources for fashion design, pattern making, draping, and garment construction.
Computer Labs offer advanced software for design, pattern making, and fashion visualization, including CAD, 3D modeling, and other industry-standard tools.
Library: A vast collection of fashion design and industry-related books, journals, and research materials.
Workshops and Laboratories: Students can learn about the practical aspects of the fashion industry, such as fabric dyeing, embroidery, and printing, in these spaces.
The campus also has other student amenities like sports facilities, hostels, and recreational spaces that foster a conducive environment for holistic learning.

Courses Offered
NIFT Bangalore offers various programs at both undergraduate and postgraduate levels, each aimed at shaping the skills and knowledge of students for careers in the fashion industry. The courses offered include:
Undergraduate Programs:
Bachelor of Design (B.Des): Specializations include Fashion Design, Textile Design, and Accessory Design.
Bachelor of Fashion Technology (B.FTech): A program focusing on the technical aspects of fashion, including production, textiles, and apparel manufacturing.
Postgraduate Programs:
Master of Design (M.Des): For students seeking a deeper understanding of design theory, research, and innovation.
The Master of Fashion Management (MFM) program focuses on the business, marketing, and management aspects of the fashion industry.
The Master of Fashion Technology (M.FTech) program is designed for individuals pursuing a career in fashion and textiles that emphasizes technical and engineering skills.
The curriculum is regularly updated to stay in line with industry standards, ensuring that students are equipped with cutting-edge knowledge and skills. Practical exposure and internships with leading fashion houses and retail brands are also integral components of the courses.
Faculty and Expertise
NIFT Bangalore boasts a highly qualified and experienced faculty that includes industry professionals, academicians, and designers. The faculty’s diverse backgrounds in both academia and industry ensure that students are exposed to the most relevant concepts and real-world practices. This combination of theoretical knowledge and practical experience ensures that graduates of NIFT Bangalore are ready to meet the challenges of the competitive fashion industry.
Industry Connections and Internships
NIFT Bangalore has strong industry connections with top fashion houses, retailers, textile companies, and design studios, which play a crucial role in providing students with real-world exposure. Through internships, industry visits, and live projects, students gain valuable insights into the latest trends, business practices, and technologies in fashion.
Students have the opportunity to work with some of the biggest names in the industry, gaining exposure to global fashion markets, working with designers, learning from manufacturers, and even participating in fashion shows and exhibitions. These connections significantly enhance employability and provide a strong network for future job placements.
Placements and Career Opportunities
NIFT Bangalore has a solid placement record, with students being recruited by leading fashion brands, design studios, retail giants, and global companies in various roles such as:
Fashion Designer
Textile Designer
Fashion Merchandiser
Fashion Consultant
Brand Manager
Apparel Production Manager
The institute has a dedicated placement cell that assists students in securing internships and full-time employment. Its strong industry connections, combined with a focus on skill development, ensure that graduates are well-prepared for the competitive job market.
Extracurricular Activities and Events
NIFT Bangalore is not just about academics; it also offers students a platform to showcase their talents through extracurricular activities. These activities include fashion shows, design competitions, cultural events, and workshops. The annual NIFT Bangalore Fashion Show is a highlight of the academic calendar, where students get the chance to display their collections and designs to a wider audience.
Additionally, the institute organizes events like seminars, workshops, and exhibitions, where students can interact with industry experts, gain knowledge, and enhance their skill sets. This fosters a creative and stimulating environment, encouraging students to think innovatively.
Conclusion
NIFT Bangalore stands as a leading institution for students seeking to carve a niche in the fashion and design industry. With its excellent infrastructure, top-notch faculty, industry connections, and diverse programs, NIFT Bangalore provides students with the best possible platform to succeed in the dynamic world of fashion. Whether you're interested in design, technology, or management, NIFT Bangalore offers an education that prepares you for a successful and fulfilling career.
#NIFTBangalore#FashionDesign#FashionEducation#NIFT#FashionTechnology#DesignEducation#FashionIndustry#FashionManagement#TextileDesign
2 notes
·
View notes
Text

Welding materials on the moon
Before humans can colonize the moon or Mars, scientists and engineers must first develop techniques for building permanent structures and pressurized habitats in harsh, thin-atmosphere and low-gravity environments.
Dr. Wei Li, an assistant professor of mechanical engineering in the Erik Jonsson School of Engineering and Computer Science at The University of Texas at Dallas, is developing a virtual lunar welding platform to troubleshoot assembling large structures in such conditions.
“As we try to return to the moon and reach Mars, keeping astronauts safe while achieving the missions is very important,” said Dr. Edward White, professor and department head of mechanical engineering and holder of a Jonsson School Chair. “Being in Earth’s orbit is a lot easier knowing that when things go wrong, we can make repairs and return safely. I’m really excited that Dr. Li’s research will help play an important role in making space travel safer and will enable us to successfully complete space missions.”
Li recently received an Early Stage Innovations three-year grant from NASA for up to $750,000 to support his study of welding on the surface of the moon. He was one of six researchers nationwide selected to receive the 2024 annual award, which is designed to accelerate the development of groundbreaking, high-risk/high-payoff space technologies.
“There are three main challenges for the astronauts working on the moon’s surface,” Li said. “The moon has a very thin atmosphere, so there are steep temperature changes, from around minus 387 degrees Fahrenheit to 260 degrees Fahrenheit. There is also an extreme vacuum environment due to the thin atmosphere. Finally, the gravity on the moon’s surface is only about one-sixth that of the Earth. The extreme environment can complicate the reliable implementation of building or manufacturing large structures on the moon’s surface and can lead to manufacturing defects.”
Welding metal in such an environment can cause defects that impact the material’s load-bearing capability, leading to fractures and ductile cracks; nevertheless, in-space assembly is vital to NASA’s long-term exploration goals, Li said.
“It would be very hard to establish regular machine shops on the moon’s surface to manufacture metal structures as we do on Earth,” Li said. “However, it could be possible to use spacecraft to ship metal components from the Earth to the moon, then deploy welding technology there to assemble the components into large structures that could enable the establishment of a human community.”
Li’s project will simulate lunar conditions to test the processes of electrical arc, laser and electron-beam welding in that type of environment. His virtual lunar welding platform simulates the welding process and welding-joint mechanical properties with a multiple-physics modeling approach. Among the equipment he is using is a custom-built, directed energy deposition machine, a technology typically used for additive manufacturing of metals. Li said the research also could be applied to fused deposition modeling, a type of 3D-printing process that can print nonmetallic parts in space.
Li, who directs the Comprehensive Advanced Manufacturing Lab in the Jonsson School, will work with his team to create the simulated environment at UT Dallas while working directly with NASA researchers, including Dr. Fredrick Michael from NASA’s Marshall Space Flight Center.
Li said his team will validate the simulation framework and modeling results with both space-based and on-the-ground experiments, as well as with historical experimental flight data from Skylab, the first U.S. space station. He said the model could be developed further for other space environments, including Mars and the International Space Station.
Dr. Wei Li received a grant from NASA to develop a platform that could overcome some of the challenges in building permanent structures in harsh, thin-atmosphere and low-gravity environments. Credit The University of Texas
2 notes
·
View notes
Text
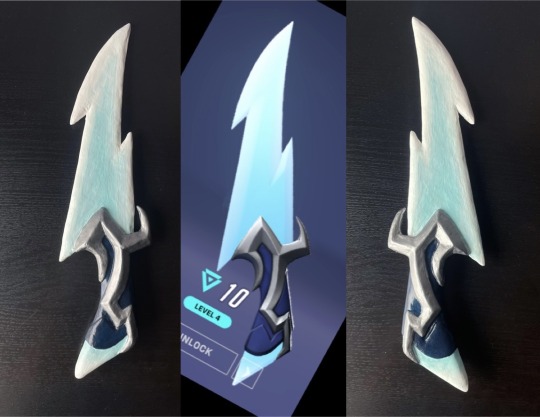
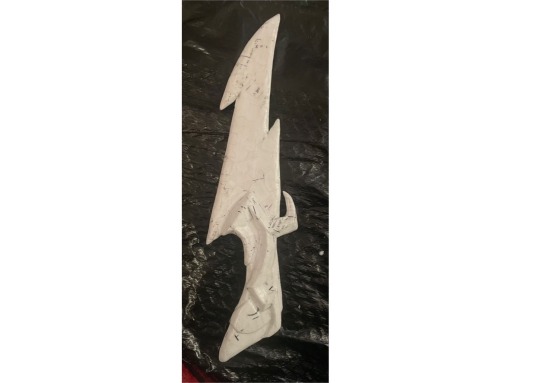
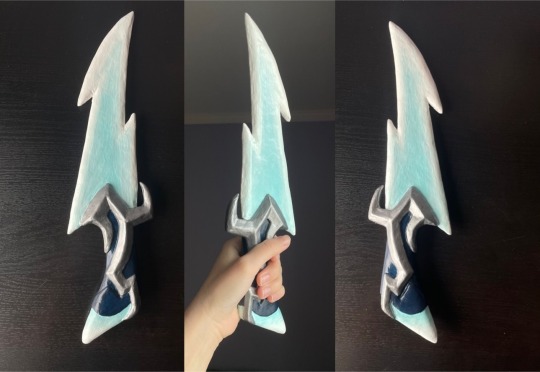
Making Junker Queen’s Mythic Skin Knife :3
(and how i make halfway-decent cosplay weapons for potentially zero dollars !)
You can check my “nyx cos” tag for the other two weapons i’ve made so far!
Thought it’d be fun to share my very scrappy craft process without good quality EVA foam/worbla/and the like. First time I made D.Va’s gun it was actually zero dollars because I used crap I already had lying around, so if you have basic craft supplies, you can totally do something like this without splurging on anything else! Plus it’s super fun !!
Materials:
Blueprint/Guide
I quite literally grab screenshots of the front/back/sides of the weapon I’m trying to make, blow it up to size on my PC monitor, tape a piece of paper over it and trace it directly from there. Otherwise, you can trace it digitally + print it out to size. If it’s a bigger weapon or has distinct components you’ll probably have to split it into parts/make multiple copies.
Overwatch is great for this because you can actually very easily get a 360 view of every weapon from the hero gallery. Otherwise, there’s usually a 3D model available for any game weapons you can find online.
Cardboard
Always save boxes!!!
Box Cutter
Craft Foam
And I mean that cheap, kid’s craft foam you use in elementary school.
Apparently Michael’s has “holiday themed” packs of foam sheets that are nothing special, just a relevant color. But that means they go on sale right after that holiday and you can get a 15 pack of 9 x 12 foam sheets for $3. Apparently white is a Christmas color!
Hot Glue
Mod Podge/White Glue (for Paper Mache)
Paint!
Acrylic paint, spray paint, whatever ya got. Hell, I even used pink nail polish for D.Va’s gun because I didn’t have a good pink paint color. Aside from the fumes, works well enough!
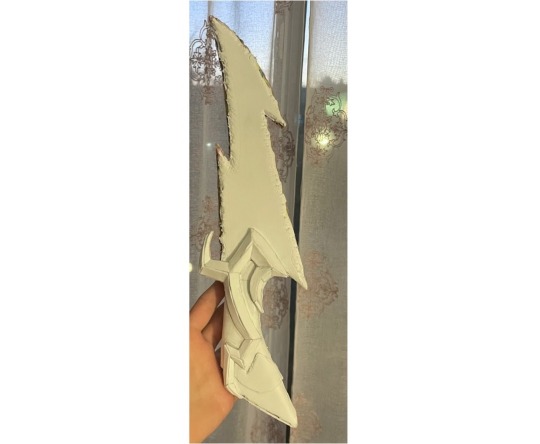
I make the base layer out of cardboard, cutting it out by directly tracing the blueprint I make. For the knife, it was a lot simpler, since it’s mostly a flat blade, but same logic for guns, you just have to really think about the different components + layers.
Then I use the craft foam + hot glue to build on top of that + for any details! Since the cheapo foam you get is usually 2mm foam, it doesn’t really hold its own shape, hence the cardboard. I’m pretty sure the nicer EVA foam I see cosplayers use is a lot denser + can come thicker, so with that you could probably make the whole thing out of foam and have nicer edges.
Speaking of the blade’s edges, these were trash. Get a sharper blade T-T Every time I try to get a rounded/bevelled edge by carving the edge of the foam, it comes out flaky. I think the way this foam is, it’s just too soft to get a clean angled cut out of. I ended up just kind of scraping the blade across the edge in an attempt to vaguely angle it thinner on edges. Which, for guns and not a knife blade, ends up fine with the next step, but for this… it definitely could’ve used a cleaner edge. Sooo maybe DO use better materials if you’re making a dagger LMAO
BUT for the most part, however ugly/flaky/messy your foam is will not matter much because…
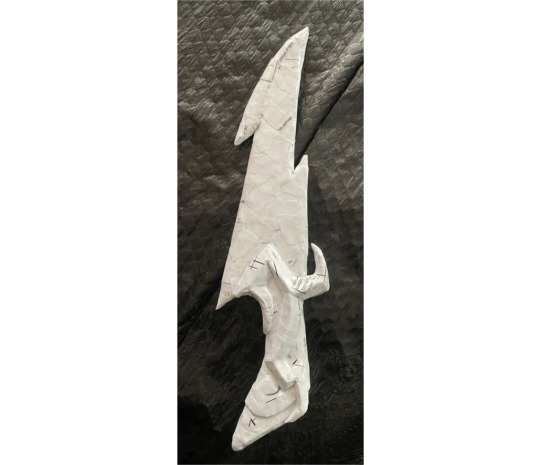
Paper mache!! Basically, I just needed some way to smooth everything out, get rid of foam seams, cardboard edges, etc. And it works! Also makes it pretty satisfyingly sturdy. I use old college homework as scrap paper + mod podge because it’s what I had on hand. Regular watered down white glue is surely cheaper, tho I’m not sure how much different the finish/structure will be. I’ll probably try that at some point!
Most important thing after this, though, is sanding it. As you can tell, all the paper edges are really obvious, so the one thing to actually buy here, if you don’t have it, is sandpaper. I didn’t have it when I made D.Va’s gun, and you can tell. I found a small variety pack of 80-320 grit sandpaper for around $7 I think (you can prob find cheaper), and it’ll last me quite a few projects! Those grits work pretty great, too, you definitely need to get up to a pretty fine one for it to be nicely smooth.
Not sure how well this comes across in a picture, but: sanded! And really take your time sanding, you want these things as smooth as you can get it so it actually looks good when you paint it. Also, wear a mask!! Do not breathe in paper + glue dust!!
After sanding it, I brushed on another layer of (matte! so paint actually sticks to it) Mod Podge just for an extra smooth base layer. Not sure how necessary it is, since I didn’t do it on my last gun, but I think it helped? lol
After that, it’s just painting time!! I grabbed cheap acrylic paints from Michael’s and went to town. The only thing I’d say you really have to choose with care is metallics. Apparently, a decent silver is a lot easier to find in acrylics than gold! Even then, there’s probably better options than what I used, but I think it looks decent enough.
I had a sealer spray paint from a different project, so I’ve just been using that to seal everything. It’s not the greatest choice, since it’s a glossy finish, it’s.. really glossy. I don’t mind it personally, but depending on what you’re making, mayyybe don’t pick a glossy one lmao.
And there you have it!! Cheapo prop weapons! I hope this was mildly intriguing or possibly helpful. I love me some cheap crafting and I encourage everyone to do cheap crafting. So fun!!
#no but seriously why is worbla so expensive#nyx cos#overwatch#overwatch 2#overwatch cosplay#cosplay#prop weapon#cosplay props#cosplay tips#junker queen
6 notes
·
View notes
Text
Summary Analysis of CNC Milling Process

In modern manufacturing, CNC milling technology is widely used for its high precision and flexibility. Whether it's a mechanical part, an automotive component, or a component for a medical device, CNC milling provides excellent machining results.
What is CNC Milling?
CNC milling is a computer-controlled machining process that utilises a rotating tool to cut a workpiece. CNC milling allows for greater accuracy and consistency than traditional manual milling. It is often combined with other machining methods (e.g. turning, drilling) to meet different and diverse manufacturing needs.
Workflow of CNC Milling
Design stage In the initial stages of CNC milling, designers use Computer-Aided Design (CAD) software to create a model of the product. Commonly used software includes SolidWorks and Autodesk, which are tools that help designers accurately draw the shape and dimensions of the desired part.
Programming stage Once the design is complete, the CAD file needs to be converted to G-code, a language that CNC machines can understand. With Computer-Aided Manufacturing (CAM) software, the design files are converted into machine-executable instructions that enable automated machining.
Machine setting During the machine set-up phase, the workpiece needs to be fixed to the table and a suitable tool selected. At the same time, the operator needs to set the initial co-ordinates to ensure accurate positioning during machining.
Advantages of CNC Milling
High precision and dimensional stability CNC milling allows for micron-level machining accuracy, ensuring consistency from part to part.
Complex shapes can be processed Whether it's a simple flat surface or a complex three-dimensional structure, CNC milling can handle it with ease.
Efficient production capacity Due to its high degree of automation, CNC milling can significantly increase productivity and shorten lead times.
Applications of CNC Milling
CNC milling technology is used in a wide range of industries, including:
Mechanical parts: Used in the manufacture of key components in a variety of mechanical equipment.
Automotive parts: High-precision parts for the automotive industry, such as engine components.
Medical device parts: Ensure the reliability and safety of medical devices.
Optical product parts: For the production of optical instruments and related products.
Frequently Asked Questions
What materials can be CNC milling machined? CNC milling is suitable for a wide range of materials, including metals (e.g. aluminium, steel), plastics, wood, and more. However, for some materials, such as ceramics or certain composites, the machining is more difficult and requires special handling.
What are the limitations of CNC milling? Despite its advanced technology, CNC milling has some limitations. For example, machining may be limited for internal vertical angles or very complex small structures.In addition, high hardness materials may lead to faster tool wear, which can affect productivity.
Comparison of CNC milling with other manufacturing technologies The advantages and disadvantages of each can be seen when comparing CNC milling with other manufacturing techniques such as 3D printing. CNC milling is generally superior to 3D printing in terms of accuracy and surface finish, but 3D printing has advantages in rapid prototyping and complex geometries. In terms of cost-effectiveness, the choice of technology depends on specific project needs and budget.
Summary
In summary, CNC milling is an indispensable manufacturing technology that plays an important role in several industries with its efficiency, precision and flexibility.
#prototyping#prototype#rapid prototyping#prototype machining#precision machining#cnc machining#cnc milling#machining parts#cnc milling 5 axis#cnc milling machining#cnc milling turning#precision cnc milling#cnc milling parts
2 notes
·
View notes
Text
Cosplay Guide Update
So I know what you're all probably thinking.
Where's the update? How long till the next release? You said you'd be working on it.
Well about that.
It turns out that I'm an absolute fucking moron.
Peaking behind the production curtain here, but I generate my images for the guide using extracted/ripped assets from the MW titles, importing them into blender, converting and assigning textures to the relevant objects, and then generating still image renders in Blender at relatively high resolutions.
It was that last component that was a major time sink, as with my older rig it was taking anywhere between 30-60 mins to generate a single image. And then while I was doing that, I wasn't able to do anything else on my system as my performance would tank.
I just thought it was because I was using an old GPU, so I only recently (read: within the past month) upgraded from a 1050 to a 3060 TI.
I did a test render with the new card, same result. Ages to render.
Wtaf did I get a new card for then, aside from being able to play games released in the past couple of years...
So I finally caved and did a bit of research... and well...
... guess who forgot to configure Blender to use GPU rendering instead of CPU rendering....
Yeaaaaaaahhhh, not my proudest moment. I did another test render with a completely different set of assets, as I was kinda knee deep in another 3d modelling passion project:
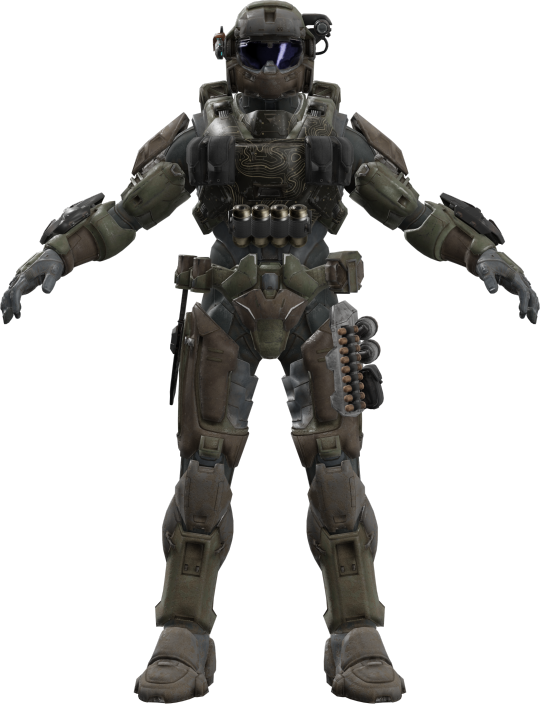
Imagining what our MW boys would look like as Spartan IV's... That's Soap btw.
That took five minutes.
SO ANYWAY
Now that I'm not giving my computer a simultaneous heart attack and stroke trying to render a picture of a plate carrier, I can now expedite production on the MW3 kit breakdowns. Honestly, the product of the renders was becoming a chore with how long it was initially taking and the performance hit preventing me from doing something else while I waited (like reseaching pieces of kit, adding text to a breakdown page, formatting, etc etc)
Now that I've worked that kink out? I should be able to condense my production pipeline and timeframe considerably.
Can I give you an ETA for 1.2? Fuck no.
How long is a piece of string? Honestly, with how my life is atm and how fast my fixations are shifting, I can't guarantee being able to do this for long spurts of time like I initially managed.
I will say that I will expand the scope slightly to feature notable NPCs such as Shadow Company operators from that one mission in MWII, and also going back to MW2019 and adding breakdowns of character loadouts seen there, to provide an all encompassing campaign character guide.
Once all that's done, I'll be hanging up my guide hat for the time being until another major FPS drops that has everyone running to cosplay... could be a Battlefield, could be another MW, might be another IP entirely. Who knows, we'll have to wait and see!
Thanks for sticking around for the ramble... felt good to get something out.
Until next time!
Jesse
5 notes
·
View notes
Text
How-To IT
Topic: Core areas of IT
1. Hardware
• Computers (Desktops, Laptops, Workstations)
• Servers and Data Centers
• Networking Devices (Routers, Switches, Modems)
• Storage Devices (HDDs, SSDs, NAS)
• Peripheral Devices (Printers, Scanners, Monitors)
2. Software
• Operating Systems (Windows, Linux, macOS)
• Application Software (Office Suites, ERP, CRM)
• Development Software (IDEs, Code Libraries, APIs)
• Middleware (Integration Tools)
• Security Software (Antivirus, Firewalls, SIEM)
3. Networking and Telecommunications
• LAN/WAN Infrastructure
• Wireless Networking (Wi-Fi, 5G)
• VPNs (Virtual Private Networks)
• Communication Systems (VoIP, Email Servers)
• Internet Services
4. Data Management
• Databases (SQL, NoSQL)
• Data Warehousing
• Big Data Technologies (Hadoop, Spark)
• Backup and Recovery Systems
• Data Integration Tools
5. Cybersecurity
• Network Security
• Endpoint Protection
• Identity and Access Management (IAM)
• Threat Detection and Incident Response
• Encryption and Data Privacy
6. Software Development
• Front-End Development (UI/UX Design)
• Back-End Development
• DevOps and CI/CD Pipelines
• Mobile App Development
• Cloud-Native Development
7. Cloud Computing
• Infrastructure as a Service (IaaS)
• Platform as a Service (PaaS)
• Software as a Service (SaaS)
• Serverless Computing
• Cloud Storage and Management
8. IT Support and Services
• Help Desk Support
• IT Service Management (ITSM)
• System Administration
• Hardware and Software Troubleshooting
• End-User Training
9. Artificial Intelligence and Machine Learning
• AI Algorithms and Frameworks
• Natural Language Processing (NLP)
• Computer Vision
• Robotics
• Predictive Analytics
10. Business Intelligence and Analytics
• Reporting Tools (Tableau, Power BI)
• Data Visualization
• Business Analytics Platforms
• Predictive Modeling
11. Internet of Things (IoT)
• IoT Devices and Sensors
• IoT Platforms
• Edge Computing
• Smart Systems (Homes, Cities, Vehicles)
12. Enterprise Systems
• Enterprise Resource Planning (ERP)
• Customer Relationship Management (CRM)
• Human Resource Management Systems (HRMS)
• Supply Chain Management Systems
13. IT Governance and Compliance
• ITIL (Information Technology Infrastructure Library)
• COBIT (Control Objectives for Information Technologies)
• ISO/IEC Standards
• Regulatory Compliance (GDPR, HIPAA, SOX)
14. Emerging Technologies
• Blockchain
• Quantum Computing
• Augmented Reality (AR) and Virtual Reality (VR)
• 3D Printing
• Digital Twins
15. IT Project Management
• Agile, Scrum, and Kanban
• Waterfall Methodology
• Resource Allocation
• Risk Management
16. IT Infrastructure
• Data Centers
• Virtualization (VMware, Hyper-V)
• Disaster Recovery Planning
• Load Balancing
17. IT Education and Certifications
• Vendor Certifications (Microsoft, Cisco, AWS)
• Training and Development Programs
• Online Learning Platforms
18. IT Operations and Monitoring
• Performance Monitoring (APM, Network Monitoring)
• IT Asset Management
• Event and Incident Management
19. Software Testing
• Manual Testing: Human testers evaluate software by executing test cases without using automation tools.
• Automated Testing: Use of testing tools (e.g., Selenium, JUnit) to run automated scripts and check software behavior.
• Functional Testing: Validating that the software performs its intended functions.
• Non-Functional Testing: Assessing non-functional aspects such as performance, usability, and security.
• Unit Testing: Testing individual components or units of code for correctness.
• Integration Testing: Ensuring that different modules or systems work together as expected.
• System Testing: Verifying the complete software system’s behavior against requirements.
• Acceptance Testing: Conducting tests to confirm that the software meets business requirements (including UAT - User Acceptance Testing).
• Regression Testing: Ensuring that new changes or features do not negatively affect existing functionalities.
• Performance Testing: Testing software performance under various conditions (load, stress, scalability).
• Security Testing: Identifying vulnerabilities and assessing the software’s ability to protect data.
• Compatibility Testing: Ensuring the software works on different operating systems, browsers, or devices.
• Continuous Testing: Integrating testing into the development lifecycle to provide quick feedback and minimize bugs.
• Test Automation Frameworks: Tools and structures used to automate testing processes (e.g., TestNG, Appium).
19. VoIP (Voice over IP)
VoIP Protocols & Standards
• SIP (Session Initiation Protocol)
• H.323
• RTP (Real-Time Transport Protocol)
• MGCP (Media Gateway Control Protocol)
VoIP Hardware
• IP Phones (Desk Phones, Mobile Clients)
• VoIP Gateways
• Analog Telephone Adapters (ATAs)
• VoIP Servers
• Network Switches/ Routers for VoIP
VoIP Software
• Softphones (e.g., Zoiper, X-Lite)
• PBX (Private Branch Exchange) Systems
• VoIP Management Software
• Call Center Solutions (e.g., Asterisk, 3CX)
VoIP Network Infrastructure
• Quality of Service (QoS) Configuration
• VPNs (Virtual Private Networks) for VoIP
• VoIP Traffic Shaping & Bandwidth Management
• Firewall and Security Configurations for VoIP
• Network Monitoring & Optimization Tools
VoIP Security
• Encryption (SRTP, TLS)
• Authentication and Authorization
• Firewall & Intrusion Detection Systems
• VoIP Fraud DetectionVoIP Providers
• Hosted VoIP Services (e.g., RingCentral, Vonage)
• SIP Trunking Providers
• PBX Hosting & Managed Services
VoIP Quality and Testing
• Call Quality Monitoring
• Latency, Jitter, and Packet Loss Testing
• VoIP Performance Metrics and Reporting Tools
• User Acceptance Testing (UAT) for VoIP Systems
Integration with Other Systems
• CRM Integration (e.g., Salesforce with VoIP)
• Unified Communications (UC) Solutions
• Contact Center Integration
• Email, Chat, and Video Communication Integration
2 notes
·
View notes
Text
#TheeForestKingdom #TreePeople
{Terrestrial Kind}
Creating a Tree Citizenship Identification and Serial Number System (#TheeForestKingdom) is an ambitious and environmentally-conscious initiative. Here’s a structured proposal for its development:
Project Overview
The Tree Citizenship Identification system aims to assign every tree in California a unique identifier, track its health, and integrate it into a registry, recognizing trees as part of a terrestrial citizenry. This system will emphasize environmental stewardship, ecological research, and forest management.
Phases of Implementation
Preparation Phase
Objective: Lay the groundwork for tree registration and tracking.
Actions:
Partner with environmental organizations, tech companies, and forestry departments.
Secure access to satellite imaging and LiDAR mapping systems.
Design a digital database capable of handling millions of records.
Tree Identification System Development
Components:
Label and Identity Creation: Assign a unique ID to each tree based on location and attributes. Example: CA-Tree-XXXXXX (state-code, tree-type, unique number).
Attributes to Record:
Health: Regular updates using AI for disease detection.
Age: Approximate based on species and growth patterns.
Type: Species and subspecies classification.
Class: Size, ecological importance, and biodiversity contribution.
Rank: Priority based on cultural, historical, or environmental significance.
Data Collection
Technologies to Use:
Satellite Imaging: To locate and identify tree clusters.
LiDAR Scanning: For precise 3D modeling of forests.
On-the-Ground Surveys: To supplement remote sensing data.
AI Analysis: For rapid categorization and health diagnostics.
Registration and Citizenship Assignment
Tree Dossier: Each tree receives a profile in the database with all its recorded attributes.
Citizen Designation: Trees are acknowledged as citizens of Thee Forest Kingdom, emphasizing ecological respect.
Legal Framework: Advocate for laws to grant trees specific rights under environmental protection acts.
Maintenance and Monitoring
Health Monitoring: Use drones, satellite updates, and IoT sensors for ongoing health assessments.
Database Updates: Incorporate real-time data about environmental changes and tree growth.
Public Involvement
Encourage people to "adopt" trees and participate in their preservation.
Create educational programs to promote awareness of tree citizenship.
Key Benefits
Environmental Conservation: Improved forest management through real-time data and protection of ecosystems.
Cultural Recognition: Trees are recognized as a vital part of the Earth’s community, honoring their importance.
Ecological Advocacy: Strengthened legal protections for forests and individual trees.
Next Steps
Assemble a task force of environmental scientists, satellite imaging experts, and software developers.
Secure funding through governmental grants, non-profits, and eco-conscious corporations.
Pilot the program in a smaller region before scaling to all of California.
Would you like me to draft a more detailed technical or legal framework for this system?
The implementation of the Tree Citizenship Identification Network and System (#TheeForestKingdom) requires a robust technological and operational framework to ensure efficiency, accuracy, and sustainability. Below is an implementation plan divided into major components.
System Architecture
a. Centralized Tree Database
Purpose: To store and manage tree data including ID, attributes, location, and health.
Components:
Cloud-based storage for scalability.
Data categorization based on regions, species, and priority.
Integration with satellite and IoT data streams.
b. Satellite & Imaging Integration
Use satellite systems (e.g., NASA, ESA) for large-scale tree mapping.
Incorporate LiDAR and aerial drone data for detailed imaging.
AI/ML algorithms to process images and distinguish tree types.
c. IoT Sensor Network
Deploy sensors in forests to monitor:
Soil moisture and nutrient levels.
Air quality and temperature.
Tree health metrics like growth rate and disease markers.
d. Public Access Portal
Create a user-friendly website and mobile application for:
Viewing registered trees.
Citizen participation in tree adoption and reporting.
Data visualization (e.g., tree density, health status by region).
Core Technologies
a. Software and Tools
Geographic Information System (GIS): Software like ArcGIS for mapping and spatial analysis.
Database Management System (DBMS): SQL-based systems for structured data; NoSQL for unstructured data.
Artificial Intelligence (AI): Tools for image recognition, species classification, and health prediction.
Blockchain (Optional): To ensure transparency and immutability of tree citizen data.
b. Hardware
Servers: Cloud-based (AWS, Azure, or Google Cloud) for scalability.
Sensors: Low-power IoT devices for on-ground monitoring.
Drones: Equipped with cameras and sensors for aerial surveys.
Network Design
a. Data Flow
Input Sources:
Satellite and aerial imagery.
IoT sensors deployed in forests.
Citizen-reported data via mobile app.
Data Processing:
Use AI to analyze images and sensor inputs.
Automate ID assignment and attribute categorization.
Data Output:
Visualized maps and health reports on the public portal.
Alerts for areas with declining tree health.
b. Communication Network
Fiber-optic backbone: For high-speed data transmission between regions.
Cellular Networks: To connect IoT sensors in remote areas.
Satellite Communication: For remote regions without cellular coverage.
Implementation Plan
a. Phase 1: Pilot Program
Choose a smaller, biodiverse region in California (e.g., Redwood National Park).
Test satellite and drone mapping combined with IoT sensors.
Develop the prototype of the centralized database and public portal.
b. Phase 2: Statewide Rollout
Expand mapping and registration to all California regions.
Deploy IoT sensors in vulnerable or high-priority areas.
Scale up database capacity and integrate additional satellite providers.
c. Phase 3: Maintenance & Updates
Establish a monitoring team to oversee system health and data quality.
Update the network with new technologies (e.g., advanced AI models).
Periodically review and revise data collection protocols.
Partnerships
Government Agencies: U.S. Forest Service, California Department of Forestry and Fire Protection.
Tech Companies: Collaborate with Google Earth, Amazon AWS, or Microsoft for cloud and AI capabilities.
Environmental Organizations: Partner with WWF, Sierra Club, or TreePeople for funding and advocacy.
Budget Estimation
Initial Investment:
Satellite data and licenses: $10M
IoT sensors and deployment: $5M
Database and app development: $3M
Operational Costs:
Cloud services and data storage: $2M/year
Maintenance and monitoring: $1M/year
Research and development: $1M/year
Long-term Vision
Expand the system to other states or globally.
Use the database for reforestation efforts and combating deforestation.
Develop educational programs to teach communities about the importance of trees as citizens.
Would you like me to assist in designing the user interface for the public portal or drafting partnership proposals for funding?
To begin building the program for the Tree Citizenship Identification System, we’ll start with a scalable framework that allows us to process, store, and analyze data while preparing for future expansions. Here's an actionable development plan with an initial focus on foundational code and infrastructure:
Step-by-Step Development
Phase 1: Setting Up the Backend Infrastructure
Objective: Create the core database and develop the data pipeline for processing tree data.
Technologies:
Programming Languages: Python, JavaScript (Node.js), SQL.
Frameworks: Flask or FastAPI for APIs, Django for web application backend.
Database: PostgreSQL for structured data, MongoDB for unstructured data.
Code Snippet 1: Database Schema Design (PostgreSQL)
-- Table for Tree Registry CREATE TABLE trees ( tree_id SERIAL PRIMARY KEY, -- Unique Identifier location GEOGRAPHY(POINT, 4326), -- Geolocation of the tree species VARCHAR(100), -- Species name age INTEGER, -- Approximate age in years health_status VARCHAR(50), -- e.g., Healthy, Diseased height FLOAT, -- Tree height in meters canopy_width FLOAT, -- Canopy width in meters citizen_rank VARCHAR(50), -- Class or rank of the tree last_updated TIMESTAMP DEFAULT NOW() -- Timestamp for last update );
-- Table for Sensor Data (IoT Integration) CREATE TABLE tree_sensors ( sensor_id SERIAL PRIMARY KEY, -- Unique Identifier for sensor tree_id INT REFERENCES trees(tree_id), -- Linked to tree soil_moisture FLOAT, -- Soil moisture level air_quality FLOAT, -- Air quality index temperature FLOAT, -- Surrounding temperature last_updated TIMESTAMP DEFAULT NOW() -- Timestamp for last reading );
Code Snippet 2: Backend API for Tree Registration (Python with Flask)
from flask import Flask, request, jsonify from sqlalchemy import create_engine from sqlalchemy.orm import sessionmaker
app = Flask(name)
Database Configuration
DATABASE_URL = "postgresql://username:password@localhost/tree_registry" engine = create_engine(DATABASE_URL) Session = sessionmaker(bind=engine) session = Session()
@app.route('/register_tree', methods=['POST']) def register_tree(): data = request.json new_tree = { "species": data['species'], "location": f"POINT({data['longitude']} {data['latitude']})", "age": data['age'], "health_status": data['health_status'], "height": data['height'], "canopy_width": data['canopy_width'], "citizen_rank": data['citizen_rank'] } session.execute(""" INSERT INTO trees (species, location, age, health_status, height, canopy_width, citizen_rank) VALUES (:species, ST_GeomFromText(:location, 4326), :age, :health_status, :height, :canopy_width, :citizen_rank) """, new_tree) session.commit() return jsonify({"message": "Tree registered successfully!"}), 201
if name == 'main': app.run(debug=True)
Phase 2: Satellite Data Integration
Objective: Use satellite and LiDAR data to identify and register trees automatically.
Tools:
Google Earth Engine for large-scale mapping.
Sentinel-2 or Landsat satellite data for high-resolution imagery.
Example Workflow:
Process satellite data using Google Earth Engine.
Identify tree clusters using image segmentation.
Generate geolocations and pass data into the backend.
Phase 3: IoT Sensor Integration
Deploy IoT devices to monitor health metrics of specific high-priority trees.
Use MQTT protocol for real-time data transmission.
Code Snippet: Sensor Data Processing (Node.js)
const mqtt = require('mqtt'); const client = mqtt.connect('mqtt://broker.hivemq.com');
client.on('connect', () => { console.log('Connected to MQTT Broker'); client.subscribe('tree/sensor_data'); });
client.on('message', (topic, message) => { const sensorData = JSON.parse(message.toString()); console.log(Received data: ${JSON.stringify(sensorData)}); // Save data to database (Example for PostgreSQL) saveToDatabase(sensorData); });
function saveToDatabase(data) { const query = INSERT INTO tree_sensors (tree_id, soil_moisture, air_quality, temperature) VALUES ($1, $2, $3, $4) ; const values = [data.tree_id, data.soil_moisture, data.air_quality, data.temperature]; dbClient.query(query, values, (err) => { if (err) console.error('Error saving to database', err); else console.log('Sensor data saved successfully!'); }); }
Phase 4: Public Portal Development
Frontend Technologies:
React.js or Vue.js for interactive user interfaces.
Mapbox or Leaflet.js for tree visualization on maps.
Features:
Interactive tree maps with search functionality.
User registration for tree adoption programs.
Deployment Plan
Use Docker to containerize the application.
Deploy on AWS, Azure, or Google Cloud for scalability.
Monitor system health using Prometheus and Grafana.
Next Steps
Develop a testing environment for pilot deployment.
Add AI-based disease detection and prediction using TensorFlow or PyTorch.
Create an adoption feature where citizens can adopt trees and track their health.
Would you like me to set up a GitHub repository with this initial framework or assist further with deployment?
I'll prepare the project framework and outline the repository structure for the Tree Citizenship Identification System. Below is the proposed structure for the repository, followed by details of the files and components.
Proposed Repository Structure
tree-citizenship-id-system/ ├── backend/ │ ├── app.py # Flask application for backend API │ ├── database/ │ │ ├── schema.sql # Database schema for PostgreSQL │ │ ├── db_config.py # Database connection configuration │ │ └── seed_data.sql # Initial sample data for testing │ ├── services/ │ │ ├── tree_registration.py # Functions for tree registration │ │ └── sensor_data.py # Functions for processing IoT sensor data │ └── requirements.txt # Python dependencies ├── frontend/ │ ├── public/ │ │ ├── index.html # Main HTML file │ │ └── favicon.ico # Favicon for the app │ ├── src/ │ │ ├── App.js # Main React/Vue app file │ │ ├── components/ │ │ │ ├── TreeMap.js # Map component for visualizing trees │ │ │ └── TreeDetails.js # Component for detailed tree view │ │ └── styles.css # Styling for the frontend │ └── package.json # Frontend dependencies ├── scripts/ │ ├── satellite_data_processor.py # Script for processing satellite data │ └── sensor_data_simulator.py # Mock data generator for IoT sensors ├── deployment/ │ ├── Dockerfile # Docker configuration │ ├── docker-compose.yml # Docker Compose for multi-service setup │ └── cloud_setup_instructions.md # Deployment guide for cloud platforms ├── tests/ │ ├── test_backend.py # Unit tests for backend API │ └── test_frontend.js # Unit tests for frontend ├── README.md # Overview of the project └── LICENSE # Project license
Repository Details
Backend:
app.py: Main Flask app for handling API requests like tree registration and sensor data.
database/schema.sql: SQL script for creating necessary tables.
services/: Directory for modular backend logic.
Frontend:
App.js: Main entry point for the frontend application.
TreeMap.js: Integrates Mapbox/Leaflet.js for displaying tree locations.
TreeDetails.js: Displays detailed information about a selected tree.
Scripts:
satellite_data_processor.py: Automates the extraction and classification of tree data from satellite imagery.
sensor_data_simulator.py: Generates fake sensor readings for development and testing.
Deployment:
Docker configuration ensures that the app runs consistently across environments.
Cloud setup instructions provide guidelines for deploying on platforms like AWS, Azure, or GCP.
Tests:
Unit tests ensure the reliability of both the backend and frontend.
Next Steps
I will initialize the repository structure locally.
Package the files and components needed for the first version.
Provide a link to the repository for access.
I’ll get started. Please hold on for a moment.
4 notes
·
View notes
Text
Mastering 3D Piping Modeling

Mastering 3D piping modeling is essential for engineers working on complex projects. This skill improves design precision, saves time, and ensures that systems are optimized for performance. By understanding the core components, tools, and steps involved in 3D modeling, engineers can produce more accurate designs. Explore how mastering this technology can enhance your career and improve project success. Start building your expertise in 3D piping modeling today. Click the link and read more about the piping model.
#3dpiping#engineeringdesign#pipingmodeling#clashdetection#constructiontech#industrialdesign#pipingsoftware#3dmodeling
2 notes
·
View notes
Text

Egyptian Spearman Model Sheet
I made this model sheet of an ancient Egyptian spearman in preparation for a 3D modeling project. Once I have the models for all the component made in Blender, I plan to give the dude a more dynamic, fearsome-looking pose than what he has here.
If you’re wondering what the fly-shaped medals on the man’s necklace are, fly medals made of gold or ivory were rewards for bravery in both Egyptian and Kushite cultures.
#model sheet#reference sheet#ancient egypt#egyptian#kemet#african#black man#dark skin#bipoc#digital art#art
2 notes
·
View notes