#How to insert text in preview
Explore tagged Tumblr posts
Visit Tumblr Blog
Explore Tumblr blogs with no restrictions, modern design and the best experience.
Last Seen Tumblr Blogs


Fun Fact
Tumblr has been providing a Korean-language service since 2013.
Text
A QUICK GUIDE TO AO3 CUSTOMIZATION FROM SOMEONE WHO KNOWS NOTHING ABOUT CODING

ft adding pink to everything and my secret to writing long comments
note: I originally posted this to twt but if that place burns in a fiery pit I spent too long on this for it to disappear, so I'm putting it here too :)
so many people know way more about this than I do, but this is a step-by-step walkthrough of the changes *I've* made, and hopefully it works as an introduction people can build from for whatever they'd like to do
There are a lot of images in this post! (click to enlarge)
to start, AO3 skins
site skins change how the AO3 website appears when logged in (even on mobile), mine is pink and blue!

I'll have my skin turned off throughout the post so the guides appear as they will for you
to create, edit, and view skins, go to the "skins" tab from the left-hand menu. you can also view public site skins from there or from the button in the preferences.


public site skins are made by other users. i would really encourage previewing and exploring them to become familiar with the possibilities (maybe you just want to use one of them and now you're done!)
to create your own skin
on the skins page, click "create site skin"
if you don't know CSS (same), use the wizard! clicking on the "?" will give more information about each option
I only use the colours section you'll see a link right there for hex codes I use pink as a header colour and bue for accent but lots of people change the background colour and that looks really cool!
submit


The next step (optional!!!) is to add CSS from a public skin to your own. I use "ByLine" by Branch. this separates the tag categories and adds spacing to make them easier to read.
here is a before and after using the fic "Landslide" by @roosterbruiser as an example


to see the CSS of a skin, click the title
copy all the text below the CSS heading
in the skin creator/editor press the custom CSS option and paste all the text into the CSS box


you can have both wizard and custom CSS settings, in mine you can see the header and accent colours as well as the CSS

level up: USERSCRIPTS
userscripts are small pieces of code that modify a website. for AO3, this may involve adding shortcuts and buttons or even advanced tagging functions (computer people, I'm so sorry if this is wrong, I'm trying). I use Greasy Fork and Tampermonkey.
This is how I write long and formatted comments!
Greasy Fork is an archive of userscripts and Tampermonkey is a browser extension and userscript manager. You don't need to use these two in particular. please use your common sense when downloading anything or adding permissions to your browser.
Greasy Fork guide on installing scripts
Install Tampermonkey on Chrome
there are TONS of user scripts for AO3. This is another good opportunity to explore all the possibilities. there are lots of more complicated options I haven't explored.
scripts for AO3

i use this floaty review box
and this comment formatting
EDIT: if you use chrome you might need to turn on developer mode in your chrome extension manager - you can google "tampermonkey developer mode" and it should explain that :)
to install (once you have Tampermonkey installed):
open the script you want in Greasy Fork and press install
Tampermonkey will open, press install again


clicking the Tampermonkey extension will let you toggle scripts on and off, and opening the dashboard will let you view, edit, and delete scripts


i find i can only have a few turned on at a time before they cancel each other out, but that depends on which ones you're using and someone more savvy might be able to fix that
how to use the floaty review box - write more comments!
there will now be a "floaty review box" button at the top of the work, it will open a floating text box you can move anywhere on the page. highlighting any text and pressing the insert button will paste the text with italics into the box


anything you type in the review box will appear in your comment at the bottom of the page!
if you have also installed the comment formatting script, you'll be able to highlight any text in your comment and use the new buttons above the comment box to format it

thats all ive got! Hopefully this is a good starting point to get familiar with some of the terms and basics for skins and scripts <3
if you want some inspo for how to comment on fics i made a whole fic rec list on twitter based on comments I've left, it's here. i have a masterlist of recs there mostly for darklina/reylo and similar ships.
the tag #reading with ru has cod recs and me talking about books
:)
#please no one follow me from this im never helpful otherwise#ao3 skins#ao3#fanfic#ao3 community#fandom#ao3 resources#im sorry if the image quality is awful lmk if I should clarify any of the text!#floating comment box#floating review box#ao3 guide
770 notes
·
View notes
Text
How to format, print, and bind a zine

This is a consolidated version of previous posts on zine making, with more detail and screenshots. For a version of this post on gdocs, click here.
This is a step-by-step guide on how to use InDesign (or similar programs) to format and print a zine. This can be used for fanzines, sketchbooks, anything. It’s also only one way to do things - there are as many methods as there are zines under the sun. If you’re interested in other ways, searching for zinemaking on youtube would be a start.
If you are printing your zine, your total page count must be a multiple of 4.
Examples of multiples of 4 ✅
4, 16, 112
Not a multiple of 4 ❌
7, 99, 31
This is because our book will be made of folded A4 sheets (that’s regular printer paper). 1 folded A4 makes 2 A5 pages. Each A5 page has a front and back. Therefore each sheet of paper makes 4 pages.

How to format
Open InDesign. Go to Create New > Print. Choose A5 and tick Facing Pages. Enter your page number (this can be changed later). I’ve put 12. Hit Create.

Locate the Rectangle Frame Tool.

Draw a rectangle over your whole page, or just the part where you want your images to go.

Press Ctrl+D and insert the image you want on that page.

That’s it! Repeat on every page and you’ll have a book. Promise.

Further reading
I need a free alternative to InDesign.
InDesign is free for the savvy but I also recommend Scribus which is free and open source and very lightweight. The method is exactly the same but the Rectangle Frame Tool is called Image Frame and the Ctrl+D shortcut will now be Right click > Get Image instead.
I need help with designing my A5 pages.
For my first sketchbook zines, I arranged several images on an A5 canvas in a program like CSP or Procreate and exported them as a JPG into InDesign or Scribus. You can do this if your images aren’t already A5 size or you don’t want to waste time with InDesign’s formatting tools.
I need to get fancier with it, format text, or export my file as small as possible.
Here are the InDesign tutorials I used and liked:
How to Add Page Numbers
How to keep Page Numbers on Top
How to Create a Table of Contents
What is Overset Text and How to Fix It <- essential for formatting text onto multiple pages
How to Reduce InDesign File Sizes
Formatting best practices
Remember that in addition to your front and back cover you also have an inside front and inside back cover. You can leave these blank or create an endpaper with a pattern or include a short message or something. Look inside any books or zines on your shelf for inspiration. Or don’t listen to me and put your first drawing or poem there. Just be aware printer paper is thin so you might be able to see it through the cover.
Avoid putting anything important in the gutter (inside edge) or outside edges of the page. Also be careful of creating double page spreads that go across the centre of the book. Because of how we will print and fold the pages, each half of your spread might not meet up perfectly.

How to print it out
Open your completed book’s PDF file in Acrobat Reader (free download: https://get.adobe.com/reader/)
Print with the following settings: Booklet, and Booklet subset: Both sides.
We can see a preview of our print-out on the window on the right. The pages will look jumbled up, but form the book in order when folded.

Congratulations! Now you’ll have a stack of paper. Once it’s folded it should resemble your (unbound) final book. Use a bulldog clip or similar to keep your pages together neatly.

How to bind (2 methods)
If your book is less than 30 pages, I recommend using a long arm stapler, or a stapler that can open to lay flat. They are cheap.
There are also special book binding staplers or heavy duty staplers, if your book is thicker than 30 pages. Just position your book so the staples are in the middle of the spine (or as close as you can get) and send it. They will be a little wonky… that’s fine.
You can also separate your book into staple-able segments and then join them into 1 big book with tape or thread.
For my 112-page zine, I used thread to bind it.
These instructions are copied from the video ‘How to Print & Bind a Zine’ by LFONinja.
You can watch it here: https://www.youtube.com/watch?v=zKYy6G7lIy8
You will need: Ruler, awl, thread, sewing needle
Make 5 holes in the crease of the pages like so. (½ page, then ½ of that, then ½ of that again)

If the paper is thick, be careful when making the holes. It helps to have a piece of blu tack, putty, or soft eraser underneath the spine of the book as you work for the point of the awl to push into.
I don’t recommend separating the papers into smaller stacks as your measurements will likely vary and the holes won’t align.
Use a needle and thread to go through the holes in the following pattern. At the end, tie a knot with the ends of the thread (1 and 9) in the centre of the book. You’re now done.

About page creep
Because we are using folded pages inserted into each other, they push each other out like so:

From: https://www.greenerprinter.com/ support/page-creep/
You can use a heavy duty or industrial paper cutter/trimmer to remove this edge. This is why we kept any important contents away from the edge of the page during formatting, because we don’t want this process to destroy our book’s contents.
About image edges
Because of how the printer works, the images in the book don’t extend all the way to the very edges of the paper and have a thin white border on all sides. It’s possible to crop these edges from your book with a heavy duty paper cutter. Be careful and start small (3mm or less). Depending on how much your pages move during the printing process, the size of the white edge can be different on different pages. Or you can just leave them in.
To read some of the zines featured in this post, check out naumin.itch.io.
104 notes
·
View notes
Text
Photo booth (Simon 'Ghost' Riley x GN! reader)
Warnings: none (let me know if there is any!)
Word count: 1079


There weren't many times when Simon had a day off, but when he did, you better know he'd be spending every moment with his partner.
Back for a few days after a long mission? Reports are finished in record time and left on Price's desk.
A few hours between long meetings? He's calling you or sending a text, just wanting a moment of peace and to hear your voice before he'll inevitably have to deal with Soap's shenanigans.
Point being any time away from work he has, you're the first thing on his mind, and he will do anything to get that little bit of recharge time with the one person who he feels he can truly relax with.
So when the 141 gets back from a long, few-month mission on the other side of the globe, as soon as humanly possible, Simon's heading home to be with you.
The first few days are just spent curled up together. Lazy mornings turning into lazy afternoons with lingering touches and tender kisses. Cooking together in the warmth of your shared kitchen, his big arms wrapped around your waist as his chin rests on the top of your head. Warm meals and lots of storytelling, more so coming from your end, but who wouldn't want to know about how the neighbours got into another fight and might be ending in divorce this time?
After those initial days just gently getting back into the calm civilian life, the two of you are more than happy to adventure out for the day. Treating yourselves to a nice cup of tea and a fresh pastry from a rather fancy cafe in the heart of town and a calm walk by river, hand in hand, the two of you find yourselves in a little corner store as the clouds roll over and little drops start to fall.
· · ─────── ·𖥸· ─────── · ·
"Bloody hell love, a little rain won't hurt ya," Simon chuckles as you pull him into a nearby corner store as the droplets of rain start to gain momentum, falling in a more rapid succession.
"Yes, but I did my hair today, and I don't want it to be ruined," you answer with a playful roll of your eyes. The store is much more pleasant than the rain, with a warm glow to the lights and, most importantly, nice and dry.
Deciding to busy yourselves while the rain rolls over, the two of you go up and down the few isles, pointing out little snacks you want to try or ones you have tried and definitely didn't like. Coming to the end of one of the isles you spot an old photo booth pushed into the corner and excitedly pull on Simon's arm.
"Si, look! Do you think it works?" The whole thing looks like it hasn't been used in a long while, but, taking your chances, you pull the curtain open and the display lights up.
"Suppose it does, come 'ere," a large hand moves to hold your waist as you're pulled onto Simon's lap, the two of you making a tight fit in the small booth.
With an excited squeal you press a few buttons, pulling a few pound coins from your pocket and inserting them into the machine, a quick preview of the photo format appearing on the screen. Before the two of you can plan what your poses will be, the first timer starts counting down.
""Right, just a smile then?" He says, guiding one of your arms over his shoulders as you lean your head closer, big smile pulling at your lips and a hint of a curl on the Brits. The flash clicks and the photo shows before another timer starts counting down.
"Now a silly one!" You say, holding up bunny ears behind his head as you stick your tongue out, Simon doing quite the similar pose. The timer stops and another flash goes off, both your eyes drawn to the preview of the photo. For a burly military man Simon sure does look a bit silly with the tip of his tongue poking out and your fingers as bunny ears behind him, contrasting his usual hard and gruff facade he put son for the average individual.
"Hey, you copied my idea," A playful shove is given to his shoulder as you look at the photo, chuckles leaving the both of you. "Can't help if it's a good idea," Simons voice grumbles though the smile on his scared lips tells you how happy you make him as he pokes a finger in your ribs, making you laugh.
"Simon!" You giggle, half heartedly pulling away from him, "That tickles!" The Brit doesn't stop his teasing and you try to pull away again that you almost fall off his lap, arms flailing slightly but a hand firmly on your waist ensures you don't go anywhere. In the struggle the timer for the third photo finishes and the flash goes off just as you feel like you're tipping.
As the two of you calm your giggles you see there's only one photo left and you turn to look at Simon, exaggerated disappointment on your face. "Look you ruined the photo," you tease as you point to the screen.
"Wouldn't have been ruined if ya were more original," He chuckles, fingers lightly pinching your thigh as he gazes at you with those big brown eyes. "I'm plenty original, thank you"
The timer counting down for the fourth and final picture snaps you both back as you stumble to figure out one last pose.
"What do you we do for this one?" You ask out loud as you try your hardest to think of a cute pose.
Without more than a little grumble of a 'Come 'ere' Simons free hand reaches up and gently wraps around your neck, pointer finger helping guide your face to his as your lips meet his. All thoughts are almost completely disregarded as you lean into his touch, eyes fluttering closed as his tongue traces the seam of your lips. Just as you begin to part your lips the flash goes off and the machine begins to print the series of photos.
""ere you go, love," Simon grumbles as his hand leaves your warm skin to grab the photos, handing them to you. Hand on your thigh giving you a gently pat before guiding you off his lap and out of the photo booth, grin on his lips the whole time.
#fluff#simon riley x reader#simon riley#simon ghost riley#ghost cod#cod#cod x reader#ghost x reader#simon riley x you#ghost x you#x reader#gn reader#x gn reader#karah writes
176 notes
·
View notes
Text
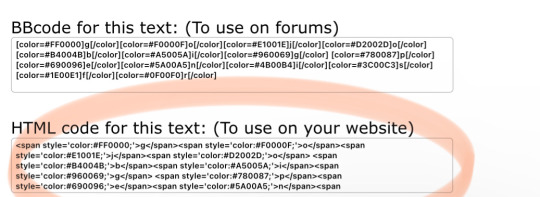
just a quick lil tutorial because i've been noticing i’m getting a lot of comments and asks abt how to get the custom color texts i use ⨾ (REMADE)
1. example
2. example
3. example
i use a bbcode & html text colorizer which can be found [ here ].
i recommend using the desktop mode which can be found here;


once clicking the link, it gives you five easy steps to follow through;
1. inserting your text.
2. choosing colour effect (you get to pick between six effects).
3. choosing your preferred colours.
4. adding additional text styles (for ex. font, size, bold, italics).
5. getting your code.
however, when using the fifth step, copy the text in the SECOND box.
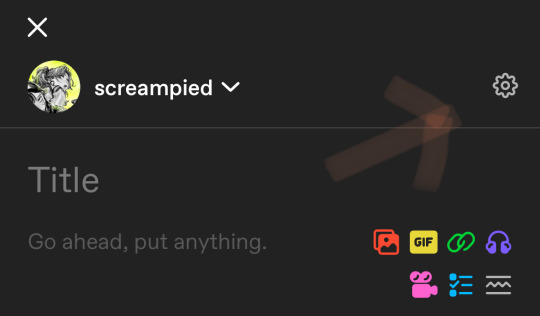
once thats copied, go to tumblr, create a post and there should be a settings cog icon on the far right hand side near your blog name.

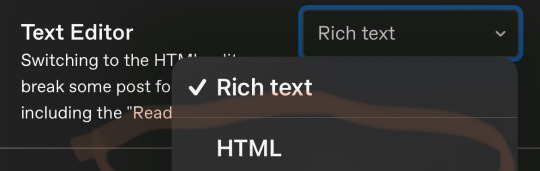
after clicking that, scroll down until you find the text editor option, and where it says 'rich text', change it to 'html'.


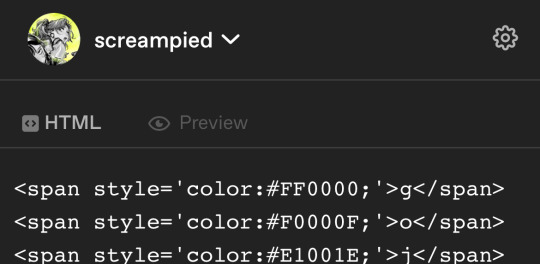
after choosing the html option (the one highlighted in green), paste the html into the section and then click preview (the one highlighted in blue).


After that you’re all done! hope this helps.
#― 𝗹𝗲𝗶𝗹𝗮𝗻𝗶’𝘀 𝗺𝘂𝘁𝗮𝗹𝘀 ⸝⸝#― 𝗹𝗲𝗶𝗹𝗮𝗻𝗶 𝘀𝗽𝗲𝗮𝗸𝘀 ⸝⸝#― 𝗹𝗲𝗶𝗹𝗮𝗻𝗶 𝟮𝟬𝟮𝟱 ⸝⸝#― 𝗹𝗲𝗶𝗹𝗮𝗻𝗶’𝘀 𝗯𝗼𝗼𝗸𝗺𝗮𝗿𝗸𝘀.ᐟ ⸝⸝#― 𝗹𝗮𝗻𝗶’𝘀 𝘁𝗮𝗴𝗹𝗶𝘀𝘁.ᐟ ⸝⸝
29 notes
·
View notes
Text
Tagging/searches
Reuploading this entire thing, updated.
• I see people complaining about Tumblr's search systems not working, and that's fair if you don't know the rules (I don't know all of them either), but one little tip I can give you is that, sometimes, simply looking up a tag on your blog shows you fewer posts than if you were to click on said tag directly in your blog's posts and browse it that way. That's how you get all of the results.
• When tagging, make sure the most important tags for general searches are the first three and for blog searches the first five. If you create a problematic tag (don't ask me what that means, that's tumblr's decision), more often than not, it does hide the entire post from your searches, meaning it won't come up even when you search it using one of its other tags (or the post's words).
• If you reblog something and tag it appropriately, it still won't show up in the general searches because those only show original posts. Tagging them is for your blog only. That said, tag your original posts so they get in the tag.
• When I can't find something, the method that never fails is to go through archives. If it's a text post, then that's fairly easy - you click on the text post filter and search a word from your post (not a tag! you can't do that with the in-built browser search, only the archive search). Remember, the result is only for the posts you see on your screen so you need to scroll -> refresh the search -> scroll etc. It won't always highlight the word for you, or better said, you won't always see it, and in that case, it means it is there but not in the post's preview (the preview is small; it can't fit everything in it).
Photos are more difficult to find but it is possible if you use the right tags to organise them. As in, don't just tag under the general tag, create subtags.
• If you want to create a tag for yourself only, add an underscore before your tag. It works exactly like a normal tag except for the fact that it's hidden for everyone but you. You won't see it when you look at a post but it will be there when you click on it and enter the editing mode or when you edit in your mass post editor.
• Featured tags: These are tags you can set for your blog. If you don't set them, tumblr will pick them for you based on what you post the most. They show up in your archive's tags and in your blog's search (though you won't see all of them in your blog's search if you have too many). If you can't find a tag there, add it to your featured.
• Capital letters make no difference (Abc = abc = ABC). They're a matter of personal preference. However, spaces matter (abc def is not the same as abcdef ..... think of fan art and fanart for example).
• If you want to find anything on tumblr, use: words you remember from a post site:tumblr.com (you can add /post directly after that for more accuracy because some posts get indexed differently and it wouldn't catch those without that addition)
• url.tumblr.com/day/insert year/insert month/insert day
• If you want to search by using two tags at once, use: https://[blogURL].tumblr.com/search/%23[tag1]%2C%20%23[tag2] (just remove the brackets)
A post that's worth a read
What are tags actually for
#tagging#tag guide#tumblr#abby talks#tumblr guides and related#An example of the hidden tag would be _scrn on my Arcane side blog. I use it for my own screenshots + I added it to my featured.
39 notes
·
View notes
Text
I wanted to post something earlier today but tumblr ate my post, stating there was an error- I realised inserting the link normally caused tumblr to have an aneurysm.
So I'll keep myself short with this one. Cook and Becker shared the second chapter of the artbook with anyone who purchased the book, due to another delay and I asked if it's okay for me to share the link with others. They saw no problem with it!
So for those who didn't purchase the artbook yet, here's the link: https://issuu.com/cookandbecker/docs/building_the_beira_d?fr=sNzQ4Mzg1NTAzNjA
One of my favourite bits of texts was this one
I can vividly picture this and I find the thought very funny ouwehjdioew
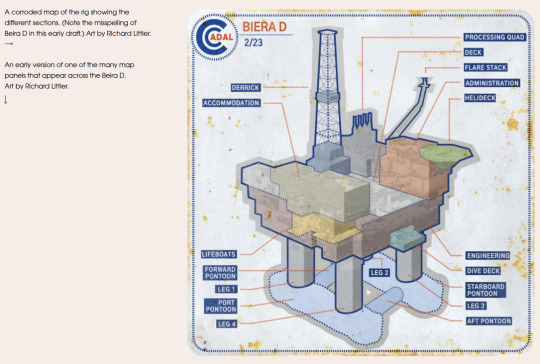
I like how the misspelling of the Beira is even mentioned here.
And then we have this earlier version of Rec Floor map
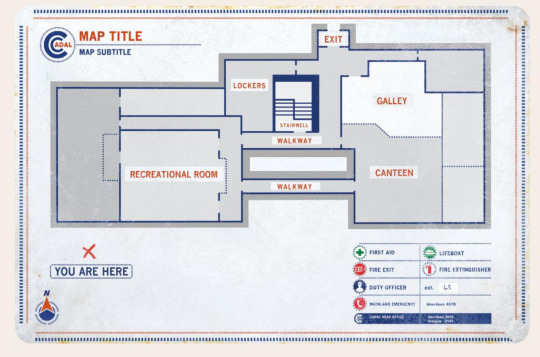
In comparison with the current version

the unfortunate Raffs

Caz is even wearing a white helmet here
And this additional shift schedule is really interesting

Here we can clearly see what the first letter of their first name is. This time clearly showing that Addair's actual name begins with M. And I wonder if MacLurg A. is Anderson?

Me clearly not geeking out by each picture shown noooo, you're crazy for thinking that I mean this is bloody awesome to see-
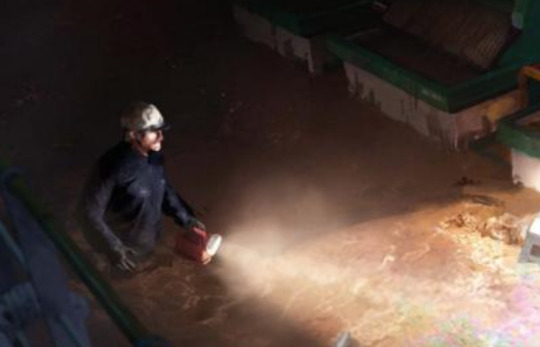
I also did not think that the dripping pipe in O'Conner's room had a deaper meaning behind it. This is something our local O'Conner/Mary fan @sukipershipper will love.
To think every tiny detail has a hidden meaning- it's just nuts thinking about it.
This was also fun to see, I talked with @thisbeartblog while going through the pages and they theorised Trots being OCD and seeing it confirmed made them very happy
Either way, I let you guys explore the rest of the preview! I know it's unfortunate that the art book got delayed again but I think the extra wait will be worth it.
18 notes
·
View notes
Note
Hiii HRU >:] I just wanted to ask how do you get your posts so pretty?? I wanna start a fan fiction page as well but I have no idea how to... Id be happy to credit you!! If you can't it's okay!! I love your work 💕
hiiii! i don't mind sharing lolol, and i hope this helps you create the fanfic page that you had in mind! wishing for your success, and thank you so much for the support heheh <3
first step, click the settings icon on the top right of your post, scroll down, and change the text editor to HTML. this will help you insert coding in your posts that you can use to give your texts a gradient colour and such! there should be an HTML button and a Preview button on the top left of your post that you can switch between to insert the codes and to see how your post looks like after (if that makes any sense :']).
if you want your text to have a gradient like this, i use the website below!
https://jsfiddle.net/j7vLfbw1/22/
you will need the hex codes of the colours you want to use, and insert it after the hashtag:
value="#FF0000" → value="#[hex code]"
click on the yellow run button at the top right, and insert the text you want in gradient at the white box below. only the white box at the top though, the white box below it is where the site will give you the code you need to copy and paste onto your post for the gradient text.
if you want your text to be in a solid colour and not in a gradient, i use the website below!
https://spacegen.carrd.co/
as for the dividers i use in my posts, i'll leave this white one for you to use! credits to @digitald0rk since they kindly gave me these white dividers in the first place o(*≧▽≦)ツ feel free to download it and edit it/change the colour! i used procreate to change the colour, and digitald0rk used ibispaint! (also feel free to check out their work, they're literally so good i can't-)

hopefully this helped! and if you have any further questions, then you know where my ask box is teehee <33
20 notes
·
View notes
Text

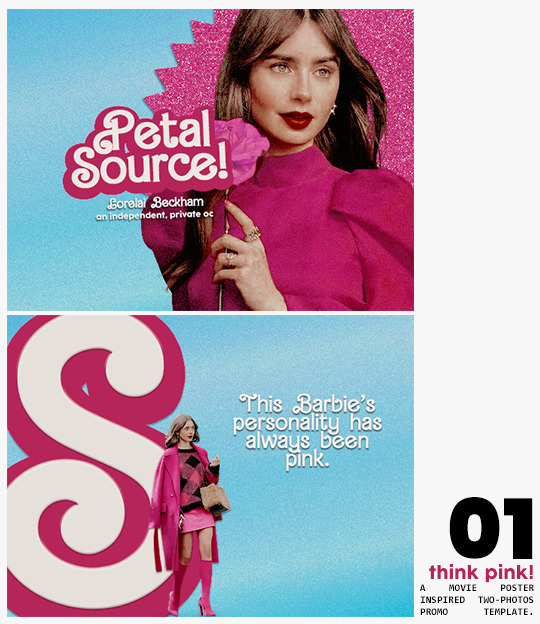
⋆ barbie fever . . . by petalsource .
. . . a complete blog makeover inspired by barbie .
hi, barbies! today, i bring you a complete makeover fully inspired by our favorite pink lady, barbie herself, to allow all of you to bring your own characters into her world in plastic!
feel free to tweak and adjust to your needs, add different background colors and overlays, but kindly do not claim as your own or use it for commercial purposes. feel free to tag me on your creations with this on #petalsource! seriously... i can't wait to see what comes of this!
💐 click the source link to get it as a package or individually on deviantart or payhip !
and . . . keep reading to find more details about the graphics, hq live previews and important tips to use the templates !
✩ about the items!
➷ think pink! -- a two-picture promo template inspired by the iconic 2023 movie posters. you'll need: two pngs of your faceclaim of choice, and the custom fonts (listed below). the glittery polygon of the first picture is available in 7 different glitter colors! high quality examples.
➷ this barbie -- two options of transparent dash icons; one matching the "initial" poster and one matching the "glittery polygon" poster. high quality examples.
➷ so plastic -- two options of centralized headers; one matching the "initial" poster and one matching the "glittery polygon" poster. to use it at its best quality, disable the "stretch header image" option when uploading the header. high quality examples.
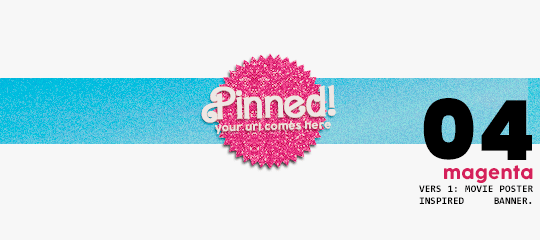
➷ magenta -- version 1.0: pinned post (or miscellaneous) banner inspired by the 2023 barbie poster. version 2.0: pinned post (or miscellaneous) pair of banners mimmicking the layout of a barbie doll box. one banner goes on top of the postbox, insert pinned post or text, and the other banner goes on the bottom! high quality examples.
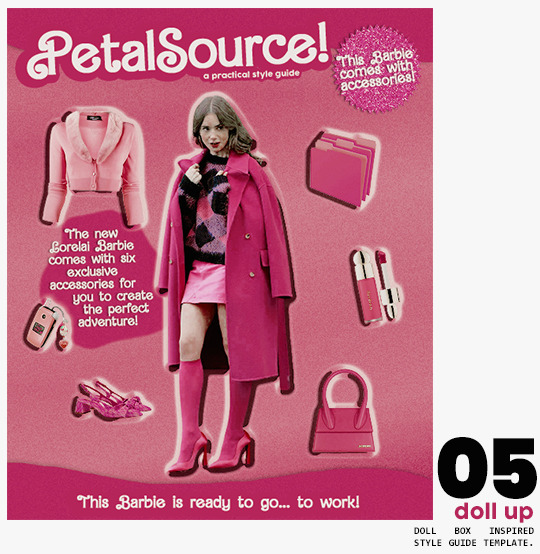
➷ doll up -- lookbook template inspired by the barbie doll box, featuring a "doll" picture and six customizable objects / accessories. you'll need: full body png of your faceclaim of choice, custom fonts (listed below), and 6 pngs of random objects or clothes to "come with" your doll. i've added a short tutorial down below on how to find and use some easily! high quality examples.
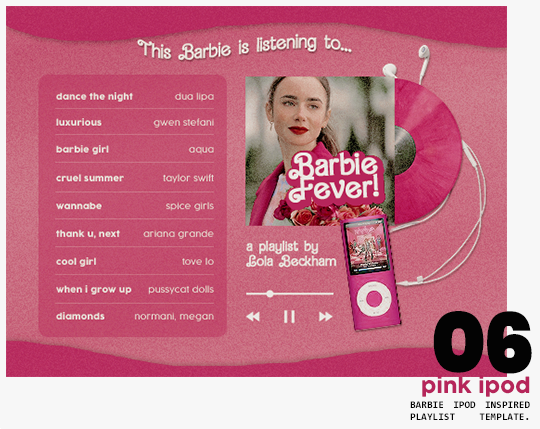
➷ pink ipod -- playlist template inspired by the barbie ipod, featuring a cover art and nine songs. high quality examples.
you can purchase all items as a package (deal price) or individually!
✩ important tips & useful information!
➷ needed fonts: bartex, cocogoose.
➷ object pngs + removing background of images: i found a super useful pinterest board with photos that can be used on your graphics: oxfordcommah's object pngs. additionally, the clothes png search on p*nterest is really diverse, and you can narrow your interests like "pink clothes png" or "vintage shoes png" and find a lot of options. once you found your images, go to remove.bg and paste their urls in there. it'll remove the background of those images for you and you can just paste them on your template and have fun!
➷ used coloring psds: the beautiful and super pink psds i used on the previews were not made by me and are NOT included in the downloads. in case you want to use them, they can be found here: dreams, 003.
➷ styles: the download includes two styles, one for a subtle drop shadow used in a few layers and one for the plastic box effect in the lookbook template. you can install them by opening the styles tab on photoshop > the four lines > load styles > find the barbie styles on your downloads!
➷ in case you have any questions, pop into my inbox or ims and i'll be happy to help you!
#template psd#template psds#barbie psd#character psd#character psds#𓂅 ♡ ⋆ 𝐦 ‚ templates .#i really really really hope you guys like this!!! i had so much fun doing it
348 notes
·
View notes
Note
This is so random and you can totally ignore this if you want but I CANT FOR THE LIFE OF ME FIGURE OUT HOW TO GET COLORED GRADIENT TEXT IN MY POSTS .·°՞(¯□¯)՞°·.
I’ve read like five separate Reddit posts and tumblr posts and I don’t even know where to go to input the code OR WJAY RHE CODE EVEN IS AHHHH. Anyways. I love your formatting it’s so cute thought I’d ask ㅠ_ㅠ
hiiiiii omg tysm<333 & no problem at all!!! i'll show u how i do it and what works for me :D (imma insert a cut here in case this gets long, i'll include screenshots too!!!)
so first, i personally use this website to get the color gradient text!
so first, i type in the text i want to have the gradient:

then, i change the number of colors i want, so the default is going to be 5 colors and i usually do 3-4
then i go and change the colors to whichever i want (picture below!!)

then i click the 'generate colored text' button:

and then it'll take you to this page:

then you want to copy that entire code in that box like i did below (highlighted in pink):

once you have it copied, go to your tumblr post that you want the gradient text to be on and go to the right upper hand corner to find the "settings" tab of your post:

and you want to go to where it says 'text editor' and change that from 'rich text' to 'html' :

then go back to your post and it should look like this (make sure you're under the "HTML" tab!) :

and then paste your copied code into the "HTML" tab ! (it should be super lengthy like so) :

then click on the "preview" tab that's next to the "HTML" tab to see what it looks like! :

and there you go!! that's what works for me and how i do it at least..not sure abt other methods or if it doesn't work for others..let me know!!
i hope this helps :')))))
10 notes
·
View notes
Note
Hi, hope this isn't a bother! I really love your Sodium theme but I was wondering if there was a way to make all of the sidebar info (progress, status, featured, etc.) sticky? I've tried fiddling with it a bit myself but I'm afraid of breaking the code.
Hi, I'll explain how to do this under the cut! It should be quite simple; just moving a line of code from its original position to somewhere else.
Go to your customize page. Click [Edit HTML].
Copy and delete the line of code as seen in the red brackets in the screenshot below. In v1.03 (3 Nov 2024), this is on line 2699. You can use ctrl+F to search for ["sb-fix"] and you should be able to locate it.

As you might have seen from the code comment in grey, any HTML elements below this line of code will become sticky (fixed in position when you scroll). Imagine it like a bookmark -- everything before the bookmark won't be sticky, and everything after will be sticky.
So now we need to scroll up and paste this code before the section we would like to be turned sticky. The red arrow points out where you would insert the code. The yellow underline and text tells you what you can search for in the theme HTML to know where to paste the code.
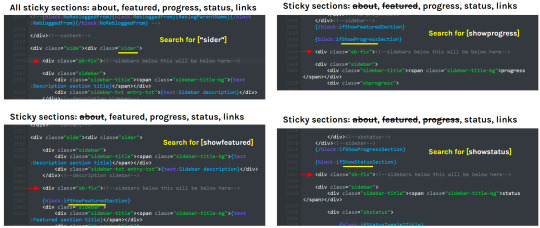
Then [Update preview], [Save], and refresh. You should see more sidebar sections sticking now. Hope this helps!
18 notes
·
View notes
Text
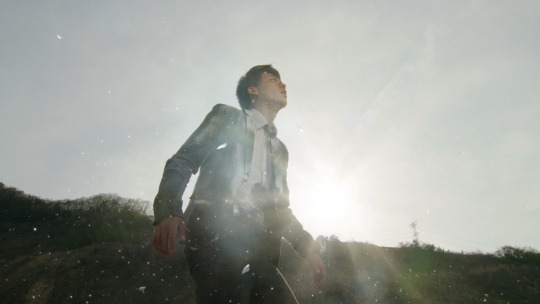
Reverse Big Bang Preview
Tonight I can share a preview of the project I've been working on for a couple of months: my fic for the Reverse @tf-bigbang, titled "Sightlines."
For this event, artists started first. Writers were then paired up with an artist, and had to write a fic based on the artwork that the artist did.
This year I was paired up with @huanted-dennys, who unknowingly drew the perfect bait pic for me: Bluestreak and Hound out on a mission. 😅 This was a fun challenge, and I cannot WAIT for you to see what we've been cooking up for you. ^.^
Look for the finished works to be posted later this month, and be sure to check out what everyone else has been working on, too!
The text version of the preview will be below the image previews. :)

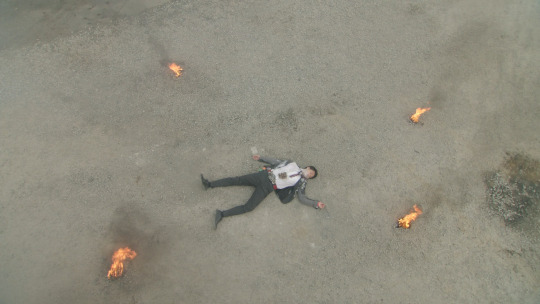
Preview: Sightlines
As the unit grumbled up the road, Hound tagged each of the three artillery mechs with preliminary target markers, and flagged the rest of the bots. Six other Decepticons made up the rest of the group, arrayed in front of and behind the larger, slower tanks. "If they don't transform before they make it into town, you're not going to have a shot," Hound said.
"I know," Bluestreak said. A bite of irritation came over the data connection, mirroring the flick of his sensor wings. "It would suck slag to have to scrub this mission just because they didn't transform anyplace where we could get a clear shot. I keep asking when the sniper ammo is going to get the upgraded armor-penetrating tips they've been working on, but they keep saying it's not ready." He flicked his wings again. "Something about needing more testing, they said. Why can't we just test them in the field? That's what the 'Cons do."
Hound was about to say something about how field testing new ammunition was impractical and sometimes dangerous when the group of Decepticons slowed to a stop about half a klick away from the edge of the village. The first two racers transformed and stood up. A moment later the rest of the group also started transforming.
"You've got a clear shot on the weakened parts of all three tanks. Painting the targets now–" Hound started to say, when he felt Bluestreak's attention sweep away from the group and into the sky.
A lone Seeker roared down from an unseen height and pulled up just short of the ground, transforming and dropping the last few meters. He walked towards the group of ground-based Decepticons, waving a greeting. "I'm going to need one more bullet," Bluestreak said. Then his feed fell silent, save for the critical data of distance, pitch, range, bearing…
Bluestreak fired, and an instant later the Seeker fell to the ground, a smoking hole in his chest where his canopy used to be.
"The – you missed!" Hound said, his attention floundering between the fallen Seeker and the tanks that were their targets.
"I don't miss," Bluestreak said calmly, racking his rifle to eject the shell, and inserting the next. His attention swivelled back to the tanks, the feed focused and still. "Get me another bullet."
36 notes
·
View notes
Text
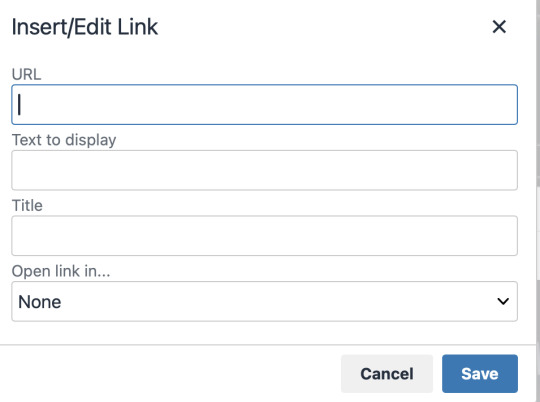
How to Embed Images and Links on AO3
Note: I have a site skin so the colors might look different. Just follow along with the red arrows! Also, this is a tutorial used on the computer, and I assume mobile posting would be different.
First, open archiveofourown.org and log in if you haven't already. If you don't have an AO3 account, sign up for one as soon as possible because it takes about a week for them to verify you and give you access to your new account.

Next, select "Post" in the top right hand corner like you would typically. Set up everything you desire as you normally would until you reach "Work Text*".
Note: If you need further help, I have an AO3 Tag Guide, a Story Title Guide, a List of Random AO3 Shortcuts, and a How to Post a Work on AO3 with Step-by-Step Explanations Guide for your convenience! I also have a Foundations Writing Lesson post for any beginners or for people who would appreciate a review <333
Once there, click on "Rich Text" in the top right of that section, and then select the image icon or the link icon, depending on which you are intending to make.
Note: Check under the cut for more in-depth instructions slash a continuation of this guide! There is an Image Icon Route and a Link Icon Route.
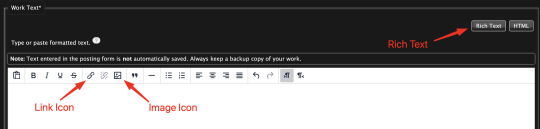
Image Icon Route
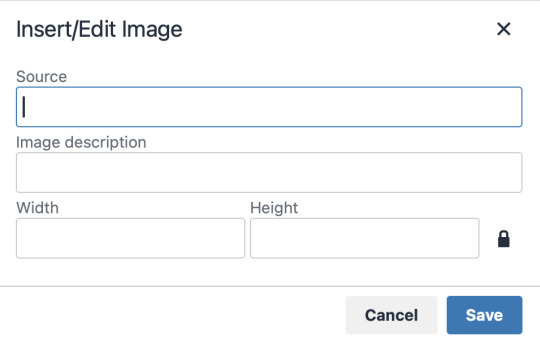
Once you click on the Image Icon, the screen similar to below should pop-up:
*Link Icon Route detour start here
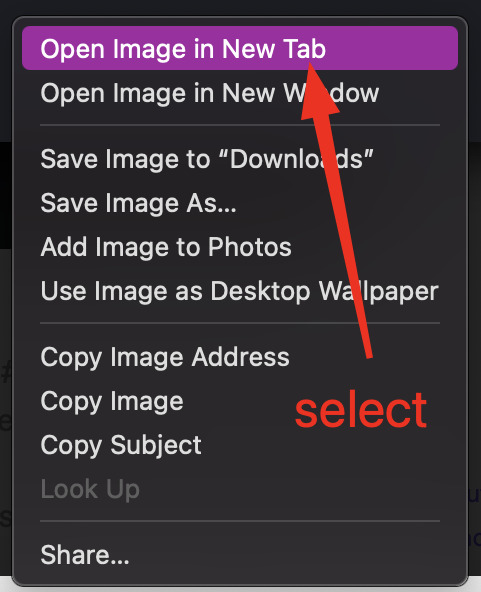
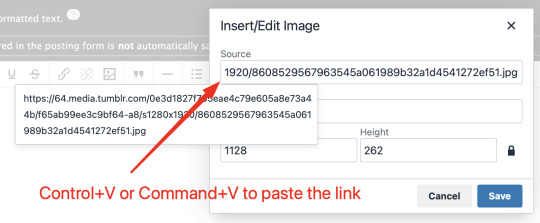
The source is the link to the image you're wanting to add to your work. AO3 doesn't host images itself, but you can use an image hosting site such as postimages.org or even Tumblr itself. If you want to use Tumblr, post a draft with the desired image or locate a post with the desired image. Once you've done that, right click the desired image and Open Image in New Tab (or whatever your computer's equivalent is).
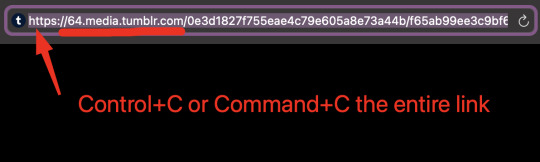
You should have a tab open that starts with "https://64.media.tumblr.com" followed by a bunch of numbers and letters. I want you to copy that link and post it in the source box.
*Link Icon Route detour ends here
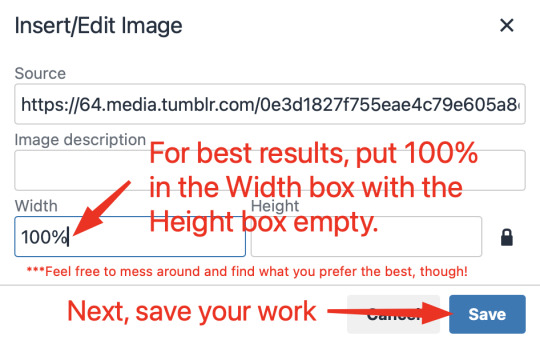
Now that the image link is in place, adjust your Width/Height boxes if desired. Feel free to add an image description as well. For best result, I suggest doing 100% in the Width box with nothing in Height, but this is ultimately a personal decision. Feel free to mess around with the proportions using the work drafts and find what's best for you!
If you prefer, you can also use < img src="LINK" alt="IMAGE DESCRIPTION" width="100%" align="center" /> aka < + img src="https://64.media.tumblr.com/0e3d1827f755eae4c79e605a8e73a44b/f65ab99ee3c9bf64-a8/s1280x1920/8608529567963545a061989b32a1d4541272ef51.jpg" alt="" width="100%" align="center" /> for this example (*excluding the plus sign at the start) to insert an image using HTML instead of Rich Text. It'll look like this:

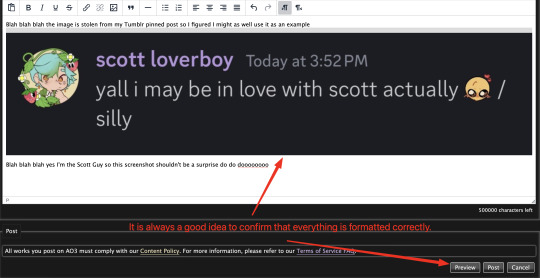
It is always a good idea to double-check and confirm that everything is how you want it. Previewing your work also allows you to create a draft.

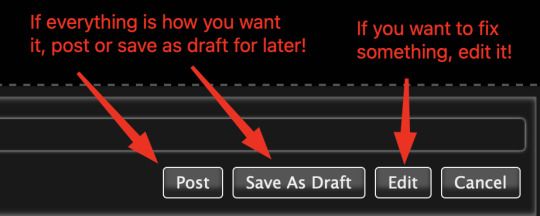
If you're unhappy with something, edit the work to fix it! If you're happy with how everything looks, go ahead and post it! You're finished here! You've successfully posted a work with an image embedded! Well done; good job :D
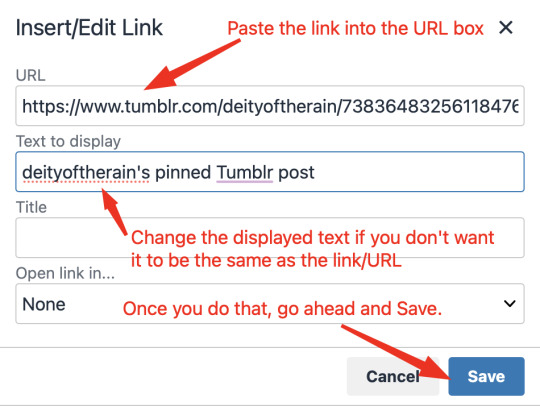
Link Icon Route
Once you click on the Link Icon, the screen similar to below should pop-up:
Go copy (Control+C or Command+C) the link to whatever it is you want to insert into the body of the work.
Note: If you're wanting to link specifically to an image and not a post containing that image, scroll up to the link icon route detour colored purple.
Once you got that, paste (Control+V or Command+V) the link into the URL box. If you want something other than the link to display, change the text in the "Text to display" box.
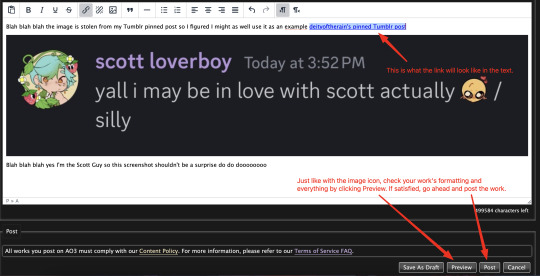
Save your work, check the formatting and everything else like we did in the Image Icon Route section. If everything is how you want it, then congratulations! You have successfully added a link embedded to your work!
If you have any questions or comments, feel free to comment and I'll respond! If this guide was helpful to you, please like and reblog! I appreciate it <333
#rain’s tips#ao3 author#ao3 help#ao3 writers#ao3#archive of our own#embedded#images#links#ao3 link#ao3 images#ao3 guide#idk how to tag this#idk what tags to use#writing help#guide
17 notes
·
View notes
Text
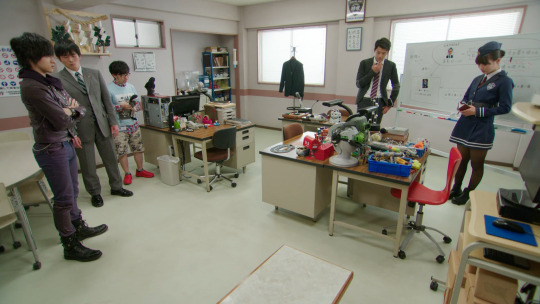
Kamen Rider Drive episode 32 👍

bro looks gorgeous in the preview 😭 hell yeah, slay your heart out (pun intended)
Omg opening 🕺
HELP THEM INTERRUPTING
Btw during the op I kept thinking about how I missed pops 👍glad to see him being silly again (missing Rinna too </3)

LMAOOOOO
AUFJDSAGFSDGHJFDSGKJ???!?! fashion.
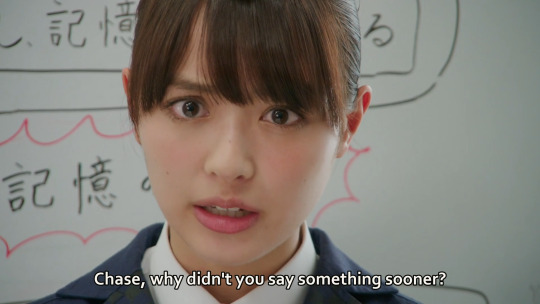
Dysphoria hitting like a truck today I'm afraid, listening to Chase and I'm suddenly Brain (<- overcome by envy) /lh
😭 again...that's so fair tho
This shot made me realise how short the otaku guy looks compared to others and I looked up his height 😭 was surprised to find out he's (slightly) shorter than me damn

whimsical
this is such a pretty scene,,
Also I thought this earlier in the ep?? or the last one tbh I don't remember- and I've said this before in passing but like.. the roidmudes are gonna die right (the villains I mean). I hope at least Brain will get killed by Gou or smth, not for any big reason, I'd just really like to see that LMAO. the line-up of Brain-Gou, Heart-Chase, 001-Shinnosuke is made very clear but idk if the deaths will actually occur on that basis 😭 I just want Gou to kill Brain for shits and giggles /lh I also don't want Heart to die but alas </3 that's what being a villain does to a mf (bonus death points if you're a character I like- //SHOT)


First off damn he just signed the divorce papers or smth /jjjjjjj (the only way I could convey my thoughts, my fish) Secondly HELP the pretty bg changing 😭 Third...AYO?????????????????
Scratch what I just said I guess about there being a clear line-up between the riders and roidmudes ASKJFSDGJKFSDKH

Pack it up Kiryu Sento /j (every time I hear that word, I think of Build...oufsdkjdsjfds I miss Build....Tbh same with even more simple words like "begin", "last" or "best",, it activates my Build brain- even non-words like just saying "saa.." before a sentence, I immediately go "HOLY SHIT !?!?!??!?!?! KAMEN RIDER BUILD???!??!!?")
???????????????? the site stopped working um. why have you forsaken me mid-episode </3 /lh
LMAOOOOOOOOOOOOOOOOO I think I just got a huge spoiler..I won't even say it cause idk if Adri has seen that far or not (idk which ep that happens in) 😭 giggling tho how did I manage to do that... Anyway I'm downloading the mkv file rn 👍 waiting,, unless the website gets fixed, then I'll just go back to that (moots if you have any good sites to watch KR online do dm me 🙏 I use one of 2 sites usually but it does tend to bug 🪲 out sometimes,, downloading takes too long and I'm impatient 😔)
I LOVE HIM :(

GOU!!!!!!!!!!!!!!!!!!!!!!!!!!!!!!!!!!!!!!!!!!!!!!!
HELP ok so:

This bit made me really happy cause you expect him to say it and then he does which just makes you grin

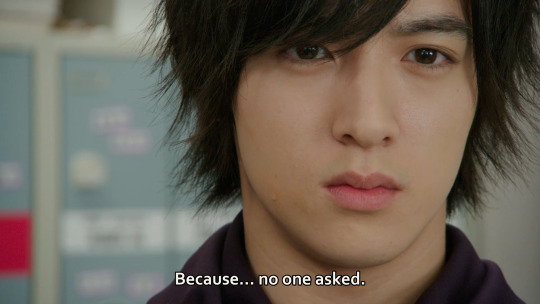
and then it cuts to this frame and I LOST it bc of Chase's default standing pose...Never change, Chase, never change (Mr o(-( (

Gou just watching 😭 he's also in a default standing pose but a different type

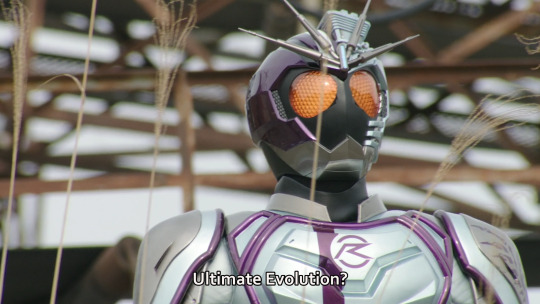
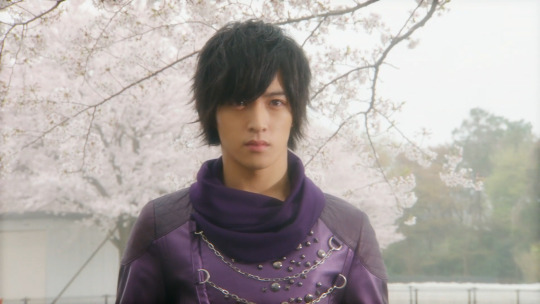
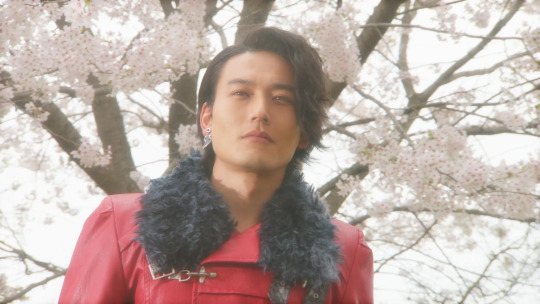
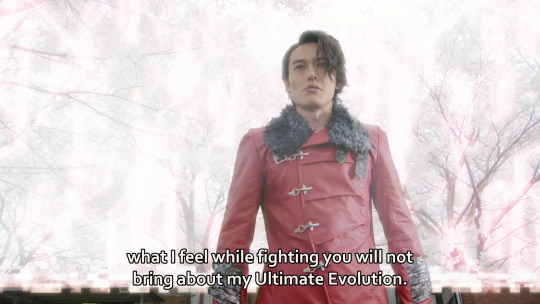
1. That IS very pretty 2. Ultimate....make-up *insert the ost of that bit* 3. EVOLUUUUTION!!! BLACK HOLE
OHHHHHHHHHHHHHHHH THAT WAS FROM THIS EPISODE OK NVM ADRI HAS SEEN THIS!!!!!!!!!!! yippee (I usually don't mind spoilers but it's still a bruh moment if I come across them without meaning to so 👍 glad this wasn't later on into the season)
This is really sad (I love Shinnosuke (I am, however, glad it's not Gou or Chase in this situation...rejoice but in a sad way....Finally a (fakeout) death does not affect my faves directly 🙏))
THIS SCENE IS SO GOOOOOD Kamen Rider handles character deaths so well 😭

BRO GOT A JOJO ASS DEATH CONFIRMATION LMAO
ADRI !!!!!!!!!!!!!! stop reading now there's spoilers incoming for a series you haven't seen yet (to my knowledge??? Kuuga- I just want to talk about smth kinda unrelated but it's still spoilers nonetheless!!)
I'll pad the text for a bit for the spoilers so if their eyes dart over the first few sentences in this paragraph, they won't get spoiled- also hopefully the different color that blends in with the bg a bit will help make it less noticeable. Anyways I saw a glimpse of the next ep's preview at the end and this is VERY much giving Kuuga vibes at around the middle mark where Godai gets poisoned. The way you know it's not an actual death death (as in: they'll come back) but the way they handle it with the characters' reactions, the camera work and just the overall tone just GETS you. You very well know it's not the end of their character but the way the show tells that part of the story very much feels like a genuine loss and I think that's a REALLY big strength that Kamen Rider has. Ik usually Adri and Nemo (& I know Nemo's watchlist) read these but just in case if anyone else gets this far !!! further spoilers for: Build and W !!!!!
Ok just a few sentences for the padding, hi :> if you're reading this I hope you're doing well o7 ok anyways so...It's such a huge strength on the series' end. I view these as kind of separate instances bc (at least) I didn't know whether they'd come back or not narrative-wise.. Ok nvm I did know about Philip bc of spoilers BUT with the writing, I never would've guessed. Meanwhile with Shinnosuke and Godai you know for sure that it's gonna be ok (<- both bc they're the mcs and also bc it happens mid-season, while Gentoku, Kazumi and Philip all die at the end). They handle these deaths in such a spectacular way that the impact is still very much prominent even if they do come back :(((( It's so good..I love Kamen Rider, man.
10 notes
·
View notes
Note
Hello! :D
So I got a couple questions
First: How do you get text to be a different color? (besides the colors provided by tumblr) I think it looks super cool :3
Second: Are you okay with people drawing their ocs to fit the Sunshine Suburbia au? Not to force you to insert them or anything, but just for funsies? If not that's okay /gen
I also want to say that I love your art, I wish I could transfer it into physical food and eat it /vpos
Anyways that's all, have a nice day :D
Howdy!
1: (ALOT OF JARGON WARNING!)
So I mainly edit my Sunshine Suburbia posts using Tumblr on the computer (Aka On my browser, This stuff is impossible on mobile as far as I know…) which allows you to swap from rich text editor (The default, and only option on the mobile app) to HTML (Alot more flexible on what you can do- BUT a headache to look at because it’ll be a GIANT wall of format along with your post’s text)
So once you’ve managed to get the HTML editor up you’ll need a hex code which represents the color you want your text to be- (ex: the code I use for Jevin is #0a01fe). The easiest way to get these is using your art program of choice (In my case, Procreate fw!) and color picking said color and checking the Hexidecimal section on where you pick colors!
You could manually input the HTML coding for colors but I really don’t like looking at HTML code for very long (Augh headache) so I use this text editor https://spacegen.carrd.co/ by another user called luna ! I copy paste the generated code to the Tumblr HTML editor (Usually replacing the text I had put in there, You can also italicize, bolden, etc using the spacegen editor ) and go to preview at the top of the editor and wow volia! More specifically colored text!!
Notes:
- Line breaks / Read mores break when you swap over from Rich Text to HTML but colored text does not break when you switch from HTML to Rich Text.
- Please be aware of what background your text will be seen on… It’s kind of why Wenda’s text isn’t colored on the Sunshine suburbia blog… Can’t guarantee people can read it as not everyone uses a dark bg- Same goes for Black / Tenebrae and some characters having texts slightly off from their actual colors. (Too light on white bgs, Too dark on black bgs…)
2: I’m absolutely fine with people drawing and writing their ocs to fit the Sunshine Suburbia au! Excited even! It’s even how I’d likely handle people interacting with the askblog (NOT THIS BLOG, DO NOT RP WITH THIS BLOG, THIS IS MY PERSONAL ART BLOG!!!! MY THERAPIST WILL HEAR ABOUT YOU IF YOU DO THAT!) as I sort of want to avoid crossovers mostly to keep the setting from getting messy! (I’ll likely detail this in the Visitor guide post on the Sunshine suburbia blog itself)
I’m just not cool with like— Trying to squirm in relationships (Mostly romantic and familial… But knowing someone before/ being friends with them is fine- It doesn’t have as many implications as the latter…) on the characters as they have their own things going on unless they’ve extensively discussed it with me WHICH I highly doubt would happen and alot of the times it doesn’t fit with the AU… But art and writing to fit them into the AU without those previous elements is COOL AND I’D LOVE TO SEE EM- PLEASE TAG ME IF YOU DO THAT!
I’d also try to provide more info about the world in there as the blog goes on to help with that- (Don’t be scared to prod for world building questions in this case… Most are not spoilery but most of the asks on this personal blog are bound to be a bit looser than what I’d give on the actual blog itself)
And also thank you! I’ve been told by a friend my art tastes like tv static (in a cool way!) Thanks for the ask! ^^
13 notes
·
View notes
Note
Hi fren! Totally fine if u don’t wanna answer this but I was wonderin how u do the multi-colored titles on ur fics? They look super cool I love the effect so much 🩷 also I love your writing so much ur inspiring me to want to start to write 😊
hey bae!! ofc sure i gots u! i actually answered this months back but i lost the ask so i dont mind re-explaining it for yew !! also thank u sm :( ur so sweet im honoreddd 🥹
tut underneath.
okay so by multicolored titles you mean gradients, yes? so—you have two methods. you can do this on mobile or on tumblr desktop.
the method i’ll show is on the phone / personally it takes longer to do on desktop.
so !!! the app i use to change coloring is stuffbydavid -> after that, you would have to copy the code and insert it, i’ll walk u thru step by step bc it is kinda complicated eheh.
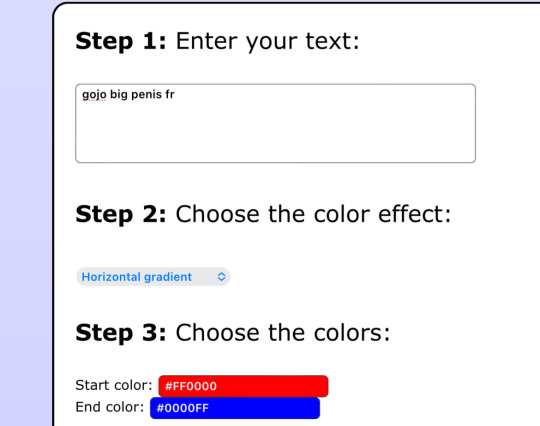
step one — once u open the app, it lays out all the steps. pretty simple! so you wanna start by referring to the first step, typing in your desired title for your fic. i’m using that as an example.
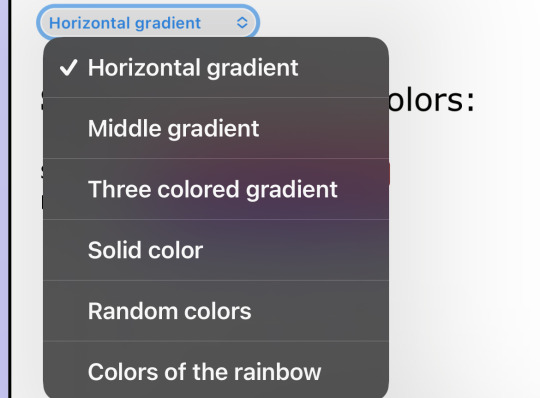
step two — now you can color your words! as u can see, it’s alr automatically set to horizontal gradient. there’s other options u can choose, but personally for my titles i always use the middle gradient for the more multi colored effect :3
( refer to here for the choices! three colored gradient and middle gradient are the best choices for a multi colored effect in my opinion / horizontal gradient is just good for two colors )
step three — after u choose ur desired option, now is time to copy && paste !! do not click the BBcode, u want to copy / paste the second option, otherwise it will not work. and make sure u copy the entire code. top to bottom
step four — now, u wanna log into tumblr via the mobile website on ur phone ( not the app ) u have to do it this way for a reason to paste the code . .
make a new draft then follow these steps.
open ur draft then press the settings icon near the top right
scroll a bit to where it reads Text Editor, click on the button near the right -> now switch it to where it says HTML.
now !!! this is where u paste the code. once u do that, save the draft -> or u can press preview to see how it looks.
this should be the final result !! hopes this helps 💟💟💟
43 notes
·
View notes
Note
How to insert images into ao3 in the notes?
Thanks for your ask! I know this can be incredibly frustrating, so here is my method:
Upload your image onto the Internet Archive: Since AO3 doesn't host images itself, you'll need to host it elsewhere, and ensure it's the kind of place that won't delete content or cause your link to break. That's why I use archive.org, because like AO3, it values preservation and runs off of donations (which you should totally contribute to if you can).
In your notes, paste this HTML code: <p><img src="[IMAGE LINK]" alt="[ALT TEXT]" width="1200" height="600" align="center" /></p>
Get the right image link: Alright, this is the part that I always get tripped up on and takes me forever to figure out. You cannot trust any embed text the Internet Archive gives you; it won't work! You also can't just use the link from the page for your item. What you have to do is right click on the item and open the image in a new tab, and then use that link. It should look something like this, as the percentages in there gives it away: https://archive.org/download/tli-part-iii-banner-for-ao3/TLI%20Part%20III%20Banner%20for%20AO3.png
Fill out the blanks in the HTML: So you take that image link and paste it to replace [IMAGE LINK], then you delete [ALT TEXT] and describe your image in words. This is important because it means screen readers can tell vision-impaired readers what the image is, and also if the image does not load for whatever reason, the alt text will be displayed instead. You may also need to adjust the width and height in the HTML as well, but I've heard that part generally doesn't matter so much.
Preview your story: Before you hit post, you'll want to ensure the embed is working correctly. That's why you should preview before you post. I will warn you that AO3 does like to add random spaces and such around HTML code after you exit from preview back to editing, so watch out for those and fix them before you hit post.
If your code works, SAVE IT! Copy and paste it somewhere it will always be in reach and easy to use later. Trust me: you don't want to have to figure out how to do this all over again.
I reckon the next time I post a fic that involves an embedded image, I should record a tutorial, since it'll give you something to follow along with visually. What does everyone think?
#how to use ao3#ao3#how to ao3#ao3 html#ao3 help#cora's ask box#cora's original posts#fanfiction help
38 notes
·
View notes