#Image tutorial
Explore tagged Tumblr posts
Visit Tumblr Blog
Explore Tumblr blogs with no restrictions, modern design and the best experience.
Last Seen Tumblr Blogs


Fun Fact
Users from the US are the majority of Tumblr visitors.
Text
Smashing out Mesh (crochet)
So I have been doing a lot of filet and mesh crochet recently and I got to thinking.
There has to be a faster way.
Disclaimer: This is not my original idea, and I will admit that I basically took this and extrapolated. Hence why I'm sharing this for free.
I figured out the equation that tells you how to crochet a lot of rows at the same time.
Caveats:
I've tested this on mesh (3DC blocks) and fillet (4DC blocks) up to 5 rows at a time. I use ergonomic hooks and doing more than that on them just isn't physically comfortable with Super Saver yarn, though I can confirm that a 5 row setup also works with lace weight yarn so if the yarn is thin enough or you're using a Tunisian hook I don't see why you couldn't do more than 5 at a time.
You don't have to use this method, but if you do want to smash out a quick mesh or filet project, you can.

I made this on a 11" tablet so it should be very zoomable on any device for readability.
Enjoy!
#Crochet#Technique#Crochet mesh#Filet crochet#Multiple rows#Time saver#fibre arts#Image tutorial#Equation#I am apparently that one adult who does use algebra after I left school
32 notes
·
View notes
Text

WE ARE SO FUCKING BACK
#i need the tutorial to come back asap bc i need to screenshot zoe's :3 face.....#ive been trying to screenshot all the new sprites for zoe and (especially) liam (he just looks SOOOO good in the new style fr....)#i love love love the new characters so much omfg....#omen and nico and doug and april are all soooo charming lolol#bunni mumbles#monster prom#monster con#anyways. expect a image dump of many liams (ft. a few zoes) in the near future lol
557 notes
·
View notes
Text


Hi *flashbangs you with Flatland fanart*
#flatland#flatland fanart#feel free to draw my designs :0#if someone reads this please send me a image ID tutorial I have no idea how they work and I´d hate to mess it up :^]c#my art
739 notes
·
View notes
Text
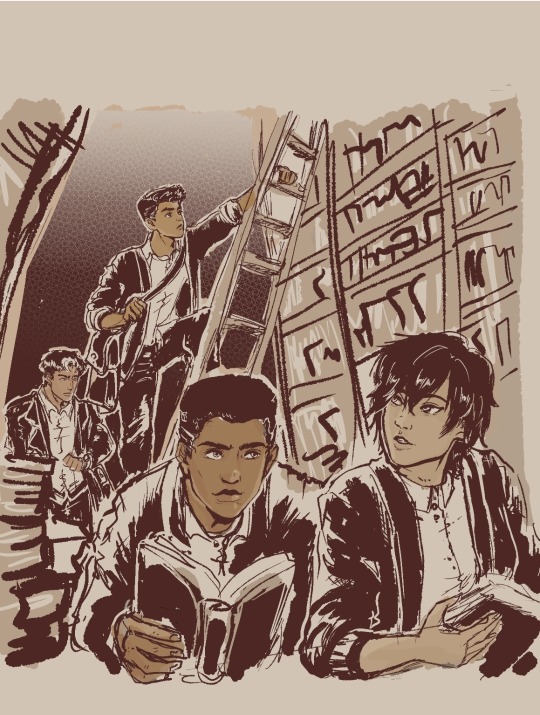
'Dead Poets Society' gang
Headcanon that these four drop poetry and literature quotes on their conversations unprompted.
Jason 'English-major-I-only-visit-the-manor-for-the-library' Todd-Wayne
Damian 'I-master-liberal-arts-unlike-you-plebs-PHD-holder' al Ghul-Wayne
Cassandra 'I-learn-English-thru-Shakespeare-as-god-intended' Cain-Wayne
Duke 'only-title-holder-of-vigilante-poet-and-will-cuss-you-just-as-poetically' Thomas-(future) Wayne
#My background is ass#I promise to practice but omg i am losing motivation coz its too ugly#started putting some on coloring that i started being happy about it#But my background is level toddler i hate it#the patience and discipline to make my lines straight and clean is nonexistent gdi...why did past me choose library gdi#Just writing some Duke in my fics and this image of them all just made me wanna do art...Duke is a poet and writes stories u kno?#Duke is not a wayne yet...and is not dead yet...but with how comics goes then its just a matter of time lol#They're all in school here...Cass and Jason are college watching over their juniors in high school#everyone use cardigans but Jason like his leather so no thanks lol#Duke and Cass in outsiders are cute#jason todd#dc comics#damian wayne#fanart#robin#cassandra cain#duke thomas#inking & background study#Damian is now 14!!!! He's getting old...he's like a baby yesterday omg#I need to stop obsessing over this so i posted a WIP so i can continue writing my fic!!! argh#Im gonna watch youtube tutorials again on drawing bookshelves coz i cannot do this without guidance
653 notes
·
View notes
Text
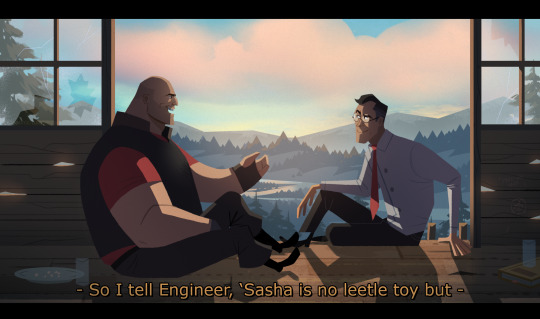
#tf2 heavy#tf2 medic#tf2#tf2 fanart#text is just flavour to make it look more screenshotty idk#there's so much wrong with this image but im moving onto other stuff fkjgjkfds#i'll draw other characters soon i promise#ty for the sweet tags on this!!#i'll do a tutorial at some point as this sort of lighting is NOT complicated at ALL im telling you. it's literally just a multiply layer#and a bloom
4K notes
·
View notes
Text


jagged, crystalized and pixelated tumblr banner masks!
for the 2 anons that asked!
okay to repost, just dont claim as yours. and free to use (its what they were made for, duh!)
keep in mind gifs dont mesh well with translucent colors if youd like to use these with them :0
#🌫️ i know what you dread | creations#anonymous#carrd resources#rentry resources#rentry#web graphics#rentry tutorial#rentry inspo#rentry gif#rentry decor#rentry graphics#rentry template#image masks#edit resources#editing resources
1K notes
·
View notes
Text

N from my twt
#n harmonia#n harmonia gropius#n pokemon#pokemon fanart#zack’s silly gay art tag#my art#fanart#tested out a shading tutorial i saw today shrugs#twt destroyed the quality of this image but idgaf its fine#pokemon
2K notes
·
View notes
Text
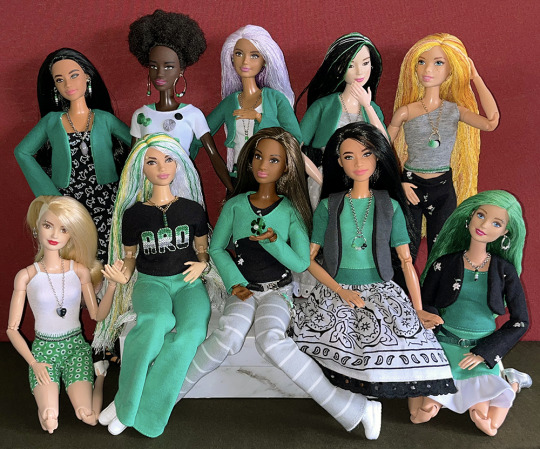
Over the past eighteen months, I've made enough green, white, grey and black clothing pieces to outfit ten Barbie dolls in aro colours. In addition, every doll has earrings, necklaces, belts or embroidery featuring pride stripes. Now I just have to figure out how to make a one-sixth-scale aro pride march display...
(More information about the making of aro-themed doll accessories and clothes is available on my website.)
#aro week#asaw 2025#aromantic#green aro pride flag#sewing#embroidery#cross stitch#pride crafts#needlework#needlecraft#fashion dolls#barbie#pride#link#aro worlds wordpress#image description in alt text#I'll be sharing a tutorial for the floss rehairs later this week
206 notes
·
View notes
Text
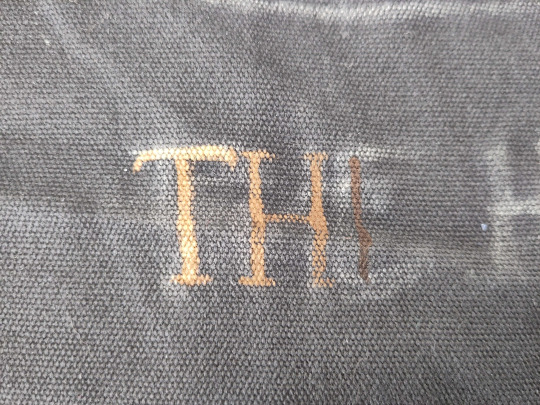
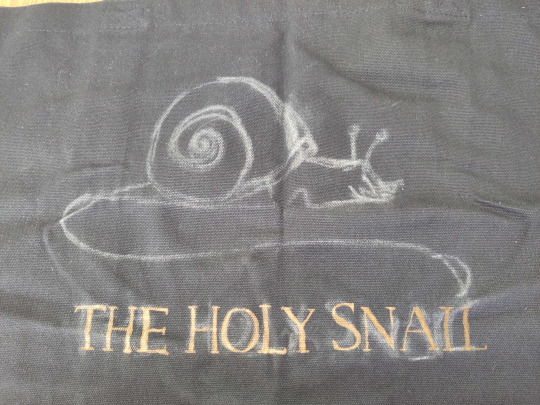
cheapskate bleach tutorial

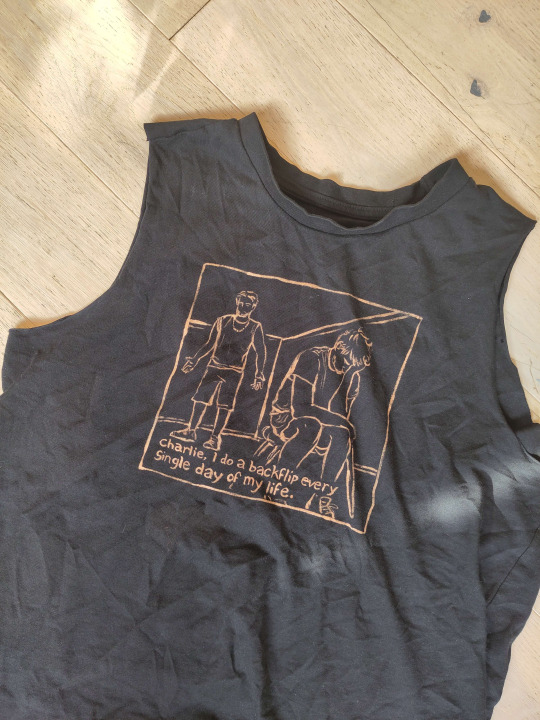
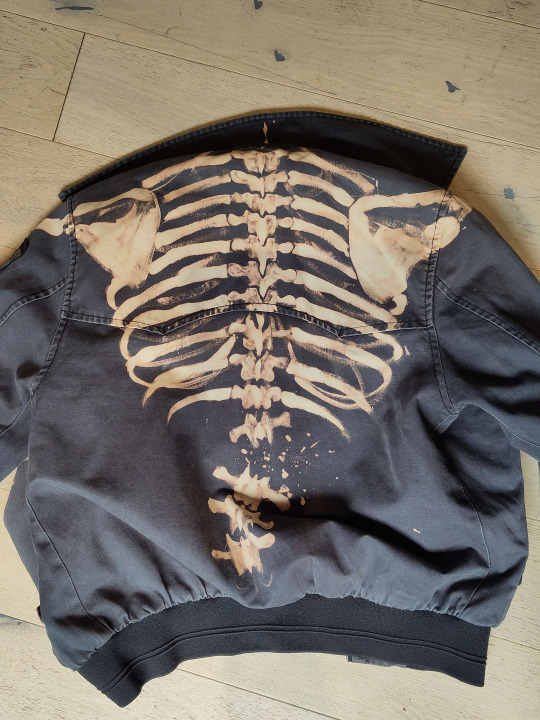
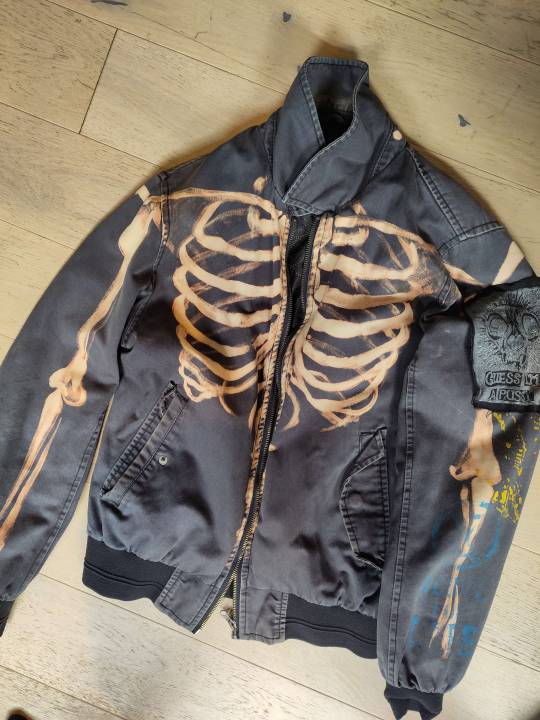
Sticking it under a readmore but this is how i make my shirts etc for like a fiver's worth of materials. I am far from being an expert btw im just playing with chemicals. also probably do this in a ventilated area or something
You will need:
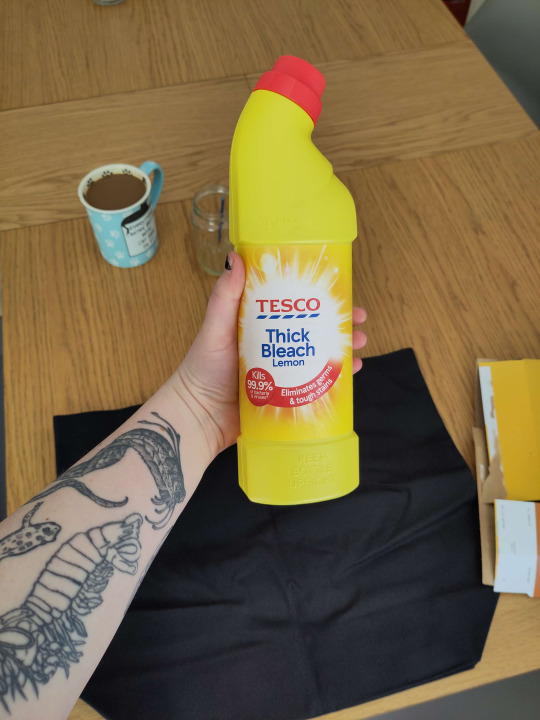
Bleach (I use thick toilet bleach it's like 80p)
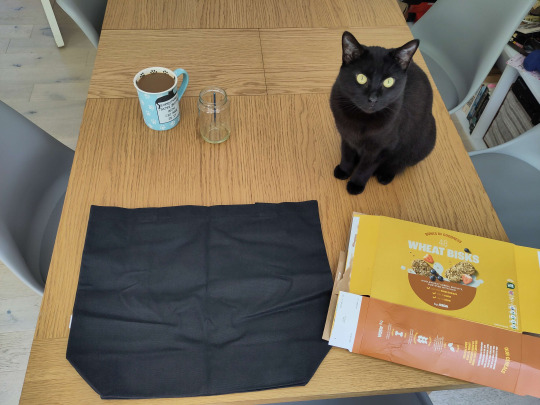
The thing you want to bleach onto (In this case, a tote bag for a friend. usually i thrift old black shirts.) You should do a patch test before any real bleaching -- dab a tiny bit on the inside of a hem somewhere before you commit. I don't show that below because i forgot to do it but you should. You should ALSO iron the thing before you bleach it. So it's flat. Do as I say not as I do etc.
Something to put inside / between your garment and the table (Asda brand weetabix box babyyy)
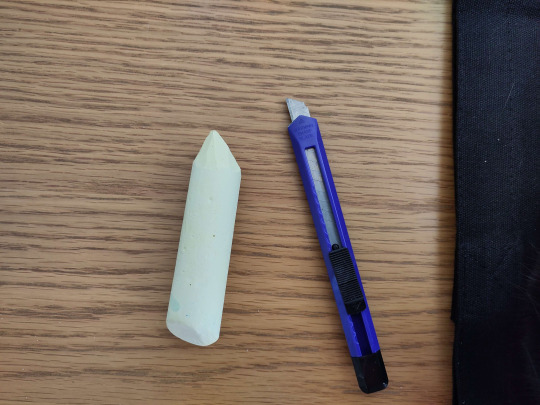
Paintbrush (Mine is from a multipack from Poundland. I also accidentally left it in bleach last time and it kind of dissolved so I had to cut off the most egregious of the stray bristles.)
Chalk (For snacking) (I'm joking please don't eat the chalk) (I only have big pavement chalk, again, from Poundland, but you can get a good point with a craft knife)
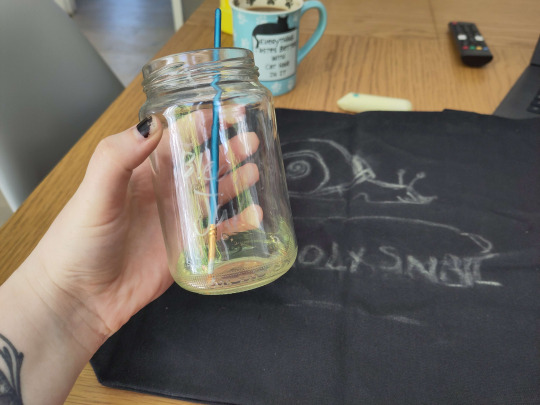
Step one: move the cat
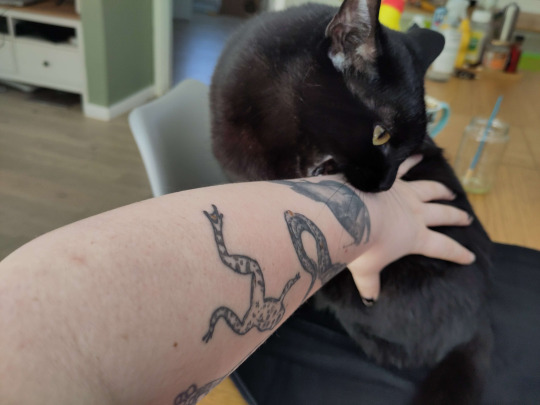
Step two: insert cereal box into / behind the thing you are bleaching.
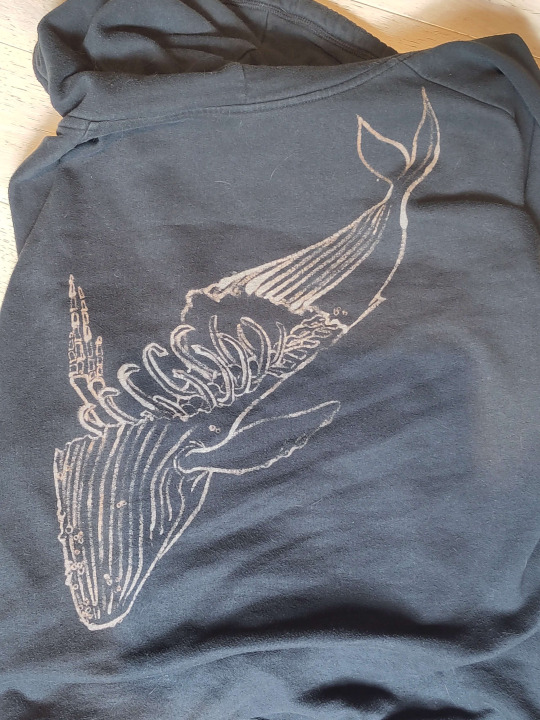
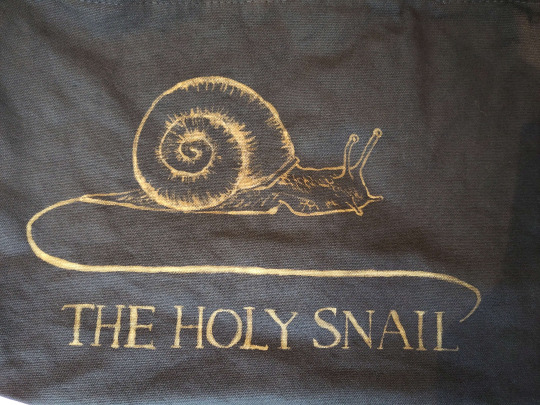
Step three: chalk on your design. this is the logo of a wine brand i have never tried but i like the snail. It can be super rough or very precise, whichever helps you know where to put your lines.
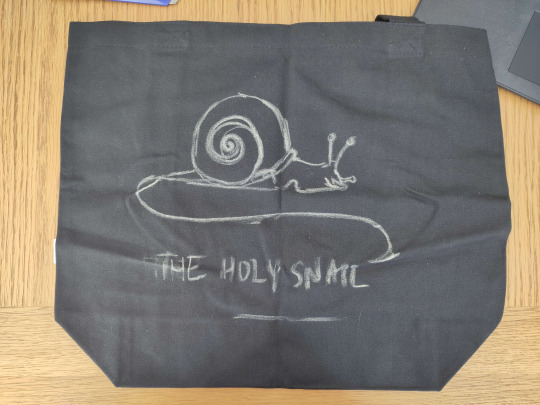
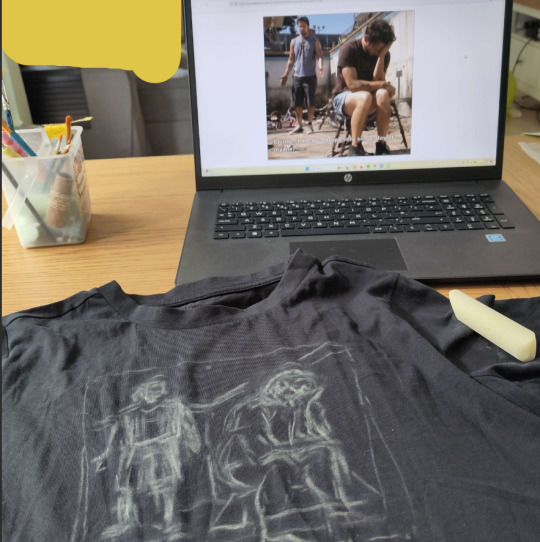
As you can tell it's easy to move stuff and redo it by just smudging the chalk away, or, worst case scenario, giving it a wash. Though that sucks if you're impatient like me bc you do NOT want to bleach this while it's wet. Once you're happy with your design, smack it around a bunch to take off most of the chalk, so you wind up with a vague outline. I didn't get a pic of this stage but here's what the iasip one looked like:
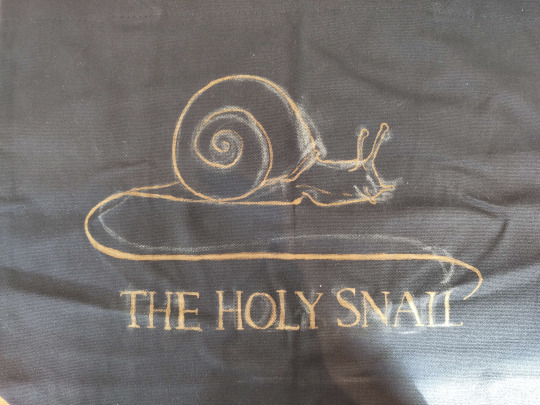
Step four: Acquire your bleach and put it in the special bleach jar your hosuemates labelled so you would stop drinking normal water out of it. Accept that Nyx hates you for not letting her drink it.

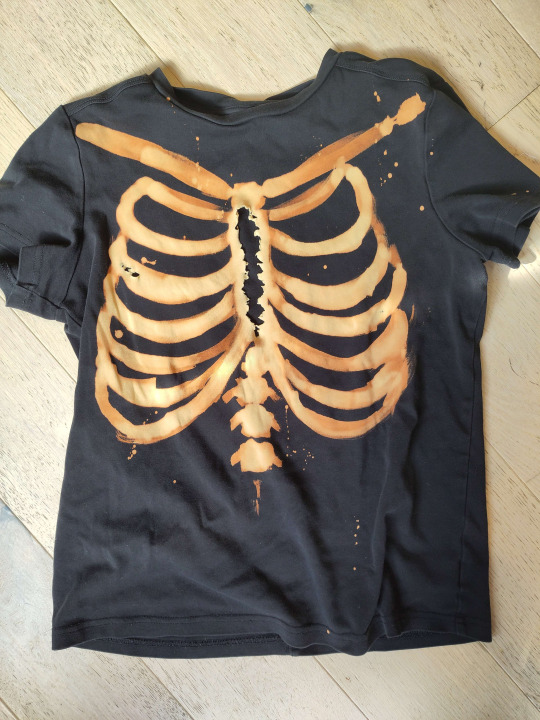
Step five: Go for it man. The bleach is kinda goopy so don't expect it to come out like paint, but it does mean that you can control the line crispness and width quite easily depending on how hard you press the brush down. I find it really helps for stuff like serif fonts.
You can dilute your bleach with water, which can help it get into all the little crevices esp if your fabric is a little bumpy, but do another small patch test before committing to anything on the main piece, because some fabrics absolutely suck up water and your lovely crispy lines will blow out like an old tattoo. don't do it. Unless you want that look, in which case get silly with it
The other weird thing abt it is obviously that you can't see what you painted right away, it takes a couple seconds to show up, so it's a pretty slow process. The fabric will first go darker where you painted, then lighten from orange to a pale yellow over about 30 seconds. DON'T go "this bleach aint shit" and paint over it to make it lighten faster -- overbleaching it can weaken the fabric and make it tear.
Tragic.
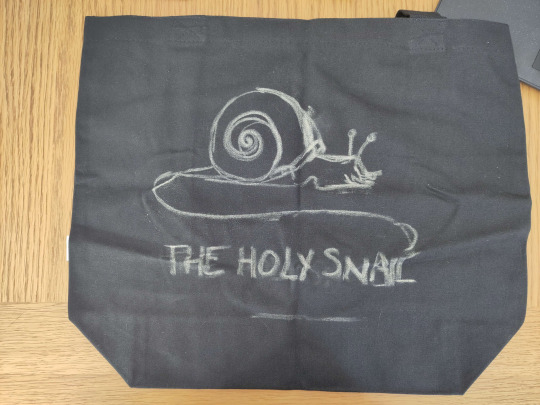
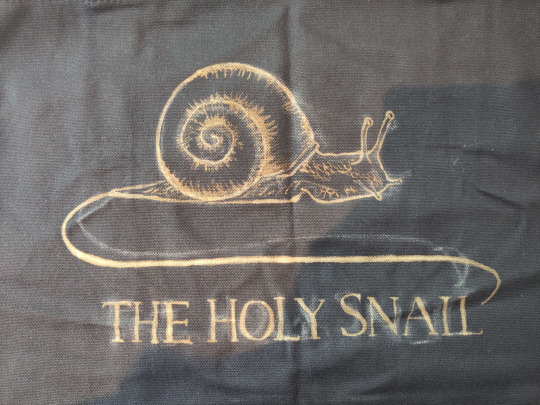
Here are some progress shots of the snail! When you're finished, you should wait for it to develop properly, but it depends how light you want it to be. I let the lines sit for a while before doing the details, and then washed it a bit prematurely so they'll stay a little darker. For nice pale yellow you want to wait around an hour.
Step six: drown her
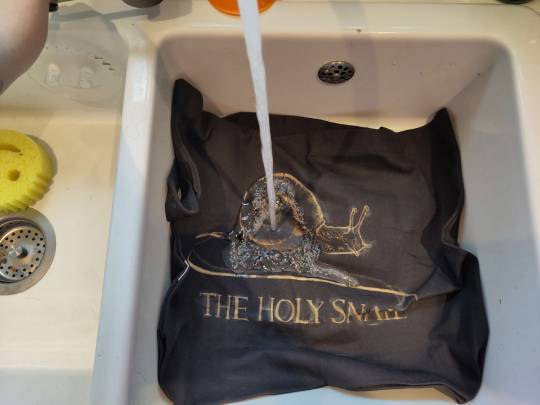

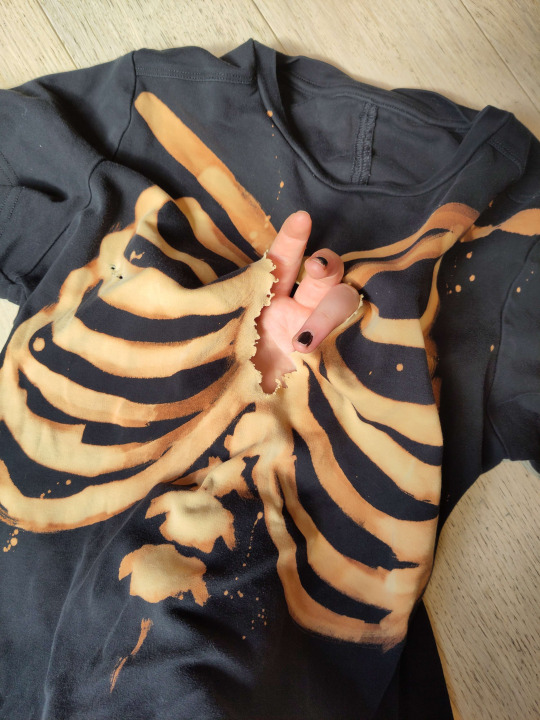
Nice cold water, wash out all the remaining bleach and chalk. I chucked it in the wash for ten minutes because it's a weird shape and size to wash in the sink and I'm a lazy bastard. but handwashing works just as well.
Step seven: revel in your new bootleg merch. You made that. You did that. thrive. go forth and make weird shit.
#bleach#art tutorial#clothes#diy#i've never done a tutorial before so hopefully this is coherent lol#img descriptions are all in alt text#it got dark while i was making this so pls excuse the varying image quality loll
210 notes
·
View notes
Note
Can you tell me how you post your art on Ao3? I keep trying and failing. Maybe it's my image hosting site?
Hey! Sure I'll attempt to explain. It's possible it's your hosting site, but hard to say. I use a site called Maltshop, or more accurately MLTSHP. It's been working great for me since I started using it but the downside is that it is a paid hosting service at $3 per year. I know not everyone can do that though, but if you're able to throw them $3 per year it could be worth it. At that tier they allow for up to 300MBs per month uploads. They have a $24 per year tier that is unlimited file size uploads. Another benefit - and this may not apply to you, but maybe someone who's reading this - is that they allow for Adult/Mature/NSFW whatever you want to call it image hosting.
Here's my process - and keep in mind this is just for adding an image. If I'm adding an image to a fic then I start a new post on Ao3, paste the fic in first, then add the image in the body of the fic where I want it also following this process:
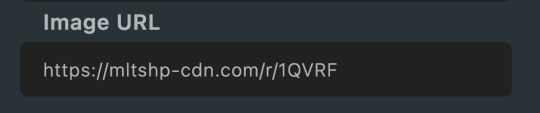
I go to MLTSHP and upload my image. It thinks for a second then gives me two URLs. A "post url" and an "image url." I copy the "image url"
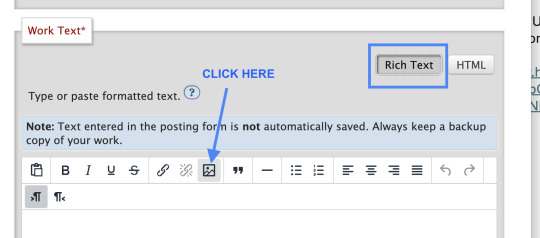
2. Then I go over to Ao3, click "new post," add all that necessary stuff it asks you to add like title, tags, summary, etc. then in the actual Work Text editor box I click "Rich Text." That's key as it defaults to "HTML" editor when you start your new post and while some people are awesome and good at HTML, I am not that "some people" and need my Rich Text editing box.
3. When you're in the Rich Text editor version of the Work Text box, click the little image icon

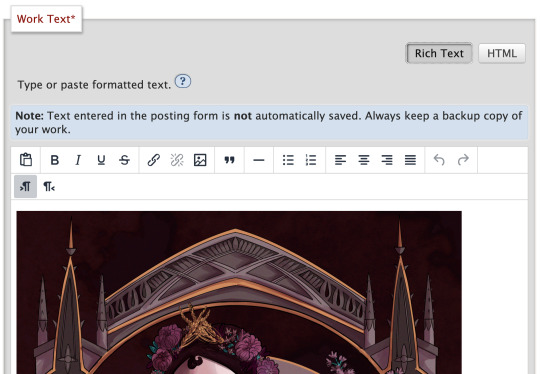
4. A dialogue box will pop up where you can paste that Image URL link from step 1 above. You can then add your Alt Text (called Image Description) and adjust the size of your image, then click save

5. Then I futz with the sizing for a bit, make sure all the necessary post info is included, add text if there's any to go along with your image - ya know like if you have a whole fic you're posting, then preview, then post the image and voila!
And that's my entire image posting on Ao3 process! I hope it helps, but if you need further help, feel free to DM me!
136 notes
·
View notes
Text

"Figure Practice 040" Video.
Models: Me + @adorkastock and @GadgieCAT13
Video/Camera Work: Me/Blue
If you want to help support me and get awesome stuff like early access/polls & pose requests Become A Patron or you can check out my Ko-Fi store for exclusive stock!
Read My Rules Before You Use My Stock.
#Creative Commons#CreativeCommons#FreeStock Images#human anatomy#anatomyreference#FreeStock#FreeStockImage#Drawing Resource#anatomy#anatomy reference#Figure#Practice#Figure Practice#Anatomy#Timed#Timed Practice#Study#Tutorial
98 notes
·
View notes
Note
*clicks the pen* How do you draw Vincent's curly fuzzy hair? I imagine you got a good brush for it but how about shading it?
So a lot of it has to do with the brush, which is actually my all-purpose brush I use for most aspects of my painting.
it has a sponge-like texture, as seen below:

you can see how the edges form that perfect fluffy shape, which is ideal for highly textured hair
I actually put a step-by-step of this latest piece up on my patreon wip tier, so I can show you how the hair was done:

so it's basically just blocking in the shape, using the airbrush for the initial gradient, then constantly adding more texture by dabbing the brush in short bursts, from darker shadows to the lighter brown/gray highlights~
I know it's not a super thorough explanation, but I hope this helps <3
#asks#quinncent#tutorial#vince's hair is one of my fave things to draw 🥰#actually..textured hair in general is usually easier and more fun~#(2 of these are just the same image lol whoops 😅)
142 notes
·
View notes
Note
How did you go about redesigning the clothes in you remaster?
Ooh great question! I'll go into more detail below, but the gist is that I broke down each character into their vibes and general aesthetic and tried fitting it to my design biases.


I tend towards more grounded designs than the original JRPG-inspired armour and clothes, so I referenced a lot of medieval fashion for the setting. You'll usually see me covering bared skin in battle outfits or toning down extra details I struggle to draw

Then, using those references, I'd try to thumbnail basic shapes and colours to figure out which works best


(More specific character notes below)

For some characters like Iseul, I didn't feel much need to change his outfit so I mostly toned down the detail to suit my style. I shifted the colour scheme to something warmer and removed the fur and extra armour to serve his image as animal-loving and battle-avoidant. This serves as great contrast to his timeskip outfit where he then commits to being both a warrior and a prince, with more ornamentation and practical armour


I designed Helena and Alain as contrasts. They have very similar themes and designs, so I decided to smooth Alain down into the picture-perfect metal knight while Helena's wilder and asymmetric. I referenced more realistic armour for Alain but overall I wanted to keep his clothes similar.
For Helena, my design style is more practical and thematically I want to avoid Helena baring skin and vulnerability so I extended her corset into more of a chest armour and covered her other thigh. To add to her duality of magic and metal, I gave one arm armour and bared the other to show off magical scars.


August and Altea's designs are where I start to venture off into more vibes-based outfits. August is humble and traditional, a knight with proud loyalty to his Lord and family, so I gave him medieval colours to represent both on his tabard. The armour is still there, but it's less focus on metal and more on "cheaper" materials to serve as a contrast to his timeskip where he becomes a proper knight in shining armour. For that reason, I took away the cape and other unnecessary decoration.
Then Altea is flashy, wealthy, and bright. I kept the focus on light armour, with scalemail as the only obvious protection. I've mentioned before but I took inspiration from south east asian fashion (mostly cambodia and malaysia) as a grounded but ornate basis for her magical girl theme. Here the colour scheme and fabrics are what mostly connects it to the original

Similarly, Lennox is where vibes rule and the overal aesthetic changes quite a bit. He's often described with "choir boy" hair, so I wanted to combine choir robes with ornate priestly outfits to sell him as a vain cult-leader. I kept the symmetry, long coat, and lack of obvious armour, but I wanted him to look less modern and stick with less structured outfits.

One thing specific to the generals, is that I wanted to give them more of a variety to colour palettes to sell that while they're working together, they're not exactly happy about it. While they all have a focus of blue and silver to keep them cohesive, they each have a motif: Alain - silver, Helena - pale blue, Jinhai - brown, Lennox - dark blue, Magnus - turquoise
#love and legends#character design#costume design#whyyy did the image orientation all fuck up??#art#art ref#tutorial#ish#i love doing redesigns#or well converting designs to fit my biases :P
236 notes
·
View notes
Text
posting art twice in one day!?!? what???
okay but full disclosure i did end up tracing the rat. im sorry. they're poking it with a stick
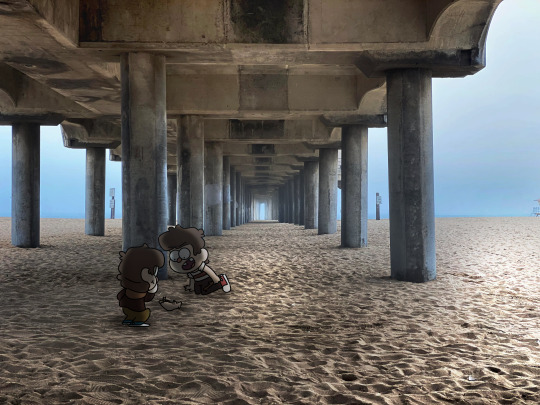
closeup under the cut if you wanna see how like. mediocre it is
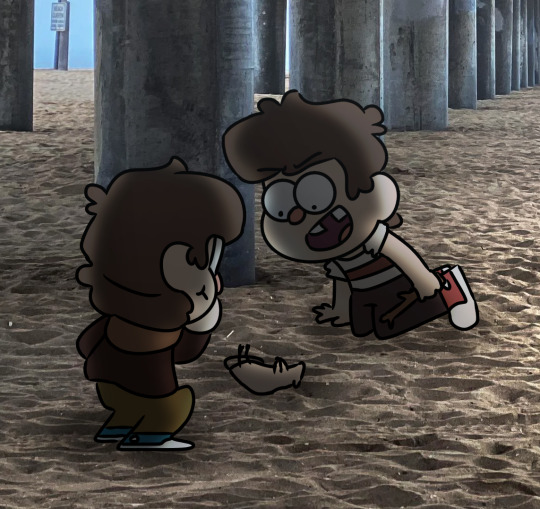
#i do love having them like. off to the side like that#so the main focus isnt EXACTLY them they just blend in with the image#i had sm trouble with ford's legs i hate drawing legs. someone drop a leg tutorial#gf stan#gravity falls stan#stan pines#stanley pines#stan gravity falls#stanley gravity falls#gf ford#gravity falls ford#ford pines#stanford pines#ford gravity falls#gravity falls#gf#gf fanart#gravity falls fanart#connor draws#put that man in an environment#lil stan#lil stan twins#lil ford
77 notes
·
View notes
Text
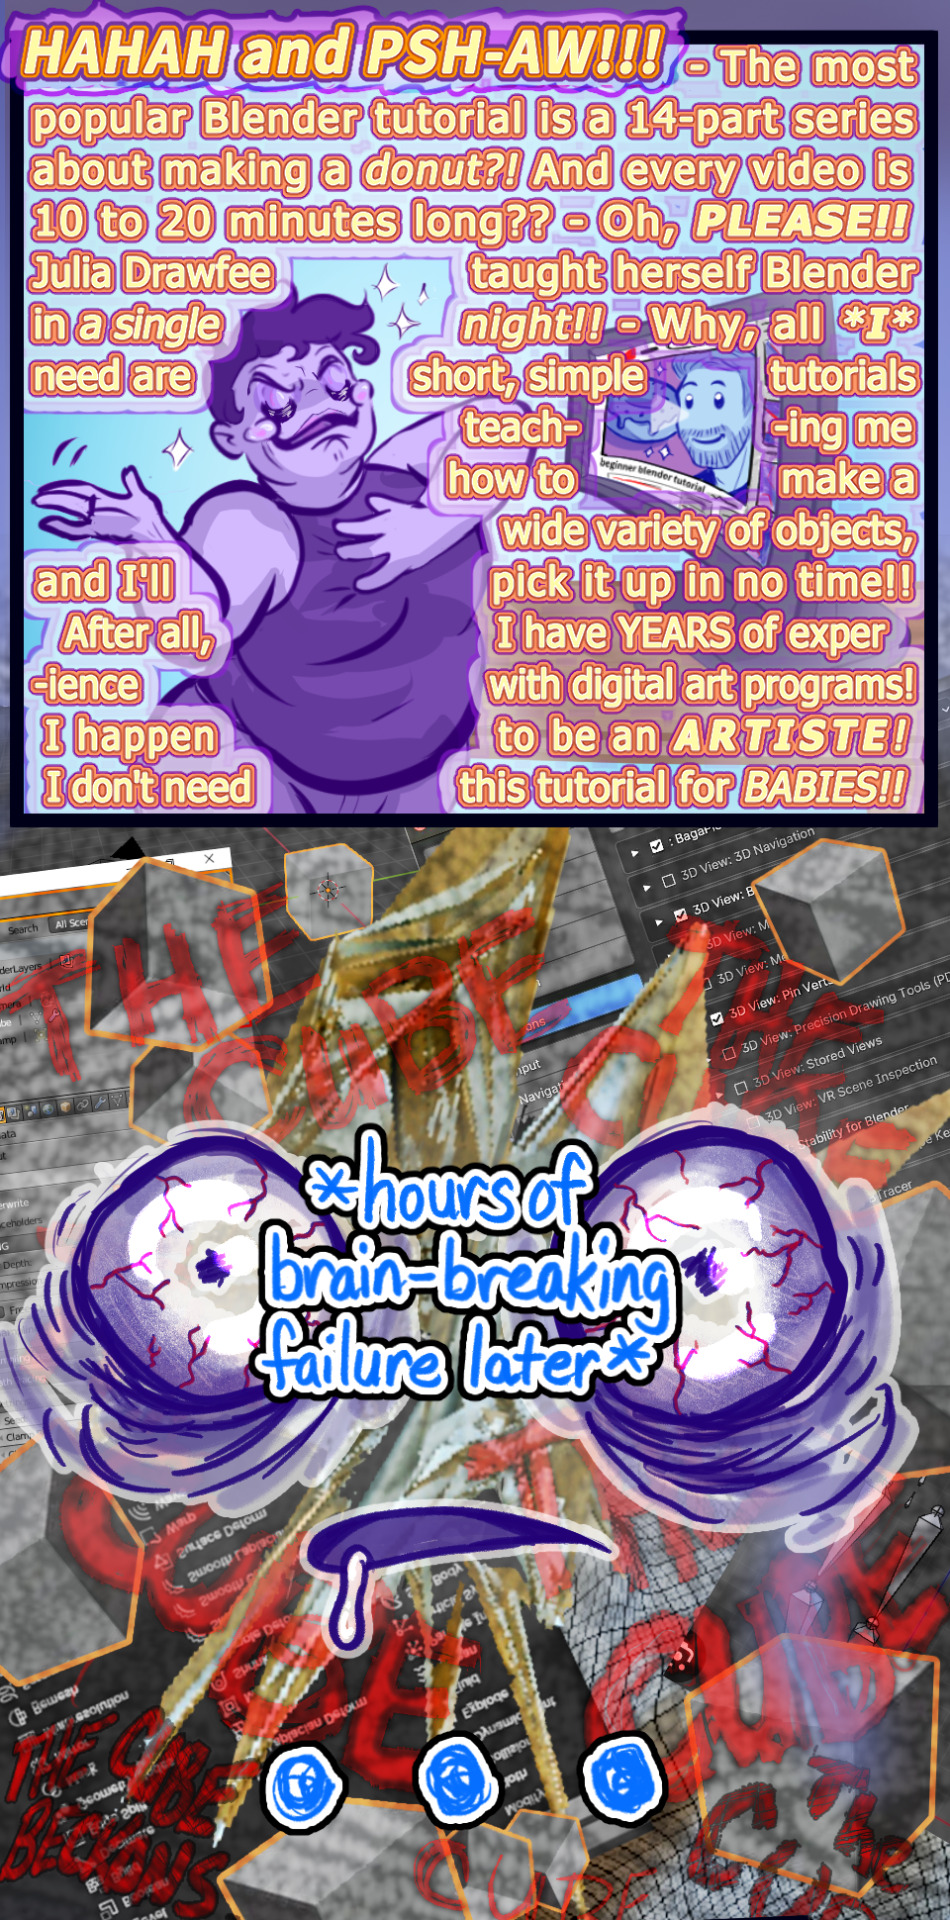
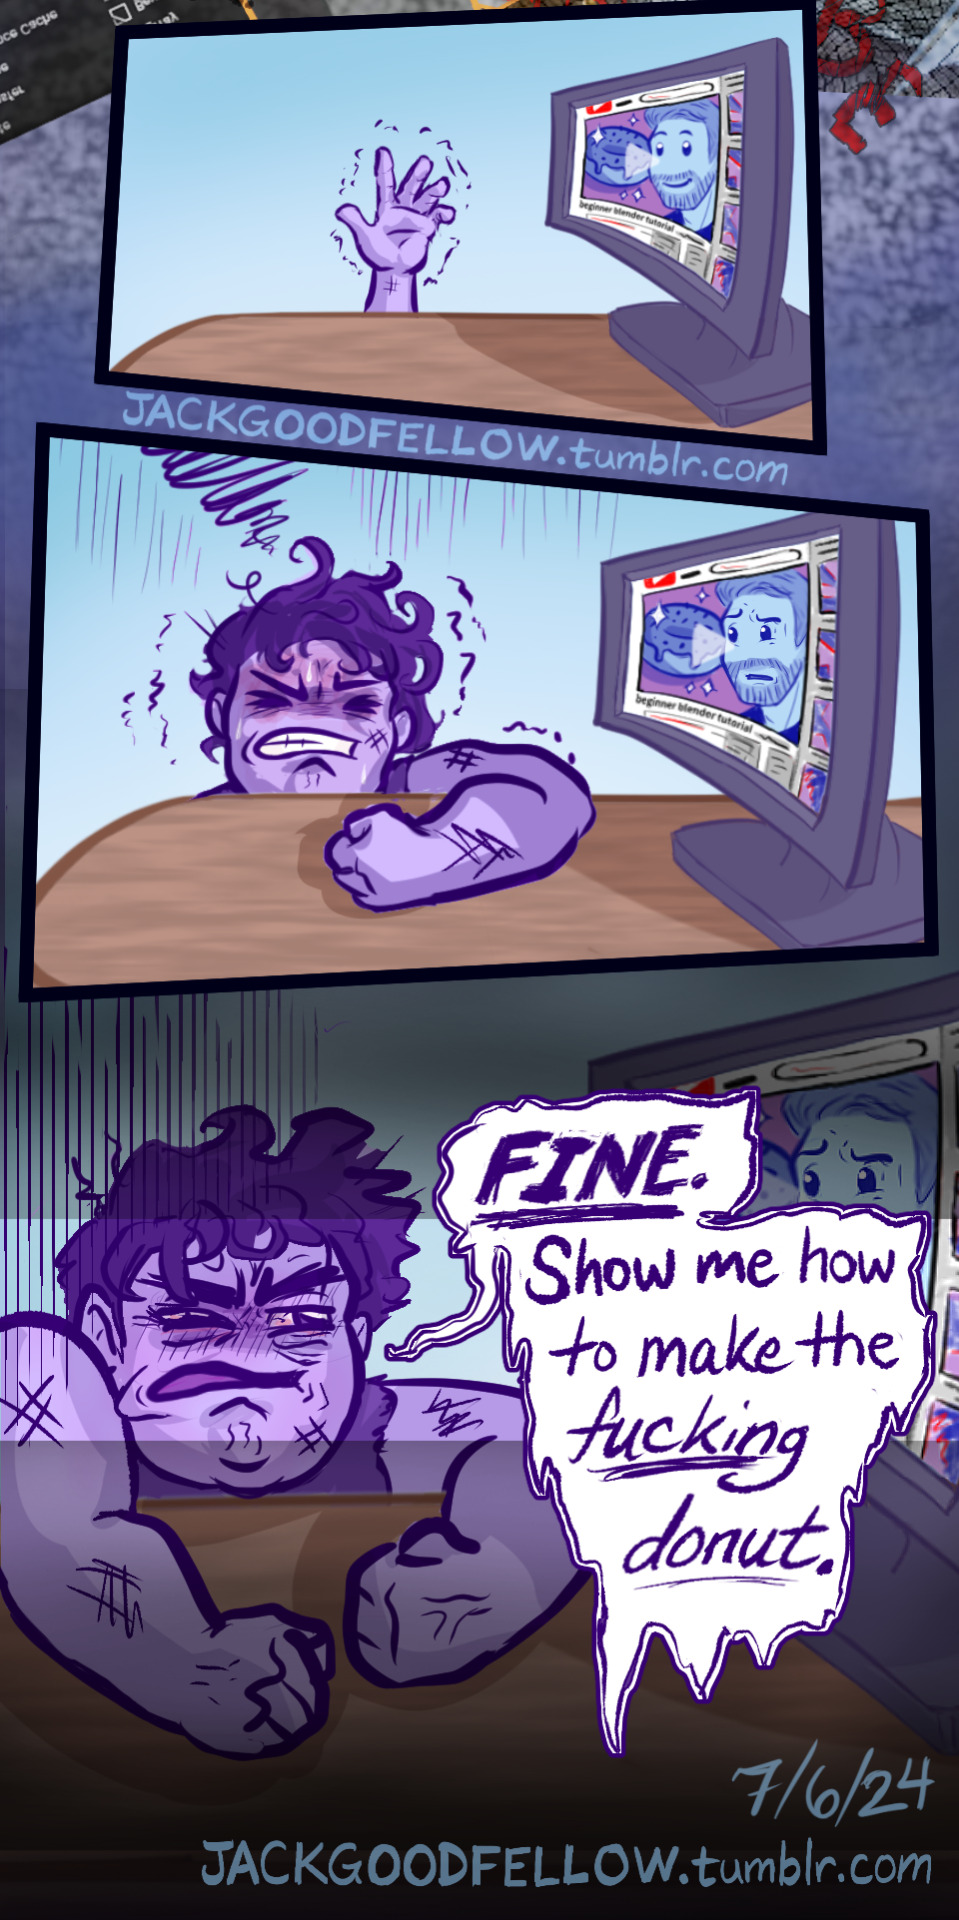
Anyway, it turns out setting art goals according to what Julia from Drawfee can do is like setting swim goals according to what sea otters can do.
#my art#alt-text#image description#blender#blender tutorial#blender donut#blender donut tutorial#learning blender#blender 4.1#blender 4.0#3d modeling#3d animation#3d memes#blender modeling#blender meme#blender community#blender cube#THE CUBE BECKONS#3d artist#julia lepetit#julia drawfee#drawfee
184 notes
·
View notes
Note
hi!! I was wondering if you could share tips (or at least a timelapse) on how you do your lineless art? It’s so simple, yet so pretty, and I’d really love to learn from you :0
Thank you so much! Lineless art IS simple (or rather...as simple as you make it haha)....lined stuff with cel shading is what I find really tough as it's SO tied down and concrete! You can definitely cheat a lot more with raw colour...
I put this tutorial together quickly to hopefully explain a little the basics of my process. I use A LOT of layers but it's mainly to keep all the 'bits' seperate (limbs from torso, head from torso etc) as I'm a fiddler when it comes to rotations but the actual process is very simple. Of course you can add further complexity with gradients, texture etc but I thought I'd use a really straight-forward example.
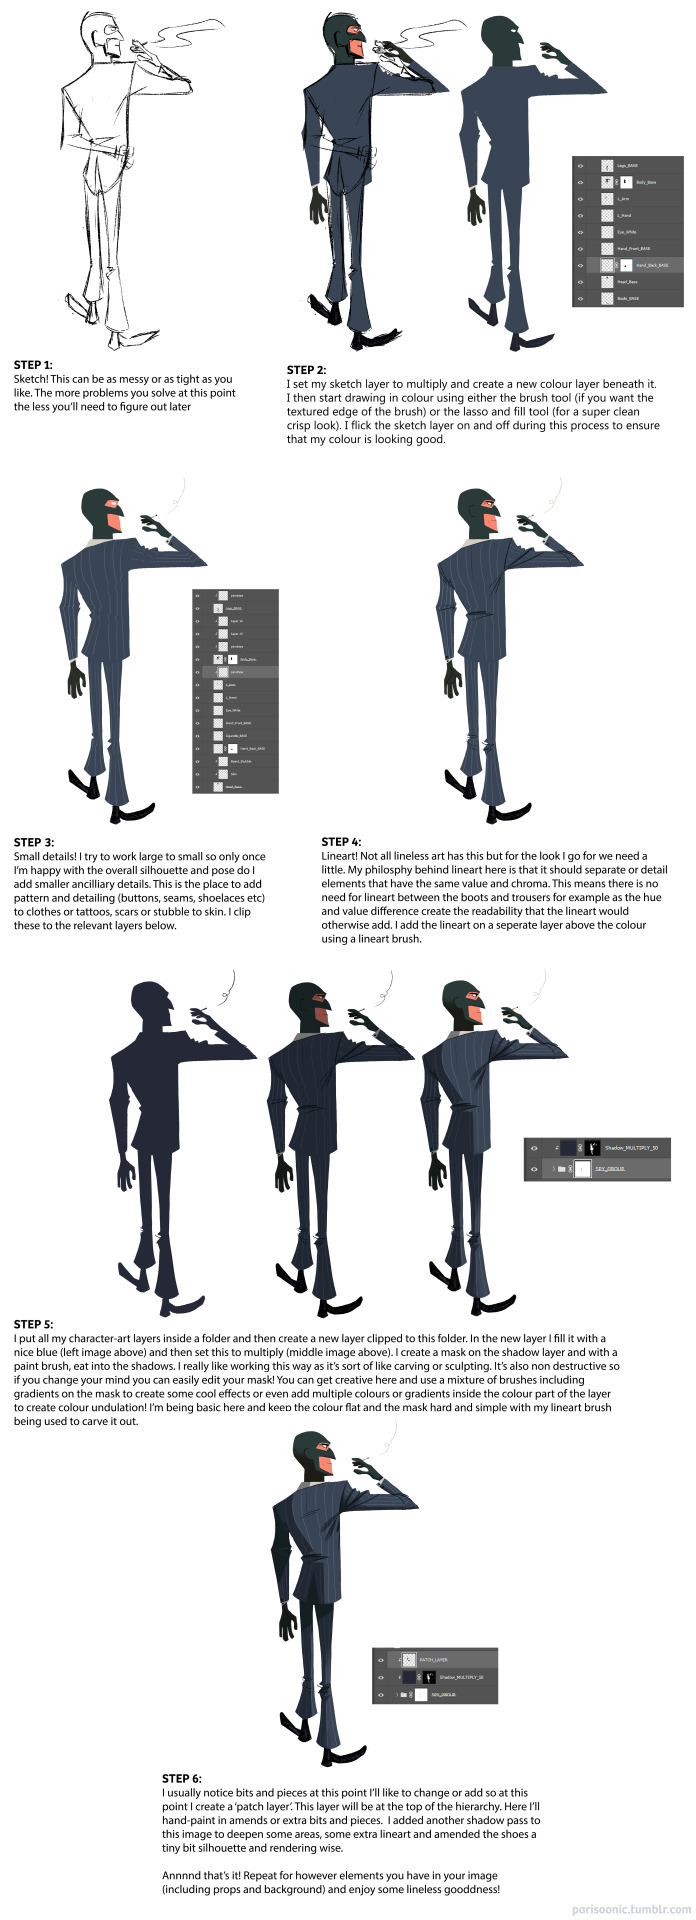
Unfortunately I don't have any timelapses to hand and I'd have to either bust out Procreate or figure out how to record my screen in PS to record one! Might be fun to do in the future :) Next best thing though - my pal works in exactly the same way I do and she's uploaded a bunch of speed paints here (albeit most are landscapes). I also touch on my lineless approach with the few progress pics I posted here and here. Hopefully this helps! Studying other lineless art is the way to go - lots of great vintage illustration to look at as well as shows like Tangled: The Series, Carmen San Diego and Samurai Jack.
358 notes
·
View notes