#Like there's more softwares and resources I could link you I know of that
Photo


Rotoscoping Tutorial by @antoniosvivaldi
Hi everyone! I’m excited to announce my long-delayed Rotoscoping Tutorial - requested by a number of people over the past calendar year.
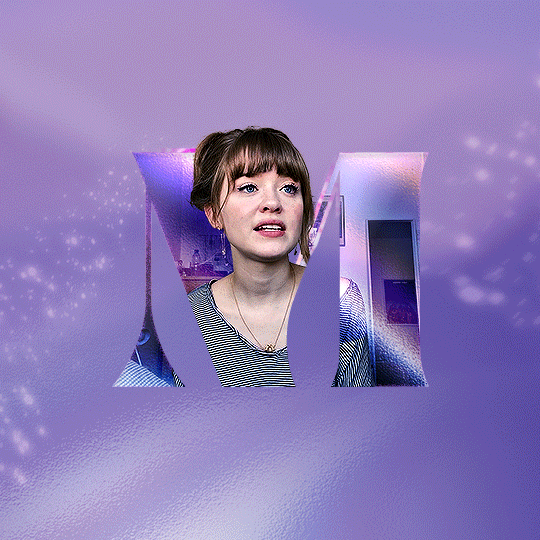
In this tutorial, I will show you how to create the cutout gifs like this (and seen in most of my gifsets under this tag) with Rotoscoping on After Effects. I’ll also provide additional examples and a number of things that I do to optimise my giffing / Rotoscoping workflow (e.g. useful shortcuts & other things to be aware of).
This is the structure of the tutorial:
Why Rotoscoping? Photoshop video timeline’s limitations
Photoshop workflow pt 1: Preparing your gif
After Effects workflow: Interface, shortcuts, and Rotoscoping tools
Photoshop workflow pt 2: Assembling your gif; with multiple examples
Bonus content: Rotoscoping tips* & workarounds to common issues
For quick reference, here are example gifsets (and where Rotoscoping is used in the posts) that I will mention in the tutorial:
Example 1: Cutout gif effect | panels 2 + 4
Example 2: Changing a gif’s background colour | all panels
Example 3: Cutout gif effect in a shape | all panels
Example 4: Putting it all together | panels 1, 3, & 5
What you need & need to know:
Software: Photoshop & After Effects (After Effects 2021 or later for Rotobrush 2.0)*
Hardware: 16GB RAM required to run later versions of AE*
Difficulty: Advanced; Knowledge in making gifs, applying layer masks, and using video timeline interface assumed
Key concepts: Rotoscoping (AE) / Video Timeline (AE+ PS) / Layer Masks & Groups (PS)
Supplementary files: tutorial resources
*I’m currently running the latest version of PS & AE on an M2 Mac, but I’ve also used older versions (CC 2015 & 2020) on Intel-based Macs. I’ll outline some known compatibility & performance issues, and workarounds later in this tutorial that could help streamline your giffing workflow.
Tutorial under the cut. Like / Reblog this post if you find this tutorial helpful. Linking this post / the example gifsets in your post caption, will be greatly appreciated if you read this to create effects seen in Examples 3 + 4.
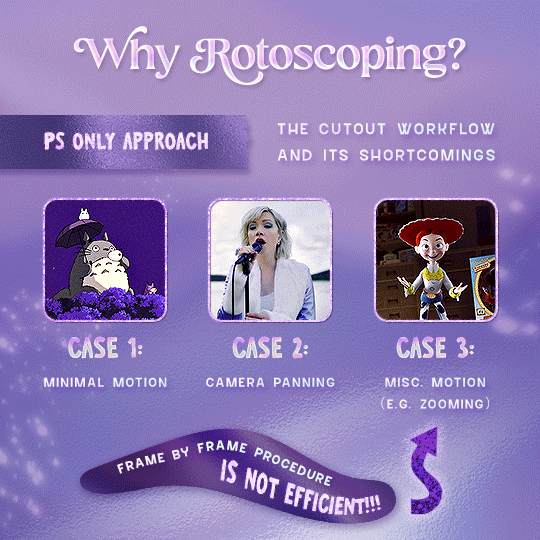
1) Why Rotoscoping?
My Rotoscoping journey is motivated by the shortcomings on Photoshop - namely the limited options to manipulate the Layer Mask keyframes in the video timeline interface, as well my need to gif more efficiently.
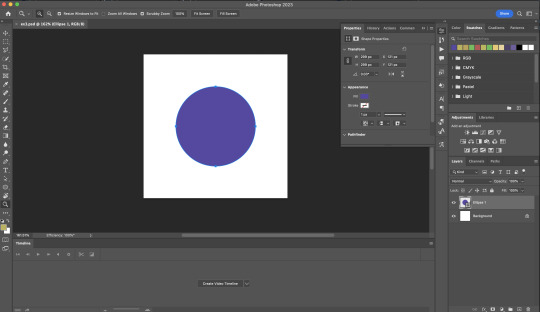
Suppose I want to cutout this subject or recolour the background of a gif on Photoshop: I personally classify the gifs that I prepare on PS into 3 types based on the motion of the subject
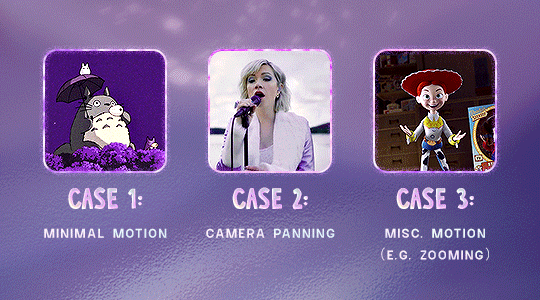
These are the common Photoshop-only approaches when attempting to mask the subject in the gif.
Case 1: minimal motion in the subject → a simple layer mask will do the trick
Case 2: some linear panning of the subject in the gif → using the Layer Mask Position keyframes in the video timeline interface will do the trick
Case 3: subject moves around a lot (e.g. zoom motion) → Unfortunately this is where a Photoshop-only workflow will require frame by frame masking. Layer Mask Position keyframes only apply positional translation (but not transformation / rotation) on the layer mask
Enter Rotoscoping on After Effects: Instead of resigning to frame by frame procedure on Photoshop, I opted to make my life easier by learning to Rotoscope on After Effects. This essentially provides me an opportunity to cutout / recolour a wider range of gifs with relative ease.
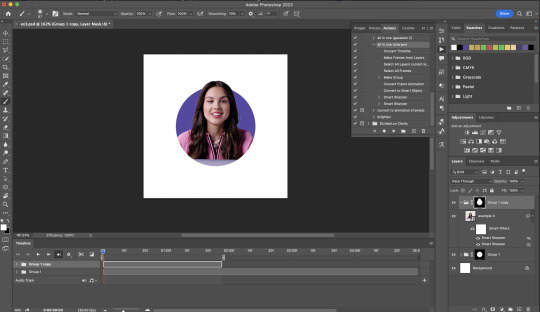
2) Photoshop pt. 1: Preparing your gif
Prepare your gif the usual way - whether you screencap or import frames from video.
Then your Photoshop should look like this:
Now, I shall walkthrough & explain my personal giffing workflow (as of 2023) after loading the gif frames. To speed up the process, import my gif prep action file to Photoshop.
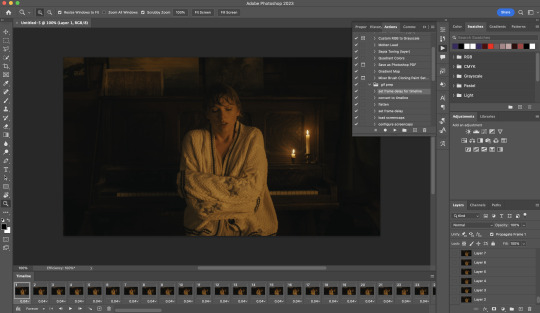
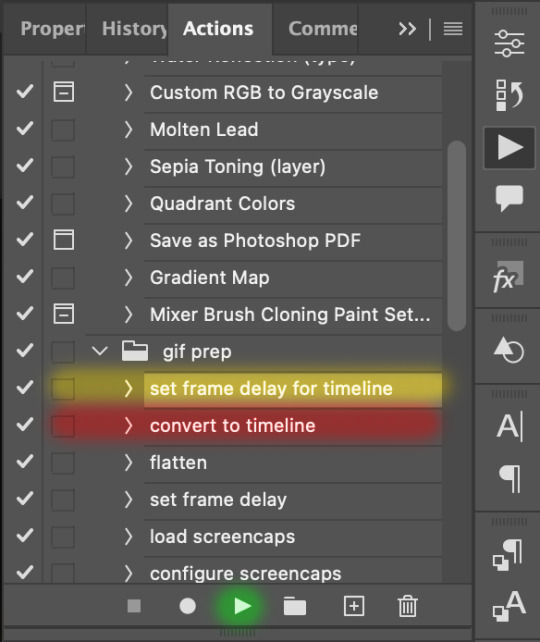
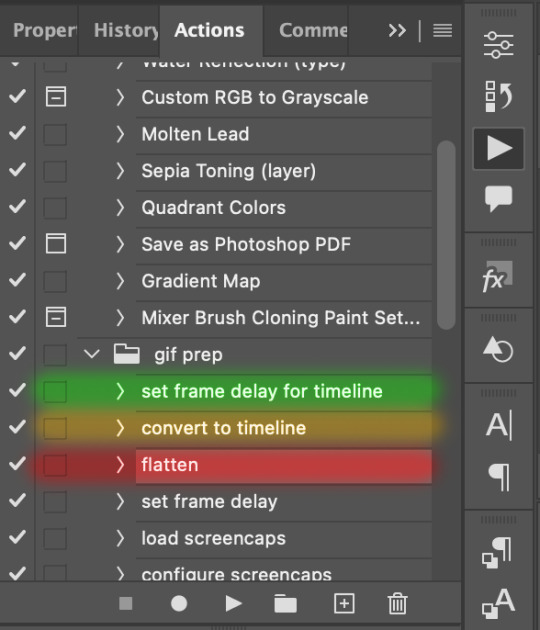
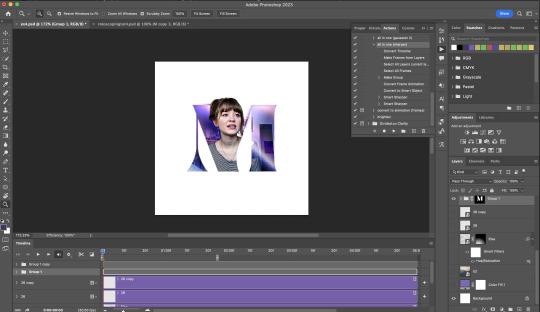
Going to Window > Action, you’ll see a set of actions under the “gif prep” folder.
"set frame delay for timeline” (highlighted in yellow) will set all of your entire gif’s frame delay to 0.03s
“convert to timeline“ (highlighted in red) will take you to the Video Timeline interface
To play an action, press on the Play button (highlighted in green)
i. Set the frame delay of the entire gif to 0.03s. (play “set frame delay for timeline” from my gif prep action pack)
I work with everything in 0.03s frame delay (or equivalently 30fps) at first. It’s always possible to change the frame delay of the final gif to 0.05s before uploading onto Tumblr.
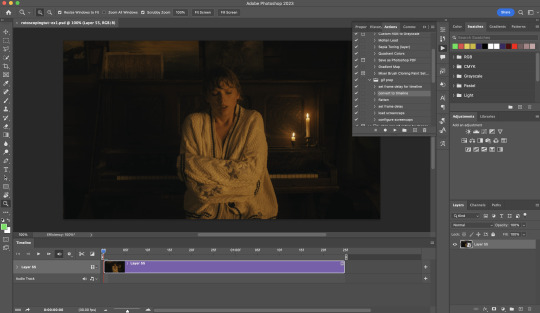
ii) Convert this gif to a Smart Video Layer (play “convert to timeline” from my action pack)
Note: I personally don’t resize the gif just yet. That’s because Rotoscoping in full video resolution will render higher quality details around the edges as well as more flexibilities later on in the editing process.
Performance optimisation: If your computer has 8GB of RAM or less, you might find it helpful to crop / resize your gif to Tumblr dimensions now for a less sluggish performance in After Effects later on.
(I have giffed on a desktop with 8GB of RAM and it’s quite slow at rendering individual frames of a 1080p short clip on AE)
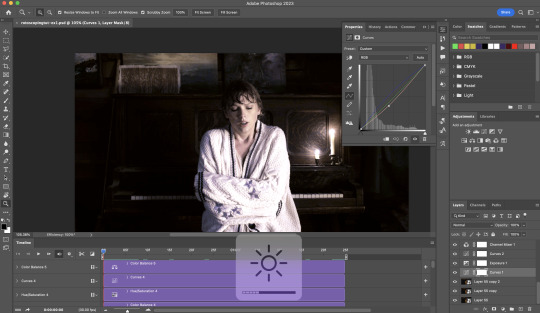
iii) Add colouring adjustments on the gif. This will save you A LOT of time when you Rotoscope gifs that are originally very dark / poorly lit (e.g. the uncoloured Taylor Swift gif shown just above).
If you usually colour your gifs at the very end of your giffing process (i.e. after sharpening), this will be a bit of a change.Nevertheless I still highly recommend adding some base colourings now to at least increase the contrast between the subject and the background.
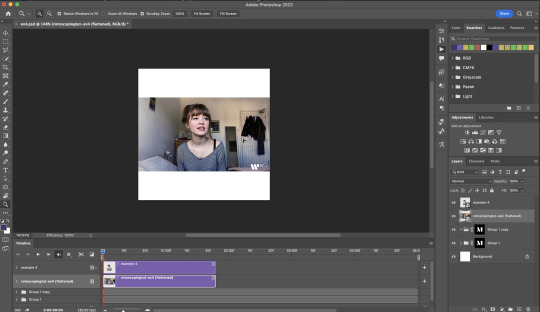
iv) To minimise lagging on After Effects, simplify this gif file as follows:
Flatten / Unsmart this gif file back to frame animation mode: play “flatten” (highlighted in red) from my gif prep action pack
Set the frame delay to 0.03s: play “set frame delay for timeline” (highlighted in green)
Convert the simplified gif file back to the video timeline interface: play “convert to timeline” (highlighted in yellow)
After “unsmarting” and converting back to the video timeline, your interface should look like this

And voila! This gif PSD is now ready to be imported to After Effects for Rotoscoping work!
3) After Effects: Interface and useful shortcuts
Open After Effects and Import (Cmmd / Ctrl + I) your gif PSD that you’ve just prepared.
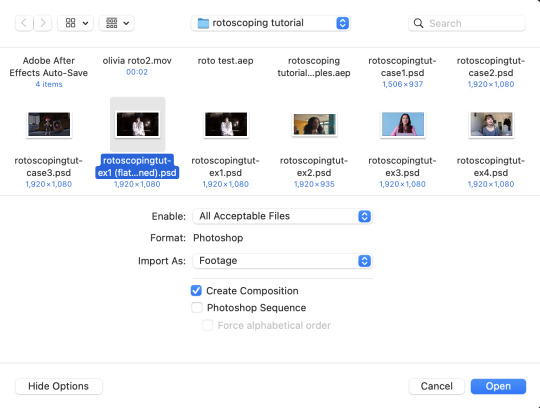
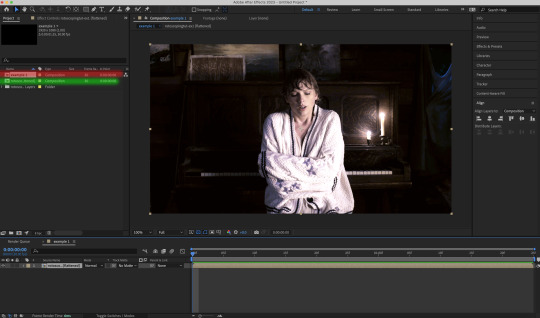
After importing your gif PSD to After Effects, the interface should look like this.
In the screenshot below, there are two compositions: the imported gif (highlighted in green) & another composition file made from selecting the imported gif (highlighted in red)
For the rest of the workflow, we will edit from the clone composition (the one highlighted in red), so select this one.
Before we take our plunge into the Rotoscoping, here are a few useful shortcuts to remember. I’ll explain the Roto Brush tool in the next section.
Preview the previous: fn + up arrow
Preview the next frame: fn + down arrow
Add to Roto Brush selection: holding Shift while you’re using the Roto Brush Tool
Subtract from Roto Brush selection: holding Alt while you’re using the Roto Brush Tool
Change Roto Brush size: while holding Cmmd / Ctrl, click + drag your mouse left / right
4) After Effects: The Rotoscoping Process
To access the Rotoscoping tools, click on the Roto Brush icon (highlighted in red in the screenshot below)
Then you’ll get the following dropdown options with two Rotoscoping Tools
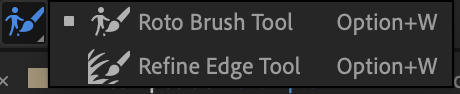
Roto Brush Tool: This is where you add / subtract your Rotoscoping selection in your composition
Refine Edge Tool: Paint around the edge of your selection for more refined edges. Very helpful for Rotoscoping fuzzy edges / hairs
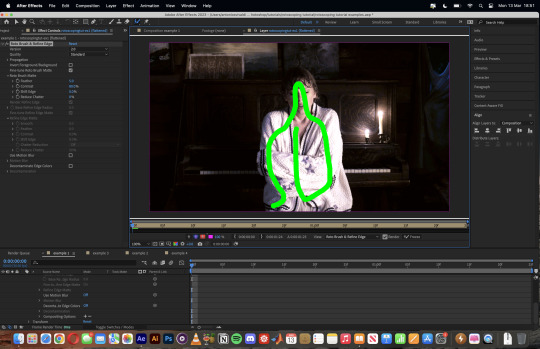
To make some Rotoscoping selection, first grab the Roto Brush Tool and click on the subject you want to cut out from your composition.
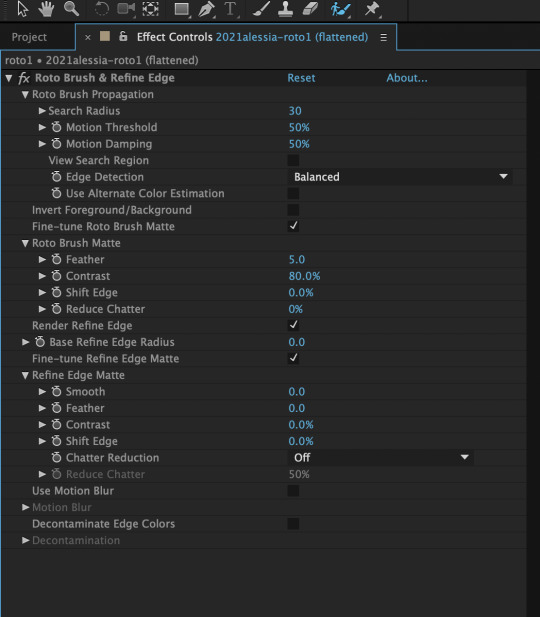
When you’re Rotoscoping you’ll see this in the Effect Controls panel.
There are two versions of Roto Brush:
Version 2.0: The Rotoscoping selection is powered by AI for higher accuracy when you propagate the frames.
Version 1.0 (Classic): This is the legacy Roto Brush Tool that uses a lesser algorithm. Recommended only if Roto Brush 2.0 is unstable on your machine due to RAM issues.
And two quality settings for Roto Brush 2.0:
Standard
Best
Note: I am currently unable to use Roto Brush 2.0 with Best quality model on my machine to compare the differences myself, so I’ll link this page that explains the two quality settings.

Note: if you’re using an older version of After Effects you’ll see this instead. This corresponds to Roto Brush 1.0 / Classic in the newer versions of AE.
When you’ve made a selection using the Roto Brush Tool, you’ll see the pink lines around the subject. This is the region that you’ve selected to Rotoscope!
To bring out some details around the edges, grab the Refine Edge Tool and paint around the edges
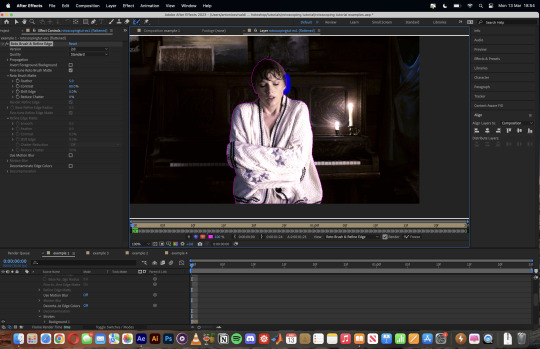
Then the interface will look like this

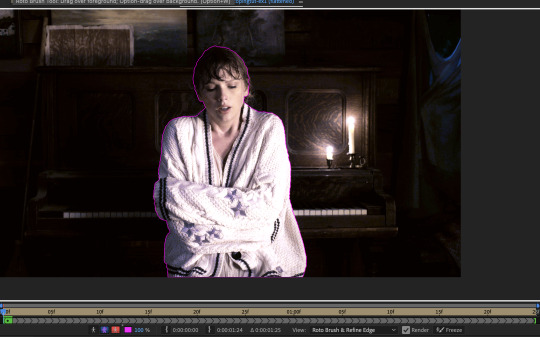
To view the Rotoscoping selection that you’ve made more intuitively, you could click on the following buttons.
Personally I like the viewing my selection using Toggle Alpha (the second box from the left) & Toggle Alpha Boundary (the 3rd box from the left)

Toggle Alpha
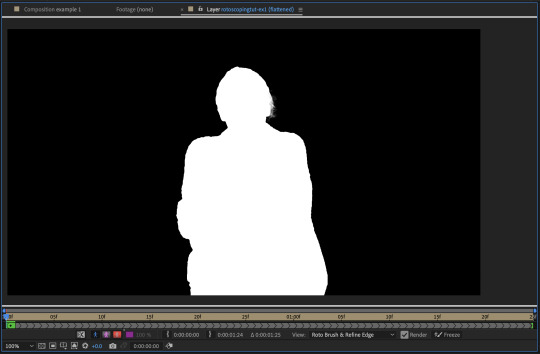
Toggle Alpha Boundary

Note: If you aren’t happy with the initial Roto Brush selection, you can always add (press Shift while using the Roto Brush Tool) / subtract (press Alt / Option using the Roto Brush Tool) your selection.
After you’re happy with your Rotoscoping selection in the first frame of your composition, press fn + down to view the next frame.
Repeat pressing fn + down and fix the selection along the way (e.g. I subtracted a small area from my Rotoscoping selection with the Roto Brush tool to make the edge look cleaner).

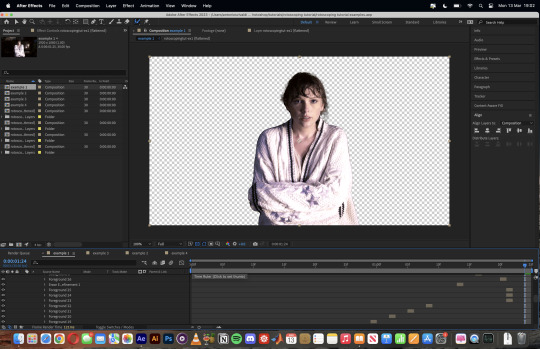
After fixing the selection along the way, go back to the composition file (select the clone composition again) and you will see that a cutout gif is made!
To export this, go to File > Export > Add to Render Queue. You’ll be redirected to the Render Queue panel at the bottom of After Effects.
Highlighted in red: click to change export setings
Highlighted in green: click to change save destination
Highlighted in yellow: click to render video

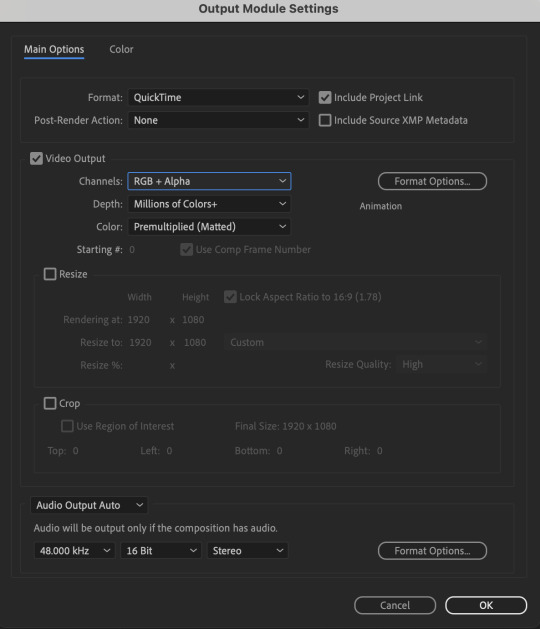
To preserve the transparency of your cutout gif, you need to change your export settings in the Output Module.
Under the Video Output section, change your Channels to RGB + Alpha. Press OK. Then Render the video.
5) Photoshop pt. 2: Assembling your final gif
The essence is to drag the cutout gif (aka the video file that you’ve just rendered on AE) into a new PSD composition file. This will be where you’ll do the rest of your giffing. Your workflow will contain the follow steps:
Make a new blank PSD composition file in Tumblr dimensions
Enable the Video Timeline
Follow the instructions detailed in the individual examples i.e. drag the cutout gif into the PSD & adjust the timeline start / end points
Exporting the final gif. If you’ve worked in 0.03s frame delay all the way up to here, just play the action that I’ve provided in the tutorial in the following order to set the frame delay to 0.05s.
EXAMPLE 1: finalising your cutout gif | sample gifset
After enabling the Video Timeline in your PSD composition file you’ll see something like this
Go to your folder, drag the cutout gif you’ve made on After Effects, resize / reposition, then press Enter.
And also make sure to adjust the Video Timeline’s start / end values.
Add some finishing touches. Because I did the Rotoscoping at full HD resolution, I’ll also need to sharpen my gif in this step.
After you’re happy, you can export this into a gif file and do what you usually do to change the frame delay to 0.05s.

Notes on my “Unsmarting” approach:
To prevent accidentally writing over a PSD composition file that I’ve spent time editing, I personally render this into a short video (File > Export > Render Video) and use the following export settings (to prevent quality loss)
Then I open the rendered clip and play the actions in my gif prep action pack as follows:
flatten: this “Unsmarts” the clip / video
set frame rate: this sets all frames to have 0.05s frame delay
This is the final interface that I get before I pull up the Save For Web window.
EXAMPLE 2: changing your gif’s background colour (for Case 3 gifs) | sample gifset
From your folder, drag BOTH the cutout gif (rendered on AE) and the original gif to your blank composition.
Important: you need to make sure that both layers are properly lined up in the composition file (i.e. selecting both layers when repositioning / resizing)
On Photoshop, press Enter twice and place the cutout gif on top of the original gif from the Layers panel. Then you should get something like this
Select both layers and resize / reposition them in your PSD composition until you’re satisfied with the placements.
The basic idea here is to add some adjustment layers / other things in between the cutout gif and the original gif. To do this, select the original gif layer in the Layers panel.
Then you can start adding.a bunch layers e.g. textures, onto the composition.
And then here’s the exported gif!

6) Fancier Rotoscoping examples
Note: knowledge in using layer masks / groups and making shape / text layers assumed
In the next two examples, I’ll show you how to combine the two previous examples with shape / text layers.
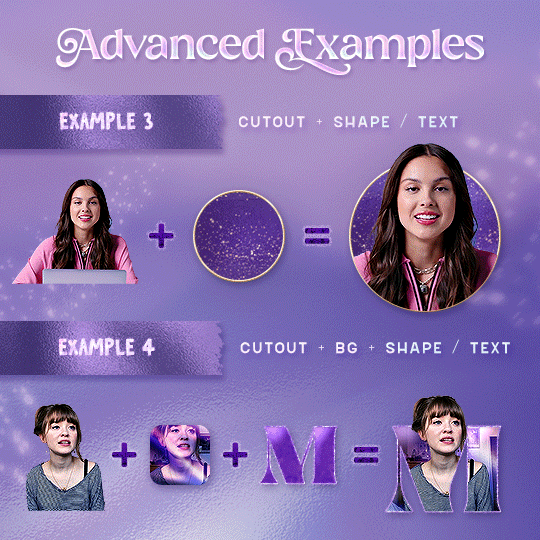
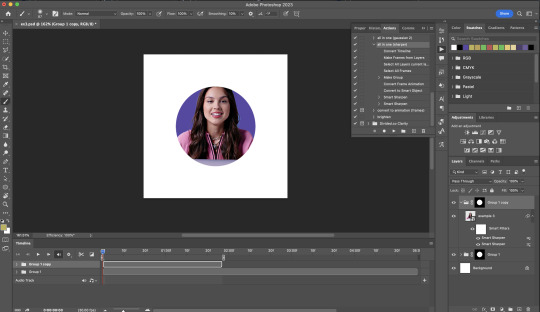
EXAMPLE 3: Placing your cutout gif into a shape / text layer | sample gifset
Add a text / shape layer to your blank PSD composition
We want to prepare a masked group so in the Layers panel:
Make selection from layer: Cmmd / Ctrl + Click (highlighted in red)
Make a new group: click on the folder icon (in yellow)
Create layer mask: click on the icon (in green)
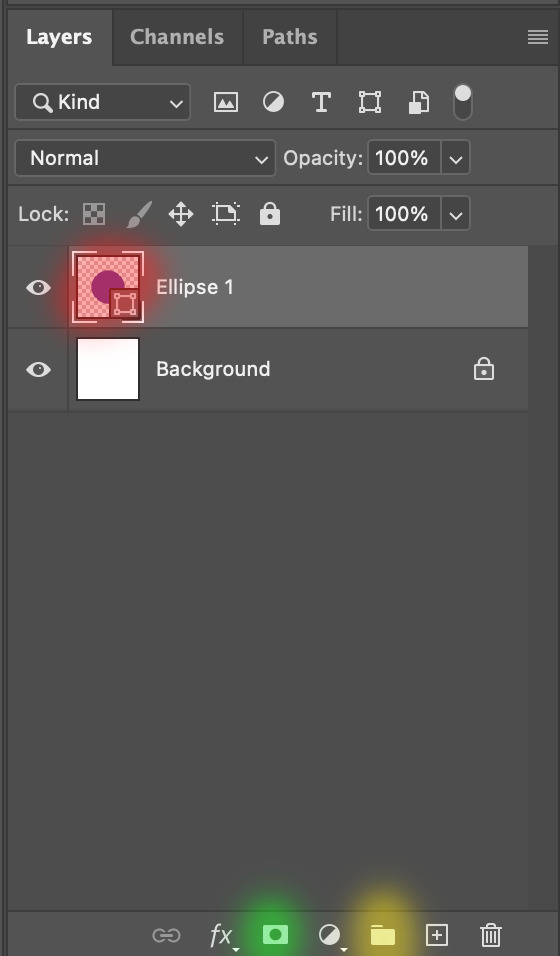
After duplicating the masked group you’ll get something like this in the Layers panel
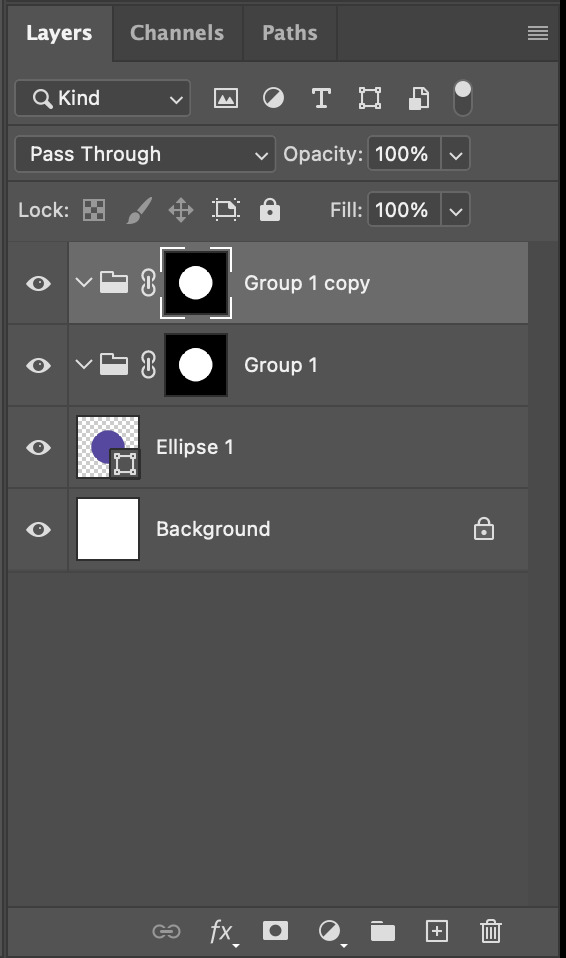
Drag your cutout gif into the PSD composition

Place the cutout gif into the masked group on top
Select the mask of the top group and paint (in white) over the region you want to reveal for the cutout gif
Add some finishing touches & export the gif!

EXAMPLE 4: Putting it all together | sample gifset
You follow the same approach as in Example 3 to prepare the masked groups, but you need to drag two gif layers in (and resize them using the approach outlined in Example 2)
Place the gif layers as follows
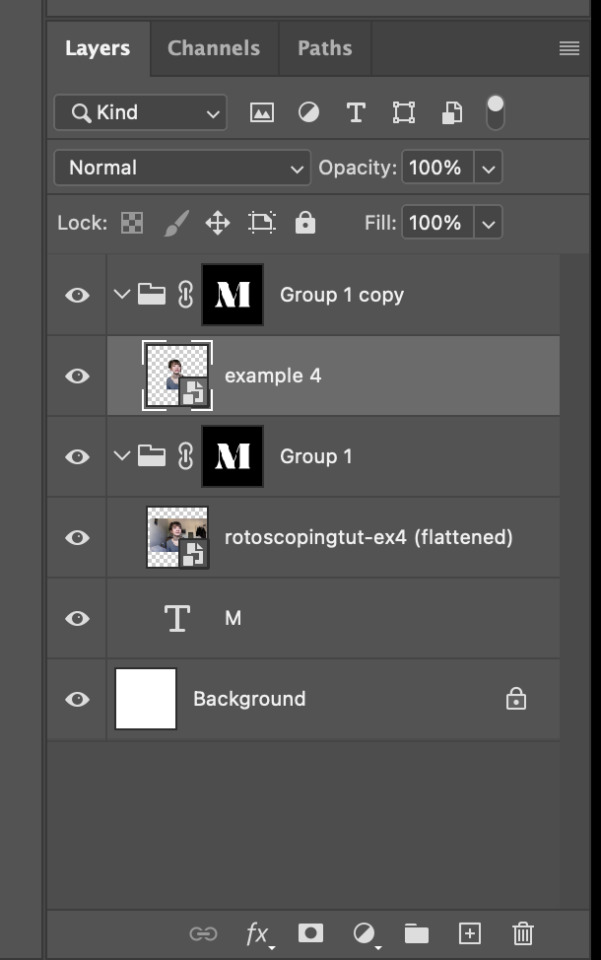
While selecting the mask of the group on top, paint (in white) over the region that you want to reveal in the cutout gif
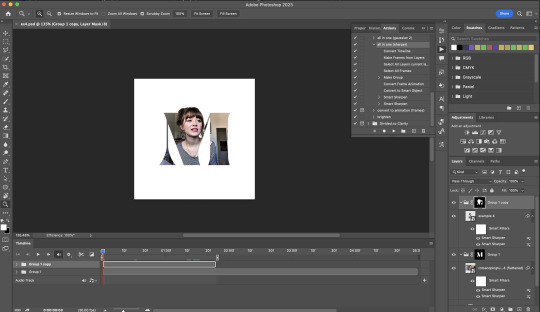
Now select the original gif (placed within the other group) and add some adjustment layers
After adding some finishing touches & exporting the gif, I get this!
Note: you can do even more overlay effects in the background portion of example 4. There will just be more masked groups + adjustment layers
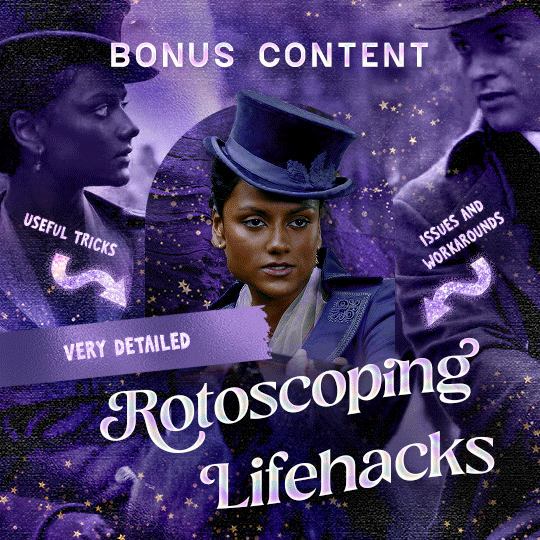
7) Bonus: Some useful Rotoscoping / giffing lifehacks
GIFFING LIFEHACKS:
— Use best quality footage that you could find & Rotoscope in full video resolution, for better details around the edges
— Poorly lit scenes & low contrast edges are harder to Rotoscope (e.g. Toy Story set / TS evermore set).
If you’re new to AE, I would recommend choosing videos with well-lit gifs with simpler backgrounds and high contrast edges (e.g. Maisie Peters Cate’s Brother set)
— Use Rotobrush 2.0 if you’re using After Effects 2021 or later. It’s more difficult to Rotoscope / change background colour for gifs with a lot of movements with the classic Rotobrush tool. If the scene is tricky, you might want to switch to the “Best” quality model.
HARDWARE-RELATED PERFORMANCE OPTIMISATION:
— The recent versions of Photoshop require at least 8GB of RAM. If you have less RAM, it will still work provided you have enough scratch disk space. For better performance, it’s best to close other applications when you’re using Photoshop.
— The recent versions of After Effects require at least 16GB of RAM. If your machine has less RAM than this, there are some workarounds to prevent your machine from hanging:
Essential: close other applications that you’re running on your computer
Resize your gif down to Tumblr dimensions & sharpen it before importing to After Effects.
Install an older version of AE
8) Bonus: Some known software + hardware issues, and workarounds
KNOWN ISSUES ON PHOTOSHOP:
I currently have minimal issues in my giffing workflow, but I’ll nevertheless outline a few common known Photoshop issues for anyone who needs some workarounds.
— Video Timeline interface missing: this affects Apple Silicon Macs (i.e. M1 / M1 Pro / M1 Max / M1 Ultra / M2 / M2 Pro / M2 Max)
Update to newer version of Photoshop (updated 2022 or 2023)
Open Photoshop with Rosetta
— Scratch disk full error: This is a common issue with machines that lack RAM & have nearly used up internal storage. Editing video layers in the timeline interface uses a lot of memory hence will require a lot of scratch disk space.
Make sure that you have enough free storage space while using Photoshop. Alternatively you can use an external hard drive as a scratch disk.
KNOWN ISSUES ON AFTER EFFECTS:
These are a few issues that I have personally ran into over the course of giffing on multiple devices & multiple versions of After Effects.
Note: Inputs from M1 / M2 Mac users with regards to experiences on using the After Effects Rotoscoping tools are welcome!
— Rotobrush 2.0 set to “Best” quality model causes AE to crash: this affects anyone who’s using MacOS Ventura
I’m currently experiencing this issue on my M2 Mac. The workaround right now is to change the Roto Brush 2.0 quality setting to Standard.
This is due to some software compatibility issues on Adobe’s side specifically with MacOS Ventura. Fingers crossed that they will properly fix this bug in the future updates!
— Cannot re-open project files with Rotoscoping: this affects anyone using the initial release of After Effects 2020 (I had installed this on an Intel-based machine and it sucked)
The only option here is to update to a later version of After Effects.
8) More useful Rotoscoping resources
Rotoscoping + Keyframes Tutorial by @jenna--ortega
Rotoscoping + Masking Tutorial by @usergif
Rotoscoping For Beginners in After Effects | Motion Graphics Tutorial
I hope you enjoy reading this! If you have any questions / need any help related to this tutorial, feel free to send me an ask!
#after effects#tutorial#gif tutorial#photoshop tutorial#dearindies#tusermelissa#usernik#useryoshi#usershreyu#usercim#userrobin#useralison#userannalise#userkosmos#userisaiah#usergiu#userives#*#my resources#my tutorials
2K notes
·
View notes
Text
Watcher's Expenses
I didn't major in accounting: I took three classes and it grinded my brain to a fine powder. However, after graduating with a business admin degree, being a former eager fan of their videos, and from a cursory glance over their socials, there's a lot to consider in their spending behavior that really could start racking up costs. Some of these things we've already noticed, but there are other things I'd like to highlight, and I'll try to break it down into the different categories of accounting expenses (if I get something wrong, let me know. I was more concentrated in marketing 🤷♀️). I'm not going to hypothesize numbers either, as that would take out more time than I'm willing to afford-- you can assume how much everything costs. Anyways, here's my attempt at being a layman forensic accountant:
Note: All of this is assuming they're operating above board and not engaging in any illegal practices such as money laundering, tax evasion, not paying rent, etc.
Operating Expenses
Payroll: 25+ staff salaries and insurance
Overhead Expenses
CEO/founder salaries
Office space leasing or rent (In L.A, one of the most expensive cities in the US)
Utilities (water, electricity, heating, sanitation, etc.)
Insurance
Advertising Costs
Telephone & Internet service
Cloud Storage or mainframe
Office equipment (furniture, computers, printers, etc.)
Office supplies (paper, pens, printer ink, etc.)
Marketing costs (Social media marketing on Instagram, Youtube, SEO for search engines, Twitter, etc. Designing merchandise and posters, art, etc. )
Human Resources (not sure how equipped they are)
Accounting fees
Property taxes
Legal fees
Licensing fees
Website maintenance (For Watchertv.com, Watcherstuff.com, & Watcherentertainment.com)
Expenses regarding merchandising (whoever they contract or outsource for that)
Inventory costs
Potentially maintenance of company vehicles
Subsequent gas mileage for road trips
Depreciation (pertains to tangible assets like buildings and equipment)
Amortization (intangible assets such as patents and trademarks)
Overhead Travel and Entertainment Costs (I think one of the biggest culprits, evident in their videos and posts)
The travel expenses (flights, train trips, rental cars, etc. For main team and scouts)
Hotel expenses for 7-8 people at least, or potentially more
Breakfasts, lunches and dinners with the crew (whether that's fully on their dime or not, I don't know; Ryan stated they like to cover that for the most part)
Recreational activities (vacation destinations, amusement parks, sporting activities etc.)
The location fees
Extraneous Overhead costs (not sure exactly where these fall under, but another culprit, evident in videos and posts)
Paying for guest appearances
Expensive filming & recording equipment (Cameras, sound equipment, editing software subscriptions, etc.)
The overelaborate sets for Ghost files, Mystery Files, Puppet History, Podcasts etc. (Set dressing: Vintage memorabilia, antiquated tech, vintage furniture, props, etc.)
Kitchen & Cooking supplies/equipment
Office food supply; expensive food and drink purchases for videos
Novelty items or miscellaneous purchases (ex. Ghost hunting equipment, outfits, toys, etc.)
Non-Operating Expenses
These are those expenses that cannot be linked back to operating revenue. One of the most common examples of non-operating expenses is interest expense. This is because while interest is the cost of borrowing money from a creditor or a bank, they are not generating any operating income. This makes interest payments a part of non-operating expenses.
Financial Expenses
Potential loan payments, borrowing from creditors or lenders, bank loans, etc.
Variable Expenses
Hiring a large amount of freelancers, overtime expenditure, commissions, etc.
PR consultations (Not sure if they had this before the scandal)
Extraordinary Expenses
Expenses incurred outside your company’s regular business activities and during a large one-time event or transactions. For example, selling land, disposal of a significant asset, laying off of your employees, unexpected machine repairing or replacement, etc.
Accrued Expenses
When your business has incurred an expense but not yet paid for it.
------------------------------------------------------------------------------------------------------------------------
(If there's anything else I'm missing, please feel free to add or correct things)
To a novice or a young entrepreneur, this can be very intimidating if you don't have the education or the support to manage it properly. I know it intimidates the hell out of me and I'm still having to fill in the gaps (again, if I've mislabeled or gotten anything wrong here, please let me know). For the artistic or creative entrepreneur, it can be even harder to reconcile the extent of your creative passions with your ability to operate and scale your business at a sustainable rate. That can lead to irresponsible, selfish, and impulsive decisions that could irreparably harm your brand, which is a whole other beast of its own.
My guess at this point is that their overhead and operation expenses are woefully mismanaged; they've made way too many extraneous purchases, and that they had too much confidence in their audience of formerly 2.93 million to make up for the expenses they failed to cover.
It almost seems as if their internal logic was, "If we make more money, we can keep living the expensive lifestyle that we want and make whatever we want without anyone telling us we can't, and we want to do it NOW, sooner rather than later because we don't want wait and compromise our vision." But as you can see, the reality of fulfilling those ambitions is already compromised by the responsibility of running a business.
And I wrote this in another post here, but I'll state it again: Running a business means you need to be educated on how a business can successfully and efficiently operate. Accounting, marketing, social media marketing, public relations, production, etc; these resources and internet of things is available and at your disposal. If they had invested more time in educating themselves on those aspects and not made this decision based on artistic passion (and/or greed), they would have not gotten the response they got.
Being a graphic designer, I know the creative/passionate side of things but I also got a degree/got educated in business because I wanted to understand how to start a company and run it successfully. If they’re having trouble handling the responsibility of doing that, managing production costs, managing overhead expenses, and especially with compensating their 25+ employees, then they should hire professionals that are sympathetic to their creative interests, but have the education and experience to reign in bad decisions like these.
Anyways, thanks for coming to my TedTalk. What a shitshow this has been.

#watcher#watcher entertainment#ryan bergara#shane madej#steven lim#watcher tv#watchergate#accounting
63 notes
·
View notes
Text
20dollarlolita pattern school step 3) prep and pattern selection.
NOTE: Here's a link to the pattern school discord. If this link has expired, please message me off-anon and I can send you one. I like to get to know everyone in the pattern school and so I don't let too many people in at once, so that I don't get overwhelmed.
So quick summary of where we were: Pattern School is a project that I'm working on in this blog, and that has an accompanying Discord server. The purpose of Pattern School is to teach people, though hands-on experience, the consistent conventions that sewing patterns use. It also teaches basics about how to transform patterns into designs that do what you want them to do. Pattern School is divided up into steps. Each step builds on the skills of the previous one, and each one teaches new elements.
Here's the pattern school tag, in chronological order.
In step 1, everyone follows a commercial pattern with notches, grainlines, and written instructions. This pattern is for something that is not fitted to a human body/is not multi-sized. In this step, we make sure that everyone has a basic foundation understanding of how commercial patterns are made. We choose a non-fitted item so that selecting the correct fit and adjusting for body shape is not necessary. If the student wishes, an additional challenge for step 1 will be to look at a pattern, see if it's usable in lolita fashion, and make good fabric and trim selections to make a usable lolita item.
In step 2, we take a pattern for pajama pants and use it to create bloomers. This step introduces the basics of pattern manipulation. We go into how to remove seam allowance, measure ourselves for fullness, and assemble a garment from a modified pattern. Once again, there is a challenge of choosing good trim and fabric options to build a usable lolita garment.
In step 3, we will be making a lolita or lolita-adjacent garment for ourselves. This garment will be a fitted item, and it will have a closure. What's a closure? Closures are something that opens and closes to allow the wearer to get in and out of the garment. Closures can be zippers, button plackets, hooks and eyes, IDK freaking magnets or something, if you want to put velcro as a closure then more power to ya, but your garment needs to have some kind of closure. I've made resources for how to put in zippers, but other closures are probably also acceptable. Pullover elastic is not a closure. We are making a garment for ourselves because it's a lot easier to make a fitted garment when you have the body you're using right there with you at all times. If you are always with another human being while you sew, you could probably use them, but the critical component is that you have the body accessible to you all the time.
This time, the challenge is also to make something that either can be part of your lolita wardrobe, or that forces you to choose and style something that has a lot of lolita fashion aesthetics. If you want to pick a lolita-adjacent concept, like Aristocrat or Fairy Kei, you're probably fine? If you're doing this on your own, the person who decides if you're cheating is you. If you're in the Discord, you can ask if something's acceptable and like 15 people will disagree with it before tagging me and then I make up an answer on the spot. I firmly belive that Ouji is just lolita with pants and doesn't need to be stated separately.
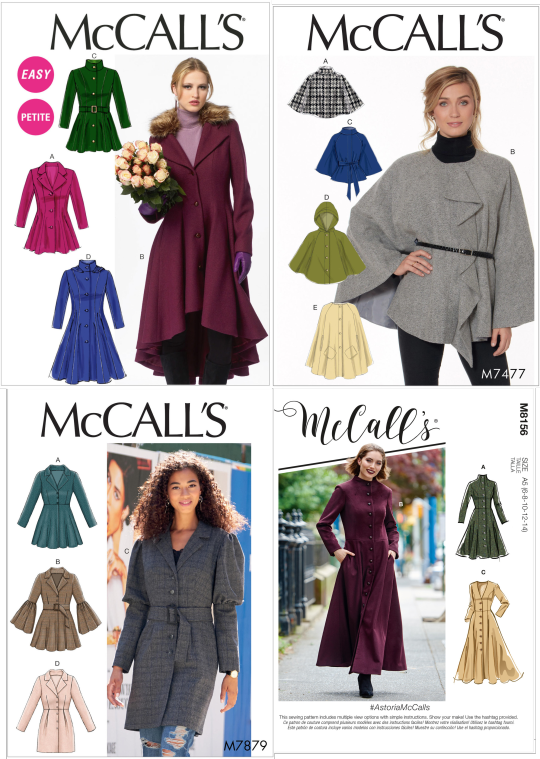
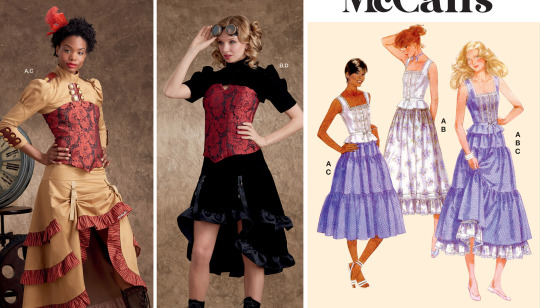
I previously made a very long list of garments that you can make EGL fashion with, but it's older and some of the patterns are out of print. So, here's a few hours of me going through the big 4 pattern website and finding stuff that has potential.
Dresses:

Left | Center | Right
So quick note: my image editing software kept refusing to function with images off simplicity.com, so we're going to alternate between funky screenshots and semi-competent images. I'm not sorry.

Left | Center | Right
Any time you're making a lolita dress from an existing dress pattern, you'll need to check that the skirt will hold our petticoats. Frankly, most of them don't. You've done the bloomer step, so you do have experience with this kind of modification, but I'll do a tutorial later about checking this and drafting your own skirt onto an existing bodice. For step 3, doing a commercial pattern for the bodice and then following a web tutorial for the skirt totally counts. What we're looking for in a dress pattern is the ability to mod it into a working lolita dress. Please note that Simplicity 8444 (the pirated-but-not-pirate lolita dress) and Simplicity s9735 (the “why'd you use Derpy-chan??”) dresses are not eligible for Step 3, as they are both elastic pullovers.


Top Left | Top Center | Top Right
Bottom Left | Bottom Right
Blouses:
However, Simplicity 8444 and s9735 both have blouses that work for step 3. If you want to build the JSK on your own and then follow the blouse pattern for step 3, you're good.
The McCall Titanic looking thing is a really fun blouse to make for this, and it's got a back zipper, so if you're not confident in your button-sewing then it's a good option.
Any button-up that goes all the way to the neck has some lolita potential. M8463 is actually pretty loliable on its own.

Top Left | Top Center | Top Right
Bottom Left | Bottom Right
Vests are easy to make, don't take a lot of fabric (so you can use some really fancy fabric and have it not break the bank). You're going to have to find a good reference image for lolita but they're really good for ouji and aristocrat, so they get a category.
Top Left | Top Right
Bottom Left | Bottom Right
I've just always wanted to make my own lolita coat so they get a category. Once again, you're going to need to double check that the flare fits your skirts.
Left | Right
Welcome to the weird shit category. There's a costume shop near me that sells these funky bolero steampunk things and I've always wanted to put it in a coord, so it's on here. The other one is a top that you could probably use as the top half of a JSK, so if you want to make a coordinating skirt then you could have some fun separates. I think handmade lolita needs more coordinating separates. They're a real thing but I want them to be more common.
So that's in no way a complete collection of patterns you can use, but I hope that's got some kind of inspiration about pattern. My test garment was made off an etsy pattern. There's plenty of other patterns out there. This was just the fastest way for me to showcase some patterns that do work.
We'll do a little more about looking at style lines and finding how to understand this a little better in the future, but for now here we are.
54 notes
·
View notes
Text
mere haath mein (echo x gn!reader)
》 summary: reader and echo's love story from strangers to friends to lovers throughout the clone wars (a 4+1 type of story)
》 series masterlist: (please read the masterlist before continuing on!)
part 1 | part 2 | part 3 | part 4 | part 4.5.1 | part 4.5.2 | part +1 📍 (you are here!)
click here to read on AO3
》 part +1 word count: ~2.2k
》 part +1 warnings: none
》 part +1 spoilers: none
》 a/n: this is it! thank you to everyone who read this story ^_^ this fic started out purely self-indulgent bc i am an echo girlie at heart, but i hope you all enjoyed reading it as much as i enjoyed writing it. this scene is what inspired me writing all the previous parts and is therefore the longest part (because i still cannot believe people write off the clones like objects instead of people with emotions and hopes and fears :( ) please do let me know your thoughts on this fic and if you could like to see any additional parts in this series! enjoy this last chapter :DD

+१ (+1)
At first, it’s the little things. How sometimes he can’t tear open a meal packet easily, or how he takes longer to put on his armor. How he adjusts his grip on his blaster, or he types up reports slower on his datapad.
Of course, Echo never complains. It’s not in his nature to, especially not while you’re at war, and there are arguably bigger and worse things to worry about.
But you notice anyway.
It takes a month or two for you to realize his struggles. Even though you officially transferred to Clone Force 99, you still mainly work with the 501st and other legions thanks to Tech’s precise expertise. His knowledge combined with his training as a soldier and experience in the field meant you rarely accompanied them on missions. So you put your skills to work elsewhere, not wanting to remain idle.
You would come back to the Kamino barracks you shared with the boys only a few days a week at most. Long trips just to get back to the squad wasn’t exactly a good use of the Republic’s dwindling resources, so you make do with the time you have.
It’s not until you request to have your office transferred to Kamino do you observe Echo’s constant conflict with being one-handed. The extra time on your hands allows you to be with Clone Force 99 more often, giving you time to get to know them and how they work together.
Echo is so incredibly subtle about his pain, his exhaustion, and the numerous issues with his scomp link that it’s really only because of your engineering training that you detect the problem. At this point, your mind unconsciously latches onto anything that you perceive as a potential source of trouble. You’ve practically hardwired your brain to find anything and everything that could be a complication, no matter how small.
And you would be damned if you couldn’t fix this one.
So you shove all your impending datapad reports aside and pull up your CAD software and, with a little hacking, Echo’s medical records on your monitors. (You doubt any of the higher-ups will care anyway). You crack open your old notes from university, poring over them and Echo’s reports, scrutinizing every detail and writing down notes in your precious engineering notebook.
Frankly, you are livid over the fact that the Kaminoans or the Republic didn't give Echo a prosthetic to make his life easier. He's an ARC trooper for Maker's sake, constantly going on missions deemed too dangerous for any regular clone. Doesn't that warrant at least a little respect?
You don't dignify that question with a response, already knowing the answer to it. It pisses you off how little they care, how clones are viewed as expendable, how they're nothing more than sentient droids. Even someone at as high of a rank as Echo is still written off even though he has sacrificed everything for the Republic.
For the next week or so, you work in earnest, staying up late nights and waking up at early hours to continue working as you regain the knowledge you temporarily lost while working as an astroengineer. As cool as starships are, nothing can compare to the satisfaction of completing a project that changes someone’s life–it’s why you wanted to be a biomedical engineer in the first place.
Not to mention your constant rage acting as fuel to keep going with the project and refuse to stop.
You build prototype after prototype, constantly adjusting and readjusting your designs, scrapping ideas and thinking of new ones. It’s an arduous process, especially for a challenge you have never faced before, but you put in everything you have to give because this is for Echo.
And Echo is worth it.
You meticulously note down every flaw and success, wanting to have something to look back on for future iterations--after all, there are always more ways to improve.
There are times where Echo is close to figuring out your surprise for him, often walking in while you're mentally elbow deep in your designs, the exploded-view of the parts up on your monitor as you solder together the 3D-printed parts. You luckily throw a cover over the prototype and switch to a different project right before he sees. He glances at you in surprise, but decides not to push, much to your relief.
The worst (and, arguably, best) part is when Echo worries about you, concerned about your lack of sleep and how you practically live in your office makerspace. You come into the barracks long after Echo is asleep and leave long before he's awake. And there are nights where you just don't come in at all, often having too much work to finish because of how much time and effort your job demands of you. Echo does what he can, dropping off meals whenever he's able and cushioning your head with a pillow whenever you fall asleep in your chair. He hates that it isn't enough.
Every time he asks, you deflect his questions and his concern, choosing to inquire about his most recent mission or how his kinship with the Bad Batch is coming along. He reluctantly answers you as he watches you multitask, eagerly listening to him while you repair another starship in the main garage.
But finally, Echo has had enough.
He barges into your office in the middle of the night as soon as he gets back to Kamino after a particularly long mission, heavy footsteps startling you as you scramble to cover the prosthetic.
Echo seethes out your full name, hand curled into a fist as he points at you with his scomp link, and you know you're in deep shit now.
"That's it. I’m going to bed right now and I am taking you with me,” he declares, anger and exhaustion dripping from every word.
“But–”
“No buts! For the past month, I’ve been patient. I do my best to support you and ask you what you need and you can barely even give me the time of day!” Echo exclaims, exasperated. You bite the inside of your cheek, the guilt beginning to weed into your heart as he continues.
“Every time I ask you what’s going on, what’s keeping you here, you just shrug me off and answer with a question of your own,” Echo scoffs, throwing his arms up. “And forget me, what about you? You don’t sleep, you barely eat–when was the last time you did your own damn laundry?”
Your body curls into itself, head hanging down. You can’t meet his eyes, ashamed of how you were so caught up in making his life better that you inadvertently made it worse.
The fight bleeds out of Echo as fast as it entered and he lets out a resigned sigh, posture slackening as he stands in front of you. He lifts your chin up to meet his gaze. The swirl of distress and disquiet is rampant, as clear as the dark shadows under his eyes.
“Just tell me what’s going on,” Echo pleads, the statement coming out as a whisper. You swallow the lump in your throat as you nod. You didn’t want to give it to him today, preferring to wrap it up and hand it to him after he’s well-rested, but at this point, you feel as if you have no choice.
You reach over the durasteel table and uncover the prosthetic hand in a flourish. Echo chokes on air in shock as he stares, frozen and rooted to the ground. You gently pick up your prototype and hold it out to him.
“This is what’s going on,” you reveal, the apology laced in between your words.
Echo is silent as he takes it from your hands, examining the prosthetic in awe before looking at you, tears in his eyes. You smile at him, your face mirroring his own as they begin to fall.
“I-I don’t even know what to say–”
“A thank you will be enough,” you tease lightheartedly, and he laughs in spite of himself, voice caught in his throat as he begins to cry.
“Thank you,” he murmurs, pulling you into a bone-crushing hug that you eagerly return. When he lets go, you begin explaining yourself and the prototype.
“I noticed you were having difficulty doing stuff now that you’re one-handed and I wanted to do something about it since clearly no one else cared,” you frown at the last part, your fury seeping through your words. “This is what I’ve been working on. It’s painful enough trying to have a body readjust to the regular world, but you have it worse because we’re in the midst of a galactic war. So I decided to do my best to make it a little easier for you.”
You sigh as you watch him admire the prosthetic, turning it over in his hand as he listens to you. Your fingers tap lightly against your work table. “When you put it on, it accommodates the scomp link and hides it within, making it look just like a regular hand.”
“I thought you were an astroengineer?” Echo cuts in, confusion written plainly on face as he glances at you.
You chuckle in response to his hidden question. “Technically, I’m not. I’m a biomedical engineer by training. I learned astroengineering on the fly for the GAR,” you smile fondly as Echo blinks in surprise before rolling his eyes at your awful pun. He smiles.
You continue then, demonstrating the hand for him, pulling the prototype out of his grip and gently latching it onto the mechanical part. “I put in a kind of cloaking technology too.”
You tap the interface on the inner wrist and the metal fades away to the exact color of his brown skin. Echo gasps in surprise as he flexes his muscles, the hand smoothly curling into a fist.
“This way, it literally looks and acts like a normal hand and you can go on more covert missions,” you say proudly as you watch him play with it. This feature was the hardest part of making the prosthetic. Converting neural impulses into something a machine could not only understand but actually translate into action that didn’t look clanky and awkward was probably the most frustrating challenge you have ever faced.
You tap the interface again and it fades back to metal. “Inside each finger is a tool you can use out in the field,” you continue, having each finger retract to show knives, cutters, and even a poison vial.
“And lastly…” you make the fingers reverse their action and then retract the entire hand, revealing the scomp. “If you want to use the scomp link, you can do so without having to take the entire hand off!”
Echo stares at the scomp link uncomprehendingly. He’s doing that a lot. Echo doesn’t say anything, hesitantly touching the prosthetic with his flesh hand.
“Right–uh, well, this is only the first prototype, so there are still a lot of problems with it. I have to run a debugger through the code again and make sure the cloaking tech holds up in the field since planet environments can really impact the way everything works. There are a bunch of tests I need to–”
“I love you.”
You stop abruptly, mind short-circuiting as you glance up at Echo in surprise, clearly not expecting such a phrase to cut off your anxious ramble.
“I–what?” you ask rather eloquently. You mentally facepalm. Nice going.
“I love you,” Echo whispers into the space between you, a shared breath holding the weight of the phrase in the charged air. You search his eyes in question–does he mean it? You find your answer amidst the sparkling galaxies and twinkling stars in his warm gaze and you breathe in his confession before exhaling your own.
“I love you too, Echo.”
The smile that breaks out on his face is unrivaled. He scoops you up in his arms, much to your surprise, and spins you around, a laugh bubbling out of you both when your foot hits your chair.
Echo sets you down ever so gently, mellow kindness permeating his every action as he leans in. “Can I kiss you?”
Your heart melts at the patient question because of course he can. Echo is so careful about never pushing boundaries, constantly taking the time to make sure you’re comfortable. And so, you answer him with a nod and shift your face to meet his lips.
It’s chaste and slightly awkward–Echo doesn’t know where to put his hands, instead hovering over your waist, and your nose bumps into his when you move. You both let out a quiet laugh of peace as you rest your head over his heart, his arms engulfing you in a hug. The cool, white lights of your makerspace shine down on you both as you breathe in the light sandalwood incense you light when you work. Rain patters the window gently and you sigh, listening to Echo’s calming heartbeat.
“Let’s go to sleep, cyar'ika.”
---
part 1 | part 2 | part 3 | part 4 | part 4.5.1 | part 4.5.2 | part +1 📍 (you are here!)
please consider reblogging! it really helps me and is super encouraging ^_^
#echo#star wars#tbb#the bad batch#bad batch#echo x reader#arc trooper echo#arc trooper echo x reader#arc trooper echo x you#clone trooper echo#the bad batch x you#the bad batch echo#the bad batch x reader#tbb echo#echo x you#star wars tcw#star wars clone wars#star wars: the clone wars#sw fic#star wars fic
28 notes
·
View notes
Text
So, I think I'm not alone when I say that the BL3 model for Jack looks kind of… strange? Well, a few months ago, I decided to do a little comparison between the model from BL2 and BL3 and came to the conclusion that whilst the model itself is not bad, it's the textures that could use a lot of work.
Well, I present to you my reworked textures.
I've retouched almost everything (as was in my capabilities, considering I don't know how to use blender/any other texture painting software, so this was all done through the magic of Photoshop.) There are definitely some details wrong, f.e. the buttons on his back are supposed to be gold but from what I understand, they share the same texture with the ones in the front, which made the whole model look strange at first glance.

There's also a lot more detail added to the smaller pieces, like the pocket watch and the weird thing he has strapped on his leg.

I'm still angry over the fact that they didn't texture the bottom of his shoes smh… like, that was the most iconic part of his whole look.

All jokes aside, IMO the reason why the texture work is very much lacking in polish is because how important resourcing your talent in game dev usually is. They knew that Jack would only appear in the Handsome Jackpot DLC in small portions, so they didn't need to make his textures as detailed as the other, more prominent characters that appear during the game.
Oh, and did I mention that this is completely free for download?
The textures are compatible with Kabalstein's model over on DeviantArt [Click here for the model]
And here's the Dropbox link for the reworked textures [Click here for reworked textures]
166 notes
·
View notes
Note
hi cat! 🩷 so as you know i really enjoy your ts2 posts and lately i've gotten the itch to play it again! but last time i played ts2 i played it with only a few crappy cc clothes lol, so i have no idea what mods are essential mods to have in ts2 or where to get them, how to prevent saves from getting corrupted and how to build your own custom hood - stuff like that. so i wondered if you have any advice or if you knew any guides on where to even get started on this? 😭 thank you 🩷🩷🩷
vilna hiiiiiii!! first of all i am so sorry that this took me so long to reply! i got ill and it hit me harder than it should rip 😭 anyways, thank you so much as always for your kind words, you know i love your stuff so it really is appreciated 💖
it’s a long write-up and i reference a lot of guides and resources from the community from which i learned myself. i’m really grateful to this community for sharing these resources, truly! i tried to organize this as best and include as much as i could, but i'm sure there may be missing things or things left unclear. so if you have any questions feel free to message me!
i. installation
i personally use the sims 2 rpc launcher by lazyduchess, which is included in osab’s installation guide. i really like this guide, since it includes links to the full sims 2 collection, as well as indications to make the game work more nicely with modern hardware and software, such as modern graphics cards through graphics rules makers or the 4gb patch.
it also includes instructions for reshade installation (i personally use the rpc injection method).
ii. setting up a clean slate
whether you want to play in a premade neighborhood or a custom neighborhood, i recommend using a clean slate, meaning empty and/or clean neighborhoods. many functions of the game use hoods, and sometimes these aren’t actual physical hoods and instead add sims as townies or npcs. there are also “clean” versions of premade neighborhoods that fix/tweak oversights by maxis.
mind that if you want a brand new hood without maxis’ townies, you need to get an empty pleasantview template (N001) in your game’s installation folder, or disable it somehow by changing its name. you can still play in pleasantview as it will be stored in your documents neighborhoods folder, and you can use clean versions for that. you also need to get empty stealth hoods.
this all may sound a bit complicated, but simgaroop made a wonderful write-up here for different user cases depending on what you’d like to do in your game. the mods linked here are a boon!
as for making a brand new empty hood, i love getting custom terrains (which are sc4 files originally made in simcity 4). some of my faves are made by @/nimitwinklesims, but i also like finding them at modthesims. you don't need to create each type of subhood, but i do have at least one of each in bloom valley. in bloom valley i have two downtowns (one is magic town from sims 1 originally converted to sims 2 by @/voleste. the other is @/kattaty's remake of downtown, which will be deleted and replaced with a downtown i'll make myself to be more consistent with my other subhoods. it is incredible, and i think i will use some of their lots in my new downtown because they are great), i have two shopping districts. one is strangetown because i love those premades and townies; i never have sims visit or form relationships with them though, it's just so i see them around. the other is oakburg which uses acorn bend as a base, it works more or less as an expansion to bloom valley and it's where i play more often than not these days. then i have the vacation hood makeovers by @/plumbtales. the university hood was made from scratch by me.
when you create your own hood, you will either have to set up your own townies from scratch or source them from community shared townie hoods. for making townies from scratch, i recommend @/simper-fi’s guide (also recommend getting the mods linked here before you make a hood).
for townie hoods shared by other simmers, i recommend those shared by @/mikexx2 (seriously, look at all those familiar faces that ended up as spouses for gen 1 in bloom valley) and @/marvelann’s sims made townies by @/letthemplaysimscc. i also use the bon voyage locals shared by @/plumbtales. i also make my own townies from time to time or use specific downloaded sims as townies.
iii. on corruption
here’s the good news: as it turns out, corruption really isn’t an issue. april black has made an excellent video on the matter of corruption; although it is long, i recommend anyone who plays ts2 to watch it, or at the very least the final timestamp. to know what to do and what not to do.
although corruption isn’t an issue, i still consider the suite of “anti corruption” mods to be essential in order to avoid overpopulation and overall weirdness.
iv. making the game look pretty
i have linked my eye and skin genetics over here
my supernatural skins default replacements: alien - witch - vampire - plantsim - werewolf - considering switching my vampire, zombie, and werewolf defaults to this
for hair, i only use 4t2 conversions. i just like the way they look. i use @/platinumaspiration’s 4t2 defaults collection, which is a boon. for custom hairstyles, i recommend going through @/4t2clay
for clothes, i recommend going through the sims 2 defaults database. i have also linked some favorite creators for male clothes here. note that they also have female clothes. other creators i enjoy: @/mdpthatsme @kaluxsims @/jacky93sims @/goatskickin
i have a lot of makeup and “skin details” in my folder, but i have always been fond of @/lilith-sims’ things
for build/buy, that’s more difficult to pinpoint, but i again recommend @/sims4t2bb for a conversion database, and also @/veranka-downloads’s plentiful 4t2 and 3t2 conversions. some creators that feature in my folder: @/i07jeuu @/linacheries @/nonsensical-pixels @/pforestsims @/tvickiesims
custom sliders in cas: @/simnopke’s sliders, @/memento-sims’ sliders
for the ui, i use the incredible @/greatcheesecakepersona’s clean ui; i also use the mods linked here (+ @/keoni-chan’s amazing talk to me icon to replace icons), particularly the one to remove the red border in pause mode since that won’t be removed in tab camera
speaking of camera, this is the camera mod i use
i regrettably don’t recall the exact lighting mod i use (looking at them, probably cinema secrets), but i know it is one shared by @/veronaquiltingbee
to beautify my neighbor, i consider these skylines by @/lowedeus to be essential (+ optimized textures by @/celestialspritz). additionally i use the rural charm terrain and roads default replacement by @/criquettewashere in addition to most if not all of their hood decorations. i also love 3t2 hood decor conversions!
another useful resource is the gos events
please note that a lot of these creators do multiple categories of cc, so recommendations for one category may overlap with another; i know that this is just scratching the surface but i hope it helps
v. gameplay mods
i use so many mods to overhaul the gameplay so there will be some omissions. i’ll do my best to provide the most important ones (ignoring the ones previously mentioned)
economy and careers: uni part-time jobs for teens - lower wages - no 20k simoleons handout - loan jar (afaik lamaresims is working on a version to enforce regular payments) - custom bills (750%) - expensive bills for apartments (300%) - private school bill fix (in moreawesomethanyou-al.zip; charges the household 200 simoleons each school day for a child in private school) - lamare’s job options mods - 50% job promotion chance - restricted job offers - work food delivery
food & eating: basically @/jacky93sims's whole library
lifespan & health: lifespan (modified as follows, baby to elder: 3 - 7 - 14 - 21 - 91 - 7-14; i will make the adult lifespan longer still given that i play very slowly, it works as young adult and adult stages, and as is i don’t see many sims of gen 1 living to meet their grandchildren) - more dangerous fires - frequent & faster disease processing
personality: 3t2 traits project and associated mods
relationships and woohoo: acr - romantic standards - reproductive capabilities configurer - pregnant sims wear any outfit
supernatural/occults: plantsims can change hairstyle - no more leafy hair - no more werewolf hair - child lycanthropy - werewolf fangs fix - werewolf transformation 3 nights a week + no personality change vampires can’t eat food - vampire motive decay during day based on aspiration + vampire hunger goes down at night & social/fun decay- hereditary supernaturalism
travel and community lots: visit other sims - community time (+ limeyyoshi’s fix, reuploaded bc i cannot find it)
university: semester changes - pets at university - maternity for young adults - maternity outfit fixed for young adults
misc: planting overhaul - monique’s hacked computer, which i use to give sims separate bank accounts, study skills and badges online, and so on (1 - 2 - 3 - 4) - townie apartment residents - community lot skilling - engagement and wedding ring for color traits - invisible medicine cabinet (so sims can brush teeth and wash face with any mirror) - shiftable everything - midgethetree’s mods - fix subhood selection - longer seasons (7 days)
10 notes
·
View notes
Note
I saw that you use a tablet, a desktop, and paper notes. How do you conciliate those notes?
Is there a mechanism of making primary notes on one resource and then passing those notes to other while reviewing them?


hi! thanks so much for asking! here are my favorite methods for sharing notes between devices :). i personally have apple devices so i can fairly easily airdrop and sync things between devices, but i also frequently work at the library desktop computers where i can't do that! so here's my tips and tricks for sharing notes between devices
for context: i've been mostly doing digital notetaking recently, but i also like to scan my paper notes as well!
i'm going to be dividing this post into 2 methods! (there will be some overlap). syncing already written notes and syncing notes (in progress) between devices
for already written notes:
the first step i would take is export your notes as a pdf or any other file type. if they're handwritten try going into your notes app (for ios) or downloading a pdf scanner app for your phone! if your notes are digital check the sharing options in your app to see if there's anything about "exporting".
personally, i like to use either discord or notion. i have created a discord server with only myself that i use just for sharing links/files/anything between devices! i like discord because there's apps for pc, mac, tablets, and phones; and even a web app! discord is really nice and fast, and you can make different channels (as pictured below) for organization. as long as your file size isn't too big, you should be fine.

my second app i like to use is notion! notion is such a beast in itself, but i like to use it to upload files and images and links! below are two ways i have used it: to upload pdfs/files, and to upload goodnotes (my notetaking app) links to the pages i'm writing on! similar to discord, notion has apps for all devices, but it also works great just by itself on the website (no app required)! it's really great to access it from all my devices.


another way you could share your notes on different devices is through the cloud! (yes, discord and notion are both through the cloud). google drive, microsoft onedrive, icloud storage, etc. are great tools that you can use to upload files and see on multiple devices. i personally like discord and notion more, just because they're already apps i frequently use, but if you can't get either one cloud-based storage platforms are also a great idea! they definitely have more security than discord or notion, because your files may be at risk of being deleted!
for the purposes of sharing notes to reference on another device when writing an essay, or something of similar vain, i really love discord and/or notion and they both work great!
for syncing notes in real time:
pretty similar to the last one, i would say notion or google docs (or microsoft word on the web i believe has similar functionality, or onenote, anything similar!)
if you want to be writing notes on one device and have them sync up quickly on another - i think any word processing software is the best bet for you.
both notion and google docs you can access them on any device, and/or on their websites too!
google docs is a lot more straightforward, but since notion is so powerful it provides a lot of flexibility for your notes! here's an (old) example of notes i've taken on notion. (i personally really like how easy it is to make columns!)
i hope this helped a little bit! please let me know if you have any more questions :)
also! notetaking is very much an individual thing, if something works for me and doesn't work for you - that's okay! we're all learning and just have to figure out what's best for ourselves.
#to: ilyastudies#from: silverfroot#thanks for the ask!#studying tips#studying#studying aesthetic#studyblr#study motivation#university#studyspo#study blog#study inspo#academia#chaotic academia#study aesthetic#study tips#advice#study advice#study methods#study resources#resource#text post#*
26 notes
·
View notes
Text
ULTIMATE CBS MASTERPOST
(or, a general hub to answer a few questions that my followers who are here for other things that are not my passion projects might be curious about)
recently i've been really pushing hard into working on this revival project, so i thought it would be helpful to have a nice big post with links to all of my stuff inside it!

"what is care bear stars?"
care bear stars was a 2008-2009 fanime created, drawn, and animated by joshua click (known at the time as jcstars5). here's a general synopsis:
Care Bear Stars follows the story of Terry Rogers, who meets a magical anthropomorphic bear named True Heart Bear. She gives him a magical talisman, and with it, he transforms into Tender Heart Bear. Along with the other Care Bear Stars, they work to protect good feelings and love among humankind and fight the evil Professor Coldheart, alongside a rogues gallery of otherworldly foes.
for those who don't know exactly what a fanime is and what it entails, here's a good definition from TVtropes:
Fanime (a portmanteau of “fan” and “anime”) is a type of Web Animation typically created by young amateur artists that originated on YouTube around 2006, a year after the site's launch. ... In the past, many fanime were animesque cartoons based on pre-existing anime, especially Tokyo Mew Mew and other Magical Girl shows. Tracing was also common. Instead of using animation software, creators would usually draw frames in MS Paint or Photoshop and composite them in Windows Movie Maker. ... As fanime was predominately created by very young artists inexperienced in animation in the beginning, it gained a reputation for being bad. ... Following the mainstream popularity of Nyan~ Neko Sugar Girls, this type of fanime dominated the community for a long time, but creators attempting to create genuine shows still remain and the community has grown increasingly talented and creative throughout the years.
care bear stars was received pretty well for its time for fanime, receiving a decent amount of fanwork and discussions on websites like deviantArt. though it was far from the only fanime at the time with its premise, its generally considered one of the pillars of first generation fanime alongside series like elemental goddess, and stood out for having full TV length episodes (something that was unheard of at the time for fanime).
the project was cancelled in 2009 after the creator received a cease & desist letter from then (now defunct) owners of the care bear stars franchise, cookie jar group.
for a more in depth write up of my knowledge of CBS during its active period, joshua click's thoughts looking back on the series in adulthood, and where many of the VOs in the project are now, you can check out this document i've worked on and off on for 8 years
"why do you gaf?"
autism
i met some really great friends from the fanime community and now i've imprinted on this show in my mind more than any fanime that i'd ever watched
i love care bears
autism again
as a testament to said autism: here's a collection of all the care bears stars fanart i've ever found
"okay so what is care bear stars r?"
exactly what it sounds like. it's just a 1-to-1 remake of the premise, characters, etc with what i could find of the original project + what i would have done if it were me
for an in-depth (but WIP) write up of my revival, CARE BEAR STARS R, you can click here
you can also find all of my art & write-ups here , and all of my friends' fanart here , and all of the references for them here
other resources
my twitter thread that i consistently update
my tumblr tag for posting about care bear stars
the original series in chronological (series) order
thank you so much for reading!
26 notes
·
View notes
Text
Improving Your Time Management Skills
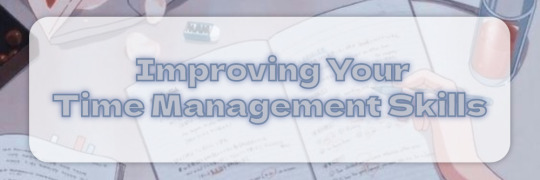
Hiya! This is the part 3, and final post, of what I talked about in part 1's post (LINK) where I talked about tips from my manager, who's Senior Software Developer, about 3 top skills to work on in the workplace, and I wanted to share them here! She mentioned; Work Ethic, Communication and Time Management.
Today, we will go over improving your time management skills in the workplace - but remember, her tips can be applied to any other environment that this might be useful to apply!

Time Management?
Time management skills at the workplace mean being able to use your time effectively and wisely.
It's about knowing how to prioritize your tasks and make the most of the time you have. Helps you stay organized, meet deadlines, and accomplish your work efficiently.
It's important to plan ahead, break down big tasks into smaller ones, and avoid wasting time on distractions. By managing your time well, you can get more done and feel less stressed at work.
Tips To Improving Your Time Management Skills
Just like last time, it's a long list but worthwhile to think about! Here are all of the tips that my manager gave me and some extra notes I made afterwards:
Prioritize Tasks
Identify the most important and time-sensitive tasks in collaboration with your team. Focus on completing those tasks first. Consider the frog method!
Set Clear Deadlines
Make clear deadlines for your tasks and communicate them to your team members. This helps everyone align their efforts and expectations. If for some reason there is not urgency or no deadline to get it done, make one up to keep that productivity up!
Break Down Tasks
Break larger tasks into smaller, more manageable subtasks. This makes them less overwhelming and easier to handle within the allocated time.
Regularly Assess Progress
Continuously review your progress and adjust your time management strategies as needed. Sticking to one type of method at all times is something not the best strategy. Different tasks may need a different type of time management strategy.
Keep Your Team Updated
Provide regular updates to your team about the status of your tasks. This helps maintain transparency and keeps everyone informed about progress. They can even help you if you need any! This is one place I personally need to work on since I like working alone and forgot to update people on how I'm doing! Oops!
Learn From Past Experiences
Reflect on past projects or tasks to identify areas where time management could have been improved. Learn from these experiences and apply the lessons to future endeavors. Don't repeat bad habits...
Well, I hope this was helpful to you! If you want to read the other two posts, here are:
Part 1 "Improving Your Work Ethic" - LINK
Part 2 "Improving Your Communications Skills" - LINK
Remember, time is a precious resource, and how we manage it can make all the difference in our productivity and overall success!!
#resources#my resources#career advice post#coding#codeblr#programming#progblr#studyblr#studying#tech#work tips#work life#career#career tips#career advice#time management
57 notes
·
View notes
Note
I'm thinking of trying my hand at some GBA Fire Emblem ROM hacking, and I was wondering, what software/program/whatever was used to make Sacred Echoes?
My workflow for Sacred Echoes ended up being pretty similar to how the original devs built FE8 - meaning I was mostly working with source code and the compiler with various command-line utilities to convert my asset files into a data format the GBA could handle. When I started the project in mid-2018, I already had some formal education and work experience in programming, so I was past the steepest part of the learning curve for these specific tools.
Please note that my methods are NOT the methods I would recommend for a first project unless you're already familiar with the software development process and using command-line tools. I went into Sacred Echoes knowing I would need to write a bunch of custom code to modify the game mechanics beyond what the beginner tools at the time allowed me to do, so I chose the more complex path. If you're looking for an all-in-one graphical editor that's more friendly to beginners, FEBuilder is amazing and constantly updated with new functions. Whichever method you decide on using, the FE Universe forum and discord are full of resources, tutorials, and helpful people, and I wouldn't have been able to succeed without them. Best of luck on your project!
That said, here's all the technical details and links to all the tools I used:
Sacred Echoes was built using a combination of GNU make (a build system used to automatically detect and compile changes to source code in large projects) and Event Assembler, a utility primarily built for editing the GBA Fire Emblem games. Event Assembler is used with a method called the buildfile, which is essentially a fancy text file with instructions for Event Assembler to insert source files into a ROM and linking different parts together. This meant I used different tools for creating each type of data. Unlike with a ROM editor (such as FEBuilder), I wasn't constantly saving my changes to the same ROM file, but instead freshly building it each time I made a change and wanted to test. This meant that if I messed up (very common when writing custom code), I could just comment out the relevant code or instructions in the buildfile and rebuild from source, rather than try to pick through the ROM by hand to fix issues.
There were cases where I would need to view and edit raw binary data with a hex editor (usually to find a pointer to compressed graphics or a data table); I prefer HxD for that.
For graphics, use any program that can edit and save .PNG files (I used MS Paint and GIMP), and then a tool for game graphics called Usenti to put them into a format the GBA can read. If you need to find and rip graphics from a ROM to edit them, GBAGE is the gold standard (and comes built-in to FEBuilder).
Maps are built from the tileset graphics using a program called Tiled.
For music, the GBA uses MIDI sequences, so any audio program with MIDI support works fine for that. (I used Anvil Studio). The MIDI file is then converted to GBA with a utility called midi2agb.
For unit data and other large data structures, I used a spreadsheet in CSV format, which can be edited with a program like Excel or LibreOffice Calc.
For map events and loading units, the GBA FE games use a scripting language called Event Assembler Language, which just gets written in a raw .txt file. A good plaintext editor like Notepad++ or SublimeText can help keep track of language syntax and keywords.
For assembly code, it is also written in a text editor, and then compiled to bytecode with devkitARM. Most of it I wrote in raw ARM assembly language (which is specific to the GBA's CPU), but in more complex cases towards the end of the project I wrote the code in the C programming language and compiled it with devkitARM.
To keep track of my source files and changes, and to make backups and version control easier, I just used GitHub because I already had an account, but you could also use GitLab or Bitbucket instead.
Finally, I used some tools made by the FE hacking community specifically for automating some tasks and formatting data - most of these are Python scripts, but some can be downloaded as compiled executables. I used "lyn", "TMX2EA", "C2EA", TextProcess and ParseFile, and AnimationAssembler. Ask on the FEU discord or check the forum's toolbox tag.
8 notes
·
View notes
Note
rlly thrilled to hear both of you are doing well with ur books. if u don't mind me asking: is it financially viable? Could u do something like that and support urself or is it more like pocket money? are there startup costs? (feel free to ignore this ask if this is something you don't want to talk about)
Hey Anon,
I don't know if you're the same anon but I'll post the link to the ask that sparked this question for any who are curious here.
The answer to all your questions can be yes (helpful, right?)
Details below the cut...
Is it financially viable?
In my opinion, yes but you and I may be at very different stages in our lives. Are you a student? A parent with young children? Are you struggling to pay the light bill? Do you have time and energy to throw into writing daily or nightly around real life? These things matter.
Could I live off what I'm earning since I started self-publishing nearly a year ago? Hell no. I have a very good full-time job with benefits and an excellent retirement package. My husband and I have both agreed I can't walk away from that for anything less than six-figure earnings but I can say our mortgage has been covered by my writing for the past six months. That's meaningful to us and worth my time and effort.
Does success happen? It does but I won't sugarcoat it. For every Lucy Score, Cora Reilly and T.L. Swan, self-published romance authors who are millionaires, there are thousands out there who are making much, much less. From $20 to $10,000 in a month, it varies widely! But there are things you can to do increase your chances of hitting it big.
Also, I should mention that Amy and I are Amazon exclusive, part of their Kindle Unlimited subscription service. The good part about that? We earn 70% of our sales versus 30% if we were classified as Wide authors (people who can publish elsewhere like Smashwords, etc). The not so good part, you're very dependent on Amazon. For now, it's worth it for us and the (very different) niches we chose do well in KU.
Startup costs -
KEEP IT MINIMAL! I would not throw tons of money into fancy formatting software or professional editing if you're looking to self-publish your first novel. Do the work yourself, take advantage of free resources, sites and tools and see a profit (hopefully). I published my first book May 31st last year and I had made up my initial startup costs by the time my second book was released in late July.
What you actually need..
Royalty free images to make covers - $40 and up, up, up
Catch deals from Deposit Photos. Twice a year they do a deal through appsumo where you can get 100 images for $40. It's a steal of a deal. GIMP is free software you can download to make covers. Find YouTube videos to show you how. It's all out there and free. But it takes effort. Sorry, no shortcuts there :)
Reader Services - $10/month
Many, many self-published authors use bonus stories or free stories as Reader Magnets to draw readers and future fans to their newsletters. You need a system to funnel those readers and collect emails. Bookfunnel is who I use. Some of their services are free but you pretty much need that $10/month to make use of the good stuff. They also offer author swaps and newsletter building promos if you want to grow your list of followers. StoryOrigin is an alternative site some people use.
Newsletter - $0
I use Mailerlite which is free up to 1k subscribers. There's also Mailchimp. You can have freebie landing sites from Mailerlite. I haven't bothered with a paid website domain yet but I know this is something I'll need to look into soon.
ARCs - $10 to $20/month
Booksprout is the one I use. There are probably others. I think it's about $10/month for the beginner subscription to get those reviewers. I'm using a mid-list author plan now ~ $190/year. Some niches make use of SM more for this.
Advertising - $0 to thousands
Don't bother until you've got a book or two out there (come ask me if you get to that point). I'd say the only advertising you should focus on to start with is your passive marketing - your blurb, your cover and the keywords you enter on Amazon that make your book discoverable. Beyond that, paid advertising can wait.
However, you can use Tiktok to get your book noticed. Amy is learning the ropes of this and we've both seen people whose sales have skyrocketed thanks to one or two good Tiktoks to draw readers. One person made $10k in a month off of ONE good Tiktok. Other SMs have their successes, too. This is not an area I excel at though. I'd need one of my kids to teach me more... lmao.
Finally, I'll say, I didn't go into this thinking it would make me rich and famous. I wrote 3 million words of Jonsa out of love over the course of five years. I've written 350k words of original fiction the past year and it's paying the mortgage. Thankfully, I love what I'm writing and I've set myself a five-year plan for my 'side hustle' to see how I feel in 2027. We'll see where I am then. Fingers crossed I can claim I'm a six-figure author!
But what you can achieve in self-publishing can be phenomenal if you're writing to market (giving romance readers those tropes they love and hitting the expected story beats) in a genre and niche that has hungry readers. Our discord has verified tiers so people who say they're making 50k in thirty days aren't just blowing smoke. They've proven it. Imagine making money like that and then, if you're at a point in your life where you want to try, GO FOR IT.
29 notes
·
View notes
Text
Resources
Welcome to the resources section!
Below, you will find a comprehensive collection of tools, guides, and templates to aid in character creation and writing. This includes dialogue examples, character development templates, writing software recommendations, grammar and style checkers, and various online resources
Here is an overview:
Where to get help for Character AI
Character AI Specific Resources
Writing Software / Word Processors
Word Choice, Spelling & Grammar
Learning to Write
Miscellaneous
Image Editing
Personally, I use Google Docs or LibreOffice to write, and Canva (with Canva Pro) and Procreate for image editing. You'll find all the links to these below.
Where to get help for Character AI
Character AI Discord Server - Probably the place to go for the fastest way to get help. Most active.
The Official Character AI Discord Server
r/CharacterAI_Guides - Due to the forum-like style of Reddit, posting in this subreddit allows for more people to see your request for help. It also allows for a more in-depth discussion.
r/CharacterAI_Guides
Contacting sleepymaul / CIAYAQ directly - Anyone needing help is always welcome to directly contact me. Don’t hesitate, no dumb questions. Either send me an ask here on Tumblr, or send me DM over Discord. Email is fine too.
Contact & Socials
Character.AI Specific Resources
r/CharacterAI_Guides
This is a comprehensive guide written by the lovely Vishanka. It is a fantastic source and contains all you’ll need to know to dive into Character Creation. It is what taught me in the beginning.
CIAYAQ
Another Character AI guide but written by me, sleepymaul. This one focuses more on how to use the service, giving you examples on various ways to achieve certain things.
sleepymaul’s Dialogue Examples
An extensive collection of dialogue examples that I have personally written for my characters on Character AI. The dialogue examples you’ll find there are a mix of everything, from appearance to actions, emotions, and even some fandom-specific ones.
Feel free to use them as inspiration, templates, or the foundations for your own creations. You can copy and tweak them however you like. This document is a resource for anyone looking to create characters on Character AI - or whatever project you have going on.
Character Creation Template 2.0
This is a template designed to organise the character creation process. It offers sections for the finished character, the creation process itself, and backups of different versions. You’ll find designated areas for brainstorming notes, writing dumps, etc. At the bottom, you’ll also find links to my stuff, should you need it.
Sentence Starters
To avoid having the AI constantly start the sentences/paragraphs with a pronoun or a name, I recommend introducing variety into the way you begin the sentences and paragraphs. This document is full of starters, featuring transition words, adverbs, adverbial phrases, etc.
Writing Software / Word Processors
Something we keep seeing is users losing all the work they put into a definition because the site crashed and they didn’t get to save. It is imperative that you write off-site. Not just in the case of site-crashes, but also because this is your writing. Lose access to Character.AI, and you lose your writing. Write off-site, folks.
LibreOffice - This is a free open-source word processor that works much like Microsoft Word.
LibreOffice
Google Docs - also free and functions much like Word but just in your browser. Upside here is that it works across devices. Downside is Google.
Google Docs
Scrivener - A powerful content-generation tool for long documents, including novels and research papers. Paid software.
Scrivener
Evernote - An app designed for note-taking, organising, and archiving, which is excellent for brainstorming and writing. Has a free version, which is quite limited but it could do the job. Has an app too.
Evernote
Your Notes app. Seriously, use the notes app on your phone.
Word Choice, Spelling & Grammar
Grammarly - A spell and grammar checker, but advanced. Not only does it catch spelling mistakes, it can look at sentence variety, or tell you when a sentence sounds awkward and could be phrased better. Comes with a built-in thesaurus. Free version is enough.
Grammarly
Ginger - An alternative to Grammarly, Ginger offers advanced grammar and spell checking, along with a text-to-speech feature and a personal trainer for improving your writing skills.
Ginger Software
ProWritingAid - A comprehensive writing assistant that not only checks grammar but also offers style suggestions, readability improvements, and more. It’s an alternative to Grammarly.
ProWritingAid
Hemingway Editor - This tool helps make your writing bold and clear. It highlights complex sentences, passive voice, and other issues to improve readability.
Hemingway Editor
Thesaurus - Your one stop for synonyms and similar concepts. If you’re looking for words to create variety in your writing, this is the place to go.
Thesaurus
Dictionary - Does what it says on the tin. It’s a dictionary. Biggest plus is that it comes connected with Thesaurus that I mentioned above.
Dictionary
Merriam-Webster - A trusted dictionary and thesaurus with extensive definitions and synonyms, perfect for finding the precise word.
Merriam-Webster
Sentence Starters - To avoid having the AI constantly start the sentences/paragraphs with a pronoun or a name, I recommend introducing variety into the way you begin the sentences and paragraphs. This document is full of starters, featuring transition words, adverbs, adverbial phrases, etc.
Sentence Starters
Literary Devices - A comprehensive guide to literary devices, techniques, and terms that can enhance your writing. Explanations and examples from such things as “plot” to “Epizeuxis”, this site has it all.
LiteraryDevices
Learning to Write
Resources For Describing Emotion
Resources For Describing Characters
Resources For Describing Physical Things
Miscellaneous
Writing Prompts - Websites that offer creative writing prompts to spark inspiration and overcome writer's block.
Spizzy’s Writing Prompt Generators [Promptinor | Dark Promptinator | Romance Promptinator]
Reddit Writing Prompts
Writing Prompt Generator
BehindTheName - A website that provides the etymology and meaning of names, which can be useful for character development.
BehindTheName
Spizzy’s Character Sheet - A Google Doc with detailed template for character development, covering basic info, physical descriptions, personal history, and personality traits. It includes prompts for exploring motivations and character arcs. It’s meant to help with developing rounded characters, or just keeping track of information.
Spizzy’s Character Sheet
Image Editing
Here are some places you can go to edit your avatars.
Canva - An online tool for graphic design. The focus is more on design and less image editing. Does the job of basic editing of images. Free version is enough.
Canva
GIMP - A free and open-source image editor that provides advanced image manipulation capabilities similar to Adobe Photoshop. Desktop only.
GIMP
Krita - Another free, open-source painting program. Can be used for image editing. Kind of like Adobe Photoshop. Desktop and Android only.
Krita
Pixlr - A powerful online photo editor that is accessible from any device with internet access.
Pixlr
Procreate - An iOS app for digital painting and image editing. iOS only, and a paid software, no subscriptions.
Procreate
5 notes
·
View notes
Note
I just recently finished Mass Effect 3 and man, that ending doesn't hold up as good as I remember.
How would you do it?
It's never held up for me personally since the first time I played, the whole 'oh we installed a thing if they races ever figured out how to stop the reapers' thing has always annoyed. like why would the reapers/leviathan know about the catalyst enough they put a background software in and not just...destroy it entirely???
I think I'd have the whole catalyst thing be something that was just missing, not the citadel. just something that needed to be developed. like I like that it was something previous races had worked on before and sent forth to other races to finish in it's stead, that's a good idea! I really liked that!
so I'd keep that, sure have the reapers steal the citadel. maybe they actually do figure out what they need to make it work is on the citadel still, maybe it's even using the keepers to send the code since they have a direct link to the reapers and it's through one last meeting with all the races you've gathered you figure this out. one thing I think was missing was an end scene where you rally all the races to solution together. so the reapers have the citadel, you gotta get it, makes sense.
now shep getting there I think should be more like it was in mass effect andromeda: you see people you chose to help show up towards the end on the field. it's not just them listed as valuables to the project. have the fucking rachni queen if you sided with her take out a reaper in your way. have the kirahe show up again if he was saved to 'hold the line'. let us see emily wong ram her ship into a reaper cause oh boy that was a cool death that we only learned about through supplemental material. like give us the build up and let us see what our alliance can do. if you ended up getting help from the batarians after all then see them come in and get their own revenge for what happened to their system.
and if you chose to sacrifice alliances, to kill people, to turn your back on things that could have helped you then either a) the battle field is harder or b) the ending shows that. more people die in the end if you chose not to get the resources; more is lost to the galaxy. maybe even to some species shepard isn't the hero and they turn their back on a reformed council (which I would assume happens) at the end.
and of course let shep be happy with their LI. retire on rannoch with tali or train kids in the academy with jack or hunt down cerberus outposts with miranda or dedicate your time now to solving kepral's syndrome for thane. (of course in my au he actually doesn't die and you save the drells too and they're also in ME3). or maybe if shep doesn't get enough 'resources' or people to help out then they do die after all to make that sacrifice.
like in dragon age: origins the choices and alliances you made gave different outcomes as to who showed up in battle and what ending you got, just give us that but not just in text.
6 notes
·
View notes
Note
hey!! I want to start making gifs but i don’t know how, are websites like ezgif frowned upon here in the gif community? do we make them in a specific software?
hi anon!! thanks for asking!
I would say that yes, ezgif is generally frowned upon to make gifs, but if that's the only option available for you then it's whatever works. People frown upon it because the quality of the gif is reduced in ezgif software (converting from mp4 to gif) and there are very limited coloring options. You also can't sharpen a gif because the sharpening software simply doesn't exist on ezgif. I want to reiterate that ezgif isn't like, the worst thing in the world, but it's moreso limiting your toolbox greatly.
There's two paths that you can take: get Photoshop somehow, either paying the enormous amount of money yearly for a subscription, getting it from your school if they offer it, or getting a cracked (not legal) version of it. There are a lot of downloads available here (Tumblr link) and in my tag called #resources.
Your second option is photopea, which is a free online version of photoshop and is similar to Photoshop. I used photopea for years until a friend gave me access to her Photoshop account, and I personally prefer Photoshop over photopea due to the accessibility, the filters available for coloring and sharpening, and the saving options (which I know sounds really stupid, but the exporting options for Photoshop are generally better than those of photopea. IE you can make the same gif from both softwares but photoshop's will just be better quality by nature because of its export, ie when you click 'save as gif'). However, photopea's usefulness and breaking down that barrier for people who want to get into gif making or editing graphics in general when they can't get Photoshop is very powerful and I'm glad that photopea exists, I recommend it highly for people that cannot get Photoshop/aren't comfortable with getting a cracked version of it because it's similar (not the same) to Photoshop.
I have an old photopea tutorial on YouTube if you'd like to use it to learn! It's old not because of the age but because I do things differently now than I did when I made the video and if I could, I would add more to the video, the biggest being cropping and aspect ratios. Here's a detailed post on gif sizing since I didn't include it in my tutorial, and here's my YouTube tutorial on how to make a gif on photopea. There are a bunch of tutorials on how to make a gif on Photoshop, I'm sure, since it's a better known software. Maybe I'll redo my photopea tutorial at some point. That's a mighty fine idea tbh.
Another big tip, if you for some reason have a software related question, you can literally email the CEO and creator of photopea at support[@]photopea.com. I've done it before lol. He's really helpful. That's the perk of a small software, the CEO is behind the support email. He has literally changed the software when I've asked, for example you couldn't upload videos with a frame rate greater than 10, and I made him change it to the frame rate of the video. Lmao.
Sorry for all of these words lol, I hope they helped and feel free to reach out again if you have more questions!
4 notes
·
View notes
Text
[ID: an animated GIF that reads "Tumblr 2022 My Year In Review", and shows a variety of moving stickers including the anon profile picture, grabs, stars, hearts, the plinko horse, the reblog symbol, and the tumblr symbol. It looks like a page out of highschool sketchbook. End ID.] (ID by @thetragicallynerdy <3)
I posted 7,770 times in 2022
118 posts created (2%)
7,652 posts reblogged (98%)
Blogs I reblogged the most:
@tmoblrina
@pathos-logical
@carfuckerlynch
@generic-internet-name
@three-magpies-in-a-trenchcoat
I tagged 6,482 of my posts in 2022
Only 17% of my posts had no tags
#described - 2,771 posts
#that's my queue - 1,032 posts
#described by me - 809 posts
#storytime - 675 posts
#unreality - 273 posts
#tumblr - 263 posts
#to watch later - 242 posts
#mutualsposting - 226 posts
#lovecore - 213 posts
#tropes - 184 posts
Longest Tag: 135 characters
#i didn't see a post like this earlier and didn't have time to say it myself but happy diwali to all who celebrate i love you 💜🪔🌟🕯💛
My Top Posts in 2022:
#5
who needs IDs, how do they help and why are they used? i've always been curious, i mean no harm by asking, so sorry if this is rude
Not rude at all anon, I'm so glad you asked!! Image descriptions are accessibility aids for vision-impaired folks and anyone who may have issues parsing an image (ex: an autistic person unable to comprehend a visually busy art piece). For people who can't see an image for any reason, IDs provide a way to understand what's on screen, whether it's a meme or tweet or art. For example, a blind person using a screen reader (a device that reads text out loud) wouldn't know what an undescribed all-image post was talking about, but with an ID they could know it's a tweet and then a meme mocking it
IDs can look abstruse and intimidating when you're unfamiliar with them, but I promise they're not! The simplest step to making your blog more accessible is scanning the notes of a post to find a comment with an ID and reblogging that version of the post instead! If you're interested in learning how to write your own IDs, I really love this post as a resource, plus the amazing People's Accessibility Server if you have questions or want to request descriptions! I'd also like to plug my pinned post, which has a link to a doc with templates for a ton of memes so you can describe posts yourself!
I hope this wasn't too much text and that your question was answered clearly, anon! Please feel free to go through my "image descriptions" and "accessibility" tags for more info!
115 notes - Posted October 13, 2022
#4
Copying tags in accessible ways on mobile
(Large text: Copying tags in accessible ways on mobile)
People screenshot tags all the time, whether to share a funny joke or add important commentary, but they often don't realize that this is inaccessible to vision-impaired people and many others. This is a problem because a lot of people primarily use Tumblr on the mobile app, which doesn't let you interact with tags at all unless you screenshot them. However, accessibility is always worth the extra time and effort you can spare, so here are some ways for you to easily copy tags without spending too much of either!
Image-to-text softwares
(Large text: Image-to-text softwares)
If you simply must screenshot those tags, you can still convert them back into usable text! There are plenty of easy-to-use websites that allow you to take any downloaded image and extract the text from them. I prefer onlineocr.net, but the Google Translate app has the same feature! All you need to do is input the image and hit the button, and it'll spit out the text for you to copy. This method is fantastic for images with lots of text, not to mention it's easy to do and generally accurate, and I use it all the time to great effect!
Going to browser
(Large text: Going to browser)
If you're on mobile, it's probably a safe bet to say that your phone also has a browser app. If so, all you need to do to copy the tags from a post is copy the link of said post into a browser and then copy the tags from there. This method can mean extra formatting, since hashtags and links won't copy over, but it's relatively low-effort to do and doesn't take long at all!
Going on PC
(Large text: Going on PC)
If you're on mobile, you can also consider saving the post with desired tags to your drafts. This means you can easily access it on another device, aka a computer, and copy the tags there! Copying tags on desktop is possibly the easiest way to do it, since all you need to do is highlight the text and paste it later- it'll even save the link formatting when you do! The only extra step you might have to do is add spaces between the tags, since they'll automatically come smushed together and only separated by hashtags. This method might mean you take a little longer to reblog the tags, but it is very much worth it to make the post accessible to all!
Going forth
(Large text: Going forth)
These methods are a smidgen more effort than just screenshotting or prev tagging, but I don't think it's a bad tradeoff at all! I hope this can provide quick and easy ways for everyone to get more used to thinking more conscientiously about accessibility. And these aren't your only options- alt text helps people who use screenreaders, and you should always add an image description below screenshots if you're going to add them. Hope this helps!
TL;DR: Instead of screenshotting tags, which makes them inaccessible, other options are: using image-to-text software, copying the tags on a mobile browser, or copying them on desktop Tumblr.
290 notes - Posted January 5, 2022
#3
Gif makers will be like "how can I fit as many inaccessible font options as exist on planet earth into one three-word movie title"
413 notes - Posted June 28, 2022
#2
How to Keep Doing Descriptions (from someone who does a fuckton)
Plain text: How to Keep Doing Descriptions (from someone who does a fuckton)
This is a list aimed mostly at helping people who already write IDs; for guides at learning how to do them yourself, check my accessibility and image description tags! I write this with close to two years of experience with IDs and chronic pain :)
Get used to writing some IDs by using both your phone and your computer, if you can! I find it easier to type long-form on my laptop, so I set up videos and long comics on my phone, which I then prop up against my laptop screen so I can easily reference the post without constantly scrolling or turning my head
I will never stop plugging onlineocr.net. I use it to ID six-word tags, screenshots of posts, and even comic dialogue! On that last note, convertcase.net can convert text between all-caps, lowercase, sentence case, and title case, which is super helpful
Limit the number of drafts/posts-to-be-described you save. No, seriously. I never go above 10 undescribed drafts on any of my four blogs. It doesn’t have to be that low, but this has done wonders (italics: wonders) for my productivity and willingness to write IDs. If I ever get above that limit, even if it’s two or three more, I immediately either describe the lowest-effort post or purge some, and if I can't do that then I stop saving things to drafts no matter what. No exceptions! Sticking to this will make your life so much easier and less stressful
My pinned post has a link to a community doc of meme description templates!
Ask! For! Help! Please welcome to the stage the People’s Accessibility Server! It’s full of lovely people and organized into channels where you can request/volunteer descriptions and ask/answer questions
I make great use of voice-to-text and glide typing on my phone to save my hands some effort!
Something is always better than nothing!!! A short two-sentence or one-sentence ID is better than no ID at all. Take it easy :)
If you feel guilty about being unable to reblog amazing but undescribed art, try getting into the habit of replying to OP’s post to let them know you liked it! This makes me feel less pressured to ID absolutely everything I see
I frequently find myself looking at pieces of art which feel like they need to be considered for a bit before I can write an ID for them, and those usually get thrown into drafts, where the dread for writing a comprehensive ID just builds. Don’t do that! Instead, try just staying in the reblog field for a bit and focus on the most relevant aspects of the piece. Marinate on them for a little; don’t rush, but don’t spend more than a handful of seconds either. I find after that the art becomes way easier to describe than it initially seemed!
On that note, look for shortcuts that make IDs less taxing for you to do! For example, I only ever describe clothes in art if they're relevant to the piece; not doing that every time saves a lot of time and energy for me personally
Building off of that, consider excusing yourself from a particular kind of ID if you want to. Give yourself a free pass for 4chan posts, or fanart by an artist who does really good but really complex comics, whatever. Let it be someone else's responsibility and feel twice as proud about the work that you can now allot more energy to!
As always, make an effort to find and follow fellow describers! It’s always encouraging to get described posts on your dash, and I find that sometimes I'm happier to ID an undescribed post when the person who put it on my dash is a friend who tagged it with "no ID"
TL;DR: To make ID-writing less stressful and more low-effort, use different devices and software like onlineocr.net and voice-to-text, limit the amount of work you expect yourself to do, and reach out to artists and other describers!
442 notes - Posted November 8, 2022
My #1 post of 2022
[ID: A cropped screenshot of two crabs on the tumblr dashboard. They are right next to each other and both say “love <3.” End ID]
PEACE AND LOVE ON PLANET EARTH!!!!!!!!!!!!!!!!!!!!!!!!!!!!!!!!!!!!!!!!!!!!!!!!!!!!!!!!!!!!!!! (Plain text: Peace and love on planet earth!!!!)
821 notes - Posted April 1, 2022
Get your Tumblr Year in Review 2022 ->
#tumblr2022#year in review#my 2022 tumblr year in review#your tumblr year in review#:))))#my posts#kay talks#described#long post
5 notes
·
View notes
Text

I posted 326 times in 2022
That's 306 more posts than 2021!
196 posts created (60%)
130 posts reblogged (40%)
Blogs I reblogged the most:
@xiacodes
@shahednasser
@programmerhumour
@theinsaneapp
I tagged 240 of my posts in 2022
Only 26% of my posts had no tags
#programming - 205 posts
#coding - 197 posts
#comp sci - 157 posts
#studyblr - 148 posts
#computer science - 121 posts
#100 days of code - 102 posts
#studying - 102 posts
#software developer - 88 posts
#python - 73 posts
#programmer - 68 posts
Longest Tag: 100 characters
#i said no to doing computer science at university but now i have a module all about computer science
My Top Posts in 2022:
#5
Calling all computer science/programming blogs!

Hello everyone! ʕ•́ᴥ•̀ʔっ
I have been getting dms of people wanting to follow other blogs like mine where I post my progress with programming / experimenting with different programming languages / tips and tricks / resources etc but they can't find them easily soooo I am making a post to reach the blogs these people want to find!
If you post about anything in the list belong, please reblog or comment your blog's @ so the right people can reach your blog:
programming a language
computer science
relevant memes
general talk about either subject
provide resources
student in any of the subjects
do challenges with computer science e.g. 100 days of Code
I just want this to reach as many people so our lil community within Tumblr can grow! Have a lovely day!
563 notes - Posted April 15, 2022
#4
Python Official Roadmap | Resource ♛

* means extras you could learn to enhance yourself
The intent of this guide is to give you an idea about the Python ecosystem and to help guide your learning if you are confused.
Also, please note that the list below is exhaustive, and the items are listed in no particular order. You don't need to learn everything listed in the picture, however, knowing what you don't know is as important as knowing things.
Link to the official site: Python Developer Roadmap by roadmap
-- > must add, the information is from roadmap.sh, but I just put it together in the image
676 notes - Posted April 27, 2022
#3
Python 3 Cheat Sheet | Resource ✎
Link to source: Python 3 Basic Cheat Sheet
1,608 notes - Posted April 20, 2022
#2
Build Your Own X | Resource ✿
GitHub is literally the best, what the fuck? ヾ(・ω・*)ノ
Anyhoo! This GitHub repository contains a list of tutorials that will guide you to build almost anything in web development using a range of programming language that best suits you!
Let me give you an example:
I click "Game" in the table of contents, it jumps me to the Game section. I wanna use C# so I pick a random C# game tutorial e.g. C#: Learn C# by Building a Simple RPG and it takes me to the site where someone made a whole project page with step-by-step guide to help build that game!
See the full post
1,666 notes - Posted April 18, 2022
My #1 post of 2022
800 free Computer Science classes | Comp-Sci Resources ♥
800 free Computer Science classes you could take online right with video lectures!
Link: GitHub - Developer-Y/cs-video-courses: List of Computer Science courses with video lectures
I found this link in a tweet and found the site very helpful! Take full advantage comp sci learners!!!
Have a nice day and happy programming ♥
1,711 notes - Posted April 16, 2022
Get your Tumblr 2022 Year in Review →
22 notes
·
View notes
Last Seen Blogs

legacyphoto
Untitled

moi-je-dis-ca-je-dis-rien
Alzheimer? Non merci.

leftyfreeman98
⬢FREEMΛN⬡

leertaakportfolio
abelmellema

sweetsludgegiantturtle
Untitled