#Photography tips and tricks
Explore tagged Tumblr posts
Visit Tumblr Blog
Explore Tumblr blogs with no restrictions, modern design and the best experience.
Last Seen Tumblr Blogs


Fun Fact
The total number of visits Tumblr.com received during January 2021 is 327 million.
Text
Profit from Photography in 2025: Tips & Tricks
Made by using AI. Exploring photography in 2025 is exciting. We need to learn how to make money as a photographer. This guide will show you tips and tricks to grow your business and profits. It’s important to keep up with photography trends. By using new technology and finding different ways to earn, you can make a good living. We’ll share stories of photographers who have succeeded and give…

View On WordPress
#business#earn from photography#life lessons#photography#photography 2025#photography tips and tricks#Self Improvement#stories#technology#writing
1 note
·
View note
Link
I just tried to share with you what I learned maybe you will like it
#mobile camera settings#Suhailmyself#suhail#mobile photography#photography tips#photography tips and tricks#mastering mobile photography
3 notes
·
View notes
Text
A Photographer’s Dream: Wildlife Photography Near NCR
Looking for the best Wildlife Photography spots near NCR? Discover a paradise filled with rare birds, lush greenery, and stunning landscapes. Capture breathtaking moments in nature’s lap and create unforgettable photography experiences.


#Wildlife Photography#nature photography#photography tips and tricks#travel photography essentials#landscape nature photography
0 notes
Text
📸 Struggling to find real, practical photography tips that actually work?
You're not alone! Many budding photographers spend hours searching for advice, only to find complicated guides that seem impossible to follow. That's why I created @melita_ntala – to provide simple, practical, and effective photography tips you can use right now to elevate your shots.
✅ From beginner-friendly tips to pro-level techniques
✅ Easy-to-follow tutorials
✅ Behind-the-scenes insights and gear recommendations
Whether you're just getting started or looking to refine your craft, @melita_ntala is your go-to for straightforward advice that gets results.
💡 Follow me and let’s capture better moments, together!
0 notes
Text
Best Photo Shot Tips and Tricks
Photography is an art form that allows us to capture moments, express creativity, and immortalize memories. Whether you're a beginner or an experienced photographer, there's always room to enhance your skills and elevate your photos to the next level. In this comprehensive guide, we'll explore some of the best photo shot tips and tricks to help you improve your photography game and unleash your creativity.
Introduction to Photography
Photography is more than just pointing and shooting; it's about capturing emotions, telling stories, and seeing the world through a different lens. Understanding the fundamentals of photography is crucial for mastering the art. Before diving into specific tips and techniques, let's briefly discuss the importance of photography and gain a basic understanding of its principles.
Understanding Your Camera
One of the first steps to becoming a proficient photographer is getting to know your camera inside out. Whether you're using a DSLR, mirrorless camera, or smartphone, understanding its features and functionalities is essential for capturing great shots.
Lighting Techniques
Lighting plays a crucial role in photography, shaping the mood, tone, and overall quality of your photos. Learning how to manipulate light effectively can significantly improve your photography skills.
Composition and Framing
Composition refers to how elements are arranged within a frame, while framing involves choosing what to include or exclude from the shot. Mastering composition and framing techniques can transform ordinary scenes into captivating photographs.
Choosing the Right Location
The location can make or break a photo. Whether you're shooting indoors or outdoors, selecting the right location is vital for achieving the desired aesthetic and telling a compelling story through your images.
Posing and Directing Subjects
If you're photographing people, knowing how to pose and direct your subjects can make a significant difference in the outcome of your photos. Effective communication and guidance can help you capture authentic and flattering portraits.
Editing and Post-Processing
Editing is an essential part of the photography process, allowing you to enhance colors, adjust exposure, and correct any imperfections in your photos. Understanding basic editing techniques and utilizing photo editing software can take your photos to the next level.
Special Effects and Creative Techniques
Experimenting with special effects and creative techniques can add a unique touch to your photos and set them apart from the rest. From long exposure photography to forced perspective, the possibilities are endless.
Tips for Smartphone Photography
You don't need fancy equipment to take stunning photos. Smartphone cameras have come a long way and are capable of producing high-quality images. By mastering some key techniques and utilizing the right apps, you can achieve impressive results with your smartphone camera.
Photography Gear Recommendations
While having the latest gear isn't necessary to take great photos, having the right tools can certainly make the process easier and more enjoyable. From camera bodies to lenses and accessories, we'll recommend some essential gear for photographers of all levels.
Staying Inspired and Creative
Photography is a journey of self-expression and discovery. However, it's normal to experience creative blocks from time to time. We'll share some tips for staying inspired and reigniting your passion for photography.
Common Photography Mistakes to Avoid
Even the most experienced photographers make mistakes. By being aware of common pitfalls and learning how to avoid them, you can improve your photography skills and produce better results.
Developing Your Style
Finding your unique style is an essential part of becoming a successful photographer. By experimenting with different techniques and subjects, you can develop a signature style that sets you apart from others.
Networking and Building a Portfolio
Networking with other photographers and building a strong portfolio are crucial steps in advancing your photography career. We'll discuss some strategies for networking effectively and creating an impressive online portfolio.
Conclusion
Photography is a lifelong journey of learning and discovery. By implementing the tips and techniques outlined in this guide, you can take your photography skills to new heights and capture moments that will be cherished for years to come.
FAQs (Frequently Asked Questions)
What is the best camera for beginners?
Answer: There are several excellent options for beginners, including entry-level DSLRs and mirrorless cameras from brands like Canon, Nikon, and Sony.
How can I improve my composition skills?
Answer: Practice is key. Experiment with different composition techniques, such as the rule of thirds and leading lines, and study the work of other photographers for inspiration.
Do I need expensive editing software to edit my photos?
Answer: Not necessarily. There are many free and affordable editing software options available, such as Adobe Lightroom and GIMP, that offer powerful editing capabilities.
What are some tips for taking better portraits?
Answer: Focus on lighting, composition, and posing. Pay attention to the background, use flattering angles, and communicate clearly with your subjects to capture natural expressions.
How can I find photography communities to join?
Answer: Look for local photography clubs, online forums, and social media groups dedicated to photography. Networking with other photographers can provide valuable support and feedback.
why choose ecommerce store for your cbd needs photographer guide intellectual property solutions best camera for wedding photography in home newborn photography fine art nude photography couples photography near me how much are jcpenney portraits mom and son photography ideas best clipping path service provider like some landscape photography
1 note
·
View note
Text
New Stock Photo Workflow
I have taken advantage of a previously overlooked benefit of the Canon R7 to create a new stock photo workflow that will increase efficiency and upload volume. The R7 of course comes with two card slots which can be configured to capture both raw and jpg images separately on card one and card two. Up to now I’ve been going through the arduous process of editing, rating and running just a few RAW…

View On WordPress
#books for sale#Colorado wall art#film photography#fuji film#landscape photography#landscape photography tips#model photography#model photography for stock#photography#photography books#photography techniques#photography tips#photography tips and tricks#prints#prints for sale#stock images#stock landscape images#stock photo licensing#stock photo tips#stock photography#tips and tricks#wall art#wildlife#wildlife photography books
1 note
·
View note
Video
youtube
Composition Tips for Portrait Photography you Need to Know
#youtube#portrait#composition#photography#photoshop#how to photography#learn photography#photography tips#dos and donts#compose your shot#editing#photography for all#photography tips and tricks#digital learning
0 notes
Text
Travel Photography Tips: Capture Memorable Moments

#travel photography#travel photography tips#photography#photography tips#travel photography camera#travel photography for beginners#travel photography tips for beginners#travel#travel photography lens#travel photographer#learn travel photography#travel photography gear#travel photography hacks#better travel photography#landscape photography#how to take travel photos#travel photo tips#travel photos#landscape photography tips#photography tips and tricks
0 notes
Text

Now ☝️ vs Then 👇
I'm scrolling through posts on my Instagram page and can't believe how much I've grown and progressed compared to when I first started the toy photography hobby.

Here are a few tips on how to improve your photography skills:
Practice, practice and only practice.
Make sure the lighting is good.
Avoid pictures of minifigures standing around doing nothing, the picture should tell a story.
Make sure you have something interesting in the background, but not distracting, and preferably also have something in front to achieve a 3D effect and a sense of depth.
Look at what other toy photographers are doing and learn from them. Try to recreate what they're doing in your own way.
#now vs then#toy photography#lego photography#photography#photography tips#how to improve#tips and tricks#tips and techniques#toyphotography#legophotography#toyphoto#legophoto#lego#toyphotogallery#toy photographers#instagram#legominifigures
71 notes
·
View notes
Text
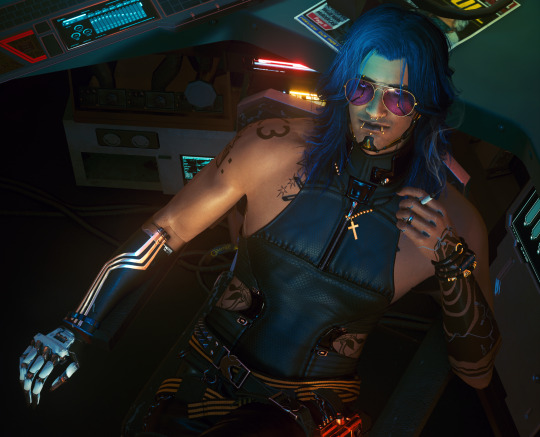
Vincent "Black Oil V" Mulder
#cyberpunk 2077#pics#male v#masc v#cp77 oc#cp2077#cp77 photomode#cyberpunk#virtual photography#cp77#v cp77#oc: black oil v#hiii im finally posting stuff after being nervous to do so for a bit hehe#im mostly just practicing and attempting to get better at vp so pls bare with me!! tips and tricks are appreciated lol#i also want to share my v!! i love him a lot and i have so much like. thoughts abt him. hes not really a v anymore but he sort of is???#i dont know what to caption this
29 notes
·
View notes
Text
Ya'll be caring about being judged by the most basic bitches and regular lame ass human beings .
Don't do that .
#violaroseshade quotes#quotes to live by#quotes about life#high on life#life quotes#quotes about sadness#popular posts#pop culture#higher truth#higher dimensions#higher consciousness#higher self#self healing#self care#self care sunday#self care tips#tips#tips and tricks#high school#witchy vibes#witch community#witchcraft community#witches of tumblr#pastel grunge#spilled poetry#spilled words#spilled thoughts#pastel goth#photography#pastel aesthetic
37 notes
·
View notes
Text
Discover the Magic of Real Moments: Candid Photography in 2025
Photography has come a long way, but the art of candid storytelling is what truly makes a photo unforgettable. In 2025, capturing those unscripted, genuine moments is easier — and more powerful — than ever. 📸 From the charm of natural lighting to the spontaneity of raw expressions, this guide walks you through 7 real techniques to breathe life into your photos. Whether you’re a beginner or a…
#business#discover#earn from photography#health#life lessons#Medium#moments\#photographay#photography#photography 2025#photography tips and tricks#Self Improvement#stories#technology#writers#writing#writingcommunity
1 note
·
View note
Text

#How to Tell if You are Too Close to That Rhino#tips#tricks#life hacks#helpful hints#advice#rhino#rhinoceros#photography
249 notes
·
View notes
Text
Nature Photography in Davos: Capturing the True Swiss Alpine Palette
Explore the art of nature photography to experience the serene beauty of untouched landscapes. With landscape nature photography, you can capture awe-inspiring sunsets, towering peaks, and verdant valleys. From delicate details to expansive views, nature photography connects you to the tranquility and magnificence of the natural world.

#nature photography#photography tips and tricks#landscape nature photography#nature photography tips#landscape photography
0 notes
Text
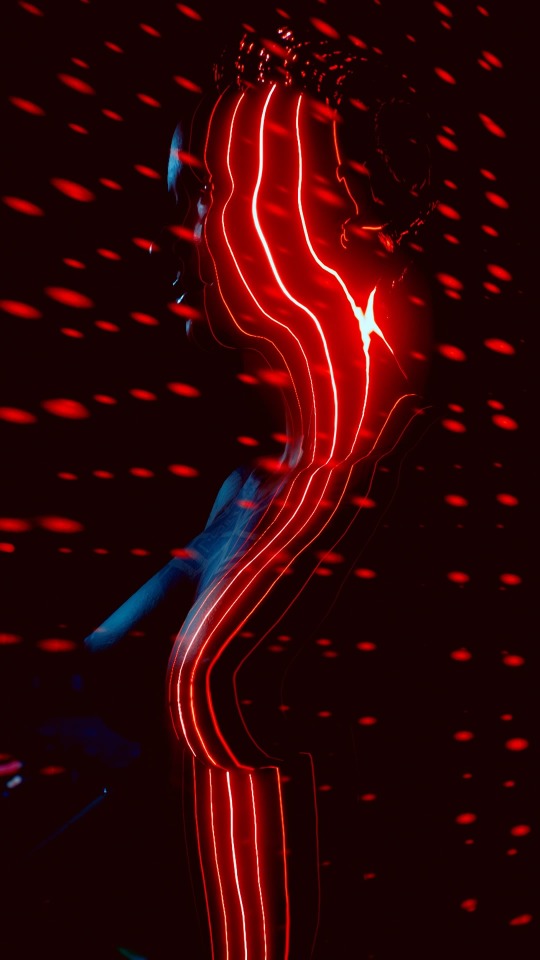
^ the process
v the result
#when i say i'm in there sideways & half-blind I MEAN IT#oc: venus#cyberpunk 2077#photomode#virtual photography#console shots#ps4#video game art#my v#oc#nomad v#tips tricks & tutorials
29 notes
·
View notes
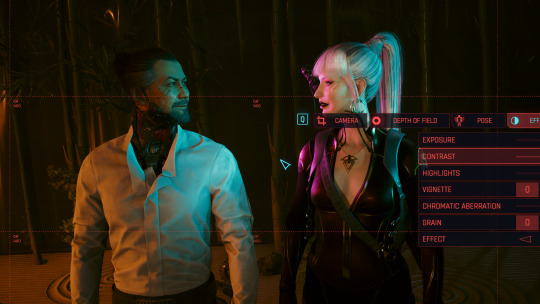
Text

Welcome to my Little CharLI and VP spotlight tutorial I will be going over a few things I have learned since starting Virtual Photography in the hopes I can help out people unfamiliar with CharLI and want to learn how to light there model, make characters look at each other and how to use AMM to help get that perfect shot.
I'm not an expert but I have improved alot since I starting using these simple tips I will share with you.

Here is what CharLi looks like when you open it, it may seem a little overwhelming at first but once you get used to what does what, its prety simple to use
I'm going to be sharing how I use spotlights in this tutorial so don't worry about the other lights for now.
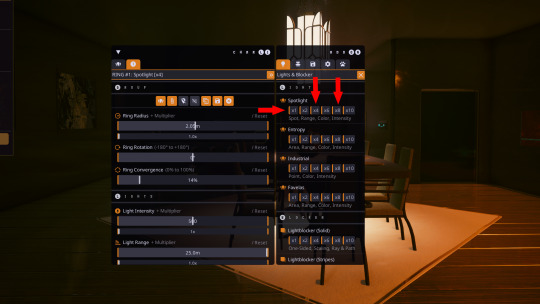
first of all I usually only use a single, or a set of 4 or 8 spotlights in my shots, you can use more of course.

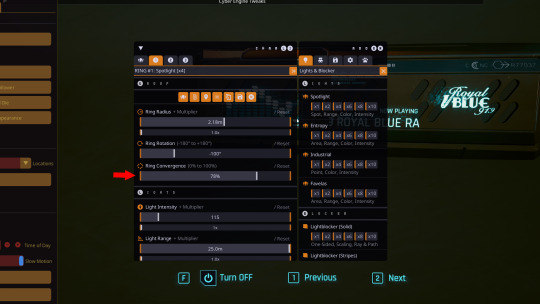
this is what the spotlights look like, they are in two parts, the main spotlight mesh, this is the physical spotlight that emits the light, and the pink triangle (Pin) this gives you an indication of there height for reference, this is useful when you are getting your lights in position as you can physically see them to get them in the right spot.

Here you have your radius, this is how close the spotlights are to your model,
your rotation this does as it says and rotates your lights around your model,
your intensity is how bright your lights are. each as two sliders, the top is subtle the bottom will be more extreme.
For example with radius if I use the top slider it moves the lights further away but only a little, if I use the bottom slider it will move them even further away. be careful as you can push them so far away light no longer hits your model or they disappear through walls. so its a little trail and error.

Here you have colour, position and angle
colour - is self explanatory, you can use the red, green and blue sliders to change the colour of your lights, it can be a bit of trail and error to get the colour you want
Position - you can adjust your lights position in the X, Y and Z axis i.e to the left, right or up or down.
Angles - tilt you lights to the left, right or up or down
Ok now we know the basics of what does what.
There is more stuff you can adjust but I'm still learning so we will only be covering what I use and know which is the basics
When you first spawn in spot lights, they will likely be to close to your model and the light will be a little too bright, so once you spawn them in we can make a few quick adjustment to there radius and light intensity to make that lighting a little less harsh.

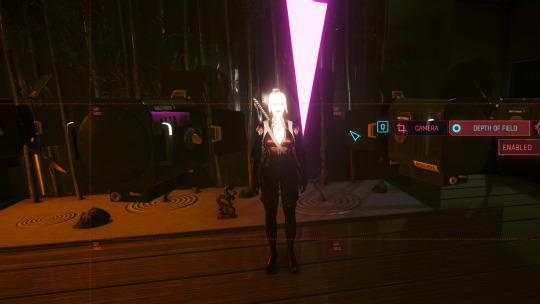
See how much better this looks already? a good tip I follow is to lower your exposure in Photomode down, then bring up lights with CharLi so you have a better control of the light on your model.
multiple spotlights spawn in a ring around your model, if you want to use different colour lights ect, I usually converge my lights so they are closer together then rotate them to one side of the model.

Once I have my coloured lights in position I duplicate them, this duplicates all settings from light intensity, radius, colour ect, then I use the rotate function to bring the duplicate lights to the other side of the model and adjust my colours.

here I have made the left lights pink and the right lights a pale blue. looks kind of cool right?
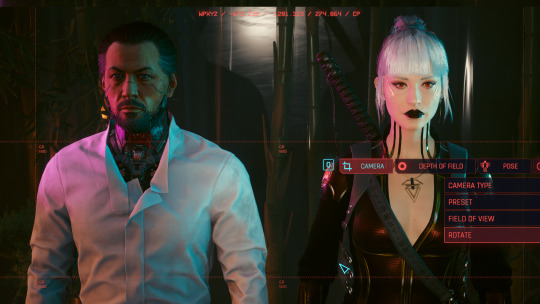
I noticed when having lights on either side, the middle of her face was not lit so I added a single spotlight in front to give her face some light. I also zoomed in using the FOV slider in Photomode. you can zoom with the scroll wheel but this can result in some distortion like making her head look bigger than her body at some angles. using the FOV slider gives you much better quality and far less distortion.
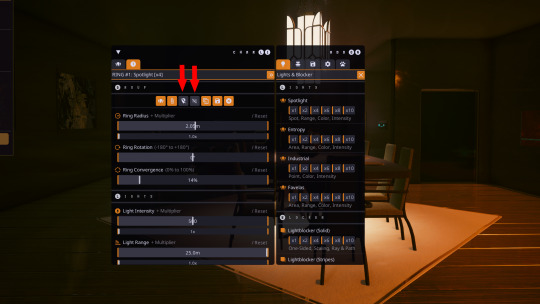
Once you are happy with your lights positions you may find the lights are in the way when trying to get your shot as at some angles the lights will be in the shot blocking your model. to solve this you can hide the mesh and pin we talked about earlier with these icons here. this will hide the lights while still lighting your model. giving you more freedom to get that perfect angle.
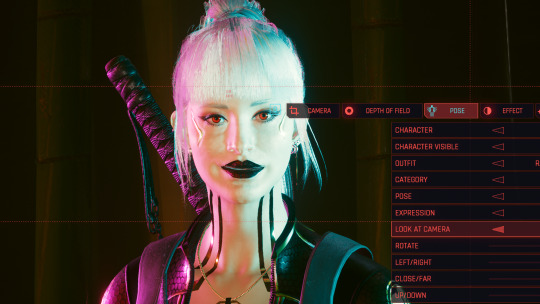
you know when you click look at camera in Photomode the body twists with the head, spoiling some poses and causing clipping ect. well with AMM you can make it so only the eyes look or only the head does.

using AMM if you head to tools, then either target your replacer or V then toggle if you want just the head to tilt to look at camera or just the eyes.


Here I have toggled just eyes so now Raven will track me with just her eyes rather than rotating her torso and head as well. if you want to swap to just the head, open AMM select just the head. then close AMM you will need to then toggle the look at camera of and on for it to change.
Another thing to bare in mind is when and if you decide to change the rotation or position of your model in Photomode. your lights will follow V so sometimes this can change your lighting. you may need to adjust rotation ect to get them back where you want them so bare that in mind if you adjust your models position after you have your lights in place.

simply use the tabs at the top to select each light and make any adjustments you need to get your lights back where you want them. un toggle hide mesh or pin if you hid them to make it easier to see where they are when making adjustments then you can re hide them when your done.

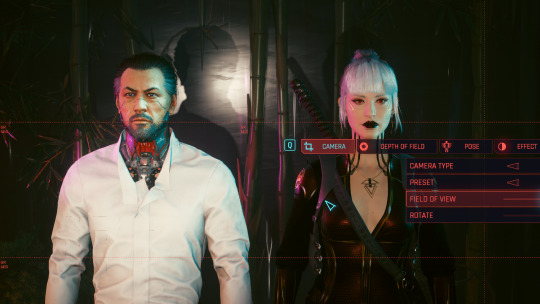
Lets say you have a replacer spawned and you want your characters to look at eachother. this can be done using the look at camera feature with a little help from AMM
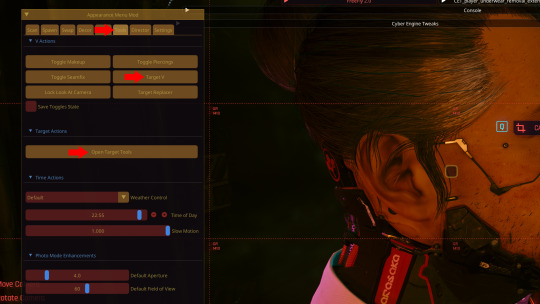
open AMM and go to tools, now depending on who you want to look at who will decide who to target. in this example I will show both. first I will target Raven (V) and select head only for look at camera. then close AMM. I will rotate the camera to the other side of my replacers head then select V and look at camera. then open AMM and target V. then open Target tools and you should have an option to freeze target.

once you freeze the target close AMM and you will see her head will stay in position and is now looking at Goro

Bare in mind once you freeze a target this way you can not unfreeze despite that being a button, If u change pose while frozen it can get pretty cursed pretty quick. its a pain in the ass. some poses you can swap to without it getting to cursed but again its trail and error. if you need to change pose ect you will have to exit Photomode and re-enter it to unfreeze it can be prety time consuming. if there is away around this I'm unaware of it currently feel free to share if you know.
Here I repeated the look at camera trick with Goro so now my models are looking at each other yay
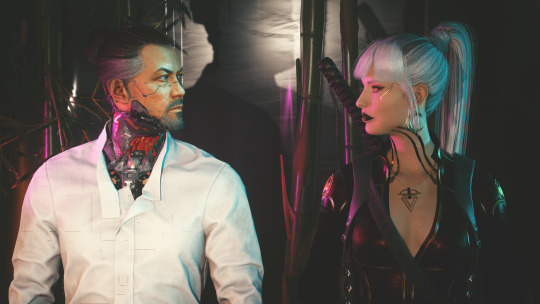
another thing to bare in mind with CharLi is the lights focus on V so you will notice here Goro is not as well lit as Raven. Spawning more lights and adjusting there position with X, Y and Z will come in handy here. it can take some experimenting though.
Here I have added additional lights and positioned them on Goro so he now has light to.

Here we have taken a photo after doing all our adjustments to lights, there position and making our models look at each other. sometimes there will be an error where it will go darker then you want when you hit space to take your shot. I think its called auto exposure error or something basicaly its the game being poopy its annoying but sometimes unavoidable so you may need to keep adjusting your lights and taking shots until the game behaves.
One final thing I like to do when tweaking my shots in photoshop. I usually adjust exposure. offset and contrast to make the pic really pop
Here I have adjusted the offset up a little and tweaked the contrast up a little. it really softens blacks and the light and makes the pic look better in my opinion.
And there you have it. all the tips and tricks I have learned while doing Virtual Photography. I hope this helps peeps out that want to get into VP.
If you have any questions regarding anything I have said my Asks are always open. I'm happy to talk you through stuff if you need some help. I'm also willing to do screen share discord calls to help you follow along or show you in real time how to do stuff if your interested in something like that drop me a DM.

🚫 Do Not Re-Upload/Edit My Shots/Art Without My Permission🚫
[Pillowfort][Instagram][Tumblr][AO3][Nexus][Ko-Fi]
#cyberpunk 2077#cyberpunk 2077 photomode#virtual photography#photomode#CharLi#lighting#vp tutorial#vp resource#AMM#amm tutorial#look at camera#vp tips#tips#tricks#tutorials#dreads tips#cp77 photomode 1 o 1#in game photomode#how to use amm with vp
19 notes
·
View notes