#Understanding kubectl
Explore tagged Tumblr posts
Visit Tumblr Blog
Explore Tumblr blogs with no restrictions, modern design and the best experience.
Last Seen Tumblr Blogs


Fun Fact
The “We are the 99%” Tumblr blog became the slogan for the Occupy Wall Street movement.
Text
Kubectl get context: List Kubernetes cluster connections
Kubectl get context: List Kubernetes cluster connections @vexpert #homelab #vmwarecommunities #KubernetesCommandLineGuide #UnderstandingKubectl #ManagingKubernetesResources #KubectlContextManagement #WorkingWithMultipleKubernetesClusters #k8sforbeginners
kubectl, a command line tool, facilitates direct interaction with the Kubernetes API server. Its versatility spans various operations, from procuring cluster data with kubectl get context to manipulating resources using an assortment of kubectl commands. Table of contentsComprehending Fundamental Kubectl CommandsWorking with More Than One Kubernetes ClusterNavigating Contexts with kubectl…
View On WordPress
#Advanced kubectl commands#Kubectl config settings#Kubectl context management#Kubectl for beginners#Kubernetes command line guide#Managing Kubernetes resources#Setting up kubeconfig files#Switching Kubernetes contexts#Understanding kubectl#Working with multiple Kubernetes clusters
0 notes
Text
Kubernetes Tutorials | Waytoeasylearn
Learn how to become a Certified Kubernetes Administrator (CKA) with this all-in-one Kubernetes course. It is suitable for complete beginners as well as experienced DevOps engineers. This practical, hands-on class will teach you how to understand Kubernetes architecture, deploy and manage applications, scale services, troubleshoot issues, and perform admin tasks. It covers everything you need to confidently pass the CKA exam and run containerized apps in production.
Learn Kubernetes the easy way! 🚀 Best tutorials at Waytoeasylearn for mastering Kubernetes and cloud computing efficiently.➡️ Learn Now

Whether you are studying for the CKA exam or want to become a Kubernetes expert, this course offers step-by-step lessons, real-life examples, and labs focused on exam topics. You will learn from Kubernetes professionals and gain skills that employers are looking for.
Key Learning Outcomes: Understand Kubernetes architecture, components, and key ideas. Deploy, scale, and manage containerized apps on Kubernetes clusters. Learn to use kubectl, YAML files, and troubleshoot clusters. Get familiar with pods, services, deployments, volumes, namespaces, and RBAC. Set up and run production-ready Kubernetes clusters using kubeadm. Explore advanced topics like rolling updates, autoscaling, and networking. Build confidence with real-world labs and practice exams. Prepare for the CKA exam with helpful tips, checklists, and practice scenarios.
Who Should Take This Course: Aspiring CKA candidates. DevOps engineers, cloud engineers, and system admins. Software developers moving into cloud-native work. Anyone who wants to master Kubernetes for real jobs.
1 note
·
View note
Text
Getting Started with Kubeflow: Machine Learning on Kubernetes Made Easy
In today’s data-driven world, organizations are increasingly investing in scalable, reproducible, and automated machine learning (ML) workflows. But deploying ML models from research to production remains a complex, resource-intensive challenge. Enter Kubeflow, a powerful open-source platform designed to streamline machine learning operations (MLOps) on Kubernetes. Kubeflow abstracts much of the complexity involved in orchestrating ML workflows, bringing DevOps best practices to the ML lifecycle.
Whether you're a data scientist, ML engineer, or DevOps professional, this guide will help you understand Kubeflow’s architecture, key components, and how to get started.
What is Kubeflow?
Kubeflow is an end-to-end machine learning toolkit built on top of Kubernetes, the de facto container orchestration system. Originally developed by Google, Kubeflow was designed to support ML workflows that run on Kubernetes, making it easy to deploy scalable and portable ML pipelines.
At its core, Kubeflow offers a collection of interoperable components covering the full ML lifecycle:
Data exploration
Model training and tuning
Pipeline orchestration
Model serving
Monitoring and metadata tracking
By leveraging Kubernetes, Kubeflow ensures your ML workloads are portable, scalable, and cloud-agnostic.
Why Use Kubeflow?
Traditional ML workflows often involve disparate tools and manual handoffs, making them hard to scale, reproduce, or deploy. Kubeflow simplifies this by:
Standardizing ML workflows across teams
Automating pipeline execution and parameter tuning
Scaling training jobs dynamically on Kubernetes clusters
Monitoring model performance with integrated logging and metrics
Supporting hybrid and multi-cloud environments
Essentially, Kubeflow brings the principles of CI/CD and infrastructure-as-code into the ML domain—enabling robust MLOps.
Key Components of Kubeflow
Kubeflow’s modular architecture allows you to use only the components you need. Here are the most critical ones to know:
1. Kubeflow Pipelines
This is the heart of Kubeflow. It allows you to define, schedule, and monitor complex ML workflows as Directed Acyclic Graphs (DAGs). Pipelines support versioning, experiment tracking, and visualization of workflow runs.
2. Katib
An AutoML component that handles hyperparameter tuning using state-of-the-art algorithms like Bayesian optimization, grid search, and more. Katib can run large-scale tuning jobs across clusters.
3. KFServing (now KServe)
A robust model serving component for deploying trained models with support for REST/gRPC, autoscaling (including scale-to-zero), and multi-framework compatibility (TensorFlow, PyTorch, ONNX, XGBoost, etc.).
4. JupyterHub
Provides multi-user Jupyter notebooks directly within your Kubernetes environment. Great for data exploration, feature engineering, and prototyping.
5. ML Metadata (MLMD)
Tracks lineage and metadata about datasets, models, pipeline runs, and experiments, enabling reproducibility and governance.
Setting Up Kubeflow: A High-Level Walkthrough
Getting Kubeflow up and running can be daunting due to its complexity and the requirements of Kubernetes infrastructure. Here’s a high-level roadmap to guide your setup.
Step 1: Prepare Your Kubernetes Cluster
Kubeflow runs on Kubernetes, so you’ll need a Kubernetes cluster ready—either locally (via Minikube or KIND), on-premises, or in the cloud (GKE, EKS, AKS, etc.). Ensure you have:
Kubernetes ≥ v1.21
Sufficient CPU/memory resources
kubectl CLI configured
Step 2: Choose a Kubeflow Distribution
You can install Kubeflow using one of the following options:
Kubeflow Manifests: Official YAML manifests for production-grade installs
MiniKF: A local, single-node VM version ideal for development
Kfctl: Deprecated but still used in legacy environments
Kubeflow Operator: For declarative installs using CRDs
For most users, Kubeflow Manifests or MiniKF are the best starting points.
Step 3: Deploy Kubeflow
Assuming you’re using Kubeflow Manifests:
# Clone the manifests repo
git clone https://github.com/kubeflow/manifests.git
cd manifests
# Deploy using kustomize
while ! kustomize build example | kubectl apply -f -; do echo "Retrying to apply resources"; sleep 10; done
The installation process may take several minutes. Once complete, access the dashboard via a port-forward or ingress route.
The installation process may take several minutes. Once complete, access the dashboard via a port-forward or ingress route.
Step 4: Access the Kubeflow Central Dashboard
You can now access the Kubeflow UI, where you can create experiments, launch notebooks, manage pipelines, and deploy models—all from a unified interface.
Best Practices for Working with Kubeflow
To make the most of Kubeflow in production, consider the following:
Namespace Isolation: Use namespaces to separate teams and workflows securely.
Pipeline Versioning: Always version your pipeline components for reproducibility.
Storage Integration: Integrate with cloud-native or on-prem storage solutions (e.g., S3, GCS, NFS).
Security: Configure Role-Based Access Control (RBAC) and authentication using Istio and Dex.
Monitoring: Use Prometheus, Grafana, and ELK for observability and logging.
Common Challenges and How to Overcome Them
Kubeflow is powerful, but it comes with its share of complexity:
Challenge
Solution
Steep learning curve
Start with MiniKF or managed services like GCP Vertex AI Pipelines
Complex deployment
Use Helm charts or managed Kubernetes to abstract infra setup
RBAC and security
Leverage Kubeflow Profiles and Istio AuthPolicies for fine-grained control
Storage configuration
Use pre-integrated cloud-native storage classes or persistent volumes
Final Thoughts
Kubeflow brings enterprise-grade scalability, reproducibility, and automation to the machine learning lifecycle by marrying ML workflows with Kubernetes infrastructure. While it can be challenging to deploy and manage, the long-term benefits for production-grade MLOps are substantial.
For teams serious about operationalizing machine learning, Kubeflow is not just a tool—it’s a paradigm shift.
0 notes
Text
Kubernetes Essentials 🚀 kubectl, YAML, Deployments Tips
In this tutorial, we cover essential Kubernetes concepts like kubectl commands, required YAML fields, Deployments, Services, ConfigMaps, and real-world best practices for smarter DevOps workflows!
✔️ Learn how kubectl talks to the Kubernetes API
🔥 Understand must-know YAML fields for production
🎯 Explore Deployments, Services, and scaling
💡 Follow real-world Kubernetes best practices for security, resource limits, and monitoring!
📂 Commands & YAML Files
youtube
0 notes
Text
A Practical Guide to CKA/CKAD Preparation in 2025
The Certified Kubernetes Administrator (CKA) and Certified Kubernetes Application Developer (CKAD) certifications are highly sought-after credentials in the cloud-native ecosystem. These certifications validate your skills and knowledge in managing and developing applications on Kubernetes. This guide provides a practical roadmap for preparing for these exams in 2025.
1. Understand the Exam Objectives
CKA: Focuses on the skills required to administer a Kubernetes cluster. Key areas include cluster architecture, installation, configuration, networking, storage, security, and troubleshooting.
CKAD: Focuses on the skills required to design, build, and deploy cloud-native applications on Kubernetes. Key areas include application design, deployment, configuration, monitoring, and troubleshooting.
Refer to the official CNCF (Cloud Native Computing Foundation) websites for the latest exam curriculum and updates.
2. Build a Strong Foundation
Linux Fundamentals: A solid understanding of Linux command-line tools and concepts is essential for both exams.
Containerization Concepts: Learn about containerization technologies like Docker, including images, containers, and registries.
Kubernetes Fundamentals: Understand core Kubernetes concepts like pods, deployments, services, namespaces, and controllers.
3. Hands-on Practice is Key
Set up a Kubernetes Cluster: Use Minikube, Kind, or a cloud-based Kubernetes service to create a local or remote cluster for practice.
Practice with kubectl: Master the kubectl command-line tool, which is essential for interacting with Kubernetes clusters.
Solve Practice Exercises: Use online resources, practice exams, and mock tests to reinforce your learning and identify areas for improvement.
4. Utilize Effective Learning Resources
Official CNCF Documentation: The official Kubernetes documentation is a comprehensive resource for learning about Kubernetes concepts and features.
Online Courses: Platforms like Udemy, Coursera, and edX offer CKA/CKAD preparation courses with video lectures, hands-on labs, and practice exams.
Books and Study Guides: Several books and study guides are available to help you prepare for the exams.
Community Resources: Engage with the Kubernetes community through forums, Slack channels, and meetups to learn from others and get your questions answered.
5. Exam-Specific Tips
CKA:
Focus on cluster administration tasks like installation, upgrades, and troubleshooting.
Practice managing cluster resources, security, and networking.
Be comfortable with etcd and control plane components.
CKAD:
Focus on application development and deployment tasks.
Practice writing YAML manifests for Kubernetes resources.
Understand application lifecycle management and troubleshooting.
6. Time Management and Exam Strategy
Allocate Sufficient Time: Dedicate enough time for preparation, considering your current knowledge and experience.
Create a Study Plan: Develop a structured study plan with clear goals and timelines.
Practice Time Management: During practice exams, simulate the exam environment and practice managing your time effectively.
Familiarize Yourself with the Exam Environment: The CKA/CKAD exams are online, proctored exams with a command-line interface. Familiarize yourself with the exam environment and tools beforehand.
7. Stay Updated
Kubernetes is constantly evolving. Stay updated with the latest releases, features, and best practices.
Follow the CNCF and Kubernetes community for announcements and updates.
For more information www.hawkstack.com
0 notes
Text
Introduction Too much monitoring and alert fatigue is a serious issue for today's engineering teams. Nowadays, there are several open-source and third-party solutions available to help you sort through the noise. It always seems too good to be true, and it probably is. However, as Kubernetes deployments have grown in complexity and size, performance optimization and observability have become critical to guaranteeing optimal resource usage and early issue identification. Kubernetes events give unique and unambiguous information about cluster health and performance. And in these days of too much data, they also give clear insight with minimal noise. In this article, we will learn about Kubernetes events and their importance, their types, and how to access them. What is a Kubernetes Event? A Kubernetes event is an object that displays what is going on inside a cluster, node, pod, or container. These items are typically created in reaction to changes that occur inside your K8s system. The Kubernetes API Server allows all key components to generate these events. In general, each event includes a log message. However, they are quite different and have no other effect on one another. Importance of Kubernetes Events When any of the resources that Kubernetes manages changes, it broadcasts an event. These events frequently provide crucial metadata about the object that caused them, such as the event category (Normal, Warning, Error), as well as the reason. This data is often saved in etcd and made available by running specific kubectl commands. These events help us understand what happened behind the scenes when an entity entered a given state. You may also obtain an aggregated list of all events by running kubectl get events. Events are produced by every part of a cluster, therefore as your Kubernetes environment grows, so will the amount of events your system produces. Furthermore, every change in your system generates events, and even healthy and normal operations require changes in a perfectly running system. This means that a big proportion of the events created by your clusters are purely informative and may not be relevant when debugging an issue. Monitoring Kubernetes Events Monitoring Kubernetes events can help you identify issues with pod scheduling, resource limits, access to external volumes, and other elements of your Kubernetes setup. Events give rich contextual hints that will assist you in troubleshooting these issues and ensuring system health, allowing you to keep your Kubernetes-based apps and infrastructure stable, reliable, and efficient. How to Identify Which Kubernetes Events are Important Naturally, there are a variety of events that may be relevant to your Kubernetes setup, and various issues may arise when Kubernetes or your cloud platform executes basic functions. Let's get into each main event. Failed Events The kube-scheduler in Kubernetes schedules pods, which contain containers that operate your application on available nodes. The kubelet monitors the node's resource use and guarantees that containers execute as intended. The building of the underlying container fails when the kube-scheduler fails to schedule a pod, causing the kubelet to generate a warning event. Eviction Events Eviction events are another crucial event to keep track of since they indicate when a node removes running pods. The most typical reason for an eviction event is a node's insufficient incompressible resources, such as RAM or storage. The kubelet generates resource-exhaustion eviction events on the affected node. In case Kubernetes determines that a pod is utilizing more incompressible resources than what its runtime permits, it can remove the pod from its node and arrange for a new time slot. Volume Events A directory holding data (like an external library) that a pod may access and expose to its containers so they can carry out their workloads with any necessary dependencies is known as a Kubernetes volume.
Separating this linked data from the pod offers a failsafe way for retaining information if the pod breaks, as well as facilitating data exchange amongst containers on the same pod. When Kubernetes assigns a volume to a new pod, it first detaches it from the node it is presently on, attaches it to the required node, and then mounts it onto a pod. Unready Node Events Node readiness is one of the requirements that the node's kubelet consistently returns as true or false. The kubelet creates unready node events when a node transitions from ready to not ready, indicating that it is not ready for pod scheduling. How to Access Kubernetes Events Metrics, logs, and events may be exported from Kubernetes for observability. With a variety of methods at your fingertips, events may be a valuable source of information about what's going on in your services. Kubernetes does not have built-in functionality for accessing, storing, or forwarding long-term events. It stores it for a brief period of time before cleaning it up. However, Kubernetes event logs may be retrieved directly from the cluster using Kubectl and collected or monitored using a logging tool. Running the kubectl describe command on a given cluster resource will provide a list of its events. A more general approach is to use the kubectl get events command, which lists the events of specified resources or the whole cluster. Many free and commercial third-party solutions assist in providing visibility and reporting Kubernetes cluster events. Let's look at some free, open-source tools and how they may be used to monitor your Kubernetes installation: KubeWatch KubeWatch is an excellent open-source solution for monitoring and broadcasting K8s events to third-party applications and webhooks. You may set it up to deliver notifications to Slack channels when major status changes occur. You may also use it to transmit events to analytics and alerting systems such as Prometheus. Events Exporter The Kubernetes Events Exporter is a good alternative to K8s' native observing mechanisms. It allows you to constantly monitor K8s events and list them as needed. It also extracts a number of metrics from the data it collects, such as event counts and unique event counts, and offers a simple monitoring configuration. EventRouter EventRouter is another excellent open-source solution for gathering Kubernetes events. It is simple to build up and seeks to stream Kubernetes events to numerous sources, as described in its documentation. However, like KubeWatch, it does not have querying or persistent capabilities. To get the full experience, you should link it to a third-party storage and analysis tool. Conclusion Kubernetes events provide an excellent approach to monitor and improve the performance of your K8s clusters. They become more effective when combined with realistic tactics and vast toolsets. I hope this article helps you to understand the importance of Kubernetes events and how to get the most out of them.
0 notes
Text
Networking in OpenShift Virtualization: A Deep Dive
OpenShift Virtualization is a powerful extension of Red Hat OpenShift that enables you to run and manage virtual machines (VMs) alongside containerized workloads. Networking plays a crucial role in OpenShift Virtualization, ensuring seamless communication between VMs, containers, and external systems. In this blog, we will explore the core components and configurations that make networking in OpenShift Virtualization robust and flexible.
Key Networking Components
Multus CNI (Container Network Interface):
OpenShift Virtualization leverages Multus CNI to enable multiple network interfaces per pod or VM.
This allows VMs to connect to different networks, such as internal pod networks and external VLANs.
KubeVirt:
Acts as the core virtualization engine, providing networking capabilities for VMs.
Integrates with OpenShift’s SDN (Software-Defined Networking) to offer seamless communication.
OVN-Kubernetes:
The default SDN in OpenShift that provides Layer 2 and Layer 3 networking.
Ensures high performance and scalability for both VMs and containers.
Networking Models in OpenShift Virtualization
OpenShift Virtualization offers several networking models tailored to different use cases:
Pod Networking:
VMs use the same network as Kubernetes pods.
Simplifies communication between VMs and containerized workloads.
For example, a VM hosting a database can easily connect to application pods within the same namespace.
Bridge Networking:
Provides direct access to the host network.
Ideal for workloads requiring low latency or specialized networking protocols.
SR-IOV (Single Root I/O Virtualization):
Enables direct access to physical NICs (Network Interface Cards) for high-performance applications.
Suitable for workloads like real-time analytics or financial applications that demand low latency and high throughput.
MACVLAN Networking:
Assigns a unique MAC address to each VM for direct communication with external networks.
Simplifies integration with legacy systems.
Network Configuration Workflow
Define Network Attachments:
Create additional network attachments to connect VMs to different networks.
Attach Networks to VMs:
Add network interfaces to VMs to enable multi-network communication.
Configure Network Policies:
Set up rules to control traffic flow between VMs, pods, and external systems.
Best Practices
Plan Your Network Topology:
Understand your workload requirements and choose the appropriate networking model.
Use SR-IOV for high-performance workloads and Pod Networking for general-purpose workloads.
Secure Your Networks:
Implement Network Policies to restrict traffic based on namespaces, labels, or CIDR blocks.
Enable encryption for sensitive communications.
Monitor and Troubleshoot:
Use tools like OpenShift Console and kubectl for monitoring and debugging.
Analyze logs and metrics to ensure optimal performance.
Leverage Automation:
Automate network configuration and deployments using infrastructure-as-code tools.
Conclusion
Networking in OpenShift Virtualization is a sophisticated and flexible system that ensures seamless integration of VMs and containers. By leveraging its diverse networking models and following best practices, you can build a robust and secure environment for your workloads. Whether you are modernizing legacy applications or scaling cloud-native workloads, OpenShift Virtualization has the tools to meet your networking needs.
For more information visit: https://www.hawkstack.com/
0 notes
Text
Getting Started with Kubernetes: A Hands-on Guide
Getting Started with Kubernetes: A Hands-on Guide
Kubernetes: A Brief Overview
Kubernetes, often abbreviated as K8s, is a powerful open-source platform designed to automate the deployment, scaling, and management of containerized applications. It1 simplifies the complexities of container orchestration, allowing developers to focus on building and deploying applications without worrying about the underlying infrastructure.2
Key Kubernetes Concepts
Cluster: A group of machines (nodes) working together to run containerized applications.
Node: A physical or virtual machine that runs containerized applications.
Pod: The smallest deployable3 unit of computing, consisting of one or more containers.
Container: A standardized unit of software that packages code and its dependencies.
Setting Up a Kubernetes Environment
To start your Kubernetes journey, you can set up a local development environment using minikube. Minikube creates a single-node Kubernetes cluster on your local machine.
Install minikube: Follow the instructions for your operating system on the minikube website.
Start the minikube cluster: Bashminikube start
Configure kubectl: Bashminikube config --default-context
Interacting with Kubernetes: Using kubectl
kubectl is the command-line tool used to interact with Kubernetes clusters. Here are some basic commands:
Get information about nodes: Bashkubectl get nodes
Get information about pods: Bashkubectl get pods
Create a deployment: Bashkubectl create deployment my-deployment --image=nginx
Expose a service: Bashkubectl expose deployment my-deployment --type=NodePort
Your First Kubernetes Application
Create a simple Dockerfile: DockerfileFROM nginx:alpine COPY index.html /usr/share/nginx/html/
Build the Docker image: Bashdocker build -t my-nginx .
Push the image to a registry (e.g., Docker Hub): Bashdocker push your-username/my-nginx
Create a Kubernetes Deployment: Bashkubectl create deployment my-nginx --image=your-username/my-nginx
Expose the deployment as a service: Bashkubectl expose deployment my-nginx --type=NodePort
Access the application: Use the NodePort exposed by the service to access the application in your browser.
Conclusion
Kubernetes offers a powerful and flexible platform for managing containerized applications. By understanding the core concepts and mastering the kubectl tool, you can efficiently deploy, scale, and manage your applications.
Keywords: Kubernetes, container orchestration, minikube, kubectl, deployment, scaling, pods, services, Docker, Dockerfile
#redhatcourses#information technology#containerorchestration#kubernetes#docker#container#linux#containersecurity#dockerswarm
1 note
·
View note
Text
HELM MasterClass: Kubernetes Packaging Manager
1. Introduction
Understanding Kubernetes
Kubernetes has become the de facto standard for container orchestration, enabling developers to deploy, manage, and scale applications efficiently. Its powerful features make it an essential tool in modern DevOps, but the complexity of managing Kubernetes resources can be overwhelming.
The Role of HELM in Kubernetes
HELM simplifies the Kubernetes experience by providing a packaging manager that streamlines the deployment and management of applications. It allows developers to define, install, and upgrade even the most complex Kubernetes applications.
Overview of the Article Structure
In this article, we'll explore HELM, its core concepts, how to install and use it, and best practices for leveraging HELM in your Kubernetes environments. We'll also dive into advanced features, real-world case studies, and the future of HELM.
2. What is HELM?
Definition and Purpose
HELM is a package manager for Kubernetes, akin to what APT is to Debian or YUM is to CentOS. It simplifies the deployment of applications on Kubernetes by packaging them into charts, which are collections of files that describe the Kubernetes resources.
History and Evolution of HELM
HELM was created by Deis, which later became part of Microsoft Azure. Over the years, it has evolved into a robust tool that is now maintained by the Cloud Native Computing Foundation (CNCF), reflecting its significance in the Kubernetes ecosystem.
Importance of HELM in Modern DevOps
In modern DevOps, where agility and automation are key, HELM plays a crucial role. It reduces the complexity of Kubernetes deployments, enables version control for infrastructure, and supports continuous deployment strategies.
3. Core Concepts of HELM
Charts: The Packaging Format
Charts are the fundamental unit of packaging in HELM. A chart is a directory of files that describe a related set of Kubernetes resources. Charts can be shared through repositories and customized to suit different environments.
Repositories: Hosting and Managing Charts
HELM charts are stored in repositories, similar to package repositories in Linux. These repositories can be public or private, and they provide a way to share and distribute charts.
Releases: Managing Deployments
A release is an instance of a chart running in a Kubernetes cluster. Each time you deploy a chart, HELM creates a release. This allows you to manage and upgrade your applications over time.
Values: Configuration Management
Values are the configuration files used by HELM to customize charts. They allow you to override default settings, making it easy to adapt charts to different environments or use cases.
4. Installing and Setting Up HELM
Prerequisites for Installation
Before installing HELM, ensure that you have a running Kubernetes cluster and that kubectl is configured to interact with it. You'll also need to install HELM's client-side component on your local machine.
Step-by-Step Installation Guide
To install HELM, download the latest version from the official website, extract the binary, and move it to your PATH. You can verify the installation by running helm version in your terminal.
Setting Up HELM on a Kubernetes Cluster
Once installed, you need to configure HELM to work with your Kubernetes cluster. This involves initializing HELM (if using an older version) and setting up a service account with the necessary permissions.
5. Creating and Managing HELM Charts
How to Create a HELM Chart
Creating a HELM chart involves using the helm create command, which sets up a boilerplate directory structure. From there, you can customize the chart by editing the templates and values files.
Best Practices for Chart Development
When developing charts, follow best practices such as keeping templates simple, using values.yaml for configuration, and testing charts with tools like helm lint and helm test.
Versioning and Updating Charts
Version control is crucial in chart development. Use semantic versioning to manage chart versions and ensure that updates are backward compatible. HELM's helm upgrade command makes it easy to deploy new versions of your charts.
6. Deploying Applications with HELM
Deploying a Simple Application
To deploy an application with HELM, you use the helm install command followed by the chart name and release name. This will deploy the application to your Kubernetes cluster based on the chart's configuration.
Managing Application Lifecycles with HELM
HELM simplifies application lifecycle management by providing commands for upgrading, rolling back, and uninstalling releases. This ensures that your applications can evolve over time without downtime.
Troubleshooting Deployment Issues
If something goes wrong during deployment, HELM provides detailed logs that can help you troubleshoot the issue. Common problems include misconfigured values or missing dependencies, which can be resolved by reviewing the chart's configuration.
7. HELM Repositories
Setting Up a Local HELM Repository
Setting up a local repository involves running a simple HTTP server that serves your charts. This is useful for testing and internal use before publishing charts to a public repository.
Using Public HELM Repositories
Public repositories like Helm Hub provide a vast collection of charts for various applications. You can add these repositories to your HELM setup using the helm repo add command and then install charts directly from them.
Security Considerations for HELM Repositories
When using or hosting HELM repositories, security is paramount. Ensure that your repository is secured with HTTPS, and always verify the integrity of charts before deploying them.
8. Advanced HELM Features
Using HELM Hooks for Automation
HELM hooks allow you to automate tasks at different points in a chart's lifecycle, such as before or after installation. This can be useful for tasks like database migrations or cleanup operations.
Managing Dependencies with HELM
HELM can manage chart dependencies through the requirements.yaml file. This allows you to define and install other charts that your application depends on, simplifying complex deployments.
Using HELM with CI/CD Pipelines
Integrating HELM with your CI/CD pipeline enables automated deployments and updates. Tools like Jenkins, GitLab CI, and GitHub Actions can be used to automate HELM commands, ensuring continuous delivery.
0 notes
Text
Kubernetes Airflow

Airflow Kubernetes Executor
Kubernetes Airflow System
Wouldn’t be convenient to be able to run Apache Airflow locally with the Kubernetes Executor on a multi-node Kubernetes cluster? That’s could be a great way to test your DAGs and understand how Airflow works in a Kubernetes environment isn’t it? Well that’s exactly what we are going to do here. I will show you step by step, how to quickly set up your own development environment and start running Airflow locally on Kubernetes. If you want to learn more about Airflow, don’t forget to check my course: Apache Airflow: The Complete Hands-On Introduction. Let’s get started!
Apache Airflow is an open source workflow management tool used to author, schedule, and monitor ETL pipelines and machine learning workflows among other uses. To make easy to deploy a scalable Apache Arflow in production environments, Bitnami provides an Apache Airflow Helm chart comprised, by default, of three synchronized nodes: web server, scheduler, and worke.
The kubernetes executor is introduced in Apache Airflow 1.10.0. The Kubernetes executor will create a new pod for every task instance using the podtemplate.yaml that you can find templates/config/configmap.yaml, otherwise you can override this template using worker.podTemplate. To enable KubernetesExecutor set the following parameters. This allows us to scale airflow workers and executors, but we still have problems like this. This article is going to show how to: Use airflow kubernetes operator to isolate all business rules from airflow pipelines; Create a YAML DAG using schema validations to simplify the usage of airflow for some users; Define a pipeline pattern. Containers Deploying Bitnami applications as containers is the best way to get the most from your infrastructure. Our application containers are designed to work well together, are extensively documented, and like our other application formats, our containers are continuously updated when new versions are made available. A Kubernetes cluster of 3 nodes will be set up with Rancher, Airflow and the Kubernetes Executor in local to run your data pipelines. Advanced concepts will be shown through practical examples such as templatating your DAGs, how to make your DAG dependent of another, what are Subdags and deadlocks, and more.
As we are going to create a multi-node Kubernetes cluster and interact with it, there are some tools to install in first. Let’s discover them.
The first one is KinD. KinD means Kubernetes IN Docker and allows to run local multi-node kubernetes clusters using Docker container “nodes”. Unlike with MiniKube, KinD has a significantly faster startup speed since it doesn’t rely on virtual machines. Take a look at the quick start guide to install it. Obviously, Docker should be installed as well on your machine.
The second tool to install is Kubectl. If you are familiar with Kubernetes, you should already know Kubectl. Kubectl is the official Kubernetes command-line tool and allows you to run commands against Kubernetes clusters. Whenever you want to deploy applications, manage cluster resources, or view logs, you will use Kubectl. Check the documentation to install it.
The last tool we need is Helm. Helm is the package manager for Kubenetes in order to install and manage Kubernetes applications in a very easy way. Helm relies on helm charts. A chart is a collection of files describing a set of Kubernetes resources. For example, the chart of Airflow will deploy a web server, the scheduler, the metastore, a service to access the UI and so on. Take a look at the Airflow chart here to have a better idea of what a chart is. Installing Helm is pretty straightforward as you can see here.
Now tools are installed, let’s create the Kubernetes cluster to run Apache Airflow locally with the Kubernetes Executor.
To give you a better hands-on experience, I made the following video where I show you how to set up everything you need to get Airflow running locally on a multi-node Kubernetes cluster. In this video, you will learn:
Airflow Kubernetes Executor
Configuring and creating a multi-node Kubernetes cluster with KinD
Installing and upgrading the Helm chart of Airflow.
Building your Docker image of Airflow packaged with your DAGs
Creating a local registry to push your Docker image of Airflow
Configuring Airflow to execute your tasks with the Kubernetes Executor.
That’s a lot of amazing stuff to learn! At the end, you will have Airflow running with the Kubernetes Executor in a local multi-node Kubernetes cluster. That way, you will be able to test and execute your DAGs in a Kubernetes environment without having to use expensive cloud providers. Enjoy!
Kubernetes Airflow System
Interested by learning more? Stay tuned and get special promotions!
1 note
·
View note
Text
What the hell is REST, Anyway?
Originating in a thesis, REST is an attempt to explain what makes the browser distinct from other networked applications.
You might be able to imagine a few reasons why: there's tabs, there's a back button too, but what makes the browser unique is that a browser can be used to check email, without knowing anything about POP3 or IMAP.
Although every piece of software inevitably grows to check email, the browser is unique in the ability to work with lots of different services without configuration—this is what REST is all about.
HTML only has links and forms, but it's enough to build incredibly complex applications. HTTP only has GET and POST, but that's enough to know when to cache or retry things, HTTP uses URLs, so it's easy to route messages to different places too.
Unlike almost every other networked application, the browser is remarkably interoperable. The thesis was an attempt to explain how that came to be, and called the resulting style REST.
REST is about having a way to describe services (HTML), to identify them (URLs), and to talk to them (HTTP), where you can cache, proxy, or reroute messages, and break up large or long requests into smaller interlinked ones too.
How REST does this isn't exactly clear.
The thesis breaks down the design of the web into a number of constraints—Client-Server, Stateless, Caching, Uniform Interface, Layering, and Code-on-Demand—but it is all too easy to follow them and end up with something that can't be used in a browser.
REST without a browser means little more than "I have no idea what I am doing, but I think it is better than what you are doing.", or worse "We made our API look like a database table, we don't know why". Instead of interoperable tools, we have arguments about PUT or POST, endless debates over how a URL should look, and somehow always end up with a CRUD API and absolutely no browsing.
There are some examples of browsers that don't use HTML, but many of these HTML replacements are for describing collections, and as a result most of the browsers resemble file browsing more than web browsing. It's not to say you need a back and a next button, but it should be possible for one program to work with a variety of services.
For an RPC service you might think about a curl like tool for sending requests to a service:
$ rpctl http://service/ describe MyService methods: ...., my_method $ rpctl http://service/ describe MyService.my_method arguments: name, age $ rpctl http://service/ call MyService.my_method --name="James" --age=31 Result: message: "Hello, James!"
You can also imagine a single command line tool for a databases that might resemble kubectl:
$ dbctl http://service/ list ModelName --where-age=23 $ dbctl http://service/ create ModelName --name=Sam --age=23 $ ...
Now imagine using the same command line tool for both, and using the same command line tool for every service—that's the point of REST. Almost.
$ apictl call MyService:my_method --arg=... $ apictl delete MyModel --where-arg=... $ apictl tail MyContainers:logs --where ... $ apictl help MyService
You could implement a command line tool like this without going through the hassle of reading a thesis. You could download a schema in advance, or load it at runtime, and use it to create requests and parse responses, but REST is quite a bit more than being able to reflect, or describe a service at runtime.
The REST constraints require using a common format for the contents of messages so that the command line tool doesn't need configuring, require sending the messages in a way that allows you to proxy, cache, or reroute them without fully understanding their contents.
REST is also a way to break apart long or large messages up into smaller ones linked together—something far more than just learning what commands can be sent at runtime, but allowing a response to explain how to fetch the next part in sequence.
To demonstrate, take an RPC service with a long running method call:
class MyService(Service): @rpc() def long_running_call(self, args: str) -> bool: id = third_party.start_process(args) while third_party.wait(id): pass return third_party.is_success(id)
When a response is too big, you have to break it down into smaller responses. When a method is slow, you have to break it down into one method to start the process, and another method to check if it's finished.
class MyService(Service): @rpc() def start_long_running_call(self, args: str) -> str: ... @rpc() def wait_for_long_running_call(self, key: str) -> bool: ...
In some frameworks you can use a streaming API instead, but replacing a procedure call with streaming involves adding heartbeat messages, timeouts, and recovery, so many developers opt for polling instead—breaking the single request into two, like the example above.
Both approaches require changing the client and the server code, and if another method needs breaking up you have to change all of the code again. REST offers a different approach.
We return a response that describes how to fetch another request, much like a HTTP redirect. You'd handle them In a client library much like an HTTP client handles redirects does, too.
def long_running_call(self, args: str) -> Result[bool]: key = third_party.start_process(args) return Future("MyService.wait_for_long_running_call", {"key":key}) def wait_for_long_running_call(self, key: str) -> Result[bool]: if not third_party.wait(key): return third_party.is_success(key) else: return Future("MyService.wait_for_long_running_call", {"key":key})
def fetch(request): response = make_api_call(request) while response.kind == 'Future': request = make_next_request(response.method_name, response.args) response = make_api_call(request)
For the more operations minded, imagine I call time.sleep() inside the client, and maybe imagine the Future response has a duration inside. The neat trick is that you can change the amount the client sleeps by changing the value returned by the server.
The real point is that by allowing a response to describe the next request in sequence, we've skipped over the problems of the other two approaches—we only need to implement the code once in the client.
When a different method needs breaking up, you can return a Future and get on with your life. In some ways it's as if you're returning a callback to the client, something the client knows how to run to produce a request. With Future objects, it's more like returning values for a template.
This approach works for breaking up a large response into smaller ones too, like iterating through a long list of results. Pagination often looks something like this in an RPC system:
cursor = rpc.open_cursor() output = [] while cursor: output.append(cursor.values) cursor = rpc.move_cursor(cursor.id)
Or something like this:
start = 0 output = [] while True: out = rpc.get_values(start, batch=30) output.append(out) start += len(out) if len(out) < 30: break
The first pagination example stores state on the server, and gives the client an Id to use in subsequent requests. The second pagination example stores state on the client, and constructs the correct request to make from the state. There's advantages and disadvantages—it's better to store the state on the client (so that the server does less work), but it involves manually threading state and a much harder API to use.
Like before, REST offers a third approach. Instead, the server can return a Cursor response (much like a Future) with a set of values and a request message to send (for the next chunk).
class ValueService(Service): @rpc() def get_values(self): return Cursor("ValueService.get_cursor", {"start":0, "batch":30}, []) @rpc def get_cursor(start, batch): ... return Cursor("ValueService.get_cursor", {"start":start, "batch":batch}, values)
The client can handle a Cursor response, building up a list:
cursor = rpc.get_values() output = [] while cursor: output.append(cursor.values) cursor = cursor.move_next()
It's somewhere between the two earlier examples of pagination—instead of managing the state on the server and sending back an identifier, or managing the state on the client and carefully constructing requests—the state is sent back and forth between them.
As a result, the server can change details between requests! If a Server wants to, it can return a Cursor with a smaller set of values, and the client will just make more requests to get all of them, but without having to track the state of every Cursor open on the service.
This idea of linking messages together isn't just limited to long polling or pagination—if you can describe services at runtime, why can't you return ones with some of the arguments filled in—a Service can contain state to pass into methods, too.
To demonstrate how, and why you might do this, imagine some worker that connects to a service, processes work, and uploads the results. The first attempt at server code might look like this:
class WorkerApi(Service): def register_worker(self, name: str) -> str ... def lock_queue(self, worker_id:str, queue_name: str) -> str: ... def take_from_queue(self, worker_id: str, queue_name, queue_lock: str): ... def upload_result(self, worker_id, queue_name, queue_lock, next, result): ... def unlock_queue(self, worker_id, queue_name, queue_lock): ... def exit_worker(self, worker_id): ...
Unfortunately, the client code looks much nastier:
worker_id = rpc.register_worker(my_name) lock = rpc.lock_queue(worker_id, queue_name) while True: next = rpc.take_from_queue(worker_id, queue_name, lock) if next: result = process(next) rpc.upload_result(worker_id, queue_name, lock, next, result) else: break rpc.unlock_queue(worker_id, queue_name, lock) rpc.exit_worker(worker_id)
Each method requires a handful of parameters, relating to the current session open with the service. They aren't strictly necessary—they do make debugging a system far easier—but problem of having to chain together requests might be a little familiar.
What we'd rather do is use some API where the state between requests is handled for us. The traditional way to achieve this is to build these wrappers by hand, creating special code on the client to assemble the responses.
With REST, we can define a Service that has methods like before, but also contains a little bit of state, and return it from other method calls:
class WorkerApi(Service): def register(self, worker_id): return Lease(worker_id) class Lease(Service): worker_id: str @rpc() def lock_queue(self, name): ... return Queue(self.worker_id, name, lock) @rpc() def expire(self): ... class Queue(Service): name: str lock: str worker_id: str @rpc() def get_task(self): return Task(.., name, lock, worker_id) @rpc() def unlock(self): ... class Task(Service) task_id: str worker_id: str @rpc() def upload(self, out): mark_done(self.task_id, self.actions, out)
Instead of one service, we now have four. Instead of returning identifiers to pass back in, we return a Service with those values filled in for us. As a result, the client code looks a lot nicer—you can even add new parameters in behind the scenes.
lease = rpc.register_worker(my_name) queue = lease.lock_queue(queue_name) while True: next = queue.take_next() if next: next.upload_result(process(next)) else: break queue.unlock() lease.expire()
Although the Future looked like a callback, returning a Service feels like returning an object. This is the power of self description—unlike reflection where you can specify in advance every request that can be made—each response has the opportunity to define a new parameterised request.
It's this navigation through several linked responses that distinguishes a regular command line tool from one that browses—and where REST gets its name: the passing back and forth of requests from server to client is where the 'state-transfer' part of REST comes from, and using a common Result or Cursor object is where the 'representational' comes from.
Although a RESTful system is more than just these combined—along with a reusable browser, you have reusable proxies too.
In the same way that messages describe things to the client, they describe things to any middleware between client and server: using GET, POST, and distinct URLs is what allows caches to work across services, and using a stateless protocol (HTTP) is what allows a proxy or load balancer to work so effortlessly.
The trick with REST is that despite HTTP being stateless, and despite HTTP being simple, you can build complex, stateful services by threading the state invisibly between smaller messages—transferring a representation of state back and forth between client and server.
Although the point of REST is to build a browser, the point is to use self-description and state-transfer to allow heavy amounts of interoperation—not just a reusable client, but reusable proxies, caches, or load balancers.
Going back to the constraints (Client-Server, Stateless, Caching, Uniform Interface, Layering and Code-on-Demand), you might be able to see how they things fit together to achieve these goals.
The first, Client-Server, feels a little obvious, but sets the background. A server waits for requests from a client, and issues responses.
The second, Stateless, is a little more confusing. If a HTTP proxy had to keep track of how requests link together, it would involve a lot more memory and processing. The point of the stateless constraint is that to a proxy, each request stands alone. The point is also that any stateful interactions should be handled by linking messages together.
Caching is the third constraint: labelling if a response can be cached (HTTP uses headers on the response), or if a request can be resent (using GET or POST). The fourth constraint, Uniform Interface, is the most difficult, so we'll cover it last. Layering is the fifth, and it roughly means "you can proxy it".
Code-on-demand is the final, optional, and most overlooked constraint, but it covers the use of Cursors, Futures, or parameterised Services—the idea that despite using a simple means to describe services or responses, the responses can define new requests to send. Code-on-demand takes that further, and imagines passing back code, rather than templates and values to assemble.
With the other constraints handled, it's time for uniform interface. Like stateless, this constraint is more about HTTP than it is about the system atop, and frequently misapplied. This is the reason why people keep making database APIs and calling them RESTful, but the constraint has nothing to do with CRUD.
The constraint is broken down into four ideas, and we'll take them one by one: self-descriptive messages, identification of resources, manipulation of resources through representations, hypermedia as the engine of application state.
Self-Description is at the heart of REST, and this sub-constraint fills in the gaps between the Layering, Caching, and Stateless constraints. Sort-of. It covers using 'GET' and 'POST' to indicate to a proxy how to handle things, and covers how responses indicate if they can be cached, too. It also means using a content-type header.
The next sub-constraint, identification, means using different URLs for different services. In the RPC examples above, it means having a common, standard way to address a service or method, as well as one with parameters.
This ties into the next sub-constraint, which is about using standard representations across services—this doesn't mean using special formats for every API request, but using the same underlying language to describe every response. In other words, the web works because everyone uses HTML.
Uniformity so far isn't too difficult: Use HTTP (self-description), URLs (identification) and HTML (manipulation through representations), but it's the last sub-constraint thats causes most of the headaches. Hypermedia as the engine of application state.
This is a fancy way of talking about how large or long requests can be broken up into interlinked messages, or how a number of smaller requests can be threaded together, passing the state from one to the next. Hypermedia referrs to using Cursor, Future, or Service objects, application state is the details passed around as hidden arguments, and being the 'engine' means using it to tie the whole system together.
Together they form the basis of the Representational State-Transfer Style. More than half of these constraints can be satisfied by just using HTTP, and the other half only really help when you're implementing a browser, but there are still a few more tricks that you can do with REST.
Although a RESTful system doesn't have to offer a database like interface, it can.
Along with Service or Cursor, you could imagine Model or Rows objects to return, but you should expect a little more from a RESTful system than just create, read, update and delete. With REST, you can do things like inlining: along with returning a request to make, a server can embed the result inside. A client can skip the network call and work directly on the inlined response. A server can even make this choice at runtime, opting to embed if the message is small enough.
Finally, with a RESTful system, you should be able to offer things in different encodings, depending on what the client asks for—even HTML. In other words, if your framework can do all of these things for you, offering a web interface isn't too much of a stretch. If you can build a reusable command line tool, generating a web interface isn't too difficult, and at least this time you don't have to implement a browser from scratch.
If you now find yourself understanding REST, I'm sorry. You're now cursed. Like a cross been the greek myths of Cassandra and Prometheus, you will be forced to explain the ideas over and over again to no avail. The terminology has been utterly destroyed to the point it has less meaning than 'Agile'.
Even so, the underlying ideas of interoperability, self-description, and interlinked requests are surprisingly useful—you can break up large or slow responses, you can to browse or even parameterise services, and you can do it in a way that lets you re-use tools across services too.
Ideally someone else will have done it for you, and like with a web browser, you don't really care how RESTful it is, but how useful it is. Your framework should handle almost all of this for you, and you shouldn't have to care about the details.
If anything, REST is about exposing just enough detail—Proxies and load-balancers only care about the URL and GET or POST. The underlying client libraries only have to handle something like HTML, rather than unique and special formats for every service.
REST is fundamentally about letting people use a service without having to know all the details ahead of time, which might be how we got into this mess in the first place.
19 notes
·
View notes
Text
Kubectl Config Set-Context - How to use
Currently or in future, we will be going to manage more number of Kubernetes clusters. It is important to have better way to manage it. In Kubernetes there is more number of tools, in this articles let’s check about kubectl set-context. Also, will try to cover some examples and best practices for better understanding. Introduction The first time you configure kubectl, you need to place…

View On WordPress
0 notes
Text
What Is a Kubernetes Cluster and How Does It Work?
As modern applications increasingly rely on containerized environments for scalability, efficiency, and reliability, Kubernetes has emerged as the gold standard for container orchestration. At the heart of this powerful platform lies the Kubernetes cluster—a dynamic and robust system that enables developers and DevOps teams to deploy, manage, and scale applications seamlessly.
In this blog post, we’ll explore what a Kubernetes cluster is, break down its core components, and explain how it works under the hood. Whether you're an engineer looking to deepen your understanding or a decision-maker evaluating Kubernetes for enterprise adoption, this guide will give you valuable insight into Kubernetes architecture and cluster management.
What Is a Kubernetes Cluster?
A Kubernetes cluster is a set of nodes—machines that run containerized applications—managed by Kubernetes. The cluster coordinates the deployment and operation of containers across these nodes, ensuring high availability, scalability, and fault tolerance.
At a high level, a Kubernetes cluster consists of:
Master Node (Control Plane): Manages the cluster.
Worker Nodes: Run the actual applications in containers.
Together, these components create a resilient system for managing modern microservices-based applications.
Key Components of a Kubernetes Cluster
Let’s break down the core components of a Kubernetes cluster to understand how they work together.
1. Control Plane (Master Node)
The control plane is responsible for the overall orchestration of containers across the cluster. It includes:
kube-apiserver: The front-end of the control plane. It handles REST operations and serves as the interface between users and the cluster.
etcd: A highly available, consistent key-value store that stores cluster data, including configuration and state.
kube-scheduler: Assigns pods to nodes based on resource availability and other constraints.
kube-controller-manager: Ensures that the desired state of the system matches the actual state.
These components work in concert to maintain the cluster’s health and ensure automated container orchestration.
2. Worker Nodes
Each worker node in a Kubernetes environment is responsible for running application workloads. The key components include:
kubelet: An agent that runs on every node and communicates with the control plane.
kube-proxy: Maintains network rules and handles Kubernetes networking for service discovery and load balancing.
Container Runtime (e.g., containerd, Docker): Executes containers on the node.
Worker nodes receive instructions from the control plane and carry out the deployment and lifecycle management of containers.
How Does a Kubernetes Cluster Work?
Here’s how a Kubernetes cluster operates in a simplified workflow:
User Deploys a Pod: You define a deployment or service using a YAML or JSON file and send it to the cluster using kubectl apply.
API Server Validates the Request: The kube-apiserver receives and validates the request, storing the desired state in etcd.
Scheduler Assigns Work: The kube-scheduler finds the best node to run the pod, considering resource requirements, taints, affinity rules, and more.
kubelet Executes the Pod: The kubelet on the selected node instructs the container runtime to start the pod.
Service Discovery & Load Balancing: kube-proxy ensures network traffic is properly routed to the new pod.
The self-healing capabilities of Kubernetes mean that if a pod crashes or a node fails, Kubernetes will reschedule the pod or replace the node automatically.
Why Use a Kubernetes Cluster?
Here are some compelling reasons to adopt Kubernetes clusters in production:
Scalability: Easily scale applications horizontally with auto-scaling.
Resilience: Built-in failover and recovery mechanisms.
Portability: Run your Kubernetes cluster across public clouds, on-premise, or hybrid environments.
Resource Optimization: Efficient use of hardware resources through scheduling and bin-packing.
Declarative Configuration: Use YAML or Helm charts for predictable, repeatable deployments.
Kubernetes Cluster in Enterprise Environments
In enterprise settings, Kubernetes cluster management is often enhanced with tools like:
Helm: For package management.
Prometheus & Grafana: For monitoring and observability.
Istio or Linkerd: For service mesh implementation.
Argo CD or Flux: For GitOps-based CI/CD.
As the backbone of cloud-native infrastructure, Kubernetes clusters empower teams to deploy faster, maintain uptime, and innovate with confidence.
Best Practices for Kubernetes Cluster Management
Use RBAC (Role-Based Access Control) for secure access.
Regularly back up etcd for disaster recovery.
Implement namespace isolation for multi-tenancy.
Monitor cluster health with metrics and alerts.
Keep clusters updated with security patches and Kubernetes upgrades.
Final Thoughts
A Kubernetes cluster is much more than a collection of nodes. It is a highly orchestrated environment that simplifies the complex task of deploying and managing containerized applications at scale. By understanding the inner workings of Kubernetes and adopting best practices for cluster management, organizations can accelerate their DevOps journey and unlock the full potential of cloud-native technology.
0 notes
Text
Kubernetes Cloud Controller Manager Tutorial for Beginners
Hi, a new #video on #kubernetes #cloud #controller #manager is published on #codeonedigest #youtube channel. Learn kubernetes #controllermanager #apiserver #kubectl #docker #proxyserver #programming #coding with #codeonedigest #kubernetescontrollermanag
Kubernetes is a popular open-source platform for container orchestration. Kubernetes follows client-server architecture and Kubernetes cluster consists of one master node with set of worker nodes. Cloud Controller Manager is part of Master node. Let’s understand the key components of master node. etcd is a configuration database stores configuration data for the worker nodes. API Server to…
View On WordPress
#kubernetes#kubernetes cloud controller manager#kubernetes cluster#kubernetes cluster backup#kubernetes cluster from scratch#kubernetes cluster installation#kubernetes cluster setup#kubernetes cluster tutorial#kubernetes controller#kubernetes controller development#kubernetes controller example#kubernetes controller explained#kubernetes controller golang#kubernetes controller manager#kubernetes controller manager components#kubernetes controller manager config#kubernetes controller manager logs#kubernetes controller manager vs scheduler#kubernetes controller runtime#kubernetes controller tutorial#kubernetes controller vs operator#kubernetes etcd#kubernetes etcd backup#kubernetes etcd backup and restore#kubernetes etcd cluster setup#kubernetes etcd install#kubernetes etcd restore#kubernetes explained#kubernetes installation#kubernetes installation on windows
0 notes
Text
What is Kubernetes?
Definition:
Kubernetes (also known as k8s or “Kube”) is an open-source containerized applications management platform that helps DevOps automate many manual processes such as deploying, managing, and scaling containerized applications.
In layman’s terms:
Kubernetes is a system that manages containers (containerized applications) where a container is a built image of an application that holds all the required things to run that application(like platform info., dependencies, libraries, environment variables, etc.) Building a complete application requires many services and so do the containers. Managing those containers is a hectic and time-consuming job for a human. To minimize the efforts and time required, Kubernetes comes into play.
Why Kubernetes?
Containerized applications deployed in K8s start up faster than the virtual machines we deploy. Kubernetes is 53% faster in deploying applications than other tools, which significantly impacts the life of DevOps.
It also makes scaling an application easier because of less time consumption.
The auto-scaling capability of Kubernetes is a huge advantage as new business requirements need something which can auto-scale up and down on its own to save the cost required to run applications.
Great!
Let’s first understand the components of K8s:
Control plane: The collection of processes that control Kubernetes nodes. It is responsible for task assignments in the K8s cluster.
Nodes: A node is a machine that performs the task requested by the control plane, which includes deploying pods, assigning resources, etc. A node can hold one or more pods.
Pod: A pod is a group of one or more containers that are deployed on some node on the K8s cluster. All containers in one pod share an IP address, IPC, hostname and resources. It is easy to move Pods through the cluster because they abstract network and storage from the underlying containers.
Replication controller: This is responsible for creating copies of the pod and managing the number of replicated copies on the cluster.
Service: Services manage the incoming and outgoing from Pods. No matter where the Pod is on the cluster or if it is replaced, the service will always proxies the request to the right Pod.
Kubelet: This service runs on nodes and reads from container manifests. It manages the defined containers and their state, ensuring they are started and running.
kubectl: It is a command line configuration tool for K8s. With the help of kubectl we can get all the information about the K8s cluster and deploy it onto the cluster with simple commands.
Hmm….. But how should it be done?
Let’s look at the basic overview of what we are gonna cover in this Chapter

Let’s Start by creating a docker image –
Prerequisite:
Backend Code in running state
Docker installed on the local machine
ECR registry
Kubectl installed on the local machine
Create a “Dockerfile” without any extension in the root folder of your project
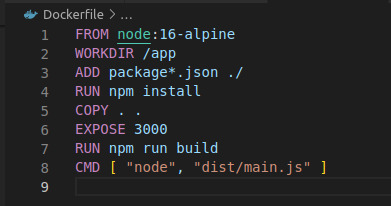
In the above code, we have exposed Port 3000. It is the port on which our application is going to listen. And the last line holds the command to run your application.
To create an image, use the following command-
docker build -t image_name.
Now the image is ready and we have to push this image to our ECR repository-
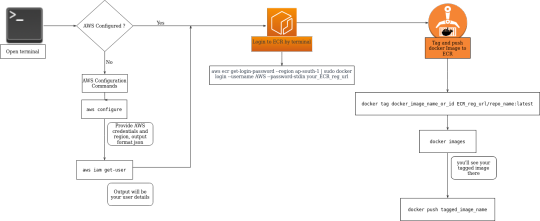
To access our AWS account on the local terminal, we have to configure it first. To configure, use the following commands-
AWS configure
AWS iam get-user

After the first command, provide AWS credentials and output format as “JSON.” The second command will show you the user you just have configured... learn more
0 notes