#anchor tag in html
Explore tagged Tumblr posts
Visit Tumblr Blog
Explore Tumblr blogs with no restrictions, modern design and the best experience.
Last Seen Tumblr Blogs


Fun Fact
Tumblr has been providing a Korean-language service since 2013.
Note
Ever since I was a youth, I have loved footnotes. I read 1 (one) piece by David Foster Wallace and went "wow, I want to use that technique!" So I would like to use footnotes in at least one fanfiction concept I have, but I don't know how to implement them into a digital format like Ao3. There aren't any page breaks in that format, which means that any footnotes would most likely have to go at the end of the chapter, and I'm worried that would negatively impact the reader experience. Is it overly jarring to have the reader scroll all the way down to read the footnote, and then scroll all the way back up to resume reading, if they want to read the footnotes alongside the main text? And if so, is this just a limitation that I have to accept, or is there some way to negate this effect, maybe through different formatting? Also, I don't know how to make the neat number that usually signifies a footnote appear in Ao3 as it should, smaller and raised above the other letters. Is there a way to do that? I suppose I could always use "[X]" as my symbol even if it isn't formatted ideally or in the standard manner, but I thought I would ask, since this ask really is about technical formatting matters and I find the latter option less aesthetically pleasing.
You can actually make that little number using html! You don't even need to use a workskin.
You can use the sup html tag to create a superscript character - that's how the AO3 logo as the word beta raised higher than the rest of the text. You would then use anchor links to make that character a clickable link to the bottom of the chapter/fic. Then, use another link at the end of your written footnote to return the reader back to where they were when they clicked.
Other people have already created guides on AO3 that will walk you through exactly what you need to do. Here's two of them:
Making footnotes on AO3 by irrationalpie
how to make a footnote in ao3 by Lucifer111
big shout out of thanks to folks who post in the Fanwork Research & Reference Guides tag ❤️
250 notes
·
View notes
Text
Convert HTML to Image: A Step-by-Step Guide ✨

Do you want to turn some HTML code you've made that's on your website and have a way to convert it into an image for you to save?
Well, look no further! I too wanted to do the same thing but funny enough, there weren't any straightforward tutorials out there that could show you how! After hours of searching, I finally discovered the solution~!
This is an old tutorial I made 🐼

💛 Set your environment
Before we dive into the conversion process, I'll assume you already have your HTML code ready. What you want to learn is how to turn it into an image file. You should have a good grasp of HTML and JavaScript. For this tutorial, we'll use the following HTML code example:

We won't include the CSS code, as it doesn't affect this tutorial. The JavaScript file (script.js) at the bottom of the body element is where we'll add the functionality for the conversion.
Your page should resemble the following:

As you can see, the "Click me" button will handle the conversion. We aim to convert everything within the div.info-div into an image.
💛 Using the html2canvas JavaScript Library
The html2canvas library allows you to take screenshots of webpages and target specific elements on a screen. Here are the steps to include the library in your project:
The steps to put the library in your project:
Visit the html2canvas website for more information.
Copy the CDN link from here

and include it in a script tag in your project's head tag in the HTML file:

That's it for including the library on the HTML side. Now, let's move on to the JavaScript code.
💛 JavaScript Functionality
Here's the JavaScript code to handle the conversion:

In this code, I want to turn the whole div.info-div into an image, I put it into a variable in const div = document.querySelector(".info-div");.
I also put the button into a variable in const button = document.querySelector("button");
I added a click event listener to the button so when the user clicks the button, it will follow the code inside of the event listener!
You can find similar code like this in the documentation of the html2canvas library:

What is happening here is:
We add the div (or what the element we want to take an image of) into the html2canvas([element]).then((canvas)
Added the image file type url to a variable = const imageDataURL = canvas.toDataURL("image/png"); - You can replace the png to other image file types such as jpg, jpeg etc
Created an anchor/link tag, added the href attribute to imageDataURL
The download attribute is where we will give the default name to the image file, I added "dog.png"
Perform the click() function to the anchor tag so it starts to download the image we created
And that's it!
💛 The End
And that's it! You've successfully learned how to turn your HTML into an image. It's a great way to save and share your web content in a unique format.

If you have any questions or need further clarification, please comfortable to ask. Enjoy converting your HTML into images! 💖🐼
#my resources#coding#codeblr#programming#progblr#studying#studyblr#programmer#html#html css#javascript#neocities#coding tips#html5 tutorial#html tutorial
157 notes
·
View notes
Text
Is there an actually complete guide to AO3's limited HTML somewhere? I know for a fact that some features work but only under slightly weird rules.
For example, if you're using the <a> tag to form an anchor to refer to later, you HTML will end up looking like <a name="Anchor" rel="nofollow" id="Anchor"> when it's done auto-correcting in the Preview. If you type in <a name="Anchor"> or <a name="Anchor" id="NotAnchor">, it will autocorrect to that, but if you type <a id="Anchor"> it will correct to an <a> tag whose only attribute is rel, or <a rel="nofollow">. (The rel="nofollow" attribute has no practical effect for most users' purposes.)
I know that AO3 will autocorrect any incompatible HTML to compatible HTML, but I don't know what the compatible HTML is, and the above <a name="Anchor"> example demonstrates that some things are compatible but don't look compatible unless you do them right!
This is especially confusing because the editor will autocorrect some HTML as soon as you switch from the HTML editor to the Rich Text editor - but it won't correct everything. I've attempted to do slightly funky things with styling that seemingly worked just fine in the editor, but vanish when I preview the chapter.
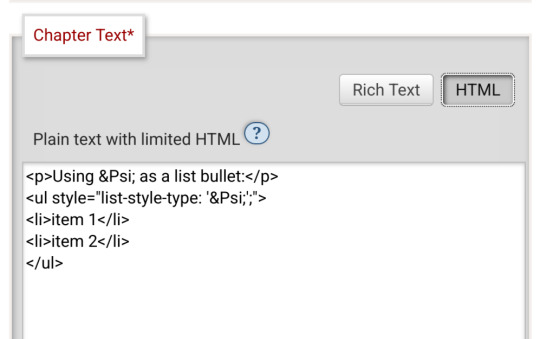
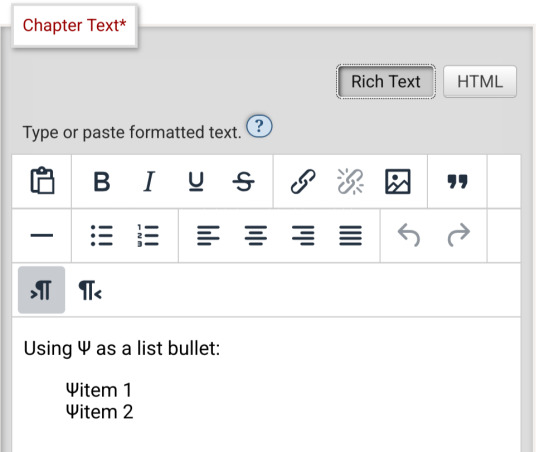
For example, here I am trying to use using the Greek character Ψ as a list bullet. When I originally typed it into the html field, I used the actual character Ψ. As soon as I switched to rich text and then back to html, it had autocorrected to Ψ, which is the escape character for Ψ. (For those who don't know, escape characters are a special code to tell the browser that this is NOT supposed to be code. <p> is an html tag; < p > will literally render "< p >".) So, it accepted the style attribute and the list-style-type, but it forced it into an escape character. So far so good.
Until I click preview. Now the custom bullet is gone, replaced with the standard circle. If I click edit again, the code has removed the CSS attribute that changed the bullet... and also replaced the escape character Ψ with the character Ψ.
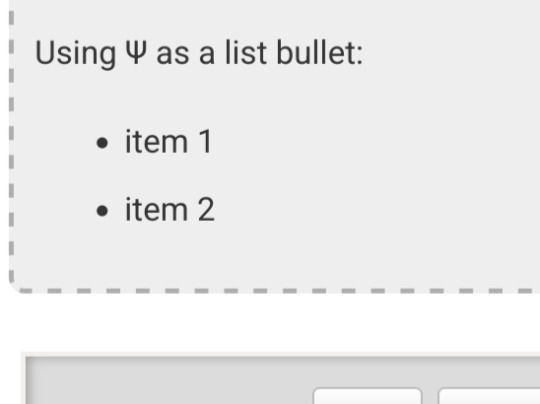
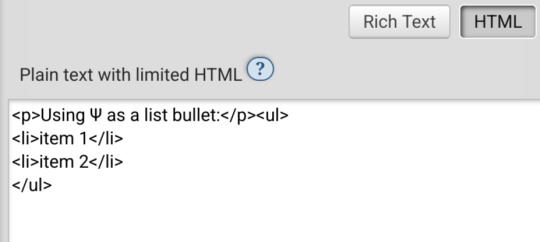
Weird.
#ao3#otw#html#ao3 formatting#ao3 html#I do not mind the lack of a clear standard at all#OTW is a nonprofit full of overworked staff and volunteers#and complete documentation is very hard#I just wanna be able to nerd more effectively#Can anyone direct me to the part of the open-source code that dictates HTML autocorrection? Is that a thing I can examine?
19 notes
·
View notes
Text
Day 4 [Link Tag In HTML ]
Introduction To HTML
Day 2 [Multimedia Elements In HTML]
Day 3 [Table in HTML]
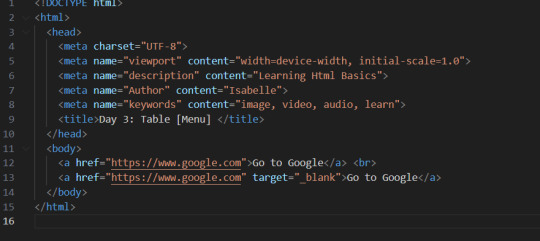
Line By Line Explanation:
: Anchor tag (used for links)
href = It stands for Hyper Text Reference. You paste the URL of the link here
Text between the tags : What the user clinks
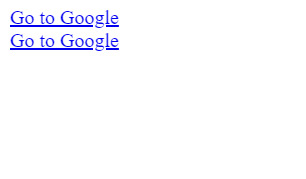
The first link will open google in the same tab. If you want the link to open in a new tab, then you use the target attribute.
Target="_blank" : Opens the link in a new tab
Final Output
____________________
Hope it helps :)
#code#codeblr#css#html#javascript#python#studyblr#progblr#programming#comp sci#web design#web developers#web development#website design#webdev#website#tech#html css#learn to code#school#study motivation#study aesthetic#study blog#student#high school#studying#study tips#studyspo#website development#coding
13 notes
·
View notes
Note
Not to be presumptuous but.. you're a coding wizard right?!?!?!?!?? Can you. help me with something pretty please. I don't know how to move computer (local) files onto html/css. I saw a "thread" where they said this can't be done in any modern browser but I'm sure. eeeeuuuuuuh bye and sorry maybe???? D:
hmmm i’m probably misinterpreting the question, but definitely look into HTML file paths!!! using an anchor tag <a>, you can link pretty much any local file to your HTML; for css, you can set the value of properties like “background-image” to local image/GIF files by using “url()”.
Linking to Local Files
Here’s a troubleshooting Q&A about linking some local files, which includes useful terminology
Using “URL()” in CSS
i’m a beginner too, but I hope this helps - this ask was buried for a while, i’m really sorry 😭😭😭 (if you’re asking about totally replicating/merging other files onto HTML/CSS by decompiling code, that’s way out of my knowledge zone 😵💫)
4 notes
·
View notes
Text
What do you mean to HTML code footnotes I have to learn what an anchor tag is. Do you realize how fucked up that is
4 notes
·
View notes
Text
Universal Scroll Button(Autochange Direction) For Any Host
Hey, do you have a site with a lot of forums? Does your host allow you to use Javascript? Boy does this weirdo have a deal for you! For the low low price of free, you can get right now access to a scroll button that swaps directions when you scroll automatically, as well as changing the target & title on hover! Act fast, this deal won't last! I kid, but enough of the ShamWowery. In reality, this is a very simple script that reads how far you have scrolled a window, & applies or removes a class to your scroll button, as well as changing the target of said scroll button & adjusting the title to reflect which way it will take you!
It's so simple, crediting me seems superfluous but if you want, feel free to credit with a link to my blog <3 I hope the new verse of our song is eminently kind to everyone!
See it In Action(Click, or look Below):
I currently use this code on two different WIPS, so feel free to check out some gifs;
To Begin
Before the end of your </body> tag in your wrappers(for Jcink) or wherever the HTML templates go on other sites, you want to place this script:
<script> $(window).scroll(function() { if ($(this).scrollTop() > 800) { $('#scroll').attr("title","To Top?").attr("href","#Top").addClass('totop'); } else { $('#scroll').attr("title", "To Bottom?").attr("href","#Bottom").removeClass('totop'); } });</script>
This seeks out an id of Scroll to adjust the href & title as needed depending on the scroll position within the relevant window. The scroll amount is in px, so to change how quickly it changes the button, alter the number 800 to whatever you desire, fiddle with it; one size never fits all.
The Styling
Once you've saved that, move to your CSS, or wherever your Style tag is to add styling for the link itself. Keep in mind the link should be contained within a container that handles its positioning for it as otherwise the script will fuck with the positioning as well as the transformation & you really just want it to spin upwards.
The styling for the link should be as follows;
#scroll { display: inline-block; positioning: relative; transform: rotate(0deg); transition: transform .5s ease-in-out; /*** ^ change the .5s to alter duration or the ease-in-out to alter the timing of the transition between button states ***/ }
#scroll.totop { transform: rotate(180deg); }
The first statement defines the default state (linking to the bottom) of the scroll button on the load of the page, the second defines the change of position once the window has been scrolled far enough to activate one's script.
The HTML
Now you've got the behaviour defined via JS & the styling defined via CSS, it's time to input the HTML, or the bone structure of the code itself. In your wrappers, template, or wherever HTML goes on your host, locate three places;
One, where you want the TOP scroll location to be. This is where the scroll button will take you once it has changed states on scrolling a certain distance. Here, you place an anchor span as follows;
<span id="Top"></span>
Two, Where you desire for the BOTTOM or BODY scroll location to be, as in where the scroll button will take you on click initially. This could also be a scroll to the start of content, in which case I recommend changing #Bottom & id="Bottom" respectively to reflect the syntax, it's entirely up to you. Here, you place an anchor span as follows;
<span id="Bottom"></span>
Finally, It's time to add the scroll button. Keep in mind, where you put it is a function of utility & design choice. Some like it persistently hovering in a fixed position, some like it in a sidebar or on userlinks, some prefer it in the navigation bar.
Wherever you place it, try to ensure that it's easily accessible on any device, screen size, & matches the User Interface logic you've used everywhere else. If you have all text buttons, don't use just an icon, if you have all icons, don't suddenly use just text. Match your action calls, so users don't feel confused while using your site.
Once you've decided where you want it, place the following code, NOTING that there should be a container for this code that positions it for you. I've provided two options; the Icon Font option (courtesy of Phosphoricons -- a free & reliable Icon Font I recommend -- As well as one which includes text, so both UI/UX design philosophies are accommodated.
Note the option with text will only rotate the caret from downwards to upwards, so the scroll text shouldn't need editing unless you want to add or supplement flavourtext.
Please choose the appropriate option for yourself;
Icon Font
<a id="scroll" class="ph-fill ph-caret-down"></a>
Icon Font with Text
<span>Scroll <a id="scroll" class="ph-fill ph-caret-down"></a>?</span>
Some Notes:
I just want to add a bit of info:
If your browser isn't scrolling smoothly to your anchors? Check your settings, & be sure the root of your CSS has scroll-behaviour: smooth; in it.
If you use this guide & have problems getting it to work, please let me know! I will troubleshoot this for you & tumblr has strange coding, I may have futzed something up, I want this to be as accessible as possible, so don't be silent; questions help!
If you are not using Jcink, or another host with a Jquery library pre-loaded, be aware that one is needed for this script to work. Most hosts will have a default Jquery library, but if yours doesn't or you're self hosting, any should do. The Jcink file is below, however, if you want to just use that.
10 notes
·
View notes
Text
PureCode software reviews | More complex regex patterns
More complex regex patterns are capable of extracting specific data from HTML tags, for instance, hyperlinks using patterns designed to target the href attribute within anchor tags. One unique aspect of regex in HTML formatting is managing spaces.
#complex regex patterns#extracting specific data#HTML tags#for instance#hyperlinks#purecode software reviews#purecode ai company reviews#purecode#purecode ai reviews#purecode company#purecode reviews
2 notes
·
View notes
Text
Learn HTML and CSS: A Comprehensive Guide for Beginners
Introduction to HTML and CSS
HTML (HyperText Markup Language) and CSS (Cascading Style Sheets) are the core technologies for creating web pages. HTML provides the structure of the page, while CSS defines its style and layout. This guide aims to equip beginners with the essential knowledge to start building and designing web pages.
Why Learn HTML and CSS?
HTML and CSS are fundamental skills for web development. Whether you're looking to create personal websites, start a career in web development, or enhance your current skill set, understanding these technologies is crucial. They form the basis for more advanced languages and frameworks like JavaScript, React, and Angular.
Getting Started with HTML and CSS
To get started, you need a text editor and a web browser. Popular text editors include Visual Studio Code, Sublime Text, and Atom. Browsers like Google Chrome, Firefox, and Safari are excellent for viewing and testing your web pages.
Basic HTML Structure
HTML documents have a basic structure composed of various elements and tags. Here’s a simple example:
html
Copy code
<!DOCTYPE html>
<html>
<head>
<title>My First Web Page</title>
<link rel="stylesheet" type="text/css" href="styles.css">
</head>
<body>
<h1>Welcome to My Web Page</h1>
<p>This is a paragraph of text on my web page.</p>
</body>
</html>
: Declares the document type and HTML version.
: The root element of an HTML page.
: Contains meta-information about the document.
: Connects the HTML to an external CSS file.
: Contains the content of the web page.
Essential HTML Tags
HTML uses various tags to define different parts of a web page:
to : Headings of different levels.
: Paragraph of text.
: Anchor tag for hyperlinks.
: Embeds images.
: Defines divisions or sections.
: Inline container for text.
Creating Your First HTML Page
Follow these steps to create a simple HTML page:
Open your text editor.
Write the basic HTML structure as shown above.
Add a heading with the tag.
Add a paragraph with the tag.
Save the file with a .html extension (e.g., index.html).
Open the file in your web browser to view your web page.
Introduction to CSS
CSS is used to style and layout HTML elements. It can be included within the HTML file using the <style> tag or in a separate .css file linked with the <link> tag.
Basic CSS Syntax
CSS consists of selectors and declarations. Here’s an example:
css
Copy code
h1 {
color: blue;
font-size: 24px;
}
Selector (h1): Specifies the HTML element to be styled.
Declaration Block: Contains one or more declarations, each consisting of a property and a value.
Styling HTML with CSS
To style your HTML elements, you can use different selectors:
Element Selector: Styles all instances of an element.
Class Selector: Styles elements with a specific class.
ID Selector: Styles a single element with a specific ID.
Example:
html
Copy code
<!DOCTYPE html>
<html>
<head>
<title>Styled Page</title>
<link rel="stylesheet" type="text/css" href="styles.css">
</head>
<body>
<h1 class="main-heading">Hello, World!</h1>
<p id="intro">This is an introduction paragraph.</p>
</body>
</html>
In the styles.css file:
css
Copy code
.main-heading {
color: green;
text-align: center;
}
#intro {
font-size: 18px;
color: grey;
}
CSS Layout Techniques
CSS provides several layout techniques to design complex web pages:
Box Model: Defines the structure of an element’s content, padding, border, and margin.
Flexbox: A layout model for arranging items within a container, making it easier to design flexible responsive layouts.
Grid Layout: A two-dimensional layout system for more complex layouts.
Example of Flexbox:
css
Copy code
.container {
display: flex;
justify-content: space-around;
}
.item {
width: 100px;
height: 100px;
background-color: lightblue;
}
Best Practices for Writing HTML and CSS
Semantic HTML: Use HTML tags that describe their meaning clearly (e.g., , , ).
Clean Code: Indent nested elements and use comments for better readability.
Validation: Use tools like the W3C Markup Validation Service to ensure your HTML and CSS are error-free and standards-compliant.
Accessibility: Make sure your website is accessible to all users, including those with disabilities, by using proper HTML tags and attributes.
Free Resources to Learn HTML and CSS
W3Schools: Comprehensive tutorials and references.
MDN Web Docs: Detailed documentation and guides for HTML, CSS, and JavaScript.
Codecademy: Interactive courses on web development.
FreeCodeCamp: Extensive curriculum covering HTML, CSS, and more.
Khan Academy: Lessons on computer programming and web development.
FAQs about Learning HTML and CSS
Q: What is HTML and CSS? A: HTML (HyperText Markup Language) structures web pages, while CSS (Cascading Style Sheets) styles and layouts the web pages.
Q: Why should I learn HTML and CSS? A: Learning HTML and CSS is essential for creating websites, understanding web development frameworks, and progressing to more advanced programming languages.
Q: Do I need prior experience to learn HTML and CSS? A: No prior experience is required. HTML and CSS are beginner-friendly and easy to learn.
Q: How long does it take to learn HTML and CSS? A: The time varies depending on your learning pace. With consistent practice, you can grasp the basics in a few weeks.
Q: Can I create a website using only HTML and CSS? A: Yes, you can create a basic website. For more complex functionality, you'll need to learn JavaScript.
Q: What tools do I need to start learning HTML and CSS? A: You need a text editor (e.g., Visual Studio Code, Sublime Text) and a web browser (e.g., Google Chrome, Firefox).
Q: Are there free resources available to learn HTML and CSS? A: Yes, there are many free resources available online, including W3Schools, MDN Web Docs, Codecademy, FreeCodeCamp, and Khan Academy.
#how to learn html and css#html & css course#html & css tutorial#html and css#html course#html css tutorial#html learn#html learn website#learn html#learn html and css#html and css course#html and css full course#html and css online course#how to learn html and css for beginners
4 notes
·
View notes
Text
The Great Produce 48 Rewatch
Hello, lovies! This post marks the start of my Produce 48 Recaps. For those of you who don't know, this show was the first time we met various trainees who went on to join a bunch of other groups, including Alice/Elris, Bugaboo, Cherry Bullet, Everglow, H1-Key, IVE, Kep1er, Le Sserafim, Lightsum, Purple Kiss, Queenz Eye, Rocket Punch, Secret Number, and of course IZ*one. Some of them also appeared on Girls Planet 999 and/or Queendom Puzzle.
Since the show is so iconic, and so messy, I'm going to back to 2018 to recap it in my own chatty, opinionated way. This post will be the anchor post and I'll add links to other episodes as we go along. Welcome to the ride!
I've decided to split the difference with respect to spoilers. No one wanted me to write it as if it's still 2018, but some people did want me to avoid spoiling who makes the final lineup, and I'm going to go with that. I'm going to tell you who goes on to be in every other group EXCEPT for who makes it into IZ*one, because that spoils this specific show and will make it less fun to watch along if that's what you want to do. I'm also not going to spoil things like when people go home and what their final ranks will be. However, after each elimination round, I'll tell you where people are now.
In case you want to either find or filter out all these recaps, I'm tagging them all with "BPR recaps P48."
If you want to start watching the show, this link is the least crappy one I've found. https://kshow123.tv/show/produce-48/episode-1.html
Intro: Episode 1: Entrances
The audition round: Episode 1: Auditions 1-10, Auditions 11-24 Episode 2: Auditions 25-36 , the unaired auditions (and audition wrap up)
Signal song mission: Episode 2: Dorm Move in and Practicing for Nekkoya Part 1 Episode 2: Practicing for Nekkoya Part 2 and final prep Episode 2: Grade Reassignment, Part 1 Episode 2: Phone Calls Home and Judges Table (Grade Reassignment Part 2) Episode 3: Grade Reassignments, Concluded Interlude: A bit of Grade Analysis Episode 3: Signal Song Performance + Start of Challenge Mission 1
Challenge Mission 1: Episode 3: The teams start practicing and we visit each one Episode 3: Love Whisper Episode 3-4: Peekaboo Episode 4: Short Hair Episode 4: Mamma Mia Episode 4: High Tension Episode 4: Boombayah (featuring Hell-bayah) (part 1) )(part 2) Episode 4: Like Ooh Ah Episode 4: Very Very Very (featuring half of Iz*one) Episode 4: Ep 4 Wrap Up and BRAPPY Awards
#Produce 48#AKB48#IVE#Le Sserafim#Lightsum#Purple Kiss#Queendom Puzzle#Rocket Punch#IZ*one#BPR recaps P48
8 notes
·
View notes
Text

This is definitely a long time coming, but I finally wrote a text only fic for Sterek, complete with a stylized AND plain text view for reading! Also my first long fic that I've written since...I don't even know when (aka it's NOT a drabble or ficlet!!). This is also belated from July, but for reasons you can read more about below the cut. Inspired by @yearoftheotpevent's July prompt "stars," as well as sniperjade's Masturbation Midsummer Bingo 2023, using the square "I can't anymore," and Summer of Cum 2023 prompts "creampie," "come marking," "precome," "come swallowing," "coming untouched," and "coming in pants" (yeah, there's definitely a spicy theme here :P).
Title: Feel You Breathing (<- on AO3) Rating: Explicit WC: 8.4k Tags: Texting/Sexting, Established Relationship, UST, Porn with Feelings, Porn With Plot, Fantasizing, Teasing, Banter, Filthy, Dirty Talk, Masturbation, Idiots in Love, Writer Derek Hale, Bartender and Graduate Student Stiles Stilinski, Business Trip, Flight Delays, Coming In Pants, Coming Untouched, Nipple Play, Light Dom/sub, Bad Pick-Up Lines, Humor, Shopping, Sex Toys, Kink Exploration, Werewolf Mates, Anchors, Love Confessions, Pet Names, Romantic Angst, Stiles AND Derek are Little Shits, POV Alternating
Summary: Derek: So, you need a distraction. Stiles: Maybe Stiles: It’d be better if you were here to help me with that. Stiles: ;D [Or: Sexy things start late one night when Derek gets a text from Stiles and escalate from there. A few secrets are revealed along the way.]
Some of my lovely Sterek friends know I've been dabbling in and out of writing text fics since last year (2022). Easier said than done 1000%, I'm going to tell you that right now. It only took me 3 tries to get it right! (And yes, it means my other 2 WIPs need to be reworked, le sigh.) It's one thing to write a text fic, but it's a completely different beast to style the damned thing with AO3 skins while making it as legible and accessible as possible. I thankfully know how to code in CSS and HTML, but it took me quite a long time to create a custom skin template that I liked and could reuse while getting the look and feel just right for our idiotic boys and the overall Teen Wolf world. Texting and sexting is legit an art. There are so many ways to approach how to write a text because each person does that differently. There's also intention required when using emojis, figuring out how someone would react to things, and hell, even playing around with timestamps and timezones is important. A text fic isn't just about words. All the tiny details add up and make a new experience. I think I took a full week to QA this whole fic because I wanted the aesthetic to look good, and it was worth it! It was nice to make something for myself, which let me write dialogue and banter and a lot of fun things I normally wouldn't had this been a different kind of fic. Super grateful for having a Write-A-Thon sprint weekend, which motivated me to finish the bulk of this baby up. And when I think about it now, this labor of love was originally supposed to be an experiment for me to play around and learn more about coding intricacies. It was supposed to be a short Porn without Plot thingie (but uhhh, it's definitely Porn with Plot and Feelings because that's the way it is). 1-2k words somehow became 8k+ words. No regrets though. It has been a long time since I've felt good about writing something this long and doing something different than the norm. It has been such a blast coming up with all the texts in this fic, because they're humorous and spicy with the usual banter and sarcasm we love between Derek and Stiles. But hey, there's some romantic angst too (they might be texting and using words, but they could do better, of course). Anyway, I hope you give this a read when you have a chance. Enjoy!
#year of the otp#teen wolf#sterek#stiles stilinski#derek hale#MasturbationMidsummer#summerofcum2023#teen wolf fanfiction#fic challenge#spicy#fic rec#self rec#my fic#sugareey
9 notes
·
View notes
Text
The menus don't work, the menus don't work, the menus DON'T WORK...

OK, my few readers. I took a break, I went back to fix the navigation, it's unfixable as-written.
I need some complex stuff in places, I was willing to forgive WP for putting out a new site editing interface that barely works - as long as it has the basic features someone would use on a storefront. I'm an outlier. I know this.
BUT IT IS NO LONGER POSSIBLE TO CREATE A MENU WITH A WORKING SUB-MENU IN IT. IF YOU TRY, THE SUB-MENU LINKS ARE UNCLICKABLE.
I am using their site editor and their 2024 theme, I should say.
I crossed my fingers and looked for the (now liable to vanish from anything more complicated than a paragraph) "edit as html" option. Nope! It's gone! I can't fix it. I would have to hack the interface somehow to fix this for WordPress, within WordPress.
I had to go looking for plugins. I HAD TO GO LOOKING FOR 3RD PARTY SOFTWARE TO GET A FUNCTIONAL MENU. And, of course, they paywall features I need. I found a "floating" menu that actually does work well enough (it's a little cramped on mobile unless you put the screen in landscape mode, but at this point you should really do that anyway, I can only format so much) but the sub-menu function is paywalled. And I'm actually fucking tempted to buy (haha, I mean "rent") it. Because the damn thing works in dark mode and across devices. And it sticks to the side in a fairly unobtrusive way, which WP's menu will not. It won't stick anywhere. And it sure as hell won't do that thing where you scroll up and it plops down for your convenience.
But if I use that floating menu without sub-menus, it's gonna get longer, and longer, and longer, until it doesn't fit on your mobile screen anymore, or potentially your tablet or desktop, and then I dunno what happens. Also, in order to keep it small, everything is a cryptic icon that displays a title when you tap it (on mobile) or hover over it (on desktop). That's kinda counterintuitive, I don't know if I want my one working menu to be like that.
I might keep looking and find another plugin that also works that well but... it's not likely. Or, if I do, I may run into another paywall. They gotta get their rent somehow!
This is a stupid problem and so far I am unable to come with with a non-stupid solution. I can:
Put all the links in the header menu, and you'll have to scroll through EVERYTHING to find the actual content every time.
Put all the links in the content area, in different places and different combinations depending on the page. (And this would mean doing some reformatting on every instalment AGAIN.)
Start fucking around with the sidebar - I don't know if it works and I'd have to rip up every template I've already made to add it.
Put all the links in the footer menu, and nobody will notice them.
Put all the links in the floating menu (see above for the issues with that).
Make sub-pages for Misc/Notes and similar that are just lists of links and serve the function of a sub-menu.
Actually put the content on the sub-page and have it navigable via anchors (this seems like it would be a bitch to load, but most of my content is just text).
Make a list of links that isn't actually tagged as a menu, thus losing the collapsible function for small screens.
Kill God.
That last one is probably the most doable but I feel like someone would get mad at me. Like, Hazbin Hotel finally got its first season on Amazon, and if God dies they might have to rewrite some shit.
If I don't lay out the money for the cryptic icon menu, we're probably going to end up with three or four accordions that are not technically menus at the top of every page. And I'll hafta check back every once in a while to see if WP fixed their shit yet.
If they don't stick with that site editor and make it useable, all this work is going to vanish like chalk marks in the rain.
I WANTED to put up another six-pack in February. I have it ready to go! But the site doesn't work. If I can't fix it this week, I won't even be able to put things up without illustrations. And forget having time to fill in the missing artwork. I got enough to do trying to kill God!
#tin soldier and soldier on#updates#website woes#in other news i woke up with an inexplicable ability to focus better on text today#which i should not have?#I'm not wearing reading glasses to write this#pretty sure this isn't gonna stay like this but wtf happened?
3 notes
·
View notes
Text
Understanding HTML: The Building Blocks of the Web
In the vast landscape of the internet, HTML stands as the foundation upon which the digital world is built. From simple static web pages to dynamic interactive experiences, HTML (Hypertext Markup Language) plays a pivotal role in shaping the online landscape. Let's embark on a journey to demystify HTML and understand its significance in the realm of web development.
What is HTML?
HTML is a markup language used to create the structure and content of web pages. It consists of a series of elements, or tags, that define the various components of a web page, such as headings, paragraphs, images, links, and more. These elements are enclosed within angled brackets (< >) and typically come in pairs, with an opening tag and a closing tag, sandwiching the content they define.
The Anatomy of HTML:
Tags: Tags are the building blocks of HTML and serve as the basic units of structure. They encapsulate content and provide semantic meaning to different parts of a web page. Common tags include <html>, <head>, <title>, <body>, <h1> (heading), <p> (paragraph), <img> (image), <a> (anchor/link), and many more.
Attributes: Tags can also contain attributes, which provide additional information about the element. Attributes are specified within the opening tag and consist of a name and a value. For example, the <img> tag may include attributes such as src (source) to specify the image file and alt (alternative text) for accessibility purposes.
Nesting: HTML elements can be nested within one another to create hierarchical structures. This nesting allows for the organization and hierarchy of content, such as placing lists within paragraphs or dividers within sections.
Document Structure: Every HTML document begins with a <!DOCTYPE> declaration, followed by an <html> element containing <head> and <body> sections. The <head> section typically contains metadata and links to external resources, while the <body> section contains the visible content of the web page.
The Role of HTML in Web Development:
HTML serves as the backbone of web development, providing the structure and semantics necessary for browsers to interpret and render web pages correctly. Combined with CSS (Cascading Style Sheets) for styling and JavaScript for interactivity, HTML forms the core technology stack of the World Wide Web.
Conclusion:
In essence, HTML is the language of the web, enabling the creation of rich and immersive digital experiences. Whether you're a seasoned web developer or a newcomer to the world of coding, understanding HTML is essential for navigating the intricacies of web development. Embrace the power of HTML, and embark on a journey to craft compelling narratives and experiences in the ever-evolving digital realm.
5 notes
·
View notes
Text
Exploring the Basics of HTML: A Journey into Web Development with an Online Compiler for HTML
In the vast universe of web development, HTML (Hypertext Markup Language) is the essential building block that transforms creative ideas into interactive web experiences. HTML provides the structural foundation for web content, allowing web developers to create well-organized and readable web pages. In this article, we will embark on a journey into the basics of HTML, exploring its core elements and their functions. Additionally, we will introduce you to a valuable resource: the Online Compiler for HTML, a tool that empowers aspiring web developers to experiment, test, and refine their HTML skills in a practical and user-friendly online environment.
HTML: The Language of the Web
HTML is the language of the web, serving as a markup language that defines the structure of web content. Its fundamental elements, or tags, are used to identify and format various aspects of a web page. Let's dive into some of the basic elements that form the foundation of HTML:
1. HTML Document Structure: An HTML document starts with the <!DOCTYPE html> declaration, which defines the document type. It is followed by the <html> element, which encapsulates the entire document. The document is divided into two main sections: the <head> and the <body>. The <head> contains metadata and information about the document, such as the page title, while the <body> contains the visible content.
2. Headings: Headings are essential for structuring content and providing hierarchy to text. HTML offers six levels of headings, from <h1> (the highest level) to <h6> (the lowest level). Headings help create a clear and organized content structure.
3. Paragraphs: To create paragraphs of text, the <p> element is used. This element defines blocks of text separated by blank lines and is a fundamental tool for organizing and formatting content.
4. Lists: HTML allows for the creation of both ordered (numbered) and unordered (bulleted) lists. Ordered lists are created with the <ol> element and list items with <li>. Unordered lists are created with the <ul> element, also with list items using `<li>.
5. Links: Hyperlinks are a crucial feature of the web. HTML provides the <a> (anchor) element for creating links. The href attribute within the <a> element specifies the URL of the page or resource to which the link should navigate.
6. Images: To embed images in a web page, HTML employs the <img> element. The src attribute within the <img> element points to the image file's location.
Introducing the Online Compiler for HTML
To practice and experiment with these basic HTML elements, there's a valuable resource at your disposal: the Online Compiler for HTML. This user-friendly online tool allows aspiring web developers to write, modify, and test HTML code in a practical environment. What sets it apart is its real-time rendering feature, enabling users to see immediate results as they make changes to their HTML code. It's an ideal platform for beginners and experienced developers alike to fine-tune their HTML skills and explore the language's capabilities.
Conclusion: The Journey Begins
Understanding the basics of HTML is the first step in your journey into the world of web development. HTML's fundamental elements serve as the building blocks upon which you'll construct your web pages. With the assistance of the Online Compiler for HTML, you have a practical and interactive resource to help you explore and master the language. As you become more proficient in HTML, you'll gain the ability to structure content, create links, and embed images, laying the foundation for the websites and web applications of the future. The journey into web development has just begun, and HTML is your trusty guide.
#coding#programming#webdevelopment#online learning#programming languages#html5#html#html website#webdev
5 notes
·
View notes
Text
How To Boost The Indexability Of A New Website 🔥
🔥 Skyrocket your website's indexability and conquer the search engine rankings! 🌟 Buckle up, folks, because I've got some insider secrets and juicy tips that'll turbocharge your site's visibility. Let's dive in! 💪
1️⃣ Speed is 🔑: Did you know that a slow website can make spiders crawl slo-mo? ⌛ Yup, search engines love speedy sites! Optimize loading times by compressing images, minifying CSS/JavaScript, and leveraging caching techniques. ⚡️ Slow websites ain't got no time for rankings!
2️⃣ XML Sitemaps for the Win 🗺️: A well-crafted XML sitemap is the magic 🔮 that helps search engines understand your website structure. Create and submit one to Google Search Console, Include all your pages, prioritize 'em, and watch as the bots scuttle through your content. 🕷️
3️⃣ Mobile-Friendly FTW 📱: it's a no-brainer to know that mobile searches surpasses desktop searches. Ensure your site is responsive and looks fab on all devices. Mobile-friendly sites win bonus points with the search bots and get blessed with better indexability. 🙌
4️⃣ Link Juice Matters 💪🧃: Internal linking is like a power-packed energy drink for your SEO efforts. 🥤 Pass that link juice around by interlinking your pages with relevant anchor texts. Search engines adore such connected websites, and it helps them find all your cool content.
5️⃣ Clear the Dead Ends ☠️: Broken links are like ghosts haunting your website. 👻 Sweep 'em away, my friend! Regularly audit your site for 404 errors and redirect 'em to relevant pages. Goodbye dead ends, hello smooth and indexable pathways! 🛠️
6️⃣ Hail the Hierarchy 🏰: A well-structured website hierarchy is a superhero cape for indexability. 🦸♂️ Use clear headings, subheadings, and semantic HTML to organize your content. It helps search engines understand the context better and boost your chances of claiming that top spot. 🥇
7️⃣ Snacks for Spiders 🍴🕷️: Meta tags bring all the spiders to the yard! Craft compelling meta titles and descriptions that entice users and search engines alike. Use relevant keywords, be concise, and ooze that click-worthy appeal. 🤩 Meta tags are the snacks search bots love to munch on!
⚠️ Hold up, folks! This is just a taste of the SEO buffet I've got for you. For a full-on feast of technical SEO expertise, check out my guide, "Unlock the Secrets of Technical SEO" 📚🔓. It's packed with even more insider info to supercharge your website's indexability and beyond! 🚀🎉
#SEO #TechnicalSEO #Indexability #SearchTraffic #WebOptimization #HustleHard #onpageseo #intetnallinks #internallinking #boosttraffic #organictraffic #freetraffic #searchengineoptimization #onpageoptimization #indexability #sitemaps #metatags #websitespeed #seomarketing #seosecrets #seostrategy #makemoneyonline #earnmoneyonline #workfromhome #homebusiness #onlinebusiness #onlinemarketing #internetmarketing #digitalmarketing #contentmarketing #digitalmarketer #affiliatemarketing
#make money online#work from home#affiliate marketing#make money with affiliate marketing#marketing#online business#home business#digital marketing#online marketing#blogger#on page seo#seo tutorial#seo services#seo#seo tips#socialmediamarketing#seo marketing#emailmarketing#on page optimization#technical seo
4 notes
·
View notes
Text
target="_blank" vs target="blank" in HTML:
Q01. What is the difference between target="_blank" and target="blank" in HTML? Q02. What is the Target Attribute in HTML? Q03. What are the different possible values of the Target Attribute in HTML? Q04. What is the meaning of target = "_blank" in the anchor tag of HTML? Q05. What is the meaning of target = "blank" in the anchor tag of HTML? Q06. What is the difference between target="_blank" vs. target="blank"?
5 notes
·
View notes