#button in html with link
Explore tagged Tumblr posts
Visit Tumblr Blog
Explore Tumblr blogs with no restrictions, modern design and the best experience.
Last Seen Tumblr Blogs


Fun Fact
Tumblr has been banned in Indonesia for providing people with access to pornographic content.
Text
youtube
Learn how to add an email link in WordPress with this easy step-by-step guide. Increase communication with your audience by making it easy for them to reach out to you via email.
#how to add email link in wordpress#call with phone link#call on smartphone button#add a call button#call button html code#click to call with button#elementor add phone number#elementor phone number#elementor#elementor tutorial#make phone number clickable in wordpress#phone number clickable wordpress#Youtube
1 note
·
View note
Text
A Brief Guide on Uploading ChoiceScript Demos to Itch.io
Since Dashingdon is shutting down, and there will be a lot of folks wanting to host their ChoiceScript demos elsewhere, I thought it'd be a good idea to provide a brief guide on how to do so for itch.io.
This is for Windows in the folder actions, but it shouldn't be too difficult for folks to translate for Mac. This also assumes you haven't changed any of the files within your game folder other than those found under 'scenes'.
Within your game folder, locate the 'web' subfolder, right click it and select 'Send to' then 'Compressed (zipped) folder. Name your newly compressed file something sensible, and I recommend moving it to a new folder outside of your game files, just to keep everything neat and tidy.

2. Assuming you already have an itch.io account, navigate to your dashboard, and click the 'Create New Project' button.

3. Name your project as you like, and under 'Kind of project', select the 'HTML' option.

4. Set the 'Pricing' to 'No Payments', you cannot use ChoiceScript for profit unless it is with the Choice of Games or Hosted Games publishing labels. No one wants to get in trouble unnecessarily here.
5. In the Uploads section, upload your newly zipped file we made in step one. After it's finished uploading, you'll be given one drop down and two tick boxes. You need to tick the 'This file will be played in the browser' option.

6. I've found so far that 'Viewport dimensions' work quite well for desktop at 1080 x 640. Either use these numbers or experiment and find what works best for you.
7. You must tick the 'Enable scrollbars' option for your game to display properly, otherwise options, text and buttons can be clipped off the bottom of the viewport.

8. Continue filling out the rest of the form, or skip it for now and scroll all the way to the bottom to the 'Visibility & access' section. Here make sure you have 'Draft' selected. This prevents others from finding your game until you're ready, and I always recommend play testing things before you make your work public.
9. Finally, hit the 'Save' button, then go and have a look at your creation by hitting the 'View page' link. And there you go! When you're ready for public release, just change the option in section 8 to 'Public'.
---
A few things to bear in mind about hosting on itch.io:
There isn't currently any way for your readers to save their game. I'm sure someone could write in a plugin similar to Dashingdon's at some point, but as for right now, this isn't available. See addition/edit below.
Make sure you properly tag your game with the 'choicescript' and 'interactive-fiction' tags. There are an awful lot of games on itch.io and it's easy to get lost in the crowd. Make sure folks can find you by having the right tags.
I hope this brief guide was useful to folks.
Best of luck to you with your writing!
---
Addition/Edit:
Thanks to @hpowellsmith for bringing this to my attention. You can add save functionality to your game by using this addon:
The ChoiceScript Save Plugin
Just tried it out on my own game and it works perfectly.
Rather than run through the addon author's own tutorial here, I'll just forward you to the Readme on their Github page.
One small note I would add is when it asks you to make the two small additions to your index file, make sure you right click the file and open it with your coding program, don't double-click it as this will just open it in an internet browser, and it won't give you the access to what you need to change.
715 notes
·
View notes
Text
Tumblr Backup Options: None of them do everything
Cheeky but true. I'll go through what's good and bad about each option though so you can decide which balances out for you.
Covered: native export, WordPress (kinda), TumblThree, tumblr-utils (kinda)
Native Export
If you go to "https://www.tumblr.com/settings/blog/yourblogname", at the bottom of the page is an export option

Once you hit the button to start the request, it will start processing. Feel free to log off, this is going to to take a few hours. You don't need to keep it open. ~22k posts took roughly a day for me. If you have a small number of posts and get stuck, you're probably broken.
When it's done processing, you can hit that download backup button and then wait some more as you wait for the zip file to download. Mine failed the first time after like twenty minutes, and then I had to start over. I think it took 1-2 hour(s) and I'm almost certain that was on Tumblr and not my internet. And that was the zip file! So make sure your computer can be on for a while before getting this started.
So what do you get?
A media folder, conversations folder, and posts folder
Media folder: Every single photo, gif, and video that has ever been on your blog or in your DMs. There is no context data attached (except for dm images which do say which conversation they're from at least), but they seem to be in chronological order because they seem to be titled by the post's ID (the string of numbers in the address bar after "/post/"). They look like "100868498227", "100868498228_0", "100868498228_1"
When you see something end with "_0" and up that means the photos are in the same post, so _0 represents the first image in the post, _1 represents the second, etc (at least, I think).
Conversations folder: HTML export files of every DM history you have on your blog. These are actually pretty well formatted, see example here.
Posts folder: html subfolder and posts_index.html file
posts_index.html: File listing every single post on your blog by post ID on its own line with no other context. Example of a line: "Post: 780053389730037760". The ID number will link to the post in the html folder
html subfolder: contains a submissions subfolder and stripped html file versions of every post on your blog. See below first what the post looks like on Tumblr, and second what the post looks like in the html folder


The way you seem to be intended to use this is to open the file index, select a post ID, and be jumped to where that post is saved as an html file, but I don't know why you would bother when the index doesn't provide any information about the posts inside it. The posts all have extremely minimal formatting. See a reblog chain below.

Notice I said ALL posts on your blog. Photo posts without a caption will just have a broken image icon and then the date and tags. Theoretically, it might be that if you unzip the entire export folder that allows it to automatically link to the image saved in your media folder. I have no fucking idea, unzipping the folder was estimated to take two hours so I didn't do it. Let me know if you do though so I can update this post!
The submissions folder is such a rabbithole I made a post just on it but long story short it's asks you haven't replied to
What do I see as the main reasons to opt for this option? 1) you don't want to download any programs or files from the internet just to backup your blog, 2) your blog is relatively small, so digging through the ID files isn't a big deal, 3) you mostly just want to download either the images (which will be browsable via thumbnail previews in the media folder if you unzip it) or conversation history, which are fairly well formatted, 4) you don't need to update your export often/ever, because you'd have to request it from the start and download the entire thing all over again, 5) you want to be able to read your text posts clearly and don't care about preserving the full formatting, and/or 6) you don't plan to reupload this information elsewhere (say on... a WordPress blog)
WordPress Automatic Ex/Import
Move your post's from Matt's right hand to his left! WordPress (another product of Automattic) has a native Tumblr importer found under your WP Admin dashboard for your site under Tools > Import > Tumblr.
How does this work? No idea! I hit import 2 days ago and it has done nothing. Maybe I'm stuck, maybe it's permanently broken. It says to contact support if it's been over 24 hours but they don't make that easy. I disconnected from Tumblr (you can only port over a blog you have the login of) and reconnected and it still said it was importing. I don't think it's ever going to do anything.
Presumably it's supposed to 1:1 import every post on your blog onto the WordPress site, which will result in a whole lot of stolen art because there's no way to select just your original posts. Also, you'd need enough storage on your webhost to house all the posts (this honestly might be my problem, but I was planning to delete all the non-original posts once it imported.... anything and backfill what it didn't get to). The one thing I'll say about this option is that it's the only one I've seen so far that exports drafts and queues as well.
I mean, if it exported anything. If this ever does anything I'll update this post, but either my blog is too large or this tool isn't totally functional anymore.
TumblThree
(previously TumblTwo, etc)
TumblThree is an all-in-one program requiring no extra downloads beyond the main Zip, and was last updated fairly recently at the time of this post. In order to run it, unzip it into one folder and run the main .exe. It has a full UI interface with lots of very descriptive helper text to help you select the right options for you without looking at the wiki. I think it's user-friendly for non-tech people.
There are a lot of options in TumblThree to change what output it gives you, but I'm going to start with the largely universal parts first:
Everything from one blog will be exported to one folder, no subfolders or sorting. As a result, the output is very messy and difficult to wade through, but post metadata and the photos are named in the same way so you can scroll, see an image preview, and then click on the metadata txt for that post and read the caption.
Depending on your settings, you can export all photos, videos, text posts, etc as their own files or exclude them from the export entirely. For the different types of media posts, you can independently select if you what to download just the media, just the metadata for it (everything that surrounds the post when you see it on Tumblr, such as the caption, OP, tags, etc), or both.
Master txt file: For every type of media metadata you export, a correspondingly named txt file will be created (images.txt, answers.txt, etc) that contains the text/metadata of every post of that type in one txt file. This is also the default behavior for exporting text posts.
Note: for text posts (which includes asks/answers), it only creates a master txt file if you do not select "Save texts as individual files", in which case it will only save each text as an individual txt file and not make a master file.
The formatting on these files is so brutal I won't even give examples, but they're unreadable. Being a .txt file, there is no native formatting, so it exports in html formatting.
Example: instead of a post that says "I want to go swimming", it exports: "I want to go < b >swimming< / b >" (minus the spaces around the b) as the post body, which is a big part of what makes it unreadable, because there are a lot of hyperlinks in all the header information listed below.
Each post in the master txt exports with: Post ID, date, post URL, slug, reblog key (no idea what that is), reblog URL, reblog name, title, [the text/caption itself], and tags.
Theoretically this means you could ctrl+f "cybertrucks" in the master txt file and then browse all your posts making fun of Tesla owners by tabbing through the returns. This is not possible with any of the previous options, and only is possible because it's all in one file, as ridiculous as it is, which is why getting that master file is so important.
For the trick to get both the individual text posts and master text.txt & answers.txt file, as well as my recommended settings and details on how updating backups works, see the read more at the end of this post.
The images.txt includes all the information listed above, but with the following additions: photo url (NOTE: this is the url on Tumblr, not a link to where it is in your folder), photo set URLs, photo caption, and "downloaded files" (NOTE: this is the name of the file it has downloaded)
The video.txt is similar to the above
The use case for this would be similar to what I described for text posts above: search keywords from captions, tags, etc and when you find what you think is what you want, copy the name from "downloaded files" and search your folder to find the actual image
I really hated TumblThree's output the first time I looked at it and then I realized the single file is the only way to make browsing tags workable, because otherwise you would have to have a folder for every tag, and posts with multiple tags would have to be duplicated between them. I'm not pressed on finding a txt to HTML converter right now but it could be an option in the future if you wanted to make things more readable.
Okay, let's get into the non-universal stuff you can customize in settings, because it's like, everything:
File names: We've already established you can search with the downloaded file name for images, but what will that be? Whatever you fucking want. Post date, reblogger name, post ID, post title, original file name, you can make it any and all of these in any order you want! You can have actually useful file names! Personally I like %e_%p_%q_%i_%x which exports as DateTime_PostTitle_BlogOriginName_PostID_IteratingNumber (note: you need some kind of unique iterator to be valid so two files don't have the same name, such as multiple photos from one post). Look how much searchable information that gives me, in chronological order! It decreases your need for the master txt file.
Tip I wish I thought of before doing my massive export: make one of the unique headers from the master txt file part of the exported file name so it's easy to search for it after identifying it in the master file.
Files scanned: this is the only method I've found that lets you back everything up, remember what it backed up, and then lets you add any new posts since that date without having to download the whole thing again. That's a game changer, but see the read more below for limitations.
You also have the option to rescan the entire thing if you want.
Post type: T3 (I'm abbreviating it now) also lets you export just your original posts, just reblogs, etc - again, giving you the most control of any options. It also lets you export replies. I, uh, would not do this because if you have any popular post on your blog it might have hundreds, or thousands of replies but hey, you can do it!
You also have the option to only download posts with a certain tag.
Blog options: You can export literally any blog you have the URL of. In fact, if you copy a blog URL while it's open, it will automatically add that blog to its UI and create an empty folder for it. It makes it easy, no private key required. I do have mixed feelings about the concept of exporting someone else's blog... but I'm also planning to do it to some of Crew-ra's blogs so... my digital horde must grow.
You can also queue blogs up and leave it to run through a lot of them. It is a lot faster than Tumblr's native export, I started this import well after I started typing this post and it took a few hours, probably not all that much longer than just downloading Tumblr's export took (and that's while running it alongside other data copy operations because I'm backing up a lot of stuff right now).
I do recommend doing a test export with a sideblog, I was able to use wild-bitchofthenorthwoods as a test import since it only has one post and it has media, so it was super quick.
(I do want to note, I think the number of downloadable items starts out matching the number of posts on your blog without scanning them until you start the export - but if you choose to export everything as its own file, you're going to end up with way more than that because a post with three images would be multiple files)
Things T3 cannot export:
Since in its simplest form it's just accessing the public upload of your blog, it cannot export your drafts, queue, or conversations
It cannot export posts as HTML files, and thus cannot export them with readable formatting natively
What do I see as the main reasons to opt for this option? 1) you don't care about exporting your DMs/conversations, 2) you want the ability to export only certain kinds of posts (original, photos, using a tag, etc), 3) you want to control the titles of the exported files 4) you don't mind wading through massive folders, 5) you want the ability to search tags (using the txt files), 6) you want the ability to update your export without starting over from the beginning, 7) you either don't want to reupload this information somewhere else, or you want to upload it somewhere that supports automatic HTML conversion (for instance, you can switch a Tumblr post from a rich text format to HTML, same with AO3, so you can put it in as HTML and then hit post to see it turn into a rich format. This techically makes T3 the most versatile/useful export option if you're planning to do anything with it other than browse your own files).
tumblr-utils
Full disclosure: haven't tried this one. But others have! tumblr-utils is a no-UI, python-based backup software. This means in order to use it you have to type commands into the terminal. If you don't know what I just said, don't use this one.
If you do, you'll need to separately download python and youtube-dl just to get this one running. You'll also need to give it your personal Tumblr API key and feed it commands deciphered from the wiki page I linked. Here are two different guides people have written on how to use it. Output:
Obviously I'm guessing based on the documentation, but one thing that is nice is this tool allows you to save each post in its own folder. Presumably each post is multiple files like we saw with T3, so this would make it easy to group them, but it also means you'd have to look in every single folder to find anything.
It seems to break posts up into timestamp folders by month, again, helping with management to narrow down where you have to search
It allows you to save only certain kinds of posts at a time like T3
It allows you to backup posts only from a certain time period (so if you keep a little .txt note of the last time you backed up, you can easily add only the new posts into your backup without having to start over from the beginning)
It allows you to only save posts under a certain tag like T3
It allows you to save only original posts
It's the only one I've found that lets you back up your liked posts
What do I see as the main reasons to opt for this option? 1) you don't care about exporting your DMs/conversations, 2) you want the ability to export only certain kinds of posts (original, photos, using a tag, etc), (okay now we get to the points that aren't also covered by T3), 3) you want posts to export already broken into folders, whether by post or by month, 4) you want to back up your likes, 5) you don't care what file names look like, 6) you're comfortable with the command line/coding and don't need a UI.
Summary:
None of these options are ideal for reuploading your files anywhere (except WordPress), but I do think TumblThree is the best of the options because of the written HTML formatting in the txt files being useful for websites that support automatic conversion (or require HTML input).
For starting another blog, WordPress wins. If it works. I'm trying to be generous here.
For searchability, T3 wins again.
For versatility... yeah you know it's T3, but tumblr-utils has a lot of the same features, too!
For sentimentality (aka conversations), it has to be the native export. There literally is not any other option.
For queues and drafts, the only theoretical option is WordPress. If it works.
For likes, the only option is tumblr-utils.
Every option does something the others don't, so theoretically to cover everything, you have to do all four options. Actually I would say do the native export if you don't have a lot of posts and aren't a freak like me, check it out, and if it doesn't work (I know it's finnicky) or you don't like the export, go with TumblThree. This also means you'll at least have your conversations even if you don't end up using the native export any other way.
And I wish it could go without saying, but don't repost people's shit, y'all. I'm backing up everything for my records only and it will never be shared with anyone else, or even browsed as long as using Tumblr instead is an option.
TumblThree adding to old backup quirks, recommended settings, & master file backup solution:
Adding to backup quirks:
From my tests, when you scan a blog you've already backed up to just add new posts to it, it does not update the master file, so if you want to update it, you'll have to do the steps I list at the end of this post. It might be possible it does update if you force rescan, but I highly doubt it.
If you scan a blog you previously backed up under more restrictive settings - say you only backed up original text posts as one file before and now you've selected to back up absolutely everything - it will only download up until the time you last backed up that blog. It will not blow past where you last downloaded to download all the photos and videos it didn't get before just because they're selected now. This is great for doing after using the master file solution I'm showing below, but if you do need to download everything after doing a more restrictive scan, you can once again follow the first few steps below to do so.
Recommended settings:
This will obviously vary by what you're trying to do, but one or two things weren't immediately obvious to me and I did say I think this was the best solution for less technical users, so I want give my personal recommendations. Settings can obviously be found under the settings button at the bottom of the screen (you may need to use the scrollbar on the UI for, which is separate from the scrollbar on the blogs panel), but when you click on a blog, when you click "Details" in the right sidebar, you can also see your most important settings at a glance and adjust them to whatever you want them to be "per blog". I believe TumblThree remembers what you last used for the blog and applies the things in settings only to new/other blogs.
The thing that is going to vary the most is how many different types of posts you want to back up (text, video, reblogs included, etc), so I'll leave that up to you. If you're going to export a media type, though, I generally recommend exporting the metadata too.
I already gave my preferred file names above and again that's going to be something that varies a lot by people. Hover over the "Filename template" box and it will give you all the options in the legend you can combine via underscores.
Leave "Skip .gif files" off unless you're hurting for hard drive space. This removes all the gifs from your download, and the reason this is provided as a separate setting is because gifs have relatively massive files (at least compared to a text file)
I'll be honest I haven't seen a difference between turning on and off "Group photo sets". Because of the way file names work, most conventions will naturally lead to photos from the same post all being in a row.
"Save texts as individual files": if you only want texts to be saved as their master text.txt and answers.txt files, uncheck this. If you want the individual files I highly recommend you also download the master file for searching purposes, in which case my recommendation is this:
1) Select to export texts only, leaving off all media options, and uncheck the "Save texts as individual files" option. 2) Export the blog. This will only result in two files, answers.txt and texts.txt. 3) Move these files elsewhere on the computer to save them. 4) With T3 closed, delete the folder for the blog and the blog's Indexes (see instructions at the end of this post for finding these). 5) Reopen T3, which shouldn't remember it ever saw the blog and create a new folder for it. Turn on the "Save texts as individual files", as well as any other media posts you want to download. 6) Export the entire blog again. 7) Move the texts.txt and answers.txt file back into the blog's folder.
I leave all other options on the Details tab off, except for:
"Force rescan" scans past the point it last backed up and searches the whole blog again. If you have a big blog, this is going to burn time. This is needed for the number of downloaded items in the panel to be accurate but I don't know why you would care or turn this on unless it lets you skip steps 3-4 above, but my blog is too big to burn through testing that, so if you try it, let me know and I'll update this post!
Master file backup solution:
See my 7 steps from above to skip having to do this, but if you accidentally do things out of order and then realize you still need the master files for texts post after backing everything else up, here's how you get it with minimal pain:
T3 will make an "Index" folder in both the main folder for the program where the exe is located and the destination folder where you have your blogs backing up (note: these were two very different places for me, if you just have it back up to the automatic Blogs folder within T3's folder, it might not create a second Index folder).
To make T3 "forget" what it has backed up previously so it goes through to the beginning and makes a master file that includes everything, all you have to do is remove the Index file(s) for the blog while it's closed so it doesn't remember it anymore. I backed my index up in another folder.
Check off for it to only download text posts, and then uncheck the "Save texts in individual files" option. This will cause it to only create the master answers.txt and texts.txt file on the rescan.
The combination of only going for one post type and only downloading one file for it means this rescan is relatively fast. When you look at your Blogs folder, you'll find a new folder has been created for your blog name (in my case, there was "n7punk" and "n7punk_2) and your output is in the new folder. I just moved it over to the original folder.
At this point you can restore the indexes, though I've only gotten it to half recognize them. I can get it to recognize my original n7punk folder so everything can stay there, but the total downloaded items is stuck at what it was when I did just the text posts. I don't really care, it was mainly the folder thing I wanted to fix. If you have lag between your last full backup and your master-only backup, this might cause some issues? I don't know because I made sure there wasn't lag, so I recommend doing another backup to add any missing items before doing this method.
You can also use this technique if you want to download only your original posts and then download everything else to a second folder. Adjust the setting to only download original posts, download the whole blog, close T3 and delete the indexes, rename the folder to whatever you want ("n7punk_original", etc), and then reopen T3 and set it to download everything and run it again from the start.
#tumblr#automattic#words and things#tumblr hacks#resource#tumblr-utils#tumblthree#100#posts that haunt me#in a good way back up your shit yall lol
435 notes
·
View notes
Text
========================================================
[tutorial: build your own neocities/nekoweb page]
========================================================
a beginner's guide for making your very own home on the indie web—retro, personal, weird, and 100% yours.
this ain’t an average wix, squarespace, or tiktok aesthetic.
we’re talking full html/css with soul and attitude.
[ prerequisites ]
------------------
> an idea
> basic text editor (vscode, notepad++, or even notepad)
> account on https://neocities.org or https://nekoweb.org
> some gifs or tiles you love (dig deep or make your own)
> optional: image host or gif repo (or self-host everything)
[ feeling overwhelmed? read this. ]
-----------------------------------
you do *not* need to know everything.
html is not a mountain. it's a garden.
you plant one tag. then another. then a style. then a button.
you can build your site piece by piece.
and every piece is a portal to somewhere personal.
you are allowed to make broken pages.
you are allowed to use templates.
you are allowed to start over as many times as you want.
this is *your* world. you control the weird.
[ step 1: create an account ]
-----------------------------
> neocities: https://neocities.org
> nekoweb: https://nekoweb.org
register a name, log in, and enter your file manager.
this is where you upload your files and see your site live.
[ step 2: your first file - index.html ]
----------------------------------------
make a new file: `index.html`
basic starter:
<html>
<head>
<title>my weird little corner</title>
<link rel="stylesheet" href="style.css">
</head>
<body>
<h1>welcome to the void</h1>
<p>this is my page. it’s strange. like me.</p>
<img src="mygif.gif">
</body>
</html>
> upload to the dashboard
> boom. you’re live at
https://yoursite.neocities.org
or https://nekoweb.org/u/yoursite
[ step 3: add a style sheet - style.css ]
-----------------------------------------
create a file called `style.css` and upload it.
here’s some nostalgic magic:
body {
background: url('tile.gif');
color: lime;
font-family: "Courier New", monospace;
text-shadow: 1px 1px 0 black;
}
img {
image-rendering: pixelated;
}
marquee {
font-size: 20px;
color: magenta;
}
link it in your html and the vibes activate.
[ step 4: decorate it like a haunted usb ]
------------------------------------------
> use <marquee> for chaos scrolls
> embed gifs from https://gifcities.org/
> steal buttons from https://cyber.dabamos.de/88x31/
> set up a guestbook at https://www.smartgb.com/
> loop audio with <audio autoplay loop>
> add fake errors, 90s web lore, random link lists
[ step 5: resources, themes, and comfort ]
------------------------------------------
> templates & layouts: https://numbpilled-themes.tumblr.com
> glitchy gifs & buttons: https://glitchcat.neocities.org/resources
> layout builder: https://sadgrl.online/projects/layout-builder/
> free tiled backgrounds: https://backgrounds.neocities.org/
> beginner html intro: https://www.w3schools.com/html/
> pixel fonts & cyber assets: https://fontstruct.com/
remember:
you don't need to know js. you don't need to be a coder.
you just need a mood, a direction, a dream.
the html will follow.
[ bonus concept: shrine pages ]
-------------------------------
> a page just for one character you love
> a room to house digital fragments of your identity
> embed quotes, music, images like altars
> call it shrine.html and link it from your homepage
[ closing mantra ]
------------------
you are not here to be optimized.
you are not a brand.
you are a ghost inside the machine,
carving your initials into the silicon void.
welcome to Your website.
========================================================
#webcore#old web graphics#neocities#web graphics#carrd graphics#carrd resources#rentry decor#rentry graphics#carrd moodboard#carrd inspo#neopets#indie#indie web#early web#webdevelopment#web development#web resources#web design#old internet#old web#oldweb#nekoweb#transparent gif#tiny pixels#pixel gif#moodboard#tutorial#html page#html theme#htmlcoding
433 notes
·
View notes
Text
KIP'S BIG POST OF THINGS TO MAKE THE INTERNET & TECHNOLOGY SUCK A LITTLE LESS

Post last updated November 23, 2024. Will continue to update!
Here are my favorite things to use to navigate technology my own way:
A refurbished iPod loaded with Rockbox OS (Rockbox is free, iPods range in price. I linked the site I got mine from. Note that iPods get finicky about syncing and the kind of cord it has— it may still charge but might not recognize the device to sync. Getting an original Apple cord sometimes helps). Rockbox has ports for other MP3 players as well.
This Windows debloater program (there are viable alternatives out there, this one works for me). It has a powershell script that give you a little UI and buttons to press, which I appreciate, as I'm still a bit shy with tech.
Firefox with the following extensions: - Consent-O-Matic (set your responses to ALL privacy/cookie pop-ups in the extension, and it will answer all pop-ups for you. I can see reasons to not use it, but I appreciate it) - Facebook Container ("contains" Meta on Facebook and Instagram pages to keep it from tracking you or getting third party cookies, since Meta is fairly egregious about it) - Redirect Amp to HTML (AMP is designed for mobile phones, this forces pages to go to their HTML version) - A WebP/AVIF image converter - uBlock Origin and uBlacklist, with the AI blacklist loaded in to kill any generative AI results from appearing in search engines or anywhere.
Handbrake for ripping DVDs— I haven’t used this in awhile as I haven’t been making video edits. I used this back when I had a Mac OS
VLC Media Player (ol’ reliable)
Unsplash & Pexels for free-to-use images
A password manager (these often are paid. I use Dashlane. There are many options, feel free to search around and ask for recs!). There is a lot that goes into cybersecurity— find the option you feel is best for you.
Things I suggest:
Understanding Royalty Free and the Creative Commons licenses
Familiarity with boolean operators for searching
Investing in a backup drive and external drive
A few good USBs, including one that has a backup of your OS on it
Adapter cables
Avoiding Fandom “wikias” (as in the brand “Fandom”) and supporting other, fan-run or supported wikis. Consider contributing if its something you find yourself passionate or joyful about.
Finding Forums for the things you like, or creating your own*
Create an email specifically for ads/shopping— use it to receive all promotional emails to keep your inbox clean. Upkeep it.
Stop putting so much of your personal information online— be willing to separate your personal online identity from your “online identity”. You don’t owe people your name, location, pronouns, diagnoses, or any of that. It’s your choice, but be discerning in what you give and why. I recommend avoiding providing your phone number to sites as much as possible.
Be intentional
Ask questions
Talk to people
Remember that you can lurk all you want
Things that are fun to check out:
BBSes-- here's a portal to access them.
Neocities
*Forums-- find some to join, or maybe host your own? The system I was most familiar with was vbulletin.
MMM.page
Things that have worked well for me but might work for you, YMMV:
Limit your app usage time on your smartphone if you’re prone to going back to them— this is a tangible way to “practice mindfulness”, a term I find frustratingly vague ansjdbdj
Things I’m looking into:
The “Pi Hole”— a raspberry pi set up to block all ads on a specific internet connection
VPNs-- this is one that was recommended to me.
How to use computers (I mean it): Resources on how to understand your machine and what you’re doing, even if your skill and knowledge level is currently 0:
This section I'll come back an add to. I know that messing with computers can be intimidating, especially if you feel out of your depth. HTML and regedits and especially things like dualbooting or linux feel impossible. So I want to put things here that explain exactly how the internet and your computer functions, and how you can learn and work with that. Yippee!
848 notes
·
View notes
Text
!!! my tag system is below all of this,,, I moved it under a cut because people reblog this post for the links :P
edit: thx for the love on this post. im going to try and continually update this!

⇩ ⠀sites FULL of web graphics ⇩
blinkie maker : make your own blinkies!
DOLLZ REVIVAL : a revival of pixel dolls where you can create and share your own. very cute!
GlowTxt : create glowing transparent text gifs that say whatever u want
HOARDER'S PILE : contains blinkies, buttons, stamps, and teddies
plasticdino.neocities.org : blinkies
Glitter Graphics : contains gifs, blinkies, dividers, and just sooo many web graphics
Cute Kawaii Resources : contains gifs, blinkies, stamps, favicons, dividers, buttons, fonts, literally everything you need. its an insane resource
Adrian's blinkie collection : collection of blinkies, stamps, and buttons
☆ (supplies.ju.mp) : blinkies, stamps, buttons, & favicons
twigbranch.carrd.co : blinkies
lallys.carrd.co : blinkies, stamps, dividers, and other resources
Bugleeblinkie.carrd.co : blinkies, and 3 very special gifs at the end ;)
unshinesblinkies.carrd.co : blinkies
The 88x31 GIF Collection : buttons. there are 5 parts! huge collection!
Bonnibel's Graphic Collection : blinkies
WELCOME TO GIFCITY : blinkies, dividers, favicons, stamps
cass-tastrophe.carrd.co : blinkies, stamps
kotatsuOS : blinkies
Cute web graphics : blinkies, stamps, dividers, and a LOT of other graphics, all very cute
⇩ some html tools! + tags below cut ⇩
MDN (mozilla.org) : if you're just starting out like me this is super helpful HTML Tutorial (w3schools.com): same here! (offers other programming languages as well!) Accessibility Checker(Free Scan) : a site you can use to check accessibility/ADA compliance when making your website! it will point out what needs to be changed. it is free, but they also offer paid services if you need more help imagecolorpicker.com : hex code picker. i use this one because you can upload an image, paste clipboard, OR type in the website and it'll grab a screenshot for you! something simple that was made really well. cssgradient.io : helps you make css gradients for backgrounds or whatever else you need them for smartgb.com : a free guestbook service FC2 Counter! : free "site visits" and "online now" counters. fully customizable Unclosed Tag Checker by Alicia Ramirez : does as it says, checks for unclosed tags (although I recommend using a program that does this as you write anyways. I use Visual Studio Code. Status Cafe : an updateable and embeddable status that you can stick anywhere on your site! it is mostly customizable with CSS but I have noticed a few small quirks with it
my tagging system :))
#graphics
#blinkies
#stamps
#buttons
#dividers
#html/css
#resources
#code
e10's web (neocities.org) <- shameless site plug. show it some love :P
#blinkies#stamps#favicons#gifs#old web graphics#old web aesthetic#old web stamps#old internet#old web#old webcore#2000s web#90s web#html#html css#html5#css#htmlcoding#web design#web resources#early web#early internet#neocities graphics#neocities#geocities#gifcities#web graphics#webcore
541 notes
·
View notes
Text
Oh, you know, just the usual internet browsing experience in the year of 2024

Some links and explanations since I figured it might be useful to some people, and writing down stuff is nice.
First of all, get Firefox. Yes, it has apps for Android/iOS too. It allows more extensions and customization (except the iOS version), it tracks less, the company has a less shitty attitude about things. Currently all the other alternatives are variations of Chromium, which means no matter how degoogled they supposedly are, Google has almost a monopoly on web browsing and that's not great. Basically they can introduce extremely user unfriendly updates and there's nothing forcing them to not do it, and nowhere for people to escape to. Current examples of their suggested updates are disabling/severly limiting adblocks in June 2024, and this great suggestion to force sites to verify "web environment integrity" ("oh you don't run a version of chromium we approve, such as the one that runs working adblocks? no web for you.").
uBlockOrigin - barely needs any explanation but yes, it works. You can whitelist whatever you want to support through displaying ads. You can also easily "adblock" site elements that annoy you. "Please log in" notice that won't go away? Important news tm sidebar that gives you sensory overload? Bye.
Dark Reader - a site you use has no dark mode? Now it has. Fairly customizable, also has some basic options for visually impaired people.
SponsorBlock for YouTube - highlights/skips (you choose) sponsored bits in the videos based on user submissions, and a few other things people often skip ("pls like and subscribe!"). A bit more controversial than normal adblock since the creators get some decent money from this, but also a lot of the big sponsors are kinda scummy and offer inferior product for superior price (or try to sell you a star jpg land ownership in Scotland to become a lord), so hearing an ad for that for the 20th time is kinda annoying. But also some creators make their sponsored segments hilarious.
Privacy Badger (and Ghostery I suppose) - I'm not actually sure how needed these are with uBlock and Firefox set to block any tracking it can, but that's basically what it does. Find someone more educated on this topic than me for more info.
Https Everywhere - I... can't actually find the extension anymore, also Firefox has this as an option in its settings now, so this is probably obsolete, whoops.
Facebook Container - also comes with Firefox by default I think. Keeps FB from snooping around outside of FB. It does that a lot, even if you don't have an account.
WebP / Avif image converter - have you ever saved an image and then discovered you can't view it, because it's WebP/Avif? You can now save it as a jpg.
YouTube Search Fixer - have you noticed that youtube search has been even worse than usual lately, with inserting all those unrelated videos into your search results? This fixes that. Also has an option to force shorts to play in the normal video window.
Consent-O-Matic - automatically rejects cookies/gdpr consent forms. While automated, you might still get a second or two of flashing popups being yeeted.
XKit Rewritten - current most up to date "variation "fork" of XKit I think? Has settings in extension settings instead of an extra tumblr button. As long as you get over the new dash layout current tumblr is kinda fine tbh, so this isn't as important as in the past, but still nice. I mostly use it to hide some visual bloat and mark posts on the dash I've already seen.
YouTube NonStop - do you want to punch youtube every time it pauses a video to check if you're still there? This saves your fists.
uBlacklist - blacklists sites from your search results. Obviously has a lot of different uses, but I use it to hide ai generated stuff from image search results. Here's a site list for that.
Redirect AMP to HTML - redirects links from their amp version to the normal version. Amp link is a version of a site made faster and more accessible for phones by Bing/Google. Good in theory, but lets search engines prefer some pages to others (that don't have an amp version), and afaik takes traffic from the original page too. Here's some more reading about why it's an issue, I don't think I can make a good tl;dr on this.
Also since I used this in the tags, here's some reading about enshittification and why the current mainstream internet/services kinda suck.
#modern internet is great#enshittification#internet browsing#idk how to tag this#but i hope it will help someone#personal#question mark
1K notes
·
View notes
Text

Boyfriend Shirt: Part 2 (Continuation of this)
⚠️NSFW/Adults Only ⚠️All characters in this work are adults ⚠️If you cannot see my work, please tap the ALL-AGE button in the top right corner of the screen to switch to ADULTS!
Link to the work in undercut.
(https://poipiku.com/7505915/11323142.html)
This work contains adult material and is suitable only for mature people. Read with caution and discretion.
I love couples who hold hands during this act 🙄💗
347 notes
·
View notes
Text


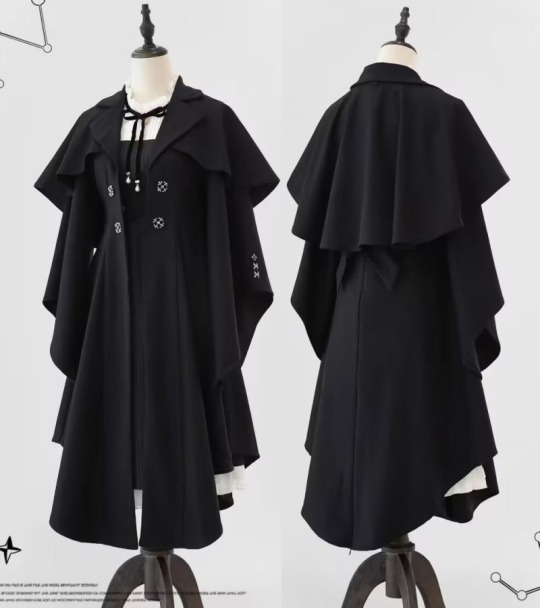


More 【Galaxy Impression Lolita Jacket Sets】 Are Restocked!
◆ Shopping Link >>> https://lolitawardrobe.com/one-button-galaxy-impression-vintage-classic-ouji-lolita-jacket-set_p8213.html
254 notes
·
View notes
Text
How to credit GIFs
I know there are other posts around this hellsite of how to do this, but because @khaotunq made this amazing post, I wanted to remind some of you of how to include a GIF that credits the original post/creator even if the GIF does not appear in the GIF options.
Option #1:
Step #1 - If you know which GIF you want to use, find the post its from, and click the three little dots to bring up the menu. Click "Copy Link"
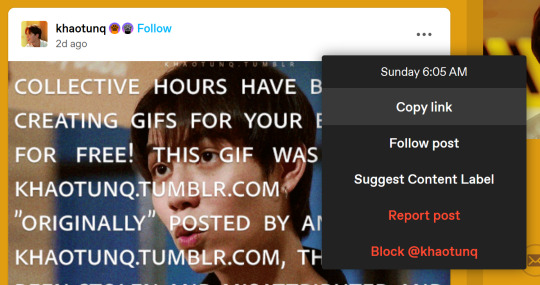
Now, in your own post, click the "GIF" button

Step #2 - When the next box appears, paste the link you just copied in it.

Step #3 - The GIF should appear, so click it, and it will insert the GIF with credit to the original post and creator.

HOWEVER, it will only insert the first GIF in the post, so if you want a different GIF in the post, you have to make a small change.
Option #2:
Step #1 - Do everything in Option #1. EVERYTHING! Now, once you have inserted the GIF into your post, it will be the first GIF in the original post as stated in Option #1.
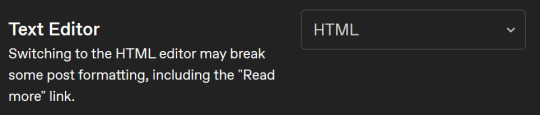
Step #2 - Click the wheel at the top of your post

Step #3 - Once you do that a menu box will appear, and where it says "Text Editor," switch from "Rich text" to "HTML"
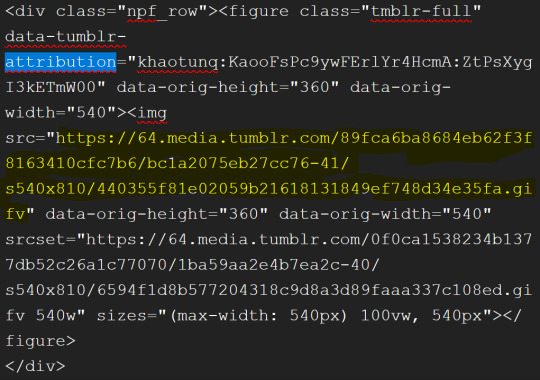
Step #4 - It might look scary now, but have no fear! Hit "Ctrl +F" to find what you need! Type "attribution" and it will locate the GIF for you.
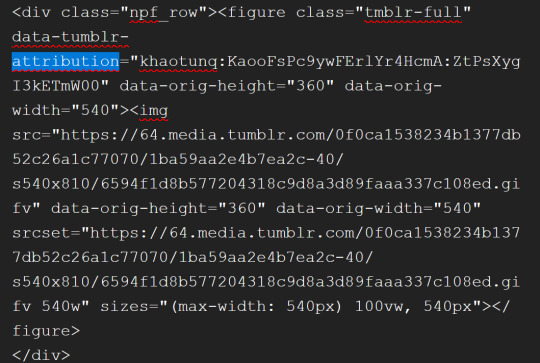
Step #5 - After "attribution" is the GIF's link that you copied earlier in quotes. Look for it!

Step #6 - Now, in another window, go back to the original post with all the GIFs and find the GIF you want. Once you see it, right-click on the GIF, and when the menu pops up, select "Copy Image Link"
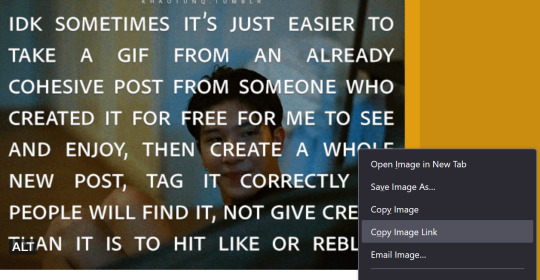
Step #7 - You will paste that new link into your post in the same spot the other link was within the quotes. In other words, replace the highlighted yellow part with the new link.
Step #8 - Click the little wheel at the top again and select "Rich text" to switch back to your normal viewing mode.

The new GIF will appear!

It seems overwhelming, but once you get the hang of it, it's easy peasy. And if you think this process is too time-consuming, remember that this is nothing compared to how much work GIF makers put into creating these GIFs for us.
Tumblr is actually very user-friendly with some practice, so do our community a favor and be friendly to the people who put in the effort.
#bl things#myspace taught a lot of us how to be tiny little code changers#bl community#be kind and attribute
326 notes
·
View notes
Text
Neocities Websites for Decor (& Other Resources)
9/4 2:10pm
i've been working on my neocities website and wanted to compile a bunch of places where one can find decor. this is not an extensive list, but rather a bunch of places where you can start finding resources.
please note that various pages could strain the eyes, including flashing lights or colors. pages called 'blinkies' usually have flashing colors throughout. [* = prominent flashing lights]
all websites, resources, and thoughts are beneath the cut
decor
effects for mouse cursors, text, and sites - https://www.mf2fm.com/rv/
assorted decor, images, and more - https://shishka.neocities.org/shishka/toybox
* random gifs from the internet archive - https://gifcities.org
https://pinkukingdom.neocities.org/toybox
http://whimsical.heartette.net/material [has tos you need to follow]
https://cinni.net/?z=/toybox/ [love this website so much]
* assorted early internet graphics - https://www.glitter-graphics.com
https://graphic.neocities.org
https://strawberry-gashes.gensoukai.net/v2/
archived images - https://web.archive.org/web/20100211160439/http://neskaya.net/pixels.php
* https://kawaiiness.net/home.php [potential eye strain]
https://www.asterism-m.com/item/ [japanese site]
https://pixelsafari.neocities.org
https://foollovers.com/mat/index.html [japanese site. has tos]
* https://gothiclolita.neocities.org/materials
https://sozai.pooftie.me [pastels. very low contrast, hard to read warning]
https://scripted.neocities.org
https://arunyi.art/#goodies
https://nonkiru.art/resources
* https://animatedglittergraphics-n-more.tumblr.com / @animatedglittergraphics-n-more
https://drive.google.com/drive/folders/1eQx_UiPvEvI4ZZECoPOuRrLhIE_6XbBy [content guide here... 4k+ gifs and graphics by @topadie]
* https://cutewebgraphics.tumblr.com/directory / @cutewebgraphics
https://pngfarm.tumblr.com / @pngfarm
https://lostsozai.tumblr.com / @lostsozai
decor directories
https://directory.cinni.net/sozai/
https://pixelsafari.neocities.org/links/directory/
https://www.tumblr.com/gender444/680981849679511552/favorite-sozaiblog-materials-sites-fool-lovers
definitions
(for those who don't know and/or are just getting into website creation)
webmaster: person who coded/created the website
favicons: small icons or graphics, usually 16x16 pixels.
pixels: graphics either custom-made or found. i've seen this term used for favicons, adoptables, and other graphics.
emoticons: old term for emojis. typically custom emoji expressions
* blinkies: thin flashing or sparkling banners, usually with text, an image, and flashing lights. collectible.
toybox: collections of favicons, stamps, blinkies, buttons, and more. all up to the webmaster's discretion and preferences
* glitters: glittering or shimmering text or images
stamps: collectible rectangular images, usually 99x56px
buttons: images that are hyperlinked to other websites. often custom-made for one particular webmaster or site.
avatars: typically 100x100 pixel images
other websites
beginner's guide to html and css - https://webguide.neocities.org
dnd style character generator - https://harlekine.neocities.org
templates/themes - https://neothemes.neocities.org
photo editor - https://photomosh.com
rainbow text maker - https://www.glitter-graphics.com/generators/rainbow.php
various other resources - https://scripted.neocities.org
learn more about websites & neocities - https://sadgrl.online
assorted resources - https://www.tumblr.com/punkwasp/725206601551773696/neocitiesindie-webmastery-resources
get started with website creation - https://www.tumblr.com/oddmerit/685644129978499072/note-cause-im-getting-sick-and-tired-of-terfs
all types of resources - https://punkwasp.leprd.space/resources/
* = prominent flashing lights/colors

i suggest not linking back (aka hotlinking) to the resources on the website. instead upload it yourself onto either neocities or an image hosting site and include credit. this way, if the person hosting the image deletes their page or loses the image somehow, your website will still be fine. (i didn't do this and had to find everything all over again... )
i have found that the best websites to use as companions to neocities are w3schools, pinterest, tumblr, and any image hosting site. w3schools for coding tutorials. pinterest for inspiration or for graphics. tumblr for any type of decor and advice. to edit my code and have a live preview, i use codepen.io.
since you read through all this, maybe take a look at my neocities site and follow me! <3
#neocities#html#css#html css#neocity#favicon#web graphics#web design#web decor#pixel art#pixels#banners#webcore#read later#resources#website#carrd resources#indie website#indiedev#webdeveloper#2000s web#old web#geocities#geocity#neopets#neo y2k#y2k aesthetic
1K notes
·
View notes
Text
why do I keep getting surprised when I learn that people don't know about the "Share" button on the top of AO3 fics that will create a tumblr post (or a tweet) with all of the relevant information about the fic (ship, characters, rating, tags, word count, summary, etc) and add a link all neatly formatted for you?*
*the Share button is at the top of every fic unless the author has selected the "Hide the share buttons on my work." option enabled in their privacy setting, so you can use to promote your own writing, or even recommend a fic to your followers.
I mean, look how easy this is:
step 1: find a story you want to share and click the "Share" button at the top:
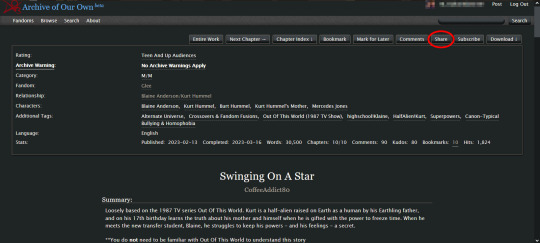
clicking that button will create a pop-up that looks like this:
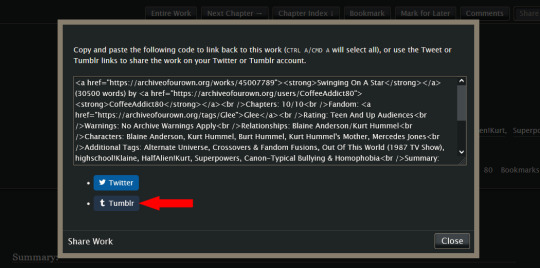
step 2: you can ignore the html in the text box; you don't need it for this. instead, click the "Tumblr" button, and (if you are logged in to your tumblr account) it will create a tumblr post that looks like this: (*this auto-generated post will automatically use tumblr's default color palette for the preview regardless of what you have your preferences set to*)
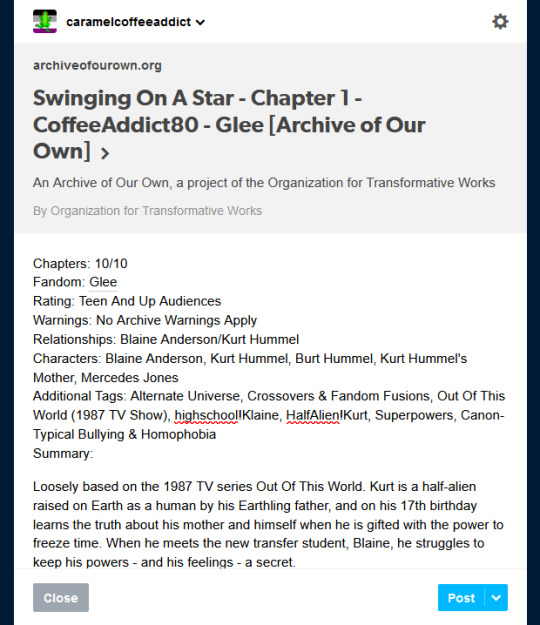
step 3: if you like the way the post looks, just click "Post". (*if you have more than one blog, make sure to double check that you are posting to the correct blog before you post it!*) or if you want, you can add an author's note to the post, maybe add a photo or a teaser of the story, or make other edits to it before clicking the "Post" button. the choice is yours.
it's so simple, and only takes a few seconds to do. it's literally just three button clicks: "Share" -> "Tumblr" -> "Post". you don't have to worry about forgetting to add important info about a story in your tumblr post; or rack your brain trying to figure out which information you should include; or even figure out how to format the post to make it look neat and easy to read.
one thing to note: if you (or the author you are recommending) have your fics locked for AO3 users only, the link at the top of the tumblr post will look like this instead:

other than that, the rest of the post will look the same as above with all of the relevant story information, minus the fic title and author name which are normally displayed in the link preview. you can manually add that missing information to the post yourself before sharing, so your followers will know what story they are clicking on.
462 notes
·
View notes
Text
Hey! So I mentioned a while ago that I have a custom workskin to make my Magnus Archives fics with transcripts look more like the transcripts at The Magnus Archives Transcripts Archive, and never got around to showing how. So now I am!
With this workskin, you'll turn transcript fics that look like this:

Into this!

Link to my fic "Just a Rumour" to see the live example, no content warnings in these first two chapters, but rating may eventually change.
Here's how you can apply this to your own fic. Steps are listed below the cut:
1. Make a workskin.
For this step, I'll refer you to the ao3 guide on how to create workskins. Make a new one, or add the following code between the dashes below to your existing skins.
---
#workskin .transcript {
font-family: "Libre Baskerville", Baskerville, "Book Antiqua", Georgia, Times, serif;
color: #586e75;
background: #fdf6e3;
padding: 1em;
width: fit-content;
margin: 0 auto 35px;
font-size: 120%;
}
---
Once you've made your workskin, follow the steps in the included link to add that workskin to the fic you want to apply this style to.
2. Tell the fic where to apply the style
The document above also explains this, but just so you can see the actual steps here:
In your fic, under the html editor view, add
<div class "transcript">
To the front of the text that will be in this format (it may not be the entire fic! You can have it in the middle of regular prose if you like).
At the end of the section that will be in the format, close it off with
</div>


Now just save your draft and confirm that it's working! If it looks off, double check your html, make sure it took and didn't delete itself or isn't misspelled.
And btw, readers who may not like this format can turn it off themselves with the Hide Creator's Style button, so this is optional for readers! It also works well with screen readers as-is.
Enjoy!
66 notes
·
View notes
Text
Needle Lace Resources
This is a very long post, so I'm including a cut.
Tutorial-like Things, Others' Work
An overview of the stages of needle lace (specifically learning from Alençon, I believe. They link to a documentary type of video on Alençon lace): https://www.taixtile.com/needle-lace-first-steps/. This blog has links to other resources (one link is broken, if I recall correctly).
A very approachable first project, I think. From a lace maker who has done very cool illustrations with lace, Maggie Hensel-Brown: https://youtu.be/OLuRpJ96p4Q?si=gqBWqYxa755gFozr
This channel has videos of the stages of needle lace making. They specifically demonstrate Irish lace, I believe. But the stages are very similar to or the same as the stages in Alençon lace. https://youtu.be/dZVagIFCnLc?si=d8lRnPsmz5iTM0Z_
Pierre Fouché has a video about making dense filling stitches and even doing short rows to makes curves (something I tried but did not yet succeed at): https://youtu.be/DK5cMQND3b8?si=qySmT9yaoTcpsUV9 He also does really cool bobbin lace illustrations by constructing patterns in cell-like units.
An embroiderer tries needle lace in two videos. In one of them she tries different styles from different places: https://youtu.be/eTO7dA4oyl4?si=VInx35kql115bIIo https://www.youtube.com/watch?v=A9Wa6-Qf5xw
Example of a different style of needle lace. Unsure what it is exactly. Some sort of cut work or reticella, idk: https://youtube.com/shorts/7DFogWC3tDI?si=uju74sPFbRj3_wrn
Sampler directions: https://youtu.be/oDKBfjDYBnU?si=shQYvaT4kAZD7BgV
Again, a more geometric style of needle lace. I don’t know the particulars of this style (styles?), since I’ve mostly been looking into styles similar to Alençon because I’m aiming for more illustration-like lace. This channel has multiple videos demoing and explaining that process: https://youtu.be/gJd6mkrsUCQ?si=AfVIiwljHvfismrX https://www.youtube.com/watch?v=R6dk721UwW4
Not so much instructions but video of a very skilled lacemaker working on a project: https://youtu.be/01H2GdEXLrs?si=2suFHSG4Kwa6Yl2m
Another lacemaker's work on their blog. I don’t know if they do as much lace making as they do other needle arts https://www.robesdecoeur.com/blog/needlelace-my-work-so-far
A lacemaker's work... the site is older and kind of tricky to navigate. Like. there's no home button, as far as I can tell. Album of their work: https://www.lacemakerslace.oddquine.co.uk/album/index.html Home page, I think: https://www.lacemakerslace.oddquine.co.uk/
Useful/Interesting Things to Know
Alençon lace -- specific French style from the Alençon region, which has a history of point lace and a current institution dedicated to preserving the skills and producing lace. This is the style that I was looking at examples of to try and learn from.
Search terms like different styles of lace that I’m not qualified to talk about but you can look into and do research on: Battenburg, point de gaze (very very fine work, like gauze)… More to be added as I learn about them.
The terms "needle lace" and "point lace" are both used to refer to lace made with a needle. I'm unclear on if there are subtle distinctions between them or if it's simply a matter of location. But having versions of a search query for both terms should help find more results than just using one.
Encyclopedia of Needlework by Therese De Dillmont is an excellent resource to learn how to do different stitches. It seems these stitches mostly come from Irish lace, according to the book. HTML copy of book available on Project Gutenberg here: https://www.gutenberg.org/files/20776/20776-h/20776-h.htm I recommend using ctrl+f to search for "lace stitch" on the page. The end of each chapter in the HTML version seems to have a link to the Table of Contents that is at the end of the entire document. It has chapters for plenty of other needle arts, so it's a good resource all around.
If you want to find examples of needle lace, look on Wikimedia Commons! Using a variety of search terms will help you find more material for inspiration/observation than otherwise
If you want to design your own needle lace depicting objects, it might be worth looking at stained glass to see how larger shapes are broken up into smaller shapes that still feel complete.
You can use multiple colors! Let yourself use multiple colors, like stained glass!
Thoughts from the Learning Process So Far (some terminology used here, look them up so you know what the actual definitions are, but I’ll define what I mean by them)
Tacking vs Couching... I'm unsure about the actual definitions so I may be using them wrong here. In the videos I’ve seen tacking seems to be making a stitch that runs along the way the cordonnet will run. Couching seems to be just when the thread that secures the cordonnet comes up through the backing and goes down through the backing at the same point. With these definitions… Tacking went faster for me than doing couching, but it feels a lot less secure and precise for the form of lace I’m making. Unless I made the tacking stitches perpendicular to the cordonnet's path, the outline cord moved too much due to tension. If it's perpendicular and not a very short stitch, it might get in the way of your filling stitches or binding off stitches. Which might be fine, since you pull them out anyways. But it would also mean more holes in the backing, and at some point the holes are too close together and might tear the backing and pattern. I don't like that. Couching—much, MUCH more tedious for me because I’m not practiced at making the needle come up in exactly the right spot. but it feels more secure to me. The outline seems to be less affected by tension as you work. And I took some shortcuts for couching that helped. I don’t couch the doubled cord, instead I whip stitch back over the already-secured cord. I might make a post to demonstrate what I mean. It kind of messes with the shape/placement of my cordonnet, but for the sake of my impatience I’m willing to sacrifice the precise shape.
Backing material... To use fabric in backing like the instructions usually say, or not? Idk. For me, it’s hard to find the right hole for the couching stitches when I can't see my pattern from the back. It took a lot of trial and error until I got a feel for how to predict where my needle would come up. I don't like the way the poke-and-check method of stitching the cordonnet down tends to rip the pattern up (at least, with my easy-to-access materials. Probably better with better materials and more practice. Using my thumb to find approximately the right spot helped, but not enough). So I just used a sandwich of tape/paper/tape as my backing. If you're willing to fuss around with fabric in your backing, it might make it easier to remove the couching threads after you're done, and when I tried. The directions I've seen usually say to use a backing of doubled-up fabric, clay paper (I'm unsure what this is. might be a thicker paper than cardstock, or it might be paper made to contain clay particles. Probably more like the first option), and contact paper. My last attempt at making a backing used notebook paper (or other type of paper) with packaging tape on both sides to provide a smooth surface and structure. I think it worked fairly well, and I didn't have to figure out where to buy contact paper (or figure out exactly what contact paper was).
#lace making#fiber arts#needle lace#instructions#tutorials#information#resources#my post#i will make this cleaner/easier to read later
125 notes
·
View notes
Text
How To Embed An Image In An Ao3 Comment
Sometimes, an image is worth a thousand words. You've read a fic, and the only way to respond to it is with a picture. Maybe this is a scribble you drew in the notes app on your phone, maybe it's art you drew with actual artistic talent, maybe it's a meme you just looked up, maybe it's a meme you just made. But you have your image, and you want to put it in someone's comments. How do you do that?
Ao3 comments support HTML, so to embed an image you need an image link to where the image is hosted somewhere on the web, and you need a bit of HTML code. First thing, the image.
You can use a site like Imgur to host your image, or a private tumblr post, or a fandom image host like Squidge Image Hosting. The important thing is that you want the actual image URL, and not the link to the page that the image is hosted on. Let's say you put your image in a private tumblr post, it would look something like this to get the image link.

You want to right-click (or control-click, whatever works on your screen) to get this dropdown menu, and go down to Copy Image Address. That drops the URL into your clipboard. And then you copy this code:
<img src="YOUR IMAGE URL" alt="DESCRIPTION OF YOUR IMAGE" border="0" width="Max-width 95%" />
In order that's the code that tells the HTML which image to pull off the web, a description that will work for screen readers, telling it that it doesn't need a border, and a bit of code that will keep the image from running off the screen if you grabbed a big image. You put your image URL in that bit of code and write a fast description, and then bingo, you're ready to post your image!
Oh god though, you're on mobile, that all looks awful: quick tip! If you host your image on images.squidge.org, they will do the html for you. It's free fandom image hosting as long as you're over 18. Upload your image, and then scroll down on the page, and there's a convenient button with the HTML just done for you already.
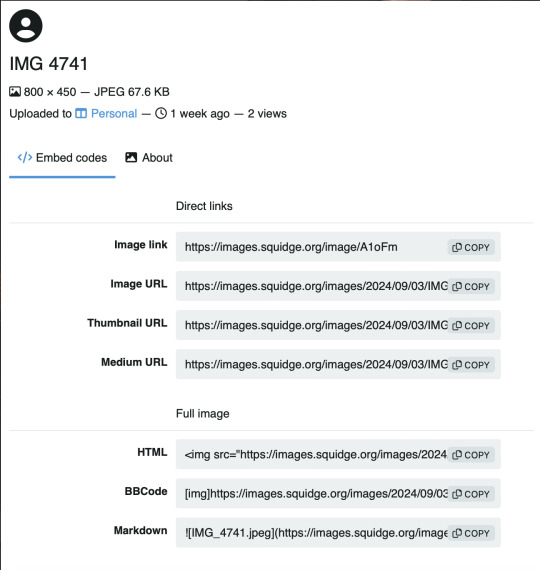
Scroll down to HTML and hit the copy button, and then just paste that into the Ao3 comment box, update the image description (cause it'll just have the title there) and you're good to go!
Go forth and decorate the world with images!

131 notes
·
View notes
Note
I really like how you implemented the code in the game! I appreciate you adding the function ♥️
Would you mind telling me how someone can implement this button on itchio? I've never seen anyone adding the option to read the code there and always thought that it's just not possible ...
❤️ I’m glad it worked, anon!
You can do almost anything on itch. You have access to all the files after all.
The easiest way is to just add your scene text files in your compiled upload file. And then link to these (I linked first to a html file that in turn links to the txt files.)
Prob should have automated it but… I’m lazy.
The button is added in the code in the gui file I think it was. There’s a function that changes one of the button texts when one clicks the stat button and I just hijacked that to add a button link ☺️
56 notes
·
View notes