#commands linux macos
Explore tagged Tumblr posts
Visit Tumblr Blog
Explore Tumblr blogs with no restrictions, modern design and the best experience.
Last Seen Tumblr Blogs


Fun Fact
Tumblr was acquired by Yahoo for $1.1B in 2013.
Text
Linux / UNIX: DNS Lookup Command
You don't need to use third-party apps or websites to find DNS information. All you need is the command line, and you can get all the information required to report or debug problems. DNS plays a critical role in modern apps and infrastructure; hence, all developers and sysadmins must know how to use these commands to resolve issues faster.
29 notes
·
View notes
Text
FFmpeg: The Ultimate Tool for Multimedia Processing
FFmpeg is a powerful open-source tool for handling multimedia files. Whether you’re encoding, decoding, converting, or streaming, FFmpeg is widely used for manipulating video and audio. Getting Started FFmpeg can be installed on various operating systems: Windows: Download from the official site. Here Mac: Use Homebrew: Brew install ffmpeg Linux: Install via package managers like APT or YUM: sudo…
#Audio Editing#Command Line Tools#Encoding & Decoding#FFmpeg#Linux#macOS#Media Conversion#Multimedia Processing#Open Source Software#Streaming#Tech Tools#Video Compression#Video Editing#windows
0 notes
Text
Boost Productivity with Databricks CLI: A Comprehensive Guide
Exciting news! The Databricks CLI has undergone a remarkable transformation, becoming a full-blown revolution. Now, it covers all Databricks REST API operations and supports every Databricks authentication type.
Exciting news! The Databricks CLI has undergone a remarkable transformation, becoming a full-blown revolution. Now, it covers all Databricks REST API operations and supports every Databricks authentication type. The best part? Windows users can join in on the exhilarating journey and install the new CLI with Homebrew, just like macOS and Linux users. This blog aims to provide comprehensive…
View On WordPress
#API#Authentication#Azure Databricks#Azure Databricks Cluster#Azure SQL Database#Cluster#Command prompt#data#Data Analytics#data engineering#Data management#Database#Databricks#Databricks CLI#Databricks CLI commands#Homebrew#JSON#Linux#MacOS#REST API#SQL#SQL database#Windows
0 notes
Text

Welcome back, coding enthusiasts! Today we'll talk about Git & Github , the must-know duo for any modern developer. Whether you're just starting out or need a refresher, this guide will walk you through everything from setup to intermediate-level use. Let’s jump in!
What is Git?
Git is a version control system. It helps you as a developer:
Track changes in your codebase, so if anything breaks, you can go back to a previous version. (Trust me, this happens more often than you’d think!)
Collaborate with others : whether you're working on a team project or contributing to an open-source repo, Git helps manage multiple versions of a project.
In short, Git allows you to work smarter, not harder. Developers who aren't familiar with the basics of Git? Let’s just say they’re missing a key tool in their toolkit.
What is Github ?
GitHub is a web-based platform that uses Git for version control and collaboration. It provides an interface to manage your repositories, track bugs, request new features, and much more. Think of it as a place where your Git repositories live, and where real teamwork happens. You can collaborate, share your code, and contribute to other projects, all while keeping everything well-organized.
Git & Github : not the same thing !
Git is the tool you use to create repositories and manage code on your local machine while GitHub is the platform where you host those repositories and collaborate with others. You can also host Git repositories on other platforms like GitLab and BitBucket, but GitHub is the most popular.
Installing Git (Windows, Linux, and macOS Users)
You can go ahead and download Git for your platform from (git-scm.com)
Using Git
You can use Git either through the command line (Terminal) or through a GUI. However, as a developer, it’s highly recommended to learn the terminal approach. Why? Because it’s more efficient, and understanding the commands will give you a better grasp of how Git works under the hood.
GitWorkflow
Git operates in several key areas:
Working directory (on your local machine)
Staging area (where changes are prepared to be committed)
Local repository (stored in the hidden .git directory in your project)
Remote repository (the version of the project stored on GitHub or other hosting platforms)
Let’s look at the basic commands that move code between these areas:
git init: Initializes a Git repository in your project directory, creating the .git folder.
git add: Adds your files to the staging area, where they’re prepared for committing.
git commit: Commits your staged files to your local repository.
git log: Shows the history of commits.
git push: Pushes your changes to the remote repository (like GitHub).
git pull: Pulls changes from the remote repository into your working directory.
git clone: Clones a remote repository to your local machine, maintaining the connection to the remote repo.
Branching and merging
When working in a team, it’s important to never mess up the main branch (often called master or main). This is the core of your project, and it's essential to keep it stable.
To do this, we branch out for new features or bug fixes. This way, you can make changes without affecting the main project until you’re ready to merge. Only merge your work back into the main branch once you're confident that it’s ready to go.
Getting Started: From Installation to Intermediate
Now, let’s go step-by-step through the process of using Git and GitHub from installation to pushing your first project.
Configuring Git
After installing Git, you’ll need to tell Git your name and email. This helps Git keep track of who made each change. To do this, run:

Master vs. Main Branch
By default, Git used to name the default branch master, but GitHub switched it to main for inclusivity reasons. To avoid confusion, check your default branch:

Pushing Changes to GitHub
Let’s go through an example of pushing your changes to GitHub.
First, initialize Git in your project directory:

Then to get the ‘untracked files’ , the files that we haven’t added yet to our staging area , we run the command

Now that you’ve guessed it we’re gonna run the git add command , you can add your files individually by running git add name or all at once like I did here

And finally it's time to commit our file to the local repository

Now, create a new repository on GitHub (it’s easy , just follow these instructions along with me)
Assuming you already created your github account you’ll go to this link and change username by your actual username : https://github.com/username?tab=repositories , then follow these instructions :


You can add a name and choose wether you repo can be public or private for now and forget about everything else for now.

Once your repository created on github , you’ll get this :

As you might’ve noticed, we’ve already run all these commands , all what’s left for us to do is to push our files from our local repository to our remote repository , so let’s go ahead and do that

And just like this we have successfully pushed our files to the remote repository
Here, you can see the default branch main, the total number of branches, your latest commit message along with how long ago it was made, and the number of commits you've made on that branch.

Now what is a Readme file ?
A README file is a markdown file where you can add any relevant information about your code or the specific functionality in a particular branch—since each branch can have its own README.
It also serves as a guide for anyone who clones your repository, showing them exactly how to use it.
You can add a README from this button:

Or, you can create it using a command and push it manually:

But for the sake of demonstrating how to pull content from a remote repository, we’re going with the first option:

Once that’s done, it gets added to the repository just like any other file—with a commit message and timestamp.
However, the README file isn’t on my local machine yet, so I’ll run the git pull command:

Now everything is up to date. And this is just the tiniest example of how you can pull content from your remote repository.
What is .gitignore file ?
Sometimes, you don’t want to push everything to GitHub—especially sensitive files like environment variables or API keys. These shouldn’t be shared publicly. In fact, GitHub might even send you a warning email if you do:

To avoid this, you should create a .gitignore file, like this:

Any file listed in .gitignore will not be pushed to GitHub. So you’re all set!
Cloning
When you want to copy a GitHub repository to your local machine (aka "clone" it), you have two main options:
Clone using HTTPS: This is the most straightforward method. You just copy the HTTPS link from GitHub and run:

It's simple, doesn’t require extra setup, and works well for most users. But each time you push or pull, GitHub may ask for your username and password (or personal access token if you've enabled 2FA).
But if you wanna clone using ssh , you’ll need to know a bit more about ssh keys , so let’s talk about that.
Clone using SSH (Secure Shell): This method uses SSH keys for authentication. Once set up, it’s more secure and doesn't prompt you for credentials every time. Here's how it works:
So what is an SSH key, actually?
Think of SSH keys as a digital handshake between your computer and GitHub.
Your computer generates a key pair:
A private key (stored safely on your machine)
A public key (shared with GitHub)
When you try to access GitHub via SSH, GitHub checks if the public key you've registered matches the private key on your machine.
If they match, you're in — no password prompts needed.
Steps to set up SSH with GitHub:
Generate your SSH key:

2. Start the SSH agent and add your key:

3. Copy your public key:

Then copy the output to your clipboard.
Add it to your GitHub account:
Go to GitHub → Settings → SSH and GPG keys
Click New SSH key
Paste your public key and save.
5. Now you'll be able to clone using SSH like this:

From now on, any interaction with GitHub over SSH will just work — no password typing, just smooth encrypted magic.
And there you have it ! Until next time — happy coding, and may your merges always be conflict-free! ✨👩💻👨💻
#code#codeblr#css#html#javascript#java development company#python#studyblr#progblr#programming#comp sci#web design#web developers#web development#website design#webdev#website#tech#html css#learn to code#github
93 notes
·
View notes
Text
One thing I noticed talking about Linux and free software is that a lot of people seem afraid of learning things about technology. I constantly read things like "I hate windows, but switching to linux would mean learning a new OS, and you have to be some super-smart programmer-hacker to do that." Or even: "Switching to firefox would mean switching browsers and I don't know how"
And that is precisely the attitude tech companies like Microsoft and Apple try to instill in their users in order to control them. They create these simple and “friendly” user interfaces for their products, but these hide information. From their OS being pre-installed to their settings apps, they keep people from learning things about how their computer works, and letting the companies make the decisions for their users.
I think people are underestimating themselves and overestimating how hard it is to learn new things are. It is like Windows/Macos have taught them some kind of technological learned helplessness. Not knowing how computers work and being afraid to learn how is how companies like Microsoft controls you, and justifies that control.
For example, people hate the forced and automatic system updates on Windows. And Microsoft justifies it as necessary because some people don’t know that their computer needs security updates and therefore don’t update, so they have to force the updates on them. That’s definitely true, and Microsoft’s tech support people is definitely very aware of that but it is a operating system that presumes that the user is incompetent and therefore shouldn’t control their own computer. And of course Microsoft abuses that power to force privacy-invading features on their users. Windows updates are also badly designed in comparison, no Linux distro I’ve used required the update program to hijack the entire computer, preventing the user from doing other things, but Windows does.
This is the dark side of “user-friendly” design. By requiring zero knowledge and zero responsibility for the user, they also take control away from the user. User-friendly graphical user interfaces (GUI) can also hide the inner workings of a system in comparison to the command line, which enables more precise control of your computer and give you more knowledge about what it is doing.
Even GUIs are not all made equal in regards to this, as the comparison between the Windows Control panel and their newer Settings app demonstrates. As I complained about before, Windows have hidden away the powerful, but complex Control Panel in favor of the slicker-looking but simplified and less powerful Settings app for over a decade now.
Of course this is a sliding scale, and there is a sensible middle-ground between using the command line for everything and user-friendly design masking taking control away from the end user.
There are Linux distros like Linux Mint and MX Linux who have created their own GUI apps for tasks that would otherwise use the command line, without taking control away from the user. This is mainly because they are open source non-profit community-driven distros, instead of being proprietary OSes made by profit-driven megacorps.
Still, giving that control to the user presumes some knowledge and responsibility on part of the user. To return to the update example, by default both Mint and MX will search and notify you of available updates, but you will have to take the decision to download and install them. Automatic updates are available in both cases, but it’s opt-in, you have to enable that option yourself. And that approach presumes that you know that you should update your system to plug security holes, something not all people do. It gives you control because it presumes you have knowledge and can take responsibility for those decisions.
All this also applies to the underlying fact that practically all pre-built computers nowadays have an operating system pre-installed. Few people install an OS themselves nowadays, instead they use whatever came with the computer. It’s usually either Windows or MacOS for desktops/laptops, and Android/IOS for smartphones (which are also a type of computer).
Now all this is very convenient and user-friendly, since it means you don’t have to learn how to install your own operating system. The OEM takes care of that for you. But again, this is a convenience that takes choice away from you. If you don’t learn how to install your own OS, you are stuck with whatever that is on the computer you bought. It’s probably precisely this step that scares people away from Linux, few people have installed even Windows, and installing your own OS seems impossibly scary. But again, learning is the only way to take back control. If you learn how to install an OS off an USB stick, you now have choices in what OS to use. (Sidenote: the hard part IMO is not the actual install process, but fiddling with the BIOS so it will actually boot from the distro on the USB stick. This old comic strip illustrates this very well).
That’s how life is in general, not just computers. Having control over your life means making decisions based on your own judgment. And to make sensible, rational decisions, you have to learn things, acquire knowledge.
The only other alternative is letting others take those decisions for you. You don’t have to learn anything, but you have no control. And in the tech world, that means big corporations like Microsoft, Google and Apple will make those decisions, and they are motivated by their own profits, not your well-being.
Computers have only become more and more capable and more important in our lives, and that can enable wonderful things. But it also means more power to the tech companies, more power over our lives. And the only way to resist that is to learn about computers, to enable us to make our own decisions about how we use technology.
902 notes
·
View notes
Note
do you know any good guides to get into furry muck?? ive wanted to try it for ages but find it confusing
so long as you have some familiarity with command line/terminal and the basic CLI procedures, i found the starting guide on the official site quite adequate. otherwise, first familiarize yourself with the command line interface of your computer. it takes a little getting used to, but this is how the entire MUCK will be, plus knowing how to use a CLI is a good skill to have.
you will need telnet installed on your computer. telnet is the protocol that will allow you to access furrymuck through your CLI (telnet is not secure, so don't type anything into furryMUCK you wouldn't want anyone to be able to see! this is the risk of using a legacy system, assume it has already been compromised and act accordingly). on windows telnet is preinstalled but you will need to enable it as described in this guide. on linux and macOS you can install it with a package manager. i use homebrew on mac.
once you have telnet, the official guides for connecting are here. character registration is done via email. mine took around a week and a half to come back. because your passwords are sent in plaintext over email and unsecured over telnet do not reuse another password. here in the registration guide.
once you access the MUCK, the area just outside the bandstand where you start has guides for new players and the people around there are generally willing to help new and clueless players (like me). it takes a little trial and error and exploring. i found this guide for interacting with the enviornment helpful.
furryMUCK is a very magical place when you're able to meet it at its own terms. part of the fantasy is the clunkiness of the ancient internet its idiosyncrasies. have so much fun!
63 notes
·
View notes
Text
Look, my favorite distro is Linux Mint, but SteamOS tops this list for a damn good REASON.
Although most Windows programs (including games) run just fine on any modern flavor of Linux, most distros require some fiddling with WINE or one of its derivatives to do so--SteamOS runs literally thousands of games out of the box. Most run just as well as on Windows, some need work, and some (like Skyrim, and like most Valve games) run BETTER on Linux than on Windows. Some, of course, don't work at all--YET. But they will.
Whatever you think of Valve, their SteamOS is pushing game compatibility with non-Windows operating systems--whether natively or through a compatibility layer--and the more people who use Linux, the more games will be built for it natively.
By the way, NO, you do not need to know anything about the command line for most modern mainstream Linux distros. There is a point and click interface for everything; in fact, Windows and MacOS copy a lot of their features from Linux.
36 notes
·
View notes
Text
how i make gifs with only free software
this is adapted from what i did on macOS for years; i now run desktop linux due to planned obsolescence / apple's addiction to waste. if you use macOS, homebrew was my real introduction to using the shell and linux-like package management, and look at me now. every single gif i've made here (#spicagif) and on my sides @chongmiz and @buwanbyul use this method.
three programs mentioned here are command line-only, but optional; all this actually takes is VLC and GIMP.
acquire video 🏴☠️. my bittorrent client of choice is transmission, and yt-dlp (cli) is great if what you want is on youtube or vimeo
take screenshots in vlc by holding down the snapshot hotkey (sft+s is default); i tend to reduce playback speed for action sequences. you can also extract frames with ffmpeg (cli) which is a vlc dependency that should install automatically with any package manager, but it only makes sense if you've exported a clip of the part you want. both options are annoying.
open these screenshots as layers in gimp and edit away. my order of business is usually scale -> crop (save .xcf) -> sharpen -> color. this will give me a repetitive strain injury because i have not found a solution other than clicking every layer and hitting ctl+f
if you need subtitles or a watermark, which i do more on my k-pop side @buwanbyul, i recommend @animstack (yes an actual official linux-adjacent blog!)
i do not actually export gifs, they are webps:

honorable mentions
sshfs: i don't keep video on my laptop or like attaching external storage to it, so i torrent straight into my headless server over ssh. i realize normal people do not have this but this is how i "stream" from my own media library
pcmanfm: i browse files with ranger, but handling that many images without thumbnails is foolish. pcmanfm is very lightweight and is meant to replace more established file browser GUIs like thunar and dolphin
edit 2025/02/26: just mentioning @vlc-official @gimp-official
15 notes
·
View notes
Text
Your All-in-One AI Web Agent: Save $200+ a Month, Unleash Limitless Possibilities!
Imagine having an AI agent that costs you nothing monthly, runs directly on your computer, and is unrestricted in its capabilities. OpenAI Operator charges up to $200/month for limited API calls and restricts access to many tasks like visiting thousands of websites. With DeepSeek-R1 and Browser-Use, you:
• Save money while keeping everything local and private.
• Automate visiting 100,000+ websites, gathering data, filling forms, and navigating like a human.
• Gain total freedom to explore, scrape, and interact with the web like never before.
You may have heard about Operator from Open AI that runs on their computer in some cloud with you passing on private information to their AI to so anything useful. AND you pay for the gift . It is not paranoid to not want you passwords and logins and personal details to be shared. OpenAI of course charges a substantial amount of money for something that will limit exactly what sites you can visit, like YouTube for example. With this method you will start telling an AI exactly what you want it to do, in plain language, and watching it navigate the web, gather information, and make decisions—all without writing a single line of code.
In this guide, we’ll show you how to build an AI agent that performs tasks like scraping news, analyzing social media mentions, and making predictions using DeepSeek-R1 and Browser-Use, but instead of writing a Python script, you’ll interact with the AI directly using prompts.
These instructions are in constant revisions as DeepSeek R1 is days old. Browser Use has been a standard for quite a while. This method can be for people who are new to AI and programming. It may seem technical at first, but by the end of this guide, you’ll feel confident using your AI agent to perform a variety of tasks, all by talking to it. how, if you look at these instructions and it seems to overwhelming, wait, we will have a single download app soon. It is in testing now.
This is version 3.0 of these instructions January 26th, 2025.
This guide will walk you through setting up DeepSeek-R1 8B (4-bit) and Browser-Use Web UI, ensuring even the most novice users succeed.
What You’ll Achieve
By following this guide, you’ll:
1. Set up DeepSeek-R1, a reasoning AI that works privately on your computer.
2. Configure Browser-Use Web UI, a tool to automate web scraping, form-filling, and real-time interaction.
3. Create an AI agent capable of finding stock news, gathering Reddit mentions, and predicting stock trends—all while operating without cloud restrictions.
A Deep Dive At ReadMultiplex.com Soon
We will have a deep dive into how you can use this platform for very advanced AI use cases that few have thought of let alone seen before. Join us at ReadMultiplex.com and become a member that not only sees the future earlier but also with particle and pragmatic ways to profit from the future.
System Requirements
Hardware
• RAM: 8 GB minimum (16 GB recommended).
• Processor: Quad-core (Intel i5/AMD Ryzen 5 or higher).
• Storage: 5 GB free space.
• Graphics: GPU optional for faster processing.
Software
• Operating System: macOS, Windows 10+, or Linux.
• Python: Version 3.8 or higher.
• Git: Installed.
Step 1: Get Your Tools Ready
We’ll need Python, Git, and a terminal/command prompt to proceed. Follow these instructions carefully.
Install Python
1. Check Python Installation:
• Open your terminal/command prompt and type:
python3 --version
• If Python is installed, you’ll see a version like:
Python 3.9.7
2. If Python Is Not Installed:
• Download Python from python.org.
• During installation, ensure you check “Add Python to PATH” on Windows.
3. Verify Installation:
python3 --version
Install Git
1. Check Git Installation:
• Run:
git --version
• If installed, you’ll see:
git version 2.34.1
2. If Git Is Not Installed:
• Windows: Download Git from git-scm.com and follow the instructions.
• Mac/Linux: Install via terminal:
sudo apt install git -y # For Ubuntu/Debian
brew install git # For macOS
Step 2: Download and Build llama.cpp
We’ll use llama.cpp to run the DeepSeek-R1 model locally.
1. Open your terminal/command prompt.
2. Navigate to a clear location for your project files:
mkdir ~/AI_Project
cd ~/AI_Project
3. Clone the llama.cpp repository:
git clone https://github.com/ggerganov/llama.cpp.git
cd llama.cpp
4. Build the project:
• Mac/Linux:
make
• Windows:
• Install a C++ compiler (e.g., MSVC or MinGW).
• Run:
mkdir build
cd build
cmake ..
cmake --build . --config Release
Step 3: Download DeepSeek-R1 8B 4-bit Model
1. Visit the DeepSeek-R1 8B Model Page on Hugging Face.
2. Download the 4-bit quantized model file:
• Example: DeepSeek-R1-Distill-Qwen-8B-Q4_K_M.gguf.
3. Move the model to your llama.cpp folder:
mv ~/Downloads/DeepSeek-R1-Distill-Qwen-8B-Q4_K_M.gguf ~/AI_Project/llama.cpp
Step 4: Start DeepSeek-R1
1. Navigate to your llama.cpp folder:
cd ~/AI_Project/llama.cpp
2. Run the model with a sample prompt:
./main -m DeepSeek-R1-Distill-Qwen-8B-Q4_K_M.gguf -p "What is the capital of France?"
3. Expected Output:
The capital of France is Paris.
Step 5: Set Up Browser-Use Web UI
1. Go back to your project folder:
cd ~/AI_Project
2. Clone the Browser-Use repository:
git clone https://github.com/browser-use/browser-use.git
cd browser-use
3. Create a virtual environment:
python3 -m venv env
4. Activate the virtual environment:
• Mac/Linux:
source env/bin/activate
• Windows:
env\Scripts\activate
5. Install dependencies:
pip install -r requirements.txt
6. Start the Web UI:
python examples/gradio_demo.py
7. Open the local URL in your browser:
http://127.0.0.1:7860
Step 6: Configure the Web UI for DeepSeek-R1
1. Go to the Settings panel in the Web UI.
2. Specify the DeepSeek model path:
~/AI_Project/llama.cpp/DeepSeek-R1-Distill-Qwen-8B-Q4_K_M.gguf
3. Adjust Timeout Settings:
• Increase the timeout to 120 seconds for larger models.
4. Enable Memory-Saving Mode if your system has less than 16 GB of RAM.
Step 7: Run an Example Task
Let’s create an agent that:
1. Searches for Tesla stock news.
2. Gathers Reddit mentions.
3. Predicts the stock trend.
Example Prompt:
Search for "Tesla stock news" on Google News and summarize the top 3 headlines. Then, check Reddit for the latest mentions of "Tesla stock" and predict whether the stock will rise based on the news and discussions.
--
Congratulations! You’ve built a powerful, private AI agent capable of automating the web and reasoning in real time. Unlike costly, restricted tools like OpenAI Operator, you’ve spent nothing beyond your time. Unleash your AI agent on tasks that were once impossible and imagine the possibilities for personal projects, research, and business. You’re not limited anymore. You own the web—your AI agent just unlocked it! 🚀
Stay tuned fora FREE simple to use single app that will do this all and more.

7 notes
·
View notes
Text
I just wanted a simple little OS that looks good and runs well without being restrictive. Something for out-of-the-box productivity, with the openness to customize if I wanted to, later down the line. My 2017 MBP is starting to behave erratically as the battery degrades, so I thought, "Oh, I'll put a bog standard Linux Distro on the 2011 MBP and give it one final try."
Fast forward 48 hours later, and I have put Debian 12.10 on the 2011 MBP over ten times, and every single time I do, it fails to boot. I've tried connecting it to ethernet, I've tried using external keyboards, I've tried absolutely everything, and the same damn thing happens: After Debian is successfully installed and reboots, it gets to the initial command line interface that Linux shows at the start of it's startup sequence, and... it freezes. It just stops. It boots, shows the GRUB picker, I pick Debian, it freezes. Great. /s
I wanted a Framework Laptop for my next device, but I'm not daily driving Windows, so oh fucking well. Guess my next computer is gonna be another Mac... Ugh... 🫠 Gonna see if OpenCore Legacy Patcher's slice of MacOS Sequoia runs any more stable on the 2011 MBP than Linux. If it does, then that's what I'm going back to.
4 notes
·
View notes
Text
How to use find command to delete all *.log files created in last 90 days except for last 7 days
7 notes
·
View notes
Text
Transform your Fedora 40 KDE Plasma desktop to look like macOS!
Looking for a sleek, modern design for your Linux setup? Our easy-to-follow guide will help you achieve that macOS look in no time! Check out the full tutorial here: Watch the full video.
youtube
Curious about the final result? Get a sneak peek: Watch the final results.
youtube
But wait, there’s more! We also offer detailed documentation and a single command auto-customization option, supporting openSUSE Tumbleweed, Fedora 40 KDE, Manjaro Linux KDE, and KDE Neon. 🖥️
Download Resources:
Pling
Get the Documentation:
Download from Ko-fi
Download from Gumroad
Download from Patreon
Single Command Auto-Customization:
Download from Ko-fi
Download from Gumroad
Patreon
Ready to make your desktop amazing? 🌈 Head over to the video and get started today!
#KDEPlasma#FedoraLinux#macOSLook#LinuxCustomization#OpenSource#LinuxTweaks#Linux#Open Source#Manjaro Linux#KDE Neon#Youtube
7 notes
·
View notes
Note
if you dont have windows. whats that button on your keyboard
its the "super" key! its the generic name for the windows/command(macos) key, and the way its used depends on your desktop environment or however you set it up.
For something like Cinnamon or Plasma, it opens an application launcher like how it does on windows. theres also various key combinations involving it which open apps or perform certain actions basically exactly how windows does.
I use a tiling window manager, i have super+space set to an application launcher, and i use the rest to control my windows. Super+H/J/K/L is focus up left/down/up/right, and doing that and holding shift moves a window around. Super+Q is close a window, Super+F to change to floating, Super+S to fullscreen, its so i can control my desktop using only the keyboard basically.
the super key was made to be in a set of 3 modifier keys (Super, Meta, Hyper) like Ctrl or Shift, it was made for old Lisp machines but the keyboards which had these keys got use in Linux and BSD as well.
Windows added the Windows key, and for a while the windows key was used as the Meta key on linux, but eventually it was moved to Super (though Plasma still incorrectly calls it Meta) and it morphed into basically just the windows button by default
but even with a windows-like DE like Plasma you can just change it to do whatever you want it to. i know the ppl who use Emacs probably do insane shit with it probably
5 notes
·
View notes
Text
Building Your Own Operating System: A Beginner’s Guide
An operating system (OS) is an essential component of computer systems, serving as an interface between hardware and software. It manages system resources, provides services to users and applications, and ensures efficient execution of processes. Without an OS, users would have to manually manage hardware resources, making computing impractical for everyday use.
Lightweight operating system for old laptops
Functions of an Operating System
Operating systems perform several crucial functions to maintain system stability and usability. These functions include:
1. Process Management
The OS allocates resources to processes and ensures fair execution while preventing conflicts. It employs algorithms like First-Come-First-Serve (FCFS), Round Robin, and Shortest Job Next (SJN) to optimize CPU utilization and maintain system responsiveness.
2. Memory Management
The OS tracks memory usage and prevents memory leaks by implementing techniques such as paging, segmentation, and virtual memory. These mechanisms enable multitasking and improve overall system performance.
3. File System Management
It provides mechanisms for reading, writing, and deleting files while maintaining security through permissions and access control. File systems such as NTFS, FAT32, and ext4 are widely used across different operating systems.
4. Device Management
The OS provides device drivers to facilitate interaction with hardware components like printers, keyboards, and network adapters. It ensures smooth data exchange and resource allocation for input/output (I/O) operations.
5. Security and Access Control
It enforces authentication, authorization, and encryption mechanisms to protect user data and system integrity. Modern OSs incorporate features like firewalls, anti-malware tools, and secure boot processes to prevent unauthorized access and cyber threats.
6. User Interface
CLI-based systems, such as Linux terminals, provide direct access to system commands, while GUI-based systems, such as Windows and macOS, offer intuitive navigation through icons and menus.
Types of Operating Systems
Operating systems come in various forms, each designed to cater to specific computing needs. Some common types include:
1. Batch Operating System
These systems were widely used in early computing environments for tasks like payroll processing and scientific computations.
2. Multi-User Operating System
It ensures fair resource allocation and prevents conflicts between users. Examples include UNIX and Windows Server.
3. Real-Time Operating System (RTOS)
RTOS is designed for time-sensitive applications, where processing must occur within strict deadlines. It is used in embedded systems, medical devices, and industrial automation. Examples include VxWorks and FreeRTOS.
4 Mobile Operating System
Mobile OSs are tailored for smartphones and tablets, offering touchscreen interfaces and app ecosystems.
5 Distributed Operating System
Distributed OS manages multiple computers as a single system, enabling resource sharing and parallel processing. It is used in cloud computing and supercomputing environments. Examples include Google’s Fuchsia and Amoeba.
Popular Operating Systems
Several operating systems dominate the computing landscape, each catering to specific user needs and hardware platforms.
1. Microsoft Windows
It is popular among home users, businesses, and gamers. Windows 10 and 11 are the latest versions, offering improved performance, security, and compatibility.
2. macOS
macOS is Apple’s proprietary OS designed for Mac computers. It provides a seamless experience with Apple hardware and software, featuring robust security and high-end multimedia capabilities.
3. Linux
Linux is an open-source OS favored by developers, system administrators, and security professionals. It offers various distributions, including Ubuntu, Fedora, and Debian, each catering to different user preferences.
4. Android
It is based on the Linux kernel and supports a vast ecosystem of applications.
5. iOS
iOS is Apple’s mobile OS, known for its smooth performance, security, and exclusive app ecosystem. It powers iPhones and iPads, offering seamless integration with other Apple devices.
Future of Operating Systems
The future of operating systems is shaped by emerging technologies such as artificial intelligence (AI), cloud computing, and edge computing. Some key trends include:
1. AI-Driven OS Enhancements
AI-powered features, such as voice assistants and predictive automation, are becoming integral to modern OSs. AI helps optimize performance, enhance security, and personalize user experiences.
2. Cloud-Based Operating Systems
Cloud OSs enable users to access applications and data remotely. Chrome OS is an example of a cloud-centric OS that relies on internet connectivity for most functions.
3. Edge Computing Integration
With the rise of IoT devices, edge computing is gaining importance. Future OSs will focus on decentralized computing, reducing latency and improving real-time processing.
4. Increased Focus on Security
Cyber threats continue to evolve, prompting OS developers to implement advanced security measures such as zero-trust architectures, multi-factor authentication, and blockchain-based security.
3 notes
·
View notes
Text
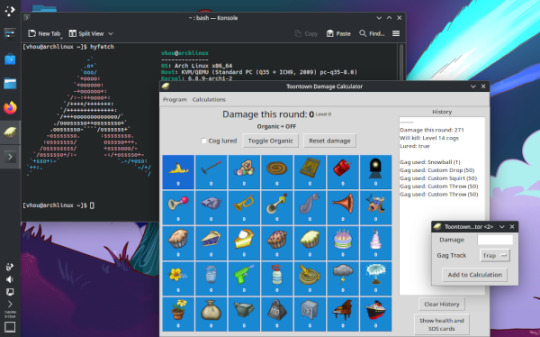
hi ive been working on my gag calculator for unm
there's a couple big things lots of people will care about, and then a couple big things only a few people, or maybe just me will care about.
the biggest thing the most people will care about is custom gags, i think this is the only gag calculator that allows for users to input a gag with a custom amount of damage, which i think is pretty cool!
ive also started using github actions to build releases rather than my own hardware (since my laptop running windows died and i currently cant otherwise make a windows executable lol) which also allows me to make executables for operating systems besides windows, and throw them in releases.
so i can now make macos executable releases! i cant actually test them myself because i don't have a mac, but in theory i think they should work! one fear is that pyinstaller's automatic codesigning is not good enough and it doesn't let you run the program without turning off security features, which wouldn't look good in the readme LOL
github actions also lets me automatically build and publish the python package versions as well, so those will now be cross platform and update beyond 4.2.0, which is nice. so sorry to the 3 people who use the python package it isn't up to date 😭
the python packages also let you run the command "tt-damage-calculator" in your terminal to open the calculator now instead of "python -m tt_damage_calculator" which i think is pretty cool
ive also been playing with arch linux for the past week or so, and pushed a dev build of the calculator to the AUR, so maybe i'll start using that as another way to distribute the calculator besides pypi and the executables, just in case anyone uses arch.
the entire program was recently recoded into a more object oriented format over the past few months. this is like the fifth major rewrite ive done of the calculator, and hopefully the second to last. i kind of want to drop tk in favor of a nicer gui builder, like qt or something. but that's something for the future.
the latest dev version of the calculator with all this stuff is at https://github.com/Vhou-Atroph/TT-Damage-Calculator/releases/tag/V4.3.0_dev.4 if you like executables, https://github.com/Vhou-Atroph/TT-Damage-Calculator/actions/runs/9149820048 if you like wheels, and https://aur.archlinux.org/packages/tt-damage-calculator if you're an arch user. it has stuff for unm, so it's not really usable on the live server, but it still has some cool features i'm proud of and wanted to talk about lol
14 notes
·
View notes
Note
Where do I learn how to code and use linux? I want to try it but I don't know anything about coding.
I will do my best to help! The answer to that question is very long if I write it all out here, but a lot of it has been answered by other people, so I'll give you an overview and link you to some resources along the way.
The good thing is that you don't need any programming knowledge to use Linux. If you just want to try out the Linux operating system and see what it's like, I would start by downloading a program like Oracle's VirtualBox: https://www.virtualbox.org/
This will allow you to basically run a second, simulated, computer on your actual computer. From there, you can download a Linux image and install it, run it inside VirtualBox, and get familiar with the operating system. This has the additional benefit that if you do something wonky to your Linux virtual machine (VM for short) by mistake, you can just delete it and recreate it and no harm will be done to your actual computer. For a step-by-step explanation, see: https://ubuntu.com/tutorials/how-to-run-ubuntu-desktop-on-a-virtual-machine-using-virtualbox#1-overview
Short aside: Linux is not a monolithic operating system like Windows or MacOS. Linux, written by a man named Linus Torvalds, is a "kernel" made up of certain very basic computer functions, and the rest of the operating system, things like the graphical user interface (GUI, to nerds like me) doesn't come with it. To be usable by normal people, Linux has to have that functionality filled in by other programmers, which creates something called a distribution, or distro for short. Ubuntu, Debian, RedHat, Linux Mint, and OpenSUSE are all Linux distros. Different distros are designed for different purposes. Ubuntu and Mint are both pretty friendly to normal folks who want to write documents, check their email, etc. RedHat is for large companies. There's a distro called Kali that's for cybersecurity and penetration testing. Etc. etc. etc. There are tons of distros. If you don't know which one to pick, I recommend Ubuntu or Mint, as I have experience with both, and they're fairly easy to use.
From this point out, a search engine will be your best friend. There are lots of helpful tutorials online, and also answers to almost any question you can imagine. If you're unsure where to start, documentation from the website of an official Linux distribution, like Ubuntu, is usually reliable, though it can be kind of opaque if you're not used to reading tech-ese. The tutorials on Ubuntu's site, however, seem to be structured with beginners in mind, and I would run through this one to start with: https://ubuntu.com/tutorials/command-line-for-beginners#1-overview
Once you get to the point of having specific questions about how a command works or how to make the operating system do something, I would take a good look at any answers from StackOverflow, which is basically a website for computer people of all skill levels to ask each other questions ranging from the basic to the ridiculously obscure. If you're wondering it, chances are good someone on StackOverflow has asked it.
Other than that, click around your new VM, create files, find programs, etc. If you really get stuck, I'll try and help, but keep in mind I may very well be searching StackOverflow myself. XD
The other cool thing about VMs is that you can try multiple operating systems, i.e. Linux Mint (https://linuxmint-installation-guide.readthedocs.io/en/latest/) which is pretty user-friendly, as I recall.
Once you get to the point where you actually want to install Linux, you'll want to back up your computer to an external hard drive so you can restore from the backup if something goes wrong, and then follow the instructions for your chosen Linux distro. LibreOffice runs on Linux and can open most Microsoft file types, so you shouldn't need to move your files to a different type, you'll just need to copy them somewhere (like another external hard drive or a thumb drive) and then copy them back when you're done with the installation. Obligatory word of warning: installing Linux on your actual machine, as opposed to a VM, WILL OVERWRITE YOUR ENTIRE HARD DRIVE. Do this with caution. Restoring from a backup is possible, so as long as you backed everything up you will not lose any data, but it can be a pain in the neck and if you're not particularly tech-savvy, you may have to go to a computer repair store to get them to do it.
Now, as to your question about learning to code: this requires no VM and no new installation; you can start doing that today. There are almost infinite tutorials online about how to start coding. CodeCademy.com is a pretty decent one, as I recall, though it's been a long time since I used it. There's also a channel on YouTube called BroCode that puts up free 'how to get started in this programming language' tutorials, which are pretty beginner-friendly. I would recommend that you start with either Python or Java (NOT JavaScript; it's not the same thing as Java, and it's a really annoying programming language, so don't do that to yourself). Python has syntax that is more similar to English than most programming languages and it is pretty powerful, but it may confuse you when you start moving to other programming languages. Java is less immediately comprehensible but probably more representative of programming languages as a whole.
Hope this helps! Feel free to send me follow-up questions or ask for clarification if I lapsed into tech-speak and this doesn't make sense.
2 notes
·
View notes