#fps tutorial
Explore tagged Tumblr posts
Visit Tumblr Blog
Explore Tumblr blogs with no restrictions, modern design and the best experience.
Last Seen Tumblr Blogs


Fun Fact
25% of US internet users with an annual income of $80-100K use Tumblr.
Text

#guardian tales#did u guys see the new little loraine tutorial chibi…i drew a chibi fp to go with it
70 notes
·
View notes
Text
some ultrakill fans flaming people for playing on lenient/harmless is so funny to me because here i am in my little corner playing on harmless with Also 100% damage reduction (in major assist settings) because my severe anxiety cannot handle the idea of me taking any damage at all . i am wearing my propeller hat and eating my lollipop and i am having fun :3 (and maybe one day i can ease that anxiety and play without major assists)
#me when my crippling anxiety is crippling fr#listen . its not as if i Want to get fucking heart palpitations whenever a few goddamn filth spawn in a room#its just how it is . and the only way to ease my irrational ass anxiety is by becoming fucking invincible#I KNOW ULTRAKILL IS SUPPOSED TO BE A (at least somewhat) STRESSFUL AND FAST PACED GAME !!! do not get me wrong#but holy shit man . do not underestimate my anxiety#fucking minecraft survival stresses me out when i encounter a fuckin skeleton (unless its multiplayer . then Suddenly all is ok . stupid#ass anxiety bruh fml)#prelude was stressing me out . PRELUDE . THE FUCKING TUTORIAL#im hoping i can ease up and slowly raise the damage taken to at least like 50% . eventually#im on 1% damage rn because even raising from 0 to 5 was scary LMAOO#like its not as if i want to play it the fuckin baby way . i WANT to be able to actually play ultrakill with damage n shit#but i just have to ease into it ig . because i cant even play video games without my anxiety screaming at me smh . fym my anxiety is a#permanent fixture in my life ? bullshit#im just hoping i can play Normally someday . eventually . because while playing with like 0 damage is more fun than being stressed out 24/7#it Is ofc . a little boring (bc No Shit) .#i want to challenge myself and i will . eventually#surely if ive done all a b and c sides in celeste i can do ultrakill on harmless haha right#ignore the fact that theyre two completely different games and that ive never played an fps in my life#and also that i have 15k deaths in celeste LOL (at least the idea of dying in that game isnt terrifying . shrug)#intense games like ultrakill just aint for everyone . thats why the assist options are there and why there r easier modes#theyre there for losers (/lh) like Me !!!! and i appreciate that theyre in the game bc i Do rlly like ultrakill#and i Do rlly want to play it (‘properly’ someday) . its js that ppl have issues like motion sickness or anxiety#and if they need assistance or an easier difficulty to enjoy the game then thats fuckin fine#literally who cares . ive watched so many videos on ultrakill now and ive seen all the tech n shit and know all the lore#its not as if i dont know the game enough to play it properly lmao#but sigh . at least i can do fun movement tech (except boosting . havent tried yet idk) like slam storage#movement is ez . combat is Hard (but not in the usual way like aim . just Anxiety™)#im ranting so much im such a yapper . anyway#ultrakill#kristiliyaps
32 notes
·
View notes
Note
Hi! Apologies if this is stated somewhere in your about and I overlooked it, but I was wondering what tools you use for gifmaking lately? I personally use to use FRAPS + Photoshop way waaaaaaay back in the day, which probably isn't as efficient anymore. I'm happy to learn new techniques but figured I'd ask as I always admired the quality of the edits you make
TYSM!! I started with FRAPS and PS too back in the day
I use OBS and Photoshop; here is a tutorial I made last year for the process, which has changed slightly since then.
I use different sharpening settings mostly, plus a few other upgrades for when I went to PS 2025 and of vital importance, I am now wearing my glasses at my desk... turns out I couldn't see the monitor for shit lmao.
#anon#replies#misadventures with aes#no I am not kidding about the glasses#I play FPS games with spouses IRL friends and UHHH night and day difference with my glasses ON#-_- my visionnnnn#I should link the tutorials in my about huh will do.... later
8 notes
·
View notes
Text
🔍 Ready to conquer the Citadelle des Morts in Call of Duty: Black Ops 6? Our new guide offers amazing secrets and strategies to help you through the first 10 rounds! Master the zombies and level up your game. Join us on this adventure!
#Call of Duty#Black Ops 6#Zombies Map#Citadelle des Morts#Zombies Guide#Gaming Strategies#Zombie Survival#CoD Tricks#Essence Guide#Mystery Box#Call of Duty Zombies#Zombies Gameplay#Power Ups#Solo Gaming#Zombie Strategies#Pack a Punch#CoD Community#CoD Gaming#Video Games#Game Guide#Zombies Tips#First Ten Rounds#Zombies Adventure#Multiplayer Gaming#Esports#Gaming Tips#Gaming Tutorial#Video Game Guide#FPS Games#Gamer Community
5 notes
·
View notes
Text
First steps - (3d, Blender, HQ version)
#nearly the first blender thing ive ever made :3#tried using it in highschool and didnt make much and it was like 10 years ago#followed The Tutorial and i think it turned out well#cycles renderer is looooong tho#1024 samples / 60 fps / 320 frames / 36 hours#maybe would've been under 12 hours if i went for 500 samples & 30 fps but gotta go hard i guess#3d#blender#lizabeth makeabeth
4 notes
·
View notes
Text
A Noob’s guide to Day of Infamy
This is Day of Infamy.
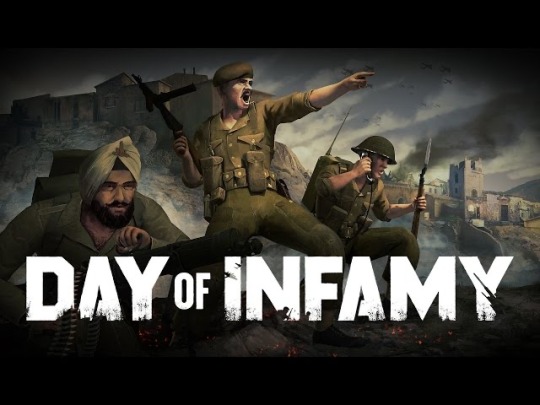
*ding*
This 2017 game made and published by New World Interactive using the Source engine, is a game that I am sad about. Not because it is sad, but because it is an interesting gem. It’s like finding a brownie shaped like a piece of turd, but it is made with the most exquisite of fudge and chocolate. It is a good game, even with a few flaws (we’ll get to those, don’t worry). In fact, I dare say that this had to be both one of my favorite first person shooters and my favorite World War 2 games. So here is a quick introduction and tutorial of how to survive this game.
First thing to know is that Day of Infamy is a multiplayer tactical first-person shooter, set in the European theatre of the Second World War. With different game mods, with most of them being some variant of finding a point on the map, and politely telling the enemy already there, to shod off. This gentle persuasion is achieved with the liberal application of both high explosives, and small automatic firearms. The maps range from The beaches of Normandy in 1944, the Streets Salerno in 1943, all the way to Crete in 1941. With such a breadth of time (6 calendar years), and a vast swath of maps (mostly France, Italy, and one Greek map), factions are vast, at the number of 3. The different factions play on certain maps, so don’t expect to see Americans at Dunkirk. Each faction has unique weapons, and units. These units don't affect gameplay all that much admittedly, as it is mostly cosmetic, but they are still nice. You can earn them through leveling up, or alternatively, you can just buy them.
First is the Americans, because of course there is.

With all the classic American WW2 weaponry, like M1 Garand, and Thompson, they will be familiar for many. As for units, once again, many of them will be familiar for those that dabble in WW2 history and/or media, such as the 101st Airborne, or the 1st Infantry Division (better known by the nickname “The Big Red One”). I also want to give a shout out, because I’m pretty sure that this is one of the only games that actually remembered that African Americans actually fought in WW2, in the form of including the 92nd Infantry Division, and the 761st Tank Battalion.
Next is everyone's favorite member of the second world war, the Wehrmacht (Germany).

I say Wehrmacht, because the vast majority of their units are Wehrmacht, such as the 272nd Volksgrenadier Division, or the 29th Panzergrenadier Division. The only exception is the 17th Panzer division, who while listed as Wehrmacht, were historically Waffen SS, so now you guys know which unit not to get. Again, most of the weaponry will be familiar for those who play WW2 shooters, such as the MP40, and MG42.
The last faction are the British… or should I say Commonwealth.

This is another reason why I like this game. You see, NWI remembered that the Brits in the second world war, had an empire, and they are willing to bring said empire into their scuffles. This means that while they do have British units like the famous/infamous Black Watch, they also have many units of Canada, such as the Princes’s Patricia’s Canadian Light infantry, as well as Australians (2/17th Battalion, who also happen to be my favorite) and Indians (12th Frontier Force Regiment). As for weaponry, most will be familiar… provided you are familiar with the British in WW2, such as the Bren, or the Lee-Enfield No. 4. They also have the one exception of where units do affect load out (we’ll get to that) with only the 2/17th Battalion being allowed to use the Owen Mk. 1.
Now that you have been familiarized with the factions, one must remember that as this is a team based game, it becomes like medieval Europe, where class matters. There are 9 classes, each with unique load outs, and purposes. Most of them also have limited slots.
Firstly, we have the basic class, the rifleman. The only class to not have a limit for slots, they are armed with a rifle. It should be noted that just because you are using a bolt action for the most part, you’re still deadly. With extra stamina, and access to rifle grenades, it is a very solid class.
Next is the assault class, who solves your issues at close range with the liberal application of an smg. Following that, is Support, who provides support by using a light machine gun, like a Bren or BAR. After that is the trifecta of basic shooter classes of Engineer (use explosives), Machinegunner (MOAR DAKKA!), and Sniper (one shot, one kill). Now the unique classes for the game starts now. After that, is Flamethrower, who decides that turning people into a barbeque is only a war crime the first time.
Now, here is the interesting part. You get one Officer, who has the ability to call support of any sort, from the innocent supply drop and smoke screens, to less innocent ones, such as artillery barrages, aerial strafings, and bombing runs. However, they can’t actually call these in, without a radio, which is accomplished with the last class, radioman. With a radio on their back, all they do is stand next to the officer, while they call in an artillery strike that will wipe the enemy team, and half of your team who were caught in the blast. (rule of thumb, you should always have both an officer and a radioman).
After choosing game mod, faction and units, and class, you have your loadout. Everyone has a primary weapon, secondary weapon, access of up to two different types of grenade, and a melee weapon. Furthermore, attachments to your weapon such as slings, bayonets, or scopes. Furthermore, you also have access to vests that can increase the amount of ammo you have. So what’s the catch? Well, weight is a factor, as in the more stuff you carry, the slower you are. Furthermore, your access to this is determined by supply points. You gain more supply points by playing the objective, so play. The. BLOODY. OBJECTIVE!!!
Anyway, items cost certain amounts of supply points, so this means you have to compromise about what you bring in. For example, if you play an American assault, an M3 Grease Gun with a sling, costs 5 supplies, while a Thompson M1A1 by itself costs 6 supplies. So, with this knowledge, prepare to compromise, especially with your first rounds.
After all that has been said, many of you might remember what I have said earlier about their flaws. Well, here they are. Map designs can be kind of poor, and lack of content update. They still support the game, but don’t hold your breath for new content that isn’t fan made (remember, this is the source engine. It’s super easy to mod… so I’ve been told), considering that the last update was back in December of 2017. This ties into the big elephant in the room… lack of players. Because of the lack of long term support, due to it being released just before another major NWI release, Sandstorm Insurgency (also a really good shooter), player counts can be pretty low. This is in spite of the fact that the vast majority of reviewers like the game. Many players often complain that the game is dead, but that isn’t quite the truth. A lot of the players for some reason seem to be on European servers. Of course, this is also the reason why I’m talking about this game.
So in summary, if you want to try a good team-based fps, or a good WWII game, I strongly recommend giving Day of Infamy a try. It comes cheaply too, being 15 USD for the base game, and 20 USD for the deluxe edition, and it can be cheaper during sales. Also, final note, this game also has amazing voice acting, of various types for the various American, German, and Commonwealth units, using a mixture of your typical fps voices, but also many witty, and genuinely funny lines (in that regards, shout out to the commonwealth voice actors, with my favorites being the Scottish and Australian voice) Many of these voices can be found on Youtube.
So take a dive into Day of Infamy, and this has been a Noob’s guide to Day of Infamy, which can be found on Steam. Enjoy the rest of your day.
#day of infamy#ww2#wwiii#world war ii#world war two#world war second#second world war#video games#first person shooter#classic fps#humorous#review#tutorial#steam games#new world interactive#nwi
2 notes
·
View notes
Text
Me, staring at my library of 100+ Steam games: I have no idea what I want to play on stream next month.
#pei rambles#i've considered playing tkrb warriors but i also don't want to start it over and i think i'm halfway through...#i've never played valorant. i have it downloaded and have played the tutorial (which idr any of) so maybe i could do a stream trying it ou#same with league. i've got it downloaded and never played it.#i'm not...good...at fps games even though i like playing them. so if i play any they will be 'suffer with me' streams#i could play genshin or hsr on stream ig. but i'm not starting a new account for it. y'all get what i already have#i have like 45 non-hentai visual novels too. and detroit become human#i could play p3 or p5... i haven't finished p4 yet though and i wasn't planning on playing it on stream so maybe p5?
2 notes
·
View notes
Video
youtube
Nvidia - How To Limit FPS In Any Game - (Tutorial)
#youtube#GeForceExperience GeForceFix TechTroubleshooting Hashtags: Nvidia FPS Gaming Tutorial PCgaming GamingTips GameOptimization GPU Tech Gamers F
0 notes
Text
youtube
Here's a tutorial for those of you that wants to improve as a sniper in XDefiant! I'll share my experiences when it comes to aiming and how to improve it (practice), sensitivity, awareness and more, so you are able to take your sniping to the next level.
1 note
·
View note
Text
Sometimes you need a break from the action. Let’s implement a fully-functional pause menu!
youtube
#shawnthebro#ue4#unreal#stb#tutorial#youtube#unrealengine#unrealtutorial#unrealengine4#programming#ue5#unreal engine 4#unreal engine 5#unreal engine#UE 4#ue 5#pause menu#pause#menu#menus#widgets#widget#ui#blueprint#code#how to make a fps#ue5 fps#making a fps#fps tutorial#fps game dev
0 notes
Text
youtube
Best settings for cs2 fix shutter and fps drop
Tv head guide
#art#artists on tumblr#youtube#csgo#csgo2#cs graphic#csgo prime accounts#gaming#fps#fps games#tutorial#niv
1 note
·
View note
Text

🎮 Welcome to our comprehensive Call of Duty: WWII walkthrough! 🎮 Immerse yourself in the epic battles of World War II as we guide you through every intense mission, strategic encounter, and heart-pounding moment of this iconic first-person shooter. Join us on this historical journey as we relive the bravery and sacrifices of soldiers during one of the most pivotal periods in human history.
🔥 In this Call of Duty: WWII gameplay series, we provide you with step-by-step guidance, tactical insights, and expert tips to conquer each mission. From storming the beaches of Normandy on D-Day to battling through war-torn European cities, we've got you covered. Get ready to experience the realism, action, and emotion of World War II like never before.
🔔 Don't forget to subscribe and hit the notification bell to stay up-to-date with each new mission in our Call of Duty: WWII walkthrough. Whether you're a seasoned veteran looking to relive the nostalgia or a new recruit diving into the series, our detailed commentary and strategic gameplay will help you navigate the challenges ahead.
📢 Join the conversation! Share your thoughts, strategies, and favorite moments in the comments below. Let's embark on this unforgettable journey together!
#CallOfDutyWWII #Walkthrough #GamingGuide #WorldWar2 #CODWW2 #Gameplay #TacticalGaming #GamingCommunity #WWIIGame #GamingWalkthrough #FirstPersonShooter #HistoricalGaming #SubscribeNow
#Call of Duty: WWII Walkthrough#Call of Duty: WWII Gameplay Guide#COD WWII Mission by Mission#World War 2 FPS#Call of Duty WWII Strategy#Tactical Gaming#WWII Historical Gameplay#Call of Duty Gameplay#COD WWII Playthrough#Gaming Walkthrough#Call of Duty: WWII Campaign#First-Person Shooter#Gaming Community#WWII D-Day#Normandy Invasion#World War II Battles#Tactical Tips#Gaming Tutorial#Gaming Commentary
1 note
·
View note
Text
I think I will clean this one bathroom and then turn in for video games :)
#sky screams into the void#im gonna play an fps because those are on my mind right now#just a question of WHICH fps......#oh theres this dude who makes tutorial games to teach you how to play different genres and he has a fps one#so i might play that first before playing a serious one#THEN i have to decide which one to play....
1 note
·
View note
Text


Had a very shitty late October, so I barely had any time for online activities.
At least I had finally installed ts1 into my smartphone by using this tutorial on reddit. A bit laggy at some moments (mostly minor visual glitches and low fps) but it is still playable nevertheless.
149 notes
·
View notes
Text

Someone asked me how I created the fade transition in this gifset which I’ll try to explain in the most comprehensive way that I can. If you've never done something like this before, I suggest reading through the full tutorial before attempting it so you know what you'll need to plan for.
To follow, you should have:
basic knowledge of how to make gifs in photoshop
some familiarity with the concept of how keyframes work
patience
Difficulty level: Moderate/advanced
Prep + overview
First and foremost, make the two gifs you'll be using. Both will need to have about the same amount of frames.
For ref the gif in my example is 540x540.
I recommend around 60-70 frames max total for a big gif, which can be pushing it if both are in color, then I would aim for 50-60. My gif has a total of 74 frames which I finessed using lossy and this will be explained in Part 4.
⚠️ IMPORTANT: when overlaying two or more gifs and when using key frames, you MUST set your frame delay to 0.03 fps for each gif, which can be changed to 0.05 fps or anything else that you want after converting the combined canvas back into frames. But both gifs have to be set to 0.03 before you convert them to timeline to avoid duplicated frames that don't match up, resulting in an unpleasantly choppy finish.
Part 1: Getting Started
Drag one of your gifs onto the other so they're both on the same canvas.
The gif that your canvas is fading FROM (Gif 1) should be on top of the gif it is fading INTO (Gif 2).

And here's a visual of the order in which your layers should appear by the end of this tutorial, so you know what you're working toward achieving:

Part 2: Creating the grid
Go to: View > Guides > New guide layout
I chose 5 columns and 5 rows to get the result of 25 squares.

The more rows and columns you choose, the more work you'll have to do, and the faster your squares will have to fade out so keep that in mind. I wouldn't recommend any more than 25 squares for this type of transition.

To save time, duplicate the line you've created 3 more times, or as many times as needed (key shortcut: CMD +J) and move each one to align with the guides both horizontally and vertically. You won't need to recreate the lines on the edges of the canvas, only the ones that will show.
After you complete this step, you will no longer need the guides so you can go back in and clear them.

Follow the same duplicating process for the squares with the rectangle tool using the lines you've created.
Align the squares inside the grid lines. The squares should not overlap the lines but fit precisely inside them.
This might take a few tries for each because although to the eye, the squares look all exactly the same size, you'll notice that if you try to use the same duplicated square for every single one without alterations, many of them will be a few pixels off and you'll have to transform the paths to fit.
To do this go to edit > transform path and hold down the command key with the control key as you move one edge to fill the space.
Once you're done, put all the squares in their separate group, which needs to be sandwiched between Gif 1 and Gif 2.

Right click Gif 1 and choose "create clipping mask" from the drop down to mask it to the squares group. This step is super important.
After this point, I also took the opacity of the line groups down to about 40% so the lines wouldn't be so bold. Doing this revealed some squares that needed fixing so even if you aren't going dim the lines, I recommend clicking off the visibility of the lines for a moment to make sure everything is covered properly.

Part 3A: Prep For Key framing
I wanted my squares to fade out in a random-like fashion and if you want the same effect, you will have to decide which squares you want to fade out first, or reversely, which parts of Gif 2 you want to be revealed first.
In order to see what's going on underneath, I made Gif 1 invisible and turned down the opacity of the squares group.

If you want text underneath to be revealed when the squares fade away, I would add that now, and place the text group above Gif 2, but under the squares group.

Make a mental note that where your text is placed and the order in which it will be revealed is also something you will have to plan for.
With the move tool, click on the first square you want to fade out. Every time you click on a square, it will reveal itself in your layers.
I chose A3 to be the first square to fade and I'm gonna move this one to the very top of all the other square layers.
So if I click on D2 next, that layer would need to be moved under the A3 layer and so on. You'll go back and forth between doing this and adding key frames to each one. As you go along, it's crucial that you put them in order from top to bottom and highly suggested that you rename the layers (numerically for example) which will make it easier to see where you've left off as your dragging the layers into place.

Part 3B: Adding the Keyframes
This is where we enter the gates of hell things become tedious.
Open up the squares group in the timeline panel so you can see all the clips.
Here is my example of the general pattern that's followed and its corresponding layers of what you want to achieve when you're finished:

So let’s try it!
Expand the control time magnification all the way to the right so you can see every frame per second.

As shown in Part 3A, select your first chosen square.
Where you place the time-indicator on the panel will indicate the placement of the keyframe. Click on the clock next to opacity to place your first keyframe.

Move the time-indicator over 3 frames and place the next key frame.

Things to consider before moving forward:
Where you place your very first keyframe will be detrimental. If you're using a lot of squares like I did, you may have to start the transition sooner than preferred.
If you're doing 25 squares, the key frames will have to be more condensed which means more overlapping because more frames are required to finish the transition, verses if you're only using a 9-squared grid. See Part 4 for more detailed examples of this.
The opacity will remain at 100% for every initial key frame, and the second one will be at 0%.

Instead of creating two keyframes like this and changing the opacities for every single clip, you can copy the keyframes and paste them onto the other clips by click-dragging your mouse over both of them and they'll both turn yellow. Then right click one of the keyframes and hit copy.
Now drop down to your next clip, move your time-indicator if necessary to the spot where the first keyframe will start and click the clock to create one. Then right click it and hit "paste".


Tip: When you have both keyframes selected, you can also move them side to side by click-dragging one of them while both are highlighted.
Your full repetitive process in steps will go as follows:
click on square of choice on the canvas
drag that square layer to the top under the last renamed
in timeline panel: drop down to next clip, move time-indicator tick to your chosen spot for the next keyframe
create new keyframe
right click new keyframe & paste copied keyframes
repeat until you've done this with every square in the group
Now you can change the opacity of your squares layer group back to 100% and turn on the visibility of Gif 1. Then hit play to see the magic happen.
PART 4: Finished examples
Example 1

the transition starts too soon Cause: initial keyframe was placed at frame 0
the squares fade away too quickly Cause: overlapping keyframes, seen below. (this may be the ideal way to go with more squares, but for only 9, it's too fast)

Example 2

more frame time for first gif
transition wraps up at a good point Cause: in this instance, the first keyframe was placed 9 frames in, and the keyframes are not overlapping. The sequential pair starts where the last pair ended, creating a slower fade of each square.


Part 5: Final Tips and Saving
You can dl my save action here which will convert everything back into frames, change the frame rate to 0.05 and open the export window so you can see the size of the gif immediately.
If it's over 10gb, one way to finesse this is by use of lossy. By definition, lossy “compresses by removing background data” and therefore quality can be lost when pushed too far. But for most gifs, I have not noticed a deterioration in quality at all when saving with lossy until you start getting into 15-20 or higher, then it will start eating away at your gif so keep it minimal.

If you've done this and your gif is losing a noticeable amount of quality and you still haven’t gotten it below 10mb, you will have no choice but to start deleting frames.
When it comes to transitions like this one, sometimes you can't spare a single frame and if this is the case, you will have to return to the timeline state in your history and condense the key frames to fade out quicker so you can shorten the gif. You should always save a history point before converting so you have a bookmark to go back to in case this happens.
That's pretty much it, free to shoot me an ask on here or on @jugheadjones with any questions.
#gif tutorial#photoshop tutorial#transition tutorial#grid tutorial#usergif#ps help#tutorials#tutorials*#resources*#requested
427 notes
·
View notes
Text
Modern! RDR2 HC’s:
the media each character consumes (*^▽^*)

Arthur Morgan

• Barely knows how to work a device.
• Only bought an iphone because John kept making fun of him for the $80 android he bought at Walmart
• John always gets mad at him for not responding to his texts
• Opens YouTube through safari.
• Watches the occasional drawing tutorial.
• Tutorials on how to take care of horses
• Watches those wilderness/camping vlogs made by middle aged men when the weather isn’t good enough to do outside work.
• Horse hoof restoration videos if he’s feeling a little crazy. • One time John sent him an out of pocket reel, and he opened it while he was in public. -it played on full volume and everyone heard
-he refused to speak to John for a week afterwards... • Doesn't comment on anything (probably doesn't even know how), but if he did on one of the reels John sends, I'm guessing it would be "on MY cellular device?"

John Marston

•Johnny boy mainly uses YouTube and Instagram
• Watches FPS game walkthroughs
• Finds unhinged people like Theo Von hilarious
• Watches Joe Rogan for his stupid conspiracy theories
-tells abigail about them to strike up conversation and she calls him stupid
• A few streamers (probably gamer ones)
• Addicted to scrolling on insta
-The type to just like every post he scrolls past
• Plays COD all the time.
-Screams when he loses and Abigail yells at him to shut up from the other room
• Sends memes to Arthur even though he doesn't understand them • If he is on tik tok he'd def comment "put this on ig reels" at every cringey tik tok he stumbles across.
Dutch Van Der Linde

• YouTube, TUMBLR, Twitter, Facebook (even though he thinks it’s outdated, but keeps it so he can send videos to Hosea)
•there an HC somewhere that said he’s the type to post obscure thirst traps on tumblr like pics of his arms/veins which is so funny
• Watches educational videos on YouTube:
-biographies on philosophers, or dictators, historical figures
-Social commentary
-Debates
• Cackles at videos of police officers getting heckled by that one “I have nothinggg😫” guy on tik tok
•Enjoys those videos of people falling over and nearly dying on Facebook and sends them to Hosea who responds with “😱😧”
• Hates Elon Musk and attacks him on twitter
• Has his own blog where he posts rants about the government and the current state of the world right now (cue in Jaden Smith) and then you scroll and it’s just a pic of his abs. • Would comment "my ranked teammates" whenever John or Micah tweet something stupid.
Hosea Mathews

•Facebook
•Only uses it on his laptop with a little mouse and everything
• Watches videos of orthopedic surgeons explaining beneficial stretches for your back and whatnot
• The news
• Animal documentary’s
• Traveling vlogs
•Watches with his eyes squinted and mouth slightly agape like old people do • Dutch sends him videos of those 'Nigerian king' scammers which he finds hilarious
Charles Smith

• Youtube, insta, tik tok
•Knows how to use tech fairly well but isn’t chronically online
•only scrolls when he’s bored in a waiting room or something
• Sports clips like Tennis, Football, UFC
• Wilderness/survival videos
• Videos of people building things from scratch •he's just a chill guy(✿◡‿◡) • Also doesn't get the memes John sends • If he stumbles across a strange and offensive tik tok he'd comment "oh that's not..."
Micah Bell

• TWITTER, instagram
• Laughs and reposts those really messed up videos of people dying in horrific accidents on insta reels
•Drunk, racist tweets
• Leaves hate comments on people’s posts when they look too happy like "kys"
• Leaves disgustingly thirsty comments on women’s posts
• Watches true crime on cable late at night as he drinks like a loser on his couch
bow divider created by @vysleix shiny divider created by @anitalenia images found on pinterest
#arthur morgan imagines#arthur morgan fluff#red dead redemption 2#arthur morgan#john marston fluff#john marston imagines#rdr2 headcanons#rdr2 imagines#rdr2 community#john marston#arthur morgan headcanons#john marston headcannons#charles smith#rdr2 micah#micah bell#rdr2 fandom
86 notes
·
View notes