#git repository not found error
Text
What is GitHub? Github tutorial and project setup, Reference guide to GitHub Commands
Hi, a new #video on #GitHub #tutorial and #Project #Setup is published on @codeonedigest #youtube channel. Learn, what is GitHub in 1 minute.
#Gitprojecttutorial #gitproject #gitprojectupload #gitprojectsetup #gitprojectmanagement #gitprojectexample #git
GitHub is a code hosting platform for version control and collaboration. It lets people work together on projects from anywhere. GitHub is easy to use, it supports both public and private repositories, it is free of cost.
In this video we will learn, how to start working with GITHUB repository? How to create GITHUB project? How to initialize GITHUB repository? How to add files in GITHUB? How to…

View On WordPress
#Git and github#git and github gull tutorial#git bash#git commands#git commands with examples#git project#git project example#git project management#git project setup#Git project tutorial#git project upload#git project vs repository#git repository#git repository clone#git repository creation#git repository delete#git repository for beginners#git repository not found error#git repository setup#Git repsository tutorial#git stash#github#github account creation#github actions#github actions tutorial#github basics#github course#github desktop#github developer pack#github kya hai
0 notes
Text
5 Essential Tools for Streamlining ReactJS Development

ReactJs stands out as a powerful framework in the dynamic world of web development. To leverage the optimal capacity of ReactJs you need to hire React developers who are thorough with its essential tools. Whether you are looking for a new hire or already have a ReactJs team in place, these tools can have a significant impact in enhancing business productivity and streamlining the development process.
Without further ado, let’s look at what are these essential tools that your ReactJs developers must be proficient in.
Enhancing Efficiency with These 5 ReactJs Development Tools
Webpack
The reliable module bundler Webpack makes managing assets and dependencies easier. Better performance is achieved through code optimization, which is crucial for ReactJS apps. When considering Reactjs developers for hire examine their competence in this tool. Webpack is an essential tool since it helps streamline the development process and saves time and effort.
Visual studio code
Developers frequently choose Visual Studio Code (VS Code) because of its many plugins and adaptability. Coding is made easier and more productive by its features, which include IntelliSense, debugging support, and Git integration. Making sure React engineers are conversant with VS Code might be a huge advantage for teams seeking to hire them.
ESLint
Ensuring the quality of code is crucial for every development effort. JavaScript code problems can be found and fixed with the aid of ESLint. It guarantees that your ReactJS projects stay tidy and manageable by enforcing coding standards. This is especially crucial if you hire React developers because it guarantees team uniformity.
React Developer Tools
Developers can easily analyze and debug React applications with the help of the React Developer Tools extension for popular browsers like Chrome and Firefox. Debugging becomes easier when component hierarchies, props, and states are understood. Debugging can be made easier by hiring ReactJS experts who are skilled with this tool.
Jest
An essential component of the development lifecycle is testing. A thorough testing framework called Jest integrates well with ReactJS. It makes developing unit tests easier and guarantees that your components function as intended. Investing in developers proficient in Jest can result in programs that are more dependable and devoid of errors.
If you are wondering how to hire Reactjs developers who are proficient in these tools, the answer is your one-stop hiring platform Uplers.
Uplers is a reputed talent network that has gained prominence for over a decade among 7,000+ global clients. With a 1M+ talent network spread across 5+ time zones, Uplers can connect you with the top 3.5% of AI-vetted Indian remote talent. You get the best match for the job at up to 40% cost-savings with zero hassle.
Not only that, Uplers can assist you in comparative salary analysis by comparing the salary of your local hire to that of an Indian remote talent. This will help you align your Reactjs salary with the existing salary trends in the market to attract and retain top talent.
Concluding Thoughts
To conclude, leveraging these React tools can significantly streamline the development process. When you hire React developers look for their competence in these tools repositories. Top talent solutions like Uplers can help you invest in the right talent and steer competition in the fast-paced web development landscape.
#hire react developer#react js developers for hire#react js salary#How to hire Reactjs developer#top talent solutions
0 notes
Text
"module not found : Error: Cannot resolve module 'react/lib/ReactMount' "
I used Reactjs and webpack to start a project, and when I run the "node server" in the command prompt, there is an error like this:
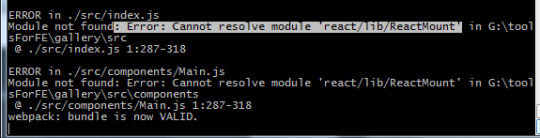
And the chrome explorer opened successful but also have problems as follows:

The github is: (github.com/Yangqin0607/gallery)
Here is the package.json
{ "private": true, "version": "0.0.1", "description": "YOUR DESCRIPTION - Generated by generator-react-webpack", "main": "", "scripts": { "clean": "rimraf dist/*", "copy": "copyfiles -f ./src/index.html ./src/favicon.ico ./dist", "dist": "npm run copy & webpack --env=dist", "lint": "eslint ./src", "posttest": "npm run lint", "release:major": "npm version major && npm publish && git push --follow-tags", "release:minor": "npm version minor && npm publish && git push --follow-tags", "release:patch": "npm version patch && npm publish && git push --follow-tags", "serve": "node server.js --env=dev", "serve:dist": "node server.js --env=dist", "start": "node server.js --env=dev", "test": "karma start", "test:watch": "karma start --autoWatch=true --singleRun=false" }, "repository": "", "keywords": [], "author": "Your name here", "devDependencies": { "babel-core": "^6.0.0", "babel-eslint": "^6.0.0", "babel-loader": "^6.0.0", "babel-polyfill": "^6.3.14", "babel-preset-es2015": "^6.0.15", "babel-preset-react": "^6.0.15", "babel-preset-stage-0": "^6.5.0", "bower-webpack-plugin": "^0.1.9", "chai": "^3.2.0", "copyfiles": "^1.0.0", "css-loader": "^0.23.0", "eslint": "^3.0.0", "eslint-loader": "^1.0.0", "eslint-plugin-react": "^6.0.0", "file-loader": "^0.9.0", "glob": "^7.0.0", "isparta-instrumenter-loader": "^1.0.0", "karma": "^1.0.0", "karma-chai": "^0.1.0", "karma-coverage": "^1.0.0", "karma-mocha": "^1.0.0", "karma-mocha-reporter": "^2.0.0", "karma-phantomjs-launcher": "^1.0.0", "karma-sourcemap-loader": "^0.3.5", "karma-webpack": "^1.7.0", "minimist": "^1.2.0", "mocha": "^3.0.0", "null-loader": "^0.1.1", "open": "0.0.5", "phantomjs-prebuilt": "^2.0.0", "react-addons-test-utils": "^15.0.0", "react-hot-loader": "^1.2.9", "rimraf": "^2.4.3", "style-loader": "^0.13.0", "url-loader": "^0.5.6", "webpack": "^1.12.0", "webpack-dev-server": "^1.12.0" }, "dependencies": { "core-js": "^2.0.0", "normalize.css": "^4.0.0", "react": "^15.0.0", "react-dom": "^15.0.0" }}
https://codehunter.cc/a/reactjs/module-not-found-error-cannot-resolve-module-react-lib-reactmount
0 notes
Text
A Guide to Salesforce DevOps
Salesforce DevOps is a set of practices that combine the software development and operations processes for the Salesforce platform. DevOps is designed to help organizations increase their agility, improve collaboration, and enhance the quality of their software releases. In this blog, we will provide a guide to Salesforce DevOps and explore how it can benefit organizations.
Understanding Salesforce DevOps
Salesforce DevOps involves integrating the development, testing, and deployment of Salesforce applications with a set of automated tools and processes. DevOps aims to streamline the software development lifecycle and improve the speed and efficiency of software releases. Salesforce DevOps involves the use of tools such as version control systems, continuous integration, continuous delivery, and automated testing.
Benefits of Salesforce DevOps
Salesforce DevOps offers several benefits to organizations, including:
Faster release cycles: Salesforce DevOps enables organizations to release new features and updates faster, which can help them stay ahead of the competition.
Improved collaboration: DevOps promotes collaboration between developers, testers, and operations teams, which can help improve the quality of software releases.
Better quality software: DevOps ensures that software releases are thoroughly tested and validated before being deployed, which can help reduce the number of bugs and issues that users experience.
Increased efficiency: DevOps automates many of the manual processes involved in software development and deployment, which can help organizations become more efficient and reduce costs.
Key Components of Salesforce DevOps
Salesforce DevOps involves several key components, including:
Version control: This involves using a version control system to manage changes to code and configuration files.
Continuous integration: This involves regularly merging code changes into a shared code repository and testing them to identify any issues.
Continuous delivery: This involves automating the deployment of software updates to production environments.
Automated testing: This involves using automated testing tools to test software releases and identify any issues before they are deployed.
Implementing Salesforce DevOps
To implement Salesforce DevOps, organizations should follow these best practices:
Define a clear DevOps strategy and communicate it to all stakeholders.
Use an Agile development methodology to ensure that development and operations teams are working together effectively.
Use a version control system to manage code and configuration changes.
Implement continuous integration to ensure that code changes are tested regularly.
Use automated testing tools to identify and address issues quickly.
Automate the deployment process to reduce the risk of errors and improve efficiency.
Salesforce DevOps Tools
Several tools are available for implementing Salesforce DevOps, including:
Git: A popular version control system that can be used to manage changes to code and configuration files.
Jenkins: An open-source automation server that can be used to implement continuous integration and delivery.
Salesforce DX: A development environment that enables developers to build and deploy Salesforce applications more efficiently.
Selenium: A suite of tools that can be used for automated testing of Salesforce applications.
Heroku: A cloud platform that can be used to deploy and scale Salesforce applications.
In conclusion, Salesforce DevOps is a powerful set of practices that can help organizations improve their agility, collaboration, and software quality. By implementing Salesforce DevOps, organizations can accelerate their release cycles, reduce costs, and deliver better software to their customers. By following the best practices outlined in this guide and using the right tools, organizations can successfully implement Salesforce DevOps and realize its many benefits.
Founded in 2015, Premium Learning Systems have established a strong foothold in the domain of training with our phenomenal results. Till date, more than 25,000 students have been a part of this journey that has enhanced their skills and enlightened their career paths.
We offer a Career Accelerator Program (C.A.P.) which is an intensive 10+ week online training program conducted by Premium Learnings to enable professionals in the Salesforce ITIndustry.
For any Queries Contact us We offer a Career Accelerator Program (C.A.P.) which is an intensive 10+ week online training program conducted by Premium Learnings to enable professionals in the Salesforce ITIndustry.
For any Queries Contact us
https://premiumlearnings.com/courses/online-career-accelerator-program/?utm_source=blogsubmission&utm_medium=tumblrDhanashree
If you are interested in Salesforce , you can join our Career Accelerator Program (C.A.P)
.Click the link and join the course: https://premiumlearnings.com/contact/?utm_source=blogsubmission&utm_medium=tumblrdhanashree
0 notes
Text
GITHUB, GITLAB, BITBUCKET. WHICH CODE REPOSITORY DO YOU USE?
Code review is an essential part of the software development process. It allows you to find and fix bugs, resolve errors, and improve code quality before implementation. Git, released in 2005, has become the gold standard for version control systems (VCS). It is the most reliable tool for source code and version control. According to a survey published by JetBrains SRO in 2021, 93% of developers surveyed use Git. It offers the most robust feature set for programmers, has the most reliable workflow, and is supported by most third-party platforms on the market.
There are three primary options among code repositories for those who use Git. They are GitHub, GitLab, and Bitbucket. All these three platforms offer excellent services for managing repositories. So which code repository should you use? And which one will be the best choice for your team’s needs?
Each tool has its share of fans. According to the research mentioned earlier by JetBrains, GitHub is leading with a 34% market share. GitLab and Bitbucket have 29% and 21% market share, respectively. They all have core features like integrated editing, pull request management, code review, bug tracking, mark-down support, snippets, and forks/clones of repositories, to mention but a few. But there are some differences.

GitHub, first launched in 2008, is currently owned by Microsoft Corporation. It is a code hosting platform for version control and collaboration centered around the Git VCS. It has become so popular that it is almost a synonym with Git. The platform allows collaboration for free on open-source projects. It has become the epicenter for software developers worldwide to share code easily and cooperate on major open projects. The company says that when it started, it took one year to get to 33,000 repositories, and in just two years, it had already hosted its millionth repository. Developers from across the globe continue to consider GitHub as the place where they can join a project to gain experience, show their proficiency by building a portfolio of their projects, and communicate with the active community of other developers to solve any problem. It’s the developer version of Facebook. According to the GitHub website, 83 million developers and 4 million organizations use the platform when we post this article. It hosts more than 200 million projects in total. Many of the largest companies in the world, including Pinterest, Etsy, Spotify, and Facebook, use GitHub.
GitHub provides a free wiki, issue tracker, project planner, and a code review system that works via pull requests. GitHub does not offer any testing service but has a marketplace for integrations with third-party tools. GitHub also has a robust REST API if you create custom integrations.
GitHub allows unlimited public and private repositories for free. The company started offering free private repositories again in 2020, switching from a pay-for-privacy to a pay-for-features model. The cost is $4 per user per month for teams that want more advanced features. GitHub also offers an enterprise version that allows you to host GitHub instances on your servers. This enterprise service costs $21 per user per month.
GitLab was founded in 2011 and launched three years later in 2014. The reason for such a long delay is that GitLab was initially developed as a collaboration tool rather than a repository hosting solution. Invented by a Ukrainian programmer, the platform made a considerable impression on another programmer from the Netherlands in 2012 by its code quality. Both programmers teamed up, upgraded the product, and in 2014 GitLab was officially incorporated as a limited liability corporation. GitLab’s website defines the corporation as an open core company that develops software for the software development lifecycle with 30 million estimated registered users and more than 1 million active users. It has a vibrant community of more than 2,500 contributors. It is the platform for companies including Siemens, Goldman Sachs, Credit Agricole, and Airbus.
GitLab’s stated goal is to revolutionize workflows for development teams – meaning it does not just store code and help to collaborate but strives to do much more. The main distinction between GitLab and other systems is that it supports the entire DevOps cycle. GitLab defines DevOps as a software engineering methodology intended to integrate the work of software development and software operations teams by facilitating a culture of collaboration and shared responsibility. DevOps provides a high level of automation, enabling you to go rapidly between all the development and application stages. This approach makes the testing, staging, and release processes much faster. GitLab also supports its system’s continuous integration, deployment, and delivery. These tools enable the build process to run directly from Git.
While GitLab has fewer built-in integrations than GitHub, it is open source, meaning any part of the code is subject to customization. This option provides the platform with excellent flexibility, enhanced by a robust plugin ecosystem and REST API. You may even customize the login page and user interface to reflect your branding.
Regarding pricing, GitLab allows unlimited free public and private repositories, just like GitHub. It offers paid subscriptions focused on more relevant features for managers, directors, and executives. A paid subscription for their equivalent of GitHub enterprise is $19 per user per month. Another more expansive offering is $99 per user per month, and this service competes with Veracode and Checkmarx. Most importantly, GitLab can be hosted and run on a local system since it is open source. This fact means that private repositories and codes aren’t out there in the hands of third parties. From this perspective, GitLab is more secure than GitHub.
Bitbucket is today’s third most popular Git repository. Unlike GitHub and GitLab, it allows using Mercurial (another VCS technology). It was initially launched in 2008 and was quickly acquired by Atlassian in 2010. Bitbucket currently does not have as many features as GitLab or GitHub, but it attracts companies with seamless integrations inside the Atlassian ecosystem. Atlassian is famous for tools like Jira, Confluence, and Trello, so that’s a big plus for users who regularly work with those tools. Bitbucket’s website mentions that its “best-in-class Jira and Trello integrations are designed to bring the entire software team together to execute a project.” It has a robust application marketplace and an API that allows you to build your own integrations. Atlassian now has a build and testing service. Companies using Bitbucket include Samsung, Splunk, Netflix, and Barclays Capital.
0 notes
Text
battlelog cheats mod U24!
💾 ►►► DOWNLOAD FILE 🔥🔥🔥🔥🔥
Wondering if is the right place to buy game hacks and cheats? Could you be scammed out of your money? Battlelog Hacks: EA's new Battlelog service is pretty awesome. Except when it isn't. - battlelog-hacks/ at master · cowboy/battlelog-hacks. is your ideal option if you're looking to find the best cheats for the most popular games out there. unknowncheats - multiplayer game hacking and cheats, leading the scene since we offer a huge amount of information and content for game hacks and game. 9 If you're using Firefox, make sure you have the Greasemonkey add-on installed first. Note: If you were using the original gist version , uninstall that first. See the "What's a Userscript? Once installed, reload the Battlelog webpage. You should see a little blue message in the top left of Battlelog confirming that Battlelog Hacks has been loaded. Userscripts are a convenient way to be able to add extra functionality to webpages. Chrome has native support for userscripts as Extensions, and Firefox supports userscripts via the Greasemonkey add-on. Once the userscript has been installed, changes to the main script file will automatically load whenever it's updated. Just reload the Battlelog webpage to get the latest version. And for what it's worth, I've spent a LOT of time in the WebKit inspector, setting breakpoints, monkey-patching methods, tracing through call stacks, etc. I've seen things done in JavaScript that have made my head spin and are going to keep me up at night for years to come. If this script makes your life easier, I'd appreciate a modest donation. It'll help pay for the therapist I'm going to need. Remember that once you're done developing, you'll need to disable battlelog-hacks-dev. Or just leave the webserver running, always. In lieu of a formal styleguide, take care to maintain the existing coding style. Issue a pull request when done. Found a bug? File an issue. Also, please don't edit files in the "dist" subdirectory as they are generated via build. Auto-retry join errors are now whitelisted, to avoid auto-retrying in certain situations like when kicked from a server. Version number is announced in a little blue box upon start. Broke the hooking stuff out into JavaScript Hooker, included as a submodule. Created a build tool and updated the dev web server. Automatically selects the first server in the server browser after refreshing or sorting. Now remembers Com center friends list state. Updated Server join auto-retry error list. Streamlined development process slightly. Skip to content. Star Permalink master. Branches Tags. Could not load branches. Could not load tags. This commit does not belong to any branch on this repository, and may belong to a fork outside of the repository. Battlelog Hacks What does this script do? What might this script do in the future? Installation What's a Userscript? Raw Blame. Edit this file. Open with Desktop View raw View blame. Battlelog Hacks EA's new Battlelog service is pretty awesome. Except when it isn't. What does this script do? Auto-retries server join so you don't have to spam the button. To cancel auto-retry, click the "Close" button in the Game Manager error popup. Remembers and auto-re-applies server browser sorting preference. Prevents the server browser from scrolling to the top of the page on refresh. Ensures that Com center Online friends starts opened, while Offline friends starts collapsed. Installation If you're using Firefox, make sure you have the Greasemonkey add-on installed first. What's a Userscript? Notes This is a work in progress. Lots of messages are logged to the console. Check it out. This has been tested in Firefox 7 with Greasemonkey and Chrome It works for me. Hopefully ESN will fix these issues internally, rendering this script obsolete. Contributing Running in "development" mode: Install Git for Windows if you don't already have it. Drag battlelog-hacks-dev. Run start-webserver. Reload Battlelog. Repeat steps ad nauseum. Once done, run build. Not even a version number. You signed in with another tab or window. Reload to refresh your session. You signed out in another tab or window.
1 note
·
View note
Text
Android ndk dev guide

#ANDROID NDK DEV GUIDE FOR ANDROID#
#ANDROID NDK DEV GUIDE ANDROID#
#ANDROID NDK DEV GUIDE SOFTWARE#
#ANDROID NDK DEV GUIDE SERIES#
WARRANTIES OR CONDITIONS OF ANY KIND, either express or implied. For further into the future, see the NDK Roadmap. For what we're working on, see the milestones.
#ANDROID NDK DEV GUIDE ANDROID#
Unless required by applicable law or agreed to in writing, softwareĭistributed under the License is distributed on an "AS IS" BASIS, WITHOUT Android Native Development Kit (NDK) The NDK allows Android application developers to include native code in their Android application packages, compiled as JNI shared libraries. Use this file except in compliance with the License. The ASF licenses thisįile to you under the Apache License, Version 2.0 (the "License") you may not See the NOTICE file distributed with this work forĪdditional information regarding copyright ownership.
#ANDROID NDK DEV GUIDE SOFTWARE#
Licensed to the Apache Software Foundation (ASF) under one or more contributor LicenseĬopyright 2015 The Android Open Source Project, Inc.
#ANDROID NDK DEV GUIDE FOR ANDROID#
Please see CONTRIBUTING.md for more details. Cloud Anchors developer guide for Android NDK (C) On this page Prerequisites Enable the ARCore API Authorize your app to call the ARCore Cloud Anchor API Host a Cloud Anchor Check the mapping. Submitting a pull request through GitHub. Patches and new samples are encouraged, and may be submitted by forking this project and If you've found an error in these samples, please file an issue. On Command Line/Terminal: make sure set up ANDROID_HOME and ANDROID_NDK_HOME to local installation of SDK and NDK, then go to individual sample dir, and use "gradlew assembleDebug".With Android Studio: use "Import Project(Eclipse ADT, Gradle, etc)" or "File" > "Import Project" option.Some are documented at Android Studio pageįor samples using Android.mk build system with ndk-build see the android-mk branch.Google Play Game Samples with Android Studio.Note that gradle-experimental does not work with unified headers yet: use NDK version up to r15 and Android Studio up to version 2.3 for gradle-experimental plugin, refer to directory other-builds/experimental.for ndk-build with Android Studio, refer to directory other-builds/ndkbuild.Samples could also be built with other build systems: These samples uses the new CMake Android plugin with C++ support. Describe the DragonBoard™ 410c peripherals, I/O expansion capabilities, Compute (CPU and Graphics) capabilities, and Connectivity capabilities.This repository contains Android NDK samples with Android Studio C++ integration. Create, compile and run a Hello World program.ĥ. Install Android 5.1 (Lollipop) and Linux based on Ubuntu.Ĥ. In Module 7, will give you a general introduction and brief overview of Android Studios Native Development Kit (NDK). Make use of git, adb and fastboot to flash multiple OS and repair bricked boards.ģ. Configure at least one integrated development environment (IDE) for developing software.Ģ. You are an entrepreneur, innovator or member of a DIY communityĪfter completing this course, you will be able to:ġ.You want to pivot your career towards the design and development of Internet of Things enabled products.You want to develop hands-on experience with mobile technologies and the Internet.This course is suitable for a broad range of learners.
#ANDROID NDK DEV GUIDE SERIES#
This is the first in a series of courses where you will learn both the theory and get the hands-on development practice needed to prototype Internet of Things products. We will use the DragonBoard™ 410c single board computer (SBC). Do you want to develop skills to prototype mobile-enabled products using state-of-the-art technologies? In this course you will build a hardware and software development environment to guide your journey through the Internet of Things specialization courses.
0 notes
Text
Imageoptim linux

IMAGEOPTIM LINUX INSTALL
IMAGEOPTIM LINUX UPDATE
IMAGEOPTIM LINUX MANUAL
IMAGEOPTIM LINUX SOFTWARE
What is the best image format for websites?.
What is the best image optimizer for WordPress?.
How do I optimize photos on my computer?.
Use the Adwaita theme by default on Windows as the Windows10 GTK theme.
Image previews now honor the JPEG orientation EXIF tag.
Fix image previews: no more ugly thumbnails with indexed images.
Do not allow to remove images with the key while an.
Multiselection: Multiple files can now be selected and their parameters can.
Allow to resize images (downscale only, preserve ratio).
Do not optimize again images that have already been optimized.
Display a "Canceled" status on non-optimized image while the "Stop".
The "Stop" button now stops the running optimizations and not only the.
"Optimize" and "Stop" buttons behaviour improved:.
Setting the default output locations / name or pattern of output files.
Number of threads used to optimize images.
Theme selection / dark theme preference.
YOGA can no more output a PNG larger than the input one when performing.
JPEG optimization improved: up to 7.3 % of additional size reduction.
Fix the abnormal amount of processes created (and not cleaned) when.
(changes on master but not released yet):.
IMAGEOPTIM LINUX INSTALL
On Debian / Ubuntu, they can be installed with the following command: sudo apt install gettext NOTE: you will need to have xgettext, msgmerge and msgfmt executable installed on your system to run the above commands. To compile locales, run: nox -session locales_compile
IMAGEOPTIM LINUX UPDATE
To extract messages and update locales run: nox -session locales_update You can also fix automatically coding style errors with: nox -s black_fix To run the tests only for a specific Python version, you can use following commands (the corresponding Python interpreter must be installed on your machine): nox -session test-3.7 Then you can check for lint error: nox -session lint You will first have to install nox: pip3 install nox Do not forget to add your name as the translation of the translator-credits key (one name per line, e-mail is optional): #: yoga_image_optimizer/about_dialog.py:38 To translate YOGA Image Optimizer, you can submit your translations using a Pull Request on Github.
IMAGEOPTIM LINUX SOFTWARE
If the software is not available in your language, you can help translating it. Flake8 and Black are used on this project to enforce coding style. Please note that your code must pass tests and follow the coding style defined by the pep8. This is of course not necessary if you just want to fix some typo or small errors in the code. This will allow us to discuss the best way to do it. Please consider filing a bug before starting to work on a new feature.
All the logs and message outputted by the software,.
What is your operating system / Linux distribution (and its version),.
If you found a bug, please open an issue on Github with as much information as possible:
or ask on Discord (I am not always available for chatting but I try to answer to everyone).
You can also pass some image files to open: yoga-image-optimizer image1.png image2.jpeg To run YOGA Image Optimizer, just type the following command: yoga-image-optimizer zip version or the Windows installer from the release page: You will not be able to run the software from your graphical app menu (GNOME Shell.). NOTE: Installing from PyPI will not install. Then install YOGA Image Optimizer using pip: sudo pip3 install yoga-image-optimizer
IMAGEOPTIM LINUX MANUAL
įinally, you can install desktop file, icons and manual using the following command: sudo. Then install YOGA Image Optimizer using pip: sudo pip3 install. Then clone this repository and navigate to it: git clone On Debian and Ubuntu this can be achieved with the following command: sudo apt install git build-essential python3 python3-dev python3-pip libgirepository1.0-dev libcairo2-dev pkg-config gir1.2-gtk-3.0 This is currently the simplest way to install YOGA Image Optimizer on all major Linux distributions:įirst, you will need to install some dependencies on your system. The package is available on AUR ( yoga-image-optimizer):Ī Flatpak package is available on Flathub.
0 notes
Text
Github desktop windows

#GITHUB DESKTOP WINDOWS HOW TO#
#GITHUB DESKTOP WINDOWS INSTALL#
#GITHUB DESKTOP WINDOWS WINDOWS#
NTFS, the default filesystem for Windows, does not support many features that the more modern filesystems Linux supports such as symlinks, file attributes (including the extremely important executable bit), etc. Windows users should take some extra precautions when editing Linux-spawned files.
Write themes for batocera-emulationstation.
Redirect upgrades from any board to my own builds.
Latency reduction and optimizing performance.
Raspberry Pi: Add power buttons/switches.
Sync files across multiple devices (Syncthing).
PCman built-in file manager (for Xorg-powered devices).
If you keep that in mind, the GitHub Desktop app makes working with the five basic Git commands a simple and straightforward process. My assumption is that GitHub's goal with this application is to keep this DevOps tool as simple as possible so as not to confuse the new Git users for whom it is designed. There is an option to specifically edit the name and email address properties that are attached to each commit, which are stored within Git configuration files, but the tool does not provide any facilities to edit any other configuration settings. The biggest drawback I see with the tool in this capacity is its limited support for the git config command. The tool covers the five basic Git commands. With the GitHub Desktop app, it is extremely simple to initialize a repository, stage files and issue commits. The blue button below the input fields (see above) issues a new commit to the current branch. In terms of issuing a commit, the tool provides two input fields where a user can provide a message and a description.
10 Git quiz questions to test your distributed version control skills.
Five ways to fix Git's 'fatal: repository not found' error.
How Atomist's Rod Johnson works with pull requests.
#GITHUB DESKTOP WINDOWS WINDOWS#
Where system, global and local Windows Git config files are saved.Follow these Git commit message guidelines.Where Git fits in your distributed version control system tool belt.Use the Jenkins OAuth plug-in to securely pull from GitHub.Jenkins Git environment variables list: A working shell script example.
#GITHUB DESKTOP WINDOWS HOW TO#
How to use the Jenkins Git Plugin: Tips and tricks.
Jenkins Git integration: GitHub pull request via the Git plugin.
How to 'Git cherry-pick' from another branch to your own.
Learn to Git cherry-pick a commit with this easy example.
Don't Git revert that last commit, Git reset instead.
A Git reset hard example: An easy way to undo local commits and shift head.
How to revert a Git commit: A simple undo changes example.
Tough sample GitHub interview questions and answers for job candidates.
How to Git started and use the Github Desktop app tool.
Want a private GitHub repository? It comes with a catch.
Microsoft-GitHub acquisition shakes up DevOps market.
GitHub: What is the difference between them?
How to set Notepad++ as the default Git editor for commits instead of Vim.
5 basic Git commands developers must master: Tutorial with examples.
#GITHUB DESKTOP WINDOWS INSTALL#
Step-by-step guide: How to install Git on Windows desktop computers.IT pros weigh Git version control against the competition.
0 notes
Text
Cleanflight firmware flasher software for mac

#Cleanflight firmware flasher software for mac mac os x
#Cleanflight firmware flasher software for mac install
#Cleanflight firmware flasher software for mac software
Build the codeĮnter the cleanflight directory and run make TARGET=NAZE to build firmware for the Naze32. This will download the entire Cleanflight repository for you into a new folder called "cleanflight". The right side of the Cleanflight GitHub page, like so: git clone Checkout CleanFlight sourcecode through gitĮnter your development directory and clone the Cleanflight repository using the "HTTPS clone URL" which is shown on If arm-none-eabi-gcc couldn't be found, go back and check that you entered the correct path in your ~/.profile file. Warranty not even for MERCHANTABILITY or FITNESS FOR A PARTICULAR PURPOSE.
#Cleanflight firmware flasher software for mac software
This is free software see the source for copying conditions. You should get output similar to: arm-none-eabi-gcc.exe (GNU Tools for ARM Embedded Processors) 4.9.3 20150529 (release) Ĭopyright (C) 2014 Free Software Foundation, Inc. Now close this terminal window and open a new one. Press CTRL+X to exit nano, and answer "y" when prompted to save your changes. New line at the end of the file which adds the path for the bin/ folder to your path, like so: export PATH=$PATH:~/development/gcc-arm-none-eabi-4_9-2015q2/bin Now you just need to add the bin/ directory from inside the GCC directory to your system's path. You should end up with aįolder called ~/development/gcc-arm-none-eabi-4_9-2015q2/. Such as a ~/development folder (in your home directory) and double click it to unpack it. Mac installation tarball for the latest version in the 4.9 series (e.g. Hit the "all downloads" link on the right side of the GNU Tools for ARM page to view the older releases. Install ARM GCC 4.9 series compilerĬleanflight is built using the 4.9 series GCC compiler provided by the GNU Tools for ARM Embedded Processors project.
#Cleanflight firmware flasher software for mac install
Go to the "downloads" tab and install the Installation, open up XCode and enter its preferences menu. If that doesn't work, you'll need to install the XCode development environment from the App Store. Try running xcode-select -install instead to trigger the popup. If you just get an error like this instead of a helpful popup prompt: -bash: make: command not found If so, click the "install" button to install the commandline If it isn't installed yet, you might get a popup like this. If it is installed already, you should see a message like this, which means that youĪlready have the required development tools installed: make: *** No targets specified and no makefile found. Install general development tools (clang, make, git) Checkout Cleanflight sourcecode through git.
#Cleanflight firmware flasher software for mac mac os x
Checkout CleanFlight sourcecode through gitīuilding in Mac OS X can be accomplished in just a few steps:.
Install general development tools (clang, make, git).
1 note
·
View note
Text
My horrible Odyssey to install Git LFS on my Synology NAS
So this is a bit different content from what I usually post. But I NEEDED an outlet for this incredible buildup of frustration that I had to deal with for the past WEEK.
The objective seemed easy when I decided to start this terrible journey:
Install Git LFS on a Synology NAS disk station.
The Status Quo
My friend and I wanted to work on a Unity project together, so "normal" Git, I was told, would not suffice. It had to be LFS. We looked into other options before, but I thought "Hey, why not use the readily available NAS I have? Why use external, even paid services if we can just use a homebrew solution?" And that's where the descent into madness started.
I have a DS418j, not the most advanced or expensive model. It is important to note that I went into this as a completely clueless person.
I never used Git via console commands. My knowledge of Git was generally very limited. Even at the end of all this, I still BARELY know how to set up a repository and interact with it.
I had no idea what LFS even really does.
I only had very rudimentary knowledge of how to operate my NAS via its user interface.
I never interacted with a Linux console before. It turned out that I would be doing that a lot.
A Walk in the Park?
At first, everything seemed pretty straightforward, to be honest. I googled the simple task of setting up Git on a Synology NAS. The first result was already pretty helpful.
It seemed like all I had to do was set up a new user on my NAS ("gituser"), also install the available "Git Server" from the NAS's user interface. And "WebDAV", another package that could be installed via the interface.
WebDAV, as I found out, was a key component in my journey. It was a bit of a struggle to set up, but it appeared to be important in the process of connecting to my NAS via HTTPS. And probably other things that I still have no idea about.
I didn't even know why I'm installing WebDAV in the first place, because I intended to use Git via SSH. Which another setting in my NAS would provide - the Terminal setting in the system settings. That's where I enabled SSH via port 22.
Well, my friend then told me that we cannot use LFS via SSH. Okay, I thought, that's what WebDAV is for, after all.
The Git Server had very few options, which seemed fishy to me. It literally only has one window where you set permissions for users. I gave gituser the permission to access it. That was that.
Of course I also needed a shared folder for our repositories ("git"). Creating that was not hard either. Here I noticed that gituser needs to be part of the "administrators" group for Git Server to work properly. But I could not remove it from the "users" group, so things got a bit fucky with permissions. I ended up giving both the administrators and users group a lot more permissions than I was comfortable with. But I trust my friend to not wreak havoc on my NAS for the time being.
So, everything was set up. Or so I thought.
Hitting the first Bump in the Road
I was able to connect to my NAS via SSH only, but didn't think anything of it yet. Doing that, I used Sourcetree to create the first test repo. Went to the NAS interface, checked, it was there and looked good. I could push and pull files.
Created a second repo, ran "git lfs install"... and it didn't work.
The lfs command was not known.
I quickly found out that... of course it could not be known. Other than github for example, my NAS did not have LFS pre-setup. So, I concluded, I had to go install LFS on my NAS.
...Easier said than done.
While it does support a console with most regular Linux commands... a package manager is not included. At least none that is easily accessible, or supports any common packages.
At this point I figured "Why deal with this myself?" and contacted Synology support. I asked them "how can I set up Git LFS on my NAS?"
And Synology Support said:
¯\_(ツ)_/¯
They told me they do not offer support for the console. They said I should go ask the community. Okay.
I did not ask the community, but I did a lot of googling and found out: I could not "just install" LFS. I had to get creative.
We heard you like package managers?
First, I figured out that I need to be able to use the "curl" command. All the binary files on LFS's package cloud were binaries that were apparently downloadable with curl. I did not know what curl was... but I knew I needed to get it working.
I found out that for curl to work, I needed to install PHP on my NAS. Luckily, that was possible via Synology's included package manager. But for PHP to DO anything, I also had to install the "Web Station" and configure my PHP version there. I figured... might as well!
After enabling a couple PHP commands, I felt ready to download LFS. But the question was... which version? What even was my OS?
As it turns out, Synology uses a custom Linux version for their diskstations. Of course, LFS does not "officially" provide a package for that version. I tried the nodeJS version, because I noticed I also have nodeJS installed on my NAS.
I ran into the version issue as well, unfortunately, when I tried to install the package through nodeJS. Not even changing my nodeJS version helped. Many hours later, I tried the .deb and .rpm files randomly instead of the nodeJS ones. Those also didn't want to work, despite me eventually figuring out how to lie to them about which OS I'm using.
I was almost ready to give up at that point. I was at least 3 full days into my odyssey already.
But then I spotted something else... A thing called "GoLang". Apparently, it would be possible to download LFS via GoLang. However, to do that, I of course needed to get Go first.
An initial search got me on track to "ipkg", which promised to enable me to install Go. But after reading up on it a bit, it looked woefully outdated. I had it already downloaded and was about to install, but ran into errors and trouble again.
That was when I found "Entware". It's similar to ipkg, but uses "opkg", a similar package manager. I was able to install Entware on my NAS without much trouble, and it contained the Go package that I needed so direly.
While I was at it, I also installed the available "git" and "git-http" packages from opkg, just to make sure. Who knew if they'd come in handy. I don't know if they did, but they also didn't seem to cause any harm.
Now, with Go installed (which went surprisingly smoothly), I was able to access just about anything on the internet and install it on my NAS! Hallelujah!
But if you thought it was over... just look at the scrollbar.
The end of my odyssey was finally in sight. I thought that nothing could go wrong anymore, now! With the help of Go, I was able to install the LFS binary. I was able to run it in my console, too. I was finally able to run "git lfs install".
...and it didn't help.
I got a bunch of errors, again. Instead of getting closer to the solution, it seemed like I just managed to find more obscure errors.
Here the important thing about the SSH came in, as well. LFS does not like SSH, from what I found out. But SSH was the only way for me to connect to my NAS from my PC!
In a fury of looking up stuff again, I found the "DDNS" option on my NAS. That would allow me to get a hostname and use it like a normal website address! I kinda rushed through the setup because I had no idea what I was doing.
Well, whatever I did, it seemed to be sufficient. My friend could now connect to my NAS over her Sourcetree client. But when she tried to upload LFS objects, it just didn't work. She got a "404" error.
It wasn't hard to figure out that 404 meant no access in this case - my NAS was simply refusing to show any directory to someone who doesn't have access to it.
Cue a long journey into my NAS's interface to make sure the gituser had the right permissions. I also changed the password because I read something about WebDAV being particular about some passwords. I also made a new user to see if maybe I just messed up setting up gituser.
To test if I was making any progress, my friend and I tried to access my NAS via our web browsers. But no matter what we tried, no matter what I tried, we couldn't access. 403 Forbidden or 404 Not Found. Those were the results. I couldn't even access if I used my admin account.
I tried to hack my way into pushing anyway, and only ended up corrupting our repo's history with "missing" and "broken" files because they were never properly uploaded, but LFS thought they were.
It should be noted that I had just accepted that HTTPS won't let me connect on my PC. So I had set up a hotspot for my mobile internet via my phone and used my laptop to do these things. I was in denial about eventually having to fix this, because I'm on a tight data plan on mobile and uploading and downloading Unity projects of several GB size wasn't going to happen that way.
Synology Support to the Rescue! ...Or?
It seemed like we had finally narrowed down the issue with our LFS upload attempts when I also checked the WebDAV console and it reported that it denied our login attempts through browser and Sourcetree as an "authorization failure".
So something was wrong with WebDAV.
I contacted Synology support a second time. I asked them, "Why can't my friend and I connect to my NAS via the internet when I have WebDAV enabled and everything port forwarded?"
And Synology Support said:
¯\_(ツ)_/¯
They told me WebDAV and web browsers don't use the same HTTP and HTTPS methods. They are simply not compatible. They told me I should download their WebDAV client or connect locally.
So it was known from the start that what I was attempting could never work... but it was also not mentioned anywhere on the web or Synology's help pages that this was the case.
We have a saying in Austria: "jemanden deppert sterben lassen". It translates to "to let someone die stupid". Essentially, it means that you have information and you watch someone else without this information struggle without ever telling them about it voluntarily. I felt this saying was very appropriate for my situation.
Time to give up, I guess... Except I didn't.
I was almost a week into my odyssey by now. Maybe it's a sunk-cost-fallacy, but I couldn't abandon all my work now. I refused.
A Light at the End of the Tunnel
I went back to open another browser tab (my average was 20 open tabs during this... normally it's 2 to 3). And I searched for a solution that works with WebDAV. And truly... there was ONE repo online that offered it.
A special thanks goes out to this fellow: https://github.com/mpotthoff/git-lfs-webdav
They straight up saved our project from collapsing into a pile of tears and rage.
I installed this package on my NAS, which... sort of worked. It turned out I needed to install it locally (as well?). So I did. But I needed to install Git, LFS, and Go on my local PC as well for that.
So with the help of Go, I built an exe file for my laptop, which then gave me a 401 when trying to push to LFS. Luckily I expected that. And I was overjoyed, because FINALLY a different error.
I tried to run the steps in the git-lfs-webdav repo to fix it... but got a strange error in the console.
It cried, when trying to enter my username, that the "handle" for the password was wrong. But I hadn't even entered the password yet!
Searching some more on the internet gave me no conclusive answer. Randomly, I tried a different console - my Sourcetree console apparently runs "MINGW32" while my Git console runs "MINGW64". Switching to the Git console fixed this problem for me, and switching to the Windows shell fixed it for my friend.
And then, it finally worked for my friend.
She could upload a test image via LFS, and I could receive it via LFS on my laptop.
The rest was me calling my internet provider about my PC being unable to connect. The internet provider said ¯\_(ツ)_/¯.
Luckily I did not attempt to mess with my DNS or Subnet Mask or anything of the sort, or buy a VPN/Proxy. All I had to do was create a self-signed SSL certificate on my NAS, download it, and feed it into my PC's trusted authorities files. My friend had to download and feed it too.
In Summary...
This was a horrible, terrible, awful journey. I would not recommend attempting this at home to anyone.
Even now, what we've got going on only sort-of works with our Unity project, because Unity is... Unity. We're still figuring out the details, for example why scene content is going missing and so on.
But I believe that the worst and most difficult part is over. Will I be able to recreate this in a year or two, maybe for a different repo, on a different PC?
Probably not.
3 notes
·
View notes
Text
Open Sourcing our Kubernetes Tools
At Tumblr, we are avid fans of Kubernetes. We have been using Kubernetes for all manner of workloads, like critical-path web requests handling for tumblr.com, background task executions like sending queued posts and push notifications, and scheduled jobs for spam detection and content moderation. Throughout our journey to move our 11 year old (almost 12! 🎂) platform to a container-native architecture, we have made innumerable changes to how our applications are designed and run. Inspired by a lot of existing Kubernetes APIs and best practices, we're excited to share with the community some of the tools we've developed at Tumblr as our infrastructure has evolved to work with Kubernetes.
To help us integrate Kubernetes into our workflows, we have built a handful of tools of which we are open-sourcing three today! Each tool is a small, focused utility, designed to solve specific integration needs Tumblr had while migrating our workflows to Kubernetes. The tools were built to handle our needs internally, but we believe they are useful to the wider Kubernetes community.
github.com/tumblr/k8s-sidecar-injector
github.com/tumblr/k8s-config-projector
github.com/tumblr/k8s-secret-projector
k8s-sidecar-injector
Any company that has containerized an application as large and complex as Tumblr knows that it requires a tremendous amount of effort. Applications don't become container-native overnight, and sidecars can be useful to help emulate older deployments with colocated services on physical hosts or VMs. To reduce the amount of fragile copy-paste code by developers adding in sidecars to their Deployments and CronJobs, we created a service to dynamically inject sidecars, volumes, and environment data into pods as they are launched.
The k8s-sidecar-injector listens to the Kubernetes API for Pod launches that contain annotations requesting a specific sidecar to be injected. For example, the annotation injector.tumblr.com/request=sidecar-prod-v1 will add any environment variables, volumes, and containers defined in the sidecar-prod-v1 configuration. We use this to add sidecars like logging and metrics daemons, cluster-wide environment variables like DATACENTER and HTTP_PROXY settings, and volumes for shared configuration data. By centralizing configuration of sidecars, we were able to reduce complexity in CronJobs and Deployments by hundreds of lines, eliminated copy-paste errors, and made rolling out updates to shared components in our sidecars effortless.
An example sidecar ConfigMap is below, which adds a logging container, a volume from a logger-config ConfigMap, and some environment variables into the Pod.
--- apiVersion: v1 kind: ConfigMap metadata: name: example-sidecars namespace: kube-system labels app: k8s-sidecar-injector data: logger-v1: | name: logger-v1 containers: - name: logger image: some/logger:2.2.3 imagePullPolicy: IfNotPresent ports: - containerPort: 8888 volumeMounts: - name: logger-conf mountPath: /etc/logger volumes: - name: logger-conf configMap: name: logger-config env: - name: DATACENTER value: dc01 - name: HTTP_PROXY value: http://my-proxy.org:8080/ - name: HTTPS_PROXY value: http://my-proxy.org:8080/
This configuration will add the logger container into each pod with the annotation injector.tumblr.com/request: logger-v1, with a ConfigMap projected as a volume in /etc/logger. Additionally, every container in the Pod will get the DATACENTER=dc01 and HTTP_PROXY environment variables added, if they were not already set. This has allowed us to drastically reduce our boilerplate configuration when containerizing legacy applications that require a complex sidecar configuration.
k8s-config-projector
Internally, we have many types of configuration data that is needed by a variety of applications. We store canonical settings data like feature flags, lists of hosts/IPs+ports, and application settings in git. This allows automated generation/manipulation of these settings by bots, cron jobs, Collins, and humans alike. Applications want to know about some subset of this configuration data, and they want to be informed when this data changes as quickly as possible. Kubernetes provides the ConfigMap resource, which enables users to provide their service with configuration data and update the data in running pods without requiring a redeployment. We wanted to use this to configure our services and jobs in a Kubernetes-native manner, but needed a way to bridge the gap between our canonical configuration store (git repo of config files) to ConfigMaps. Thus, was k8s-config-projector born.
The Config Projector (github.com/tumblr/k8s-config-projector)[github.com/tumblr/k8s-config-projector] is a command line tool, meant to be run by CI processes. It combines a git repo hosting configuration data (feature flags, lists of hostnames+ports, application settings) with a set of "projection manifest" files that describe how to group/extract settings from the config repo and transmute them into ConfigMaps. The config projector allows developers to encode a set of configuration data the application needs to run into a projection manifest. As the configuration data changes in the git repository, CI will run the projector, projecting and deploying new ConfigMaps containing this updated data, without needing the application to be redeployed. Projection datasources can handle both structured and unstructured configuration files (YAML, JSON, and raw text/binary).
An example projection manifest is below, describing how a fictitious notification application could request some configuration data that may dynamically change (memcached hosts, log level, launch flags, etc):
--- name: notifications-us-east-1-production namespace: notification-production data: # extract some fields from JSON - source: generated/us-east-1/production/config.json output_file: config.json field_extraction: - memcached_hosts: $.memcached.notifications.production.hosts - settings: $.applications.notification.production.settings - datacenter: $.datacenter - environment: $.environment # extract a scalar value from a YAML - source: apps/us-east-1/production/notification.yaml output_file: launch_flags extract: $.launch_flags
After processing by the config projector, the following ConfigMap is generated, which can then be posted to a Kubernetes cluster with kubectl create -f <generatedfile>.
kind: ConfigMap apiVersion: v1 metadata name: notifications-us-east-1-production namespace: notification-production labels: tumblr.com/config-version: "1539778254" tumblr.com/managed-configmap: "true" data: config.json: | { "memcached_hosts": ["2.3.4.5:11211","4.5.6.7:11211","6.7.8.9:11211"], "settings": { "debug": false, "buffer": "2000", "flavor": "out of control", "log_level": "INFO", }, "datacenter": "us-east-1", "environment": "production" } launch_flags: "-Xmx5g -Dsun.net.inetaddr.ttl=10"
With this tool, we have enabled our applications running in kubernetes to receive dynamic configuration updates without requiring container rebuilds or deployments. More examples can be found here.
k8s-secret-projector
Similar to our configuration repository, we store secure credentials in access controlled vaults, divided by production levels. We wanted to enable developers to request access to subsets of credentials for a given application without needing to grant the user access to the secrets themselves. Additionally, we wanted to make certificate and password rotation transparent to all applications, enabling us to rotate credentials in an application-agnostic manner, without needing to redeploy applications. Lastly, we wanted to introduce a mechanism where application developers would explicitly describe which credentials their services need, and enable a framework to audit and grant permissions for a service to consume a secret.
The k8s-secret-projector operates similarly to the k8s-config-projector, albeit with a few differences. The secret projector combines a repository of projection manifests with a set of credential repositories. A Continuous Integration (CI) tool like Jenkins will run the k8s-secret-projector against any changes in the projection manifests repository to generate new Kubernetes Secret YAML files. Then, Continuous Deployment can deploy the generated and validated Secret files to any number of Kubernetes clusters.
Take this file in the production credentials repository, named aws/credentials.json:
{ "us-east-1": { "region": "us-east-1", "aws": { "key": "somethignSekri7T!", }, "s3": { "key": "passW0rD!", }, "redshift": { "key": "ello0liv3r!", "database": "mydatabase" } }, "us-west-2": { "region": "us-west-2", "aws": { "key": "anotherPasswr09d!", }, "s3": { "key": "sueprSekur#", } } }
We need to create an amazon.yaml configuration file containing the s3.key and aws.key for us-east-1, as well as a text file containing our region. The projection manifest below will extract only the fields we need, and output them in the format desired.
name: aws-credentials namespace: myteam repo: production data: # create an amazon.yaml config with the secrets we care about - name: amazon.yaml source: format: yaml json: aws/credentials.json jsonpaths: s3: $.us-east-1.s3.key aws: $.us-east-1.aws.key region: $.us-east-1.region # create a item containing just the name of the region we are in - name: region source: json: aws/credentials.json jsonpath: $.us-east-1.region
Projecting this manifest with the above credentials results in the following Kubernetes Secret YAML file:
apiVersion: v1 kind: Secret metadata: labels: tumblr.com/managed-secret: "true" tumblr.com/secret-version: master-741-7459d1abcc120 name: aws-credentials namespace: myteam data: region: dXMtZWFzdC0x # region decoded for clarity: us-east-1 amazon.yaml: LS0tCnMzOiAicGFzc1cwckQhIgphd3M6ICJzb21ldGhpZ25TZWtyaTdUISIKcmVnaW9uOiB1cy1lYXN0LTEK # amazon.yaml decoded for clarity: # --- # s3: "passW0rD!" # aws: "somethignSekri7T!" # region: us-east-1
In addition to being able to extract fields from structured YAML and JSON sources, we gave it the ability to encrypt generated Secrets before they touch disk. This allows Secrets to be deployed in shared Kubernetes environments, where users are colocated with other users, and do not feel comfortable with their Secret resources being unencrypted in etcd. Please note, this requires decryption by your applications before use. More details on how the encryption modules work can be found here.
For more examples of how to use this, check out examples here!
What's Next
We are excited to share these tools with the Kubernetes open source community, and we hope they can help your organization adopt container-native thinking when managing application lifecycle like they helped Tumblr. Feature enhancements and bug fixes are welcome! And, shameless plug: if you are interested in Kubernetes, containerization technology, open source, and scaling a massive website with industry leading technologies and practices? Come join us!.
- @pipefail
96 notes
·
View notes
Photo

I’m still converting my characters to use the new nested prefabs format. It’s taking a while, as I essentially have to recreate them, ensure that the properties on each component is set properly.
I took the time to also switch from UnityEvent to just plain C# event/delegates. I found UnityEvent to be problematic for a time now and have always wanted to stop using it. It is very convenient, but the convenience is also what makes it easy for me to mess it up.
For example, if I accidentally deleted the object assigned to the UnityEvent, or if I renamed the method it was supposed to call (which means it can’t find the method to call anymore), it doesn’t count as a compile error (compared to if I subscribed to an event in C# code), so I won’t notice it easily. I’ve experienced a couple of bugs because of this, and took me a while to pinpoint the cause.
So when I get something like this:

I end up wondering why I have an empty listener there in the Death Event. I’d rack my brain figuring out what the value there used to be. Then I end up cloning my project’s git repository, checkout an old commit to see what it was. It’s quite a hassle, considering the git repo has grown to about 9+ GB in size.
3 notes
·
View notes
Text
Download GitKraken crack (keygen) latest version 9VU3#

💾 ►►► DOWNLOAD FILE 🔥🔥🔥
Git is what gives a dev their power…It binds the galaxy together. Workspaces can currently support up to repositories for an Azure Project. Users can type either gk rebase -i or gk rebase —interactive along with two refs to open the interactive rebase view. If only one ref is passed it will perform the rebase of the branch currently checked out onto the specified ref. Bug Fixes: Bugs…You will never find a more wretched hive of scum and villainy. Users will see increased performance when opening a commit diff for very large images. Large images will now display as a binary file Instead of producing an error. For large files, such as images and other media, we recommend using Git LFS. Dotted graph lines will no longer take precedence when overlapping with solid lines in graph views. When un-hiding a remote, users can continue hiding or un-hiding remotes without waiting for the triggered automatic fetch to resolve. Azure DevOps integrations and all self hosted integrations will now work properly on our new Teams license tier. Users can now use quotation marks when naming Workspaces. All Organization and Team actions will remain available after using the login screen. The scrollbar in the GitKraken Terminal will now remain clickable in all situations. When a user pushes many files up at once to GitHub, they will no longer experience an OAuth infinite loop. Opening repositories via gitkraken —path when GitKraken is already open will now work as expected. Improvements: An elegant Git client for a more civilized age. Note: Significant work towards reducing checkout times for LFS repos is underway and we plan to include these improvements in the GitKraken Client v8. When creating a new Team, members can now be added as part of the creation process. Team members are now sorted by username in the Teams section, found in the left panel of GitKraken Client. Improvements to GitKraken Workspaces: Workspaces can now be shared as Team Workspaces, allowing users to share the Workspace with specific teams within their Organization. In the Workspaces Repository view, clicking on the name of a repository will open it in a Repo Tab. Users can view repository information by clicking on the Open Repository Details option, found on the right side of the Repositories view. Users will find more options for filtering in the Workspaces Pull Requests view. For Windows users, GitKraken Client will now respect the core. On Windows, core. GitKraken CLI autocomplete will now be able to suggest more than one argument in these commands: git add.
1 note
·
View note
Text
Download GitKraken crack (license key) latest version 89T*

💾 ►►► DOWNLOAD FILE 🔥🔥🔥
Git is what gives a dev their power…It binds the galaxy together. Workspaces can currently support up to repositories for an Azure Project. Users can type either gk rebase -i or gk rebase —interactive along with two refs to open the interactive rebase view. If only one ref is passed it will perform the rebase of the branch currently checked out onto the specified ref. Bug Fixes: Bugs…You will never find a more wretched hive of scum and villainy. Users will see increased performance when opening a commit diff for very large images. Large images will now display as a binary file Instead of producing an error. For large files, such as images and other media, we recommend using Git LFS. Dotted graph lines will no longer take precedence when overlapping with solid lines in graph views. When un-hiding a remote, users can continue hiding or un-hiding remotes without waiting for the triggered automatic fetch to resolve. Azure DevOps integrations and all self hosted integrations will now work properly on our new Teams license tier. Users can now use quotation marks when naming Workspaces. All Organization and Team actions will remain available after using the login screen. The scrollbar in the GitKraken Terminal will now remain clickable in all situations. When a user pushes many files up at once to GitHub, they will no longer experience an OAuth infinite loop. Opening repositories via gitkraken —path when GitKraken is already open will now work as expected. Improvements: An elegant Git client for a more civilized age. Note: Significant work towards reducing checkout times for LFS repos is underway and we plan to include these improvements in the GitKraken Client v8. When creating a new Team, members can now be added as part of the creation process. Team members are now sorted by username in the Teams section, found in the left panel of GitKraken Client. Improvements to GitKraken Workspaces: Workspaces can now be shared as Team Workspaces, allowing users to share the Workspace with specific teams within their Organization. In the Workspaces Repository view, clicking on the name of a repository will open it in a Repo Tab. Users can view repository information by clicking on the Open Repository Details option, found on the right side of the Repositories view. Users will find more options for filtering in the Workspaces Pull Requests view. For Windows users, GitKraken Client will now respect the core. On Windows, core. GitKraken CLI autocomplete will now be able to suggest more than one argument in these commands: git add.
1 note
·
View note
Last Seen Blogs

fitnesswithangel
angel

carpexvinum-blog
Old Dominion

mailinsblogofstuff
MailinsBlog


tenacioususedcars
Tenacious Used Cars