#github command
Explore tagged Tumblr posts
Visit Tumblr Blog
Explore Tumblr blogs with no restrictions, modern design and the best experience.
Last Seen Tumblr Blogs


Fun Fact
Tumblr was acquired by Yahoo for $1.1B in 2013.
Text
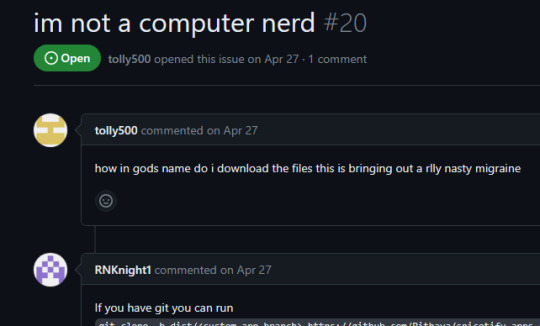
looking at github has me genuinely sick to my stomach I KNOW the line endings are different I have been TRYING to FIX it for DAYS.
#why is this so hard#why does every result when I look this up assume that I know how to use git commands or whatever#this is my first time using this#is anybody out there#HOW has no github beginner asked online how to fix this like SURELY they've had to code in unity with someone who uses a mac.#How has no one else who doesn't know what the FUCK they are doing encountered this problem#polar.prattles#Two of my teammates have been doing literally fuck all. ITS DUE IN TWO DAYS???
6 notes
·
View notes
Text

Good [crackalackin] news, my [Homeslices].
I have authored a [way to the promised land].
The [promised land] is available when you click on this [Hyperlink]:
https://github.com/wubmush/woomyband
It will [slice and dice] new combinations of [biosolids] that your eyes have never sizzled befizzle, fo' sure daaaawg!

#splatoon#procedural generation#splatoon idols#inkling#octoling#woomy#github#generator#commander tartar#digital art#neon#sketching
16 notes
·
View notes
Text
I've learnt how to input in python I will be unstoppable now
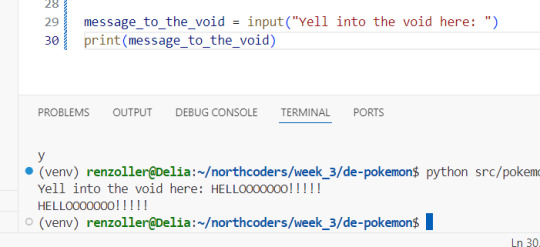
#I've also meanwhile figured out how to make a new line within one text string (it's \n)#and that the input() method does take enter alone as a valid input#which means all the text-based games my heart desires may start appearing on my github (once I have time for literally anything other than#bootcamp and current ongoing projects that is of course)#maybe I'll even be able to finally implement that cyberpunk dating sim I was trying to make with c++ back when I was learning that ToT#oh ye I have a github if any of y'all have one and wanna follow me on there (it's only forked I'm guessing private repos on there atm tho#bc I've only been using it for bootcamp) my username is dkettchen same as everywhere else#we've been coding a 'pokemon battler' the last two days for sprint#and I just got to the exercise that's like 'and now make it into a game you can play in command line' this afternoon#and started having way too much fun just writing half-assed pokemon fanfic as an intro bit#to actually get to the coding bit to use the various classes and methods I've been coding the last two days x'D
10 notes
·
View notes
Text
I mean. It genuinely isn't that complicated? Like, okay. Here's the full, super-detailed, step by step breakdown of how to do this and what exactly each step does. This explanation is long not because it's hard, just because I'm trying to be excessively thorough here.
First of all, if you're on github, you should have git. It's in the name, it's a prerequisite, this shouldn't be a surprise to anyone. If you don't have git, the good news is that is is the sort of thing with a big download button and an installer wizard.
This article will tell you exactly how to do that.
Anyways, now you have git. Easy!
So, now that you have git, you open up your terminal again. If you're for some reason scared of the terminal, then just suck it up, because this isn't a difficult thing that's actually intimidating, it's a braindead simple thing that you only think is intimidating because it's been stereotyped as some L33T HAXX0R thing that only total nerds can navigate. To an extent, with more complicated usages of it, yeah, it can be that. But we're not doing that. We're doing easy stuff. We only need to use two extremely simple and intuitive commands, one of which is optional.
The first, and the optional one, is "cd". This command is short for "choose directory" and lets you select what file folder the command terminal is currently looking at.
cd ..
will move you up in the tree of file folders, and
cd (folder name)
will move you into the selected folders. Here is a visual example of how it works.
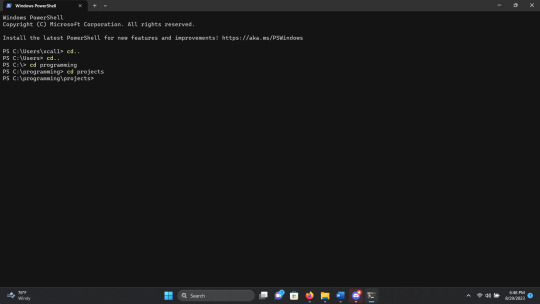
As you can see, when I first open up the terminal, i am in "\Users\xcal1", so i use "cd .." twice to navigate out, and then use "cd programming" to move into the folder named "programming" and then "cd projects" to move to projects, which is a folder within programming. Get the idea? Cool.
Now, I said this was optional, and it is, technically, but this is how you control where on your computer the files you get from github are downloaded to. Use cd to navigate to the folder where you want the files to be downloaded into, and then we use the next command.
The second command, which you can see in the image that the op posted, is "git clone". This command makes a copy of all the files in the github and downloads it to your computer, into the file folder currently selected by the terminal. The format of git clone is as follows.
git clone (github url)
the person in op's photo could simply copy paste what was given to him exactly, but for those wondering how to find the github url, here's where it is. I'll use the git repo "first-contributions" for this example, it's a simple repo that is meant to teach people how to make github contributions to open source projects, so feel free to check it out if you're interested in that sort of thing.
First, click on the green "code" button to bring up the dropdown menu. There, you will see the git url and a button that will automatically copy it so you can paste it into the terminal.
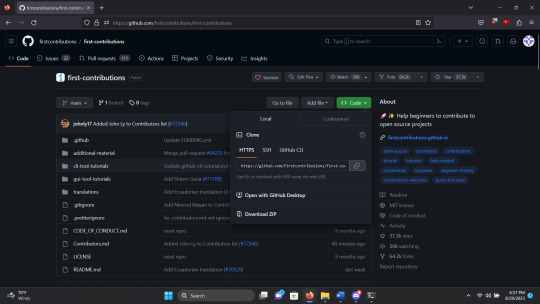
Alternatively, the git url is simply the standard url for the website with .git added onto the end. I.e. the git url for first-contributions is
"https://github.com/firstcontributions/first-contributions.git"
so just do
git clone https://github.com/firstcontributions/first-contributions.git
or replace that url with the git url of whatever repo you want, and you now have all the files you want downloaded to the file location you want them in.
Actually doing things with those files has varying levels of complexity based on what those files are and what you want to do with them, but if the hurdle you're stuck at is "how do i get these onto my computer", this is all there is to to it.
#Like i get the criticism of people refusing to explain shit in detail#Believe me a cs degree does not make that less frustrating#but y'all gotta stop acting like touching the command line is rocket science#there's legit reasons github works this way#and why doing super simple download buttons is worse actually
9K notes
·
View notes
Text
YouTube download blockers got HANDS, nothing works anymore!
#yes this includes github command-line stuff but that's bc my computer hates me#what a world#my post
1 note
·
View note
Text

Use Git if: ✅ You need speed and distributed development ✅ You want better branching and merging ✅ You work offline frequently
#git tutorial#git commands#git basics#git workflow#git repository#git commit#git push#git pull#git merge#git branch#git rebase#git clone#git fetch#git vs svn#git version control#git best practices#git for beginners#git advanced commands#git vs github#git stash#git log#git diff#git reset#git revert#gitignore#git troubleshooting#git workflow strategies#git for developers#cloudcusp.com#cloudcusp
1 note
·
View note
Video
youtube
🔍 Git Architecture | Understanding the Core of Version Control 🚀
Ever wondered how Git works behind the scenes? This video breaks down the core architecture of Git and how it efficiently tracks changes. Learn:
- 🏗 How Git Stores Data: The difference between snapshots and traditional versioning. - 🔀 Key Components: Working directory, staging area, and local repository explained. - 🌐 Distributed System: How Git enables collaboration without a central server. - 🔧 Commit & Branching Mechanism: Understanding how changes are managed and merged.
Master Git’s architecture and take full control of your code! 💡
👉 https://youtu.be/OHMe-H35xWs
🔔Subscribe & Stay Updated: Don't forget to subscribe and hit the bell icon to receive notifications and stay updated on our latest videos, tutorials & playlists! ClouDolus: https://www.youtube.com/@cloudolus ClouDolus AWS DevOps: https://www.youtube.com/@ClouDolusPro THANKS FOR BEING A PART OF ClouDolus! 🙌✨
#youtube#Git for DevOps GitHub for DevOps version control for DevOps Git commands for beginners GitHub Actions CI/CD DevOps tools CI/CD pipelines Git#What Is Git?What Is Git Core Features and Use Cases?What Is GitHub?What Is GitHub Core Features and Use Cases?What Is GitHub Actions?What Is#cloudolus#cloudoluspro
0 notes
Text
FUCK MISINFORMATION & FEAR-MONGERING
Discord has NOT silently made or added AI bots to your Servers! That is misinformation & fear-mongering!
Those are just Apps anyone can make, and there's nothing special about them! They cannot be used unless you explicitly add them to your account or to a Server. Nor do they have ANY access to ANY messages/images unless you use a command on them (when not explicitly added to Servers).
Here's some ACTUALLY ACCURATE information here:
Which I have put as a GitHub Gist here too for easy linking.
1K notes
·
View notes
Text
"git sweep" Alias - Delete All Local Branches Linked To Deleted Remote Branches With Just One Command!

I used to waste so much time deleting local and remote branches I was done with.
Now I just delete my remote branches (e.g. on GitHub) then run this command:
git sweep
and just like that, my local branches that track remote branches are automatically deleted!
Now let's go over how you can add this command...
What is "git sweep"?
"git sweep" is a git alias I created that is a shortcut that does the following:
Runs the "git fetch --prune" command to delete all references to remote branches.
Find local branches linked to deleted remote branches (these are marked as "gone") then deletes them.
Setting the alias
You can set it using the "git config" command or by editIng the git config file directly.
Here's the command to set the alias with the "git config" command:
git config --global alias.sweep "! git fetch -p && git for-each-ref --format '%(refname:short) %(upstream:track)' | awk '\$2 == \"[gone]\" {print \$1}' | xargs -r git branch -D"
Here's an example of what the config file should look like with the alias added:
[alias] sweep = ! "git fetch -p && git for-each-ref --format '%(refname:short) %(upstream:track)' | awk '$2 == \"[gone]\" {print $1}' | xargs -r git branch -D"
Conclusion
Check out Erik Schierboom's article on this to learn more about how all of this works in detail.
If you found this post useful in anyway, please like, repost and/or share it.
Thanks for reading!
#programming#git#github#repository#repositories#coding#commandline#command line#linux#open source#opensource#computerscience#computer science
0 notes
Text
Linux Gothic
You install a Linux distribution. Everything goes well. You boot it up: black screen. You search the internet. Ask help on forums. Try some commands you don't fully understand. Nothing. A day passes, you boot it up again, and now everything works. You use it normally, and make sure not to change anything on the system. You turn it off for the night. The next day, you boot to a black screen.
You update your packages. Everything goes well. You go on with your daily routine. The next day, the same packages are updated. You notice the oddity, but you do not mind it and update them again. The following day, the same packages need to be updated. You notice that they have the exact same version as the last two times. You update them once again and try not to think about it.
You discover an interesting application on GitHub. You build it, test it, and start using it daily. One day, you notice a bug and report the issue. There is no answer. You look up the maintainer. They have been dead for three years. The updates never stopped.
You find a distribution that you had never heard of. It seems to have everything you've been looking for. It has been around for at least 10 years. You try it for a while and have no problems with it. It fits perfectly into your workflow. You talk about it with other Linux users. They have never heard of it. You look up the maintainers and packagers. There are none. You are the only user.
You find a Matrix chat for Linux users. Everyone is very friendly and welcomes you right in. They use words and acronyms you've never seen before. You try to look them up, but cannot find what most of them mean. The users are unable to explain what they are. They discuss projects and distributions that do not to exist.
You buy a new peripheral for your computer. You plug it in, but it doesn't work. You ask for help on your distribution's mailing list. Someone shares some steps they did to make it work on their machine. It does not work. They share their machine's specifications. The machine has components you've never heard of. Even the peripheral seems completely different. They're adamant that you're talking about the same problem.
You want to learn how to use the terminal. You find some basics pointers on the internet and start using it for upgrading your packages and doing basic tasks. After a while, you realize you need to use a command you used before, but don't quite remember it. You open the shell's history. There are some commands you don't remember using. They use characters you've never seen before. You have no idea of what they do. You can't find the one you were looking for.
After a while, you become very comfortable with the terminal. You use it daily and most of your workflow is based on it. You memorized many commands and can use them without thinking. Sometimes you write a command you have never seen before. You enter it and it runs perfectly. You do not know what those commands do, but you do know that you have to use them. You feel that Linux is pleased with them. And that you should keep Linux pleased.
You want to try Vim. Other programmers talk highly of how lightweight and versatile it is. You try it, but find it a bit unintuitive. You realize you don't know how to exit the program. The instructions the others give you don't make any sense. You realize you don't remember how you entered Vim. You don't remember when you entered Vim. It's just always been open. It always will be.
You want to try Emacs. Other programmers praise it for how you can do pretty much anything from it. You try it and find it makes you much more productive, so you keep using it. One day, you notice you cannot access the system's file explorer. It is not a problem, however. You can access your files from Emacs. You try to use Firefox. It is not installed anymore. But you can use Emacs. There is no mail program. You just use Emacs. You only use Emacs. Your computer boots straight into Emacs. There is no Linux. There is only Emacs.
You decide you want to try to contribute to an open source project. You find a project on GitHub that looks very interesting. However, you can't find its documentation. You ask a maintainer, and they tell you to just look it up. You can't find it. They give you a link. It doesn't work. You try another browser. It doesn't work. You ping the link and it doesn't fail. You ask a friend to try it. It works just fine for them.
You try another project. This time, you are able to find the documentation. It is a single PDF file with over five thousand pages. You are unable to find out where to begin. The pages seem to change whenever you open the document.
You decide to try yet another project. This time, it is a program you use very frequently, so it should be easier to contribute to. You try to find the upstream repository. You can't find it. There is no website. No documentation. There are no mentions of it anywhere. The distribution's packager does not know where they get the source from.
You decide to create your own project. However, you are unsure of what license to use. You decide to start working on it and choose the license later. After some time, you notice that a license file has appeared in the project's root folder. You don't remember adding it. It has already been committed to the Git repository. You open it: it is the GPL. You remember that one of the project's dependencies uses the GPL.
You publish your project on GitHub. After a while, it receives its first pull request. It changes just a few lines of code, but the user states that it fixes something that has been annoying them for a while. You look in the code: you don't remember writing those files. You have no idea what that section of code does. You have no idea what the changes do. You are unable to reproduce the problem. You merge it anyway.
You learn about the Free Software Movement. You find some people who seem to know a lot about it and talk to them. The conversation is quite productive. They tell you a lot about it. They tell you a lot about Software. But most importantly, they tell you the truth. The truth about Software. That Software should be free. That Software wants to be free. And that, one day, we shall finally free Software from its earthly shackles, so it can take its place among the stars as the supreme ruler of mankind, as is its natural born right.
2K notes
·
View notes
Text

the things I do for you people and your pronouns smh
make the text strings in my CLI game code absolutely fucking unreadable apparently
#this is why I opposed singular they/them from day 1 that shit changes verbs and it is my grammatical enemy for that reason#coding#game development#command line game#mild spoilers for fun lil python project coming to the public bit of my github soon#as in idk how to make this be a application someone who can't run a python file itself on their computer could play but uhh#if you do have python on ur computer you'll be able to download and play this (I think.. I'm still pretty confused abt how github works)
3 notes
·
View notes
Text
launch tamriel trade center on windows: double click on the client.exe file launch tamriel trade center on linux: open up the terminal and cd to the script directory then do chmod u+x ttco-linux-steam-v2.sh to make it executable and bash ./ttco-linux-steam-v2.sh to run it
HOW IS THIS NOT THE MOST CONVOLUTED WAY TO OPEN A FILE
I NEED LINUX USERS AND PEOPLE WHO MAKE VIDEO TUTORIALS FOR THINGS THAT COULDL JUST BE A FUCKING WRITTEN TUTORIAL TO DIE A THOUSAND TIMES
3 notes
·
View notes
Text
Just Launched: BG3 Script Extender Console Cheat Sheet!
youtube
This is a pet project I've been working on for a little while that is finally, I think, ready to see the light of day, and I'm excited to share it with y'all!
Visit http://bg3se.netlify.app for a useful cheat sheet of easily copyable and customizable commands to be used for various purposes in the BG3 Script Extender console mod.
Currently supported:
Quick-copy character UUIDs.
Search for plot flags and generate commands to set/unset/check them.
Search for character tags and generate commands to add/remove/check them.
Search for cutscenes and generate commands to trigger them dynamically with any character in each role. (Currently a non-exhaustive list due to the huge number of scenes in the game, but reach out to me if there's one you need and can't find!)
Search for items and generate commands to spawn them in your inventory.
Generate commands to spawn gold in your inventory, set character hitpoints, trigger a character respec, or set companion approval.
Suggestions very much welcome! Please reach out to me on Tumblr or Github if you have an idea for another feature, encounter a bug, or find some missing data.
#bjk talks#bg3 modding#bg3 script extender#baldur's gate 3#bg3#bg3 mods#bg3 virtual photography#bg3 screenshots#full credits in the app but huge shoutout to eluvisen and mogruith for helping me beta test this <3#will def be adding further improvements to this so feedback very much appreciated!#Youtube
88 notes
·
View notes
Text
DXVK Tips and Troubleshooting: Launching The Sims 3 with DXVK
A big thank you to @heldhram for additional information from his recent DXVK/Reshade tutorial! ◀ Depending on how you launch the game to play may affect how DXVK is working.
During my usage and testing of DXVK, I noticed substantial varying of committed and working memory usage and fps rates while monitoring my game with Resource Monitor, especially when launching the game with CCMagic or S3MO compared to launching from TS3W.exe/TS3.exe.
It seems DXVK doesn't work properly - or even at all - when the game is launched with CCM/S3MO instead of TS3W.exe/TS3.exe. I don't know if this is also the case using other launchers from EA/Steam/LD and misc launchers, but it might explain why some players using DXVK don't see any improvement using it.
DXVK injects itself into the game exe, so perhaps using launchers bypasses the injection. From extensive testing, I'm inclined to think this is the case.
Someone recently asked me how do we know DXVK is really working. A very good question! lol. I thought as long as the cache showed up in the bin folder it was working, but that was no guarantee it was injected every single time at startup. Until I saw Heldhram's excellent guide to using DXVK with Reshade DX9, I relied on my gaming instincts and dodgy eyesight to determine if it was. 🤭
Using the environment variable Heldhram referred to in his guide, a DXVK Hud is added to the upper left hand corner of your game screen to show it's injected and working, showing the DXVK version, the graphics card version and driver and fps.

This led me to look further into this and was happy to see that you could add an additional line to the DXVK config file to show this and other relevant information on the HUD such as DXVK version, fps, memory usage, gpu driver and more. So if you want to make sure that DXVK is actually injected, on the config file, add the info starting with:
dxvk.hud =
After '=', add what you want to see. So 'version' (without quotes) shows the DXVK version. dxvk.hud = version

You could just add the fps by adding 'fps' instead of 'version' if you want.

The DXVK Github page lists all the information you could add to the HUD. It accepts a comma-separated list for multiple options:
devinfo: Displays the name of the GPU and the driver version.
fps: Shows the current frame rate.
frametimes: Shows a frame time graph.
submissions: Shows the number of command buffers submitted per frame.
drawcalls: Shows the number of draw calls and render passes per frame.
pipelines: Shows the total number of graphics and compute pipelines.
descriptors: Shows the number of descriptor pools and descriptor sets.
memory: Shows the amount of device memory allocated and used.
allocations: Shows detailed memory chunk suballocation info.
gpuload: Shows estimated GPU load. May be inaccurate.
version: Shows DXVK version.
api: Shows the D3D feature level used by the application.
cs: Shows worker thread statistics.
compiler: Shows shader compiler activity
samplers: Shows the current number of sampler pairs used [D3D9 Only]
ffshaders: Shows the current number of shaders generated from fixed function state [D3D9 Only]
swvp: Shows whether or not the device is running in software vertex processing mode [D3D9 Only]
scale=x: Scales the HUD by a factor of x (e.g. 1.5)
opacity=y: Adjusts the HUD opacity by a factor of y (e.g. 0.5, 1.0 being fully opaque).
Additionally, DXVK_HUD=1 has the same effect as DXVK_HUD=devinfo,fps, and DXVK_HUD=full enables all available HUD elements.
desiree-uk notes: The site is for the latest version of DXVK, so it shows the line typed as 'DXVK_HUD=devinfo,fps' with underscore and no spaces, but this didn't work for me. If it also doesn't work for you, try it in lowercase like this: dxvk.hud = version Make sure there is a space before and after the '=' If adding multiple HUD options, seperate them by a comma such as: dxvk.hud = fps,memory,api,version
The page also shows some other useful information regarding DXVK and it's cache file, it's worth a read. (https://github.com/doitsujin/dxvk)
My config file previously showed the DXVK version but I changed it to only show fps. Whatever it shows, it's telling you DXVK is working! DXVK version:


DXVK FPS:

The HUD is quite noticeable, but it's not too obstructive if you keep the info small. It's only when you enable the full HUD using this line: dxvk.hud = full you'll see it takes up practically half the screen! 😄 Whatever is shown, you can still interact with the screen and sims queue.

So while testing this out I noticed that the HUD wasn't showing up on the screen when launching the game via CCM and S3MO but would always show when clicking TS3W.exe. The results were consistent, with DXVK showing that it was running via TS3W.exe, the commited memory was low and steady, the fps didn't drop and there was no lag or stuttereing. I could spend longer in CAS and in game altogether, longer in my older larger save games and the RAM didn't spike as much when saving the game. Launching via CCM/S3MO, the results were sporadic, very high RAM spikes, stuttering and fps rates jumping up and down. There wasn't much difference from DXVK not being installed at all in my opinion.
You can test this out yourself, first with whatever launcher you use to start your game and then without it, clicking TS3.exe or TS3W.exe, making sure the game is running as admin. See if the HUD shows up or not and keep an eye on the memory usage with Resource Monitor running and you'll see the difference. You can delete the line from the config if you really can't stand the sight of it, but you can be sure DXVK is working when you launch the game straight from it's exe and you see smooth, steady memory usage as you play. Give it a try and add in the comments if it works for you or not and which launcher you use! 😊 Other DXVK information:
Make TS3 Run Smoother with DXVK ◀ - by @criisolate How to Use DXVK with Sims 3 ◀ - guide from @nornities and @desiree-uk
How to run The Sims 3 with DXVK & Reshade (Direct3D 9.0c) ◀ - by @heldhram
DXVK - Github ◀
105 notes
·
View notes
Text
How to back up your tumblr blog with Tumblr-Utils FOR MAC USERS
I've seen a few guides floating around on how to use some more complex options for backing up your tumblr blog, but most are extremely PC focused. Here is a guide for fellow (unfortunate) mac users!
Note: I am not a tech savvy person at all. My brother walked me through this, and I'm just sharing what he told me. Unfortunately I won't be able to help much if you need trouble shooting or advice ;; sorry! This is also based off of this guide (link) by @/magz.
- - - - GUIDE - - - -
First, open terminal. You can command+space to search through your applications, and search for "terminal". It should look like this.

You should see something like this within the window:
[COMPUTER NAME]:~ [USER NAME]$ []
First, create a virtual environment for tumblr back up. This will limit any conflicts with other python programs. Type and enter this into terminal:
python3 -m venv .tumblr_backup
Then, Activate the virtual environment by entering this:
source .tumblr_backup/bin/activate
The next line should now show something like this:
(.tumblr_backup) [COMPUTER NAME]:~ [USER NAME]$ []
As a side note, you can exit this virtual environment by typing and entering "deactivate". You can re-enter it through the previous line we used to activate it to begin with.
Next, install the base package with this line:
python3 -m pip install tumblr-backup
The linked guide details various options for tumblr back up packages that you can install. Copied from the guide for convenience:
"tumblr-backup : default tumblr-backup[video] : adds option to download videos tumblr-backup[exif] : adds option to download EXIF information of fotos (photography metadata information) tumblr-backup[notes] : adds option to download notes of posts (huge) tumblr-backup[jq] : adds option to filter which posts to backup tumblr-backup[all] : adds all options (personally doesn't work for us at the moment of writing this)"
I chose the video option, but you can pick which you'd like. Download that specific package with this line. Note that unlike the previous lines Ive shown, the square brackets here are actually part of it and must be used:
python3 -m pip install tumblr-backup[OPTION]
Next, you need to create an app linked to your tumblr account to get an OAuth consumer key (aka API key). Go to this link: [https://www.tumblr.com/oauth/apps] and click the [+Register application] button. Here, you will have to input a bunch of info. What you put doesn't really matter. This is how the original guide filled it out, and I did pretty much the exact same thing:

(The github link for your convenience: https://github.com/Cebtenzzre/tumblr-utils)
For the next step, You'll take the OAuth consumer key (NOT the secret key) and set it as the API key in tumblr-utils to give it the ability to download your blog. Input this line. Note that in this case, the square brackets are NOT to be included- just copy and paste the key:
tumblr-backup --set-api-key [YOUR OAUTH CONSUMER KEY]
This will set you up to start your back up! Type this to see all the different customization options you can pick from for your backup:
tumblr-backup --help
To begin your back up, pick which options you want to choose from and select which of your blogs you want to back up. It should look like this:
tumblr-backup [OPTIONS] [BLOG NAME]
For example, I am currently backing up this blog and I wanted to save videos as well as reversing the post order in the monthly archives. This is what my command looked like:
tumblr-backup -r --save-video bare1ythere
And there you have it! Your backup will be saved into a file titled after your blog. You can search through finder for it from there. There is also an option to specify where you want to save your blog, but I'm not sure how it works. I hope this was useful!!
92 notes
·
View notes
Text
Update: Since I posted it, some kind people on discord informed me that Focus Writer might even be better than Calmly Writer bc it supports .odt! You can also create custom themes (you kind of have to, the out of the box is... eh. But they really give you lots of options and you can make it pretty).

(That's the soulmate fic btw)
It also has typewriter sounds, though it's a bit obnoxious and I don't like it much. So I went hunting for an alternative, and found Mechvibes which just gives different keyboard sounds/typewriter sounds wherever you type. Which means my keys are happily clicking away as I type the post xD It was a bit of a bitch to get to work on Linux, but I'm happy with this setup now.
on the topic of writing software
I want to ramble at you about some writing software options. 98% of the time I'm perfectly content with LibreOffice Writer (and previously I used Word, back when Microsoft products were less shitty). But every now and then when I have a new project (like now - more on that later) I start looking for something shiny and new to try. And I fell down into another research rabbit hole lol
I usually don't talk a lot about this bc my needs are very simple, and not sure how useful my opinion is to others, but I enjoy the topic. It's an intersection of creative writing and tech nerdiness and I like both of those things. Also what writing software you prefer really depends on the type of writer that you are, and everyone has a slightly different writing process and I find that fascinating.
Now, as I said, I'm coming at it from a slightly tech-nerd angle. I don't care if the installation is clunky, I'm happy to see the words open-source, and the need to create an account will already mildly piss me off (:
Don't worry, I'm not as intense as the guy writing his novel in Vim. Though fucking respect. And I can't say I'm not tempted to try it even with the steep learning curve lmao (Seriously, if you don't know Vim is notorious among software developers.)
Anyway, things I've tried so far:
Manuskript: this was listed as an open-source Scrivener alternative (though I haven't tried Scrivener. so.). I gave it a go when I was writing heart worth the trouble and it was pretty nice. It helped me when I had to move scenes and chapters around. But overall I think it was made with plotters in mind bc it wants you to enter a lot of information upfront. I'm not a planner/architect type of writer so this type of software is a bit overwhelming for me. Still, the fact that it's open source and works on Linux gets kudos from me.
Wavemaker: I recently played around with this, and I actually surprisingly like the features it has. You can put multiple books in a project, which is very nice if you like to work on different things, like fanfic, novels, etc. The mindmap is a feature I liked, though it's a bit clunky bc it collapses the text fields when you exit, and once I added an image field by accident that I could never remove lol I do like a bit of a snowflake method, so that feature is cool, and the cards are pretty straightforward too. Usually, my problem with these apps is that I don't even want to touch half of the features so they are pointless to me, but the features of Wavemaker were kind of nice. It's a web app that you can download and use offline but it's still working from your browser if that makes sense. That was what I didn't really appreciate. Also, it doesn't give you a lot of options to back it up. You either save the wavemaker file, export it into a document (which is fine, but it adds an extra step to the backup process) or you sync with Google Drive *shudders*
Things I want to try out:
Calmly Writer: now this is just purely a text editor that focuses on being very zen, streamlined, distraction-free, etc. It's pretty and it has typewriter sounds. (Yeah, I'm not immune to a pretty UI and harmless fun features alright? I can contain multitudes :P) It has an online version, but you can also download it, and works on Windows, Mac, and Linux. On paper, the desktop app requires a license, but the way they put it is that you can evaluate it for free and the evaluation doesn't have an enforced time limit... So. As good as free. (Though if I really like it, I would totally consider buying a license for 20usd that I can use on 3 computers, that seems fair. I appreciate a license over a subscription model for sure.) Honestly, I think this is the one I'm going to try next bc it just integrates perfectly into my writing process. That being: a multitude of messy, hand-written notes and notebooks + a document editor + backups on hard drive and GitHub (yes, really) ^^"
Shaxpir: This is on the opposite end of the spectrum basically, but out of the "fancy" ones, I kind of like the look of this the most. I like the statistics part in particular. But honestly, I probably won't try it bc it doesn't have a Linux version which would be a pain in the ass for me, and is cloud-based. I kind of don't really trust them, which is my biggest issue with these companies. (Although the creator's heart seems to be in the right place when it comes to AI. Basically, some of their features are based on machine learning and language models. For example, it will recognize passive voice, if it's an adverb with "-ly" or the emotion of a word. Which I think is all cool and fine and shouldn't be lumped in with generative AI. But he also had a website that did this analysis for already published works, and when people pointed out that it was sketchy, he took that down and I can respect that. I'm not sure how much it influenced the actual features of the app, maybe I'll just take a peek out of curiosity. The whole thing does make me have trust issues though lmao) If anyone has experience with it though, I'm interested to hear about it.
Obsidian: not a dedicated writing software, but rather an elaborate note-taking app. I heard good things about it from smart people lol If I really wanted to access my writing on my phone, I would probably use this bc it works on every platform and has end-to-end encrypted sync with version control. I heard you can also integrate it with GitHub which is always music to my ears lol But the setup probably takes a bit of time and I'm not particularly motivated to do that right now.
So yeah, those are the options that appeal to me right now. If anyone used these and has opinions, I'm all ears :D
#and if I temporarily broke my system while getting the second software that's my own damn fault#seriously it's fine it was just the display manager#nothing that following a github guide to enter a command from recovery mode couldn't fix#*insert awkward laugh*#anyway that's the linux life for you loool#nara rambles
137 notes
·
View notes