#html image tag
Explore tagged Tumblr posts
Visit Tumblr Blog
Explore Tumblr blogs with no restrictions, modern design and the best experience.
Last Seen Tumblr Blogs


Fun Fact
Tumblr was attacked by a cross-site scripting worm deployed by the Internet troll group GNAA on Dec 3, 2012.
Text
https://www.infidigit.com/blog/html-image-tag/
Mastering Image Optimization: Top 5 Practices with HTML Image Tags
Learn image optimization for a seamless website experience. Explore the best practices using HTML Image Tag, compression, file types, SEO optimization, and CSS sprites.
0 notes
Text
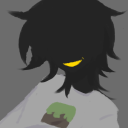
PAPA V ICONS #1 ⛧ save from under the cut ⛧ 128 x 128px (correct icon dimensions) ⛧ credit is appreciated <3 ⛧ ask me for a different background colour and i'll make it!
photo source: x


#i've been meaning to do stuff like this for ages#and i've got grand plans with more serious images#but this photo has bewitched me so. here we are jhdbfjh#i've actually been waiting to get an icon page but tumblr's been funny about unsupported html or whatever#so that'll have to wait#these look blurry and crunchy on the post but i promise they're the right size#might use one myself. i'm so sorry vessel#maybe your time is up#re: the other colours - i've got a pink one that i haven't posted#and am happy to do more#it's very easy so lmk and i'd be happy to provide#the band ghost#papa v perpetua#user copia all tag#user copia layout
15 notes
·
View notes
Text
she's live

now you can see what everyones height is in my head because i refuse to download height sliders. look at ass <3
#also works on mobile btw ☝️ !!#me successfully making this is proof you can achieve anything with 500 google searches#you should see my search history#html how to put image. html how to change image size. html how to put images in a row. html how to center a row of images. html how to#their pinterest boards are disabled at the moment because i need to make them look good before i share them#and most tags don't work yet because i'm too lazy to go back through my whole blog and tag almost 2 years worth of posts 😭#going to christen it by reblogging one of those dress up your sim prompt ask games#if i can find it#and then i'm going to get completely stuck into rufus and sawyers gameplay yessss i can't wait#leaving virgils gameplay forever i think because when rufus and sawyer have a kid i'm moving him in as the babysitter#would you believe me if i told you there is 0 cc clothes in this#i've fallen in love with maxis clothing recently idk what happened to me#besides roxys boots and virgils bag its a vanilla lookbook#thank you to everyone who voted on the poll yesterday btw#even though it was 50/50 the majority of the time it was up#it ended up 60/40 after an hour tho so i went with my fav macmahon lifestages instead of young adult stages!#goodnight <3
247 notes
·
View notes
Text
man learning html is a fucking lot. like i'm having a great time and kinda can't believe i threw together a working website in a day but it's gonna be so much work to make it look like. good.
#html#i'm throwing this in the tag in case anyone would be kind enough to throw me tips a la things they wish they'd known right away#esp for websites displaying images#i'm using the htmldog tutorials b/c the site is on neocities but i'm going into resources pretty blind here
5 notes
·
View notes
Text
With the change to the post editor and the loss of picloadr (RIP), I had been trying to figure out a way to keep our promo queue updated easier. It's no mass post queuer, but this zap I made on Zapier will clone any new posts made on your blog and add it to the end of your queue so it'll be perpetually refilling itself. It should work with the free account because that's what I'm using. This is my only contribution to the rpc so you're welcome. Go forth and be great.
#rph#rpc#rpt#tumblr rp#rp admins#idk what to tag this as but pass it on I guess#might save a fellow rp admin from having their head explode from trying to figure it out#I tried using IFTTT and it wouldn't keep the html or the image as a gif#or if it kept the image it would put the description as the caption on the image itself#twas a nightmare#( briana talks )
13 notes
·
View notes
Text

hi i am back!!!!:~)
#tag rambles#long time no see!!!#i have updated the mobile version of little webpage but not the HTML version quite yet so that’ll be coming soon#it certainly is not spring of 2019 anymore ??1?#i love a lot of the same things still though so content will be similar!!#that would be cottagecore#and webcore#and silly images#seasonal things#and maybe personal stuff too#like music or a diary of sorts!!!!#i don’t know if anyone is active but#i just like it here…#i’ve been changing the way i use the world wide web lately#i’ve been a lot less interested in most platforms#and i’d like to just come to a place once a day and. do little sharing#and then be done with it?#but we’ll see!!!#to whoever read all this here is a treat 🧁
2 notes
·
View notes
Text

made some changes to the html for my art blog ✌️
#looks very cool#very polished & nice#personal#html stuff#my edits#i updated the tags page and got rid of the header image#also added a cool grid pattern to the header/post background#oh hey the search bar actually works :D#it didn't before and i couldn't figure out why
0 notes
Text
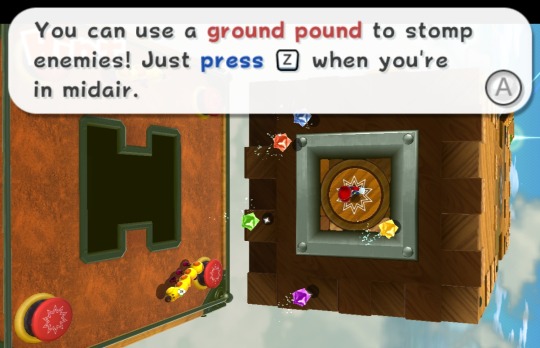

Most games that have a dialogue system making use of more than one text style have an internal markup system (similar to e.g. HTML tags) used to determine properties of the text, such as size, color etc. inside the message.
In the Super Mario Galaxy games, some of these tags are not merely redundant but outright self-defeating, so that one tag may change the text properties only to be immediately undone by a different tag changing them to something else.
The image shows a baffling example of a message in Super Mario Galaxy 2 that visually changes color 5 times (starting with black, to red, to black, to blue and finally back to black), which would normally need no more than 5 color change tags.
However, internally, the game instead changes the color 10 times, including multiple times in a row into the same color. This messy implementation is likely a remnant of various rewrites of the original message whereby the tags were never cleaned up between revisions.
Main Blog | Patreon | Twitter | Bluesky | Small Findings | Source: HEYimHeroic
4K notes
·
View notes
Text
9 blogs moved, 26 to go.......

#it would be more but i can't move my mod showcase blogs#they're just too much#too many moving parts ajkslda#i'm gonna see if i can do something to make it easier for me but tbh I may to let them disappear into the void#bc in order to put them on neocities I have to add all of the html tags to EVERYTHING#do the images tags the formatting tags the link tags and it's just#impossible#impossible to do for blog posts that have 50+ images and links#so yeah#bee.txt
0 notes
Text
Tumblr Backup Options: None of them do everything
Cheeky but true. I'll go through what's good and bad about each option though so you can decide which balances out for you.
Covered: native export, WordPress (kinda), TumblThree, tumblr-utils (kinda)
Native Export
If you go to "https://www.tumblr.com/settings/blog/yourblogname", at the bottom of the page is an export option

Once you hit the button to start the request, it will start processing. Feel free to log off, this is going to to take a few hours. You don't need to keep it open. ~22k posts took roughly a day for me. If you have a small number of posts and get stuck, you're probably broken.
When it's done processing, you can hit that download backup button and then wait some more as you wait for the zip file to download. Mine failed the first time after like twenty minutes, and then I had to start over. I think it took 1-2 hour(s) and I'm almost certain that was on Tumblr and not my internet. And that was the zip file! So make sure your computer can be on for a while before getting this started.
So what do you get?
A media folder, conversations folder, and posts folder
Media folder: Every single photo, gif, and video that has ever been on your blog or in your DMs. There is no context data attached (except for dm images which do say which conversation they're from at least), but they seem to be in chronological order because they seem to be titled by the post's ID (the string of numbers in the address bar after "/post/"). They look like "100868498227", "100868498228_0", "100868498228_1"
When you see something end with "_0" and up that means the photos are in the same post, so _0 represents the first image in the post, _1 represents the second, etc (at least, I think).
Conversations folder: HTML export files of every DM history you have on your blog. These are actually pretty well formatted, see example here.
Posts folder: html subfolder and posts_index.html file
posts_index.html: File listing every single post on your blog by post ID on its own line with no other context. Example of a line: "Post: 780053389730037760". The ID number will link to the post in the html folder
html subfolder: contains a submissions subfolder and stripped html file versions of every post on your blog. See below first what the post looks like on Tumblr, and second what the post looks like in the html folder


The way you seem to be intended to use this is to open the file index, select a post ID, and be jumped to where that post is saved as an html file, but I don't know why you would bother when the index doesn't provide any information about the posts inside it. The posts all have extremely minimal formatting. See a reblog chain below.

Notice I said ALL posts on your blog. Photo posts without a caption will just have a broken image icon and then the date and tags. Theoretically, it might be that if you unzip the entire export folder that allows it to automatically link to the image saved in your media folder. I have no fucking idea, unzipping the folder was estimated to take two hours so I didn't do it. Let me know if you do though so I can update this post!
The submissions folder is such a rabbithole I made a post just on it but long story short it's asks you haven't replied to
What do I see as the main reasons to opt for this option? 1) you don't want to download any programs or files from the internet just to backup your blog, 2) your blog is relatively small, so digging through the ID files isn't a big deal, 3) you mostly just want to download either the images (which will be browsable via thumbnail previews in the media folder if you unzip it) or conversation history, which are fairly well formatted, 4) you don't need to update your export often/ever, because you'd have to request it from the start and download the entire thing all over again, 5) you want to be able to read your text posts clearly and don't care about preserving the full formatting, and/or 6) you don't plan to reupload this information elsewhere (say on... a WordPress blog)
WordPress Automatic Ex/Import
Move your post's from Matt's right hand to his left! WordPress (another product of Automattic) has a native Tumblr importer found under your WP Admin dashboard for your site under Tools > Import > Tumblr.
How does this work? No idea! I hit import 2 days ago and it has done nothing. Maybe I'm stuck, maybe it's permanently broken. It says to contact support if it's been over 24 hours but they don't make that easy. I disconnected from Tumblr (you can only port over a blog you have the login of) and reconnected and it still said it was importing. I don't think it's ever going to do anything.
Presumably it's supposed to 1:1 import every post on your blog onto the WordPress site, which will result in a whole lot of stolen art because there's no way to select just your original posts. Also, you'd need enough storage on your webhost to house all the posts (this honestly might be my problem, but I was planning to delete all the non-original posts once it imported.... anything and backfill what it didn't get to). The one thing I'll say about this option is that it's the only one I've seen so far that exports drafts and queues as well.
I mean, if it exported anything. If this ever does anything I'll update this post, but either my blog is too large or this tool isn't totally functional anymore.
TumblThree
(previously TumblTwo, etc)
TumblThree is an all-in-one program requiring no extra downloads beyond the main Zip, and was last updated fairly recently at the time of this post. In order to run it, unzip it into one folder and run the main .exe. It has a full UI interface with lots of very descriptive helper text to help you select the right options for you without looking at the wiki. I think it's user-friendly for non-tech people.
There are a lot of options in TumblThree to change what output it gives you, but I'm going to start with the largely universal parts first:
Everything from one blog will be exported to one folder, no subfolders or sorting. As a result, the output is very messy and difficult to wade through, but post metadata and the photos are named in the same way so you can scroll, see an image preview, and then click on the metadata txt for that post and read the caption.
Depending on your settings, you can export all photos, videos, text posts, etc as their own files or exclude them from the export entirely. For the different types of media posts, you can independently select if you what to download just the media, just the metadata for it (everything that surrounds the post when you see it on Tumblr, such as the caption, OP, tags, etc), or both.
Master txt file: For every type of media metadata you export, a correspondingly named txt file will be created (images.txt, answers.txt, etc) that contains the text/metadata of every post of that type in one txt file. This is also the default behavior for exporting text posts.
Note: for text posts (which includes asks/answers), it only creates a master txt file if you do not select "Save texts as individual files", in which case it will only save each text as an individual txt file and not make a master file.
The formatting on these files is so brutal I won't even give examples, but they're unreadable. Being a .txt file, there is no native formatting, so it exports in html formatting.
Example: instead of a post that says "I want to go swimming", it exports: "I want to go < b >swimming< / b >" (minus the spaces around the b) as the post body, which is a big part of what makes it unreadable, because there are a lot of hyperlinks in all the header information listed below.
Each post in the master txt exports with: Post ID, date, post URL, slug, reblog key (no idea what that is), reblog URL, reblog name, title, [the text/caption itself], and tags.
Theoretically this means you could ctrl+f "cybertrucks" in the master txt file and then browse all your posts making fun of Tesla owners by tabbing through the returns. This is not possible with any of the previous options, and only is possible because it's all in one file, as ridiculous as it is, which is why getting that master file is so important.
For the trick to get both the individual text posts and master text.txt & answers.txt file, as well as my recommended settings and details on how updating backups works, see the read more at the end of this post.
The images.txt includes all the information listed above, but with the following additions: photo url (NOTE: this is the url on Tumblr, not a link to where it is in your folder), photo set URLs, photo caption, and "downloaded files" (NOTE: this is the name of the file it has downloaded)
The video.txt is similar to the above
The use case for this would be similar to what I described for text posts above: search keywords from captions, tags, etc and when you find what you think is what you want, copy the name from "downloaded files" and search your folder to find the actual image
I really hated TumblThree's output the first time I looked at it and then I realized the single file is the only way to make browsing tags workable, because otherwise you would have to have a folder for every tag, and posts with multiple tags would have to be duplicated between them. I'm not pressed on finding a txt to HTML converter right now but it could be an option in the future if you wanted to make things more readable.
Okay, let's get into the non-universal stuff you can customize in settings, because it's like, everything:
File names: We've already established you can search with the downloaded file name for images, but what will that be? Whatever you fucking want. Post date, reblogger name, post ID, post title, original file name, you can make it any and all of these in any order you want! You can have actually useful file names! Personally I like %e_%p_%q_%i_%x which exports as DateTime_PostTitle_BlogOriginName_PostID_IteratingNumber (note: you need some kind of unique iterator to be valid so two files don't have the same name, such as multiple photos from one post). Look how much searchable information that gives me, in chronological order! It decreases your need for the master txt file.
Tip I wish I thought of before doing my massive export: make one of the unique headers from the master txt file part of the exported file name so it's easy to search for it after identifying it in the master file.
Files scanned: this is the only method I've found that lets you back everything up, remember what it backed up, and then lets you add any new posts since that date without having to download the whole thing again. That's a game changer, but see the read more below for limitations.
You also have the option to rescan the entire thing if you want.
Post type: T3 (I'm abbreviating it now) also lets you export just your original posts, just reblogs, etc - again, giving you the most control of any options. It also lets you export replies. I, uh, would not do this because if you have any popular post on your blog it might have hundreds, or thousands of replies but hey, you can do it!
You also have the option to only download posts with a certain tag.
Blog options: You can export literally any blog you have the URL of. In fact, if you copy a blog URL while it's open, it will automatically add that blog to its UI and create an empty folder for it. It makes it easy, no private key required. I do have mixed feelings about the concept of exporting someone else's blog... but I'm also planning to do it to some of Crew-ra's blogs so... my digital horde must grow.
You can also queue blogs up and leave it to run through a lot of them. It is a lot faster than Tumblr's native export, I started this import well after I started typing this post and it took a few hours, probably not all that much longer than just downloading Tumblr's export took (and that's while running it alongside other data copy operations because I'm backing up a lot of stuff right now).
I do recommend doing a test export with a sideblog, I was able to use wild-bitchofthenorthwoods as a test import since it only has one post and it has media, so it was super quick.
(I do want to note, I think the number of downloadable items starts out matching the number of posts on your blog without scanning them until you start the export - but if you choose to export everything as its own file, you're going to end up with way more than that because a post with three images would be multiple files)
Things T3 cannot export:
Since in its simplest form it's just accessing the public upload of your blog, it cannot export your drafts, queue, or conversations
It cannot export posts as HTML files, and thus cannot export them with readable formatting natively
What do I see as the main reasons to opt for this option? 1) you don't care about exporting your DMs/conversations, 2) you want the ability to export only certain kinds of posts (original, photos, using a tag, etc), 3) you want to control the titles of the exported files 4) you don't mind wading through massive folders, 5) you want the ability to search tags (using the txt files), 6) you want the ability to update your export without starting over from the beginning, 7) you either don't want to reupload this information somewhere else, or you want to upload it somewhere that supports automatic HTML conversion (for instance, you can switch a Tumblr post from a rich text format to HTML, same with AO3, so you can put it in as HTML and then hit post to see it turn into a rich format. This techically makes T3 the most versatile/useful export option if you're planning to do anything with it other than browse your own files).
tumblr-utils
Full disclosure: haven't tried this one. But others have! tumblr-utils is a no-UI, python-based backup software. This means in order to use it you have to type commands into the terminal. If you don't know what I just said, don't use this one.
If you do, you'll need to separately download python and youtube-dl just to get this one running. You'll also need to give it your personal Tumblr API key and feed it commands deciphered from the wiki page I linked. Here are two different guides people have written on how to use it. Output:
Obviously I'm guessing based on the documentation, but one thing that is nice is this tool allows you to save each post in its own folder. Presumably each post is multiple files like we saw with T3, so this would make it easy to group them, but it also means you'd have to look in every single folder to find anything.
It seems to break posts up into timestamp folders by month, again, helping with management to narrow down where you have to search
It allows you to save only certain kinds of posts at a time like T3
It allows you to backup posts only from a certain time period (so if you keep a little .txt note of the last time you backed up, you can easily add only the new posts into your backup without having to start over from the beginning)
It allows you to only save posts under a certain tag like T3
It allows you to save only original posts
It's the only one I've found that lets you back up your liked posts
What do I see as the main reasons to opt for this option? 1) you don't care about exporting your DMs/conversations, 2) you want the ability to export only certain kinds of posts (original, photos, using a tag, etc), (okay now we get to the points that aren't also covered by T3), 3) you want posts to export already broken into folders, whether by post or by month, 4) you want to back up your likes, 5) you don't care what file names look like, 6) you're comfortable with the command line/coding and don't need a UI.
Summary:
None of these options are ideal for reuploading your files anywhere (except WordPress), but I do think TumblThree is the best of the options because of the written HTML formatting in the txt files being useful for websites that support automatic conversion (or require HTML input).
For starting another blog, WordPress wins. If it works. I'm trying to be generous here.
For searchability, T3 wins again.
For versatility... yeah you know it's T3, but tumblr-utils has a lot of the same features, too!
For sentimentality (aka conversations), it has to be the native export. There literally is not any other option.
For queues and drafts, the only theoretical option is WordPress. If it works.
For likes, the only option is tumblr-utils.
Every option does something the others don't, so theoretically to cover everything, you have to do all four options. Actually I would say do the native export if you don't have a lot of posts and aren't a freak like me, check it out, and if it doesn't work (I know it's finnicky) or you don't like the export, go with TumblThree. This also means you'll at least have your conversations even if you don't end up using the native export any other way.
And I wish it could go without saying, but don't repost people's shit, y'all. I'm backing up everything for my records only and it will never be shared with anyone else, or even browsed as long as using Tumblr instead is an option.
TumblThree adding to old backup quirks, recommended settings, & master file backup solution:
Adding to backup quirks:
From my tests, when you scan a blog you've already backed up to just add new posts to it, it does not update the master file, so if you want to update it, you'll have to do the steps I list at the end of this post. It might be possible it does update if you force rescan, but I highly doubt it.
If you scan a blog you previously backed up under more restrictive settings - say you only backed up original text posts as one file before and now you've selected to back up absolutely everything - it will only download up until the time you last backed up that blog. It will not blow past where you last downloaded to download all the photos and videos it didn't get before just because they're selected now. This is great for doing after using the master file solution I'm showing below, but if you do need to download everything after doing a more restrictive scan, you can once again follow the first few steps below to do so.
Recommended settings:
This will obviously vary by what you're trying to do, but one or two things weren't immediately obvious to me and I did say I think this was the best solution for less technical users, so I want give my personal recommendations. Settings can obviously be found under the settings button at the bottom of the screen (you may need to use the scrollbar on the UI for, which is separate from the scrollbar on the blogs panel), but when you click on a blog, when you click "Details" in the right sidebar, you can also see your most important settings at a glance and adjust them to whatever you want them to be "per blog". I believe TumblThree remembers what you last used for the blog and applies the things in settings only to new/other blogs.
The thing that is going to vary the most is how many different types of posts you want to back up (text, video, reblogs included, etc), so I'll leave that up to you. If you're going to export a media type, though, I generally recommend exporting the metadata too.
I already gave my preferred file names above and again that's going to be something that varies a lot by people. Hover over the "Filename template" box and it will give you all the options in the legend you can combine via underscores.
Leave "Skip .gif files" off unless you're hurting for hard drive space. This removes all the gifs from your download, and the reason this is provided as a separate setting is because gifs have relatively massive files (at least compared to a text file)
I'll be honest I haven't seen a difference between turning on and off "Group photo sets". Because of the way file names work, most conventions will naturally lead to photos from the same post all being in a row.
"Save texts as individual files": if you only want texts to be saved as their master text.txt and answers.txt files, uncheck this. If you want the individual files I highly recommend you also download the master file for searching purposes, in which case my recommendation is this:
1) Select to export texts only, leaving off all media options, and uncheck the "Save texts as individual files" option. 2) Export the blog. This will only result in two files, answers.txt and texts.txt. 3) Move these files elsewhere on the computer to save them. 4) With T3 closed, delete the folder for the blog and the blog's Indexes (see instructions at the end of this post for finding these). 5) Reopen T3, which shouldn't remember it ever saw the blog and create a new folder for it. Turn on the "Save texts as individual files", as well as any other media posts you want to download. 6) Export the entire blog again. 7) Move the texts.txt and answers.txt file back into the blog's folder.
I leave all other options on the Details tab off, except for:
"Force rescan" scans past the point it last backed up and searches the whole blog again. If you have a big blog, this is going to burn time. This is needed for the number of downloaded items in the panel to be accurate but I don't know why you would care or turn this on unless it lets you skip steps 3-4 above, but my blog is too big to burn through testing that, so if you try it, let me know and I'll update this post!
Master file backup solution:
See my 7 steps from above to skip having to do this, but if you accidentally do things out of order and then realize you still need the master files for texts post after backing everything else up, here's how you get it with minimal pain:
T3 will make an "Index" folder in both the main folder for the program where the exe is located and the destination folder where you have your blogs backing up (note: these were two very different places for me, if you just have it back up to the automatic Blogs folder within T3's folder, it might not create a second Index folder).
To make T3 "forget" what it has backed up previously so it goes through to the beginning and makes a master file that includes everything, all you have to do is remove the Index file(s) for the blog while it's closed so it doesn't remember it anymore. I backed my index up in another folder.
Check off for it to only download text posts, and then uncheck the "Save texts in individual files" option. This will cause it to only create the master answers.txt and texts.txt file on the rescan.
The combination of only going for one post type and only downloading one file for it means this rescan is relatively fast. When you look at your Blogs folder, you'll find a new folder has been created for your blog name (in my case, there was "n7punk" and "n7punk_2) and your output is in the new folder. I just moved it over to the original folder.
At this point you can restore the indexes, though I've only gotten it to half recognize them. I can get it to recognize my original n7punk folder so everything can stay there, but the total downloaded items is stuck at what it was when I did just the text posts. I don't really care, it was mainly the folder thing I wanted to fix. If you have lag between your last full backup and your master-only backup, this might cause some issues? I don't know because I made sure there wasn't lag, so I recommend doing another backup to add any missing items before doing this method.
You can also use this technique if you want to download only your original posts and then download everything else to a second folder. Adjust the setting to only download original posts, download the whole blog, close T3 and delete the indexes, rename the folder to whatever you want ("n7punk_original", etc), and then reopen T3 and set it to download everything and run it again from the start.
#tumblr#automattic#words and things#tumblr hacks#resource#tumblr-utils#tumblthree#100#posts that haunt me#in a good way back up your shit yall lol
436 notes
·
View notes
Text
========================================================
[tutorial: build your own neocities/nekoweb page]
========================================================
a beginner's guide for making your very own home on the indie web—retro, personal, weird, and 100% yours.
this ain’t an average wix, squarespace, or tiktok aesthetic.
we’re talking full html/css with soul and attitude.
[ prerequisites ]
------------------
> an idea
> basic text editor (vscode, notepad++, or even notepad)
> account on https://neocities.org or https://nekoweb.org
> some gifs or tiles you love (dig deep or make your own)
> optional: image host or gif repo (or self-host everything)
[ feeling overwhelmed? read this. ]
-----------------------------------
you do *not* need to know everything.
html is not a mountain. it's a garden.
you plant one tag. then another. then a style. then a button.
you can build your site piece by piece.
and every piece is a portal to somewhere personal.
you are allowed to make broken pages.
you are allowed to use templates.
you are allowed to start over as many times as you want.
this is *your* world. you control the weird.
[ step 1: create an account ]
-----------------------------
> neocities: https://neocities.org
> nekoweb: https://nekoweb.org
register a name, log in, and enter your file manager.
this is where you upload your files and see your site live.
[ step 2: your first file - index.html ]
----------------------------------------
make a new file: `index.html`
basic starter:
<html>
<head>
<title>my weird little corner</title>
<link rel="stylesheet" href="style.css">
</head>
<body>
<h1>welcome to the void</h1>
<p>this is my page. it’s strange. like me.</p>
<img src="mygif.gif">
</body>
</html>
> upload to the dashboard
> boom. you’re live at
https://yoursite.neocities.org
or https://nekoweb.org/u/yoursite
[ step 3: add a style sheet - style.css ]
-----------------------------------------
create a file called `style.css` and upload it.
here’s some nostalgic magic:
body {
background: url('tile.gif');
color: lime;
font-family: "Courier New", monospace;
text-shadow: 1px 1px 0 black;
}
img {
image-rendering: pixelated;
}
marquee {
font-size: 20px;
color: magenta;
}
link it in your html and the vibes activate.
[ step 4: decorate it like a haunted usb ]
------------------------------------------
> use <marquee> for chaos scrolls
> embed gifs from https://gifcities.org/
> steal buttons from https://cyber.dabamos.de/88x31/
> set up a guestbook at https://www.smartgb.com/
> loop audio with <audio autoplay loop>
> add fake errors, 90s web lore, random link lists
[ step 5: resources, themes, and comfort ]
------------------------------------------
> templates & layouts: https://numbpilled-themes.tumblr.com
> glitchy gifs & buttons: https://glitchcat.neocities.org/resources
> layout builder: https://sadgrl.online/projects/layout-builder/
> free tiled backgrounds: https://backgrounds.neocities.org/
> beginner html intro: https://www.w3schools.com/html/
> pixel fonts & cyber assets: https://fontstruct.com/
remember:
you don't need to know js. you don't need to be a coder.
you just need a mood, a direction, a dream.
the html will follow.
[ bonus concept: shrine pages ]
-------------------------------
> a page just for one character you love
> a room to house digital fragments of your identity
> embed quotes, music, images like altars
> call it shrine.html and link it from your homepage
[ closing mantra ]
------------------
you are not here to be optimized.
you are not a brand.
you are a ghost inside the machine,
carving your initials into the silicon void.
welcome to Your website.
========================================================
#webcore#old web graphics#neocities#web graphics#carrd graphics#carrd resources#rentry decor#rentry graphics#carrd moodboard#carrd inspo#neopets#indie#indie web#early web#webdevelopment#web development#web resources#web design#old internet#old web#oldweb#nekoweb#transparent gif#tiny pixels#pixel gif#moodboard#tutorial#html page#html theme#htmlcoding
434 notes
·
View notes
Text
!!! my tag system is below all of this,,, I moved it under a cut because people reblog this post for the links :P
edit: thx for the love on this post. im going to try and continually update this!

⇩ ⠀sites FULL of web graphics ⇩
blinkie maker : make your own blinkies!
DOLLZ REVIVAL : a revival of pixel dolls where you can create and share your own. very cute!
GlowTxt : create glowing transparent text gifs that say whatever u want
HOARDER'S PILE : contains blinkies, buttons, stamps, and teddies
plasticdino.neocities.org : blinkies
Glitter Graphics : contains gifs, blinkies, dividers, and just sooo many web graphics
Cute Kawaii Resources : contains gifs, blinkies, stamps, favicons, dividers, buttons, fonts, literally everything you need. its an insane resource
Adrian's blinkie collection : collection of blinkies, stamps, and buttons
☆ (supplies.ju.mp) : blinkies, stamps, buttons, & favicons
twigbranch.carrd.co : blinkies
lallys.carrd.co : blinkies, stamps, dividers, and other resources
Bugleeblinkie.carrd.co : blinkies, and 3 very special gifs at the end ;)
unshinesblinkies.carrd.co : blinkies
The 88x31 GIF Collection : buttons. there are 5 parts! huge collection!
Bonnibel's Graphic Collection : blinkies
WELCOME TO GIFCITY : blinkies, dividers, favicons, stamps
cass-tastrophe.carrd.co : blinkies, stamps
kotatsuOS : blinkies
Cute web graphics : blinkies, stamps, dividers, and a LOT of other graphics, all very cute
⇩ some html tools! + tags below cut ⇩
MDN (mozilla.org) : if you're just starting out like me this is super helpful HTML Tutorial (w3schools.com): same here! (offers other programming languages as well!) Accessibility Checker(Free Scan) : a site you can use to check accessibility/ADA compliance when making your website! it will point out what needs to be changed. it is free, but they also offer paid services if you need more help imagecolorpicker.com : hex code picker. i use this one because you can upload an image, paste clipboard, OR type in the website and it'll grab a screenshot for you! something simple that was made really well. cssgradient.io : helps you make css gradients for backgrounds or whatever else you need them for smartgb.com : a free guestbook service FC2 Counter! : free "site visits" and "online now" counters. fully customizable Unclosed Tag Checker by Alicia Ramirez : does as it says, checks for unclosed tags (although I recommend using a program that does this as you write anyways. I use Visual Studio Code. Status Cafe : an updateable and embeddable status that you can stick anywhere on your site! it is mostly customizable with CSS but I have noticed a few small quirks with it
my tagging system :))
#graphics
#blinkies
#stamps
#buttons
#dividers
#html/css
#resources
#code
e10's web (neocities.org) <- shameless site plug. show it some love :P
#blinkies#stamps#favicons#gifs#old web graphics#old web aesthetic#old web stamps#old internet#old web#old webcore#2000s web#90s web#html#html css#html5#css#htmlcoding#web design#web resources#early web#early internet#neocities graphics#neocities#geocities#gifcities#web graphics#webcore
542 notes
·
View notes
Text
For everyone who asked: a dialogue parser for BG3 alongside with the parsed dialogue for the newest patch. The parser is not mine, but its creator a) is amazing, b) wished to stay anonymous, and c) uploaded the parser to github - any future versions will be uploaded there first!
UPD: The parser was updated!! Now all the lines are parsed, AND there are new features like audio and dialogue tree visualisation. See below!
Patch 7 dialogue is uploaded!
If you don't want to touch the parser and just want the dialogues, make sure to download the whole "BG3 ... (1.6)" folder and keep the "styles" folder within: it is needed for the html files functionality (hide/show certain types of information as per the menu at the top, jumps when you click on [jump], color for better readability, etc). See the image below for what it should look like. The formatting was borrowed from TORcommunity with their blessing.

If you want to run the parser yourself instead of downloading my parsed files, it's easy:
run bg3dialogreader.exe, OPEN any .pak file inside of your game's '\steamapps\common\Baldurs Gate 3\Data' folder,
select your language
press ‘LOAD’, it'll create a database file with all the tags, flags, etc.
Once that is done, press ‘EXPORT all dialogs to html’, and give it a minute or two to finish.
Find the parser dialogue in ‘Dialogs’ folder. If you move the folder elsewhere, move the ‘styles’ folder as well! It contains the styles you need for the color coding and functionality to keep working!
New features:
Once you've created the database (after step three above), you can also preview the dialogue trees inside of the parser and extract only what you need:

You can also listen to the correspinding audio files by clicking the line in the right window. But to do that, as the parser tells you, you need to download and put the filed from vgmstream-win64.zip inside of the parser's main folder (restart the parser after).
You can CONVERT the bg3 dialogue to the format that the Divinity Original Sin 2's Editor understands. That way, you can view the dialogues as trees! Unlike the html files, the trees don't show ALL the relevant information, but it's much easier to orient yourself in.


To get that, you DO need to have bought and installed Larian's previous game, Divinity Original Sin 2. It comes with a tool called 'The Divinity Engine 2'. Here you can read about how to unstall and lauch it. Once you have it, you need to load/create a project. We're trying to get to the point where the tool allows you to open the Dialog Editor. Then you can Open any bg3 dialogue file you want. And in case you want it, here's an in-depth Dialog Editor tutorial. But if you simply want to know how to open the Editor, here's the gist:
Update: In order to see the names of the speakers (up to ten), you can put the _merged.lsf file inside of the "\Divinity Original Sin 2\DefEd\Data\Public\[your project's name here]\RootTemplates\_merged.lsf" file path.
Feel free to ask if you have any questions! Please let me know if you modify the parser, I'd be curious to know what you added, and will possibly add it to the google drive.
2K notes
·
View notes
Note
Can you tell me how you post your art on Ao3? I keep trying and failing. Maybe it's my image hosting site?
Hey! Sure I'll attempt to explain. It's possible it's your hosting site, but hard to say. I use a site called Maltshop, or more accurately MLTSHP. It's been working great for me since I started using it but the downside is that it is a paid hosting service at $3 per year. I know not everyone can do that though, but if you're able to throw them $3 per year it could be worth it. At that tier they allow for up to 300MBs per month uploads. They have a $24 per year tier that is unlimited file size uploads. Another benefit - and this may not apply to you, but maybe someone who's reading this - is that they allow for Adult/Mature/NSFW whatever you want to call it image hosting.
Here's my process - and keep in mind this is just for adding an image. If I'm adding an image to a fic then I start a new post on Ao3, paste the fic in first, then add the image in the body of the fic where I want it also following this process:
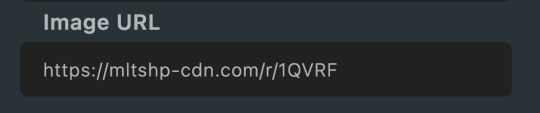
I go to MLTSHP and upload my image. It thinks for a second then gives me two URLs. A "post url" and an "image url." I copy the "image url"
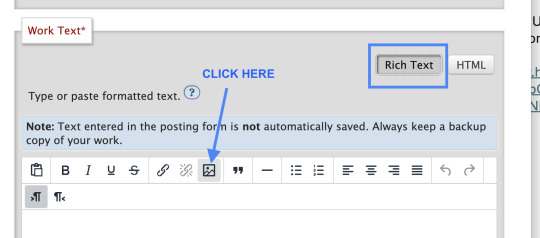
2. Then I go over to Ao3, click "new post," add all that necessary stuff it asks you to add like title, tags, summary, etc. then in the actual Work Text editor box I click "Rich Text." That's key as it defaults to "HTML" editor when you start your new post and while some people are awesome and good at HTML, I am not that "some people" and need my Rich Text editing box.
3. When you're in the Rich Text editor version of the Work Text box, click the little image icon

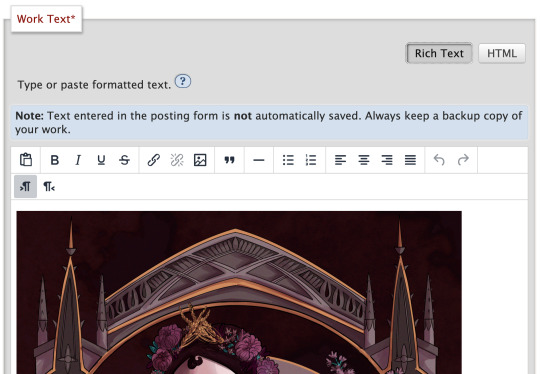
4. A dialogue box will pop up where you can paste that Image URL link from step 1 above. You can then add your Alt Text (called Image Description) and adjust the size of your image, then click save

5. Then I futz with the sizing for a bit, make sure all the necessary post info is included, add text if there's any to go along with your image - ya know like if you have a whole fic you're posting, then preview, then post the image and voila!
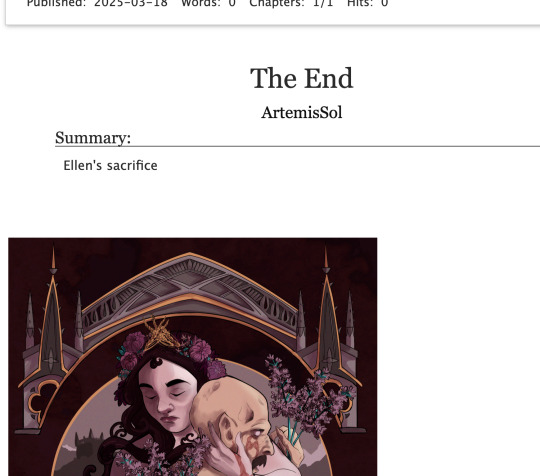
And that's my entire image posting on Ao3 process! I hope it helps, but if you need further help, feel free to DM me!
136 notes
·
View notes
Text
.。*♡゚ A/n: totally not trying to learn html (which technically isn't a programming language, for what I had read), and well, if Idia was teaching me I would learn everything so quickly tbh. Or not. He would start explaining and I would have the sudden urge to kiss him, oh well it happens ig

"Uh... I think I have an error in my code." You break the silence, tone soft as the computer screen lights up your eyes just the right way for Idia to lost himself in the reflex. He love your eyes, your concentrated face, the way you stick out your tongue without realizing.
And he loves the way you timidly look to him, as if he has all the answers to your questions - which, about this subject, he have, by the way.
"Ah~ your closing array is missing a closing slash. Here, Yuu-shi." He pointed your error with a soft tone, blue nail hitting the screen, and a surprised pout grew on your lips.
He wanted to smother you in his arms, to pick you up and hold you till his arms fell off and his corpse rot - that was how bad he yearned for you, your skin, you smell. He breathes really hard to refrain from doing it, though. You wouldn't want that. He was just a mere R card, a lonely gamer, a-
"Thank you, Idia. You're the best." You giggle to yourself, feeling yourself warm under his eyes and lousy smile. Unbeknownst to you, the only things that were going through his head were about you.
Your smile, the way your eyes lightened up, your laughters and giggles, the messages you passed each other in class (when he was there in person), your secret handshake. Idia loved you. He loved your very dearly.
He loved you so much that he could cry.
"Uh... it's no big deal," yet his hair was getting hotter, rosey tone starting to burn brightly. "Don't forget the closing stash, and everything should work properly. This programming language is not that used anymore, but most can learn useful things learning it anyway. I think."
Idia had half of his mind to know that he was rambling again, talking so fast that he could make Eminem cry. But he couldn't stop when you looked at him with such big eyes filled with curiosity and wonder, taking notes of everything he was saying.
He noted then that you had hello kitty stickers on your page. A few drawings that Ortho made of him, Idia and you; that almost killed him right then and there.
"Ah... HTML uses elements, tags, and attributes to organize text, images, links, and other multimedia elements. It can be combined with CSS for styling and JavaScript for interactivity."
#twst idia shroud#yandere idia shroud x reader#idia shroud x reader#idia shroud#idia x reader#idia x mc#yandere idia#twst idia#twisted wonderland idia#yandere idia x mc#yandere idia x reader#idia x yuu#idia x you#yandere idia x yuu#yandere idia shroud x yuu#yandere idia shroud x mc#yandere idia shroud
94 notes
·
View notes
Text
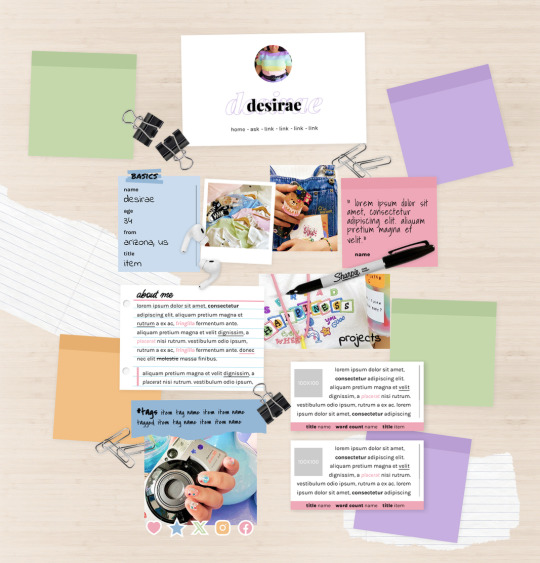
MEL: ABOUT PAGE BY ETHEREAL THEMES
View on payhip ($6.00), check out the preview or support me on patreon for more themes + pages, header templates, coloring psds and more every month!
About Page
Navigation: Home, ask + 4 links (room for more if needed)
**No Javascript Needed**
Color options for: background, links, all content boxes, five accents + more
Sections include:
Profile with avatar, name and links
Basics/info list
Sticky note quote
About me notecard
Tags links
Scrolling Project/WIPs cards
Social media sticker links
Images Include:
100x100 Avatar
170x170 Polaroid
Three additional images
Advanced HTML to edit colors and information as this is only available as an HTML page; box + table size changes not recommended. Let me know if you come across any issues.
84 notes
·
View notes