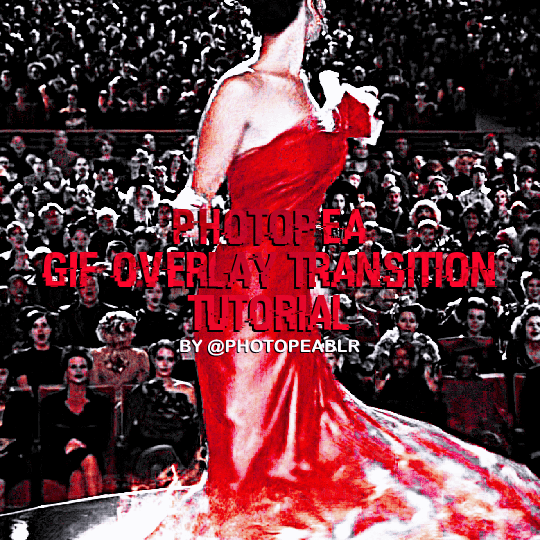
#i also wanted to see how using an actual gif tutorial would be
Text

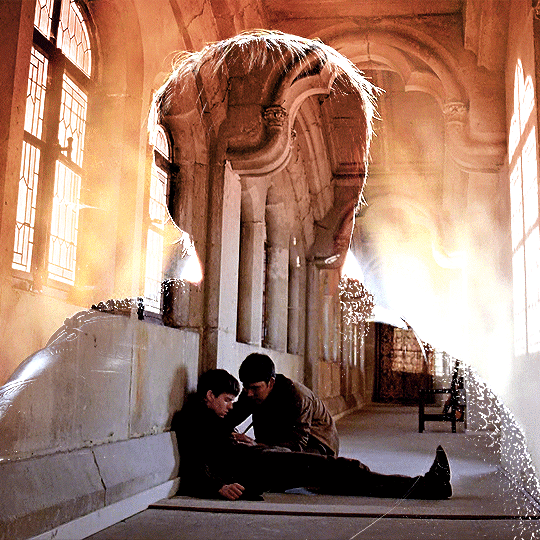
i like her cloak
#elden ring#melina#melina adoring hours again#my gifs#tempted to replay the game and just gather gif footage#i also wanted to see how using an actual gif tutorial would be#it certainly helped with sizing and i even found some shortcuts i didn't know#so that was pretty neat#wdym my plan for the day was to sit down and finally finish a fic#lies
37 notes
·
View notes
Text

neocities guide - why you should build your own html website
do you miss the charm of the 90s/00s web where sites had actual personality instead of the same minimalistic theme? are you feeling drained by social media and the constant corporate monopoly of your data and time? do you want to be excited about the internet again?
try neocities!!
what is neocities?
neocities is a free hosting website that lets you build your own html website from scratch, with total creative control. in their own words:
"we are tired of living in an online world where people are isolated from each other on boring, generic social networks that don't let us truly express ourselves. it's time we took back our personalities from these sterilized, lifeless, monetized, data mined, monitored addiction machines and let our creativity flourish again."
why should I make my own website?
web3 has been overtaken by capitalism & conformity. websites that once were meant to be fun online social spaces now exist solely to steal your data and sell you things. it sucks!!
building a personal site is a great way to express yourself and take control of your online experience.
what would I even put on a website?
the best part about making your own site is that you can do literally whatever the hell you want! focus on a specific subject or make it a wild collection of all your interests. share your art! make a shrine for one of your interests! post a picture of every bird you see when you step outside! make a collection of your favorite blinkies! the world is your oyster !!
here are some cool example sites to inspire you:
recently updated neocities sites | it can be fun to just look through these and browse people's content!
space bar | local interstellar dive bar
creature feature | halloween & monsters
big gulp supreme
peanutbuttaz | personal site
dragodiluna
linwood | personal site
patho grove | personal site
getting started: neocities/html guide
sound interesting? here are some guides to help you get started, especially if you aren't familiar with html/css
sadgrl.online webmastery | a fantastic resource for getting started with html & web revival. also has a layout builder that you can use to start with in case starting from scratch is too intimidating
web design in 4 minutes | good for learning coding basics
w3schools | html tutorials
templaterr | demo & html for basic web elements
eggramen test pages | css page templates to get started with
sadgrl background tiles | bg tiles
rivendell background tiles | more free bg tiles
fun stuff to add to your site
want your site to be cool? here's some fun stuff that i've found
blinkies-cafe | fantastic blinkie maker! (run by @transbro & @graphics-cafe)
gificities | internet archive of 90s/00s web gifs
internet bumper stickers | web bumper stickers
momg | gif gallery
99 gif shop | 3d gifs
123 guestbook | add a guestbook for people to leave messages
cbox | add a live chat box
moon phases | track the phases of the moon
gifypet | a little clickable page pet
adopt a shroom | mushroom page pet
tamaNOTchi | virtual pet
crossword puzzle | daily crossword
imood | track your mood
neko | cute cat that chases your mouse
pollcode | custom poll maker
website hit counter | track how many visitors you have
web revival manifestos & communities
also, there's actually a pretty cool community of people out there who want to bring joy back to the web!
melonland project | web project/community celebrating individual & joyful online experiences. Also has an online forum
melonland intro to web revival | what is web revival?
melonking manifesto |
status cafe | share your current status
nightfall city | online community
onio.cafe | leave a message and enjoy the ambiance
sadgrl internet manifesto |
yesterweb internet manifesto | sadly defunct, still a great resource
reclaiming online social spaces | great manifesto on cultivating your online experience
in conclusion
i want everyone to make a neocities site because it's fun af and i love seeing everyone's weird personal sites that they made outside of the control of capitalism :)
say hi to me on neocities
#neocities#old web#webcore#old internet#web revival#indie web#html#website#recource#guide#can you tell that i've gotten REALLY into neocities this month!!!!!#but its so FUN i love seeing everyones weird af websites#its amazing#i love celebrating the old web#ANYWAYS MAKE A NEOCITIES HERES A GUIDE#i haven't touched html in like a decade#and i've been having a great time relearning#:)#share your sites with me!!!!!!#oh and share resources if you have them!
78K notes
·
View notes
Note
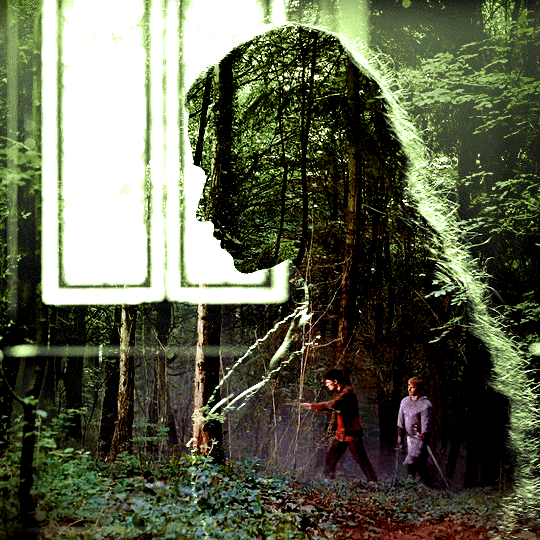
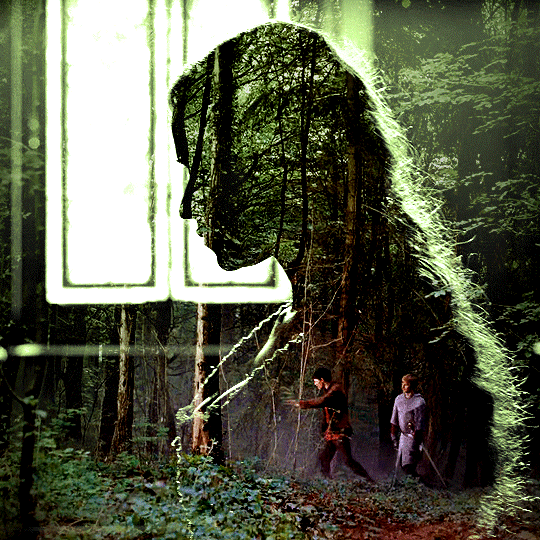
Hi! Can I ask how you did the double exposure gifs for your merlin set? They're beautiful btw!
heyy, thank you!! of course!
it's actually not very hard, the trick is to find the right shots for this. here's how i did it (reference gifset), under the cut.

for this tutorial i will be:
— using photoshop cs5 on windows
— assuming you know how to make gifs using the timeline
— have basic coloring, sharpening, groups, and layer masks knowledge
I. CHOOSING THE RIGHT SHOTS
the ultimate trick to pull this off is to choose the right image. in order to do the double exposure, you need a silhouette shot that has these:
a defined and dark silhouette with a background that is not too busy
enough contrast between the silhouette and the background
the silhouette should take at least 50% of the space
not too much movement
here are a few examples of why they work and why they won't:
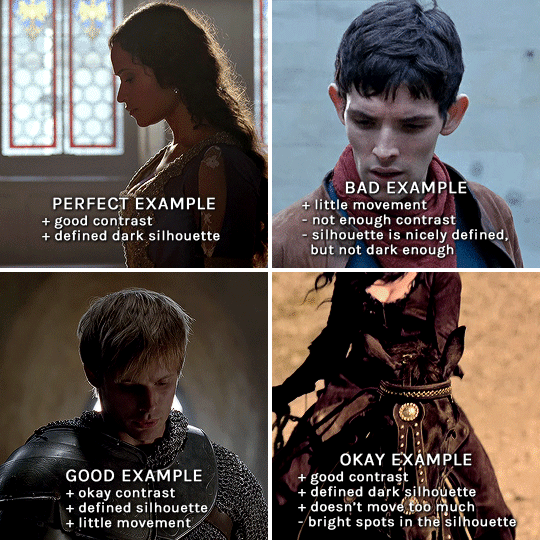
gwen: perfect example since this shot is already quite contrasted with a defined silhouette. there won't be a lot of work needed to make this one work.
merlin: not a great example because even tho there's a somewhat good contrast between him and the background, the silhouette is just too bright, not dark enough.
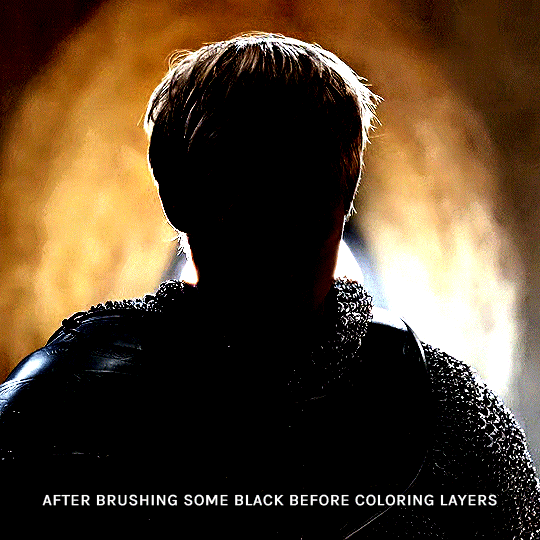
arthur: another good example, even if there are some bright spots on his face and armor. since he's not moving too much, you can definitely brush some black over him to make his silhouette darker (i'll explain/show later)
morgana: this one could work because the contrast is great, but of course her skintone is very bright against the black clothing. that being said, since the movement is not too bad, it could be possible to brush some black over her and move these layers with keyframes (as mentioned for arthur's example). i haven't tried it tho, but i think it would work well enough.
once you have your silhouette shot, you need another gif for the double exposure. what works best, in my opinion, are:
wide, large shots
shots with no to little camera movement (no pan, zoom, etc), but the subjects in the shot can have little movement of course
pretty cinematography/scenery shots
i find these are easier to find and make it work, it's not as "precise" as with silhouette shots. it's mostly just trial and error to see what works best with the silhouettes.
II. PREPPING THE SILHOUETTE
for the effect to work, we want a silhouette that's dark as possible. i'm gonna use the gwen and arthur shots as examples.
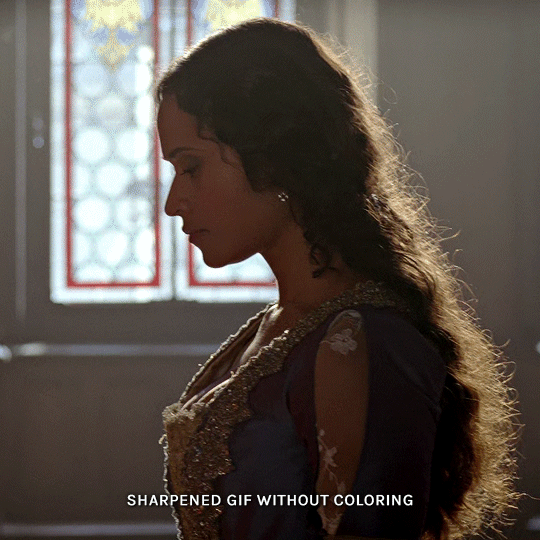
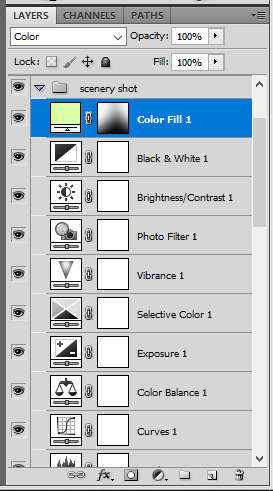
for the gwen gif, i started by sharpening, and then upped the contrast by quite a lot so her silhouette is mostly black, while retaining some nice details. i've used only 3 layers here:

selective color layer: in the blacks tab, playing with the black slider (value: +10)
brightness/contrast layer: added a lot of contrast (+61) and a bit of brightness (+10)
black and white layer: on top, its blending mode set to soft light and at 20% opacity. gives a bit more depth and contrast

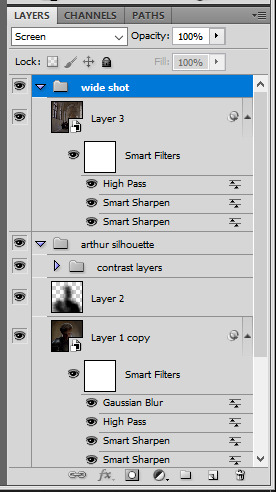
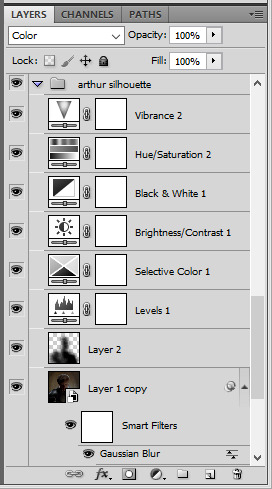
then for the arthur example, i've also sharpened it first, and added contrast layers in this order (the skintone looks horrible, but it won't matter soon lol):
levels layer: black slider at 0, grey slider at 0.76, white slider at 104
selective color layer: in the blacks tab, black slider at +10
brightness/contrast layer: brightness at +1-, contrast at +47
black and white layer: on top, its blending mode set to soft light and at 20% opacity. gives a bit more depth and contrast
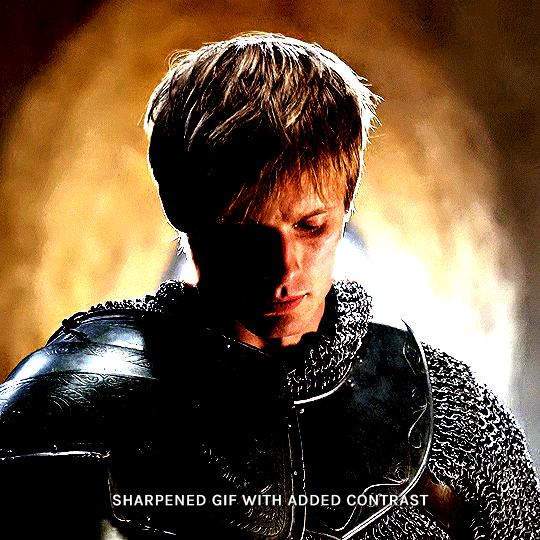
as you can see, half of his face is still quite bright. to correct that, create a new empty layer and put it between the gif and the coloring layers.
using a really soft brush and the black color, brush some black over his face and body on that new empty layer. you can edit the layer's opacity if you want, i've set mine to 71%. since arthur doesn't move much here, there's no need to keyframe this layer's position. for the morgana example, this is where you'd need to play with keyframes to make it work. here's where i'm at now after this:
you can always edit this layer later if you need, after doing the double exposure blending.
once the silhouette is all ready, you can put all layers in a group and rename it (i've renamed mine silhouette).
III. BLENDING
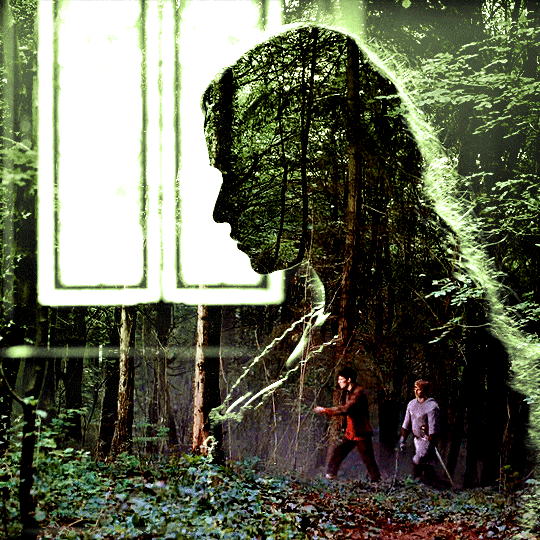
now the fun part! import the wide/scenery shot in photoshop, then resize it to the same height of your silhouette gif. make sure the gif is a smart object layer, and sharpen it. finally, bring this gif onto the silhouette canvas (by right clicking the smart object > duplicate layer). once you have both gifs onto your canvas, put the wide shot gif layer in a group, and set this group's blending option to screen.

you can then position the wide/scenery gif the way you like it in the canvas. this is how it looks for both examples after i've done that:

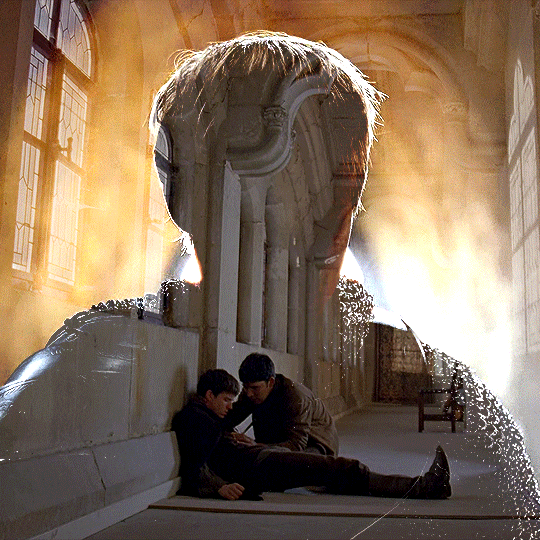
if the blending mode screen doesn't give you the best result, so you can play around with other blending modes (such as lighten and linear dodge in these particular cases), but generally speaking, screen is the real mvp here haha.
IV. COLORING
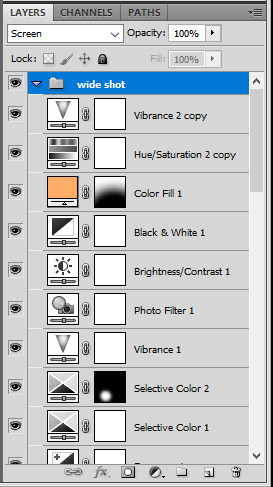
now that the double exposure effect is done, we need to color the gifs to bring them together. i went with simple coloring here, simply enhancing the colors that were already there. just make sure that the coloring layers for each gif are in their respective groups. here's how i've colored both examples:
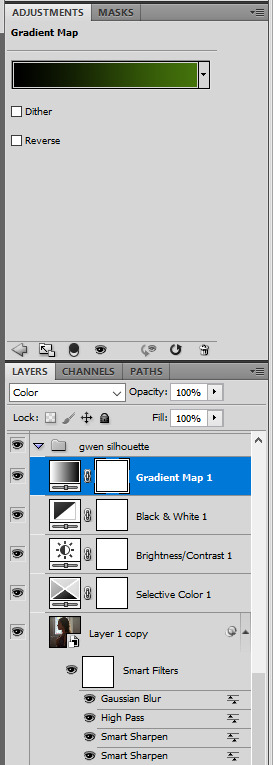
gwen silhouette group: i added a gradient map layer on top of the contrast layers in black to green and set the blending mode to color
scenery shot group: multiple coloring layers, with a green color fill layer (blending mode set to color), with a layer mask so it only affects the top half of the gif
for the arthur gif, i did something very similar but with warmer colors. i didn't use a gradient map for arthur though:
arthur silhouette group: i made the yellow warmer, closer to orange/red, with a hue/saturation layer, and added more vibrance. didn't feel like it needed a gradient map layer here though.
wide shot group: basic coloring layers to enhance colors from the merlin & daegal shot, and an orange color fill layer set to the color blending mode.
at this point you're pretty much done. just need to add some final touches and typography (if you want).
V. FINAL TOUCHES
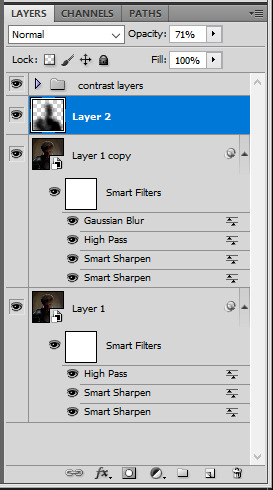
a small and completely optional detail, but i wanted to soften the edges of the wide gifs. to do so i've duplicated the smart object gif layer and removed the sharpening filters (right click on smart filter > clear smart filters). put this layer on top of the other smart object layers (but still below the coloring).
then with this same layer still selected, go to filter > blur > gaussian blur... > 10px. this will give you a very blurry gif, but we only want the edges of the canvas to be softer. so add a layer mask to this layer. with a very large and soft brush (mine was at 0% hardness and about 800px size), brush some black onto the layer mask to remove the blur in the middle of the gif.

you can play with this layer's opacity or gaussian blur amount if you want (by double clicking on the gaussian blur smart layer filter). here how both examples look with this gaussian blur layer:

you can also mask some of wide/scenery gifs if you'd prefer, so it shows less outside of the silhouette. just put a layer mask on that whole wide shot group and brush some black or grey on the layer mask. it's what i did for the gwen gif, with a very soft brush and i set the mask density to 72% (i kept the arthur one as is tho):

and that's how i did it! hopefully that was clear enough :)
#alie replies#*ps help#resource#tutorial#allresources#*gfx#usercats#usersmia#userrobin#userfaiths#usertina#usermoonchild#userchibi#uservivaldi#usertreena#userraffa#userriel#userelio#usermadita#usersmblmn
1K notes
·
View notes
Text

HOW TO: Make Animated Neon Text
Hi! No one asked for this tutorial, but this is one of my favorite typography effects as of late — so I thought I'd share how I do it. You can see this effect in the first gif of this *NSYNC Celebrity set and the last gif of this Anthony Bridgerton set. Disclaimer: This tutorial assumes you have a basic understanding of gif-making in Photoshop. It's also exclusively in Timeline and uses keyframes for the fading effect seen on the blue text.

PHASE 1: PREP YOUR BASE GIF
1.1 – Choose a dark scene.
This effect looks best contrasted against a dark background. You can definitely do it with a bright background, but just like a neon sign irl, you only turn it on in the dark/at night — so keep that in mind!
1.2 – Determine the length of your clip.
Depending on how much you want your text to flash or fade in, you'll want to make sure you have a scene long enough to also allow the text not to flash — reducing the strain it takes to actually read the text. For reference, my gif is 48 frames.
1.3 – Crop, color, etc. as you would.
New to gif-making? Check out my basic tutorial here!
PHASE 2: FORMAT YOUR TEXT
Before we animate anything, get your text and any vectors laid out and formatted exactly as you want them!
2.1 – Finding neon sign fonts.
It's easy as going to dafont.com and typing "neon" into the search bar!
2.2 – Fonts I used.
Neon Glow by weknow | Neon by Fenotype | Neon Bines by Eknoji Studio

And to not leave my fellow font hoarders hanging, the font for "tutorial by usergif" is Karla (it's a Google font) 🥰
2.3 – Group your text layers. (Conditional)
If you plan on having multiple text layers like I did and you want them to appear connected (like how the last letters of "NEON" and "sign" intersect with the wand icon), I suggest putting the layers into groups according to color (the shortcut to group layers is Command+G). If you don't group your text and just apply the outer glow settings to each individual layer, you'll end up with something like this:

—where you can see the glow overlap with the line, instead of the smooth connection you see in my final example gif. I'm using 2 colors for my text, so I made a group for red and a group for blue.
2.4 – Apply Outer Glow.
Right-click your text layer (or your group if you have several layers) and select "Blending Options" to open the Layer Style menu. Check "Outer Glow" and feel free to play around with the settings until you like the way your text looks!
Your outer glow color should be darker and more vibrant than the color of the text itself. The text should be within the same color family but much brighter and, sometimes, almost white (see Step 2.2 again for my text colors).
Here are the settings for the Red Glow (the glow color is #FF3966) and Blue Glow (#00F0FF):

These aren't always my exact settings but they're pretty close to my standard. I always set the blend mode to Hard Light and usually have the opacity at 100%.
For every gif I use this effect on, I like to play around with Spread and Size. Spread will make the glow look denser and "expand the boundaries" (source: Adobe) and Size will diffuse the glow and blow it out so it covers a larger area (Adobe says it "Specifies the radius and size of blur").
2.5 – Duplicate your text layer/groups and remove glow.
We're only going to be animating the glow on our text, and since doing this affects its opacity/visibility, we want to preserve the base text by creating a duplicate.
I just hit the Command+J shortcut to duplicate my groups and delete the Outer Glow effects, making sure that the "No Glow" version is above the "Glow" version:

I also put all these groups into one group called "Text" for organization and so I could apply a drop shadow to all the elements for better visibility.
PHASE 3: CREATE THE FLASHING EFFECT
This is for the effect you see on the RED text in my gif!
3.1 – The 0.03-Second Rule
If you've read any of my animation tutorials before, you're probably already familiar with this rule. In my experience (and for reasons I can't explain), Video Timeline pauses every 0.03 seconds (try clicking the forward button a few times, you'll probably find a "duplicate" or paused frame). So, keep all your layers a duration of 0.03-second increments (e.g. 0.06 or 0.09 seconds can also work) and align them on the Timeline at 0.03-second intervals. If you don't follow this rule, you'll get duplicate frames when you export, resulting in a choppy final gif.
3.2 – Trim and arrange your text layers.
Only on the layers/groups WITH the Outer Glow effect, trim them into several segments of varying lengths where the glow will be "on" (visible) and leaving spaces where the glow should be "off."
Typically, I'll have a mixture of 0.06 and 0.03-second text. That's when the glow will be visible. Between each "flash" of visibility, I've got a 0.03-second blank space, baby *pen clicks* and I'll write your name:

The layers shown above are arranged with a few flashes and two long segments of no flashing. This is the order and duration of each segment shown above (purple = visible segments):
0.06 blank, 0.06 visible, 0.03 blank, 0.03 visible, 0.03 blank, 0.03 visible, 0.03 blank, 0.24 visible (the long bit where "FLASHING" doesn't flash at all), 0.03 blank, 0.03 visible, 0.03 blank, 0.12 visible
(I only did this for the text that says "FLASHING" to give it a glitching effect. The other red text keeps the glow visible starting at the first long segment.)
PHASE 4: CREATE THE FADE-IN EFFECT
This is for the effect you see on the BLUE text in my gif!
4.1 – Animate using the Opacity Keyframe.
Again, we're only touching the layers/groups WITH the glow effect. If you only have one layer of text, you'll find the Opacity Keyframe by clicking the film reel icon:

If you're working with groups like me, you'll find it in the Timeline panel under the group when it's expanded:

As you can see, I already added my keyframes (lil diamond babies). And luckily, it's super easy to do!
4.2 – Add the ending Keyframe first.
We're starting at the end because our layers/groups are already at 100% opacity. Drag the playhead (the blue arrow attached to the red vertical line) to a spot where you want the glow to be 100% opaque — this is where the glow will be fully "on" or visible. [Again, follow the 0.03-Second Rule. You will get duplicate frames regardless when using keyframes (this will be explained in the note in Phase 5), but abiding to the rule will mitigate the amount of dupes you get.]
Then, click the clock icon by "Opacity" to place a keyframe:

4.3 – Add the starting Keyframe.
Go backward from the ending Keyframe you just placed (I went back 0.12 seconds — but you can play around with the duration of the fade, just keep it a multiple of 0.03):

And drop another keyframe, this time by clicking the diamond icon by "Opacity":

4.4 – Reduce the opacity on the starting Keyframe.
Keeping that keyframe you just placed selected, go to the layers panel and reduce your layer's/group's opacity to 0%:

Now, this Outer Glow will slowly fade from 0% to 100% opacity.
And just for a visual aid, here's where my fade-in keyframes are in relation to my flashing segments:

To refresh your mind, the 0% Opacity Keyframe starts when "FLASHING" is visible for 0.24 seconds (the first long segment of visibility).
With these keyframes, you'll get a smooth fade-in à la ✨light switch with a dimmer✨
PHASE 5: EXPORT
Yay, we're finished! Convert from Timeline back to Frames and export your gif!
NOTE: If you only did the flashing effect and followed my 0.03-Second Rule, you shouldn't have any duplicate gifs.
BUT if you included the fade-in effect using keyframes, you WILL have duplicate frames. 'Tis the nature of keyframes. 🤷♀️ I had 4 extra frames where the fade-in starts, which I deleted. So, as always, I recommend checking your frames when you convert from Video Timeline back to Frame Animation — and manually delete any duplicate frames.
Sorry this tutorial is so long 🙈 I over-explain so you're not just mechanically copying steps, but understanding the WHY behind each step! Thanks for bearing with me
If you have specific questions about this tutorial, feel free to send a message to usergif and I'll try my best to help! :)
More USERGIF tutorials • More resources by Nik • USERGIF Resource Directory
#typography#gif tutorial#completeresources#usershreyu#useryoshi#userelio#userzaynab#userives#usertreena#usercim#userrobin#userkosmos#usersalty#userhella#alielook#uservalentina#uservivaldi#*usergif#*tutorial#by nik#flashing gif
777 notes
·
View notes
Photo
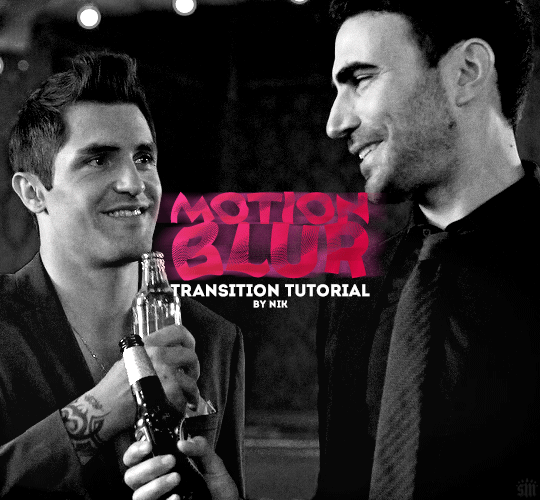
HOW TO: Do a Motion Blur Transition
Using Timeline or Frame Animation
Hi! Someone asked me for a tutorial on the transition effect in the second gif of this set (also featured in this set and the text on this set). So, here it is! This is one of the easiest and least tedious of the gif transition effects in my opinion — and I’m going to go over how to do it both in Timeline and Frame Animation (using the screencap method). Disclaimer: This tutorial assumes you have a basic understanding of gif-making in Photoshop.

PHASE 1: PREP
This phase applies to both the Timeline and Frames method!
1.1 – Prepare your caps.
(New to gif-making? Check out my basic tutorial here!)
The key to this kind of gif is making sure your final gif, with all the transitions, won’t be too long or too big of a file to post (Tumblr’s limit is 10 MB).
If your gif is going to be big like mine (540x500px), you might want to keep your total frames between 50-60. I decided to try getting away with a whopping 70 frames total... because I like to test fate (spoiler: my final gif ended up being 9.6 MB 🙈). Since my gif is transitioning between two scenes, that means each scene was 35 frames.
If you aren’t doing screencaps like me, just make sure your clips are equal in length. And if you’re transitioning between more than 2 scenes (like the Mando example I linked at the beginning), you’ll have to use shorter clips/fewer frames per scene. In my Mando gif, each scene was 16 frames and my final gif was 64 frames.
1.2 – Crop, sharpen, color, etc. as you would.
For this, since you’ll probably have 2 more more sets of coloring, just make sure your coloring is only being applied to the appropriate gifs. The way I do that is by aligning my adjustment layers with my gif as you can see in the screenshot in 1.3 below.
1.3 – Arrange your frames or clips.
If you’re working in Timeline, drag the clips/layers of your second gif so they’re immediately after the ones of your first gif. I like to keep things separated in Groups:

Note: I’m keeping my text layers separate because I don’t want the motion blur to affect them. But if you wanted to make your text transition from one word to another, you can either follow the same steps I’m about to show you and apply them to your text layers, or simply merge your text layers with your gif and adjustment layers, so they can all get the motion blur filter applied to them!
If you’re working in Frames, simply paste the frames of your second gif after the frames of your first gif. Again, you can either keep your text separated or part of the motion blur.
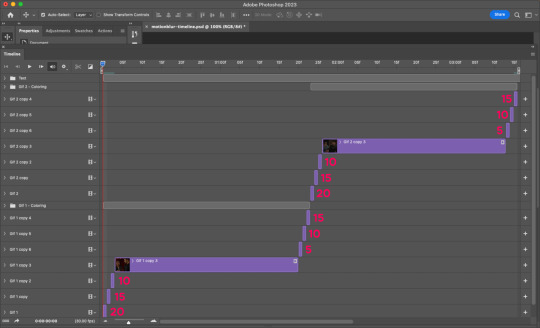
METHOD: TIMELINE
T.1 – Divide the Timeline.
Using the Scissors Tool, you’ll want to divide each gif so there are 3 small segments at the beginning and end. (3 is my go-to, however, for my Mando gif, I actually only did 2 segments because each section was already so short.)
Now there are two options for this:
OPTION 1: Simplest, 00:01 Seconds Each, Makes Duplicate Frames
You might be wondering, why on earth would I want duplicate frames? You wouldn’t, usually. But this method only causes the duplicates to happen on the blurred frames, so it’s not noticeable at all! However, if you’re like me (read: Type A) — just knowing there are duplicate frames may bother you. If that’s you, go to Option 2.
Each of these segments are the absolute smallest Photoshop will allow, a duration of 00:01.

Sometimes Timeline won’t let you cut things that short (for me, this typically only happens at the end of a clip). So my work around is to cut the segment so it’s 00:02 seconds long, then drag the clip until it’s as small as it can be. Here’s a gif showing that process:

You can see that after I dragged the clip so it would be 00:01, I also dragged the big clip over so it would still continue as normal. Timeline is neat because, even if you divide a clip, each segment can be dragged back to its full length.
OPTION 2: 00:02 / 00:01 / 00:02, No Duplicate Frames
Timeline works in a weird way... when you move forward one frame by clicking the right arrow, you don’t always see movement in your gif. And if you don’t line up the clips properly with the movement, it can create duplicate frames. The easy way to fix this is by making the 3 segments 00:02, 00:01, and 00:02 seconds respectively. This goes for the segments at the beginning and end.
You can see the duration of each segment and an example of how the gif doesn’t move on certain frames in this gif of my workspace:

T.2 – Apply the Motion Blur filter in varying distances or strengths.
Now that we have all of our segments, it’s time to apply the blur. Motion Blur is under Filter > Blur > Motion Blur!

This is the window you’ll see when you click it:

Note the fields where you can change the angle and distance.
The angle is basically the direction in which you want the blurred effect to stretch. I always do 0 because I want my gifs to blur together horizontally — I just think it looks smooth. You can play around with it if you want to get a different effect!
The distance is what I like to refer to as the strength of the blur. But really, it’s distance because it’s how long the blurred effect is being stretched.
The rule of thumb here is to apply the filter in a gradation. The part at the beginning of one gif should go from strongest (greatest distance) to weakest (least distance). The part at the end of one gif should go from weakest to strongest.
I keep things easy to remember and do 20, 15, 10 for the beginning and 5, 10, 15 for the end. The reason the numbers aren’t the same is because I don’t want the end of Gif 1 (which is blurred 15px distance) to be the same as the beginning of Gif 2 (which is blurred 20px distance). If they’re the same amount of blur, I don’t think the transition looks as smooth.
Here’s my entire timeline and the strength of blur I used for each of the transitional clips:
T.3 – Export
That’s it! Convert from Timeline to Frames, export your gif, and there you go!
Reminder, if you decided to do Option 1, you’ll have duplicate frames, and therefore more frames than you started out with when you initially imported caps.
METHOD: FRAMES
F.1 – Apply the Motion Blur filter in varying distances or strengths.
In Timeline, we created segments. But in Frames, each frame acts as one of those segments — so we don’t need to divide anything. We can just get straight to the filter!
Now, disclaimer: the way I’m working with Frames right now is with the adjustment layers merged with the frames. I typically work in Timeline, so I colored in Timeline and then converted into Frames for this. However you work, just make sure the coloring from one part of your gif doesn’t affect the other part.
Anyway, here’s where to find Motion Blur again:
And here’s what the window will look like:
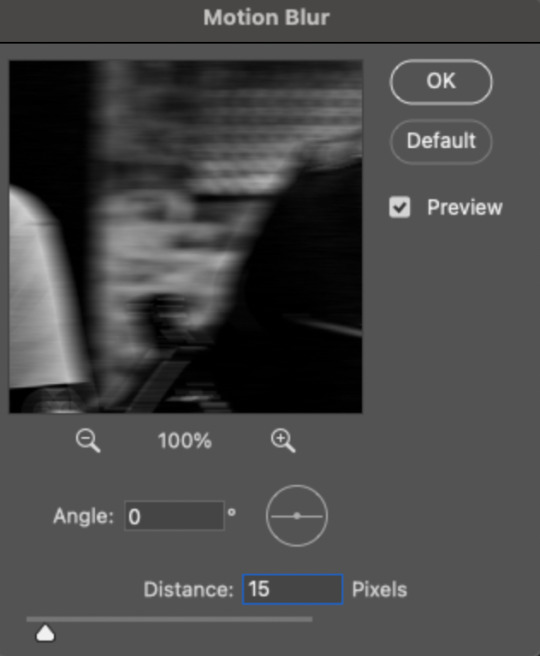
Now just apply the filter in increasing and decreasing degrees. In case you didn’t read the Timeline section, I’ll paste exactly what I said there:
Note the fields where you can change the angle and distance.
The angle is basically the direction in which you want the blurred effect to stretch. I always do 0 because I want my gifs to blur together horizontally — I just think it looks smooth. You can play around with it if you want to get a different effect!
The distance is what I like to refer to as the strength of the blur. But really, it’s distance because it’s how long the blurred effect is being stretched.
The rule of thumb here is to apply the filter in a gradation. The part at the beginning of one gif should go from strongest (greatest distance) to weakest (least distance). The part at the end of one gif should go from weakest to strongest.
I keep things easy to remember and do 20, 15, 10 for the beginning and 5, 10, 15 for the end. The reason the numbers aren’t the same is because I don’t want the end of Gif 1 (which is blurred 15px distance) to be the same as the beginning of Gif 2 (which is blurred 20px distance). If they’re the same amount of blur, I don’t think the transition looks as smooth.
Here are all my frames and the strength of the blur I used for each of the transitional frames:

Note: I wanted to mention again that I kept my text layers in a separate group and didn’t apply the transition to them:

F.2 – Export
Finished! Easy peasy!
EXPORTING TIP
If you’ve read my other tutorials, you already know this tip — but since I’m part of Discord servers where members are encouraged to share embed links to their creations, I often rearrange the order of my frames before saving them. (This tip is also handy for making sure the best frame of your gif is visible for Tumblr users who turn off auto-playing gifs.) In this case, I made frame 27 my new frame 1 because I didn’t want my embed preview to look like a blurry gif. Everything will still be in the same order, but anywhere your gif is paused, the best frame will be displayed!
Anyway, that’s it! If you have specific questions about this tutorial, my ask box is open. Hope this helps! <3
#gif tutorial#completeresources#usershreyu#useryoshi#userelio#userannalise#userzaynab#userives#usermarsy#usertreena#usercim#userrobin#userkosmos#usersalty#userhella#alielook#userk8#uservivaldi#resource*#gfx*
835 notes
·
View notes
Text
How to have animated rentry graphics with semi-transparency!!
Have you ever had this problem? You find this super pretty clipping mask that you wanna use...

...But when you try to save it as a gif, it suddenly breaks the pretty blurring?

So, let's talk about APNG:
APNG (Animated PNG) is exactly what it sounds like: a png that can be animated, with all the benefits of our beloved png format!! Such as unlimited colours!! Bet you didn't know this could be done!
Actually, you probably didn't know that for a good reason: APNG does not work everywhere. For example, I&'m not using it in this post because the animation won't work on Tumblr. It also doesn't work on old browsers, which you can check here if yours supports it or not:

However, even if the animation doesn't work, it will show the first frame as a still image!! So even those on older devices will still get to enjoy the graphic!!! (unless like... you want to do a fade-into-existence animation where the first frame will have nothing... but those are uncommon anyway)
But for this post, what's important is where it DOES work, and that is image hosting websites like imgur or catbox. And so, by extension, it will also work on Rentry + its forks!!
So how does one actually make an APNG?
Ezgif:
Note: DO NOT CONVERT GIFS TO APNG! It's useless because the gif file does not store any information about transparency, has less colours/lower quality, and you'll be needlessly removing backwards compatibility.
Go to APNG Maker and upload your frames individually. Check "don't stack frames" and make your APNG.

Photopea:
Works normally same as if you would save a gif. File -> Export as -> PNG. (You do need to have the frames layers in a folder same as you would for a gif)

Photoshop and Ibis Paint:
Unfortunately, Photoshop and Ibis do not let you just export as an APNG like that. You'll have to save each frame individually and then import them into Ezgif or Photopea.

As you can see, it's that simple! If you'd like, you can see a rentry template I& made using this the example APNG I& was showing throughout the tutorial here. I& was not able to find who made the overlay mask in the first place but a frame version of the cherry blossoms there did show up on adobe stock when I& tried to reverse search it so all they did was fill in a circle in the middle anyway.
Lastly, I& wanted to address one more question:
Why not use WEBP and/or AVIF instead? They offer the same benefits!
Well for one, fuck Google and fuck WEBP all my& homies hate WEBP. But for two, APNG has the benefit of backward compatibility: it's older (supported by more browser versions) and if the animation doesn't work, it still shows the first frame of it. WEBP and AVIF, on the other hand, don't show up at all/show alt text.
That's all, happy APNGing!
#rentry#rentry graphics#editblr#rentry tutorial#tutorial#edit tutorial#graphics#pfp masks#clipping mask#apng
57 notes
·
View notes
Text

I have made up from last time that was about only one chapter, this time we have 5 in a row. We finished act one, fam!
previously, in harrowbean the ninth:
this happened
I want to also thank you for all your nice comments and replies, I read every single one, I promise ♥
ch. 7 to 11 summarized terribly, here we go:
it's time to cross the river
difficult task to perform
as someone who lives literally surrounded by rivers, in every direction, I can relate
my rivers don't carry ghouls though, as far as I know
I mean, there are ghost and cryptid legends, but not ghouls that stick to the windshield of a spaceship like bugs
like these ones do
so harrow and yandere twin aren't doing fantastic
yandere twin loses it in like the first 2 seconds
harrow sees the ghosts of all the ninth kids who died for her to be alive
there's water also, but that part sounds very relaxing, actually
getting covered by water but not needing to breath
I'd be there forever tbh
but we can't, because ghoulies
mercygirl is still doing sound effects like kronk
btw we're changing her name to mercygirl because it's what I've been calling her now
I have been told by a number of you that mercygirl is your camilla so I apologize for disrespecting your blorbina
I might do it again, if the situation arises, though
mercygirl is piloting the ship and emperor the fool is just chillin' until he realizes harrow is walking about and doing theorems, which they didn't think she'd be in a state to do, so they didn't tell her not to do it
these people half-assing plans, who would have thought
mercygirl calls the emperor john

emperor johnnyboy tries telling harrow to come back from her state because she's in too deep and it's becoming dangerous
mercygirl stars talking about the death of cassiopeia (another name that's easy to remember)
says cassiopeia had a ceramics collection, which makes her worthy of all my respect
harrow was thinking "five", idk what it's about
next thing we know, we're back to our gideonless retelling of gideon
in this version, teacher explains things
he says the house was inhabited previously by "ten normal human beings of the Resurrection, though half were blessed already with necromantic gifts"
I'm tired of MATH
he says they left blueprints, he tells them about the Sleeper, he tells them how not to awaken it, he tells them about the trap door, he tells them what's under the trap door, he asks them to work together...
you know what this is like
it's like reading gideon was entering a new game and skipping every tutorial they give you
and reading this is like clicking every NPC's info and reading all that they say
ANYWAY, here is where ortus 1...
wait, this is going to be confusing
I want to call ortus from the ninth "ortus 1" and the new guy "ortus 2"
because ninth ortus was the first to show up
but new ortus is actually older and also is ortus the first
we're gonna go with ortus and lyctor!ortus, for now
so, as I was saying, this is were ortus starts becoming much more insistent in these "flashbacks" about him not being the right choice
which, he's not wrong
we know he's not wrong
and harrow is saying stuff like "unless you can summon matthias nonius" (matthias nonius is becoming a recurrent thing, let's remember harrow compared gideon to him at one point)
and ortus goes "I don't understand why you chose me" to which harrow says "there was nobody else" and ortus exasperatedly says "you never did posses an imagination"
VERY IMPORTANT THING
a skeleton turns around when they're walking and says "is this how it happens?"
we'll come back to that shortly
REMEMBER IT
(I know you all remember it, you've read this already, just act like I'm dora the explorer and play along)
next chapter starts in not!dulcinea's funeral
I'm sad I used the oliver queen grave meme already, I can't use it again to express my feelings
I'm gonna use the steel magnolias scene where they laugh at the funeral instead
so, we are introduced to the famous augustine who's name I will remember
there's some conversation about first and second generations and about not!dulcinea being chosen, and Emperor Johnny Bravo says "we were all there to meet her, all sixteen of us"
MORE MATH
I guess she was the last one of these, but maybe we knew that already, I feel we knew that already
apparently, not!dulcinea was the most reluctant to slurp her cavalier, but that didn't stop any of them, not even her, so
Emperor Johnny Quest says "for god's sake" and harrow thinks "the god who became a man and yet still invoked himself, apparently"
when she's right, she's right
that's better commentary than I could make
I have to respect augustine a little bit because he asked "which one of the kiddies did her in?" and I thought that was hilarious
he is called the saint of patience, which makes my previous comment about them being named via sarcasm very correct
it's like captain planet or the power rangers but chosen as funnily as possible
they start summoning lyctor!ortus by saying that he's interested in "you-know-what", which is both suspicious and childish and the vibes of these lyctors are all over the place
augustine thinks something's wrong, which is an understatement at this point, but ok
lyctor!ortus comes in as if summoned by the gossip and harrow calls him "the next terrible part of your life" which is saying something
lyctor!ortus comes with news of the seventh beast or whatnot that's trailing them
harrow bleeds from her ears and smashes her head on the next available surface to pass out
the mood
who could blame her
this lyctor job is terrible
it's like the end of drop dead gorgeous and harrow is kristen dunst
I'm not explaining that, in case you haven't watched a classic
we are back to the "flashbacks" and we've got a special appearance from the fifth
*studio audience claps and cheers*
they say they prefer to look into books than going downstairs, which is something one would consider if one had known what the fuck was downstairs from the start
abigail also does sound effects like mercygirl, it's catching on
abigail finds a piece of a recipe note that mentions an M and a Nigella
still no G&P
we know nigella is the cav of cassiopeia, the ceramics collector
I remember nigella's name because of the cook, which makes it funnier that it's a recipe
M could be mercygirl
abigail also gives harrow a note
abigail says that she'd like to summon the ghost of a lyctor but she's not sure how that could work or where they go when they die
ortus, magnus and abigail, in this gideonless version, are a polycule
I am convinced of that
while they're talking, magnus says "is this really how it happens?"
REMEMBER I SAID WE'D BRING THAT BACK
IT'S BACK
abigail starts telling harrow that she's got the energy of a lot of dead kids in her and harrow storms out
harrow gets angry when ortus calmly agrees about things and she doesn't want to look into why
I WONDER WHY THAT IS
harrow looks at abby's note again and now there's text on it
it's a longer version of the note she found before
it's a rant
it mentions dead eggs, implantation, some guy being sent after the OP, said guy taking pity on OP
OP is mad about all of this and doesn't use punctuation
what ortus reads isn't what harrow reads, once again
NOW THIS BIT
"ortus, I need a cavalier with a backbone" "You always did and I am glad, I think, that I never became that cavalier"
the gideon points keep adding up
harrow then goes to sleep and is like this
final thing in act I, in chapter 11, is harrowbean stabbing not!dulcinea again, which
always make sure, it's like resident evil in here
just in case, let's stab her a bunch of times
so, are these "flashbacks" happening in real time whenever harrow isn't conscious?
is it her trying to remember what actually happened?
or is it her trying to hide it?
was there actually a longer period of time between the defeat of not!dulcinea and the emperor Jon Arbuckle coming to pick them up?
a period of time in which harrow learned things that made her write those letters?
and in which something happened regarding gideon?
is the note of the implantation also related?
why was gideon born in space?
of course I'm not asking you, please don't spoil anything, I'm just asking the void of desperation and chaos right now
we'll see if any of this gets answered soon or if I just get more questions
also, guess who wasn't mentioned
see you on the next one!! I'll try to get back to the awesome replies I've been getting soon ♥
#luly reacts to tlt#harrow the ninth#harrow the ninth spoilers#tlt spoilers#the locked tomb#long post#gif cw
117 notes
·
View notes
Note
this blog is such a cool idea!! i'm fairly new to gifmaking and still learning how to get the best out of photopea. i was wondering if you knew of a way to get gif overlays to work seeing as there isn't a timeline function? like when one gif blends into another with like an ink effect? i was trying and failing yesterday 😅
hello!! thank you for the question <3 apologies for the wait on this tutorial, but follow the steps under the cut below to learn how to make a gif like this!
Before you do anything, make sure you know how many frames your gif is going to be. This is vital for this tutorial, as you are going to be blending gifs together and to do so, you need all of them to be the same length.
step one: the transition gif
Once you have found the gif overlay you want to use for your transition (I will be using the first one from this pack), open it in Photopea. Since you should know how many frames your gif is going to be, make sure you delete the unnecessary frames from the gif overlay. For example, my gif is going to be 36 frames, so I will make sure to delete any other frames I don’t want besides 36 frames. You will also probably need to rename the frames that you’re going to be keeping; with the gif overlay I’m using, all of the frames are titled something like “_a_frm0,30”. However, my gifs end with “,50”, so I need to change the names of the 36 frames of this overlay so they all say “_a_frm0,50” for all 36 frames. This is arguably the most tedious bit of the entire process, which is why I do it first before anything else.
Now you will need to save two different versions of this gif. The first version will be for the “first” gif, and the second version will be for the “second” gif that your gif will transition into. As you likely noticed, gif overlays are black and white; for this tutorial, the first version will be the gif as it comes, and the second version will be inverted. Below are what mine look like after having cropping and resizing the gifs to the size I need them to be for my finished product:


In order to do the inversion, while selecting the folder of your gif overlay on the “Layer” panel on your right, go to Layer… > New Adjustment Layer > Gradient Map…. With the pop up that shows up, check the “Reverse” button to invert your gif overlay. Save this version as well as the other version without the inversion.
step two: creating the transition
after creating both your gif overlay versions as well as the two gifs you’re going to transition between, open up all four of the completed gifs you have created thus far.
Copy over the gif overlays on top of their respective gifs (so, your first gif should have the first version of the gif overlay, and the second gif you want to transition to should have the inverted version of the gif overlay). To copy over the gifs, right click and select Duplicate Into… and select the gif that the overlay will be on. You will want the black of these overlays to show up on both of them, so make sure you set the blending mode on the gif overlay to “Multiply” (you don’t have to change anything about the actual gif that is going to be part of the transition).
Once you have completed this, go to Layer > Animation > Merge in order to combine the gifs with the overlay on them. These are what my gifs look like with the gif overlay transition over them:


step three: final gif
Create a new canvas by going to File > New and creating one with a black background and sized to the size you’ve cropped your other gifs. Duplicate your merged gifs into this canvas, first gif on the bottom above the Background layer and the second gif above that first gif.
You don’t have to do anything to the first gif, but for the second gif, you will need to change the blending mode to “Screen” for the transition to work properly.
From here, do anything else you would like to do to your finished product (add your watermark, do typography, etc). Once you’ve done what you wanted for your finished product, merge your gifs again using Layer > Animation > Merge and then save your gif.
And you’re done! You have successfully completed your gif overlay transition. :)
#photopea#photopea tutorial#gif tutorial#photopea gif tutorial#completeresources#usergif#tusergeo#userars#userpunk#lextag#userlace#*#*tutorials#*kai#answered#resources#tutorials#gif effect tutorials
142 notes
·
View notes
Note
Please oh please share with us how you did the effect in your latest Nancy drew set, it is truly so gorgeous I cannot stop looking at it!
hi nonny, sorry this took a while. so you're looking for the effect from this post:
i made it fairly easy on myself for this one because i am lazy and impatient as hell, so hopefully this is a rather short tutorial.
there's a neater and tidier way to do this that would require frames instead of timeline but for the effect i was aiming for, the slightly sloppier and faster way actually worked fine.
preparation: you'll need a gif with the overlay effect that you like and want to use. i'm giving you the one i used for all the gifs in this set (just slightly altered for each individual gif):

then, of course, you need two gifs — one that'll be your base gif (the coloured one in my example) and one that'll "bleed into" the other one (the black and white one here).
base gif: i just did my regular preparation and colouring, added some yellow and red brush strokes here and there to add some colour and that was it.
i also added some text at this point and i positioned it on top of my base gif but underneath the overlay layers (because i wanted the text to vanish with the overlay):
second gif: i did a quick and very basic black and white colouring for this one.
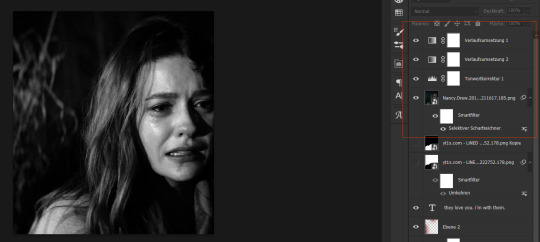
for the overlay effect to work properly, i set the blending mode of this gif to multiply.
overlay: now the fun part. i added my overlay effect gif and changed its size and position to my liking and so that the important parts of my base gif were visible long enough (aka the kiss).
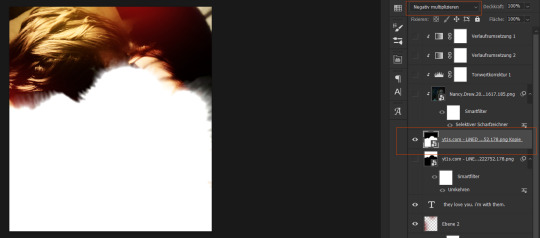
i set this layer to screen and clipped the b/w gif and the adjustment layers to it.
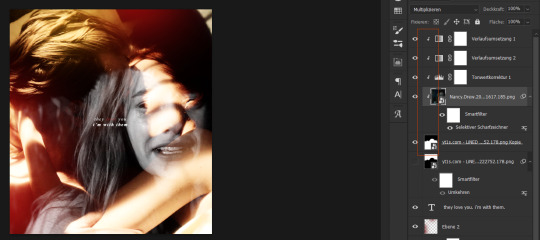
the thing is, as you can see, the overlay part is way too transparent to be efficient. you might get away with this if your base gif is dark enough but for the scene i wanted to use as a base it just didn't look right.
so i duplicated the overlay effect layer, dragged it underneath my original one, inverted it and set it to darken. et voilà, this worked wonders:
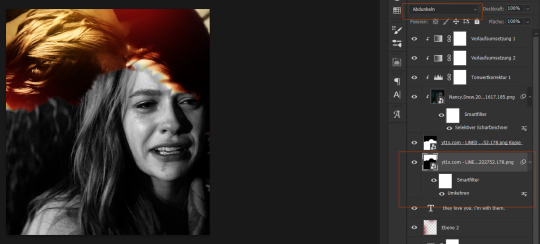
before saving, have a look at your timeline and whether everything lines up. you can change the starting point of your overlay effect (having it come in later or earlier) or your other gifs. whatever looks right to you and also fits into the size limitation.
and that's it. if something didn't make sense or you want to know anything else, just let me know. hope this helped, nonny. ♥️
247 notes
·
View notes
Note
Hi! I saw your ask as open and I wanted to request something for the Self aware Project Sekai AU you made :)
May I request how the Vocaloids react to the player? Like, how would they become self aware? We’re they self aware to begin with? Thank you :)

How vocaloids react to player ✨️
(Sorry everyone for being gone for so long, I was just emotionally exhausted and had a few angsty teen thoughts)
Platonic/Romantic - tbh idk? Depends on how u take it :^
Let's start off with the fact, that they all know know that they're not exactly their original counterparts
Yes, they are vocaloids, but..different? They're in game, nothing new for Miku- but it seems like it's their first time being alive. They know it's their voice, their songs but it just..feels weird?
- though this mostly applies to Miku, as she's the first one to greet us and has her..original form?
She knows it's her, but different her.
- I wanna say that I see all sekai vocaloids as different people, BECAUSE during April fools, THEY MET EACH OTHER and uhm- I'd recommend watching that video to understand what happened. They kinda became friends, and 25ji Rin liked wxs Kaito's (or what Kaito that was?) head pats. She was waiting for her Kaito to arrive.
SO that means they are ALL different.
Now, that we finally sorted out what was important, we can finally make some content
Hatsune Miku(s)!

The Miku that greets us:
She knows she is Miku, but she doesn't have knowledge of stuff outside the game. She is a sekai keeper, and keeps hopes and dreams of every vocaloid producer. But...She is unsure if this true. Some stuff happened before she even existed! (Games existence)
So she knows she isn't exactly the first Miku. But Miku anyways.
She was staying there all alone, for so long.. (game downloading)
Yes, she loved watching over sekais, but..it's not like she has anyone..
So when she first meets you! She is so excited to make a friend! She says you're a sekai watcher like her, because you two "sang" (aka you playing tutorial)
Whether you played bad or good didn't matter. She liked it.
She didn't wanna lose you, but it's not like you're leaving her. Your presence is always near her when you play and read stories/events.
She doesn't see you often, unless you're pulling for characters or there's an event/sth she needs to explain to you.
She's such a little tease, not giving you card you want if she knows you have more pulls. Don't worry, she will give you it, but just pull one/few more times please.. she doesn't want to be alone anymore.
First though when she met you: I am not alone anymore?
Sekai Mikus
As long as you won't harm others she's fine!
She is very cautious when it comes to [band's name]. They're her 1st priority.
At first she thought you are just there to watch over them, but she noticed you actually help them improve (I hc that by playing their songs, decorating sekai, grooving their cards and kizuna level you can make them better and improve them)
Aww, thank you so much! You are a great help!
.
.
.
.
.
Overtime all vocaloids became kinda obsessive over you? They want you to play their band's songs and care mostly, if not ONLY about them and their band! Yes, they're grateful you helped them improve, but they will bring you into their world, and you will make it real. Not just a game, but a R E A L, LIVING WOLRD. NO NPCS, NO GAME CODE
Until then, everyone is just a piece of cra- I mean, code. Your word also seems so dangerous... that's why they need to protect you from world's harm!
Not gonna lie, EVERY other vocaloid acts this way, so I'll end it here, sorry ^^; (Maybe I will make a part 2?)
But trust me, beware of Niigo and MMJ the most.... both, vocaloids and group

^ them when u interact with other groups
(Also beware of Tenmas, and Shinonomes. You can kinda trust Hinomoris)
#yandere project sekai#yandere pjsk#yandere project sekai x reader#yandere pjsk x reader#yandere prsk#project sekai x reader#pjsk x reader#yandere x reader#romantic yandere#platonic yandere#leo/need miku#moremorejump miku#25ji miku#vivid bad squad miku#wxs miku#leo/need#vbs#vocaloid#yandere vocaloid#yandere vocaloid x reader
223 notes
·
View notes
Text
28 asks! :DD Thank you as always!! 💖💖
@astaherussy
My FNAF AU has been sorted out. In the sense that the timeline has been re-written enough that I can go back to drawing it..
Now the next comic in the AU is a re-write/re-draw of my old FNAF comic, Moon Malfunction. A few months ago though there were several time sensitive projects that came up and I needed to shelf Moon Malfunction 2.0 until they were done. Well now they're all done.. but Moon Malfunction is gonna take me some time to get around to..
For the past few months I've been in a really bad spot mentally and physically. And taking on my FNAF Recap/Repair project is just not something I feel I have the mental energy to do at the moment.. All it feels like is a one big pile of work. And all I wanna do I just draw what ever comes easily to me and focus on recovering..
Soooo for the time being,, my main FNAF AU might not see any updates for a bit.. Though I haven't forgotten about it and I do want to get back to it at some point soon. But for now I want to cut any work out of my relaxing/drawing time and just draw what ever I want. Which atm is pirate cookies-- <XDD

They're also great for grabbing something across the room while I stay in bed 😎😎
Why haven't I drawn anything like that yet- what--
I might just have to at some point! :00

@ardent-38
AWWW THANK YOU SO MUCH!! THATS SO SWEET!! BUT ALSO LSKNAKJ XDDD
I never thought of it like that! Anyone who gets into the game through my characters is like a lactose intolerant person recommending an ice-cream joint- and they're very persuasive! XDD
But fr, thank you! And hey, even if my characters aren't in the game, they'll always be here on Tumblr waiting for you XDD

Actually, I wasn't! :00 I haven't seen that episode of the Cuphead show. But I'm assuming its about Cala Maria and Captain Brineybeard, yes? If so I can easily see the relation XD

(Post in question)
AAAA THANK YOU!! The comic was different than what I'm used to. But it was a nice change of pace. I'm glad you liked it! :}}}
@badlyblurry (Post in question)
FRRRRRR THO He's been holding that glow back for a while. Trying not to send the wrong messages to Blue and potentially damage their friendship 💔💔

XDDD ITS OK!! THANK YOU SO MUCH!! :DDD 💖💖✨
@mod-bubamon
I have! In this post you can see 3 of them floating behind Melvin! (The anthro donkey)
And in this post, you can see Melvin holding one while it passes away... :((((( Sad day for sure.

Well? What did she taste like? XDD
Oh wait you're dead my bad-

Unfortunately I cant think of any songs that would match each crew members theme.. Rn all my brain can think about is this 👇
youtube
@nunyabusiness459 (Comic in question)

🥰🥰THANK YOU!! :DDD
What is primordial dough? :0

@2006-stupid-thatsme
Thank you! :DD Though unfortunately my fwernnd, I am known for being very bad at explaining how I do art things. :(
If I tried to explain my thought/design process it would just be a lot of word spaghetti that boils down to "uhhh... I just drew it.,. aandd if it dont look good.. draw it differently.. until it looks good-"
My advice would be to look on YouTube for character design tutorials or ask some other artists that have artwork similar to mine and see if they can help. :( Again, so sorry! I wish I could articulate my thoughts better 💔💔

@beryl-shade
This actually makes me think- Google says that if you add too much sugar to a cookie they become brittle.
Huh,, makes me think. If one of the cookies was baked with too much sugar.. they'd break real easy.. hmm.. 👀👀

@whereismycupofcoffee


@artistiemi
Thank you so much!! :DD I wish the same for you!! ✨💖✨
@sunnys-bloog
I've thought about drawing them! :0 And I thiiink I drew Franny one time..? The Blue one. Although I don't think I'll be able to find the sketch unfortunately-

NOT THE GUMDROP BUTTONS!!
tbh though I think they'd see him as just a normal guy! :0 Right..?

@beryl-shade
I'm not sure.. considering what I know about the games.. I thiiink they'd be horrified?? <XDD If they understand that they're made of dough, it'd be the equivalent of a human walking into a giant meat factory where they chop up meat and make weird false humans..
Okay yeah, they'd be horrified for sure XDDD
@wdillustration
:DD THANK YOU SO MUCH!! :}}}

@neo-metalscottic (Cookie run post in question)
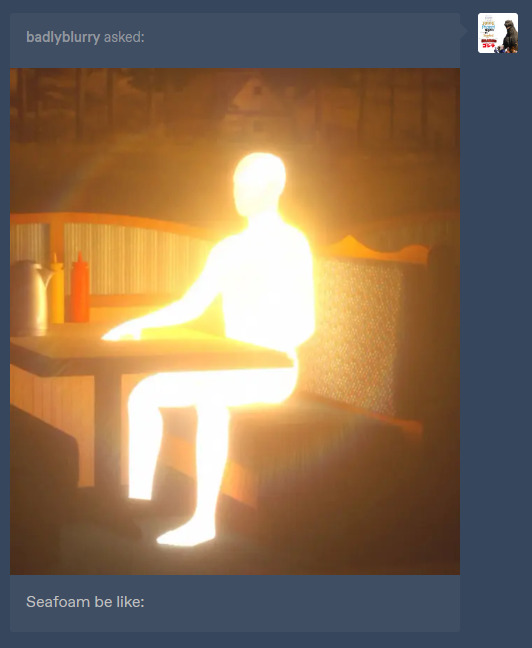
AAAAA thank you so much!! I'm glad you liked it!! :DD As for the power, I think you're right about it being a rare occasion. And the idea of her gaining better control over it over time? While her love grows as well?? Perfection. But man I'm also tempted to make it so she can change when ever she wants. :( I really like drawing her and Seafoam together like that.. 🥺
As for the Colossal squid episode,, I'd have to go back and re-watch it to decide if I'll keep it for my AU or not..
But thinking about all the stuff you described about a violent altercation and nightmares?? 👀👀 Its giving me ideas! XDD
Now if the crew did face a violent altercation like that, I imagine their #1 goal would to protect the Octopod. That's their home man! They would probably do what ever they could to get the octopod away from the situation. Like the Captain manually piloting it and some of the crew being sent out in gups to distract the squid. Stuff like that :0

@luna-purple454
AAA IT WAS ON THE 10TH BUT THANK YOU!! XDD :DD
@khoiazo
It was on the 10th actually- and hey thanks! Seam could probably use the calories <XD

@unpopularartist14 (referencing this ask post)
<XD oh boy, what a stark contrast between the sides--

@shaziztrazh
I didn't have them in mind while designing them,, though maybe I took some subconscious inspiration? I see the similarities! :0
#my response#fnaf security breach#octonauts#cookie run#cookie run kingdom#cookie run ocs#my ocs#welcome home#Youtube
87 notes
·
View notes
Photo
PHOTOPEA BLENDING TUTORIAL by kai @heroeddiemunson
howdy! i’m back with another tutorial for photopea :) nobody asked for this one, but i have noticed people who have reblogged my gifsets commenting on my blending, and i thought it’d be cool to have a tutorial on how i do it!
what you need:
photopea (basically photoshop in your browser, completely free!)
basic giffing knowledge, because i won’t cover it in this tutorial (other tutorials: tutorial by @benoitblanc, tutorial by @ashleysolsen)
decide what scenes you’re going to be blending; i don’t recommend blending more than three gifs together, just for the sake of being able to see what all your gifs are. for this tutorial, i will blending three gifs together. also make sure that all of your gifs are the same amount of frames as well, otherwise this blending tutorial won’t work!
step one: making your individual gifs
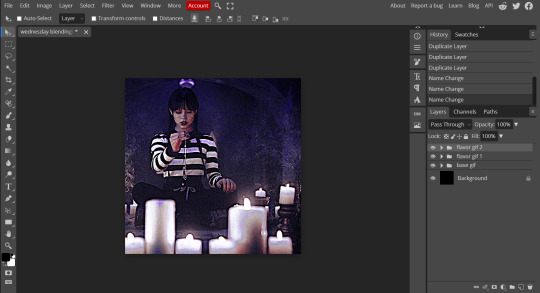
first thing’s first: you need to make the individual gifs you’re going to be blending. make sure when you’re cropping these gifs, you have a sort of understanding of what they will look like together; you can check this by right clicking on one gif, selecting duplicate to, and choosing the gif you’re going to be blending it with. on the other gif, you should have the duplicated version of the first gif on top. here’s what my work station looks like after i’ve duplicated two of my three gifs onto the third gif’s canvas:

now you can change the opacity of the gif(s) you have layered. here’s an example of what my three gifs may look like when they’re blended together (the middle gif is at 50% opacity, and the top gif is at 30% opacity):

since none of these gifs have been colored yet, it may be a little hard to see, so feel free to play around with the opacities of your gifs to make sure that you cropped them how you want them to be blended. i like my crops, so now i can color each of these gifs individually!
when i’m blending gifs, i like to think of them as my “base” and “flavor” gifs. “base” gifs i tend to keep simple, usually with some sort of color overlay on top of them to make the “flavor” gifs pop out more. below is what my “base” and “flavor” gifs look like individually before i’ve sharpened/blended them:

for my “base” gif, i colored it as normal, and then went to layer > new adjustment layer > gradient map; from here, i clicked the black to white gradient in the pop up, and then chose the white color and changed it to the color that i wanted (in this case, the hex code #b7a6ff). my “flavor” gifs are colored as i would color any other gif i’d make that isn’t blended.
save your psds of these gifs, sharpen, and go to file > export as > GIF. now you have the gifs you’re going to blend! great job! :)
step two: making your blended gifs’ canvas
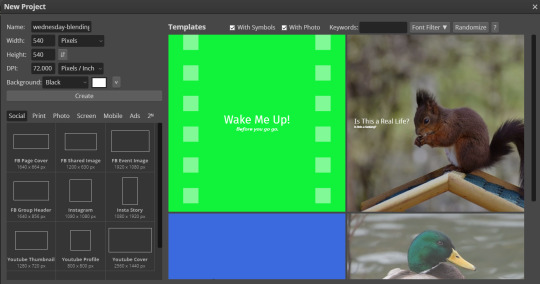
now that we have our gifs we’re going to blend, we have to have a “canvas” to put them on. to do this, go to file > new… and make a new canvas. make sure the canvas is the same size as your crops, and your background is set to black! below is what i did for the gifs i’m going to be blending:
now to put our gifs that we made onto this canvas! unfortunately, photopea doesn’t allow you to use the open & place feature for gifs, so we’ll have to go to file > open and open our gifs individually. similarly to what we did in step one, right click your gifs and select duplicate to and duplicate the gifs you will be blending into your new canvas.
now your canvas will look something like this:
and we can move on to the fun part, which is actually blending the gifs together!
step three: blending!
so, when blending gifs, there’s a lot of ways to do it. i’ve found that blending gifs is a lot of experimentation, since you’ll probably never find yourself blending two gifs the same way every time.
for now, let’s change the blending modes (drop down menu above the layers panel; it should say “pass through” right now) for each of the gifs, that we can actually see them as we blend them.
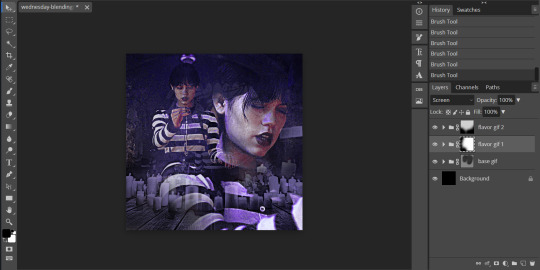
for my “base” gif, i always set the blending mode to “lighten” no matter what. but the fun thing about your flavor gifs is you actually have a fun choice of choosing either “lighten” or “screen”, depending on what you want the gif to look like. below i show the difference of what “lighten” or “screen” look like for each of my flavor gifs:

i personally really like what it looks like with my first “flavor” gif with the “screen” blending mode and the second “flavor” gif with the “lighten” blending mode, so that’s what i’ll be doing; but it always depends on your gifs that you’re blending and what you want it to look like, so do what works best for you!
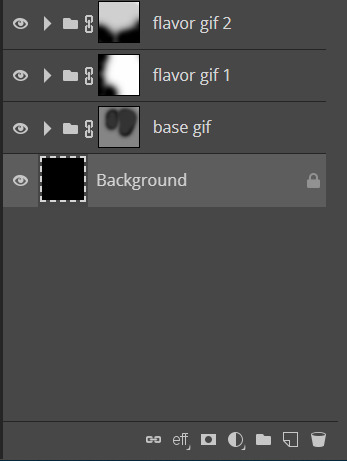
so as you could probably see from my screenshots or your own gifs, sometimes it gets a little hard to see your gifs. to fix this (and probably my favorite part of the blending process), select one of your gifs, and then look below your layer panel to click the “add raster mask” button (it looks like a little rectangle with a circle in the middle of it). do this same step for each of the gifs you will be blending, and your layers panel should look something like this (i’ve also highlighted the “add raster mask” button):

the raster masks are white, which means anything white is something you can see. using black with the brush tool gets rid of parts of the gif that may be visible. for example, this is what my gif looks like after playing around with getting rid of some of the stuff that was covering the parts of other gifs i wanted visible:
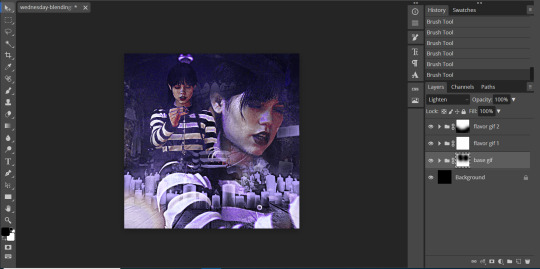
but to me, the black is a little too intense, as it gets rid of a lot of the gifs. but we’re in luck: the best thing about raster masks is that you can use various shades of grey to really blend your gifs together in unique ways by changing the colors in the bottom left corner. below i have a couple screenshots of what my blending for these gifs look like, as well as what my layers look like with the different shades of grey i used:
and now, our gif is almost finished! make sure to save your canvas as a psd, just so you don’t lose any of the work you’ve done.
step four: finishing touches
before we save this gif as a gif, i want to do some finishing touches. as we all know about me, i love myself some very colorful gifs, and i want the purple to stand out more in this gif. to do this, go to layer > add adjustment layer > gradient map and do like what we did for the “base” gif to make the same black to purple gradient we did before.
on the gradient map layer’s raster mask, use your brush tool like you used for erasing parts of your gif in order to erase part of this layer. i personally make my brush 1000px large and with 0% hardness into what i like to call my “big fluffy brush” (which makes no sense, because it isn’t fluffy, but it’s what i call it anyway). doing your best to center your brush in the middle of your gif and left clicking once should get rid of most of the gradient map’s color, but feel free to click again if you’d like. here’s what my gif looks like after two clicks of my big fluffy brush:

that doesn’t add much more color, but that’s okay, because it does add more contrast for us. go to layer > add fill layer > color fill and put in the color you have been using (in my case, that purple color). like the last layer, do your best to center your big fluffy brush and left click until you’re satisfied. here’s what my gif looks like after two clicks:

from here, i change the blending mode to “color”, and set the opacity at 50%. i then right click and choose duplicate layer, and with this new layer, change the blending mode again to “soft light” and set the opacity at 25%. now my gif looks like this:

now my gif is much more colorful! from here, i’ll add some typography and whatever else to my finishing touches before i once again save this psd so i don’t lose my progress. and now we can move to the final step!
step five: exporting
before we can export our gif, we have to combine our gifs together so they act as one singular blended gif rather than multiple separate gifs on one canvas. go to layer > animation > merge, and your individual gifs should be combined into one gif on your layers panel something like this:

and now, you can go to file > export as > GIF. make sure your gifs move together as you want them to, as well as that it’s until 10MB, and viola! congrats, you’ve just blended together a gif! :)
#photopea tutorial#photopea gif tutorial#completeresources#allresources#userars#userzesty#tusersai#dailyresources#gif tutorial#photopea#mystuff#mytutorials#hopefully i explained this good enough#feel free to send me asks if i said something confusing sjdhldsf
397 notes
·
View notes
Text
The RalsAlmanac, Volume I
Okay, here it is! A series of essays that will attempt to definitively explain just who or what Ralsei is, referring to scenes from the game as evidence, as well as external sources where appropriate.
There will be some conjecture, as there's just so much we don't know about him, and what little we are given isn't exactly the most revealing. However, I've done my best to cleave as closely to the source material as I can, and I believe there's a strong case to be had here.
Hopefully you'll be able to see where my points come from, or at the very least you'll learn something you didn't know before. Either way, thanks for your consideration!
Volume I - Ralsei Is A Character In A Role-Playing Game.

Self-indulgent reference out of the way, lemme ask you a question.
Who is Ralsei?
It's a question that seems like it should be easy to answer. He's the Prince From The Dark, the third of the three Delta Warriors, he exists to serve the lightners, and is the most precious little cinnamon roll that ever lived. He enjoys baking and crochet, can hold a tune, is a decent interior-decorator, and holds his friends Kris and Susie in very high regard.
Thing is, that's about all you can really say about him without veering into speculation and headcanons, and they're more surface-level observations than anything else. What exactly does "Prince From The Dark" mean, for instance? Prince in what sense, exactly? Ceremonial, or with the actual power that royalty conveys? Where does he rank in comparison to, say, King or Queen, both actual rulers of actual kingdoms? The title of "prince" would suggest that he answers to them, but while they rule their own municipalities, Ralsei's title implies he rules over ALL dark worlds. You could go on asking these questions forever, but I think you see what I'm getting at.
A more productive avenue of questioning might be: What role does Ralsei play in the story of Deltarune? Perhaps more of his underlying character and motivation could be gleaned by looking at what he does for the story and the game. And this would be correct... sort of.
We tend to think of him as the squishy healer of the party, the Heart and moral centre of the Fun Gang. And he absolutely is that, but he's also quite a bit more. He plays all sorts of different roles and character archetypes in the first two chapters of the game, including but not limited to:
the old man whose purpose is to wax poetic about the ancient prophecy...

the know-it-all tutorial fairy who walks you through the basic game mechanics...
the straight-man DM trying to keep everything on the rails...

the young sheltered noble experiencing the outside world for the first time...

the demure love-interest to the main protagonist...
the Polyanna determined to see the good in everybody...
the mysterious waif who knows things he shouldn't...
...eye candy…?
...and so on and so forth.
And so what, I hear you cry. Characters in video games can have more than one personality trait, after all. And yes, this is true! But usually, the different aspects of a character's roles, how they interact with, reinforce or contradict each other, can tell us more about their inner world - what motivates them, what they actively like and dislike... in short, it grants them depth and allows us to engage with them as actual people, rather than just a series of game functions and character traits dressed up in a pretty bow.
But that's not what we see with Ralsei. In fact, far from showing us any real, deep aspect of his character, each new guise he dons and part he plays in the narrative further obfuscates him from us. We learn no new meaningful information from any of these exchanges... except for one thing, but we'll come to that in a moment.
This vexes us, because we WANT to know more about him, but all we end up getting is stock JRPG tropes dressed up in a warm, fluffy coat. There HAS to be something deeper, we reason - he's hiding things from us, so he must be a secret villain. Or his backstory is so tragic, so traumatising, that he cannot properly articulate it to us right now. Or maybe what we see really IS what we get - a simpering, airheaded fool whose only desires in life are to be cute, please his betters and do what he's told. Yet even this explanation seems... unsatisfying, especially since we KNOW he harbours some angst about himself and his sense of identity.
And speaking of which, that one thing we learn? Right at the end of Chapter 2's Acid Tunnel sequence, he utters a single sentence:
This is arguably one of the most significant lines of dialogue in the entire game up to this point. But what does it mean, exactly? I believe most people assume it means he doesn't have a clear sense of who he is outside of his ordained purpose, which is certainly valid, and definitely something I believed for a long time. And yet, this explanation does not deepen our understanding of his character in any meaningful way; looking back over all his interactions with the cast, it does not allow us to glean any further information about him.
And you can say that's because he himself doesn't know what he's like... but again, this doesn't actually change anything, and we just end up with a circular logic trap. We don't know anything because he doesn't tell us anything, and he doesn't tell us anything because he doesn't know anything, so how can we be expected to know anything, except that no-one seems to know anything about him… which is very frustrating to us Ralsei scholars, and gets us no closer to truly understanding him.
But look at what he says again. Really look at it. It’s a very strange way of saying “I don’t really know who I am”, isn’t it? After all, if that’s what he means, then why doesn’t he just say that? I’m certain you’ve realised by now, but it’s because that’s NOT what he’s saying at all. He literally has no clue what being “himself” is supposed to be, because he wasn’t even created with a sense of “Ralsei-ness” in the first place. Little wonder, then, that we can’t discern anything about his internal world, when there is nothing there to be discerned.
But before I elaborate any further, I want to talk about a couple of scenes in Deltarune that are just... puzzling. This is relevant, I promise. The first is during the dialogue with Rouxls Kaard before the rematch with K.Round. Ralsei says something interesting in the lead-up to the fight:

Note Susie’s baffled reaction to this. Then not long afterwards, he continues with:

Throwaway joke, right? We laugh because Susie's right - K. Round and its crown do look exactly the same to us, and so Ralsei's dramatic utterances are deflated and lose their impact. We laugh, beat the boss with Susie's help and forget all about it. But here's the thing - if K.Round looks the same to us, and it looks the same to Susie, and presumably by extension the rest of the in-game characters... when why exactly does Ralsei take the time to insist otherwise?
Is he... lying? Our most precious little boy, guilty of perjury? Say it ain't so! :O
The second scene is in chapter 2 - Queen has challenged us to a game of Punch-Out on her absurdly tall arcade machine, and we can talk to the characters before trying to interact with it. Talk to Ralsei, and if you answer "Gaming is my life" to his prompt, he says this:
Most people don't even come across this in their playthrough, so I wouldn't be surprised if it's new to you reading this. But again, note this strange discrepancy between what Ralsei reports is happening and what Susie says is actually happening. It becomes apparent to most people that Kris can affect the tone of their voice when saying what we tell them to, which affects how the response is taken by other characters and gives us a subtle clue about how they actually feel about certain characters or situations.
Are we to assume, then, that Ralsei isn't actually listening to how Kris says things, but only what they're saying? And if that's correct, then... what does that say about him?
Taken at face-value, within the context of the game, neither of these events really make much sense. It just looks like Ralsei is being overly-dramatic, or lying, or perhaps even insensitive to what their friend is trying to tell him, which doesn't quite track with his per-established shallow traits of kind, all-loving and moralistic. It's perplexing and seemingly out-of-character for him. So it might help to consider, in each of these scenarios, who exactly Ralsei is talking to.
Is it Kris and/or Susie? This would make the most sense, but it's actually not that likely, considering the aforementioned discrepencies between his descriptions and Susie's observations. So is it himself? Again, if he can see things the same as everyone else in-game, that wouldn't make much sense, because then he's just saying stuff that... isn't true? Or in the latter example's case, just completely ignoring what Kris is saying, which doesn't seem to entirely gel with what we know about him.
So, who does that leave? Well, the only other person - or should I say entity - who is present for both of those scenes is... us. The player of Deltarune. And that might seem even stranger than the previous options, until you realise what it is he's actually doing - providing flavour text, additional exposition informing us of details that we wouldn't - or shouldn't - be able to make out on a pixelated display with no voice-acting, attempting to give us a richer sense of these events in order to increase our sense of immersion in the game and world of Deltarune. In effect, he's playing the part of a character in a role playing game, doling out “flavour text” that contradicts another character’s experience of the same scenes, and he's doing it entirely for OUR benefit. Not Kris’s, not Susie's – ours.
He tells us that K.Round's crown is different, and that it is in pain from its forced control, to try and increase the stakes of the fight, and to give us a motivation that's not "here's the exact same boss again lul". He responds to Kris's words the way he does, not because he doesn't understand the nuances of their tone, but to try and amp us up for the upcoming challenge, and to validate our choice when we select the dialogue option "Gaming is my life". Because we cannot hear Kris's tone of voice - and Ralsei knows that. To him, Kris's tone literally doesn't matter, because he doesn't believe it matters to us in that exact moment.
And here’s the thing: if not for Susie’s asides immediately contradicting him, we’d likely take what he says here as what’s actually going on. To Ralsei, the reality he and his friends experience is not important – it’s the image of that reality that he’s trying to convey to the player. It’s like he knows he’s part of a game, meant just for us to experience and enjoy, as opposed to a real world filled with real people having real experiences.
And the reason I brought this up is to illustrate what I believe Ralsei to actually be - namely, that he a walking, talking, singing and dancing amalgam of stock JRPG characters and tropes that's trying very hard to present as an actual person, to the point of knowing absolutely nothing about who he even is outside of that. Put in even blunter terms, he's literally a fluffy goat-shaped vehicle to set the player on their journey through the game, to keep them playing and to keep them invested. People looking for deeper aspects of his character come up short and are disappointed because they're looking for something that does not currently exist.
And just so that I'm clear, I do not mean that Ralsei is "acting", or that he's "wearing a mask", because that would imply that there was actually something underneath his "facade" to begin with. No, this is who the Prince of the Dark is - a very convincing fascimile of a person, following his directive to ensure that the story of Deltarune is resolved, and that the game of Deltarune is played to completion. And once you realise that, a lot of things that Ralsei says and does that seemed strange before suddenly make a lot more sense.
As for the why... well, that'll have to wait for another time. But hopefully you can begin to see how my future essays in this series all tie in to this one, because I think you can only really understand those with the framework that this text provides. I hope that my reasoning made sense and wasn't too difficult to follow, but I'll be happy to provide additional information, clarification, or even just discussion on any aspect of this essay... even if we just wind up (respectfully) agreeing to disagree. Would love to hear what people thought about this!
Thanks for reading!
#Writing#essay#analysis#theory#Deltarune#Ralsei#character study#The RalsAlmanac#deltarune chapter 1#deltarune chapter 2#essay collection
42 notes
·
View notes
Text
How I Make Gifs ~ For Anon ❤️

An anon asked me if I would ever consider doing a tutorial for how I make gifs! It's very flattering that you like my gifs enough to want to know exactly how I make them, so here is a little tutorial using my favourite character from my favourite movie ❤️
I might also make a separate tutorial for giffing dark scenes later 😌
Here's a download of my gif in PSD form if you'd like to get a better look at the settings I used.
Programs used: PotPlayer, Photoshop.
First, you need to get your screencaps. I would suggest using a high quality recording of whatever movie/TV show/video you want to make gifs of. My recording of Fellowship is in 1080p, and the quality looks incredible!
I use PotPlayer to get my screencaps. To do this, open the video file in the program and find the moment you want to gif. It's probably best to go back to just before that particular moment, and then press Ctrl + G. This will bring up the consecutive image capturer window. Below are the settings I use to get my screencaps:
Then, press start and wait for your moment to be captured! Once you've got everything you need, press stop and navigate to the folder that you indicated under storage. Here you will find all of your screencaps! You probably ended up with way more than you need (I know I certainly did 😅). Now, delete all of the screencaps that you don't want in your gif.
For the actual gif making, I use a cracked version of Photoshop. I don't exactly remember where I found it unfortunately, but I'm sure that there's people out there who might have some links handy if you look around! Once you've got PS open, navigate to File > Scripts > Load Files Into Stack... and click on it! That will open the Load Layers window.
Now, change Use to Folder. Then, click browse and navigate to the folder that contains your screencaps. Click select folder, and after a few moments of loading your window should look more like this.
Then, press OK, and wait for your layers to load. Depending on how many caps you have, it could take longer. Once it's finished loading, you need to decide on your gif dimensions! For this, I decided on 268px x 225px. Once you've chosen your size, use the crop tool to get your gif to that size. Now, you should have a smaller image, like this:
The next step I do is to use this Photoshop action by @maziekeen. They have a little tutorial on how to use this action there, so I'll just say that once you've loaded it into your program, use part 1 / load into stack. Press the play button, and then the OK button on the two windows that pop up. Now, your gif will be nice and sharpened, and you'll be able to see it move for the first time! Here's what mine currently looks like, without any other edits:
Now, it's time to start on colouring. Every gif (or scene, sometimes you can reuse the same colouring if you're giffing an entire scene) is different, so it will have different needs. However, I tend to always use the same layers in the same order for all of my gifs — it's just the settings that change. I think the colouring of this particular scene is lovely, so I don't want to change it drastically, I just want to enhance it.
First, I create a Curves layer. At this point, I also like to make a group to hold all of my adjustment layers. This makes it easier for you to switch your adjustment layers on and off if you want to compare with the original colouring!
Going back to your curves layer, pick the little white eyedropper tool in the Properties tab. You want to find and click on the whitest area in the gif and make it a bit brighter! I picked the white in one of Boromir's eyes.
This is what my gif looks like now with the Curves layer:

Next, I use Levels. It's a very subtle change, but you can notice a slight darkening of the blacks in the image. Here's my settings for this layer:
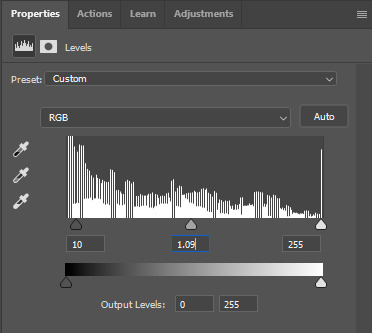
And here's the gif with this step applied. Like I said, it's a very subtle change:
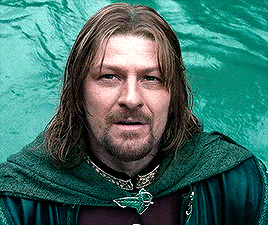
Up next is Brightness & Contrast. This layer is just a case of messing around with the settings until it looks right for you. You don't want to make it look too bright or too contrasted, though, because it will make the colouring look weird.
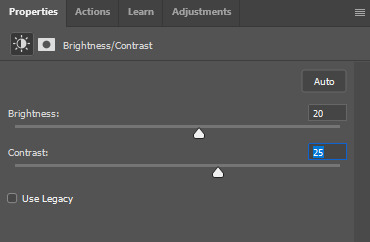
A bit more of a change this time! We're getting there:
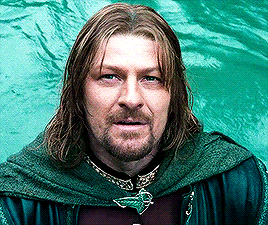
Next, I like to do Colour Balance. Sometimes I wait and do the Selective Colour layer first (it'll still be above Colour Balance though), but with this gif, I decided to do it first. I want Boromir in the foreground to contrast more with the watery background, so I upped the Red in the Midtones. I think Midtones is the most important part of Colour Balance, so the Highlights and Shadows are more minor adjustments here.
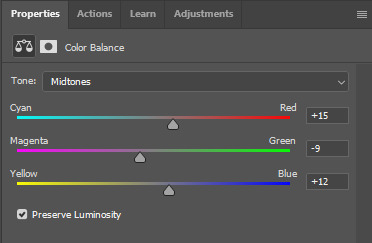
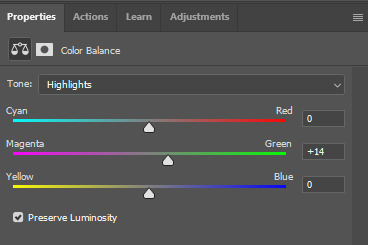
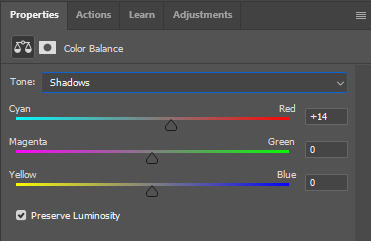
Here's the gif with the Colour Balance layer!
Now, we have Selective Colour. Like I said before, I sometimes like to do this layer and then go back to the Colour Balance to make minor adjustments. For this gif I mainly focused on slightly reducing the cyan in the reds and yellows to add a little more colour to Boromir's tunic and hair.
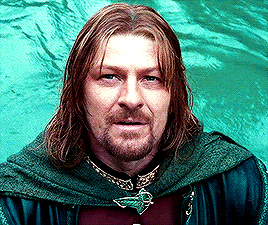
I'm a big fan of bright, vibrant gifs, so I like to use the Vibrance layer copiously.
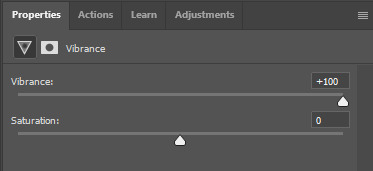
I upped the vibrance to max, but it's left Boromir's face looking a bit too red and his neck is a little pink, so I went back and did some minor adjustments to the Colour Balance and Selective Colour layers to fix that. Then, voila!
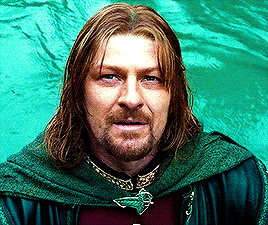
Now that we're done with colouring, go back to the beginning of the timeline at the bottom the screen. Then, go back to Actions and scroll down to the bottom, and look for the action called part 2 / finishing. Just like with the first action, press the Play button and it will work its magic!
Press Ctrl + Shift + Alt + C, and try playing your gif from there. Sometimes, the gif will be too fast and you'll need to slow it down, and you can't always tell until you play it in the 'Save for Web' window. I ended up slowing mine down from 0.05 to 0.07.
Once your gif is looking just right, press Ctrl + Shift + Alt + C again. These are the settings I use to save my gifs, and I think it makes them look really nice! Then click Save, and save your gif wherever you want.
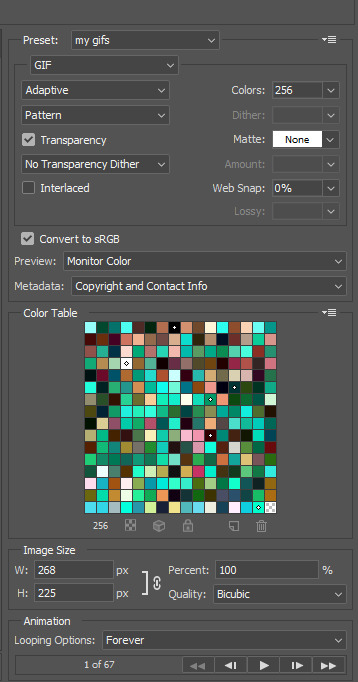
Now, once you've saved your gif, you can post it to Tumblr (if that's what you're wanting to do) or simply keep it to yourself! But I'm sure that others would love to see your creations :D
***
A little extra info - this gif doesn't have text because there's no dialogue, but these are the settings I use for gifs with text (the text size depends on the dimensions of the gif):

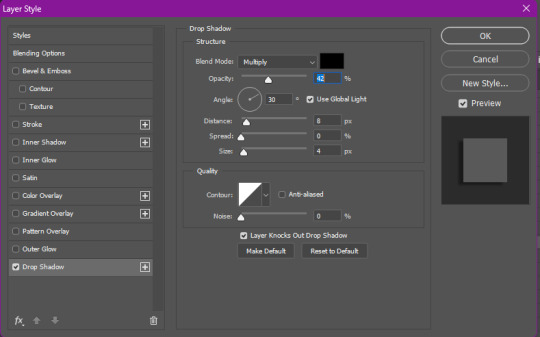
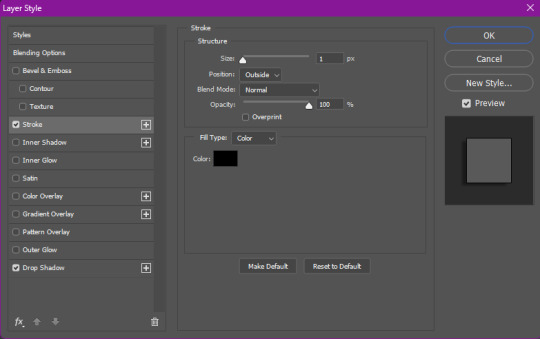
Sometimes I use white text, sometimes I use yellow. And if there's more than one person talking I use both!
I hope that this tutorial was helpful, and if you have any more questions, feel free to ask!
#gif making#gif making tutorial#gif tutorial#psd tutorial#gif coloring tutorial#gif colouring tutorial#mari speaks#mari’s stuff
22 notes
·
View notes
Text
Attention all whump gifmakers and visual artists!!!

I am seeking your opinions and advice.
So I am seriously considering creating a whump gif makers challenge for some time in 2024. I'm thinking maybe in August because it seems pretty empty in terms of whump challenges.
I don't know what it would look like or what I'd call it but I want something just for gif makers/visual artists instead of a writer's challenge that gif makers are allowed to take part in as well but are actually just geared towards writing and the prompts are really hard. There's so many writing challenges and I love them. I do. But lately I feel they're getting harder and harder for gif makers to participate in (that might just be my problem though who knows) in terms of prompts.
So I want something made specifically for whump gifmakers. An event to bring everyone together, meet other gif makers, learn and share skills, share our favorite whump scenes and find new ones to loves. I could also share gif making tutorials and resources for people who are new to it or would like to up their skills. From basic skills like screencapping and software and how to use programs like photoshop to more complex things like how to do layouts and blending techniques.
Would this be of interest to you all?
If yes, what kinds of things do you as a gif maker like best about prompt challenges? What do you like least? What would you like to see in a monthly gif making challenge?
Let me know what you guys think! Share your thoughts! I'll even add a poll option but I'd love to hear your thoughts on the comments!
Please reblog for larger sample size thank you
63 notes
·
View notes
Photo
HOW TO: Make a Pantone “Color of the Year” Gif
A few people have asked about my Pantone sets which use the “Color of the Year” swatch design. So, here’s a full tutorial with a downloadable template of my exact overlay! Disclaimer: This tutorial assumes you have a basic understanding of gif-making in Photoshop.
PHASE 1: PICKING A SCENE + PANTONE COLOR(S)
I’m starting with this because it’s crucial for planning your gifset as well as making sure the execution is smooth sailing. The steps in this phase won’t necessarily be literal steps but some tips for how I usually go about making a Pantone set:
1.1 – Picking a scene.
Scene selection is everything. To make things easy on yourself, I suggest choosing scenes where the background is mainly ONE color — for example, a scene where the subject has a clear blue sky behind them. To make things even easier, choose a color that isn’t the same color as the subject of your gif. Like, if your subject is a human, I’d avoid using a gif with a red or yellow background unless you want to do a lot more work to mask their skin.
Rip me using a scene of green lil Grogu in green grass lmao. But I guess that goes to show you could really do this with any scene (I just did lots of masking and keyframe animations to perfect this green shade). BUT selecting your scenes wisely = a lot less work.
1.2 – Picking Pantone colors.
People often ask me how I choose my colors and there are a few methods which I’ll go over below.
But note that not all Pantone colors have a cute name, or any name (fun fact: only Pantone textiles have official names and they end with TCX, TPX, or TPG).
METHOD A: Google Search “Pantone [Color]”
Source: Google
Easy but not always fruitful, all you do for this method is open Google and type “Pantone [insert color here].” For example, when searching for teal colors, I searched several things including: Pantone Teal, Pantone Turquoise, Pantone Blue, Pantone Green, Pantone Blue Green, etc. Then, just sift through the Google results and click on whatever comes up from the official Pantone website! Since Pantone’s site blocks some info behind a paywall, you won’t be able to get a hex code from them. But you can just screenshot the swatch from their site, put it in Photoshop, and use the eyedropper tool to figure out the color.
METHOD B: Color-Name Site
Source: https://www.color-name.com/
This handy website lets you search by colors using the upper navigation bar. Or you can just type something like "magenta" or "blue pantone" or even “frog” and see what comes up lol. Color-name can put together palettes too! I like that this site also tells you the hex code of a color, which is really helpful for getting the right code to put in my overlay. Note: Not every color on this site is a Pantone textile, so not all of these names are Pantone-official names. You can tell it’s official if, in the Pantone row of the Color Codes table on the middle of the page, it has a code that’s 2 numbers, a dash, 4 numbers, and either TCX, TPX, or TPG.
METHOD C: User-Made Pantone Colors Archive
Source: https://margaret2.github.io/pantone-colors/
For my Wednesday characters as Pantone colors set, it was all about matching the color name to the character’s vibe. So, before looking at the actual colors themselves, I wanted to find the perfect color names. I stumbled upon this page. The pros = it lists pretty much all of the current official Pantone names. The cons = it’s not convenient since there’s no filtering tool. You can do Command+F and search for keywords, but that’s it. I literally scrolled through this whole page for my Wednesday set and read every single name, which... I think means... something’s wrong with me /lh /hj
METHOD D: Official Pantone Color Finder
Source: https://www.pantone.com/pantone-connect
This is last on my list because I don’t actually recommend it. Unless you already have access to this resource from your school or work or something, I would never pay for it and it is a paid feature only. Boooo 👎 But there is a free trial (which I’ve never used), so if you want to see what it’s about, you can definitely go for it.
PHASE 2: MAKING THE BASE GIF
Again, just some super quick tips for making a gif that, I think, looks best with this kind of set — but if you’re still learning how to gif, I do have a basic gif-making tutorial here for extra guidance!
2.1 – Uncheck “Delete Cropped Pixels” before cropping your gif. When you use the crop tool, this checkbox appears in the top toolbar. Unchecking it allows you to move the positioning of your gif later on, which is handy in this case when you want to choose which part of your gif will be underneath the Pantone swatch. You can read more about this tip in my basic gif-making tutorial (linked above; Step 1.5 – Tip B).

2.2 – Make your gif 540px width. My gifs for these sets are usually 540x540px but I think 540x500px will also look good. I think it’s more impactful though to make a big gif to show off your coloring.
PHASE 3: ADDING THE PANTONE OVERLAY
3.1 – Download my template
I made this template myself, so all I ask is that you don’t claim it as your own and that you give me proper insp or template credit in your caption if you decide to use it! Get the PSD with the transparent background here!
3.2 – Download the font Helvetica Neue Bold
The font I use (and I’m pretty sure it’s the same font Pantone uses) is Helvetica Neue Bold, with some very specific letter spacing (which I determined by studying Pantone’s official Color of the Year Very Peri design). It’s already set in my .psd but here are specs in case: color name spacing = -40, color code spacing = -75 (sometimes I’ll do -25 for the numbers after the dash if I don’t like how tightly they’re packed together).
I uploaded Helvetica Neue Bold to my dropbox here!
3.3 – Import my overlay
You can either drag the whole folder onto your gif from tab to tab or right-click the folder, select Duplicate Group, and select your gif as the destination document. Just make sure this overlay group is above your base gif!
3.4 – Fill the color swatch
In my .psd, on the layer labeled “Pantone Swatch,” just grab the hex code of your chosen Pantone color and fill that layer using the Paint Bucket tool! I’ve already put a layer mask on the layer for you so it fits perfectly inside the square outline.
If you’re using my .psd, all the blend mode settings are already in place! I usually set the colored square behind the Pantone logo to the Color blend mode, but sometimes, I prefer the way Hue looks. It’s up to you!
You can also adjust the drop shadow settings to make your text more visible as needed. The layers are arranged in this order so the drop shadows don’t interfere with the semi-transparent part of the colored swatch.
3.5 – Insert the color name and code
My .psd has two versions to choose from: (1) a color name that fits on one line and (2) a color name that requires two lines. Use the one that applies to your color name and simply type that and color code into the corresponding text layers!
Note 1: Pantone doesn’t keep their font size uniform for every color of the year. They’ll sometimes shrink the text to fit longer names, but I like being consistent. So, I use this one font size for all my colors.
Note 2: My template has all the text left-justified and matching the starting point of the P in Pantone. BUT, sometimes the gif looks better if you nudge the text a bit so it looks more centered. Use your discretion when aligning the text!
Note 3: Btw, you definitely don’t have to use the TCX/TPG codes like me. (I’m a nut and there’s no way I’ll ever do a Pantone set and not use those types of codes to maintain uniformity across this series lol.) I’ve seen others do sets inspired by mine using different color codes or even just the hex code itself!
PHASE 4: COLORING THE BASE GIF
The key here is to make a majority of your gif feature your chosen Pantone swatch. If you’re really smart with your scene selections, this should be a breeze! If you’re stubborn like me and want to use specific scenes with the opposite color of your chosen Pantone swatch, there will be a bit more color manipulation involved... However, this isn’t a coloring tutorial, so again, I’m going to give some tips and resources that will hopefully help you out!
4.1 – Color matching.
Now that you have the Pantone swatch on your gif, you should be able to reference that center square set to Color/Hue to match the rest of your gif to that color. Feel free to paint a little blob of your color onto another layer anywhere on your gif so you can refer to it closer over a specific part of your gif. For example, I put a little circle over Grogu’s head to see how closely I matched Pantone’s Peapod color, then I tweaked my adjustment layers a bit more until the colors matched near perfectly and I couldn’t tell where that blob begins or ends. The left is the solid color and the right is set to the blending mode Color (like the square):
4.2 – Moving the base gif.
This isn’t really about coloring... but remember when I said to uncheck “Delete Cropped Pixels” in Step 2.1? Well, here’s your chance to adjust your canvas and move the gif around so the exact part you want under the color swatch is in the right position. I personally think these kinds of sets are more impactful when you put a differently colored part of your gif under the swatch so you can see through it and the difference is clearer. In my example, I put Grogu in the center so the green box would cover some of his brown potato sack robe.
4.3 – Color manipulation.
Color manipulation is when you transform your media’s original color grading into a completely different color. The Grogu gif isn’t a great example because the original scene was already a green-yellow color:
I mean, the difference is still pretty drastic but that’s mostly because my file was HDR and washed out as a result.
So, here’s an example I made using a gif from my first Pantone set for ITSV (I’m not doing this demo to the Grogu gif because it’d be too much work to manipulate a green background with a green subject. This ITSV scene is perfect bc the majority of it is blue while the subjects are mostly red.)
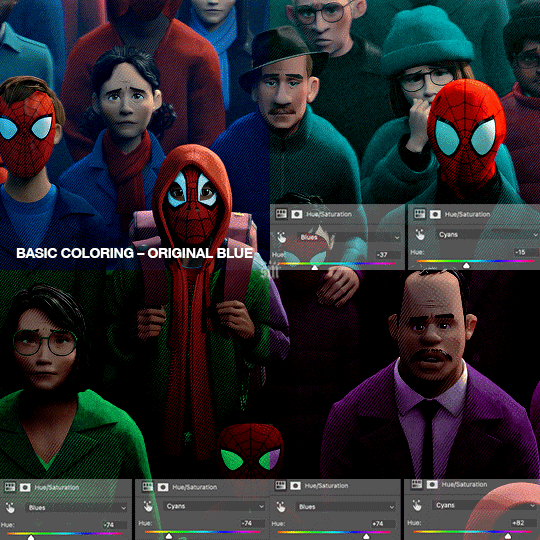
For the “basic coloring,” I did everything as I normally would: mostly levels and selective color layers.
For color manipulation, my fav adjustment layer is Hue/Saturation (those are the screenshots that are on the gif above). When you’re smart with your scene selection, it’s pretty easy to manipulate colors with one Hue/Sat layer because you usually only need to tamper with 1-2 colors and, hopefully, they shouldn’t interfere with skin tones (obviously you’ll do other layers to further enhance your gif’s brightness, contrast, etc. — but I just mean the heavy lifting usually only takes me one layer with a good scene choice).
All you have to do is figure out what color the majority of your gif is, toggle to that color’s channel, and fiddle with the hue slider. In the gif above, you can see that I played with both the Blue and Cyan channels. Here’s why:
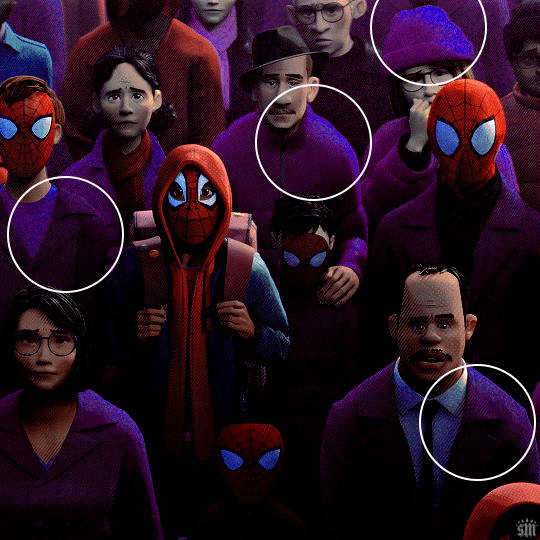
If I only adjust the Blue hue slider, I get those speckles of cyan peaking through in the gif above. Unless you’re working with completely flat colors — like 2D animation with zero shading/highlights — a color is never just one, solid color. Blue isn’t just blue, it may have some cyan. Purple isn’t just purple, I often have to toggle the Blue channel too. So, yeah, be mindful of that!
I’ll sometimes go in with the brush tool and paint over some areas of my gif to really smooth out the color and make it uniform. When I do that, I just set that painted layer to the Color blend mode. Some of the resources below go into that technique a bit more!
4.4 – Coloring resources.
While not all of these tutorials cover the same type of color manipulation I did in my gifs, I think the principles are similar and would be helpful to anyone who’s a beginner:
– color manipulation tutorial by usergif/me: I go a bit more in depth here (I think lol)
– how to change the background of any gif by usergif/fionagallaqher: a great tutorial for using keyframes so you can manipulate the background of a gif with lots of motion
– bea’s color isolation gif tutorial by nina-zcnik: this tutorial has more tips about hue/saturation layers as well as masking your subject
– elio’s colouring tutorial by djarin: this tutorial shows a lot of examples of first manipulating the colors then brushing over the gif with a matching color for extra coverage
And just one last note on coloring, I always try to appreciate gifs with the mentality that “good” coloring is 100% subjective. One of the only things I would classify as “bad” coloring is when you whitewash or [color]wash someone’s skin tone. So, as long as you keep the integrity of your subjects’ natural skin — especially if they’re a POC — you should feel good about your coloring, because it’s yours and you worked hard! <3
PHASE 4: EXPORT
That’s it!! If you work in Video Timeline like me, just convert from Timeline back to Frames, export your gif, and voila!
Easy PEAsy. 🥁
If you have specific questions about this tutorial, my ask box is open <3
Also, check out these other Pantone-inspired sets by my friends @nobodynocrime (Mulan set) and @wakandasforever (Ponyo set)! There are so many ways to use Pantone colors in your set, so I hope this inspires you to create something beautifully colorful <3
#gif tutorial#completeresources#usershreyu#useryoshi#userelio#userannalise#userzaynab#userives#usermarsy#usertreena#usercim#userrobin#userkosmos#usersalty#usermills#userhella#alielook#resource*#gfx*#pantone*
1K notes
·
View notes
Last Seen Blogs
beautiful-de4mity
Earth of Silence, Confused Universe

matthewpsd
Matthew Espinosa with PSD

hongkongcompany7
Hong Kong company incorporation

moving-towards-bright-future
Untitled

carolgoncalves
Sem título