#my costuming tutorials
Explore tagged Tumblr posts
Visit Tumblr Blog
Explore Tumblr blogs with no restrictions, modern design and the best experience.
Last Seen Tumblr Blogs


Fun Fact
US Tumblr user growth rate is estimated to slow down to 4.1%.
Note
How did you go about redesigning the clothes in you remaster?
Ooh great question! I'll go into more detail below, but the gist is that I broke down each character into their vibes and general aesthetic and tried fitting it to my design biases.


I tend towards more grounded designs than the original JRPG-inspired armour and clothes, so I referenced a lot of medieval fashion for the setting. You'll usually see me covering bared skin in battle outfits or toning down extra details I struggle to draw

Then, using those references, I'd try to thumbnail basic shapes and colours to figure out which works best


(More specific character notes below)

For some characters like Iseul, I didn't feel much need to change his outfit so I mostly toned down the detail to suit my style. I shifted the colour scheme to something warmer and removed the fur and extra armour to serve his image as animal-loving and battle-avoidant. This serves as great contrast to his timeskip outfit where he then commits to being both a warrior and a prince, with more ornamentation and practical armour


I designed Helena and Alain as contrasts. They have very similar themes and designs, so I decided to smooth Alain down into the picture-perfect metal knight while Helena's wilder and asymmetric. I referenced more realistic armour for Alain but overall I wanted to keep his clothes similar.
For Helena, my design style is more practical and thematically I want to avoid Helena baring skin and vulnerability so I extended her corset into more of a chest armour and covered her other thigh. To add to her duality of magic and metal, I gave one arm armour and bared the other to show off magical scars.


August and Altea's designs are where I start to venture off into more vibes-based outfits. August is humble and traditional, a knight with proud loyalty to his Lord and family, so I gave him medieval colours to represent both on his tabard. The armour is still there, but it's less focus on metal and more on "cheaper" materials to serve as a contrast to his timeskip where he becomes a proper knight in shining armour. For that reason, I took away the cape and other unnecessary decoration.
Then Altea is flashy, wealthy, and bright. I kept the focus on light armour, with scalemail as the only obvious protection. I've mentioned before but I took inspiration from south east asian fashion (mostly cambodia and malaysia) as a grounded but ornate basis for her magical girl theme. Here the colour scheme and fabrics are what mostly connects it to the original

Similarly, Lennox is where vibes rule and the overal aesthetic changes quite a bit. He's often described with "choir boy" hair, so I wanted to combine choir robes with ornate priestly outfits to sell him as a vain cult-leader. I kept the symmetry, long coat, and lack of obvious armour, but I wanted him to look less modern and stick with less structured outfits.

One thing specific to the generals, is that I wanted to give them more of a variety to colour palettes to sell that while they're working together, they're not exactly happy about it. While they all have a focus of blue and silver to keep them cohesive, they each have a motif: Alain - silver, Helena - pale blue, Jinhai - brown, Lennox - dark blue, Magnus - turquoise
#love and legends#character design#costume design#whyyy did the image orientation all fuck up??#art#art ref#tutorial#ish#i love doing redesigns#or well converting designs to fit my biases :P
237 notes
·
View notes
Text


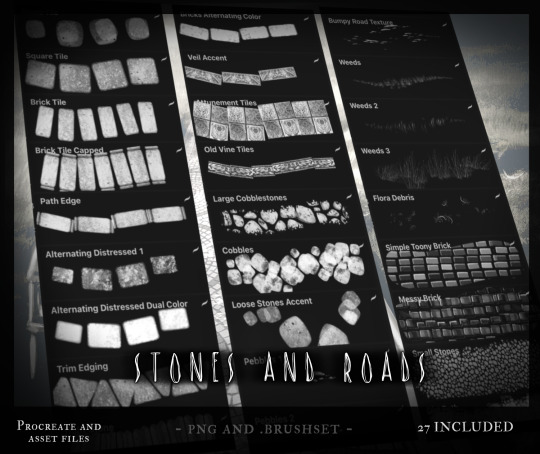


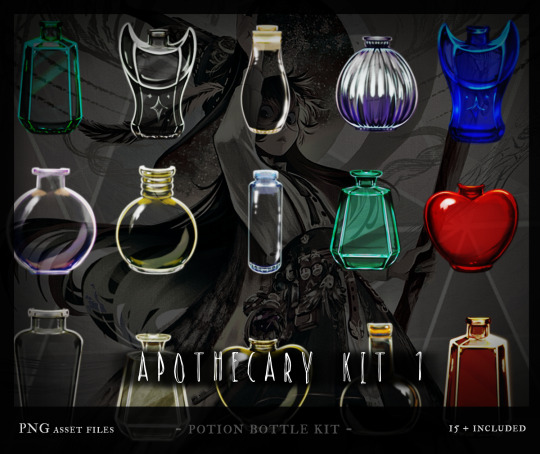

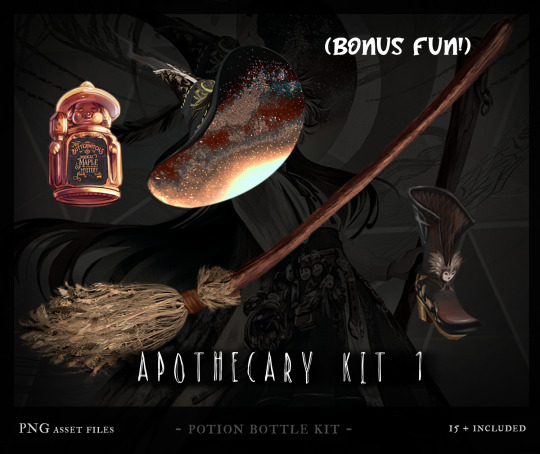
Also, hey, if you're in need of some fun and useful digital brushes, assets and tools, here's a bunch of recent packs made for my Patreon All of my brushes and assets are hand made (and the assets I made are made *with* these hand made brushes) and are available for use to make your own art go by quicker or to bring in some new elements!

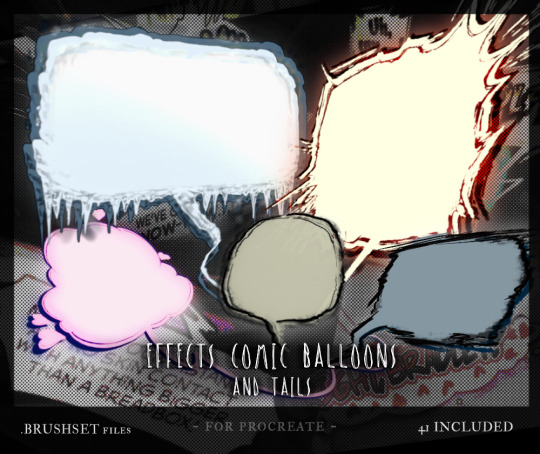
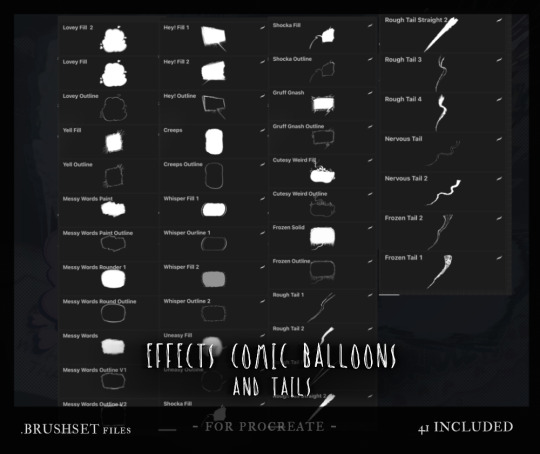


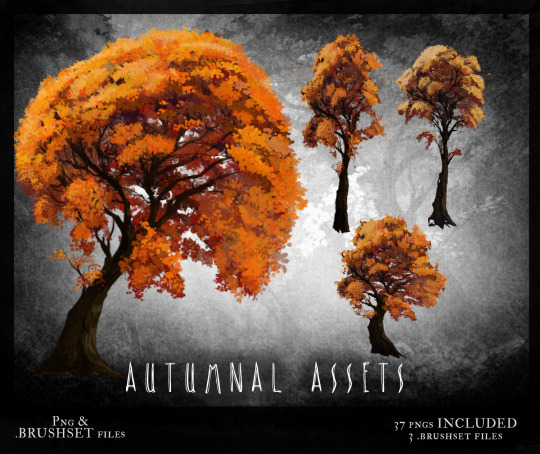

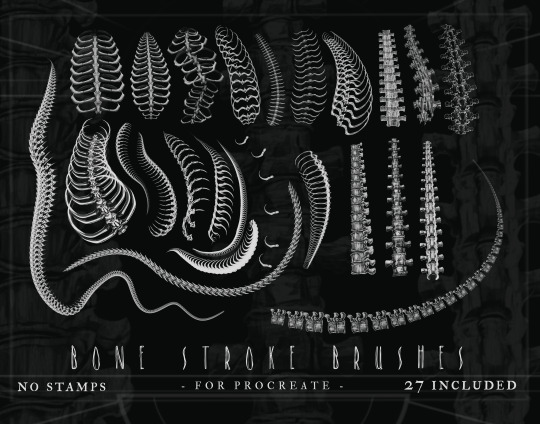
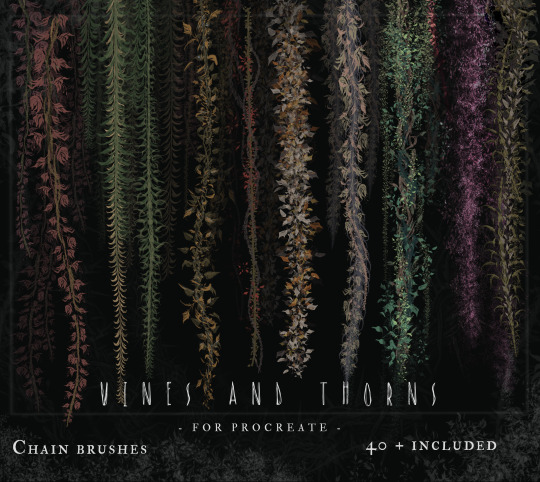
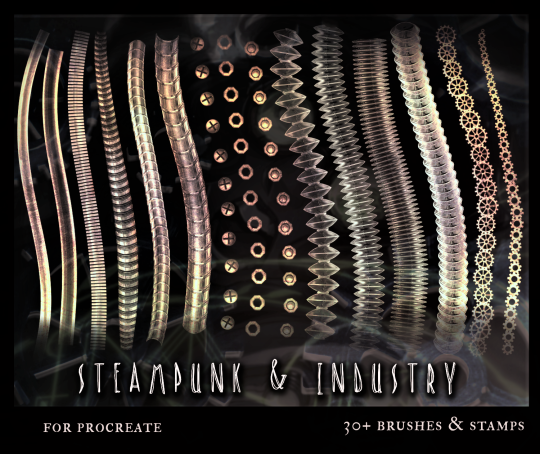

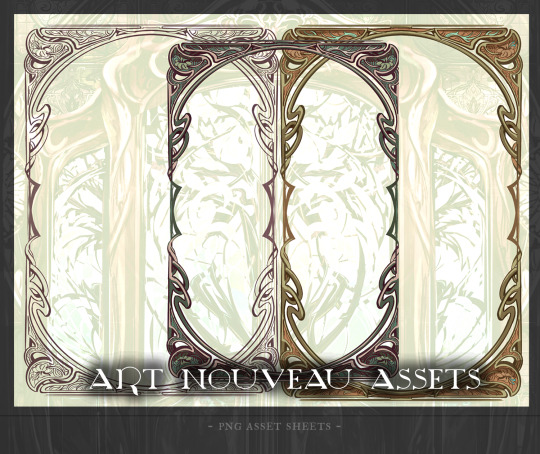

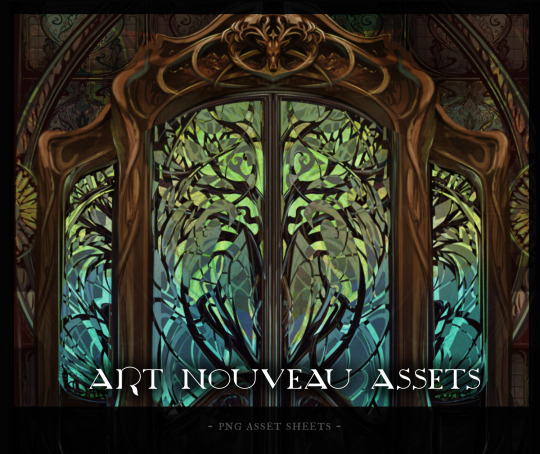
All of these and more are up there. You can grab them and support my art, the production of Solivaga, and the feeding of food here at my✨ Patreon ✨ !
#art resources#artwork#resources#tutorials#useful stuff#autumn#fall#art nouveau#brushes#digital brushes#procreate#png assets#every time I get someone asking how i make the backgrounds in Soli so quickly#I point to these tools and assets I make for myself#make them for me but share them with you#all brushes and assets are fair use without any license except for the costume brushes and assets for my characters
136 notes
·
View notes
Note
Am i allowed to ask how did you make such a majestic Gabriel helmet
Hi, sorry for the late answer, but thank you, and of course!

Disclaimer: most of the times when making cosplays, I just fuck around and find out. Meaning: I won't have templates for most things, exact pictures of the process, or measurements. I included everything I could, and explained everything I can.
Making costumes for me is lots of trial and error, and it still is to this day, as I am by any means NOT a professional. Obviously it'd be easier if I'd invest in sketching things out more and measuring, but that's completely on me.
I hope that nonetheless this somewhat helped, even though it's not a very good "tutorial"...
Please do check out the "Notes:" section at the end of the post for more thoughts, further help, and other stuff!
Tutorial below the line:
𓂃𓂃𓂃𓂃𓂃𓂃𓂃𓂃𓂃𓂃𓂃𓂃𓂃𓂃𓂃𓂃𓂃𓂃𓂃𓂃𓂃𓂃𓂃𓂃𓂃𓂃𓂃𓂃𓂃𓂃𓂃𓂃𓂃𓂃𓂃𓂃𓂃𓂃𓂃
Materials used: ● Paper ● EVA foam ● Pins ● Modeling paste ● Water based prime ● K100 & K40 sandpaper (probably better if you use a mini sander/polisher) ● Hot glue, super glue, white glue ● White and gold acrylic paint ● And of course: scissors, razor blade,

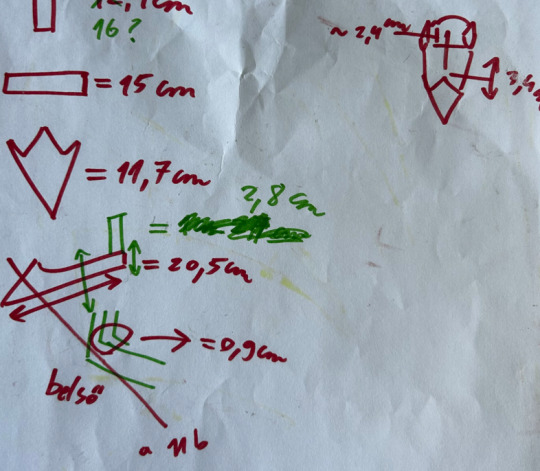
1. Sketching and measuring: One of the first things that is advised to do for anything and everything is to sketch your ideas out. It doesn't have to make sense to other people, if you yourself understand what you're trying to depict. Also make lots of notes, brainstorm, just generally put ideas out so things are more clear for you as you progress. This also includes measuring your head from front, side, and around. When you did, you can then use this very helpful and free template, which you can print out with the measures of your head. Seriously, shoutout to this template, it saved so much time whenever I made most of my masks.
𓂃𓂃𓂃𓂃𓂃𓂃𓂃𓂃𓂃𓂃𓂃𓂃𓂃𓂃𓂃𓂃𓂃𓂃𓂃𓂃𓂃𓂃𓂃𓂃𓂃𓂃𓂃𓂃𓂃𓂃𓂃𓂃𓂃𓂃𓂃𓂃𓂃𓂃
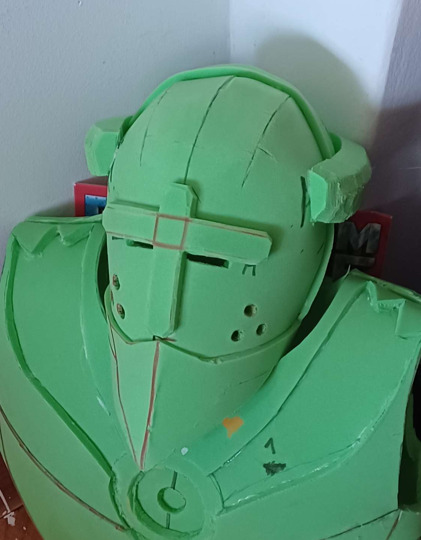
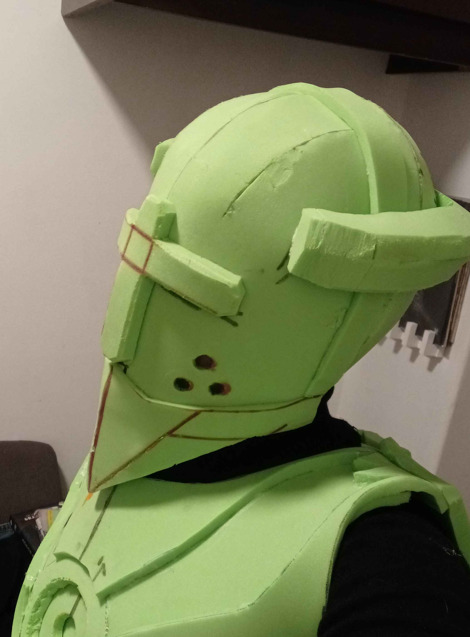
2. Applying the features: The way I put his features on the base template is by using the previous sketches and measurements. But what I do, is I cut them out in paper first, to see if they look good on the base by attaching them on the foam with pins. If it does, I trace it onto the foam, then cut it out a bit longer, to see if by any chance it looks better longer, if not, you can just cut the foam again.
The cross and halo were pretty easy: ● You can just draw a cross and cut it out (if you want to make it "pop out/3D", glue a layer under the shape like how I did in the picture). ● For the halo, it depends on how thick your foam is; ¹you could just cut out three long lines, which are then glued together to make a half circle, then apply it on the head, but I had to do it a bit tricky. Not sure how to explain it exactly, but when I cut a line for the halo, I also had to cut the end a bit "tilted", so I can glue a mini foam triangle shape to it, then cut a line with a tilted cut at the end again, then glued it to the other end of the triangle, and I continued this process as needed. With this, I made a half-circle for the halo. The "beak" is a bit tricky: I had a bit of trouble with this for the first time too, but here is how I did it: ● As you can see on the picture, it's in three seperate parts. The front is a triangle-ish shape with a 'peak' at the bottom of the cross. Under that is another triangle, and then it connects to the part that wraps around the head. ¹: This is because if you just cut out the entire shape of his "beak", and glue it together like that, it'd look like as if he got stung by a bee, because the foam is dense, and it'd pop-out a little. At least for me, it was a reoccuring issue with other parts as well. But again, this depends on the thickness and stretchiness. So tl;dr, you need to make sure that the foam is not "tense", you need to make it "relaxed" by placing multiple parts together to make the desired shape (same case with the base head, halo, etc.). For the cracks in the foam: I used modeling paste to fill those gaps in as much as I could, then used sandpaper to smooth out the edges and excess. For the holes on his cheeks: This is not a recommended idea, as it ruins the foam, but: I literally just grabbed my hot glue gun, and stabbed where the holes would be with the hot tip of it. Not advised, because the foam becomes dense and sticky at that area. It'll also be hard to paint. Mask's vision?: Quote the disclaimer: My peripherial is absolutely terrible in this mask. The front view is okay-ish. What I did for the vision is I cut two thicker lines out of the foam right under the cross, so it's somewhat hidden as well.
𓂃𓂃𓂃𓂃𓂃𓂃𓂃𓂃𓂃𓂃𓂃𓂃𓂃𓂃𓂃𓂃𓂃𓂃𓂃𓂃𓂃𓂃𓂃𓂃𓂃𓂃𓂃𓂃𓂃𓂃𓂃𓂃𓂃𓂃𓂃𓂃𓂃𓂃𓂃
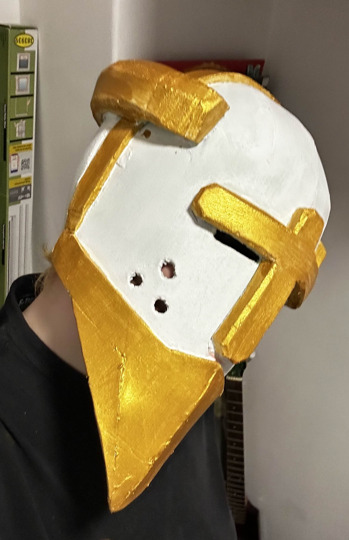

3. Painting and coating: My biggest enemy is the combination of paint and foam. Seriously, I can not begin to explain how much money I have spent on just paint and glue, in attempt for the paint to not chip off, but it still does. (if anyone has better advice for this please let me know!!) Here's what I did so the paint kind of sticks there: Firstly, an advice that I wish I had gotten much, much sooner before starting this project: Coat the area that you want to paint with white glue! This helps so that the paint can stick there longer, and it won't pop-off more easily. You can also try primer, but white glue is better in my opinion, primer just makes it a bit more dense. Then I used a lot of white acrylic paint. If you can just buy white foam, please do so. It'll save so much time and money (and insanity too). I think I had at least 10-15 coats so it looks fully white (the picture is not even the finished one). Note: I don't recommend using spray paint. It dries and chips down faster, also not very stretchy. It's cheaper, easier, but it won't last for long. I unfortunately stumbled into this issue, and it was not a cool thing to see.
I also recommend using a vivid gold color. Previously, I used a more realistic one, but it just looked washed and sad. Give Gabriel some life with that shiny, glittery gold!
𓂃𓂃𓂃𓂃𓂃𓂃𓂃𓂃𓂃𓂃𓂃𓂃𓂃𓂃𓂃𓂃𓂃𓂃𓂃𓂃𓂃𓂃𓂃𓂃𓂃𓂃𓂃𓂃𓂃𓂃𓂃𓂃𓂃𓂃𓂃𓂃𓂃𓂃𓂃

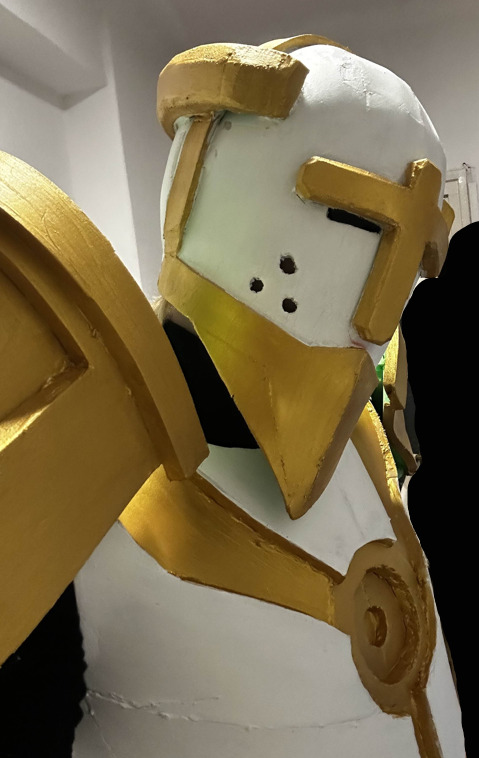
4. After refining edges and making sure that the painting looks nice and sharp, you're done! Again, I hope this somewhat helped. It's a shame that I don't really keep my templates and progress photographed, since it's more just for myself and for fun. I don't really post online anyways.
But, if you have any further questions, or if there's still some confusion, or if something is not exactly clear, let me know!
𓂃𓂃𓂃𓂃𓂃𓂃𓂃𓂃𓂃𓂃𓂃𓂃𓂃𓂃𓂃𓂃𓂃𓂃𓂃𓂃𓂃𓂃𓂃𓂃𓂃𓂃𓂃𓂃𓂃𓂃𓂃𓂃𓂃𓂃𓂃𓂃𓂃𓂃𓂃
Notes: ● I had really thick foam, so I had to manually make it thinner at times. I think foam around 4-5mm. thickness is good for a helmet. The thicker the sturdier; keep that in mind. ○ Again, if you can, please buy foam in the desired colors, so you wouldn't have to deal with a lot of painting. ○ On this topic, breathing is a little hard if the foam is thick, and it also gets warm very quickly. I use a balaclava so my skin doesn't stick to the foam when using it for a long time. If you can endure warmth for a long time, this project especially for you! ● I usually make my helmets smaller in size, so it looks more "accurate". Basically, it's just good for my head, therefore it's not very comfortable. I advise making it a little bigger than your actual head size for comfort. ● The helmet itself took me about 4-8 days max. all-in-all. Unsure about this exactly, because I don't usually look at the time when I make costumes. ● Please be careful with using darker colored sharpies!! It took me a while to hide them with the white paint especially. ● Don't be afraid to put personal creativity into the mask! My previous masked had horns instead of halo, but I just wanted to make this one more accurate. It depends on you! ○ Huge inspiration for the costume was dotflare's Gabriel model, especially for the smaller details. Please check them out, the model is free as well and very beautiful. If you can run blender, it'll help you so much with making the cosplay. ● As mentioned, I usually cut foam a bit longer to see how it'd look. Sometimes, it's actually better than the original measurement, but also, it could save mistakes if the size is not good after-all. ● As mentioned², no spray paints!! It chipped off for me and I thought I was going to cry. However, I'm unsure how spray paint works with white glue covered foam. It could be tried out on a piece of foam, maybe it works. ● Last thought: For the vision: you could try hiding the hole for your eyes with white mesh. ● This post kind of reads like a certain book from Mark Z. Danielewski, which was really not on purpose when I started making this post.
#cosplay#gabriel ultrakill#ultrakill#ultrakill gabriel#gabriel#costume#mask#helmet#help#“tutorial”#my cosplay
30 notes
·
View notes
Text
I'm going to make a cosplay of Jia's ceremonial robe from GxK: The New Empire!

This might be a little difficult, but I have a hand-sewing experiences back from my elementary and high school subject. With little expenses I have, maybe I will start on summer time. Plus, drawings as well.
If you have any suggestions of the designs, you should ask me. I'm all free to answer it.
@gorillageek27 @lionpatriot13 @amethyst-raptor06 @gojigojigojira @geminanvaju @jadewolf-writes @miss-couch-potato @godzillajuniorreborn @kia-ko @mossizi @astraerystarr
#probably it's a little difficult to make#but i watch some tutorials on how to make capes and robes in a hand sewn style#i will try my best#godzilla#jia andrews#kaylee hottle#cosplay#design#costume design#monsterverse#kaiju#godzilla x kong: the new empire#gxk#gxk: the new empire#legendary pictures
24 notes
·
View notes
Text


Hi everyone!
Thought I’d share my pirate costume for a ren faire I went to last year!!
(How I made it below the cut)
I thrifted the white undershirt, which I added some string to at the neckline, to get that lace up look.

The skirt is also thrifted, many sizes too big, so I brought it in at the waist and added pleats to get that volume. I also pinned up one side, and added some other skirts underneath to give it some volume.

The lace up vest is entirely handmade and reversible (quite possibly the best item I’ve ever made, I’m insanely proud of it).

To make it, I altered a pattern for a vintage vest, adding a lining and cropping the front pieces to make space for the ribbon details. I used soda tabs to hold the ribbon. I used five per side, but this can be different depending on how you want the ribbon to sit.
I wrapped a scrap of fabric around my waist and added a thrifted belt with a crochet bag handmade by my best friend. I also added a set of dice in a matching colour, as well as some strings of beads I made from thrifted necklaces and charms from past projects.
To make the hat, I found a cheap costume hat and pinned it to the shape I wanted, then covered it in a nicer fabric, using a lot of pleats to emphasise the shape. I sewed lace around the edges, and tucked some feathers behind a thrifted pin on the side.

The final details were *a lot* of gold jewellery for those pirate vibes, and some dagger earrings I bought at an artist market.
This is a very easy costume to thrift, with the details mostly in the layering and colour scheme. And of course, all that gold jewellery!
As always, feel free to ask questions, and hopefully this helped!!
#cosplay#ren faire#ren faire costume#pirate#pirate cosplay#cosplay tutorial#pirate cosplay tutorial#my cosplay
26 notes
·
View notes
Text
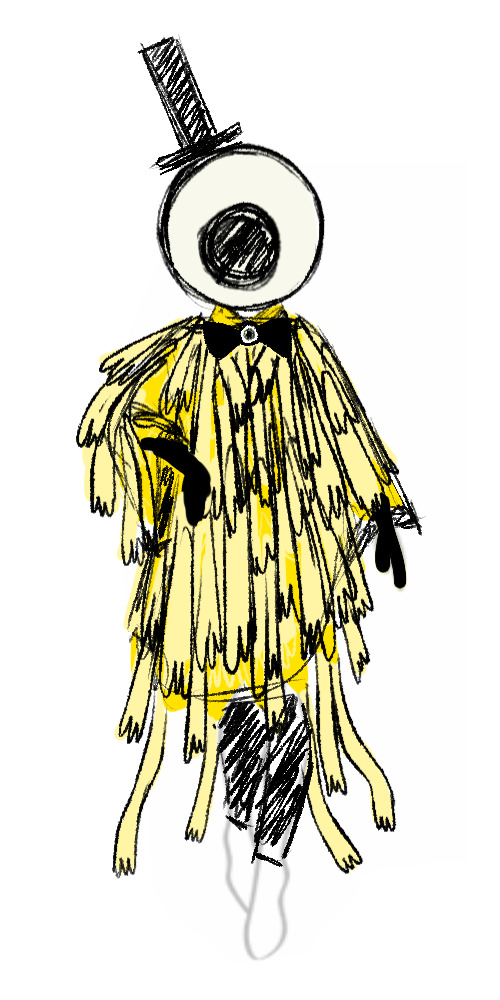
bill cipher deconstructed, a cosplay
#gravity falls#bill cipher#so i changed my mind and im now entering alexs costume contest#aka im making my SISTER enter the contest for me#i already bought the final pieces for my greed cosplay so i dont wanna change my plans now#but i asked my sister and she agreed to wear whatever i make. she will regret those words.#this is a combination of two of my favorite runway looks and is exceedingly derivative jfkldsa#but hey i aint a fashion designer! it doesnt matter if i steal runway designs bc this aint for a runway!! its for nycc babeyyyy!!!#i cannot take too long on this tho bc i NEEEEEED to get a semi functional version of my ford marionette done#and thats gonna be taking most of my time#so this will be a 2 day project at MOST#ive got it all worked out. worlds most slapdash stolen runway look. i can do this.#i just need to buy the craft supplies and then get to work#maybe i can contract my dad to lacquer and spraypaint the eyeball for me....#my sister is so going to regret agreeing to this lol#unless we win in which case neither of us can regret anything#also i did not draw the pose base. i googled 'fashion design base' and chose one from a tutorial. for claritys sake.#fluffle... something#fluffle art#i guess
43 notes
·
View notes
Text
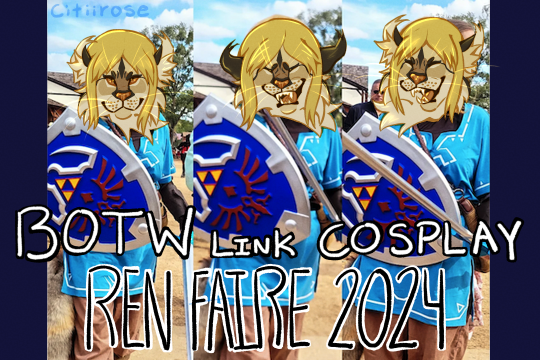
Check out my new video on my YT channel, Citiirose :)
#rose art#my art#thumbnail#art#youtuber#cosplayer#cosplay#costume#tutorial#process#link#loz#legend of zelda#botw#breath of the wild
7 notes
·
View notes
Text


My dredge arm is (nearly) ready for painting. I'm so so so excited to finally have this piece done and over with
Materials used thus far:
Polyfil
Tights
Expanding foam
Foam clay
Pool noodles
Duct tape
Masking tape
Modge podge (glue and adhesive spray)
Liquid latex + toilet paper for texture
If there is any interest for a tutorial I'll do my best to put one together; this is very experimental and if I were to start over I would do it differently.
#dead by daylight#dbd cosplay#the dredge dbd#Cosplay#cosplay wip#cosplay tutorial#my cosplay#diy craft#hand crafted#diy punk#diy cosplay#halloween costumes#halloween cosplay#Dbd#dbd killer
15 notes
·
View notes
Note
hello hello!! hs cosplayer here; was curious to how you pulled off your talald cosplay!! im plannin to do one soon at some point and i wanna atleast know what materials i need for the outfit since im already havin a big bopper in the works!! :o
any help would be appreciated!! thank you in advance,, 🥹✨
Hey there, thanks for the ask! I think one of the great things about Talald’s jester outfit is that the way it’s rendered in her sprites allows for a lot of interpretative freedom towards your fabric choice.

(whoops this post ended up really long)
You can really make it work for your comfort level and budget—for example, I used neoprene for the main body of the dress because I like working with fabrics that do weird structural things, but you could just as easily use a woven cotton with a zipper somewhere in the bodice, or a jersey fabric if you want to make it more like a skater dress.
Regardless of fabric choice though, really stiff iron-on interfacing is probably gonna be one of your best friends. It’s how I got the “shoulder pads” on the tabard to stand up, it gives my purple collar its stiffness, and it keeps the points in the skirt from flopping down past the bottom of the petticoat.
There are a couple of specific fabrics I’d recommend for specific parts of this costume: for the pink under-sleeves, your best bet is a light to medium weight stretch fabric like spandex, stretch velvet (what I used), or cotton jersey. For the purple sleeve petals, you’ll probably want a super light woven fabric so the petals flop around the way they do in her sprites. I like polyester chiffon but I could also see cotton voile working well, or something else that’s really light without any stiffness.
Also, a lot of people ask me how I got the tails to stand out the way they do! I used polyvinyl tubing, thanks to this very helpful video from Vailence the Clown/sugarvail on Tiktok, whose whole page is full of great reference material for clown and circus type cosplay stuff.
I’m planning on making another cosplay detail highlight post soon, so keep an eye out for that too!
#hope this helps! i’m applying this costume to another competition next year but if i get in i might also post my build book here#once the judges no longer need it#until then i’m gonna keep making breakdowns and stuff#don’t have enough footage for tutorials sadly lol#cosplay#my cosplay#vast error#talald hieron#cosplay tips#asks
6 notes
·
View notes
Text
Whew. Been doing other things for a couple months, but I got back to work today, and the Falin cosplay is almost done. I think I just need to detail my boots, put lights in the staff, find a border for the robe and sew it on, and maybe fix the white overshirt (but tbh I'm kind of sick of that thing so maybe I just won't. who knows).
#pickle pontificates#then I gotta try and make armor for my brother... much harder#or at least new territory. idk at least I'll have a tutorial for the armor i guess#my outfit is all from my brain baybee. and the secondhand store#i'm sooooooo unreasonably happy with how it's turning out. and i have literally never made a costume before so it's very heartening
2 notes
·
View notes
Text

happy halloweiner 🎃🦇👻
#digital art#doodle#tunga#im learning blender rn bc 2d art?? aint happenin#im still in the donut tutorial mines so have tricker treating tungas i made in paint 3d#im p sad that i didnt get a chance to get a costume together this year. its my first time as the one handing out candy#i have a lil bat wing head band n i made my cat a costume but still u_u
23 notes
·
View notes
Text
okay i know have new art & archi related projects piling up, but like what if,,
i make a monster high fright song edit with tamon class 1-1's mane six in their halloween costumes...
#eve babbles#yes i do in fact call sakura and his 5 other besties the mane six because they're 6 so#they may not be horses but in my head they very much are#do not @ me on that#also this would entail me having to design costumes for kiryu and tsugeura#but i will take the challenge#this is also entails that i need to edit which is fine ig#yt tutorials save me
3 notes
·
View notes
Text
just found out there’s a regency themed ball in my area on october HRK
#oohhh I wanna go BADLY.#u need to dress up for it and they have costumes for hire but u can bring ur own#see my toxic trait is that I’m delusional enough to believe that I can do anything as long as I follow a tutorial#i AM considering on making the dress myself. no I have no sewing experience but we have a sewing machine.
10 notes
·
View notes
Text
I’m still dumbfounded that over the weekend someone was dead set convinced I copied the work of and stole techniques from another cosplayer on my Ranni cosplay and like when I tried to direct them to where they could see my progress they ignored me and still called me a liar despite there being clear proof that I came up with all of my designs on my own and used my own techniques for everything like. Girlie help. Why are you trying to gotcha me when I’m being polite and showing you exactly what my work was, literally what’s going on here is I’m simply cosplaying the same character as someone else, there’s no rules against that and I’m sorry I guess apparently you’ve never picked up a sewing machine enough to tell the difference between two different skilled craftspeople’s work attempts at cosplaying the same character
#it was an absolutely unhinged moment like this person was internet yelling at me to credit the other person and I’m like well I love their#work too but you see I can’t credit them bc I didn’t use any of their techniques I used my own work in this cosplay#like. have I seen the tutorial video you’re referencing? yes of course! but I didn’t come across it until I was almost done with my own#my own costume. you know. the point where it would be impossible to steal something anyway#it’s just. the gall to insult me so much saying that it’s impossible for me to have come up with all that work by myself#I blocked the person but I’m just hoping they don’t go straight to the other cosplayer they accuse me of stealing from bc not that I’m worri#worried about them thinking I stole her techniques bc it would be painfully obvious if she saw my work that I didn’t steal anything.#I just don’t want her to have to deal with time wasting bullshit lol
10 notes
·
View notes
Text
When ur fam is ok if you’re gay but not if you’re a furry 💀💀
#the girlfriend follow-up question after replying no to the boyfriend question isn’t too surprising#but my aunt being anti-furry was not on the Christmas 2023 bingo 💀#mentioned having friends in my uni’s furry club and she asked me if I was a furry like she was abt to stage an intervention Lmaoo#turns out she stumbled across fursuit making tutorials while making a bowser costume for Halloween#she thinks they like animals and that fursonas are their “alter egos#Christmas#Christmas Eve#family gathering moment#gay#lesbian#lgbt#lgbtq+#furry
3 notes
·
View notes
Text
i am going to become an intimacy coordinator but specifically for cosplayers and their guns
#mochi rambles#mochi cosplay#i guess adding to my List Of Stock Photos to make is just#a rough tutorial on How To Gun#because man cr is bad at it#i understand that percy literally invented the things but like#he should fukken know better#how to bother mochi in .3 seconds: cosplay editon#a) slathering yourself in JUST face paint and deeming that acceptable for fantasy skin make up#or b) holding a gun prop in ways that would certainly AT THE VERY LEAST maim you if it were and irl gun#i am a rootin tootin high femme redneck and i will die on stupid hills for stupid costume hobbies
5 notes
·
View notes