#my first tutorial
Text
Character Sketching Basics (for total beginners)
I've never really made art tutorials, but I do actually semi-routinely teach digital art classes to local kids in my area.
As a result of this, I have also now signed up for a volunteer character sketching workshop for such kids that I am hosting tomorrow.
I figured that since I will have 15 kids there and I can't possibly introduce them to the base concepts one by one, I should make some easy to understand slides that try and teach them the basic thoughts that go behind a good character sketch.
Aaaand I figured I would share them here. They are in danish, but I will translate underneath each pic.
And before any other of the amazing artists on here start pointing out that this is possibly a bit too simplsitic to be a "proper" tutorial - the workshop is for the 11-14 crowd that may have never heard these things before. That's why it's kept as completely simple as possible.
Anyway, here we go:
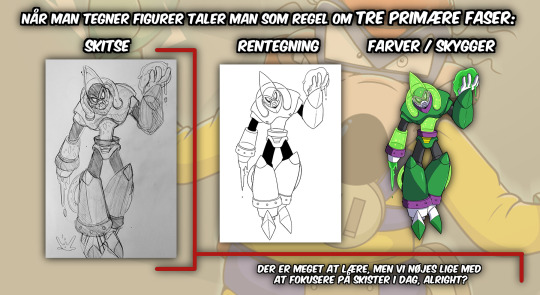
When we draw characters, we usually talk about three pimary stages - Sketch, Inking and Colors/Shading.
That's a lot of stuff to learn, but we'll focus on sketching for today, alright?
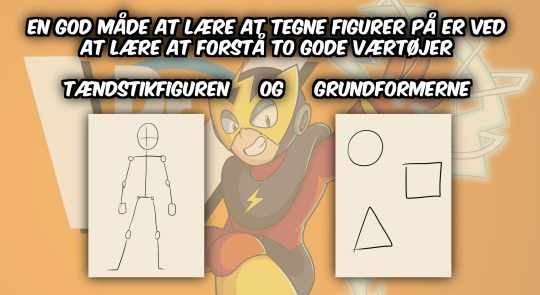
A good way to learn how to draw characters is by learning to understand two great tools - the STICK FIGURE and the BASIC SHAPES.
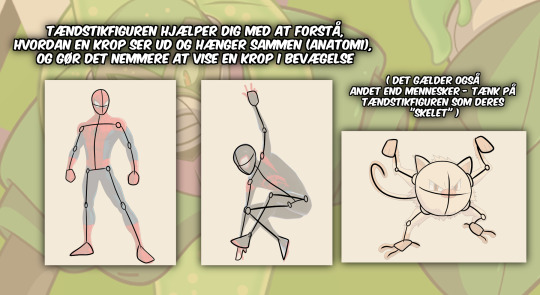
The Stick Figure helps you understand what a body looks like and how it fits together (anatomy), and makes it easier to portray a body in motion.
(This also goes for nonhuman creatures - consider the stick figure their "skeleton")
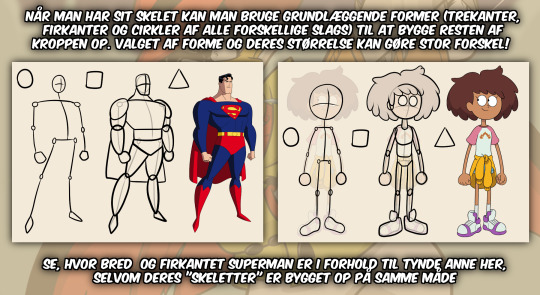
Once you have your skeleton, you can use basic shapes (triangles, squares and circles of all kinds) to build the rest of the body. Your choice of shapes and their sizes can make a massive difference!
Notice, how blocky Superman looks compared to the skinny Anne here, even though their skeletons are built basically the same way.

You can also use basic shapes to create some really unique characters, and maybe even tell us something about their personality at the same time. This is called "shape language". Take a look at how some famous characters use very simple shapes.
The always friendly and happy Mickey Mouse is round and friendly-looking. With just three circles, he became famous worldwide.
The skinny, refined Pearl's body consists primarilly of triangles and long circles - this works really well for a dancer, who is also a bit of a perfectionist. She even carries a spear, which is a pointy weapon that really needs the one wielding it to be precise!
Almost every character in "Phineas and Ferb" consists of simple shapes that make them easy to recognize.
Phineas and Ferbs' heads consist of just a big triangle and two squares respectively. And with Isabelle and Candace, you can even spot a couple of half-circles!

If you learn how to see these shapes and where they are hiding, you can learn to draw almost any character you can imagine - even the ones that look super difficult and complicated.
Shredder here looks almost impossible to draw, but even he has a lot of squares and triangles you can find if you look close enough - and if you drew a solid enough skeleton to start with, so you can tell where certain things are supposed to go on his body.
You also use these techniques to draw harder parts of the body, such as hands. It's really difficult, but it'll come to you with practice.
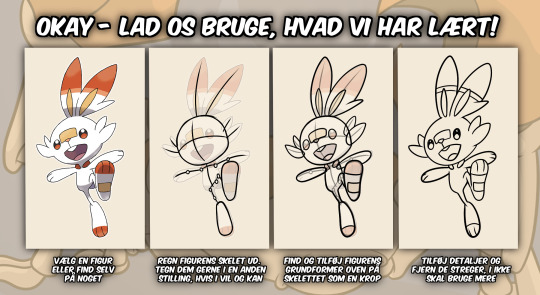
Okay - let's use what we've learned!
Pick a character or make something up yourself.
Figure out the characters' skeleton. Go ahead and draw them in a different pose, if you want and if you feel you can.
Find and add the characters' basic shapes and add them on top of the skeleton to make a body.
Add details and start erasing the lines you no longer need.

A FEW LAST PIECES OF ADVICE
- Draw softly and loosely. It's hard to erase your lines if you pressed down hard on your paper.
- Try not to choose a character that's too complicated to start with. We all gotta start somewhere.
- Don't worry about your sketch looking a little messy. After all, it's just a sketch. All it needs to be is a good starting point for when you ink it later.
- Your sketch does NOT need to look 100% like the original. The important part is that you can spot how their bodies are constructed, and find all their most important traits.
- If there's a part you are having a hard time drawing, take a break and work on something else. Sometimes your brain just needs a little break.
- Ask for help! That's why I'm here!
- Remember to take breaks now and then. It's good for your hands and for your backs.
----
Soooo yeah. That's my tutorial for ABSOLUTE beginner kids. I hope this will land well tomorrow.
#art tutorial#beginner#begginer artist#beginner artists#kids art tutorial#character sketching#sketching#sketches#fanart#guide#how to draw#danish#my first tutorial#god i hope this goes over well and the kids have fun i am always worried that i am being boring#also there are gonne be like 15 kids there i usually only deal with up to 5 help me#superman#pokemon#amphibia#steven universe#tmnt#teenage mutant ninja turtles#mickey mouse#phineas and ferb#disney#dc#nintendo#spiderman#spider-man#miles morales#peter parker
58 notes
·
View notes
Text


+bonus
This Barbie is... Evan Buckley
#be nice this is my first gifset that i made using photopea#and i saw like three tutorials only lmao#evan buckley#evan buck buckley#christopher diaz#buck and chris#911 fox#911 on fox#911 abc#911 on abc#911 edit#911 edits#911edit#my edits#my gifs
3K notes
·
View notes
Text
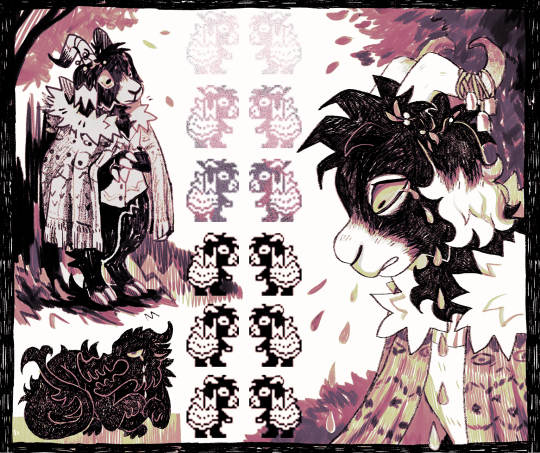
more svanhildr - trying new things, like a brave boy
#my art#anthro#furry#illustration#oc#svanhildr#dysterel#i have so many great brushes i never use for no reason so i'm expanding my horizons and using like 10 brushes instead of 3#and i used the pencil tool for the first time so i could make a sprite of svanhildr#btw don't do pixel art without looking at multiple tutorials first. worst mistake of my life#i think my blobby indeterminate sprite daughter looks great though#also has anyone seen brass eye and if so have you seen when the posh reporter lady is walking to the prison#and she turns to the camera and says something like “i'm going going inside now. like a BAD boy”#anyway it gets me every time and writing brave boy made me remember it
2K notes
·
View notes
Text
youtube
#stylized hair#b3d#blender 3d#my first tutorial#hope it's helpful!#3d character modeling#*technically 3d character modeling* but like... just the hair lol#Youtube
0 notes
Text

Congratulations GemPearl for winning the trafficblr shipping poll!
this is compensation for missing the vote entirely please forgive
year of yuri off to a roar of a start!
#trafficshipping#traffic shipping#hermitshipping#gempearl#pearlgem#life series#geminitay#pearlescentmoon#shiny duo#my art#artists on tumblr#propaganda post#i swear tumblr dunked this in hot oil i promise it didnt look this jpeg-y when i uploaded it#idk what the protocol is for ship tags &whether or not to main tag this. i'll just do it &if 1 person complains I'll remove them#also added alt text. first time doing it. i followed a tutorial but im open to critique & if 1 person complains i'll change it
752 notes
·
View notes
Text
Splatoon 3: Side Order is good, but not great. I still highly recommend it, but if you care about the story, you're going to be disappointed. Quick review: spoilers ahead.
Side Order was the devs experimenting with Splatoon's gameplay loop. The campaign is a rogue-like, and it works amazingly well. Super fun, super challenging, building my deck and fighting through challenges with the stakes of resetting really scratched an itch in my brain. They did a great job with it.
Unfortunately, I feel like priority went to game design rather than story. Much of the mysterious artwork we saw in the first teaser trailer was completely unused; turns out, all of that was just concept art that never made it into the final product. Side Order failed to make me care about what was happening. I don't know why the protagonist had to be Agent 8; it could've been anyone else and the story would've worked the same.
Octo Expansion was the absolute peak of meshing story and gameplay. The campaign's hook is insanely strong; we immediately empathize with Agent 8 because we know from previous lore that octolings like her have been trapped underground for all their lives. We care about her fight to the surface because it's a fundamentally ideological fight for freedom. The plot stuff about Tartar and the Thangs is just nice set dressing; 8's fight for freedom is the real story.
There's none of that in Side Order. I don't particularly care about Marina's metaverse, even if it's tied to Octo Expansion's story. I don't know why Acht is there other than backstory stuff. It really feels like 8 is just told to do something and she does it because she's the protagonist; she has zero personal stakes or motivations in the conflict. This is a story blunder the devs did in Splatoon 3's default campaign––forgetting to give the protagonist a personal reason to fight––that I hoped would be fixed here, but alas.
What makes it worse is that the gameplay and story progression are completely out of sync. I beat the entire game on my third run in 4 hours. With each run, you get up to two keys to potentially unlock bits of story. That means you'll get about one piece of the story every two runs. There are twelve pieces of the story; I got the first and then beat the whole damn game. Now I have to go back and grind to see the remaining story when I've already beaten the final boss and resolved the conflict. I missed the entire story because I never had to reset because I blazed through the gameplay! It's just a real shame that I experienced everything without knowing... why it's happening. The final boss had me asking myself what the hell is going on because I don't know the backstory at all.
Again, I still really recommend. The devs did a great job, but Side Order remains in the shadow of Octo Expansion's incredible success. Like the default singleplayer campaign, there's just a lot of lost story potential here that, while not necessary, would have really elevated this DLC into something amazing.
#long#personal#rant#splatoon#side order#it's a shame too because I got SO FUCKING HYPED at the title drop#when I realized that the entire first 30 minutes of the game was JUST THE OPENING TUTORIAL and they hit you with the music#and the “nintendo presents” and the title drop to a slow mo explosion. I thought “holy shit this is gonna be huge”#alas it wasn't because it turns out i'm better at roguelikes than the devs anticipated so i beat it in 3 hours lol#octo expansion was a cultural reset. it did something to my brain. the entire rising action part of the story; the reveals the twists the#boss fights the upward climb. it was so incredibly hype and just upped the stakes over and over. nothing's come close
582 notes
·
View notes
Text
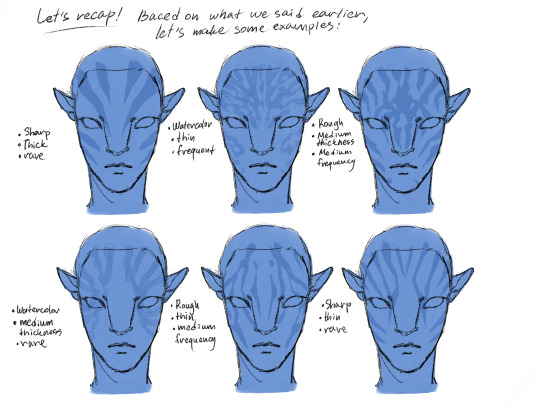
Face stripes for forest Na'vi tutorial
Sooo my friend was struggling with na'vi stripes so I made this whole tutorial so you won't struggle anymore like he was! Excuse me for my english mistakes
Let's start!
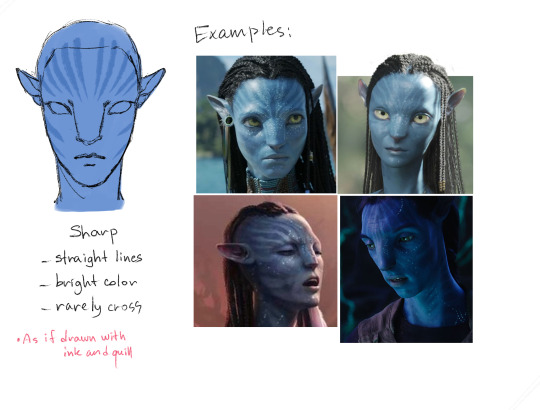
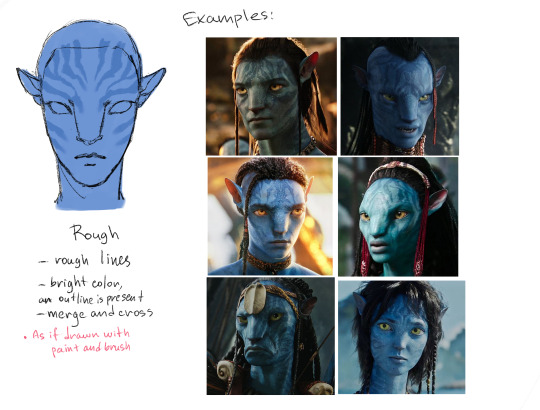
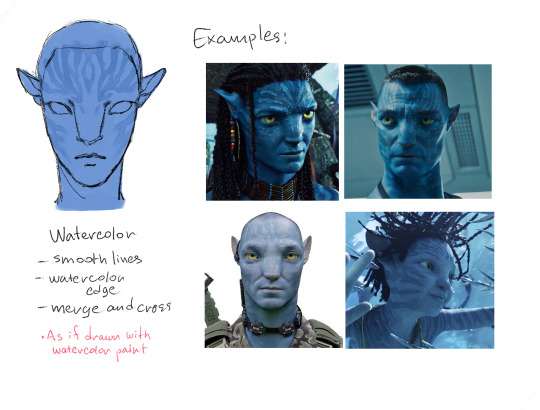
Shape
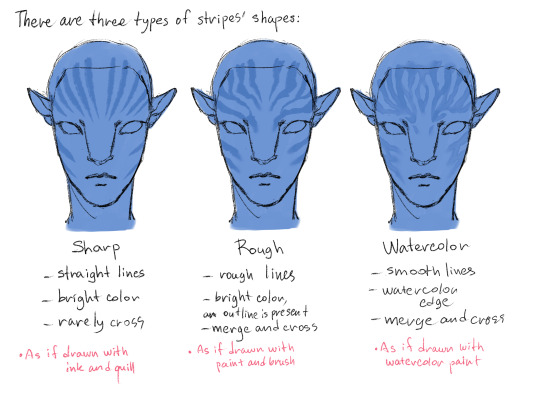
Examples:
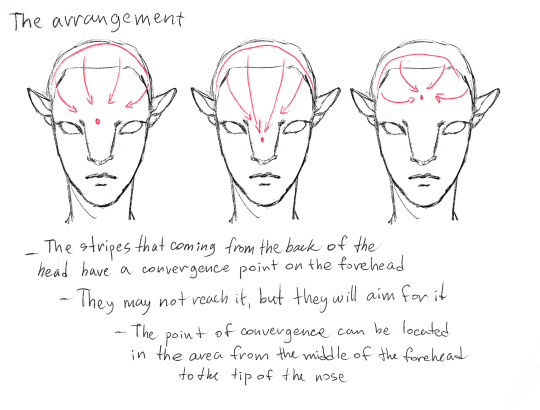
Arrangement

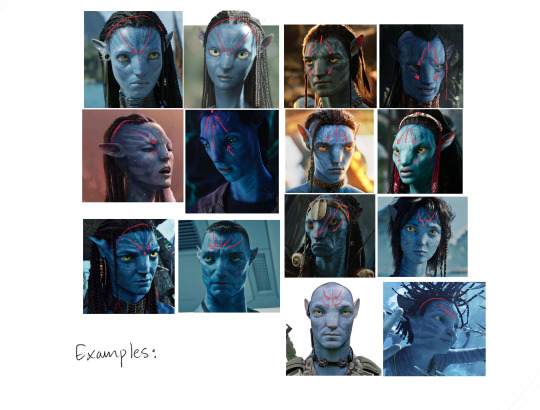
Examples:
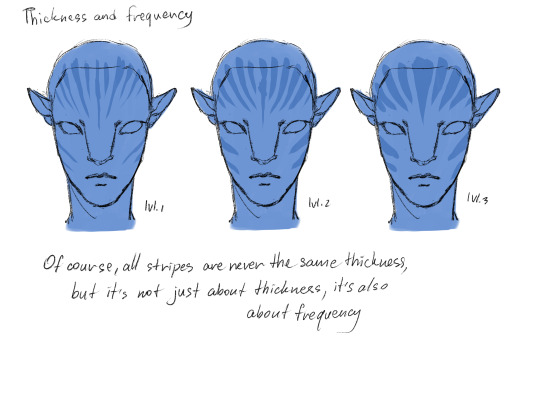
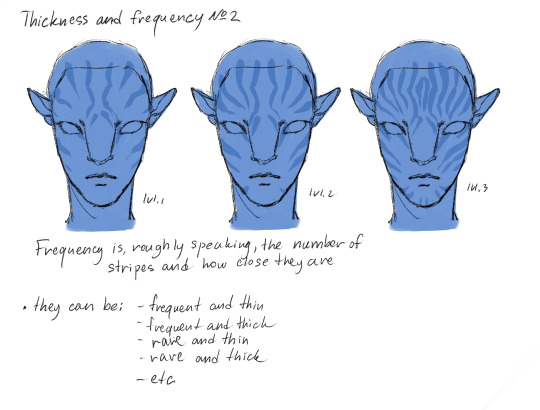
Thickness and frequency
Summary!
Important!
All the described rules are not axiomatic, and the structure of the stripes is very flexible and unpredictable. This tutorial isn’t intended to drive the authors of the OCs in the frame, but only to help those who have problems with this topic
Interesting Facts
Let's finish this short tutorial with a few facts about Na'vi stripes that you need to know:
- The pattern of stripes is independent of genetics. That is to say, nothing, not the shape, not the location, not the thickness, not the frequency is dependent on the parent. It's absolute randomness, just like fingerprints
- The stripes don't have to be perfectly symmetrical
- They can likely change with age as the skin renews itself, but not significantly (examples: Neytiri in the first and second movies; Kiri, who supposedly has stripes identical to Grace's but slightly different)
- The type of stripes on the face aren’t entirely dependent on the stripes on the body. The face, for example, may have frequent stripes, while the body stripes are rare. (Should we expect a tutorial for body stripes?)
- The rough type appears to be the most common, especially among male characters
- The sharp type comes next, but is more common in females (from what I've noticed)
- The watercolor type only appeared in The Way of Water, so we haven’t seen these characters in the first movie, however this type is also valid
Thanks for reading!
#it's my first ever tutorial please be nice(#english is not my first language#art#art tutorial#original characters#character tutorial#avatar#avatar tutorial#avatar fanart
850 notes
·
View notes
Text
curse of the pharaoh
#made my first gif ever#idk why i chose this moment it just spoke to me#dan and phil#phan#gonna make some more gifs and try to understand what coloring is or how you're supposed to do it#if anybody has any good tutorials to recommend lmk!!#mygifs#gifs
193 notes
·
View notes
Text
TRADITIONAL ARTISTS! i wanted to make sure you guys know about erasable pens- not because pencils dont exist but because they ERASE WITH HEAT! so if you do a sketch in purple and ink it over in nice contrasting black so you're sure you got every line, you can hit that puppy with a heat gun for like 10 seconds and the sketch instantly vanishes
rebog to save a life etc 🙏
#art tips#artblr#drawing tutorial#drawing traditional#drawing tips#from ellie#ive been doing this and ive done so many drawings today for the first time in AGES#its so much more gentle on my joints to not scrub it with eraser and it only cost me $2 to get my purple pen
788 notes
·
View notes
Text
Oh my god oh my god oh my god
There's a Vash and Wolfwood dog papercraft
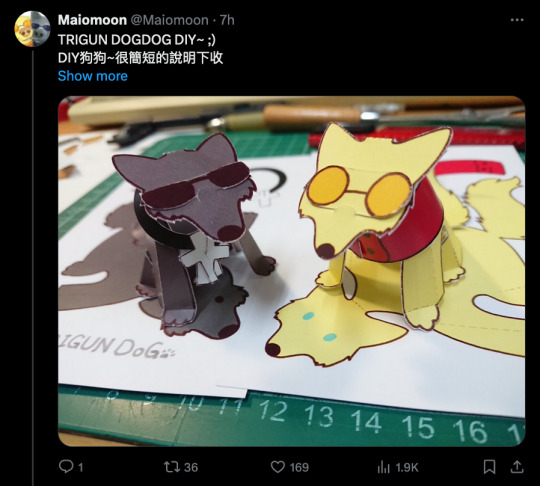
#Trigun#I know that op shows a lot of tools at the beginning of the tutorial#But this is a SUPER basic papercraft if you want to give it a go!#I highly recommend cardstock if you can#But you can get away with it if it's all you got#I don't think regular paper will stand up as well#Matte photo paper would probably be the best but that shit's expensive#I'm going to work on a couple modifications for my version#Either double-sided printing or two layers...#I think the former#Anyway#The moment this awful migraine is gone#I KNOW WHAT I'M DOING#(As it may be apparent I'm a papercraft addict and I'm totally willing to give anyone advice if they need it!)#(I'm still working on the Trigun foxes btw just working Vash and Wolfwood yin yang kitties first)#I LOVE that this is glue-free tbh#I'm so fucking messy at gluing
229 notes
·
View notes
Photo
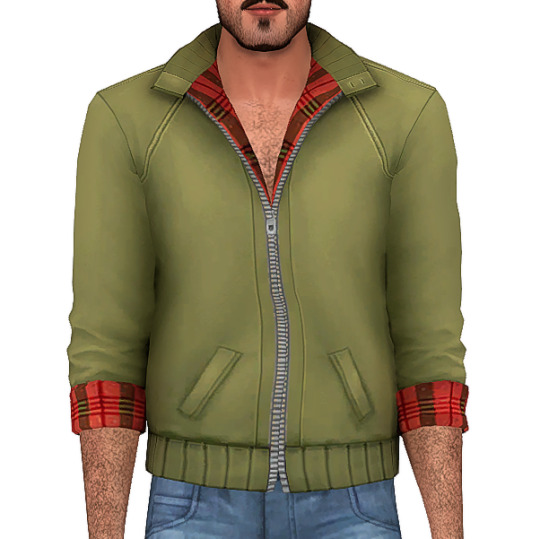
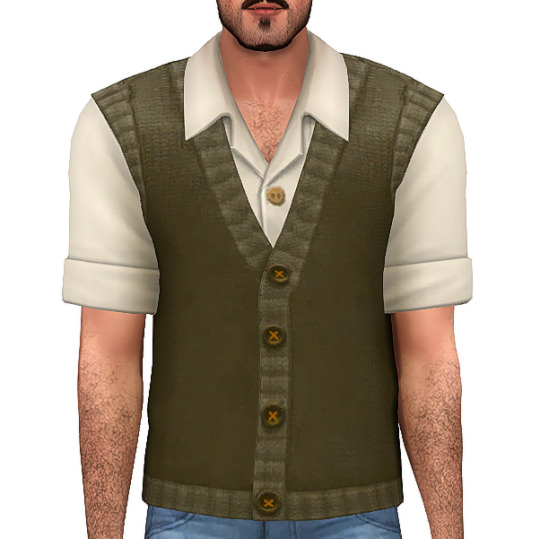


cillian set
harrington jacket: 3 swatches, 4.1k polys
sweater vest: 3 swatches, 4k polys
vest and jacket: 5 swatches, 4.6k polys
flat cap: 16 swatches (credit to fableroot), 2.6k polys
tou: no paywalls or ads, do whatever you want :) if you find issues shoot me an ask on my main blog @buglaur, not this one!!
download simsfileshare (merged or separated)
#ts4#sims 4#ts4cc#please take these off my hands#the more i see them the more i don't wanna post them#and idk why because they turned out pretty good for a first try!!#if there is clipping i'm so sorry 🙏#these were made with no tutorials and a lot of blindly clicking buttons in blender#thanks to everyone who helped me sort out the issues!!#and my testers#sorry for the boring name too i had no idea so i just named it after my guy here
1K notes
·
View notes
Note
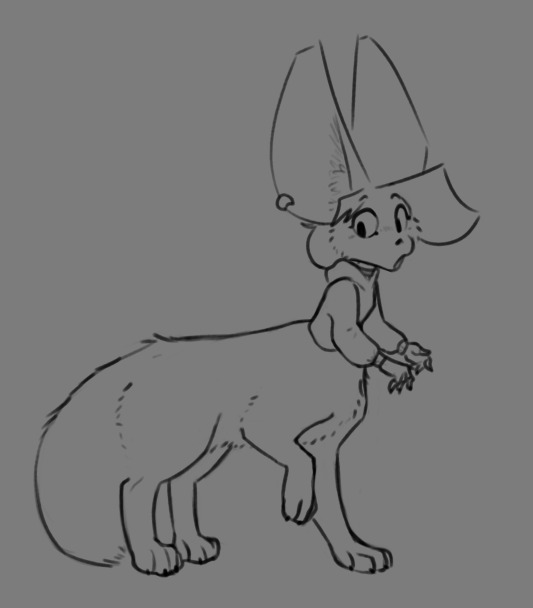
SHAKES YOU how do you draw taurs. i need help i genuinley cant wrap my head around the anatomy of it. optionally i need help with fat taurs but any kind of taur is okay
Ooh, I love these sorta questions!!!
So there are two main things folks usually struggle with when it comes to drawing taurs as a whole. 1, they struggle with quadrupedal anatomy and 2. connecting the humanoid upper body to the quadrupedal lower body. Obviously there's no shame in either of these things, drawing four legged animals, especially if you're more used to the anatomical structure of something more humanoid is quite tough! And finding the sweet spot where humanoid and quadruped meet to make a taur is a bit of a struggle for folks who're still figuring it out.
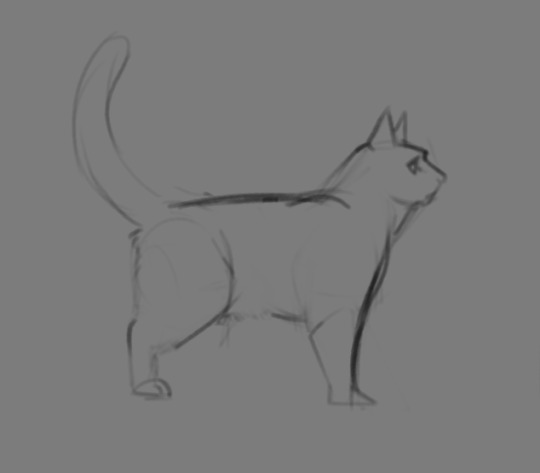
So! The first thing you wanna do really is just familiarize yourself with quadrupedal anatomy. Look at the skeleton of the creature you're trying to taur and see how things like their limbs bend differently or how they're just differently naturally posed as compared to someone who walks upright.
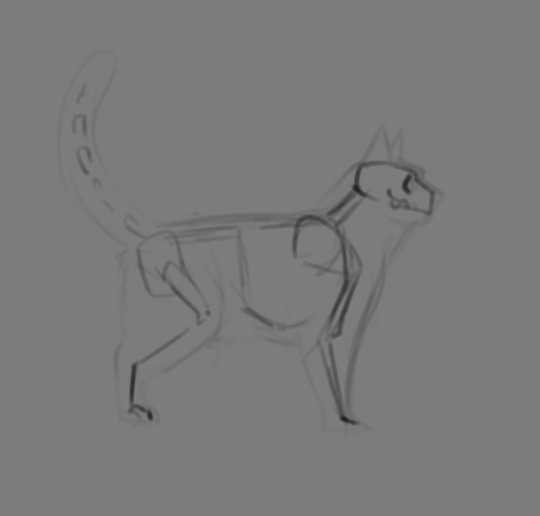
This is a very simplified skeleton of a cat, but you can pretty immediately see how differently everything bends. And I'm not saying it's something you have to perfectly master to know how to draw a taur (especially when you get to drawing fat taurs), but i highly recommend becoming familiar with how a quadrupedal body is structured, the silhouette of most animals is quite misleading! And absolutely use reference!
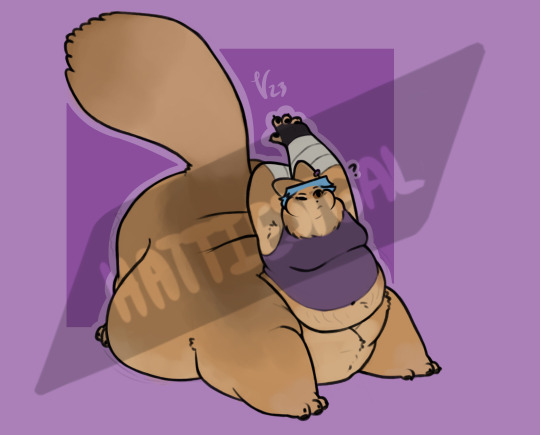
Heck, our first go at drawing taur Riley was super heavily referenced (I'll even share the ref image if anyone is interested!), and this still came out real jank. Practice makes perfect!
As for connecting the upper body to the lower body, this is a little more subjective and up to you, but I'll lay out some general guidelines.

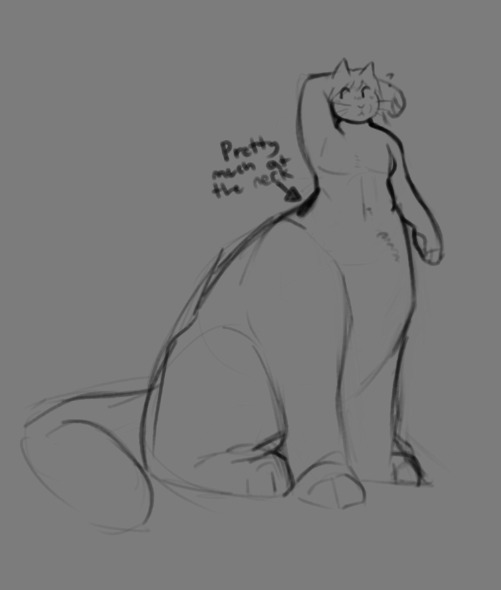
Generally speaking, you wanna put the humanoid torso where the base of the neck is, the front of the torso kinda merging with the rest of the taur body just after the tummy, basically just before the crotch starts.

As for the back, you're gonna want to shoot for just shy of where the butt starts, waist having curved back outwards. It gets a little awkward if you go higher or lower than that. And obviously, you wanna make sure the torso is firmly planted in the center of where the neck should be, ehehe.
That's pretty much the basics though! As always, i recommend looking at how your favorite taur artists draw the creatures and studying off of that! Familiarize yourself with quadrupedal anatomy, and use reference!! You will absolutely get it down with time. I will absolutely cover fat taurs if there's interest in it, and ofc, lemme know if there's anything I missed or need to go over! I hope this helps!
#hat answers#my art#my ocs#Riley Foxglove#design talk#tutorials#taurposting#i imagine this one'll find a much more niche audience but i really do hope its helpful!#these are the two things that definitely gave me grief when i was first figuring out how to Taur#but im sure theres plenty more i missed!#never be afraid to ask about stuff!!!!!!
152 notes
·
View notes
Text
ham sandwich
#my violet trainer during the first encounter tutorial#she’s monster hunter coded#trainer aoi#pokemon scarlet and violet#pokemon sv#pokemon
154 notes
·
View notes
Text
Yay my new friend hobie <33
#watched the movie yesterday finally <333#this is. my first time drawing him and I did this in half an hour and I don’t typically draw Crazily but now I did and I Get It#like. genuinely for half an hour this ain’t bad eh?#gotta learn how to draw wicks properly though which. hmmm I need to find a good tutorial#anyway. I’ll draw him better soon <33#across the spiderverse#hobie brown#spider punk#atsv fanart
371 notes
·
View notes
Note
hi! I ADORE your art sm, and was wondering if you had, like, a ref sheet for zuko? im trying to figure out how to draw him :-)
thank youuu! and i did not have one but lucky for you i’m going Thru It (the artblock) and i’m prAYING that doodling zuko will cure it. i hope u can find this helpful too lol


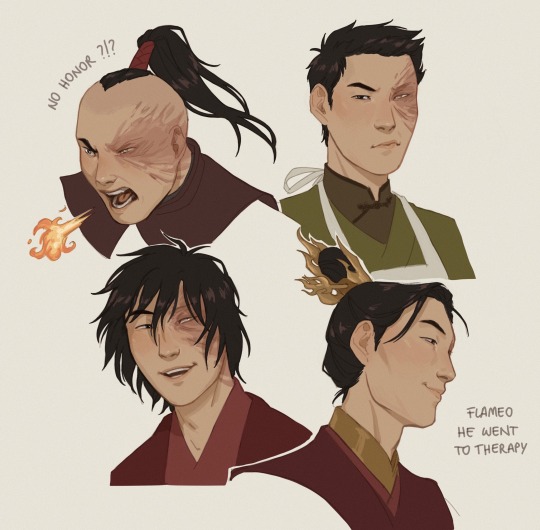
#id in alt text#my son my scrinklo scrimblo my one and only my rotten soldier my sweet cheese#learning the hard way that silly little portraits wit kinda monotonous expressions are my comfort zone hehe#im also working on the clothing tutorial for the other anon it just uhm. might take a bit#trying to break down my art process is DIFFICULT lads idk what i’m doing all of the time i’m serious#zuko#my art#ash replies#ask#also side note. this is the first time i drew ponytail zuko and u know what i take back everything i ever said about that hairstyle#its amazing it’s bold it’s a statement s1 zuko ur a misunderstood fashion icon#ahead of your time
3K notes
·
View notes
Text
learning after effects by. doing whatever this is, apparently
#luo binghe#svsss#scum villian self saving system#scum villains self saving system#incorrect svsss quotes#mxtx#incorrect mxtx#i just did tutorials until i figured out how to edit the curves for keyframes and then was like#'i'll figure the rest out by making a binghe edit'. first of all. you and what content.#and then this took me like. Way too many fucking hours anyway. ...i genuinely don't want to talk about it. learning programs is hard#this was not how i was supposed to be spending my free time this week. oops. learning valuable new tools can be productive.#even if it occurs through creating. this#anwyay i've been thinking about that post + illustration together ever since i saw the image for the first time
246 notes
·
View notes
Last Seen Blogs

gerren623-blog
Gerren Hall

artezza-art
Art's art

nenebewet
Untitled

probatiostudies
a failed attempt at studyblr

soulsdontbreaktheybeeend
My heart in Joker's hands.