#navbar examples
Explore tagged Tumblr posts
Visit Tumblr Blog
Explore Tumblr blogs with no restrictions, modern design and the best experience.
Last Seen Tumblr Blogs


Fun Fact
Hackers stole 65M passwords from Tumblr in 2013.
Text

Awesome Navbar Examples
4 notes
·
View notes
Text

Sticky Navigation Menu
#sticky navigation menu#sticky navbar#codenewbies#html css#html5 css3#css animation examples#webdesign#css#code#html css menu#css menu
5 notes
·
View notes
Text

Navigation Menu Hover Effect
#css menu#css menu hover effects#html css navbar#css navbar#menu html css#html css#divinector#frontenddevelopment#css#html#css3#css animation examples#html css animation#css animation tutorial
0 notes
Text

Best Regards The Solar System Design Analysis https://app.box.com/s/dqbysn55yvzrfnsi77m7fjl2xxeirlqe or https://app.box.com/s/dqbysn55yvzrfnsi77m7fjl2xxeirlqe or https://gerges2022.livejournal.com/255339.html Paper Argument The Current Solar System Description Is Wrong Because It Depends On (5 Wrong Concepts) which are 1 The physicist Supposes The Planets Motions Are Independent From Each Other 2 Planet Formation And Nature (The Major Discussion) 3 Space Nature And Properties 4 The Sun Rays Creation Theory 5 The Solar System History (The Big Bang Concept is Wrong) Paper hypothesis No. (1) The Gravitational Waves Are Produced By The Planets Motions Energies And Not By The Gravitational Field- ALSO - (The Sun Doesn't Produce A Gravitational Field) Planet motion produces energy (1/2 mv^2) and this energy creates waves in the space- and these waves move by its planet velocity- for example- Mercury (47.4 km/s) moves and its motion energy creates waves in the space and these waves move by equal velocity (47.4 km/s)- means- the planets move and their motions create waves in the space and each wave moves by its planet velocity- AND the planets revolve around the sun in the same one direction for that their motions energies create waves in the space and these waves move perpendicular on the revolution direction (Toward Pluto orbit) AND in Pluto orbit these waves are unified together into one unified wave- this unified wave moves by a velocity= 205.8 km/s where The 9 planets velocities total=176 km/s but I add the Earth moon velocity (29.8 km/s) that makes the total to be 205.8 km/s – I add the moon velocity because the energy is stored finally in the moon orbit- This Unified Wave Is The Gravitational Waves –AND- the gravitational waves are reflected three times in the solar system – from Neptune to Saturn (1st reflection) and from Uranus to Jupiter (2nd reflection) and from Venus to Mars (3rd reflection) The gravitational waves reflection causes effects on the planets data because the reflection defines the energy motion direction- Also the gravitational waves reflection causes to square the wave velocity- means- if a gravitational wave velocity is (v) and this wave is reflected- its velocity after the wave reflection will be (v^2) Paper hypothesis No. (2) The Sun Is Not Doing Nuclear Fusion To Produce Its Rays- Instead- The Sun Rays Are Produced By The Gravitational Waves Motions Energies- let's see this article This Is Extraordinary: Gravity Can Create Light, All on Its Own https://www.msn.com/en-us/news/technology/this-is-extraordinary-gravity-can-create-light-all-on-its-own/ar-AA19YL5d?ocid=hpmsn&cvid=620db4352aa943e2b454919a7b724604&ei=83 This new article tells the gravitational waves can move by speed of light and can produce a light beam- I claim The Sun Rays are produced based on this method by the gravitational waves motions energies and not by the sun nuclear fusion process AND Paper 1st hypothesis stated- The Gravitational Waves Are Produced By The Planets Motions Energies- and NOT By The Gravitational Field Shortly the Sun Is Not Doing Nuclear Fusion To Produce Its Rays- Instead- The Sun Rays Are Produced By The Gravitational Waves Motions Energies- AND- The Gravitational Waves Are Produced By The Planets Motions Energies- Means- The Sun Is A Phenomenon Created By The Planets Motions Energies (CONT) Gerges Francis Tawdrous +201022532292 Physics Department- Physics & Mathematics Faculty Peoples' Friendship university of Russia – Moscow Curriculum Vitae https://www.academia.edu/s/b88b0ecb7c E-mail [email protected] [email protected] ORCID https://orcid.org/0000-0002-1041-7147 Facebook https://www.facebook.com/gergis.tawadrous VK https://vk.com/id696655587 Tumblr https://www.tumblr.com/blog/itsgerges Livejournal https://gerges2022.livejournal.com/profile Pocket https://getpocket.com/@646g8dZ0p3aX5Ad1bsTr4d9THjA5p6a5b2fX99zd54g221E4bs76eBdtf6aJw5d0?src=navbar
box https://app.box.com/s/47fwd0gshir636xt0i3wpso8lvvl8vnv Academia https://rudn.academia.edu/GergesTawadrous publications http://vixra.org/author/gerges_francis_tawdrous Slideshare https://www.slideshare.net/Gergesfrancis
#Materials Science#Science#Neutrons#Glass#Space#Materials processing#Materials characterization#Gravity#time#humans are weird#strange#void#gravity#tumblr humor#memes#jokes#funny#haha#dank humor#meme humor#dark humor#humor#lol#ha ha funny#funny shit#funny post#funny stuff#funny memes
20 notes
·
View notes
Note
Since you blocked me even though I already sent this once clearly you don’t actually want to confront anything real - here it is again. Plenty of videos of Lando being sexist including him describing girls he’s been with as ‘it’ ‘the old’ one?’ “the top golf one?’ ‘the nationality one’
Saying ‘if a girl asks about star signs, you get up and leave’
And more, also suggesting ‘you sometimes have to listen to a girl to get a reward (sex)https://www.tumblr.com/fastcarsgovroom/646471312353705984/dont-really-know-what-to-make-of-still-it-but
And it genuinely hurt people as seen here - https://www.reddit.com/r/formula1/comments/ma6iff/i_love_a_sport_that_doesnt_love_me_back/?utm_source=share&utm_medium=mweb3x&utm_name=mweb3xcss&utm_term=1&utm_content=share_button
Let’s not forget him calling the Horner situation ‘off track noise’ and we shouldn’t focus on it
This one where he disagreed with Vettel and the rest of the paddock and said the fans who harassed girls at the grand price shouldn’t be banned - https://ef-1.tumblr.com/post/689751344232464384/this-aint-it-chief-there-was-racial-and-sexual/amp
https://www.essentiallysports.com/f1-news-as-f1-stands-against-inappropriate-behavior-by-fans-lando-norris-faces-immense-backlash-for-problematic-take?utm_source=navbar&utm_campaign=article_share
Ironic you bring you piquet up since Norris also defended him 😂 - https://www.total-motorsport.com/f1-norris-piquet-racial-slur-people-make-mistakes/amp/
There’s literally so much more racist Halloween costumes, weird dms, I could go on and on but I’m sure you’ll weasel your way around it - don’t act high and mighty when none of these drivers are saints Lando is just a horrible as you want to make everyone else out to be
okay, let's go through parts here
1. the misogynistic comments —
i'm still failing to see a concrete video proof, but okay. i don't agree with what he said, and i would definitely feel offended if i got told that. liking a driver ≠ agreeing with everything they say.
seeing as it happened in 2021, almost four years ago, i'd definitely say that lando has grown and matured. it's not an excuse for what he said, keep that in mind. lando has done a lot more that highlights the fact he isn't misogynistic than not.
take it as an example: an interview with brazilian journalist mariana becker. she asked him a question, he said “you're definitely the one who asks the better questions here”, and another journalist from the crowd said he was a liar. lando went on to promptly defend mariana.
2. horner comments —
literally every driver did it lol. doesn't make it any better, but they all did it. plus, it wouldn't be smart — pr wise — to say shit about the rival team's tp, would it?
3. vettel disagreement —
people grow, change and mature. people can change a lot from a year to the other. he wasn't saying he didn't want them banned; he was saying it just shouldn't be for life because people can regret what they did. shocking, right?
again, i would've been slightly more upset at the time, but seeing as he has done a lot more to talk about abuse in the sport with fans amongst themselves and fans with drivers, as well as always broaching the topic of mental health, i'd say he has done more to prove he's not approving of abuse in the sport.
4. piquet comment —
cannot and will not defend him on that one. he was wrong, period.
still doesn't erase the fact he chose to participate in the blm movement when lewis brought it up. cl16 refused to do so, if i'm not mistaken.
but then again, max verstappen and red bull were the ones to take piquet to the paddock in são paulo and break his permanent ban.
5. final thoughts —
all of them are going to do controversial shit. they're rich fucks who don't have much grasp of the real life. that's shitty.
what stands out is the fact he changed. grew. matured. he has done a lot more over the years to prove he's not any of those things than to prove he is.
6. extra bits about lando —
auctioned off his hungary helmet and the money was destined to two charities. auctioned off his pole position award in singapore, which was signed by sir jackie stewart. gives concert tickets to his garage crew. is defined as "humble" by his engineer.
11 notes
·
View notes
Text
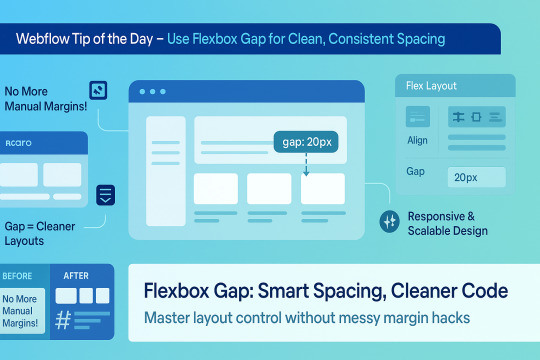
🌟 Webflow Tip of the Day – Use Flexbox Gap for Clean, Consistent Spacing
When building layouts in Webflow using Flexbox, don’t manually add margins between elements. Instead, use the “Gap” property for smarter, scalable, and more elegant spacing.
🔧 How to Use Flex Gap:
Select your Flex container
In the Style Panel → under Layout → enable Flex
Use the Gap field to set uniform spacing (e.g., 20px)
This works both for horizontal and vertical spacing!
✅ Why It’s Better Than Margins:
Maintains consistent spacing across breakpoints
Cleaner code — no messy margin overrides
Easier to manage on large-scale layouts
Improves responsiveness and scalability
💡 Practical Examples:
Equal spacing between buttons in a CTA
Neat rows of cards or feature boxes
Structured menu items in navbars
🔄 Bonus Tip: Use with Grid layout too — Gap is a game-changer there as well!
🚀 Want to build pixel-perfect, responsive Webflow sites like a pro? 📌 Connect With Me:
🌐 Portfolio: www.webflowwork.com 🎯 Upwork: https://bit.ly/4iu6AKd 🎯 Fiverr: https://bit.ly/3EzQxNd
#webflow#freelancewebdeveloper#web design#web development#webflowdesign#webflowexperts#webflowlandingpage#website#nocode#ui ux design#fiverr tutorial#fiverr#freelancing#upwork
0 notes
Text
Building Stunning and Accessible Navigation Menus with ShadCN

Navigation menus are super important in any app or website. They help users find their way around easily. ShadCN makes it easy to create menus that look amazing and work perfectly.
This blog will show you how ShadCN simplifies menu creation. Let’s explore the key design ideas behind ShadCN and provide practical examples to help you build menus that are both user-friendly and visually appealing.
Why ShadCN for Navigation Menus?
ShadCN is a special toolkit that brings together the power of Tailwind CSS and the flexibility of Radix UI. This unique combination makes it the perfect choice for building stunning and user-friendly navigation menus. Here's why:
Effortless Style: ShadCN seamlessly integrates with your existing Tailwind CSS design system. This means your menus will automatically look and feel consistent with the rest of your application, saving you time and effort.
Accessibility Built-In: ShadCN components like dropdowns, sidebars, and tabs are designed with accessibility in mind from the very start. This ensures that everyone, regardless of their abilities, can easily navigate your application.
Easy Customization: Want to tweak the colors, add a unique touch, or make it truly your own? ShadCN gives you the freedom to customize each component to perfectly match your brand's style and personality.
By choosing ShadCN, we're not just building menus; we're creating an exceptional user experience that is both beautiful and accessible.
Step-by-Step Guide to Building Navigation Menus with ShadCN
Here’s how you can get started:
Install ShadCN
npx shadcn-ui@latest init
Create a Sidebar Menu Let’s build a responsive sidebar menu using ShadCN and Tailwind CSS:
//Example Navbar.tsx import { Sidebar } from "shadcn-ui"; export function Navbar() { return ( <Sidebar> <Sidebar.Section> <Sidebar.Item href="/dashboard">Dashboard</Sidebar.Item> <Sidebar.Item href="/profile">Profile</Sidebar.Item> <Sidebar.Item href="/settings">Settings</Sidebar.Item> </Sidebar.Section> </Sidebar> ); }
Add a Dropdown Menu Use dropdown menus for nested navigation options:
import { Dropdown } from "shadcn-ui"; export function UserMenu() { return ( <Dropdown> <Dropdown.Trigger> <button>User Menu</button> </Dropdown.Trigger> <Dropdown.Content> <Dropdown.Item href="/profile">Profile</Dropdown.Item>{" "} <Dropdown.Item href="/logout">Logout</Dropdown.Item> </Dropdown.Content> </Dropdown> ); }
Role-Based Navigation with Conditional Rendering Implement dynamic menus based on user roles using conditional rendering:
import { Sidebar } from "shadcn-ui"; export function RoleBasedSidebar({ role }: { role: string }) { const menuItems = { admin: [ { label: "Dashboard", href: "/admin/dashboard" }, { label: "Manage Users", href: "/admin/users" }, ], user: [ { label: "Dashboard", href: "/user/dashboard" }, { label: "My Profile", href: "/user/profile" }, ], }; return ( <Sidebar> <Sidebar.Section > {menuItems[role]?.map((item) => ( <Sidebar.Item key={item.href) href = { item.href } > { item.label } </Sidebar.Item> ))} </Sidebar.Section > </Sidebar > ); }
Enhancing Accessibility in Navigation Menus
ShadCN ensures accessibility by default, but here’s how you can take it further:
Use ARIA roles like role="navigation" for the main menu container.
Add aria-current="page" for active menu items to improve screen reader support.
Use keyboard navigation to ensure menus are operable without a mouse.
Key Benefits of Using ShadCN for Menus
Ease of Use: Pre-built components save time and effort. Customizability: Modify styles and behaviors to fit your brand. Accessibility: Fully ARIA-compliant for a better user experience.
Common Challenges and How to Overcome Them
Responsive Design: Ensure menus adapt seamlessly to different screen sizes using Tailwind’s responsive utilities. Deep Navigation Hierarchies: Use nested menus or breadcrumbs for better usability.
Conclusion
ShadCN is a game-changer for building navigation menus, offering a seamless blend of design, functionality, and accessibility. Whether you're creating a simple dropdown or a complex sidebar, ShadCN’s components empower you to craft intuitive navigation experiences effortlessly.
0 notes
Text
ARTG 476 Blog Post #4 Self Audit
What is your domain name?
I haven't fully committed to a domain name but I have been doin some thinking. My number one idea for my e-portfolios domain name is www.Katinatryonart.com.
What Platform do you plan on using, and why?
I want to try Adobe Portfolio. I've never used this platform before but from examples it looks like it can achieve the look and feel I want in my e-portfolio.
Main Navbar Links
Illustrations
Projects
About
Shop
Project I will show in my e-portfolio


0 notes
Text
Moving eBooks from Calibre to your Mobile Device
Woohoo, you've got your Calibre Library (or Libraries) set up and now you want to be able to access all those lovely, lovely ebooks on your phone/tablet/eReader of choice.
Well, there are a couple of ways to do that. The most straightforward method is the Send to Device option available in the Calibre User Interface. A more fun method, but takes a bit of setup, is the web interface for the Calibre web server. With the web server active, all your libraries are available to access on your local internet via : (Ex: 192.168.1.55:7070) as the url for your web browser.
Let's go with method number one first. The Send to Device method. You'll want to use this most especially for eReaders that are geared specifically towards ebooks and nothing else, like Kindle e-Ink devices. But it works for pretty much any phone/tablet/eReader device regardless.
Admittedly, I've only experience with one type of e-ink device thus far (and oh has the e-Ink screen been so much easier on my eyes to read) but it's stripped down interface has such a bare-bones browser that there's really very little it is capable of in that regard. Attempting to interface with the Calibre's web server is pretty impossible in this case, so Send to Device is really the only way for Calibre to get my fanfic library onto this particular device. Thankfully it's super easy to use.
First, plug in your device to your computer and make sure it registers. Some newer devices are particularly difficult about what cords you use (my Kindle, for example, only connects to my laptop for data + charging with a usb-c to usc-c cord, regular usb to usb-c cords only allow for charging) so you'll have to figure that part out for yourself. But once you can verify your device has registered to your computer as an external file system, it's time to head over to Calibre.
Make sure you've got the right library open and find the book (or books) you want to move onto your eReader. Select the book, or books, and then right click the selected entry (or entries). This will bring up a menu that includes Send to Device as the option second from the top. Selecting that option should, in turn, open a flyout menu when hovered on. If your device is compatible with Calibre - which most are, so long as you keep Calibre updated relatively often - it will have been detected already. Along with any memory cards it might have. From there it's pretty straight forward. Select where you want to send the book - if you have multiple eBook formats available, you can choose which format of the book to use - and it will either start a new job copying the book to your device or it will ask you if you want to allow formatting the book first before copying the book over. The formatting option should only pop up if the selected format isn't one the eReader device can utilize.
The overall process of using Send to Device is a lot easier than hunting through the folders of your computer for specific book files and helps better ensure that the end result will actually be readable when you disconnect your eReader device and pull up the book.
Now for the somewhat more complicated, but far more fun option. The Web Server.
You'll want to head over to the Calibre Preferences option in the top navbar and launch the Preferences modal. In the row second from the bottom, labeled Sharing, is an option with a server icon titled "Sharing over the net". You'll want to select that option.
You should now see the "Sharing over the net" modal, which has five tabbed pages available. Let's concern ourselves with the main tab first, but I'll touch on all five of them before we're done.
First you may want to adjust the port number - 8080 is something of a default port for listening to http requests on, so if you're running multiple servers then switching to something less commonly used would be a good idea.
If multiple people are going to be using your calibre libraries through the web interface, then the check to require a username and password would be useful to restrict privileges such as write access for editing metadata through the web-ui or which libraries you want to make available to certain users, which is good if you want to say restrict libraries your kids have access to or what books are available for any visitors to read. It's also a good safety practice to make in case you decide to go a step further than I have and figure out how to make your Calibre libraries accessible outside your home network.
If you want the Calibre to start the server automatically when the application is started, there's also a checkbox for that. But if you want it to run whenever the computer is active, then you'll want to select the button labeled "Start calibre when the computer is started" in addition to the "Run server automatically when calibre starts" checkbox.
If you've selected the option for requiring usernames/passwords, then before you start the server you'll want to actually add those user accounts.
Let's head over the the second tab now - User accounts. Once there, you'll see that you can add and remove users as well as choose their restrictions.
First, you'll want to create your account. Click the Add user button and then in the dialog modal it opens, fill in the username and password you want for your account, then click the OK button.
By default all new users are granted write access (metadata editing) and access to all libraries. For your personal account, that's great. But for a Guest account maybe not so much.
If you create a guest account, then it's easy to remove write access by selecting the user and then unchecking the "Allow to make changes" checkbox. You can change the library restrictions by clicking the Restrict the libraries can access" button.
A second modal will open for adjusting the restrictions. It's set up initially by allowing access to all libraries, but there is a select at the top of the modal where you can change that select to either "Only the specified libraries" or "All except the specified libraries" depending on how you want to set the restrictions. However, you can restrict the books available within the libraries themselves using a regex expression (search expression) so that if there are certain books you don't want available to guests within a library you're otherwise fine with guests having access to, you can make those restrictions. These search expressions are the same ones you'd utilize in the main list of an open library, so you could create a tag for restricted books (as an example) and then use that tag to restrict those books from view in otherwise available libraries. (Another example would be restricting based on fanfic rating.)
Once your users and their associated restrictions are set up, let's check out the Advanced tab next. If you make your library available outside your local network, you'll want to check out these settings in more detail as a lot of them relate to error logging and increased security settings to prevent anyone from breaking into your user accounts and screwing up your metadata. However, even if you're keeping the server local only, you might want to change defaults for the book list mode - I tend to prefer the details_list option over the default selection cover_grid. You can always play with these settings again later, though, and restart the server to see what the differences are.
Over on the Book list template tab, you can adjust the html used to populate the custom list option utilized by the book list mode, which is one of the options available over on the Advanced tab.
I haven't really done much examination of the Search the internet tab's features, but the gist of it is that you can add URLs your content server can search for books and author data. I'd assume that this would allow Calibre to take you to Goodreads pages or other Calibre instances if set up correctly, but it's not something I've investigated as of yet so I'm not entirely certain.
Alright, let's head back to the Main tab and hit the Start server button. Beneath that button it should give you the information you need to reach the web interface via browser - the ip address and port - you'll want to head over to your browser with this information and put in the url bar the : (IE: 192.168.1.25:8080) and hit enter. If everything was set up correctly, the server is running, and you've input the correct ip address and port number combo, then you should land on your Calibre UX. If you required a username and password, then you'll need to input those first before landing on the main page.
Congratulations, you've got all those libraries and books available on your local internet now for every computer, tablet, and phone in your house. You can either read in the browser itself or download an eBook and load it up in your preferred eReader application.
#kitkatt0430 explains#calibre#ficArchiving#personally i prefer calibre's included eReader for the computer over the web interface when I read on my computer#it does a better job of remembering my place when I need to close the book for whatever reason#but the web interface is great for downloading stuff onto my phone or tablet
1 note
·
View note
Text
Bootstrap in WordPress: Setup, Themes, Pros & Cons, and Alternatives
Web development keeps to conform, with responsive layout emerging because the gold trendy for web sites. At the leading edge of this movement is Bootstrap, a effective the front-give up framework. Paired with WordPress, the sector’s maximum famous content cloth control device (CMS), Bootstrap offers developers a streamlined technique to constructing responsive, netherland rdp at&t vps residential rdp cell-first web sites.
This manual explores the whole thing you want to realize approximately the use of Bootstrap in WordPress, from setup and issues to pros, cons, and alternatives. Throughout the blog, we’ll also display how tools like Netherlands RDP, AT&T VPS, and Residential RDP can enhance the improvement, finding out, and website hosting system.
What is Bootstrap?
Bootstrap is a front-give up framework that simplifies net improvement. Created thru Twitter in 2011, Bootstrap has grown into a comprehensive toolkit with pre-designed CSS lessons, responsive grid structures, JavaScript plugins, and reusable UI additives.
Why is Bootstrap Important?
The primary motive for Bootstrap’s popularity lies in its functionality to create websites which are responsive, mobile-first-class, and visually attractive. Integrating Bootstrap with WordPress permits developers to:
Rapidly prototype responsive websites.
Create visually cohesive difficulty topics.
Optimize consumer revel in throughout devices.
Use Cases for Bootstrap and WordPress
Bootstrap’s flexibility makes it quality for a number of WordPress tasks, including:
Business web sites.
Portfolios.
E-commerce systems.
Blogs.
While working on those use cases, gadget like Netherlands RDP can offer a stable, remote surroundings for trying out usual performance globally. Similarly, an AT&T VPS ensures that the hosted internet site on line runs seamlessly underneath heavy site traffic.
Why Use WordPress with Bootstrap?
WordPress and Bootstrap together provide the exceptional of each worlds. WordPress manages the backend, at the identical time as Bootstrap handles the the front-quit layout, ensuring a seamless workflow.
Advantages of Combining WordPress with Bootstrap
Rapid Development: Pre-designed additives reduce coding.
Responsive Design: Ensures a regular person experience at some stage in devices.
Customizable Themes: Easy to regulate with Bootstrap’s grid and software instructions.
Community Support: Both systems boast widespread communities for troubleshooting and assets.
For builders operating remotely, a Residential RDP allows brief get right of entry to to files and servers, making sure paintings continuity.
How to Set Up Bootstrap in WordPress
Setting up Bootstrap in WordPress involves three essential steps: including Bootstrap, customizing the subject matter, and trying out responsiveness.
Step 1: Adding Bootstrap
Bootstrap may be introduced the use of:
CDN: Quick and lightweight.
Local Files: Provides extra manage however requires net web hosting Bootstrap documents in your server.
Here’s an instance of together with Bootstrap via CDN on your functions.Php report: -\code\- function add_bootstrap_to_theme() { wp_enqueue_style('bootstrap-css', 'https://cdn.jsdelivr.net/npm/[email protected]/dist/css/bootstrap.min.css'); wp_enqueue_script('bootstrap-js', 'https://cdn.jsdelivr.net/npm/[email protected]/dist/js/bootstrap.bundle.min.js', array('jquery'), null, true); } add_action('wp_enqueue_scripts', 'add_bootstrap_to_theme');
Testing the mixing the usage of Netherlands RDP permits make certain the scripts load efficiently for the duration of numerous networks.
Step 2: Customizing Your Theme
Bootstrap calls for modifications to the WordPress situation count number documents, along with header.Php, footer.Php, and index.Php. Add Bootstrap instructions to factors like menus, buttons, and paperwork.
Bootstrap Navbar Example
Here’s a clean Bootstrap navbar in your WordPress theme:
<nav class="navbar navbar-expand-lg navbar-light bg-light"> <a class="navbar-brand" href="#">Site Name</a> <button class="navbar-toggler" type="button" data-bs-toggle="collapse" data-bs-target="#navbarNav"> <span class="navbar-toggler-icon"></span> </button> <div class="collapse navbar-collapse" id="navbarNav"> <ul class="navbar-nav"> <li class="nav-item"><a class="nav-link" href="#">Home</a></li> <li class="nav-item"><a class="nav-link" href="#">About</a></li> </ul> </div> </nav>
Tools like Residential RDP can be used to test the ones adjustments for the duration of numerous devices with out disrupting neighborhood environments.
Step 3: Testing Responsiveness
Bootstrap’s grid tool is the coronary heart of its responsive layout. Create layouts that adapt to unique display sizes:
<div class="container"> <div class="row"> <div class="col-md-6">Left Column</div> <div class="col-md-6">Right Column</div> </div> </div>
Testing on an AT&T VPS ensures your website performs properly under awesome situations, collectively with low bandwidth or immoderate traffic.
Top WordPress Themes Built with Bootstrap
Several WordPress subjects leverage Bootstrap’s skills. Here are a few famous alternatives:
Shapely
Features: A one-web page layout suitable for portfolios and corporation internet websites.
Ideal For: Showcasing awesome snap shots or merchandise.
Use Case: Hosting on AT&T VPS guarantees speedy loading instances for photo-heavy pages.
Sparkling
Features: Minimalist format with a focal point on clarity.
Ideal For: Blogs and private web web sites.
Testing: Use Netherlands RDP to assess international net page overall performance.
Newspaper
Features: A modern-day difficulty designed for content material-heavy web sites.
Ideal For: Online magazines or records blogs.
Advantages: Pairing this with Residential RDP ensures seamless a long way flung updates.
Pros of Using Bootstrap in WordPress
Responsiveness
Bootstrap guarantees your internet site is cellular-first, providing fantastic usability in the course of gadgets. Test the responsive features the use of Netherlands RDP to validate global overall performance.
Customization Options
With pre-designed additives and grid structures, Bootstrap permits countless customization. Accessing those files remotely thru Residential RDP guarantees consolation.
Developer Efficiency
Using Bootstrap minimizes the time spent on repetitive coding obligations. Hosting on an AT&T VPS similarly hurries up improvement with quick loading environments.
Cons of Using Bootstrap in WordPress
Learning Curve
Beginners may additionally find Bootstrap’s application instructions overwhelming. Using Residential RDP for committed studying durations can assist decrease downtime.
Code Overhead
Bootstrap consists of capabilities that might not be used, which includes unnecessary bulk. Testing load times on an AT&T VPS can spotlight regions for optimization.
Limited Originality
Websites constructed with Bootstrap on occasion appearance comparable. Customizing designs on Netherlands RDP ensures a completely unique appearance.
Alternatives to Bootstrap for WordPress
While Bootstrap is strong, a few developers select different frameworks. Here are tremendous alternatives:
Tailwind CSS
A software-first CSS framework that gives flexibility with out Bootstrap’s bulk. Test its integration with WordPress the usage of Residential RDP.
Foundation through Zurb
Known for advanced responsiveness and accessibility functions. Hosting it on an AT&T VPS affords fast net web page masses.
Bulma
A lightweight framework with a simple syntax. Use Netherlands RDP to test its basic performance in splendid regions.
RDP and VPS in Bootstrap Development
Netherlands RDP for Global Testing
Testing your WordPress internet web site via Netherlands RDP ensures compatibility throughout particular areas and net situations.
AT&T VPS for Hosting
Using an AT&T VPS provides immoderate-tempo website hosting, decreasing downtime and making sure clean average performance for Bootstrap-powered web sites.
Residential RDP for Remote Work
A Residential RDP lets in developers to paintings securely on their WordPress tasks, even on public networks.
…Conclusion…
Bootstrap and WordPress are a dynamic duo for growing responsive, feature-rich internet websites. By leveraging tools like Netherlands RDP, AT&T VPS, and Residential RDP, developers can streamline their workflow, take a look at successfully, and host effectively.
Whether you pick Bootstrap or explore alternatives like Tailwind CSS or Foundation, the essential thing to fulfillment lies in adapting the device and technology for your specific wishes. With the proper setup and assets, you may construct a internet site that not best meets man or woman expectations however exceeds them.
0 notes
Text

Awesome CSS Menu Hover Effects
#codingflicks#html css#frontend#css#html#css3#frontenddevelopment#css animation examples#css navbar#css menu hover animation#css menu hover effects#css menu hover#html css animation#css animation tutorial#animation css
3 notes
·
View notes
Text
Bootstrap 5: A Comprehensive Guide for Web Developers

Introduction:
Bootstrap is a popular front-end framework that simplifies the process of building responsive and visually appealing websites. With its pre-built components, grid system, and utility classes, Bootstrap offers a robust toolkit for developers of all levels. In this guide, we’ll explore the key features of Bootstrap 5 and provide practical examples to help you get started.
Core Concepts
Grid System: Bootstrap’s grid system is highly flexible and responsive. It uses containers, rows, and columns to create layouts that adapt to different screen sizes.
Components: Bootstrap offers a wide range of pre-designed components, including buttons, forms, navigation menus, alerts, and more. These components are fully customizable and can be easily integrated into your projects.
Utilities: Bootstrap provides a variety of utility classes for styling elements such as spacing, colors, typography, and more. These classes can be used to quickly and efficiently customize the appearance of your website.
Advanced Features
Customizing Bootstrap: Bootstrap can be customized to match your specific design needs. You can override default styles, create custom components, and use variables to manage your project’s theme.
JavaScript Plugins: Bootstrap includes several JavaScript plugins, such as carousels, modals, and tooltips. These plugins can add dynamic functionality to your website without requiring extensive JavaScript knowledge.
Responsive Design Best Practices: Bootstrap is built with responsive design in mind. It automatically adjusts to different screen sizes, ensuring a great user experience on all devices.
Real-world Examples
To illustrate the power of Bootstrap, let’s consider a simple example: creating a basic landing page.
<!DOCTYPE html>
<html lang=”en”>
<head>
<meta charset=”UTF-8″>
<meta name=”viewport” content=”width=device-width, initial-scale=1.0″>
<title>Bootstrap
Landing Page</title>
<link href=”https://cdn.jsdelivr.net/npm/[email protected]/dist/css/bootstrap.min.css" rel=”stylesheet”>
</head>
<body>
<! — Navbar →
<nav class=”navbar navbar-light bg-light”>
<div class=”container-fluid”>
<a class=”navbar-brand” href=”#”>Navbar</a>
</div>
</nav>
<! — Content Section →
<div class=”container text-center mt-5">
<h1>Hello, Bootstrap 5!</h1>
<p>This is a simple example.</p>
</div>
<script src=”https://cdn.jsdelivr.net/npm/[email protected]/dist/js/bootstrap.bundle.min.js">
</script>
</body>
</html>
To learn how integrating these elements can transform your business, read the full article on our website Algorizon Technologies.
For an in-depth look at the benefits of integrating web development, software solutions, and digital marketing, click here to read the full article on our website.
0 notes
Text

CSS Creative Menu Hover Effects
#css menu hover effects#css menu hover#html css menu#pure css animation#css animation examples#css animation#learn to code#code#html css#frontenddevelopment#css#css3#html#divinectorweb#navigation menu css#css navbar#navbar
1 note
·
View note
Text

Best Regards The Solar System Design Analysis https://app.box.com/s/dqbysn55yvzrfnsi77m7fjl2xxeirlqe or https://app.box.com/s/dqbysn55yvzrfnsi77m7fjl2xxeirlqe or https://gerges2022.livejournal.com/255339.html Paper Argument The Current Solar System Description Is Wrong Because It Depends On (5 Wrong Concepts) which are 1 The physicist Supposes The Planets Motions Are Independent From Each Other 2 Planet Formation And Nature (The Major Discussion) 3 Space Nature And Properties 4 The Sun Rays Creation Theory 5 The Solar System History (The Big Bang Concept is Wrong) Paper hypothesis No. (1) The Gravitational Waves Are Produced By The Planets Motions Energies And Not By The Gravitational Field- ALSO - (The Sun Doesn't Produce A Gravitational Field) Planet motion produces energy (1/2 mv^2) and this energy creates waves in the space- and these waves move by its planet velocity- for example- Mercury (47.4 km/s) moves and its motion energy creates waves in the space and these waves move by equal velocity (47.4 km/s)- means- the planets move and their motions create waves in the space and each wave moves by its planet velocity- AND the planets revolve around the sun in the same one direction for that their motions energies create waves in the space and these waves move perpendicular on the revolution direction (Toward Pluto orbit) AND in Pluto orbit these waves are unified together into one unified wave- this unified wave moves by a velocity= 205.8 km/s where The 9 planets velocities total=176 km/s but I add the Earth moon velocity (29.8 km/s) that makes the total to be 205.8 km/s – I add the moon velocity because the energy is stored finally in the moon orbit- This Unified Wave Is The Gravitational Waves –AND- the gravitational waves are reflected three times in the solar system – from Neptune to Saturn (1st reflection) and from Uranus to Jupiter (2nd reflection) and from Venus to Mars (3rd reflection) The gravitational waves reflection causes effects on the planets data because the reflection defines the energy motion direction- Also the gravitational waves reflection causes to square the wave velocity- means- if a gravitational wave velocity is (v) and this wave is reflected- its velocity after the wave reflection will be (v^2) Paper hypothesis No. (2) The Sun Is Not Doing Nuclear Fusion To Produce Its Rays- Instead- The Sun Rays Are Produced By The Gravitational Waves Motions Energies- let's see this article This Is Extraordinary: Gravity Can Create Light, All on Its Own https://www.msn.com/en-us/news/technology/this-is-extraordinary-gravity-can-create-light-all-on-its-own/ar-AA19YL5d?ocid=hpmsn&cvid=620db4352aa943e2b454919a7b724604&ei=83 This new article tells the gravitational waves can move by speed of light and can produce a light beam- I claim The Sun Rays are produced based on this method by the gravitational waves motions energies and not by the sun nuclear fusion process AND Paper 1st hypothesis stated- The Gravitational Waves Are Produced By The Planets Motions Energies- and NOT By The Gravitational Field Shortly the Sun Is Not Doing Nuclear Fusion To Produce Its Rays- Instead- The Sun Rays Are Produced By The Gravitational Waves Motions Energies- AND- The Gravitational Waves Are Produced By The Planets Motions Energies- Means- The Sun Is A Phenomenon Created By The Planets Motions Energies (CONT) Gerges Francis Tawdrous +201022532292 Physics Department- Physics & Mathematics Faculty Peoples' Friendship university of Russia – Moscow Curriculum Vitae https://www.academia.edu/s/b88b0ecb7c E-mail [email protected] [email protected] ORCID https://orcid.org/0000-0002-1041-7147 Facebook https://www.facebook.com/gergis.tawadrous VK https://vk.com/id696655587 Tumblr https://www.tumblr.com/blog/itsgerges Livejournal https://gerges2022.livejournal.com/profile Pocket https://getpocket.com/@646g8dZ0p3aX5Ad1bsTr4d9THjA5p6a5b2fX99zd54g221E4bs76eBdtf6aJw5d0?src=navbar
box https://app.box.com/s/47fwd0gshir636xt0i3wpso8lvvl8vnv Academia https://rudn.academia.edu/GergesTawadrous publications http://vixra.org/author/gerges_francis_tawdrous Slideshare https://www.slideshare.net/Gergesfrancis
#anthro art#art#artwork#digital art#character design#furry#my art#furry art#original character#furry anthro#observer effect#mothership#quantum physics#quantum mechanics#we got all the sciences here#physics#life#astronomy#philosophy#wolf
4 notes
·
View notes
Text
Concept of React Router
React Router is a powerful library that enables seamless navigation and routing in React applications. Understanding the core concepts of React Router is essential for building dynamic, user-friendly single-page applications. This guide covers the fundamental concepts and provides practical examples to help you master React Router.
Core Concepts of React Router
1. Router Component
The Router component is the foundation of React Router. It wraps your entire application and enables routing functionality.
BrowserRouter: Uses the HTML5 history API to keep your UI in sync with the URL.
HashRouter: Uses the hash portion of the URL (i.e., window.location.hash) to keep your UI in sync with the URL.
import { BrowserRouter } from 'react-router-dom';
function App() { return ( ); }
export default App;
2. Route Component
The Route component is used to define a mapping between a URL path and a component. It renders the specified component when the URL matches the path.
import { Route, Routes } from 'react-router-dom';
function App() { return ( } /> } /> } /> ); }
function Home() { return
Home Page
; }
function About() { return
About Page
; }
function Contact() { return
Contact Page
; }
3. Link Component
The Link component is used to create navigational links in your application. It works similarly to an HTML anchor tag but prevents full-page reloads.
import { Link } from 'react-router-dom';
function Navbar() { return ( Home About Contact ); }
4. useNavigate Hook
The useNavigate hook allows you to programmatically navigate to different routes.
import { useNavigate } from 'react-router-dom';
function Home() { const navigate = useNavigate();
const goToAbout = () => { navigate('/about'); };
return (
Home Page
Go to About ); }
5. Dynamic Routing
Dynamic routing allows you to pass parameters through the URL. This is useful for creating pages that depend on dynamic data, such as user profiles or product details.
import { useParams } from 'react-router-dom';
function App() { return ( } /> ); }
function User() { const { id } = useParams(); return
User ID: {id}
; }
6. Nested Routes
Nested routes allow you to define routes within other routes. This is particularly useful for layouts that require sub-sections, such as dashboards.
function Dashboard() { return (
Dashboard
} /> } /> ); }
function Profile() { return
Profile Page
; }
function Settings() { return
Settings Page
; }
7. Protected Routes
Protected routes restrict access to certain parts of your application based on authentication status.
import { Navigate } from 'react-router-dom';
function ProtectedRoute({ element, isAuthenticated }) { return isAuthenticated ? element : ; }
function App() { const isAuthenticated = false; // Replace with actual authentication logic
return ( } /> } /> } />} /> ); }
8. Handling 404 Pages
Handling 404 pages ensures that users are informed when they navigate to an undefined route.
function NotFound() { return
404 Not Found
; }
function App() { return ( } /> } /> } /> ); }
Diagram: Basic React Router Flow
graph LR A[BrowserRouter] --> B[Routes] B --> C[Route path="/"] B --> D[Route path="/about"] B --> E[Route path="/contact"] B --> F[Route path="*"] C --> G[Home] D --> H[About] E --> I[Contact] F --> J[NotFound]
Conclusion
Mastering React Router is crucial for building efficient and user-friendly React applications. By understanding and utilizing its core concepts—such as Router, Route, Link, and dynamic routing—you can create a seamless navigation experience for your users. Explore these concepts further and practice implementing them to enhance your React development skills.
Hope you liked the article on React Router for any query visit: https://reactmasters.in/ or free demo sessions kindly contact us at Mob:+91 84660 44555
0 notes
Text
bootstrap navbar react router
Creating a Bootstrap Navbar with React Router: A Step-by-Step Guide
Navigating through a React application seamlessly is essential for a smooth user experience. Integrating React Router with a Bootstrap navbar is an excellent way to create a functional and aesthetically pleasing navigation system. Here’s how to do it.
Step 1: Set Up Your React Project
First, make sure you have a React project set up. You can create one using Create React App if you don't have a project already.npx create-react-app react-bootstrap-navbar cd react-bootstrap-navbar npm install react-router-dom bootstrap
Step 2: Install Necessary Packages
To use Bootstrap with React, you need to install Bootstrap and React Router DOM.npm install react-bootstrap bootstrap react-router-dom
Step 3: Add Bootstrap CSS
Include Bootstrap CSS in your project by adding the following line to your src/index.js file:import 'bootstrap/dist/css/bootstrap.min.css';
Step 4: Set Up React Router
Configure React Router in your application. Create a src/components directory and add your page components there. For this example, let’s create three simple components: Home, About, and Contact.
src/components/Home.jsimport React from 'react'; function Home() { return <h2>Home Page</h2>; } export default Home;
src/components/About.jsimport React from 'react'; function About() { return <h2>About Page</h2>; } export default About;
src/components/Contact.jsimport React from 'react'; function Contact() { return <h2>Contact Page</h2>; } export default Contact;
Step 5: Create the Navbar Component
Now, create a Navbar component that will use Bootstrap styles and React Router links.
src/components/Navbar.jsimport React from 'react'; import { Navbar, Nav, Container } from 'react-bootstrap'; import { LinkContainer } from 'react-router-bootstrap'; function AppNavbar() { return ( <Navbar bg="dark" variant="dark" expand="lg"> <Container> <Navbar.Brand href="/">MyApp</Navbar.Brand> <Navbar.Toggle aria-controls="basic-navbar-nav" /> <Navbar.Collapse id="basic-navbar-nav"> <Nav className="me-auto"> <LinkContainer to="/"> <Nav.Link>Home</Nav.Link> </LinkContainer> <LinkContainer to="/about"> <Nav.Link>About</Nav.Link> </LinkContainer> <LinkContainer to="/contact"> <Nav.Link>Contact</Nav.Link> </LinkContainer> </Nav> </Navbar.Collapse> </Container> </Navbar> ); } export default AppNavbar;
Step 6: Set Up Routing
Configure routing in your main App.js file to render the appropriate components based on the URL.
src/App.jsimport React from 'react'; import { BrowserRouter as Router, Route, Routes } from 'react-router-dom'; import AppNavbar from './components/Navbar'; import Home from './components/Home'; import About from './components/About'; import Contact from './components/Contact'; function App() { return ( <Router> <AppNavbar /> <Routes> <Route path="/" element={<Home />} /> <Route path="/about" element={<About />} /> <Route path="/contact" element={<Contact />} /> </Routes> </Router> ); } export default App;
Step 7: Run Your Application
Start your development server to see your Bootstrap navbar with React Router in action.npm start
Open your browser and navigate to http://localhost:3000. You should see your navigation bar at the top of the page, allowing you to switch between the Home, About, and Contact pages seamlessly.
Conclusion
By following these steps, you’ve created a responsive and dynamic navigation bar using Bootstrap and React Router. This setup not only enhances the user experience with smooth navigation but also leverages the power of React components and Bootstrap's styling. Happy coding!
1 note
·
View note