#pen tool tutorial
Explore tagged Tumblr posts
Visit Tumblr Blog
Explore Tumblr blogs with no restrictions, modern design and the best experience.
Last Seen Tumblr Blogs


Fun Fact
In 2020, 44% of users from Denmark used Tumblr daily.
Text
youtube
Master the Pen Tool in 10 Minutes | Adobe Illustrator Tutorial
Using the Pen tool in Adobe Illustrator can be difficult, hard to understand and infamously hard to learn. In this Adobe Illustrator Tutorial, I'm going to break it down so you will be able to use the Pen Tool in Adobe Illustrator Easily!
#graphic design#education#illustrator tutorials#Master the Pen Tool in 10 Minutes#Master the Pen Tool#illustrator pen tool#pen tool#illustration#illustrator tips#adobe illustrator#illustrators on tumblr#graphic design tips#youtube#vector illustration#graphic designers#Youtube
2 notes
·
View notes
Text
i may or may not be looking into 3D rigging so i can study and rig the models in afk journey
... i have 0 experience in this field but all i need is to find a program that will allow me to look at models, not necessarily a program that will allow me to rip models from the game. i can take care of the rest from there.
#going back to my roots...#small me: i wanna draw digitally :D#also small me: *brute forces their way into learning how to use paint tool sai with a wacom bamboo pen tablet*#tutorials for art programs just did not exist in my headscape. i learned how to use sony vegas pro all on my own too#unhinged polymath behavior#that being said i also learned how to use traditional media on my own. 'learned' being in large quotation marks#same with embroidery lmao even then i wouldn't say i sew well bc i haven't practiced it much#young_girl_smiling_smugly_with_burning_building_in_bg.jpg#val.txt
2 notes
·
View notes
Text
youtube
In this lesson, we go over how to use the pen tool. We cover how to create curved and smooth lines along with how to manipulate your anchor points.
To get the starter file, download it at: https://drive.google.com/file/d/1NjVD...
#adobe illustrator#beginner#teach me that#how to#tutorial#loch ness monster#drawing#pen tool#Youtube
1 note
·
View note
Text
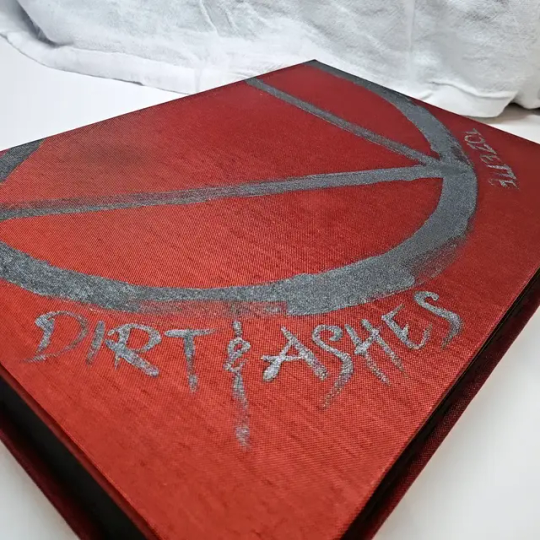
Book Decoration: AKA All The Ways I Don't Use a Cricut
(this post is for people who don't want to buy an expensive cutting tool, or for those that do have an expensive cutting tool that would like to mix things up a little)
1. Print That Shit
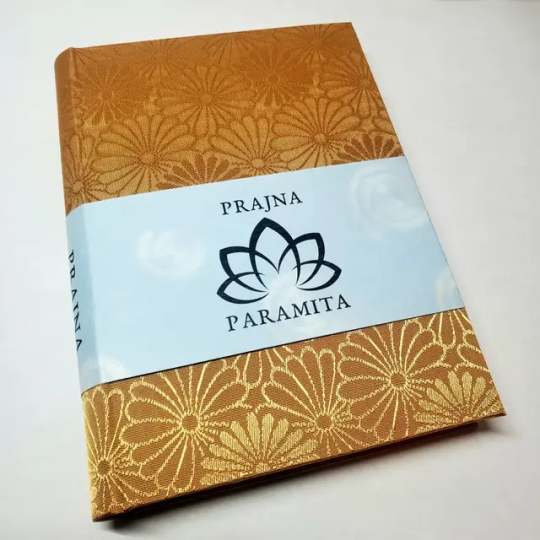
If you're already printing your own textblocks, an easy step for titles is to print them. Above is a title printed onto an "obi" of decorative paper. I measured out where I wanted things on the finished book and laid it out in Affinity, then printed it on a full sheet & trimmed it down to wrap around the book. A more simple method is to print & glue on the label into a slight indent in the cover (to protect it). A third option is to do the spine in bookcloth, while you print on paper for the cover and then glue that paper onto the boards (this usually looks even better when it is a three-piece bradel bind).
2. Foil Quill / Heat Pens
The heat pen is one of my go-to tools, but it can be a bit touchy about materials. The most popular version is the We R Memory Keepers' Foil Quill (which is one of the most ergonomic), but other pens exist that can get you to a higher heat temp, finer lines, or more consistent foil. For example, I have a pen created by a local Japanese bookbinding studio that fares way better on leathers than the WRMK quill & with a finer tip, but it's hell to control. Best results in general are on paper or smooth bookcloth (starched linen, arrestox, colibri - even duo will work but its less solid). The fuzzier a bookcloth is, the less your foil quill wants to deal with it. This means the heat n bond method of making bookcloth does not play nice with a heat pen usually, but there are two solutions: 1) use this tutorial on paste + acrylic medium coated bookcloth instead that will get you a perfect surface for the heat pen, or 2) use the pen on paper & then glue onto the cloth. I did a video tutorial for both foil quill use and this type of homemade bookcloth for @renegadeguild Binderary in 2023.
You get the most consistent results by tracing through a printed template that is taped in place, as I do in the video above.
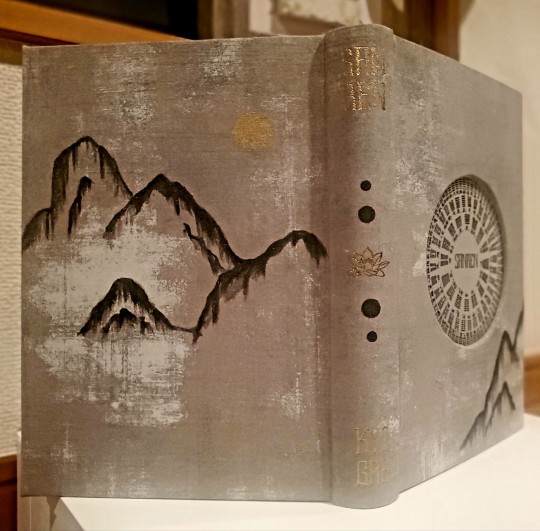
3. Paint That Shit
Acrylic paints will do you fine! The above is free-handed with a circle template, because I wanted that vibe. If you need straight lines that won't seep, lay them down with tape first & then paint over it first with a clear Acrylic medium, then your color. Same goes for stencils. Two more examples of painted bookcloth:
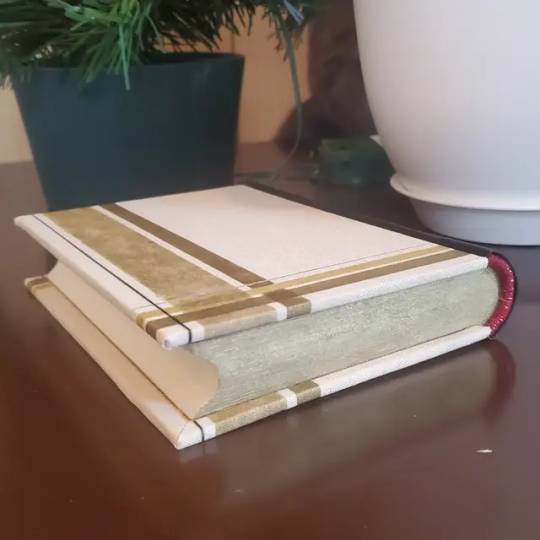
4. IT'S GOT LAYERS

By using layers of thinner boards, you can create interesting depths & contrasts on your cover. You can also make cutouts that peep through to the decorative paper behind. The most important part to this technique is the order in which each edge is wrapped. To get a good wrapped inside edge, you will split the turn in into tabs to get them to conform to a curve. You can also layer multiple colors of bookcloth without multiple layers of board, as seen below left, so long as you mind your cut edges for fraying.
5. Inlaid... anything
Mirrors! Marbled paper! I saw someone do a pretty metal bookmark once! The key is creating a little home for it to live in, which is pretty similar to the above layering method. On one layer you cut the shape, & glue that layer onto the bottom solid board before covering. You can do the top layer as an entire 1 mm board (like I did for the mirrors) or a sheet of cardstock, like I would use for inlaid paper.
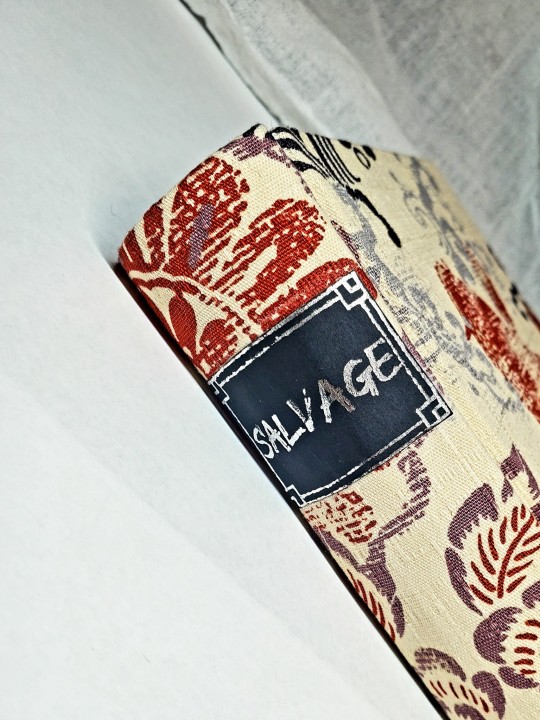
6. Decorative Paper
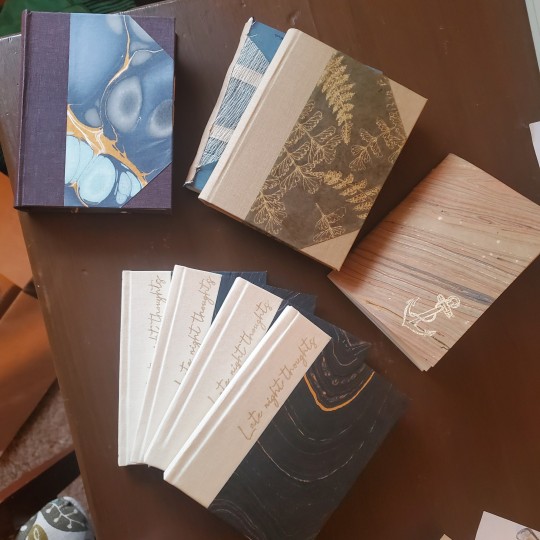
Decorative paper is always helpful & adds to the paper hoard... & its effects can be layers with other techniques, as below. Marbles, chiyogami, momi, or prints & maps of all kinds can be great additions. Some papers may need a protective coating (such as wax or a sealer).
7. Stamps (with optional linocut)
While I've not used many more regular rubber stamps, I do know some who have, successfully! And I've used one once or twice with embossing powder (see photo 3 up, the gold anchor on the little pamphlet bind). What also works is to carve your own linocut or stamp, & then use block printing ink to ink it onto your fabric (as i did above). A bit time intensive, but it was nice how easily reproducible it was, and I liked the effect I got for this particular bind.
These methods are not exhaustive, just ones I've used, and there are of course many others. I haven't gone too into detail on any of these for the sake of length (& post photo limits) but feel free to ask about more specifics. Usually I'm using them in combination with other options.
#fanbinding#bookbinding#celestial sphere press#ficbinding#in progress review#bookbinding how to#i am not particularly anti-cricut or anything#it's just a very expensive tool#and its prevalence sometimes makes new binders think they HAVE to get one#when they absolutely do not#you can make pretty books without it
1K notes
·
View notes
Text
Edit this screenie with me!


This is an unused screenie of Penny Pizzazz and Marcus Flex. Feel free to save the screenshot (Dropbox link below) and follow along with the instructions, or play around with it and do your own thing! I’m going to keep the instructions as simple as possible; hopefully they make sense.
Note: My process is kinda involved, but it’s a relaxing hobby for me. You do not need to do all of these steps! If the process doesn’t bring you joy, don’t bother!
I’m using procreate, but I’m also a photoshop user. You can use any software that has layers and blend modes :)
Instructions and downloads under the cut!
Dropbox link to the screenshot, and overlays!
1. Let’s start with shadows. The first step is to create a new layer. Put the blend mode to “multiply” (this darkens anything you draw on the layer). Then select a soft brush. We’ll start with Penny’s face. Use the eyedropper tool to choose a shadowy color of her skin (hold your finger on the color you want).

2. Decide where the light will be coming from (we’ll be placing it behind them on the top left). Deepen the shadows already made by the game, and add some shadows opposite to where the light will be. Choose a darker color to match each area you’re drawing on (Penny’s hair, her shirt, Marcus’ skin, his sweater).
When you’re finished drawing the shadows, go into your layer and lower the opacity. Less is more!

3. Choose the eraser (set it to soft brush). With a light hand, soften any shaded areas that are too harsh. Basically you want to blend the shadow with the skin using the eraser. You can also use Gaussian blur!

4. Let’s add some background lighting. This will also be our guide as we add bolder highlights in the next steps. Make a new layer and set the blend mode to “add.” Take your soft brush and a yellowy-orange color, and draw some glowy light coming from the top left.
Lower the opacity and take the eraser and erase much of the light on the right side of Marcus, and erase a bit of the light on their skin/ hair/ etc (like we did with the shadows). You can use Gaussian blur here too!
Note about lighting and highlights: experiment with the color of light, because some will look better depending on the environment and the sims skin tones. Because Penny and Marcus have dark skin, a bolder or darker yellow/orange will look much better than a pale yellow.

5. Let’s start adding more highlights! Make another new layer and change the blend mode to “add.” Choose a yellow-orange and paint some highlights on Penny’s hair, her left shoulder, her chest, cheekbone, and the left side of Marcus’ face. I made the image on the left a different color so you can see where I put the highlights.
Lower the opacity, and use the eraser or Gaussian blur to blend.

6. More highlights! Make a new layer and set the blend mode to “overlay.” Overlay lightens while adding color. I use “light pen” for any outlined highlights (the outer left of Penny’s hair, Penny’s shoulder, the left side of Marcus’ face), and I use a soft brush for the rest. Lower with the opacity, and use the eraser to blend.
This is a great time to play around with other highlight colors! I’m sticking with yellows, so I chose a peach color. Note: the red is to show what I drew.

7. We’re going to import a light leak overlay, and set the layer to “screen.” Then take your eraser, and erase any areas where you don’t want there to be too much light (red areas).

Finally, I’ll merge the layers together and bump up the highlights by going to adjustments > curves. Then I’ll add noise, and a vintage dust overlay. Sometimes I do more than this, sometimes less. I also like to draw hair strands and stuff, but that’s a whole second tutorial.
262 notes
·
View notes
Note
Excuse me, I love your au Transformers, I'm wondering what kind of app you're using or tools to make your arts comics? I have been trying on how to make my own au story, but I couldn't find the right place to do it, so do you have any tips to share?
I was thinking of doing a small tutorial for how I do my comics, so I’m taking your ask as an excuse to actually do it hehe


This is my process⬆️
I do everything on procreate, although other drawing programs like CSP are better for comics I find procreate more intuitive and easier to use
And these are the brushes I use ⬇️

The first I found in google, it’s just like a real ballpoint pen and I love its feel, especially when drawing with colors, I use it for lineart. Barskerville is part of the brushes procreate comes with, I just changed the pressure sensitivity and texture a bit to my liking. Basic HRB I use for coloring and shading. I also use the basic soft airbrush paired with the lasso tool when shading sometimes. (These are the brushes I use right now, but I experiment and change them all the time)
I think that’s all, hope this helps anyone out there who’s thinking on making their own comic, good luck :)
205 notes
·
View notes
Note
I just wanted to say I think your art style is awesome! I was wondering if you had any tutorials on how you draw anatomy in your style (hips and legs especially)? Sorry if there's already one posted and I just didn't see it 🥲. Happy New Year :>
thanks for the kind words. i tend to draw people pretty stylized and then some so a good bit of artistic licence gets used. these tips are just what i use so feel free to take them with a grain of salt. with anatomy in particular you can kind of talk in circles because human/animal bodies are that complex so ill just zone in on the points you specified. here's a little image with a bunch of pointers:

the above image condenses a lot of the points I'd make, but basically the key parts are to start with the bare essentials and build up that complexity. using a line of action is a good way to get a quick, rough start. you draw a line out in the general direction of the pose and do your best to adhere to it to give the pose a sense of flow.
you can also draw smaller, thumbnail versions that throw a lot of caution to the wind but capture the basic energy of what you're going for. even having a tiny little stick figure version of your idea can make for a good guideline of where to take it forward.
when it comes to actual limbs, you wanna consider how they integrate and work together, kind of like how chains do. you can see on some of the parts of pear i've drawn out these wireframes to kind of portray how the mass of her legs works in a three dimensional space. for aspects like the waist/hips, i use that X technique i highlight above a lot, particularly for the lower torso. a lot of the times, even when drawing a character totally naked, imagining them wearing things like skintight underwear can help a lot to guide you in the right direction.
its also a good idea to consider things like gravity and weight to a degree. humans are essentially big meat sacks and gravity is always pulling down on that, but theres all kinds of aspects that effect that, such as character build or clothing. pear technically isn't naked in this, but i've tried to imagine her as such and take that into account.
if you are drawing digitally, don't be afraid to take advantage of the convenience you get with that workflow. you can retry and iterate on things a lot faster that pen and paper, and do things that aren't really feasible at all when it comes to editing and modifying your existing work. things like resizing certain bodyparts, instantly flipping the canvas, or using selection tools to completely adjust the positions of parts of your drawing. to give you an example heres a timelapse with all the little edits i made just to this demo drawing:

you don't have to use these techniques linearly, either. sometimes ill have a really solid idea for a piece in my head, and go back to basics with certain elements if they’re not coming out right or i just want to brush them up a bit more. some of the tutorial-y parts i added in i didn't actually use during the drawing but often do use so they're there just for demonstration. not every drawing i do starts as building blocks or a really basic version, often ill just start with a face and build it out from there.
i always encourage liberally using references (this can include yourself) and trying out stuff like life drawing or looking at things like existing photographs of real people/places/things if you can, the more you use learning material the better you'll draw up a mental inventory in your head that you can rely on more and more. some of these tips are things i've learned from other artists over the years (the chin one especially i remember seeing a tutorial about lol), so this is a lot of knowledge i've amassed from other sources over time myself. there are plenty of times ill use all sorts of reference material and its all in service of arriving at the final destination as smoothly as possible. learn by doing, as they say. hope this helps!
1K notes
·
View notes
Note
Hey, I was wondering if you had any starter tips for digital art? I'm a traditional artist and have been for years, but I was recently given a tablet and clip studio. I am having SUCH a hard time getting anything to look right: shaky lines, flat/too soft pieces, just an absolute childish mess every single time. I see all these gorgeous digital pieces and have NO IDEA how to get there.
Heya!
So, it's been a very very long time since I transitioned from traditional to digital art, but I DID do proper traditional for a few years; we're talking ink pens, color pencils, markers, watercolor, fancy papers, the works. I did some acrylic painting too but only monochrome (and before anyone asks, these works no longer exist so I can't share them) all that to say that I do have some experience with the former and definitely felt the learning curve when I changed to a tablet.
To get the unhelpful advice out of the way first: It's a different and unfamiliar medium, and there is probably nothing significant that you're "missing" about it except time and exploration. There are pillars to digital art just like there are in traditional art, but when it comes to personal process everyone has their quirks and habits - you gotta mess around and find what works for you. I suggest looking up tutorials and speedpaints on youtube even if you know all the basics or if the style you see doesn't appeal to you; just watching how others do their thing might help you figuring out how you would like to do yours!
Now, for the more practical advice:
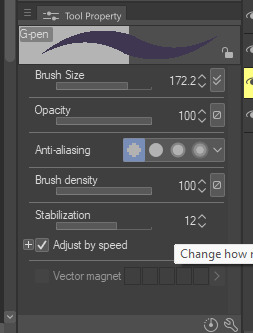
-I don't know what kind of tablet you got, but assuming it's a non display, that's an extra hurdle you have to get over in developing the eye-hand coordination necessary to use it. This feels very alien at first but it shouldn't take longer than a few weeks to feel completely natural.
-On that note, if there is a significant size discrepancy between the tablet and the screen you are looking at, that might mess you up. Try adjusting the size of the CSP window so it fits the size of the actual drawing surface you are using more closely.
-Every drawing tablet's pen has pressure settings that can be tweaked to your liking, I for one always make it a little softer than the default.
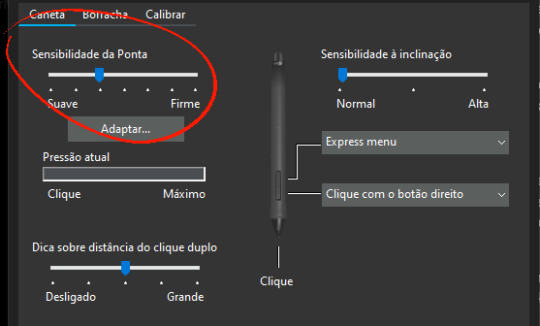
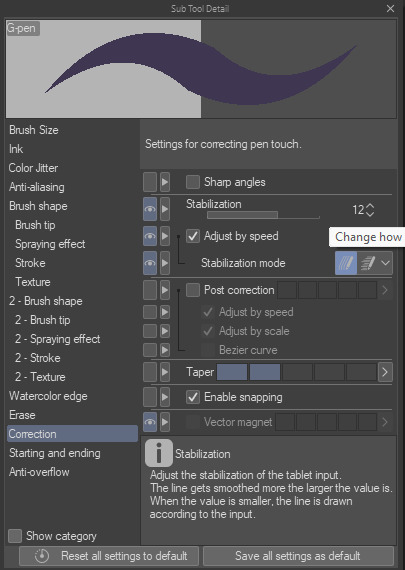
-BRUSH STABILIZATION! That's a setting every individual brush (and almost every tool, I believe) on CSP has. It does as advertised: stabilizes your brush strokes. A lot of people like this set between 8-20 depending on the brush, and it can make a huge difference to the way you draw.
It is usually always visible in the tool properties, but if not, you can toggle it on through the "sub tool details" menu by clicking the little wrench symbol on the bottom right.
Hopefully this has been helpful at all. Good luck!
211 notes
·
View notes
Text

Hello! I got an ask [x] for a tutorial for one of my recent gifsets for tgcf [x], so here it is, split into three parts:
Drawing a Curve
Template - optional: if you want the curve to flow throughout your entire gifset
Colouring - optional: specific to that particular gifset I did
Progressions
PART 1: DRAWING A CURVE
Trying this out as a screen recording for the first time since it's easier to show 🤡
PART 2: TEMPLATE
This part is optional and only applies if you want your curve to flow throughout all the gifs in your gifset. Of course, you can do your curves individually per gif, but it's generally better to have a template for how the entire curve will flow first so that the joining lines between each gif flow smoothly.
Create a new document for your template. For the height, calculate the height of the entire gifset, including the buffer areas between each gif (4px). E.g. for a gifset of 4 gifs, each of which are 540px in height, the total height would be 540px x4 gifs + 4px x3 buffers = 2172px
In your new document, go to View > Guide > New Guide Layout and change the number of rows to the number of gifs. Make sure Gutter is 4px.
In my case, for this gifset, I skipped step 2 and manually created the template for each gif instead, since every other gif has a different height.
Put in a single frame of each scene in your template (see image below).

5. Club the layers according to which gif they will be in, apply the corresponding layer masks for each gif, and draw your curve that will flow through all 5 gifs (see image below). The reason for doing this (having the previews of the scenes in at this stage) is so that as you're drawing your curve, you have a better idea of where it will flow.

6. Duplicate the curve such that each group (i.e. gif of your gifset) has one such curve layer.

7. When you're ready to edit your actual gif, import your scene into Photoshop and duplicate the layers for that particular gif to your imported document. You may need to shift your duplicated layers or crop your file to the right size.

PART 3: COLOURING
The colouring for this gifset is pretty straightforward since everything is in black and white.
1. Import all your scenes and position them accordingly. Add a mask on your curve layer so that you can mask out the parts of the curve you want to be "hidden under" your scene - so that your curve looks like it's interacting with your scenes.

2. These are the usual adjustment layers I use for black and white colouring, but it's up to you to use what you prefer or are familiar with. Play around with the numbers for each adjustment layer to see what works best for the particular scene.

3. Slap on a crumpled paper texture for an added grunge effect.

4. Colour the remaining scenes and done!


PART 4: OTHER GIFS THAT ALSO WORK THIS WAY
Progression 1: curves flowing to organic shapes
set: [x]
Using the same Curvature Pen Tool, but this time with the fill on, to create shapes first. Then, link up the shapes with lines.

Progression 2: flickering curves and organic shapes
set: [x]
On top of Progression 1, draw 2-3 variations of your curves and shapes and lay them out chronologically on timeline so that you get this flickering effect.

119 notes
·
View notes
Text
Hi folks! Welcome to my art blog

I'm Milla! or you can call me Mill or Staria if you want ;D
This is my art blog where i post my fanarts and OCs i also post daily doodles aka the mini fellas!
i also do phone wallpaper sometimes! check the tag below!
current fandom:
Hermitcraft
Life Series/Traffic Series
other adjacent smps eg. empires, pirates, ratssmp, etc.
EPIC: The Musical
Indie games eg. Hollow Knight, Rain World

[ Commission me on VGen ]
[ Mini fellas pinterest board! ]
[ HADM2025 ]
[ Mini fellas Tutorial ]
[ My carrd ]

=FAQ=
my asks are closed for now as i am flooded with them lol
yes i will do more wallpapers of other mcyt but rn im doing the life series winners first then i'll do other lifers and then maybe other series
i'm an adult! i can laugh at adult jokes ;D
You can use my art for personal stuffs like pfp, banner, wallpaper, etc. as long as you give proper credit!
also you should not be profiting from my art in any way (unless agreed upon eg. commissioned art)
Most of the duos art are platonic! unless it's an official couple like the jizzie ;)

=Art Tools=
I am a phone artist I use my phone and fingers 📱👆
Art program: ibis paint
My brush: Genius Pen << lineart & Felt Tip Pen (Soft) << colors
#milla art#<< my art tag!#milla asks#<< my ask responses!#milla oc#<< my oc tag#minifellas#<< my daily doodles!#wallpaper#<< my wallpaper tag! f2u <3
180 notes
·
View notes
Text
gio officialpenisenvy's DIY packer tutorial
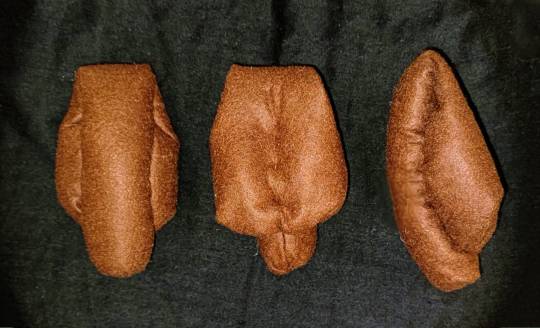
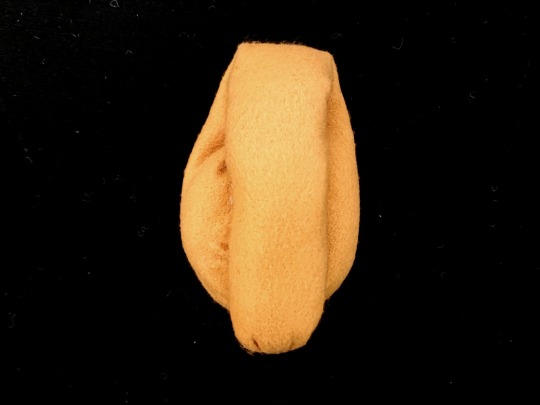
are you transmasc and tired of shoving socks down your boxers? did you lose your penis in a freak accident and wish you could have your bulge back? do you know the basics of sewing and want to find out how to make a packer? you've come to the right place! i have been making and selling packers for a year, and this is my tried and true method for hand-sewing a packer in roughly half an hour, to results such as these:
MATERIALS NEEDED: felt in your choice of colour (if you want to use fabric, go for a jersey knit so it won't fray, and use more stuffing to make up for the lack of structure), sewing thread in your choice of material and colour, stuffing of any kind (i use acrylic batting, you can use an old pillow, cotton balls, fabric scraps cut into tiny pieces...)
SEAMS USED: a backstitch or running backstitch is the only seam you really need to know; i employ a gathering stitch and a whipstitch as well for aesthetic purposes, but if you only know how to backstitch you can absolutely make a slightly uglier version of this packer. if you're an absolute beginner, here is a helpful tutorial: just double up the thread and knot it for a stronger seam.
STEPS:
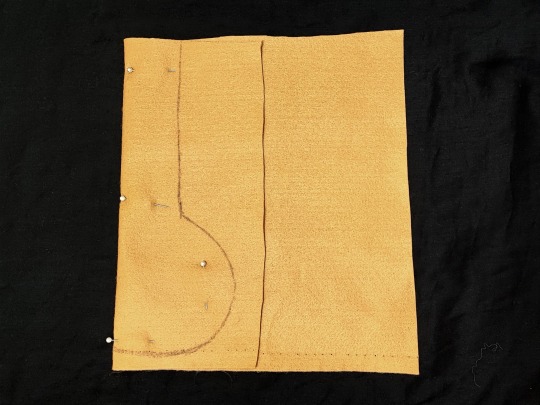
cut a piece of fabric approx. 25x25cm or 10x10in wide and fold it in half vertically, then draw a shape on the fold like the one pictured above, with the widest point measuring roughly 12cm or 5in and the smallest point (the shaft) measuring roughly 5cm or 2in
carefully pin the fabric and cut out the pattern along the shape you've drawn, leaving a small seam allowance of approx. 1/2cm or 1/4in (if you feel unsure in your ability to follow a small seam allowance, you can cut it larger and trim it to size later; if you're using fabric, a larger seam allowance is recommended)
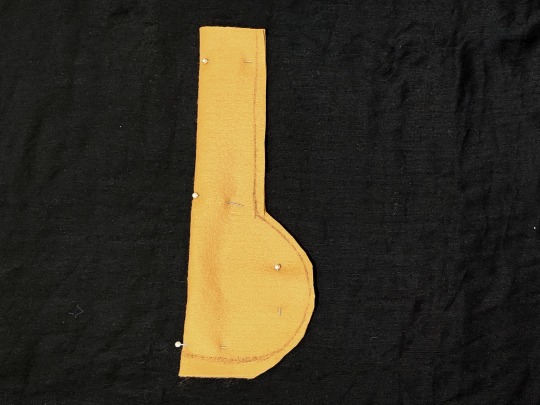
sew alongside the seam of the shaft with a tight backstitch or running backstitch; you can tug on the thread after every stitch, so the seam will pucker up and give the shaft a more natural curved-inwards effect
close the top part of the shaft (the head) and the bottom part of the sac (roughly up to the marked X in the picture) with a tight and multiply-reinforced gathering stitch, almost like a drawstring effect; you can use a backstitch here, but it won't look as natural
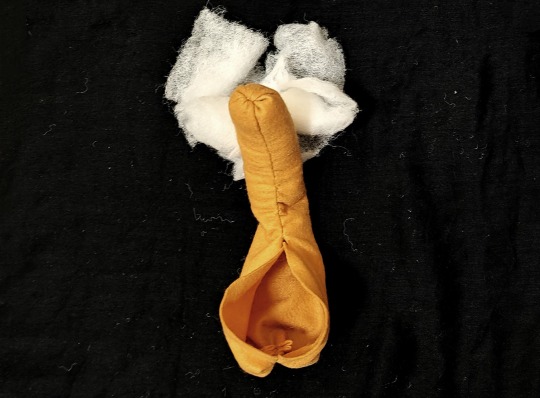

turn the packer inside out and put your stuffing inside the shaft, packing it quite full (but not so full it has no give, as real soft penises are somewhat squishy); this might be tricky to do if you have short fingers like me, so you can use a pen or your scissors or any other thin elongated tool to help you get to the tip
stuff the sac a bit less than the shaft, and try to make two balls with your stuffing (you can see i have cut out two strips of batting in the first picture) so they look like two separate testicles
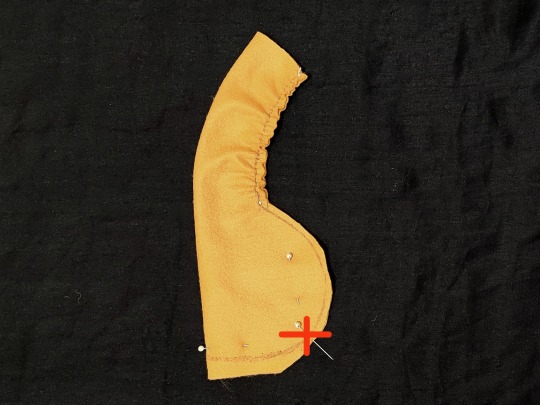
sew the sac closed: i used a whipstitch and pulled the thread tight so the fabric would gather and pucker like a real sac, but you can use a ladder stitch or a backstitch at your preference
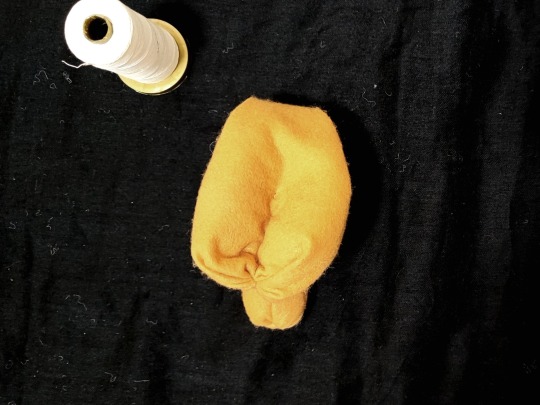
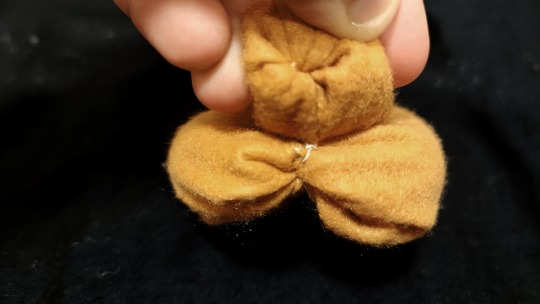
to further separate the testicles, sew a few stitches down the middle of the sac, so the two balls will lay separate with a flat seam in the middle (pictured above you can see how the stitches should look from the back)
optionally, you can secure the very tip of the shaft to the very bottom of the sac with a few stitches, so the packer will stay folded and won't run the risk of opening up (of course, you can skip this step if you want your shaft and your sac to be able to separate like a real penis)
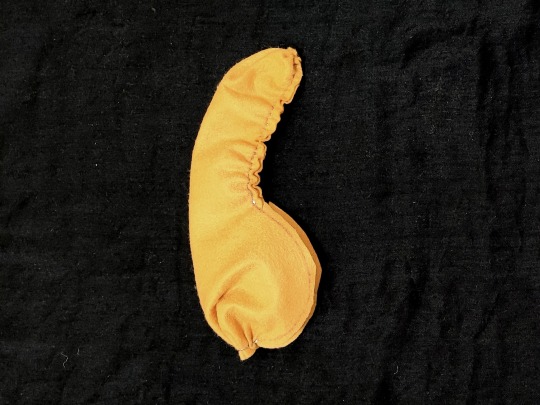
and here you have it, your packer is finished! you can wear it in your underwear directly on your skin, or sandwiched in between two pairs of underwear, or however you prefer. direct contact with water should be avoided as much as possible; the packer doesn't need to be cleaned daily, but a spritz with rubbing alcohol will kill most germs and get rid of any funky smells, and if it gets stained you can spot-treat it with a little water and soap and make sure it dries thoroughly.
#transmasc#ftm#trans diy#trans resources#ftm packer#sewing#ok to rb#mine#long post#(didn't put this under a readmore so it can still be fully visible in case i delete or move blogs)
93 notes
·
View notes
Text
youtube
Affinity Designer Tutorial - Designing a Maze This tutorial video uses a simple approach using lines, grids, and layer blend modes to create a simple labyrinth. In search of a maze pattern for an illustration that matched my needs, I ended up creating my own in a quick and easy fashion. Set up a grid, use the pen tool to create lines snapped to the grid, and erase lines using the blend mode erase. Take the design to the next level and make it circular or add perspective using warp groups. Enjoy!
#tutorial#illustration#vector#affinity#youtube#video#graphic design#design#easy#simple#maze#labyrinth#lines#grid#pen tool#Youtube
0 notes
Text

Dolly's guide to glow this summer ✨🐬

visualize 💭

We all have that dream version of ourselves living in our heads, but with school and work, it can be tough to actually bring her to life. Now that classes are wrapping up and summer’s right around the corner, it’s the perfect time to start becoming her 🎀
Pinterest and Canva are amazing tools when it comes to figuring out your vibe. When you’re scrolling through Pinterest, don’t just save the first cute thing you see. Instead, ask yourself things like: “What would she wear?” “How does her hair look?” “What’s her everyday makeup?” Thinking this way helps you build a clear, consistent aesthetic to aim for.
For the next part, grab that cute notebook you’ve been saving because now’s the time to finally use it. Grab a pen in your fave color and start by answering these:
How does she talk?
What are her core values?
What’s a day in her life like?
move move move 🛼


The fastest way to bring out your inner glow is by moving your body. When you move, you increase blood flow and sweat, which helps flush out toxins and improve circulation. This, in turn, reduces inflammation and gives you that radiant glow🌟
One of the best things about summer is that there are so many fun ways to get active—it’s easier to sweat and feel good. Whether it’s a 30-minute walk or a 1-hour gym session, simply moving your body is already a win. Below, I’ll list some cute and easy ways to get moving:
Hot girl walks🌸 – Put on a cute outfit, turn on your fave playlist, and stroll around your local park or neighborhood.
Incline walking on the treadmill – A great alternative if you’d rather stay out of the sun but still want the benefits.
At-home Pilates & workouts – Throw on a cute set and follow a YouTube tutorial (just make sure the instructor is certified). Below are some of my fave channels!!
https://www.youtube.com/@DaisyKeech
https://www.youtube.com/@MadeleineAbeid/videos
https://www.youtube.com/@MoveWithNicole
https://www.youtube.com/@LillySabri
nourishment 🥒

The key to keeping that inner glow shining really comes down to your diet. When you regularly eat ultra-processed foods and lots of sugar, your body will show it, whether you want it to or not. This can lead to persistent low mood, continuous breakouts, and even premature aging. To fight back, focus on eating a diet full of fruits, veggies, and healthy fats. ✨
Here are a few tips to help glow from the inside out:
Struggle with getting in fruits & veggies? Try making a smoothie or looking into supplements—but always talk to your doctor first so you’re not taking anything unnecessary or harmful.
Add collagen & omega-3-rich foods like bone broth, chicken skin, salmon, and citrus fruits. These support skin health and boost elasticity.
Green tea + kombucha = goddess glow🌟 They’re packed with powerful antioxidants that help reduce inflammation, protect your cells, support gut health, and just overall benefit your health.
The (not so) secret to keeping your skin glowy and juicy is hydration!!! You need to stay hydrated both inside and out to get that natural radiance. When your body is well-hydrated, your circulation improves, more nutrients are delivered to your skin and cells, and toxins get flushed out. Below are some ways to stay hydrated:
Eat more water-rich fruits and veggies like strawberries, watermelon, cucumber, cantaloupe, lettuce, and spinach.
DRINK YOUR WATER!!!💦 If you struggle with plain water, try adding the mentioned fruits and veggies for a light, refreshing flavor (cucumber & strawberries are my faves) You can also use electrolyte powders, my top rec is the one from Ultima.
Alternatives If I’m not in the mood for water, I’ll also go for coconut water, tea, or 100% fruit juice (make sure it’s not from concentrate!).

skin 🧖♀️

When it comes to soft, shiny skin, exfoliation + hydration is the ultimate duo (with consistency of course) I like to focus on hydration during the day and exfoliation at night, since your skin is more sensitive to the sun after exfoliating.
DRY BRUSH, DRY BRUSH, DRY BRUSH!!! I've seen such a drastic difference in my skin texture since doing it consistently, especially paired with a good scrub.
About body scrubs... I know it hurts to hear this, but ditch the sweet scented ones and invest in a good chemical body scrub with AHA, BHA, or glycolic acid. They penetrate the skin and dissolve dead skin cells more efficiently and promote cell turn over leading to smoother & brighter skin.
If you’re prone to dry skin like me, skip the pricey body oils and pick up a petroleum based product like Vaseline or Aquaphor. Petroleum creates a barrier that locks in moisture, effectively preventing moisture loss and it works so well.
SPF!!!!!!!☀️I cannot stress this enough—protect your skin, always.
This is the first time i've ever made a long post like this, i hope it was helpful !!! please reach out if you have any questions, stay gorgeous dolls 🐬🫧🌸


#𝓅𝓌𝓃𝒸𝑒𝓈𝓈 𝓉𝒶𝓁𝓀 ྀི#hyper femininity#it girl#dolly aesthetic#key west kitten#just girly things#girly girl#girlblogging#coquette#pink pilates princess#self improvement#glow up#self care#self growth#coqeutte#self love#virtual doll#becoming that girl#dream girl#self confidence#self concept
87 notes
·
View notes
Note
Hello!! I'm sorry if you've already been asked but I couldn't find the info on your blog - I was curious about which brushes or techniques you use for colouring? I've been struggling with digital colouring and yours looks wonderful!

Here's a list of the brushes I mostly use – I work in Procreate! Included them for sketching and lineart too in case ppl are curious!
RR pens are by Rinreeper (gumroad) and the marker liner is by Olguioo (gumroad) – both free to get on Gumroad! Others are just the default Procreate brushes without any tweaks, though I sometimes increase the stabilization amount in the brush settings.
As for my technique, I pretty much wing it every time... I'll try to compile a more detailed tutorial on how I colour! I like to use a lot of saturated colors and rely on multiply/overlay layers when I can't get them right. And the lasso tool is my best friend when it comes to blocking in colors and creating hard edges. The default flat brush is my fave, I use it for almost everything. ☆
58 notes
·
View notes
Note
Got any tips in shading stuff in black and white digitally?
Hi Anon!
You're in luck! I'm currently wrapping up a book which is shaded digitally, so I've been thinking a lot about this recently.
How I do this is by no means the only way, so take from these tips as much or little as you want! When I add grays and shadows to a line art drawing, I try to think about these things:
Preparing the image
I like to work with a file that has a white background and a layer with only line art on top of it. Between these two layers I add new layers where I use the pen tool and bucket to fill areas with black, then I lower the opacity for that layer to get a value that I want.


This method works well for me, and for simpler pieces I don't need more than 3 layers with different values - light, medium and dark grays.
I work in Clip Studio. Here's a picture of the layers of a recent drawing. Each layer is actually completely black but you can see the opacity percentages by each layer. Lower percentage -> brighter value. This makes it super duper easy to change the value of a layer, no need to repaint it, just change the opacity!

Value composition
For the best result, do a couple of value sketches with a limited set of values and find something that works well for the image. Getting the values right is what will improve the image the most! Here's a quick tutorial on muddycolors. Muddy Colors is a very nice art blog to check out. Looking at grayscale storyboard drawings or value sketches are great ways to pick up on this too.
I try to group values when working with grays. Take this image for example:

The character in the foreground has mainly dark grays, which separates her from the background, which has mostly light grays. Then the windows are white and the roof black.
Value composition is a huge and complex area and I recommend anyone wanting to learn to be more conscious about their values and to do value sketches. Analysing art you think has good values is great too.
Shadows
Not every piece needs shadows, but they can add a lot to an image! I use three kinds of shadows when I work in grayscale.
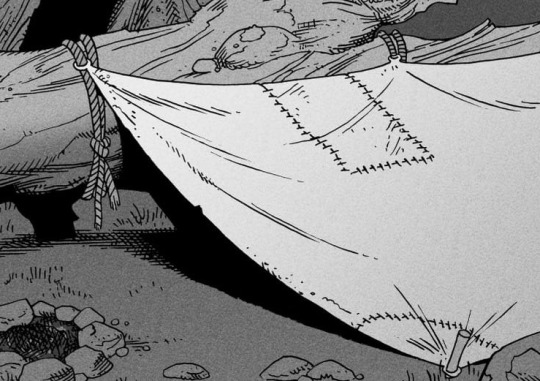
Inked shadows - these shadows are added during the inking stage and usually show areas where light would have almost no way of getting there, such as under this tent.
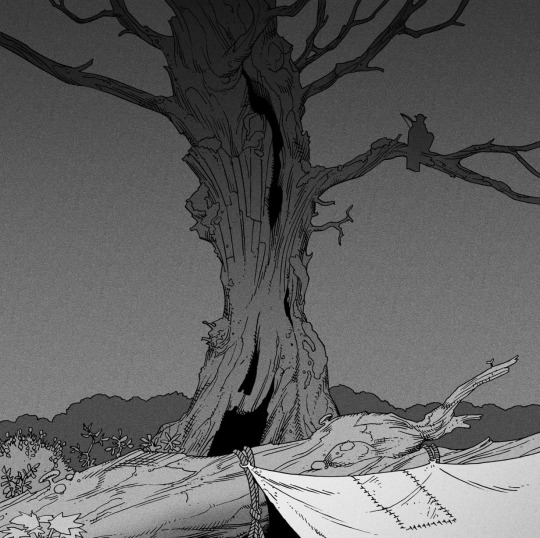
Gradient shadows - these shadows usually represent something getting further and further away from a light source or an area that would bounce light. This tree receives a tiny bit of light from a campfire on the ground and moonlight that bounces on the ground and up, fading as we get higher up in the tree. But mainly I add these gradients in ways that look cool and will help the overall composition.
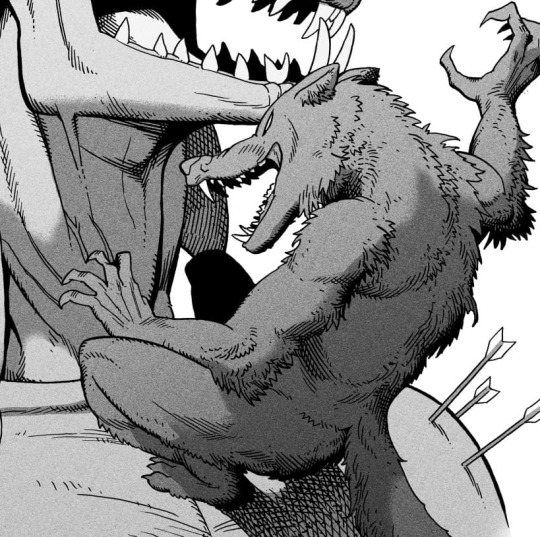
Hard shadows - these shadows appear when a strong light casts shadows and can be used on a shape or to cover something. Here's a werewolf with shadows on its back, which gives it a better sense of mass and is interesting visually!
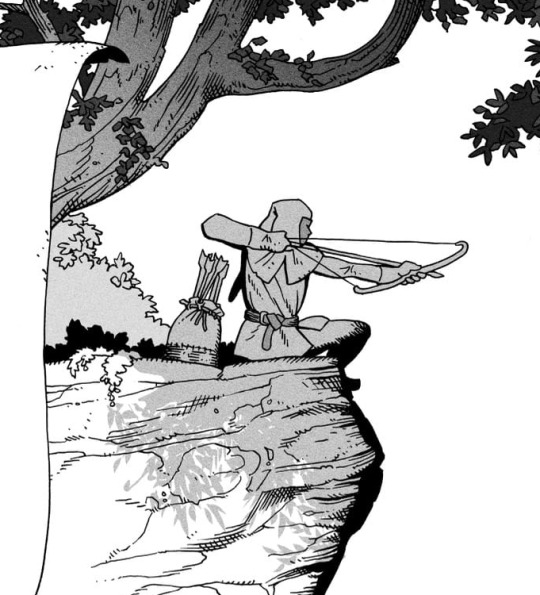
You can also cover an area in shadow like this, where the tree casts a shadow down on the archer and the cliff.
Texture
I like to add a layer of noise as a finishing touch. In Clip Studio you can create a noise layer with Filter->Render->Perlin noise... Find a balance of scale and amplitude that works for the image, then change the layer mode to "Vivid Light" and lower the opacity of the layer to around 30%. I like how this looks, it's not super visible usually but helps make the drawing feel less artificial and digital.

I hope that helps! Here are some nice links too:
Muddy Colors
Android Arts
Gurney Journey - Read his books!
Happy drawing!
352 notes
·
View notes
Text
Someone asked me a question earlier, but it wouldn’t let me respond to it so I’ll try my best to sum up some of the things they asked me. they asked me about my comic making process. I should be honest I’m almost a complete amateur. I wanna say I’m self-taught, but that’s not to take away from all of the YouTube videos and tutorials that I’ve watched online. Somehow I just ended up putting them together and into what I have now.
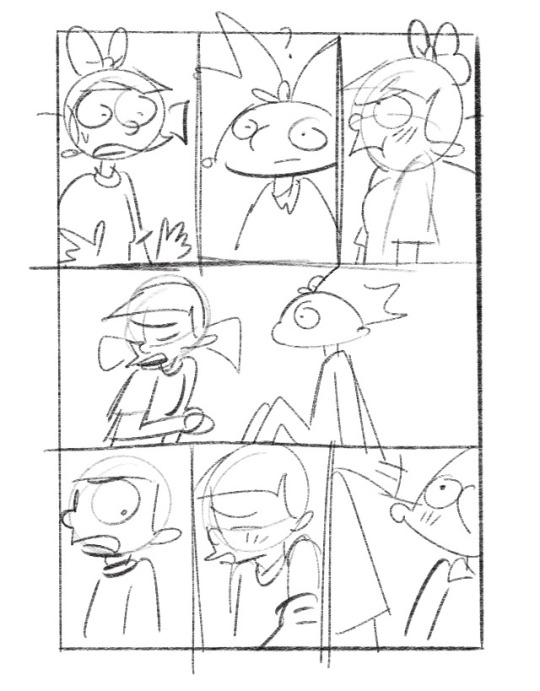
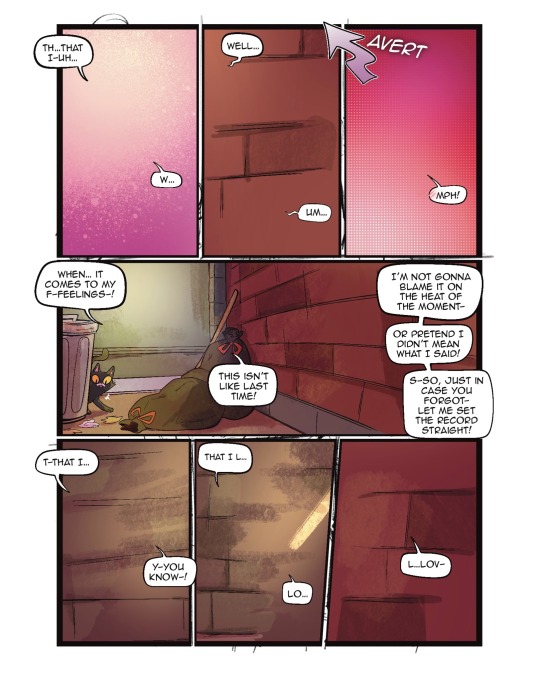
To start off with I almost always try to write my script first. after the script, what’s most important to me is the expressions on the characters faces. I think more than anything that gives me the best direction to my writing. As you can see with my first image, sometimes it can be as simple as just drawing stick figures this just gives me a directional idea of how my paneling’s gonna look. I’d say on average. I do up to three drafts the first draft direction. The second draft is a better idea of that direction and the third draft is all the cleanup so it’s ready for line art 
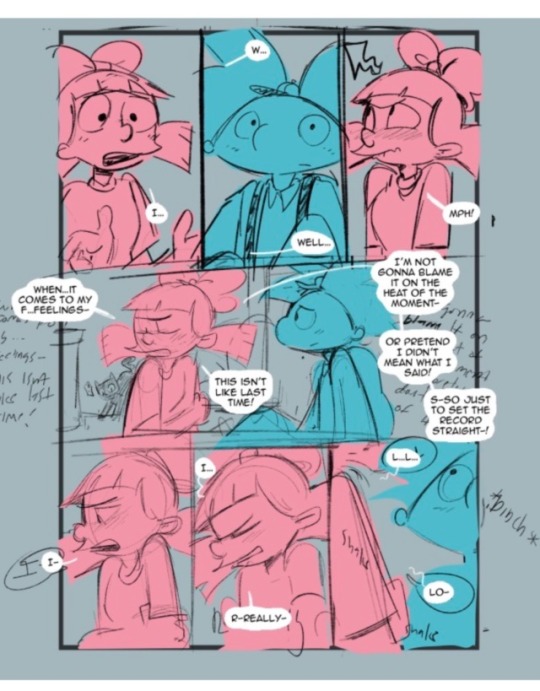
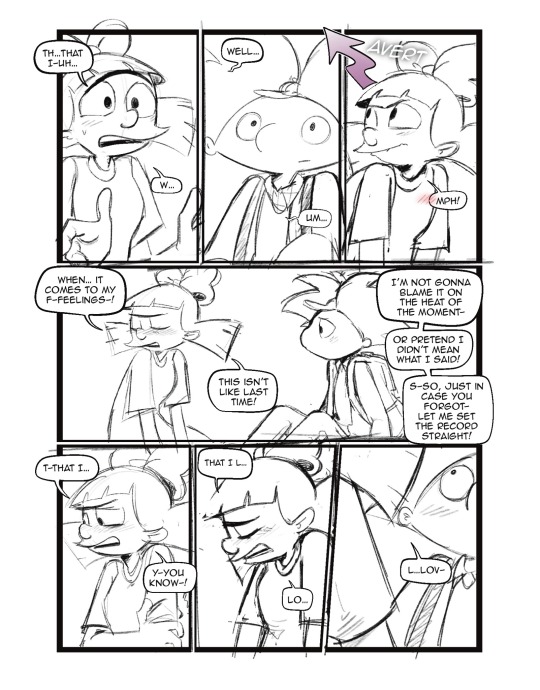
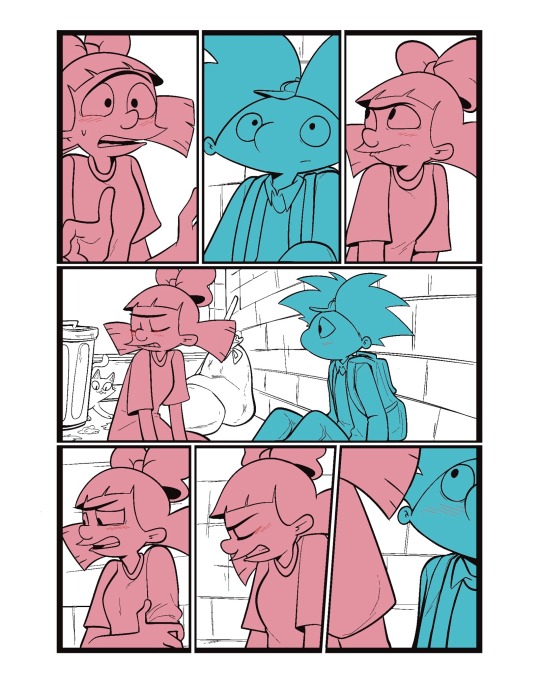
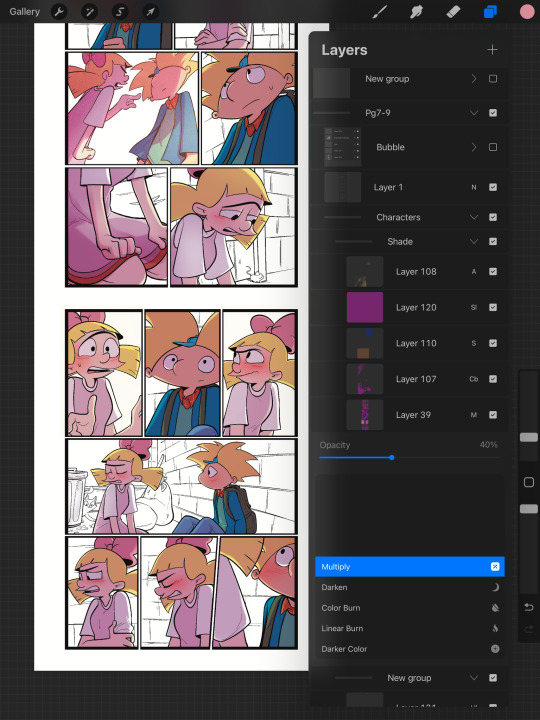
I usually separate my characters by specific color. This is so when I go into color, it’s easier to see which characters need what.
You can call me a bit of a cheater, but I like to use closed lines when I draw my characters. that way I can use a reference layer to just fill in the colors instead of having to do it manually or using my magic wand tool. 
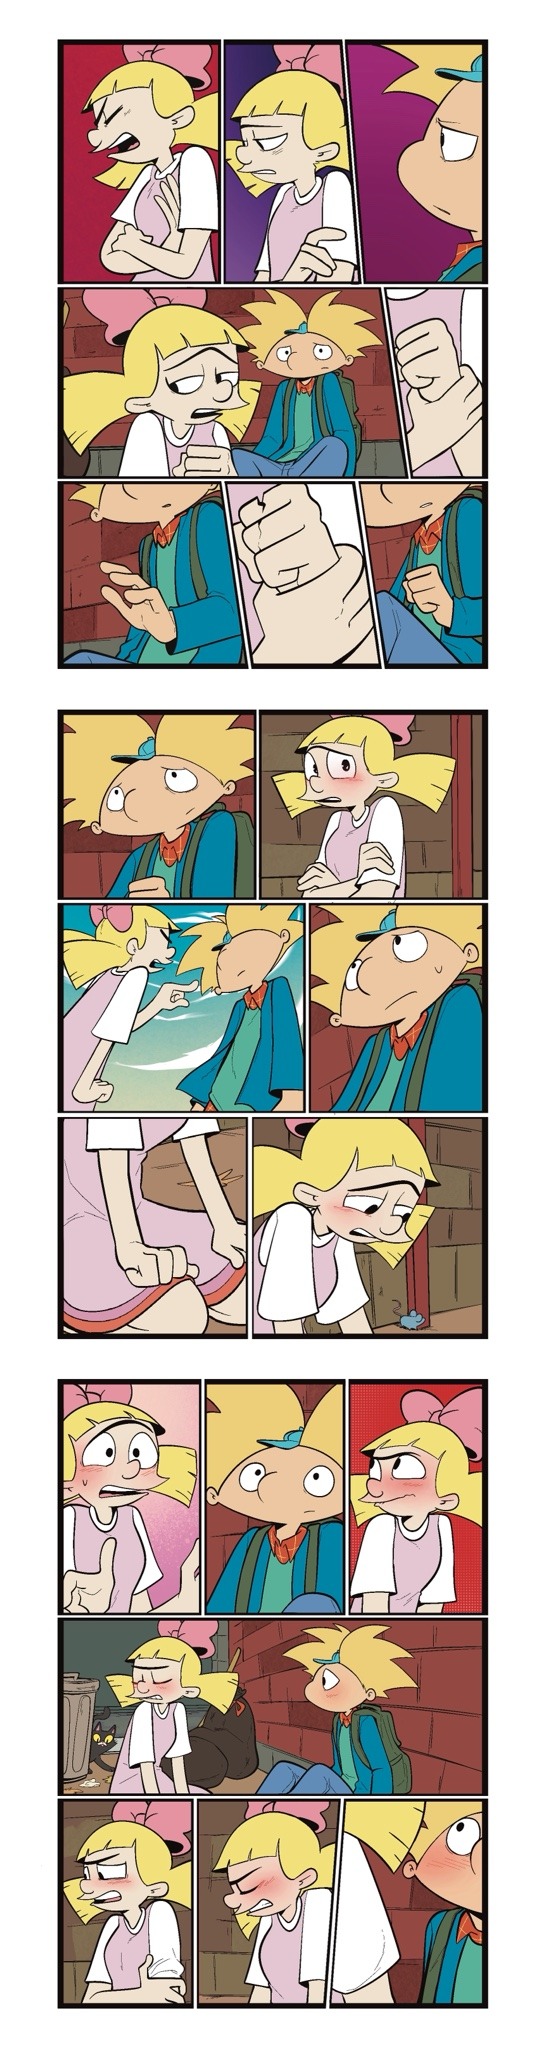
I also utilize the pallets on Procreate to pick their colors
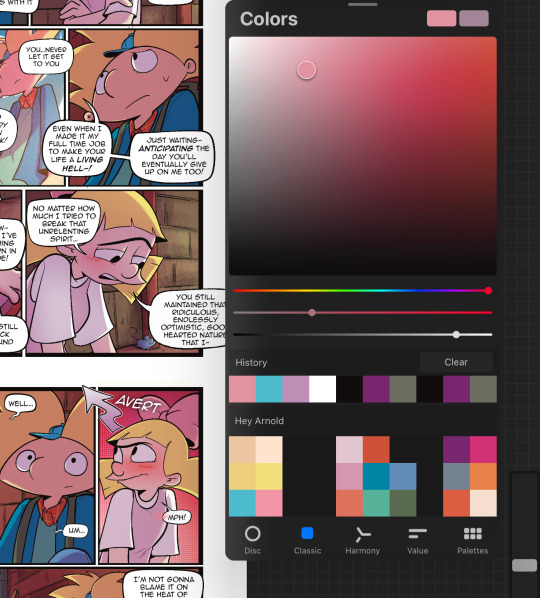
When it comes to shading, I like to use multiplayer layers and erase out the lighting. I might use some ambient lighting here and there with a dark pinkish purple this is going to depend on where your scene is taking place, but since mine is an alleyway, my multiplayer layer is at 40 opacity. For the characters, I usually use my syrup brush to blend in some of the less harsh shades. When it comes to my backgrounds, I like to use my glowing brush to erase out the lighting.
I still myself have a hard time drawing backgrounds I struggle to find where to put my characters in place some people find it easier to draw the background first and then the characters and although I do agree, that’s easier to establish the shot, I need focus on my characters. So what I usually do is draw my characters in a box and then draw that box in a space and that space becomes my background.
 I play around a lot with the Procreate effects that they have I use a pen called, burst for dramatic feelings, like a burst of energy or a burst of emotions I might use a comic dotted layer for something more comedic or action based. 
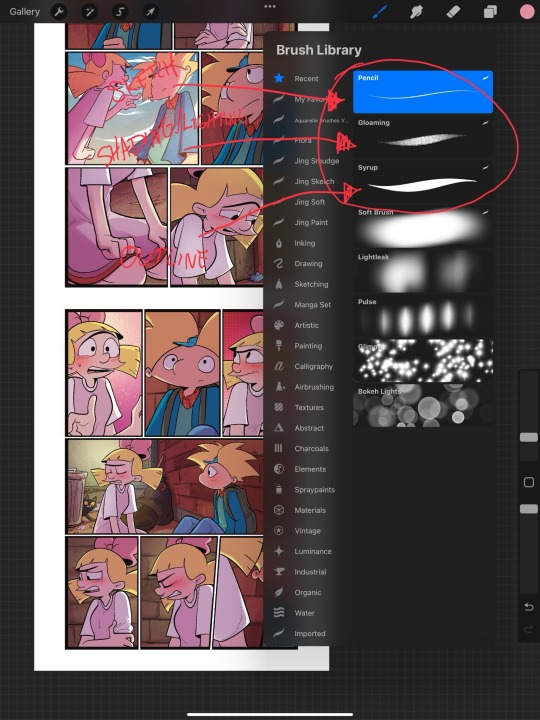
When it comes to brushes, I use a pencil for the sketch, a gloaming for the shading and syrup for the outline. Those are the main pens I use and everything else is effects. 
My organization isn’t always the best either, but this is how I usually do it. Panels and bubbles are at top, including the special effects like for example if I were to write the word ‘shake’ If Helga was shaking or blush, if Arnold was blushing, this would be in the bubble layer.  under that would be panels under that would be characters and in that folder I would have line art, then lighting and shading then color and that follows the same formula for background. 
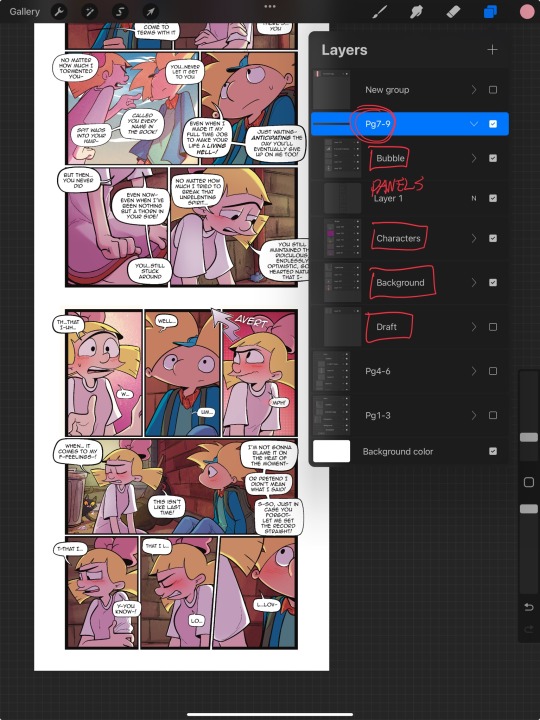
This is a general breakdown of what I do in my comic, and I couldn’t say at all, but I hope it gives you an idea of what I do. again I’m no professional and you should take all my advice with a grain of salt. My best advice is learned by doing I think if you looked at my first chapter and saw my latest chapter, you’ll see my improvement and my paneling in my expressions in my establishing shots and in my color shading. So if you wanna make a comic, just make it and learn as you go, your first one isn’t gonna be a banger more than likely but it’ll be the best learning experience, in my opinion. If you guys have any questions, I am an open book! Feel free to ask me anything.I stream on my TikTok when I make my comics so if you want to watch the process, you’re more than welcome to tune into that but I’m not gonna lie. It’s a bit tedious to watch 😂 I’m @eden_fries on most platforms.  
#arnold x helga#helga pataki#hey arnold#web comic#helga g pataki#fanart#comic#my art#fan comic#my comic#the process
72 notes
·
View notes