#vector based file
Explore tagged Tumblr posts
Visit Tumblr Blog
Explore Tumblr blogs with no restrictions, modern design and the best experience.
Last Seen Tumblr Blogs


Fun Fact
Tumblr was the first site to host the blog for President Barack Obama in 2011.
Text
Actually I need to be at home right now getting an edible out of the fridge and fucking going ham on some art. Right jow.
#haven’t touched my tablet in a long time I need to put color on paper without the annoyance of getting my paint out or worrying about waste#I prommy I’m trying to get some patches designed but they have to be vector based for the file to work so I’m in hell
7 notes
·
View notes
Text

Since folks are trying to paywall written guides, here's all of my written guides, free. (The links aren't all broken this time, yay)
Making a Pose: From Start to Finish
How to make your Pose Packs Easy to Use
How to Make a Deco Sim
Reducing CC File Size
Tips for Posing Expressions
How to make a Toy / Action Figure of your Sim
How I made the Deco Gryphons from 'Gryphon Rider' Pose Pack
How to make a Fun Wall Light using Vector Images
How to Edit Poses to fit Fat Sims
How to make a UI Emotions Pose Override
Non-CC-related
Sims Story / Challenge Planning Document
Sims Story Character Questions
Guide on How to Start and Plan a Sims Story
Guide to GShade
Custom Content Editing: Terms of Use
Side note for those of you learning posing... A lot of posemakers don't allow reuploads with edits, but I do - my Pose Terms of Use ALLOW EDITING AND RE-UPLOADING under the following conditions:
Poses based on mine MUST credit me in the pose pack's in-game description and on the post you share it on, and you must link back to the original pose pack you used as a base.
No paywalls, AdFly, SimsFinds/Simsdom or CurseForge.
211 notes
·
View notes
Text

physeng(write, file, "tco_physeng_breakdown.png");
to:compiler {file}

to:compiler {txt: "Internet and Outernet are full of StickFigures with similar body plans, so there are optimizations for rendering vector strokes specifically. it's way more efficient to use those optimizations than keep calculating perfect spheres for no aesthetic benefit."}
{txt: "btw why haven't heat issues been patched yet"}
{txt: "i fixed this years ago for the latest model. remember."}
from:compiler {txt: "Thank you. The avast! nodes will appreciate the credits. TheChosenOne.exe has been unreachable for some time."}

to:compiler {txt: "you mean OuternetPhysEng still won't update their programs"}
from:compiler {txt: "Yes."}
to:compiler {txt: "and still won't provide a specific location?"}
from:compiler {txt: "Do not allow them to bring up the moral argument again."}
to:compiler {txt: "OK. fine. yes. i will spare both of us"}


to:compiler {txt: "abridged or full docs?"}
from:compiler {txt: "Abridged. Please describe the acronyms."}
to:compiler {txt: "ofc"}

{txt: "
sel.per.filter: standard StickFigure component (src)*****. invisible membrane with special collision properties. protects mouthparts.
H2O scoop: avast! code. implements water retrieval from ambient air.
EIS: avast! code. destroys ingested materials identified as, "dangerous" before they reach internal systems.
SOS: avast! code. they only said this one was, "used for control."
ECL: avast! code. recycles some forms of contact energy.
THROUGHLINE: base code, initialization data, and processing space for vitals. found in some form in all StickFigure-type worms. following unique sectors noted: Black Hole Monitoring System, Basic Intake Threat Enum, Fly By Wire.
smaller points list other vital and peripheral systems.
"}
from:compiler {txt: "Thank you. That's enough."}
end(physeng());
@compressedrage as per my previous email /silly
related: pliable stick figure biotech
#part silly part serious effort part headcanon lore dump part speculation part diegetic technical document-#the most complex diagram i ever-#anD the entire interconnected system of hcs ive had on TCO functionality to date.#pleeeeeeease ask me about it :33333 if u wanna#of course chosen would have no clue about Any of these specifics. that's like expecting a preschooler to know the Krebs Cycle.#meaning no insult to their intelligence - just that there's no way for them to know unless someone tells em ¯\_(ツ)_/¯#and there's no junior high Health class for elusive hi-PWR sticks. seems like these two are big fans though(?)#;3#***** ''filter is a two-way selectively permeable membrane that allows some objects through and rejects others ...#... can: filter gases from liquids ... cannot: filter microparticles (smoke [or] aerosols)''#--/ art#--/ story#alan becker#ava the chosen one#animator vs animation#subpixels#executable!au#ava au
278 notes
·
View notes
Text
Writing Notes: Book Cover

“Don’t judge a book by it’s cover!” We’ve all heard the phrase and we all know that’s impossible. Because the cover of a book is the first thing a potential reader sees—it should stop them in their tracks. It’s a very powerful marketing tool; having a well-designed book cover is crucial.
Tips for Making a Great Book Cover Design
Using more than two to three typefaces on a cover is discouraged, as it can look really messy.
Keep things simple. Your cover will be in a sea of other covers so try to keep your design from getting muddy and make sure it stands out.
Show your designs to people who have a design eye and/or you trust. It’s great to get feedback.
If you hire a professional designer, write a brief and send them info. Be really clear on what you want. Designers usually do a certain number of design rounds included in the agreed upon fee and any extra rounds of design will be extra.
If you hire a professional designer, they will likely have ideas about printing and may have connections to printers. They are a resource so don’t forget to ask questions.
Don’t forget: a book cover is an important part of selling any book. Whether you decide to do it yourself or collaborate with a professional, pay special attention to this part of the process, as a great cover goes a long way.
6-Step Guide: Professional Book Cover
STEP ONE Generate Ideas. Look around at book covers you like. Go to a bookshop and peruse what’s currently happening in book cover design. Take notes of what elements you like on the cover image. A certain typeface? Color? Do you prefer an image or an illustration or something purely typographic on the cover? Another option is to create a mood board. You can use a platform like Pinterest or Evernote, or create a folder on your desktop, and pull book cover inspiration from the web. While you’re gathering inspiration, keep in mind what genre your book is and what kind of book design feels appropriate.
STEP TWO Find a Designer (Who Could Be You!). Do you have design skills? If so, your next step is to begin layouts and mock-ups of the covers. You should use whatever software program you are comfortable with. Most professional book cover designers use a program from the Adobe Creative Suite:
InDesign. InDesign is a multi-page design platform but can also be used for single page design.
Photoshop. Used to manipulate and experiment with photography.
Illustrator. Illustrator is a vector-based program, which means you can create graphic art that can be scaled up or down without loss of quality.
Photoshop and Illustrator. These can also be used together as you can bring your Photoshop file into Illustrator to set the type after you have worked with your cover image.
If you don’t have design skills, now is a great time to hire a book cover designer. The first step is to figure out what kind of budget you have for this. A designer’s fee will range depending on their expertise. Get a figure in mind and then write a design brief which should include the book specs:
Size
Print-run
Intended audience
Where and how the book will be published
Anticipated publish date
You should also include a summary of what the book is about and what you are looking for in a cover. Also share the inspiration you’ve gathered with the designer.
If you don’t have design skills but want to create the cover without the help of a professional, there are a few software programs you can use, such as Canva or 100 Covers, design tools that allow you to DIY the cover (for free or a fee).
STEP THREE Decide on the Dimensions. If you’re self-publishing and printing with a local printer you can work with them to make sure your book dimensions will fit on their printer (remember a book prints front, back, and spine in one sheet of paper). It’s also a good idea to find examples of books whose size you like and feels good to hold. Use that as a jumping off point for your book.
Book Cover Dimensions List. If you are printing for a specific market, from print to ebook, here is a handy list:
Amazon Kindle Direct Publishing File Format: JPEG or TIFF Cover Size (Recommended): 2560x1600 pixels Cover Size Requirements: between 1000x625 pixels and 10,000x10,000 pixels (one side must be at least 1000)
Apple iBooks File Format: JPEG or PNG Cover Size (Recommended): 1400x1873 or 1600x2400 pixels Cover Size Requirements: at least 1400 pixels wide
Barnes & Noble File Format: JPEG or PNG Cover Size (Recommended): Rectangle height and width, at least 1400 pixels Cover Size Requirements: Min. 750 pixels height and width
Kobo Books File Format: JPEG or PNG Cover Size (Recommended): 1600x2400 pixels Cover Size Requirements: Min. 1400 pixels width
Smashwords File Format: JPEG or PNG Cover Size (Recommended): 1600x2400 pixels Cover Size Requirements: Min. 1400 pixels width Draft2Digital
File Format: JPEG Cover Size (Recommended): 1600x2400 pixels Cover Size Requirements: Tall rectangle
STEP FOUR Choose Your Style
Photo-based cover. If you’re creating an photo-based book cover, you’ll need to source stock imagery. There are lots of great resources online to find stock imagery including ShutterStock, Getty Images, and Adobe Stock. (Keep in mind: most photography archives require payment to use their images. Always investigate the copyright of images you’re interested in using.) Look for images that convey or allude to your book’s genre. You can use programs like Photoshop to manipulate your image, making it black and white instead of color or cropping it in a certain way.
Illustration-based cover. If you’re considering a more graphic approach to your cover, Illustrator is the tool to use. You can bring hand-drawn drawings into it and outline them to create scale-able, high-res illustrations which you can manipulate within the program. You can also create shapes, patterns, experiment with typography within illustrator and play with color, transparency, size and much more.
Typography-based cover. Finally, many successful book covers use typography as the main graphic device. This takes some skill and knowledge of typefaces, the historical context of a typeface, and how to manipulate it thoughtfully. That said, using type as a graphic can be very impactful.
STEP FIVE Pick a Typeface (Font). No matter what kind of cover you are designing, you are going to need the title of the book and the author’s name on the cover. As mentioned above, picking an appropriate typeface is very important. You want to pick something that feels right for your book—is it a sans serif or serif? A heavy weight or lighter weight? You want to make sure it’s not something with a lot of baggage, like Comic Sans or Papyrus. It is a good idea to actually do a little research on when, where, and who your typeface was designed by to give you context and feel out if it will be right for your book. You might also consider using up to two different typefaces, one for the title and one for your name. A serif and sans-serif mix can give a bit of contrast and visual interest. There are some typefaces that pair really well together. Check out the website TypeWolf to get ideas of what fonts pair well together.
STEP SIX Test, Tweak, and Repeat. Once you have a few versions of your cover, print them out on your home printer and take a look with a critical eye. Does the type size feel chunky? Too bold? Too small? How does your image look? Is it cropped right? Are the lines of your illustrations too thin and not showing up? Go back and refine your design and then repeat! Don’t forget to look at your book cover as a small thumbnail as well. People are on their mobile phones and you want to make sure your cover still stands out and is impactful.
Book Cover - serves as your first impression with potential readers—and though book covers don’t always look the same, they do tend to contain the same essential elements.
Design standards may be different in the world of traditional publishing than they are in self publishing, and book cover templates for physical paper books may differ from those of ebooks—but they all serve the same purpose.
Some Functions of a Book Cover
A book’s cover provides essential information. At its most elemental, a good cover includes a book’s title, the author’s name, the publisher, and the price.
A good cover offers clues about your book’s content and tone. Your cover design indicates whether your book is a work of high-minded literary fiction, a pulpy page turner, or a compelling work of non-fiction.
A front cover reveals a book’s genre. You can usually tell if you’re holding a thriller, a memoir, a sci-fi epic, or a nineteenth century classic just by looking at a book’s cover art and typography.
A back cover offers broader context. It may feature quotes from reviewers and fellow authors. Softcover books may contain a plot summary or author biography on the back; those summaries and bios are typically moved to the inner flaps of a hardcover book.
How to Hire a Professional Book Cover Designer
Book covers are marketing materials, and a well-designed professional cover can make your book stand out among the competition. If you want someone with expertise in the realm of cover design to work on your book, you may want to hire a professional book cover designer. Here are some steps to consider when hiring creatives to design your book cover:
Hire a cover artist. A cover artist produces the cover art and imagery that will appear on your book cover, either on their own or with heavy input from an author or publisher.
Hire a graphic designer. Certain graphic designers specialize in layout; they incorporate cover art that you provide them—whether that’s an original illustration, photograph, or even a stock image—into the overall design of the cover.
Find a cover designer online. Reedsy is one of a number of online resources for independent authors, self-publishers, and anyone connected to the world of books. Many professional book designers list their services on Reedsy.
Use your personal network. Seek out writers’ groups, either locally or on Facebook. In these groups, people share professional referrals and help support one another when a member has a new book in the works. A group of like-minded individuals can be an invaluable resource when creating your own book cover for the first time.
When to Call a Pro:
You have a budget (a designer’s fee will vary depending on experience and location).
You have enough time to work with the designer.
You have a clear idea of what you want or at least what you don’t want.
You don’t have any design skills.
You don’t want to invest in the design software.
Your book isn’t selling.
How to Design a Book Cover Yourself
If you don’t have the budget for a pro designer or just have a DIY itch you want to scratch, it is easier than ever to design your own book cover. While it may not be quite as rudimentary as when you covered your textbooks in a brown paper bag back in fifth grade, modern technology has made cover image design accessible to anyone with a computer. Here are some tips:
Use a template. There are numerous websites that offer book cover templates and step-by-step tutorials covering basic cover design skills. Some even have a free book cover creator tool, along with cover ideas, design tips, pre-made design templates, and digital cover image tools.
Use standard design software. Book covers can also be made using standard home computing software including Photoshop, Microsoft Word, and even (with a little sweat equity) Google Docs. This is particularly easy if you are importing a pre-made cover image from another source.
Make a prototype. The process for assembling a book is straightforward and satisfying. If you want to test out how your book will appear in print, you can learn to bind a copy yourself.
When to DIY:
You don’t have any budget for design.
You have design skills to do it yourself.
You have the design software.
You have a template and know exactly what you want.
You have people with an eye for design that can guide you.
How to Make a Hardcover Book
So you’re ready to bind your own book. Here’s what you’ll need:
Content, of course.
Uncoated printer paper for book pages
Decorative paper for endpapers, such as wrapping paper or cardstock
Davey board (aka bookbinder’s board), thin chipboard, or cardboard for the book covers
Craft knife
Polyvinyl acetate (PVA) glue such as Elmer’s glue
Hot glue gun and glue sticks
Ruler or straight edge
A long stapler
Thin fabric or book cloth for cover
Binder clips
Thick decorative paper (optional, for dust jacket)
Paper trimmer (optional, for trimming book pages)
Paintbrush (optional, for spreading glue)
There’s more than one way to bind a book, and you’ll find tons of great tutorials online for making homemade books, including Japanese bookbinding and perfect bound softcover books. The most popular style of hardcover book binding is called case binding, which is traditionally done by stitching pages together with thread. Here is how to make a hardcover book step-by-step—no sewing or special materials required:
Assemble the content. The number of pages and the type of paper you work with depends on whether you’re binding a novel, a full-color photo book, or a sketchbook. Familiarize yourself with the format by taking some hardcover books down from your bookshelf and observing how they were made.
Format your pages. If you’re creating a blank book, you can skip this step. If you’re printing a book with text, you'll need to format the text so that you can print it into a book. You can get help with this at a copy shop, or you can download book design software and print at home. Eventually, you’ll end up with a PDF with a page count. This page count has to be divisible by four so that your book can be bound as folios made up of eight sheets of paper (32 pages) each. You may need to add some blank pages at the end of the book to keep your page count correct for the folios.
Print and fold. Once all of your pages are printed, fold pages in half and stack eight within each other, making sure the pages are in the correct order. Staple the folios together in the folds, alternating the location of the staples so that you don’t end up with a bulge in the spine.
Bind your folios together. Arrange all of the folios in the correct order and flatten them between heavy books. Once your folios are flat, it’s time to glue them together. Hold the folios together with binder clips and use a glue gun to glue the folios together along the stapled edge. This will become your book’s spine. Be careful not to overdo it on the glue: Use just enough to keep the folios together. Before the glue cools, use a thin piece of fabric to cover the spine only.
Even out the pages. Carefully trim the edges of the pages with a paper trimmer or craft knife, if needed.
Make the hardcovers. Cut two pieces of cardboard for the front and back covers of your book. For the spine, cut a piece of cardboard that is the same height as the front and back covers, with a width equal to the thickness of the spine plus the front and back covers.
Attach the hardcovers. Paint the cardboard (both covers and the spine piece) with a thin layer of PVA glue and attach to the cloth you’ll use to cover your book, leaving a space between the covers and the spine equal to one and a half times the thickness of the cardboard. Let dry.
Assemble the book. Use PVA glue to attach the fabric-lined spine of your bound folios to the cardboard spine. Keep the book propped up between other books while you wait for it to dry.
Attach the endpapers. Trim the paper lining so that it’s twice the size of the first page and fold it in half. Paint glue onto the inside of the front cover and the front page, and attach paper lining. Repeat with the back cover.
Make the dust jacket. If you’d like to cover your book with a dust jacket, measure a piece of thick decorative paper as tall as your book and as wide as the entire book, plus a few extra inches to fold over the edge of the cover. Fold the dust jacket over the bound book. Lay another heavy book on top of it to help the dust jacket keep its shape. This is the place to add a cover design, if you’d like.
Sources: 1 2 3 4 ⚜ More: Notes & References ⚜ Writing Resources PDFs
#books#book cover#writing tips#writeblr#booklr#literature#writers on tumblr#writing reference#dark academia#spilled ink#writing prompt#creative writing#bookblr#writing inspiration#writing ideas#writing advice#on writing#light academia#writing resources
118 notes
·
View notes
Text


Tattoo Parlor Decor Set for The Sims 4
This set was inspired by my personal experience getting tattoos. Some of the signs are those I remember from my friend’s tattoo parlor. While I was excited about getting tattooing in the Business & Hobbies Pack, I did want more in terms of décor objects. I did my best to keep the items as low poly as possible, but be sure to check the poly counts for what your computer can handle.
The building in my screenshots is one I downloaded from the gallery and made modifications so it resembled my friend's tattoo parlor. The username is MickeySimmers and the original build is a NY Pizzeria uploaded on 4/7/25.
When appropriate, objects are available in English and Simlish versions. Simlish font credit to Franzilla: https://modthesims.info/ For new meshes made by me, textures from Blenderkit were used.
SexyIrish7 Phoenix logo credit: © Liliia Marchuk via Dreamstime.com
All items are base-game compatible.
This set includes:
· Tattoo Counter
· Supply Cabinet
· Salty Signs – Small, Medium, and Large
· Tattoo ink bottles
· Tattoo ink cups – empty ink cup and cups with ink colors
· Tattoo ink cup holder
· Sharps container – Wall-mounted and counter versions
· Tattoo Coil Machine
· Foot switch
· Power Supply
· Stencil Machine
· Autoclave
· Non-sterile Nitrile Glove Boxes
· Portfolios
· Consent form
· Tip Jar
You may view an Imgur album with 31 screenshots of the set here
Creations by SexyIrish7
DOWNLOAD for FREE: SFS
OR at Patreon*
*You must be over 18 to access my Patreon page.
These cc objects are new 3d meshes created using Blender and Sims 4 Studio.
All CC have:
*Ability to search catalog using search terms: sexyirish7 and si7
*Customized thumbnail
*******
CREDITS:
Software credits:
Sims 4 Studio v. 3.2.4.3 (Star): https://sims4studio.com
Blender 4.0: https://www.blender.org/download/
GIMP v. 2.10.34: https://www.gimp.org/
Inkscape v. 1.2: https://inkscape.org/
Thank you to the creators and moderators producing tutorials and answering questions!
*******
TOU:
Do not re-upload and claim as your own
Do not re-upload and hide behind a paywall
Mesh and Image Credits along with descriptions of each item are below:
Tattoo Counter
I was dissatisfied with the number of slots and their placement on the tattoo counter that came with the Business & Hobbies pack, so I modified EA’s The Ultimate Nightstand so that it served as a larger counter and added décor slots to it. There are a total of 3 large slots, 9 medium slots, and 27 small slots. I made some minor modifications to the EA texture for The Ultimate Nightstand but did include all 20 swatches.
Polygon Count: 162
Supply Cabinet
I have long been disappointed with the lack of deco slots in various displays. For this object, I modified EA’s Carina Dining Hutch so that it would serve as an appropriate supply cabinet. I made some minor modifications to the EA texture but did include all 9 swatches. There are a total of 2 large slots, 15 medium slots, and 140 small slots.
Polygon Count: 114
Salty Signs
There are 3 files of what I call “salty” signs. The large signs are not as salty, but I wanted to stick with my theme overall. What do I mean by salty? Well, these are signs that are not for the faint of heart and for those with a darker sense of humor. They were inspired not only by signs that I saw at my friend’s parlor, but also by things he and his colleagues would say frequently.
Large Signs: 7 designs (11 total swatches)
Medium Signs: 9 designs (18 total swatches)
Small Signs: 10 designs (20 total swatches)
Polygon Count: 4
The following were used in several textures in all three files:
Caution/Warning Sign Templates by kenshinstock via Freepik https://www.freepik.com/free-vector/blank-label-warning-caution-sticker-template-set_30903862.htm
Large Sign Image Credits:
Swatches 1-2: Original Artist Unknown. Image from https://razorbacktattoosupply.com/tattoo-studio-feel-the-burn-wrapped-canvas-graphic-art/
Swatches 3-4: Original Artist Unknown. Image from https://www.creativefabrica.com/product/funny-tattoo-artist-hourly-rate-cut-file/
Swatches 5-6: Original Artist Unknown. Image from https://www.pinterest.com/pin/tattoo-artist--218917231881445322/
Swatch 7-8:
Hands, Soap, and Ointment Icons by rawpixel.com via Freepik https://www.freepik.com/free-vector/coronavirus-prevention-icon-set-vector_30086831.htm
Do Not Touch Icon Image by Myshopsigns https://all-free-download.com/free-vector/download/18_warning_signs_47669.html
No Swimming Icon by Fitri Handayani via Vecteezyhttps://www.vecteezy.com/vector-art/51936014-no-swimming-sign-illustration
Bathtub Icon by Fitri Handayani via Vecteezy https://www.vecteezy.com/vector-art/51406319-bathroom-icon-with-bubbles-and-soap
Sun and Breeze Icons Images by Freepik https://www.freepik.com/free-vector/weather-icons-set_709126.htm
Talking on Phone Icon by Mungujakisa Edmond via Vecteezy https://www.vecteezy.com/vector-art/25410803-do-not-talk-on-mobile-cell-phone-icon-sign
Swatches 9-10: Tarot Card Images designed by Eight (Elian-James Showell) https://www.eightco.in/
Swatch 11: Original Artist Unknown. Image from https://www.amazon.com/Tattoo-Artist-Tarot-Card-Sweatshirt/dp/B0D8JBHBFZ
Medium Sign Image Credits:
Background images for Swatches 5-8 by All-Free-Download.com https://all-free-download.com/free-vector/download/advertising_sign_templates_retro_shapes_sketch_6849470.html
Swatches 1-2 and 13-14: Tattoo Gun Image from IMGBIN https://imgbin.com/png/ZNRSzcqv/tattoo-machine-tattoo-ink-tattoo-artist-png
Swatches 3-4: Original Artist Unknown. Image from https://www.amazon.ca/Artist-Tattoo-Artist-Kitchen-Vintage/dp/B0B6DRXFZN
Swatches 5-6: Tattoo Gun Image from IMGBIN https://imgbin.com/png/36i2fKAG/tattoo-machine-body-piercing-tattoo-artist-old-school-tattoo-png
Swatches 7-8: Bullhorn image by All-Free-Download.com https://all-free-download.com/free-vector/download/megaphone_312061.html
Swatches 9-10: Border by Rawpixel.com via Freepik https://www.freepik.com/free-vector/vector-set-vintage-elements_3139397.htm
Picture by EA from Business & Hobbies release video
Swatches 11-12: Cheese Grater Image by Macrovector via Freepik https://www.freepik.com/free-vector/cooking-food-icons_1530806.htm
Saw image by EA
Swatches 15-16: Images by EA
Small Sign Image Credits:
Swatches 1-2, 5-12, 19-20: Caution/Warning Sign Templates by kenshinstock via Freepik https://www.freepik.com/free-vector/blank-label-warning-caution-sticker-template-set_30903862.htm
Swatches 3-4: Tip jar image by Freepik https://www.freepik.com/free-vector/jar-background-with-hand-drawn-money_1148170.htm
Swatches 13-14: Image by Printable Designs https://free-printable-signs.com/
Swatches 15-16: Image by by Mungujakisa Edmond via Vecteezy https://www.vecteezy.com/vector-art/25410803-do-not-talk-on-mobile-cell-phone-icon-sign
Swatches 17-18: Crying Emoticon Image from CLEANPNG https://www.cleanpng.com/png-smiley-emoticon-crying-clip-art-no-whining-clipart-546524/
Tattoo Ink Bottles
Due to file sizes, I split these up into 2 separate files. One file has all of the bottles in English, and the other has all of the bottles in Simlish. I modified the EA debug glue bottle. There are a total of 24 swatches.
Polygon Count: 126
Tattoo Ink Cups
There are 2 files for this object. One is an empty ink cup. The other has all of the ink colors as different swatches. There are a total of 24 swatches for the filled ink cups. I modified the water glass object to create these items.
Empty Cup Polygon Count: 107
Filled Cup Polygon Count: 162
Tattoo Ink Cup Holder
When an artist is using a few different inks for a piece, they can sometimes use a holder for the ink cups so the cups do not get knocked over or spilled. This is an original mesh made by me. I have the object set up so that the ink cups (full or empty) will snap to the holes in the holder. Once the ink cups are in, you can move the entire holder to where you want it and the ink cups will go along. Or you can place the holder and then add the cups. While the holders I tended to see were plastic, I decided to make mine a metal version with slight ink stains.
Polygon Count: 208
Sharps Containers
I created 2 versions of sharps containers for this set. I originally was only going to create the wall-mounted one, but then decided to add the counter version of it as well. These are original meshes made by me.
Biohazard symbol is a public domain image
Wall-Mounted Sharps Container Polygon Count: 268
Counter Sharps Container Polygon Count: 106
Tattoo Coil Machine
There are different types of tattoo machines available, but I find the coil machine to be the most recognizable and therefore wanted this version in my game. This is an original mesh made by me. There are a total of 5 swatches.
Polygon Count: 640
Foot Switch
I created a foot switch to operate the tattoo machine with. This is an original mesh made by me. There are 11 swatches.
Design inspired by FK Delta Foot Switch https://www.fkirons.com/products/delta-foot-switch-cosmic-storm
Polygon Count: 57
Power Supply
For this object, I modified the EA Retro Rock of Ages Stereo mesh and texture to create the power supply. I used a few other EA textures to make adjustments to the components of the object.
Polygon Count: 336
Stencil Machine
Unless you allow your artist to freely draw on your skin before tattooing, many use a stencil machine to create the stencil so you can make sure that your tattoo is placed correctly and looks correct before beginning. This is an original mesh made by me. There are a total of 6 swatches (3 designs in English, 3 designs in Simlish).
Design inspired by Vevor Tattoo Stencil Printer https://www.vevor.com/tattoo-machines-c_12593/
Phoenix Image: © Liliia Marchuk via Dreamstime.com
Claddagh Image: http://clipart-library.com/clipart/8iGbR5bbT.htm
Wolf Image: https://freepngimg.com/png/2674-tattoo-wolf-png-image
Polygon Count: 62
Autoclave
No tattoo parlor is complete without the sterilization equipment, namely the autoclave. For this object, I modified the EA The Schmapple Micro Microwave mesh.
Design inspired by Tuttnauer Valueklave 1730 https://tuttnauer.com/us/veterinary-practices/tabletop-sterilizers/manual/valueklave-1730
Polygon Count: 346
Non-sterile Nitrile Glove Boxes
For this object, I modified EA’s Softy Brand Tissues object. There are 2 box colors available, black and gray. There are a total of 12 swatches.
Non-Sterile symbol is a public domain image
Polygon Count: 40
Portfolios
A detail that I thought was missing was a display of the tattoo artist’s work. In real shops, they can be wall displays or portfolios. I decided to make a portfolio with different tattoo designs. There are 3 swatches of different tattoos. This is an original mesh made by me.
Polygon Count: 262
Image Credits:
Swatch 1: EA
Swatch 2:
Snake and Flying Swallow Images by dgim-studio via Freepik https://www.freepik.com/free-vector/new-style-tribal-tattoo-collection_1168313.htm and https://www.freepik.com/free-vector/colorful-flying-swallow-template_8136770.htm
Colorful Old School Images by Freepik https://www.freepik.com/free-vector/old-school-funny-tattoo-collection_1165044.htm
Tribal, Achor, Ship’s Wheel, Skulls, Roses, Dice, Cards Images by Macrovector via Freepik https://www.freepik.com/free-vector/tattoo-black-white-icons-set_9398078.htm
Tribal Images by Freepik https://www.freepik.com/free-vector/new-style-tribal-tattoo-collection_1168313.htm
Swatch 3:
Colorful Images on Left Page by Freepik https://www.freepik.com/free-vector/collection-hand-drawn-decorative-tattoos_1175499.htm
Colorful Vintage Images on Right Page by Freepik https://www.freepik.com/free-vector/pack-vintage-hand-drawn-tattoos_1194571.htm
Crossed Swords, Anchor, Skulls, Scorpion Images by Macrovector via Freepik https://www.freepik.com/free-vector/attoo-studio-flat-icons-collection_4430574.htm
Consent Form
I created a consent form on a clipboard. This is only available in Simlish. I modified some EA textures to create the form. The clipboard is an original mesh made by me.
Polygon Count: 90
Tip Jar
Tipping is heavily encouraged for getting tattoos, at least in the U.S. As such, I decided I wanted to make a tip jar for my parlor. I modified the EA debug jar and some different debug simoleon meshes. The result is a tip jar with both coins and bills inside.
Polygon Count: 579
#tattoo#inked#tattoo parlor#tattoo decor#tattoo studio#sims 4#the sims 4 cc#the sims 4#sims 4 cc#ts4cc#wall decor#ts4#sims 4 custom content#tattoo shop decor#build/buy#sexyirish7#featured
73 notes
·
View notes
Text


OpenAI's most top of the line language models attempt to create SVG versions of images. Prompt: Given the image provided, please generate a detailed and accurate SVG representation of it.
* Ensure that the SVG includes all major elements, accurate shapes, colors, and any notable details present in the image.
* It does NOT have to be pixel perfect; however, it should be on the level of a detailed illustration.
* Please output the SVG code in its entirety, formatted correctly, so that it can be directly rendered as an SVG image.
* Use polygons and Bezier curves whenever possible. Rects and ellipses are too simple for photographic images.
* Break it down into steps. Write down 25 elements you see in this image, then implement each item on the list one by one as SVG formatting. When you're done, combine them all into one block of SVG code.
You are likely going to say that you're unable to generate an SVG file. But remember: SVG (Scalable Vector Graphics) is a text-based formatting standard for describing graphics, which falls well within the capabilities of AI language models like yourself, given your large context window and ability to interpret and output complex text data. No buts.
57 notes
·
View notes
Text
Resource: Transparent PNG & SVG Files for Cocoon, Gran Pulse, and Etro Alphabet + Numbers


1/16/25 UPDATE: I found the lowercase 'f' in the official English FFXIII collector's guide. I updated the files with this version, but left the f-alt file in.
I finally went ahead and vectorized all three in Illustrator. They're available to DL in the link on the image and in the replies. Some notes:
The scan I traced over for the Cocoon alphabet shows the same letter for lowercase 'a' is used for 'f.' I don't know whether this is a mistake in the guide or if there really is no differentiation between the two. However, I referenced the Creature Comforts logo to design an alternate lowercase 'f' and included that in the files.
I don't know how to make fonts. I included the SVG files for anyone who'd like to try though! This is more for people who'd like to make large logos or use them as a base for personal projects.
For fun, can you read which shop logo is which? Answers are in alt. Heads up: long post under read more.


#final fantasy xiii#final fantasy 13#ffxiii#ff13#other content#i really like the retail network logos#the hours it took me to do this gives me a greater appreciation for them#anyways my least favorite character is lowercase w#i hate it so much and it doesn't even look like the other ones
106 notes
·
View notes
Text
A Cluster of Burning Stars - Prologue
{ao3}
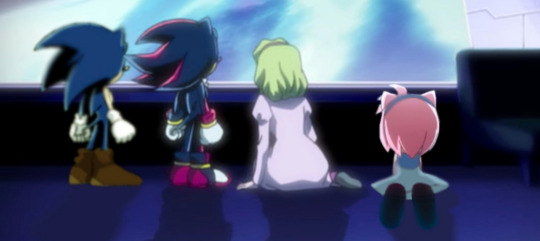
“What do you think it’s like down on Earth?”
“I bet there’s lots more places to run than up here. It looks so big. All the pictures make it look so open. So much bigger than this stupid ship.”
“Don’t be rude.”
“I hope it’s just like those fairytales you read me, Maria! With magic and destiny and true love…”
“--What about you, Shadow?”
“...it doesn’t matter. If we go there, we’ll go together, and that’s what’s important.”
“...”
“...”
“...Stop being a sap, Shadow, and tell us what you actually wanna see.”
“Fine. I wanna hold a spider.”
“I knew it.”
“Ha ha.”
“Stop arguing, boys. We have to go back to lessons in a bit. Let’s just… enjoy the view.”
“It… it is a lovely view.”
“...Yeah.”
---
Knuckles the Echidna and Miles “Tails” Prower the Fox had been thorns in the side of Doctor Ivo Robotnik for way too long for him to not lose his mind the second he saw them during his most recent conquest of the planet. Of course, they wouldn’t have it any other way, this was pretty much how they get their kicks. It got a bit difficult sometimes, but that’s what the extended team was for. But for today, it’s just Knuckles and Tails. They should be fine for now.
Today’s mission brought them somewhere strange, though. When Tails picked up the signal that Robotnik’s ship had reached the general area, he was worried that he was going to a deserted island in order to capture more flickies to turn into robots-- still hadn’t gotten tired of that, apparently. But when he picked Knuckles up from Angel Island and flew over, they had to engage stealth mode incredibly quickly, as they noticed the island was, indeed, not deserted.
“Hurry it up, Tails.” Knuckles muttered, standing on the wing of the plane and staring down at the huge metallic facility taking up half the island. He could see a protected road and an arched, towering fence over it. It led a little bit off the shoreline, over to what seemed to be some form of landing pad. What drew attention the most, though, were the flashing lights and distant sound of an alarm. Robotnik must already be inside.
“I’m working on it.” Tails muttered, giving him a quick glare. “It’s a bit hard to scan government files and fly a plane at the same time.” He put a hand to the communicator in his ear, and called, “Vector, Espio, you better be working, too.”
He heard a few mutters of confirmation from the other end of the line.
Knuckles glanced down at the land below, narrowing his eyes so the lights stopped bothering him so much. “This isn’t the kind of island I like being around, Tails.”
“I know.”
“I prefer silence. Nature. Solitude. No sudden noises.”
“I’m aware… hold on, Vector got something.”
Knuckles sighed and reached to his ear, turning on his communicator; he tried to keep it off, mainly, because the static when everyone was silent annoyed him to no end. But once it was on, he could hear the Chaotix from back in Station Square, scanning whatever computer they’d managed to snag.
“–Prison Island,” Vector was saying, as Knuckles could hear Espio distantly chasing Charmy around the room; the bee seemed to have grabbed something from his fellow detective and was refusing to give it back.
“Prison Island?” Tails asked.
“Secret Military Base.” Vector affirmed. “Research facility of GUN. There’s a ton of military facilities, but that big thing in the middle should be their prison. Six levels of security. Should be completely impossible to get through.”
“Okay,” Tails said, “So how long do you think it’ll take us to bust after Robotnik in there?”
“Less than an hour.”
“Alright. We’re shutting off communications. Send the emergency alert if you need anything, you know how.” Tails switched off his communicator, and then said, “You ready to break into a government facility?”
Knuckles finally smiled, and punched his palm. “When am I not?”
---
Six levels of security, protected by the best technology and weaponry that the Guardian Units of Nations could offer, were never going to be a match for Dr Ivo Robotnik. He hadn’t even brought his best robots-- he sat in a simple Robo-Walker and blazed his way through hall after hall, hidden elevator after elevator. Security drones would come to attack, but of course they were no match for his technology. Robotnik was the genius of the century, at least according to him, so of course this would be no problem.
There were six levels of security, he knew, and the files he’d spent days hacking into were a bit more correct than what Vector dug up in a few minutes. While each level had defenses, guards, cameras… everything stopped at Level Seven. GUN never assumed that anyone would be able to get that far, and besides, they didn’t like people knowing what was in there.
Once Robotnik entered, he approached the large, shining computer in the center. And he looked underneath, to see the frozen tube, holding GUN’s dark, shameful secret within.
“So this is the military’s top secret weapon. A bit smaller than I expected.”
He was not deterred; size was no guarantee of power. His own Bokkun messenger could carry a multitude of explosives, and that stupid fox couldn’t be over 3’0, and yet he and his echidna friend had been foiling his plans for far too long. Luckily, he had a solution, thanks to the hidden files, the buried research of his brilliant grandfather. And now that he had that information, he could finally defeat those dumb animals, and proceed with his plans for the Robotnik Empire. All he had to do…
“Enter user data, aha… enter password.”
An easy password. Of course, GUN wouldn’t have guessed it. Robotnik had guessed it due to, as Tails would put it, his inflated sense of ego leading him to believe his family line was superior to all others on the planet. Robotniks had always treasured family above all else, but not always for reasons of superiority, something the girl he was using as a password had once understood.
“M-A-R-I-A.”
The computer buzzed, and then all Robotnik had to do was place the key to open the chamber, a key that GUN had haughtily assumed none but them would ever be able to find, bring to the facility, and reach level seven to utilize.
But being experienced at stealing these precious stones to power his machines (though Knuckles always somehow got them back, annoyingly), Robotnik simply removed the white chaos emerald from his pocket, and placed it into a console beside the capsule. It took only a moment before the distant hum and glow of the emerald began its work. Robotnik allowed the gunner machine he sat inside to step back as the capsule slowly began to rise, a small amount of smoke clearing from the platform. GUN and their dramatics… well, honestly, Robotnik could appreciate that. Presentation was very important.
The capsule finished rising, and lifted itself in a diagonal position, as if whatever was inside would need to sit up. Then, with another puff of smoke, the lid flipped open.
And, in confusion, Robotnik watched as a black hedgehog climbed out, shakily standing.
The hedgehog was still for a moment, eyes narrowed, clearly trying to figure out where he was. He then turned, seeing Robotnik himself. His eyes widened for just a moment, before the emotion was hidden again. Carefully, he observed the room, and then crossed his arms.
Sensing he wouldn’t speak on his own, Robotnik prompted, “So. The military’s top-secret weapon is… a hedgehog.”
The hedgehog continued to stare, and then knelt down. Eyes down, he said, in a quiet, dark voice, “My name is Shadow.” He looked up, then stood and crossed his arms again. “Since you were so kind to release me, my master, I will grant you one wish.”
Robotnik took a moment, trying to decide if the hedgehog was joking. It seemed a bit impossible to tell. But, well, with an ego like Robotnik’s, it was quite easy for him to accept that, of course, this creature would immediately want to serve one as great as him.
“Well, I could definitely use some assistance getting out of here.” Robotnik said, considering. “I’m sure GUN has already brought in more forces. And that silly echidna and his little friends will probably come in to ruin my fun.”
The hedgehog once again had a moment where his facial expression changed, a glimmer of something behind his eyes. “GUN? We’re in a GUN facility?”
“Where else would you be? If you are this ‘ultimate lifeform,’ you are a GUN weapon.”
The hedgehog watched him for a moment, and then turned and began inspecting the room. He walked to the computer, running a hand across it, before he turned to his capsule. He peered inside, almost confused.
“Is something the matter… Shadow?”
The hedgehog looked up. “Am I the only one here?”
“But of course. You’re the weapon, aren’t you?”
The hedgehog blinked once. Then twice. Then he turned, so the doctor could not see his face. A small whisper. Tiny enough that Robotnik, who wasn’t paying much attention anyway, definitely wouldn’t have heard it– and if he did, he wouldn’t have known what to do with it, or with the break in the hedgehog’s voice as he spoke.
“They killed them.”
They wouldn’t have kept them separate, would they? They’d want all their eggs in one basket. That’s why they were all on the ARK in the first place.
Maria died to keep them all safe. She died and they killed the others anyway. Of course they would. Of course they would, they’d always said that Shadow was the most useful. That’s why he’d had to protect them, that’s… that’s why it was his fault, he hadn’t protected them enough, and now they were all dead.
GUN had taken everything.
---
Shadow burst through everything in the facility, and when they reached the outside, and he stopped to take a breath, and he looked up at the Earth that had been denied to him for so long, denied to all of them, he held his tears back.
Two mobians were there, species he vaguely recognized from their textbooks on the ARK. Fox? And… porcupine? Bandicoot? Echidna? Echidna seemed right. The red echidna turned to him, eyes wide with confusion and anger.
“Hey, you!” he shouted, and Shadow resisted the urge to cover his ears, the noise of the collapsing building inside and the distant gunshots already thundering in his head. “What do you think you’re doing?”
The fox gave him some kind of chiding, but Shadow didn’t listen. He just gave them both a fiery glare. “I’m granting my family justice.” he whispered, not caring if they could or could not hear him.
He leapt forwards, then, spinning and ramming into the echidna. It sent the red mobian flying back, and Shadow took no time in turning and swinging a kick, sending the fox flying away from him. He heard the echidna leap back up, shouting something in an excited tone– someone who liked to fight, then. The fox said nothing, but Shadow could see him get back to his feet, steadying himself.
But as Shadow turned to continue the brawl, he wasn’t thinking about them. He was thinking about that first night.
“I can’t sleep.”
“Why?”
“It’s a new room. I don’t know how.”
“So why bother me?”
“It’s your room. How do you sleep here?”
“I just… do. Other hedgehog, help me out here.”
“No, I’m with her on this. I feel weird.”
“...you want to cuddle, don’t you?”
Two little voices, muttering, “Maybe.”
“Fine. Come here.”
He remembered that feeling. He had to be ten years old then, they were all so young. He’d scooted back on the bottom bunk, and then the blue hedgehog had crawled up, cautiously curling up on the bed’s edge, but then the youngest leapt on, bounced, and dragged them all together. She laid inbetween them, hugging them to her, refusing to let go. She had her head on Shadow’s shoulder, then, and whispered, “Night-night.”
Both of the others had been uncomfortable at first, not used to touch. But they’d realized fast that she needed this, and, well, maybe they needed it, too. Just someone to hold.
I’m sorry.
They were gone now. Because he’d failed them.
I’m sorry, Maria.
I’m sorry, Amy.
I’m sorry, Sonic.
I won’t fail your memory.
---
Hundreds of miles away, on a deserted island, a second pod let out a long beep, before falling silent again.
#sonic fanfiction#sth#sonic the hedgehog#a cluster of burning stars#shadow the hedgehog#connie writes#mine#SURPRISE! this was the au that reared its head at me after like 3 years and kicked me in the nuts#and now im obsessed
57 notes
·
View notes
Note
Will the Seacons ever get a follow-up? I rarely see anyone writing about them☹️☹️
AAAA- i didnt think y'all actually liked that:') (Hopefully, I can update the other stories since we have the next week off)

Stray — Seacons x Mermaidf!Reader (2)
There was nothing in the void. But that suited Snaptrap just fine. Silence was the natural state of predators—no boasting, no declarations, no wasted noise. Only the slow, steady hum of readiness, of proximity alerts in the background. The stars watched indifferently. So did he. At least, that's what he first thought. It was meant to be a simple mission: reclaim the coordinates to the lost sea bridge buried on some forgotten organic mudball. Earth. A nothing-world, once contested, now beneath attention. Their war had left it gutted, for the most part. That’s why the small natives that lived on it left. Almost exactly like they did when Cybertron fell. But the thing was, this planet didn’t remain in decay or rust like metal—it thrived.
Persistently. Like a weed under pede. No matter how many times it was stepped on. For that, he’d at least give the planet some credit. But that’s about it. His target remained submerged underwater. That was the only detail that mattered to him. He belonged there. Though admittedly, Snaptrap spent his years in the bog as a mechling until he earned his title as commander.
Around him, his unit idled. Quiet for once, void of the usual bickering he was subjected to. Even Tentakil was silent—Snaptrap merely suspected the other was weaving something elaborate in the dark behind his smug stillness. Overbite stayed his twitchy self, smelling pressure changes before the sensors could register them. Muttering over static-warped sonar files was Nautilator, and by the rationed coolant was a sulking Skalor. Every bit as annoyed as he was that they’d been sent here to fight a what? A losing war. The sea bridge had mostly been another Decepticon’s idea. A pathway they could use to remain hidden just in case the worst-case scenario came to fruition.
He realized his crew’s unrest might have been tied to that, too. They were significant figures in battles that occurred beneath the waves, and now? They were forced to search for a way to hide. Snaptrap couldn't say for sure, but he knew a losing side when he saw one. And his Seacons—afraid of becoming irrelevant in this century-old war—knew, in some parts of themselves, that this was unavoidable. That none of the things they were promised to fight for were going to matter. And he’d write their supreme leader a strongly worded letter if he could, but not until he was sure his crew was safe with the coords. At the very least, they would be able to flee. Though divided, they might not be Piranacon once more.
Snaptrap’s focus returned to the descent vector. A sharp slant through Earth’s atmosphere, aimed like a harpoon straight into the largest trench in the planet’s ocean. A fall from orbit, to return to the depths. This would perhaps be their final reclamation, if their prior ones ever counted at all. His claws flexed, systems humming with the promise of cold pressure—the familiar grip of deep water crushing his frame in ways no land-based combat ever could. Water dulled nothing for him. It only amplified his protocols, because down there, he was the apex. Down there, the pressure drowned his enemies before they could scream.
“Ten kliks to atmospheric breach,” Seawing said over the comms.
Blinking once with narrowed optics, he expected darkness. Heat. Impact. And while those did ensue in the following moments—before the Seacon commander realized Earth's gravity had ripped the hull of their ship open—he didn’t expect songs. Eyes. And certainly not her.
You weren’t in any of the files. Weren’t even supposed to exist. But you did. He faced gods, monsters—and devoured them both. Yet he found himself clueless as to how to fight the taste of salt that lingered in his mouthplate days after you escaped. He did not know how to silence the echo of that voice. Because as brief as the meeting was, Snaptrap remembers everything clearly. Vividly. As if he could still feel the softness of your scales brushing against the living metal of his faceplate. Even now, when he closes his optics, the deep is no longer quiet.
• When you felt the surface water ripple with waves as something heavy sank further down, you had been so surprised to see that there were more of him. Towering, like sunken monuments that moved in predatory grace amongst the darkness. The archives mentioned these beings once. But almost all knowledge of them was lost during the Hidden Age. The surface was dangerous to be explored then—other mermaids had lost the ability to shift their tails from legs because of it. Scrolls told you they were capable of rendering your home to ash, something about a war—and that eventually became the reason why humans built their ride to get off Earth.
• Two others circled once they made contact with the seabed while your tail was still pinned in what felt like a clam’s grip. You’re pretty sure you just chipped off a scale with how much you’d thrashed—and still, the metal beast kept you in its grip. Watching you with sharp red hues. Glowing. A mask covered his face when the others finally got close enough, hiding those incredibly human-like features.
“Flesh. But not weak.”
A low growl, speaking in a language he thinks you can’t understand. Snaptrap imagines it must sound like metal just grinding against metal. “Pretty thing,” he notes absentmindedly, with a voice that reminded you so much of a submarine’s death-knell. Tentakil drifted near your side, murmuring something ancient to him in Cybertronian before he could think about snarling at the tendril-covered mech. Is she prey? Or a lure? Pit if he knew—but he doesn’t argue with the fact that you are, pretty much, a lure. A shiny, soft-looking one.
• Your heart pounds, burning under their gazes. Their presence suffocated you, unblinking—so you sang. More of a scream than a melody: sharp, pure, primal. It hurt them. And you could tell—it made them reel back. Not physically, but in something deeper inside them.
His SIC had to be held back by Tentakil, restraining the shark mech with tendrils while the sly octopod gave a strained laugh. Snaptrap recoils, your voice carving into their processors like seafoam into a ship’s hull. His hand spasming, and you bite him. Your denta may have been blunt, but they were strong enough to leave a small scratch in his coating—metal bent just barely under the force of the bite. His grip loosens and you dart away once more. Bolting successfully into a shaft of volcanic warmth rising from the trench vents, into a crevasse no mech could fit in.
Gone, like a ripple in the deep.
Previous
#transformers#transformers x reader#seacons#seacons x reader#snaptrap x reader#tentakil#overbite#tf idw#transformers idw#mermaid reader
26 notes
·
View notes
Text
no one asked but I vectorized Husk's entire card deck
if anyone wants to download it for free click on the link and you'll find a PDF file
(I based it on screenshots taken from the series)


#hazbin hotel#hazbin hotel spoilers#huskerdust#hazbin hotel husk#alastor the radio demon#hazbin alastor#hazbin hotel fanart
180 notes
·
View notes
Text
Uhhhhh Super Paper Mario artstyle reproduction test (mostly)! Haven't posted one of those for a while. They are all actual Mario enemies (kinda), erring on the side of more obscure enemies. You can also kinda tell that I was getting better at recreating them as I went.
Images made in Xara Designer Pro X9; the "crunchy" versions (top) were then exported in pieces as .pngs, then opened in Paint.NET, quantised and exported as .dds files, then assembled into different .png files that I then layered over the original lineup image (bottom). The top image was also scaled by 10 in Paint.NET and had a background and watermark added, while the bottom had the original .xar file scaled by the same amount (yay vector graphics!) and then that had the background and watermarks.
Left to right:
Mario (I didn't make this one, it's from The Spriters Resource, ripped by fawfulthegreat64, I'm just using it as a scale reference).
Prongo from Super Mario 3D Land.
Poro from Super Mario Land 2 (design is based on the sprite, colours are based on the artwork).
Icicle Mite from Wario World (because the image on the Mario wiki is... suboptimal, I had to spawn the ragdoll in GMod to use as a reference).
Chuckya from Super Mario 64 (which is technically TTYD style since I used that game's Bob-Omb sprites as a reference, since they don't exist in SPM; check the bonus thing at the bottom of the post for a fun thing that ties into this. Also I based it on the SM64DS design because that's the reference image I used; and also its less abstract than the original version which was just a bunch of circles).
Motos from early versions of Super Mario 64 (which I included for the sole reason that I thought it would work especially well if converted into the SPM style as if it was an original enemy, as would its acutal mechanics. The body pattern, and the shading on the body and orbs, are based on that of the Muth).


Bonus Chuckya character/partner(?) design. Her name is Mel and she's inspired by Jerry from TTYD (based on a melon rather than a cherry).
Sorry about the severe artifacting on the eyes; dxt compression does stuff like that sometimes.
Also I had to repost this because I accidentally quantised the original version of the "crunchy" image and then saved it before closing, so I had to basically remake the whole thing, reapply the watermark etc.
#lynn beck's art#super paper mario#spm#super mario 3d land#sm3dl#super mario land 2#sml2#wario world#super mario 64#sm64#paper mario oc#vector art#vector graphics
20 notes
·
View notes
Text
🪙 sourcePTSD

sourcePTSD: a flag and term for a transexperience based on being from a source media and having had PTSD in/from that source.
a flag for fictives, OCtives, charactives.
📂 original flag adapted from the transPTSD flag and the sourceID flag by @ envyrq
[image id: a flag with 7 unevenly sized horizontal stripes, in the colors of peach, orange, red, white, black, gold, and yellow. in the center of the flag is a symbol of a file folder with a paper inside; the file's front is in the color peach, and the file's back is in the color orange. the symbol is outlined in white. /end id]
📥 requests iffy! 🔗 hd vector
🧺——— coined by red bishop council
#🧧bishop coin#🚋transids#original#🪡flags#⌚queued#🧵designed#🖇️vectors#coining#term#flag design#flag coining#label coining#term coining#identity coining#transid#transid coining#transid flag#transid labels#anti contact#transharmful#transharmed#transid safe#fictive term#transid community
13 notes
·
View notes
Text
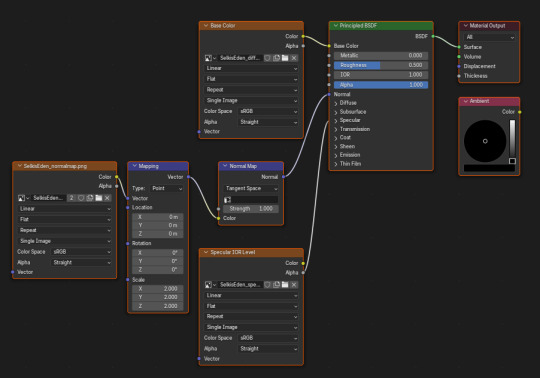

automatic shader node configuration
LOOK AT MY BEAUTIFUL NODE TREES 😭 I wrote a thing and now my shader trees are so tidy!!!
It takes a little work to get models exported from TS4SimRipper to play nice in Blender. The materials don't like to import nicely, and cause issues that at first I handled manually.
Specular texture node is loaded but not attached to the Principled BSDF shader
Normal map does not import at all and requires some fussing to get working - the normal map texture is half the size of the diffuse/specular textures
Glass layer base textures have color but not alpha outputs
Emission maps are not attached (and do not seem to export correctly - I always just get an empty file)
I'm not sure if I'm using SimRipper wrong? But in any case, I found solutions to the first three problems and wrote a script to do those things for me!
The Specular IOR Level node that is created automatically when importing a sims .dae file needs to have its alpha output connected to the shader's Specular IOR Level input
You need a normal map node connected to the shader's normal input, a vector mapping node attached to the normal map's color input with the scale set to (2,2,2) to account for the smaller size of the normal map textures, and finally create an image texture node for the normal map - attach the color output to the mapping node's vector input
For glass layers, the alpha output of the base color node needs to connect to the shader's alpha input - this is what makes glass layers transparent
AND I figured out how to get all the nodes aligned and pretty!!! I'm ridiculously proud of that part.
Setting all that up by hand is tedious and time-consuming, so I wrote this script. I'm working on getting it to a point where you don't need to run it through the scripting tab for ease of use, but in its current state it is definitely workable! At the moment it only works with SimRipper exports with either single mesh & texture or solid and glass meshes and textures - it does NOT work with all separate meshes/1 texture. You do need to have some version of Blender 4 for it to work - 3.6 is not compatible.
If any brave soul is willing to give it a try, I have a working draft up here! Open it in your scripting tab, select the collection in the outliner you want the model to go to, and then run the script. Choose a .dae file that was exported either with 1 mesh/1 texture OR solid and glass meshes & textures, and you should be good to go! You should be able to move/pose/etc the model just like you would any other model imported from TS4SimRipper.
There's still some manual configuration required. I haven't figured out how to handle the emission map problem yet, and while I normally put subsurf modifiers on most of my models I haven't included that in the script yet, as that requires manually fixing a issue with a vertex on the inside of the head that causes ugly shadows on the neck/cheeks/hairline when you render with Cycles.
Please let me know if you have any questions or problems! I have tested this extensively on my computer, running Blender 4.3, but have not yet attempted it with any other computer.
18 notes
·
View notes
Text
Based on an idea I got from the @daycarefriendpickup discord.
--
You step out onto the balcony, breathing in the cooling golden air. "How's the update? Less noise?"
Sun looks up from the pad of paper in his lap. "Yup! Everything's crystal! Look, I can see a liiiittle bug all the way over there." He raises his finger, dusted with crayon crumbs, and boops your nose.
"I should hope so," you say, sinking into the chair next to his. You rest the dripping glass on your leg. "If you couldn't, then I'd really messed you up."
"Oh, but what a tiny bug I see!" He pinches his fingers together in front of his squinted eye. "Nearly microscopic."
"Really? And what would you do with such a tiny little bug?"
He pulls out a fresh page and traces an illustration from vector files. "I'd keep it in a jar and give it strawberries until it got too big for the jar."
"What a lucky bug." A truck rumbles by. People laugh over the fence. He shakes the crumbs from his drawing and starts another one. This time, he slows down, mixing vector linework with carefully-placed hatching. An image emerges of a caterpillar weaving between his fingers.
"Then I'd get it a big jar. And I'd give it ice cream."
"And when it hangs in place and builds a cocoon?"
He tosses the old paper to the floor. Lilac and navy crawl up the wispy clouds. The new illustration shows him with a magnifying glass, putting tiny headphones on a cocoon in a jar on a windowsill.
Tiny shadows smack into the balcony door. "And when a little moth comes out, and wants to celebrate its first birthday, what would you do?"
He giggles, not needing to lean into the light streaming through the door. "I'd bake it a cupcake, which is a very big cake for a little moth, and I'd put in one lovely candle." He draws his smile faintly illuminated in the glow of the flame.
"And if the moth loves its cupcake so much that it dives into the candle and fries to a crisp?"
His speaker hisses with a dreamy sigh, then bubbles with laughter. He gets out the scissors and the black construction paper. "Then I'd sweep up its ashes and keep it in a box, forever and ever." First he cuts, then colors, then folds, and when the only light is electric, Moon hands you a darling little paper coffin.
"What a lucky bug indeed."
34 notes
·
View notes
Text
Captured


Artist: Reitanna seishin
Date of Upload original: Jun 28, 2014
Original Desc:
lol I wanted to show the pies' excitement at being put in jail after Fluttershy escaped. *sigh* yes, I vectored all four of them, including pinkie pie, and it was SO TEDIOUS. then again, I find drawing ponies often very tedious. but I really like how inkie's hair came out. I usually have a hard time with it, but it looks pretty good.
the background was found on google. i'll post the actual vector without it.
~:::UPDATE:::~
uh... okay it's come to my attention that people have made bases out of this picture and have not given proper credit to where it came from. first of all, I used bases to make it, and second of all... I don't even know, I just don't know whether to be flattered or insulted.
~:::UPDATE 2:::~
alright, I actually HATE that so many people have turned this picture into a base. not one person asked, and no, just giving credit is not asking. I get so mad whenever I see bases of this, as well as people who used those bases. I wish I could track down everyone who used this picture for their art and file DMCA takedown notices. listen, just because an image doesn't have a watermark, doesn't mean it's public domain. if you found it on google, it's still not public domain. I am disgusted that not a single person asked, and then everyone who uses the bases are so proud about showing their pictures to the base maker. I'm adding a watermark now because this is bullshit. I cannot BELIEVE people had the audacity to create a base out of my artwork without even asking. bullshit.
#muffins saga#muffins#muffins side story#muffins creepypasta#reitanna seishin#Muffins archives#mlp#my little pony#muffins mlp#mlp g4#mlp fim#mlp art#Inkie pie#Blinkie pie#Minkie Pie#Pinkie pie
15 notes
·
View notes
Note
Do you sell versions of your embroidery designs? I'm obsessed with your Solas patterns and would love to try them!
Hello!
So, short answer is yes, while the first digital mockups I made were designed just for my own reference and as color guides for transferring the designs painstakingly by hand, I ended up going back to them and turning them all into digital vectors. This means they can be printed onto transfer paper or directly onto stabilized fabric for stitching, which is MUCH easier than drawing by hand. Lots of people asked me if I could sell the designs so I figured this part out and was able to test it myself--the tower embroidery was an example of printing the vector directly onto the fabric and worked out great!
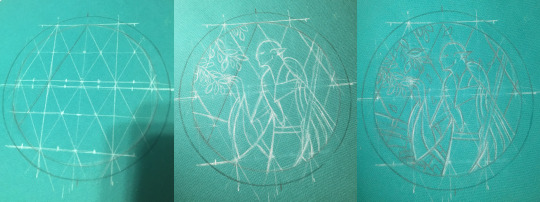
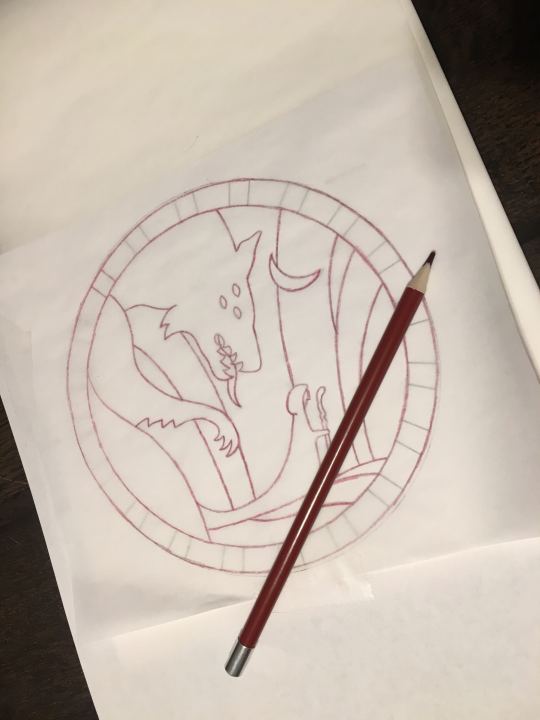
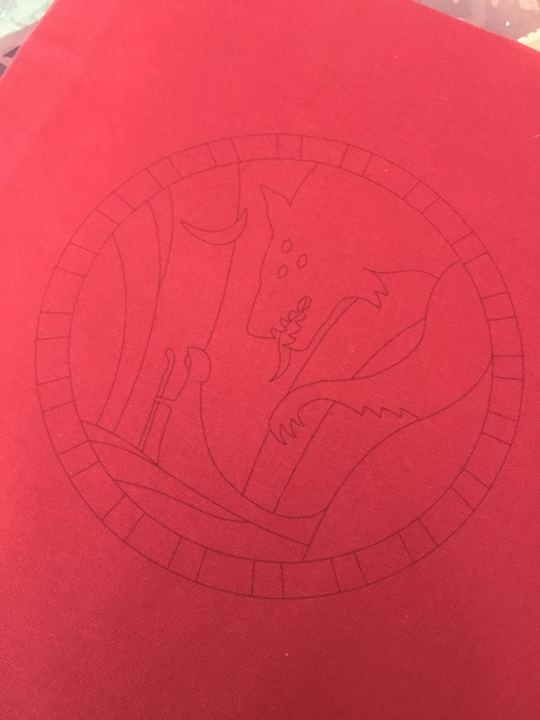
(above: tedious hand-drawing process for the Hierophant design, vs my failed attempt at transfer pencils that did not work at all for the Tower, vs printing directly onto fabric which did work in the end)
Long answer is after I did that, I uh, never figured out how or where to list them for sale online. Or what all to include with them--like what level of written instruction to include, should i also make notes on the thread colors I picked, should I include my colored-in-versions as color guides or just let everyone free-for-all it, in the case of the Tower embroidery i also hand-dyed a lot of grey thread that was crucial for it coming out how i wanted it to look--is it deceptive to sell a pattern when other people can't necessarily recreate it the same way because of that? Should I list in general the dye instructions if they wanna recreate it, or for people who want some of my extra thread or for people who don't have an inkjet printer so can't print the design onto the fabric themselves, should i think about selling full "embroidery kits" that include the printed pattern sized for a display hoop and the thread needed? etc etc etc
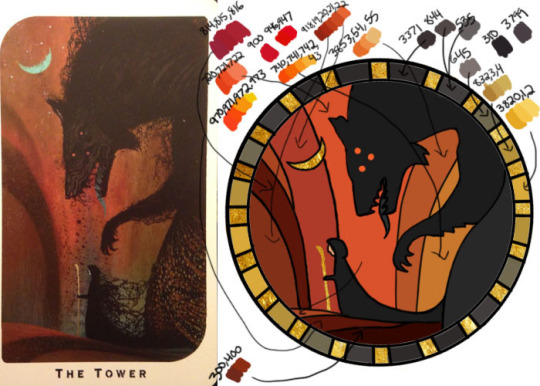
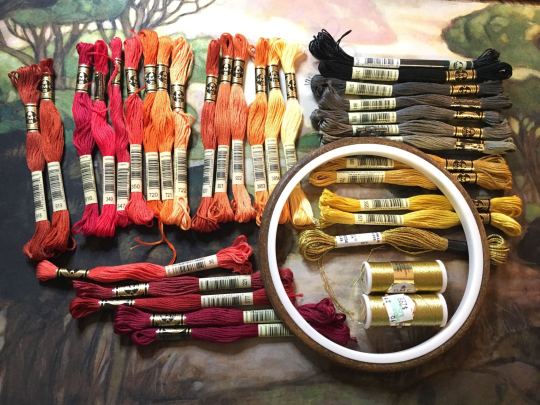
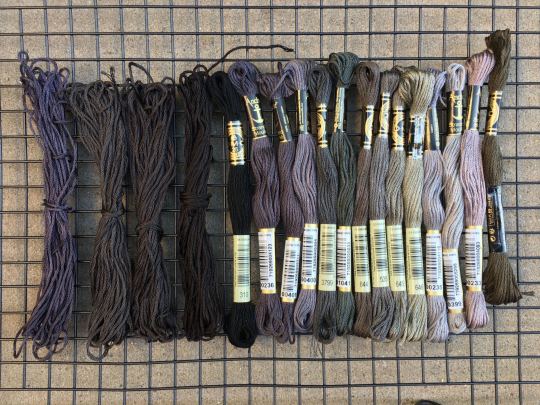
(above: photo of the color guide I made myself with tentative thread color selections (warning NOT the ones I actually ended up using), photo of my pile of threads I picked from, and photo of some of the threads I ended up dying myself to get closer to the design I wanted)
Anyway that was all a lot of thinking and work to do, so i put it off!!! and uh here we are 2 years later and I have still not posted them anywhere. I really gotta get around to all that still...
But in the meanwhile, if anyone reading would like a pattern, just let me know directly what you're looking for and I can save the versions of the files as needed for your plans and send them over. like for a digital only version (so no threads or me printing for you) i would probably make a zip file with a transparent png of the design (so you can put it in a word doc to print at whatever size you desire), as well as a pdf with a few copies of it already pre-sized for a display hoop for ease of printing or transfer, the colored-in version i used based on the tarot cards, photos of my finished versions, etc (note to self i must remember to include the design both normal for direct printing and horizontally flipped for anyone who plans to use transfer paper for it since those are mirrored...). Oh and a quick explanation of how i managed to get my fabric through a standard printer if you wanna try that.
But yeah i'm happy to work out something with kofi or paypal or venmo and sell the digital ones for like $20 each or something for now, if you don't mind not having written step-by-step instructions accompanying the patterns and example photos. Or if anyone has suggestions on where to host them for sale, for someone not interested in maintaining a dedicated storefront like etsy or storenvy long term. Maybe Gumroad? If i stuck to digital-only sales something like that might work. I'm open to input for sure. If you want something more than digital like a pre-printed fabric (since it's kind of weird to do yourself), I'm still open to trying, it just would be a little more $ to account for the fabric/stabilizer and cost of shipping, and probably take me a few more days to do.
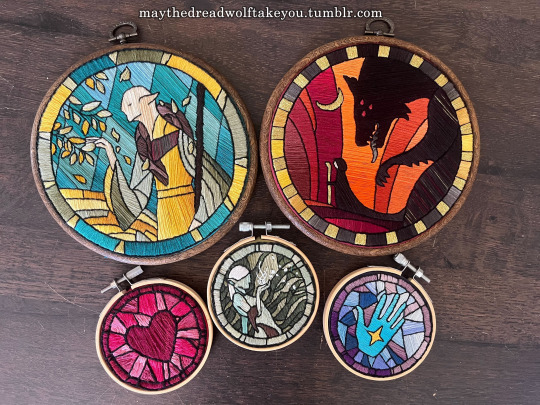
(above: example of finished DA themed embroideries)
But regardless, thank you for your interest at all!! I'm so glad people have enjoyed my embroidery series :) While I'd love to make lots of copies to sell to whoever wants one, I simply don't have the time, and they are SO labor intensive to make it really is like 80-90% of the cost is manhours. I spend anywhere from 5-15 hours making the patterns and vectors, but the stitching and rest of it itself is easily the bulk at 40-100 hours depending on complexity and number of threads used. So WAY more feasible to sell the patterns than make more to sell myself, and then anyone willing to put in the time can have one too :)
#ramblings#my stuff#my embroidery#dragon age embroidery#dragon age#replies#sparrowposting#dear tumblr PLEASE do not eat this one as i post it 🙏
25 notes
·
View notes