#3 oz glass canning jars
Text
When it comes to practicality and versatility, our 6 oz glass jars with plastic lids are a top choice. These jars are perfect for storing spices, herbs, homemade beauty products, and more. The twist-on plastic lids provide a secure seal, ensuring your contents stay fresh and spill-free. 3 oz Hexagon Glass Jars: Add a touch of elegance to your packaging with our 3 oz hexagon glass jars. These unique jars are perfect for showcasing specialty products such as honey, jam, or bath salts. Their distinctive shape and crystal-clear glass construction make them a standout choice for artisanal goods.. For more details www.skunkjarspackaging.com
#3oz glass jars#3oz glass jars with lids#3oz glass jars for sale#3oz glass candle jars#3 oz glass jars wholesale#3 oz glass jars with lids#3 oz glass jars with lids wholesale#3 oz glass jars#3 oz glass canning jars#3 oz glass bottles with caps#3 oz glass bottle with cork#3 oz child resistant glass jars#3 oz glass bottles for sale#3 oz hexagon glass jars#6 oz glass jars with plastic lids#6 oz glass jars with lids#6oz glass jars#6oz glass jars with lids#6oz glass spice jars#6 oz amber glass jars#6 ounces to glass#6 oz glass bottle bulk#6 oz glass baby bottles#4 oz glass jars with lids near me#6 oz glass bottles with caps#6 oz glass bottles with cork#6 oz glass containers with lids#10oz glass jars#10oz glass candle jars#10 oz amber glass jars
0 notes
Text
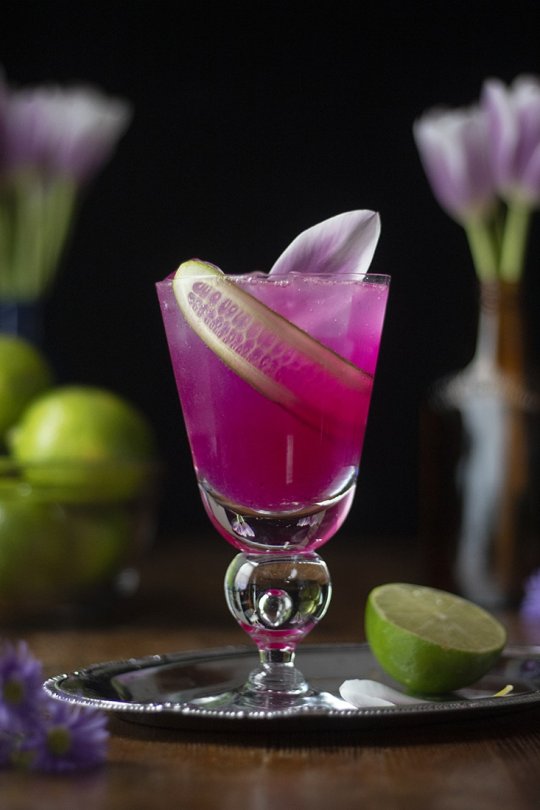
Dragon Fruit Cucumber Limeade !
INGREDIENTS:
For the dragon fruit syrup:
1 cup sugar
1 cup hot water (does not need to be boiling)
100 g frozen pink dragon fruit (about 1/2 cup)
For the Dragon Fruit Cucumber Limeade:
1 oz dragon fruit syrup
1 oz fresh lime juice
1/2 baby cucumber (or 3 slices large cucumber)
1 slice jalapeno (optional)
4-6 oz still or sparkling water (to taste)
1 1/2 oz vodka or tequila (optional)
To make a large batch:
1 cup dragon fruit syrup
1 cup fresh lime juice (about 8-9 limes)
4-6 cups cold still or sparkling water (to taste)
1 cucumber, chopped
1/2 jalapeno, chopped (optional. Remove seeds for less heat)
1 1/2 cups vodka or tequila (optional)
INSTRUCTIONS:
For the dragon fruit syrup:
Combine the sugar, hot water, and frozen dragon fruit in a heatproof jar or other container. Stir to help thaw the fruit and dissolve the sugar.
Allow the mixture to sit for a few minutes, until all of the fruit has thawed and the sugar has dissolved. Use a fine mesh strainer to strain out the seeds and any excess pulp.
Store any leftover syrup in a sealed container in the refrigerator for up to 2 weeks.
For the Dragon Fruit Cucumber Limeade:
In a cocktail shaker, muddle the cucumber and optional jalapeno.
If using still water: Add the syrup, lime juice, optional alcohol and 4-6 ounces of water to the shaker and fill 3/4 with ice. (If using vodka, start with 4 ounces of water, you can add more, to taste, afterward).
Shake until chilled, then fine strain the liquid into a highball glass filled with ice and garnish with cucumber.
If using sparkling water: Add the syrup, lime juice, optional alcohol and 1 ounce of still water to the shaker and fill 3/4 with ice.
Shake until chilled, then fine strain the liquid into a highball glass with ice and top with 4-5 ounces of sparkling water, to taste. Garnish with cucumber.
To make a large batch:
Add the cucumber and optional jalapeno to a blender with enough water for the blender to operate (try 1/4 cup). Blend until mostly liquified, then use a fine strainer to remove the pulp, reserving the liquid. If you don't have a blender, you can use a muddler or a large wooden spoon to mash the cucumber and jalapeno in a small bowl or large measuring cup, then strain, pressing on the pulp to extract as much liquid as possible. Reserve the liquid.
In a large pitcher, add the dragon fruit syrup, fresh lime juice, and cucumber/jalapeno liquid. Stir to combine.
If adding vodka or tequila, add 12 ounces (1 1/2 cups) alcohol to the pitcher and top with 4-5 cups of cold still or sparkling water, to taste. If skipping the alcohol, add 5-6 cups of still or sparkling water, to taste. Stir gently and serve in highball glasses over ice. Garnish each drink with cucumber.
Courtesy: Moody Mixologist.
This article was not sponsored or supported by a third-party. A Cocktail Moment is not affiliated with any individuals or companies depicted here.
#art#design#cocktails#drinks#cocktail#cocktail recipes#recipes#drink recipes#drink#cucumber#dragonfruit#happy lunar new year#happy new year#limeade#mocktail#moody mixologist#tequila#vodka#syrup
47 notes
·
View notes
Text
Pine - The Mundane and Magical 101

Growing up on my edge of the west coast, Pine trees have always been abundant. Specifically the Western White Pine for example.
This plant spirit is one I work with generally in the winter as this is where I personally feel it’s energy is stronger. It's a wonderful plant to work with and has been used by indigenous cultures to this land for healing. To venerate and honour this land I work with Pine.
Scientific Name: Pinus
Family: Pinaceae
Parts used: For species of Pine it varies
Planet: Mars
Element: Air
CAUTIONS: It is important to know not all species of Pine are edible. Also please note that if you have pets be cautious with Pine as it can cause irritation to the mouth and gastrointestinal issues. Which can lead to serious complications if ingested. Keep any pine needles and oils out of reach.
ALWAYS check with your local herbalist and doctor before consuming any medicinal medicine as they will be able to direct you on proper dosages. Some medications can also interact and so can some conditions with certain herbs.
Do NOT consume if pregnant and Pine may irritate the gut by creating heartburn.
IMPORTANT: Some Pine trees look very alike to other toxic plants so source responsibility and safely.
Uses in Herbalism and healing:
Internally, pine is a traditional remedy for coughs, colds, allergies, and urinary tract and sinus infections.
Topically, pine is used for infections and to lessen joint inflammation in arthritic conditions.
Uses in Magic:
Pine's correspondences are purification, protection, prosperity, healing, fertility and strength.
Pine needles scattered on the floor is said to drive away evil
When burned it can purify negativity
Needles can be burned for reversal spells or back to sender spells
Money magic
Can be used in oils, teas, incense, washes, etc. Get creative!
Makes a great purifying natural cleaner mixed with vinegar
Branches of pine above the bed is said to keep sickness away
In Japan Pine trees are venerated as sacred. Symbolizing longevity. Some place Pine above the front door to ensure lasting joy within, for the leaves are evergreen.
Recipes:
Herbal Salve for Inflammation - Makes 5 ounces
What you need
1 oz. beeswax (use carnauba wax for a vegan salve)
4 oz. Pine Pitch infused oil in Olive Oil - See my Infused Oils post to learn more
Directions
Wrap beeswax bar in an old towel. On a sturdy surface, use a hammer to break bar up into small chunks.
Place beeswax in a double boiler and gently warm over low heat until the beeswax melts.
Add herbal oils and stir over low heat until well-mixed.
Remove from heat
Quickly pour warm mixture into prepared heat safe tin(s) or cosmetic glass jar(s)
Store in a cool location for 1 to 3 years.
Sources and extra reading material:
Please remember while I provide sources, some content is my own UPG from working for years intuitively with this herbal ally. What you do not see from my sources assume it is my UPG and take what information you will. Always cross reference and research yourself. All medical knowledge will be sourced.
Books:
Cunningham's Encyclopedia of Magical Herbs (Expanded and Revised Edition) by Scott Cunningham
The Complete Herbal Tutor by Anne McIntyre
Links:
Want to check out my other posts? Here’s the Masterpost
#pine trees#pine cones#pine needles#witchcraft#witch#herbal magic#herbalism#herbalist#herbal medicine#winter solstice#witchblr#pine correspondences#protection magic
21 notes
·
View notes
Note
Hi there!! I just wanted to say, I don't know you super super well but we're mutuals and you give off a very positive impression to me! you seem like a really interesting person with a ton of extremely cool interests and great insight into the media you enjoy. you come across as a well-read and also generally quite nice person! i'd definitely hang out with you. you intrigue me but not in a "i wanna shake your glass jar" sort of way, just "oh hey i'd really love to have a conversation with you! you seem both nice and insightful!!" <3 (by the way, i didn't initially follow just for disney stuff, actually it was mostly for oz stuff, and my watchlist/read list has significantly increased because of the other media you talk about/reblog! keep up the great work i love seeing you on my dash)
-🥣⏲️🪄🌸
Hi. I want to thank you for this message. You're incredibly nice, and if you want, you can come off of anon and we can talk about Oz stuff!
I got a transphobic anon last night and that, coupled with lack of sleep the night before last and not taking care of myself much yesterday, made me sad and also want affirmation. I blocked the transphobic anon, obviously, but it still hurts, even if it was just the message of a coward hiding behind a grey mask.
I'm working on a Dorzma fic right now, actually. It's kind of been at a standstill, but I want to complete it, and when I do, it will honor to share it with you and everyone. It's a retelling of the first six books through a Dorzma lens, with an emphasis on Dorothy's time outside of Oz, processing her place in the world and feelings for Ozma.
Again, thank you. I'd love to talk with you more.
4 notes
·
View notes
Text
"Spatial Mage Brothers" Cocktail

When a friend of mine was binging Black Clover, we used to get together to watch certain episodes, and I’d make us mixed drinks that corresponded in some way to either the plot or featured characters, and some of them turned out pretty decently (in my opinion) so I’m thinking of sharing some recipes. Besides writing fanfictions, mixology is one of my hobbies, but I’m a bit of a light weight so my drinks aren’t super heavy on the alcohol. They’re all easy to make though and only have a couple ingredients each.
This cocktail was inspired by Finral & Langris and one of my favourite Black Clover Episodes, Episode 80 (I actually have a second cocktail for this episode but we'll start with this one). Please drink responsibly.
Recipe below the cut:
Episode 80: “Spatial Mage Brothers”
A Finral Roulacase & Langris Vaude Inspired Cocktail
Ingredients:
2 oz Cherry Vodka
1 oz Lime Vodka [For a more bitter drink, increase the amount of Lime Vodka to 2oz or switch the ratio with the Cherry Vodka]
8 oz Lemon-Lime Soda (I used Sprite) [For a more cherry taste you can use a cherry-flavored lemon-lime soda]
1 oz Juice from the Maraschino Cherry Jar
1/2 oz Lime Juice (usually only takes 1/2 a lime if you're using fresh lime juice)
Ice
As many maraschino cherries as Langris would want you want
Directions:
1. Put both vodkas, the cherry juice, and lime juice into a cocktail shaker with ice. Shake.
2. Pour into a glass over ice while simultaneously pouring in the lemon lime soda. Stir.
3. Top with cherries. Think about Finral and Langris’s strained brotherly relationship and drown your sorrows. Enjoy. 💚💙
#anime inspired cocktails#black clover cocktails#spatial mage brothers#my boys 💚💙#please drink responsibly#maybe I will post more of these if there is any sort of interest...
22 notes
·
View notes
Note
How to make meth
How to make meth
Making Methamphetamine at home:
List of chemicals and materials: Diluted HCl - also called Muriatic acid - can be obtained from hardware stores, in the pool section
NaOH - also called lye
Ethyl Ether - aka Diethyl Ether - Et-0-Et - can be obtained from engine starting fluid, usually from a large supermarket. Look for one that says "high ethyl ether content", such as Prestone
Ephedrine The cottons in todays vicks nasle inhalers dont contain efed or pfed (ephedrin or psuedoephedrin) but there are still lots of easy ways to get good ephed or pfed, pure ephedrin can be extracted out of it's plant matter, from a plant that can be bought at most garden stores. Or you can get pfed from decongestive pills like sudafed. Most people perfer to work with pfed from pills rather then ephed from the plant. The important thing is that you must have pure pfed/ephed as any contaminants will fuck up the molar ratio leaving you with over-reduced shit or under-reduced shit. Or contaminats will jell durring baseifying and gak up your product which will then be very hard to clean. So you want to find a pill that is nearly pure pfed hcl, or as close to pure as you can get. Also check the lable on your pills and see what inactive ingredients they contain. Inactive ingredients are things like binders and flavors. These you dont want and will remove when cleaning your pills. but certain inactive ingredients are harder to remove then others. You dont want pills with a red coating, you dont want pills with alot of cellose in them and you dont want pills with much wax. you also dont want pills that contain povidone. As a rule, if you have a two pills that contain the same amount of pfed hcl then take the smaller sized pill because it obviously has less binders and inactive ingredients, time released pills are usualy harder to work with because they have more binders and tend to gel up durring the a/b stage. Also only buy pills that have pfed hcl as the only active ingredient. You first have to make ephedrine (which is sometimes sold as meth by itself):If you are selling it...I would just make ephedrine and say it's meth.
Distilled water - it's really cheap, so you have no reason to use the nasty stuff from the tap. Do things right.
List of equipment : A glass eyedropper
Three small glass bottles with lids (approx. 3 oz., but not important)one should be marked at 1.5oz, use tape on the outside to mark it (you might want to label it as ether). One should be clear (and it can't be the marked one).
A Pyrex dish (the meatloaf one is suggested)
A glass quart jar
Sharp scissors
Clean rubber gloves
Coffee filters
A measuring cup
Measuring spoons
Preparing your Lab:
Preparing Ethyl Ether: WARNING: Ethyl Ether is very flammable and is heavier than air. Do not use ethyl ether near flame or non-sparkless motors. It is also an anaesthetic and can cause respiratory collapse if you inhale too much.
Take the unmarked small bottle and spray starter fluid in it until it looks half-full. Then fill the rest of the way with water, cap the bottle and shake for 5 minutes. Let it sit for a minute or two, and tap the side to try and separate the clear upper layer. Then, draw off the top (ether) layer with the eyedropper, and throw away the lower (water) and cloudy layer. Place the ether in the marked container. Repeat this until you have about 1.5 oz. of ether. Put the cap on it, and put it in the freezer if you can. Rinse the other bottle and let it stand.
Ethyl ether is very pungent. Even a small evaporated amount is quite noticeable.
Ephedrine & or P-Ephedrine: Please discuss this on the neonjoint forum
5. Pour 1/8 teaspoon of the lye crystals into the bottle of ephedrine and agitate. Do this carefully, as the mixture will become hot, and give off hydrogen gas and/or steam. H2 gas is explosive and lighter than air, avoid any flames as usual. Repeat this step until the mixture remains cloudy. This step neutralizes the HCl in the salt, leaving the insoluble free base (l-desoxyephedrine) again. Why do we do this? So that we can get rid of any water-soluble impurities. For 3 oz. bottles, this should take only 3 repetitions or so.
6. Fill the bottle from step 5 up the rest of the way with ethyl ether. Cap the bottle, and agitate for about 8 minutes. It is very important to expose every molecule of the free-base to the ether for as long as possible. This will cause the free base to dissolve into the ether (it -is- soluble in ether).
7. Let the mixture settle. There will be a middle layer that is very thick. Tap the side of the bottle to get this layer as thin as possible. This is why this bottle should be clear.
8. Remove the top (ether) layer with the eyedropper, being careful not to get any of the middle layer in it. Place the removed ether layer into a third bottle.
9. Add to the third bottle enough water to fill it half-way and about 5 drops of muriatic acid. Cap it. Shake the bottle for 2 minutes. When it settles, remove the top layer and throw it away. The free base has now been bonded to the HCl again, forming a water soluble salt. This time, we're getting rid of ether-soluble impurities. Make sure to get rid of all the ether before going to step 11!
10. If there is anything left from step 3, repeat the procedure with it.
11. Evaporate the solution in the Pyrex dish on low heat. You can do this on the stove or nuke it in the microwave (be careful of splashing), but I have found that if you leave it on top of a hot-water heater (like the one that supplies hot water to your house) for about 2-3 days, the remaining crystals will be ephedrine HCl.
If you microwave it, I suggest no more than 5-10s at one time. If it starts "popping", that means you have too little liquid left to microwave. You can put it under a bright (100W) lamp instead. Microwaving can result in uneven heating, anyway.
First Batch: 120mg ephedrine HClEstimated: 300mg (100% of theoretical, disregarding HCl)
Now, Making Methamphetamine out of ephedrine by reducing it with Hydroiodic Acid and Red Phosphorus.
Items needed: Alot of matchbooks (the kind with the striking pad)
Coffee filters (or filter paper)
Something that measures ml and grams
A flask (a small pot with a lid can be used)
iodine
Hydroiodic Acid (I will tell you how to make this)
Red Phosphorus (I will tell you how to make this)
Lye
*Optional (toluene and HCI gas)
Making Red Phosphorus: The striking pad on books of matches is about 50% red phosphorus. The determined experimenter could obtain a pile of red phosphorus by scraping off the striking pads of matchbooks with a sharp knife. A typical composition of the striking pad is about 50% red phosphorus, along with about 30% antimony sulfide, and lesser amounts of glue, iron oxide, MnO2, and glass powder. I don't think these contaminants will seriously interfere with the reaction. Naturally, it is a tedious process to get large amounts of red phosphorus by scraping the striking pads off matchbooks, but who cares?
Yeah, Mr. White! Yeah, science!
6 notes
·
View notes
Text

Wellness Wednesday:
Thanksgiving Day?
More like Thanksgiving Week!
You can look at the Meal Tracker. I've been eating Thanksgiving Themed Food all week and loving every minute of it - and - there's more to come.
It's been a very chill week so I am short on words.
Looking to relax and unwind going into Thanksgiving break.
.
.
47th CHECK-IN:
Current Goals:
Lose 52 lbs: Completed
Loss 52 lbs as of 4/12/2023
Milestone: Loss 100 lbs as of 11/01/2023
New Goal: Maintain or Continue on The Weight Loss Path
Avoid "Junk Food"
Minimize Take-Out / Fast Food Consumption
Short Term:
Vegetarian-ish Diet: Completed
End Date: 4/09/2023 - 46 Days Total
Groundhog Day Diet: Completed*
10/01/2023 - 10/31/2023
.
.
Meal Tracker:
THURSDAY
Lunch:
Southwest Style Salad with Chicken
Snack:
(2 - 0.5 oz) Bag of Smartfood's White Cheddar Popcorn
(2 - 0.5 oz) Bag of Smartfood's Movie Theater Butter Popcorn
(2) Servings of Good & Gather's Tex Mex Trail Mix
(1) Klements Beef Stick
Supper:
Few Slices of Seasoned Oven Baked Turkey Breast
(2) Scoops of Instant Potatoes
(2) Scoops of Stover's Herb Stuffing
(2) Sccops of Bob Evan's Macaroni and Cheese
(2) Scoops of Green Bean Casserole
(2) Glasses of Chocolate Milk
(2) Sweet Hawaiian Dinner Rolls
FRIDAY
Lunch:
A Large Thanksgiving Leftover Burrito
- Extra Large Tortilla
- Leftover Turkey
- Leftover Instant Potatoes
- Leftover Stuffing
- Leftover Green Bean Casserole
- Leftover Macaroni and Cheese
- Turkey Gravy
- Shredded Mexican Cheese
Snack:
(2 - 0.5 oz) Bag of Smartfood's White Cheddar Popcorn
(0.5 oz) Bag of Smartfood's Movie Theater Butter Popcorn
Serving of Good & Gather's Tex Mex Trail Mix
Large Bag of Movie Theatre Popcorn (No Butter)
Supper:
(4) Hot Turkey & Swiss Sliders
- Leftover Turkey Breast
- Swiss Cheese
- Sweet Hawaiian Buns
(23.5oz) Jar of Dole Tropical Fruit: Pineapple & Papaya
(1) Glass of Chocolate Milk
SATURDAY
Lunch:
Meat, Cheese, Cracker Charcuterie
- (12) Ritz Crackers
- (12) Slices of Summer Sausage
- (6) Slices of Pepperjack Cheese
- (6) Slices of Cheddar Cheese
- Hot Mustard
Birds Eye Breaded Green Beans
- Mustard
- Ranch
Snack:
(1) Glass of Chocolate Milk
Bag of Orville Redenbacher Ultimate Butter Popcorn
Supper:
Can of Progresso Creamy Chicken Noodle Soup
- 10 Crackers
(1) Glass of Chocolate Milk
SUNDAY
Lunch:
(4) Oven Baked Ham & Swiss Sliders
(2) Air Fried Twice Baked Potato Skins
(4) Scoops of Tator Tot Stuffing Casserole
(2) Scoops of Pasta Salad
MONDAY
Lunch:
Meat, Cheese, Cracker Charcuterie
- (12) Ritz Crackers
- (12) Slices of Summer Sausage
- (6) Slices of Pepperjack Cheese
- (6) Slices of Cheddar Cheese
Serving of Good &Gather's Tex Mex Trail Mix
(1) Glass of Chocolate Milk
Snack:
Serving of Good & Gather's Tex Mex Trail Mix
Supper:
Can of Progresso Tomato Basil Soup
- 10 Crackers
(1) Grilled Cheese Sandwich
(1) Glass of Chocolate Milk
TUESDAY
Lunch:
Cheese and Crackers
- (12) Ritz Crackers
- (6) Slices of Pepperjack Cheese
- (6) Slices of Cheddar Cheese
Supper:
Can of Progresso Creamy Chicken & Broccoli with Brown Rice
- 10 Crackers
(1) Glass of Chocolate Milk
WEDNESDAY
Snack:
(3 - 0.5oz) Bags of Smartfood's White Cheddar Popcorn
(2) Serving of Good & Gather's Tex Mex Trail Mix
Supper:
Rana's Individual Serving Meat Lasagna
American Style Pasta Salad
(1) Glass of Chocolate Milk

.
.
Workouts:
THURSDAY
(400) Jumping Jacks [8 sets of 50]
(100) Glute Bridges [4 sets of 25]
(100) Push-Ups [10 sets of 10]
(100) Sit-Ups [5 Sets of 20]
(100) Reverse Leg Lifts [10 sets of 10]
(100) Leg Kickbacks [10 sets of 10]
(10 min) Planks [10 Sets of 1 min]
(5 min) 6 Inches [10 Sets of 30 sec]
(100) Leg Lifts [10 Sets of 10]
FRIDAY
(400) Jumping Jacks [8 sets of 50]
(100) Glute Bridges [4 sets of 25]
(100) Push-Ups [10 sets of 10]
(100) Sit-Ups [5 Sets of 20]
(100) Reverse Leg Lifts [10 sets of 10]
(100) Leg Kickbacks [10 sets of 10]
(10 min) Planks [10 Sets of 1 min]
(5 min) 6 Inches [10 Sets of 30 sec]
(100) Leg Lifts [10 Sets of 10]
SATURDAY
(400) Jumping Jacks [8 sets of 50]
(100) Glute Bridges [4 sets of 25]
(100) Push-Ups [10 sets of 10]
(100) Sit-Ups [5 Sets of 20]
(100) Reverse Leg Lifts [10 sets of 10]
(100) Leg Kickbacks [10 sets of 10]
(10 min) Planks [10 Sets of 1 min]
(5 min) 6 Inches [10 Sets of 30 sec]
(100) Leg Lifts [10 Sets of 10]
SUNDAY
* Morning Workout *
(400) Jumping Jacks [8 sets of 50]
(100) Glute Bridges [4 sets of 25]
(100) Push-Ups [10 sets of 10]
(100) Reverse Leg Lifts [10 sets of 10]
(100) Leg Kickbacks [10 sets of 10]
(100) Sit-Ups [5 Sets of 20]
(5 min) Planks [5 Sets of 1 min]
* Evening Workout *
(400) Jumping Jacks [8 sets of 50]
(100) Glute Bridges [4 sets of 25]
(100) Push-Ups [10 sets of 10]
(100) Sit-Ups [5 Sets of 20]
(100) Squats [4 sets of 25]
(100) Reverse Leg Lifts [10 sets of 10]
(100) Leg Kickbacks [10 sets of 10]
(10 min) Planks [10 Sets of 1 min]
(5 min) 6 Inches [10 Sets of 30 sec]
(100) Leg Lifts [10 Sets of 10]
MONDAY
* Morning Workout *
(400) Jumping Jacks [8 sets of 50]
(100) Glute Bridges [4 sets of 25]
(100) Push-Ups [10 sets of 10]
(100) Reverse Leg Lifts [10 sets of 10]
(100) Leg Kickbacks [10 sets of 10]
(100) Sit-Ups [5 Sets of 20]
(5 min) Planks [5 Sets of 1 min]
* Evening Workout *
(400) Jumping Jacks [8 sets of 50]
(100) Glute Bridges [4 sets of 25]
(100) Push-Ups [10 sets of 10]
(100) Sit-Ups [5 Sets of 20]
(100) Reverse Leg Lifts [10 sets of 10]
(100) Leg Kickbacks [10 sets of 10]
(10 min) Planks [10 Sets of 1 min]
(5 min) 6 Inches [10 Sets of 30 sec]
(100) Leg Lifts [10 Sets of 10]
TUESDAY
* Morning Workout *
(400) Jumping Jacks [8 sets of 50]
(100) Glute Bridges [4 sets of 25]
(100) Push-Ups [10 sets of 10]
(100) Reverse Leg Lifts [10 sets of 10]
(100) Leg Kickbacks [10 sets of 10]
(100) Sit-Ups [5 Sets of 20]
(5 min) Planks [5 Sets of 1 min]
* Afternoon Workout *
(400) Jumping Jacks [8 sets of 50]
(100) Glute Bridges [4 sets of 25]
(100) Push-Ups [10 sets of 10]
(100) Reverse Leg Lifts [10 sets of 10]
(100) Leg Kickbacks [10 sets of 10]
(100) Sit-Ups [5 Sets of 20]
(5 min) Planks [5 Sets of 1 min]
* Evening Workout *
(400) Jumping Jacks [8 sets of 50]
(100) Glute Bridges [4 sets of 25]
(100) Push-Ups [10 sets of 10]
(100) Sit-Ups [5 Sets of 20]
(100) Reverse Leg Lifts [10 sets of 10]
(100) Leg Kickbacks [10 sets of 10]
(10 min) Planks [10 Sets of 1 min]
(5 min) 6 Inches [10 Sets of 30 sec]
(100) Leg Lifts [10 Sets of 10]
WEDNESDAY
* Morning Workout *
(400) Jumping Jacks [8 sets of 50]
(100) Glute Bridges [4 sets of 25]
(100) Push-Ups [10 sets of 10]
(100) Reverse Leg Lifts [10 sets of 10]
(100) Leg Kickbacks [10 sets of 10]
(100) Sit-Ups [5 Sets of 20]
(5 min) Planks [5 Sets of 1 min]
* Evening Workout *
(400) Jumping Jacks [8 sets of 50]
(100) Glute Bridges[4 sets of 25]
(100) Push-Ups [10 sets of 10]
(100) Sit-Ups [5 Sets of 20]
(100) Reverse Leg Lifts [10 sets of 10]
(100) Leg Kickbacks [10 sets of 10]
(10 min) Planks [10 Sets of 1 min]
(5 min) 6 Inches [10 Sets of 30 sec]
(100) Leg Lifts [10 Sets of 10]
.
.
WEIGHT TRACKER:
Starting Weight (Noon, 1/01/2023): XXX.X lbs
Weight at Last Check-In, 11/15/2023: 0.0 lbs
Weight As of Noon, 11/22/2023: -0.4 lbs
Total Weight Loss: -101.0 lbs
.
.
Closing Thoughts:
The Good:
Finally taking a Vacation from work. Looking for to 7 full days of R&R.
The Bad:
Slightly exhausted from out-of-whack sleep schedule and long days. Hoping to catch up on sleep.
The Ugly:
Have this weird head fog, eye burning, allergy flair up... during my Thanksgiving Break!

2 notes
·
View notes
Text
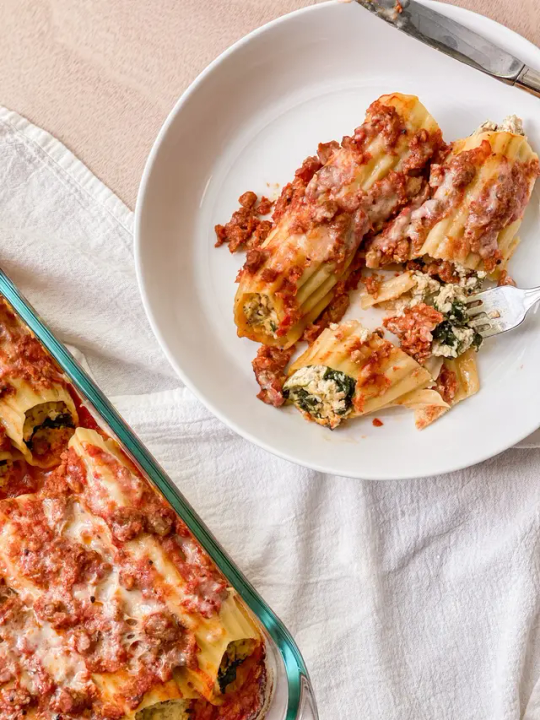
Ricotta and Sausage Stuffed Manicotti (Vegan)
Yield: 5 servings | Prep time: 20 minutes | Cook time: 40 minutes | Total time: 1 hour
-----------------------------------------------------------------------------
Hungry Planet plant-based meats are truly nutritious, featuring fewer calories, less fat, no saturated fat, and no unnecessary ingredients. The sausage crumbles are especially one of my favorites; they're so easy to add to any recipe and will turn your boring jarred pasta sauce into a deliciously meaty meal. Hungry Planet also offers other easy-to-cook-with plant-based meats like grilled chicken strips, Thai meatballs, Italian sausage meatballs, and more. Find them in the freezer section at your local Sprouts Market and Shop Hungry!
Ingredients:
1 box (8 oz) of manicotti noodles
1 package (8 oz) of Hungry Planet Italian Sausage™ Crumbles
1 tbsp cooking oil (grapeseed or canola)
1 block (14 oz) of firm tofu
3 tbsp vegan cream cheese
1/2 cup vegan mozzarella cheese, divided in half
2 tsp dried oregano
2 tsp garlic powder
1/2 tsp salt
2 large handfuls of fresh baby spinach (or 1/2 cup of frozen spinach)
1 jar (25 oz) red pasta sauce
Directions:
Lightly grease a 9x13, 3" deep pan or glass baking dish and set aside.
Start by boiling the noodles.
Bring a large pot of water to a boil. Carefully add the entire box of manicotti noodles.
Boil the noodles according to the "al dente" instructions on the box, usually for about 7 minutes.
Once they are cooked, turn off the heat and carefully remove the noodles from the water. Lay each noodle out on a fresh towel to dry, making sure they are not touching each other.
While the noodles are boiling, prepare the sausage crumbles.
In a medium sized bowl, add the entire jar of red sauce. Set aside.
Heat a medium sized frying pan on the stove over medium heat.
Add 1 tbsp of oil to the pan.
Add the entire bag of Hungry Planet sausage crumbles to the pan and quickly mix to coat the crumbles in the oil.
Cook, stirring occasionally, for about 2-3 minutes or until the sausage crumbles are just defrosted (do not overcook since they will be baked in the oven).
Remove half of the sausage crumbles and add them to the bowl with the red sauce. Mix and set aside.
Add the spinach to the frying pan with the other half of the sausage crumbles and cook until the spinach has wilted (or defrosted if you're using frozen).
Remove the sausage/spinach mixture from heat and set aside.
Next, prepare the tofu ricotta filling.
Remove the tofu from the package and gently press it with a kitchen towel to remove some of the excess moisture.
Place the tofu in a large mixing bowl and use the back of a fork to break it up into fluffy crumbles.
Add the cream cheese, 1/4 cup of mozzarella cheese, oregano, garlic powder, and salt to the tofu and mix until everything is evenly combined.
Gently fold in the entire sausage/spinach mixture to the bowl with the tofu.
Now that you have the boiled manicotti noodles, ricotta sausage mixture, and sausage red sauce done, it's time to stuff the manicotti.
Preheat your oven to 350° F.
Using a small spoon, fill each manicotti noodle with the tofu mixture. Try to fill about 10-12 noodles (you need less filling per noodle than you think, maybe about 2.5-3 tbsp per noodle).
Place the filled manicotti noodles in the greased baking dish.
Once all the manicotti noodles are stuffed, top them evenly with the sausage red sauce mixture.
Sprinkle the other 1/4 cup of mozzarella shreds on top of the red sauce.
Cover the dish with tin foil and bake for 30-35 minutes, or until the sauce is bubbling and the cheese is melted.
Remove from the oven, uncover, and let it cool for about 10 minutes before serving.
Top with some fresh basil leaves or oregano for a garnish.

Tips and Tricks:
The Hungry Planet sausage crumbles can also be defrosted in the microwave! Simply microwave them on high for about 1 minute, then mix in the roughly chopped spinach and microwave for another minute or until the spinach is wilted (or defrosted).
Store any leftovers in an air-tight container in the fridge for up to 7 days.
Reheat leftovers in the microwave for 2 minutes or until the manicotti noodles are warmed through. Top with extra red sauce and cheese if desired.
#entrees#advertisement#vegan recipes#vegan food#pasta recipes#christmas recipes#pasta#go vegan#tofu#tofu recipe
5 notes
·
View notes
Text
FALL CSA WEEK 1 & 2 so belated
P I C K L I S T
october 18
carmen peppers - habanada pepper - hungarian hot wax - poblano peppers - zinnias - mizuna - red onion - garlic - cilantro - acorn squash - plum tomatoes - broccoli
BREAD OF THE WEEK: olive focaccia
P I C K L I S T
october 25
NAPA CABBAGE - CARROTS - GINGER - DAIKON RADISH - LETTUCE - SNACKING SWEETIE PEPS - CARMEN PEPPER - CAYENNE PEPPER - HABANERO PEPPER - LEEKS - PLUM TOMATOES - GARLIC - RASPBERRIES - HOUSE PLANT - CARVING PUMPKIN - FLOWERS
BREAD OF THE WEEK: AUBERGINE BREAD
FARMY FOODIE PRO-TIPS:
Literally meaning “sour stuff,” this is the everyday Vietnamese pickle that you’ve seen and eaten countless times in bánh mì, on rice plates, and in other dishes. Ðồ chua is typically made with daikon and carrot, but you can use jicama instead of the daikon for a crunchy-sweet result. It does require more time: You can’t massage it as it will just break apart and you need to chill the pickle 1–2 days to allow the flavors to fully develop before using. If using daikon, choose one that is dense with firm, smooth skin, which are signs that it enjoyed good growing conditions and will likely taste more sweet than bitter. Precut jicama may be sliced into matchsticks for this pickle.
Makes about 6 cups
2 lb. daikon (about 1), peeled, cut into 3x¼" matchsticks
12 oz. carrots (about 6 medium), trimmed, peeled, cut into 3x¼" matchsticks
4 tsp. Diamond Crystal or 2½ tsp. Morton kosher salt
4 tsp. plus 1 cup granulated sugar
2½ cups distilled white vinegar
Preparation
Step 1
Toss 2 lb. daikon (about 1), peeled, cut into 3x¼" matchsticks, 12 oz. carrots (about 6 medium), trimmed, peeled, cut into 3x¼" matchsticks, 4 tsp. Diamond Crystal or 2½ tsp. Morton kosher salt, and 4 tsp. sugar in a medium bowl to combine. Let sit 20 minutes. You should be able to bend a piece of daikon to make the ends touch without it breaking. (If you need to speed up the process, you can massage and knead vegetables with your hands until softened, about 3 minutes.)
Step 2
Rinse vegetables in a large mesh sieve or colander under running water, then press or shake to expel excess moisture. Divide between two 1-qt. glass jars or airtight containers.
Step 3
Stir 2½ cups distilled white vinegar, remaining 1 cup sugar, and 2 cups lukewarm water in a medium bowl until sugar is dissolved. Pour into jars to cover vegetables; reserve any excess for making salad dressing (you may have about 1 cup liquid left over). Cover and let sit at least 1 hour at room temperature. Drain before using.
Do ahead: Vegetables can be pickled 1 month ahead. Chill.
BAECHU KIMCHI BY MORIHOUSE (@mori.house)/ Makes about one 750ml mason jar
1 large Napa Cabbage**, about 1kg/2lbs
Sea Salt (non-iodized), fine to semi-fine- 3% the weight of the Napa Cabbage
3-5 GARLIC cloves, thinly sliced
zest of 1 Lemon, sliced into thin slivers
2 dried Togarashi Chili Peppers or Chile de Arbol, chopped (deseeded, optional)
3-5 cloves Garlic, crushed into a paste
3-5 Tbsp Gochugaru (Korean Chili Pepper Flakes)***
1 Tbsp Fish Sauce (optional)
Pickling Brine* or Filtered Water
JENNY’S NOTE:
OTHER CSA CROPS TO ADD TO THIS KIMCHI RECIPE JULIENNED CARROTS/ SLICED DAIKON RADISHES/ MINCED OR GRATED GINGER
Supplies:
1x Mortar & Pestle
1x Large Mixing Bowl
2-3 Spoons for mixing
1x 750ml sterilized, air-tight Mason Jar
1x Knife or Cleaver
1x Heavy object like a large stone or a large mason jar filled with water for weighing down your pickles.
1x Dish Towel
1x Small jar or pitcher for collecting excess brine
1x Fork or utensil to press down the pickles into the jar
Prepare the garlic scapes, lemon zest and chili peppers as described. Cut your cabbage into 1/8ths lengthwise and then widthwise into approximately 3 inch chunks. (JENNY’S NOTE: Add your julienned carrots, sliced radishes, grated ginger here to the mix)
Place into a large bowl and scatter the salt, lemon zest, garlic and chili peppers over the cabbage. Gently massage the salt into the cabbage mixture evenly. As you are doing this, you will feel the cabbage excrete its water content. This will take just a few minutes.
Next use a plate or another round flat object which has a smaller circumference than the bowl, so it fits just inside rim and on top of the cabbage mixture. Using a large stone, mason jars filled with water or another heavy object, weigh the plate and cabbage down. Cover the top of the bowl with a towel to keep dust from getting in and let it sit weighed down like this for at least 3 hours to lightly pickle. After the 3 hours or more have elapsed, you will find the water from the cabbage will have filled the bowl to cover the kimchi in what is now a salty *pickling brine.
Decant the brine into a pitcher or jar and gently squeeze a little out of the cabbage mixture. At this stage you will have a fresh, lightly-pickled style of napa cabbage known in Japan as “Hakusai no Tsukemono”. If you don’t like spicy, you can skip ahead to the jarring stage.
Crush your garlic into a paste with a mortar and pestle and a couple pinches of salt to break it down easier. Add your gochugaru, fish sauce (if using) and using small amounts of the brine, make a paste similar in thickness to a tomato paste. Chuck this paste into the drained cabbage mixture, still in the original bowl, and massage all together, making sure the paste is distributed evenly.
Use the following final steps for both the spicy and non-spicy versions: Layer your kimchi into the mason jar in 3-4 stages. Between each layer, use a fork to gently press the kimchi down as flat as you can. Continue to do this until all the kimchi is in the jar. Give it a few more presses with a fork, getting as much oxygen and as many air bubbles out as possible. If your kimchi paste was the right consistency, brine will rise to the top as you press the air out of the kimchi. If not, add small amounts of brine until it does. If making only non-spicy Kimchi, you will definitely need to add some brine. This extra thin layer of liquid at the top will help to seal your kimchi during the beginning of the fermentation process. Seal the jar and place it in the coolest and darkest part of your home.
Next is the waiting! 1 MONTH is the sweet spot but while it may not be for everyone, do try to wait at least 5-7 days before tasting. It takes at least this long for there to be any noticeable fermentation. In the colder seasons, it may take even longer, up to 10 days. If you want to “taste-as-you-go”, be sure to use a clean utensil and DON’T double dip! However long your preferred fermentation time, you will need to help the kimchi release carbon dioxide gas every couple of days. You may notice that when you open it, the kimchi will bubble. Sometimes it will bubble like soda but it may also only bubble slightly or barely at all. Either way, you can rest assured that it is fermenting. Each time you release the gas, you will also notice the kimchi may have risen slightly. Using a fork press it down again as much as you can. Brine may or may not rise to cover the kimchi at this stage and that is ok.
Note: Depending on whether or not you sterilized your jar properly and the environment temperature, you may occasionally find trace amounts of white, blue or green mold on the top of your kimchi. DO NOT worry about this. Simply remove it from the kimchi or wipe it off if it is on the jar or lid. However, if you find black mold, I’m sorry to say your kimchi may have been contaminated by unwanted outside bacteria. At that stage, it is better to start over just to be safe. All this said, mold is highly unlikely using this method.
After 1 month (or shorter) has elapsed, enjoy your kimchi as a side to most of your favorite Asian dishes, cook it in a dish or eat it as a snack!
**Do not use standard or savoy cabbage to substitute. However, you can use Bok Choy (same weight) as a substitute if Napa Cabbage is nowhere to be found.
***Note: I have had some students use Cayenne Pepper, Paprika or Chili Powder in lieu of Gochugaru before, but please use caution as the spice levels between these differ substantially. If you are absolutely unable to get Gochugaru and still want to try making spicy kimchi, start by making your paste with just one tablespoon of one of these substitutes. Taste it first, then add more, tablespoon by tablespoon until you reach a spice-level which is tolerable for you. However, I suggest you do try to add Gochugaru as a regular item in your kitchen. It is very versatile and easy to find online or at Asian Markets.
2 notes
·
View notes
Text
instagram
𝗖𝗵𝗼𝗰𝗼𝗹𝗮𝘁𝗲 𝗕𝗿𝗼𝘄𝗻𝗶𝗲 𝗖𝗵𝗲𝗮𝘁𝘀 𝗧𝗿𝗶𝗳𝗹𝗲
A trifle consists of both soft and crunchy layers put on top of each other in a glass or ceramic cup for serving. For this recipe you can switch things up for dietry requirements/preferences. The traditional English food trifle is a layered which contains custard, sponge fingers, sherry soaked cake, fruit, jam and whipped cream.
𝙄𝙣𝙜𝙧𝙚𝙙𝙞𝙚𝙣𝙩𝙨
• 50g (2 oz) chocolate flavour Angel Delight
• 300ml (1/2 pt) semi-skimmed milk
• 200g (7 oz) brownies (you can make the brownies yourself or shop buy)
• 400g (2/3 pt) double cream
• 100g (4 oz) chocolate
𝙈𝙚𝙩𝙝𝙤𝙙
1) In a bowl, prepare the Angel Delight pudding according to package instructions using the milk.
2) Whip the cream in another bowl until soft peaks form.
3) Crush the chocolate into small pieces and place in another bowl.
4) Crumble the brownies into a large bowl.
5) You are now ready to assemble the trifle. Ideally, you should use portion sized jars or containers.
6) Start layering the pudding by placing the brownies in the base, followed by a layer of chocolate pudding, and cream.
7) Repeat the process by adding as many layers as you can and top with chocolate when the container is full.
Just to note - Angel Delight is a well known brand for chocolate pudding but shops stock their own no name brand as well!
If you don’t have time to prepare your own brownies, you can also consider using cookies, sponge fingers, waffles, wafers etc. Whether it be chocolate or golden vanilla cookies, they’ll both taste great!
𝙎𝙪𝙗𝙨𝙩𝙞𝙩𝙪𝙩𝙚𝙨 𝙛𝙤𝙧 𝙬𝙝𝙞𝙥𝙥𝙚𝙙 𝙘𝙧𝙚𝙖𝙢 𝙞𝙛 𝙮𝙤𝙪 𝙙𝙤𝙣'𝙩 𝙡𝙞𝙠𝙚 𝙞𝙩:
• Mascarpone – this would almost make your dish tiramisu-like. Just need a bit of coffee
• Cream Cheese – your dish would be like a cheesecake in a cup. Simply delicious!
• Crème Fraiche – with acidity, it will cut through the richness of the chocolate. Great with fruit
•Vanilla, caramel or chocolate pudding – just reuse the pudding if you are fan of the Angel Delight
• Fruit coulis – can use these to make your dish lighter, less intense on the calorie count.
• Caramel – rich, intense flavour that will add an extra something
#angel delight#cheat trifle#creamy food#no bake dessert#no bake#yourblendedfamily#cheat day eats#food blog#easy recipes#easy recipes at home#budget friendly food#mum food#in my kitchen#eat pretty things#chocaholic#eat capture share#food photos love#chocolate trifle#trifle#cheat bakes#kitchen art#buzz feast tasty#home making mama#parent folk#chocolate brownie#chocolate#our food stories#hits the spot#easy dessert#no bake trifle
3 notes
·
View notes
Photo
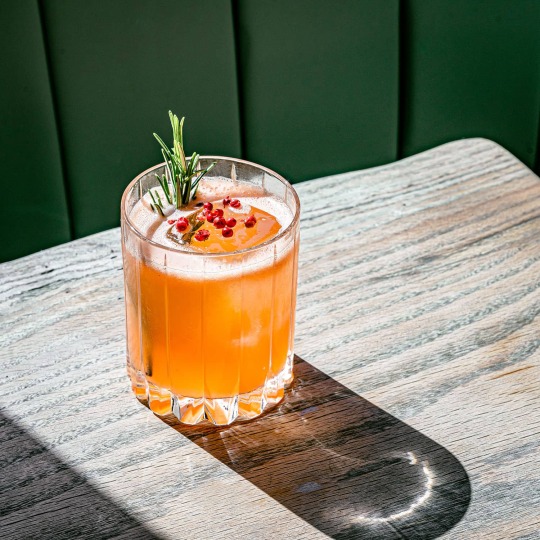
El Cantinero !
Ingredients:
2 OZ. Blanco Tequila or Mezcal
1 OZ. Grapefruit Cordial
3/4 OZ. Fresh Lime Huice
Dash of Ghost Pepper Tincture
_____________________
Grapefruit Cordial:
10 OZ. Fresh Grapefruit Juice
10 OZ. Sugar
3 OZ. Fresh lime juice
3 OZ. Aperol
1 TBSP. White Peppercorn Lightly Ground
20-30 Scrapes of Star Anise on a Microplane
_____________________
Ghost Pepper Tincture:
7 1/2G Thai Chili
10G Ghost Pepper
375ML Vodka
Preparation:
Add all of the ingredients to a shaker and shake with ice. Strain into an ice-filled glass. Garnish.
Note: If you’re spice-averse, you can leave out the ghost pepper tincture all together.
Grapefruit Cordial:
Add ingredients to a sealable container. Stir and infuse overnight. Strain. Will keep in the refrigerator for 2 to 3 weeks.
Ghost Pepper Tincture:
Chop peppers and combine with the vodka in a container such as a mason jar. Make sure to use gloves when handling the ghost peppers. Shake and let it sit overnight. Will keep indefinitely.
Recipe: Keith Larry (Little Rascal, Brooklyn),
Photo: Joanna Lin
This article was not sponsored or supported by a third-party. A Cocktail Moment is not affiliated with any individuals or companies depicted here.
#art#design#cocktail#cocktail recipes#recipes#grapefruit#sugar#lime#aperol#chili#thai#vodka#keith larry#joanna lin#peppercorn
61 notes
·
View notes
Text
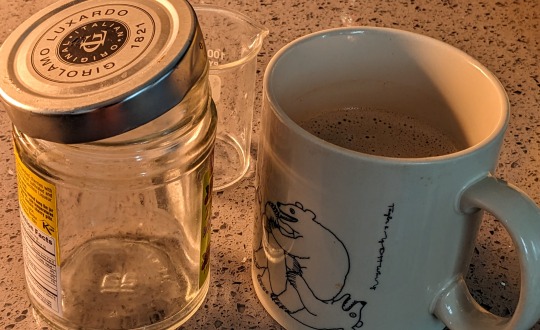
[peanut butter mocha latte]

i woke up this morning hating life, ffs. one of these and i felt like someone pushed a 'press to activate' button on my back. dishes got done. cooking and meal planning happened. i even had the energy to sing.
moral of the story: i really REALLY need stimulants to function. for me, they are Not Optional. and yes, i have to remind myself of this literally every morning during PMDD time.
equip yourself first:
a way to shake shit up. a glass jar with a tight-filling lid is my preferred method.
a way to heat shit up relatively quickly. the simpler the better, and you don't have all day. microwaves and stoves are fine; i own a hot water kettle and use the microwave for heating other liquids on days like this.
ingredients:
1 part espresso or cold brew concentrate.
1 part milk or alterna-milk of your choice. (i use full-fat oat milk... always trying to sneak in extra calories if i can.)
1 part filtered water.
a pinch of salt.
for every 60 ml (~2 fl. oz) strong coffee, add:
3-6 g (1-2 tsp) cocoa powder or raw cacao powder.
16 g (1 tbsp) natural peanut butter (i.e.: no sugar, no additional oils. nothing but roasted peanuts... and maybe salt. i use the unsalted kind).
additional fixins:
15 ml (1 tbsp) of MCT oil. your brain is mostly fat. feed it.
sweetener of your choosing, 5ml (1 tsp) to start. try honey, raw cane sugar, agave syrup...
how to make:
heat water and milk to the boil, separately. unless you don't care about foam. foam is life to me.
add coffee, hot milk, sweetener, peanut butter and cocoa/cacao powder to your jar and seal it tightly.
wrap towels or a tee shirt or something around it to keep your hands safe, and shake until everything is blended together. the exercise from this will help wake you up too.
pour water into your desired cup or mug, then the latte mix. stir a little to blend everything together.
enjoy.
i hope you feel a little better and more ready to start your day.
#simple meals#recipes#metric#cafe latte#actually adhd#actually pmdd#neurodiverse stuff#peanut butter#can be made vegan#just make sure your sugar wasn't made with bone char#nondairy#healthy food#recipes in metric#get those extra calories in
5 notes
·
View notes
Note
grace van dien literally ruined herself. go on twitter and youtube and all you see is the faze drama. she's not coming back from this. she's done
You know, I’m also thinking of getting into candle making. It’s funny, because I’ve never been one to use fancy soaps or bath bombs or go crazy on scented candles, but stuff like this is so much fun to make!
Here’s a recipe of one I’ve been looking at:
Purple Blackberry Flower Candle
What You’ll Need:
Round Glass Candle Jar
14 oz. EcoSoya Advanced Soy Wax
6 oz.White Beeswax
1 oz.Blackberry Sage Cybilla Fragrance Oil
Cd-20 Wick
Purple Wax Dye Block
Flower Template
Optional: Glossy Silicone Square Tray Molds (2 molds)
ONE: In a large heat safe container, melt 14 oz. of Advanced EcoSoya Wax and shavings of the Purple Wax Dye Block in the microwave using 30 second bursts. For this candle, the majority of the wax dye block was used to create a vibrant, rich purple color. If you prefer a lighter purple, use less colorant.
TWO: Once you are happy with the color, add 1 oz. of the Blackberry Sage Cybilla Fragrance Oil and use a spoon to thoroughly combine.
THREE: Place the wick in the center and use chopsticks, pencils or dowels to hold the wicks in place. Slowly and carefully pour the purple wax into the container. Set aside, and allow to fully cool and harden.
FOUR: While the candle cools, it’s time to make the flowers. Cut out the flower stencils from the Flower Template. Melt 6 oz. of white beeswax in a heat safe container using 1 minute bursts. Beeswax has a high melting point, and takes longer to melt than most waxes. Because of this, be careful when removing the container from the microwave as it will be very hot!
FIVE: Split the wax in half, and color one container lightly with shavings of the Purple Wax Dye Block. Pour both containers of wax into two Glossy Silicone Square Tray Molds. If you do not have two molds, you can split this step into two; simply melt 3 oz. of white beeswax at a time and only color one batch.
SIX: Soon, the beeswax will begin to cool and harden. Once the beeswax can be touched with your finger and does not pull away, gently place the flower cut-outs on the wax. Using a chopstick or wood skewer, use the flower as a stencil and “draw” a flower into the wax. Move quickly as the beeswax hardens fast.
SEVEN: Continue drawing both small and large flowers into the white and purple wax. You only need one small and one large flower for each candle, but you will be able to carve more than two flowers. Carve more for future candles, or save the wax to remelt and reuse later.
EIGHT: Use a straw or the end of your carving tool to create a hole in the center of your flower. This is where the wick will be threaded, so ensure it is large enough for the wick to fit through. Set the trays of flowers aside to fully cool and harden before removing the flowers from the mold.
NINE: Once the wax has fully cooled, gently press the bottom of the mold, around the flowers. The wax around the flowers will begin to break, releasing the flower shapes. Be very careful during this step, you don’t want to break the flowers! If this happens don’t worry. Remelt and wax, pour and trace the flowers again. =)
TEN: Melt a very small amount of beeswax in the microwave using 30 second bursts. Use a dropper or spoon to drop a small amount of wax near the wick.
ELEVEN: Gently place a large flower onto the candle and hot wax. The hot wax will adhere the flower to the candle.
TWELVE: Place a small amount of hot wax on the large flower, and gently place a small flower on top. Be careful not to press too firmly, as this could crack the flowers. When ready to use, light the wick and enjoy! Reminder, never leave a burning candle unattended, and hot candles can damages surfaces so always use a hot plate or covering.
2 notes
·
View notes
Text
"Schedule 1" Salted Peanut Butter Cookies
Because they're highly addictive and have no medical purpose
These bad boys are dairy free and gluten free, completely by accident. They're incredibly cheap to make AND only use four ingredients that you probably already have, they're super adaptable for dietary restrictions, and you can be eating cookies inside 90 minutes. What more could you want?
I use a 2-teaspoon scoop for these, which makes them just the right size to eat about seven cookies before you even realize what you've done. I recommend a larger scoop for bigger cookies, which will slow you down later. You'll thank me, I promise.
Definitely do not sink four or five chocolate chips into the middle of every dough ball, because then these cookies become legitimately weapons grade.
Recipe by Smitten Kitchen & Ovenly
1 3/4 cups (335 grams) packed light brown sugar
2 large eggs, at room temperature (this is important, because you'll be dissolving the sugar into the eggs - if your eggs are cold, sink them in a glassful of comfortably-hot water for a couple minutes.)
1/2 teaspoon vanilla extract
1 3/4 cups (450 grams, or one 16.3 oz jar) smooth, cheap peanut butter (just get the cheapest stuff you can find for this, the stabilizers and emulsifiers help prevent the cookies from being greasy. You can use natural nut butter if you want, i guess, but it won't be as good and it'll cost you more, which is unnecessary. If you need to accommodate a peanut allergy, use the closest available equivalent to a Jif-style spread.)
Coarse-grained sea salt, to finish. (I used kosher salt, which works fine. If you have fancy salt, feel free to use it but know it's not strictly necessary.)
In the bowl of a stand mixer, combine the brown sugar and eggs and beat the living daylights out of it until light-colored, smooth, and ribbony.
Mix in the vanilla extract, then add the peanut butter and mix thoroughly. You'll notice a change in texture pretty quickly, it will magically transform from a batter to a soft dough reminiscent of play-doh.
Pop the entire bowl of cookie dough into the fridge, and preheat your oven to 350*. By the time your oven is hot, your dough will be ready.
Line a cookie sheet with parchment, but tinfoil is fine too if that's what you have. Drop little balls of cookie dough in whatever size you prefer. If you don't have a doser/scooper, flatten the bottoms a bit so they bake more evenly. Then, garnish each one with a sprinkling of salt.
These cookies will not spread in the oven so whatever size you start with is what you'll have at the end; I aim for roughly the size of a golf ball or a bit smaller. For cookies this size, 9 minutes was sufficient for my oven - larger cookies may take anywhere from 12-15 minutes, but your timing may vary. Your cookies are done when beginning to color golden brown and fragrance your kitchen with toasty aromas.
They will be a tiny bit soft, this is fine. Cool on the cookie sheets until you can comfortably handle them, which will finish baking them through if needed, then transfer to a wire rack to cool all the way. If you can wait that long.
Store airtight at room temp. Don't worry about how long they stay fresh, they'll be gone long before they spoil.
#peanut butter cookies#recipe#cookie recipe#smitten kitchen#ovenly#impress your friends and family#broke people recipes#cheap recipes#easy recipes#cheap cookie recipe#easy cookie recipe#gluten free#dairy free#allergy friendly
4 notes
·
View notes
Link
Check out this listing I just added to my Poshmark closet: Tallow Body Butter Tea Tree Eucalyptus
0 notes
Link
Check out this listing I just added to my Poshmark closet: 2 Blue Ball© Canning Jars 3 cup Jars, Wide Mouth, 24 oz Glass w/ lids.
0 notes
Last Seen Blogs

carbonsteelmarkettrends
Carbon Steel Market & Trends

bellysntoes
Bellys And Toes✨

pecadoperezoso
pecado perezoso
pecadoperezoso
pecado perezoso

risefromyourgrave-blog
Rise from your grave !