#Beginner Sewing Tutorial
Explore tagged Tumblr posts
Visit Tumblr Blog
Explore Tumblr blogs with no restrictions, modern design and the best experience.
Last Seen Tumblr Blogs


Fun Fact
Tumblr is available in 18 languages.
Text
Beginner-Friendly Wrap Tulip Skirt Tutorial with Free Pattern
In this post, you will learn how to sew tulip skirt with free PDF pattern. Welcome to my step-by-step guide on creating your very own wrap tulip skirt! Whether you’re new to sewing or looking to add a versatile piece to your wardrobe, this tutorial is perfect for you. I’ll provide a free tulip skirt pattern in 8 sizes, ensuring a flattering fit for everyone. Customize the length to your…
#Beginner Sewing Tutorial#custom skirt length#DIY skirt#Free Sewing Pattern#sewing guide#tulip hem skirt#tulip skirt#tulip skirt pattern#wrap tulip skirt
18 notes
·
View notes
Text
First Quilt!
It has been a lot of fun and a lot of trial and error but it's done!!!

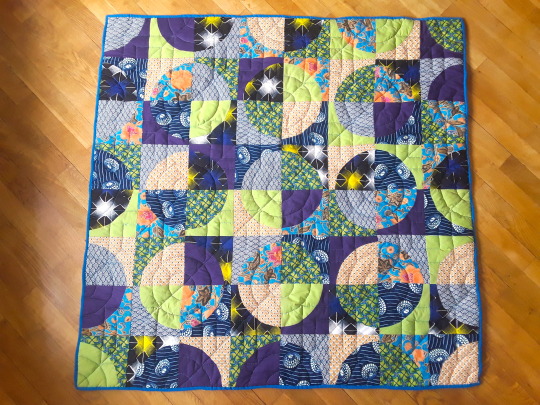

It's roughly 1.20 x 1.20m (which is a number of feet I can't be bothered to look up but let's say it's about child sized and it'll be great to chill on the couch).
I want to thank @langdon813 who I've never talked to (sorry if you hate being tagged) but whose gorgeous Drunkard path quilts made me wanna do it too :)
I had never done any quilting before (but I did sew), so here's what I've learned, if any beginner is interested in jumping off the deep end the way I did and wants advice from someone who has freshly acquired experience but will also not use any confusing technical terms (with pictures!) :
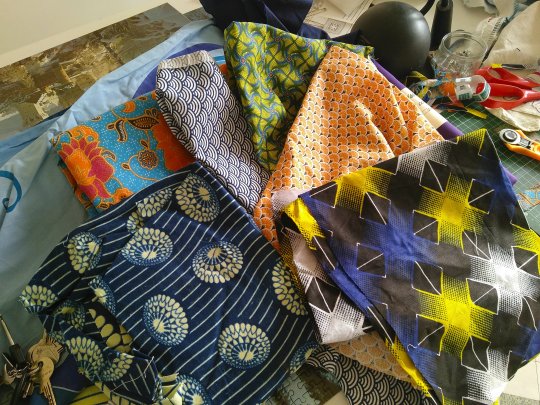
Fabric picking : so most advice I read was to go for pre-selected bundles of fabric that already go together, but I'm contrary and like to do my own thing so I used wax fabric (the blue ones on top the pile) I had laying around, which I strongly recommend: it's very easy to cut due to it being waxed, and I added a few fat squares from the shop, plus I also had the orange and blue floral and I based the coulour scheme on it. One thing that's true is it would have been easier to work with fabric of the same thickness, and the floral was givne to me by my ma who got in on trip to Thailand and it was alot thinner than the rest which didn't help.
Cutting: I got a rotary cutter for the occasion and it's great! Do not maybe push too hard on it and give yourself nerve damage the way I did (temporary but still), it's actually ery sharp and easy to use, so long as your template doesn't slip you're fine
Piecing :Yes you can do curved piecing even if you have zero experience, you just gotta make a template and
pin it a lot.
1/4 inch margins is the standard so I rolled with it because I don't like converting, but when you're strictly metric it is kind of annoying but doable because my machine does have a 1/4 inch mark and if you stick a length of tape along it it's pretty easy to follow, even for curved piecing.
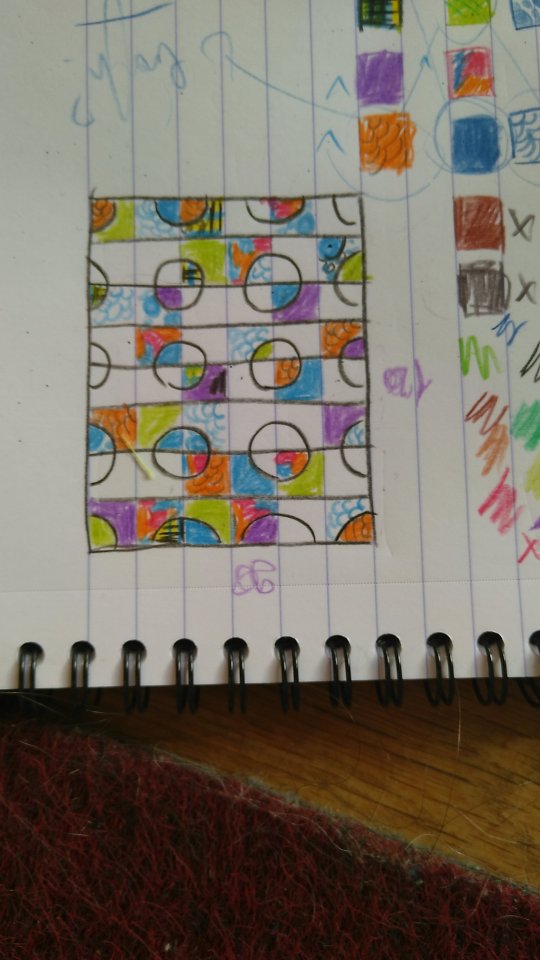
Layout: At some point you've got to decide the layout is done, because I've re-arranged the blocks at least 6 times and it's a very good way to go insane. (For rough reference, my plan was to have no repeat fabrics in any of the circle-in-a-square blocks, and I only made one mistake which I clocked too late to change)
Chain piecing!! Meaning you pile your blocks together in a specific order (that I personnaly wrote straight up on each piece with a very sophisticated letter/numbers down/across system) and then just sew them together in a line without having to cut the thread between each pair. Looks a little like a fanion banner and at some point it feels like you'll be forever tangled into it but then it's magic :) It's not that hard actually and will save you a lot of time + there's a lot of online tutorials you can use.
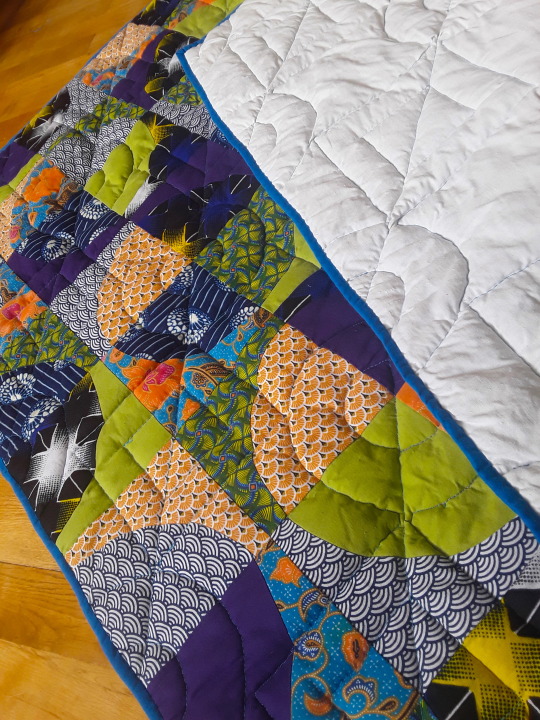
Basting! (which it took me while to understand is the part where you attach the backing, the fluff and the quilt top together) : you need more safety pins. Safety pins will save you from the wrinkles and the unfortunate oopsies of realising you've caught your backing double folded into your quilting stitch, which I did a good three times and was not fun to undo. Also, I forgot to tape the backing to the floor and it probably would have helped with the wrinkling...
Backing : I used an old linen table cloth I got for 10€ at a charity shop, and I've still got about 2/3 of it left, so I recommend that, it's sturdy but soft enough, doesn't thread easily and can be washed at very high temps, if that's a thing you do.
Quilting! Well, my machine came with a quilting foot for free motion quilting (which means you're the one moving the fabric along in whichever direction and you can sort of draw with your stitches) and it seemed fun so I did that, and here's what I learned : curves are hard but doable, also my machine doesn't like to go back (kept skipping sitiches for some reason) so it involves a lot of shifting the quilt around, which isn't easy considering the bulk. And also, drawing the quilting pattern you want so you can follow it while quilting actually does help, I used an iron/heat-erasable pen and it worked just fine. Check your stitch tension, mine was too loose and I realised too late so there's spots where I could pull on the thread and it looped, had to stitch back over that.
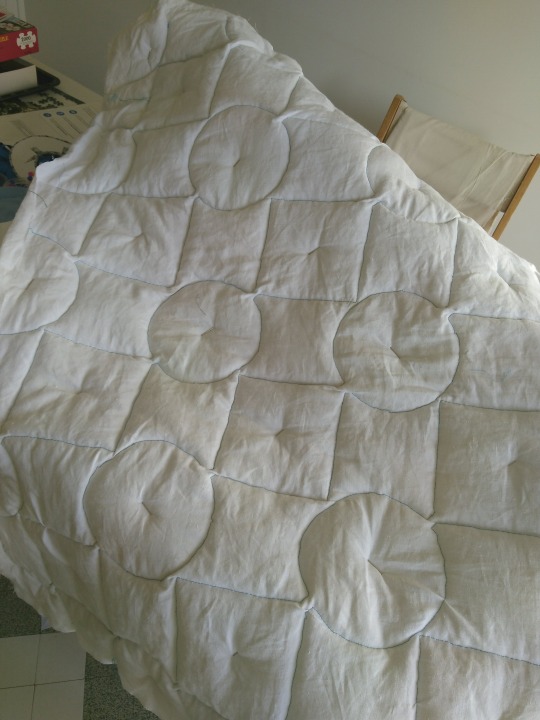
Quilitng pattern : I wasn't sure what to do, supposedly your batting (aka: the fluff) comes with instructions on how tight you should quilt to avoid it coming apart through use but I got mine cut at the fabric shop and forgot to ask so I just rolled with a rough 10cm maximum distance in between stitching lines but tried to do less in most places. According to many blogs : the tighter your lines the stiffer your quilt, so I kept it loose for comfort. (Picture is halfway done, I added a smaller square/circle inside each square/circle and if you look at it you'll see it's actually diagonal lines form one end of the fabric to the other.)
Binding is boring, and there's nothing to it. I got a length of pre-cut bias binding, machine-sewed it front to front to the quilt top side of the quilt and the folded it back and secured it by hand to the back with a ladder stitch. Took me roughly and entire rewatch of the Last Of Us. There's a trick to doing the corners that's fairly simple but I've lost the tutorial...
Overall : I got myself a quilting book with techinques and such and it helped, but there's a ton of stuff online, and once you get over the very Christian American mum vibe of most of the blogs, it's all very helpful (and gorgeous!) (no offense meant to Christian American mums, it's just a bit of a culture shock from where I'm standing).
#quilting#quilters of tumblr#quiltblr#quilt tutorial#quilt pattern#quilt#drunkard path#home sewing#sewing#sewing project#beginner's quilt#beginner quilting
181 notes
·
View notes
Text
Hot & Cold Rice Bag Tutorial
I put a new tutorial up on my blog Craft Witch! I made a tutorial for an easy, beginner-friendly, but super useful project: a rice bag that you can freeze or heat for pain relief. It's great for headaches, muscle aches, period cramps, minor injuries...you get the idea.
Like all of my sewing tutorials, this uses hand-sewing and does not assume you have any expensive equipment or even experience in sewing. So if you've been wanting to pick up sewing (or wanting to get back into it) but you've been intimidated by other tutorials, maybe give this one a shot?
This is one of the easiest hand sewing projects you can do, so that makes it great for new sewists of any age! It’s just a rectangle and some back stitches, and some rice that you probably already have on hand. You don’t need to iron or do anything fancy. It doesn’t take very long—I didn’t time it, but each of the two bags I made for this project took less time than an episode of Columbo. And, since it gets turned inside-out, it’s absolutely fine if your stitches aren’t very even or pretty, if you cut the fabric badly, if your thread isn’t well-matched, or anything else.
Let me know what you think, and share if you like! Thanks for reading, and if you enjoy my work, I have a Ko-Fi and a Patreon! Also I'm running a promotion on Patreon right now, 50% off your first month with code DISCOUNT1.
#craft witch#crafts#sewing#sewing tutorial#free tutorial#blogging#beginner sewing#chronic pain#migraine
50 notes
·
View notes
Text
Yesterday was so productive hobby wise for me. I learned a new knitting pattern (it’s super basic but i’ve never known how to do any patterns before in general) and I tried crocheting for the first time ever!!! I struggled a lot and it ended up really wonky looking but that’s okay. I’m still really happy about it!


(i also bought supplies for balloon animals ^_^)
#Dab babbles#Did i get any writing done at all?#No. No i did not.#But i’m still very happy and I need to buy more yarn since i was just trying stuff out with random scraps from around the house#yarn crafts#If anyone has tips for sewing and/or crocheting feel free to send them my way o7#I’m just figuring it out by myself#bless the people on YouTube making “for absolute beginners” tutorial videos#Ily
11 notes
·
View notes
Text
Making simple pouches from scraps
This started as a comment about simple projects for beginner sewists, but it got a bit out of hand, so I decided to drop it on this blog with illustrations for easier reference!
The result are pouches that I use to organize small things like the items in my daily carry bag (e.g. pens, medicine/toiletries) or regularly packed items that I would like to be able to grab quickly to bring to certain outings (e.g. dice bag for roleplay).
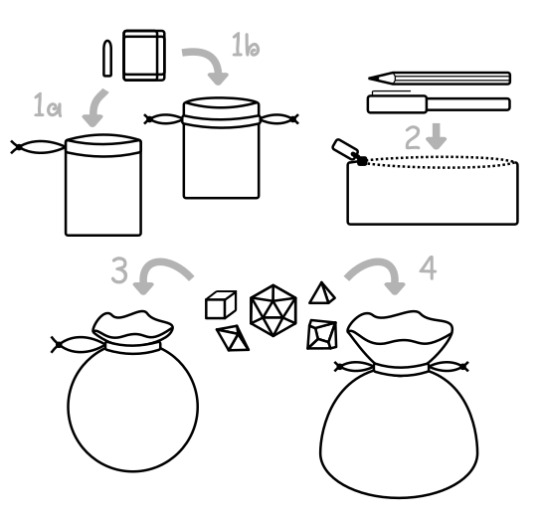
Generally, there are four kinds of pouches I have made from scraps:
A flat, rectangular drawstring bag, good for small items like e.g. tampons, band aids, pill blisters. We're going to discuss two variations, one of which is a little easier (a) and one that IMHO looks a little better (b).
A flat, equally rectangular zipper bag, good for pens or makeup.
A circle drawstring bag, good as a smaller dice bag or as a gift bag, imho.
A circle drawstring bag with a flat bottom. A bit more complicated, but better for bigger dice collections. Because we greedy gremlins need space for all our shiny click-clacks, don't we ;)
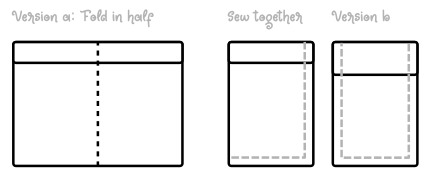
1. Flat Drawstring Pouch
These are super easy in my opinion. You’ll need either a single piece that is significantly wider than it is high, which I usually make into version a or two scraps in about the same size, which I like to use for version b.
For version a, to make it a drawstring, we fold over the top edge (about 1,5cm/half an inch is usually enough) to the inside and sew that down close to that folded down fabric edge.
For version b, do the same for both pieces, but the fold over needs to be a bit bigger (about 3cm/an inch) as you need a little more space. Sew this down the same as version a, but add a second seam above, with a distance of about 1cm (~3/8th inch). If you have a twin needle, this might also be a use for it.

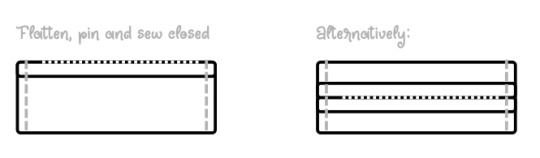
Then, for version a, you fold the wide piece in half and for version b you lay the two pieces on top of each other, outsides together in both cases. And then you sew shut all the sides you want to be closed.
Turn it inside out and – using a seam ripper or pair of snips – cut holes into the outer layer of fabric on each side of each side seam.
This means two holes for version a between the seam and top edge and four holes for version b, between the two seams.

(Only one side each depicted here, do the same on the back.)
Then you can thread a string or ribbon into one of the holes and through the channels you have sewn. I tie the string to a small safety pin as it is easier to push through the channel from the outside.
For version b you can either use two strings (one for each side) or one long one to go all the way around (by going out the hole on one side of the side seam and going into the one on the other side of the side seam).
Tie up the ends of your strings and you’ve got your drawstring bag!
2. Flat Zipper Bag
As a note: The zipper might prove challenging. However, it does present a great opportunity to try your hand on this dreaded piece of haberdashery. To make things easier on yourself I would recommend to avoid invisible or separating zippers and to make sure they’re not shorter than the longest item (e.g. the longest pen) you would like to fit through it.
Aside from the zipper you will need a roughly square piece of fabric. I usually just use the zipper as a ruler for one side, making sure that the whole scrap (so including seam allowance) is the same length as the tape. If you don’t quite have that, take e.g. the noted longest pen as reference and, as illustrated below, make sure that (in addition to seam allowance) one side of the square is the length of the pencil (L) and two of its heights (H).
The other side determines how much space we have in the pouch. So for our example we want it to be at least three pencil heights plus one extra for wiggle room (so 4*H). But we need this measure twice because a pouch generally has at least two sides, so all in all we’re at 8*H. Or you use whatever you have as long as it’s bigger than that. ;)

First of all we sew the zipper in. We determine the outside of both the zipper and the fabric and put them against each other, with one of the outer edges of the zipper tape aligned with the side that is supposed to be the opening. Pin it, then you sew it on with a straight stitch. If you’re using a normal foot (in contrast to a zipper foot, which should come with its own instructions), you can usually let it run along the teeth, as that will provide a great ruler to not get any wobbliness in your seam.

Tip: Make sure you’re not sewing too close to the zipper’s slider. I usually push it all the way to the opposing end of the zipper when I start sewing and when I’m halfway, I sink my needle into the fabric, lift the sewing foot and pull the slider all the way to the already sewn end before I lower the foot again and proceed to sew the other half.
You’ve attached one side of the zipper! Great! Now do the same thing on the other side, still making sure to lay outsides onto each other. You will end up with what looks like a zippable tube with the slider on the inside. Flatten the tube, pin it closed if necessary (the zipper tape might be a bit stubborn) and sew it close on both ends. (Careful to move the slider away from your needle!)
I like my zipper on one edge, but you can just as well flatten the tube so the zipper is centered on one of the sides.
Turn the whole thing inside out and TADA! Zipper pouch!
3. Circular Drawstring Pouch
This pouch is probably the easiest of the pouches as you only have to sew a channel around the edge and draw a string through. That channel, however, is basically a hem on a small circle. Which will prepare you for the pain of hemming circle skirts ;)
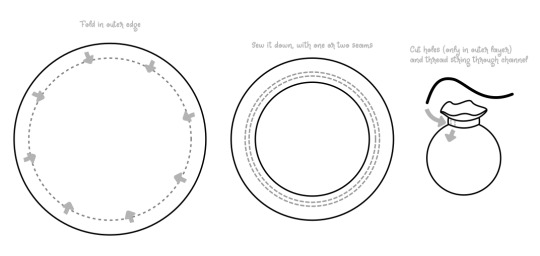
Once again you will have to cut holes for the drawstring to go in and it is fully a matter of taste if you do more than two holes, but they should be an even number.
4. Drawstring Pouch With Flat Bottom
This pouch has similarities with the other draw string pouch, but because of the flat bottom it is the only one that will stand on its own, which makes it a good shape for a bigger pouch. Nevertheless, it is still a good scrap project!
You will need a circular piece and a strip that is the length of the circle’s circumference and at least the height of the circle’s radius 6 cm / 2 inches.
(If you struggle to find the circle’s circumference and radius, I included the equations for both in the illustration below. The Diameter can be measured by folding the circle in half and measuring the fold.)
Fold over one of the long (top) edges and sew drawstring channels as described for the flat pouches. Then lay the bottom edge along the edge of the circle, pin and sew them together. You will hate it, as flats sewn to curves is the point of this, but it’s worth the effort.

Finally, sew the two short edges of the strip together and turn the bag inside out.
Once again, you will have to add a drawstring, but it is up to you how many holes you cut for it, 2 or more, buit an even number.
8 notes
·
View notes
Text
Easy DIY Flounce Tutorial for Beginners | Free Printable Pattern Included
youtube
#youtube#diy#sewing#sew#tutorial#free pattern#free sewing pattern#beginner sewing#sewing tutorial#sewing patterns#upcycling
23 notes
·
View notes
Text
More refs
embroidery:
youtube
necklines:
youtube
sewing patterns:
youtube
101 notes
·
View notes
Text
First things first, basic materials for basically any cosplay.
No need for sewing machines or even embroidery hoops, they’re pretty new in the grand scheme of things and people made insane stuff without them for millenia after all.
(I actually recommend learning hand sewing FIRST, it lets you learn how to fix your stuff in a pinch and is way easier to get into. It’s slower, sure, but it also lets you make finer, more consistent seams and if you have sensory issues tied to sound it’s FAR less likely to set you off. Plus, it’s calming and frankly impresses the hell out of people at competitions and the like and some groups (like re-enactments) do not count machine made things at all in their competitions and standards.)
All you need to sew clothing is a needle, thread, scissors, a measuring tape, a pencil and sharpener or chalk to mark things in a washable way, fabric and time.
If you aren’t totally confident in being able to track seams or keep them even, straight pins or clips helps hold stuff together. You also want these if you don’t want to transfer a pattern from paper to the fabric with drawn lines, but that’s also not exactly needed since I go off the base shapes and measurements. If you aren’t confident with holding material extremely taught while you work on embroidery or bead work and the like, a good embroidery hoop can be found second hand for pretty cheap and you can usually find a really good one for under $10 usd at a craft store with an embroidery section (with $10 being a MASSIVE one, I recommend getting a 6 inch or less unless your doing something at a standing one, which is overkill most of the time).
I’ll explain how to use the materials later, but everyone has trouble with fabric and I’ve had people balk at the cost before, so here’s where to start (or if your on a tight budget)
- broadcloth: cheap cotton, comes in a whole array of solid colors and a staple of cosplay. Be sure to make certain you don’t make something too tight with this, it isn’t the best at holding up to extreme strain. Typically about $5 usd a yard… full price.
- quilting cotton: slightly more enxpensive and usually patterned in some way broadcloth. If you go to a fabric store they will have TONS of this. Averages about $6-8 usd a yard full price, depending on the brand and store.
- old linens: a cosplay classic. Go to goodwill or Facebook marketplace or a garage sale or something and buy up a bunch of old bed sheets and stuff or some curtains and be ready to get dirty with dye, bleach, and a lot of prayers. Best to aim for solid white, makes it easier, unless you want that specific color/pattern. Upside is that these make bigger pieces easier to make. Think cloaks, super big skirts, “Aladdin” pants, things that have a high depth AND width to the piece you need. Lowers the seam count, at least.
- Muslin: I will have an unhinged rant about historical vs modern muslin later on, but this is a fabric you can get for as little as ¢50 a yard in some cases used for a pattern making method called “draping” that will also be explained at a later date. It’s thick, completely undyed/unbleached, and sturdy enough to take some abuse and doesn’t gray too bad. It’s shit compared to historical muslin, but it does its job as a cheap canvas in a pinch. Be warned: these come on VERY short bolts and often aren’t “double wide” like other fabrics, which can be an issue and lead to TONS of seams.
Again, muslin is used to make patterns usually. Will explain “draping” later but it’s pretty self explanatory based on the name.
#cosplay help#cosplay tutorial#cosplaying#ac3s tutorials#cosplay materials#fabric#beginner cosplay tips#sewing#hand sewing
43 notes
·
View notes
Text
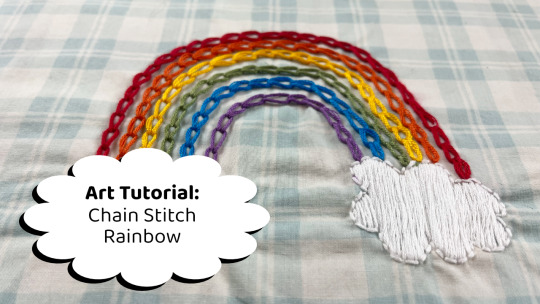
Looking for a gloomy day project? Try making a chain stitch rainbow!This project is beginner friendly and uses only 3 basic embroidery stitches.
Watch the tutorial
#design#sewing#fashion#handcrafted#handmade#slow fashion#textiles#textile art#one of a kind#embroidery#tutorial#yarn#youtube#my art#artwork#art#diy#crafts#video#hand stitching#rainbow#diy project#diy craft#diy tutorial#embroidery tutorial#beginner embroidery
5 notes
·
View notes
Text
How to Sew a Dress for Beginners: Easy DIY Tutorial
In this post, you will learn how to sew easy dress for beginners with free PDF pattern in 8 sizes. Love what you see ? Support me by snagging some cool items from my shop! Every purchase helps me bring you more awesome content. Thank you! Shop Now Are you ready to dive into the world of sewing and create your very own clothes? Today, I’m going to guide you through an easy sewing tutorial for…
#Beginner Sewing Guide#Beginner Sewing Tutorial#DIY strappy dress#Easy Sewing Projects#Free dress pattern#Homemade dress#How to sew a dress for beginners#Sew your own clothes#sewing for beginners#sewing tips and tricks#Sewing Tutorial for Beginners#Simple dress pattern#step-by-step sewing guide
8 notes
·
View notes
Text
Can You Learn to Sew Online? A Comprehensive Look at Your Options with ONSA
At ONSA - Online Sewing Academy, the world of stitching and garment construction should be accessible to everyone, regardless of location or schedule. In today's digital age, online learning has revolutionized how we acquire new skills, making it possible to master intricate crafts like sewing from the comfort of our homes. But can you truly become an expert stitcher through virtual classes alone? Let's explore the options available and how ONSA empowers you to embark on an enriching sewing journey.
The Beauty of Pre-Recorded Video Lessons
Ah, the world of pre-recorded tutorials - a treasure trove of knowledge at your fingertips! ONSA's extensive library of meticulously crafted video lessons offers a comprehensive exploration of sewing techniques, from the fundamentals of threading a needle to the intricacies of advanced garment construction. One of the most significant advantages of this format is the ability to learn at your own pace, rewinding and revisiting lessons as many times as needed until each stitch and seam becomes second nature.
Our pre-recorded videos are thoughtfully designed to cater to diverse learning styles, combining visual demonstrations with clear, concise explanations. Whether you're a visual learner who thrives on observing each step or an auditory learner who appreciates detailed verbal guidance, our lessons ensure that no aspect of the sewing process is left unexplained.
While budget-friendly and convenient, we understand that pre-recorded content may lack the human interaction that many pupils crave – the ability to ask questions, receive real-time feedback, and benefit from the personalized attention of an experienced instructor. This is where our live, interactive classes come into play.
The Magic of Live, Interactive Classes
Imagine having a seasoned ONSA instructor by your virtual side, guiding you through the intricate sewing world with patience and expertise. Our live, online classes provide an immersive, interactive experience replicating the intimacy of a physical classroom setting. Through video conferencing technology, you can follow along with your instructor, ask questions as they arise, and receive real-time feedback on your technique.
One of the most significant advantages of live classes at ONSA is the ability to learn at a pace that suits your individual needs. Our instructors are adept at adapting their teaching methods to accommodate varying skill levels, ensuring that every student feels included and supported. Whether you're a complete novice taking your first tentative stitches or a skilled stitcher seeking to elevate your art, our talented teachers can customize lesson plans to align with your unique goals and aspirations.
From mastering the art of inserting invisible zippers to acquiring advanced draping skills for haute couture designs, our live classes cover various topics, catering to hobbyists and aspiring professionals. Private one-on-one sessions and small group workshops provide ample opportunity for personalized guidance, fostering an environment where questions are welcomed, and challenges are addressed with patience and expertise.
The ONSA Edge: A Holistic Approach to Sewing Education
At ONSA, we understand that sewing is more than just a practical skill – it's an art form that combines technical precision with creative expression. Our approach to online sewing education is rooted in this philosophy, nurturing both the technical and artistic aspects of this timeless craft.
Our team of expert instructors, each with years of industry experience and a passion for teaching, has thoughtfully crafted a multifaceted curriculum that covers the entire spectrum of sewing, from understanding fabric properties and pattern drafting to mastering advanced construction techniques and exploring fashion design principles.
By combining our comprehensive library of pre-recorded video resources with live, interactive sessions, ONSA provides a 360-degree learning experience tailored to your schedule, skillset, and aspirations. Whether you prefer the convenience of self-paced learning or thrive on the dynamic energy of a virtual classroom, our blend of educational formats ensures that your sewing journey is enriching, engaging, and tailored to your unique needs.
Beyond the technical aspects of sewing, ONSA also emphasizes the importance of nurturing creativity and self-expression. Our lessons encourage students to experiment with fabric choices, color combinations, and design elements, fostering an environment where individuality is celebrated and personal style is cultivated.
Sewing Mastery: A Journey, Not a Destination
At ONSA, we firmly believe that sewing mastery is a lifelong pursuit, a continuous learning and refinement journey. Our online academy is designed to support you at every stage of this journey, from your first tentative stitches to the creation of intricate, couture-worthy garments.
As you progress through our curriculum, you can participate in virtual sewing circles, where you can connect with fellow stitchers, share your creations, and seek inspiration from a community of like-minded individuals. Our instructors are not just teachers but mentors dedicated to your growth and success, offering guidance and encouragement every step of the way.
Sewing is more than just a hobby – it's a powerful form of self-expression, transforming fabric into wearable art that reflects your unique style and personality. At ONSA, we strive to empower you to unleash your creativity, one stitch at a time, by providing a comprehensive and immersive online learning experience tailored to your needs.
Ready to Start Stitching Your Dreams into Reality?
Whether you're a busy professional seeking a creative outlet, a stay-at-home parent looking to explore a new passion, or a lifelong stitcher yearning to elevate your skills, ONSA - Online Sewing Academy supports your sewing journey.
Explore our diverse online sewing courses today, from beginner-friendly introductions to advanced masterclasses, and unlock a world of possibilities that transcends time and space. With ONSA, the art of sewing is no longer limited by your location or schedule – it's a vibrant, accessible realm where your dreams can be woven into reality, one exquisite thread at a time.
Join our virtual community of passionate stitchers, where inspiration, camaraderie, and personal growth intertwine seamlessly. Embark on a transformative journey that will teach you sewing techniques, ignite your creativity, boost your confidence, and empower you to express your individuality through the timeless art of garment construction.
The world of sewing awaits, and at ONSA, we're committed to being your trusted guide every step of the way. Unleash your inner stitching prowess, and let your creativity take flight – the possibilities are endless.
#sewing#sewing classes#online sewing classes#learn to sew online#virtual sewing lessons#sewing tutorials#pre-recorded sewing videos#live sewing classes#interactive sewing instruction#ONSA sewing academy#sewing education#sewing mastery#garment construction#fashion design#pattern drafting#sewing techniques#creative sewing#sewing community#sewing journey#sewing skills#beginner sewing#advanced sewing#couture sewing#self-paced learning#personalized instruction#sewing mentorship#sewing creativity#sewing expression#wearable art#fabric art
15 notes
·
View notes
Text

Fast Four Patch Quilt Pattern is a great one for beginners. FREE Pattern Here: https://www.diaryofaquilter.com/fast-four-patch-quilt-tutorial/
#crafts#gifts#decor#sewing#quilting#briar rose quilts#bedding#shopping#quilters of tumblr#quilt#quilts#quilt pattern#free pattern#free quilt pattern#fast four patch#quilt tutorial#diary of a quilter#beginners pattern#beginners quilt#beginners guide
5 notes
·
View notes
Text
Gonna show yall how I fix my pants cause nobody got money for new jeans in this economy
#here is an unprompted tutorial lol#i hate fixing clothes so its very beginner friendly and also not that nice looking? but it looks cool so ill show you#sewing#ig i should tag this appropriately in case anyone might need it lol
18 notes
·
View notes
Video
youtube
Learn Pattern Drafting for Beginners: Make a Wrap Skirt That Fits YOU!
2 notes
·
View notes
Text
Master Your Serger and Overlocker with the #1 Online Sewing Course!
Master Your Serger and Overlocker with the #1 Online Sewing Course! Tired of tangled threads, skipped stitches, or confusion over your serger’s settings? Whether you’re a sewing enthusiast or a professional looking to refine your craft, The Number 1 Serger and Overlocker Online Sewing Course is your ultimate guide to mastering these powerful machines. Say goodbye to frustration and hello to…
#advanced serger techniques#beginner serger course#best online sewing course#cover stitch mastery#decorative serger stitches#DIY sewing projects#fabric-specific serger skills#learn to use a serger#lifetime sewing access#online sewing classes#overlocker online classes#professional seam finishes#save time sewing#serger hacks#serger maintenance guide#serger sewing course#serger tension settings#serger video tutorials#serger vs overlocker#sewing community forum#sewing course enrollment#sewing machine troubleshooting#sewing machine tutorials#sewing tips for beginners#threading a serger machine
0 notes
Text
Important concepts for ALL garment(clothing) creation:
Wrong side/ Right side:
Also called “inside” and “outside”, this is how your seams are arranged. You want ALL SEAMS on the WRONG side, which means you need to watch how you line up your pieces and make sure you don’t have things flipped. If you are doing a lining, then the WRONG side of the lining is the “outer” layer and the RIGHT side of the lining is the “inner” part that is seen or against your skin.
This is VERY important with things that are knit or crocheted, or that have a pattern that’s only on one side or embroidery/bead work. The RIGHT side is what displays what you want seen, like how if you look at the inside of a sweater with designs on it you will see “floats” across the part that’s hidden from veiw.
Floats:
These are bits of thread, yarn, etc. that are “floating” on the inside of a garment. Usually just an embroidery or yarn work thing, but also applicable to smocking (explanation as to what this is to come with the big pleating/smocking post I have in the works) in some cases.
Seam allowance:
An extra bit of fabric added to the base pattern dimensions to allow for room for seams to be made and not easily rip. Depending on fabric, skill level and method of sewing you may need more or less. This means that you can have a 1/6 of an inch average seam allowance for hand sewing but still need 3/4 of an inch for machine work.
Stitch gauge:
I’ve head this called a few things, but it’s the distance between stitches. More important with yarn work, but tight/short stitches with sewing with fabric also alters how things come out.
Tension:
How tight you keep the thread you are working with and how much you pull the fabric with each stitch. VERY IMPORTANT for embroidery and yarn work, hand sewing being a bit more lenient. Tension is controlled for you by a machine, you just need to figure out what setting works best and stick to that. This varies a lot based on materials being used.
Puckering:
This is what happens when your tension is too tight or (with crochet and knit) you accidentally add some stitches and go right back to the number you had before or do the inverse. It leaves “puckers” or points of tension or unnecessary gathering at that point, which can cause issues ranging from bad aesthetics to straight up tears from the added strain on the fabric. This is easier to control with a good tension and stitch gauge combo, and is again mostly a hand sewing/hand embroidery problem.
Interfacing:
Not a VITAL thing, but frequently used by intermediate beginner and up cosplayers and fashion designers. It’s a material similar to a very thin felt or fuzzy paper in texture that adds structure to a garment. You stick a piece of it between an outer and inner layer, sew all into one piece, and if it’s the fusible type iron it so it sticks together better. Usually this is used for collars, sleeve cuffs, and other small things that need to be stiffer due to button holes and button plackets (will be explained in the fastenings post) or needing to “stand”.
Bonus material explained!
Boning:
If you’ve seen a corset or something with really stiff lines that curve around a body, you know generally what this is. I’ll go into more detail in a post about just this and its many uses, but it’s a (at least in modern day stuff) plastic or super stiff braided material that is shoved into channels to add structure and support. They are somewhat flexible, but can cause issues with movement if not done right and need to be “capped” to prevent poking. The underwire of a bra is technically a piece of boning, for a really common example of this.
Corseted is fairly advanced, especially since it involves at LEAST 3 or 4 layers of fabric plus the material itself to be a decent base plus fastenings which are a whole different beast, so I DO NOT recommend trying this right out the gate.
#ac3s tutorials#beginner cosplay tips#hand sewing#sewing#cosplay help#cosplaying#cosplay materials#cosplay#cosplayer#tutorial#this is just terminology tbh#but it’s important
15 notes
·
View notes