#Custom development testing tools
Explore tagged Tumblr posts
Visit Tumblr Blog
Explore Tumblr blogs with no restrictions, modern design and the best experience.
Last Seen Tumblr Blogs


Fun Fact
Tumblr.com is the 103rd most visited website in the world.
Text
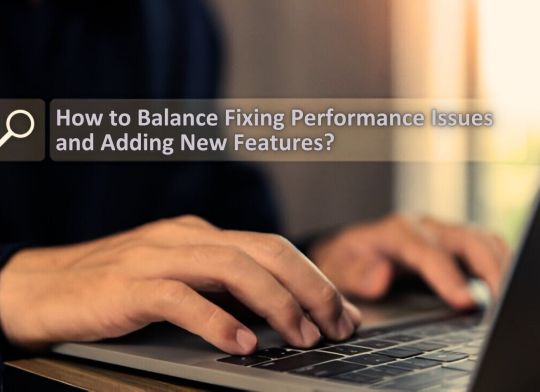
How to Balance Fixing Performance Issues and Adding New Features in Web Applications?
In today’s digital landscape, web applications are essential for business operations, marketing, and consumer involvement. As organizations expand and consumer expectations rise, development teams are frequently confronted with the difficult task of balancing two key priorities: addressing performance issues and introducing new features.
While boosting performance improves the user experience and increases efficiency, new features are required to remain competitive and meet market demands. Prioritizing one over the other, on the other hand, might have negative consequences—performance concerns can lead to a poor user experience while failing to innovate can result in a competitive disadvantage.
This blog delves into how to balance improving performance and introducing new features to web apps, allowing firms to satisfy technical and market demands efficiently.
Why Balancing Performance and New Features Is Crucial
A web application‘s success depends on both its performance and its features. However, relying entirely on one might result in imbalances that impair both user happiness and business progress.
Performance:Performance is an important component that directly influences user retention and happiness. Users can become frustrated and leave if the application has slow loading times, crashes, or problems. Ensuring that your web application runs smoothly is essential since 53% of mobile consumers would quit a site that takes more than three seconds to load.
New Features:On the other hand, constantly adding new features keeps users interested and promotes your company as innovative. New features generate growth by attracting new consumers and retaining existing ones who want to experience the most recent changes.
The dilemma is deciding when to prioritize bug fixes over new feature development. A poor balance can harm both performance and innovation, resulting in a subpar user experience and stagnation.
Common Performance Issues in Web Applications
Before balancing performance and features, it’s important to understand the common performance issues that web applications face:
Slow Load Times: Slow pages lead to higher bounce rates and lost revenue.
Server Downtime: Frequent server outages impact accessibility and trust.
Poor Mobile Optimization: A significant portion of web traffic comes from mobile devices and apps that aren’t optimized for mobile fail to reach their potential.
Security Vulnerabilities: Data breaches and security flaws harm credibility and user trust.
Bugs and Glitches: Software bugs lead to poor user experiences, especially if they cause the app to crash or become unresponsive.
Strategic Approaches to Fixing Performance Issues
When performance issues develop, they must be handled immediately to guarantee that the online application functions properly. Here are techniques for improving performance without delaying new feature development:
Prioritize Critical Issues:Tackle performance issues that have the most significant impact first, such as slow loading times or security vulnerabilities. Use analytics to identify bottlenecks and determine which areas require urgent attention.
Use a Continuous Improvement Process:Continuously monitor and optimize the application’s performance. With tools like Google PageSpeed Insights, you can track performance metrics and make incremental improvements without major overhauls.
Optimize Database Queries:Slow database queries are one of the leading causes of web app performance issues. Optimize queries and ensure that the database is indexed properly for faster access and retrieval of data.
Reduce HTTP Requests:The more requests a page makes to the server, the slower it loads. Minimize requests by reducing file sizes, combining CSS and JavaScript files, and utilizing caching.
5. Leverage Caching and CDNs: Use caching strategies and Content Delivery Networks (CDNs) to deliver content quickly to users by storing files in multiple locations globally.
Why Adding New Features is Essential for Growth
In the rapidly changing digital environment, businesses must continually innovate to stay relevant. Adding new features is key to maintaining a competitive edge and enhancing user engagement. Here’s why:
User Expectations:Today’s consumers expect personalized experiences and constant innovation. Failure to add new features can lead to customer churn, as users may feel your web application no longer meets their needs.
Market Differentiation:Introducing new features allows your application to stand out in the marketplace. Unique functionalities can set your app apart from competitors, attracting new users and increasing customer loyalty.
Increased Revenue Opportunities:New features can lead to additional revenue streams. For example, adding premium features or new integrations can boost the app’s value and lead to increased sales or subscription rates.
4. Feedback-Driven Innovation: New features are often driven by user feedback. By continuously developing and adding features, you create a feedback loop that improves the overall user experience and fosters customer satisfaction.
Read More: https://8techlabs.com/how-to-balance-fixing-performance-issues-and-adding-new-features-in-web-applications-to-meet-market-demands-and-enhance-user-experience/
#8 Tech Labs#custom software development#custom software development agency#custom software development company#software development company#mobile app development software#bespoke software development company#bespoke software development#nearshore development#software development services#software development#Website performance testing tools#Speed optimization for web apps#Mobile-first web app optimization#Code minification and lazy loading#Database indexing and query optimization#Agile vs Waterfall in feature development#Feature flagging in web development#CI/CD pipelines for web applications#API performance optimization#Serverless computing for better performance#Core Web Vitals optimization techniques#First Contentful Paint (FCP) improvement#Reducing Time to First Byte (TTFB)#Impact of site speed on conversion rates#How to reduce JavaScript execution time#Web application performance optimization#Fixing performance issues in web apps#Web app performance vs new features#Website speed optimization for better UX
0 notes
Text
Software Development Company in Patna - Cybonetic Technologies Pvt Ltd
Cybonetic Technologies Pvt Ltd is an innovative software development company in Patna. We are dedicated to helping businesses with modern software solutions to grow and run business smoothly. Our expert software developer team specializes in a wide range of services, including mobile app development, website development, E-commerce development, and software consulting, delivering top-quality services for your business needs. We also focus on creating user-friendly, scalable, and robust software that empowers your business operations. Contact us today!

#software development#software development company in Patna#custom software applications#software developers#software development tools#programming languages#end-to-end solutions#testing#deployment#maintenance#innovative software solutions
0 notes
Text
WP Engine is a well-known managed WordPress hosting provider.
It offers a range of features and services tailored specifically for WordPress websites, making it a popular choice among businesses, bloggers, and developers who seek reliable, high-performance hosting solutions.

#Managed WordPress Hosting:#security#and reliability.#automated updates#and staging environments.#Genesis Framework and StudioPress Themes:#Access to the Genesis Framework for building fast#secure#and SEO-friendly websites.#Includes over 35 StudioPress themes for customization and design flexibility.#Global Edge Security:#Advanced security features including DDoS protection and Web Application Firewall (WAF).#Managed threat detection and prevention.#Content Performance:#Tools and analytics to measure and optimize content performance.#Helps improve site speed and SEO rankings.#Dev#Stage#Prod Environments:#Separate development#staging#and production environments for better workflow management.#Allows for testing changes before pushing them live.#Automated Migrations:#Easy migration tools to transfer existing WordPress sites to WP Engine.#Assisted migrations for a smoother transition.#24/7 Customer Support:
0 notes
Text
Testing
Delivering exceptional software requires a keen eye for quality. At Alt Digital Technologies, we don't just develop, we engineer trust through our comprehensive testing solutions. We focus on delivering top-notch quality assurance, the cornerstone of any successful software product. Our proficiency in automated testing, ensures your software’s seamless performance, saving valuable time and resources.
We also value the importance of manual testing in software testing. Our adept testers are thorough in their approach, ensuring no potential issue goes unnoticed. Equipped with a range of automated software testing tools, we offer a balanced testing solution that combines the speed of automation with the meticulousness of manual testing. Choose Alt Digital Technologies for a flawless software experience.

#software testing#technology#manual testing#testing#software#technologies#commerce tools#digital strategy consultant#software devops service#digital customer experience services#it consulting services#it service provider#devops service#softwaredevelopment#software company#IT Solutions#web development#digital marketing#digital commerce#Digital Transformation#digital experience#ALTDigital#Alt Digital#salesforce#salesforce cloud#Salesforce Development#Salesforce development services#Salesforce developers#salesforce partner#salesforce services
0 notes
Text


Matts Free Messy Brush Pack + Texture Assets for Procreate is now available for download over on my Gumroad storefront: here
This Messy Brush Pack is listed as free/pay what you want - it's important to me that creative tools and resources are financially accessible to those who want to explore and play but can't feasibly do so - if you want to test the brushes out, you can always pay later (but it is not mandatory) if you do want to support my practice!!
What's Included?
x4 of Matts Messy Brushes:
Messy Inky Outline – a light and loose ink brush that can be used for linework, it emulates the build up of ink depending on the pen tilt angle.
Messy Ink Liner – designed to emulate a dry ink texture with grit, feels like your trusty ink pen is almost out of ink.
Messy Inker – great for blocking out shapes and forms, is slightly translucent - can be used as a quick & dirty fill brush.
Messy Pencil – emulates a soft pencil quality that builds up, you use the Inky Outline brush as an eraser to tidy up the rough edges after rendering to your hearts content.
x12 Texture Asset Files:
Texture Assets – a selection of 12 custom texture files, they are all in Grayscale, use them as clipping masks on fill layers or linework, play with the layer filter types and opacity (they're great fun the adjust, my favorite preference is the soft light layer filter at 60% opacity!!) you can erase parts of them using the brushes in this Messy Brush pack to better curate where you want texture to be in your piece, generally are very intuitive to work with!!
I am currently hard at work developing + revising what will be a larger brush pack for Procreate - currently at 60+ brushes in counting - custom brush stamp shapes, grains etc. This future brush pack will be appropriately priced and be released alongside a condensed version of the pack, so customers who are low-income can still partake and play with some fun brushes. Thank you for your support and enjoy these free tools + assets!! If you would like to stay updated with my work, you can find me over on: instagram | bluesky | twitter | patreon | linkedin *ੈ✩‧₊˚
#procreate brushes#procreate#illustration#digital brushes#digital art brushes#brush pack#free brushes#brush set#texture asset#digital illustration#digital drawing#digital art#sketchbook#ink brush#pencil brush#comic art#character desgin#visdev#visual development#concept art#fungi#mushroom#mushroom art
456 notes
·
View notes
Text
StreamBuilder: our open-source framework for powering your dashboard.
Today, we’re abnormally jazzed to announce that we’re open-sourcing the custom framework we built to power your dashboard on Tumblr. We call it StreamBuilder, and we’ve been using it for many years.
First things first. What is open-sourcing? Open sourcing is a decentralized software development model that encourages open collaboration. In more accessible language, it is any program whose source code is made available for use or modification as users or other developers see fit.
What, then, is StreamBuilder? Well, every time you hit your Following feed, or For You, or search results, a blog’s posts, a list of tagged posts, or even check out blog recommendations, you’re using this framework under the hood. If you want to dive into the code, check it out here on GitHub!
StreamBuilder has a lot going on. The primary architecture centers around “streams” of content: whether posts from a blog, a list of blogs you’re following, posts using a specific tag, or posts relating to a search. These are separate kinds of streams, which can be mixed together, filtered based on certain criteria, ranked for relevancy or engagement likelihood, and more.
On your Tumblr dashboard today you can see how there are posts from blogs you follow, mixed with posts from tags you follow, mixed with blog recommendations. Each of those is a separate stream, with its own logic, but sharing this same framework. We inject those recommendations at certain intervals, filter posts based on who you’re blocking, and rank the posts for relevancy if you have “Best stuff first” enabled. Those are all examples of the functionality StreamBuilder affords for us.
So, what’s included in the box?
The full framework library of code that we use today, on Tumblr, to power almost every feed of content you see on the platform.
A YAML syntax for composing streams of content, and how to filter, inject, and rank them.
Abstractions for programmatically composing, filtering, ranking, injecting, and debugging streams.
Abstractions for composing streams together—such as with carousels, for streams-within-streams.
An abstraction for cursor-based pagination for complex stream templates.
Unit tests covering the public interface for the library and most of the underlying code.
What’s still to come
Documentation. We have a lot to migrate from our own internal tools and put in here!
More example stream templates and example implementations of different common streams.
If you have questions, please check out the code and file an issue there.
5K notes
·
View notes
Note
Hello! Your IF story inspired me to start my own IF game
Im thinking of using twine
And I would like to ask you if you had any tips or advice
Thank you!
Also side note I’m really excited and very interested in how this story is going to play out I already love the cast and can’t wait to see the rest!
OOoo thank you so much! I'm very flattered the game inspired you!
Twine has many different story formats, each with their own pros and cons. I personally use Sugarcube (I think next to Harlow, it is the most popular) so all my tips will be for Twine Sugarcube:
Basic tips:
Bookmark the Sugarcube V2 Document. This is your bible. It will have everything you need to use Twine. It's a daunting read, but I use it to troubleshoot when I forget how Macros work. I always have tab open for it.
Download a Twine Template. If you are brand new to Twine and making IFs, I heavily suggest downloading a template or two. Most of them come with tutorials and examples on how they work. Sometimes they even provide more helpful resources on Twine. I use Vahnya's Template II that I modified myself afterwards.
Study from pre-exisiting Twine IFs. Might be controversial, but I personally believe that diving in and seeing how other authors code and structure their stories helps a lot. Eventually you'll figure out a system and structure that works for you. It might not work for all games, but most Twine games can be downloaded and opened up in the twine editior. If you're worried about spoilers or upsetting people, feel free to download my game and see whats inside. I make multiple copies of the game, so any build I have out in the public is not the original build and therefore have no spoilers. I know it will look insane when you open it, but there's a method to the madness.
Writing and Planning:
Making an IF is no joke! Plan your story out, know your big variables, your branching routes and at least some part of your ending!! Try to stay as organized as possible. These projects and can will spiral out of control if you're not careful. I suggest having a giant excel sheet with tabs for important variables, chapter/scene breakdowns, wordcount and characters ect. Updating it will be a pain (that I am guilty of not doing) but will make developing easier. Even if you don't make a big project, its still good practise to do it.
#Stylesheet:
All the code in here relates to how the game looks. You can fiddle in there to configure the game to look how you want it to look. If you even want to see what element is tied to what ID code, the best thing to do is playtest the game (build >> play) and then leftclick and select "inspect element" you browser will open up the developer window and you see what elements are tied to what and even play around with the contents to test out CSS elements you like.
This website is a great resource on using CSS and other coding language. I personally used it many time to modify my game.
Helpful resources and Macros:
Chapel has made a LOT of custom macros that you can add to your game. You can find the list here.
But the most important one is the Pronoun Template. It might be confusing at first but one you understand how it work, its a great tool to have. You can even add gendered titles so that they work with the pronoun template.
Idrellegame is a great resource on coding in Twine. You can find the list here. It helped me out when starting out.
Exporting to Itch:
I never see people talk about Butler when it comes to uploading If games onto itch.io, so i'm doing it now.
What is Butler? Its a command-line tool that Itch made to upload your game onto Itch.io quickly and reliably.
The documentation is here. And I suggest coping and pasting the export codes onto a doc so you can use them for every update afterwards.
Here is a youtube tutorial you can follow along as well: https://www.youtube.com/watch?v=_JCJa5iWREM
I personally have the Butler on the Itchio.app so that's its always up to date.
Thats all I can offer off the top of my head, if you or anyone wants some help on something specifically, feel free to DM me or drop another ask in the inbox. Always happy to help. Working in twine is very overwhelming for newcomers.
60 notes
·
View notes
Text
Writing Notes: The Five-Factor Model of Personality
Culture is transmitted to people through language, as well as through social norms which establish acceptable and unacceptable behaviors which are then rewarded or punished (Henrich, 2016; Triandis & Suh, 2002).
With an increased understanding of cultural learning, psychologists have become interested in the role of culture in understanding personality.
The 5 Personality Traits According to this Model
OPENNESS TO EXPERIENCE
Refers to a person's imagination, feelings, actions, ideas
LOW score: More likely to be practical, conventional, prefer routine
HIGH score: More likely to be curious, have a wide range of interests, be independent
CONSCIENTIOUSNESS
Competence, self-discipline, thoughtfulness, goal-driven
LOW: Impulsive, careless, disorganized
HIGH: Hardworking, dependable, organized
EXTROVERSION
Sociability, assertiveness, emotional expression
LOW: Quiet, reserved, withdrawn
HIGH: Outgoing, warm, seeks adventure
AGREEABLENESS
Cooperative, trustworthy, good-natured
LOW: Critical, uncooperative, suspicious
HIGH: Helpful, trusting, empathetic
NEUROTICISM
Tendency toward unstable emotions
LOW: Calm, even-tempered, secure
HIGH: Anxious, unhappy, prone to negative emotions
Applicability
The idea that personality can be described and explained by five traits (OCEAN) has important implications, as does the fact that most personality tests were constructed and initially tested in Western countries.
Western ideas about personality may not apply to other cultures (Benet-Martinez & Oishi, 2008).
2 Main Cultural Approaches for Researching Personality
Etic traits - considered universal constructs that are evident across cultures and represent a biological bases of human personality. If the Big Five are universal then they should appear across all cultures (McCrae and Allik, 2002).
Emic traits - constructs unique to each culture and are determined by local customs, thoughts, beliefs, and characteristics. If personality traits are unique to individual cultures then different traits should appear in different cultures.
Using an Etic Framework
Cross cultural research of personality uses an etic framework and researchers must ensure equivalence of the personality test through validation testing.
The instrument must include equivalence in meaning, as well as demonstrate validity and reliability (Matsumoto & Luang, 2013).
Example: The phrase feeling blue is used to describe sadness in Westernized cultures but does not translate to other languages.
Differences in personality across cultures could be due to real cultural differences, but they could also be consequences of poor translations, biased sampling, or differences in response styles across cultures (Schmitt, Allik, McCrae, & Benet-Martínez, 2007).
Personality Test/Measure Used: The NEO-PI
Most of the cross-cultural research on the Five-Factor Model (FFM) and Big Five (OCEAN) has been done using the NEO-PI (and its subsequent revisions; i.e., it is an assessment tool developed to measure the 5 dimensions of personality according to the FFM) which has demonstrated equivalence, reliability and validity across several cross-cultural studies (Costa & McCrae, 1987; McCrae, Costa & Martin, 2005).
Research using the NEO-PI found support for the entire Five-Factor Model in Chinese, Dutch, Italian, Hungarian, German, Australian, South African, Canadian, Finnish, Polish, Portuguese, Israeli, Korean, Japanese, and Filipino samples, in addition to other samples (McCrae, Costa, Del Pilar, Rolland, & Parker, 1998).
NOTE
Personality tests rely on self-report which is susceptible to response bias like socially desirability responding.
To evaluate this possibility, McCrae and colleagues (2005) recruited students from 50 cultural groups and modified the NEO-PI to be in the third person (i.e., he, she, his, her):
The research participants were asked to complete the form on someone else that they knew very well (McCrae et al., 2005).
The same 5 factors emerged in this study.
These results provided empirical support for the FFM and for the use of self-report instruments when conducting cross-cultural personality research.
There was no reason for the students to respond in a desirable way because they were answering questions about someone else.

Sources: 1 2 ⚜ Writing Notes & References
#writing notes#personality#psychology#culture#writeblr#character development#spilled ink#dark academia#langblr#studyblr#writing reference#literature#writers on tumblr#writing prompt#poetry#poets on tumblr#writing inspiration#writing ideas#writing inspo#creative writing#fiction#character building#light academia#research#writing resources
183 notes
·
View notes
Text

THE SIMS 3 TUTORIAL
HOW TO CREATE DEFAULT REPLACEMENT MOD USING CUSTOM MESH & TEXTURE FOR SIMPLE OBJECT
⚠️ Tumblr has 30 pictures limit, so I cannot include too many pictures. If you want to zoom in the pictures, click the pictures to enlarge, or save the pictures into your PC, zoom the pictures on picture viewer or zoom in the pictures on your mobile phone. ⚠️
----------------------------------------------------
I create this tutorial to make easier to follow because there are older tutorials available before but scattered on internet and usually only say "Export to replace s3asc" without explaining how to export the edited object properly.
My method is using TSR Workshop instead of exporting the object using Sims 3 Object Export/Import plug in because exporting to replace the s3asc using that plug in always giving error notification "ERR: Model has 1 groups; original had 0" and cannot be exported.
For beginners who are very new using s3pe and haven't created default replacement mod before, better start from simple object first.
Simple objects I mean in-game object that has single MODL and single texture with no morphs, no GeoStates, no presets, no CAS colour channels, and easily cloned from OBJD on catalogue. Usually as utensils that Sims holding in their hand, not buy/build objects. For example: Pencil, pan, fork, spoon.
----------------------------------------------------
Tools to prepare:
s3oc
s3pe
Milkshape 3D for bone assignment (Version I use 1.8.5 beta, discontinued by its developer, therefore feel free to download the full version with its license key provided).
Sims 3 Object Export/Import 1.01 by Wesley Howe (Milkshape plug-in. Download msS3ObjPluginsV101.rar )
TSR Workshop (Older version for TS3 only version 2.0.88)
TSR Workshop plug-ins for export.import TSRW Object.
3D Program (Blender/Maya/3dsMax)
Editing images software (Photoshop, make sure you have to install .dds plugin by Nvidia. For free software alternative, you can use GIMP with its .dds plugin)
This tutorial will not teach you how to:
Meshing object ❌
Create alpha texture ❌
Change thumbnails in-game ❌
Install programs and plug-ins ❌
This is how I created Chinese chopsticks replacement mod using custom mesh and texture.
In summary, this tutorial has 10 steps:
Step 1. Clone the Object using s3oc
Step 2. Open S3PE to Copy the Original Resource Code and Export the Files
Step 3. Export the Original Mesh as Base Mesh to .obj format
Step 4. Create Your Custom Mesh
Step 5. Bone Assignment & Create Group
Step 6. Create custom Texture
Step 7. Import the .wso of Edited Mesh on TSR Workshop & Export the package
Step 8. Export MODL file from Package saved from TSR Workshop
Step 9. Finalizing in s3pe & Replacing the Original file with Edited File & Correcting the Code As Same As Default Code
Step 10. Test the CC in your game.
-----------------------------------
✳️ Step 1. Clone the Object using s3oc
Before cloning the object, check the Game Folder for in-game object file location. Settings > Game Folders...
Take a look if the Base Game or Expansion Pack for object file you want to clone is in the right folder. For example, my The Sims 3 game are all bought from Steam, so the location is D:\SteamLibrary\steamapps\common\The Sims 3
If you want to clone object from Expansion Pack, make sure input the folder location. For example, the location for World Adventures EP is D:\SteamLibrary\steamapps\common\The Sims 3\EP1

If you are done, close the pop-up box. You can continue click Cloning then choose Normal Object...
Wait until you get the whole catalogue. Click Search...

For example, I clone object from World Adventures Expansion Pack. You can clone object from Base Game or other Expansion Packs as long it is considered as "utensil" that Sim holding on hand. For example: "Pencil" or "Pan"
Search for text: chopsticks
or if you want to clone object from Base Game, search: utensil
Tick check marks for Resource Name, Object Name, Object Desc then click "Search button"
Search result gives you results with name "chopsticks". Here is the object we are looking for: UtensilChopsticks
We need the OBJD file to clone. OBJD = Object Data.

Click "Clone or Fix" at the right bottom. Then you see the next page to determine if you want to clone with renumber or not. If you want to make default replacement, then do not check the Renumber box. Keep it blank.
Tick check box means the s3oc will generate new resource code for new item. Not tick the check means the s3oc will overwrite the same resource code, it is to replace object you cloned in-game.
I am personally a detailed person, so I usually tick as many as I want: tick "Deep clone" "Missing String Tables" and "Include Thumbnail" to include more details. Then click "Start" to proceed.

It will give you file name [CreatorName]_ObjectName_Number
Then save your package file in "DBPF Package" format in your project folder. Always make folder for any file to make everything organized.
✳️ Step 2. Open S3PE to Copy the Original Resource Code and Export the Files
Open S3pe, locate your package file you cloned from s3oc. Find the MODL of Utensil Chopsticks, Right-Click, "Details..."

On Resource Details, click "Copy TGI" to copy the Resource Code. Type, Group, and Instance will automatically be copied on clipboard. Then open Notepad, Right-Click to "Paste".
Click GRID on bottom of the s3pe (I mark it red on picture), it will give you pop-up box with Data Grid. Click "Resources", it will be highlight blue and there's 3 dots button appeared on the right side. Click the 3 dots button. It will give you TGI Block List Editor.
Inside MODL's TGI Block List Editor only has IMG. You may wondering why, but that's how the game coded. Type, Group, Instance of _IMG inside TGI Block List Editor should be the same as _IMG on the package.
Copy the TGI, Group, Instance to your Notepad.

After you copied code of MODL, do the same for the texture image (_IMG), but only copy the code from Resource Details. You cannot edit TGI Block List Editor for _IMG as the Grid button for _IMG is greyed out.
The main task is the code of your edited mesh and texture should be the same as the code you copied now from original package you cloned with s3oc.
Keep the code on notepad. You will need this code later.
Export the MODL file. Right-Click, "Export to s3asc". The file appears in long string such with name for example: S3_01661233_08000001_B619DB2238C3430B%%+MODL_filebase
Do not rename the file. Save.

Export the texture file. Right-Click "Export > To File..." The file will be saved in .dds format. Do not rename the file. Save.

✳️ Step 3. Export the Original Mesh as Base Mesh to .obj format
Open Milkshape. Import the s3asc file you saved before.
More steps click spoiler tag "Read More / Keep Reading" below
File > Import > Sims 3 Object Import v 1.01 by Wesley Howe

Locate the s3asc file, then the original chopsticks mesh appears.
Click the "Joints" tab. It has 4 codes. Check box "Draw vertices with bone colors" It will show Bone Assignment colors on the original mesh. Yellow on top chopstick and light blue on bottom chopstick. The colours are to make the object has rig and movement following the Sim's interaction.

Take a look at the 4 codes on Joints Tab. You can play around to see which colour of the code will appear, after that copy paste the code to Notepad to make it easier to comprehend.
Click Select from Tools menu, Select Options: Face. On "Right/Left/Top/Bottom 2D View", Left-click make selection of one part of chopsticks. While the part of object being selected (Red), click Joints then Choose "Assign".
0x96239247 --> Yellow 0xFEAE6981 --> Purple 0xCD68F001 --> Light Blue 0xD0DECA8E --> Red
Your edited mesh must have the exact same Bone Assignment colour later. Check again if the code and colour are correct.

You can save object mesh as .obj to other 3D software such as Blender or any other 3D software.
✳️ Step 4. Create Your Custom Mesh
Use the original .obj as base model. While you can create longer mesh or any edited version as you wish.
Make sure the scale and position of the edited mesh is same as base original mesh, because the edited mesh will be used on Sim's hand.

If you are done editing the mesh, export the UVmap.
You can export the uvmap in higher resolution, as long as it is Power of 2. 64x64, 128x128, 256x256, 512x512, 1024x1024, 2048x2048, 4096x4096. I export in 1024x1024 pixels to make the size of texture larger and have more details.
Then export the mesh object in .obj format.
✳️ Step 5. Bone Assignment & Create Group
Open Milkshape. Import the original mesh.
Check the Groups Tab. Original mesh has 1 group, "group 00". Group 00 means it is the main mesh. There is no shadow beneath the object.

Import the edited mesh as .obj file.

My edited mesh has one single name "default" name on the Group Tab. While edited mesh may have a lot of file name scattered on Group Tab. Regroup the file name to simplify your edited mesh into one single name. Select > Regroup.
The main task is replacing the EA's original mesh with your edited mesh.
Before you delete anything, you must do Bone Assignment first to the edited mesh you created.
Your edited mesh does not have Bone Assignment, so it appears white.
Remember the 4 codes you copied earlier in Notepad.

Copy Bone Assignment from original mesh to your edited mesh.
This case, your want to Bone Assign Yellow colour.
Select > Face to select one part of chopsticks of your edited mesh. On Joints Tab, double click the appropriate code 0x96239247 in blue highlight then the code box on the right side of "Rename" will appear 0x96239247. Make sure the code is correct. Then you can click "Assign".

Your edited mesh will appear in Yellow colour. Then do the same for another part of chopsticks.
Select another part of chopsticks of your edited mesh. On Joints Tab, double click the appropriate code 0xCD68F001 in blue highlight then the code box on the right side of "Rename" will appear 0xCD68F001. Click "Assign".

Your edited mesh will appear in Light Blue colour.
Then what's the other code for? With colour purple and red?
Leave them. Let the codes have the same exact codes as appear in original mesh and let the colours only assigned Yellow and Light Blue. The colours are to determine rig for interaction in-game, which only use Yellow as upper part of chopstick and Light Blue as bottom part of chopstick.
You can safely delete the original mesh with name group00 until it remains your only your edited mesh.

Rename your edited mesh to group00. Type group00 on the box then click "Rename" on the left side.

Export to TSRW Object in .wso format. .wso is format with bone assignment on object attached.

Save your .wso in your project folder.
✳️ Step 6. Create custom Texture
Import original texture you exported from s3pe to your editing image software.
Look at the original texture made by EA. 32x64 pixels. It is very low resolution, blurry and stretched, because the texture should be compressed as low as possible by game designer. As player you want it has higher detail to look realistic as possible and your PC of course can handle high resolution content, sure you can make the resolution much higher than EA's.

Import the UVMap you saved from 3D software. For example, UVmap I imported has 1024x1024 resolution. Add your custom texture. Then save it to .dds format in the same name as original texture. Save in separate folder, name it "Edited Texture" to keep it separated from original texture.
✳️ Step 7. Import the .wso of Edited Mesh on TSR Workshop & Export the package
Open your TSR Workshop.
Create New Project > New Import >Next...

Then Browse original mesh by EA in package format in your project folder.
On Open file box, you cannot see .package file because the filter is .wrk (TSR Workshop Project). Choose the .package dropdown.

Then you can see .package file.
Open the .package. After the file is located, then Next. On Project Details I usually skip without giving name of Project Name and Title. Next.
You must have seen green land with white blank sky.
Where's the mesh? It is actually there... just being zoomed in too close. You need to zoom out by scrolling down mouse.
You can see the original chopsticks mesh by EA. You can save the project file in .wrk format. After you save the file, import the .wso of your edited mesh. Mesh tab > High Level detail. Click green arrow folder icon to import. Then your edited mesh will appear replacing the original EA mesh.

As you see, the texture is messed up because the texture is still using original EA's texture. But then you check Textures tab and it has blank dropdown...
I cannot change the texture on this TSR Workshop!
Don't worry, we can replace the texture on s3pe later.
No need to change anything other than importing mesh. Click Edit > Project Contents to save as package.
You will see pop up box with number or files DDS, FTPT, LITE, MODL, OBJD, OBJK, etc. Export > To. package. Give name such as "EditedChopsticks_TSRW"

✳️ Step 8. Export MODL file from Package saved from TSR Workshop
Open S3PE, File > Open package "EditedChopticks_TSRW" that you saved from TSR Workshop.
Export MODL. Right-Click, export. It gives you file name with [StringOfNumber] .model .
Save it on project folder. Keep it organized and separated from original MODL. Name the folder "Edited MODL". Do not rename the file.
✳️ Step 9. Finalizing in s3pe & Replacing the Original file with Edited File & Correcting the Code As Same As Default Code
Open s3pe, File > Open original package that you cloned from s3oc. [CreatorName]_ObjectName_Number
Find the MODL. Right-Click > Replace...
Locate to your edited MODL with filename .model .
Then click Open.
The original MODL of the package should be replaced with your edited mesh.
Do the same for the texture.
Locate to your edited texture with filename .dds
Then click Open.
The original texture of the package should be replaced with your edited texture.
Take a look at MODL's Type, Group, Instance. It has the same code as original MODL in the original package cloned with s3oc (because it has been replaced)
Don't forget to see the code inside TGI Block List Editor.
Repeat step 2 how to check the code. Right-Click on MODL/IMG > Details... and click GRID > Resources > TGI Block List Editor.
The Type, Group, Instance of the _IMG are different compared from IMG from original package clone, which means that is the evidence of edited mesh replaced the original.
Rename the Instance with default/original Instance you copied on notepad from Step 2. Type, Group, Instance should be the same as default/original Type, Group, Instance.

Open notepad with resource code you copied from Step 2. Make sure the Type, Group, and Instance are all the same.
If the codes are the same, then your edited mesh and texture will overwrite the default mesh and texture with the same code in the game. Save, Commit, Save the package.
Check again if the texture is replaced properly. Right-Click on _IMG > ViewDDS.
ALTERNATIVES!
Yes, you can delete unwanted files in your edited package, to keep the package clean. Simply Right-Click>Deleted.
The only files needed in package are: MODL, _IMG, _KEY
They are the only files with your edited mesh/texture including codes to overwrite the default codes.
You can Start new fresh blank s3pe. Right-Click>Import from file...
Locate your edited MODL and _IMG (texture) file.
On Resource Details box, tick mark "Use resource name" > OK.
Make sure all the Type, Group, and Instance of MODL and _IMG including in the TGI Block List Editor are all the same as the code in original package.

Save the package.
✳️ Step 10. Test the CC in your game.
Put the package to your CC folder in your The Sims 3 document folder to see if the CC is working or not.
If the CC is working as your intended, with your custom mesh and texture, then test the animation. Are the chopsticks animation working as the same as original EA's? If the animation are working well too, then congratulations!

Your default replacement are working. Give applause to yourself. 👏
-------------------------------------
QUESTIONS!
Q:
Can I use this tutorial for making default replacement for buy/build object?
A: This tutorial covers basic method of using TSR Workshop and replacing the default codes (Type, Group, Instance), so you will understand the basic principle of doing default replacement mod.
Keep in mind that different object has different case. Buy / build object has MLOD (not just MODL) more than one, texture images more than one, has presets, and CAStable colour channels.
The TGI Block List Editor for buy/build object has a lot of codes, so have to spend a lot of time to do trial-and-error to make the default replacement working properly, because a lot of times the texture doesn't work (still using default EA's texture), or when the object appears right with your edited mesh and texture, after you choose the presets, the object reverts back to your edited mesh with default EA's texture.
Q:
Help! The texture is black! / still using same EA's texture when tested in the game!
A: The texture codes must be not the same. Check the Type, Group, Instance of _IMG. Do the codes are the same like codes in original package? Check the TGI Block List Editor for MODL, is the _IMG inside has the same Type, Group, Instance as in original package.
Q:
Help! The object disappears when tested in the game!
A: You must be replacing OBJD in your package. Do not replace OBJD. Just MODL and texture only.
#tutorial#the sims 3#the sims 3 tutorial#thebleedingwoodland#the sims 3 default replacement mod#modding#s3pe#s30c#TSR Workshop
120 notes
·
View notes
Text
Also preserved in our archive (Daily updates!)
By Adam Piore
A new study from researchers at Mass General Brigham suggests racial disparities and the difficulty in diagnosing the condition may be leading to a massive undercount.
Almost one in four Americans may be suffering from long COVID, a rate more than three times higher than the most common number cited by federal officials, a team led by Boston area researchers suggests in a new scientific paper.
The peer-reviewed study, led by scientists and clinicians from Mass General Brigham, drew immediate skepticism from some long COVID researchers, who suggested their numbers were “unrealistically high.” But the study authors noted that the condition is notoriously difficult to diagnose and official counts also likely exclude populations who were hit hardest by the pandemic but face barriers in accessing healthcare.
“Long COVID is destined to be underrepresented, and patients are overlooked because it sits exactly under the health system’s blind spot,” said Hossein Estiri, head of AI Research at the Center for AI and Biomedical Informatics at Mass General Brigham and the paper’s senior author.
Though the pandemic hit hardest in communities of color where residents had high rates of preexisting conditions and many held service industry jobs that placed them at high risk of contracting the virus, the vast majority of those diagnosed with long COVID are white, non-Hispanic females who live in affluent communities and have greater access to healthcare, he said.
Moreover, many of the patients who receive a long COVID diagnosis concluded on their own that they have the condition and then persuaded their doctors to look into it, he said. As a result, the available statistics we have both underestimate the true number of patients suffering from the condition and skew it to a specific demographic.
“Not all people even know that their condition might be caused or exacerbated by COVID,” Estiri said. “So those who go and get a diagnosis represent a small proportion of the population.”
Diagnosis is complicated by the fact that long COVID can cause hundreds of different symptoms, many of which are difficult to describe or are easily dismissed, such as sleep problems, headaches or generalized pain, Estiri said. According to its formal definition, long COVID occurs after a COVID-19 infection, lasts for at least three months, affects one or more organ systems, and includes a broad range of symptoms such as crushing fatigue, pain, and a racing heart rate.
The US Centers for Disease Control and Prevention suggested that in 2022 roughly 6.9 percent of Americans had long COVID. But the algorithm developed by Estiri’s team estimated that 22.8 percent of those who’d tested positive for COVID-19 met the diagnostic criteria for long COVID in the 12 months that followed, even though the vast majority had not received an official diagnosis.
To calculate their number, Estiri’s team built a custom artificial intelligence tool to analyze data from the electronic health records of more than 295,000 patients served at four hospitals and 20 community health centers in Massachusetts. The AI program pulled out 85,000 people who had been diagnosed with COVID through June 2022, and then applied a pattern recognition algorithm to identify those that matched the criteria for long COVID in the 12 months that followed.
Some researchers questioned the paper’s conclusions. Dr. Eric Topol, author of the 2019 book “Deep Medicine: How Artificial Intelligence Can Make Healthcare Human Again,” said the medical field is still divided over precisely what constitutes long COVID, and that complicates efforts to program an accurate AI algorithm.
“Since we have difficulties with defining long Covid, using AI on electronic health records may not be a way to make the diagnosis accurately,” said Topol, who is executive vice president of Scripps Research in San Diego. “I’m uncertain about this report.”
Dr. Ziyad Al-Aly, chief of research and development at the VA St. Louis Health Care System, and an expert on long COVID, called the 22.8 percent figure unrealistically high and said the paper “grossly inflates” its prevalence.
“Their approach does not account for the fact that things happen without COVID (not everything that happens after COVID is attributable to COVID)— resulting in significant over-inflation of prevalence estimate,” he wrote via email.
Estiri said the research team took several measures to validate its AI algorithm, retroactively applying it to the charts of 800 people who had received a confirmed long COVID diagnosis from their doctor to see if it could predict the condition. The algorithm accurately diagnosed them more than three quarters of the time.
The algorithm scanned the records for patients who had a COVID diagnosis prior to July 2022, then looked for a constellation of symptoms that could not be explained by other conditions and lasted longer than two months. To refine the program, they conferred with clinicians and assigned different weights to different symptoms and conditions based on how often they are associated with long COVID, which made them more likely to be identified as potential sufferers.
Now that the initial paper has been published, the team is building a new algorithm that can be trained to detect the presence of long COVID in the medical records of patients without a confirmed COVID-19 diagnosis so the condition can be confirmed by clinicians and they can get the care they need, Estiri said.
But the most exciting part of the new research, Estiri said, is its potential to facilitate follow-up research and help refine and individualize treatment plans. In the months ahead, Estiri and his co-principal investigator Shawn Murphy, chief research information officer at Mass General Brigham, plan to ask a wide variety of questions by querying the medical records in their sample. Does vaccination make a patient more or less likely to develop the condition? How about treatment with Paxlovid? Do the symptoms patients develop differ based on those factors? What are the genomic characteristics of patients who are suffering from cardiovascular symptoms as opposed to those whose symptoms are associated with lung function or those who crash after exercising? Can they identify biomarkers in the bloodstream that could be used for diagnosis?
They have already prepared studies on vaccine efficacy, the effect of age as a risk factor, and whether the risk of long COVID increases with the fourth and fifth infection, Estiri said. “We were waiting for this paper to come out,” he said. “So now we can actually go ahead with the follow-up studies. With this cohort we can do things that no other study has been able to do, and I’m hoping it can really help people.”
Study link: www.sciencedirect.com/science/article/pii/S2666634024004070
#mask up#public health#wear a mask#pandemic#covid#wear a respirator#covid 19#still coviding#coronavirus#sars cov 2
52 notes
·
View notes
Text
Development Update!
01/15/25
We just developed the capabilities to generate hundreds of item codes custom tailored in seconds. Tested, and it worked! Generating Kickstarter reward codes will now be a breeze.
We have finished nearly all accessories on all starter poses. The only items missing a few pose renders are the Iridescent Trail and the Guard Set, both of which are being actively worked on.
Huge lift on optimizing for mobile. We now have most pages on the website working on mobile. It's not perfect, but it's getting good enough for the start of a closed beta. Slightly shoddy, but functional for mass testing and further improvement.
Pelt submissions are working. We have moderation tools and extensive testing tools for users. Users can now use the dynamic layering system on unclipped pelts by making two layers in a PSD. Users can test pelt previews on any cat they own. We also developed a coverage % system which will help determine the cost of a print.
The pelt shop has been implemented and is undergoing testing, including version 1.0 of a rough tagging system, allowing for extensive custom filtering. The goal is, after beta user testing, to expand this system site wide to forum threads, cat profiles, and eventually the notebook feature.
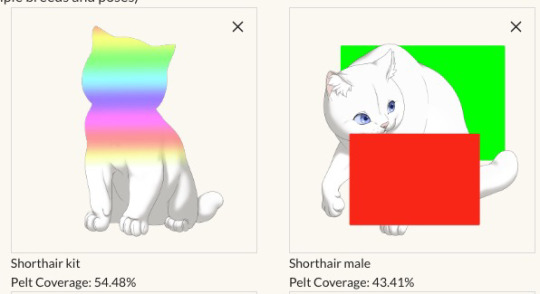
*As an aside, in the preview this was version 1 of the pelt submission testing. The terms "male" and "female" will be replaced with the venus and mars symbols
We're tentatively looking at dates for closed beta between February and March, and this week will hopefully help us determine a final decision for an official announcement. Thank you for the patience!
#paw borough#pet site#virtual pet#indie game#petsite#pet sim#development update#pawborough#kickstarter update#kickstarter rewards#pelts#beta#beta testing#closed beta
33 notes
·
View notes
Text
STARKSTRESSER -PLATİN

In a digital landscape where stability and performance are paramount, StarkStresser offers cutting-edge solutions designed to elevate your online presence. Whether you are a gamer seeking a competitive edge or a developer ensuring robust application performance, our comprehensive suite of tools—including advanced IP stressers and free IP booters—caters to a multitude of needs. With a focus on delivering seamless connectivity and unparalleled reliability, StarkStresser empowers users to effectively test their networks under simulated conditions.
Stresser
A stresser is an online tool designed primarily for testing the resilience of networks and servers against various types of attacks. It simulates Distributed Denial of Service (DDoS) attacks, which can overwhelm a server by flooding it with traffic, and it is crucial for organizations to understand how resilient their infrastructure is to such threats. Using a stresser can help businesses identify vulnerabilities in their systems and improve security measures.
However, it's essential to note that the ethical use of stress testing tools is paramount. Users should only test devices and networks they own or have explicit permission to test. Misuse of a stresser can lead to legal consequences, including potential fines and imprisonment.
When searching for a reliable ip stresser, it’s vital to look for one that provides clear usage guidelines and supports ethical considerations. Many reputable services also offer features that allow users to simulate attacks within controlled environments, enabling businesses to prepare better for real-world cyber threats.
In the realm of cybersecurity, understanding the capabilities of a stresser can empower organizations to actively defend against potential attacks. Be sure to research any selected tool thoroughly, ensuring it aligns with your security testing needs and ethical standards.
Ip Stresser
An IP stresser is a tool or service designed to test the resilience of a network or website against various types of stress attacks. Often utilized by web administrators and security professionals, an IP stresser can simulate considerable traffic to help evaluate the potential vulnerabilities of a specific IP address or server. This testing can help organizations strengthen their defenses against actual malicious attacks.
However, it is crucial to note that the use of an ip stresser should always be conducted ethically and legally. Using it to attack or disrupt services without authorization is illegal and can lead to severe consequences. Always ensure you have the necessary permissions to conduct such tests on a network or system.
In the context of stress testing, there are various types of IP stressers available, which can differ in their methods and intensity. Some users prefer IP stressers that offer adjustable parameters to customize the attack, while others might seek those with user-friendly interfaces that can deliver quick results.
Another vital aspect to consider is the choice between premium and free IP stressers. While free versions can be tempting due to their no-cost nature, they often come with limitations in terms of performance and reliability. Paid options typically provide more robust features, better support, and a more reliable service, making them suitable for serious testing purposes.
As you explore various IP stressers, it’s essential to choose one that aligns with your specific needs, whether you're looking for free solutions or comprehensive paid services. Always prioritize using reputable services to ensure that your testing complies with legal requirements and ethical standards.
Ip Stresser Free
When it comes to stress testing your server or network, finding an ip stresser free option can be appealing for many users. Free IP stress testing services, commonly known as stresser tools, offer a way for individuals to test the resilience of their networks without incurring any costs. However, it is crucial to be aware of the risks and limitations associated with these free options.
These services typically have a limited capacity compared to their paid counterparts, which may restrict the intensity of the tests you can perform. Users should also consider the legality and ethical implications of using such tools, as testing without permission can result in significant legal troubles.
Moreover, relying on an ip booter or free stresser might expose your network to potential vulnerabilities, including the risk of data breaches or exposure to malicious attacks. Therefore, it’s advisable to conduct thorough research and choose reputable providers when selecting an ip stresser free option.
In conclusion, while free stresser tools might seem like an appealing solution, always prioritize security and legality by using these tools responsibly and considering paid services for more comprehensive testing solutions.
Ip Booter
An IP booter is a specialized tool designed to perform Distributed Denial of Service (DDoS) attacks by overwhelming a specific target IP address with excessive traffic. The idea is to disrupt the target's online services, making them unavailable for legitimate users. Booters have gained popularity in certain circles, particularly within gaming communities, where individuals seek to retaliate against others by interrupting their connection.
It's important to distinguish between legitimate use and malicious intent. There are instances where individuals may seek to test the robustness of their own networks or those for whom they have explicit permission. However, the use of IP booters against unsuspecting targets is generally illegal and unethical. Many countries have strict laws against unauthorized DDoS attacks, which can lead to severe penalties.
In addition to the ethical concerns, users should be wary of utilizing free ip booter, as they often compromise security. Free services may expose users to malware, phishing attempts, and data breaches. For those considering a stresser or IP stresser, prioritizing reputable and secure services is crucial, ensuring that they comply with legal standards and best practices in cybersecurity.
In conclusion, while the allure of using an IP booter may be tempting, it is essential to recognize the potential consequences—both legally and ethically. Responsible internet usage and adherence to laws protect not only individuals but the entire online community.
993 notes
·
View notes
Text
Patna's Finest Software Development Company - Cybonetic Technologies Pvt Ltd
Explore a transformative experience with Cybonetic Technologies Pvt Ltd, renowned as the top software development company in Patna. Our devoted team is dedicated to delivering state-of-the-art solutions, encompassing Mobile App Development, Website Development, E-Commerce Development, software consulting, and Digital Marketing Services. Witness business expansion with our inventive and budget-friendly offerings. Contact us to collaboratively shape the future!
#software development#software development company in Patna#custom software applications#software developers#software development tools#programming languages#end-to-end solutions#testing#deployment#maintenance#innovative software solutions
0 notes
Note
So how much $ (in general) does it cost to produce a fully animated/rigged, fully voiced 1-3 minute cutscene in a game that’s in ongoing development (something like SWTOR, where they have a lot of prebuilt assets)? Like just a general low range and high range?
I’m seeing a lot of people complaining about prioritizing content they want, and don’t know enough about the behind the scenes costs to properly communicate they’re being unrealistic with their complaints.
The cost of any content in game dev is directly proportional to how much new stuff needs to be created for that content. In order to create a basic conversation cutscene to put into a game, we would need:

A narrative designer to write the script for the cutscene
A cinematic designer to script out the cinematic - which characters speak, in which order, with what timing, in which location, and what other actions they would take over the course of the cutscene
Animations for the characters to play in those positions
A rig for those characters to play those animations
Character models for the characters involved
Voice recordings for the characters to speak
A tool with which to set all of these parameters and organize the cutscene
A game system that can parse the tool data and assets and construct the cutscene from them
A script system to start playing the cutscene when the proper conditions are met
This doesn't include extra stuff like VFX, music, lighting, environments, props, etc. that might need to be created for certain specific cutscenes. In an ongoing game like SWTOR, element numbers 4, 5, 6, 7, 8, and 9 were already built long ago and already exist. As long as the designers can create the characters with the in-game character creator and reuse the existing rigs, no new resources need be expended to create them. If you need a completely new custom character model, that takes time from a character artist and a texture artist. If the character needs to animate differently than everyone else (i.e. needs its own rig), that's time from a rigger to create. If the cutscene needs new animations we need to bring on an animator to spend time building the new animations needed for the cutscene.

Using some napkin math, let's consider costs. We usually use the $10,000 per month figure to pay for a developer (salary, benefits, rent, utilities, software licenses, etc.) or approximately $2,500 per development week per person. Let's assume that each task takes a developer a week to complete.
Write the script (Narrative designer)
Script the cinematic (Cinematic Designer)
Record audio (Sound Designer + Voice Actor + studio time)
Rig one new character (Rigger) x however many new characters
Animate one animation (Animator) x however many new animations
Model one new character (Character Artist + Texture Artist) x however many new characters
Track all tasks and keep everyone on schedule (Production)
Test and validate that the cutscene works (QA)

At the very minimum, we need the script, the cinematic, production, and the QA tester, so a very bare bones cutscene that reuses all assets and has no new VO (say it only reuses the alien language) would cost 4x$2,500 = $10,000. If we add voice recording and keep it to one voice actor (let's say she voices both characters in the cutscene), then the cost jumps to 7x$2,500 = $17,500 because we need the sound designer, the voice actor, and the recording studio time. Adding in two new animations (e.g. one character throwing a punch and the second character reacting to getting punched) would add another two weeks of animator time, raising the cost to 9x$2,500 = $22,500. And so on and so forth. Those costs add up very quickly.

There are ways to get a "bulk" discount of course - we hire voice actors for blocks of four or eight hours, so we can record multiple cutscenes during that session and share some of those costs. We can create one new character and reuse her across multiple cutscenes so that we get more value out of her. Things get cheaper if we reuse stuff more, but they still cost a lot up front. The bulk discounts only really work if the things we're paying for can be reused multiple times though - the more specific an asset is (e.g. a kissing animation), the harder it is to reuse and the more expensive it tends to be relative to other assets.
[Join us on Discord] and/or [Support us on Patreon]
Got a burning question you want answered?
Short questions: Ask a Game Dev on Twitter
Long questions: Ask a Game Dev on Tumblr
Frequent Questions: The FAQ
102 notes
·
View notes
Text
We're making a Starbound/Terraria inspired space sandbox game!
We're making a 2D sandbox game similar to Starbound! Or uh, terraria in space.
#nodev contains shitposting
#planetarium contains dev progress
Specifics under the cut
Who are you?
Aspen - Project Lead, Programmer, Pixel artist, Sound Designer.
Hey! I'm Aspen, I've been programming and making games for many many years in basically every engine there is... But never felt the drive to finish one, until now! I consider myself very experienced in the engine we're using (Gamemaker Studio 2.5) and have confidence we'll be able to make this game a reality. I also run the Tumblr account, so assume it's me behind the wheel as a default. Thank you for checking the game out!
Alec - Concept artist, Character Designer
H a l l o I'm Alec, I like writing and drawing and painting and designing shiiiiiiiit. I adore world building and have frequent bursts of creative possession in which I conceive and birth the greatest ideas and concepts in a mere moment. Otherwise, I can be a total dumbass and completely useless. I'm good at colours 👌 I have been a 85% a home-brew DM for about 2 years now and that is the greatest proof of my ADHD-given God powers of creativity. Slay.
What a cool guy!
Design pillars
Immersion. Above all else, I would like roleplay (casual or serious) to be natural and well supported. I would like players to find engaging with the world, and it's characters to be very personal.
Innovation. Tropes such as "You spawn in a green forest and can walk left or right" will be actively avoided. Biomes will have generation that presents more unique movement opportunities. Such as geysers in rock pools launching players high up, or giant twisting vines that hold up chunks of land to hop between.
More quality less quantity. Planets will be significantly more content-dense than Starbound, and perhaps controversially travel between them will be more difficult/expensive as well. This would encourage players to take advantage of all the resources presented on each planet, instead of hopping from one to the next. This would also encourage us throughout development to give each planet as much love as possible. Each planet should feel like a 'miniature terraria world'. Though actually achieving that is easier said than done.
Meaningful content. Procedurally generating creatures from 100 different pre-set monster parts could technically produce limitless alien creatures for players to encounter. But in both No Man's Sky and Starbound. I find this novelty to wear off quick, these creatures are not manually, meaningfully crafted and beyond an unusual appearance and some shallow gameplay changes... They do not create much of a memorable experience for the player. In my opinion, anyway. I would rather hand-craft every creature and make them all significantly unique and interesting. That's not to say procedurally generated creatures won't ever have a place in the game, but they certainly wont be as prevalent as others games.
Okay well... What's finished?
Fundamental lighting shaders akin to Starbound.
Some world generation brushes and basic commands.
A text mark-up language (heavily optimised), and game chat.
Extensive custom debugging tools
Hard and soft-loading of chunks to save on as much memory and CPU usage as possible.
Complete unloading, and compression of chunks on top of the previously mentioned system. As well as a live-saving system.
Setting, Story baseline, and conceptualization of the first 3 playable species. Each species will have a different starting planet, and immediately different playthrough.
Designs and cultures of several additional unplayable races.
Character proportion tests, sprites and sketches.
First-pass on collision functions.
Weighted Tile variance and tile connections.
CONCERNS
Multiplayer. While I have made an online multiplayer game before and it's definitely doable for this game, it would require some practice in a one-off test game to be fully confident. It would also take a LOT of time.
Modding. As far as I know gamemaker games are notoriously difficult for players to modify. Something like Unity is far easier even without mod support. Gamemaker on the other hand is difficult even if I want to design systems in favor of modders. This is kind of a problem for later, I have faith there'll be something we can do to make it work... But a cursory look says it won't be easy. I would be extremely disappointed if there was nothing we could do.
#starbound#gamedev#indiegamedev#indie#roleplay#programming#game design#terraria#world generation#sandbox#planetarium
67 notes
·
View notes
Text
A very apropos HumbleBundle right now…
Instructional tools for making games in Godot 4 Engine—a free and open-source videogame-making engine.
Master Godot—the lightweight, fast, and free game engine behind hits like Sonic Colors: Ultimate. Whether you want to use the brand new version 4 or the battle-tested version 3, these courses will get you building platformers, RPGs, first-person shooters, city-builders, strategy games, and more—no prior experience required! Plus, you’ll learn how to customize your games by creating your own art and assets, all while supporting Girls Who Code with your purchase!
$1 gets you Intro To Godot 4 Game Development; $25 gets you a whole suite of instructional tools and courses that cover all sorts of videogame-making skills. The program and the engine itself is free.
If you want to start learning to make 2D and 3D RPGs, platformers, survival games, strategy games, or FPSs, this has introductions to how to do all of that using an open-source non-corporate-controlled cross-platform-compatible program.
139 notes
·
View notes