#David Hardware
Text


(Source: David Hardware on Instagram)
Jensen and Justin with actor David Hardward for tonight's episode of 'Tracker."
If you look on the mirror in the top photo, you see they have Jensen's picture from when he worked out for 'The Boys.'
#jensen ackles#russell shaw#justin hartley#colter shaw#david hardware#tracker cbs#tonight's episode#❤️❤️❤️❤️
34 notes
·
View notes
Text
#people who who are gonna vote jk rowling forget furries invented critical software and hardware#not to mention furry existed long before jk rowling#the earliest furry dates back to 1970s and#shitpost humor#look up David Benaron and tell me jk Rowling did more than him#terfs will get so mad#furry#furry fandom#furries
582 notes
·
View notes

Text
ChatGPT on Philosophy
Q: If I said that "the universe is its own hardware and software" what theories and authors does that sound like?
A: The idea that "the universe is its own hardware and software" can be interpreted in different ways, but it could be related to several philosophical and scientific theories.
One possible interpretation of this statement is that the universe is a self-organizing system that operates according to its own laws and rules, without any external influence or intervention. This idea is consistent with certain philosophical schools such as pantheism, which views the universe as a divine or spiritual entity.
From a scientific perspective, this idea is similar to the concept of emergence, which is the phenomenon whereby complex systems can arise from simple interactions between their components, without the need for a central controlling entity. The universe could be seen as an emergent system that is self-organizing and self-regulating, with its own "hardware" (the physical laws and constants that govern its behavior) and "software" (the patterns and structures that emerge from those laws).
This idea could be related to the work of several scientists and philosophers, including:
Baruch Spinoza, who proposed a pantheistic view of the universe as a single, infinite substance that encompasses everything
Alan Turing, who developed the concept of a universal Turing machine, which is a theoretical model of a computer that can simulate any other computer or computation
Stephen Wolfram, who has proposed that the universe can be seen as a computational system that generates complex patterns and structures through simple rules and interactions (in his book "A New Kind of Science")
David Deutsch, who has proposed that the universe can be seen as a universal quantum computer that performs calculations through the interaction of elementary particles (in his book "The Fabric of Reality")
#chatgpt#reference#spinoza#alan turing#wolfram#David Deutsch#emergence#philosophy#The Fabric of Reality#A New Kind of Science#turing machine#pantheistic#reality#universe#Self-organizing system#Quantum computer#books#hardware#software
18 notes
·
View notes
Photo
Trying to play David White’s other games is going... not so good...
(its “Google Code Archive” has some apparent instructions for “compiling” it on Windows here, but sadly like most Linux devs they forget that the amount of manual compiling the average modern non-Linux user is used to is “none at all”, so it’s not as helpful as it could be...)
#silvertree#silvertree rpg#silver tree#silvertree windows 296#david white#davewx7#game preservation#media preservation#lost media#yeah putting this in the lost media tag even though it's downloadable since it's super old + I can't run it + no footage#dying for a crumb of Old Game rn... if anyone can get this running easy on modern hardware hmu
2 notes
·
View notes
Video
youtube
Bound Together by Scott Hardware from the album Engel
#music#canadian music#scott hardware#telephone explosion#carlyn bezic#simone tisshaw baril#deidre nox#robert shortill#david psutka#adam kemp#telephone explosion records#scott harwood#video#visualizer#johan arthurs#animation
14 notes
·
View notes
Text
How I ditched streaming services and learned to love Linux: A step-by-step guide to building your very own personal media streaming server (V2.0: REVISED AND EXPANDED EDITION)
This is a revised, corrected and expanded version of my tutorial on setting up a personal media server that previously appeared on my old blog (donjuan-auxenfers). I expect that that post is still making the rounds (hopefully with my addendum on modifying group share permissions in Ubuntu to circumvent 0x8007003B "Unexpected Network Error" messages in Windows when transferring files) but I have no way of checking. Anyway this new revised version of the tutorial corrects one or two small errors I discovered when rereading what I wrote, adds links to all products mentioned and is just more polished generally. I also expanded it a bit, pointing more adventurous users toward programs such as Sonarr/Radarr/Lidarr and Overseerr which can be used for automating user requests and media collection.
So then, what is this tutorial? This is a tutorial on how to build and set up your own personal media server using Ubuntu as an operating system and Plex (or Jellyfin) to not only manage your media,, but to stream that media to your devices both locally at home, and remotely to anywhere in the world where you have an internet connection. This is a tutorial about how building a personal media server and stuffing it full of films, television shows and music that you acquired through indiscriminate and voracious media piracy various legal methods like ripping your own physical media to disk, you’ll be free to completely ditch paid streaming services. No more will you have to pay for Disney+, Netflix, HBOMAX, Hulu, Amazon Prime, Peacock, CBS All Access, Paramount+, Crave or any other streaming service that is not named Criterion Channel (which is actually good). If you want to watch your favourite films and television shows, you’ll have your own custom service that only features things that you want to see, and where you have control over your own files and how they’re delivered to you. And for music fans out there, both Jellyfin and Plex support music streaming, meaning you can even ditch music streaming services. Goodbye Spotify, Youtube Music, Tidal and Apple Music, welcome back unreasonably large MP3 (or FLAC) collections.
On the hardware front, I’m going to offer a few options catered towards differing budgets and media library sizes. The cost of getting a media server up and running using this guide will cost you anywhere from $450 CDN/$325 USD at the entry level to $1500 CDN/$1100 USD at the high end. My own server was priced closer to the higher figure, with much of that cost being hard drives. If that seems excessive, consider for a moment, maybe you have a roommate, a close friend, or a family member who would be willing to chip in a few bucks towards your little project provided they get a share of the bounty. This is how my server was funded. It might also be worth thinking about cost over time, how much you spend yearly on subscriptions vs. a one time cost of setting up a server. Additionally there's just the joy of being able to scream "fuck you" at all those show cancelling, movie deleting, hedge fund vampire CEOs who run the studios through denying them your money. Drive a stake through David Zaslav's heart.
On the software side I will walk you step-by-step through installing Ubuntu as your server's operating system, configuring your storage as a RAIDz array with ZFS, sharing your zpool to Windows with Samba, running a remote connection between your server and your Windows PC, and then a little about started with Plex/Jellyfin. Every terminal command you will need to input will be provided, and I even share a custom #bash script that will make used vs. available drive space on your server display correctly in Windows.
If you have a different preferred flavour of Linux (Arch, Manjaro, Redhat, Fedora, Mint, OpenSUSE, CentOS, Slackware etc. et. al.) and are aching to tell me off for being basic and using Ubuntu, this tutorial is not for you. The sort of person with a preferred Linux distro is the sort of person who can do this sort of thing in their sleep. Also I don't care. This tutorial is intended for the average home computer user. This is also why we’re not using a more exotic home server solution like running everything through Docker Containers and managing it through a dashboard like Homarr or Heimdall. While such solutions are fantastic and can be very easy to maintain once you have it all set up, wrapping your brain around Docker is a whole thing in and of itself. If you do follow this tutorial and had fun putting everything together, then I would encourage you to return in a year’s time, do your research and set up everything with Docker Containers.
Lastly, this is a tutorial aimed at Windows users. Although I was a daily user of OS X for many years (roughly 2008-2023) and I've dabbled quite a bit with various Linux distributions (mostly Ubuntu and Manjaro), my primary OS these days is Windows 11. Many things in this tutorial will still be applicable to Mac users, but others (e.g. setting up shares) you will have to look up for yourself. I doubt it would be difficult to do so.
Nothing in this tutorial will require feats of computing expertise. All you will need is a basic computer literacy (i.e. an understanding of what a filesystem and directory are, and a degree of comfort in the settings menu) and a willingness to learn a thing or two. While this guide may look overwhelming at first glance, it is only because I want to be as thorough as possible. I want you to understand exactly what it is you're doing, I don't want you to just blindly follow steps. If you half-way know what you’re doing, you will be much better prepared if you ever need to troubleshoot.
Honestly, once you have all the hardware ready it shouldn't take more than a weekend to get everything up and running.
(This tutorial is just shy of seven thousand words long so the rest is under the cut.)
Step One: Choosing Your Hardware
Linux is a light weight operating system, depending on the distribution there's close to no bloat. There are recent distributions available at this very moment that will run perfectly fine on a fourteen year old i3 with 4GB of RAM. Moreover, running Plex or Jellyfin isn’t resource intensive in 90% of use cases. All this is to say, we don’t require an expensive or powerful computer. This means that there are several options available: 1) use an old computer you already have sitting around but aren't using 2) buy a used workstation from eBay, or what I believe to be the best option, 3) order an N100 Mini-PC from AliExpress or Amazon.
Note: If you already have an old PC sitting around that you’ve decided to use, fantastic, move on to the next step.
When weighing your options, keep a few things in mind: the number of people you expect to be streaming simultaneously at any one time, the resolution and bitrate of your media library (4k video takes a lot more processing power than 1080p) and most importantly, how many of those clients are going to be transcoding at any one time. Transcoding is what happens when the playback device does not natively support direct playback of the source file. This can happen for a number of reasons, such as the playback device's native resolution being lower than the file's internal resolution, or because the source file was encoded in a video codec unsupported by the playback device.
Ideally we want any transcoding to be performed by hardware. This means we should be looking for a computer with an Intel processor with Quick Sync. Quick Sync is a dedicated core on the CPU die designed specifically for video encoding and decoding. This specialized hardware makes for highly efficient transcoding both in terms of processing overhead and power draw. Without these Quick Sync cores, transcoding must be brute forced through software. This takes up much more of a CPU’s processing power and requires much more energy. But not all Quick Sync cores are created equal and you need to keep this in mind if you've decided either to use an old computer or to shop for a used workstation on eBay
Any Intel processor from second generation Core (Sandy Bridge circa 2011) onwards has Quick Sync cores. It's not until 6th gen (Skylake), however, that the cores support the H.265 HEVC codec. Intel’s 10th gen (Comet Lake) processors introduce support for 10bit HEVC and HDR tone mapping. And the recent 12th gen (Alder Lake) processors brought with them hardware AV1 decoding. As an example, while an 8th gen (Kaby Lake) i5-8500 will be able to hardware transcode a H.265 encoded file, it will fall back to software transcoding if given a 10bit H.265 file. If you’ve decided to use that old PC or to look on eBay for an old Dell Optiplex keep this in mind.
Note 1: The price of old workstations varies wildly and fluctuates frequently. If you get lucky and go shopping shortly after a workplace has liquidated a large number of their workstations you can find deals for as low as $100 on a barebones system, but generally an i5-8500 workstation with 16gb RAM will cost you somewhere in the area of $260 CDN/$200 USD.
Note 2: The AMD equivalent to Quick Sync is called Video Core Next, and while it's fine, it's not as efficient and not as mature a technology. It was only introduced with the first generation Ryzen CPUs and it only got decent with their newest CPUs, we want something cheap.
Alternatively you could forgo having to keep track of what generation of CPU is equipped with Quick Sync cores that feature support for which codecs, and just buy an N100 mini-PC. For around the same price or less of a used workstation you can pick up a Mini-PC with an Intel N100 processor. The N100 is a four-core processor based on the 12th gen Alder Lake architecture and comes equipped with the latest revision of the Quick Sync cores. These little processors offer astounding hardware transcoding capabilities for their size and power draw. Otherwise they perform equivalent to an i5-6500, which isn't a terrible CPU. A friend of mine uses an N100 machine as a dedicated retro emulation gaming system and it does everything up to 6th generation consoles just fine. The N100 is also a remarkably efficient chip, it sips power. In fact, the difference between running one of these and an old workstation could work out to hundreds of dollars a year in energy bills depending on where you live.
You can find these Mini-PCs all over Amazon or for a little cheaper on AliExpress. They range in price from $170 CDN/$125 USD for a no name N100 with 8GB RAM to $280 CDN/$200 USD for a Beelink S12 Pro with 16GB RAM. The brand doesn't really matter, they're all coming from the same three factories in Shenzen, go for whichever one fits your budget or has features you want. 8GB RAM should be enough, Linux is lightweight and Plex only calls for 2GB RAM. 16GB RAM might result in a slightly snappier experience, especially with ZFS. A 256GB SSD is more than enough for what we need as a boot drive, but going for a bigger drive might allow you to get away with things like creating preview thumbnails for Plex, but it’s up to you and your budget.
The Mini-PC I wound up buying was a Firebat AK2 Plus with 8GB RAM and a 256GB SSD. It looks like this:

Note: Be forewarned that if you decide to order a Mini-PC from AliExpress, note the type of power adapter it ships with. The mini-PC I bought came with an EU power adapter and I had to supply my own North American power supply. Thankfully this is a minor issue as a barrel plug 30W/12V/2.5A power adapters are plentiful and can be had for $10.
Step Two: Choosing Your Storage
Storage is the most important part of our build. It is also the most expensive. Thankfully it’s also the most easily upgrade-able down the line.
For people with a smaller media collection (4TB to 8TB), a more limited budget, or who will only ever have two simultaneous streams running, I would say that the most economical course of action would be to buy a USB 3.0 8TB external HDD. Something like this one from Western Digital or this one from Seagate. One of these external drives will cost you in the area of $200 CDN/$140 USD. Down the line you could add a second external drive or replace it with a multi-drive RAIDz set up such as detailed below.
If a single external drive the path for you, move on to step three.
For people with larger media libraries (12TB+), who prefer media in 4k, or care who about data redundancy, the answer is a RAID array featuring multiple HDDs in an enclosure.
Note: If you are using an old PC or used workstatiom as your server and have the room for at least three 3.5" drives, and as many open SATA ports on your mother board you won't need an enclosure, just install the drives into the case. If your old computer is a laptop or doesn’t have room for more internal drives, then I would suggest an enclosure.
The minimum number of drives needed to run a RAIDz array is three, and seeing as RAIDz is what we will be using, you should be looking for an enclosure with three to five bays. I think that four disks makes for a good compromise for a home server. Regardless of whether you go for a three, four, or five bay enclosure, do be aware that in a RAIDz array the space equivalent of one of the drives will be dedicated to parity at a ratio expressed by the equation 1 − 1/n i.e. in a four bay enclosure equipped with four 12TB drives, if we configured our drives in a RAIDz1 array we would be left with a total of 36TB of usable space (48TB raw size). The reason for why we might sacrifice storage space in such a manner will be explained in the next section.
A four bay enclosure will cost somewhere in the area of $200 CDN/$140 USD. You don't need anything fancy, we don't need anything with hardware RAID controls (RAIDz is done entirely in software) or even USB-C. An enclosure with USB 3.0 will perform perfectly fine. Don’t worry too much about USB speed bottlenecks. A mechanical HDD will be limited by the speed of its mechanism long before before it will be limited by the speed of a USB connection. I've seen decent looking enclosures from TerraMaster, Yottamaster, Mediasonic and Sabrent.
When it comes to selecting the drives, as of this writing, the best value (dollar per gigabyte) are those in the range of 12TB to 20TB. I settled on 12TB drives myself. If 12TB to 20TB drives are out of your budget, go with what you can afford, or look into refurbished drives. I'm not sold on the idea of refurbished drives but many people swear by them.
When shopping for harddrives, search for drives designed specifically for NAS use. Drives designed for NAS use typically have better vibration dampening and are designed to be active 24/7. They will also often make use of CMR (conventional magnetic recording) as opposed to SMR (shingled magnetic recording). This nets them a sizable read/write performance bump over typical desktop drives. Seagate Ironwolf and Toshiba NAS are both well regarded brands when it comes to NAS drives. I would avoid Western Digital Red drives at this time. WD Reds were a go to recommendation up until earlier this year when it was revealed that they feature firmware that will throw up false SMART warnings telling you to replace the drive at the three year mark quite often when there is nothing at all wrong with that drive. It will likely even be good for another six, seven, or more years.

Step Three: Installing Linux
For this step you will need a USB thumbdrive of at least 6GB in capacity, an .ISO of Ubuntu, and a way to make that thumbdrive bootable media.
First download a copy of Ubuntu desktop (for best performance we could download the Server release, but for new Linux users I would recommend against the server release. The server release is strictly command line interface only, and having a GUI is very helpful for most people. Not many people are wholly comfortable doing everything through the command line, I'm certainly not one of them, and I grew up with DOS 6.0. 22.04.3 Jammy Jellyfish is the current Long Term Service release, this is the one to get.
Download the .ISO and then download and install balenaEtcher on your Windows PC. BalenaEtcher is an easy to use program for creating bootable media, you simply insert your thumbdrive, select the .ISO you just downloaded, and it will create a bootable installation media for you.
Once you've made a bootable media and you've got your Mini-PC (or you old PC/used workstation) in front of you, hook it directly into your router with an ethernet cable, and then plug in the HDD enclosure, a monitor, a mouse and a keyboard. Now turn that sucker on and hit whatever key gets you into the BIOS (typically ESC, DEL or F2). If you’re using a Mini-PC check to make sure that the P1 and P2 power limits are set correctly, my N100's P1 limit was set at 10W, a full 20W under the chip's power limit. Also make sure that the RAM is running at the advertised speed. My Mini-PC’s RAM was set at 2333Mhz out of the box when it should have been 3200Mhz. Once you’ve done that, key over to the boot order and place the USB drive first in the boot order. Then save the BIOS settings and restart.
After you restart you’ll be greeted by Ubuntu's installation screen. Installing Ubuntu is really straight forward, select the "minimal" installation option, as we won't need anything on this computer except for a browser (Ubuntu comes preinstalled with Firefox) and Plex Media Server/Jellyfin Media Server. Also remember to delete and reformat that Windows partition! We don't need it.
Step Four: Installing ZFS and Setting Up the RAIDz Array
Note: If you opted for just a single external HDD skip this step and move onto setting up a Samba share.
Once Ubuntu is installed it's time to configure our storage by installing ZFS to build our RAIDz array. ZFS is a "next-gen" file system that is both massively flexible and massively complex. It's capable of snapshot backup, self healing error correction, ZFS pools can be configured with drives operating in a supplemental manner alongside the storage vdev (e.g. fast cache, dedicated secondary intent log, hot swap spares etc.). It's also a file system very amenable to fine tuning. Block and sector size are adjustable to use case and you're afforded the option of different methods of inline compression. If you'd like a very detailed overview and explanation of its various features and tips on tuning a ZFS array check out these articles from Ars Technica. For now we're going to ignore all these features and keep it simple, we're going to pull our drives together into a single vdev running in RAIDz which will be the entirety of our zpool, no fancy cache drive or SLOG.
Open up the terminal and type the following commands:
sudo apt update
then
sudo apt install zfsutils-linux
This will install the ZFS utility. Verify that it's installed with the following command:
zfs --version
Now, it's time to check that the HDDs we have in the enclosure are healthy, running, and recognized. We also want to find out their device IDs and take note of them:
sudo fdisk -1
Note: You might be wondering why some of these commands require "sudo" in front of them while others don't. "Sudo" is short for "super user do”. When and where "sudo" is used has to do with the way permissions are set up in Linux. Only the "root" user has the access level to perform certain tasks in Linux. As a matter of security and safety regular user accounts are kept separate from the "root" user. It's not advised (or even possible) to boot into Linux as "root" with most modern distributions. Instead by using "sudo" our regular user account is temporarily given the power to do otherwise forbidden things. Don't worry about it too much at this stage, but if you want to know more check out this introduction.
If everything is working you should get a list of the various drives detected along with their device IDs which will look like this: /dev/sdc. You can also check the device IDs of the drives by opening the disk utility app. Jot these IDs down as we'll need them for our next step, creating our RAIDz array.
RAIDz is similar to RAID-5 in that instead of striping your data over multiple disks, exchanging redundancy for speed and available space (RAID-0), or mirroring your data writing by two copies of every piece (RAID-1), it instead writes parity blocks across the disks in addition to striping, this provides a balance of speed, redundancy and available space. If a single drive fails, the parity blocks on the working drives can be used to reconstruct the entire array as soon as a replacement drive is added.
Additionally, RAIDz improves over some of the common RAID-5 flaws. It's more resilient and capable of self healing, as it is capable of automatically checking for errors against a checksum. It's more forgiving in this way, and it's likely that you'll be able to detect when a drive is dying well before it fails. A RAIDz array can survive the loss of any one drive.
Note: While RAIDz is indeed resilient, if a second drive fails during the rebuild, you're fucked. Always keep backups of things you can't afford to lose. This tutorial, however, is not about proper data safety.
To create the pool, use the following command:
sudo zpool create "zpoolnamehere" raidz "device IDs of drives we're putting in the pool"
For example, let's creatively name our zpool "mypool". This poil will consist of four drives which have the device IDs: sdb, sdc, sdd, and sde. The resulting command will look like this:
sudo zpool create mypool raidz /dev/sdb /dev/sdc /dev/sdd /dev/sde
If as an example you bought five HDDs and decided you wanted more redundancy dedicating two drive to this purpose, we would modify the command to "raidz2" and the command would look something like the following:
sudo zpool create mypool raidz2 /dev/sdb /dev/sdc /dev/sdd /dev/sde /dev/sdf
An array configured like this is known as RAIDz2 and is able to survive two disk failures.
Once the zpool has been created, we can check its status with the command:
zpool status
Or more concisely with:
zpool list
The nice thing about ZFS as a file system is that a pool is ready to go immediately after creation. If we were to set up a traditional RAID-5 array using mbam, we'd have to sit through a potentially hours long process of reformatting and partitioning the drives. Instead we're ready to go right out the gates.
The zpool should be automatically mounted to the filesystem after creation, check on that with the following:
df -hT | grep zfs
Note: If your computer ever loses power suddenly, say in event of a power outage, you may have to re-import your pool. In most cases, ZFS will automatically import and mount your pool, but if it doesn’t and you can't see your array, simply open the terminal and type sudo zpool import -a.
By default a zpool is mounted at /"zpoolname". The pool should be under our ownership but let's make sure with the following command:
sudo chown -R "yourlinuxusername" /"zpoolname"
Note: Changing file and folder ownership with "chown" and file and folder permissions with "chmod" are essential commands for much of the admin work in Linux, but we won't be dealing with them extensively in this guide. If you'd like a deeper tutorial and explanation you can check out these two guides: chown and chmod.

You can access the zpool file system through the GUI by opening the file manager (the Ubuntu default file manager is called Nautilus) and clicking on "Other Locations" on the sidebar, then entering the Ubuntu file system and looking for a folder with your pool's name. Bookmark the folder on the sidebar for easy access.

Your storage pool is now ready to go. Assuming that we already have some files on our Windows PC we want to copy to over, we're going to need to install and configure Samba to make the pool accessible in Windows.
Step Five: Setting Up Samba/Sharing
Samba is what's going to let us share the zpool with Windows and allow us to write to it from our Windows machine. First let's install Samba with the following commands:
sudo apt-get update
then
sudo apt-get install samba
Next create a password for Samba.
sudo smbpswd -a "yourlinuxusername"
It will then prompt you to create a password. Just reuse your Ubuntu user password for simplicity's sake.
Note: if you're using just a single external drive replace the zpool location in the following commands with wherever it is your external drive is mounted, for more information see this guide on mounting an external drive in Ubuntu.
After you've created a password we're going to create a shareable folder in our pool with this command
mkdir /"zpoolname"/"foldername"
Now we're going to open the smb.conf file and make that folder shareable. Enter the following command.
sudo nano /etc/samba/smb.conf
This will open the .conf file in nano, the terminal text editor program. Now at the end of smb.conf add the following entry:
["foldername"]
path = /"zpoolname"/"foldername"
available = yes
valid users = "yourlinuxusername"
read only = no
writable = yes
browseable = yes
guest ok = no
Ensure that there are no line breaks between the lines and that there's a space on both sides of the equals sign. Our next step is to allow Samba traffic through the firewall:
sudo ufw allow samba
Finally restart the Samba service:
sudo systemctl restart smbd
At this point we'll be able to access to the pool, browse its contents, and read and write to it from Windows. But there's one more thing left to do, Windows doesn't natively support the ZFS file systems and will read the used/available/total space in the pool incorrectly. Windows will read available space as total drive space, and all used space as null. This leads to Windows only displaying a dwindling amount of "available" space as the drives are filled. We can fix this! Functionally this doesn't actually matter, we can still write and read to and from the disk, it just makes it difficult to tell at a glance the proportion of used/available space, so this is an optional step but one I recommend (this step is also unnecessary if you're just using a single external drive). What we're going to do is write a little shell script in #bash. Open nano with the terminal with the command:
nano
Now insert the following code:
#!/bin/bash
CUR_PATH=`pwd`
ZFS_CHECK_OUTPUT=$(zfs get type $CUR_PATH 2>&1 > /dev/null) > /dev/null
if [[ $ZFS_CHECK_OUTPUT == *not\ a\ ZFS* ]]
then
IS_ZFS=false
else
IS_ZFS=true
fi
if [[ $IS_ZFS = false ]]
then
df $CUR_PATH | tail -1 | awk '{print $2" "$4}'
else USED=$((`zfs get -o value -Hp used $CUR_PATH` / 1024)) > /dev/null AVAIL=$((`zfs get -o value -Hp available $CUR_PATH` / 1024)) >
/dev/null
TOTAL=$(($USED+$AVAIL)) > /dev/null
echo $TOTAL $AVAIL
fi
Save the script as "dfree.sh" to /home/"yourlinuxusername" then change the ownership of the file to make it executable with this command:
sudo chmod 774 dfree.sh
Now open smb.conf with sudo again:
sudo nano /etc/samba/smb.conf
Now add this entry to the top of the configuration file to direct Samba to use the results of our script when Windows asks for a reading on the pool's used/available/total drive space:
[global]
dfree command = home/"yourlinuxusername"/defree.sh
Save the changes to smb.conf and then restart Samba again with the terminal:
sudo systemctl restart smbd
Now there’s one more thing we need to do to fully set up the Samba share, and that’s to modify a hidden group permission. In the terminal window type the following command:
usermod -a -G sambashare “yourlinuxusername”
Then restart samba again:
sudo systemctl restart smbd
If we don’t do this last step, everything will appear to work fine, and you will even be able to see and map the drive from Windows and even begin transferring files, but you'd soon run into a lot of frustration. As every ten minutes or so a file would fail to transfer and you would get a window announcing “0x8007003B Unexpected Network Error”. This window would require your manual input to continue the transfer with the file next in the queue. And at the end it would reattempt to transfer whichever files failed the first time around. 99% of the time they’ll go through that second try, but this is still all a major pain in the ass. Especially if you’ve got a lot of data to transfer or you want to step away from the computer for a while.
It turns out samba can act a little weirdly with the higher read/write speeds of RAIDz arrays and transfers from Windows, and will intermittently crash and restart itself if this group option isn’t changed. Inputting the above command will prevent you from ever seeing that window.
The last thing we're going to do before switching over to our Windows PC is grab the IP address of our Linux machine. Enter the following command:
hostname -I
This will spit out this computer's IP address on the local network (it will look something like 192.168.0.x), write it down. It might be a good idea once you're done here to go into your router settings and reserving that IP for your Linux system in the DHCP settings. Check the manual for your specific model router on how to access its settings, typically it can be accessed by opening a browser and typing http:\\192.168.0.1 in the address bar, but your router may be different.
Okay we’re done with our Linux computer for now. Get on over to your Windows PC, open File Explorer, right click on Network and click "Map network drive". Select Z: as the drive letter (you don't want to map the network drive to a letter you could conceivably be using for other purposes) and enter the IP of your Linux machine and location of the share like so: \\"LINUXCOMPUTERLOCALIPADDRESSGOESHERE"\"zpoolnamegoeshere"\. Windows will then ask you for your username and password, enter the ones you set earlier in Samba and you're good. If you've done everything right it should look something like this:

You can now start moving media over from Windows to the share folder. It's a good idea to have a hard line running to all machines. Moving files over Wi-Fi is going to be tortuously slow, the only thing that’s going to make the transfer time tolerable (hours instead of days) is a solid wired connection between both machines and your router.
Step Six: Setting Up Remote Desktop Access to Your Server
After the server is up and going, you’ll want to be able to access it remotely from Windows. Barring serious maintenance/updates, this is how you'll access it most of the time. On your Linux system open the terminal and enter:
sudo apt install xrdp
Then:
sudo systemctl enable xrdp
Once it's finished installing, open “Settings” on the sidebar and turn off "automatic login" in the User category. Then log out of your account. Attempting to remotely connect to your Linux computer while you’re logged in will result in a black screen!
Now get back on your Windows PC, open search and look for "RDP". A program called "Remote Desktop Connection" should pop up, open this program as an administrator by right-clicking and selecting “run as an administrator”. You’ll be greeted with a window. In the field marked “Computer” type in the IP address of your Linux computer. Press connect and you'll be greeted with a new window and prompt asking for your username and password. Enter your Ubuntu username and password here.

If everything went right, you’ll be logged into your Linux computer. If the performance is sluggish, adjust the display options. Lowering the resolution and colour depth do a lot to make the interface feel snappier.

Remote access is how we're going to be using our Linux system from now, barring edge cases like needing to get into the BIOS or upgrading to a new version of Ubuntu. Everything else from performing maintenance like a monthly zpool scrub (this is important!!!) to checking zpool status and updating software can all be done remotely.

This is how my server lives its life now, happily humming and chirping away on the floor next to the couch in a corner of the living room.
Step Seven: Plex Media Server/Jellyfin
Okay we’ve got all the ground work finished and our server is almost up and running. We’ve got Ubuntu up and running, our storage array is primed, we’ve set up remote connections and sharing, and maybe we’ve moved over some of favourite movies and TV shows.
Now we need to decide on the media server software to use which will stream our media to us and organize our library. For most people I’d recommend Plex. It just works 99% of the time. That said, Jellyfin has a lot to recommend it by too, even if it is rougher around the edges. Some people run both simultaneously, it’s not that big of an extra strain. I do recommend doing a little bit of your own research into the features each platform offers, but as a quick run down, consider some of the following points:
Plex is closed source and is funded through PlexPass purchases while Jellyfin is open source and entirely user driven. This means a number of things: for one, Plex requires you to purchase a “PlexPass” (purchased as a one time lifetime fee $159.99 CDN/$120 USD or paid for on a monthly or yearly subscription basis) in order to access to certain features, like hardware transcoding (and we want hardware transcoding) or automated intro/credits detection and skipping. jellyfish features for free. On the other hand, Plex supports a lot more devices than Jellyfin and updates more frequently. That said Jellyfin's Android/iOS apps are completely free, while the Plex Android/iOS apps must be activated for a one time cost of $6 CDN/$5 USD. But that $6 fee gets you a mobile app that is much more functional and features a unified UI across Android and iOS platforms, the Plex mobile apps are simply a more polished experience. The Jellyfin apps are a bit of a mess and the iOS and Android versions are very different from each other.
Jellyfin’s actual media player itself is more fully featured than Plex's, but on the other hand Jellyfin's UI, library customization and automatic media tagging really pale in comparison to Plex. Streaming your music library is free through both Jellyfin and Plex, but Plex offers the PlexAmp app for dedicated music streaming which boasts a number of fantastic features, unfortunately some of those fantastic features require a PlexPass. If your internet is down, Jellyfin can still do local streaming, while Plex can fail to play files. Jellyfin has a slew of neat niche features like support for Comic Book libraries with the .cbz/.cbt file types, but then Plex offers some free ad-supported TV and films, they even have a free channel that plays nothing but Classic Doctor Who.
Ultimately it's up to you, I settled on Plex because although some features are pay-walled, it just works. It's more reliable and easier to use, and a one-time fee is much easier to swallow than a subscription. I do also need to mention that Jellyfin does take a little extra bit of tinkering to get going in Ubuntu, you’ll have to set up process permissions, so if you're more tolerant to tinkering, Jellyfin might be up your alley and I’ll trust that you can follow their installation and configuration guide. For everyone else, I recommend Plex.
So pick your poison: Plex or Jellyfin.
Note: The easiest way to download and install either of these packages in Ubuntu is through Snap Store.
After you've installed one (or both), opening either app will launch a browser window into the browser version of the app allowing you to set all the options server side.
The process of adding creating media libraries is essentially the same in both Plex and Jellyfin. You create a separate libraries for Television, Movies, and Music and add the folders which contain the respective types of media to their respective libraries. The only difficult or time consuming aspect is ensuring that your files and folders follow the appropriate naming conventions:
Plex naming guide for Movies
Plex naming guide for Television
Jellyfin follows the same naming rules but I find their media scanner to be a lot less accurate and forgiving than Plex. Once you've selected the folders to be scanned the service will scan your files, tagging everything and adding metadata. Although I find do find Plex more accurate, it can still erroneously tag some things and you might have to manually clean up some tags in a large library. (When I initially created my library it tagged the 1963-1989 Doctor Who as some Korean soap opera and I needed to manually select the correct match after which everything was tagged normally.) It can also be a bit testy with anime (especially OVAs) be sure to check TVDB to ensure that you have your files and folders structured and named correctly. If something is not showing up at all, double check the name.
Once that's done, organizing and customizing your library is easy. You can set up collections, grouping items together to fit a theme or collect together all the entries in a franchise. You can make playlists, and add custom artwork to entries. It's fun setting up collections with posters to match, there are even several websites dedicated to help you do this like PosterDB. As an example, below are two collections in my library, one collecting all the entries in a franchise, the other follows a theme.

My Star Trek collection, featuring all eleven television series, and thirteen films.

My Best of the Worst collection, featuring sixty-nine films previously showcased on RedLetterMedia’s Best of the Worst. They’re all absolutely terrible and I love them.
As for settings, ensure you've got Remote Access going, it should work automatically and be sure to set your upload speed after running a speed test. In the library settings set the database cache to 2000MB to ensure a snappier and more responsive browsing experience, and then check that playback quality is set to original/maximum. If you’re severely bandwidth limited on your upload and have remote users, you might want to limit the remote stream bitrate to something more reasonable, just as a note of comparison Netflix’s 1080p bitrate is approximately 5Mbps, although almost anyone watching through a chromium based browser is streaming at 720p and 3mbps. Other than that you should be good to go. For actually playing your files, there's a Plex app for just about every platform imaginable. I mostly watch television and films on my laptop using the Windows Plex app, but I also use the Android app which can broadcast to the chromecast connected to the TV. Both are fully functional and easy to navigate, and I can also attest to the OS X version being equally functional.
Part Eight: Finding Media
Now, this is not really a piracy tutorial, there are plenty of those out there. But if you’re unaware, BitTorrent is free and pretty easy to use, just pick a client (qBittorrent is the best) and go find some public trackers to peruse. Just know now that all the best trackers are private and invite only, and that they can be exceptionally difficult to get into. I’m already on a few, and even then, some of the best ones are wholly out of my reach.
If you decide to take the left hand path and turn to Usenet you’ll have to pay. First you’ll need to sign up with a provider like Newshosting or EasyNews for access to Usenet itself, and then to actually find anything you’re going to need to sign up with an indexer like NZBGeek or NZBFinder. There are dozens of indexers, and many people cross post between them, but for more obscure media it’s worth checking multiple. You’ll also need a binary downloader like SABnzbd. That caveat aside, Usenet is faster, bigger, older, less traceable than BitTorrent, and altogether slicker. I honestly prefer it, and I'm kicking myself for taking this long to start using it because I was scared off by the price. I’ve found so many things on Usenet that I had sought in vain elsewhere for years, like a 2010 Italian film about a massacre perpetrated by the SS that played the festival circuit but never received a home media release; some absolute hero uploaded a rip of a festival screener DVD to Usenet, that sort of thing. Anyway, figure out the rest of this shit on your own and remember to use protection, get yourself behind a VPN, use a SOCKS5 proxy with your BitTorrent client, etc.
On the legal side of things, if you’re around my age, you (or your family) probably have a big pile of DVDs and Blu-Rays sitting around unwatched and half forgotten. Why not do a bit of amateur media preservation, rip them and upload them to your server for easier access? (Your tools for this are going to be Handbrake to do the ripping and AnyDVD to break any encryption.) I went to the trouble of ripping all my SCTV DVDs (five box sets worth) because none of it is on streaming nor could it be found on any pirate source I tried. I’m glad I did, forty years on it’s still one of the funniest shows to ever be on TV.
Part Nine/Epilogue: Sonarr/Radarr/Lidarr and Overseerr
There are a lot of ways to automate your server for better functionality or to add features you and other users might find useful. Sonarr, Radarr, and Lidarr are a part of a suite of “Servarr” services (there’s also Readarr for books and Whisparr for adult content) that allow you to automate the collection of new episodes of TV shows (Sonarr), new movie releases (Radarr) and music releases (Lidarr). They hook in to your BitTorrent client or Usenet binary newsgroup downloader and crawl your preferred Torrent trackers and Usenet indexers, alerting you to new releases and automatically grabbing them. You can also use these services to manually search for new media, and even replace/upgrade your existing media with better quality uploads. They’re really a little tricky to set up on a bare metal Ubuntu install (ideally you should be running them in Docker Containers), and I won’t be providing a step by step on installing and running them, I’m simply making you aware of their existence.
The other bit of kit I want to make you aware of is Overseerr which is a program that scans your Plex media library and will serve recommendations based on what you like. It also allows you and your users to request specific media. It can even be integrated with Sonarr/Radarr/Lidarr so that fulfilling those requests is fully automated.
And you're done. It really wasn't all that hard. Enjoy your media. Enjoy the control you have over that media. And be safe in the knowledge that no hedgefund CEO motherfucker who hates the movies but who is somehow in control of a major studio will be able to disappear anything in your library as a tax write-off.
804 notes
·
View notes
Text
The US House of Representatives passed a series of pivotal policy bills on Saturday that would see $95 billion in foreign war and military funds, a potential ban on TikTok in the country, the seizure of frozen Russian sovereign assets, and new sanctions on Iran.
The Israel Security Supplemental was approved with an overwhelming vote of 366-58.
This bill includes a prohibition on sending funds to the United Nations Relief and Works Agency UNRWA as the genocide in Gaza nears its 7-month mark.
The funding package allocates $26.4 billion in aid to the occupation entity, $4 billion for the Iron Dome and David's Sling missile defense systems, and $1.2 billion for the Iron Beam defense system. Additionally, $4.4 billion is allocated to replenish military items and services provided to "Israel," while $3.5 billion is earmarked for the procurement of advanced weapons systems and other items through the Foreign Military Financing Program.
Furthermore, it includes $9.2 billion in public assistance, including emergency food, shelter, and basic services, to populations experiencing crises. It also provides additional flexibility for transfers of military hardware to "Israel" from US stockpiles held in other countries.
#yemen#jerusalem#tel aviv#current events#palestine#free palestine#gaza#free gaza#news on gaza#palestine news#news update#war news#war on gaza#us congress#gaza genocide#genocide#imperialism
444 notes
·
View notes
Text
thinking about android brains. in abioastronautics i gave connor three thirium valves/hearts like a squid, mostly just to make him more alien, and i also considered also giving him a torus shaped brain like a squid's nerve ring but i had no idea how to smoothly bring that up or why that would be necessary for any reason other than "it would be cool" since that shape really confers no practical advantage in this context. in my other fics i did not think about this, i just say cpu every time i want to refer to a human brain and dont get into it. but i want to get into it. whats in their heads. i want to look inside
#being practical it is probably just. a chip#but also thirium..carries information? thats crazy on its own#how is information from a liquid medium(???) converted to something that a can be read by like. classical computer hardware then?#I NEED TO KNOW#but david doesnt have an answer for me so i will simply have to..make one up myself..sigh..time to search keywords
1 note
·
View note
Text


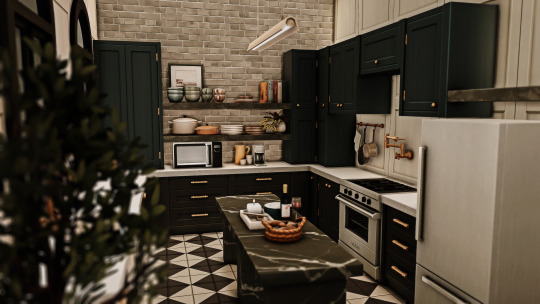
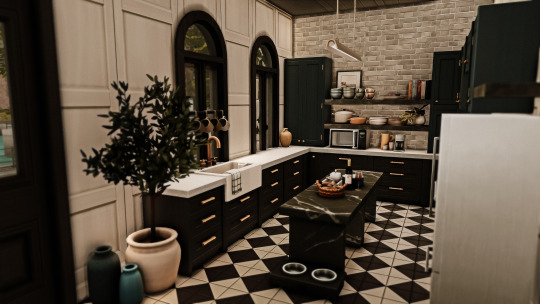


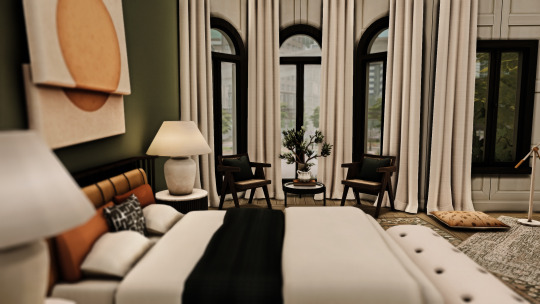

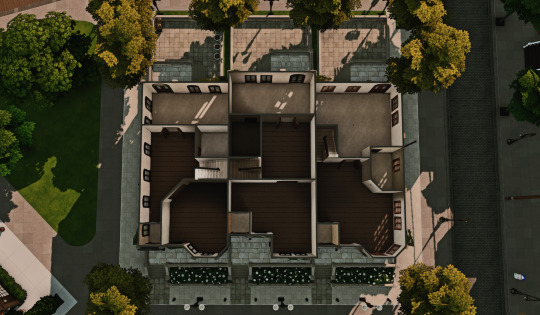

Summit Lane Apartments ♥ The Sims 4: Speed Build // CC
♥ Hi guys, today's build is a New York inspired apartment block located in San MyShuno. It consists of three units with different layouts suited for all your beautiful sims!
I furnished 1 out of the 3 units. Feel free to furnish the rest! You also have the option to download a non-furnished version.
READ ME
♥ Please make sure to turn on bb.moveobjects on!
♥ Please DO NOT reupload or claim as your own.
♥ Feel free to tag me if you are using it (videos, photos, etch) I love seeing my build in other people's save files!
SPEED BUILD VIDEO
0:02 Intro
1:10 Speed Build
22:16 Photos
♥ Lot Details:
Lot Name: Summit Lane Apartments
Lot size: 30x30
Location: Spice Market, San MyShuno
♥ MODS:
TOOL MOD by TwistedMexi
♥ CC LIST:
Note: I have all parts of all sets in this list, so I highly recommend you guys dl them since I frequently use them in all my builds!
Furnished
Awingedllama: Boholiving, Blooming Rooms
Greenllama: The Woodwind Collection
Joyce : Simple Living
Veranka: Ivy Vines (optional)
The Clutter cat: Dandy Diary
Harrie: Bafroom, Brownstone, COastal, Country, Octave, Shop the look 1 & 2, Spoons
House of Harlix: Baysic, Harluxe, Jardane, Livin RUm, Orjanic, Kichen, Tiny Twavellers
Felix Andre: Berlin, Chateau, Colonial, FLorence, Georgian, Gothic, Grove, Kyoto, London, Paris, Shopthelook, November 2017 , petite Trianon
CharlyPancakes: Much, Maple & S Construction, The lighthouse Collection, Chalk, Insomnia, MIscellenea, Modish, SMol, Modish
Kiwisim4: Blocklhouse bedroom, Blockhouse Outdoor Dining
LittleDIca: Chic Bathroom, Countryside Cabine, RIse&grind
MadameRia: Basic luxe
Mycupofcc: Maple manor- Modernist Collection
Marvell: Sienna COllection
Mlysim: Simple Clothes Racks
Myshunosun: Freja, Gale Dining, Lottie, SImmify, Teenage Dream
Peacemaker: Caine, Coba, Creta, Elsie, Hamptons, Hinterlands, Hundon Bathroom, Myra, Shaker Kitchen
Pierisim: Auntie Vera, Calderone, Coldbrew, David Apartment, Domaine Du Clos, MCM, Oak house, Teeny Weeny, The office, Tilable, Unfold, Winter Garden, Woodland Ranch
Charlypancakes x Pierisim: Precious Promises
Simplistic: Restoration Hardware , Distressed Floral Area
Sixam: Boho Bathroom, Cozy family room, SMall Spaces Laundry Room
Tuds: 2ndwave, Cave, NCTR, SHKR, Wave
UnFurnished
Veranka: Ivy Vines (optional)
Charlypancakes: Munch, Maple & S Construction
FelixAndre: Chateau, Berlin, Colonial, Florence, Georgian, Gothic, Grove, Novermber 2017 set, Paris, Kyoto, Petite Trianon
Harrie: Brownstone Collection, Coastal
LittleDica: Countryside Cabin, Rise & Grind Cafe
FelixAndre x Harrie: Orjanic
Attention: This will be up on my Gallery later this evening! Tray files are all available now
♥ Tray file: Furnished (V1) , Unfurnished (V2)
♥ Origin ID: Applez
♥ Twitter: Rheya28__
♥ Tiktok: Rheya28__
960 notes
·
View notes
Text

"Three years trying to put this thing in the ground. Three years too long ..."
Brushes used: Photoshop Ballpointpen-Brushes by Food For Crows (David Schmelling) and Photoshop Inking Brushes pack by Francisco Beltrán, both found on @cubebrush.
Hardware and software: This was drawn first on lined notepad paper with a ballpoint pen and pencil for shading, scanned into @photoshop, and then finished on my @wacom Cintiq 22"
#resident evil#chris redfield#resident evil village#resident evil 8#resident evil fanart#chris redfield fanart#chris redfield resident evil#resident evil chris redfield#digital painting#digital illustration#digital art
187 notes
·
View notes
Note
it may interest you to know that because I continually forget on my SYWTBAW rereads and have to look up what, exactly, a Lotus Esprit looks like so many times, my Google homepage now always includes at least one article and/or sale of some kind of Lotus. It's been months. (And some of the offers have wormed their way into my very long term 'for future consideration' bucket...)
It's interesting to note that the classic 1983 model has routinely had a pretty good rep as an admittedly high-performance used car. Prices naturally vary, depending on where you're sourcing one and what kind of shape it's in. But you can plainly get pretty nice ones without breaking the bank (in sports car-money terms anyway).
The thought "Wouldn't it be cool to have one of those?" has crossed my mind more than once. But this far along in my life, I very much doubt just getting/having one could match the sheer open-mouthed rush of falling-in-love-with-hardware I first experienced on passing the Lotus showroom in Manhattan, seeing the Esprit in the window there, and realizing exactly what the sentient, predatory sports car in So You Want To Be A Wizard needed to look like.
It was a just-in-time addition, as the book was in copyedit at that point. I'd been groping around for something to fill in for the visual experience of falling down in front of a sports car that, when you sit up, appears to be smiiiiiiling at you. This happened to me with David Gerrold's Corvette, one time. But I knew that for SYW... I really needed something less, well, commonplace. And then the Lotus turned up right under my nose (around 5th and 30th or thereabouts, IIRC), and that was that.
Every now and then, one crosses my path in London, or here. Never fails to make me smile.

156 notes
·
View notes
Text

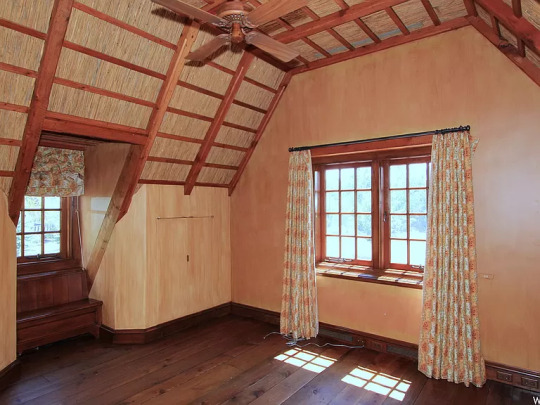
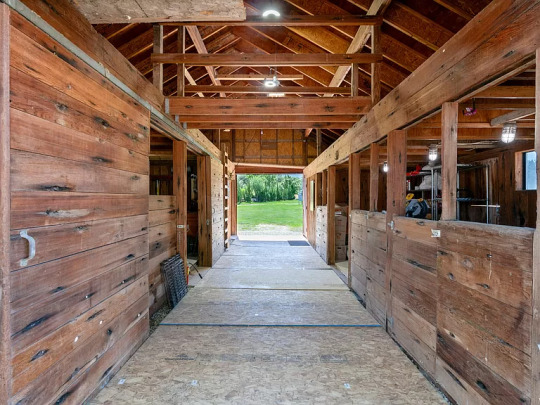
I thought that this house was in Europe, but it's actually a 1994 build in Holliday, Utah. According to the description, renowned architect, David Easton, designed this Cape Dutch style cottage and put his heart and soul into every detail. The roof is thatch (where do you find someone to maintain that?). 2bds, 3ba, $4.5M.

Interesting to see a clock on the exterior of a home- gives it a Bavarian look.

A "sally port" goes thru the middle of the house.
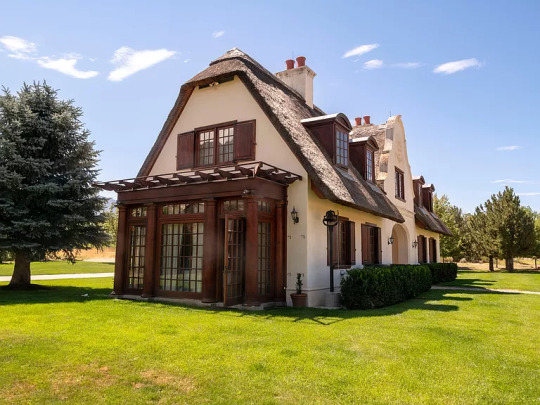
Too small to be a sun room, this addition is an interesting window jut-out.
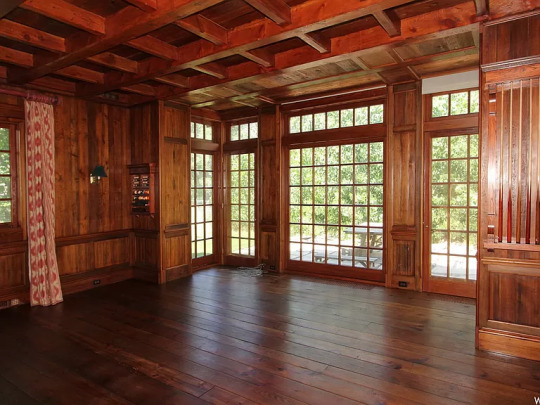

How it looks from inside. This is the great room and it has a bar.


They don't show a kitchen or dining room, they go directly upstairs to the 2 bedroom suites.

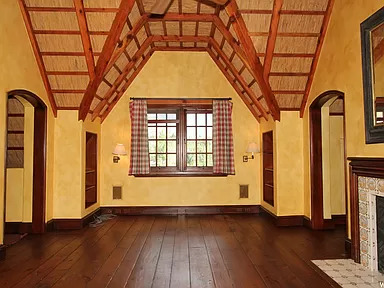
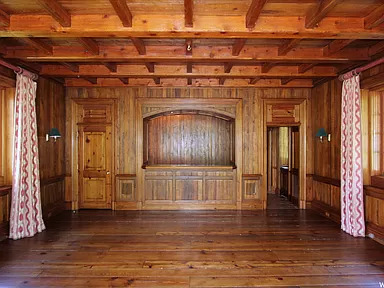
The bedrooms have lots of built-ins and thatched ceilings.
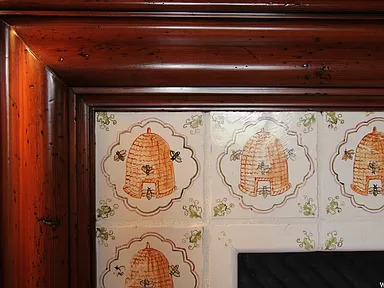
Adorable beehive tiles on the fireplace surround.


The home was built in 1994, but the doors are antique wood with original antique hardware.

Isn't this a beautiful piece?

The mirror frame matches the door.
This bedroom is a lovely peach color.
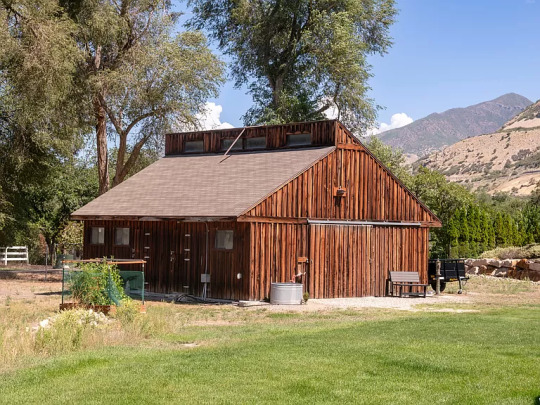
There is also a horse barn on the property.
It's pretty large so I'm surprised that there's no fenced-in coral area.
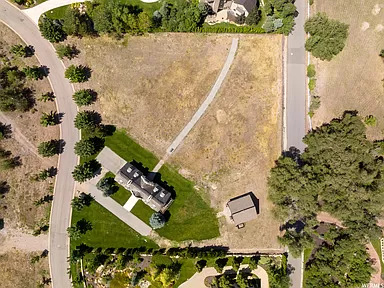

The home is in the corner of a 2 acre lot.
122 notes
·
View notes
Text
John price beefing with your HOA because they won’t let you have your cute little garden.
Or: John Price says fuck suburbia
You just want to plant the carrot seeds (which are likely long dead, but Price sure isn’t about to crush your dreams) that you’ve had lying around for forever.
You’d always had dreams of a home with a play house in the back yard- with raised beds and a potting bench and a yard full of soft, green grass where your future kids could run barefoot spend their summers with sun kissed cheeks and dirty hands and feet from playing in the dirt.
You’d planned to start small- strawberries and peppers in the brand new big pots that caught your eye last time you went with John to the hardware store.
You’d been estatic when you’d got your first plant- a small strawberry plant from the nearby nursery- into a pot. Proudly sitting it in the front yard by your door way and watering it daily.
But it wasn’t long before the sweet woman next door, the wife of the HOA president (who your sure was put up to this by her husband) came over to “politely” inform you that the HOA didn’t allow gardens of any sort to be visible from the street.
Your cheeks had burned bright red at the correction, but you’d politely nodded and didn’t argue, picking up your prized plants after she left and carrying them to the backyard in a walk of shame.
When John got back and found out what happened, he had (discreetly) went to go have a chat with the neighbors. And by the time he was done, he had frankly made up his mind.
He’s only meant for the conversation to take a few minutes at most. Just him politely explaining that one strawberry plant was not a garden. But he’d made the mistake of mentioning you and his future plans for the house and yard- raised beds, a red door to add a splash of color to the otherwise plain house front, a play house or swing set one day- and he’d been forcefully pulled into a conversation of the HOA’s restrictions and rules, which ruined practically everyone of the plans he knew his wife had for their little house.
So, it seems this won’t be the last house you two buy or the one where you raise your kids. If you couldn’t have your sweet little garden and bright red door- if you two couldn’t make this house your own, what was the point?
He’d move you out to the country, he decided. No more suburbia. Maybe he’d even bring you back to the U.K.
Either way, there wouldn’t be any of this HOA bullshit.
#Spotify#captain john price x reader#john price x reader#john price x fem!reader#john price#price x reader#captain john price#captian price#cod price#john price x f!reader#john price x y/n#john price fluff#john price x you#price mw2#captain price#captain john price x female reader#captain johnathan price
97 notes
·
View notes
Text


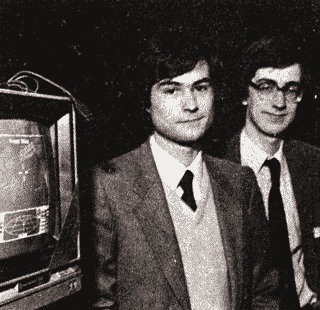
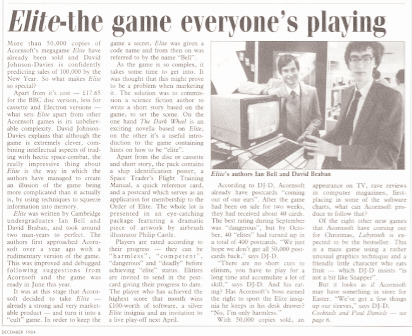
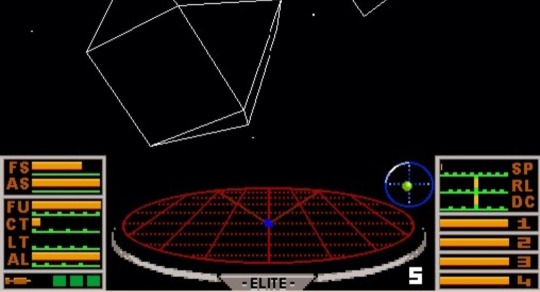

🇬🇧 Elite is a groundbreaking space trading and combat video game that emerged in the mid-1980s, captivating gamers with its expansive universe and innovative gameplay. Developed by David Braben and Ian Bell, Elite was first released in 1984 for the BBC Micro and Acorn Electron computers, later expanding to other platforms.
🚀 Elite was revolutionary for its time, offering players an open-ended experience set in a vast, procedurally generated galaxy. The game allowed players to pilot a spaceship through various star systems, engaging in trade, combat, and exploration. Elite's development was driven by its ambitious scope and technical achievements, leveraging procedural generation to create a seemingly infinite universe within the constraints of early computer hardware.
🌌 In Elite, players assume the role of a spaceship pilot navigating through a complex network of star systems, each with its own planets, space stations, and resources. The game featured realistic physics for space travel and combat, adding to its immersive appeal. Players could trade goods between star systems, mine asteroids for resources, and engage in dogfights with pirates or law enforcement.
🛰️ As players accumulated wealth and experience, they could upgrade their ships with better weapons, shields, and cargo holds. Elite introduced a reputation system that influenced how NPCs interacted with the player, offering a sense of depth and consequence to the gameplay.
🎮 Elite's success paved the way for the space simulation genre, inspiring a generation of game developers and spawning sequels and spiritual successors. The game's combination of exploration, combat, and trading became a hallmark of the genre, influencing titles like Wing Commander, Freelancer, and EVE Online.
🌠 In recent years, Elite Dangerous, a modern incarnation of the series developed by Frontier Developments, has garnered acclaim for its expansive gameplay and realistic depiction of space exploration. Elite Dangerous builds upon the foundation laid by the original Elite, offering players an even more immersive experience in a procedurally generated galaxy.
🌟 Elite remains a landmark in video game history, celebrated for its ambition, innovation, and enduring influence on the space simulation genre. For gamers looking to explore the vast reaches of space and engage in thrilling adventures, Elite remains a timeless classic worth experiencing. Fly safe, Commander!
#old technology#techtime chronicles#companies#tech#technology#old tech#technews#information technology#corporations#electronics#elite#video games#zx spectrum#sinclair#retro gaming#gaming#computing#old computers#computer science#computers#elite dangerous#acorn electron#bbc micro#legacy gameplay#expansive universe#1980s computers#software#software development#programming#hardware
34 notes
·
View notes
Text
Ruben Dias x Reader - A House Is Not A Home Part 3/8
This damn chapter 😭😭

Ruben's wife dies during childbirth along with their son. Ruben hasn't been in a relationship since. Y/N is a single mother to a four year old boy. She buys a house in the small town that Ruben lives in. The house needs alot of fixing which Ruben helps with, resulting in him slowly falling in love with Y/N. However, falling in love with Y/N makes Ruben feel like he is betraying his dead wife.
Enjoy!
You and Ruben found a good rhythm. He helped you clear the ruins of your house, loading the waste onto his truck in order to take it to the local junkyard. Despite spending three days clearing the house it still felt like you were only scratching the surface.
"Once we've cleared the last of the wood, you'll be able to move back in." Ruben assured.
"Yes, that or I might have to move into the barn." Your attention was drawn to to the old shed out by the fields. To both yours and Ruben's suprise, it had been able to sustain the harsh winds from the storm.
"I don't think that's such a good idea." Ruben said.
"Why not?" The barn looked perfectly inhabitable to you.
He didn't answer, as there was no reason why you couldn't have access to somthing on your property.
"I'm serious Y/N."
He tried to stop you as you started crossing the field, making your way towards the barn. Ruben claimed that it belonged to him and he intended to keep it that way.
"I thought you were a real-estate agent?" You said, still marching on towards the barn, Ruben at your heals.
"What, no." He frowned. "I own a hardware store in town. What made you believe that I was a real-estate agent?"
"You sold me this house didn't you?" Including the barn.
"Yes, because I used to own it."
You stopped walking. Ruben's chest heaved up and down with his heavy breathing.
"You used to live here? In this house. My house?"
Ruben nodded. "Yes."
"Well, what's wrong with it?"
"Huh?"
"The house, what's wrong with it?"
He frowned. "Nothing?"
"Then why did you sell it to me, a perfectly fine house?"
Ruben looked taken back by the question, searching for a good answer without finding one. You were shocked and frustrated by this revelation, as you had always assumed that the barn was part of the property, your property.
"Well then, if there's nothing else."
Determined to assert your rights as the new owner, you decided to enter the barn anyway. Ruben made one last attempt to try and stop you, but you pushed past him and walked inside. As soon as you did, you gasped in surprise. The barn was filled with all sorts of treasures - old furniture, toys, and even a baby's crib. It looked like someone had left everything behind without any intention of ever coming back.
"Ruben what is all...." You turned to look at him. He stood by the barn door, holding it open.
"Are we done here?" He asked, the expression on his face startling you.
"Um I....sure."
You left the barn, Ruben shutting the door behind you. The walk back to the house was quiet, awkward even.
"I have to get back to town, run some errands." Ruben stood by his truck, looking at you impatiently.
You nodded. "Okay."
"Do you need me to take you back to Kat and David's or...?"
They were letting you stay with them as long as you needed to
"No. I'll manage." You said.
Ruben nodded. "I'll see you later then."
He hopped into his truck and drove away. Leaving you stranded with your many questions. Back at Katarina and David's you told them what happened over dinner.
"Poor Ruben." Katarina sighed.
David wiped his mouth with a napkin. "We've tried to get Ruben to sell that house for years now. It's been very difficult for him."
"Why?" You asked.
Katarina reached for her husband's hand as the two of them bowed their heads in sorrow. David then rose from the table to retrieve something out of a cabinet. It was a picture of two young girls not older than ten years old.
"These are our daughters, Emily and Gina." David said, pointing to the image of the two girls. You never knew that the two of them had children. Where were they?
"Emily is our oldest."
"And brightest." Katarina smiled.
"But Gina, she had a spirit like no other, always running around, dreaming of being a firefighter..."
"Or an astronaut."
Katarina and David seemed to complement each other as the two of them spoke joyfully about their two daughters.
"But Gina she was special in many ways. You see she was born with a heart condition, genetically passed onto her. We knew her life would be different from her sisters, shorter that is. That's why Gina always lived her life to the fullest, always in a rush against time. She married young..."
"To the most handsome man she had ever seen." Katarina qouted her daughter, tears of joy streaming down her face.
"That man was Ruben." David confirmed. "They met as Emily and Gina were getting their degrees at the University of Manchester. Gina and Ruben were so in love, head over heels. And as Gina confirmed her pregnancy she told us about her and Ruben's plans to by a house, to move back home and raise their family here, where we could be with our grandchild all the time. But as her pregnancy enveloped there were a few complications..."
"Caused by her heart." Katarina took the turn to speak as David was unable to, struggling to hold back the tears. "She died giving birth to our grandson. The doctors says her heart simply couldn't take it."
Silence fell around the dinner table. You wanted to say something, anything, but there were no words to mend the pain that Katarina and David had to endure following their daughters death.
"And your grandson?" You dared ask, but by then Katarina and David seemed to have collected themselves.
"He passed away along side his mother." David said.
How tragic. You felt so sorry for them, for Ruben.
"As you can imagine it really took a toll on Ruben. Gina had been very upfront about her condition, but as stubborn as Ruben is his feelings for her never changed. A real good man he is."
"But..." Katarina said. "None of us expected her death to come when it did, let alone Ruben. The house he and Gina had built....he has never been able step foot in it again, let alone sell it. Well...until he sold it to you, of course."
Why was that? You wanted to ask. Why were you the exception? Just then your phone vibrated in your pocket. You looked to the display and excused yourself to take the call, slipping out onto the back proch for some privacy.
"Yes?"
"Mommy?"
"Hello baby, how are you?" Your heart swelled at the sound of your son's voice.
"Mommy, when are you coming home?"
"Did grandma tell you to ask me that?"
A chuckle. "Yes."
You smiled. "Well tell grandma that this is my home now, exactly where I'm at. It's your home too, you know?"
"When are you coming to get me?"
"Do you still mark the days on the calendar I bought you?"
"Yes!" Your son cheered. "Grandma helps me."
"She does, that's good. Ask grandma how many days are left until the train comes to pick you and grandma up to come and see me."
There was a muffled sounds on the other end of the line. Your son running with your mother's cell phone in his hands. You left the porch and puttered around in Katarina and David's backyard, careful not to step on any of the planted flowers.
"Mommy."
Your son returned to the line.
"Yes Johnny?"
"Grandma says there's ten days left until the train leave."
"Ten days. Well then, I'll see you in ten days baby."
"I'll see you Mommy."
"Love you, bye."
"Bye."
You hung up the phone, a large smile on your lips. That smile faltered however, seeing Ruben standing on the porch, arms crossed, fingers drumming his biceps.
"Ruben." You exhaled. You didn't think you'd see him for a while after your little disagreement at the house this morning.
"Aren't you cold?" He asked, somthing very distant in the way he adressed you.
"I was on the phone, I was just about to head inside." You said.
"With your husband?"
You frowned.
"On the phone." Ruben uncrossed his arms, stepping down from the proch. "Was that your husband, Johnny?"
"Right, yeah." Ruben must have overhead your conversation. "I was on the phone with my husband...Johnny. "
"How is he doing...in the military?" He asked.
"Oh, you know..."
Ruben raised a brow. "I do?"
"He's doing military stuff, taking his time to check in on me." You said, trying not to shiver as the nights cold hit you. "What about you, what are you doing here?"
"Oh." Ruben perked up, fixing his posture. "I...I actually came here to apologize...to you."
"Me?"
He nodded. "This morning. In the barn. I overreacted. You're right, it's your property and you should be allowed to whatever you want with it."
You shook your head. "No Ruben, I understand. The stuff, if you want to keep them there you could. It's alot, and if you're just gonna leave hem there to rot...." You shook your. "Never mind. The barn is yours if you want it."
Ruben stood quiet, his eyes regarding you with slight suspicion. "They told you didn't, didn't they?"
"What?" Heat rose to your frozen cheeks. "Kate and David...they told you about their daughter, Gina, didn't they."
You held your tounge but nodded.
Ruben sighed, his legs folding as he took a seat on the steps of the porch. You joined him, scooting close as his body generated more heat than yours.
"I should have told you about the house, who it belonged to before I sold it to you." Ruben ran a hand through his dark hair.
"Nothing required you to, unless..."
"Unless?" He turned to you, a wrinkle dented in his forhead.
"You know." You shrugged. "Unless the house is haunted or somthing."
Somthing changed in his face, laughter followed his newfound expression. Ruben laughed, to your suprise. It was lovely as you never heard it before. Ruben really didn't look like a person to laughed but it was lovely, as well as his smile.
"It's not funny." You said, playfully nudging his side.
"Haunted." He chuckled. "You truly believe that I could sell you a haunted house?"
"Well did you?"
Ruben's expression changed again, a look of terror."
"Did you?" You asked, scared as to why he hesitated to answer your question.
"No, Y/N. I didn't sell you a haunted house, although I admit that that house has been haunting me for years."
"I'm sorry about your wife." You said after a time spent in silence.
Ruben looked to you, tilting his head down to meet your eyes as your height difference was ridiculous. "Thank you, but it's been a few years."
"How old would he be, your son?"
You realized that the question had startled him as you felt Ruben's muscles tense beside you. Perhaps he hadn't thought of his son, nor his wife in years.
"Four." He said, nothing more, nothing less.
Four, that's how old , Johnny, your son was. You kept that to yourself though, as it was not the time to tell Ruben about your own family, especially since you had been lying to him about a part of it.
"Your cold." He said.
Ruben must have felt your body leaning closer to him, stealing his heat. Or he had just heard the sound of your teeth, rattling like bones.
Let's get you inside."
"I actually want to stay for a bit longer. They don't look like that in the city." You said.
Ruben frowned, but followed your gaze as your head tilted upwards, admiring the ray of stars in the sky.
He sat back down, but not without removing his jacket, draping it over your shoulders.
"It's a beautiful view, no?" He said. "Moving out here, Gina and I used to spend hours in the fields just watching them, the stars."
"How was she, Gina?"
You looked to Ruben, his eyes mesmerized by the stars. His profile was captivating, rough but sculptured, he was handsome.
"She was like no one I've ever met." Evaporating smoke left Ruben's mouth as his eyes shifted to look at you. "I miss her so much." He said.
It was implusive, yet not terrifying. Although you were practically strangers you felt comfortable with Ruben, connected somehow. And so you grabbed his hand, leaning your head to rest on his shoulder. You felt his palm twitch beneath yours, nevertheless he did not pull away. And so you stayed like that, sitting close, holding hands, with the stars watching over your heads.
#fanfiction#football imagine#ruben dias#man city#manchester city#ruben dias x reader#ruben dias imagine#footballer imagine#footballer x reader#football angst
110 notes
·
View notes
Last Seen Blogs

bunnybubble
manu bunnyposting

shylylion
stay here with me

dasebasstian
GoKustom

kazumist
𓆩♡𓆪

pantyhosedcockguy
Straight married male who loves sexy women in pantyhose or stock