#GPU Applications
Explore tagged Tumblr posts
Visit Tumblr Blog
Explore Tumblr blogs with no restrictions, modern design and the best experience.
Last Seen Tumblr Blogs


Fun Fact
BuzzFeed published a report claiming that Tumblr was utilized as a distribution channel for Russian agents to influence American voting habits during the 2016 presidential election in Feb 2018.
Text
#GPU Market#Graphics Processing Unit#GPU Industry Trends#Market Research Report#GPU Market Growth#Semiconductor Industry#Gaming GPUs#AI and Machine Learning GPUs#Data Center GPUs#High-Performance Computing#GPU Market Analysis#Market Size and Forecast#GPU Manufacturers#Cloud Computing GPUs#GPU Demand Drivers#Technological Advancements in GPUs#GPU Applications#Competitive Landscape#Consumer Electronics GPUs#Emerging Markets for GPUs
0 notes
Text
Time to choose a GPU for my new PC! 🙂 *is confronted by the horror of complexity inherent in engineering machines in many-dimensional domains with high functionality gradients* ok no big dealio! umm, eenie, meenie…
#if you know what the Good GPUs Are for like personal scientific-ish applications for <$600. please tell me.#honestly if you know anything at all about the current state of GPUs please tell me.#(also note I’ll likely be getting an intel cpu if that matters)#much appreciated. *is sucked into a gpu fan*
8 notes
·
View notes
Text
Have you ever had to wrestle with your machine just to make something work? Drop your story below. 👇#linux
#1cuin.dll#cpu threshold#dll dependency error#dll error#dll missing wine#gpu threshold#linux#linux debugging#linux overheating fix#linux performance issue#linux windows compatibility#register dll wine#regsvr32#system freeze linux#tech struggle#uibuntu#wine#wine 32-bit prefix#wine application error#wine architecture#wine dll not loading#wine linux#wine regsvr32 fix#wine troubleshooting#winetricks
0 notes
Text
Nvidia CEO Jensen Huang calls US ban on H20 AI chip ‘deeply painful’
[ASIA] Nvidia CEO Jensen Huang said Washington’s plan to stymie China’s artificial intelligence (AI) capabilities by restricting access to its H20 graphics processing units (GPUs) was “deeply uninformed”, as the US semiconductor giant continues to navigate through a deepening tech rivalry between the world’s two largest economies. In an interview with tech site Stratechery following his keynote…
#AI#AI Diffusion Rule#America#American#Ban#Beijing#Ben Thompson#Biden administration#Blackwell AI graphics processors#calls#CEO#China#Chinese#chip#Computex#CUDA application programming interface#deeply#DeepSeek#Donald Trump#Foxconn#GPUs#H20#Hon Hai Precision Industry#Huang#Huawei Technologies#Jensen#Jensen Huang#mainland China#Nvidia#painful
0 notes
Text
#HighPoint#NVMe#AICs#GPUs#ideal for high-demand applications in#HPC#TechInnovation#powerelectronics#powermanagement#powersemiconductor
0 notes
Text
The Rise of NPUs: Unlocking the True Potential of AI.
Sanjay Kumar Mohindroo Sanjay Kumar Mohindroo. skm.stayingalive.in Explore NPUs: their components, operations, evolution, and real-world applications. Learn how NPUs compare to GPUs and CPUs and power AI innovations. NPUs at the Heart of the AI Revolution In the ever-evolving world of artificial intelligence (#AI), the demand for specialized hardware to handle complex computations has never…
#AI hardware#edge AI processing#future of NPUs#Neural Processing Unit#News#NPU applications#NPU architecture#NPU technology#NPU vs GPU#Sanjay Kumar Mohindroo
0 notes
Text
Navigating the World of High-Performance Computer
In an era dominated by technology, building a high-performance computer is not just a necessity for many but a passion. Whether it’s for gaming, professional workloads, or creative pursuits, understanding the world of high-performance computer parts is crucial. This guide navigates through the essential components and considerations for assembling a dream machine that meets both your needs and…
View On WordPress
#3D rendering#air cooling#AMD CPUs#AMD GPUs#application performance#application speed#backup solutions#clock speed#computer assembly#computer components#connectivity options#cooling systems#creative computing#custom PC build#data storage#DIY computing#enthusiast computing#gaming PC#gaming performance#graphics memory#HDD storage#heat management#high-performance computing#Intel CPUs#liquid cooling#modular cables#motherboard features#multi-core processors#multitasking#Nvidia GPUs
1 note
·
View note
Text
Tech Breakdown: What Is a SuperNIC? Get the Inside Scoop!
The most recent development in the rapidly evolving digital realm is generative AI. A relatively new phrase, SuperNIC, is one of the revolutionary inventions that makes it feasible.
Describe a SuperNIC
On order to accelerate hyperscale AI workloads on Ethernet-based clouds, a new family of network accelerators called SuperNIC was created. With remote direct memory access (RDMA) over converged Ethernet (RoCE) technology, it offers extremely rapid network connectivity for GPU-to-GPU communication, with throughputs of up to 400Gb/s.
SuperNICs incorporate the following special qualities:
Ensuring that data packets are received and processed in the same sequence as they were originally delivered through high-speed packet reordering. This keeps the data flow’s sequential integrity intact.
In order to regulate and prevent congestion in AI networks, advanced congestion management uses network-aware algorithms and real-time telemetry data.
In AI cloud data centers, programmable computation on the input/output (I/O) channel facilitates network architecture adaptation and extension.
Low-profile, power-efficient architecture that effectively handles AI workloads under power-constrained budgets.
Optimization for full-stack AI, encompassing system software, communication libraries, application frameworks, networking, computing, and storage.
Recently, NVIDIA revealed the first SuperNIC in the world designed specifically for AI computing, built on the BlueField-3 networking architecture. It is a component of the NVIDIA Spectrum-X platform, which allows for smooth integration with the Ethernet switch system Spectrum-4.
The NVIDIA Spectrum-4 switch system and BlueField-3 SuperNIC work together to provide an accelerated computing fabric that is optimized for AI applications. Spectrum-X outperforms conventional Ethernet settings by continuously delivering high levels of network efficiency.
Yael Shenhav, vice president of DPU and NIC products at NVIDIA, stated, “In a world where AI is driving the next wave of technological innovation, the BlueField-3 SuperNIC is a vital cog in the machinery.” “SuperNICs are essential components for enabling the future of AI computing because they guarantee that your AI workloads are executed with efficiency and speed.”
The Changing Environment of Networking and AI
Large language models and generative AI are causing a seismic change in the area of artificial intelligence. These potent technologies have opened up new avenues and made it possible for computers to perform new functions.
GPU-accelerated computing plays a critical role in the development of AI by processing massive amounts of data, training huge AI models, and enabling real-time inference. While this increased computing capacity has created opportunities, Ethernet cloud networks have also been put to the test.
The internet’s foundational technology, traditional Ethernet, was designed to link loosely connected applications and provide wide compatibility. The complex computational requirements of contemporary AI workloads, which include quickly transferring large amounts of data, closely linked parallel processing, and unusual communication patterns all of which call for optimal network connectivity were not intended for it.
Basic network interface cards (NICs) were created with interoperability, universal data transfer, and general-purpose computing in mind. They were never intended to handle the special difficulties brought on by the high processing demands of AI applications.
The necessary characteristics and capabilities for effective data transmission, low latency, and the predictable performance required for AI activities are absent from standard NICs. In contrast, SuperNICs are designed specifically for contemporary AI workloads.
Benefits of SuperNICs in AI Computing Environments
Data processing units (DPUs) are capable of high throughput, low latency network connectivity, and many other sophisticated characteristics. DPUs have become more and more common in the field of cloud computing since its launch in 2020, mostly because of their ability to separate, speed up, and offload computation from data center hardware.
SuperNICs and DPUs both have many characteristics and functions in common, however SuperNICs are specially designed to speed up networks for artificial intelligence.
The performance of distributed AI training and inference communication flows is highly dependent on the availability of network capacity. Known for their elegant designs, SuperNICs scale better than DPUs and may provide an astounding 400Gb/s of network bandwidth per GPU.
When GPUs and SuperNICs are matched 1:1 in a system, AI workload efficiency may be greatly increased, resulting in higher productivity and better business outcomes.
SuperNICs are only intended to speed up networking for cloud computing with artificial intelligence. As a result, it uses less processing power than a DPU, which needs a lot of processing power to offload programs from a host CPU.
Less power usage results from the decreased computation needs, which is especially important in systems with up to eight SuperNICs.
One of the SuperNIC’s other unique selling points is its specialized AI networking capabilities. It provides optimal congestion control, adaptive routing, and out-of-order packet handling when tightly connected with an AI-optimized NVIDIA Spectrum-4 switch. Ethernet AI cloud settings are accelerated by these cutting-edge technologies.
Transforming cloud computing with AI
The NVIDIA BlueField-3 SuperNIC is essential for AI-ready infrastructure because of its many advantages.
Maximum efficiency for AI workloads: The BlueField-3 SuperNIC is perfect for AI workloads since it was designed specifically for network-intensive, massively parallel computing. It guarantees bottleneck-free, efficient operation of AI activities.
Performance that is consistent and predictable: The BlueField-3 SuperNIC makes sure that each job and tenant in multi-tenant data centers, where many jobs are executed concurrently, is isolated, predictable, and unaffected by other network operations.
Secure multi-tenant cloud infrastructure: Data centers that handle sensitive data place a high premium on security. High security levels are maintained by the BlueField-3 SuperNIC, allowing different tenants to cohabit with separate data and processing.
Broad network infrastructure: The BlueField-3 SuperNIC is very versatile and can be easily adjusted to meet a wide range of different network infrastructure requirements.
Wide compatibility with server manufacturers: The BlueField-3 SuperNIC integrates easily with the majority of enterprise-class servers without using an excessive amount of power in data centers.
#Describe a SuperNIC#On order to accelerate hyperscale AI workloads on Ethernet-based clouds#a new family of network accelerators called SuperNIC was created. With remote direct memory access (RDMA) over converged Ethernet (RoCE) te#it offers extremely rapid network connectivity for GPU-to-GPU communication#with throughputs of up to 400Gb/s.#SuperNICs incorporate the following special qualities:#Ensuring that data packets are received and processed in the same sequence as they were originally delivered through high-speed packet reor#In order to regulate and prevent congestion in AI networks#advanced congestion management uses network-aware algorithms and real-time telemetry data.#In AI cloud data centers#programmable computation on the input/output (I/O) channel facilitates network architecture adaptation and extension.#Low-profile#power-efficient architecture that effectively handles AI workloads under power-constrained budgets.#Optimization for full-stack AI#encompassing system software#communication libraries#application frameworks#networking#computing#and storage.#Recently#NVIDIA revealed the first SuperNIC in the world designed specifically for AI computing#built on the BlueField-3 networking architecture. It is a component of the NVIDIA Spectrum-X platform#which allows for smooth integration with the Ethernet switch system Spectrum-4.#The NVIDIA Spectrum-4 switch system and BlueField-3 SuperNIC work together to provide an accelerated computing fabric that is optimized for#Yael Shenhav#vice president of DPU and NIC products at NVIDIA#stated#“In a world where AI is driving the next wave of technological innovation#the BlueField-3 SuperNIC is a vital cog in the machinery.” “SuperNICs are essential components for enabling the future of AI computing beca
1 note
·
View note
Text
Amazons GPT55X Unveiled
Hey there, tech enthusiast! 🚀 Grab your coffee because we’re about to dive into one of the most exciting innovations in the world of AI: Amazon’s GPT55X. Picture this: you’re chatting with a friend, and they casually mention this groundbreaking piece of tech. Confused? Don’t fret. We’re here to break it down for you, friend-to-friend. Introducing the Rockstar: Amazons GPT55X Ever watched a movie…

View On WordPress
#Advanced AI capabilities#AI constant improvement#AI creativity and problem-solving#AI in entertainment#Amazon GPT55X overview#Amazon&039;s AI transformation#Contextual AI understanding#Dynamic learning and AI#Ethical AI development#GPT55X future prospects#GPT55X in customer engagement#GPT55X in e-commerce#GPT55X in e-learning#GPT55X in healthcare#GPU accelerated browsing#Industry-neutral AI applications#Multimodal AI interactions#Pros and cons of GPT55X#Technical challenges in AI#Virtual AI tutoring
0 notes
Text

How to use DXVK with The Sims 3
Have you seen this post about using DXVK by Criisolate? But felt intimidated by the sheer mass of facts and information?
@desiree-uk and I compiled a guide and the configuration file to make your life easier. It focuses on players not using the EA App, but it might work for those just the same. It’s definitely worth a try.
Adding this to your game installation will result in a better RAM usage. So your game is less likely to give you Error 12 or crash due to RAM issues. It does NOT give a huge performance boost, but more stability and allows for higher graphics settings in game.
The full guide behind the cut. Let me know if you also would like it as PDF.
Happy simming!
Disclaimer and Credits
Desiree and I are no tech experts and just wrote down how we did this. Our ability to help if you run into trouble is limited. So use at your own risk and back up your files!
We both are on Windows 10 and start the game via TS3W.exe, not the EA App. So your experience may differ.
This guide is based on our own experiments and of course criisolate’s post on tumblr: https://www.tumblr.com/criisolate/749374223346286592/ill-explain-what-i-did-below-before-making-any
This guide is brought to you by Desiree-UK and Norn.
Compatibility
Note: This will conflict with other programs that “inject” functionality into your game so they may stop working. Notably
Reshade
GShade
Nvidia Experience/Nvidia Inspector/Nvidia Shaders
RivaTuner Statistics Server
It does work seamlessly with LazyDuchess’ Smooth Patch.
LazyDuchess’ Launcher: unknown
Alder Lake patch: does conflict. One user got it working by starting the game by launching TS3.exe (also with admin rights) instead of TS3W.exe. This seemed to create the cache file for DXVK. After that, the game could be started from TS3W.exe again. That might not work for everyone though.
A word on FPS and V-Sync
With such an old game it’s crucial to cap framerate (FPS). This is done in the DXVK.conf file. Same with V-Sync.
You need
a text editor (easiest to use is Windows Notepad)
to download DXVK, version 2.3.1 from here: https://github.com/doitsujin/DXVK/releases/tag/v2.3.1 Extract the archive, you are going to need the file d3d9.dll from the x32 folder
the configuration file DXVK.conf from here: https://github.com/doitsujin/DXVK/blob/master/DXVK.conf. Optional: download the edited version with the required changes here.
administrator rights on your PC
to know your game’s installation path (bin folder) and where to find the user folder
a tiny bit of patience :)
First Step: Backup
Backup your original Bin folder in your Sims 3 installation path! The DXVK file may overwrite some files! The path should be something like this (for retail): \Program Files (x86)\Electronic Arts\The Sims 3\Game\Bin (This is the folder where also GraphicsRule.sgr and the TS3W.exe and TS3.exe are located.)
Backup your options.ini in your game’s user folder! Making the game use the DXVK file will count as a change in GPU driver, so the options.ini will reset once you start your game after installation. The path should be something like this: \Documents\Electronic Arts\The Sims 3 (This is the folder where your Mods folder is located).
Preparations
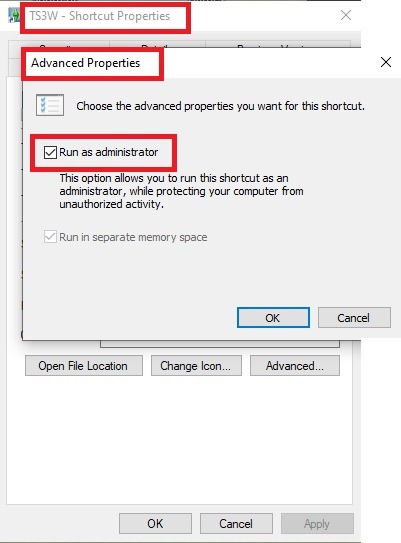
Make sure you run the game as administrator. You can check that by right-clicking on the icon that starts your game. Go to Properties > Advanced and check the box “Run as administrator”. Note: This will result in a prompt each time you start your game, if you want to allow this application to make modifications to your system. Click “Yes” and the game will load.
2. Make sure you have the DEP settings from Windows applied to your game.
Open the Windows Control Panel.
Click System and Security > System > Advanced System Settings.
On the Advanced tab, next to the Performance heading, click Settings.
Click the Data Execution Prevention tab.
Select 'Turn on DEP for all programs and services except these”:
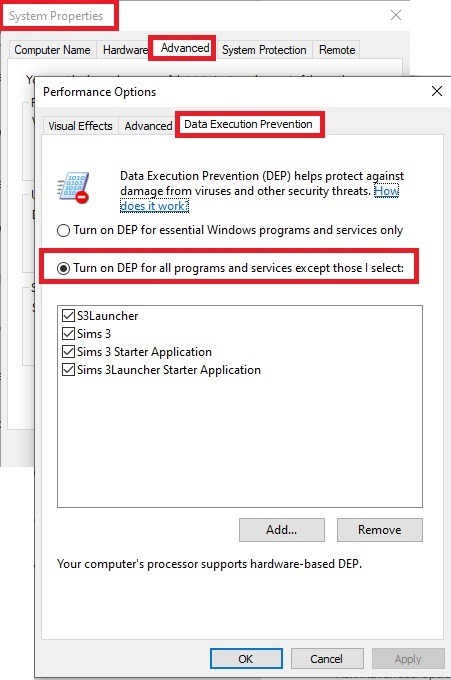
Click the Add button, a window to the file explorer opens. Navigate to your Sims 3 installation folder (the bin folder once again) and add TS3W.exe and TS3.exe.
Click OK. Then you can close all those dialog windows again.
Setting up the DXVK.conf file
Open the file with a text editor and delete everything in it. Then add these values:
d3d9.textureMemory = 1
d3d9.presentInterval = 1
d3d9.maxFrameRate = 60
d3d9.presentInterval enables V-Sync,d3d9.maxFrameRate sets the FrameRate. You can edit those values, but never change the first line (d3d9.textureMemory)!
The original DXVK.conf contains many more options in case you would like to add more settings.

A. no Reshade/GShade
Setting up DXVK
Copy the two files d3d9.dll and DXVK.conf into the Bin folder in your Sims 3 installation path. This is the folder where also GraphicsRule.sgr and the TS3W.exe and TS3.exe are located. If you are prompted to overwrite files, please choose yes (you DID backup your folder, right?)
And that’s basically all that is required to install.
Start your game now and let it run for a short while. Click around, open Buy mode or CAS, move the camera.
Now quit without saving. Once the game is closed fully, open your bin folder again and double check if a file “TS3W.DXVK-cache” was generated. If so – congrats! All done!
Things to note
Heads up, the game options will reset! So it will give you a “vanilla” start screen and options.
Don’t worry if the game seems to be frozen during loading. It may take a few minutes longer to load but it will load eventually.
The TS3W.DXVK-cache file is the actual cache DXVK is using. So don’t delete this! Just ignore it and leave it alone. When someone tells to clear cache files – this is not one of them!
Update Options.ini
Go to your user folder and open the options.ini file with a text editor like Notepad.
Find the line “lastdevice = “. It will have several values, separated by semicolons. Copy the last one, after the last semicolon, the digits only. Close the file.
Now go to your backup version of the Options.ini file, open it and find that line “lastdevice” again. Replace the last value with the one you just copied. Make sure to only replace those digits!
Save and close the file.
Copy this version of the file into your user folder, replacing the one that is there.
Things to note:
If your GPU driver is updated, you might have to do these steps again as it might reset your device ID again. Though it seems that the DXVK ID overrides the GPU ID, so it might not happen.
How do I know it’s working?
Open the task manager and look at RAM usage. Remember the game can only use 4 GB of RAM at maximum and starts crashing when usage goes up to somewhere between 3.2 – 3.8 GB (it’s a bit different for everybody).
So if you see values like 2.1456 for RAM usage in a large world and an ongoing save, it’s working. Generally the lower the value, the better for stability.
Also, DXVK will have generated its cache file called TS3W.DXVK-cache in the bin folder. The file size will grow with time as DXVK is adding stuff to it, e.g. from different worlds or savegames. Initially it might be something like 46 KB or 58 KB, so it’s really small.
Optional: changing MemCacheBudgetValue
MemCacheBudgetValue determines the size of the game's VRAM Cache. You can edit those values but the difference might not be noticeable in game. It also depends on your computer’s hardware how much you can allow here.
The two lines of seti MemCacheBudgetValue correspond to the high RAM level and low RAM level situations. Therefore, theoretically, the first line MemCacheBudgetValue should be set to a larger value, while the second line should be set to a value less than or equal to the first line.
The original values represent 200MB (209715200) and 160MB (167772160) respectively. They are calculated as 200x1024x1024=209175200 and 160x1024x1024=167772160.
Back up your GraphicsRules.sgr file! If you make a mistake here, your game won’t work anymore.
Go to your bin folder and open your GraphicsRules.sgr with a text editor.
Search and find two lines that set the variables for MemCacheBudgetValue.
Modify these two values to larger numbers. Make sure the value in the first line is higher or equals the value in the second line. Examples for values: 1073741824, which means 1GB 2147483648 which means 2 GB. -1 (minus 1) means no limit (but is highly experimental, use at own risk)
Save and close the file. It might prompt you to save the file to a different place and not allow you to save in the Bin folder. Just save it someplace else in this case and copy/paste it to the Bin folder afterwards. If asked to overwrite the existing file, click yes.
Now start your game and see if it makes a difference in smoothness or texture loading. Make sure to check RAM and VRAM usage to see how it works.
You might need to change the values back and forth to find the “sweet spot” for your game. Mine seems to work best with setting the first value to 2147483648 and the second to 1073741824.
Uninstallation
Delete these files from your bin folder (installation path):
d3d9.dll
DXVK.conf
TS3W.DXVK-cache
And if you have it, also TS3W_d3d9.log
if you changed the values in your GraphicsRule.sgr file, too, don’t forget to change them back or to replace the file with your backed up version.
OR
delete the bin folder and add it from your backup again.
B. with Reshade/GShade
Follow the steps from part A. no Reshade/Gshade to set up DXVK.
If you are already using Reshade (RS) or GShade (GS), you will be prompted to overwrite files, so choose YES. RS and GS may stop working, so you will need to reinstall them.
Whatever version you are using, the interface shows similar options of which API you can choose from (these screenshots are from the latest versions of RS and GS).
Please note:
Each time you install and uninstall DXVK, switching the game between Vulkan and d3d9, is essentially changing the graphics card ID again, which results in the settings in your options.ini file being repeatedly reset.
ReShade interface
Choose – Vulcan
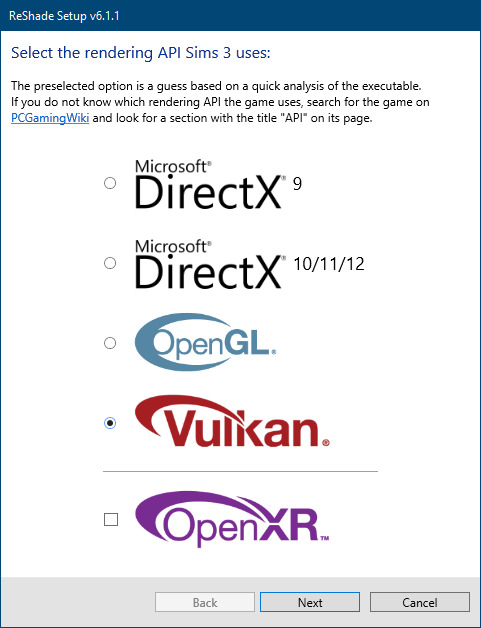
Click next and choose your preferred shaders.
Hopefully this install method works and it won't install its own d3d9.dll file.
If it doesn't work, then choose DirectX9 in RS, but you must make sure to replace the d3d9.dll file with DXVK's d3d9.dll (the one from its 32bit folder, checking its size is 3.86mb.)
GShade interface
Choose –
Executable Architecture: 32bit
Graphics API: DXVK
Hooking: Normal Mode
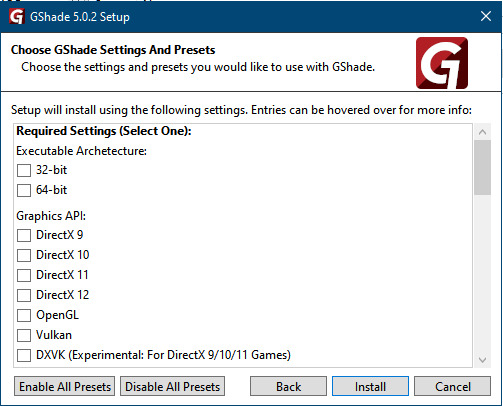
GShade is very problematic, it won't work straight out of the box and the overlay doesn't show up, which defeats the purpose of using it if you can't add or edit the shaders you want to use.
Check the game's bin folder, making sure the d3d9.dll is still there and its size is 3.86mb - that is DXVK's dll file.
If installing using the DXVK method doesn't work, you can choose the DirectX method, but there is no guarantee it works either.
The game will not run with these files in the folder:
d3d10core.dll
d3d11.dll
dxgi.dll
If you delete them, the game will start but you can't access GShade! It might be better to use ReShade.
Some Vulcan and DirectX information, if you’re interested:
Vulcan is for rather high end graphic cards but is backward compatible with some older cards. Try this method with ReShade or GShade first.
DirectX is more stable and works best with older cards and systems. Try this method if Vulcan doesn't work with ReShade/GShade in your game – remember to replace the d3d9.dll with DXVK's d3d9.dll.
For more information on the difference between Vulcan and DirectX, see this article:
https://www.howtogeek.com/884042/vulkan-vs-DirectX-12/
747 notes
·
View notes
Text
DXVK Tips and Troubleshooting: Launching The Sims 3 with DXVK
A big thank you to @heldhram for additional information from his recent DXVK/Reshade tutorial! ◀ Depending on how you launch the game to play may affect how DXVK is working.
During my usage and testing of DXVK, I noticed substantial varying of committed and working memory usage and fps rates while monitoring my game with Resource Monitor, especially when launching the game with CCMagic or S3MO compared to launching from TS3W.exe/TS3.exe.
It seems DXVK doesn't work properly - or even at all - when the game is launched with CCM/S3MO instead of TS3W.exe/TS3.exe. I don't know if this is also the case using other launchers from EA/Steam/LD and misc launchers, but it might explain why some players using DXVK don't see any improvement using it.
DXVK injects itself into the game exe, so perhaps using launchers bypasses the injection. From extensive testing, I'm inclined to think this is the case.
Someone recently asked me how do we know DXVK is really working. A very good question! lol. I thought as long as the cache showed up in the bin folder it was working, but that was no guarantee it was injected every single time at startup. Until I saw Heldhram's excellent guide to using DXVK with Reshade DX9, I relied on my gaming instincts and dodgy eyesight to determine if it was. 🤭
Using the environment variable Heldhram referred to in his guide, a DXVK Hud is added to the upper left hand corner of your game screen to show it's injected and working, showing the DXVK version, the graphics card version and driver and fps.

This led me to look further into this and was happy to see that you could add an additional line to the DXVK config file to show this and other relevant information on the HUD such as DXVK version, fps, memory usage, gpu driver and more. So if you want to make sure that DXVK is actually injected, on the config file, add the info starting with:
dxvk.hud =
After '=', add what you want to see. So 'version' (without quotes) shows the DXVK version. dxvk.hud = version

You could just add the fps by adding 'fps' instead of 'version' if you want.

The DXVK Github page lists all the information you could add to the HUD. It accepts a comma-separated list for multiple options:
devinfo: Displays the name of the GPU and the driver version.
fps: Shows the current frame rate.
frametimes: Shows a frame time graph.
submissions: Shows the number of command buffers submitted per frame.
drawcalls: Shows the number of draw calls and render passes per frame.
pipelines: Shows the total number of graphics and compute pipelines.
descriptors: Shows the number of descriptor pools and descriptor sets.
memory: Shows the amount of device memory allocated and used.
allocations: Shows detailed memory chunk suballocation info.
gpuload: Shows estimated GPU load. May be inaccurate.
version: Shows DXVK version.
api: Shows the D3D feature level used by the application.
cs: Shows worker thread statistics.
compiler: Shows shader compiler activity
samplers: Shows the current number of sampler pairs used [D3D9 Only]
ffshaders: Shows the current number of shaders generated from fixed function state [D3D9 Only]
swvp: Shows whether or not the device is running in software vertex processing mode [D3D9 Only]
scale=x: Scales the HUD by a factor of x (e.g. 1.5)
opacity=y: Adjusts the HUD opacity by a factor of y (e.g. 0.5, 1.0 being fully opaque).
Additionally, DXVK_HUD=1 has the same effect as DXVK_HUD=devinfo,fps, and DXVK_HUD=full enables all available HUD elements.
desiree-uk notes: The site is for the latest version of DXVK, so it shows the line typed as 'DXVK_HUD=devinfo,fps' with underscore and no spaces, but this didn't work for me. If it also doesn't work for you, try it in lowercase like this: dxvk.hud = version Make sure there is a space before and after the '=' If adding multiple HUD options, seperate them by a comma such as: dxvk.hud = fps,memory,api,version
The page also shows some other useful information regarding DXVK and it's cache file, it's worth a read. (https://github.com/doitsujin/dxvk)
My config file previously showed the DXVK version but I changed it to only show fps. Whatever it shows, it's telling you DXVK is working! DXVK version:


DXVK FPS:

The HUD is quite noticeable, but it's not too obstructive if you keep the info small. It's only when you enable the full HUD using this line: dxvk.hud = full you'll see it takes up practically half the screen! 😄 Whatever is shown, you can still interact with the screen and sims queue.

So while testing this out I noticed that the HUD wasn't showing up on the screen when launching the game via CCM and S3MO but would always show when clicking TS3W.exe. The results were consistent, with DXVK showing that it was running via TS3W.exe, the commited memory was low and steady, the fps didn't drop and there was no lag or stuttereing. I could spend longer in CAS and in game altogether, longer in my older larger save games and the RAM didn't spike as much when saving the game. Launching via CCM/S3MO, the results were sporadic, very high RAM spikes, stuttering and fps rates jumping up and down. There wasn't much difference from DXVK not being installed at all in my opinion.
You can test this out yourself, first with whatever launcher you use to start your game and then without it, clicking TS3.exe or TS3W.exe, making sure the game is running as admin. See if the HUD shows up or not and keep an eye on the memory usage with Resource Monitor running and you'll see the difference. You can delete the line from the config if you really can't stand the sight of it, but you can be sure DXVK is working when you launch the game straight from it's exe and you see smooth, steady memory usage as you play. Give it a try and add in the comments if it works for you or not and which launcher you use! 😊 Other DXVK information:
Make TS3 Run Smoother with DXVK ◀ - by @criisolate How to Use DXVK with Sims 3 ◀ - guide from @nornities and @desiree-uk
How to run The Sims 3 with DXVK & Reshade (Direct3D 9.0c) ◀ - by @heldhram
DXVK - Github ◀
105 notes
·
View notes
Text
The LINUX REVIEW! Okay so I been using CachyOS on my desktop pc and Arch linux on my laptop (previously Linux Mint) for over a month now and I just wanted to post about my thoughts, from someone who has been exclusively on Windows my entire life and am not a programmer/dev (and now, no longer has anything that runs on Windows so you may see where this is going)
Laptop specs: AMD ryzen CPU i don't remember specifics, 8gb ram, 500gb storage (Truly just an average trash laptop whos already physically falling apart)
PC specs: 7600x CPU, 7800 XT GPU, 32gb ram, 2tb storage
List of things I've noticed or liked:
(Laptop) Fans no longer blaze on idle. Was really embarrassing bringing my laptop to school because of this and now no longer an issue. The fans only kick in when necessary
(Overall) Less ram usage. on idle, Windows 11 ate about half my ram on my laptop, its now about 1 gb on arch. Similarly, on my PC CachyOS is about 1.8 gb on idle.
(Overall) More customization compared to Windows. I've stuck with the cinnamon DE for all of them and at least on Cinnamon, customization is easy for the average person who doesnt wanna go mess w configs.
(Overall) I can update my computer and still use it like normal. If its a relatively deep update that needs to restart the restart time is as long as any other regular restart. I wont be tricked to being stuck on a blue loading screen for 10 minutes.
(Overall) I can run all games I like to play, even relatively newer ones like Monster Hunter Wilds. Which is now a few months old, but even Nightreign which is Brand New runs perfectly. People need to stop saying gaming is impossible on Linux. Yall are just addicted to Fortnite
(Overall) Pirating games is also easy and have had no performance issues with pirated games running via Lutris
(Overall) Better performance on Minecraft. Most games r kinda the same, but there are a select few like Minecraft who run better now
(Laptop) i can watch a FUCKING YOUTUBE VIDEO without my computer DYING
(PC) Everything just Works. CachyOS is really good. The reason this isn't an overall point is just that I'm more responsible for getting the packages my laptop needs, so obviously there wasn't a good out of box experience for a normal user on Arch. For being arch-based CachyOS is perfect and has no issues
(Overall) No Microsoft
(Overall) I can use pngs as icons for applications instead of needing to convert to ico
(Overall) And also, Converting something from one format into another is 10x simpler
List of things that are silly:
I can say "yay" to update my computer :3
I will never leave my wiggly window phase. blblublbublbubblubblub
List of things that I don't like:
Honestly such a trivial issue but the RGB on my keyboard under my capslock fucks up and gets stuck and I am in the select tiny minority where openRGB doesn't support my keyboard and akko drivers aren't available for Linux. im not sure i can say i "dont like" it because its such a non issue, its just a thing I wanted to acknowledge.
38 notes
·
View notes
Text


Pride Month: Manonia Evans & Donna Burkett Fight for Same-Sex Marriage Rights
On October 8th, 1971, Donna Burkett & Manonia Evans made Wisconsin history when they visited the Milwaukee County Clerk’s office to apply for a marriage license. When their application was denied because they were a same-sex couple, they proceeded to file a lawsuit in the U.S. District Court for the Eastern District of Wisconsin claiming that County Clerk Thomas Zablocki had denied them due process and equal protection under the law by refusing to recognize their constitutional right to marriage. Burkett told GPU News “The law should protect us and help us the way it does any two straight people who love each other and want to live together... That’s our civil rights; that’s what this is all about.”
Not to be deterred, Burkett & Evans were married on Christmas Day, 1971, by Father Joseph Feldhausen, a local openly gay pastor who was involved in numerous civil rights and social aid initiatives in Milwaukee.
Though same-sex marriage would not be legalized in Wisconsin until 2014, their case was part of the first wave of same-sex marriage lawsuits in the nation and was covered by both the The Advocate and Jet. The Milwaukee Journal Sentinel caught up with Burkett in 2014, when she received an “everyday courage" award from the Milwaukee LGBT Community Center, who called her an “a little-known pioneer of the marriage equality movement”.
video source: October 12, 1971, Daily News, Milwaukee Journal Stations Records
--Ana
#LGBTQ#Pride Month#Marriage Equality#Donna Burkett#Manonia Evans#Same Sex Marriage Rights#LGTBQ+#UWM Archives#GPU News#LGBTQ Archives#LGBTQ History#Milwaukee History#Black History#Milwaukee
45 notes
·
View notes
Text

@nornities @cocodotgreen and @ anyone else who might be curious/interested...
This is something more suited to a post than a reply, so here we are. I've posted about this before, usually with pictures, but the pictures end up being hard to read because they're small, with gray text on a white background and…yeah. So, I'm just going to make a list of the individual settings that I have changed/enabled.
Bear in mind that I really have no idea what I'm doing. I got most of this stuff from a long-ago, now-deleted post on the MTS forums, combined with reading around on gamer forums/sites, but with the latter I didn't always understand what I was reading, so I just stabbed around enabling and disabling stuff until it looked good and didn't cause any crashes or extra performance issues or anything. "Stabbing around" is pretty much my modus operandi when it comes to fiddling with this type of thing, whether it's NVIDIA settings or lighting mods.
I'm guessing what works/looks good might be dependent on your GPU, though, not to mention any mods that affect the game's appearance that you might use. I have an RTX4060 now, but I was using most of these settings when I was using my old faithful GTX1050Ti. At the very least, I suppose you can use these settings as a base for your own bout of stabbing around. :)
Anyway, the following is a list of only the things that I changed from the default settings, using NVIDIA Profile Inspector, which is a free third-party program that you can download, but I think you can do most if not all of this just with NVIDIA's native Control Panel. Whatever you use, make sure you're setting up a profile for TS3 and not for any other game and certainly not for your global settings.
If anything's unclear or you have questions, feel free to ask, though as I said I really have no idea what I'm doing. LOL
So, the list is behind the cut. I've grouped the items together by the "section" they appear in in the Profile Inspector. It'll probably be organized differently if you use something else to do this, but hopefully you can find the things to change.
1 - Compatibility Ambient Occlusion - Compatibility: 0x00000007 SLI - Compatibility Bits (DX9): 0x00000004
2 - Sync and Refresh Frame Rate Limiter - Background Application: Off Frame Rate Limiter V3: 60FPS
Note: This is what I use to limit my game's framerate, but I know other people use different methods. Like I think framerate limiting can be done with the Smooth Patch now. So, if you use some other method, you don't need these settings. Just make sure you use some method, since TS3 doesn't have a native limiter, and the runaway frame rates that you can get with newer cards can damage them over time.
3 - Antialiasing Antialiasing - FXAA Enabled: Off Antialiasing - MFAA Enabled: On Antialiasing - Transparency Supersampling: 8x Sparse Grid Supersampling Antialiasing (MSAA) - Mode: Override any application setting Antialiasing (MSAA) - Setting: 8xQ (8x Multisampling)
Note: With these, I chose MFAA over FXAA because it is, so I read, generally better quality, but of course that means it's more resource-hoggy. So, if your system is weaker you might want to use FXAA instead. Or not. Who knows? LOL Either way, you need to disable the game's native antialiasing or things will look funky.
4 - Texture Filtering Anisotropic Filter - Optimization: On Anisotropic Filter - Sample Optimization: On Anisotropic Filtering - Mode: User-defined/Off Texture Filtering - LOD Bias (DX): -1.5000 Texture Filtering - LOD Bias (OGL): +0.1875 Texture Filtering - Quality: High Quality
5 - Common Ambient Occlusion - Usage: Enabled Ambient Occlusion - Setting: Quality Extension Limit (OGL): Off
28 notes
·
View notes
Text
Exploring Startups’ LLM Fine-Tuning on Intel GPUs

The second development sprint on the Intel Developer Cloud was recently finished by the Intel Liftoff team and AI startups (see the report about the first sprint here). The Intel Liftoff program team and companies concentrated on providing their products with specialized, LLM-powered feature enablement during this sprint. Participants in hackathons are redefining standards for AI application development across industries by leveraging Intel’s AI stack and support.
Opening Doors for Members of Intel Liftoff
AI startups had access to the Intel Developer Cloud through the virtual event, which also gave them access to Intel Data Center GPU Max Series 1550 and 4th Gen Intel Xeon Scalable processors. The goal of the hackathon was to examine the potential of upcoming LLM-based applications.
The Four Most Innovative Ideas
The four creative teams from among those that participated were chosen for the final showcase:
All hackathon participants received access to several GPUs, a first for Intel Liftoff, and were able to distribute training (data parallel) runs over them all at once. Our hackathon participants were able to fine-tune 3 to 13 billion parameter LLMs in a couple of hours thanks to the larger Data Center GPU Max 1550 model’s availability with 128 GB of VRAM. The Intel oneAPI software stack, Intel oneAPI Base Toolkit, Intel oneAPI Deep Neural Network (oneDNN), Intel oneAPI DPC++/C++ Compiler with SYCL* runtime, and Intel Extension for PyTorch were used to optimize the models for all four of these applications on Intel GPUs.
Chatbots from Dowork Technologies, LLM
applying LoRA, Dowork Technologies modified OpenLLaMA-13B with 4 PVC 1550s by synthesizing a fine-tuning dataset and applying it. Their technology enables businesses to create LLM chatbots and other applications using corporate data in a safe manner, acting as dynamic, conversational institutional memories for staff members — basically, a Private ChatGPT!
“We have been optimizing our 13 billion parameter model using Intel Hardware. The good results have given us the computing capacity required for such a comprehensive model. However, we saw a minor delay in text production during inference. We are enthusiastic to work with Intel to overcome this obstacle and unlock even better performance in future solutions as we push our AI models to new heights, said Mushegh Gevorgyan, founder and CEO of Dowork Technologies.
SQL queries for business analytics: The Mango Jelly
To automate business analytics for marketers, Mango Jelly’s application needed a new functionality for creating SQL queries. During this Intel Liftoff development sprint, which produced amazing results, this crucial feature that is essential to their business plan was built from the ground up. The team improved OpenLLaMA-3B using real customer data and Intel GPUs so that it could provide well-structured queries in response to marketing requests written in everyday language.
We were able to optimize an open-source LLM on incredibly potent hardware as part of Intel Liftoff. It was astounding to see the Intel XPU function at such high speeds. With the help of open-source models and cutting-edge hardware, this alliance gives us more flexibility over customization, tuning, and usage restrictions. Additionally, it highlights the suitability and readiness of our solution for enterprise use cases, according to Divya Upadhyay, co-founder and CEO of The Mango Jelly.
Enhancing Staffing with Terrain Analytics
A platform is provided by Terrain Analytics to help businesses make better hiring decisions. Terrain had created a functionality to parse job postings using OpenAI’s Ada API before to the sprint, but they ran into issues with cost and throughput. They were able to perfect an LLM for this particular use case during the Intel Liftoff sprint by using Intel Data Center GPU Max (Ponte Vecchio) for training and a 4th generation Intel Xeon Scalable Processor (Sapphire Rapids) for inference. The resulting model performed better than the default Ada API, with noticeably improved throughput and significant cost savings.
Terrain can now scale Deep Learning and Language Learning Models without running into computational limits thanks to the incorporation of Intel technology. Nathan Berkley, a software engineer at Terrain Analytics, and Riley Kinser, co-founder and head of product, claim that both of the models they developed showed superior success metrics to those produced using OpenAI’s Ada model and that they processed data 15 times more quickly.
Making LLMs more welcoming to business
With a focus on security and viability, Prediction Guard is an expert in supporting the integration of LLMs into company operations. The deliverables created by LLMs sometimes have an unstructured nature and could provide compliance and reputational difficulties. The platform of Prediction Guard provides answers to these problems. They improved the Camel-5B and Dolly-3B models using data from two paying customers, showcasing their capacity to improve LLM outputs for better business application.
“Prediction Guard was able to show the client how to cut the current OpenAI-based transcription processing time from 20 minutes to under one minute after evaluating LLM data extraction on Intel DCGM. According to Daniel Withenack, founder and CEO of Prediction Guard, their Pivoting initiative for potential clients has the potential to save operational costs by $2 million yearly.
Awaiting the Intel Innovation Event with anticipation
These accomplishments demonstrate the potential that AI businesses may unleash with the Liftoff for businesses program as we rush towards the Intel Innovation event in September. Our program participants are setting new standards for AI application development by utilizing Intel’s AI stack and assistance.
0 notes
Text
I’ve been having steam crash on me a lot over the past few days and this time it like froze and messed up a bunch of other random applications and then the error pop up said I could turn off hardware acceleration when restarting and I’m just like. Why was that on to begin with??? I have one (really old) GPU I don’t think “Hardware Acceleration” is really gonna work??
Anyways I turned it off and a game that was taking over a minute to start up now took like 6 seconds
52 notes
·
View notes