#Tips To Prevent Pigmentation
Explore tagged Tumblr posts
Visit Tumblr Blog
Explore Tumblr blogs with no restrictions, modern design and the best experience.
Last Seen Tumblr Blogs


Fun Fact
Tumblr is available in 18 languages.
Text
Tips To Prevent Pigmentation From Getting Worse?
Pigmentation is a common skin concern that affects people of all ages and skin types. Whether it’s due to sun exposure, hormonal changes, acne scars, or genetic factors, pigmentation issues can lead to uneven skin tone, dark spots, and blemishes. While pigmentation is not harmful, it can impact one’s appearance and cause frustration. If you are someone struggling with pigmentation and have no idea what to do, then you have landed on the right page. This blog brings top tips to prevent pigmentation from getting worse from the clinic offering the best pigmentation treatment in Delhi. Stay Tuned to know more!

Tips To Prevent Pigmentation From Getting Worse

Here are expert tips to prevent pigmentation from getting worse:
Protect Your Skin from the Sun
Sun is the main culprit of making pigmentation worse. This is because UV rays from the sun stimulate melanin production in the skin. This eventually causes existing dark spots or pigmentation to become darker. In case of unprotected and prolonged exposure, it can also lead to the formation of new pigmentation over time.
Incorporate Skin Brightening Ingredients in Your Skincare Routine
Incorporating skin-brightening ingredients in your skincare routine can help reduce hyperpigmentation. These products work by preventing the development of dark spots. Examples of such ingredients include vitamin C, Niacinamide, Alpha Arbutin, retinoids, and licorice extract.
Be Consistent with Your Skincare Routine
Skincare might work magically but it’s definitely not magic. Thus, the key to making skincare work like magic is consistency. Being consistent with your skincare routine prevents it from getting worse and helps fade it gradually.
Avoid Picking or Scratching Your Skin
Another most important tip to prevent pigmentation from getting worse is to avoid picking at acne, blemishes or any existing spots. This is because picking at the acne or acne marks can result in post-inflammatory hyperpigmentation, which is even more stubborn to treat. In addition, in severe cases, these scars can even become permanent. Thus, avoid picking up acne or blemishes, preventing pigmentation from getting worse.
Get expert consultation from the Best Dermatologist for managing Pigmentation!
Pigmentation can be a stubborn skin issue, but with the right care and preventive measures, you can keep it from worsening and even reduce its appearance. By incorporating sun protection, gentle skincare practices, brightening ingredients, and regular exfoliation into your routine, you’ll be well on your way to achieving clear, even-toned skin. If you are struggling with pigmentation, get expert consultation from the best dermatologist in Delhi only at Delhi Wellness Clinics. From chemical peels to lasers to anti pigmentation peels they offer various treatments that help one to get their flawless skin back.

To know more, book an appointment at Delhi Wellness Clinics today!
Original Source:- https://delhiwellnessclinic.wordpress.com/2025/04/10/tips-to-prevent-pigmentation-from-getting-worse/
#pigmentation#Tips To Prevent Pigmentation#pigmentation treatment in Delhi#best dermatologist in Delhi#Delhi Wellness Clinics
0 notes
Text
Preventing Pigmentation Problems: Tips from a Hyderabad Skin Doctor


If you are bothered by your unusual skin tone, no worries, there are plenty of ways to reduce or erase your skin pigmentation. In case you are looking for causes of skin pigmentation and ways to prevent or reduce pigmentation problems, you are reading just the right article. Here you will find amazing tips to prevent or get rid of skin pigmentation with Pigmentation Treatment in Hyderabad, suggested by skin doctor, Dr.Ravali Yalamanchili head of Neya Dermatology & Aesthetics.
Causative Factors/Types of Skin Pigmentation

Here are the most common causes of pigmentation issues that can affect people of any skin tone to varying degrees discussed by Dr.Ravali Yalamanchili, Skin Doctor in Hyderabad:
Skin inflammation- Trauma or injury to the skin such as eczema, bug bites, acne, cuts, scrapes, or scratching of the skin due to friction caused by vigorous ribbing can all result in inflamed skin. Inflammation can further increase the production of melanin by melanocytes, leaving the skin darker than before after the wound heals. When inflammation is the reason behind skin pigmentation, it is referred to as post-inflammatory hyperpigmentation.
Sun exposure- The melanin of the skin protects the skin from sun damage. The sun’s UV rays encourage the local proliferation of melanocytes to prevent sun damage. The extra melanin is what makes the skin look darker than the unusual skin tone, and that’s sun tan. However, when skin is over or frequently exposed to the harmful UV rays of the sun, dark sunspots appear. Lifelong sun exposure can cause age spots or solar lentigos.
Melasma- It is a type of hyperpigmentation that is characterised by the appearance of brown spots/patches on the face. It mostly occurs in pregnant women because of their hormonal fluctuations and is referred to as chloasma- the mask of pregnancy. It is thought to be an outcome of a combination of factors including sun exposure, hormonal changes, and genetics.
Side effects of certain medications- These include non-steroidal anti-inflammatory drugs, antibiotics, antimalarials, and some chemotherapy drugs.
Some medical conditions- Addison’s disease is a disorder of the adrenal gland that can cause an increase in melanin production resulting in hyperpigmentation.
Dermatologist-Approved Tips To Prevent Pigmentation Issues And Maintain Evenly Toned Skin
Keep your skin moist.
You must choose an effective moisturiser based on your skin type. Creamy moisturisers are recommended for normal or dry skin types while oil-free moisturisers are for oily-skinned people. A good moisturiser will contain hydrating agents like hyaluronic acid and glycerine along with retinol (Vitamin A derivative) to help boost skin cell turnover. It can allow new skin cells to remain healthy as they come to the surface to replace old, damaged cells.
2. Refrain from scratching and picking up your skin.
Itchy skin concerns like a bug bite or healing skin injuries may tempt you to scratch the skin and having a stubborn blackhead may tempt you to squeeze it. Scratching or picking of the skin can cause skin to inflame and eventually change colour.
3. Sun-protect your skin.
The most effective way to avoid sun-induced skin pigmentation is to diligently apply a broad-spectrum sunscreen of high SPF onto the sun-exposed areas of the body and face, before stepping outside during daytime hours. You can even wear sun-protective clothing like full-length clothes to cover your hands and legs and a wide-brimmed hat to protect your head, face, ears, and neck. If possible, it is recommended to avoid outdoor activities between 10 a.m. to 2 p.m.
4. Stick to the use of gentle skincare products.
Use only those skincare products that do not sting or burn when applied, as skin-irritating ingredients can trigger or worsen pigmentation issues.
5. Protect yourself from common skin-darkening triggers.
If you have pimples, fight them off with acne medications. Use bug spray to prevent bug bites. This way you can prevent your skin from darkening from acne breakouts and bug bites.
6. Try out natural home remedies.
According to some research, natural items that may work in lightening skin pigmentation include apple cider vinegar, green tea extract, aloe vera, black tea water, licorice extract, red onion, milk, and red lentils.
7. Explore skin care products containing antioxidants, AHA, and kojic acid
Choose skincare products that have powerful skin brightening/whitening/depigmentation agents such as Vitamin C, AHA, and kojic acid. Vitamin C is a nutrient-rich antioxidant that can fight off free radical damage to the skin. AHA (alpha-hydroxy acid) is a chemical skin exfoliant that can help remove outermost affected skin layers to reveal new skin. Kojic acid is beneficial for acne-prone skin as it helps remove acne lesions or prevent the breakout of acne spots by reducing oiliness and inflammation.
8. Ask a skin doctor about high-tech options.
Initially, you are recommended for some topical products to treat skin pigmentation. But, if they are failing to fix the pigmentation problem, you may need to undertake more aggressive options to banish your skin discoloration. Dermatologists can help you find the best treatment and can also help to learn more on Pigmentation treatment cost in Hyderabad and also on their efficacy.
Best Treatment Options To Get Rid of Skin Pigmentation Performed By A Skin Doctor at Neya Dermatology & Aesthetics
Laser resurfacing
Laser resurfacing or peeling is one of the best Pigmentation treatments in Hyderabad. The laser light beams directly target the pigmented skin to remove the skin layers and boost collagen production. Both ablative and non-ablative lasers can help resurface the skin and lighten pigmentation. Ablative lasers work by heat damaging the superficial skin layers, stimulating collagen production, and enabling new cell formation. Non-ablative lasers do not cause any harm to the skin surface. For dramatic, long-lasting results, the pigmented skin needs to be repeatedly treated with lasers in multiple sittings scheduled weeks apart.

Chemical peel treatment for skin pigmentation involves the application of an acidic solution over the pigmented skin to cause the upper skin layers to peel off and reveal brighter, smoother skin from underneath. Additionally, chemical peels can help boost collagen production to improve overall skin health and appearance. Depending upon how deep the pigmentation is, there are three types of peels to choose from: superficial (such as glycolic acid, lactic acid), medium (such as salicylic acid), and deep (such as trichloroacetic acid). Mild and medium peels would be required to be applied multiple times while deep peels can provide skin improvement in a single treatment.
3. Microneedling
In microneedling treatment for skin pigmentation, a device with several ultra-fine needles is used to create micro punctures in the skin. This triggers natural healing of the skin by promoting collagen and elastin production. As a result, the skin gets remodelled and the pigmentation appears lighter. Three to six microneedling sessions, each spaced 4–6 weeks apart, will be required to get optimal results. For maintenance of results, microneedling is recommended after every 6 to 12 months.
Pigmentation is a skin concern that can be managed with initial treatment and expert advice provided by a dermatologist. One can consult experts at Neya Dermatology & Aesthetics to address it and flaunt their youthful, healthy, pigmentation-free skin.
Original Source:- https://blogstudiio.com/preventing-pigmentation-problems-tips-from-a-hyderabad-skin-doctor/
#pigmentation treatment#Pigmentation Treatment in Hyderabad#Preventing Pigmentation Problems#Types of Skin Pigmentation#Tips To Prevent Pigmentation#Skin Doctor in Hyderabad#neya clinic
0 notes
Text
How to Minimize and Avoid Hyperpigmentation?
Have dark pigmentation patches on your face? Don't worry, you are not alone! Hyperpigmentation is a condition that makes those areas darker than the rest of the parts of the skin. An excessive buildup of melanin- the pigment produced by skin cells - contributes to this condition. Hyperpigmentation can appear on the facial area, hands, arms, or dark patches. It may also occur in the areas where any sort of scarring from the skin has existed in the past, like acne scars or burn scars. Now that you know what hyper-pigmentation is, you may be curious about how to decrease and prevent it. This blog will explain some effective steps to decrease and prevent this brown skin, and individuals will be radiant for a long time. We have taken references from the Skin Experts of Skinlogics Clinic, which provides the best Pigmentation Treatment in Noida. Read on to find out the tips to reduce and prevent pigmentation!

How Can I Reduce and Prevent Hyperpigmentation?
Some preventive measures that you can take against the risk of hyperpigmentation are:
Avoid Direct Sunlight: Avoid going out in the sun when its rays are strongest, usually from 10 am to 2 pm.
Wear a Hat: Protect your face with a hat with a wide brim.
Incorporate Vitamin C in Your Routine: Vitamin C is a potent antioxidant most famous for keeping your skin bright. It curbs the damage caused by too much sun exposure.
Use SPF: Apply a good sunscreen that is SPF 30 or higher and apply it daily to protect your skin from those risky UV rays.
Avoid Scratching the Skin: Mosquito bites can spread to cause deeper pigmentation by scratching the skin. So, the best thing you can do about it is not to touch the skin. So, if you are to feel the skin like when applying skincare or makeup, first wash your hands before touching your skin.
Often Exfoliate: Exfoliation helps remove the dead skin cells, covering a new fresh layer where you may get a well-toned complexion. Gentle exfoliation of the skin will loosen all clogged pores, which can help enhance the overall texture and look if done regularly.
Consult the Best Skin Doctor in Noida for Hyperpigmentation!
Sun damage accounts for one of the most significant causes of hyperpigmentation. To prevent further damage, apply SPF and avoid direct sunlight. You can probably reduce and even prevent hyperpigmentation by following the above tips. However, when it doesn't work, you should seek consultation from a leading skin doctor.

In that case, you can visit Skinlogics Clinic, which is widely popular for having the best skin doctor in Noida in-house. The clinic is highly reputed for its treatment options for pigmentation. The treatment options a dermatologist provides include chemical peels, vampire facials, medi facials, lasers, etc. To have the best out of these effective pigmentation treatments, visit Skinlogics Clinic and get rid of dark spots and hyperpigmentation!
Original Source:- https://skinlogicsclinic.wordpress.com/2024/12/09/how-to-minimize-and-avoid-hyperpigmentation/
#beauty#Best Skin Doctor in Noida#health#Minimize Hyperpigmentation#Pigmentation Treatment in Noida#prevent pigmentation#skin#skin-care#skincare#Skinlogics Clinic#tips to reduce Pigmentation
0 notes
Text

The Enderby Shield, Enderby, Leicestershire 350-250 BCE, The British Museum, London
Made from willow bark, this 2300 year old shield is the only known example from Europe. Unlike other shields of this period. it has no metal parts. Faint areas pigment and scored line of red lines decorate the front and it has been pierced several times, perhaps by a bone-tipped spear.
The shield was found in a pit where the waterlogged conditions prevented its decay.
#ice age#stone age#bronze age#iron age#prehistoric#prehistory#neolithic#mesolithic#paleolithic#archaeology#shield#prehistoric weapon#wood#preservation#ancient craft#ancient cultures#ancient design#British Museum
86 notes
·
View notes
Text
Slime DIYs and tricks!


Basic Slime Recipe (for stretchy slime)
Ingredients:
1/2 cup white or clear PVA glue
1/2 teaspoon baking soda
1 tablespoon contact lens solution (must contain boric acid)
(Optional) 1 teaspoon lotion for extra stretch
Coloring, glitter, charms, etc.
Instructions:
Mix glue and baking soda in a bowl.
Add any coloring, glitter, or extras you want.
Slowly add contact lens solution while stirring.
Knead until no longer sticky.
Design Ideas & Add-Ins
Galaxy Slime – Mix black, blue, purple, and silver slimes together. Add fine glitter for a cosmic effect.
Butter Slime – Add air-dry clay to make it smooth and spreadable.
Floam Slime – Mix in foam beads for a crunchy, textured slime.
Jelly Cube Slime – Cut up makeup sponges or soft foam cubes and mix them into clear slime.
Cloud Slime – Add instant snow powder for a fluffy, drizzly texture.
Metallic or Pearl Slime – Use metallic pigments or pearlescent mica powder for a shiny finish.
Glow-in-the-Dark Slime – Add glow-in-the-dark pigment or glow paint.
Holographic Slime – Mix in holographic glitter or flakes for a dazzling effect.
Slime-Friendly Paints & Colorants
Acrylic Paint – Works well but can thicken slime, so add lotion or more glue.
Food Coloring (Gel or Liquid) – Easy to mix in, but gel works best for vibrant colors.
Mica Powder – Great for shimmery or metallic effects.
Eyeshadow or Pigments – Crush up old eyeshadow for a unique color mix.
Glow Paints – Use non-toxic glow-in-the-dark paint to make luminous slime.
Alcohol Inks – Best for clear slime to maintain transparency while adding rich color.
Avoid:
Oil-based paints (they won't mix well).
Watercolor paints (they’re too diluted).
Storage Tips
Use an Airtight Container – Keeps slime from drying out.
Keep Away from Heat & Sunlight – Heat can make slime melt and separate.
Store in a Cool, Dry Place – A drawer or plastic bin is perfect.
Revive Dried-Out Slime – Add a little warm water or lotion and knead it back to life.
Fix Sticky Slime – Add a tiny bit of contact lens solution.
Prevent Mold – If using natural add-ins (like shaving cream or cornstarch), store in the fridge and use within a few weeks.


#agere classroom#age regressor#agere positivity#agere community#sfw agere#agere blog#age regression#agere#age regressive#agere little#agere crafts#agere daycare#agere diy#autistic agere#sfw age regression#safe agere#sfw#sfw little blog#sfw interaction only#agere activities#sfw littlespace#agere board#sfw blog#agere activity#slime making#slime#slimemaking#slime for stim
24 notes
·
View notes
Note
Hii! This is for the story requests. Could you do a chloe/lila fic, fall themed with playful flirting/bickering? Please no angst, just pure fluff, my heart can't handle it🤧
Ive been obsessed with this ship since it was introduced😖
Keep up the great work and take your time with it👍🏾
I had so much fun with this one that it's becoming cannon to my fic btw
Chloe grumbled to herself desperately as she searched through her bag, all alone in the locker room while Y/n and Adrien were chatting up a storm. She knew she had emergency lipstick, she always had emergency lipstick. Or, at least Sabrina did.
"I can't believe you, Sabrina. How dare you. Now I have to look through my own bag." Chloe huffed. "Ridiculous, utterly ridiculous."
"I agree," A voice made Chloe jump as she yelped.
"AHH! Oh." Chloe's shoulders relaxed and tensed at the same time. "It's just you."
"Just me." Lila chuckled. "And how dare Sabrina, couldn't she have thought of you when she got sick?" Lila cooed as if to a child.
"Yes!" Chloe shouted. "Finally, someone who gets it."
Lila made a face, briefly dumbfounded.
"Wow, you really are stupid." Lila snickered. "You're lucky you're cute or you'd have nothing."
Chloe looked up from searching her bag once again.
"Repeat that last part?"
"That you're stupid?" Lila repeated, face red.
"No. The other part." Chloe pressed.
"There was no other part." Lila insisted.
"Oh, it's okay." Chloe smiled. "I know I'm beautiful."
Lila couldn't tell if her face was red from embarrassment or annoyance. Most likely both.
"Of course you do." Lila rolled her eyes.
"Oh? So you agree with me." Chloe chuckled.
"Whatever you want to believe, princess." Lila crossed her arms. "Still looking for your lipstick without your maid? I think you're falling apart without her."
"Sabrina is not my maid!" Chloe shouted; for a second, Lila thought Chloe might actually defend her. "Maids don't get sick and leave you."
"Oh, poor you. A princess without her maids is nothing but a common in a fancy dress." Lila patted Chloe's head dismissively.
"Nonsense! I still have my prince charming." Chloe flipped her hair. "Now if you excuse me, I was looking for my lipstick."
"The one in Sabrina's bag?" Lila lifted an eyebrow, amused.
"No!" Chloe went red. "My backup lipstick."
"You mean the backup lipstick in Sabrina's bag?" Lila's eyes crinkled in a bemused smirk.
"I--! I--!" Chloe short-circuited before returning to her default solution. "Then give me your lipstick!"
"Wouldn't that make me your prince charming?" Lila uncrossed her arms and rested them on her hips.
Chloe wanted to say it would make Lila a maid, but she restrained herself--biting her lip.
"More like a knight." Chloe grumbled.
"Your knight in shining armor?" Lila pretended to ponder for a second. "Hm... that'll do."
Lila reached into her bag and took out her lipstick. Chloe grabbed for it but Lila caught her hand.
"Ah, ah, ah." Lila chided, wagging a finger. "A princess shouldn't apply lipstick herself."
Chloe went red, furious.
"You--" Chloe was quickly shushed with the same finger as Lila popped the cap to the lipstick and twisted it to reveal the red pigment.
"This is degrading." Chloe complained.
"Nonsense, princess." Lila chuckled. "Now, pucker your lips."
Chloe did as commanded, her face burning. Lila leaned forward, applying the lipstick. Slower than she applied it on herself. She traced the contours of Chloe's lips, her own face inches away from Chloe's--but far enough away to be excusable.
"There, you're all dolled up now." Lila smiled.
"That was unnecessary." Chloe commented, zipping her bag closed.
"Nonsense." Lila tutted. "I do that for everyone I lend lipstick to."
Lila tapped the tip of Chloe's nose before turning around and beginning to walk away. Chloe felt an unexplainable sting of jealousy in her stomach.
"You do?" Chloe asked, barely preventing her voice from cracking.
"I do." Lila lied.
"Th-then!" Chloe raised her voice to stop Lila from walking away. "You will stop doing that for everyone else!"
Lila turned around.
"Is that a command, princess?"
Chloe nodded.
"Very well. I will only apply lipstick to you."
Lila turned around before Chloe could see how red her face was.
#strawberry boi#strawberry answers#writing#fanfic#writers on tumblr#fanfiction#miraculous fic#miraculous#mlb#chloe bourgeois#lila rossi#cerise bianca#lila x chloe#cerise x chloe#lets go lesbians#toxic yuri#lesbian#sapphic#gay#wlw#writing commissions#writing community
26 notes
·
View notes
Text

Poisoned (Veneers Version)
The twins finish a day of work and community service at Vacay Island. As they sit in their room…something happens to Velvet. Veneer is noticing changes in his sister… changes that happened after using the Trolls essence… changes that he fear have left his sister to far gone.
Tonight, they stayed at Vacay Island.
Bruce designated a suit just for them. Velvet and Veneer spent the rest of the night in their room after a long day of work around the resort. Veneer exhausted himself on top of his bed, Velvet sat at there desk writing something… her back faced towards him.
“Not a bad day!” Veneer exclaimed with a smile on his face. “We even managed to make a few good extra tips.”
“This is slave work.” Velvet declared.
“Oh come on Vels! This is hard earned money we’re making now. And may I add we’re at least OUT here instead of rotting INSIDE a prison cell.” Her brother said. Velvet hissed…. Something was wrong, he figured, she had been much moodier lately. Veneer sat up to look at his sister.
“Everything okay, Vels?” Veneer was trying to be more open with Velvet again… to establish that relationship they once had. “….. Y-you know you can talk to me right?” His voice grew shakey.
“Oh really I can? That’s wonderful! Maybe you can tell all my secrets to the entire world while you’re at it!” She said in a scream…. She still didn’t face her brother.
“Are you still mad about what happened? I had to Vels… You were…. Changing.” Veneer admitted. “We had to get out…. And we did. The little Trolls… they saved us.”
“No! They ruined us! We had everything Veneer!” She stood up and faced him…..his heart sank.
“V-Vels….” He stammered…. He recognized that look… the pink pigmentation around her eyes…whoever this was now… it wasn’t his sister. He had to be careful.
“We were at the top! Everyone loved us!” Velvet yelled.
“… it wasn’t real though…” Veneer responded. “They were just responding to an effect the Troll had…y-you know that.”
“I don’t care! I had everything! Everyone LOVED me, ADMIRED me. I was it. I was popular. ME! And you took it away!” She screamed.
SMACK!
She hit her brother clear across the face, knocking him to the ground. Her nails left long, red mark from his eye down to the corner of his lip.
“Vels!” He cried. She hovered over him.
“They loved me Veneer. They loved me. Why did you have to take it away from me? Just like you took mom and dad’s love away with your stupid sickness! You ruin everything! Everything!” Velvet attempted to go for his neck, but he was quick to move. His sister lost balance and fell to the floor.
Veneer dared not turn around. He went over to lock all the locks to their suit…. Hoping it would prevent anyone from coming in and getting hurt at the fit of her rage. He then quickly ran to the bathroom and locked him self in.
Velvet pulled and pulled at the door.
“Coward! You’ve always been a coward!” She screamed as she pulled and pulled at the door.
Veneer sat in the deep most corner of the bathroom, hugging his knees, rocking back and forth.
“It’ll be over. It’ll be over.” He whispered to himself…. He noticed how his sister got angrier as time went on… this wasn’t this first… this is why he did what he did… why he admitted to the world that they were frauds… he could’ve lost his sister. But then he began to wonder, if he already did.
He heard a knock from the outside door leading into the room.
“Guys? Guys! What’s going on?” It was Floyd.
“Stay out, Floyd!” Veneer screamed loud enough for the little Troll to hear… he didn’t want to risk Velvet hurting Floyd or any of the other Trolls.
“Open the door Veneer!” His sister screamed as she shook and shook the door.
“Please, stop, please stop.” He whispered rocking back and forth as he hugged his knees.
“Velvet! What’s going on??” Floyd cried out again.
SNAP!
Velvet was able to break the door open… her pink pigmented eyes glaring down at Veneer…. There was actual fear in his eyes… this moment right here was all too familiar to him ….
“I’m going to break you!” Velvet said as she neared her brother. Veneer covered his entire face with his arms.
“Stop please, don’t hurt me! I’m sorry! I’m sorry!” He cried. At that instant something over came Velvet… the cry of her brother, the fear in his voice and eyes… the pigmentation around her eyes began to disappear. She blinked cluelessly at her surrounding, then down at Veneer.
“Ven?” She asked as she knelt down laying a hand on his shoulder. He shrugged her away, making himself into a tighter ball.
“Dont touch me!” He said, his face buried in between his knees. The door to their suit finally opened up, in came running the little Trolls, Gristle with the keys to the room in hand behind them.
“Whats going on in here?” Branch asked with Floyd at his heals. They all caught a glimpse of the red slash across Veneeres face..
“…oh my god…” Velvet whispered. Did she do that? She’d always rough Veneer up a bit, but never to the point where she would ever hurt him….what happened? Why? Why did she hurt him?
Veneer didn’t move. He trembled as he began to cry, not looking up at anyone.
“I…. I have to…. I have to go…” She said as she stood up and ran out of the room. Branch looked after her… then to Veneer.
The little Troll recalled that day he found Veneer standing at the edge of a cliff, unknowingly ready to throw himself off… something was happening… the twins had to be watched carefully.
“Keep an on him. I’m going to follow Vels.” Branch said as he ran off.
#dreamworks trolls#trolls band together#trolls 3#trolls veneer#velvet and veneer#velvet trolls#veneer#velvet#velvet and veneer trolls#fandom#fanfiction#fanfic#oneshot#au#poison
43 notes
·
View notes
Note
Do you mind if I ask what kind of clay you use for your sculptures? I recently tried to get into clay sculpting and I thought that I had gotten good clay but it seems like no matter what I do it doesn't look smooth and I just leave dents, bumps, and fingerprints all over it. It might just be me being new and bad at the craft, though (like should I be wearing gloves?) But if the clay does make a difference, the kind you use looks nice ;o;
I don’t mind at all!
I use oven bake polymer clay for my sculptures! For the ones I paint, I use a combination of Super Sculpey (peach colored) and Super Sculpey Firm (grey colored). i usually use the former for the base of the sculpture, and then the firmer clay for small details and areas that I want to give a little extra strength.
I find i have the worst issues with fingerprints when i use the type of Sculpey that comes in white- its a lot softer than the Super variants (and also more brittle in its baked form). I used some for the white parts of this sculpture I made in 2019, and its a lot less smooth than my more recent sculptures
BUT! I’ve also started doing some stuff in recent years that could potentially help with getting a smoother look on any variety of sculpey!
i started baking my sculptures in stages- sculpey can be rebaked multiple times without too much trouble, and this helps prevent me from leaving fingerprints on or squishing parts while im working on another part of the sculpture (although too many times and it can start to look burnt, so if youre not painting it you’ll want to watch out for this). it can be a little difficult to get unbaked clay to stick to the baked clay though, so i use the oven bake glue sculpey makes to help adhere it
I started using fine grit sandpaper on baked sculptures to smooth out unwanted lumps and fingerprints. this can work really well, especially on larger smooth areas where theres less danger of accidentally snapping something off. if you try it, you probably want to wear a dust mask and do this somewhere ventilated, because breathing the clay dust seems like a bad idea.
My friend gifted me this set of clay tools, and the one with the pointy blue silicone tip has been super helpful for smoothing over small areas that my fingers cant reach.
i found out like, a month ago? that you can use rubbing alcohol on unbaked sculpey to smooth out fingerprints, and it works SO well. just test it out first on sculpey with added pigments, like the little packs that come in bright colors- i tried it out with some gold sculpey that had glitter in it and it didnt work as well there as it does on the super sculpey/super sculpey firm- with the gold it felt like the alcohol was like, catching the pigment and glitter bits and giving the clay a weird filmy appearance. but i just put a little onto the sculpture with my finger or the silicone tool and it really helps smoothing out the surface!
sorry for the long answer, and that its only really relevant for one type of clay- i hope that it can potentially be helpful though!!
#i love sharing any sculpting tips i can#kind of hate sounding like an ad for sculpey though lol. its just where i ended up speccing all of my sculpting experience into#asks#sculpting#OH also if any of this doesnt work for you: feel free to figure out your own techniques; these are just what i personally have found helpfu
27 notes
·
View notes
Text
Messy Mascara: Mastering the Indie Sleaze Makeup Look 🌟


Indie sleaze beauty is all about embracing a bit of messiness and adding a touch of rebellious glamour to your makeup routine. It’s about smudged eyeliner, smoky eyes, and bold lips that make a statement. Here’s how to achieve that effortlessly cool indie sleaze look with some easy tutorials and inspiration.
1. The Smudged, Smoky Eye: The Signature Indie Sleaze Look 👁️
The smoky eye is a staple of indie sleaze beauty, and it’s all about that perfectly imperfect look. Here’s how to create the ultimate smoky eye with a touch of messiness:
Prep Your Eyes: Start with an eyeshadow primer to ensure your look lasts all day. This also helps to create a smooth base for blending.
Apply a Base Color: Use a neutral shade that matches your skin tone as a base. Apply it over your entire eyelid to create a smooth canvas.
Build the Smoky Effect: Apply a dark, smudgy eyeshadow (like charcoal, deep brown, or black) to your eyelid. Focus on the outer corner and blend it inward using a fluffy brush. Don’t worry about precision—indie sleaze is all about that effortless, smoky vibe.
Add Definition: Line your lower lash line with the same dark eyeshadow or a kohl pencil. Smudge it with a brush for that perfectly undone look. Use a lighter shade to highlight the inner corner and under your brow bone.
Finish with Mascara: Apply a few coats of mascara, making sure to add extra volume and a bit of clumpiness for that grungy effect. Don’t be afraid to let some mascara smudge a little—it adds to the vibe!
Smoky Eye Tip: For an extra edge, use a gel liner to create a winged effect and smudge it out for a dramatic, lived-in look.
2. Bold Lips: Adding a Pop of Rebellious Color 💋
Bold lips are the perfect complement to a smoky eye. They add a striking contrast and make your indie sleaze look stand out. Here’s how to rock a bold lip like a pro:
Choose Your Shade: Go for deep reds, plum shades, or even bright, unconventional colors like blue or green. Indie sleaze is all about pushing boundaries, so don’t be afraid to experiment.
Prep Your Lips: Exfoliate your lips to remove any dead skin. Apply a lip balm to keep your lips hydrated and smooth.
Apply Lip Liner: Use a lip liner that matches your lipstick shade to define your lips and prevent feathering. Outline your lips carefully and fill them in for a base color.
Apply Lipstick: Use a bold, pigmented lipstick and apply it evenly over your lips. For a more intense look, layer it on and press your lips together to blend the color.
Create a Messy Finish: Indie sleaze beauty embraces a bit of imperfection. Don’t worry about perfect edges—dab a little lipstick outside the lip line for a lived-in, smudged effect if you’re feeling daring.
Bold Lip Tip: For an extra touch of grunge, use a lip gloss or balm on top of your lipstick to give it a slightly messy, glossy finish.
3. Finishing Touches: Completing Your Indie Sleaze Look 🌟
To complete your indie sleaze look, add a few finishing touches that enhance your overall vibe:
Play with Blush: Apply a bit of blush to the apples of your cheeks and blend it upwards. For an indie touch, use a pink or peach shade and apply it with a light hand for a natural, flushed look.
Eyebrows: Keep your brows natural and a bit messy. Use a brow gel to add a touch of definition, but don’t go for perfect, sculpted brows. The indie sleaze look is all about that effortlessly cool style.
Accessorize: Add a few edgy accessories like studded earrings, layered necklaces, or a vintage-inspired headband to complete your look.
Finishing Touch Tip: For added drama, experiment with a touch of highlighter on your cheekbones and the bridge of your nose for a subtle glow that complements the smoky eye and bold lip.
Final Thoughts, Gorgeous: Embrace the Messy Mascara Vibe 🌟
And there you have it—your ultimate guide to mastering the indie sleaze makeup look with Messy Mascara! From smoky eyes and bold lips to embracing a bit of messiness and imperfection, indie sleaze beauty is all about attitude and effortless glamour. So go ahead, embrace your inner indie queen, and rock that grungy, rebellious look with confidence!
What’s your favorite indie sleaze makeup look? Share your tips and tricks in the comments—I’d love to see how you’re embracing the messy mascara vibe! 💕
#2014 grunge#2014 nostalgia#2014 tumblr#grunge#indie music#indie#grunge makeup#makeup tips#makeup#indie makeup#makeup inspo
13 notes
·
View notes
Text
art tips
here's some traditional art tips from me:
acrylic painting:
different brands do different things with their paint and one of them has to do with pigment characteristics versus consistency. For example, most of Liquitex’s paints are the same texture and consistency because they adjust their formula to act as such, whereas Golden Acrylics doesn’t and the pigments characteristics are allowed to shine through. Learning about specific pigments can be a pain but it can also help you make sure your painting ends up how you wanted it to.
if you’re doing a layered painting “proper painting”- THIN LAYERS. THIN THIN LAYERS. acrylic loves to clump up on itself like nail Polish. Go slow and pay attention to how it dries.
acrylic paint appears lighter than how it will dry. If you’re planning a color scheme, get some paper or a sketch page and swatch your colors and let them completely dry. They will also appear a lot lighter if you dilute them with water.
one note of the characteristic of acrylic paint is that it doesn’t tend to have the depth or luminosity of oil paint. If you get the right paints, you can do it. Some paints are more transparent and they work great for this. Work in thin layers, layer and layer and layer, and add opaque paints to add definitive layers so once the painting is done, there is depth. Phthalo paints work great for this.
when mixing colors, the paint can start to look foggy, and a lot of times this is from air being whipped into the paint. If you’re worried that this foggy paint won’t look how you wanted it to, swatch it and let it dry. In my experience, it applies and dries fine.
oil painting:
this is for really people who had terrible instructors or self taught: fat over lean does matter. fat over lean is the concept that the oilier paint should be for the final layers while the thinned out paint, or lean paint, is for the first layers. this helps to prevent cracking on both traditional oils and water mixable oils. so your leanest paint is for your under painting while your fattest paint is your final layers. this isn’t really a “learn the rules to break them” concept, it’s more of a “you want your painting to survive more than 5 years” concept.
oil paint appears the same color it will dry as if it is at normal opacity. This gets effected by diluting or fattening the paint, however.
if you’re gonna paint on paper with oil paint, use thick paper. I mean at least 300g/140 lb paper. If you can, prime it with gesso. And it’ll work great.
Water mixable oil paints work the same as traditional oil paints without the need for solvents or mineral spirits.
watercolor & colored pencils:
colored pencils: treat these like newborns. gentle. the pigment can break easily, like pencil graphite can. use circles to blend and lay down a more opaque layer. sharpen them gently. i have a whole separate, manual sharpener for my colored pencils.
watercolor paintings: use cotton paper or paper with cotton in it. trust me it works better. the paper warps less and you can add more water than just normal paper. cotton paper is more expensive though. kinda like using wood board instead of canvas for an oil painting.
Watercolor: take care of your brushes like they are your one and only begotten son, okay? You can paint with a messed up brush in acrylic or oil but watercolor depends on the brush a lot of times.
general art tips:
Get a heavyweight paper sketchbook if you want to sketch out paintings or swatch paint and keep them for future reference.
Paint in general: PAY ATTENTION TO THE LIGHTFASTNESS ! This is very important if you ever intend to have your art in galleries or for sale. Lightfastness just means how long the pigments in your paint stay the same as when they were packaged as when they are on your painting. Improved lightfastness pigments are normally marked with “permanent” in their names, like “permanent alizarin crimson”.
General safety: PICK UP YOUR PAINT WATER OR SEAL IT IF YOU HAVE PETS!! Even if they won’t get fatally sick, it won’t make them feel good, and in my experience they don’t care if the water is bright red.
Painting: have a designated paint water cup. Do not drink Out of this cup. Learn it is a paint water cup. Then you will Not drink out of paint water cup.
GET SOME BRUSH SOAP!! Get it!! I promise you it makes a difference. If you can’t invest in any, use something like Dawn or Mrs. Meyers dish soap but keep an eye on how dry the brushes are if they are natural hair. The paint soap I use is the Masters brush cleaner and preserver and I got a massive tub of it for $20 at my local art store.
find a local art store if you are able! And I do not mean Michael’s or Hobby Lobby. I mean local. A lot of times they’re competing with these stores and they have cheaper prices and some even have student/professor discounts. The one I go to has a lot of stuff under MSRP and I get a discount. And they don’t sell any bad quality items.
if you’re struggling with a concept, find a book on it. Internet Archive as a library with a lot of art books, some stores sell art books. Art books are useful insight; even if you don’t agree with the author, it can help you realize what you’re trying to achieve. However, if you’re buying it, make sure to skim it and see if it’s actually useful for you. I have a lot of DK published art books.
if you feel stagnant in your art, look at art. I mean it. Look at photography, painting, fashion, sculpture, jewelry— look at things. This is how I ended up painting fish. And guess what? I freaking love painting fish. I again have a library of books just so I can look at them For inspiration.
General art: if you want to be able to travel with your supplies but don’t know how to do so, let me give you some tips in this tip: Get a massive bag. I mean a big ole canvas bag. I got one from Aldi for $8 that works great. If you already have one, even better. If you have a big enough backpack, you can use that too. Get a palette that can cover. You can DIY one, probably, or you can buy one. Then if you have any wet paint, you don’t have to throw it out or risk getting it everywhere. If this isn’t a concern of yours, no worries. Use a hair tie or scrunchie to bundle your brushes together. This keeps them from going everywhere. Situate your paints so they won’t be crushed if you’re taking tubes. Bring a small amount of brush cleaner with you. I reused a skincare jar for mine. Bring what you’re going to paint on.
General art: reuse jars. I mean it. I have some skincare jars that I’ve reused to hold paint oil and brush cleaner and I use old pasta sauce jars for brush cups. They work great.
here’s how to wash off different paints from your skin- oil paints— get a true soap. Dish soap works too. Acrylic paint— let it dry and you can brush it off with a nail brush or old toothbrush. watercolor paint- wipe it off with a wet wipe or a dampened paper towel/hand towel. If you’re going to use a hand towel, have a designated towel since it can stain.
Stretched canvas; if you’ve damaged or pierced your canvas, you can probably fix it with gesso and acrylic paint, or just acrylic paint. You can also sew the canvas back if you really want to save it.
Here’s some art stuff I like and use but you don’t need it:
Masterson oil palette
Pentalic Nature Sketch 25% cotton sketchbook
Winsor & Newton Artisan Water Mixable oil Colour
Golden Professional acrylic heavy body paints
The Masters Brush cleanser and preserver
Liquitex palette knives
#art#art tips#art help#art advice#art process#artist on tumblr#artists on tumblr#oil painting#acrylic painting#watercolor painting#traditional art#🖤 art tag
42 notes
·
View notes
Note
i actually have a question about grey cats! how come sometimes they have a silvery look to them? how does that work?
Depends! The most straightforward answer, of course, is that the cat in question just has nice, glossy fur, but there's also a gene referred to as "silver" (or inhibitor) that might be what you're thinking of.
This gene prevents the development of all yellow/red pigment in the fur, which can cause a variety of effects depending on how wide the band of yellow/red pigment the cat had was.
Here's an article that explains it better:
18 notes
·
View notes
Text
How Does Residential Metal Roofing Affect Cooling Costs in Summer?
As summer temperatures rise, many homeowners in Omaha search for effective ways to keep their homes cool without incurring exorbitant energy bills. Residential metal roofing has emerged as a popular solution for its durability, energy efficiency, and aesthetic appeal. But how exactly does a metal roof impact your home's cooling costs during the sweltering summer months? In this guide, we’ll dive deep into how metal roofing works, its cooling benefits, and why it might be the right choice for your home.
What Makes Metal Roofing Unique?
Metal roofs are crafted from materials like steel, aluminum, zinc, or copper, making them incredibly durable and long-lasting. They stand apart from traditional roofing materials, such as asphalt shingles, due to their ability to handle extreme weather conditions and reflect sunlight effectively.
Key Features of Metal Roofs
Durability: Metal roofs can last 40-70 years, far outlasting other roofing types.
Eco-Friendliness: Many metal roofs are made from recyclable materials and are themselves recyclable at the end of their lifespan.
Energy Efficiency: Unlike other roofing materials, metal roofs are designed to reflect sunlight, significantly reducing heat absorption.
How Metal Roofs Reduce Cooling Costs
Solar Reflectance
One of the standout benefits of metal roofing is its ability to reflect solar radiation. Metal roofs with reflective coatings or lighter colors can bounce back a significant portion of the sun's rays, keeping your home cooler.
What It Does: Reflects sunlight to minimize heat absorption.
How It Helps: Reduces the workload on your air conditioning system, leading to lower energy bills.
Thermal Emittance
Metal roofing materials also have high thermal emittance, meaning they can release any absorbed heat efficiently. This prevents heat from building up in your attic and transferring into your living spaces.
Ventilation Benefits
Proper installation of a metal roof often includes ventilation enhancements, such as ridge vents, that further help expel hot air from your attic. This additional airflow ensures a cooler home environment.
Why Omaha Homeowners Benefit from Metal Roofing
Omaha's summer climate can be unforgiving, with high temperatures and plenty of sunlight. In such conditions, the energy-saving benefits of a metal roof become particularly evident.
Lower Energy Bills
With reduced heat absorption and improved energy efficiency, many Omaha homeowners experience noticeable savings on their cooling costs. A metal roof helps minimize the strain on air conditioning systems, which means lower electricity bills during peak summer months.
Increased Comfort
Homes with metal roofs tend to maintain more stable indoor temperatures. This translates to a more comfortable living space, even during the hottest days of the year.
Environmentally Conscious Choice
By reducing your energy consumption, metal roofing contributes to lower greenhouse gas emissions, aligning with sustainability goals. For Omaha homeowners aiming to live more eco-friendly lifestyles, this is an added incentive.
Factors That Influence Cooling Efficiency
While metal roofs offer inherent benefits, several factors can enhance their cooling efficiency. Let’s look at what can maximize your energy savings:
Color Matters
The color of your metal roof significantly impacts its reflective capabilities. Lighter shades, such as white, light gray, or pastel colors, are more effective at reflecting sunlight than darker hues.
Pro Tip: If you're concerned about aesthetics, many manufacturers offer cool roof coatings in a variety of colors that still provide high reflectivity.
Cool Roof Coatings
Cool roof coatings are special treatments applied to metal roofs to improve their reflectance and emissive properties. These coatings often include pigments designed to reflect sunlight, making them a great option for homeowners looking to maximize energy efficiency.
Proper Insulation
Good attic insulation complements the performance of metal roofs. While the roof reflects heat, insulation prevents any residual warmth from penetrating into your living areas.
Roof Pitch and Orientation
The slope and direction of your roof can also influence its cooling performance. A steeper pitch and strategic orientation can optimize reflectivity, especially in Omaha’s sunlit summer conditions.
Metal Roofing Compared to Other Roofing Materials
To truly understand the value of metal roofing, it helps to compare its performance with other popular materials:

Practical Tips for Homeowners Considering Metal Roofing
If you’re considering upgrading to a metal roof to enjoy its cooling benefits, here are some actionable tips:
Choose Certified Installers: Ensure your roof is installed by professionals experienced with metal roofing systems.
Opt for Reflective Coatings: If you’re in a particularly sunny area, reflective coatings can maximize your energy savings.
Inspect Regularly: While metal roofs are low-maintenance, periodic inspections can keep them in peak condition.
Combine with Smart Ventilation: Make sure your attic is well-ventilated to complement the cooling effects of the roof.
Common Misconceptions About Metal Roofing
Despite its many advantages, some people hesitate to invest in metal roofing due to misconceptions. Let’s clear up a few:
“Metal Roofs Are Noisy”: Modern metal roofs include underlayment and insulation, ensuring quiet interiors even during heavy rain.
“Metal Roofs Are Expensive”: While the upfront cost may be higher, the long-term savings on energy and maintenance often outweigh the initial investment.
“Metal Roofs Are Prone to Rust”: Most metal roofs come with corrosion-resistant coatings, making them highly durable and rust-proof.
Conclusion
If you’re looking to lower your cooling costs while enhancing your home’s energy efficiency, residential metal roofing is a fantastic option. Its ability to reflect sunlight, emit heat, and reduce energy consumption makes it an excellent investment for Omaha homeowners facing hot summer months.
Interested in exploring the benefits of metal roofing for your home? Contact local Omaha roofing experts today to learn more about your options. Upgrade your roof and enjoy a cooler, more energy-efficient home this summer!
7 notes
·
View notes
Text
Top 5 Best-Selling Nail Products on Amazon in 2025
The domain of nail care has become an integral facet of contemporary personal grooming, with e-commerce platforms such as Amazon serving as pivotal marketplaces for high-caliber nail products. In 2025, consumer demand for advanced, enduring, and environmentally sustainable nail care commodities has experienced exponential growth. This article conducts a critical analysis of the five preeminent best-selling nail products on Amazon, elucidating their key attributes, functional advantages, and the underlying factors contributing to their widespread consumer appeal.
UNA GELLA Soft Gel Nail Tips Glue
Rationale for Popularity UNA GELLA Soft Gel Nail Tips Glue is a market leader owing to its unparalleled adhesive strength and multi-functionality. This 15ml gel adhesive is engineered for application on acrylic nails, press-on enhancements, and nail extensions, ensuring a durable bond resistant to chipping and peeling. The formulation necessitates polymerization under a UV/LED lamp, facilitating a professional-grade finish with extended longevity.
Distinctive Features
Superior Adhesive Integrity: Suitable for both neophytes and seasoned professionals.
Precision Application: Equipped with a fine-bristled brush for meticulous usage.
Solvent-Based Removal: Enables facile detachment without inflicting damage on natural nails.
Consumer Perceptions Amassing over 12,000 reviews with an aggregate rating of 4.3 stars, this product is lauded for its resilience and user-friendly application. A substantial cohort of users asserts that it surpasses traditional nail adhesives, establishing itself as an indispensable tool for at-home nail artistry.
Beetles Gel Nail Polish Kit
Rationale for Popularity Beetles Gel Nail Polish has attained household recognition due to its dynamic pigmentation and professional-grade finish. This 15ml gel lacquer is an optimal selection for do-it-yourself manicures, featuring a robust, chip-resistant composition that cures effectively under UV/LED illumination.
Distinctive Features
Expansive Color Spectrum: Available in over 32 hues, spanning from neutral tones to electrifying neons.
Non-Toxic Formulation: Devoid of hazardous constituents such as formaldehyde and toluene.
Cost-Effective: Priced competitively at $6.99, catering to budget-conscious nail art enthusiasts.
Consumer Perceptions With an impressive 4.4-star rating and over 136,000 reviews, users extol its seamless application and saturated pigmentation. Many attest to its durability, with manicures maintaining integrity for up to three weeks without deterioration.
O’Keeffe’s Working Hands Hand Cream
Rationale for Popularity Although not exclusively a nail care product, O’Keeffe’s Working Hands Hand Cream is indispensable for sustaining optimal nail and cuticle health. This 3.4-ounce formulation is specifically designed to rehabilitate severely dry, compromised epidermis, rendering it a preferred choice among individuals prioritizing comprehensive nail wellness.
Distinctive Features
Intensive Moisturization: Incorporates glycerin and allantoin to enhance hydration retention.
Non-Occlusive Composition: Rapidly assimilates without residual greasiness.
Clinically Endorsed: Approved for use on sensitive dermal profiles.
Consumer Perceptions Boasting a 4.7-star rating with over 75,000 endorsements, this formulation is widely recognized for its efficacy in ameliorating cutaneous dehydration. Users highlight its ability to prevent nail fragility while fostering robust nail growth.
Cutex Strength Shield Nail Polish Remover
Rationale for Popularity Cutex Strength Shield Nail Polish Remover represents an avant-garde solution for individuals seeking an efficacious yet non-damaging polish removal alternative. This 6.7oz formula is enriched with vitamins E, B5, and hydrolyzed silk, which collectively fortify and revitalize the nails during the removal process.
Distinctive Features
Gentle Composition: Compatible with natural, gel, and acrylic nails.
Reinforcement Properties: Minimizes the risk of nail splitting and peeling.
Expedited Efficacy: Rapidly dissolves even highly pigmented polishes.
Consumer Perceptions Maintaining a 4.7-star rating with over 69,000 reviews, consumers commend its non-drying nature and palatable fragrance. Frequent users report significant improvements in nail resilience and overall health.
SUNUV UV LED Nail Lamp
Rationale for Popularity The SUNUV UV LED Nail Lamp is an industry-leading device for achieving salon-caliber manicures in a domestic setting. This 48W apparatus features multiple timer settings, facilitating the accelerated polymerization of gel polishes.
Distinctive Features
Expedited Curing: Completes gel polish polymerization within 30-60 seconds.
Ergonomic Construction: Compact and lightweight for convenient storage.
Universal Applicability: Compatible with all UV/LED-curable gel lacquers.
Consumer Perceptions With a commendable 4.6-star rating and over 51,000 testimonials, this device is extolled for its operational efficiency and durability. Consumers recognize its cost-effectiveness relative to professional salon visits, asserting its consistent delivery of superior results.
Key Differentiating Factors The preeminent nail care products on Amazon in 2025 exhibit several critical attributes that underpin their preeminence:
Unparalleled Quality and Durability: Each item is meticulously formulated to ensure superior performance, whether in terms of adhesion, pigmentation, or hydration.
User Accessibility: The curated selection encompasses products suitable for both novice and professional users, fostering widespread adoption.
Economic Viability: Despite their advanced formulations, these products remain competitively priced, maximizing consumer accessibility.
Empirical Validation: Endorsed by thousands of satisfied users, these products have cultivated a robust reputation for reliability and effectiveness.
Conclusion The contemporary nail care industry is characterized by perpetual innovation, with emergent products emphasizing enhanced durability, user convenience, and self-expression. Whether catering to at-home enthusiasts or seasoned nail technicians, the top five best-selling nail products on Amazon in 2025 epitomize excellence in functionality and consumer satisfaction.
2 notes
·
View notes
Note
tip-
any type of red pigment juice/food is great for your gut and cardiovascular health! lycopene is an antioxidant in red pigment foods which can prevent cardiovascular disease and other shit idk. it also contains prebiotics in it which will help feed your gut.
alsoooo cranberry contains proanthacynidins which will keep bad bacteria like e. coli from sticking to cell walls which is what’s giving you the UTI. this is more for preventing it. make sure if you’re drinking cranberry juice that it’s 100% and no added sugar because processing destroys it! (you can also take capsules) 🤍
JAZZY ILY
3 notes
·
View notes
Text
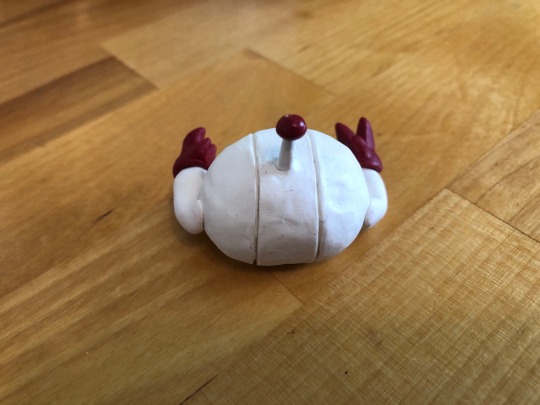
Enhancing Doll Brows
This is my guide to either enhancing or completely redoing an AG doll’s eyebrows. Several people have asked about this, and I hope it will be useful.
You will need: a doll, watercolor pencils in black, brown and white, cotton swabs (preferably the pointy makeup ones), a small amount of water, and setting spray. If you are removing the original brows, you’ll also need nail polish remover and a paper towel to wipe the color off.
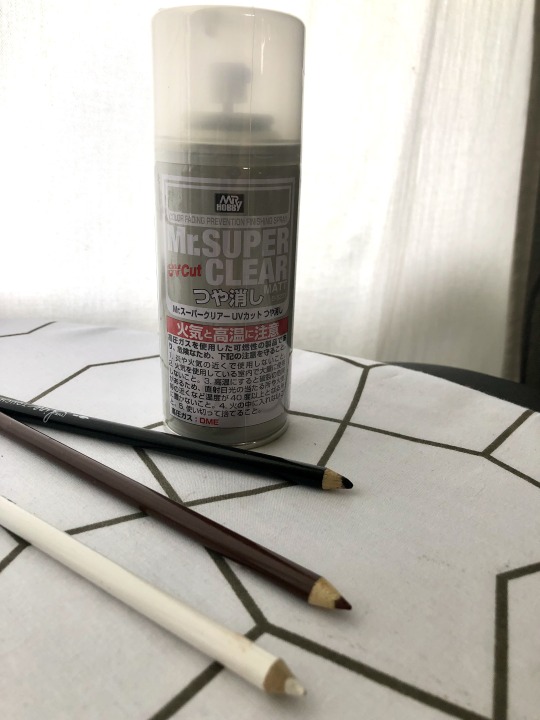
I use Mr. Super Clear from Amazon, specifically the matte UV Cut version, so it doesn’t dry shiny and protects the doll’s vinyl and paint from fading in sunlight. The watercolor pencils were from a cheap set I got at the craft store. Almost any brand will do, but make sure your pencils are sharp! (I had to sharpen my white and black after I took this photo.)

Next, you will need to prep your doll for her treatment. You can easily overspray and get the setting spray in the doll’s eyes and hair, and it makes the eyes cloudy and the hair dry and crunchy. To prevent this, I used a couple of long scraps to tie back and cover my subjects’ hair, and half a cotton ball taped down to protect their eyes. You want to make sure there is plenty of space to work around their brows, so you might notice that you can see the top of Lydia’s (known as Subject A for this post) eyelids. This is fine as long as the eyelashes are covered.
Once ready, go outside and spray their faces with the setting spray, concentrating on the forehead. Be careful not to totally soak the face. All you want is a light dusting. Once it dries, you can always spray another layer if you don’t think the first one is sufficient. This preliminary spray makes a better surface for your pencils to grip. If you skip it, you may not be able to get any pigment on your doll’s face. Let dry for 20-30 minutes between layers.

Next, you will want to start filling in the brows with short, light strokes, from root to tip, in the direction of hair growth. You will likely want to practice with a pencil on paper first, if you haven’t done this before.

This is after a handful of strokes on each brow. I usually begin with black, but I did Subject A’s left brow in brown first for illustration purposes. It doesn’t really matter which you start with. For me, brown is primarily a filler, unless I’m working on a doll I want to have paler brows.

This is after some more lines in both black and brown, with a few (4-5) strokes of white to provide depth.
If you make a mistake, use the water and a cotton swab/Q-tip to remove the errant mark and continue. You may have to remove everything you have done and start over. That’s okay. In this case, I didn’t like the white line at the bottom of her left eyebrow, so I wiped it off and re-drew the black and brown lines that were removed.
Keep working until you are satisfied with the result, then set with another layer of setting spray. Your doll will look amazing!
It helps if you don’t immediately go to set the paint after you finish. Give it a few minutes, then go back and look to make sure it’s the look you want. I did this several times with mine, and I kept adding a few lines here and there until I was happy. If you spray it and then decide you don’t like it, you will have to use nail polish remover and it will wipe out the original paint along with your watercolor work.

New brows: These are much more difficult than simply filling in because you have no good indication of their shape and position.
Once you have removed the original ones with nail polish remover and done the preliminary spray, you can start sketching a guiding line.

This image shows a couple of layers of short strokes, following the brow ridge.
This was so, so hard for me in the beginning, one eyebrow would be perfect and the other would...not. At all. If you aren’t sure of your skills, you may want to get a practice head from eBay or somewhere to practice on until you feel ready to work on a “real” doll.

More lines, going over the original work. As you can see, they aren’t quite the same, so I kept going, setting Subject B aside for awhile several times. I used black, then brown, and then a few white strokes.
Set the paint afterwards with the setting spray.

Et voila! I’m not 100% happy with that right eyebrow, but I can go back and redo it some other time.
32 notes
·
View notes
Text
୨ৎ grow your nails .+
these are some tips that can help grow and strengthen your nails !!
Care Routine—
01. Wash your hands with warm water
02. Dry by gently patting with a clean towel or tissue paper
03. File your nails gently in your preferred shape (straight, coffin, rounded etc)
A glass nail file is more recommended. Regular files are rough and might shred the layers of your nail, making them flakier, eventually breaking them. A glass file, on the other hand, is more gentle.
04. Massage cuticle oil on your cuticles and nail bed
Healthy cuticles promote nail growth. If your nail bed is damaged, your nails won't grow as fast.
Tips—
01. Be more cautious with what you're doing with your nails
Don't put pressure on your nails, they are not tools, so try not to use them to open things. Also, when you're grabbing things, or opening drawers etc, make sure you use your fingers, and not your nails.
02. Massage your cuticles using cuticle oil throughout the day (don’t push too hard)
You can keep a bottle of cuticle oil in your purse / bag and regularly reapply it, about 3-5 times a day.
03. Use nail polish often
Polished nails are not only cute, but the nail polish itself can act as a second layer of protection for your nails, keeping them stronger. Make sure to apply a base coat before polish to avoid staining your nails yellow from the pigments !!
04. Eat enough carbs and protein (balanced meals)
A healthy diet is the most effective way to grow your nails. All of the previous tips will not work if your diet isn't healthy !!
05. Massage vitamin (capsules) on your nails and cuticle
Nails are mostly made of keratin, and keratin needs vitamins to keep your nails strong and healthy. You can rub vitamin E or C capsules on your nails to strengthen and prevent them from breaking. (this helps with growth indirectly since strong nails will last longer, so they don't break often and 'reset' your growth)

1 note
·
View note