#advanced css
Explore tagged Tumblr posts
Visit Tumblr Blog
Explore Tumblr blogs with no restrictions, modern design and the best experience.
Last Seen Tumblr Blogs


Fun Fact
The average Tumblr user visits about 67 pages every month.
Text
Exploring the :has() Selector in CSS
CSS has progressed greatly over time, introducing a number of advanced selectors that improve the ability to style web pages with precision and flexibility. One of the most recent additions to the CSS selector is the :has() pseudo-class. This blog will go over the details of the :has() selector, including its usage, benefits, and practical examples to help you use this powerful tool in your web development projects.
What is the :has() Selector?
The :has() selector is a relational pseudo-class that lets you choose an element depending on the presence of a descendant or a more complicated relationship within its subtree. In simpler terms, it allows you to style a parent element if it contains specific child components.
Syntax:
element:has(selector) { /* CSS properties */ }
Key Features
Relational Selection: Unlike typical CSS selectors, which focus on the element or its immediate children, :has() selector looks at the content within the element to see if it fits a specified conditions.
Dynamic Styling: It can dynamically apply styles based on the presence or absence of specific elements, resulting in more interactive and context-aware designs.
Please check out nine examples of the :has selector by clicking on the link.
follow- https://www.linkedin.com/company/skillivo/
#html#css#javascript#web design#web development#programming#coding#advanced css#css3#html5#frontenddevelopment#webdevelopment#css tutorial#skillivo
1 note
·
View note
Text
CSS Descendant Selector: Unraveling the Web Styling Magic
Have you ever had trouble styling something inside something else? Well, don't worry! CSS descendant selectors can help. In this article, we'll look at how they work, what they're used for, and the best ways to use them.
I. Introduction II. Basics of CSS Descendant Selector III. CSS Descendant Selector in Action IV. Benefits of Using CSS Descendant Selector V. Common Mistakes and Pitfalls VI. Advanced Techniques with CSS Descendant Selector VII. Tips for Efficient CSS Coding VIII. Real-world Use Cases IX. Handling Responsive Design with Descendant Selectors X. Future Trends and Updates XI.…

View On WordPress
#Advanced CSS#CSS Best Practices#css selector#css selectors#CSS Styling#HTML and CSS#Responsive Design
0 notes
Text
React JS
Component-Based Architecture:
React applications are built using components, which are reusable, self-contained pieces of the UI. Components can be nested, managed, and handled independently, leading to better maintainability and scalability.
JSX (JavaScript XML):
React uses JSX, a syntax extension that allows HTML to be written within JavaScript. This makes the code more readable and easier to write.
Virtual DOM:
React maintains a virtual DOM, an in-memory representation of the actual DOM. When the state of an object changes, React updates the virtual DOM and efficiently determines the minimal set of changes needed to update the real DOM, leading to performance improvements.
One-Way Data Binding:
Data flows in one direction, from parent to child components, which makes the data flow and logic easier to understand and debug.
State Management:
React components can maintain internal state, making it easy to build dynamic and interactive UIs. For more complex state management, libraries like Redux or Context API can be used.
Advantages of Using React
Performance:
Due to the virtual DOM, React minimizes direct manipulation of the DOM, resulting in better performance for dynamic applications.
Reusable Components:
Components can be reused across different parts of an application, reducing the amount of code and enhancing consistency.
Strong Community and Ecosystem:
A large community and a rich ecosystem of tools and libraries support React, making it easier to find solutions, get support, and integrate with other technologies.
SEO Friendly:
React can be rendered on the server using Node.js, making web pages more SEO-friendly compared to traditional client-side rendering.
Getting Started with React
To start building applications with React, you need to have Node.js and npm (Node Package Manager) installed. Here’s a basic setup to create a new React application:
Install Node.js and npm:
Download and install from Node.js website.
Create a New React Application:
You can use Create React App, an officially supported way to create single-page React applications with no configuration required:
npx create-react-app my-app cd my-app npm start
import React from 'react';
function Welcome(props) { return
Hello, {props.name}
; }
export default Welcome;
#React JS#Front end Developer#Advanced JavaScript#coding#html css#htmlcoding#html#css#php#website#html5 css3#software#React Training
5 notes
·
View notes
Text
i super duper wish i could go back to when i was first learning html and css and asking my mom to take me to the library to get those html coding books that were from 2004 or something
#🐶#i fuckinggggg#it's like wanting to unlearn everything about a special interest just so you could learn it all over again#i love LEARNING#i will admit though there are a ton of stuff i'm still not good at with html and css lol.... the more advanced advanced stuff#BUT EVEN like.... media like shows or movies or games for the first time#like please#LIKE MY FAVORITE THING TO DO is like... find little basic simple teehee tutorials about css selectors and html tags etc. and just. read the#like i wanna collect html and css tutorial books and everything like resources#THIS is why my pinterest is an absolute treasure trove to me
4 notes
·
View notes
Text

1. High Demand in the Job Market
React is widely used by companies globally, from startups to tech giants like Facebook, Netflix, and Airbnb. Learning React enhances your employability in the fast-growing web development industry.
2. Easy to Learn and Use
React has a simple syntax and component-based architecture, making it easy for beginners and experienced developers alike to build dynamic web applications.
3. Component-Based Architecture
React’s reusable components save development time and ensure consistency across your project. This modular approach simplifies building and maintaining large applications.
4. Strong Community Support
With an extensive and active community, React offers a wealth of tutorials, libraries, and tools to help you overcome challenges and learn new techniques.
5. High Performance
React’s Virtual DOM ensures efficient updates and rendering, making applications faster and more responsive. This is especially crucial for modern, performance-intensive web apps.
6. Cross-Platform Development
React forms the foundation of React Native, enabling you to create mobile applications for iOS and Android using the same skills. This versatility is a major plus for developers.
7. SEO-Friendly
React supports server-side rendering, improving search engine optimization and ensuring better visibility for your applications.
8. Backed by Industry Leaders
React is maintained by Facebook and a strong community, ensuring continuous updates, improvements, and a stable ecosystem.
9. Great for Building Interactive UIs
React makes it easy to create highly interactive user interfaces with dynamic updates, enhancing the user experience.
10. Future-Proof Your Career
As web applications continue to dominate, React’s relevance is only expected to grow. Learning React ensures you stay ahead in your development career.
💡 Conclusion: Whether you are a beginner in web development or an experienced developer looking to upskill, React is a must-learn tool. Its simplicity, performance, and wide adoption make it an invaluable asset in your programming toolkit.
#React JS#Front end Developer#Advanced JavaScript#coding#html css#htmlcoding#html#css#php#website#html5 css3#software#React Training
0 notes
Text
Dos & Don'ts for the WordPress Block Editor
New Post has been published on https://thedigitalinsider.com/dos-donts-for-the-wordpress-block-editor/
Dos & Don'ts for the WordPress Block Editor
The WordPress Block Editor continues to improve. Each new version contains something worth celebrating.
The tool has empowered content creators and designers. You no longer need additional plugins to build a functional page layout. WordPress core includes just about all the basics. Need something more? There are plenty of ways to extend the editor, too.
None of this makes the Block Editor foolproof, however. It’s still easy to paint yourself into a virtual corner. A simple mistake can mean more difficult maintenance – particularly when clients are involved.
I’ve built quite a few sites with blocks. And not every decision was a good one. Yes, I’ve created a few messes. Cleaning them up can be time-consuming.
Today, I’m going to share a few things I’ve learned. May these lessons help you avoid a similar fate!
The WordPress Developer Toolbox
WordPress Themes, WooCommerce Themes, Plugins, Web Templates, Newsletter Templates, and much more!
Do: Think about Future Maintenance Needs
Page layouts don’t last forever. They must adjust as our content needs evolve. The Block Editor can act as a trap in these situations.
Consider a company’s staff listing, for example. Let’s say our client wants to display each person’s name, title, and photo.
It sounds simple. We can use the Columns block to create a beautiful and responsive layout. The page looks perfect. But what happens when we need to make changes?
Staff members come and go. Yes, we could replace the departed staffers with the new ones. Then again, our client wants them to display in alphabetical order. The required changes don’t follow suit. What do we do now?
The options are less than ideal. We could edit the block’s code to rearrange each column. Or we could reconstruct the layout from scratch. Both possibilities are rife with peril. OK, perhaps I’m being a bit dramatic. But it’s not fun.
A custom block may be a better solution. Using Advanced Custom Fields PRO, you could create an interface that allows for easier maintenance. Adding, deleting, and rearranging the list would be built into the block. There’s no need to reinvent the wheel when making changes.
The lesson is to think about the future maintenance needs of your layout. Then, implement a strategy that will allow for changes. You’ll be glad when the time comes.
Don’t: Allow Users to Switch between the Block and Classic Editors
The WordPress Classic Editor is still alive and well. Millions of websites are using it. That’s OK. There’s nothing wrong with using a tool you’re comfortable with.
However, mixing the Block and Classic editors can be messy. The Classic Editor plugin has a setting that allows users to switch between editors. You might want to leave this feature turned off.
Let’s say you’ve built a complex layout using the Block Editor. But your client doesn’t like blocks. Or they aren’t familiar with them. They decided to edit this page using the Classic Editor. Hilarity (or tragedy) ensues.
Then, you edit the page and switch back to the Block Editor. You see numerous errors stating that blocks contain invalid content. The “Attempt Block Recovery” feature doesn’t work. It looks like you have a mess on your hands.
Too much can go wrong in this scenario. Thus, don’t allow users to switch between editors. It’s an accident waiting to happen.
Do: Choose Third-Party Block Plugins Carefully
There are a multitude of plugins for extending the Block Editor. Many of them offer a suite of custom blocks.
That’s a good thing. The core blocks included with WordPress aren’t always flexible. Thus, installing a custom block may be of help. But it’s worth scrutinizing them first.
Custom blocks are plugins, after all. They can vary in terms of features and quality. The same rules apply when choosing the right one.
Only install what you need. Study each plugin’s reviews and changelog. And remove any block plugins you aren’t using.
What’s the danger? The wrong plugin could cause bugs or performance issues. Plus, security is always a concern.
Third-party blocks require a commitment. Be sure that you’re ready to take that step.
Don’t: Edit Blocks as HTML
The Classic Editor made it easy to switch between visual and code editing. You might use this feature to add HTML or a CSS class. There were some hiccups, but it worked well enough.
The Block Editor has a similar feature. Blocks have an “Edit as HTML” interface. You can access it via each block’s options menu.
I never understood the purpose of this feature. That’s likely because I always end up breaking something. Adding a CSS class, for instance, triggers an error when switching to the Visual editor.
A "This block contains unexpected or invalid content" error is displayed. From there, I have to go back in and remove the class. The same issue happens when adding other types of content as well.
Therefore, it may be wise to consider editing block HTML as off-limits. There’s more risk than reward.
Plus, you can use the Custom HTML block for similar tasks. Add HTML, CSS, or even JavaScript into the field. You won’t break it!
By the way, you can add CSS classes to blocks via the Advanced tab in the settings panel.
Do: Use the Block Editor’s List View Feature
WordPress allows us to nest blocks inside each other. And blocks are portable. You can drag them anywhere on the screen. That can result in some undesired effects.
For instance, moving blocks to a new spot can be difficult. It’s easy to make a mistake. The wrong move could undo a lot of hard work.
The List View feature can save you a lot of headaches. It provides a visual outline of each block on your page. It even works with nested blocks.
Even better, you can easily reposition blocks directly within List View. Click on a block and drag it to the desired position. Need to move multiple blocks? That’s also possible.
The user experience is infinitely better than wrestling with the editor. You’ll have a better sense of where you are on the page. And it will likely make for easier edits.
Do: Keep Experimenting with the Block Editor
The Block Editor isn’t perfect. Like all editors, it has some quirks and annoyances. But it’s still worth testing the limits.
That’s often the best way to learn. So, create a local website and experiment. See what works and what doesn’t. But don’t limit yourself to a single test.
The user experience is evolving. Thus, a technique that didn’t work last time may now be possible. You might even install the Gutenberg plugin to get a taste of what’s coming in future releases.
Doing so will serve you well. You’ll be able to build layouts that stand the test of time. And you might be surprised at what you can accomplish using blocks.
Related Topics
Top
#advanced custom fields#bugs#Building#classes#code#columns#content#creators#CSS#custom fields#Design#designers#Developer#display#easy#Editing#effects#Features#Future#gutenberg#HTML#issues#it#JavaScript#layout#Learn#Learn WordPress#LESS#list#members
1 note
·
View note
Text
Advanced CSS Techniques and Best Practices - A Comprehensive Guide by WebTutor.dev

Cascading Style Sheets (CSS) plays a crucial role in web development, allowing developers to bring life and style to their web pages. If you are looking to take your CSS skills to the next level, you're in the right place! In this advanced blog post, we will delve into the world of CSS, focusing on the comprehensive guide provided by Webtutor.dev in their CSS Introduction tutorial. Get ready to enhance your CSS knowledge and discover advanced techniques and best practices.
Optimizing CSS Performance: Techniques and Tools
Efficient CSS code is essential for maintaining fast-loading web pages. We'll explore advanced techniques to optimize CSS performance, such as minimizing file size, reducing render-blocking CSS, and utilizing CSS preprocessors. The Webtutor.dev guide will provide insights into performance optimization strategies and recommend helpful tools.
CSS Layouts: Flexbox and Grid
Modern CSS layout techniques, namely Flexbox and Grid, have revolutionized web design. We'll dive deep into these powerful tools, exploring their features, properties, and best use cases. The Webtutor.dev guide will offer practical examples and tutorials to help you master the art of creating flexible and responsive layouts.
Advanced Selectors and Pseudo-classes
CSS selectors allow you to target specific elements on a web page. We'll go beyond the basics and explore advanced selectors, including attribute selectors, sibling combinators, and pseudo-classes. The blog will highlight real-world scenarios where these selectors shine, enabling you to create targeted and dynamic styles.
CSS Transitions and Animations
Adding subtle animations and transitions can greatly enhance the user experience. We'll delve into CSS transitions and animations, covering advanced techniques such as keyframes, timing functions, and complex animations. The Webtutor.dev guide will provide practical examples and tips for creating smooth and visually appealing animations.
Customizing and Styling Form Elements
Forms are an integral part of web applications, and customizing their appearance can greatly improve usability and aesthetics. We'll explore advanced techniques for styling form elements using CSS, including styling checkboxes, radio buttons, dropdowns, and input fields. The blog will showcase creative examples and provide guidance for cross-browser compatibility.
Responsive Design: Advanced Media Queries and Breakpoints
Responsive design is essential for creating websites that adapt to different screen sizes. We'll dive into advanced media queries and breakpoints, enabling you to design fluid and responsive layouts for a variety of devices. The Webtutor.dev guide will offer tips for managing complex layouts and provide examples of responsive design patterns.
Cross-browser Compatibility and CSS Prefixing
Ensuring consistent rendering across different web browsers can be a challenge. We'll discuss advanced techniques for achieving cross-browser compatibility, including CSS prefixing, vendor-specific properties, and polyfills. The blog will provide insights into browser support tables and strategies to handle browser-specific quirks.
Conclusion
As we conclude our exploration of advanced CSS techniques and best practices with the guidance of Webtutor.dev's CSS Introduction guide, you're now equipped with the knowledge to take your CSS skills to new heights. Remember to experiment, practice, and stay updated with emerging CSS trends and techniques. With the expertise gained from this comprehensive guide, you'll be able to create stunning, performant, and responsive web designs. Happy coding!
#Learn Code for Free#Learn CSS Online#Free Online CSS Tutorial#Css Online Tutorial#CSS Introduction tutorial#Advanced CSS Techniques#CSS trends and techniques#Learn CSS selectors#Learn CSS Layouts#Modern CSS layout#Learn CSS Prefixing#Styling Form Elements#CSS elements online tutorial#CSS elements tutorial for beginners#CSS elements for web developers#CSS tags and elements#Learn CSS elements#CSS elements for web development tutorial#Basic CSS elements#CSS elements for beginners#CSS elements for websites
1 note
·
View note
Text
A QUICK GUIDE TO AO3 CUSTOMIZATION FROM SOMEONE WHO KNOWS NOTHING ABOUT CODING

ft adding pink to everything and my secret to writing long comments
note: I originally posted this to twt but if that place burns in a fiery pit I spent too long on this for it to disappear, so I'm putting it here too :)
so many people know way more about this than I do, but this is a step-by-step walkthrough of the changes *I've* made, and hopefully it works as an introduction people can build from for whatever they'd like to do
There are a lot of images in this post! (click to enlarge)
to start, AO3 skins
site skins change how the AO3 website appears when logged in (even on mobile), mine is pink and blue!

I'll have my skin turned off throughout the post so the guides appear as they will for you
to create, edit, and view skins, go to the "skins" tab from the left-hand menu. you can also view public site skins from there or from the button in the preferences.


public site skins are made by other users. i would really encourage previewing and exploring them to become familiar with the possibilities (maybe you just want to use one of them and now you're done!)
to create your own skin
on the skins page, click "create site skin"
if you don't know CSS (same), use the wizard! clicking on the "?" will give more information about each option
I only use the colours section you'll see a link right there for hex codes I use pink as a header colour and bue for accent but lots of people change the background colour and that looks really cool!
submit


The next step (optional!!!) is to add CSS from a public skin to your own. I use "ByLine" by Branch. this separates the tag categories and adds spacing to make them easier to read.
here is a before and after using the fic "Landslide" by @roosterbruiser as an example


to see the CSS of a skin, click the title
copy all the text below the CSS heading
in the skin creator/editor press the custom CSS option and paste all the text into the CSS box


you can have both wizard and custom CSS settings, in mine you can see the header and accent colours as well as the CSS

level up: USERSCRIPTS
userscripts are small pieces of code that modify a website. for AO3, this may involve adding shortcuts and buttons or even advanced tagging functions (computer people, I'm so sorry if this is wrong, I'm trying). I use Greasy Fork and Tampermonkey.
This is how I write long and formatted comments!
Greasy Fork is an archive of userscripts and Tampermonkey is a browser extension and userscript manager. You don't need to use these two in particular. please use your common sense when downloading anything or adding permissions to your browser.
Greasy Fork guide on installing scripts
Install Tampermonkey on Chrome
there are TONS of user scripts for AO3. This is another good opportunity to explore all the possibilities. there are lots of more complicated options I haven't explored.
scripts for AO3

i use this floaty review box
and this comment formatting
EDIT: if you use chrome you might need to turn on developer mode in your chrome extension manager - you can google "tampermonkey developer mode" and it should explain that :)
to install (once you have Tampermonkey installed):
open the script you want in Greasy Fork and press install
Tampermonkey will open, press install again


clicking the Tampermonkey extension will let you toggle scripts on and off, and opening the dashboard will let you view, edit, and delete scripts


i find i can only have a few turned on at a time before they cancel each other out, but that depends on which ones you're using and someone more savvy might be able to fix that
how to use the floaty review box - write more comments!
there will now be a "floaty review box" button at the top of the work, it will open a floating text box you can move anywhere on the page. highlighting any text and pressing the insert button will paste the text with italics into the box


anything you type in the review box will appear in your comment at the bottom of the page!
if you have also installed the comment formatting script, you'll be able to highlight any text in your comment and use the new buttons above the comment box to format it

thats all ive got! Hopefully this is a good starting point to get familiar with some of the terms and basics for skins and scripts <3
if you want some inspo for how to comment on fics i made a whole fic rec list on twitter based on comments I've left, it's here. i have a masterlist of recs there mostly for darklina/reylo and similar ships.
the tag #reading with ru has cod recs and me talking about books
:)
#please no one follow me from this im never helpful otherwise#ao3 skins#ao3#fanfic#ao3 community#fandom#ao3 resources#im sorry if the image quality is awful lmk if I should clarify any of the text!#floating comment box#floating review box#ao3 guide
760 notes
·
View notes
Text
ao3 skins faq
Just a few answers to questions I've seen in the notes on this poll
What is a site skin? A site skin is CSS code that changes the way AO3 looks. This could be anything from changing the page colour to the font to the way tags look to hiding parts of the site - and more.
Where do I find site skins? There are a few places. The easiest one is in the site footer (that red band at the bottom of the page). There are four skins linked there under the word Customize, and you can click on them to see what they do. Another place to find skins is https://archiveofourown.org/skins?skin_type=Site Those skins were created years ago and loaded into AO3 for easy applicaiton. Just hit the Use button and they'll be applied to your account. Lastly, you can find skins created by other AO3 users. Some people post their code on AO3 itself, some use github or other code repositories. A lot of folks share their skins here on tumblr with images and then a link to the code itself.
How do I save them to my account? If you're using the ones in the footer or the ones linked on the Public Skins page, you don't need to save them. Those are built into AO3. If you want to create your own (or use one created by another user), that's when you save them to your account. Tap on your name at the top of the Ao3 page. Then select Dashboard, then select Skins. Tap the button labelled Create Site Skin and give your skin a unique name. Write or paste the CSS code into the big box, then hit the Submit button to save it. If you want to use it right away, hit the Use button on the next page.
What's the difference between a Work Skin and a Site Skin? A work skin changes the appearance of an individual AO3 work, and it changes it for everyone who looks at that work. This lets you turn your fic into something that looks like an email or a text chain or a newspaper, etc etc without having to use images. Work skins can also be turned off by other users, so if they just want to read the plain text of your work they still can. A site skin changes how the entire site looks - but only for you.
How do you have 100+ site skins?? I start a lot of skins that I abandon partway through. I also create skins for certain specific purposes - for example, changing the look of all of the buttons on the site - and then I can just grab that chunk of code and add it to any "full" site skins I create for the purposes of sharing. I have a lot of experiments that fail, but I keep the code around because maybe I'll learn how to fix it someday.
Can I create my own site skin if I don't know how to code? You can! AO3 has a site skin Wizard that will help you change the colours, fonts, and font sizes on the site. Go to your Dashboard > Skins > Create Site Skin and then tap on Use Wizard. Give your skin a unique title. Click on the ? bubbles to get examples of how to enter information into each box. If there's anything you don't want to change, you can just leave that box empty. When you add in colours, they must be hex colour codes, and they must include the # at the start. Any font you add need to exist on your device (so it might work on your computer but not on your phone because your phone doesn't have that font installed). You can add parent skins to Wizard skins, too. See below!
I wish I could have [X functionality] in [Y aesthetic skin] You can! If you create one site skin in order to block certain works or tags, you can add that skin on top of an aesthetic skin. To do so, edit your aesthetic skin, scroll down and tap on the Advanced button (lower left of the CSS box), tap on Parent Skin, type in the name of your blocking skin and Add Parent Skin. Then save your aesthetic skin, and the two are combined! You can also do this with those skins that are native to AO3. So for example, you want a Reversi (dark mode) skin that Shortens Long Tags and also hides the "you have muted some users" banner. Create a site skin with the muted users code:
p.muted.notice { display: none; } And add Reversi and Shortening Long Tag Fields to it as parents. (you can also copy/paste all of the code into a single site skin, if you'd prefer)
For more FAQs, you can check out the Skins & Archive Interface section on AO3's FAQ page. Or you can drop questions in the notes, too.
316 notes
·
View notes
Text

The 100% Good Twine SugarCube Guide!
The 100% Good Twine SugarCube Guide is a coding guide for the SugarCube format of Twine. It is meant as an alternative to the SugarCube documentation, with further explanations, interactive examples, and organised by difficulty. The goal of this guide is to make the learning curve for new SugarCube user less steep, and provide a comprehensive and wide look over the format.
VIEW / DOWNLOAD THE GUIDE!!!!
The Guide is compartmentalised in (currently) four categories:
THE BASICS or the absolute basics to start with SugarCube. No need for extra knowledge. Just the base needed to make something.
THE BASICS + adding interactivity, and creating a fully rounded IF game May require a bit of CSS knowledge (formatting rules)
INTERMEDIATE MODE adding more customisation and complex code Will probably require some CSS knowledge, and maybe some JavaScript
ADVANCE USE the most complex macros and APIs Will surely require some JavaScript/jQuery knowledge
Note: The Advanced Use includes all the APIs, macros, and methods not covered by the previous categories. This includes code requiring very advance knowledge of JavaScript/jQuery to be used properly.
Each category explains many aspects of the format, tailored to a specific level of the user. More simpler explanations and examples are available in earlier chapters, compared to the later ones.
If something is unclear, you found a mistake, you would like more examples in the guide, or would like a feature covered, let me know!
The Guide currently covers all macros (as of SugarCube v.2.37.3), all functions and methods, and APIs. It touches upon the use of HTML, CSS, JavaScript and jQuery, when relevant. It also discusses aspects of accessibility.
The Guides also provides a list of further resources, for the different coding languages.
The Guide is available in a downloadable form for offline view:
HTML file that can be opened in Twine
.tw file that can be opened in Twine
source code, separating the chapters, .js and .css files
GITHUB REPO | RAISE AN ISSUE | TWINE RESOURCES TWEEGO | TEMPLATES | CSCRIPT 2 SG GUIDE
Twine® is an “an open-source tool for telling interactive, non-linear stories” originally created by Chris Klimas maintained in several different repositories (Twinery.org). Twine is also a registered trademark of the Interactive Fiction Technology Foundation.
SugarCube is a free (gratis and libre) coding format for Twine/Twee created and maintained by TME.
VIEW / DOWNLOAD THE GUIDE!!!!
As of this release (v2.0.0), it is up to date with the version 2.37.3. If you are looking for the guide covering SugarCube 2.36.1, you can find it on my GitHub.
Note: the Guide is now complete. There won't be further substantial updates.
#the 100% Good Twine SugarCube Guide#template#templates#guide#coding in twine#twine#coding#HTML#JavaScript#CSS#macros#interactive fiction#sugarcube#interactive games#k thanks. i don't need any more reminders that sugarcube update and that I NEED TO UPDATE MY RESOURCES#i KNOW#manonamora
505 notes
·
View notes
Text


Hey!
I made some cursors for the romanceable characters!
Get them here for free: x
And if you want them for your tumblr blog. See below!

How to add your blorbo on your blog:
Edit your tumblr theme
Scroll down and click 'Advanced options'
Paste any of the following below on the 'ADD CUSTOM CSS'

Adeline
body, *, a, a:hover { cursor:url(https://64.media.tumblr.com/cebfe4e501f3f3d5a3318bb19b628ea9/7b313a406e2b99c3-76/s75x75_c1/5c2dbe228be79a956bafee68f5af5bd843f8e242.pnj), auto; }

Celine
body, *, a, a:hover { cursor:url(https://64.media.tumblr.com/e62f93a39a280df94d46c371a2d82773/7b313a406e2b99c3-a3/s75x75_c1/5119049cc52305eb7096e54b732513a61ac76270.pnj), auto; }

Juniper
body, *, a, a:hover { cursor:url(https://64.media.tumblr.com/0898acc118e4594ed6f338cffaf4dc1d/7b313a406e2b99c3-87/s75x75_c1/6e5405c753f8c810d47a0e2cb579163eb9db1463.pnj), auto; }

Reina
body, *, a, a:hover { cursor:url(https://64.media.tumblr.com/e711e91ff84bb00e9bcb0441f6f4191c/7b313a406e2b99c3-05/s75x75_c1/33f03044f6807b522b0a627ba377e5886757ee09.pnj), auto; }

Valen
body, *, a, a:hover { cursor:url(https://64.media.tumblr.com/331f8d17b206d49a8e638d697e41f437/7b313a406e2b99c3-92/s75x75_c1/e81fade7017223d83abcc4b0793bf7cd64ba20fe.pnj), auto; }

Balor
body, *, a, a:hover { cursor:url(https://64.media.tumblr.com/a43c00912490a9e8bb9ce4a3437290fd/7b313a406e2b99c3-8c/s75x75_c1/ecfffe4fb610e6172aebc87975b6b0f68bf68561.pnj), auto; }

Caldarus
body, *, a, a:hover { cursor:url(https://64.media.tumblr.com/a8fb9ce48e2d60c02790b25eed9512bc/7b313a406e2b99c3-12/s75x75_c1/71807760964b40a8678349de53ab9b06d98a9156.pnj), auto; }

Eiland
body, *, a, a:hover { cursor:url(https://64.media.tumblr.com/545485a1729d330b95492042aea09807/7b313a406e2b99c3-f9/s75x75_c1/826a71b3988ffc48fdf94e6ba8068e6a4187b4ba.pnj), auto; }

Hayden
body, *, a, a:hover { cursor:url(https://64.media.tumblr.com/b74876dfddff5ea8781caf303a1df2dc/7b313a406e2b99c3-e5/s75x75_c1/f0e15a108a70f3a24c6f89978999f1957fcc67dd.pnj), auto; }

March
body, *, a, a:hover { cursor:url(https://64.media.tumblr.com/b767223f9d14864cefb67e2f0d4650e3/7b313a406e2b99c3-64/s75x75_c1/f10af51b4655afe440952392076437eadd9348e4.pnj), auto; }

Ryis
body, *, a, a:hover { cursor:url(https://64.media.tumblr.com/355392baeb312090763c2950995af81b/7b313a406e2b99c3-2a/s75x75_c1/5eb7d4ea417826b15f3fb2f27cee627ed1f49433.pnj), auto; }
95 notes
·
View notes
Text
Ad | Some Humble Bundle Goodies
One for the audio engineers - The Audio Arcade bundle gives you a whole bunch of royalty-free music and SFX as well as plugins to insert in all the major game engines. Ambient tracks, environmental sounds, explosions, you name it.
Money raised goes towards Children's Miracle Network Hospitals.
For those who dabble in Virtual Reality, the Upload VR Showcase with Devolver Digital has a bunch of Serious Sam VR games as well as the Talos Principle, a really solid puzzle game.
Money raised goes to Special Effect which helps people with disabilities enjoy games via accessible controllers. I've seen the stuff they do and it's honestly great.
Want to get into programming but don't know where to start? The Learn to Program bundle has a tonne of resources covering everything from HTML and CSS through to Python, C# and Ruby.
Money raised goes towards Code.org which seeks to expand participation in computing science by helping women and students of colour.
The Future Tech Innovators Toolkit is a software bundle with courses on Robotics, Electronics and programming with Raspberry Pi and Arduino.
Money raised goes towards Alzheimers Research UK.
The Home How-To Guides bundle offers a complete set of books for home improvements and projects. Want to know more about plumbing, home repair, bathrooms, wiring or carpentry? This bundle has you covered.
Money raised goes to It Gets Better, a charity that supports LGBT Youth.
Want to pick up the latest Elden Ring DLC? It's also available on the Humble Store with the key being redeemable on Steam.
105 notes
·
View notes
Text
Permanent Blacklists for AO3
Would you like to permanently remove fics with your squicks, triggers, and dislikes from all AO3 searches by default so that you never have to think about or encounter them again? Well now you can!
The ability to do this has actually been around for a little while but it relies on some new CSS functionality that wasn't supported on all major browsers until fairly recently (though you may still have to enable it manually on some). I'm not going to explain how this method works or how to code AO3 skins in general, as I've only dabbled in it a little and there are already some very good tutorials out there. If you want all of the details, check out these guides:
Skins and Archive Interface FAQ – The official skins guide created by AO3. Lots of good information but might be overwhelming and confusing for a beginner.
A Non-Extensive Guide on How to Start Creating a Skin for AO3 by ao3skin – Some good, fairly easy to understand, beginner info on CSS and specifically how it applies to AO3 skins.
Permablocking Specific Tags - Site Skin by Eli0t – Everything you need to know to create permablock lists. If your blacklist doesn't seem to be working as expected, check this for troubleshooting tips.
What I can offer though are some handy pre-made blacklists that you can use as-is or as a starting point to create your own so that you don't have to go to the trouble of figuring out how any of this works or hunting down relevant tags. Just copy the code, open AO3, go to My Preferences > Skins > Create Site Skin, paste it in the box, title it, and click Submit!
Note: The following lists are very specific to me and my own personal tastes. Absolutely no judgement if you love any of the things that I choose to blacklist. You do you. I just happen to like my fics fucked up and relatively canonical.
★ No Reader Fic – Hides all self-insert and reader fic.
★ No Alternate Universes – Hides anything tagged with the most common AU tags. There are so many incredibly specific AUs there's no way to list all of them and AU tagging is also extremely inconsistent from fic to fic so this blacklist may only catch 80% of AUs, but that's better than nothing. You could always exclude the entire alternate universe tag, rather than trying to list specific ones, but unfortunately canon divergence and other less extreme AUs would get caught in the crossfire, which is not worth it for me.
★ No Fluff – Hides anything tagged with the most common fluff and romance tags. I specifically left out "fluff and angst" though because sometimes that's used for things that are mostly angst with only a bit of fluff and I do love angst.
★ Bonus: No Dead Dove – This list is not mine (for obvious reasons) but I know some people may find it useful. Hides anything with the main archive warnings and many common problematic, taboo, or controversial tags. Some of these I wouldn't even classify as dead dove, they're literally just kinks, so I'd suggest reviewing the list carefully and removing any that don't apply to you.
Additional Notes:
This system doesn't work exactly the same as AO3's exclusion filters because you can't use top-level wrangled tags to block all subtags. It only blocks exact matches.
Once the blacklist is implemented you'll see no indication that anything was blocked (except for fewer fics listed on each search page); the entire blurb will be hidden. The tags and fic counts listed in the filter bar will remain unchanged. If you want more advanced features like whitelisting or adding something to indicate when a fic was removed, check out the permablocking guide by Eli0t.
Here's a link with info on which browsers currently support the new "has()" element, which this blacklist system relies on. As of right now Firefox for desktop still has to be manually enabled (for instructions see the section on flag enabling in the permablocking guide). Firefox for iOS isn't listed on this website but it seems to work fine for me.
There are other browser-specific extensions that let you permablock tags, such as this one and this one, that may be more a little more user friendly, but I've never tried them so I can't vouch for them and they may not work consistently between different devices. The good thing about doing blacklists via skins is that, after setting it up once, it should work automatically on pretty much any device (as long as you're logged in to your AO3 account).
#I'm so stoked about this feature#it's a GAME CHANGER#I put a lot of effort into creating my blacklists#I couldn't not share them and hopefully make someone's life easier now that I've already done all the work#assuming anyone shares my preferences#ao3#ao3 skins#ao3 help#tutorial#wendy's help desk
383 notes
·
View notes
Text
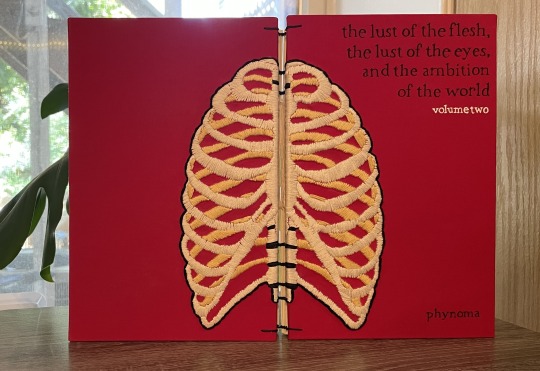
the lust of the flesh, the lust of the eyes, and the ambition of the world | phynoma


[ID: Two pictures of two hand-bound books, the first of which shows their front covers and the second of which shows their spines and part of their front covers at an angle. The leftmost book is bound in yellow bookcloth and has a hand-embroidered smiling mouth with bloody teeth on the bottom portion of the front and back cover. The title, "the lust of the flesh, the lust of the eyes, and the ambition of the world" is in the top right corner in black as well as the words "volume one" in maroon. The rightmost book is bound in red bookcloth and has a hand-embroidered ribcage on the lefthand side of the front cover and the righthand side of the back cover. The title, "the lust of the flesh, the lust of the eyes, and the ambition of the world" is in the top right corner in black as well as the words "volume two" in white. Both volumes have stitching across the spine that joins the embroidery on the front and back covers so that the design stretches across the spine. /End ID]
It's finally time to share the books I made for the 2023 Rusty Quill Big Bang, hosted by @pilesofnonsense! This year, I was paired with the wonderful @phynoma, who wrote a post-circus AU entitled the lust of the flesh, the lust of the eyes, and the ambition of the world where Jon is marked by an entity known as the Consuming that feeds off hunger and desire and focuses, in Jon's case, around sexual hunger and desire. It's a truly spectacular fic with excellent worldbuilding, spot-on characterization, and a wide variety of sexual encounters of all flavors, and I highly recommend it!
As this fic is written in transcript format, I wanted to go with an open-spine binding style that would have the advantage of both lying extremely flat when opened and giving the fic a more screenplay-like appearance. Also as a consequence of the transcript format, the final page count ended up being large enough that I split the fic into two volumes, the first of which covers season three and the second of which covers seasons four and five.

[ID: Two pictures of the same hand-bound books, the first of which shows volume one and the second of which shows volume two. Both books are fully open to display their front and back covers touching. We can see that the embroidered design, half of which is on the front cover and half of which is on the back, forms a complete picture when the book is fully open. /End ID]
Each volume has hand-embroidered front and back covers, with titles done in black, white, and maroon gel pen. The covers were designed so that when the book is fully open, the front and back cover designs come together to form one single cohesive image. Additionally, when the book is closed, the spine stitching was done so that the design stretches across the spine, thus making the full design complete whether the book is fully open or fully closed. I'm really proud of how these covers turned out, and even though the embroidery took much longer than I anticipated it taking, it's definitely something I would do again!
More description and pictures of the interior of the books are below the cut:
I went with a visually simple yet technically complex design for the typeset of this fic. Microsoft Word's styles were very much my friend, as well as its advanced find-and-replace feature, to automate a lot of the formatting for this fic. The most complex bits were the group chat excerpts and making sure all the profile pictures were positioned correctly, as well as the email chain excerpts in volume one. The text messages were done separately in an HTML workspace and then included via screenshots, and because I had an HTML/CSS text message code already sitting around from a previous project, those were relatively simple to format!
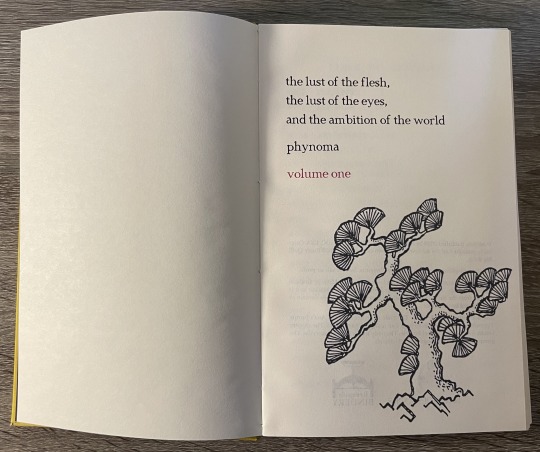

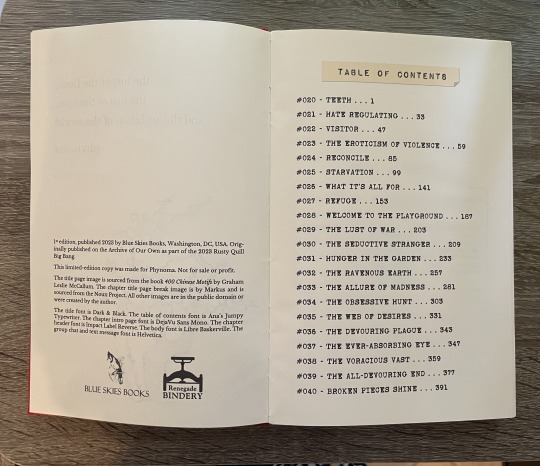

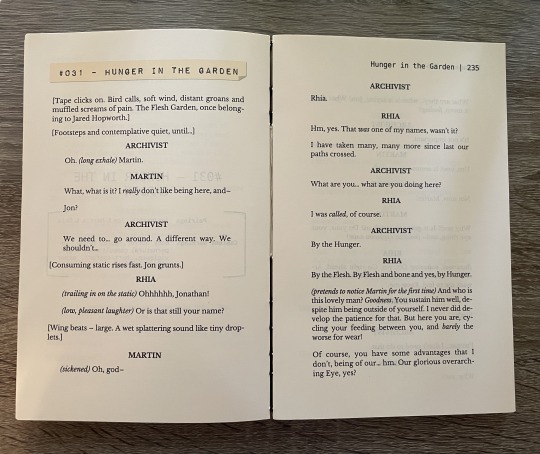

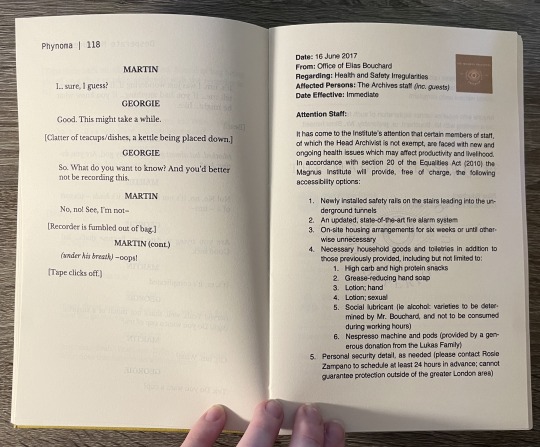
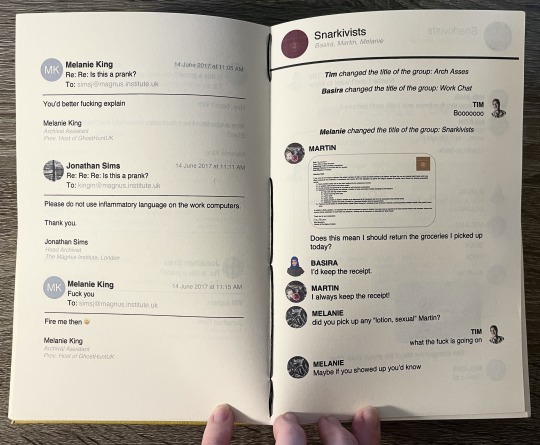
[ID: Eight pictures of the interior of the hand-bound books from previous photos. The first picture shows the title page of volume one, which has the title and author name in black and "volume one" in red, as well as a picture of a ginko tree. The second picture shows the title page of volume two, which has the title and author name in black and "volume two" in red, as well as a picture of a cherry blossom tree. The third picture shows the colophon and table of contents for volume two, highlighting the binder logos--a bluejay and a bookpress--and the faux-label table of contents title. The fourth picture shows the chapter header page for the chapter "voyeurism" in volume one, featuring brackets around the notes, content warnings, and pairings for the chapter as well as a quote from the confessions of augustine, which is separated from the warnings with an open eye graphic. The fifth picture shows the beginning of the chapter "hunger in the garden" in volume two, displaying the transcript formatting of the text as well as the faux-label chapter name on the top left. The sixth picture shows text messages in volume two, which are formatted the same as text messages on an iOS system with blue and gray bubbles and a name header that says "Jonathan Sims." The seventh picture shows some chapter text as well as a faux-office memo, done in a sans serif font, written from Elias Bouchard to the Archives team. The eighth picture shows on the left page faux emails, done in an iOS style with profile pictures for each email, and on the right page a faux-group message with profile pictures for each member and a header that labels the groupchat as the Snarkivists. /End ID]
The fonts used for this typeset were chosen based on those used for the unofficial Magnus Archives transcripts--DejaVu Sans Mono for the chapter intro pages and Libre Baskerville for the body text. I'm not 100% sure that those are the actual fonts used for the unofficial transcripts, but based on the reverse font search I did, those seem to be a close match for it.
This was a big project for me, and I'm so happy to finally see it to completion! Once again, a big thanks to Phynoma for being such a wonderful partner to work with--I'm excited to send you these books so you can see them in person 💜
357 notes
·
View notes
Text
Anyway should mention this here:

I fell in with the Website League, an island of federated social media websites that's mainly spun off old cohosters, run partially by consensus committee of various stakeholders and intended to be a relatively sustainable form of non-commercial social media.
If you like what you see, you can sign up to one of the open-access nodes.
Official launch is today, since it's the last day of cohost, but this has been in the works for a few weeks.
The Website League is based on ActivityPub software, mainly GoToSocial and Akkoma, running in allowlist mode, so we only federate with other League members. This keeps moderation load lower and simplifies management.
We're explicitly not federating with the broader fediverse, which among other things should allow us to experiment with patched versions of the software to support more advanced and interesting post formats, e.g. actual interleaved text and images as a first class citizen, cohost-style CSS fuckery.
If you're interested you can join the (ugh) discord or just try and join an instance. I'm hosting weague.awful.cloud.

It's early days so things are likely to change fast, but hey.
48 notes
·
View notes
Note
hi! do you have any tips on learning to program or resources that helped you along the way? so far all i know is html css and a little bit of js but i want to work my way up to the c languages someday and its kinda daunting as a goal without going to uni v": thank you in advance for any advice!
You know more than I do!! I bet some of my followers are programmers tho, pls help this person out with resources c:
i do have the codepen site saved in my bookmarks, maybe it'll be useful to you? ive found some of the examples there helpful in the past!
70 notes
·
View notes