#and fresh herbs growing in pots by the windowsil
Text
It may be silly and quaint but I like to daydream about my future fridge that is organized by just me…
Eggs would be in a clear, reusable container so i can see how many are left
A well kept drawer just for cheese
Perishables like potatoes and fruits would be front and center, easy to grab and see if they’ve gone bad
Clear nozzled bottles that are labeled for different cooking oils wether it be cooking wine, olive oil, etc all labeled with the name and last restock date
A drawer for herbs like garlic cloves and other vegetables in that sort of vein
Little clear organiser baskets of snacks places in a line like they would be at the grocery store
Sodas also in a similar clear container so i can see when to restock
2 % milk and Heavy cream aplenty as well as whipped cream
A butter section seperate from everything so i dont have to go digging for it every time….
Everything neat and tidy and easily accessible for any recepie I may try
OH! And a basket organizer purely reserved for leftovers in tupperware so they dont get forgotten about
#thats the dream……#and people who respect my fridge space#oh glory i cant wait for the day i have my own refrigerator#a man can only dream#oh and my kitchen to have a dinosaur themed apron waiting for me????#come home to a beautifully clean kitchen ready for me to work#and a large sink so dishes are a bit easier to handle#a beautifully organized cabinet#and fresh herbs growing in pots by the windowsil#i need rosemary for a recepie?#you bet im grabbin it fresh#basil? thyme? mint? bay leaves?#you got it baby#tomatoes too so when bills run high we still have a heart source#would love to grow more things too#home gardens are the best form of anarchy#ohhhhhh and i’d have the best potato peeler#OHHHHH and a big ol blog or metal bar with plenty of knife variations!#my fridge also has space for letting bread rise#everything is simple and easy to access#the whole kitchen is decorated with dinosaurs#theres dino magnets on the fridge holding up whatever is available to cook#theres stickers on the air fryer#and a waffle maker and toaster#oh and a combination flatop stove#idk electric or propane#maybe propane but that can be annoying to change#it would be so beautiful…..
4 notes
·
View notes
Text
Chapter 34: Cohabitation

During the Clone Wars, the Bad Batch is tasked with a variety of missions across the galaxy. An unexpected addition to their team throws a wrench in the mix, particularly for Tech, who finds a particular connection with this disillusioned Padawan-turned-mechanic named Vel throughout the events in this action-adventure romance. COVER ART BY @zaana!!
Master List of Chapters

A thick stew bubbled cheerfully on the stove, filling the cottage with the rich scents of local game and vegetables. Vel gave it a stir, sprinkling in a few pinches of herbs chopped from her windowsill planter boxes. Winter had fallen across Bendego, and while the seasons were fairly temperate, they were varied just enough to give the full experience of each. A light layer of snow was dusted across the ground, held back mostly by the thick canopy of trees above. Out in the meadow, there was a good few inches of fresh fluff that lay pristine and untouched across the curves of the hills.
The fire crackled in the hearth, playing its part in the soothing symphony of a cozy home. The light scent of smoke complimented the faint undertones of the heavy wooden furniture, the fragrant plants scattered throughout each room, and the mouthwatering dinner simmering in its pot. Sinking into the plush couch, Vel pulled out her datapad, reviewing the sector of the forest that she had planned to survey the next day. There were plants that only appeared in winter – hardy succulents and fascinatingly thin vines that somehow withstood the season’s chill – and Vel could have sworn she spotted something new beneath a huge fallen tree trunk.
The door banged open and Tech clattered in, his arms full of wood, a few plants, a backpack, a datapad, and a hat. Vel would have been peeved at the startle it caused her but he was so irresistibly adorable in his thick winter layers that she couldn’t help but smile. As he kicked off his boots and began dropping his items in their delineated spaces, she put the datapad to sleep and rose to her feet, waiting for him with open arms as he finished. The tip of his nose and the apples of his cheeks were red, and as she pressed her lips to his, she marveled at the cold, feeling more and more grateful for her day in.
“I marked the kalendor sprouts in the fern sector,” Tech said, drifting off as he closed his eyes and inhaled deeply, savoring the rich scents of their home. “But if tomorrow is similarly undesirable for outdoor work, I am certain they will remain identifiable for at least another week. So there is no rush.”
“Thanks. Although… maybe we could both stay home tomorrow,” Vel suggested, tracing an idle finger along the lapel of his dark plaid winter coat. “I can think of some things we could do…”
“I am sure you are an endless fount of excellent ideas, my love, but I assured you I would fix the creaky floor within the month, and there is still ample time in that deadline.”
“That’s not what I was thinking of,” she returned, nuzzling into his neck and placing a few open-mouthed kisses in a trail from his shoulder to his ear. He shuddered, a shaky little breath accompanying his excitement, bringing a smile to her face.
They had been living together for the better part of a year, and the slow progress of physical intimacy had been a smooth and intoxicating journey of learning each other’s bodies in new ways and growing in deeper understanding of one another. Tech was slow-moving, and Vel wasn’t complaining, as she hadn’t ever got much further than kissing with the couple of people who had shown interest in her. There was an undeniable hunger to dive into the deep end, but the tantalizing pace of Tech’s exploration was as captivating as it was satisfying. But on each of the recent mornings that she’d woken up next to him, the look in his eyes and the weight of his hands as he glided them over her curves had a new intensity that had her shivering in anticipation.
“Hmm. I have a compelling suspicion that you are attempting to seduce me,” Tech accused, pulling back slightly to give her a mockingly stern look. “And further, to avoid our assigned duties in order to pursue it?”
“You know I’ve always lived life on the edge,” she laughed, unable to keep a straight face at her own ridiculousness, and a smile played on Tech’s face as well. “Okay, okay. I’m just thinking a lazy day with nothing to do but watch the snow fall sounds really good after the last couple of weeks!” she admitted, letting out a little sigh as he kissed the top of her head before turning to remove his coat.
“I believe this is a fitting situation in which to use figurative language, so I shall agree and say that perhaps it would not be the worst thing in the world.”
* * *
Dinner was unusually quiet, not between Tech and Vel but in the lack of the company they usually had. The first snowfall of the year may have been enough of a deterrent, but Vel had to admit she was surprised that not even Fives nor Wrecker were there. It was commonplace for visitors to show up unannounced, conveniently in time for dinner, which Vel was growing increasingly skilled at creating. She’d made good friends with a few of the women in the nearby village and had immediately taken an interest in their unique style of cooking with the planet’s bountiful ingredients.
Their family, as they called the entire group they’d come to the island with, had all been appreciative of Vel’s new hobby and were more than willing to be test subjects for the various creations she would try. Echo had a very “discerning palette” (or he was simply picky, according to Crosshair) and was able to ruthlessly critique anything and everything. Wrecker, on the other hand, found delight in anything and everything, so the two of them had frequent and vigorous disagreements when they ate together. Hunter would often bring some meat; he had turned into quite the mountain man and was some mixture of farmer and trapper that resulted in him always having more food than he knew what to do with.
“I’m surprised no one’s here,” Vel commented, swallowing a hot mouthful of the rich stew.
“Hmm,” Tech agreed, “I cannot posit as to why.”
“Teeech…” she said slowly, squinting at him from behind another spoonful. Something about his tone and the nonchalance with which he said it made her instantly suspicious. He looked up from his bowl with the largest, most innocent eyes she had ever seen. Her heart did a flip.
“Alright, I am certain I could come up with a variety of possible theories as to why our usual rotation of visitors seems to be experiencing a temporary cessation; I simply thought it was one of those ‘rhetorical’ sort of comments.” He turned back to his stew, tilting the bowl to scoop the last bit of the hearty broth into his spoon. That was another odd thing… He didn’t normally eat so quickly.
“I feel like you’re up to something,” Vel admitted, starting to feel foolish if she had misread him. She nudged his foot beneath the table, causing him to jerk his head back toward her. His mouth was slightly open, eyes wide, then he slowly closed it, assuming an expression of perfect nonchalance.
“Technically, I am always up to something,” he said pertly, and she guffawed so hard it surprised even herself, causing her to drop her spoon with a clatter.
“I freakin’ love you,” she laughed, picking up the bowl to drink the remainder. Tech rose to his feet, clearing the table and beginning to wash the dishes in the large white sink while Vel finished. She brought her bowl to him, slipping it beneath the warm, soapy water before wrapping her arms around his waist, pressing against his back and turning her head to rest on his shoulder blade. “Thank you,” she murmured contentedly.
“I am merely completing my usual tasks,” Tech answered, continuing his scrubbing.
“Doesn’t mean I can’t be grateful.”
“Fair enough.”
“So… you interested in dessert?” Vel purred against his back, hands splaying across his abdomen with a lightly suggestive pressure.
“I believe the answer to that question, in the appropriate context and barring any sickness, handicap, or brain damage, will always be yes,” Tech said, the corner of his lip lifting as he found his own wit quite entertaining. “But judging by the way you are touching me, I must assume once again that you are attempting to… ‘enter my pants’.”
“Me? Never!” she laughed, releasing him and coming to stand beside him. “And it’s ‘trying to get in your pants’. But I kinda like your version better.” The sparkle in her eyes spoke volumes about the peace and joy that had graced her life recently. She felt ebullient, still unable to fully come to terms with the fact that this was all hers – a beautiful planet, a fulfilling job in nature, a cozy home, and all of it shared with the most incredible man that she never believed she could have deserved, much less won over. But as he finished the dishes with one last cursory wipe of the counter, neatly folding the towel and turning to face her, she didn’t care whether it were all a dream or not. His honey brown eyes were soft and affectionate, and she felt drawn to him like a magnet.
She slid a gentle hand across his hip bone, settling it on his waist, and sidled forward, tracing a finger across his torso as she savored every inch. Her chin tipped up to bring her face to his, and with a meaningful gaze of gratitude and love, she leaned against him to kiss him tenderly. It never failed to thrill her, the way he would stiffen for a split second no matter how much warning he had, and then he would melt, slowly fitting his form around hers and immersing himself in their shared passion. But this time, after just a short moment, he pulled back, eyes moving quickly as he spoke.
“I… ah… For a variety of reasons, I am fairly convinced that now is not the best time to pursue… that. As wonderful as it is.” His words were sheepish, and there was that suspicion again… Something was definitely different. Vel’s mind began to spin a hundred different stories of things she could have done wrong, faults he may have found with her, and various other tragedies that were about as likely as Palpatine returning (not likely at all. zero. zip. zilch. none. Zillo baby chewed him up good). She opened her mouth to confess her insecurity but was cut off by the front door crashing open.

artwork by @vimse!
Tag List: @merkitty49 @vimse @arctrooper69 @dystopicjumpsuit @starrylothcat @ghostperson69 @dreamie411 @savebytheodoresnonjosestuff @523rdrebel @clonemedickix @sinfulsalutations @ughhhhfoff @coraex @amorfista @nobody-expects-the-inquisitorius @followthepurrgil @littlefeatherr @sunshinesdaydream @thew0nderer2342 @dangraccoon @iceskategirl18 @chickentenderx @skellymom @girl_scout_reject @mooncommlink
Click here to join or leave the tag list. <3
#tech fanfic#tech fic#tech x oc#romance fanfic#the bad batch fanfiction#the bad batch#star wars fanfiction#star wars the bad batch#tbb#tbb fanfic
33 notes
·
View notes
Text
Medicinal Garden Kit – BRAND NEW

A Lifelong Pharmacy in a Box: My Review of the Medicinal Garden Kit
I've always been curious about natural remedies and the idea of having a homegrown supply of medicinal herbs. But starting a garden from scratch, especially one focused on medicinal plants, seemed daunting. That's where the Medicinal Garden Kit came in, and let me tell you, it's been a game-changer!
Easy Does It: Perfect for Beginners
As someone with limited gardening experience, I was worried about the complexity of growing medicinal herbs. However, the Medicinal Garden Kit took all the guesswork out of it. It arrived with everything I needed: ten different seed packets with clear labels, high-quality potting mix, plant markers, and a comprehensive instruction booklet. The instructions were incredibly user-friendly, with detailed information on each herb, from sowing depths to watering requirements. Even for complete beginners like myself, the process felt manageable and even enjoyable.
A Bounty of Beneficial Herbs
The kit boasts a fantastic selection of ten diverse medicinal herbs. Each herb caters to a range of common ailments, from soothing chamomile for relaxation to immune-boosting echinacea for those winter sniffles. I was particularly excited about the inclusion of lavender, known for its calming properties, and peppermint, perfect for homemade teas. The variety in the kit ensures I have a natural remedy on hand for a variety of needs.
From Seed to Steep: The Joy of Cultivation
There's something incredibly rewarding about watching tiny seeds transform into thriving little plants. The Medicinal Garden Kit provided the perfect opportunity to witness this magic firsthand. Following the clear instructions, I planted the seeds and meticulously cared for them. The joy of seeing green shoots emerge after a few days was truly special. It's been fascinating to learn about each herb's specific needs and witness their unique growth patterns.
A Sustainable Source of Wellness
One of the things I love most about the Medicinal Garden Kit is its sustainability. Unlike store-bought herbs with questionable origins, I know exactly where these herbs come from – my own little windowsill or garden patch. Many of the herbs in the kit are perennials, meaning they'll come back year after year with proper care. This not only reduces waste but allows me to enjoy a continuous supply of fresh, homegrown medicinal herbs.
More Than Just a Garden, It's an Experience
The Medicinal Garden Kit has been more than just a way to grow herbs; it's been an enriching experience. It's reconnected me with nature, fostering a sense of accomplishment and pride as I watch my little herb garden flourish. The act of nurturing these plants has become a form of self-care, and the knowledge that I'm cultivating my own natural remedies empowers me to take a more proactive approach to my well-being.
If you're curious about natural remedies or simply want to try your hand at gardening, I highly recommend the Medicinal Garden Kit. It's a fantastic starter kit, perfect for beginners, and the sense of satisfaction you get from cultivating your own little patch of well-being is truly unmatched.
4 notes
·
View notes
Text
The Spoonie Garden
I’ve mentioned this in a couple of posts, and now it’s probably time for the full post about it. A little while after I got officially diagnosed with fibromyalgia, I decided to start trying a little herb garden. It started just in propagator boxes on my windowsill, but soon moved to pots hanging on the balcony rail. I have no idea what possessed me to try gardening right when I’d been diagnosed with a chronic pain condition, but I think it had something to do with wanting something nice, and also wanting something to nurture and care for in the hopes that doing so would motivate me to do the same for myself. Either way, I never looked back, and I’m even trying flowers this year, because having herbs is nice but I wanted something that was just pretty.
Now, a lot of people think they can’t have a window or balcony garden. I was one of them until I decided to try it anyway. One of the things I found was that a lot of the things people worry about aren’t that big a deal. Light levels, for instance. My flat faces northwest, and it doesn’t get a lot of sun; I was always told that this would make it very hard to keep a garden. But honestly, there’s been light enough for most of the herbs I’ve wanted to grow, and even enough for tomatoes. Space isn’t so much of an issue either; most of the herbs I grow are pretty self-contained, and I could move them all indoors if I had to for the winter. Thing is, even that’s not a necessity for most of them; I had a lot of my herbs outside and while they seemed to die over the winter months, the spring brought them right back. It’s really a matter of remembering to water them daily (not even that in the winter months when they’re mostly hibernating), maybe treat them to some plant food once a week, and cutting them back when winter’s coming to dry the herbs for use in the winter months. (Another reason that a dehydrator is such a good investment.) Plus it makes a lot of recipes a bit more budget-friendly, having your own fresh herbs on demand. The problem with recipes that only call for a couple of sprigs of a certain herb is that supermarkets never sell them in “just a couple of sprigs”, so you end up paying above the odds for a bunch of herbs knowing that you’ll throw away half of them.
Here’s my list of must-have herbs for the window or balcony, with pictures:
Parsley
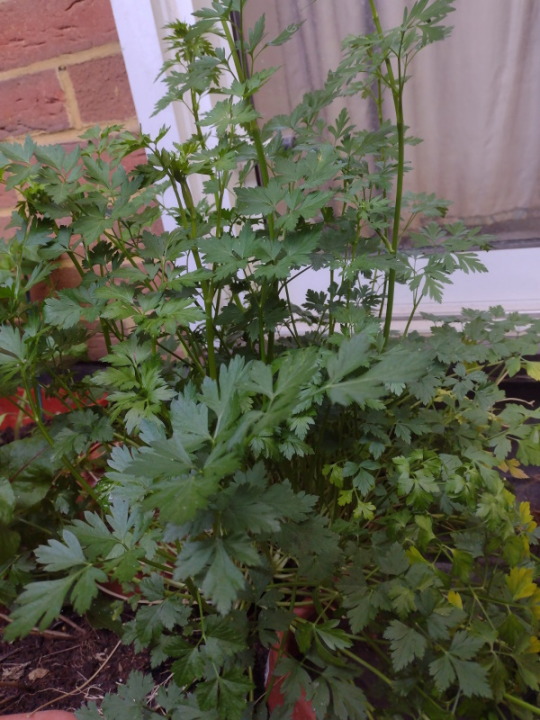
Parsley sees use in a lot of different recipes, and it’s sturdier than you’d think. At the time this was taken, the tallest stalks were waist-high on me. I haven’t used it much, but my mother dropped by for a few stalks the other day, and I’ve been thinking of trying parsley sauce, so it’s good to have.
Sage and Rosemary
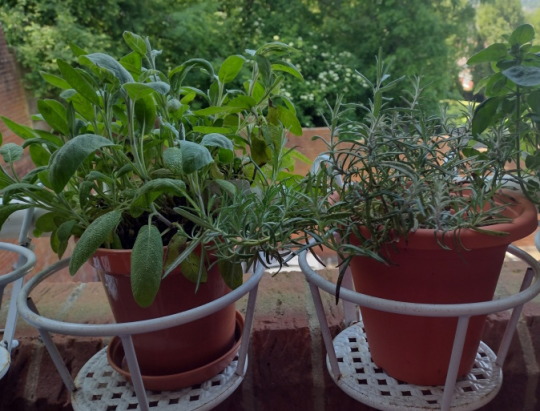
These both survived the winter outdoors, even during a cold snap, with no trouble at all. Sage and rosemary are wonderful in stews, to stuff a whole chicken, all sorts of things. Plus, of course, my recent lemon and rosemary steak recipe needs the rosemary, so it came in very handy today.
Oregano and Thyme
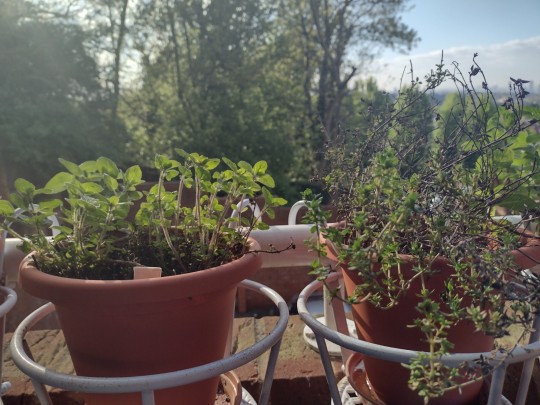
These two looked like they died over the winter. I cut back the oregano but didn’t bother with the thyme. I don’t know why I left the pots out there, but when I saw new green growth in and amongst the dead-looking stalks, I just watered them and waited to see what would happen. This is the end result; since that picture was taken, the oregano has only got bigger, and the thyme is almost entirely green and is flowering. I’m a big fan of oregano, especially in pasta sauces, and it’s so much better fresh. Thyme’s also good in stews and in whole roast chicken, and at least one recipe I’ve made recently called for it, so both have been worth it.
Mint, Coriander / Cilantro, and Dill

The mint is another one I cut back over the winter and watched it resurrect come spring. I have plans for mint sauce, and I stick the leaves in the dehydrator and have an endless source of mint tea. I also have plans towards learning how to make my own mint extract. As for the coriander / cilantro ... well, that I did have to replant this year, but it’s come along nicely. One of the dill plants (the one in the grey pot) is also one I planted this spring, but the other is actually a rescue plant - I got one of those pots of live dill from the supermarket for my refrigerator dill pickle recipe, and decided to repot it to see if it would thrive. Looks like it did. Now I’m never short of dill for my refrigerator dill pickles; I don’t have to buy £1 worth of dill to use maybe eight sprigs and throw the rest away, and all it costs me is some time watering them in the morning.
(Not pictured - basil, which I recently repotted and moved outside but isn’t quite impressive enough to take pictures of yet. Another one that’s good for pasta sauces, though I forgot my resolution to grow enough for pesto sauce this year.)
It’s an investment of time and spoons, but it’s got serious benefits. Watching something you planted grow is kind of miraculous, in its way, and I can’t speak for anyone else, but for me at least, it helps my mental state. I have moments of feeling pretty helpless and trapped and useless with the fibromyalgia. I mean, I can’t go to half the places I used to, I walk with a cane, and there are so many doors closed to me because of all of this. But my little balcony garden shows me that I can still do things, even if it’s only watering the plants once a day and remembering to throw in some plant food once a week. There’s tangible proof that I am accomplishing something in spite of how much I hurt.
Also, again, fresh herbs are vastly superior to dried herbs, and picking them fresh off the plant is better still. A non-starter in winter, admittedly, but when most of your herbs will actually benefit from being cut down in winter and the ones that don’t won’t take long to replant, at least being able to dry your own herbs for winter use saves money in the long run.
It’s not something that everyone can do, having a little garden, but more people can do it than think they can. If you don’t have a balcony, a windowsill will do. A lot of plants will be okay with whatever light you can give them. Also, when you’ve watched something go from a tiny shoot to a foot-high explosion of aromatic greenery, it’s pretty easy to remember to water them. Just remember to always use a bigger pot than you think they’re going to need when repotting. Roots need room to breathe, and if there’s not enough soil to absorb water, the water you give it will just drain out and your plant will wilt no matter how much you water it.
Fresh herbs are a joy in the kitchen, and they don’t take as much space, or as many spoons, to maintain as you’d think. Maybe give it a try with just one if you’re a little nervous about it - pick your favourite herb and get some seeds and soil, and try it at home. Therapeutic and tasty.
15 notes
·
View notes
Text
Herbs for Beginners: Growing and Using Fresh Herbs
Growing herbs is a rewarding and practical hobby that can enhance your cooking, improve your health, and add beauty to your home. Whether you have a sprawling garden or just a windowsill, herbs are relatively easy to grow and maintain. This guide is designed for beginners who want to explore the world of fresh herbs, offering tips on developing and creative ways to use them in your daily life.
Choosing the Right Herbs for Your Garden
If you're new to gardening, it's wise to start with hardy herbs that require minimal care. Some of the easiest herbs to grow include basil, mint, Parsley, chives, and oregano. These herbs thrive in various conditions and are forgiving if you occasionally forget to water them.
Basil is a versatile herb that grows well in warm, sunny conditions. It's a staple in many cuisines and can be used in everything from pesto to salads. Mint is another beginner-friendly herb that grows quickly and can even become invasive. Its refreshing flavor is perfect for teas, desserts, and garnishing dishes.
Whether curly or flat-leaf, Parsley is a biennial herb that can add a fresh, clean flavor to soups, sauces, and salads. With their mild onion flavor, chives are ideal for adding a subtle kick to dishes, while oregano is a robust herb that adds depth to Mediterranean and Mexican cuisine.
Understanding Sunlight and Soil Needs
To thrive, most herbs require at least 6-8 hours of sunlight daily. If you plan to grow herbs indoors, place them in a sunny spot, such as a south-facing window. Choose a location that receives ample sunlight throughout the day for outdoor gardening.
Soil quality is also crucial for growing healthy herbs. Well-drained soil is essential to prevent root rot and other moisture-related issues. A good potting mix or garden soil enriched with organic matter, such as compost, will provide the necessary nutrients for your herbs to flourish.
Planting and Caring for Your Herbs
Herbs can be grown from seeds or purchased as seedlings from a garden center. Starting from seeds is more economical and offers a wider variety of herbs, but it requires patience and careful attention during germination.
To start seeds, fill small pots or seed trays with a quality potting mix, plant them according to the packet instructions, and keep them moist. Once the seedlings are large enough to handle, they can be transplanted into larger pots or directly into the garden.
If you prefer a quicker start, purchasing seedlings is a convenient option. These young plants are ready to be placed in your garden or containers and will establish themselves more quickly than seeds.
Watering and Pruning Your Herbs
Herbs need consistent watering, but it's essential not to overwater them, which can lead to root rot. A good rule of thumb is to water when the top inch of soil feels dry. Herbs grown in containers may need more frequent watering than those planted in the ground, especially during hot weather.
Pruning your herbs regularly encourages bushier growth and prevents them from becoming leggy. For leafy herbs like basil and mint, pinch back the tops of the plants to promote fuller growth. Flowering should be discouraged for most herbs, as it can cause the leaves to lose flavor. Pinch off any flower buds that appear to keep your herbs productive.
Harvesting and Storing Fresh Herbs
The best time to harvest herbs is in the morning after the dew has dried but before the sun is too intense. This is when the essential oils in the leaves are at their peak, providing the most flavor and aroma.
You can begin harvesting for most herbs once the plant has enough foliage to support growth. Regularly harvesting your herbs not only provides you with fresh ingredients but also encourages the plants to produce more leaves.
Storing Herbs for Future Use
Fresh herbs are best used immediately, but if you have more than you can use, there are several ways to preserve them. One of the simplest methods is to air-dry your herbs. Gather small bunches, tie the stems together, and hang them upside down in a cool, dry place. Once dried, store the herbs in airtight containers away from direct sunlight.
Freezing is another effective method of preserving herbs. Chop the herbs and place them in ice cube trays, covering them with water or olive oil before freezing. These herb cubes can be added directly to soups, stews, or sauces.
Cooking with Fresh Herbs
Herbs are incredibly versatile and can be used in various dishes. Fresh basil, for example, is perfect for making pesto, adding to salads, or garnishing pizzas. Mint can be used in sweet and savory dishes, from adding freshness to a fruit salad to enhancing the flavor of lamb.
Chives are excellent for sprinkling on baked potatoes, adding scrambled eggs, or mixing into cream cheese. Oregano pairs beautifully with tomatoes and is a key ingredient in many Italian dishes, such as marinara sauce and pizza.
Environmental and Aesthetic Benefits
Growing and using fresh herbs is a fulfilling and accessible way to enrich your culinary experiences and improve your overall well-being. Whether you're just starting or looking to expand your gardening skills, herbs offer endless possibilities for creativity and enjoyment. With a little care and attention, you can enjoy the benefits of fresh, homegrown herbs all year round.
1 note
·
View note
Text
From Seed to Serenity: My Medicinal Garden Kit Experience

I've always been drawn to the idea of cultivating my own natural remedies. Fresh herbs not only add a delightful touch to cooking, but many boast a range of health benefits as well. However, starting a garden, especially one focused on medicinal plants, can seem daunting. That's where the Medicinal Garden Kit – BRAND NEW!Deliverable comes in. Here's a look at my experience with this fantastic kit.
A Complete Package for Budding Herbalists
The Medicinal Garden Kit is a fantastic option for anyone interested in growing their own medicinal herbs, regardless of experience level. The kit arrives neatly packaged and includes everything you need to get started: a variety of organic seeds, enough potting mix to fill several containers, plant markers for easy identification, and a comprehensive guidebook. The guidebook is particularly impressive, offering detailed instructions on planting, caring for, and harvesting each herb. It even includes recipes and suggestions for using the herbs in various ways.
Diverse Selection of Beneficial Herbs
One of the things I love most about the Medicinal Garden Kit is the curated selection of herbs. The kit features a variety of popular and versatile medicinal plants, such as chamomile for relaxation, echinacea for immune support, lavender for stress relief, and peppermint for digestive issues. This diverse selection allows you to explore the world of herbal remedies and discover which plants resonate most with your needs.
Easy to Grow, Even for Beginners
As someone who wouldn't necessarily call themself a green thumb, I was pleasantly surprised by how easy the Medicinal Garden Kit is to use. The guidebook provides clear, step-by-step instructions on seed planting, watering, and maintaining healthy plant growth. The kit even includes helpful tips for those with limited space, suggesting container gardening options for balconies or patios. Within a few weeks, I had a thriving little herb garden flourishing on my windowsill.
Fresh Herbs for a Healthier Lifestyle
The most rewarding aspect of using the Medicinal Garden Kit has been the ability to harvest and utilize my own homegrown herbs. There's a certain satisfaction in brewing a cup of chamomile tea made from the chamomile flowers you've nurtured from seed. Knowing exactly where my herbs come from and how they've been grown gives me peace of mind. Plus, having fresh herbs readily available has encouraged me to incorporate them more into my cooking, adding a delicious and healthy touch to my meals.
A Gateway to a Sustainable and Holistic Approach to Wellness
The Medicinal Garden Kit is more than just a collection of seeds; it's a gateway to a more sustainable and holistic approach to wellness. By cultivating your own medicinal herbs, you're not only empowering yourself to take charge of your well-being, but you're also connecting with the natural world in a meaningful way. Whether you're a seasoned gardener or a curious beginner, the Medicinal Garden Kit provides a fun and rewarding experience that allows you to nurture your body and mind from the ground up.
1 note
·
View note
Text
How to Grow Microgreens at Home
Introduction
Growing your own microgreens is a rewarding experience that can provide you with a consistent supply of fresh, flavorful, and nutrient-dense greens. Not only are microgreens easy to grow at home, but they are also a cost-effective way to ensure that you have access to healthy produce year-round.
Microgreens are the young seedlings of vegetables and herbs that are harvested when they are just a few inches tall. They are packed with vitamins, minerals, and antioxidants that can help boost your immune system, improve digestion, and reduce inflammation. Plus, they add a burst of flavor and color to salads, sandwiches, smoothies, and other dishes.
Starting your own microgreens garden is an excellent way to incorporate more fresh produce into your diet while also reducing your carbon footprint. By growing your own greens at home, you can avoid the environmental costs associated with transporting food long distances and packaging it in plastic.
In addition to being environmentally friendly and nutritious, growing microgreens is also an enjoyable hobby that can be done indoors or outdoors. Whether you have limited space or live in an apartment without access to a garden plot, you can still enjoy the benefits of gardening by starting a microgreens garden on your windowsill or balcony.
In this blog post, we will provide you with step-by-step instructions on how to start your own microgreens garden. We will cover everything from choosing the right container and growing medium to selecting seeds and harvesting your microgreens. By following our guide, you'll be able to grow fresh greens in as little as 7-14 days! So let's get started on creating your very own homegrown microgreens garden.
Choosing the Right Container and Growing Medium
When it comes to growing microgreens, choosing the right container and growing medium is crucial for the success of your garden. The container should be at least 2 inches deep and have drainage holes to prevent water-logging. You can use a variety of containers such as plastic or wooden trays, shallow pots, or even recycled containers like egg cartons or yogurt cups.
The growing medium you choose should be lightweight, sterile, and have good water retention. This is important because microgreens have delicate roots that need oxygen to grow properly. Some good options for growing mediums include peat moss, coconut coir, or vermiculite.
Peat moss is a popular choice for many gardeners because it is readily available and affordable. It has excellent water retention properties and provides good aeration for the roots. However, peat moss is not a sustainable resource and can contribute to environmental degradation.
Coconut coir is an eco-friendly alternative to peat moss that is made from the fibers of coconut husks. It has similar properties to peat moss but is more sustainable and renewable. Coconut coir also has natural anti-fungal properties that help prevent diseases in your microgreens.
Vermiculite is another option for a growing medium that has good water retention properties. It is made from expanded mica minerals and provides good aeration for the roots. However, vermiculite can be expensive compared to other options and may not be readily available in all areas.
In addition to these growing mediums, you can also mix them together to create your own custom blend that suits your needs. For example, mixing equal parts of peat moss and vermiculite creates a well-balanced growing medium that provides both good water retention and aeration.
Selecting the Seeds
When it comes to selecting the right seeds for your microgreens garden, there are a few things to consider. First and foremost, it's important to choose seeds that are specifically labeled for microgreens. These seeds have been selected and treated with care to ensure that they will grow into healthy, flavorful greens that are perfect for eating.
Some popular options for microgreen seeds include arugula, broccoli, radish, and sunflower. Each of these varieties offers its own unique flavor profile and nutritional benefits. Arugula has a spicy taste that pairs well with salads and sandwiches, while broccoli microgreens are packed with vitamins A and C. Radish microgreens add a peppery kick to any dish, and sunflower microgreens have a nutty flavor that is perfect for snacking.
In addition to choosing the right type of seed, it's also important to consider the quantity of seeds you'll need for your container. As a general rule of thumb, you should aim to use about 1-2 tablespoons of seeds per container, depending on the size of the container. It's important not to overcrowd the seeds in your container as this can lead to poor growth and even mold.
By carefully selecting the right type and quantity of seeds for your microgreens garden, you can ensure a bountiful harvest of fresh, nutrient-dense greens that are perfect for incorporating into your favorite meals.
Sowing the Seeds and Watering Them
Once you have chosen your container and growing medium, it's time to sow the seeds. The first step is to sprinkle the seeds evenly over the growing medium. Make sure that you don't overcrowd the container as this can lead to poor germination and growth.
Next, gently press the seeds into the growing medium, but be careful not to bury them too deep. Microgreens need light to germinate, so if you cover them too much, they may not sprout.
After sowing the seeds, it's important to water them properly. You can use a spray bottle or watering can to gently water the seeds. Be careful not to over-water them as this can cause fungal growth and rotting of the seeds.
Keep an eye on the moisture level of your growing medium and make sure it stays moist but not waterlogged. Over-watering can also cause problems with mold growth and root rot.
It's important to note that different types of microgreens have different requirements when it comes to seed spacing and depth, so be sure to check the instructions for your specific variety.
By following these simple steps for sowing and watering your microgreen seeds, you'll be well on your way to a bountiful harvest of fresh greens in no time!
Covering the Container and Placing It in a Warm, Dark Area
After sowing your microgreen seeds, it's time to cover the container and place it in a warm, dark area. By doing this, you'll be creating a mini greenhouse that will help retain moisture and promote germination. There are several options for covering your container. You can use a lid if your container has one or plastic wrap if it doesn't. Ensure that whatever you use is transparent to allow light to penetrate through.
Once covered, place the container in a warm and dark location such as a closet or cabinet. The ideal temperature range for most microgreens is between 60-75°F (15-24°C), so ensure that the room you choose falls within this range. Keep an eye on the seeds daily and mist them with water as needed to keep them moist. Be careful not to overwater them as this could cause mold growth.
It's worth noting that some microgreens require different conditions during germination stages. For example, some seeds like sunflower require more light than others while others like cilantro prefer cooler temperatures around 50°F (10°C). Therefore, before starting your garden, research the specific requirements of the seeds you plan to grow.
After a few days, depending on the variety of microgreens you're growing, you should start seeing sprouts emerge from the soil. At this point, it's time to uncover your container and move it into a sunny spot where they can receive adequate sunlight for photosynthesis. It's important to note that different varieties of microgreens require varying amounts of sunlight exposure; therefore, research each type before exposing them directly under sunlight.
Harvesting Your Microgreens
Harvesting your microgreens is an exciting and rewarding experience. Most microgreens will be ready to harvest in about 7-14 days, depending on the variety you choose. You can tell when they are ready by their height, which should be around 1-2 inches tall, and the development of their first set of true leaves.
When it comes time to harvest your microgreens, use scissors or a sharp knife to cut them just above the soil line. Be sure to rinse them gently with water and pat them dry before using them in your favorite recipes.
Growing your own microgreens is an easy and fun way to get fresh and healthy greens at home. By following our step-by-step guide, you can enjoy a steady supply of nutrient-dense greens that are perfect for salads, sandwiches, smoothies, and more. Not only will you save money by growing your own produce, but you'll also have the satisfaction of knowing exactly where your food comes from. So why not start your own microgreens garden today?
#Microgreens#young#tender#tiny#edible#seedlings#nutrient-rich#greens#sprouts#miniature#flavorful#vibrant#culinary#garnish#salad#health#home garden#microgreen#sustainable#sustainability#ecofriendly#ecology#ecosystem#environment#climate#climate change#greenthumb#vegetable#vegetables#veggies
4 notes
·
View notes
Note
Hi yes this question is for Farmer Rachael.
Farmer Rachael- which of your characters, if any, has a green thumb? Which would be most enthusiastic about planting a garden? What would they want to grow? And who, if anyone, absolutely can’t keep a plant alive no matter what?
Thank you for considering these burning questions.
ok SO.
I've been thinking about this for a couple of hours and I think I have an answer now.
These pertain to the versions of the characters I've tweaked for my own stories, so it might differ from canon a little. BUT:
Green thumb and would love gardening:
Joel Miller, because he'd love to see life in the plants and know that he cared for something and helped to sustain it.
Root Pearl Ezra wouldn't have had time or any place to grow a garden because of his touring schedule, but I think he's really good with houseplants, only because he likes to talk so much - and sing to them. I think he's got a couple plants in his bedroom, and maybe one or two smaller ones in the studio ... plus a huge one on the balcony of his apartment. If he's gone, he has someone come in and care for them,
Life is Good Frankie has a small garden in his backyard. Tomatoes and cucumbers and maybe some spicy peppers, too. Gardening is a way for him to relax and sort of zone out. This applies to BiCO Frankie, too - but I think he'd have a larger garden since he has more available land.
Marcus Pike has a few potted herbs on his kitchen windowsill, and uses them - specifically basil and mint - often.
Cannot keep a plant alive to save their lives:
Dieter Bravo could kill a fake plant, and he wouldn't even have to try too hard.
Javier Pena was given a houseplant as a welcome to Colombia by one of the secretaries at the Embassy, and he promptly put it on top of a cabinet in his apartment - in front of the window so it could get some sun - ... and then he forgot to water it for three weeks.
Jack Daniels in any form is not too focused on plants. On Deck Jack is more likely to be interested in a garden, just because of the way he grew up on the ranch, but he's more focused on the animal side of things.
Tim dreams about having a massive garden so that he can pick fresh herbs and produce to cook with, but while he's so heavily involved in work, it's next to impossible for him to keep up with it since he can't guarantee he'll ever be home. He's looking forward to the day he can try again, though.
Thank you for asking these!
I'm so excited for my garden to start growing.
#ask something-tofightfor#thank you alyssa!#farmer rachael is back in business#also honestly the thought of any one of these characters with their hands in the dirt and a thin sheen of sweat is too much#especially frankie and joel
3 notes
·
View notes
Text
Some of my Favourite Herbs and Their Uses (Part II) - Deborah Blake (The Eclectic Witch's Book of Shadows)
Peppermint: Leaves. Healing, purification, love, prosperity, abundance, psychic powers. Peppermint has traditionally been used for healing work, either as a tea or by rubbing the leaves over the affected area. In herbal medicine, it is used for both upset stomachs and headaches, so this makes sense. The leaves or a few drops of essential oil can be sprinkled in vulnerable areas to keep away pests and added to wash water when you are housecleaning or mopping. I like to use it in prosperity work. As a member of the mint family, peppermint spreads and grows exuberantly, making it the perfect symbol of abundance.
Rose: Petals and hips (rose hips are the fruit of the plant). Love, healing, protection, divination. Roses are useful in healing work, but their most common association–magickally and otherwise–is with love. If you are making a love sachet or any kind of love magick mixture, you will definitely want to add rose petals. You can use fresh roses or dried petals. If you are doing healing work, you may want to use rose hips, which are high in vitamin C and can be made into healing tea. If someone you love (romantically or not) gives you roses, hang them upside down to dry and keep the petals for magickal work. Different colors of roses can be used for varying kinds of magick, such as red for passion and pink for friendship.
Rosemary: Leaves. Healing, protection, love, conscious mind and memory, and purification. Rosemary is an all-around hardworking magickal herb. It is associated with protection, and people used to plant rosemary bushes outside their homes to keep them safe from thieves and maintain the health of those in the household. (You can use small potted plants or a rosemary wreath instead.) It can boost all mental abilities, so you can burn rosemary incense if you have to study for a test. A common saying is “rosemary for remembrance,” which refers not only to its mind-sharpening gifts but also to its use in rituals to honor the dead. It is my favorite protection herb, and I use it in all my charm bags and magickal kits for that purpose.
Sage: Leaves. Protection, purification, wisdom, long life. Probably best known for its use in sage and smudge sticks, which are used to purify both people and spaces. Sage sticks are usually made from white sage, which grows in desert conditions and is stronger in flavor and aroma than the common culinary sage most of us have in our kitchens. Regular culinary sage can be used in both cooking and magick. Sage is easy to grow in the garden or on a windowsill, so you can pluck a leaf or two and add it to your food. Dried sage can be used in protection charm bags or mixes. If eaten regularly, the herb was said to impart long life and also make one wise. (This makes sense since “sage” is another word for a wise person.)
Thyme: Leaves. Purification, healing, psychic ability, love, sleep. Thyme is another herb that is easy to grow in the garden (or even places where you walk since it makes a sweet-smelling ground cover) or on a kitchen windowsill. Fresh or dried thyme can be used in various magickal applications. It can be burned to purify a space before magickal work or added to healing baths, teas, or magickal mixes. It is said that if you place it under your pillow, it will cure nightmares. Lore has it that if a woman wears thyme in her hair, she will be irresistible–but I have to wonder if people are just staring at her because she has a plant in her hair.
Yarrow: Leaves and flowers. Courage, love, protection, psychic ability, exorcism. Yarrow is a flowering herb that can often be found growing wild, and it is a pretty addition to an herb garden, witchy or otherwise. It has traditionally been used in protection and love spells and was said to make love last for at least seven years. (After year eight, you’re on your own.) It can be made into tea, dried and added to charm bags or decorations, or placed in a vase as a fresh bouquet when it is in season. You can use its exorcism powers to help drive out negativity from your home.
*Most of the herbs I’ve listed are perfectly safe for cats and dogs, but you always want to use caution if you are using plants around animals. Keep in mind that they are often attracted to the smell of herbs and will chew on live plants and gnaw through plastic bags to get dried herbs.*
#witch#witchyvibes#witchythings#witches#witch aesthetic#witchcraft#baby witch#beginner witch#green witch#pagan witch#tarot witch#witch community#witchblr#witchcore#witchlife#magick#pagan#paganism#paganpride#baby pagan#wicca#wiccan#eclectic witch#pagan wicca#wiccamagic#wicca aesthetic#witches of tumblr
4 notes
·
View notes
Note
Oliver Emanuel if you still do it 🥺
fresh herbs growing in small pots on your windowsill, the distant sound of coyotes on a clear summer night, the tangy taste of sourdough bread, the combined energy of thousands of souls gathered at a music festival, the swarm of a thousand starlings flying under a sunset sky 🌿
{requests are open! message me your name and i'll tell you some things i associate it with.}
3 notes
·
View notes
Text
How to Start an Urban Garden in Small Spaces: A Beginner's Guide
Urban living often means limited space, but that shouldn’t deter you from cultivating your own fresh produce. With a little creativity and planning, you can transform even the tiniest balcony or window sill into a thriving urban kitchen garden. Here’s your ultimate guide to get started.
1. Assess Your Space
Before you dive into planting, take a good look at your available space. Whether it’s a sunny windowsill, a balcony, or a small yard, understanding your space will help you choose the right plants.
Light: Most vegetables and herbs need at least 6 hours of sunlight daily. Observe how the sunlight moves across your space to identify the sunniest spots.
Size: Consider how much space you have for pots and containers. Vertical gardening with shelves or hanging planters can maximize your space.
Access: Ensure you have easy access to water and that your plants are within reach for regular maintenance.
2. Choose Your Containers
Containers are key to urban gardening. They come in various shapes, sizes, and materials, including:
Pots and Planters: Ideal for most plants. Ensure they have drainage holes to prevent waterlogging.
Raised Beds: Perfect for those with a bit more space. They can be placed on balconies or in small yards.
Vertical Gardens: Use wall-mounted planters or trellises to grow herbs and small veggies in a compact area.
Hanging Baskets: Great for trailing plants like cherry tomatoes or strawberries.
3. Select the Right Soil
Good soil is crucial for healthy plants. Urban gardeners often use potting mixes designed for containers, which offer better drainage and aeration compared to garden soil. Look for soil mixes that are rich in organic matter and nutrients.
Potting Mix: Choose a high-quality mix with good drainage properties.
Compost: Enhance soil fertility by adding compost. It enriches the soil with essential nutrients and improves its structure.

4. Pick the Right Plants
When choosing plants for your urban kitchen garden, consider the amount of sunlight your space receives and how much time you can dedicate to care.
Herbs: Basil, mint, parsley, and chives are easy to grow and perfect for small spaces. They thrive in containers and can be used in your everyday cooking.
Leafy Greens: Spinach, lettuce, and kale are great for shaded areas and can be harvested continuously.
Vegetables: Cherry tomatoes, peppers, and radishes do well in pots. Choose dwarf or compact varieties if space is limited.
Fruiting Plants: Strawberries and dwarf citrus trees are suitable for containers and can add a touch of greenery to your space.
5. Water Wisely
Consistent watering is vital for the health of your plants. Container plants often dry out faster than garden beds, so check the moisture level regularly.
Watering Schedule: Most plants need to be watered once or twice a week, but this can vary. Check the top inch of soil; if it’s dry, it’s time to water.
Drainage: Ensure your containers have drainage holes. Excess water can lead to root rot, so make sure the excess can escape.
6. Fertilize and Maintain
Plants in containers require regular feeding as nutrients are quickly depleted. Use a balanced, water-soluble fertilizer or organic options like compost or worm castings.
Fertilizing: Apply fertilizer according to the needs of your plants. Over-fertilizing can be harmful, so follow instructions on the product label.
Pruning: Regularly prune plants to encourage healthy growth and prevent overcrowding. Remove dead or yellowing leaves to improve air circulation.
7. Pest Control
Even small gardens can face pest issues. Keep an eye out for common pests such as aphids, spider mites, and whiteflies.
Natural Remedies: Use natural pest control methods like neem oil, insecticidal soap, or introduce beneficial insects such as ladybugs.
Preventive Measures: Maintain plant health by not overwatering and ensuring good air circulation to minimize pest problems.
8. Harvest and Enjoy
The best part of gardening is reaping the rewards. Harvest your produce at the peak of freshness for the best flavor and nutritional value. Most herbs can be snipped as needed, while vegetables and fruits should be picked when they reach their mature size.
Conclusion
Starting an urban kitchen garden is not only rewarding but also a great way to enhance your cooking with fresh, homegrown ingredients. By assessing your space, choosing the right containers and plants, and maintaining a proper care routine, you can create a flourishing garden even in the heart of the city. Embrace the joy of gardening and enjoy the taste of your very own urban harvest. Happy gardening!
#urban gardening tools#Kitchen Garden Fertilizers#Plant Seeds for Kitchen Garden#Gardening Tools#Vegetable seeds#vegetable seeds for home garden#fence for plants
0 notes
Text
How to Start Your First Garden at Home
Starting a garden at home is a rewarding endeavor that connects you to nature, provides fresh produce, and enhances your living space. Whether you're growing vegetables, herbs, or flowers, the process can be both therapeutic and practical. However, for beginners, the idea of starting a garden can seem overwhelming. With the proper planning, tools, and knowledge, you can create a thriving garden at home. Here’s a step-by-step guide to help you get started on your gardening journey.
Assessing Your Space
Before you plant your first seed, assess the space you have available for your garden. The type of garden you can create depends on your available area, whether it’s a small balcony, backyard, or even a windowsill.
Understanding Light ConditionsThe first step in garden planning is understanding the amount of sunlight your space receives. Most plants require a minimum of six hours of sunlight per day to thrive. Observe how the sunlight moves through your chosen area during the day. If you have a shady spot, look for shade-tolerant plants, such as lettuce, spinach, and ferns. Conversely, areas that receive full sun are ideal for plants like tomatoes, peppers, and sunflowers.
Choosing the Right LocationIf you're working with a backyard, choose a level area that’s free from competing tree roots. Avoid spots that tend to collect water after rain. If you have limited space, container gardening is an excellent option for patios and balconies. Even small windowsills can support a herb garden. Make sure the space is easily accessible so you can care for your plants without difficulty.
Selecting the Right Plants
Selecting the right plants is crucial to the success of your first garden. It’s important to choose plants that are suitable for your region and the amount of sunlight your garden receives. You should also consider your preferences, whether you want to grow vegetables, herbs, flowers, or a combination.
Start with Easy-to-Grow PlantsFor beginners, it’s wise to start with plants that are known for being easy to grow and maintain. Vegetables like tomatoes, cucumbers, and lettuce are relatively easy for first-time gardeners. Herbs like basil, mint, and parsley are also forgiving and thrive in a variety of conditions. For flowers, marigolds, zinnias, and sunflowers are good choices due to their resilience and minimal maintenance needs.
Consider Your ClimateDifferent plants thrive in different climates. Make sure to research plants that grow well in your specific region. For instance, if you live in a warm climate, you might consider growing peppers, tomatoes, or okra. If you reside in a cooler climate, plants like peas, spinach, and kale will do better. Additionally, check your local growing zone to select plants that are adapted to the seasons in your area.
Preparing Your Soil
The quality of your soil is a critical factor in the success of your garden. Healthy soil provides essential nutrients, water, and air to plants, fostering strong growth.
Test Your SoilBefore planting, it’s a good idea to test your soil to determine its pH and nutrient levels. You can purchase a soil test kit at a garden center or send a sample to a local agricultural extension office for testing. Most vegetables and flowers thrive in soil with a pH of 6.0 to 7.0, which is slightly acidic to neutral. Knowing your soil’s pH will help you make any necessary amendments to improve plant growth.
Improve Soil QualityIf your soil is too sandy, it may not retain water well, and if it’s too clay-heavy, it might not drain properly. Amend your soil by adding organic matter, such as compost, which improves soil structure and provides essential nutrients. Mulching with leaves, straw, or grass clippings can also help retain moisture and regulate soil temperature. For container gardening, use high-quality potting soil designed for your chosen plants.
Planting Your Garden
Once you’ve chosen your plants and prepared your soil, it’s time to plant your garden. The planting process involves timing, spacing, and care, all of which contribute to its success.
Planting at the Right TimeTiming is essential when starting your garden. Plant too early, and frost may kill your seedlings; plant too late, and you may miss your growing window. Research the appropriate planting times for your chosen plants in your area. Many seed packets and plant labels guide when to plant based on your region’s frost dates.
Proper SpacingOne of the most common mistakes beginners make is planting too closely together. Crowded plants compete for nutrients, sunlight, and water, which can stunt their growth. When planting, follow the recommended spacing guidelines for each plant. This will give your plants the room they need to develop healthy roots and foliage.
Watering Your Plants
Watering is a crucial aspect of garden maintenance. Most plants require consistent watering, especially during dry periods. However, avoid overwatering, which can lead to root rot and other issues. A good rule of thumb is to water deeply once or twice a week, depending on the weather and soil conditions. Watering in the morning is ideal, as it allows plants to absorb moisture before the heat of the day.
Maintaining Your Garden
Once your plants are in the ground, ongoing care is necessary to ensure your garden thrives. Regular maintenance tasks include watering, weeding, pruning, and fertilizing.
Fertilizing Your PlantsPlants need nutrients to grow strong and produce fruits or flowers. Over time, soil can become depleted of essential nutrients, so fertilizing is often necessary. Choose a balanced fertilizer with equal parts nitrogen, phosphorus, and potassium (N-P-K). Organic options, such as compost or manure, can also provide a slow-release nutrient source.
Managing PestsPests can pose a challenge to gardeners, especially when plants are young and tender. Common garden pests include aphids, slugs, and caterpillars. To manage pests, inspect your plants regularly for signs of damage. Use natural pest control methods, such as encouraging beneficial insects like ladybugs or using homemade remedies like soap spray. If the pest problem persists, you may need to resort to organic or chemical insecticides, but always follow safety guidelines.
Harvesting and Enjoying the Fruits of Your Labor
The most rewarding part of gardening is harvesting the fruits, vegetables, or flowers you've grown. However, knowing when and how to harvest is crucial to getting the most from your garden.
Harvesting VegetablesVegetables are usually harvested at their peak ripeness to ensure the best flavor and texture. For example, tomatoes should be picked when they are entirely red but still firm, while cucumbers should be harvested when they’re young and tender. Don’t wait too long to harvest, as overripe vegetables can become challenging or bitter. Make sure to handle your produce gently to avoid bruising.
Enjoying Your HarvestOnce you've harvested your garden’s bounty, you can enjoy the fruits of your labor in various ways. Fresh vegetables and herbs can be used in cooking, while flowers can be arranged into beautiful bouquets for your home. Share your harvest with friends and family, or preserve excess produce by canning, drying, or freezing. The satisfaction of growing your food or flowers is unparalleled, and it connects you to the cycles of nature in a meaningful way.
Continuing Your Gardening Journey
Your first garden is just the beginning of a lifelong passion for gardening. With each season, you’ll learn more about the plants you grow, the techniques that work best in your space, and how to adapt to the changing conditions of your environment.
Learning from ExperienceEvery gardener encounters challenges, from pests to weather conditions, but these obstacles are valuable learning experiences. Keep a gardening journal to track what you planted, how well it grew, and any issues you encountered. Over time, this record will help you refine your approach and become a more successful gardener.
Expanding Your Garden
As you gain confidence in your gardening abilities, you may want to expand your garden by trying new plants, building raised beds, or creating a more elaborate layout. You might experiment with different gardening techniques, such as vertical gardening, companion planting, or organic methods. Gardening is a continual process of discovery, and there’s always something new to learn.
Starting your first garden at home is a rewarding adventure that brings you closer to nature and provides lasting benefits. With thoughtful planning, the right tools, and ongoing care, you can cultivate a garden that not only beautifies your space but also enriches your life. Happy gardening!
0 notes
Text
March Sneak Preview
I’ve made a point to actually plan out my meals for the month in more than an abstract way. Part of that is down to you guys, because it’s encouraged me to try recipes I’d been pondering but having executive dysfunction about, so thank you. I thought I’d give a quick overview of what recipes I’m going to be trying this month, and talk a bit about ways of cutting costs for recipes in general.
First, March content - these are the recipes I’m trying this month, or just plain keeping in the rotation because variety is a good thing.
Curry (specifically lamb dopiaza and aloo gobi, my absolute favourites)
Beef stew (I recently bought a slow cooker; more on that later)
Roast pork shoulder (not only how to initially roast it, but three or four ways to use the leftovers that’ll make one roast last the best part of a week)
Chicken broccoli pasta bake (with notes about how gluten-free and lactose-free substitutions will affect things)
Treats (specifically three-ingredient peanut butter cookies, home-made shelf-stable instant hot chocolate, and for those with a dehydrator, cinnamon caramel apple chips)
Given that a few people following this blog have come up with some great variations on the recipes I’ve already posted, I really look forward to seeing what you do with these!
A couple of those recipes above are kind of tricky when it comes to their base ingredients. Mostly the stew and the curry. The meat’s expensive, yes, but oddly, the spices are worse. Herbs and spices are one of those things that can really make or break a dish but also start getting expensive when you buy them all at once. I noticed this a lot with the curry, honestly; it’s a great one to have in the personal recipe book for a spoonie because it’s literally just “throw everything into a pot for a couple of hours”, but the number of spices it needs can be really intimidating, price-wise. So I thought about it and came up with a couple of ways that the sticker shock can be at least minimised when it comes ot herbs.
Grow your own. I know how that sounds, I really do. I will say this, though - it’s not as hard as some people seem to think. I live in a north-facing apartment that really does not get a lot of light and last year was an absolute bonanza of fresh herbs to use in cooking. Plus combine that with a dehydrator and you’ll be more likely to give away cooking herbs than to have to go buy them from the supermarket. Hell, my Scarborough Fair Collection (literally parsley, sage, rosemary, and thyme) has been surviving outdoors in a pretty horrific cold snap, as has some mint and my strawberry plants (though they’re obviously not bearing fruit right now). I was also growing marjoram, oregano, dill, cilantro, and basil, plus cayenne peppers, peas, and tomatoes - most of which I’ll have to replant this year. Even if all you’ve got is a windowsill, these plants are hardier than you’d think. Just requires doing the rounds with a watering can. If that’s a route you decide to take, get one of the little 1 litre watering cans; something small and easy to lift. If you’re short on space, priority for planting should be basil (lots of basil - pesto sauce is super easy to make), oregano, cilantro, dill, thyme, rosemary. ...You know what? I’ll just stick with “this gets its own post later”.
Buy in bulk ... a bit at a time. The good thing about dried herbs and spices is that they take a very long time to go 'bad’, and you don’t normally need a whole lot of each in a recipe, so you don’t run out quickly. Still, stuff like green cardamom pods tends towards the costly, and the cornucopia of spices you need for a good curry ... it adds up. So buy the spices a piece at a time - turmeric and cumin one big shopping day, garam masala and clove on another big shop, green cardamom pods on their on the next time, and so on. It takes some organisation, but it helps in two ways - spreads the cost, and gives you time to arrange some space for your sudden bounty of spices. Don’t buy in bulk the first time, just in case you don’t like the recipes you can use this stuff with, or if it’s too much spoon expenditure. But if you do find something you like, usually you’re using a teaspoon or less of these things, so you’ve got a lot of time to buy a bulk package of those items over the course of a lot of shopping trips, and just refill the original spice jar from that when it’s empty.
Honestly, that’s about it. There are ways to spread the cost and to do away with it entirely in some cases, but at the end of the day, stuff costs too much money and there’s not a whole lot we can do about it at this point. I’ll keep adding money-saving tips to these recipes, since I know it’s incredibly tricky to manage a budget when maybe you’re not up to working full time, or when more money than is reasonable needs to go on medication etc. I find it helps to remind myself that yeah, that pork roast was expensive but that’s five-six days’ worth of meals right there, so a lot less I need to buy; doesn’t make the pain of sticker shock go away, but it soothes the burn a little.
4 notes
·
View notes
Text

The Benefits of Growing Organic Microgreen Seeds: A Guide for Urban Gardeners
In recent years, the popularity of organic microgreen seeds has soared among urban gardeners and health enthusiasts alike. Microgreens, the young seedlings of vegetables and herbs, pack a powerful punch of nutrients and flavour, making them a favourite addition to salads, sandwiches, and smoothies. If you’re looking to grow your own fresh, organic produce at home, organic microgreen seeds are an excellent place to start. In this guide, we’ll explore the benefits of organic microgreen seeds and why they’re a must-have for your indoor garden.
What Are Organic Microgreens?
Microgreens are tiny, edible plants harvested just after the first true leaves have developed. Despite their small size, microgreens are incredibly nutrient-dense, often containing higher concentrations of vitamins, minerals, and antioxidants than their mature counterparts. Organic microgreen seeds are grown without the use of synthetic pesticides, herbicides, or fertilizers, making them a healthier and more sustainable choice for you and the environment.
Health Benefits of Organic Microgreens
One of the most compelling reasons to grow organic microgreen seeds is their impressive nutritional profile. Studies have shown that microgreens can contain up to 40 times the nutrient levels of fully-grown vegetables. This means that a small handful of organic microgreens can provide a significant boost to your daily intake of essential vitamins and minerals, such as vitamin C, E, K, and beta-carotene.
Incorporating organic microgreens into your diet can support a healthy immune system, improve digestion, and reduce the risk of chronic diseases. Their high antioxidant content helps combat oxidative stress, which is linked to aging and various health conditions.
Why Choose Organic Microgreen Seeds?
When you choose organic microgreen seeds from a trusted source like All That Grows, you’re opting for seeds that are free from harmful chemicals and genetically modified organisms (GMOs). Growing your microgreens organically ensures that you’re consuming produce in its purest form, with no unwanted residues. Plus, organic farming practices are better for the soil, water, and biodiversity, making them a more sustainable option for the planet.
Growing Organic Microgreens at Home
Growing organic microgreens at home is surprisingly easy and requires minimal space, making it perfect for urban dwellers. All you need is a shallow container, organic microgreen seeds, potting soil, and a sunny windowsill. Within a week or two, you’ll have a fresh crop of microgreens ready to harvest.
Here’s a simple step-by-step process to get you started:
Fill a shallow tray with organic potting soil.
Sprinkle the organic microgreen seeds evenly over the soil.
Lightly press the seeds into the soil and mist with water.
Cover the tray with a lid or plastic wrap until the seeds germinate.
Place the tray in a sunny spot and water regularly.
Once the microgreens reach a height of about 1-2 inches, they’re ready to harvest. Simply snip them at the base, rinse, and enjoy!
Conclusion
Organic microgreen seeds are a fantastic investment for anyone looking to boost their health while enjoying the satisfaction of growing their own food. With their rich nutrient content and easy cultivation process, organic microgreens are a great addition to any urban garden. Explore the wide variety of organic microgreen seeds available at All That Grows and start your journey to healthier eating today!
0 notes
Text
Indoor Herb Gardening: Fresh Flavors Year-Round
Imagine having a garden bursting with fresh herbs right in your kitchen. Indoor herb gardening is a convenient and rewarding way to have fresh flavors at your fingertips all year long. Whether you're an experienced gardener or a beginner, growing herbs indoors is a delightful project that enhances your culinary creations and adds a touch of greenery to your home. Here's how to get started and ensure your indoor herb garden thrives.
Why Grow Herbs Indoors?
Freshness and Flavor
Indoor herbs offer unparalleled freshness and flavor for your cooking. Snip a few leaves, and you'll immediately notice the difference compared to store-bought options.
Convenience
Having an indoor herb garden means you can harvest herbs whenever you need them, regardless of the season.
Space Efficiency
Even if you have limited space, you can grow a variety of herbs in small pots on your windowsill, countertop, or hanging planters.
Choosing the Right Herbs
Basil
A staple in many cuisines, basil thrives indoors and adds a burst of freshness to dishes like pasta and salads.
Mint
Great for teas, desserts, and garnishes, mint is easy to grow but requires frequent pruning to prevent it from taking over.
Rosemary
This hardy herb adds a delightful aroma and flavor to roasted meats and vegetables.
Thyme
Perfect for soups, stews, and sauces, thyme is a low-maintenance herb that thrives indoors.
Chives
Chives are versatile and add a mild onion flavor to a variety of dishes, from omelets to salads.
Setting Up Your Indoor Herb Garden
Light
Herbs need plenty of light to thrive. Place your herb garden near a south-facing window where they can get at least 6-8 hours of sunlight daily. If natural light is insufficient, consider using grow lights.
Containers
Choose containers with good drainage to prevent waterlogging. Clay pots, ceramic pots, and even repurposed containers can work well as long as they have drainage holes.
Soil
Use a high-quality potting mix designed for indoor plants. Avoid garden soil, as it can be too heavy and may contain pests.
Watering
Herbs need regular watering but avoid overwatering. The soil should be moist but not soggy. Allow the top inch of soil to dry out between waterings.
Caring for Your Herbs
Pruning
Regular pruning encourage bushy growth and prevents herbs from becoming leggy. Use scissors or pruning shears to snip off the top leaves and stems.
Feeding
Feed your herbs with a balanced, water-soluble fertilizer every 4-6 weeks to promote healthy growth.
Pest Control
Keep an eye out for pests like aphids and spider mites. If you spot any, treat your plants with insecticidal soap or neem oil.
Enjoying Your Harvest
Culinary Uses
Add fresh herbs to your recipes for an instant flavor boost. Basil is great in pesto, mint in mojitos, and rosemary in roasted potatoes.
Preserving Herbs
To enjoy your herbs even longer, consider drying or freezing them. Hang bundles of herbs upside down to dry, or chop and freeze them in ice cube trays with a little water or olive oil.
Conclusion
Indoor herb gardening is a fulfilling hobby that provides fresh flavors and greenery year-round. With a little care and attention, and the help of indoor LED grow lights, you can enjoy the taste and aroma of fresh herbs in your cooking every day. So, start your indoor herb garden today and experience the joy of harvesting your own homegrown herbs.
#led grow lights#best led grow lights#commercial led grow lights#indoor led grow lights#california lightworks
0 notes
Text
8. ZeroWaste:
Habits I started after learning about ZeroWaste:
saving seeds from fruits, I want to try grow them, buying fully grown plants costs money, whatever green looks nice
washing and drying egg shells to crush into fertilizer water or to put near plant roots over soil
saving fabric scraps, I want to make pillow again, it was easy to do
growing herbs on windowsill, I would love to have nice garden, but its nice to use self grown herbs for tea, salad or baking, I have relatives who like plants and hand crafts and inspiration jumped to me
drying fresh and washed fruit peels, I used these powdered in cake, in slices in tea, scent pouch and decoration for candle
making vinegar from fruit scraps and using it as home cleaner, I used apples and sugar, but vinegar can be made from any fruits and sugar, it needs to be left to ferment with some airflow, its ready after two weeks and can be mixed into water so that it wont be too strong to surfaces, it can be used on metal, plastic, some materials it can't be used on because it is too strong wood, porcelain, mineral stone, it can be used to kill bacteria from surfaces and remove scent from clothes by adding little bit into cloth wash, I tried this because I developed health issues and finding
drying used coffee grounds to use later for plant fertilizer water
using left over tea for hair mask, using it long time or often it will change tone little bit, for short time it softens hair and makes it silky, I tried black tea and later with other one result wasn't as soft
using freshly used coffee grounds for refreshing face scrub / body scrub, coffee and coconut oil etc, don't store the mix - use it same day, it will go bad fast
ZeroWaste habits I want to try:
making patch work blanket from left over fabric pieces, patchwork looks so nice, I tried to crochet a patchwork shirt before but it was too difficult, but I can do anything with ready pieces just need to attach them together
compost, sounds funny but I would like to how it works close and what effects it has on garden, watching effects of fertilizer mix was fun it made herbs more lush and green
make bread snack with
roll macrame yarn from long fabric scrap slices and use it to make decorative items as gifts, things like bag shoulder strap, around the neck key chain, fabric bowl, plant pot cover
0 notes
Last Seen Blogs

ossielv
Ossiel V

sizzlingsuitlover-blog
JinOwnz

kissydevil
dear believer, see me

lov4hgirl
yuki

the-garbanzo-annex-jr
The Garbanzo Annex Jr