#art technique tutorials
Explore tagged Tumblr posts
Visit Tumblr Blog
Explore Tumblr blogs with no restrictions, modern design and the best experience.
Last Seen Tumblr Blogs


Fun Fact
In Q3 of 2020, 31% of US users access the Tumblr app daily.
Text
November 7: Your daily creative pep-talk
Hey, creative? Your art matters more now than it ever did. Let's make sure it gets finished.
youtube
#createit22#overcoming writers block#creative writing tips#writer's inspiration#breaking through writer's block#writing exercises#motivation for writers#writer's block solutions#writing challenges#author productivity#stress relief for writers#artist support#creative guidance#artistic development#artist resources#art community growth#overcoming creative blocks#art career advice#inspiration for artists#marketing for artists#art technique tutorials#Youtube
0 notes
Text
a little tutorial
#reserved#mishima technique#mishima pottery#pottery#ceramics#ceramic#ceramic art#carving#underglaze#timelapse#video#art video#art techniques#ouroboros#snake#tutorial#sgraffito#greenware
3K notes
·
View notes
Text

✨🥀 Let's mourn with mama
#my art#snappy's art tag#kirby oc: sir meteor#mama meteor#mama posting#on my background painting arc#shout out to gouache landscape tutorials I had to watch a few of those to learn new techniques#and shout out to my plant collection for being there when I needed to study plant silhouettes#but this piece… Ough#there’s a sweetness to it there’s a melancholy to it#for those who have read far enough: did you guys notice the red flowers :) starting at the base of the skull and pooling around meteor#yeah#could mean anything
163 notes
·
View notes
Text
The Why of Sewing 5: Avoiding Bad Tutorials
There are so many tips and tricks and tutorials online and some of them are handing out great advice, but not all the advice is good. Here are a few things that if you see happen in that video you should immediately take a larger grain of salt.
Red Flag #1: Sewing over pins
Sewing over pins is controversial. Some will tell you it is fine, and it almost never causes a problem. Which may be true, but what they don’t tell you is what actually happens if your needle hits a pin. The best case scenario of a needle hitting a pin is a bent pin and a damaged needle.
Sewing machine needles are not designed to hit metal, ever. At the very least every time the needle passes through the fabric it becomes less and less sharp. Hitting a pin will destroy the tip. It can also bend the needle. Or it can break the needle. It can cause the needle to jam up and disrupt the timing of the moving parts inside the machine. A machine with broken timing is generally repairable by a professional, but do you want to spend $100 and loose access to your hobby for a week because you didn’t want to remove a pin? That may be the worst case scenario to you - but remember that broken needle? If you are lucky, the thread through the eye keep all the bits of the needle in one place, but when the needle breaks fragments sometimes go flying. They can fly into your machine, causing damage (again $100 and a week of lost sewing time). Or they can fly out into your room, lurking to be stepped on by yourself, or your child, or your pet. OR they can fly into your face. Many a sewist has a tale of a needle fragment bouncing off their glasses or having to take a trip to the ER because they didn’t have glasses on. It isn’t how frequently a problem occurs when sewing over pins, it is how disastrous the outcome has the potential to be when it does occur.
When it comes down to it, sewing pins is a dangerously bad habit that can damage your machine and your person. If you see someone sewing over pins in the tutorial you can lay money down that they a) do not know better or b) know and do not value your safety.
Red Flag #2 Not Pressing Seams
If you are watching the tutorial and you never see the creator pressing, or see evidence that seams are pressed be wary. I see this most often in "tutorials" made by folks who have just learned a very little bit and want to monetize their new knowledge. If the seams in their final product look like they laid a hardcover book open on a table, that is a big red flag.
I saw something somewhere long ago that said “Sewing is just ironing with extra steps” and no truer meme has ever been made. Wish I could find it. No teacher worth your time is skipping the ironing. Look for the following things: ironing on camera, mentioning that pressing should be done at certain points, and of course nice flat seams.
Red Flag #3 Big Changes with an "Easy Method"
Beware of “easy” tutorials that make a significant change to a garment. Your jeans will not become high or low waisted from anything short of taking them apart and remaking them. They can become shorts rather easily. Yes it is possible to turn jeans into a skirt but I am old enough to know better. It won’t be easy and it will not be cute. Best case scenario you will look fundamentalist.
Making one garment into another kind of garment is usually more difficult than sewing from scratch.
Orange Flag #1 Unfinished Seams
I am calling this an orange flag, but ONLY an orange flag if the original tutorial was focused on costumes and cosplay. If the tutorial is teaching you to make anything that needs to survive more than a couple wears and washes this becomes a red flag.
It is common in cosplay to leave seams unfinished, as an item has limited wear and washing in its future. Unfinished fabric edges fray from washing and friction, some fabrics fray faster than others and leaving your seam allowances on a regularly worn garment as naked as a jaybird is a glaring mark of inexperience.
There are many types of seam finishes, and there are times when seams DON'T need extra finishing, but a good tutorial will either show the finishing, describe ways to finish the seams, or explain why they don't need to be finished. Some examples of seams that can be left to fly free are seams on the bias, most knit fabrics, and seams that will be enclosed in a lining.
Orange Flag #2 Gimmicks and "Hacks"
Lifehack has become code for a gimmicky trick that rarely works the way it is shown via television magic. If you see a nifty trick in a short video, look at the account it comes from. If everything they post is about gimmicks or shortcuts - using straws or cardboard contraptions to do things in sewing with no explanation of how they are normally done, be wary. It is one thing to show a tip, but if all they do are 30 second gimmick videos - it is unlikely that those tricks will actually work when you try them. Most will likely be no better or worse than a waste of your time.
Now that I've given you things to avoid, here are some youtube channels I personally watch and love and learn from.
If you do not know how to sew - start here https://www.youtube.com/@Evelyn__Wood Even if you are not into vintage style I think Evelyn Wood is one of the best at explaining how sewing is done to the beginner.
This is the only channel I actually tune in for live videos, but even if you don't catch it live Saremy has a wealth of knowledge and always goes into why things work the way they do. https://www.youtube.com/@SewSewLive
Sewing therapy is another channel where you can just watch someone go through the process of sewing from start to finish. She shares tips, and there is nothing better about learning the order of operations than just watching someone sew an item. https://www.youtube.com/@SewingTherapy
If you do not have or want a sewing machine start here. https://www.youtube.com/@sewncompany - Many years ago the creator and I lived in the same city and would occasionally cross paths. I don't think she knows me from Adam but I love her tutorials and she has been kind and gracious in every encounter we had. Her tutorials include both right and left handed instructions!
General tutorials from someone who knows what they are doing https://www.youtube.com/@ProfessorPincushion
Garment Sewing content that includes tips as well as styling ideas. Karina does a lot of pattern testing and I think does a really good job at showing how to incorporate the garments into everyday life. https://www.youtube.com/@LiftingPinsandNeedles
If you want to learn to quilt, start here https://www.youtube.com/@JustGetitDoneQuilts
and here https://www.youtube.com/@thelasthomelyhouse - this one is a lot more inspiration for me than a tutorial but its kind of a combination.
Stitch with Rachel has lots of quilting tutorials and inspiration and is really great for English and Foundation Paper Piecing tutorials. https://www.youtube.com/@stitchwithrachel
#quilting#sewing#sewing tutorial#fabric#textile art#sewing tips#sewing techniques#the why of sewing#fabric grain#Youtube
98 notes
·
View notes
Note
I audibly gasped at your Totk Zelda drawing and most recent Link drawing!! Your art is genuinely so cool and I love how you use colours :D
Thank you!! I'm actually a little colorblind (but i still see color, just not perfectly) so getting compliments on color is awesome for me. Primarily in my storyboarding day job i'm just doing black and white sketches so apart from my fanart, i get almost no color practice in my work.
For my more involved "cinematic" pieces i'm using a different methodical coloring and lighting process which is difficult to parse succinctly. But conversely, for my color sketch portraits you mentioned, I'm using a photoshop gradient map, which is essentially a dynamic color filter laid on top of my black and white sketches.

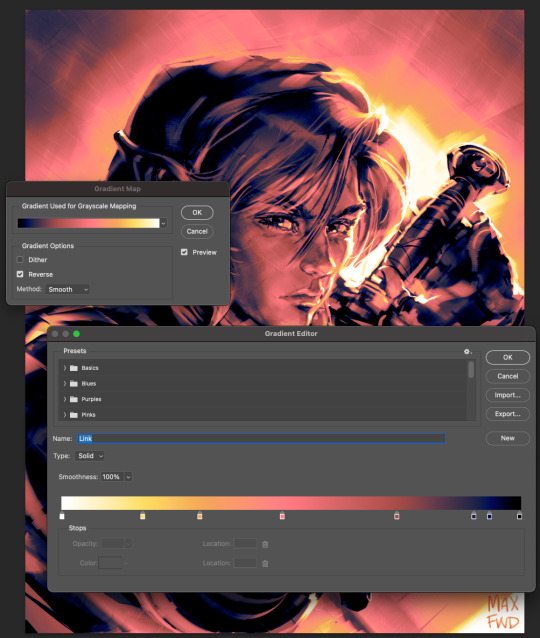
The gradient map settings look like this; if you have a cool black and white photograph or drawing (needs to have a high dynamic range of lighting) try giving the gradient map a try. It's pre-AI tech so I don't consider it cheating but i'm honestly surprised it's not more widespread. This technique was shown to me many many years ago by a director client and friend of mine, as a means to quickly colorize storyboards. Appropriately, he told me he learned a lot of great color tips like this from old Tumblr tutorials :) Please share with someone who you know loves to draw in black and white but struggles with color (like me!!)
#zelda fanart#the legend of zelda#tloz#rough sketch#art process#concept art#art#art timelapse#zelda#figuredrawing#art tutorial#art tips#artists on tumblr#art resources#art techniques#fantasy illustration#fantasy art
56 notes
·
View notes
Text
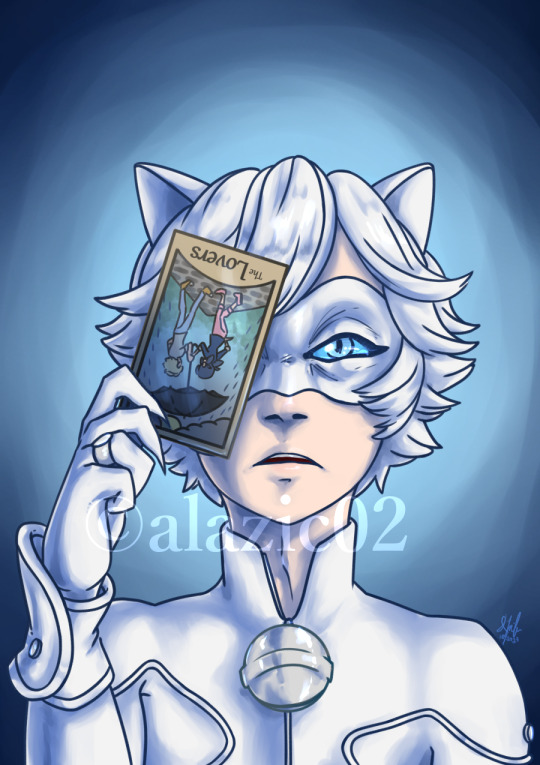

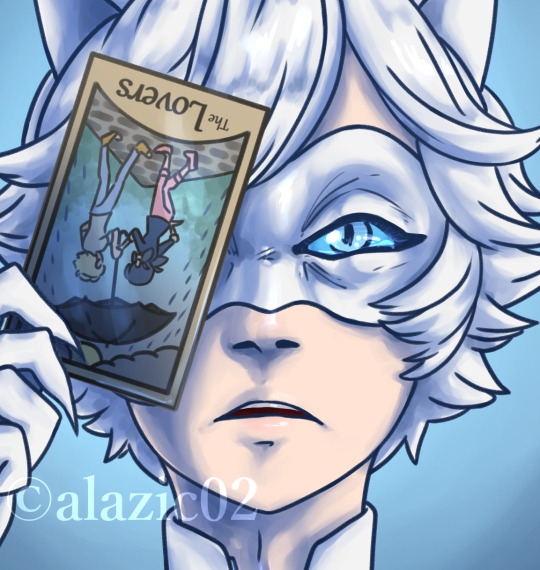
My full piece for the Le Blanc zine, a Chat Blanc Miraculous Ladybug zine hosted over at @leblanczine! I had a lot of fun working on this piece, playing with the shadows and saturations. Everyone's work looks amazing and it all came together so well!
The leftover sale runs through May 4, 2024 so make sure you grab what's available :)
Tumblr post || Shop
Artwork ©: alazic02 | buy me a ko-fi
Do not repost.
#miraculous ladybug#leblanczine#le blanc zine#chat blanc zine#zine#miraculous ladybug zine#chat blanc#art#my art#fanart#digital#alazic02#theres alt text on the first image that describes the full piece! the other two are closeups#idk if theres much left but theres a promo code 'leftovers' for 20% off your order#anyway i really enjoyed rendering this one actually and that took up most of the time i worked on it#i gotta look at more tutorials and stuff bc i feel like ive plateaued in terms of techniques for digital art and i wanna update my style
345 notes
·
View notes
Note
hi! firstly, i love your art so much! you're one of my biggest inspirations right now in my own art journey 🤍. Ok my question is that, while you were improving go where you are right now, are there any tutorial videos or youtubers you watch? if you do, who would you recommend? :3
I shit you not this is what my screen looks like every time I draw
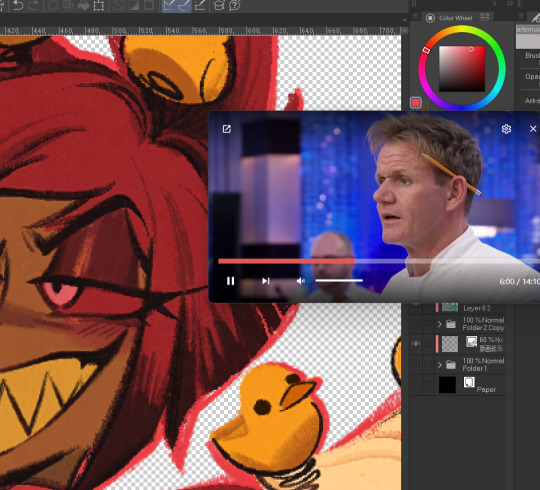
And I hardly watch tutorials ( Unless it's Adobe stuff, certain app settings idk, 3d/Game dev coding or Graphic design) 😭 Digital Art: SamDoesArts / tppo Graphic Design/Editing: Envato Tuts+ / Satori Graphics Animation: Alan Becker / Toniko Pantoja
#messyr#I'm more of a hands-on learner and like to imitate techniques but i do tend to watch sometimes. SOMETIMES..#70 percent of gordon videos 20 percent of Black holes/ space videos 10 percent tutorials fr AAAAAAAAAHAHAHHA#art process
225 notes
·
View notes
Text
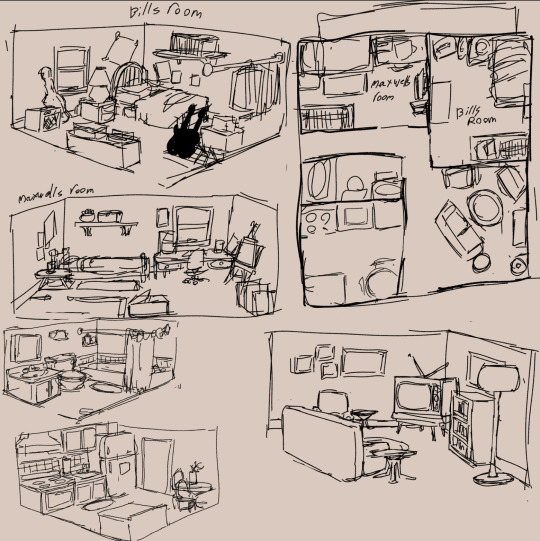
I have learned how much more easier and better it is to plan shots in panels by laying out the area your characters are in, because like, you KNOW where shit is
Just do like, a simple floorplan of the area, at the very least, and it helps a million, I swear
Like this, doesn't have to be as in depth but it helps fr
#art#drawing#artists on tumblr#small artist#artist#my art#web comic#comic art#comic artist#art advice#drawing advice#art tutorial#art tips#drawing techniques#drawing tips#drawing tutorial#comic tips
253 notes
·
View notes
Text
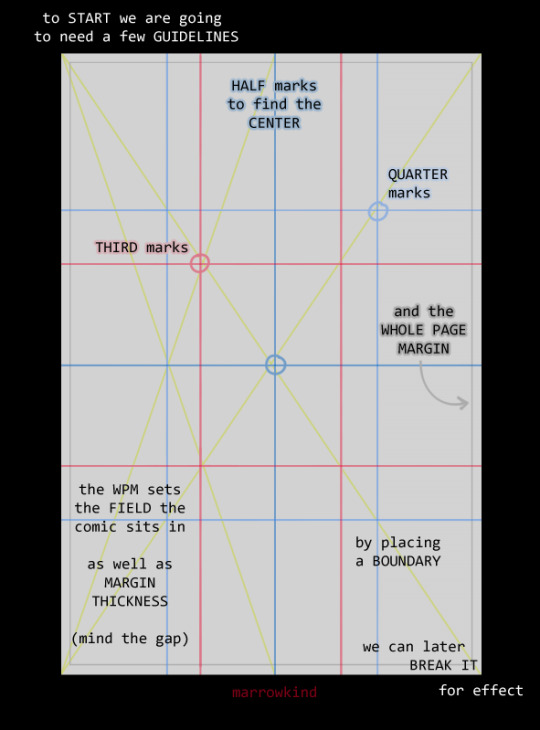

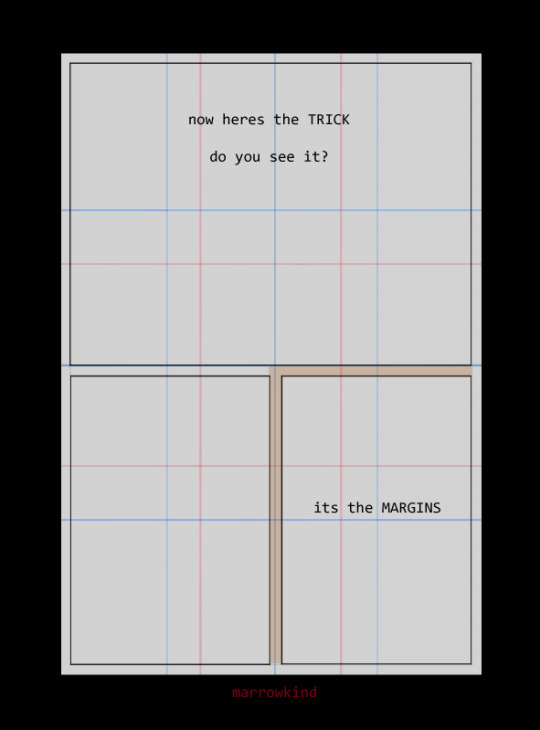

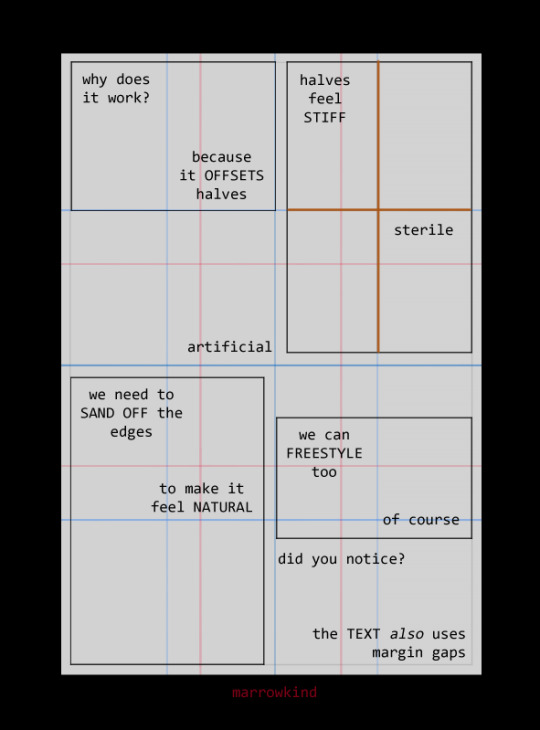
Some basic comic paneling advice.
Obviously, this doesn't get into Space Is Time, beats and pacing, or more general composition principles, but it's meant as a starting point to just get panels on a page.
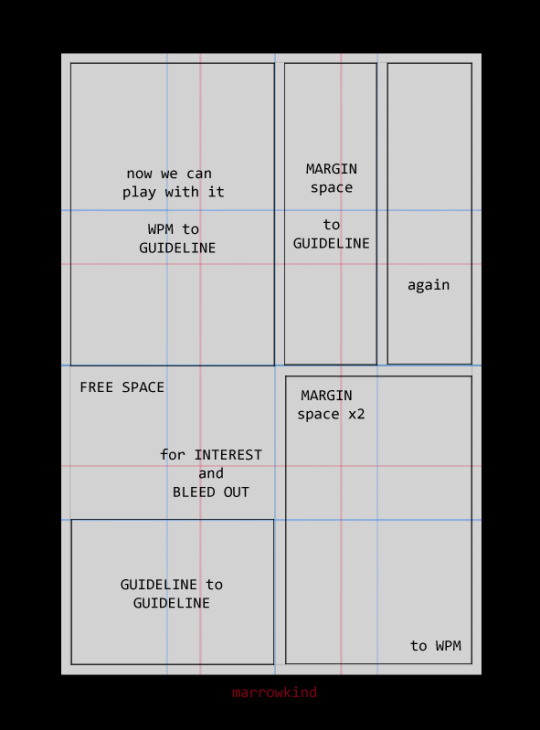
Sometimes layouts are just setting down panels, which you then feel out re: readability and beats. Sometimes what you put down doesn't work, but that's okay! Just keep playing and puzzling.
You can find the half, quarter, and third marks by making lines from the corners of the whole page, then lines from the corners of the vertical half of the page.
#comic advice#comic tutorial#webcomic tutorial#webcomic advice#comic layout#layout template#comics#art advice#most of my comics rn are in various stages of completion so i don't got much to show but!#this technique has helped me figure out layouts more quickly so i wanted to share#this is for comics with gutters but gutterless can follow similar techniques albeit the proportions are more fiddly#would love to do a part 2 that gets more into pacing and composition but we'll see
17 notes
·
View notes
Text
Smashing out Mesh (crochet)
So I have been doing a lot of filet and mesh crochet recently and I got to thinking.
There has to be a faster way.
Disclaimer: This is not my original idea, and I will admit that I basically took this and extrapolated. Hence why I'm sharing this for free.
I figured out the equation that tells you how to crochet a lot of rows at the same time.
Caveats:
I've tested this on mesh (3DC blocks) and fillet (4DC blocks) up to 5 rows at a time. I use ergonomic hooks and doing more than that on them just isn't physically comfortable with Super Saver yarn, though I can confirm that a 5 row setup also works with lace weight yarn so if the yarn is thin enough or you're using a Tunisian hook I don't see why you couldn't do more than 5 at a time.
You don't have to use this method, but if you do want to smash out a quick mesh or filet project, you can.

I made this on a 11" tablet so it should be very zoomable on any device for readability.
Enjoy!
#Crochet#Technique#Crochet mesh#Filet crochet#Multiple rows#Time saver#fibre arts#Image tutorial#Equation#I am apparently that one adult who does use algebra after I left school
32 notes
·
View notes
Note
I really would love an idea of your process I'm still learning how to digital art and you're such an inspiration! I know you have a lot of info but I wanna get better and you do such good work! Sorry if this is rude to ask, I've followed you for years and just was able to afford a tablet. ^w^ If you don't want to answer you don't have to I love your art!!
YEAS OFC!! congrats on your first tablet, i know how excited i was w mine (tho i had been using mouse for so long that it took a long time to get used to it haha)
honestly there's a lot i could give tips for it really depends on what program you're using ! I still use Paint Tool SAI personally, but there really isnt any one best program guaranteed to make your art better, never get caught in the trap of thinking your program makes or breaks your art cuz it's really not true..!
but general tips for digital art itself:
experiment with layers, this is the very base of anything digital art (you can still use single layer but i gotta stress how understanding layering and layers is a skill that transfers to a LOT of digital anything, even video editing)
relatedly, here's a tutorial i did on layer folders and clipping! it might be a lot at first and i understand! all of my past tutorials are tagged as #tut ~
get to know your program's tools and shortcuts. shortcuts will make you faster at digital art without even needing to get faster at the art itself (assuming you're using something with a keyboard). majority of my speed these days comes from experience w what im drawing but definitely also from shortcuts.
if you see any tutorials you want to try, try them!! don't sit on them and do nothing with them, art is as much muscle memory as it is knowledge. even if you know all the steps you still gotta "train" yourself for it yanno?? it prolly won't do much just sitting there in a reblog tag..!
don't be afraid to colour pick to learn. lots of artists say dont colour pick, but like, as long as you aren't doing it to recreate their character then tbh you can still do that to learn what's going on. sometimes a colour isn't what you think it is..!
trust the process!! if u really aren't feeling a piece that's ok, but if you ever try digital painting you NEED to trust your process. it will always look like garbo mess at first before it's refined, don't get discouraged each time cuz then you won't finish anything!! likewise not everything needs to be shared, no one has to see the drawings you give up on or didn't like, so try not to feel bad about something not turning out either!
try not to get hung up on comparisons between you and other artists. this kind of thinking can really make art not fun anymore 0(
ultimately art is about fun imo, if you are having fun trying something, or making something, or you just want to draw the same OC over and over then do it! i personally have done a study on figures maybe 3 times in my entire life because that kind of thing bores me, i do art because it's fun and feels good, intrinsic motivation is the best imo!
if you had a specific question about anything tho, either how i've done something or about a program/tool you can always inbox me! i might be slow to reply cuz busy a lot, but i genuinely love to share now (i know in the past i've been protective but i've grown a lot since then i like to think...!)
#honestly the hardest part i remember when i started was learning programs!#they can be very confusing#in that case you can look up beginner tutorials for your program!#i am only experienced with PTS unfortunately so i can only help with that#sorry for the ramble i think about art a lot JKBSDKBFSDB#but i do have a few topics in my tut tag#i've considered a series of topics for beginners in the past .......#either way tho if u had anything specific or wanted to know how i do something specific lmk !!#most of my techniques aren't PTS exclusive afaik#mostly just layers and layer modes!#text#ask#not art#tut#anon#thank you btw UYAAYY
12 notes
·
View notes
Text
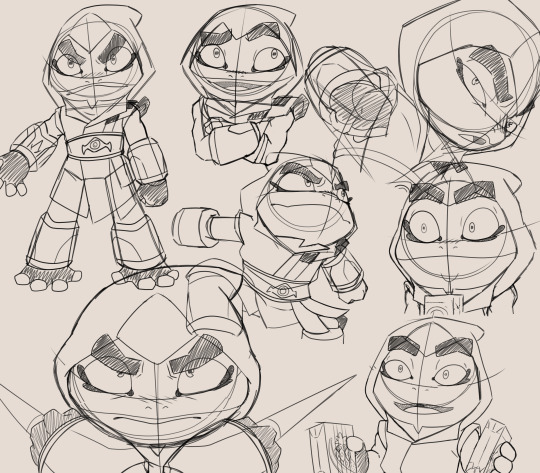
Found some practice sketches I did bout a month ago of me reteaching myself how to draw best boy Bullfrog,,, again lol
A different theme I did with these though is that if he was injured I would fix em up (The right column is the main product of this 👍)
#in conclusion: he is generally very round yet has very sharp features#some angles are incredibly difficult with the circle technique doh#arthrobug#bugbrain#art#captain laserhawk#bullfrog#clh bullfrog#clh#clhabdr#doodles#sketches#practice#honestly should I make a short and basic tutorial of how I draw out bullfrog and rayman? might help s o m e one lmao
122 notes
·
View notes
Text
5 jab counters
#kickboxing#martialarts#fitness#workout#boxing#workoutmotivation#gymlife#gym#like4like#gymmotivation#boxing jab#muay thai#muay thai knee#muay thai videos#muay thai motivation#muay thai sparring#muay thai kick#muay thai class#Muay Thai techniques#fitness journey#gym video#gym life#gym body#gymrat#gym motivation#kickboxing tutorial#martial arts instructional video#martial arts motivation#Muay Thai drills#stronger than excuses
30 notes
·
View notes
Note
sry for the out of the blue ask but your art is so freaking gorgeous i am seriously floored!!! i was wondering if you would share how you get that lovely grain texture in your drawings because it's like a visual stim to me. i love it!!! hope you have a wonderful day <3
thank you so much!! this ask has totally made my day 🫶🌟
i’ve recently become obsessed with the stock procreate Noise Brush. i’m using it for rendering a lot right now because i like how abstract it is and it pairs well with rough sketches.

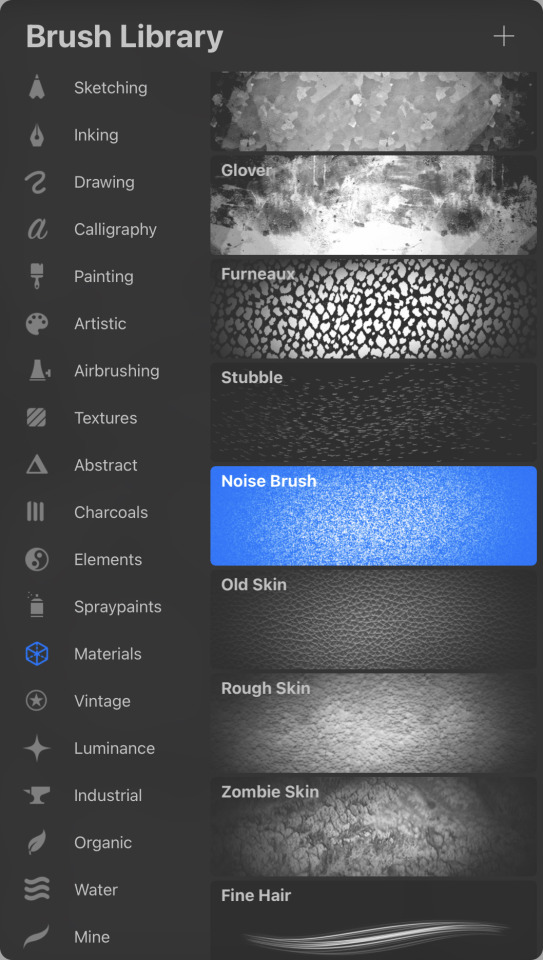
the above sketch looks way more complete and 3D despite still being my first draft!
i also use the stock procreate Dry Ink brush because it blends nicely with the noise brush but lays down a much denser line, so it’s good for coloring in large spaces while still keeping that painted look.
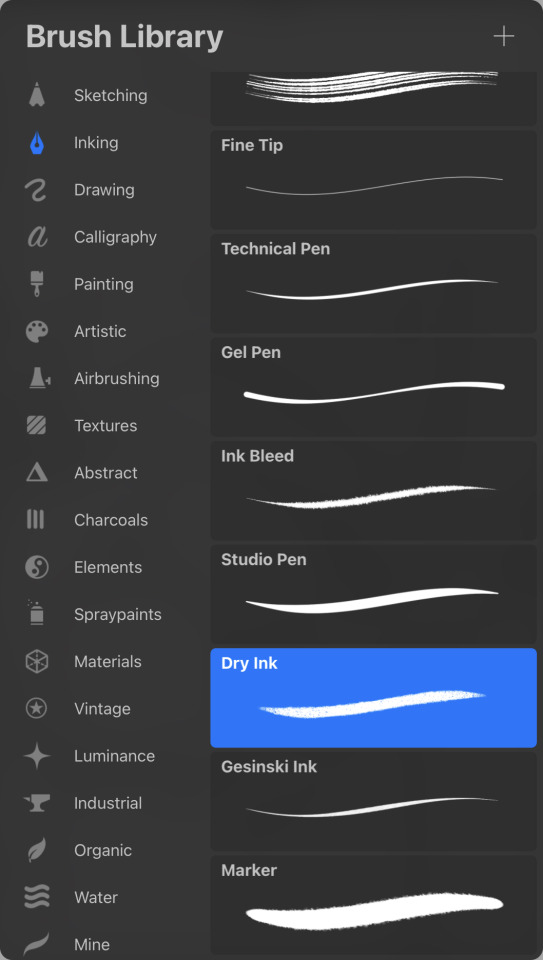
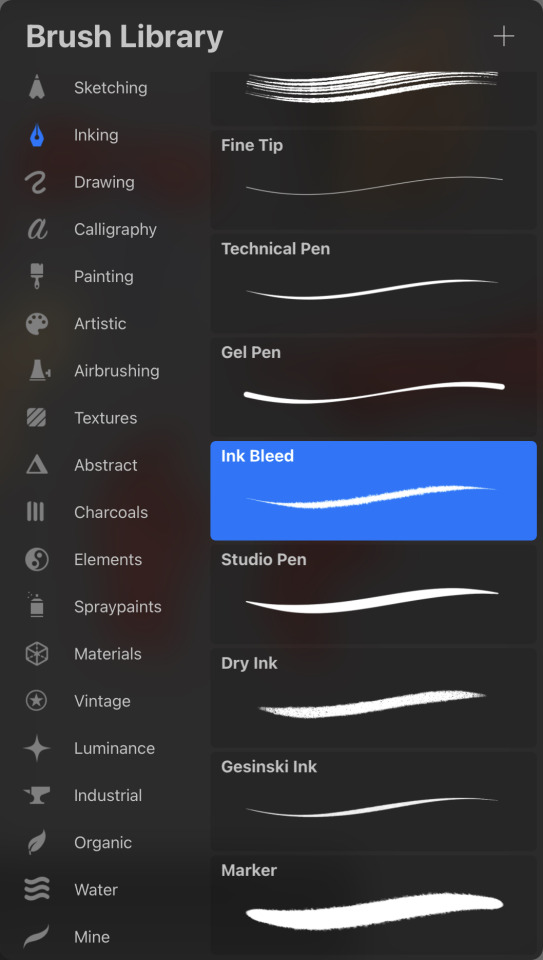
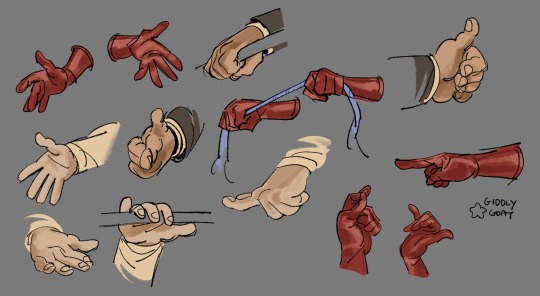
these hands were inked with Ink Bleed because i love the crunchy texture of that brush. it has a very nice sketchy quality that can still produce some really precise lines.
as for rendering with the noise brush, i like to do each big block-in on a separate layer. i lay down a bulky shadow with noise and carve out wherever the light hits the surface using a dry ink eraser. that way, it looks nice and stenciled. when i like my new shadow, i usually combine it down to the main shadow layer for simplicity’s sake, and begin a new layer for the next shadow. this is so that i can easily erase and create the perfect gradients without affecting the pre-existing shadows.
i’m always happy to share my techniques and talk about them! i’m always learning new things and changing how i do things and i have no ten commandments lawl. i’m glad you say the noise is like a visual stim because it’s the same way for me, it’s so satisfying! i hope this is helpful :’D
#THANK YOUUU I LOVE ASKS LIKE THESE 🫶#i’m having a splendid time i hope you are too!#you’re the best! go make some awesome art and have fun!#asks#anon#no id#videos#giddly’s art#art tutorials#art techniques#idk lol
30 notes
·
View notes
Text
The Why of Sewing 3: Fabric Anatomy (Fiber Content)
This post is in a series I am starting that is going to talk about concepts in sewing and fiber arts and try and explain some of the whys behind the hows.
The beginner sewist is often (correctly) advised at the beginning of their journey to start with cotton fabric, sometimes specifically woven cotton, but not always. Nevermind that cotton fabric can vary from a tshirt to denim and canvas.
We have learned the difference between a knit and a woven fabric in my previous posts (check the tag #the why of sewing which should bring up the whole series). Let's talk fiber content.
Like fabric structure I basically break fiber down into two groups: natural fibers and synthetic fibers. Below I am going to talk about the fibers you are most likely to encounter as you shop as a home sewist. It is NOT a complete list of fibers, nor could I list the entirety of fabric types made with each fiber.
Natural fibers: these are fibers that come from plants and animals and require minimal processing to be made into fabric.
Wool: This comes from sheep, which are sheared 1-2 times a year. The animal is not hurt in the process and even sheep not raised for fiber production must be sheared for their health. Wool is warm, but breathable. It can be easy to work with in some ways, but it does shrink when washed and so many modern sewists avoid wool. Some folks have sensitivities to wool as well. Wool is most commonly used in suitings and knits.

Image: Shorn sheep in a verdant field (Source: By Roger Kidd, CC BY-SA 2.0, https://commons.wikimedia.org/w/index.php?curid=13035358)
Silk: Silk is made from the cocoons of silkworms, and generally harvested prior to the hatching of silkworm larvae. Silk is expensive to produce and considered a luxury good. Silk is shiny and lightweight, it can be surprisingly warm. Silk can loose its sheen in the wash and because the fiber is so delicate it can be difficult to sew. There is a lot of misinformation on the production of both silk and wool online. Worm Spit has been educating fiber artists about the process of making silk since 2002.
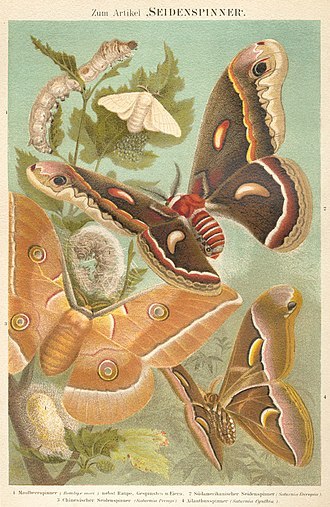
Image: a vintage style poster showing various stages of the silkworm moth (By Bibliographisches Institut, in Leipzig - Meyers Konversations-Lexikon, 4th Auflage, Band 14, Seite 826a (4th ed., Vol. 14, p.826a), Public Domain, https://commons.wikimedia.org/w/index.php?curid=2317808)
Cotton: Cotton comes from the cotton plant, there are several varieties commonly grown and it is the most common natural fiber used in textile production. The cotton fiber comes from the seed head of the plant. Cotton can be made into light breathable fabrics and warm cosy fabrics. The list of fabrics made from cotton might actually be endless but here are a few you might encounter: jersey knits, denim, quilting cotton, gauze, lawn, voile, sweatshirting, twills, poplin, oxford cloth, canvas...
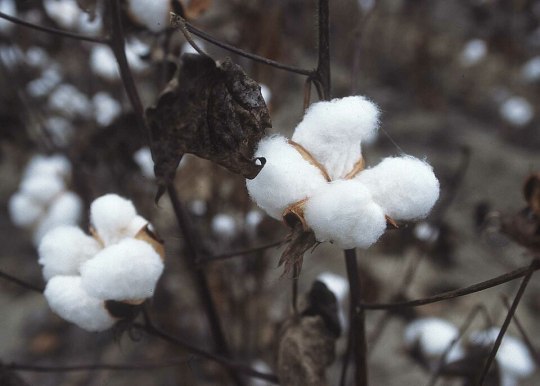
Image: the cotton boll, or seed pod (source: Public Domain, https://commons.wikimedia.org/w/index.php?curid=689304)
Linen: Linen comes from the flax plant. The fiber comes from the long stem of the flax plant and can be difficult to break down into a usable state. It is also difficult for modern spinning equipment to make into threads, which is why linen tends to be quite expensive in comparison to cotton. Linen is cool to the touch and very strong. It also wrinkles very easily. Coarsely woven linen can be uncomfortable for some to wear. Linen tends to be made into simple plain woven fabric, occasionally knit fabrics, and can vary in weight from handkerchief linen (very fine, almost transparent) to canvas. I recently reblogged THIS POST which had some incredible links regarding linen production.
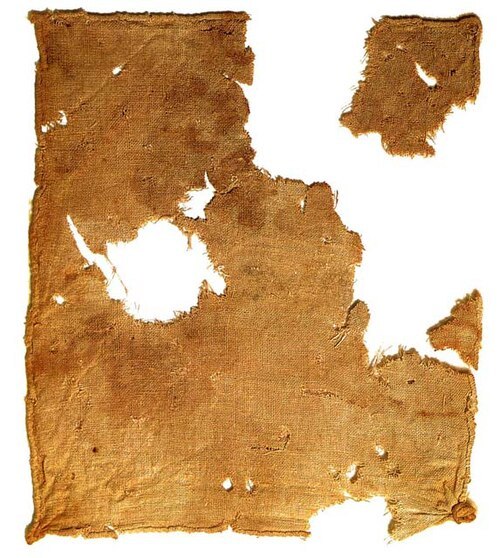
Image: linen cloth recovered from Qumran Cave 1 near the Dead Sea (Public Domain, https://commons.wikimedia.org/w/index.php?curid=248420)
Synthetic fabrics: these are fibers that have been manufactured through industrial processes.
Polyester/Acrylic/Nylon: These fabrics are plastic. They are made from different types of plastic, but ultimately a liquid petrolum product is extruded into a long filiment and made into cloth. They can be made into woven or knit fabric. The way they are made can have many different properties. Generally polyester is what you find in the home sewing world. Polyester is not breathable and because it is oil based it tends to hold on to smells. It melts when it is too hot and therefore can only be ironed carefully. Polyester also tends to be very strong and can help make very sturdy fabrics. Because polyester is very inexpensive to produce it is frequently combined with other fibers to reduce production cost.
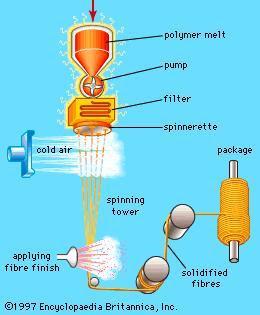
A diagram of "dry spinning" polyester fibers (source: https://encyclopedia.che.engin.umich.edu/fiber-spinning/)
Spandex/Lycra/Elastine: this is the stretchy stuff! Generally found in combination with other materials this is what makes fabric go beyond the mechanical stretch that is produced by the fabric structure. In small amounts mixed with cotton it makes a fantastic tshirt jersey, 100% spandex is great for swim and dancewear. As we discussed in the knit article I posted previously adding stretch to sewing does make it more complicated to work with, but used wisely spandex is your friend. Best not pressed excessively as the fiber has a protein structure that breaks down when it is hot. Also if you have a garment or fabric with a lot of spandex content you might want to consider avoiding the dryer.
Rayon/Viscose/Bamboo/Lyocell/Cupro/Tencel: There are SO MANY names for cellulose fabrics. These are sometimes categorized as semi-synthetic fibers, or even put in with natural fibers. They are all the same thing deep down. Cellulose (generally sourced from trees and plants) is chemically broken down into its most essential parts and then extruded into a filiment. These fibers were originally developed as a silk substitute. Rayons are fine, breathable, and have a drape that clings to the body. They shrink in the wash and can continue to shrink through several washes. They also can be fragile when wet. Rayons are made into both woven fabrics and knits and they tend to be thin and fine fabrics. Rayon fabrics, especially those labeled as bamboo are frequently greenwashed as environmentally friendly, because they are sourced from a renewable resource, but the process of producing cellulose fibers is highly polluting and uses significant amounts of water.
While there are outliers, most textiles you will encounter while shopping for fabric will be made of the above fibers. A deeper dive into these would be fun, but I find at least 3 potential rabbit holes I could go down every single post I make here.
#quilting#sewing#sewing tutorial#fabric#textile art#sewing tips#sewing techniques#the why of sewing#fabric content#fiber#fiber content#cotton#wool#linen#silk#rayon
103 notes
·
View notes
Text

Pencil drawing of a faucet, by Japanese artist Kohei Ohmori
#大森 浩平#Art#artist#pencil#pencil drawing#hyperrealism#duane hanson#faucet#water faucet#illustrations#high resolution#kohei ohmori#surreal#surreal art#figurative art#ron mueck#art tutorial#sketchbook#sketch#techniques
10 notes
·
View notes