#file searching tutorial
Explore tagged Tumblr posts
Visit Tumblr Blog
Explore Tumblr blogs with no restrictions, modern design and the best experience.
Last Seen Tumblr Blogs


Fun Fact
In February 2021, Tumblr had 518.6 million blog accounts.
Text
Heartbreaking: the Sparks audio shitpost i wanted to make is too complicated for me to make. I'm sure though that you would all have loved to hear what High C would sound like if every note in it was C
#the funniest thing about this is that whenever i tried to look for some sort of guide or any sort of help with how to do this#all that google would offer me were misinterpretations of my search#like i'd ask how to change every note of a song to the same note or something#and i'd just get answers for how to... idk change the key of a song or how to do it with midi files if anything#and if i add 'audio editing'? well now all i get are just tutorials for audio editing in general#which is all not what i'm looking for ofc. but maybe that's just google being the useless thing that it undeniably is now#i've been thinking about this since the post that i'm about to reblog dropped. the vision i have for this is beautiful#such a shame that i can't turn it into reality...#goosepost
5 notes
·
View notes
Text
maybe my horrendous inclination for computer guys is bc im so ass at computer stuff myself
#spent an HOUR looking at youtube tutorials downloading stardew valley mods cuz im so not tech savvy#my google searches are like: ‘where is finder menu’ ‘where is go bar in finder menu’ ‘how to move a zip file’#boomer levels skills 😭😭 EMBARRASSING
3 notes
·
View notes
Text
Okay this is so fucking stupid but I REALLY need help. I can't even figure out how to word this, but anyone who knows .HTML and coding. Please.
Here it goes: I have been teaching myself absolute BASICS about website coding. Ive basically taught myself how to place text where I want it, place some images/gifs, and buttons. It's a choose your own adventure game- you read the text, you click a button, it takes you to a new page with new text and new buttons. A small project to learn some of those little things.
This in mind: how do I turn this into a browser game? Are there sites that host these things? Do I have to pay for it? Is there something i need to do to make it like... a playable file that i can send as a whole to someone else for text playing??
#i just want to share my shitty little choose your own adventure game with someone so i can like. know it works?#but its all just.... files and folders. which i just dont know what to do with. i dont even know how to put this question#into a short enough sentance to go into youtube or google's search#ive done all of this thru short video tutorials and none of them were..... for this? so i cant even go to a specific video ive watched#for the answer#so if anyone knows anything about this please!!!!! share your knowledge!!!!!#AND IF YOU DONT KNOW PLS GIVE ME AN IDEA HOW TO ASK GOOGLE OR YOUTUBE
2 notes
·
View notes
Text
25 ways to be a little more punk in 2025
Cut fast fashion - buy used, learn to mend and/or make your own clothes, buy fewer clothes less often so you can save up for ethically made quality
Cancel subscriptions - relearn how to pirate media, spend $10/month buying a digital album from a small artist instead of on Spotify, stream on free services since the paid ones make you watch ads anyway
Green your community - there's lots of ways to do this, like seedbombing or joining a community garden or organizing neighborhood trash pickups
Be kind - stop to give directions, check on stopped cars, smile at kids, let people cut you in line, offer to get stuff off the high shelf, hold the door, ask people if they're okay
Intervene - learn bystander intervention techniques and be prepared to use them, even if it feels awkward
Get closer to your food - grow it yourself, can and preserve it, buy from a farmstand, learn where it's from, go fishing, make it from scratch, learn a new ingredient
Use opensource software - try LibreOffice, try Reaper, learn Linux, use a free Photoshop clone. The next time an app tries to force you to pay, look to see if there's an opensource alternative
Make less trash - start a compost, be mindful of packaging, find another use for that plastic, make it a challenge for yourself!
Get involved in local politics - show up at meetings for city council, the zoning commission, the park district, school boards; fight the NIMBYs that always show up and force them to focus on the things impacting the most vulnerable folks in your community
DIY > fashion - shake off the obsession with pristine presentation that you've been taught! Cut your own hair, use homemade cosmetics, exchange mani/pedis with friends, make your own jewelry, duct tape those broken headphones!
Ditch Google - Chromium browsers (which is almost all of them) are now bloated spyware, and Google search sucks now, so why not finally make the jump to Firefox and another search like DuckDuckGo? Or put the Wikipedia app on your phone and look things up there?
Forage - learn about local edible plants and how to safely and sustainably harvest them or go find fruit trees and such accessible to the public.
Volunteer - every week tutoring at the library or once a month at the humane society or twice a year serving food at the soup kitchen, you can find something that matches your availability
Help your neighbors - which means you have to meet them first and find out how you can help (including your unhoused neighbors), like elderly or disabled folks that might need help with yardwork or who that escape artist dog belongs to or whether the police have been hassling people sleeping rough
Fix stuff - the next time something breaks (a small appliance, an electronic, a piece of furniture, etc.), see if you can figure out what's wrong with it, if there are tutorials on fixing it, or if you can order a replacement part from the manufacturer instead of trashing the whole thing
Mix up your transit - find out what's walkable, try biking instead of driving, try public transit and complain to the city if it sucks, take a train instead of a plane, start a carpool at work
Engage in the arts - go see a local play, check out an art gallery or a small museum, buy art from the farmer's market
Go to the library - to check out a book or a movie or a CD, to use the computers or the printer, to find out if they have other weird rentals like a seed library or luggage, to use meeting space, to file your taxes, to take a class, to ask question
Listen local - see what's happening at local music venues or other events where local musicians will be performing, stop for buskers, find a favorite artist, and support them
Buy local - it's less convenient than online shopping or going to a big box store that sells everything, but try buying what you can from small local shops in your area
Become unmarketable - there are a lot of ways you can disrupt your online marketing surveillance, including buying less, using decoy emails, deleting or removing permissions from apps that spy on you, checking your privacy settings, not clicking advertising links, and...
Use cash - go to the bank and take out cash instead of using your credit card or e-payment for everything! It's better on small businesses and it's untraceable
Give what you can - as capitalism churns on, normal shmucks have less and less, so think about what you can give (time, money, skills, space, stuff) and how it will make the most impact
Talk about wages - with your coworkers, with your friends, while unionizing! Stop thinking about wages as a measure of your worth and talk about whether or not the bosses are paying fairly for the labor they receive
Think about wealthflow - there are a thousand little mechanisms that corporations and billionaires use to capture wealth from the lower class: fees for transactions, interest, vendor platforms, subscriptions, and more. Start thinking about where your money goes, how and where it's getting captured and removed from our class, and where you have the ability to cut off the flow and pass cash directly to your fellow working class people
50K notes
·
View notes
Text
In the wake of the TikTok ban and revival as a mouthpiece for fascist propaganda, as well as the downfall of Twitter and Facebook/Facebook-owned platforms to the same evils, I think now is a better time than ever to say LEARN HTML!!! FREE YOURSELVES FROM THE SHACKLES OF MAJOR SOCIAL MEDIA PLATFORMS AND EMBRACE THE INDIE WEB!!!
You can host a website on Neocities for free as long as it's under 1GB (which is a LOT more than it sounds like let me tell you) but if that's not enough you can get 50GB of space (and a variety of other perks) for only $5 a month.
And if you can't/don't want to pay for the extra space, sites like File Garden and Catbox let you host files for free that you can easily link into NeoCities pages (I do this to host videos on mine!) (It also lets you share files NeoCities wouldn't let you upload for free anyways, this is how I upload the .zip files for my 3DS themes on my site.)
Don't know how to write HTML/CSS? No problem. W3schools is an invaluable resource with free lessons on HTML, CSS, JavaScript, PHP, and a whole slew of other programming languages, both for web development and otherwise.
Want a more traditional social media experience? SpaceHey is a platform that mimics the experience of 2000s MySpace
Struggling to find independent web pages that cater to your interests via major search engines? I've got you covered. Marginalia and Wiby are search engines that specifically prioritize non-commercial content. Marginalia also has filters that let you search for more specific categories of website, like wikis, blogs, academia, forums, and vintage sites.
Maybe you wanna log off the modern internet landscape altogether and step back into the pre-social media web altogether, well, Protoweb lets you do just that. It's a proxy service for older browsers (or really just any browser that supports HTTP, but that's mostly old browsers now anyways) that lets you visit restored snapshots of vintage websites.
Protoweb has a lot of Geocities content archived, but if you're interested in that you can find even more old Geocities sites over on the Geocities Gallery
And really this is just general tip-of-the-iceberg stuff. If you dig a little deeper you can find loads more interesting stuff out there. The internet doesn't have to be a miserable place full of nothing but doomposting and targeted ads. The first step to making it less miserable is for YOU, yes YOU, to quit spending all your time on it looking at the handful of miserable websites big tech wants you to spend all your time on.
#this is a side point so it's going here but I really think tech literacy should be a requirement in schools like math grammar history etc.#we live in a world so dominated by the stuff and yet a majority of the population does not understand it at even the most fundamental level#tiktok#tiktok ban#indie web#neocities#web development#current events#twitter#facebook#meta#amazon
10K notes
·
View notes
Text
CoPilot in MS Word
I opened Word yesterday to discover that it now contains CoPilot. It follows you as you type and if you have a personal Microsoft 365 account, you can't turn it off. You will be given 60 AI credits per month and you can't opt out of it.
The only way to banish it is to revert to an earlier version of Office. There is lot of conflicting information and overly complex guides out there, so I thought I'd share the simplest way I found.
How to revert back to an old version of Office that does not have CoPilot
This is fairly simple, thankfully, presuming everything is in the default locations. If not you'll need to adjust the below for where you have things saved.
Click the Windows Button and S to bring up the search box, then type cmd. It will bring up the command prompt as an option. Run it as an administrator.
Paste this into the box at the cursor: cd "\Program Files\Common Files\microsoft shared\ClickToRun"
Hit Enter
Then paste this into the box at the cursor: officec2rclient.exe /update user updatetoversion=16.0.17726.20160
Hit enter and wait while it downloads and installs.
VERY IMPORTANT. Once it's done, open Word, go to File, Account (bottom left), and you'll see a box on the right that says Microsoft 365 updates. Click the box and change the drop down to Disable Updates.
This will roll you back to build 17726.20160, from July 2024, which does not have CoPilot, and prevent it from being installed.
If you want a different build, you can see them all listed here. You will need to change the 17726.20160 at step 4 to whatever build number you want.
This is not a perfect fix, because while it removes CoPilot, it also stops you receiving security updates and bug fixes.
Switching from Office to LibreOffice
At this point, I'm giving up on Microsoft Office/Word. After trying a few different options, I've switched to LibreOffice.
You can download it here for free: https://www.libreoffice.org/
If you like the look of Word, these tutorials show you how to get that look:
www.howtogeek.com/788591/how-to-make-libreoffice-look-like-microsoft-office/
www.debugpoint.com/libreoffice-like-microsoft-office/
If you've been using Word for awhile, chances are you have a significant custom dictionary. You can add it to LibreOffice following these steps.
First, get your dictionary from Microsoft
Go to Manage your Microsoft 365 account: account.microsoft.com.
One you're logged in, scroll down to Privacy, click it and go to the Privacy dashboard.
Scroll down to Spelling and Text. Click into it and scroll past all the words to download your custom dictionary. It will save it as a CSV file.
Open the file you just downloaded and copy the words.
Open Notepad and paste in the words. Save it as a text file and give it a meaningful name (I went with FromWord).
Next, add it to LibreOffice
Open LibreOffice.
Go to Tools in the menu bar, then Options. It will open a new window.
Find Languages and Locales in the left menu, click it, then click on Writing aids.
You'll see User-defined dictionaries. Click New to the right of the box and give it a meaningful name (mine is FromWord).
Hit Apply, then Okay, then exit LibreOffice.
Open Windows Explorer and go to C:\Users\[YourUserName]\AppData\Roaming\LibreOffice\4\user\wordbook and you will see the new dictionary you created. (If you can't see the AppData folder, you will need to show hidden files by ticking the box in the View menu.)
Open it in Notepad by right clicking and choosing 'open with', then pick Notepad from the options.
Open the text file you created at step 5 in 'get your dictionary from Microsoft', copy the words and paste them into your new custom dictionary UNDER the dotted line.
Save and close.
Reopen LibreOffice. Go to Tools, Options, Languages and Locales, Writing aids and make sure the box next to the new dictionary is ticked.
If you use LIbreOffice on multiple machines, you'll need to do this for each machine.
Please note: this worked for me. If it doesn't work for you, check you've followed each step correctly, and try restarting your computer. If it still doesn't work, I can't provide tech support (sorry).
#fuck AI#fuck copilot#fuck Microsoft#Word#Microsoft Word#Libre Office#LibreOffice#fanfic#fic#enshittification#AI#copilot#microsoft copilot#writing#yesterday was a very frustrating day
3K notes
·
View notes
Text
How to bookbind your fanfic!
Part 1: From AO3 to printing
The necessary first step is turning your AO3 fanfic into booklets. Your whole book will be a bunch of booklets piled on top of each others and stitched together.
Booklet examples:

Btw, this is the official Word tutorial on how to make a booklet.
You can see there are different options. I usually do 8 pages, which is what you will see in the video. This means that a booklet of 8 pages is two sheets of paper, printed front and back, folded and one put inside the other. To have your word pages in the correct order you will need to format your word document.
Everything is in the video but here is the text for easy reading (btw the fanfic I used is Exit by schwutthing, an amazing Valjean/Javert fic)
Do not download the fanfic on AO3. Click on "Entire work" and copy paste it on word.
Format your word document. Click on File-> Margins. Select "Multiple pages: Book fold" and "Sheets per booklet: 8". Put "Gutter" to 1cm.
Double click on the empty area just above your text, on a random page of the document. This will make the "Do not download the fanfic on AO3. Click on "Entire work" and copy paste it on word.
Format your word document. Click on File-> Margins. Select "Multiple pages: Book fold" and "Sheets per booklet: 8". Put "Gutter" to 1cm.
Double click on the empty area just above your text, on a random page of the document. This will make the "Header and Footer" option appear. You can click on "Footer" and select the format for the pages' number. Always add the pages number, it will make your life easier.
Now you can justify your book. I usually justify (select all text with CTRL+A and click on Justify), but keep in mind that some documents might not enjoy passing through "justify" so double check your final document. For example, if there are lines of poetry and the author wrote into the next line without starting a new paragraph the justify option will make it weird.
Make your book pretty! I added some illustrations and blank pages. I also made the title of the fanfic bigger.
Fix the chapters' titles and notes. I clicked on Home-> Find and searched for "Chapter", so I could select on each chapter title and make it bold, and also delete the "Chapter text" added just after. You can do the same with "notes" in case you want to delete notes.
Now it is time to print! I prefer to save in pdf before, so I will do that.
IF YOU HAVE A PRINTER THAT DOES NOT PRINT BOTH SIDES
Click on print
Select "Microsoft print to pdf"
Select "Manually print on both sides"
This will create two different files pdf, one for the front pages, and one for the back pages.

Click on the file for the front pages and print them all. Do not panic if you see the pages number all over it.
Now take your printed (only on one side) block of pages and load it into your printer again, making sure that you will now print on the blank back. Open your back pages pdf file and print.
(you can do a trial with a few pages to see if everything is lining up correctly).
IF YOU HAVE A PRINTER THAT PRINT BOTH SIDES
"Click on print
Select "Microsoft print to pdf"
Select "Print on one side"
This will create a single pdf that you can print on your both-sides printer. You will see that the page are not in the order you had on the word document, but the whole file will start with page 8 (see video).
Now print!
What you want is this:
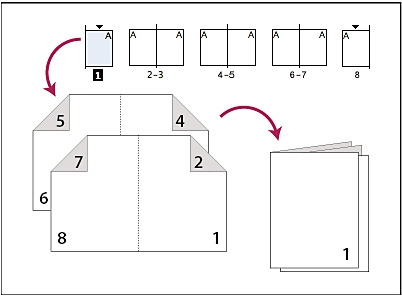
You can see that on the front you have page 8 first, page 1 after, because when folded it will end up with page 1 at the start of your booklet! And on the back of this first sheet you have 7 and 2, that will end up in the correct position.
Now you will have a lot of pages... time to fold and create your booklet! Every two sheets... you will fold as you see above.
Next post will be specifically about folding the booklet, making the holes and sewing them together.
2K notes
·
View notes
Text
ib by @bogactivity's artwork, cross-posted on ao3
dumbass boyfriend! sukuna who takes time out of his day to groom his nails (clip, file and paint) after you expressed your discomfort of the sound of his nails scratching on every surface including his ipad screen (ouch). he thinks of it as your way of neutering him, because really, a king clipping his claws? it feels like an insult. regardless, he does it.
he does not expect to enjoy it so much.
he knows you don't have the luxury of time or money to get your nails done everyday, so he makes good use of his ipad's screen time and searches up ways to paint one's nails in different manners. he sticks to his regular black of course, but sometimes if you focus hard enough you'll see a matte finish on his nails.
it's a comical sight to come back to your boyfriend soon to be husband sprawled on a couch that seems miniscule under his weight as he uses one right hand to cut and file his left hand's nails, and vice versa to paint his third and fourth hands (following a youtube tutorial titled how to get gel nails at home in just seven steps! - simple & affordable for beginners).
dumbass boyfriend! sukuna who finally looks up from his ipad screen and notes your arrival, asking you what took you so long - there are nails to be painted, more specifically, your nails.
dumbass boyfriend! sukuna who is gifted a nail-care set for your next anniversary, and the two of you get matching - yes, matching - nails done for the special day.
dumbass boyfriend! sukuna who becomes a regular at your favorite nail salon alongside you, and on listening to everybody's gossip, offers to blow up any and all offenders heads (including the cheating boyfriend of his usual nail artist and the shitty mother in law of your nail artist).
dumbass boyfriend! sukuna who becomes a trending pin on pinterest and every artist's favorite reference picture the minute you upload a picture of you and sukuna's matching manicure. the difference in your hand sizes is enough to make people gush and scream "me and who?" much to sukuna's confusion.
#works ★#jjk headcanons#jujutsu kaisen headcanons#ryomen sukuna headcanons#sukuna headcanons#jjk crack#jujutsu kaisen crack#sukuna crack#ryomen sukuna crack#jujutsu kaisen x reader#jujutsu kaisen x you#jjk x you#jjk x reader#jujutsu kaisen x gender neutral reader#jjk x y/n#ryomen sukuna x you#ryomen sukuna x reader#sukuna x you#sukuna x reader#sukuna x y/n#ryomen x reader#ryomen x you#ryomen x y/n#sukuna ryomen x reader#sukuna ryomen x you
2K notes
·
View notes
Text
STP Deluxe Lighting Tool Arrives ^ ^


Get STP Deluxe here (⬅️click the attachment at the end of that post)
STP is a set of lighting tools that bring various light and shadow effect ingame, mainly used for indoor photography. Posters and GIFs above show the ingame effect of STP.
For STP beginners, it may take time to get used to STP. I highly recommend to read the introduction in the file folder. Also, welcome to view the 'STP Tutorial' collection or search the 'tutorial' tag on Patreon.
I don't think Deluxe brings huge improvement compared to Standard, but there are some differences. For STP users (get used to STP Standard already), please pay attention:

1. There are White version and Cyan version files, which cannot be placed in mod folder at the same time. The only difference is that the default white light is replaced by cyan light in Cyan version files. Please choose only one version to use.
2. There are XS1 and XS2 lighting tool. 'XS' refers to its size (smaller than S size). '1' and '2' refer to the height (position) of light source. '2' is half unit higher than '1'. Now you can arrange the lighting tool more flexibly.
And so sorry that there are some errors of LMC in the latest version of game. I'm afraid it won't arrive this week. I'll try to squeeze some time to fix it next month. But if I don't have time, maybe I'll just share this unsatisfying version of LMC...
Anyway, welcome to share your experience of using STP ^ ^
#the sims 4#sims4 cc#sims 4 lighting#ts4 cc#ts4 furniture#ts4 lighting#sims 4 furniture#sims 4 cc#stp#achino#s4cc#s4cc download#s4 lighting
290 notes
·
View notes
Text
How cutiesai made 14 Days With You
I've received quite a few requests in the past asking how I made 14DWY, what resources I used, how I organised my lore, etc. — so I figured I'd make one big post and share it with everyone else as well! It features a buuunch of helpful stuff I wish I'd known when I first made 14DWY, so hopefully this will help others too!
⚠ This is all copied & pasted from a Discord post I made back in early 2024! I'll also be adding to it over time, so feel free to check back every so often! ^^

What engine do I use?
14DWY uses the Ren'Py engine!
There are two preinstalled games (called "Tutorial" and "The Question") that give you a basic rundown on how to use the program!!
Zeil Learning's video called "Ren'py Tutorial For Beginners" is also a good place to start for those who have no idea where to begin with Ren'Py!
I also really recommend these Ren'Py resources:
Lemma Soft Forums
Ren'Py Discord server
Ren'Py subreddit
Zeil Learnings, ElaineDoesCoding, Visual Novel Design, and Ess Ren'Py Tutorials on YouTube
Searching through the "Ren'Py" tag on itch.io for community-made assets and resources (make sure to give credit if you use someone's asset(s))!
Feniks and Wattson offer some really helpful stuff!!
Not Ren'Py related, but helpful for creating a VN:
Obsidian and Notion for planning and worldbuilding
Visual Studio Code and Atom (comes preinstalled with Ren'Py iirc?) for scripting/coding
Pixabay and Pexels for royalty-free images and stock photos
DOVA-SYNDROME for music
Clip Studio Paint (paid) and Krita (free) for drawing
Toyhou.se to store your littol guys (If you need an invite code, I have over 300 to give away lmao ^^ Send in an ask to @cutiesigh if you'd like one!)
An itch.io account to upload your game for free and share it with others
General tips to keep in mind:
Make games for fun, not for fame. Too often, I see new developers create VNs with "trending tropes" because they see how successful it is and want the same level of popularity. As harsh as it sounds, this only makes your game feel hollow and superficial, and players will notice.
When using Ren'Py, it's better to have multiple .rpy files rather than putting everything into one large file!! It makes organising and finding things easier, and if something gets corrupted... at least you won't lose everything!
Plan everything beforehand, but give yourself room to expand and implement new ideas.
Start small and slowly expand over time. Don't start off with an overly ambitious project, as it can be disheartening when you put all this effort into something just for it not to gain any traction. Also, be grateful for your earliest supporters, as they're the ones who will lift your project off the ground!!
This is a personal preference, but I recommend starting off with itch.io as your main distribution platform. Most storefronts take a cut from your donations and revenue, and sites like Steam require a $100 fee just to publish your game on their platform. Itch is free, and you can even toggle off revenue sharing in your profile settings! (I like to keep it at 10% though, because I'm grateful for everything the site provides ♡)
If you ever need help with Ren'Py, you're always welcome to join the 14DWY Discord server and ping me in the help channel!
410 notes
·
View notes
Text


Shop Sign Wall Lights
I put together a few sets of shop sign wall lights. But there are instructions. I kept some swatches as a default white color so that you could pick which color you want the light to be while in live mode. This saved on the file size of the package file because the more textures a file has, the more bloated the file size is.
I had some fun with some shop names although I mainly included generic titles in both English and Simlish.
DOWNLOAD for FREE: SFS
OR at Patreon*
*You must be over 18 to access my Patreon page.
INSTRUCTIONS ON CHANGING LIGHT COLORS
Once you place the light in build mode, then go to live mode. Click on the light and you will get the following pie menu.

Select SET COLOR AND INTENSITY and then choose THIS LIGHT. The color options will then appear so you can select which color you want.

If you use the name signs along with the Awning Lights, make sure to place the name on top of the awning so when you select the color picker, the correct sign changes colors. The other option is to place the name separate from the awning, go to live mode and change the color, then go back to build mode and add the awning light you want.
Enable the bb.moveobjects on cheat and then you can make adjustments to location and size of objects. You can adjust the position of the light on the wall by depressing the Alt key while placing the sign (on PC). You can adjust the size of the item by depressing the Shift key and either [ (for smaller) or ] (for bigger) (on PC).
CREDITS
Awning Shop Lights - 19 swatches of various awning wall lights. 18 are pre-colored and one is white so you can change the color yourself in game.
Candy Shop Lights - 20 swatches
Pottery Shop Lights - 25 swatches
Tattoo Shop Lights - 21 swatches
Enjoy!
Creations by SexyIrish7
These cc objects are new 3d meshes created using Blender and Sims 4 Studio.
Polygon Count: 6
All CC have:
*Ability to search catalog using search terms: sexyirish7 and si7
*Customized thumbnail
*******
CREDITS:
Software credits:
Sims 4 Studio v. 3.2.4.1 (Star): https://sims4studio.com
Blender 4.0: https://www.blender.org/download/
GIMP v. 2.10.34: https://www.gimp.org/
Inkscape v. 1.2: https://inkscape.org/
Thank you to the creators and moderators producing tutorials and answering questions!
*******
Model and Image credits:
Mesh created by me.
Simlish font credit to Franzilla: https://modthesims.info/
Image credits:
Awning Lights Image credits: Modified image from Adobe Stock
Candy Shop Image credits:
Swatches 1-3: Image by pch.vector on Freepik https://www.freepik.com/free-vector/christmas-candies-symbols-set-neon-style_11241813.htm#fromView=search&page=1&position=26&uuid=8b541325-0e62-4e37-9468-6bacd30f8963&query=neon+lollipop+candy
Swatches 4-8: Image by gstudioimagen on Freepik https://www.freepik.com/free-vector/sweet-candy-neon-seamless-pattern_5595774.htm#fromView=search&page=2&position=30&uuid=e2259de5-014d-4d04-af87-1198ee0f35e2&query=%40gstudioimagen+neon
https://www.freepik.com/free-vector/sweet-candy-neon-seamless-pattern_5595775.htm#fromView=search&page=1&position=27&uuid=e2259de5-014d-4d04-af87-1198ee0f35e2&query=%40gstudioimagen+neon
Swatches 9-10: Image by openclipart.org https://all-free-download.com/free-vector/download/peppermint_candy_clip_art_13182.html
https://all-free-download.com/free-vector/download/round_candy_with_stick_card_on_pink_background_6823183.html
Swatch 11: Image by All-free-download.com https://all-free-download.com/free-vector/download/round_candy_with_stick_card_on_pink_background_6823183.html
Swatches 12: Image by katemangostar on Freepik https://www.freepik.com/free-vector/ice-cream-cart-neon-sign_3238564.htm#fromView=search&page=8&position=42&uuid=2f82b4d1-5ca8-449c-ae22-4573861ebcb0&query=neon+sign+retail
Pottery Shop Image credits:
Swatch 1: Crafting icons created by andinur - Flaticon https://www.flaticon.com/free-icon/pottery_17392031
Swatch 2: Image by katemangostar via Freepik https://www.freepik.com/free-vector/aquarius-neon-sign_5561944.htm#fromView=search&page=2&position=5&uuid=c55e5e21-0550-46f0-b9be-cfa85ff38796&query=Ceramic+Neon
Swatch 3-4: Pottery icons created by Smashicons - Flaticon https://www.flaticon.com/free-icon/vase_3760867
https://www.flaticon.com/free-icon/vase_3760970
Swatch 5: Icon by istar_design_bureau via Freepik https://www.freepik.com/icon/pottery_1958438#fromView=search&page=2&position=20&uuid=096084ae-13fe-429c-a419-e6e13ccd37b9
Swatch 6:Icons by Eucalyp - Flaticon https://www.flaticon.com/free-icon/pottery_6552610
Swatch 7: Icon by berkahicon via Freepik https://www.freepik.com/icon/spin_13785816#fromView=search&page=2&position=0&uuid=096084ae-13fe-429c-a419-e6e13ccd37b9
Swatches 8-11: Icons by Freepik https://www.freepik.com/icon/pottery_8540816#fromView=search&page=3&position=43&uuid=096084ae-13fe-429c-a419-e6e13ccd37b9
https://www.flaticon.com/free-icon/machine_9200546
https://www.flaticon.com/free-icon/vase_8838322
https://www.flaticon.com/free-icon/pottery_3305262
Tattoo Shop Image credits:
Swatch 1: Modified Image by katemangostar on Freepik https://www.freepik.com/free-vector/tattoo-salon-neon-text-with-tattoo-machine-neon-sign-night-bright-advertisement_2438198.htm?log-in=email
Swatch 2: Image by Nippy Custom https://www.nippycustom.com/products/tattoo-neon-sign
Swatches 3-5: Image by bohlam via Vecteezy https://www.vecteezy.com/vector-art/2185717-tattoo-studio-neon-signs-style-text-vector
https://www.vecteezy.com/vector-art/34210463-neon-sign-tattoo-studio-with-brick-wall-background-vector
*******
TOU:
Do not re-upload and claim as your own
Do not re-upload and hide behind a paywall
#the sims 4 cc#ts4cc#sims 4 cc#the sims 4#wall decor#sims 4#ts4#lights#wall lights#signs#shop signs#retail#pottery#ceramics#tattoo#ink#candy#lollipop#sweets#sugar#light tutorial#sexyirish7
259 notes
·
View notes
Text
My GIF Making process: Screen capturing using MPV player, Organizing files, 3 Sharpening settings, Basic Coloring PSD + Actions set

This is a very long post so heads up.
I’ll try to be as thorough and true as much as possible to the way I make my gifs (I already use Photoshop Actions which I’ve long since set up but now for this tutorial I’m reviewing them to show you the exact steps I’ve learned to create my gifs 😃) and present them to you in a semi-coherent way. Also, please bear with me since English is my second language.
First things first. Below are the things and tools we need to do this:
Downloaded 4K or 1080p quality videos (let’s all assume we know where to get these—especially for high definition movies and tv series—so this post doesn’t get removed, okay? 😛)
Adobe Photoshop CC or the CS versions can work as well, but full disclosure I haven’t created gifs using the CS versions since 2020. I’m currently using Adobe Photoshop 2024.
mpv player. Use mpv player to get those frames/screenshots or any other video player that has a screen grabber feature. I’ve used adapter for the longest time but I’ve switched to mpv because the press to screenshot feature while the video is playing has been a game changer not to mention ultimate time saver for me. For adapter you need to play it in another video player (like VLC player), to get the start and end timestamps of the scene you want to gif which takes me ages before I can even open Photoshop.
Anyway! Please stop reading this post for a moment and head over to this amazing tutorial by kylos. She perfectly tells you how to install and use mpv player, both for Mac and Windows users.
One thing I have to share though, I had a tough time when I updated my MacOS to Sonoma since MPV is suddenly either duplicating frames or when I delete the duplicates the player seems to be skipping frames :/ I searched and found a solution here, though it didn’t work for me lol. My workaround for this in the meantime is decreasing the speed down to 0.70 then start screenshotting—it’s not the same pre Sonoma update but it works so I’ll have to accept it rather than have jumpy looking gifs.
Now, after this part of kylos’ tutorial:

you can continue reading the following sections of my gif tutorial below.
I want to share this little tip (sorry, this will only cater to Mac users) that I hope will be helpful for organizing the screenshots that MPV saved to the folder you have selected. Because believe me you don’t want to go through 1k+ of screenshots to select just 42-50 frames for your gif.
The Control + Command + N shortcut
This shortcut allows you to create a new folder from files you have pre-selected. As you can see below I have already created a couple of folders, and inside each folder I have selected screenshots that I want to include in one single gif. It's up to you how you want to divide yours, assuming you intend to create and post a Tumblr gifset rather than just one gif.

Another tip is making use of tags. Most of, if not all the time, I make supercorp gifs so I tag blue for Kara and red (or green) for Lena—just being ridiculously on brand and all that.
Before we finally open Photoshop, there's one more thing I want to say—I know, please bear with me for the third? fourth? time 😅
It's helpful to organize everything into their respective folders so you know the total number of items/frames you have. This way, you can add or delete excess or unnecessary shots before uploading them in Photoshop.
For example below there are 80 screenshots of Kara inside this folder and for a 1:1 (540 x 540 px) Tumblr gif, Photoshop can just work around with 42-50 max number of frames with color adjustments applied before it exceeds the 10 MB file size limit of Tumblr.

Sometimes I skip this step because it can be exhausting (haha) and include everything so I can decide visually which frames to keep later on. You'll understand what I mean later on. But it's important to keep the Tumblr 10 MB file size limit in mind. Fewer frames, or just the right amount of frames, is better.
So, with the screenshot organization out of the way, let's finally head over to Photoshop.
Giffing in Photoshop, yay!
Let’s begin by navigating to File > Scripts > Load Files into Stack…

The Load Layers window will appear. Click the Browse button next.
Find your chosen screenshots folder, press Command + A to select all files from that folder then click Open. Then click OK.
After importing and stacking your files, Photoshop should display the following view:

By the way, I'll be providing the clip I've used in this tutorial so if want to use them to follow along be my guest :)
If you haven't already opened your Timeline panel, navigate to Windows > Timeline.
Now, let's focus on the Timeline panel for the next couple of steps.
Click Create Video Timeline, then you’ll have this:

Now click the menu icon on the top right corner then go to Convert Frames > Make Frames from Clips

Still working on the Timeline panel, click the bottom left icon this time—the icon with the three tiny boxes—to Convert to Frame Animation
Select Make Frames From Layers from the top right corner menu button.
So now you have this:

Go and click the top right menu icon again to Select All Frames
Then click the small dropdown icon to set another value for Frame Delay. Select Other…

The best for me and for most is 0.05 but you can always play around and see what you think works for you.
Click the top right menu icon again to Reverse Frames.
I think Photoshop has long since fixed this issue but usually the first animation frame is empty so I just delete it but now going through all these steps there seems to be none of that but anyways, the delete icon is the last one among the line of feature buttons at the bottom part of the Timeline panel.
Yay, now we can have our first proper GIF preview of a thirsty Lena 😜

Press spacebar to watch your gif play for the very first time! After an hour and half of selecting and cutting off screenshots! 😛 Play it some more. No really, I’m serious. I do this so even as early (lol) as this part in the gif making process, I can see which frames I can/should delete to be within the 10 MB file size limit. You can also do it at the end of course 🙂
Now, let’s go to the next important steps of this tutorial post which I’ve numbered below.
Crop and resize to meet Tumblr's required dimensions. The width value should be either 540px, 268px, or 177px.
Convert the gif to a Smart Object for sharpening.
Apply lighting and basic color adjustments before the heavy coloring. I will be sharing the base adjustments layers I use for my gifs 😃.
1. Crop and Resize
Click on the Crop tool (shortcut: the C key)

I like my GIFs big so I always set this to 1:1 ratio if the scene allows it. Press the Enter key after selecting the area of the frame that you want to keep.
Side note: If you find that after cropping, you want to adjust the image to the left or another direction, simply unselect the Delete Cropped Pixels option. This way, you will still have the whole frame area available to crop again as needed and as you prefer.
Now we need to resize our gif and the shortcut for that is Command + Opt + I. Type in 540 as the width measurement, then the height will automatically change to follow the ratio you’ve set while cropping.
540 x 540 px for 1:1
540 x 405 px for 4:3
540 x 304 px for 16:9
For the Resample value I prefer Bilinear—but you can always select the other options to see what you like best.
Click OK. Then Command + 0 and Command + - to properly view the those 540 pixels.

Now we get to the exciting part :) the sharpen settings!
2. Sharpen
First we need to have all these layers “compressed” intro a single smart object from which we can apply filters to.
Select this little button on the the bottom left corner of the Timeline panel.


Select > All Layers
Then go to Filter > Convert for Smart Filters
Just click OK when a pop-up shows up.
Now you should have this view on the Layers panel:

Now I have 3 sharpen settings to share but I’ll have download links to the Action packs at the end of this long ass tutorial so if you want to skip ahead, feel free to do so.
Sharpen v1
Go to Filter > Sharpen > Smart Sharpen…
Below are my settings. I don’t adjust anything under Shadows/Highlights.
Amount: 500
Radius: 0.4
Click OK then do another Smart Sharpen but this time with the below adjustments.
Amount: 12
Radius: 10.0

As you can see Lena’s beautiful eyes are “popping out” now with these filters applied. Click OK.
Now we need to Convert to Frame Animation. Follow the steps below.
Click on the menu icon at the top right corner of the Timeline panel, then click Convert Frames > Flatten Frames into Clips
Then Convert Frames > Convert to Frame Animation
One more click to Make Frames From Layers
Delete the first frame then Select All then Set Frame Delay to 0.05

and there you have it! Play your GIF and make sure it’s just around 42-50 frames. This is the time to select and delete.
To preview and save your GIF go to File > Export > Save for Web (Legacy)…
Below are my Export settings. Make sure to have the file size around 9.2 MB to 9.4 MB max and not exactly 10 MB.

This time I got away with 55 frames but this is because I haven’t applied lighting and color adjustments yet and not to mention the smart sharpen settings aren't to heavy so let’s take that into consideration.
Sharpen v1 preview:

Sharpen v2
Go back to this part of the tutorial and apply the v2 settings.
Smart Sharpen 1:
Amount: 500
Radius: 0.3
Smart Sharpen 2:
Amount: 20
Radius: 0.5
We’re adding a new type of Filter which is Reduce Noise (Filter > Noise > Reduce Noise...) with the below settings.

Then one last Smart Sharpen:
Amount: 500
Radius: 0.3
Your Layers panel should look like this:

Then do the Convert to Frames Animation section again and see below preview.
Sharpen v2 preview:

Sharpen v3:
Smart Sharpen 1:
Amount: 500
Radius: 0.4
Smart Sharpen 2:
Amount: 12
Radius: 10.0
Reduce Noise:
Strength: 5
Preserve Details: 50%
Reduce Color Noise: 0%
Sharpen Details: 50%
Sharpen v3 preview:

And here they are next to each other with coloring applied:
v1

v2

v3

Congratulations, you've made it to the end of the post 😂
As promised, here is the download link to all the files I used in this tutorial which include:
supercorp 2.05 Crossfire clip
3 PSD files with sharpen settings and basic coloring PSD
Actions set
As always, if you're feeling generous here's my Ko-fi link :) Thank you guys and I hope this tutorial will help you and make you love gif making.
P.S. In the next post I'll be sharing more references I found helpful especially with coloring. I just have to search and gather them all.
-Jill
#tutorial#gif tutorial#photoshop tutorial#gif making#sharpening#sharpening tutorial#photoshop#photoshop resources#psd#psd coloring#gif coloring#supercorp#supercorpedit#lena luthor#supergirl#my tutorial#this has been a long time coming#guys. i'm BEGGING you. use the actions set - it was a pain doing all this manually again ngl LMAO#i've been so used to just playing the actions#so this has been a wild refresher course for me too 😆
632 notes
·
View notes
Text

As storytellers, realism and continuity are important to us, and they're sometimes hard to achieve within the confines of the game. I’m personally a big fan of posing Sims in open doorways, and unless you want to be limited to the CC options that exist, you’re stuck having to make some poor Sim walk in and out and pausing at just the right moment for the desired effect. But it’s actually very easy to edit a door in Blender to make your own open version!
I initially learned about "posing" objects from surelysims' Wicked Whims posing tutorial, which I highly recommend as a whole. However, it might be a little overwhelming to learn a whole new posing system for the sake of a screenshot or two, which is where this tutorial is meant to come in. Some of my explanations might seem overly simplistic, but I wanted it to be approachable even for beginners. I am far from an authority on using Blender or making CC, and I'm sure there are flaws in this process or easier ways to achieve certain things, but it works well enough for my purposes and I hope it will work for yours too. 💗
Now, onto the tutorial...
Figure out what door or gate you want to create an open version of. If it’s from the vanilla game, all you need to do is make note of its name. If it’s CC, find the package in your mods folder, make a copy, and paste it into My Documents > Sims 4 Studio > Mods. This will allow you to find it in S4S in the next step!
Open S4S. On the main screen, make sure “Standalone Recolor” is checked under the “Object” button, then click the button.

A new window should pop up (if it’s your first time doing this, it may take a while to load). At first, it will show every single object in the game. If you know the name of the object you’re looking for, you can use the search bar to find it. You can also use the filtering options to narrow the selection down by category, game pack, and whether it’s vanilla or custom content. Here, I’ve filtered the search to only base game doors. Once I find the door I want to adjust, I click on it and hit “Next.”

This will pop up a window prompting you to save a new file. Place it somewhere you know you’ll be able to find it easily later and name it accordingly. This file will ultimately contain your mesh edit, so you don’t want to lose it! I suggest placing it in a dedicated folder, on your desktop, or in your Mods folder directly.

On the next screen, you’ll be looking at the contents of the package itself. For this tutorial, you don’t need to worry about grabbing anything but the mesh. Click on the “Meshes” tab and then “Export Mesh.” You’ll again be prompted to save.

Open the mesh file you just saved in Blender. (If the view is funky to start, I recommend hitting 1 on your keyboard’s number pad to get a forward-facing view.) [It should also be noted I’m using Blender 3.6, so my screenshots and the location of certain settings may be different than in earlier or newer versions.]
You’ll see that there are actually multiple meshes involved (and the number can vary from object to object). Right now, we’re only concerned with the “rig.” If you’re familiar with posing, you’ll know that all Sims have a rig that is used to move different parts of their bodies around. Objects also have a rig, and objects that can open will have “bones” that control their moving parts. So click on “rig” and then change “Object Mode” in the bottom corner to “Pose Mode.”


Now, if you hit A on the keyboard, it will select all bones and you can see where they’re located. As far as I can tell, all doors have two bones that control their swinging movement. They both do essentially the same thing. I tend to stick with the top bone, which is called something like “bind_doorSwing.”

Pro-tip: If you’re having trouble seeing or selecting the rig's bones, you can change the view on the right side of the screen to “dope sheet.” Then when you save the position of the bones, just like when posing a Sim, by selecting all with A then clicking I and selecting “Location & Rotation,” the list of available bones will pop up there.


Rotate the door open using this bone or bones, if it’s a double door. On double doors, I recommend rotating each side individually rather than trying to rotate them together, as you may get unexpected results. You can use the R+Z combo on the keyboard to limit the direction of movement. (You can also use this in combo with numbers to swing them more precisely. For example, if you want a 45 degree swing, you can press R+Z+45.) Specifying the Z axis allows you to only swing the doors open and closed while restricting their movement in other directions.

Once you’ve got the doors swung open to where you want them, hit A to select all bones, then hit I and select “Location & Rotation” to save the position. (If you’re a poser, this maneuver is already familiar to you - and you know how important it is! If you skip it, the new position won’t save and the doors will revert back to closed.)

That’s it! You don’t have to do anything else to the mesh. Save your file in Blender. If you want to keep it separate from the original door mesh, save as instead and name it something different. (This is why you may want a dedicated folder, since the number of files does add up!)
Reopen the package you made earlier in S4S (or simply return to it if you’ve kept it open). From the same place you exported the mesh, you will now import the edited mesh. Hit “Import Mesh,” navigate to your edited Blender file, and you should now see your edited door replace the original. Since it’s the same mesh, all the swatches will still work perfectly with it.

You’ll notice that you’ve only replaced the “LOD 0 (High)” version of the mesh. When you click the drop-down menu, you’ll see that there are also medium and low detail versions, as well as shadow meshes at all levels of detail. If you’re only making an object for personal use, you don’t have to worry too much about LODs. You can probably just import the same mesh into LOD 1 and LOD 2 and be fine (so long as your computer isn't a potato). And if this is just for you, I honestly wouldn't even touch the shadow LODs.
The only other thing you might do is go back to the “Catalog” tab and alter the object name so you can find it easily in the game catalog. You can also edit the description, price, etc. if you so desire. Hit “Save.”

Test in game! If the package isn’t already in your Mods folder, move it there. As long as you didn’t mess with any of the tags, it should still be in the door section of build mode and work perfectly as a functional door. The door swinging animation will look different, and you could probably get rid of it if you wanted, but that’s above my current skill level and I don’t think it’s really necessary for our purposes. If all you need is an open version of a very specific door for storytelling purposes, it gets the job done.


(First screenshot: doors swung open as intended, second screenshot: doors swinging in the opposite direction as they’re walked through)
These steps can also potentially be used to create open versions of other in-game objects like gates, books, chests/boxes, etc. I’m only just beginning to experiment with minor mesh edits, but once you get the hang of it they can often be faster and easier than trying to line up the best circumstances to get the perfect shot in-game. I might make more tutorials for small edits like this that help with storytelling realism and continuity in the future!
#ts4#sims 4#ts4 storytelling#ts4 tutorial#sims 4 storytelling#sims 4 tutorial#this is the first tutorial i've written so do let me know if anything's confusing!!!#*tbw
265 notes
·
View notes
Text
Giving your Rook a custom name for the subtitles in 5 minutes - A modding tutorial
The tutorial is also available on Nexusmods as a PDF-file, and as a Google Doc.

Hidden under the read more for length, but it's actually super easy! Anyone can do it following instructions, I promise!
The guide assumes you’ve already installed Frosty Mod Editor, so I won’t be covering its basic set-up. If it’s your first time using the Editor, please refer to this guide by Gabbet. Gabbet's guide may look somewhat intimidating, but to prepare for my tutorial, you’ll only need its “Frosty Editor Download & Installation” section.
Open the Mod Editor and navigate to View >> Localized String Editor

2. Once you open the Localized String Editor, click on the leftmost column inside it, input the following string ID: "0002F709" (without the "") and press Enter. It should display one search result that says “Rook”.
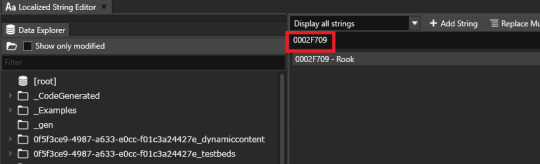
3. Click on the line in the search results to make it appear in the column to the right. There, erase “Rook” and type in your custom name using your keyboard. In this tutorial, I’m using “Ghilasara” as an example.

4. Once you finish typing your custom name, click “Update” to save the result.

That will refresh the line’s contents in the search results.
You’ve made all the necessary edits, and your mod is now ready to be exported :)
5. In the Editor’s main window, click on File > Export to Mod
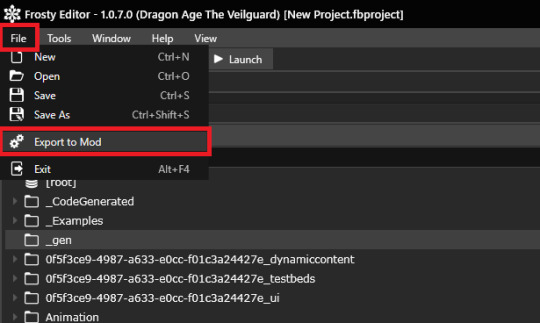
Feel free to fill in the contents of the pop-up window as you see fit. Note that the first line, “Title” will be the name under which your mod displays in the Mod Manager. I named mine “Rook to Ghilsara” to make it easy to find in case I need to remove it or turn it off.
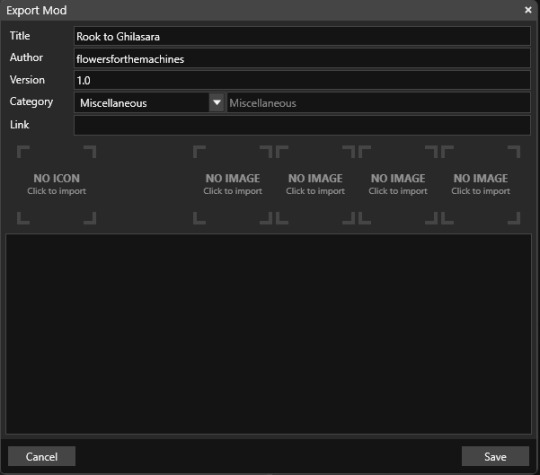
And, that’s that! All you have left to do is to import your mod into the Mod Manager.
#how the hell do I tag this#Dragon Age#Dragon Age Veilguard#Dragon Age The Veilguard#DAV Modding#DAV Tutorial#flowers mods#dragon age#dragon age the veilguard#datv modding#veilguard modding#rook datv#rook#dragon age rook#flowers.txt
210 notes
·
View notes
Text
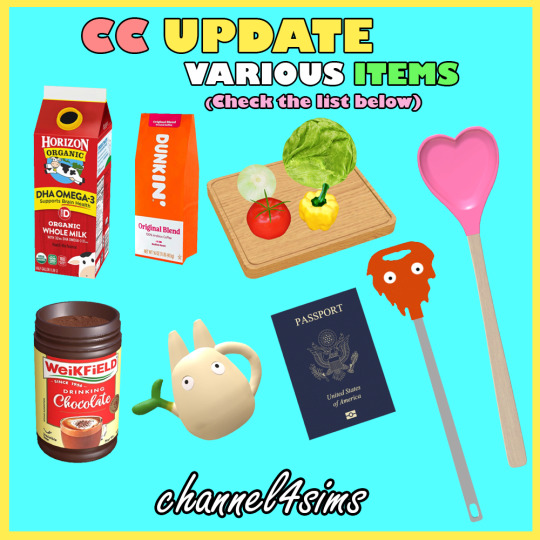
UPDATED CC (APRIL 2025)
Sul sul ^^
I hope everyone is doing well :)
There's a list of CC I updated for you :)
🌸🌸🌸🌸🌸🌸🌸🌸🌸🌸🌸🌸🌸🌸🌸🌸
UPDATED CC (April 24/25, 2025):
Backyard Stuff - Food Items Override (Fixed + Mesh and texture updated).
Baking Board Override + deco (Fixed + Mesh and texture updated).
Bar Items Replacement (Fixed + Mesh and texture updated).
Decorative Caboodles (It's now functional. You can store items in it).
Chocolate Powder Override + Decorative (Fixed + Mesh and texture updated + 2 more options added).
Coffee Bag Replacement & Deco (Fixed + Mesh and texture updated + 4 more options added).
Cooking Spoon OVERRIDE (Fixed + Mesh and texture updated).
Kitchen Knife OVERRIDE (Fixed + Mesh and texture updated).
Fridge Food Board Override (Fixed + Mesh and texture updated).
Guitar Functional and Deco (Updated textures. Now there's the Stratocaster logo on it).
Kitchen Sponge Override (Fixed + Mesh and texture updated).
Milk Bottle Override & Deco Version (Fixed + Mesh and texture updated).
Passport Deco (Fixed + Mesh and texture updated + more countries added).
Passport Simlish Deco (Fixed + Mesh and texture updated + more worlds added).
Spatula Override (Fixed + Mesh and texture updated).
Flour and Sugar Sack Override (Fixed + Mesh and texture updated).
Totoro Watering Can Override + Water Spray Bottle Replacement + Deco ver (Fixed + Mesh and texture updated).
Turkey Baster Override (Fixed + Mesh and texture updated - I made it a little less sharp).
Candy Machine Bottles OVERRIDE (Fixed + Mesh and texture updated).
🌸🌸🌸🌸🌸🌸🌸🌸🌸🌸🌸🌸🌸🌸🌸🌸
HOW TO UPDATE:
🌸 First of all, delete "localthumbcache". If you don't know how to do it, here's the tutorial :)
🔷 If it's your first time downloading the item:
You don't have to do anything. Just download it and place in your Mods folder. They're all updated as of now :)
🔷 If you already have them in your Mods folder:
1- Delete the old version. If you don't know how to locate it, search for "channel4sims" in your mods folder. This will probably help you. The files are called the same.
2- Download the new file and place it in your Mods folder :)
🌸🌸🌸🌸🌸🌸🌸🌸🌸🌸🌸🌸🌸🌸🌸🌸
I hope you enjoy it a lot :)
I'll update more CC when possible.
Let me know if there are any issues.
Happy Simming ^^
#ts4cc#ts4#cc#s4cc#sims4cc#the sims 4#custom content#download#sims4#alpha cc#ts4alpha#ts4 alpha#override#replacement#mod#mods#update#channel4sims
173 notes
·
View notes
Text
Digital Stamp Making Tutorial
Hello, and welcome to the long-awaited(at least on my part) digital stamp-making tutorial from neosprites! I’d like to preface that I learned what I was doing from this tutorial so it may be a bit redundant, but if anything I get a bit more specific. Thank you so much to @graphic--horde for your work, it changed me as a graphic maker. This is gunna be a long post so feel free to bookmark it for later. Now, onto the show!

The frame I will be using for this tutorial (which is the frame I use on 99.9% of my stamps) I found from the above linked post, which I believe is from a creator that OP lost track of. Its inner dimensions are 94x50 pixels and its outer dimensions are 99x56 pixels. Here it is!

Find your material! - I recommend using websites like Tumblr and searching with the “GIF” filter only on, or alternatives such as Giphy or Tenor. Your browser may let you directly save the .gif file; if not and you are noticing it restricts you to save it as a .webp file you can try an extension like “Save webp as PNG or JPEG” (for Firefox but I image other browsers have similar functions, but I really recommend you switch to Firefox). To use this you will right click on your source .gif like normal but instead of clicking on “Save image as…” click “Save webP as…” and then click “GIF”. You should be redirected to the website ezgif.com where we will actually be doing all of our editing! Here’s the .gif we’ll be working with.

Convert to GIF (optional) - if you used the extension from the above step you should already be ready to click the blue “Convert to GIF” button. If not, go ahead and open ezgif.com and click on “webP” and then “WebP to GIF”; then convert to a gif with the blue button.

Resize the GIF - now that we have a gif ready to edit, let’s make it the right size. The easiest method I have found is to change it directly to the frame’s inner dimensions, 94x50 pixels. [EDIT: Make sure in the aspect ratio drop drop menu you select "stretch to fit" and not "center and crop to fit" like I did in the photo example.] Click “resize” and then type [94] in for the width and [50] for the height. Next press the blue “resize image” button.


Add the frame - next click “overlay” then click the thin blue button that says “Extend canvas size(use if overlay exceeds GIF sizes)”. This will give us some extra room to add the frame onto the design. Next click “Browse…” and find the frame you have saved onto your device, then click the blue “Upload image” button.


After that it’s going to be misaligned, that’s normal! It will say you have the option to drag it into place, but don’t bother. That’s one of the reasons my old stamps look wack, it’s just harder to do. Instead type [44] in for the Left box and [22] in for the Right box. It took me a while to figure out these dimensions to be honest, and I’ve only tested it with this frame so I don't know if it works with others. Then click the blue “Generate image” button.


Crop the transparent edges - click on “crop”. You will have the option to check a box that says “trim transparent pixels around the image” however, I don’t recommend this as it tends to crop a few of the frame’s pixels with it sometimes. Next, set the Left position to [44] and the Right position to [22]. For the other dimensions we will use the outer dimensions of the frame which are 99x56 pixels, this will trim everything except the tiny spaces in between the stamp frame’s spikes. Type the width as [99] and the height as [56] and click the tiny blue button that says “set”. After that click the blue “Crop image” button.


Save and use! - all that's left is to click “save” and upload the graphic to your liking. (best seen on dark mode obviously)

If you’d like to tag me in stamps you’ve made using my tutorial I would love to see them, but it’s not required!! Make sure to always give credit for pictures/gifs when you can and try not to make stuff out of personal/fan art. Thank you to the person in my inbox who requested this tutorial, I had been meaning to for a while but it was just the kick I needed. :)
#carrd graphics#carrd resources#carrd stuff#rentry graphics#rentry resources#rentry decor#rentry pixels#rentry stuff#rentry inspo#deviantart#neocities#mine#my graphics#my tutorials#resources#tutorials#tutorial#how to#stamps#blinkies#graphics#web graphic#old internet#early internet#spacehey#da stamps#page decor#custom#old web#frames
341 notes
·
View notes