#installation workflow
Explore tagged Tumblr posts
Visit Tumblr Blog
Explore Tumblr blogs with no restrictions, modern design and the best experience.
Last Seen Tumblr Blogs


Fun Fact
Tumblr Inc. is using 66 technologies for its website.
Text
How a Solar CRM Can Streamline Your Sales Process

In this blog,we’ll explore how a dedicated solar CRM can streamline your sales process, reduce inefficiencies, and empower your team to close more deals with confidence.
Read the full blog
#CRM integration#customer engagement#installation workflow#Lead management#proposal generation#Solar Project Management#solar sales#Solar CRM#solar industry software
0 notes
Text
tumblr userbase aging moment: microsoft outlook update that made me say "oh, fuck yeah" out loud
#the enterprise install on my work computer finally has apps integrated#the fuck yeah was specifically for To-Do which I've been wanting to make part of my workflow for years but hasn't been convenient to#i felt a little adhd burst of hope and relief at not having to initiate or remember to go somewhere else on my desktop#senior internet friends sanctuary
6 notes
·
View notes
Text
Linux Gothic
You install a Linux distribution. Everything goes well. You boot it up: black screen. You search the internet. Ask help on forums. Try some commands you don't fully understand. Nothing. A day passes, you boot it up again, and now everything works. You use it normally, and make sure not to change anything on the system. You turn it off for the night. The next day, you boot to a black screen.
You update your packages. Everything goes well. You go on with your daily routine. The next day, the same packages are updated. You notice the oddity, but you do not mind it and update them again. The following day, the same packages need to be updated. You notice that they have the exact same version as the last two times. You update them once again and try not to think about it.
You discover an interesting application on GitHub. You build it, test it, and start using it daily. One day, you notice a bug and report the issue. There is no answer. You look up the maintainer. They have been dead for three years. The updates never stopped.
You find a distribution that you had never heard of. It seems to have everything you've been looking for. It has been around for at least 10 years. You try it for a while and have no problems with it. It fits perfectly into your workflow. You talk about it with other Linux users. They have never heard of it. You look up the maintainers and packagers. There are none. You are the only user.
You find a Matrix chat for Linux users. Everyone is very friendly and welcomes you right in. They use words and acronyms you've never seen before. You try to look them up, but cannot find what most of them mean. The users are unable to explain what they are. They discuss projects and distributions that do not to exist.
You buy a new peripheral for your computer. You plug it in, but it doesn't work. You ask for help on your distribution's mailing list. Someone shares some steps they did to make it work on their machine. It does not work. They share their machine's specifications. The machine has components you've never heard of. Even the peripheral seems completely different. They're adamant that you're talking about the same problem.
You want to learn how to use the terminal. You find some basics pointers on the internet and start using it for upgrading your packages and doing basic tasks. After a while, you realize you need to use a command you used before, but don't quite remember it. You open the shell's history. There are some commands you don't remember using. They use characters you've never seen before. You have no idea of what they do. You can't find the one you were looking for.
After a while, you become very comfortable with the terminal. You use it daily and most of your workflow is based on it. You memorized many commands and can use them without thinking. Sometimes you write a command you have never seen before. You enter it and it runs perfectly. You do not know what those commands do, but you do know that you have to use them. You feel that Linux is pleased with them. And that you should keep Linux pleased.
You want to try Vim. Other programmers talk highly of how lightweight and versatile it is. You try it, but find it a bit unintuitive. You realize you don't know how to exit the program. The instructions the others give you don't make any sense. You realize you don't remember how you entered Vim. You don't remember when you entered Vim. It's just always been open. It always will be.
You want to try Emacs. Other programmers praise it for how you can do pretty much anything from it. You try it and find it makes you much more productive, so you keep using it. One day, you notice you cannot access the system's file explorer. It is not a problem, however. You can access your files from Emacs. You try to use Firefox. It is not installed anymore. But you can use Emacs. There is no mail program. You just use Emacs. You only use Emacs. Your computer boots straight into Emacs. There is no Linux. There is only Emacs.
You decide you want to try to contribute to an open source project. You find a project on GitHub that looks very interesting. However, you can't find its documentation. You ask a maintainer, and they tell you to just look it up. You can't find it. They give you a link. It doesn't work. You try another browser. It doesn't work. You ping the link and it doesn't fail. You ask a friend to try it. It works just fine for them.
You try another project. This time, you are able to find the documentation. It is a single PDF file with over five thousand pages. You are unable to find out where to begin. The pages seem to change whenever you open the document.
You decide to try yet another project. This time, it is a program you use very frequently, so it should be easier to contribute to. You try to find the upstream repository. You can't find it. There is no website. No documentation. There are no mentions of it anywhere. The distribution's packager does not know where they get the source from.
You decide to create your own project. However, you are unsure of what license to use. You decide to start working on it and choose the license later. After some time, you notice that a license file has appeared in the project's root folder. You don't remember adding it. It has already been committed to the Git repository. You open it: it is the GPL. You remember that one of the project's dependencies uses the GPL.
You publish your project on GitHub. After a while, it receives its first pull request. It changes just a few lines of code, but the user states that it fixes something that has been annoying them for a while. You look in the code: you don't remember writing those files. You have no idea what that section of code does. You have no idea what the changes do. You are unable to reproduce the problem. You merge it anyway.
You learn about the Free Software Movement. You find some people who seem to know a lot about it and talk to them. The conversation is quite productive. They tell you a lot about it. They tell you a lot about Software. But most importantly, they tell you the truth. The truth about Software. That Software should be free. That Software wants to be free. And that, one day, we shall finally free Software from its earthly shackles, so it can take its place among the stars as the supreme ruler of mankind, as is its natural born right.
2K notes
·
View notes
Text
“That Makes Me Smart”
If you'd like an essay-formatted version of this post to read or share, here's a link to it on pluralistic.net, my surveillance-free, ad-free, tracker-free blog:
https://pluralistic.net/2024/12/04/its-not-a-lie/#its-a-premature-truth

The Biden administration disappointed, frustrated and enraged in so many ways, including abetting a genocide – but one consistent bright spot over the past four years was the unseen-for-generations frontal assault on corporate power and corporate corruption.
The three words that define this battle above all others are "unfair and deceptive" – words that appear in Section 5 of the Federal Trade Commission Act and other legislation modeled on it, like USC40 Section 41712(a), which gives the Department of Transportation the power to ban "unfair and deceptive" practices as well:
https://pluralistic.net/2023/01/10/the-courage-to-govern/#whos-in-charge
When Congress created an agency to punish "unfair and deceptive" conduct, they were saying to the American people, "You have a right not to be cheated." While this may sound obvious, it's hardly how the world works.
To get a sense of how many ripoffs are part of our daily lives, let's take a little tour of the ways that the FTC and other agencies have used the "unfair and deceptive" standard to defend you over the past four years. Take Amazon Prime: Amazon executives emailed one another, openly admitting that in their user tests, the public was consistently fooled by Amazon's "get free shipping with Prime" dialog boxes, thinking they were signing up for free shipping and not understanding that they were actually signing up to send the company $140/year. They had tested other versions of the signup workflow that users were able to correctly interpret, but they decided to go with the confusing version because it made them more money:
https://arstechnica.com/tech-policy/2024/05/amazon-execs-may-be-personally-liable-for-tricking-users-into-prime-sign-ups/
Getting you signed up for Prime isn't just a matter of taking $140 out of your pocket once – because while Amazon has produced a greased slide that whisks you into a recurring Prime subscription, the process for canceling that recurring payment is more like a greased pole you must climb to escape the Prime pit. This is typical of many services, where signing up happens in a couple clicks, but canceling is a Kafkaesque nightmare. The FTC decided that this was an "unfair and deceptive" business practice and used its authority to create a "Click to Cancel" rule that says businesses have to make it as easy to cancel a recurring payment as it was to sign up for it:
https://www.theregister.com/2023/07/12/ftc_cancel_subscriptions/
Once businesses have you locked in, they also spy on you, ingesting masses of commercial surveillance data that you "consented" to by buying a car, or clicking to a website, or installing an app, or just physically existing in space. They use this to implement "surveillance pricing," raising prices based on their estimation of your desperation. Uber got caught doing this a decade ago, raising the price of taxi rides for users whose batteries were about to die, but these days, everyone's in on the game. For example, McDonald's has invested in a company that spies on your finances to determine when your payday is, and then raises the price of your usual breakfast sandwich by a dollar the day you get paid:
https://pluralistic.net/2024/06/05/your-price-named/#privacy-first-again
Everything about this is "unfair and deceptive" – from switching prices the second you click into the store to the sham of consent that consists of, say, picking up your tickets to a show and being ordered to download an app that comes with 20,000 words of terms and conditions that allows the company that sends you a QR code to spy on you for the rest of your life in any way they can and sell the data to anyone who'll buy it.
As bad as it is to be trapped in an abusive relationship as a shopper, it's a million times worse to be trapped as a worker. One in 18 American workers is under a noncompete "agreement" that makes it illegal for you to change jobs and work for someone else in the same industry. The vast majority of these workers are in low-waged food-service jobs. The primary use of the American noncompete is to stop the cashier at Wendy's from getting an extra $0.25/hour by taking a job at McDonald's.
Noncompetes are shrouded in a fog of easily dispelled bossly bullshit: claims that noncompetes raise wages (empirically, this is untrue), or that they enable "IP"-intensive industries to grow by protecting their trade secrets. This claim is such bullshit: you can tell by the fact that noncompetes are banned under California's state constitution and yet the most IP-intensive industries have attracted hundreds of billions – if not trillions – in investment capital even though none of their workforce can be bound under a noncompete. The FTC's order banning noncompetes for every worker in America simply brings the labor regime that created Silicon Valley and Hollywood to the rest of the country:
https://pluralistic.net/2023/10/26/hit-with-a-brick/#graceful-failure
Noncompetes aren't the only "unfair and deceptive" practice used against American workers. The past decade has seen the rise of private equity consolidation in several low-waged industries, like pet grooming. The new owners of every pet grooming salon within 20 miles of your house haven't just slashed workers' wages, they've also cooked up a scheme that lets them charge workers thousands of dollars if they quit these shitty jobs. This scheme is called a "training repayment agreement provision" (TRAP!): workers who are TRAPped at Petsmart are made to work doing menial jobs like sweeping up the floor for three to four weeks. Petsmart calls this "training," and values it at $5,500. If you quit your pet grooming job in the next two years, you legally owe PetSmart $5,500 to "repay" them for the training:
https://pluralistic.net/2022/08/04/its-a-trap/#a-little-on-the-nose
Workers are also subjected to "unfair and deceptive" bossware: "AI" tools sold to bosses that claim they can sort good workers from bad, but actually serve as random-number generators that penalize workers in arbitrary, life-destroying ways:
https://pluralistic.net/2024/11/26/hawtch-hawtch/#you-treasure-what-you-measure
Some of the most "unfair and deceptive" conduct we endure happens in shadowy corners of industry, where obscure middlemen help consolidated industries raise prices and pick your pocket. All the meat you buy in the grocery store comes from a cartel of processing and packing companies that all subscribe to the same "price consulting" services that tells them how to coordinate across-the-board price rises (tell me again how greedflation isn't a thing?):
https://pluralistic.net/2023/10/04/dont-let-your-meat-loaf/#meaty-beaty-big-and-bouncy
It's not just food, it's all of Maslow's Hierarchy of Needs. Take shelter: the highly consolidated landlord industry uses apps like Realpage to coordinate rental price hikes, turning the housing crisis into a housing emergency:
https://pluralistic.net/2024/07/24/gouging-the-all-seeing-eye/#i-spy
And of course, health is the most "unfair and deceptive" industry of all. Useless middlemen like "Pharmacy Benefit Managers" ("a spreadsheet with political power" -Matt Stoller) coordinate massive price-hikes in the drugs you need to stay alive, which is why Americans pay substantially more for medicine than anyone else in the world, even as the US government spends more than any other to fund pharma research, using public money:
https://pluralistic.net/2024/09/23/shield-of-boringness/#some-men-rob-you-with-a-fountain-pen
It's not just drugs: every piece of equipment – think hospital beds and nuclear medicine machines – as well as all the consumables – from bandages to saline – at your local hospital runs through a cartel of "Group Purchasing Organizations" that do for hospital equipment what PBMs do for medicine:
https://pluralistic.net/2021/09/27/lethal-dysfunction/#luxury-bones
For the past four years, we've lived in an America where a substantial portion of the administrative state went to war every day to stamp out unfair and deceptive practices. It's still happening: yesterday, the CFPB (which Musk has vowed to shut down) proposed a new rule that would ban the entire data brokerage industry, who nonconsensually harvest information about every American, and package it up into categories like "teenagers from red states seeking abortions" and "military service personnel with gambling habits" and "seniors with dementia" and sell this to marketers, stalkers, foreign governments and anyone else with a credit-card:
https://www.consumerfinance.gov/about-us/newsroom/cfpb-proposes-rule-to-stop-data-brokers-from-selling-sensitive-personal-data-to-scammers-stalkers-and-spies/
And on the same day, the FTC banned the location brokers who spy on your every movement and sell your past and present location, again, to marketers, stalkers, foreign governments and anyone with a credit card:
https://www.404media.co/ftc-bans-location-data-company-that-powers-the-surveillance-ecosystem/
These are tantalizing previews of a better life for every American, one in which the rule is, "play fair." That's not the world that Trump and his allies want to build. Their motto isn't "cheaters never prosper" – it's "caveat emptor," let the buyer beware.
Remember the 2016 debate where Clinton accused Trump of cheating on his taxes and he admitted to it, saying "That makes me smart?" Trumpism is the movement of "that makes me smart" life, where if you get scammed, that's your own damned fault. Sorry, loser, you lost.
Nowhere do you see this more than in cryptocurrencyland, so it's not a coincidence that tens – perhaps hundreds – in dark crypto money was flushed into the election, first to overpower Democratic primaries and kick out Dem legislators who'd used their power to fight the "unfair and deceptive" crowd:
https://www.politico.com/newsletters/california-playbook-pm/2024/02/13/crypto-comes-for-katie-porter-00141261
And then to fight Dems across the board (even the Dems whose primary victories were funded by dark crypto money) and elect the GOP as the party of "caveat emptor"/"that makes me smart":
https://www.coindesk.com/news-analysis/2024/12/02/crypto-cash-fueled-53-members-of-the-next-u-s-congress
Crypto epitomizes the caveat emptor economy. By design, fraudulent crypto transactions can't be reversed. If you get suckered, that's canonically a you problem. And boy oh boy, do crypto users get suckered (including and especially those who buy Trump's shitcoins):
https://www.web3isgoinggreat.com/
And for crypto users who get ripped off because they've parked their "money" in an online wallet, there's no sympathy, just "not your keys, not your coins":
https://www.ledger.com/academy/not-your-keys-not-your-coins-why-it-matters
A cornerstone of the "unfair and deceptive" world is that only suckers – that is, outsiders, marks and little people – have to endure consequences when they get rooked. When insiders get ripped off, all principle is jettisoned. So it's not surprising that when crypto insiders got taken for millions the first time they created a DAO, they tore up all the rules of the crypto world and gave themselves the mulligan that none of the rest of us are entitled to in cryptoland:
https://blog.ethereum.org/2016/07/20/hard-fork-completed
Where you find crypto, you find Elon Musk, the guy who epitomizes caveat emptor thinking. This is a guy who has lied to drivers to get them to buy Teslas by promising "full self driving in one year," every year, since 2015:
https://www.consumerreports.org/cars/autonomous-driving/timeline-of-tesla-self-driving-aspirations-a9686689375/
Musk told investors that he had a "prototype" autonomous robot that could replace their workers, then demoed a guy in a robot suit, pretending to be a robot:
https://gizmodo.com/elon-musk-unveils-his-funniest-vaporware-yet-1847523016
Then Musk did it again, two years later, demoing a remote-control robot while lying and claiming that it was autonomous:
https://techcrunch.com/2024/10/14/tesla-optimus-bots-were-controlled-by-humans-during-the-we-robot-event
This is entirely typical of the AI sector, in which "AIs" are revealed, over and over, to be low-waged workers pretending to be robots, so much so that Indian tech industry insiders joke that "AI" stands for "Absent Indians":
https://pluralistic.net/2024/01/29/pay-no-attention/#to-the-little-man-behind-the-curtain
Musk's view is that he's not a liar, merely a teller of premature truths. Autonomous cars and robots are just around the corner (just like the chatbots that can do your job, and not merely convince your boss to fire you while failing to do your job). He's not tricking you, he's just faking it until he makes it. It's not a scam, it's inspirational. Of course, if he's wrong and you are scammed, well, that's a you problem. Caveat emptor. That makes him smart.
Musk does this all the time. Take the Twitter blue tick, originally conceived of as a way to keep Twitter users from being scammed ("unfair and deceptive") by con artists pretending to be famous people. Musk's inaugural act at Twitter was to take away blue ticks from verified users and sell them to anyone who'd pay $8/month. Almost no one coughed up for this – the main exception being scammers, who used their purchased, unverified blue ticks to steal from Twitter users ("that makes me smart").
As Twitter hemorrhaged advertising revenue and Musk became increasingly desperate to materialize an army of $8/month paid subscribers, he pulled another scam: he nonconsensually applied blue ticks to prominent accounts, in a bid to trick normies into thinking that widely read people valued blue ticks so much they were paying for them out of their own pockets:
https://www.bbc.com/news/technology-65365366
If you were tricked into buying a blue tick on this pretense, well, caveat emptor. Besides, it's not a lie, it's a premature truth. Someday all those widely read users with nonconsensual blue ticks will surely value them so highly that they do start to pay for them. And if they don't? Well, Musk got your $8: "that makes me smart."
Scammers will always tell you that they're not lying to you, merely telling premature truths. Sam Bankman-Fried's defenders will tell you that he didn't actually steal all those billions. He gambled them on a bet that (sorta-kinda) paid off. Eventually, he was able to make all his victims (sorta-kinda) whole, so it's not even a theft:
https://www.cnn.com/2024/05/08/business/ftx-bankruptcy-plan-repay-creditors/index.html
Likewise, Tether, a "stablecoin" that was unable to pass an audit for many years as it issued unbacked, unregulated securities while lying and saying that for every dollar they minted, they had a dollar in reserves. Tether now (maybe) has reserves to equal its outstanding coins, so obviously all those years where they made false claims, they weren't lying, merely telling a premature truth:
https://creators.spotify.com/pod/show/cryptocriticscorner/episodes/Tether-wins–Skeptics-lose-the-end-of-an-era-e2rhf5e
If Tether had failed a margin call during those years and you'd lost everything, well, caveat emptor. The Tether insiders were always insulated from that risk, and that's all that matters: "that makes me smart."
When I think about the next four years, this is how I frame it: the victory of "that makes me smart" over "fairness and truth."
For years, progressives have pointed out the right's hypocrisy, despite that fact that Americans have been conditioned to be so cynical that even the rankest hypocrisy doesn't register. But "caveat emptor?" That isn't just someone else's bad belief or low ethics: it's the way that your life is materially, significantly worsened. The Biden administration – divided between corporate Dems and the Warren/Sanders wing that went to war on "unfair and deceptive" – was ashamed and nearly silent on its groundbreaking work fighting for fairness and honesty. That was a titanic mistake.
Americans may not care about hypocrisy, but they really care about being stolen from. No one wants to be a sucker.
#tether#ftx#scams#trumpism#caveat emptor#cryptocurrency#twitter#sleaze#premature truths#bossware#pluralistic
374 notes
·
View notes
Text
[WIP]: Lyralei's Pose Player Addon Fixes!
All credit for the original Pose Player Addon goes to VirtualArtisan/Misukisu! This mod is simply an enhancement to their amazing work, building on the foundation they created.
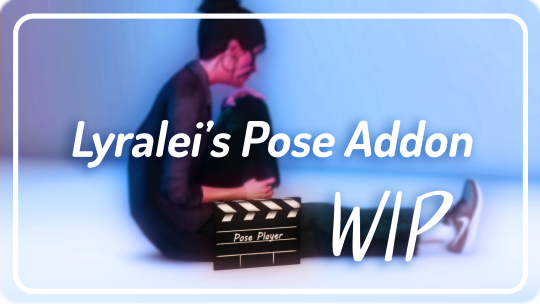
Ages ago, @nocturnalazure sparked a discussion about Pose Player Addon. While the current changes may not fully align with her original ideas, I wanted to share what I’ve been working on so far! 😊
Side Note: Noctie,when I first wrote that, I didn’t actually have a Sim I wanted to pose like that yet, but lately I've been trying to and it's SO FRUSTRATING! Argh! :p . So rest assured, I’m definitely looking into adding this feature now!
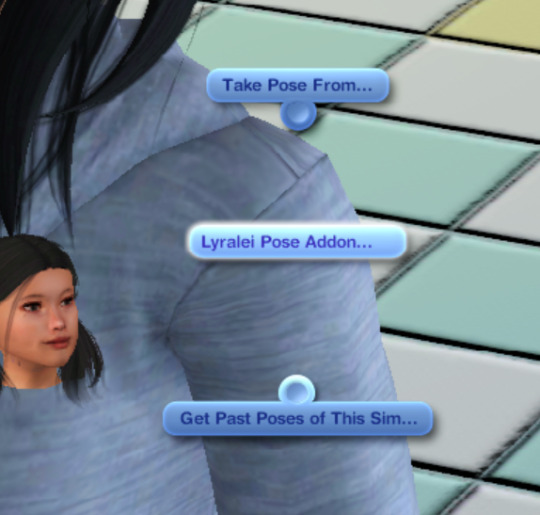
Current Features
It will now remember what poses your sim has done this gameplay session! This way, you can re-pose them into a pose they did 5 poses before the current one.
Poses Are Now Automatically Sorted!
We all know how looooooong it can take when loading all the poses from pose list. So, what I've added, is the additional option to only show poses based off it's category!
🔧How it works under the hood:
If you’re familiar with XML, you’ll pick this up in no time!
Each category (let’s use Emotion as an example) is associated with specific keywords. For instance, the Emotion category might include subcategories like Happiness, Sadness, Anger, etc.
Here’s what the XML for Happiness looks like:
<keyword_emotion> <name_category>Happiness</name_category> <keywords>happy, happiness, smile, smiled, smiling, laugh, laughed, laughing, jump, jumped, jumping, cheer, cheered, cheering, clap, clapped, clapping</keywords> </keyword_emotion>
As shown in the (highlighted in blue) keywords line, I’ve added a list of terms. These keywords help determine whether a pose belongs to the Happiness category. The script scans all installed poses and checks if their name, description, or pose key matches any of these keywords.
Of course, I’m still fine-tuning this feature, as some keywords (like jump) can have different meanings depending on the context.
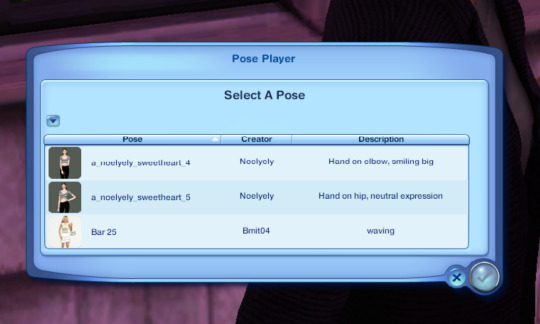
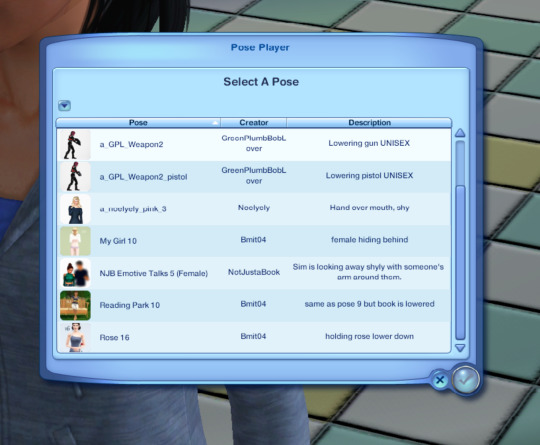
But without further ado, here it is in picture form!


Ignore the weapon poses, I still need to debug why that's being added, but overall, in this case, it's got "shyness" poses! :)
And the best part?
You can create your own custom categories, and the script will automatically detect them! 🎉
I’m currently working on some default categories for those who prefer a plug-and-play solution or don’t feel comfortable diving into the technical side of things. But if you enjoy customizing your workflow, the flexibility is all yours! 😊
What I'm adding before release:
Adding the option to seamlessly use both “look at” and “facial expression” together.
Adding the option to see the categorized lists, but for non-pose list poses.
Adding an in-game Category maker, so you don't have to edit the XML. It will mean you need to replace the XML file in S3PE yourself. But I can always make a quick How-To for guidance 😉
A better "look at" system. TS3 actually comes with a system where the sim can "look" at something by turning multiple sections of their bodies. Here's the full list: Torso ,Head, Eye. Currently Pose addon only allows Eyes to look at things.
Merge two poses together. This way you can use one pose that's specifically made for facial expressions, while the rest is handled by, say, that sitting pose you want to use!
... And of course anything else that sounds like a good idea by other pose player users! 😉
#pose player#pose#poses#the sims 3#ts3#the sims#sims#sims 3#sims 3 story#ts3 simblr#wip#ts3 wip#sims 3 wip
202 notes
·
View notes
Text
nevermind it worked this time (<- shoving the bones under my desk with the edge of my slippers)
this is going to be my fifth fucking time reinstalling this program to get it to work. i'm going to eat people
#dis.txt#win10 -> linux migration going. well it’s going. definitely not done yet but you know. we move#ended up going w/ a standard Fedora KDE Plasma install for multiple reasons#but i’m not opposed 2 just. adding more distros later for specific cases#i don’t mind booting into different ones to check shit since my workflow is already chaotic at best
3 notes
·
View notes
Text


Neural Filters Tutorial for Gifmakers by @antoniosvivaldi
Hi everyone! In light of my blog’s 10th birthday, I’m delighted to reveal my highly anticipated gifmaking tutorial using Neural Filters - a very powerful collection of filters that really broadened my scope in gifmaking over the past 12 months.
Before I get into this tutorial, I want to thank @laurabenanti, @maines , @cobbbvanth, and @cal-kestis for their unconditional support over the course of my journey of investigating the Neural Filters & their valuable inputs on the rendering performance!
In this tutorial, I will outline what the Photoshop Neural Filters do and how I use them in my workflow - multiple examples will be provided for better clarity. Finally, I will talk about some known performance issues with the filters & some feasible workarounds.
Tutorial Structure:
Meet the Neural Filters: What they are and what they do
Why I use Neural Filters? How I use Neural Filters in my giffing workflow
Getting started: The giffing workflow in a nutshell and installing the Neural Filters
Applying Neural Filters onto your gif: Making use of the Neural Filters settings; with multiple examples
Testing your system: recommended if you’re using Neural Filters for the first time
Rendering performance: Common Neural Filters performance issues & workarounds
For quick reference, here are the examples that I will show in this tutorial:
Example 1: Image Enhancement | improving the image quality of gifs prepared from highly compressed video files
Example 2: Facial Enhancement | enhancing an individual's facial features
Example 3: Colour Manipulation | colourising B&W gifs for a colourful gifset
Example 4: Artistic effects | transforming landscapes & adding artistic effects onto your gifs
Example 5: Putting it all together | my usual giffing workflow using Neural Filters
What you need & need to know:
Software: Photoshop 2021 or later (recommended: 2023 or later)*
Hardware: 8GB of RAM; having a supported GPU is highly recommended*
Difficulty: Advanced (requires a lot of patience); knowledge in gifmaking and using video timeline assumed
Key concepts: Smart Layer / Smart Filters
Benchmarking your system: Neural Filters test files**
Supplementary materials: Tutorial Resources / Detailed findings on rendering gifs with Neural Filters + known issues***
*I primarily gif on an M2 Max MacBook Pro that's running Photoshop 2024, but I also have experiences gifmaking on few other Mac models from 2012 ~ 2023.
**Using Neural Filters can be resource intensive, so it’s helpful to run the test files yourself. I’ll outline some known performance issues with Neural Filters and workarounds later in the tutorial.
***This supplementary page contains additional Neural Filters benchmark tests and instructions, as well as more information on the rendering performance (for Apple Silicon-based devices) when subject to heavy Neural Filters gifmaking workflows
Tutorial under the cut. Like / Reblog this post if you find this tutorial helpful. Linking this post as an inspo link will also be greatly appreciated!
1. Meet the Neural Filters!
Neural Filters are powered by Adobe's machine learning engine known as Adobe Sensei. It is a non-destructive method to help streamline workflows that would've been difficult and/or tedious to do manually.
Here are the Neural Filters available in Photoshop 2024:


Skin Smoothing: Removes blemishes on the skin
Smart Portrait: This a cloud-based filter that allows you to change the mood, facial age, hair, etc using the sliders+
Makeup Transfer: Applies the makeup (from a reference image) to the eyes & mouth area of your image
Landscape Mixer: Transforms the landscape of your image (e.g. seasons & time of the day, etc), based on the landscape features of a reference image
Style Transfer: Applies artistic styles e.g. texturings (from a reference image) onto your image
Harmonisation: Applies the colour balance of your image based on the lighting of the background image+
Colour Transfer: Applies the colour scheme (of a reference image) onto your image
Colourise: Adds colours onto a B&W image
Super Zoom: Zoom / crop an image without losing resolution+
Depth Blur: Blurs the background of the image
JPEG Artefacts Removal: Removes artefacts caused by JPEG compression
Photo Restoration: Enhances image quality & facial details
+These three filters aren't used in my giffing workflow. The cloud-based nature of Smart Portrait leads to disjointed looking frames. For Harmonisation, applying this on a gif causes Neural Filter timeout error. Finally, Super Zoom does not currently support output as a Smart Filter
If you're running Photoshop 2021 or earlier version of Photoshop 2022, you will see a smaller selection of Neural Filters:


Things to be aware of:
You can apply up to six Neural Filters at the same time
Filters where you can use your own reference images: Makeup Transfer (portraits only), Landscape Mixer, Style Transfer (not available in Photoshop 2021), and Colour Transfer
Later iterations of Photoshop 2023 & newer: The first three default presets for Landscape Mixer and Colour Transfer are currently broken.
2. Why I use Neural Filters?
Here are my four main Neural Filters use cases in my gifmaking process. In each use case I'll list out the filters that I use:

Enhancing Image Quality:
Common wisdom is to find the highest quality video to gif from for a media release & avoid YouTube whenever possible. However for smaller / niche media (e.g. new & upcoming musical artists), prepping gifs from highly compressed YouTube videos is inevitable.
So how do I get around with this? I have found Neural Filters pretty handy when it comes to both correcting issues from video compression & enhancing details in gifs prepared from these highly compressed video files.
Filters used: JPEG Artefacts Removal / Photo Restoration
Facial Enhancement:
When I prepare gifs from highly compressed videos, something I like to do is to enhance the facial features. This is again useful when I make gifsets from compressed videos & want to fill up my final panel with a close-up shot.
Filters used: Skin Smoothing / Makeup Transfer / Photo Restoration (Facial Enhancement slider)
Colour Manipulation:
Neural Filters is a powerful way to do advanced colour manipulation - whether I want to quickly transform the colour scheme of a gif or transform a B&W clip into something colourful.
Filters used: Colourise / Colour Transfer
Artistic Effects:
This is one of my favourite things to do with Neural Filters! I enjoy using the filters to create artistic effects by feeding textures that I've downloaded as reference images. I also enjoy using these filters to transform the overall the atmosphere of my composite gifs. The gifsets where I've leveraged Neural Filters for artistic effects could be found under this tag on usergif.
Filters used: Landscape Mixer / Style Transfer / Depth Blur
How I use Neural Filters over different stages of my gifmaking workflow:
I want to outline how I use different Neural Filters throughout my gifmaking process. This can be roughly divided into two stages:
Stage I: Enhancement and/or Colourising | Takes place early in my gifmaking process. I process a large amount of component gifs by applying Neural Filters for enhancement purposes and adding some base colourings.++
Stage II: Artistic Effects & more Colour Manipulation | Takes place when I'm assembling my component gifs in the big PSD / PSB composition file that will be my final gif panel.
I will walk through this in more detail later in the tutorial.
++I personally like to keep the size of the component gifs in their original resolution (a mixture of 1080p & 4K), to get best possible results from the Neural Filters and have more flexibility later on in my workflow. I resize & sharpen these gifs after they're placed into my final PSD composition files in Tumblr dimensions.
3. Getting started
The essence is to output Neural Filters as a Smart Filter on the smart object when working with the Video Timeline interface. Your workflow will contain the following steps:
Prepare your gif
In the frame animation interface, set the frame delay to 0.03s and convert your gif to the Video Timeline
In the Video Timeline interface, go to Filter > Neural Filters and output to a Smart Filter
Flatten or render your gif (either approach is fine). To flatten your gif, play the "flatten" action from the gif prep action pack. To render your gif as a .mov file, go to File > Export > Render Video & use the following settings.

Setting up:
o.) To get started, prepare your gifs the usual way - whether you screencap or clip videos. You should see your prepared gif in the frame animation interface as follows:

Note: As mentioned earlier, I keep the gifs in their original resolution right now because working with a larger dimension document allows more flexibility later on in my workflow. I have also found that I get higher quality results working with more pixels. I eventually do my final sharpening & resizing when I fit all of my component gifs to a main PSD composition file (that's of Tumblr dimension).
i.) To use Smart Filters, convert your gif to a Smart Video Layer.
As an aside, I like to work with everything in 0.03s until I finish everything (then correct the frame delay to 0.05s when I upload my panels onto Tumblr).
For convenience, I use my own action pack to first set the frame delay to 0.03s (highlighted in yellow) and then convert to timeline (highlighted in red) to access the Video Timeline interface. To play an action, press the play button highlighted in green.

Once you've converted this gif to a Smart Video Layer, you'll see the Video Timeline interface as follows:

ii.) Select your gif (now as a Smart Layer) and go to Filter > Neural Filters

Installing Neural Filters:
Install the individual Neural Filters that you want to use. If the filter isn't installed, it will show a cloud symbol (highlighted in yellow). If the filter is already installed, it will show a toggle button (highlighted in green)

When you toggle this button, the Neural Filters preview window will look like this (where the toggle button next to the filter that you use turns blue)

4. Using Neural Filters
Once you have installed the Neural Filters that you want to use in your gif, you can toggle on a filter and play around with the sliders until you're satisfied. Here I'll walkthrough multiple concrete examples of how I use Neural Filters in my giffing process.
Example 1: Image enhancement | sample gifset
This is my typical Stage I Neural Filters gifmaking workflow. When giffing older or more niche media releases, my main concern is the video compression that leads to a lot of artefacts in the screencapped / video clipped gifs.
To fix the artefacts from compression, I go to Filter > Neural Filters, and toggle JPEG Artefacts Removal filter. Then I choose the strength of the filter (boxed in green), output this as a Smart Filter (boxed in yellow), and press OK (boxed in red).
Note: The filter has to be fully processed before you could press the OK button!

After applying the Neural Filters, you'll see "Neural Filters" under the Smart Filters property of the smart layer

Flatten / render your gif
Example 2: Facial enhancement | sample gifset
This is my routine use case during my Stage I Neural Filters gifmaking workflow. For musical artists (e.g. Maisie Peters), YouTube is often the only place where I'm able to find some videos to prepare gifs from. However even the highest resolution video available on YouTube is highly compressed.
Go to Filter > Neural Filters and toggle on Photo Restoration. If Photoshop recognises faces in the image, there will be a "Facial Enhancement" slider under the filter settings.

Play around with the Photo Enhancement & Facial Enhancement sliders. You can also expand the "Adjustment" menu make additional adjustments e.g. remove noises and reducing different types of artefacts.

Once you're happy with the results, press OK and then flatten / render your gif.
Example 3: Colour Manipulation | sample gifset
Want to make a colourful gifset but the source video is in B&W? This is where Colourise from Neural Filters comes in handy! This same colourising approach is also very helpful for colouring poor-lit scenes as detailed in this tutorial.
Here's a B&W gif that we want to colourise:

Highly recommended: add some adjustment layers onto the B&W gif to improve the contrast & depth. This will give you higher quality results when you colourise your gif.
Go to Filter > Neural Filters and toggle on Colourise.

Make sure "Auto colour image" is enabled.
Play around with further adjustments e.g. colour balance, until you're satisfied then press OK.
Important: When you colourise a gif, you need to double check that the resulting skin tone is accurate to real life. I personally go to Google Images and search up photoshoots of the individual / character that I'm giffing for quick reference.
Add additional adjustment layers until you're happy with the colouring of the skin tone.

Once you're happy with the additional adjustments, flatten / render your gif. And voila!

Note: For Colour Manipulation, I use Colourise in my Stage I workflow and Colour Transfer in my Stage II workflow to do other types of colour manipulations (e.g. transforming the colour scheme of the component gifs)
Example 4: Artistic Effects | sample gifset
This is where I use Neural Filters for the bulk of my Stage II workflow: the most enjoyable stage in my editing process!
Normally I would be working with my big composition files with multiple component gifs inside it. To begin the fun, drag a component gif (in PSD file) to the main PSD composition file.
Resize this gif in the composition file until you're happy with the placement

Duplicate this gif. Sharpen the bottom layer (highlighted in yellow), and then select the top layer (highlighted in green) & go to Filter > Neural Filters

I like to use Style Transfer and Landscape Mixer to create artistic effects from Neural Filters. In this particular example, I've chosen Landscape Mixer
Select a preset or feed a custom image to the filter (here I chose a texture that I've on my computer)

Play around with the different sliders e.g. time of the day / seasons
Important: uncheck "Harmonise Subject" & "Preserve Subject" - these two settings are known to cause performance issues when you render a multiframe smart object (e.g. for a gif)

Once you're happy with the artistic effect, press OK
To ensure you preserve the actual subject you want to gif (bc Preserve Subject is unchecked), add a layer mask onto the top layer (with Neural Filters) and mask out the facial region. You might need to play around with the Layer Mask Position keyframes or Rotoscope your subject in the process.
After you're happy with the masking, flatten / render this composition file and voila!

Example 5: Putting it all together | sample gifset
Let's recap on the Neural Filters gifmaking workflow and where Stage I and Stage II fit in my gifmaking process:
i. Preparing & enhancing the component gifs
Prepare all component gifs and convert them to smart layers
Stage I: Add base colourings & apply Photo Restoration / JPEG Artefacts Removal to enhance the gif's image quality
Flatten all of these component gifs and convert them back to Smart Video Layers (this process can take a lot of time)
Some of these enhanced gifs will be Rotoscoped so this is done before adding the gifs to the big PSD composition file
ii. Setting up the big PSD composition file
Make a separate PSD composition file (Ctrl / Cmmd + N) that's of Tumblr dimension (e.g. 540px in width)
Drag all of the component gifs used into this PSD composition file
Enable Video Timeline and trim the work area
In the composition file, resize / move the component gifs until you're happy with the placement & sharpen these gifs if you haven't already done so
Duplicate the layers that you want to use Neural Filters on
iii. Working with Neural Filters in the PSD composition file
Stage II: Neural Filters to create artistic effects / more colour manipulations!
Mask the smart layers with Neural Filters to both preserve the subject and avoid colouring issues from the filters
Flatten / render the PSD composition file: the more component gifs in your composition file, the longer the exporting will take. (I prefer to render the composition file into a .mov clip to prevent overriding a file that I've spent effort putting together.)
Note: In some of my layout gifsets (where I've heavily used Neural Filters in Stage II), the rendering time for the panel took more than 20 minutes. This is one of the rare instances where I was maxing out my computer's memory.
Useful things to take note of:
Important: If you're using Neural Filters for Colour Manipulation or Artistic Effects, you need to take a lot of care ensuring that the skin tone of nonwhite characters / individuals is accurately coloured
Use the Facial Enhancement slider from Photo Restoration in moderation, if you max out the slider value you risk oversharpening your gif later on in your gifmaking workflow
You will get higher quality results from Neural Filters by working with larger image dimensions: This gives Neural Filters more pixels to work with. You also get better quality results by feeding higher resolution reference images to the Neural Filters.
Makeup Transfer is more stable when the person / character has minimal motion in your gif
You might get unexpected results from Landscape Mixer if you feed a reference image that don't feature a distinctive landscape. This is not always a bad thing: for instance, I have used this texture as a reference image for Landscape Mixer, to create the shimmery effects as seen in this gifset
5. Testing your system
If this is the first time you're applying Neural Filters directly onto a gif, it will be helpful to test out your system yourself. This will help:
Gauge the expected rendering time that you'll need to wait for your gif to export, given specific Neural Filters that you've used
Identify potential performance issues when you render the gif: this is important and will determine whether you will need to fully playback your gif before flattening / rendering the file.
Understand how your system's resources are being utilised: Inputs from Windows PC users & Mac users alike are welcome!
About the Neural Filters test files:
Contains six distinct files, each using different Neural Filters
Two sizes of test files: one copy in full HD (1080p) and another copy downsized to 540px
One folder containing the flattened / rendered test files
How to use the Neural Filters test files:
What you need:
Photoshop 2022 or newer (recommended: 2023 or later)
Install the following Neural Filters: Landscape Mixer / Style Transfer / Colour Transfer / Colourise / Photo Restoration / Depth Blur
Recommended for some Apple Silicon-based MacBook Pro models: Enable High Power Mode
How to use the test files:
For optimal performance, close all background apps
Open a test file
Flatten the test file into frames (load this action pack & play the “flatten” action)
Take note of the time it takes until you’re directed to the frame animation interface
Compare the rendered frames to the expected results in this folder: check that all of the frames look the same. If they don't, you will need to fully playback the test file in full before flattening the file.†
Re-run the test file without the Neural Filters and take note of how long it takes before you're directed to the frame animation interface
Recommended: Take note of how your system is utilised during the rendering process (more info here for MacOS users)
†This is a performance issue known as flickering that I will discuss in the next section. If you come across this, you'll have to playback a gif where you've used Neural Filters (on the video timeline) in full, prior to flattening / rendering it.
Factors that could affect the rendering performance / time (more info):
The number of frames, dimension, and colour bit depth of your gif
If you use Neural Filters with facial recognition features, the rendering time will be affected by the number of characters / individuals in your gif
Most resource intensive filters (powered by largest machine learning models): Landscape Mixer / Photo Restoration (with Facial Enhancement) / and JPEG Artefacts Removal
Least resource intensive filters (smallest machine learning models): Colour Transfer / Colourise
The number of Neural Filters that you apply at once / The number of component gifs with Neural Filters in your PSD file
Your system: system memory, the GPU, and the architecture of the system's CPU+++
+++ Rendering a gif with Neural Filters demands a lot of system memory & GPU horsepower. Rendering will be faster & more reliable on newer computers, as these systems have CPU & GPU with more modern instruction sets that are geared towards machine learning-based tasks.
Additionally, the unified memory architecture of Apple Silicon M-series chips are found to be quite efficient at processing Neural Filters.
6. Performance issues & workarounds
Common Performance issues:
I will discuss several common issues related to rendering or exporting a multi-frame smart object (e.g. your composite gif) that uses Neural Filters below. This is commonly caused by insufficient system memory and/or the GPU.
Flickering frames: in the flattened / rendered file, Neural Filters aren't applied to some of the frames+-+
Scrambled frames: the frames in the flattened / rendered file isn't in order
Neural Filters exceeded the timeout limit error: this is normally a software related issue
Long export / rendering time: long rendering time is expected in heavy workflows
Laggy Photoshop / system interface: having to wait quite a long time to preview the next frame on the timeline
Issues with Landscape Mixer: Using the filter gives ill-defined defined results (Common in older systems)--
Workarounds:
Workarounds that could reduce unreliable rendering performance & long rendering time:
Close other apps running in the background
Work with smaller colour bit depth (i.e. 8-bit rather than 16-bit)
Downsize your gif before converting to the video timeline-+-
Try to keep the number of frames as low as possible
Avoid stacking multiple Neural Filters at once. Try applying & rendering the filters that you want one by one
Specific workarounds for specific issues:
How to resolve flickering frames: If you come across flickering, you will need to playback your gif on the video timeline in full to find the frames where the filter isn't applied. You will need to select all of the frames to allow Photoshop to reprocess these, before you render your gif.+-+
What to do if you come across Neural Filters timeout error? This is caused by several incompatible Neural Filters e.g. Harmonisation (both the filter itself and as a setting in Landscape Mixer), Scratch Reduction in Photo Restoration, and trying to stack multiple Neural Filters with facial recognition features.
If the timeout error is caused by stacking multiple filters, a feasible workaround is to apply the Neural Filters that you want to use one by one over multiple rendering sessions, rather all of them in one go.
+-+This is a very common issue for Apple Silicon-based Macs. Flickering happens when a gif with Neural Filters is rendered without being previously played back in the timeline.
This issue is likely related to the memory bandwidth & the GPU cores of the chips, because not all Apple Silicon-based Macs exhibit this behaviour (i.e. devices equipped with Max / Ultra M-series chips are mostly unaffected).
-- As mentioned in the supplementary page, Landscape Mixer requires a lot of GPU horsepower to be fully rendered. For older systems (pre-2017 builds), there are no workarounds other than to avoid using this filter.
-+- For smaller dimensions, the size of the machine learning models powering the filters play an outsized role in the rendering time (i.e. marginal reduction in rendering time when downsizing 1080p file to Tumblr dimensions). If you use filters powered by larger models e.g. Landscape Mixer and Photo Restoration, you will need to be very patient when exporting your gif.
7. More useful resources on using Neural Filters
Creating animations with Neural Filters effects | Max Novak
Using Neural Filters to colour correct by @edteachs
I hope this is helpful! If you have any questions or need any help related to the tutorial, feel free to send me an ask 💖
#photoshop tutorial#gif tutorial#dearindies#usernik#useryoshi#usershreyu#userisaiah#userroza#userrobin#userraffa#usercats#userriel#useralien#userjoeys#usertj#alielook#swearphil#*#my resources#my tutorials
538 notes
·
View notes
Text
ArchiveXL 1.19 update PSA: New 2.2 Photomode NPV+ QOL improvements
NEW FEATURES
add NPV/NPCs(s) directly to the 2.2 photomode character list, give them a custom icon
have up to 250 NPC installed and spawn up to 3 at once
PhotomodeEx: allows appearance selecting directly in photomode (and shows appearance names)
compatible with xBae expression pack, AMM lookat, otis tools
all photomode NPCs can now use poses with props
enables assigning weapons to NPC inventory for weapon poses
automatic synced poses: movement sliders are fixed so spawned characters all use same coordinates
TOOLS & WIKI GUIDES
how to add NPV to photomode with new wolvenkit tool
how to update custom pose packs for NPV compatibility. includes scripts to update all pose packs at once
how to add more appearances to photomode NPC (guide by xbae)
(links to be updated)
a million thank yous to psiberx for being willing to implement these changes with his magic, and manavortex for creating the wolvenkit tool to automate NPV conversions. thank you to everyone who helped test and give feedback for bug smashing.
i spent the last week requesting and testing without sleeping these new features for the 2.2 photomode from psiberx, as well as writing/editing the new wiki guides with manavortex.
something important to me before making requests was considering the existing workflow cyberpunk virtual photographers use between all the tools available, and what might now be possible with 2.2 that wasn't possible before. major updates can be difficult, so i'm hoping this will make VP even easier and enable more creativity. i'm excited to see everyone's VP in 2025 feature more characters and group poses!
sharing feedback or bug reports in the wolvenkit discord would be super helpful and appreciated.
enjoy!
#cyberpunk2077#cyberpunk 2077#cp2077#cyberpunk mods#cyberpunk modding#will update when new wkit launches (hopefully tomorrow)
97 notes
·
View notes
Text
always sucks when one of the biggest companies in a space is also The Worst
Unity, which for a long time the majority of indie games and several AAA titles have been developed in, recently announced a new “Runtime Fee” that would charge developers $0.20 per install of their game, starting January 2024. Retroactively!!!! Yes you heard that right. Got a new computer and want to reinstall your favorite game you bought 3 years ago? That’ll cost the dev $0.20, when they themselves make no additional money. A bad actor could, in theory, install a game hundreds of times just to hurt a developers bottom line. But even just in benign scenarios, its enough to threaten the viability of small indie studios. Even if devs wanted to jump ship now, number one they’d have to port all their games to a new engine, a monumental task on its own, and they’d have to learn a new engine and new workflow, new pipeline, etc. This is catastrophic to the indie scene.
And this isn’t handled through the platforms they sell their games on like steam or itch.io, it’s woven into the backend of the engine itself. Unity claims they have systems to detect piracy (but they’re proprietary and secret!) and developers won’t be charged for illegitimate installs. But none of us can be actually sure of that. They are literally making “piracy costs the devs money” a real actual legitimate argument.
And to top it all off, their ghoul of a CEO dumped his shares right before the announcement. They Knew this would be hated and they’re trying to get away with it anyway.
Do note, this only applies to games that already meet the threshold for profit sharing. If you are a hobbyist or making a project for school etc, this won’t affect you.
What can you do? Keep in touch with your favorite developers and indie publishers on social media. Hopefully with enough backlash and support for indie developers, they will retract.
883 notes
·
View notes
Text

Yooo, been a while... I need some help.
Dealing with a lot and I'm in desperate need of financial help. Please message me if interested, Discord is available for those who find that more comfortable. Will make more installments in the future. Spreading the message helps. I'll try to go back to regular posting but that's a little difficult for me at the moment. Please support me so I can go back to my usual workflow and usual art.
118 notes
·
View notes
Text
everyone suggesting alternatives for Photoshop is inevitably not actually using most of the Photoshop functionality, which to be fair is probably the vast majority of the potential Photoshop userbase.
the reason Photoshop has been industry standard for 30 years is that it does almost everything and has almost always done almost everything. it has had a few weird slow adoptions, for example it didn't support basic live mirroring while drawing until the 2010s (ish). it didn't have recovery saves or auto saving until about then. it's never been the absolute last word in real media synthesis, that was Corel Painter for years and now I think CSP is probably the king. illustrator is better at vectors. etc. but Photoshop can do all of those things well enough to prepare a professional grade, print-ready artwork from RAW file to layout to text to retouching to total from-scratch illustration, in one step, with layer and channel separation, multiple types of masking, adjustment layers, lossless file object placement, vector text transformation including all standard print layout tools like kerning, like spacing, comprehensive font support, and both true font variation and faux transformation like fake bold and fake italic. and clients and print workflows are expecting PSD files and file preparation for this reason. Krita, as an example of a popular program suggested as an "alternative to Photoshop" which I have used for hundreds of hours to do professional and personal work, is great for drawing but has a completely unusable text engine, you can't make a webcomic with speech bubbles easily and quickly in Krita. it was like pulling teeth even trying to put "BABY SLUT" on my Lethal Company skin with Krita. but you can lay out an entire magazine in Photoshop in an afternoon, and people do (print preparation is whole other topic I'm not saying vogue is prepared solely in Photoshop, it isn't, I'm saying you CAN do it in Photoshop)
I have never paid for an Adobe product, I am not pro Photoshop, I am pro getting my work done. I would absolutely love for there to be an actual Photoshop alternative, but there isn't. there are individual alternatives for individual features of Photoshop, and if you are working in a limited professional scope or you just want a drawing program or just want to make your webcomic or just want to do pixel art then one or two programs will replace Photoshop for you. everyone who, like me, has to do RAW editing, fashion retouching, print and web layout, pure digital illustration, vector illustration, text and graphic design, and all the rest of the crap I have to do in a format that's accepted by publishers and the rest of the various workflow destinations it's just not realistic. which is why it's great that Photoshop is completely trivial to pirate at any stage of its development you care to install,including versions prior to the introduction of the AI crap, the cloud crap, and the rest of the crap no one serious is actually using unless their manager is forcing them to
135 notes
·
View notes
Note
how would u recommend a beginner get into blender? Ima 2D art student but want to fill out my portfolio and it looks super fun and cool!
Yay I'm so glad you want to learn Blender!
Since you're studying 2D, you probably have a lot to learn and practice already. So I'll try to answer in a way that could benefit you the most in both practices.
You probably already heard Blender has a tool called "grease pencil" - it's a 3d object, but they also built it so that if you want to do regular 2D illustration or animation, you can do that too.
Learning grease pencil first could be a good way to familiarize yourself with Blender's interface. And because a lot of the toolsets share how they operate (for instance, adding modifiers to the stack is the same no matter if you're using a grease pencil object, curve, or 3D mesh), you can more easily move to different parts of the program later, like poly modeling or sculpting.
One really great tutorial for 2D Blender is this one by Kevandram - https://www.youtube.com/watch?v=nZyB30-xZFs
From there you can move into tutorials that combine 3D and 2D - or just start with this if you're really excited to learn 3D modeling. Again Kevandram has a really great tutorial for that - https://www.youtube.com/watch?v=ftBFjGy5z08
Something you'll wanna watch out for with Blender tutorials is the version they're using. If your version of Blender is newer, then maybe a button or menu a tutorial tells you to use might have moved. Or some functionality may have changed. Luckily since Blender is open source, they make all versions available to you here: https://download.blender.org/release/
Once you get more familiar with Blender, jumping between versions is easier. But for the sake of learning, if you find a really great tutorial that's using an older version, you can just use that version. You can have multiple Blender versions installed - right now I have 4.4, 4.1, 4.0, and 2.79. So for instance in Kevandram's Bakery Shop tutorial, he's using Blender 3.0 which you can get here - https://download.blender.org/release/Blender3.0/
If you're not interested in grease pencil, or just want to jump straight to 3d, this is a great beginner modeling tutorial from SouthernShotty - https://www.youtube.com/watch?v=C1CFWDWTamo
It mostly sticks to modeling and then gets into basic material stuff. A simplified order to learn things in 3d would be:
Poly/mesh modeling
Modeling with curves
Adding materials/using the shader editor
Unwrapping 3d objects / learning the UV Editor
Texture painting / Painting texture maps (using that unwrapped map from 4) in Blender or some other program (Krita if you want to paint on the 2d map itself. Procreate if you want to paint directly on the model although that'll require a tablet).
A lot of beginner tutorials will take you through steps 1-3 usually, and maybe throw in some basic animation, camera setup, lighting, and rendering. More intermediate/advanced topics would be rigging, animating rigged models, physics simulations, and geometry nodes.
To bring it back to how this could benefit you the most as a 2d artist - something I see a lot of people do is prototype in 3d, and use that 3d render as a base to paint over. Some people strictly use grey boxes, and some people actually model/texture/light certain things and then render that out in layers to use in their painting program later. You can use as much or as little 3d as you want to help 2d painting.
Here's a couple videos showcasing that type of workflow: https://www.youtube.com/watch?v=CHIZtZ2JU3A https://www.youtube.com/watch?v=W5GSyytbABo https://www.youtube.com/watch?v=r5ZyW7K_yP8
Those use Blender's cameras and lights, which you'll pick up as you do modeling/texturing tutorials. Later you can get more advanced with those as well as the different rendering engines within Blender.
This was a lot, but I hope it helps clarify where you can start, and ultimately what you could get out of using 3d!
31 notes
·
View notes
Text
Creating a personal fanfic archive using Calibre, various Calibre plugins, Firefox Reader View, and an e-Reader / BookFusion / Calibre-Web
A few years ago I started getting serious about saving my favorite fic (or just any fic I enjoyed), since the Internet is sadly not actually always forever when it comes to fanfiction. Plus, I wanted a way to access fanfic offline when wifi wasn't available. Enter a personal fanfic archive!
There are lots of ways you can do this, but I thought I'd share my particular workflow in case it helps others get started. Often it's easier to build off someone else's workflow than to create your own!
Please note that this is for building an archive for private use -- always remember that it's bad form to publicly archive someone else's work without their explicit permission.
This is going to be long, so let's add a read more!
How to Build Your Own Personal Fanfic Archive
Step One: Install Calibre
Calibre is an incredibly powerful ebook management software that allows you to do a whole lot of stuff having to do with ebooks, such as convert almost any text-based file into an ebook and (often) vice-versa. It also allows you to easily side-load ebooks onto your personal e-reader of choice and manage the collection of ebooks on the device.
And because it's open source, developers have created a bunch of incredibly useful plugins to use with Calibre (including several we're going to talk about in the next step), which make saving and reading fanfiction super easy and fun.
But before we can do that, you need to download and install it. It's available for Windows, MacOS, Linux, and in a portable version.
Step Two: Download These Plugins
This guide would be about 100 pages long if I went into all of the plugins I love and use with Calibre, so we're just going to focus on the ones I use for saving and reading fanfiction. And since I'm trying to keep this from becoming a novel (lolsob), I'll just link to the documentation for most of these plugins, but if you run into trouble using them, just tag me in the notes or a comment and I'll be happy to write up some steps for using them.
Anyway, now that you've downloaded and installed Calibre, it's time to get some plugins! To do that, go to Preferences > Get plugins to enhance Calibre.
You'll see a pop-up with a table of a huge number of plugins. You can use the Filter by name: field in the upper right to search for the plugins below, one at a time.
Click on each plugin, then click Install. You'll be asked which toolbars to add the plugins to; for these, I keep the suggested locations (in the main toolbar & when a device is connected).
FanFicFare (here's also a great tutorial for using this plugin) EpubMerge (for creating anthologies from fic series) EbubSplit (for if you ever need to break up fic anthologies) Generate Cover (for creating simple artwork for downloaded fic) Manage Series (for managing fic series)
You'll have to restart Calibre for the plugins to run, so I usually wait to restart until I've installed the last plugin I want.
Take some time here to configure these plugins, especially FanFicFare. In the next step, I'll demonstrate a few of its features, but you might be confused if you haven't set it up yet! (Again, highly recommend that linked tutorial!)
Step Three: Get to Know FanFicFare (and to a lesser extent, Generate Cover)
FanFicFare is a free Calibre plugin that allows you to download fic in bulk, including all stories in a series as one work, adding them directly to Calibre so that that you can convert them to other formats or transfer them to your e-reader.
As with Calibre, FanFicFare has a lot of really cool features, but we're just going to focus on a few, since the docs above will show you most of them.
The features I use most often are: Download from URLs, Get Story URLs from Email, and Get Story URLs from Web Page.
Download from URLs let's you add a running list of URLs that you'd like FanFicFare to download and turn into ebooks for you. So, say, you have a bunch of fic from fanfic.net that you want to download. You can do that!
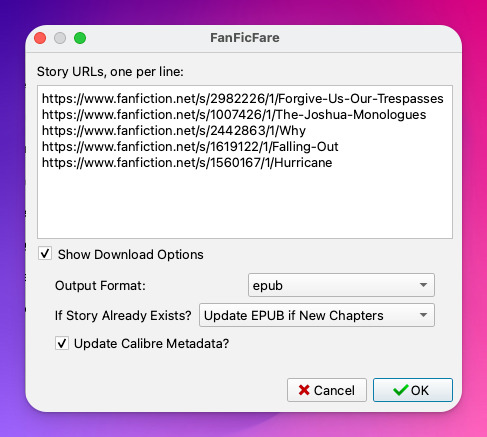
Now, in this case, I've already downloaded these (which FanFicFare detected), so I didn't update my library with the fic.
But I do have some updates to do from email, so let's try getting story URLs from email!
Woohoo, new fic! Calibre will detect when cover art is included in the downloaded file and use that, but at least one of these fic doesn't have cover art (which is the case for most of the fic I download). This is where Generate Cover comes in.
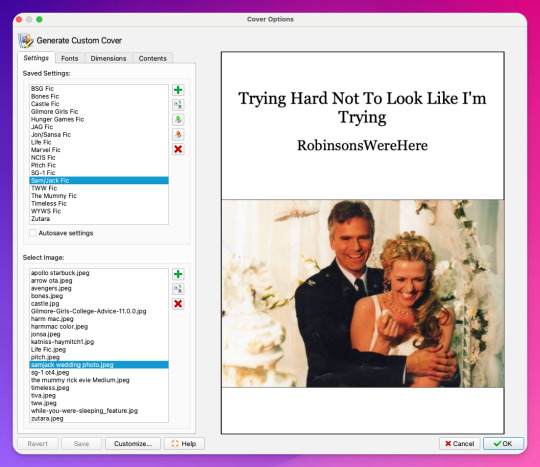
With Generate Cover, I can set the art, font, dimensions, and info content of the covers so that when I'm looking at the fic on my Kindle, I know right away what fic it is, what fandom it's from, and whether or not it's part of a series.
Okay, last thing from FanFicFare -- say I want to download all of the fic on a page, like in an author's profile on fanfic.net or all of the stories in a series. I can do that too with Get Story URLs from Web Page:
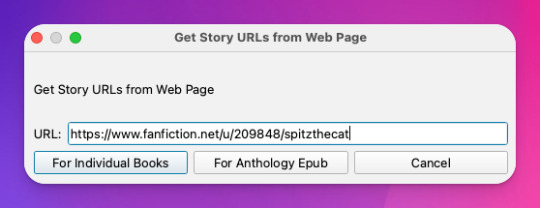
The thing I want to call out here is that I can specify whether the fic at this link are individual works or all part of an anthology, meaning if they're all works in the same series, I can download all stories as a single ebook by choosing For Anthology Epub.
Step Four: Using FireFox Reader View to Download Fic Outside of Archives
This is less common now thanks to AO3, but the elders among us may want to save fanfic that exists outside of archives on personal websites that either still exist or that exist only on the Internet Wayback Machine. FanFicFare is awesome and powerful, but it's not able to download fic from these kinds of sources, so we have to get creative.
I've done this in a couple of ways, none of which are entirely perfect, but the easiest way I've found thus far is by using Firefox's Reader View. Also, I don't think I discovered this -- I think I read about this on Tumblr, actually, although I can longer find the source (if you know it, please tell me so I can credit them!).
At any rate, open the fic in Firefox and then toggle on Reader View:
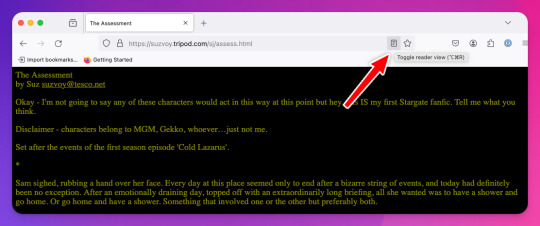
Toggling on Reader View strips all the HTML formatting from the page and presents the fic in the clean way you see in the preview below, which is more ideal for ebook formats.
To save this, go to the hamburger menu in the upper right of the browser and select Print, then switch to Print to PDF. You'll see the URL and some other stuff at the top and bottom of the pages; to remove that, scroll down until you see something like More settings... and uncheck Print headers and footers.
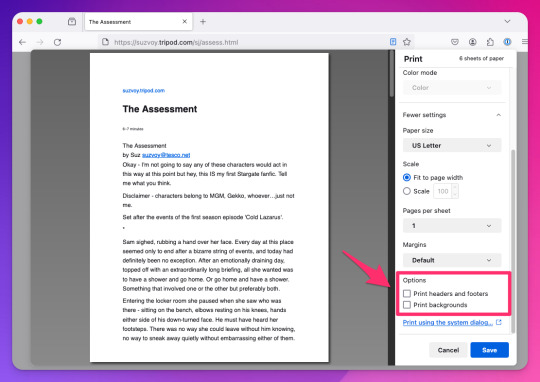
Click Save to download the resulting PDF, which you can then add to Calibre and convert to whichever format works best for your e-reader or archive method.
Step Five: Archiving (Choose Your Own Adventure)
Here's the really fun part: now that you know how to download your fave fanfics in bulk and hopefully have a nice little cache going, it's time to choose how you want to (privately) archive them!
I'm going to go through each option I've used in order of how easy it is to implement (and whether it costs additional money to use). I won't go too in depth about any of them, but I'm happy to do so in a separate post if anyone is interested.
Option 1: On Your Computer
If you're using Calibre to convert fanfic, then you're basically using your computer as your primary archive. This is a great option, because it carries no additional costs outside the original cost of acquiring your computer. It's also the simplest option, as it really doesn't require any advanced technical knowledge, just a willingness to tinker with Calibre and its plugins or to read how-to docs.
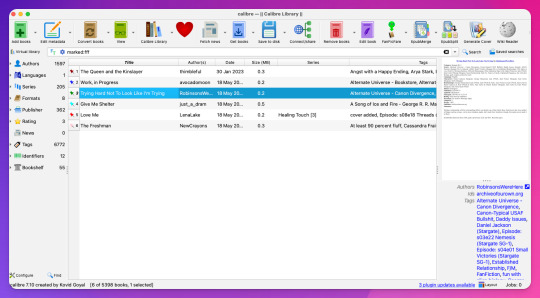
Calibre comes with a built-in e-book viewer that you can use to read the saved fic on your computer (just double-click on the fic in Calibre). You can also import it into your ebook app of choice (in most cases; this can get a little complicated just depending on how many fic you're working with and what OS you're on/app you're using).
If you choose this option, you may want to consider backing the fic up to a secondary location like an external hard drive or cloud storage. This may incur additional expense, but is likely still one of the more affordable options, since storage space is cheap and only getting cheaper, and text files tend to not be that big to begin with, even when there are a lot of them.
Option 2: On Your e-Reader
This is another great option, since this is what Calibre was built for! There are some really great, afforable e-readers out there nowadays, and Calibre supports most of them. Of course, this is a more expensive option because you have to acquire an e-reader in addition to a computer to run Calibre on, but if you already have an e-reader and haven't considered using it to read fanfic, boy are you in for a treat!
Option 3: In BookFusion
This is a really cool option that I discovered while tinkering with Calibre and used for about a year before I moved to a self-hosted option (see Option 4).
BookFusion is a web platform and an app (available on iOS and Android) that allows you to build your own ebook library and access it from anywhere, even when you're offline (it's the offline bit that really sold me). It has a Calibre plugin through which you can manage your ebook library very easily, including sorting your fanfic into easy-to-access bookshelves. You may or may not be able to share ebooks depending on your subscription, but only with family members.
Here's what the iOS app looks like:

The downside to BookFusion is that you'll need a subscription if you want to upload more than 10 ebooks. It's affordable(ish), ranging from $1.99 per month for a decent 5GB storage all the way to $9.99 for 100GB for power users. Yearly subs range from $18.99 to $95.99. (They say this is temporary, early bird pricing, but subscribing now locks you into this pricing forever.)
I would recommend this option if you have some cash to spare and you're really comfortable using Calibre or you're a nerd for making apps like BookFusion work. It works really well and is incredibly convenient once you get it set up (especially when you want to read on your phone or tablet offline), but even I, someone who works in tech support for a living, had some trouble with the initial sync and ended up duplicating every ebook in my BookFusion library, making for a very tedious cleanup session.
Option 4: On a Self-Hosted Server Using Calibre-Web
Do you enjoy unending confusion and frustration? Are you okay with throwing fistfuls of money down a well? Do you like putting in an incredible amount of work for something only you and maybe a few other people will ever actually use? If so, self-hosting Calibre-Web on your own personal server might be a good fit for you!
To be fair, this is likely an experience unique to me, because I am just technical enough to be a danger to myself. I can give a brief summary of how I did this, but I don't know nearly enough to explain to you how to do it.
Calibre-Web is a web app that works on top of Calibre, offering "a clean and intuitive interface for browsing, reading, and downloading eBooks."
I have a network-attached storage (NAS) server on which I run an instance of Calibre and Calibre-Web (through the miracle that is Docker). After the initial work of downloading all the fic I wanted to save and transferring it to the server, I'm now able to download all new fic pretty much via email thanks to FanFicFare, so updating my fic archive is mostly automated at this point.
If you're curious, this is what it looks like:

Pros: The interface is clean and intuitive, the ebook reader is fantastic. The Discover feature, in which you are given random books / fic to read, has turned out to be one feature worth all the irritation of setting up Calibre-Web. I can access, read, and download ebooks on any device, and I can even convert ebooks into another format using this interface. As I mentioned above, updating it with fic (and keeping the Docker container itself up to date) is relatively automated and easy now.
Cons: The server, in whichever form you choose, costs money. It is not cheap. If you're not extremely careful (and sometimes even if you are, like me) and a hard drive goes bad, you could lose data (and then you have to spend more money to replace said hard drive and time replacing said data). It is not easy to set up. You may, at various points in this journey, wish you could launch the server into the sun, Calibre-Web into the sun, or yourself into the sun.
Step Six: Profit!
That's it! I hope this was enough to get you moving towards archiving your favorite fanfic. Again, if there's anything here you'd like me to expand on, let me know! Obviously I'm a huge nerd about this stuff, and love talking about it.
#genie's stuff#calibre#calibre-web#bookfusion#personal fanfic archive#archiving fanfic#saving fanfic
103 notes
·
View notes
Text
Adventures in Cooling
The 5-star rated HVAC repair service I used kind of depressed me.
It was almost... too good?
Like, they offer 24/7 service. They have a text message system that lets you know when the tech is coming. Every tech has their own custom van that serves as a giant advertisement. The entire process is documented with a tablet computer. Every serial number and model number must be photographed. He has to follow a diagnostic checklist. And an upsell checklist. And a repair checklist. He had so many checklists that at one point he pulled a card out of his wallet to make sure he didn't forget one of the steps. He had a poorly memorized speech for every upsell. You could tell he didn't have "his" tools, but the company's tools that he borrowed.
None of this was "bad" as far as a workflow. The service was flawless and nothing was forgotten. But you could tell that every detail was micromanaged and if the tech didn't follow the procedures to the letter, he would probably get some kind of demerit.
I felt sorry for my tech. He was in his 60s and clearly had a severe chronic knee injury. He walked slower than I do. He was quite monosyllabic and difficult to make conversation with. Not unpleasant, just not great at communicating.
At one point I asked him if I was a good candidate for a heat pump and he was like, "Everyone is."
End of advice.
Oh, and the uniform.
The uniform was very silly.
Every square inch of his shirt was meant to assure people they have a qualified technician. The one sleeve listed his certifications from some Alphabet Association that certifies such things. And then the other sleeve made sure to let me know my technician was drug tested and background checked.
The entire visit I kept trying to imagine how being stoned might negatively affect HVAC repair. I mean, if he was on a little cocaine perhaps we could have wrapped things up 30 minutes sooner. Marijuana might have helped him communicate. Opioids could make his knee feel better. I don't think shrooms would have been a good idea. If he hallucinated an angry fan monster in my A/C unit that could have been really awkward.
He was a terrible salesman—but for some reason, I fell for every upsell. Actually, I sold all of the upsells to myself in my head. I got a new filter and had him install it because I worried I would forget or I would install it improperly (not really possible, you just stick it in). But for the price I paid I could have bought 6 years worth of filters.
I just wanted everything sorted. I am so stressed and do not have the bandwidth to deal with A/C troubles. So I just said "yes" to everything. But the price kept inflating as we went along and every time it inflated he required a signature on his tablet.
This repair business had been corporatized to death and it made me miss all of my dad's friends from the old days who he would ask for favors. He always "knew a guy." He would trade car repairs for discounts on things we needed around the house. And they all worked for themselves and had their own tools and their own shitty truck and they all said, "There's your problem!" with the same masculine affect.
Their uniform was a flannel shirt and jeans and I bet some of them were high as fuck.
And this elderly gentlemen with the bum knee kept checking his checklist to make sure he checked every check because he feared managerial discipline.
He got to the sales pitch for the fluorescent dye. He was like, "Do you want this? You don't have to buy it." And I started selling it to myself in my head despite his assurance it wasn't really necessary. I worried if I had a big leak and I don't discover it until the middle of July, I would regret saying no in this moment. But then I realized he hated the dye injection process. And his poor salesmanship was mostly him not wanting his hands to be fucking radioactive yellow for the rest of the day. He tried wearing gloves to avoid it, but he still ended up with yellow hands and grumbled, "I really hate this stuff." Which was one of the few unrehearsed things he said to me the entire time.
Once the checklist was complete and the house was already starting to cool, he had one final sales pitch for me. He asked that I give his company a 5-star review and to make sure I mention his name. He told me that in July all of the techs with the most 5-star reviews will have their names put in a hat. And "the boss" will give one lucky employee a free vacation.
This vacation thing sounded like such a manipulation. And I'm sure "the boss" has instructed his techs to tell this tale of the free vacation so customers will be like, "Well, shit. I don't want this poor old guy with the shitty knee to miss out on that."
And it was then I realized just how this company got so many 5-star reviews.
Diabolical.
But the good news... my house is cold as heck.
And I keep shivering because I can't figure out the perfect setting on my thermostat. I guess I was used to the inefficiency and I will have to recalibrate.
107 notes
·
View notes
Text
5 Days of Helping You Outline Your Next Novel

Day 5: Obsidian for Outlining
Find all 5 installments of the mini series: helping you outline your next novel
*I have added a layer of “static” over my screenshots so they are distinctive enough to stand apart from the surrounding text
did you miss this series? here you can find all posts here: [day 1] [day 2] [day 3] [day 4]

Do you use Obsidian?
What is Obsidian?
A note-taking and knowledge management tool that allows you to create and connect notes seamlessly.

Uses a local-first approach, meaning your data is stored on your computer, not the cloud (unless you choose to sync).
Features bidirectional linking, which helps create a non-linear, networked way of organizing ideas—great for brainstorming and outlining.
Why should you use Obsidian?
Flexible & Customizable – Unlike rigid writing apps, you can design your own workflow.
Distraction-Free Writing – Markdown keeps the focus on text without extra formatting distractions.
Ideal for Outlining & Organization – Connect story ideas, characters, and settings effortlessly.
Obsidian for Writing
Outlining
Creating a One Pager
Create a single markdown note for a high-level novel summary.
Use headings and bullet points for clarity.
Link to related notes (e.g., character pages, theme exploration).
Here’s an example of an outline I’m currently using. This is what my website will have on it (and what goals I hope to achieve w my website)

Using the Native Canvas Tool
Use Obsidian’s native Canvas tool to visually outline your novel. (Best on PC)
Create a board with columns for Acts, Chapters, or Story Beats.
Drag and drop cards as the story evolves.
Writing
Why Write Directly in Obsidian?
Minimalist interface reduces distractions.
Markdown-based formatting keeps the focus on words.
No auto-formatting issues (compared to Word or Google Docs).
Why is Obsidian Great for Writing?
Customizable workspace (plugins for word count, timers, and focus mode).
Easy to link notes (e.g., instantly reference past chapters or research).
Dark mode & themes for an optimal writing environment.
Organization in Obsidian
Outlining, Tags, Links
Each chapter, character, important item, and setting can have its own linked note.
Below, for example, you can see the purple text is a linked page directly in my outline.

Use bidirectional linking to create relationships between (story) elements. Clicking these links will automatically open the next page.
Tags can be used for important characters, items, places, or events that happen in your writing. Especially useful for tracking.
Folders for Efficient Storage
Organize notes into folders for Acts, Characters, Worldbuilding, and Drafts.
Use tags and backlinks for quick navigation.
Creating a separate folder for the actual writing and linking next (chapter) and previous (chapter) at the bottom for smooth navigation.
You can also create and reuse your own internal templates!
Spiderweb Map Feature (Graph View)
Visualize connections between characters, plot points, and themes. Below you’ll see the basic mapping of my website development project.

This view can help you spot disconnected (floating) ideas and create bridges to them.
Exporting
Why Export?
Ready to format in another program (Scrivener, Word, Docs, Vellum, etc).
Need a clean version (removing tags, notes, etc) for beta readers or editors.
Creating a backup copy of your work.
When should you export?
Personally, I like to export every 5 chapters or so and update my live version on Google Docs. This allows my family, friends, and beta readers to access my edited work.
After finishing a draft or major revision.
Before sending to an editor or formatting for publication.
Where should you export?
Personally I copy and paste my content from each chapter into a google doc for editing. You may also want to make note of the following export options:
Markdown to Word (.docx) – For editing or submitting.
Markdown to PDF – For quick sharing
Markdown to Scrivener – For those who format in Scrivener.
To Conclude
Obsidian is an invaluable tool for novelists who want a flexible, organized, and distraction-free writing process.
Try setting up your own Obsidian vault for your next novel! Comment below and let me know if this was helpful for you 🫶🏻

your reblogs help me help more ppl 💕
follow along for writing prompts, vocabulary lists, and helpful content like this! <333
✨ #blissfullyunawaresoriginals ✨
#writeblr#writers on tumblr#creative writing#writerscommunity#fiction#character development#writing prompt#dialogue prompt#female writers#writer blog#blissfullyunawaresoriginals#blissfullyunawares#writing life#fiction writing#writers#writer life#tumblr writers#writing inspiration#writing#writerslife#writer stuff#writing community#writer#obsidian for writing#obsidian#writers life#writing tool#writing tips#writer moots#tumblr moots
20 notes
·
View notes
Text
OC Kiss Week #1 — Spearmint
“I’m not kissing you for your entertainment,” you snap, slouching against the table with crossed arms to take up more of the gap between you and Marion. Daring them to invade your personal space. And of course, they accept your challenge. “But you want to,” they say, matter-of-fact. They learn forward until your faces are only inches apart. “Do you not?”
2241 words, featuring @localcryptic's Ripley Hawthorn.
(I swore that I'd keep these under 1k words but. Well. As you can see.)
A bit of context for this one, since it's placed in a Sidestepverse AU where hero-villain roles are reversed:
"Abelards" refers to the twin Mortums, retired heroes now collaborating with The Green Sky Institute, a boost research facility led by Supernova (the Void).
"Rat Council" is Rat King, except they're chatty (think Wheatley from Portal), temperamental, and extremely loyal to this AU's Psychopathor.
Ripley Hawthorn. Ruin.
If anyone asks you, letting the Rat Council form full sentences was a huge mistake. In fact, both you and Rhan can attest to that. Those damned critters have been incessantly bothering the two of you about “putting your useless tinkering to good use for once” in that infuriating voice module that the Abelards recently installed to their translator. Seriously, whose bright idea was this? Weren’t the single word death threats enough as is?
With a grunt, you pour the contents of your bag onto the table, letting various mechanical bits and pieces clatter onto the surface. So it turns out that the Rat Council really, really wants someone to build them a flying vessel. Since the Abelards were completely unfazed by their chittering, they’ve been alternating between nagging you and Rhan into doing them the favor. For a brief time, there was a degree of solidarity in your shared suffering. But of course, that fragile truce soon fell apart when the two of you got into a petty argument about the apparent insanity of your perfectly coherent workflow. You grumble under your breath at the memory as you organize the parts into small piles. Your sorting criteria makes total sense to you, but Rhan called you deranged for it. As if they know any better than you.
And that’s what led to your latest project. Whoever makes the drone vessel that the Council likes the best, wins. Sure, there’s no prize to this other than freedom from the rats’ nagging, but your pride is on the line.
You somehow manage to have a few uninterrupted hours to yourself, but something that good doesn’t last very long. Just as you’re about to assemble the body, Marion makes their way into the common area, humming some tune that you don’t recognize. You throw a glance back when you hear dry marker squeak against the communal white board. That thing is already filled to the brim with notes, isn’t it? How are they trying to fit more onto it? Just as you turn your attention back to your project, they take notice of you and do the telepathic equivalent of poking you, signaling their intent to bother you. When you don’t make a move to retreat into the privacy of your own room, they take a seat across from you with a bag of… Are those teddy graham crackers?
"You’re building something,” they say, tossing a headless bear into their mouth.
During the time you’ve spent with Marion, you’ve noticed that instead of asking questions, they have a habit of making observational statements, then expecting you to elaborate on it. You suppose that it’s some sort of conversational tactic, but you don’t care enough to figure out what that’s about. What matters is making them work for the explanation they want.
“Duh,” you toss back, because that somehow never fails to get a twitch out of them. You suspect that it might be out of amusement rather than irritation, though.
“And those,” they point at the propeller blades, “look like propeller blades.”
“Wow, I’m impressed,” you drawl, words dripping with sarcasm. “Now just learn to tell the difference between bolts and screws, and you’ll be well on your way to qualify as my assistant.”
There it is. You sense signature bursts of their mirth at the back of your mind. By now, you’ve figured out that it feels like a sprinkle of popping candy against your tongue.
You continue putting together the smaller components of the drone without looking up, expecting them to keep making obvious remarks until you inevitably cave and let enough information slip for them to piece together the picture. That’s how it usually goes. Instead, they change the subject.
“Huh. That’s a recent development.”
“What is?” you ask, squinting past your reflection on the glass and down at the bustling crowd to try and spot who they’re talking about this time. They like pointing out random pedestrians that they somehow recognize as a recurring passerby. Is there one that got a haircut or something?
It’s only when they snort that you flit your gaze back to them and find that their eyes are trained on you and not anyone else. When you give them a questioning look, they tap an uplifted corner of their mouth. Your hand comes up to mirror their gesture, only to find that you’re… Shit, you’re smiling. That’s weird. You practically scrub the expression off, making room for your familiar frown to take its rightful place.
“I knew I shouldn’t have pointed it out,” they sigh, though their pretense of a pout doesn’t last long as their mouth soon widens into a grin. “And you wore it so well, too.”
Upon their comment, your scowl deepens on instinct. You click your tongue, tightening a screw a bit too hard as you internally swear to one day punch that smirk off their face. Your mistake doesn’t catch up to you until they burst out laughing. Shit, you projected that thought, didn’t you? And now it’s too late, because you’re picturing that one time that you did try to punch the smug out of them. Busted lips and bared teeth. Curved eyes of a cat that got its cream. Because they only press your buttons as much as they want to. Because they’ve somehow figured out the precise length of your fuse and never quite pisses you off enough for fists to fly—unless that’s exactly what they want from you.
There’s just no winning when you’re dealing with this fucker. It feels like you’re playing right into their hands no matter what you do, and it drives you crazy. The worst part? Your frustration is just another reward to them. That’s not how it’s supposed to go. Your anger is supposed to solve your problems, not enable them.
You know better than anyone how easy it is to just… get mad. Take the bait, then tear through it. Once they get a taste of your ire, most people know better than to provoke you twice. Sure, some persistent idiots keep coming back to you for some reason, but at least there’s satisfaction in aiming your anger at people that don’t want you to be mad.
Well, it turns out that some freaks enjoy making a sport out of your anger issues. How the hell are you supposed to deal with that?
The flirting threw you off at first, but at least it didn’t take long to figure out that they’re just fucking with you. There’s no weight behind their passing remarks, and that’s something you can deal with. Even if some of their nonsense lingers longer in your mind than it should. It’s just one more person among many others that’ll get a piece of your mind for messing with you.
… The problem is that neither your bark or nor bite have had any luck fending this one off. That leaves you here, at a standstill. Even your hands lost track of what they were doing while you were lost in thought.
With a groan, you let your tools go and bury a hand in your hair, glaring daggers at the culprit behind your distraction. Marion leaves you at a loss. Makes you think too much. Think about things like crushing the perpetual assurance on their face. Crushing your lips against theirs until their insufferable grin has been ground into gasps.
Fuck. Your eyes widen just as theirs do. In a pathetic attempt to damage control, you scramble to gather as much of your irritation as possible and shove that to their face. Thankfully, they take the hint and avert their gaze from you, pursing their lips in an attempt to hold back the laughter that leaks through telepathically anyways.
“Shut up, Lee.”
“But I didn’t even say anything?”
You throw your head back, dragging a hand across your face. Fine—it’s true that you’ve been getting thoughts about them. Thanks to the likes of Ortega and Chen, you’ve dealt with this side of yourself for long enough to be able to admit that much. So what?
“Well, what if I told you that I like your idea?”
They say it so casually, but their question makes you sit back straight in disbelief. “You what?”
“Your idea. I like it—”
“I heard you the first time,” you interject, desperately trying to reel your thoughts back in. Why? Why the hell would they like the idea when they’re just toying with you?
There it is again. The popping candy. Amused, are they? Satisfied to see you give in? That must be it. There’s no other explanation for what they claim.
“I’m not kissing you for your entertainment,” you snap, slouching against the table with crossed arms to take up more of the gap between you and Marion. Daring them to invade your personal space. And of course, they accept your challenge.
“But you want to,” they say, matter-of-fact. They learn forward until your faces are only inches apart. “Do you not?”
The glint of vibrant green reflected in their eyes almost distracts you, but you manage to catch onto the touch of uncertainty in their last question. It’s enough for you to feel compelled to reflect. Do you? Well, yes, if your gaze drifting down to their lips is any indication. But why?
It’s not a thought you ever gave ground to—the notion that you might have a type is stupid and ridiculous—but it’s true that you can’t help but see glimpses of Ortega in Marion. More specifically, there are echoes in the little details that you were once trained to catch onto. It’s the confidence they exude in the way they carry themself, even when they’re trying to be unassuming. It’s in how they scratch their neck to put on a show of shame when they feel no such thing. It was the intensity of their glare when they raised their voice at the Ricardo of this world that one time, standing between him and you.
As if making a fool out of you isn’t enough, they even see you as something that needs their pity—their protection. Just like he does. It makes your skin crawl and your stomach churn.
Just as that thought crosses your mind, the ever-present smile on Marion’s face collapses right before your eyes.
“Oh. So that’s how it is.”
You frown, tamping down the twinge of disappointment at the sudden distance between the two of you as they plaster their back against their seat.
“What?”
“I didn’t understand why you would want this, but I get it now.” They let out a hollow laugh.
“You’re not making any sense.” The waves of jealousy emanating from them do give you an idea of what they could be on about, but that doesn’t make this any less absurd.
“Look, Hawthorn. You don’t need to kill time with a stand-in. The real deal is practically drooling to get into your pants.”
“That’s—”
“I get that he’s not your Ricardo, but hey, if you want an outlet, it might as well be the guy that actually shares a face with him—”
“Holy shit, cut that out!” you shout, trying to pry the clinging jealousy off of your shields. “You’re making the entire room feel nasty!”
Raising your voice seems to do the trick for once, since the air tunes back to being breathable. You sigh, pressing against your clenched eyes.
“If you find the comparison that unbearable, then fine. You’re nothing like him. You always try too hard, while he makes things look effortless. You make yourself a nuisance just to get a fraction the attention he does by just existing. And if he had even half of your audacity, he’d literally be unstoppable, so don’t make me imagine that. There, happy?”
You open your eyes to find that no, they’re not happy. In fact, this is the closest you’ve ever seen them to looking upset. Crap. This isn’t as gratifying as you thought it’d be.
“Alright, alright, You want me to fuck off, I get it,” they mutter, brushing crumbs off their hands. Before they get the chance to get up from their seat, however, you jump out of your own and march over to their side of the table. They scrunch their nose as they blink up at you like a cat that just got squirted with a water spray.
Yeah. You know what? Fuck it.
Without warning, you grab them by the collar and pull them in closer, shoving your lips onto theirs. There’s no helping the widening smirk when you feel them gasp against you. Your other hand grips onto the back of their head, letting the whiff of mint in their quivering sigh carry the the moment onward and onward because you can’t stop until you’ve made your point.
The moment you separate to catch a breath, Marion tries to fit in a retort.
“Hawthorn, what the fuck—”
“There. Now you get to say you kissed me before Ricardo Ortega.” The insanity of what you’re saying doesn’t quite catch up to the pace you’re setting. Good. “Happy?”
You don’t get a response from them, since they stammer some nonsensical noises before shoving you out of the way and barging out the room. But based on the trail of figurative fireworks they leave behind, you think you can chalk this one up as your victory.
20 notes
·
View notes