#need to find some tutorials myself first !
Explore tagged Tumblr posts
Visit Tumblr Blog
Explore Tumblr blogs with no restrictions, modern design and the best experience.
Last Seen Tumblr Blogs


Fun Fact
Women make up for the other 50% of Tumblr’s audience.
Note
If I may, how do you typically approach choosing colors in your art? It always has just a lovely feel to it, so I was a bit curious; don't feel pressured to answer ofc :]
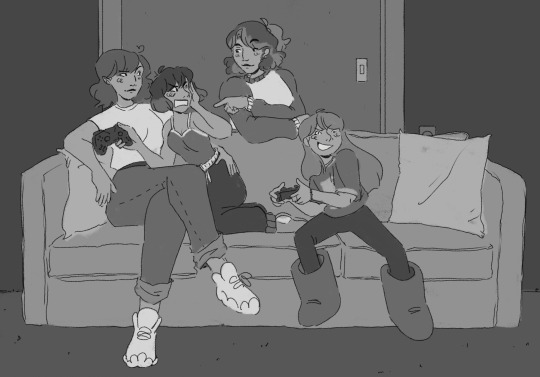
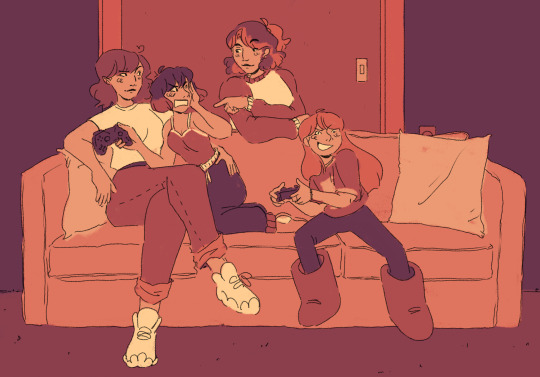
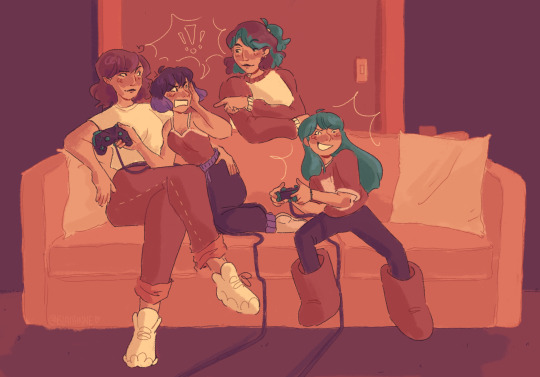
I’ve been using a lot of gradient maps lately, they work by switching the greys in your piece with a corresponding colour according to its value. Basically, I colour in black and white, grab a gradient map, and then I adjust the colours by hand until I’m happy with it. This isn’t the only kind of colouring I do, but it works great if you’re in a rush or you’re struggling to find a good starting point for your colours. I’ve been operating under a time crunch for these Sketchbook Week drawings and the Plenism promo stuff I made, so for all except one I used gradient maps. I’m actually in a bit of a funk with my colours right now soooo I’ll come back and do a proper colouring tutorial for my style once I’m happier with how my non gradient mapped colours are looking !
#after sketchbook weeks over I wanna sit and do some colour studies to find palettes I’m more happy with#even these gradient map ones I’m not thrilled with#they’re fine! but I could do better#in terms of other tricks I use I’ll often adjust the hues and saturations if the whole piece to give things more unity if I’m struggling#and/or add a new layer on top of everything and fill it with one base colour#and play around with different layer settings and opacities on top#I’ve found a luminosity layer on a low 5-10% setting is quite nice#basicslly I fuck around and find out#and if I’m in a rush I use a gradient map#they’re not neccesarily a quick fix! if you’re like me you’ll still want to do some tweaking after it’s been applied#and you need to pay attention to your values when you’re colouring in black and white#but that’s another good thing about gradient maps - they force you to focus on value over hue which is an important skill to build#so yeah I’ll come back to this and make an actual colouring tutorial once I feel like I have actual good advice to give#cause rn I’m just very meh in my colouring and I don’t think I have anything very helpful to add#need to find some tutorials myself first !#ty for the ask!#ask#art#my art#bpcol-reblogs#textpost#blethering#for this piece the adjustments were minimal in comparison to what I usually do btw#because I was rushinggggg lol#I did more for my Plenism posters n such#but I can’t really show good comparisons because I. didn’t save them like that#I usually smush all my layers together when I’m drawing sooo yeah makes it hard to go back my bad whoops#but I saved as I was going whilst drawing this so I could provide examples yipee!#if I’d been smarter and remembered more I could’ve had more process screenshots butttt oh well lmao
19 notes
·
View notes
Text
How to Make Your Own Binder that Fits Well and Looks Good
A while back I was in need of some new binders and thought hey, I bet I can make one way cheaper than buying it from somewhere (especially cus some of the ones I’ve bought in the past didn’t really fit right). Except when I started looking for a binder patterns online, I was very surprised that I really… couldn’t find many that looked very nice lol. Most of them had really wrinkled necklines, or didn't bind well, or just overall looked weird. A lot of the patterns also required a serger, which I don't have.
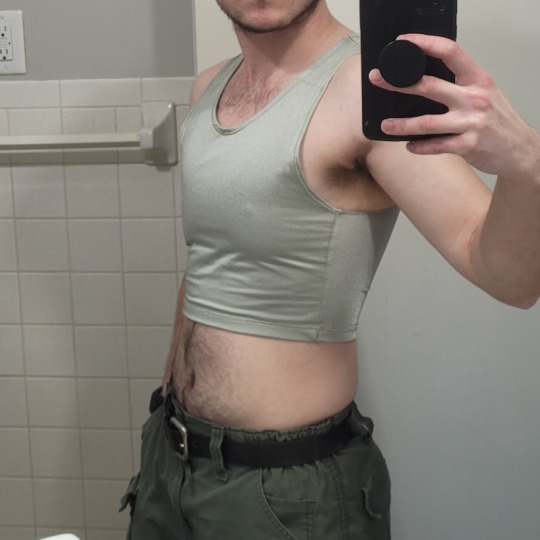
So I just said fuck it and made my own pattern! And it ended up being relatively easy! And the binders fit REALLY WELL and are comfortable to wear, even for long periods. The neckline doesn't show under shirts with loose collars, and the bottom hem doesn't gap or stick out. Here's me wearing one:
(plus I was able to make myself 5 of them for a total of like ~$50.)
So I figured I could throw together a guide to help out anyone else who wanted to make their own binder but was dissatisfied with the patterns available!
Disclaimer: This tutorial is going to assume a baseline level of sewing experience, and also will require access to a sewing machine. It is not a complicated pattern, but it will most likely require some tweaking and adjustments after you make the first one. Don’t be afraid to make alterations to make it fit better!
This tutorial is for a gc2b-style half-tank binder. It could be altered to be a full-tank binder, but all instructions will be for the half-tank design.
Materials needed:
Stretchy fabric, probably listed as 'athletic fabric' (I use this kind from Joann’s. Most athletic stretch fabrics should work, look for around 80% nylon/20% spandex blends)
Stiff fabric (I use this shirting cotton because I like how lightweight it is. If you want something a little stiffer with more structure, you can use a cotton or cotton/poly blend twill like this. gc2b binders use twill for theirs.)
Lightweight fusible interfacing (I use this kind) (get FUSIBLE not sew-in)
Fusible webbing like Pellon Wonder-Web (this is technically optional but it WILL make your life easier when you’re sewing - just make sure to get the kind with the paper backing!!!)
“But kiwisoap thats 4 whole kinds of materials, surely I don’t need that many!” Ok sure, you can probably get by without the fusible web and interfacing, but consider: they are both dirt cheap (im talking like $1-2/yard), they will make it much easier to sew the final product, and will give you an overall better-looking result. This tutorial is written with the assumption that you’ll use them.
"How much fabric will I need?" Measure the circumference of your chest below your armpits. Add 6 inches just to be safe. This is the yardage of stretch fabric you’ll need, and should give you enough material to make at least 3 binders without much excess left over. You will need around half as much stiff fabric.
Other supplies:
Big Paper (for drawing the pattern)
Flexible measuring tape
Sewing machine
Iron
Pins
Step 1: Measuring
You will need 4 main measurements for this pattern.

A) Measure the circumference of your chest just below your armpits, then divide the number in half. This will be the widest part of the pattern.
B) Measure from the top of your shoulder down to where you want the binder to end. For most folks, this will usually be around the natural waist (narrowest part of the torso), about 3-6 inches above the belly button. This will be the overall height of the pattern.
C) Measure the distance from below your armpit to where you want the binder to end. This will determine where the arm hole starts.
D) Measure the circumference of your waist where you want the binder to end, then divide the number in half.
So for example, after dividing A and D in half, my measurements are 17", 15", 7", and 14.5".
Next:
Subtract one inch from measurement A - This will help provide some compression. You might need to take it in even further depending on how it fits, but one inch is a safe starting point. I take mine in around 1.5 inches.
Subtract half an inch from measurement D. This will help prevent the bottom edge of the binder from gapping. Again, you may need to take it in more or less, depending on your own body.
Add 1.5 inches to measurement B and one inch to measurement C. This is to account for the hems and armhole placement.
This makes my final measurements
A = 16"
B = 16.5"
C = 8"
D = 13.5"
From here on out, we are only going to be working with the measurements that we have added/subtracted to, NOT the ones we initially took.
Step 2: Drawing the Pattern
You will need a piece of paper large enough to accommodate the entire pattern. This may involve taping multiple pieces together, or using a piece of newsprint, etc.
I recommend folding the paper in half to ensure that you get a symmetrical pattern. However, this means you will need to divide measurements A and D in half again, or else you’ll end up with a pattern that’s twice as wide as it should be!
Also note: the pattern is drawn with the seam allowance built in! You don’t need to add any seam allowance.
To draw the pattern:
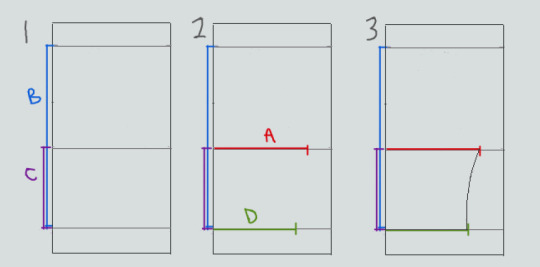

Begin with your folded paper. Measure and mark B and C on the paper, and draw a line extending across the paper. These will be your guidelines.
Measure and mark A and D along the middle and bottom guidelines, respectively. Remember, the paper is folded, so you only use half of the measurement for A and D.
Draw a loose curve connecting the endpoints of A and D. If needed, you can also just draw a straight line between the two.
Mark the opening for the neck hole. Depending on your size, it will measure around 6-8 inches across at the top (remember to divide this in half for the folded paper) and about 5-6.5 inches deep. (mine is 6.5" across and 5.5" deep) Draw a curve to connect the two points. This part will take some tweaking and adjusting to get it to look right lol.
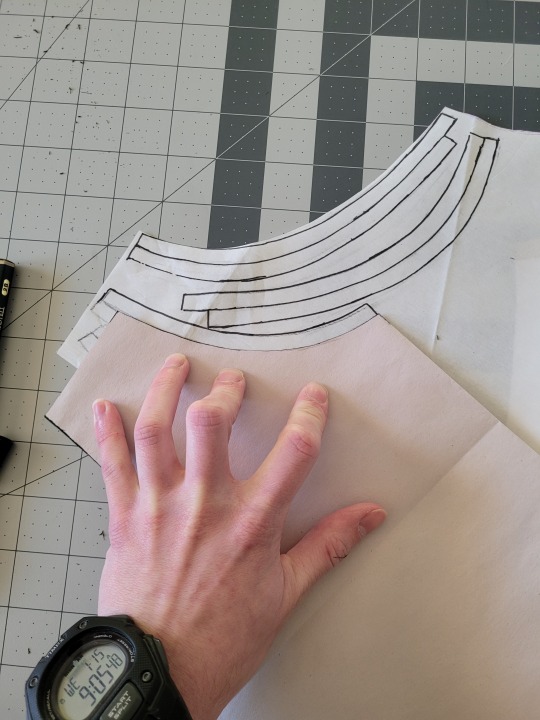
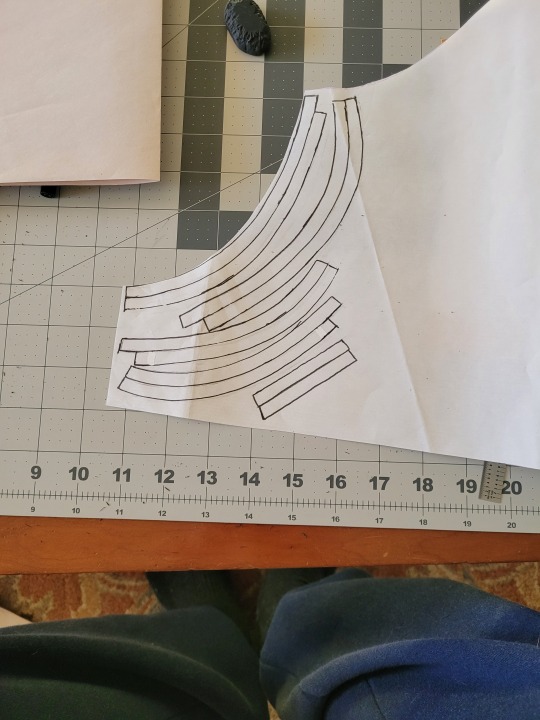
Measure the width of the strap - this should be somewhere between 2.5 - 4 inches wide. They will end up about 1/2” to 3/4” narrower once you sew them. Draw the line at a slight angle, as shown.
Connect the endpoint of the strap to the endpoint of line A with a curve like in the diagram.
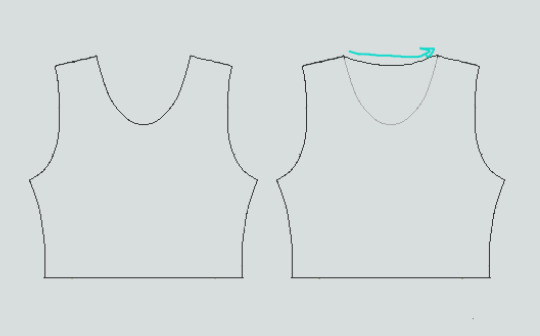
This will be the pattern for the front piece.
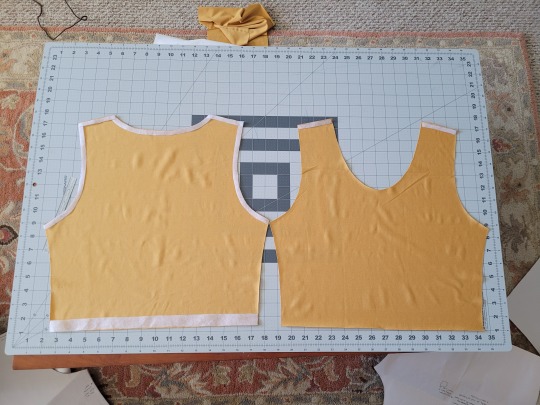
To make the back piece, trace the front pattern, but make a very shallow curve for the neckline instead of a steep one, as shown:
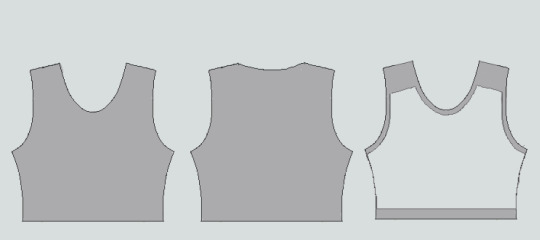
The last piece is the stiff front panel. This is what provides the flattening effect of the binder. To make the pattern, trace the front pattern again. Trim 3/8” in on the sleeves and neckline, and 3/4” to 1” along the bottom. This gives a flatter hem. Then trim the straps shorter by a few inches. This helps the binder lay flatter along the shoulders.
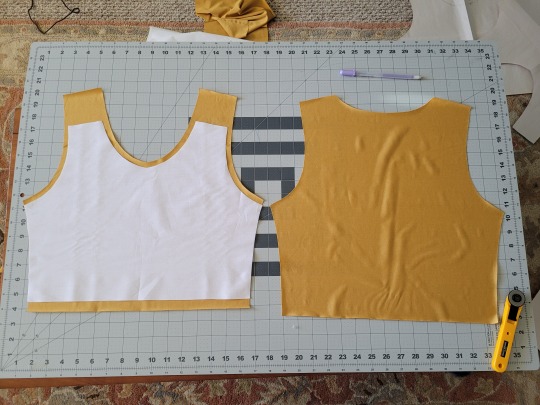
When you're done, you should have 3 pattern pieces that look approximately like this (stiff panel shown overlaid on the stretch fabric to show how it fits together).
NOTE: If you want more compression or just want to make it a bit sturdier, you can add a second panel of stretch fabric to the back piece. Just use the bottom half of the back pattern (from the widest part down to the bottom hem) to cut out another piece of stretch fabric. Attach it to the back piece with a strip of fusible webbing and a zig-zag stitch along the top.
Step 3: Putting It All Together
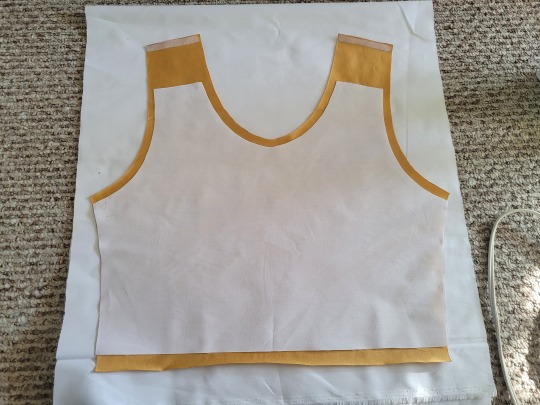
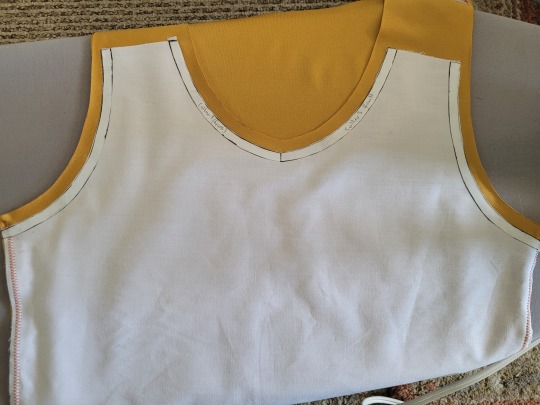
Once you’ve made the patterns and cut out the pieces of fabric, you should have something that looks like this:
The next step is adding interfacing and fusible webbing. Use your pattern to cut out 3/8" strips to fit on the top of the straps for both pieces, and to the neckline, sleeves, and bottom hem of the back piece, as shown:
If you want to add it to the bottom hem of the front piece, it will help keep that hem flat when sewing it down later, but it's not essential.
If you choose to also use fusible webbing (WHICH I RECOMMEND), you will apply it to the stiff front panel similarly to how the interfacing was applied, ~3/8” strips along the neckline, sleeves, and top of the straps. Cut out two strips for the neckline and sleeves, because we'll use those later too.
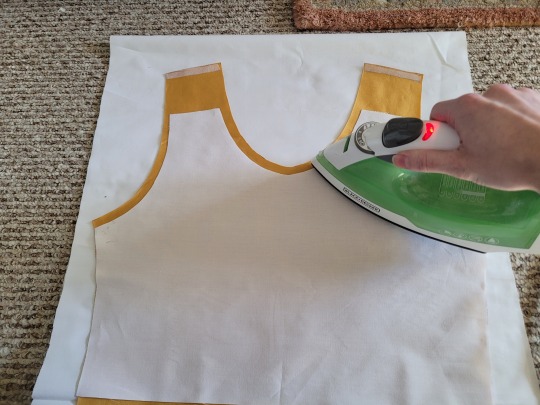
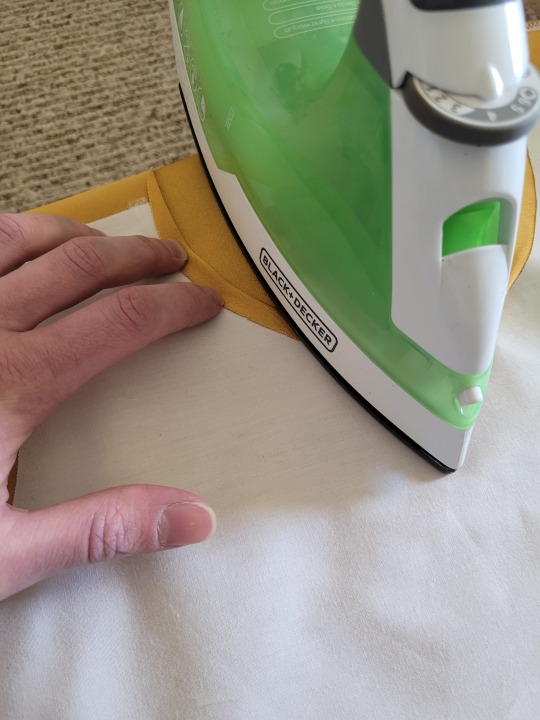
Iron the strips onto the front panel as shown:

Once it's on, just peel off the paper, position it webbing-side down on the stretch fabric, and iron it to fuse the two pieces together so everything stays in place while you sew. THIS MAKES IT WAY EASIER TO SEW.
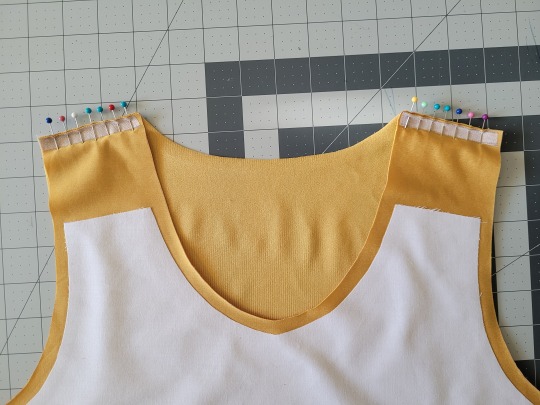
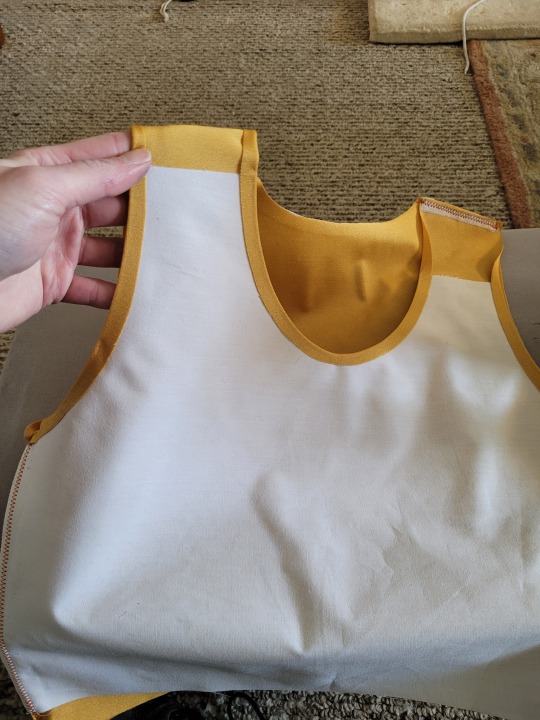
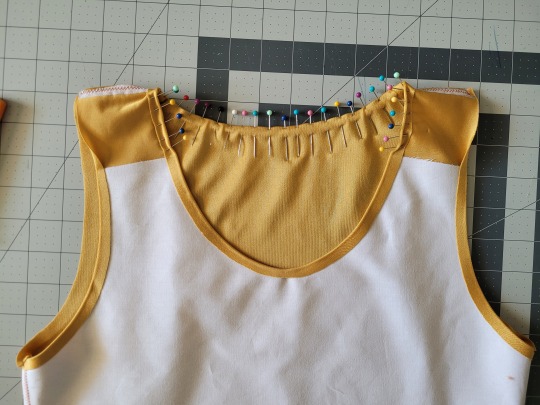
After the stiff front panel is fused to the stretch fabric, you’ll sew the straps of the front and back pieces together, then join the pieces along the sides. Pin the hell out of it to keep everything in place -this type of material is VERY prone to puckering.
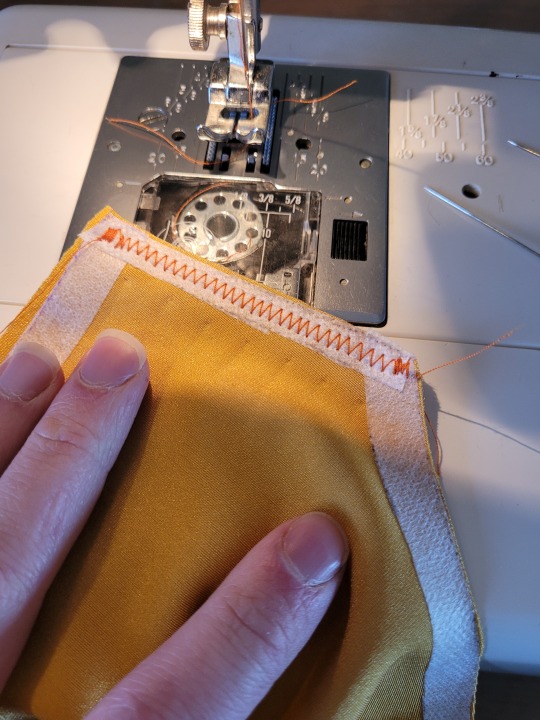
When sewing, USE A ZIGZAG STITCH. A straight stitch will NOT WORK for stretch fabric. I adjust mine to 1.3mm long and 3.5mm wide which has worked well. If your machine doesn’t let you adjust stitch length or width, well. That sucks, I don’t really have any advice.
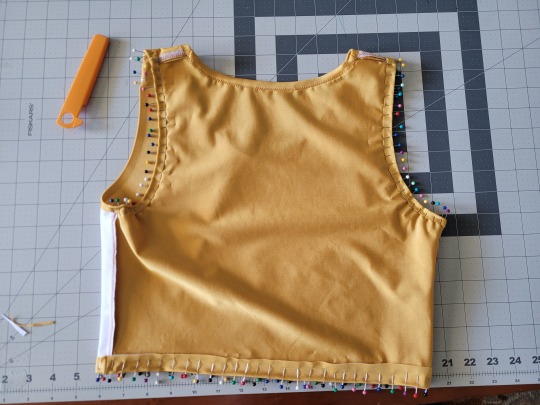
After you sew the front and back pieces together, you can add more fusible webbing to the front panel to help hold the hem down flat and prevent it from puckering while you sew it. Just add the strip, peel the paper off, then fold the hem over and iron it down. This part isn’t really necessary, but it does make the hems look nicer. If nothing else, I would recommend adding it to the neckline.
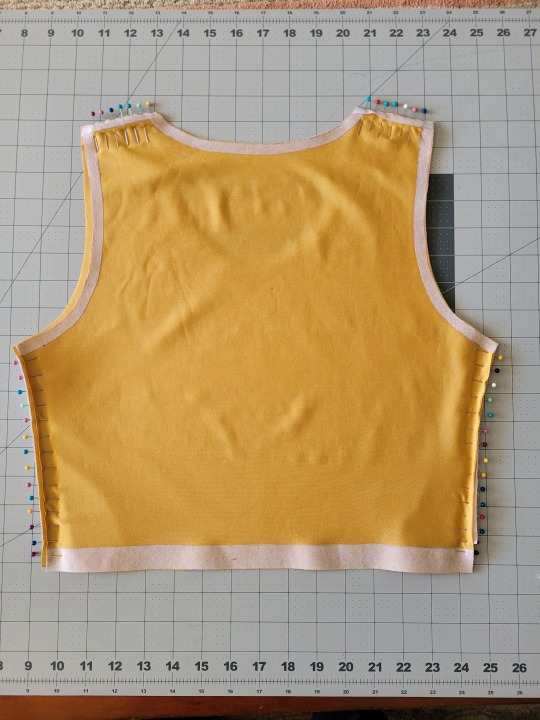
After that, you just fold & pin all the hems and sew them up with a zigzag stitch, then go over the raw edge at the top of the stiff panel (where we cut the straps shorter).
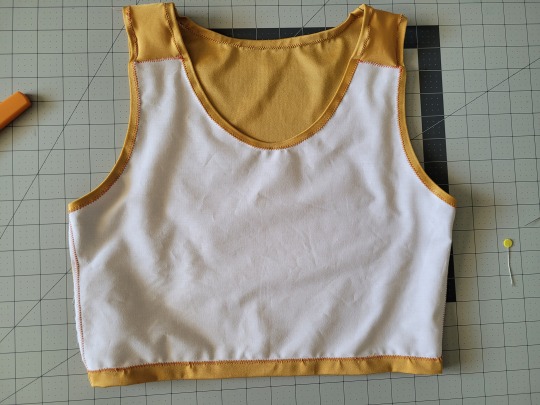
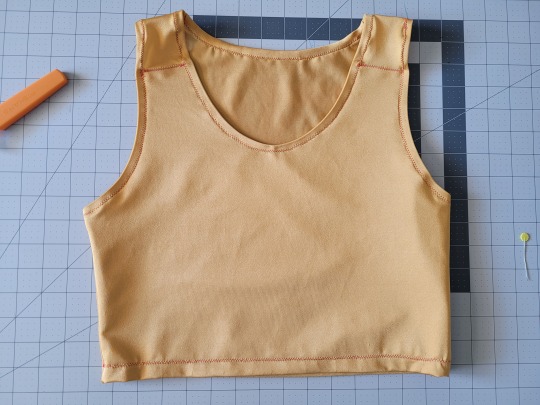
And that’s it! You’re done! And now you can make your own binders whenever you want!
And hey! If you used this tutorial and wanna throw me a dollar or two on ko-fi, I wouldn't complain.
2K notes
·
View notes
Text
how to build a digital music collection and stuff
spotify sucks aaaass. so start downloading shit!!
file format glossary
.wav is highest quality and biggest
.mp3 is very small, but uses lossy compression which means it's lower quality
.flac is smaller than .wav, but uses lossless compression so it's high quality
.m4a is an audio file format that apple uses. that's all i really know
downloading the music
doubledouble.top is a life saver. you can download from a variety of services including but not limited to apple music, spotify, soundcloud, tidal, deezer, etc.
i'd recommend ripping your music from tidal or apple music since they're the best quality (i think apple music gives you lossless audio anyway. .m4a can be both lossy and lossless, but from the text on doubledouble i assume they're ripping HQ files off apple music)
i also love love love cobalt.tools for ripping audio/video from youtube (they support a lot of other platforms too!)
of course, many artists have their music on bandcamp — purchase or download directly from them if you can. bandcamp offers a variety of file formats for download
file conversion
if you're downloading from apple music with doubledouble, it spits out an .m4a file.
.m4a is ok for some people but if you prefer .flac, you may wanna convert it. ffmpeg is a CLI (terminal) tool to help with media conversion
if you're on linux or macOS, you can use parameter expansion to batch convert all files in a folder. put the files in one place first, then with your terminal, cd into the directory and run:
for i in *.m4a; do ffmpeg -i "$i" "${i%.*}.flac"; done
this converts from .m4a to .flac — change the file extensions if needed.
soulseek
another way to get music is through soulseek. soulseek is a peer-to-peer file sharing network which is mainly used for music. nicotine+ is a pretty intuitive (and open-source) client if you don't like the official one.
you can probably find a better tutorial on soulseek somewhere else. just wanted to make this option known
it's bad etiquette to download from people without sharing files of your own, so make sure you've got something shared. also try to avoid queuing up more than 1-2 albums from one person in a row
tagging & organizing your music
tagging: adding metadata to a music file (eg. song name, artist name, album) that music players can recognize and display
if you've ripped music from a streaming platform, chances are it's already tagged. i've gotten files with slightly incorrect tags from doubledouble though, so if you care about that then you might wanna look into it
i use musicbrainz picard for my tagging. they've got pretty extensive documentation, which will probably be more useful than me
basically, you can look up album data from an online database into the program, and then match each track with its file. the program will tag each file correctly for you (there's also options for renaming the file according to a certain structure if you're into that!)
there's also beets, which is a CLI tool for... a lot of music collection management stuff. i haven't really used it myself, but if you feel up to it then they've got extensive documentation too. for most people, though, it's not really a necessity
how you wanna organize your music is completely up to you. my preferred filestructure is:
artist > album > track # track

using a music player
the options for this are pretty expansive. commonly used players i see include VLC, foobar2000, clementine (or a fork of it called strawberry), and cmus (for the terminal)
you can also totally use iTunes or something. i don't know what audio players other systems come with
i personally use dopamine. it's a little bit slow, but it's got a nice UI and is themeable plus has last.fm support (!!!)
don't let the github page fool you, you don't have to build from source. you can find the releases here
click the "assets" dropdown on the most recent release, and download whichever one is compatible with your OS
syncing
if you're fine with your files just being on one device (perhaps your computer, but perhaps also an USB drive or an mp3 player), you don't have to do this
you can sync with something like google drive, but i hate google more than i hate spotify
you can get a free nextcloud account from one of their providers with 2GB of free storage. you can use webDAV to access your files from an app on your phone or other device (documents by readdle has webDAV support, which is what i use)
disroot and blahaj.land are a couple providers i know that offer other services as well as nextcloud (so you get more with your account), but accounts are manually approved. do give them a look though!!
if you're tech-savvy and have an unused machine lying around, look into self-hosting your own nextcloud, or better yet, your own media server. i've heard that navidrome is a pretty good audio server. i unfortunately don't have experience with self-hosting at the moment so i have like zero advice to give here. yunohost seems to be a really easy way to manage a server
afterword
i don't know if any of this is helpful, but i just wanted to consolidate my personal advice in one place. fuck big tech. own your media, they could take it away from you at any moment
2K notes
·
View notes
Text
DUE TO COPYRIGHT ISSUES, THIS GUIDE IS CURRENTLY OBSOLETE.
hi, i just want to let everyone know, if any of you are frustrated with the state of TS4, i've compiled several different tutorials and made an all-in-one guide for playing TS2 on modern computers. it has all the fixes necessary to prevent crashes + pink flashing, and tips to make the game look just as nice as TS4, if not better!
please let me know if this guide is useful for you, or if anything needs to be changed/added/removed. i've tested it myself on multiple computers, and, while it works for me, there are many possibilities for error, considering that everyone's computer is different.
thank you for reading! i hope you like it :]
EDIT: i've set up a ko-fi, if anyone wants to show their appreciation for my work!! thank you so much to anyone who donates!!
EDIT 2: if you're going to copy my guide, especially if some parts are word-for-word, please give me credit, just like how i gave credit at the end of the tutorial to all of the creators whose guides i referenced in the creation of this carrd. as far as i'm aware, i came up with this idea of an all-in-one carrd first- having a large platform does not make you better than anyone else or "above" giving credit to others.
EDIT 3:
the web installer has been taken down for a copyright issue. i will have to find an alternative method of downloading. as of right now, this guide is obsolete, and reblogs will be turned off until the issue is fixed.
last updated: february 16th, 2025, update info in the replies.
#evie.txt ♡#evie's ts2 guide#the sims 2#sims 2#TS2#ts2cc#sims 2 cc#ok to reblog!#this all being said#while anyone can use my guide#i can and will block anyone anti-LGBTQ/anti-trans who interacts with this post specifically#i'm literally a nonbinary lesbian what are you doing here
924 notes
·
View notes
Text
Thank You For The Music | WillNE
Quick Drabble Inspired by this ask!
I always think of ‘Thank You For The Music’ as a farewell song. A few of my fave YouTubers (like Natacha Oceane) have slowly been phasing their way out of the internet and I thought this may be a good prompt! I also had an ask relating to a pregnant reader and threw that in here - let me know your thoughts!

It was a decision Y/N had wrestled over.
She had been a part of the content creating world since 2013, sharing a large majority of her life with her viewers. They had seen her finish up at university, develop a business from the ground up, make friends with other content creators, and they’d been keen onlookers as she fell in love with Will.
But now she was ready to close the chapter.
Y/N sat in front of the camera, Will setting up the perfect shot.
He pressed record, stepping forward to press a kiss to her forehead. “You got this?”.
She nodded. “I got this.”
“Alright. I’ll be in the living room if you need me.” He left the room, closing the door behind him.
-
@/YNsCorner uploaded a new video to her channel!
Farewell, My Friends
[Will can be seen leaving the frame]
Hello, my friends! Welcome back to our little corner of the internet.
As you can probably tell by the rather ominous title, I’ve got some news to share with you all. I’ve made the difficult decision to leave YouTube for an extended period of time.
Before I say anything else, I want to say thank you. Whether you’ve been here since the very beginning or just joined us last week, if you’ve been commenting forever or have been a silent watcher, thank you.
I’ve been on YouTube since 2013.
Over the years, I’ve shared every part of my life with you guys. You’ve watched me grow up, settle into the home that I’m in now with the person that I love, you’ve helped me start my business and opened so many doors for opportunities that I didn’t know existed. This community, in many ways, has been my safe haven. A soft place to land. A best friend to talk to when things feel a little lonely.
It’s because of this that I feel as though I owe you guys some honesty and clarity….
As most of you would know, Will and I recently got married. We’re heading into the next chapter of our life together and we are starting a family.
Which, by the way, what a head fuck. Imagine telling 2013 me she marries a YouTuber. Unreal.
This next chapter is one I’ve had my eye on for a while. It’s probably the most terrifying thing I’ve ever done, but I have a feeling it will be the most rewarding and I’m so looking forward to soaking it all up. I’ve put all of my time and effort into my first baby, aka you guys, for the last few years and I’m hoping to do the same for my next one.
I know that a large majority of my audience is a similar demographic to myself - so if you find yourself in a similar spot while I’m gone, whether that is starting a family or travelling or a new exciting opportunity - just know that I’m so thankful you were here. We got to be girls together. That goes for all of you, really. While I may not be on here for a while, I will forever be cheering all of you on.
Thank you for laughing with me, crying with me, supporting me through the dark and twisty bits as well as all of the fun shit this platform has manifested for me. It wouldn’t have been possible without you.
From the bottom of my heart, thank you.
It’s not goodbye forever, just a see you later.
Thanks guys. I love you.
[Will enters the room, Y/N stands up to reveal a bump]
Screen goes black.
—
@/ynscorner:

♡ liked by willne, sabinablair, theburntchip & miniminter
As ABBA would say, thank you for the music 🤍✨
willne: Proud of you ❤️ might have to up my content game while you’re on break
glambyflo: So happy for you guys! You have always been my favourite content creator (best believe I’ll be coming over for in person reviews and tutorials). Can’t wait to see what the next chapter looks like 🫶
taliamar: Don’t mind me SOBBING. I’m so happy for you both 😭
user876917: oh this has brought so many tears to my eyes 🥹 we are the same age and i’ve been with you since 2015. in many ways, it has felt like you’ve been my best friend throughout that time. thank you for being a safe space. love you! i’ve never been so bashfully cheerful for a person on the internet
tanyaburr: Oh I am so happy for you!! Wishing you all the best ❤️
user6123: tanyaburr where’s Martha??
callux: What a lucky kid to have parents as cool as the both of you. Congratulations 💙
lazarbeam: Fuck off!! Unreal!! Congrats guys!
tannar: A MILF is about to enter the chat… so happy for you both 🤍
tennesseethresh: 🥹🥹🩵🩵
—-
A/N: Unsure how I feel about this format!
191 notes
·
View notes
Text
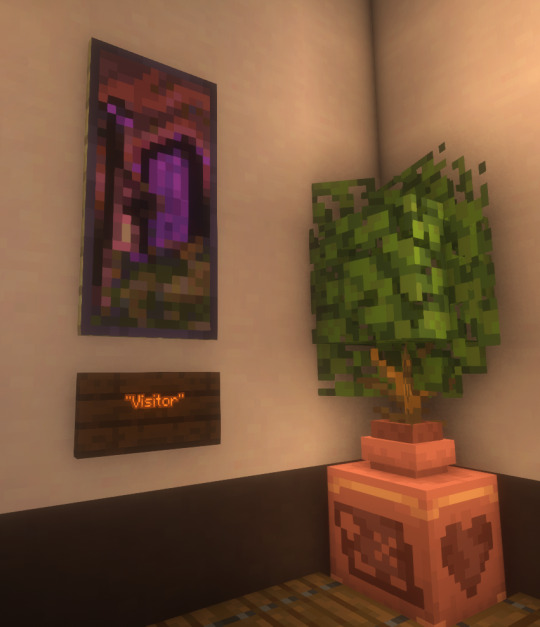
I finally finished a NEW CUSTOM MAP ART!!! "Visitor," a portrait of an enderman, is extra exciting because it's my first full-palette map painting, meaning I used block height to access all the highlight and shadow colours available!! More on the full process under the cut, but the short version of what this means is:
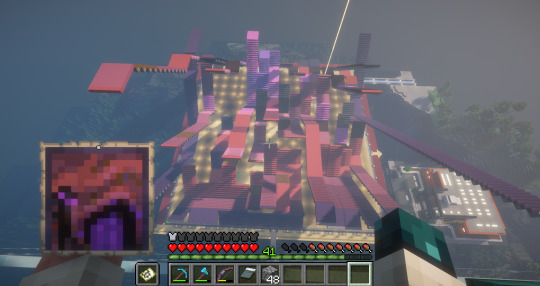
ITS A VERY COMPLICATED CONSTRUCTION. I created the art, then planned and built this manually, without any mods or schematics for construction. Huge props again to everyone else in the server for helping me gather all the materials to make this absurd thing possible!!!
This was the original art I made for it! I'm a huge fan of the "compressed" look of the vanilla paintings, so I've been starting with a large image and shrinking it down, though there were a lot of pixel tweaks to get it to read well. After shrinking it to 16x32 (for an art made of two maps), I convert it to a limited palette that I've set up to match the colours minecraft actually has available:

The map palette is actually tremendously limited, so figuring out a painting that will still look good with that constraint is a challenge in and of itself!
Anyway, the way minecraft maps work, a block that is Taller than the block to the north of it shows up with a slightly lighter colour, and a block that is Lower than the block north of it shows up on the map with a slightly darker colour. So when making a key for this one, I marked all the squares with a little arrow if it's the lighter or darker version:
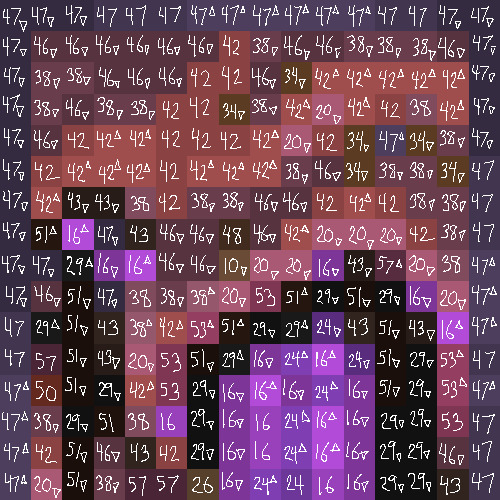
Each "pixel" here is a full stack of blocks on the mapped area: 64 blocks, 8 rows of 8. In order to achieve the affect of every block in a given pixel being taller or shorter than the block to the north of it, dark and light shades need to staircase either up or down. Because staircasing downwards in survival sounds even worse than this madness, I did some planning to make sure each of the "downwards" staircases would touch the ground, so I could simply staircase up from south to north instead. This involved figuring out how many up and down movements were in each individual column and planning out 32 little layouts:
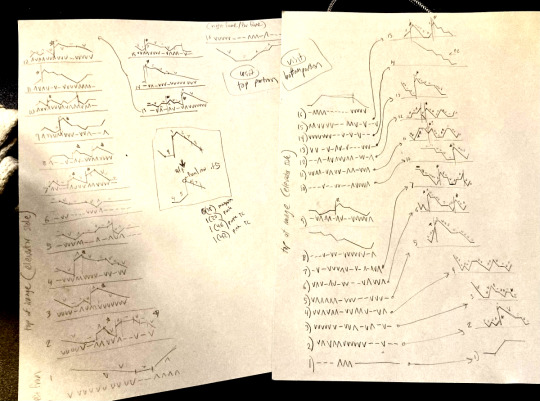
It's worth noting that if you look up minecraft map art on Youtube, most of what you'll find is either, the simple realisation that placing blocks allows you to make custom map art, or an explanation of how to use a generator that will let you plug in any picture and then produce a schematic for you. It's very cool that these exist, but I wanted to do full palette art myself, without an auto-generated schematic, and at the time THERE JUST WEREN'T ANY TUTORIALS FOR HOW TO DO ALL THIS?? Now, having the experience of finagling all this, i think perhaps the reason is that this is a mad undertaking.
ANYWAY: PROGRESS SHOTS!!
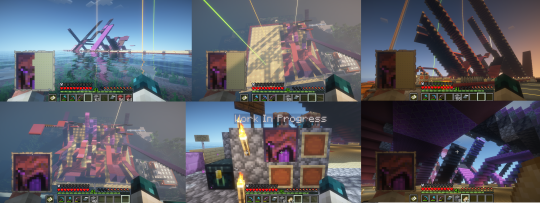
I actually love how the staircases look..... its like some kind of modern sculpture
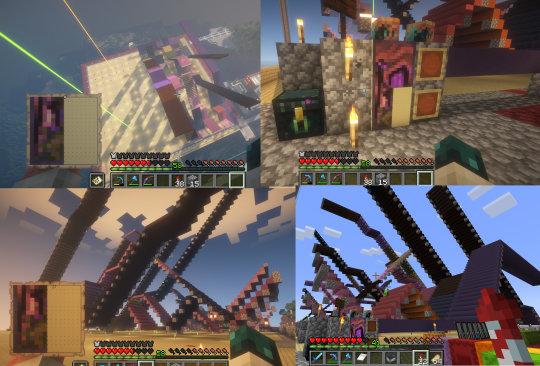
Fewer shots of the second half since I did it on call with friends; the last screenshot is one Thren took of me activating the new locked map to use for the gallery.
Once these paintings are done, I lock the finished maps, make copies, and stock them in the art gallery so other friends on our server can also put these paintings in their homes! It's a lot of work, but really rewarding to see my art decorating various buildings around the server. ;u;
I have one more custom full-palette painting I've done the art for and gathered all materials for; I still need to do the full key and plan staircasing for it before I can start, but HOPEFULLY if my resolve doesn't waver there'll be at least one more of these!!
#minecraft build#minecraft screenshots#minecraft#block game liveblogging#minecraft map art#GENUINELY SO PROUD OF THIS ONE#bsl shaders#im so tempted to make some sort of tutorial on doing this by hand sometime. you shouldnt do it by hand. but a tutorial should exist!!
485 notes
·
View notes
Text
My first 4t2 conversion set 🎉
I'm incredibly excited to announce my first ever entire set of converted 4t2 objects 🤩
It took me an entire week to do it, lots of trials and errors and some frustration and there it finally is!

The original set was made by @arwenkaboom and it is so pretty that it literally made me want to learn this entire game to game conversion thing. Yes, I've seen this set rebloged and it caught my attention straight away and I was bummed to find out it's not sims 2 cc and I immediately thought to myself "I need to learn how to convert objects from sims 4" so I did (once again thanx to this amazing tutorial) and here I am.
Thank you so very much Arwen for making this set, you're an amazing and inspiring creator 💖 (I might convert some of your other stuff in the future, that is of course if you don't mind)
🌸 The set includes (in alphabetical order):
▫️End table ▫️Glass separator ▫️Mirror ▫️Shower ▫️Sink ▫️Toilet ▫️Toilet brush ▫️Toilet paper ▫️Towels ▫️Wall light
Every object has multiple colors just like in the original set
🔶 My Dropbox download
🔷 Link to the original set *click*
Some things to be aware of:
🌸 Meshes always come in one file with one recolor and the rest of recolors is in separate files. Everything is named
🌸 Shower and sink have a bit incorrect animations as I couldn't make them work properly so sims won't be touching faucets, the water that should come out of the shower head comes out of thin air instead… All of that despite me having cres files properly edited. I've seen tho in other cc objects (which I didn't make) that these animations are also wonky there so I assume it's just how things are. Also the shower doesn't have a visible dirty state
🌸 The end table is converted as a coffee table and it's available in that section
🌸 I do recommend having some cheats turned on to place some of the deco items in specific places (moveobjects on and setquartertileplacement on)
🌸 This set works with the Ultimate Collection and the one whose name shouldn't be spoken Legacy Collection but if you have neither, in order to be able to use these objects you need to have University, Open for business, Kitchen and bath interior design and Bon voyage packs installed
🌸 I reduced the polygons in some meshes bc otherwise my SimPE wouldn't upload them and also because less is better for our elderly lady (sims 2 I mean)… I hope it doesn't lower the objects quality too much
🌸 All the files are compressed using compressorizer and together they weigh 13,6 MB
As it's my first ever converted set that I publish for the download, please be easy on me with your criticism, all tips appreciated 🫣
#4t2#4t2 cc#4t2 conversion#4t2 cc bathroom#bathroom cc#game conversion#cc#custom content download#cc conversion#the sims 2#sims 2#ts2#ts2 cc#ts2 custom content#ts2 download#mrplumbob95 conversion#the og post
138 notes
·
View notes
Text
How to take screenshots and edit (when it's just not your thing)

Alright-y!
So, I have over the years learned how to use reshade and to edit my pictures. I am really not a natural on these things, so this is very much to help others who are as aesthetically challenged as I am. I have to have certain "rules" to follow, because I can rarely just see if a picture will turn out well or not.
We all need to realize where I started. We're talking using FRAPS to take screenshots and then running holy colours batman! to get some sort of effect.
Now, I'm not one to buy fancy stuff and to pirate certain programs isn't really my thing either. So we mend and make do!
Also, I am by far very good at taking screenshots and edit, but I have learned things and hope that it might be useful for someone!
A word on light
One thing I've learned is to work with is light. Where the light is is where the focus will go. This doesn't mean that a person has to be in the spotlight, but if they aren't - try to make that a more conscious choice. I am no pro at this, but I have to say that some of my favorite screenshots are where the light is just good. It focuses the eye or it just give a vibe.


(and yes, for some reason all of my faves are of Agnes, which is a bit annoying since Amanda is my fav-character, lol)
This is also where reLight comes in handy. Yes, it's behind a paywall but there are ways that you will have to figure out yourself.
Great tutorial here on reLight by @pictureamoebae! (if you want to really understand reshade, do check out their tumblr. So many helpful tips and tricks!)


Posing
Posing is fun! I don't fully story-tell with my sims, most of it is gameplay. But I do like to pose for family pictures or to enhance something that is going on.
What you need is Andrew's Pose Player and Teleport Any Sim or Wicked Whims.
Now, I haven't figured out how to use WW for children and younger to pose, so I use both. And I like @ts4-poses to find poses. Eventually, you'll find your favorite creators and can follow them directly.


Angles and vibes
Here's a trick. Work with angles. I am a master of pictures with zero vibe, just a face. Those can be ok, and sometimes that's what you have - but try to angle your shot a little.
Or add clutter, focus on that and let something out of focus happen in the background.
Or just go higher, take the screenshot from above.
Or don't focus on your sim at all, focus on something else that adds to the story/post.


Take the screenshot
The light is good, the angle great, the poses are in place and now, we need to take the actual screenshots.
I am a huge fan of reshade, I use version 4.9.1 because that works for me and the presets I use. No need to update reshade unless it becomes too old.
It can be really difficult to to find a preset that you like. I mostly use birdie by @monasims, tawhay by @windslar and paperbacks by @literalite. But I have tried many.
I like this youtube-tutorial on how to make your own preset, which also helps if you wish to modify one that you've downloaded. I do always recommend learning how to use ADOF and CinematicDOF to help focus the image on what you want to capture. I also strongly recommend @pictureamoebae's Foundation.
To take pictures, use the tab-key to leave the UI behind and use Q and E to go down/up in your game and then the mouse to angle. I use print-screen to take my screenshot, but that's something you set up when installing reshade so that's different for everyone.
And now you have your screenshot and it's time to open an editing program. Cheap as I am, I open GIMP.
Let's edit!
I don't use many steps. Since I can't use fancy photoshop actions I have to make all the steps by myself and well - I am human and therefor lazy.
Resize and start to think of a post
First things first. I cut my pictures to work for the tumblr ratio. I actually don't resize them smaller anymore - because when I change layout on my tumblr I just feel as if it messes it up. Now, I don't have a huge screen and my screenshots aren't massive, so it's not necessary either.
My images will be 1017x1017, 1525 x 1017 or 678 x 1017.
Once this is done, I also try to look at how they will go together. If I want a post of just squares I need to have an even number of images. Sometimes I want a landscape image as a sort of heading, or one in the middle with squares around it. It depends on what I want to convey.
This is by no means something that comes natural to me - I am aesthetically challenged after all. Sometimes, I just have 5 images and have to make do.

Resized
Topaz Clean
Yup, it's awesome. No, it doesn't come with GIMP. Yes, there are ways to work around this. You will have to find those ways on your own.
But I have to say, it does makes wonder for the images. I have completely stolen @sojutrait 's settings because I really like her style and therefor - I copy. I have added a bit more sharpening, but otherwise it's completely hers.

Topaz Clean:ed
Curves
Curves my beloved! I use curves for two things! Take out the yellow (aka increase the blue) and to brighten/darken the image!
I do sometimes matte the image too and here's a good tutorial for GIMP users on how to use curves in GIMP (for a matte look)

Less yellow/more blue

Brighten the brights (but I did not brighten the darker parts)
Layers, curves and increase the light where needed
Now, remember that we need light? Sometimes, a screenshot just doesn't have the right light. So I duplicate the layer, use the free marking tool around what I wish was brighter and put that on a new layer.
Then I use curves to lighten the layer with what I want to brighten and to make darker the layer with what I want to put less focus on (here's an ok youtube video on the subject).
Below, you can see the effect on my images.


Sharpen
Pretty basic. I subtly sharpen the image again. Even if I use the sharpening in topaz clean I do like to add an extra touch before it's time to save and move on.

So sharp!
PSD and UI
I do like to use psd's now and then. I mainly use @windslar's psd-collections and @deathbypufferfish's Build-a-Sim Icon Pack.
It's mostly to help give some info about the post or when my sims age up and I want to show their traits.
I do use the UI-info sometimes. If I do, I go into Game Options in the game > Accessibility > UI-scale and just drag that up a bit. Then I copy/paste that part onto the image I'm using.


Done!
That's pretty much it. Thing is, to post good edits you have to actually take good screenshots. As annoying as it is, it's like cooking: it all comes down to the ingredients. I hate cooking Yes, editing does help but I think my main journey has been to learn to take better screenshots from the start.
The picture below is from resized to done.
Hope this might help someone! I will probably learn more and more as I continue to post, but this is where I am so far in my journey!
153 notes
·
View notes
Text
I've always wanted to learn bookbinding, ever since I was a wee little nerd, but there are a lot of things I've always wanted to learn, and this one has both a daunting upfront materials cost and a daunting upfront research cost. however, my sister is a jewel among siblings and gave me for christmas last year a handy dandy bookbinding manual, a block of good paper, and a little bag of tools.
but I still didn't have a suitable workspace, nor any of the many important tools and materials that she didn't include in her gift. so I just read the manual and pined. until maybe a month ago I got fed up with pining, flattened a cardboard box for a cutting mat, and went to town.
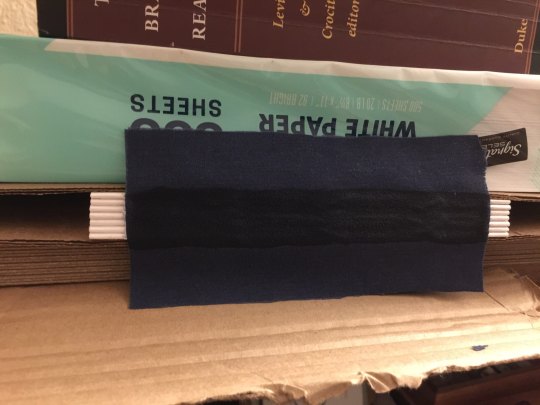
and I'm real proud of myself, so here's me rambling, plus photos!
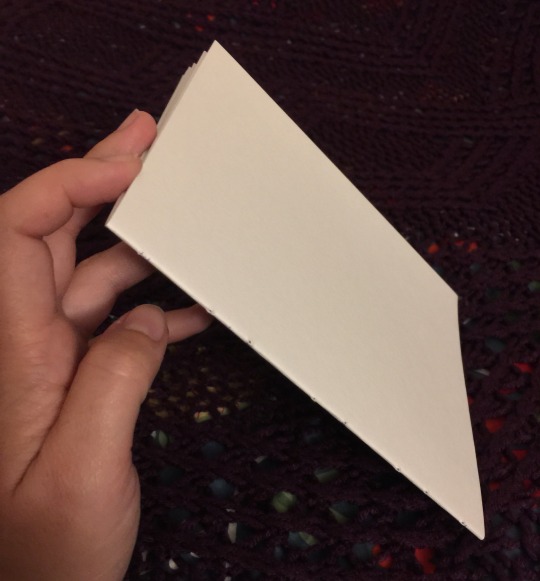
I went to the thrift store and got glue + some fabric to bind the cover, went to Michaels for a paintbrush (and later went back for a metal ruler lmao it's amazing how useful it is to have a straightedge for cutting the paper), and...could not find material for the cover boards. so I went home and pined some more. but the urges were too strong, so after a couple hours of moping I got a stack of printer paper at the grocery store (I could not bring myself to use the good paper for my first, inevitably weak attempts, I just couldn't do it) and started making a little booklet. which was a great idea, it turned out, since it makes for good practice with cutting the paper, measuring things, punching holes in the signatures, etc.
I have a big box of greeting cards from Michaels, which I used for the covers. it didn't feel like I was making a Real Book, so I got some colored paper from the stationery store and used that for end papers.
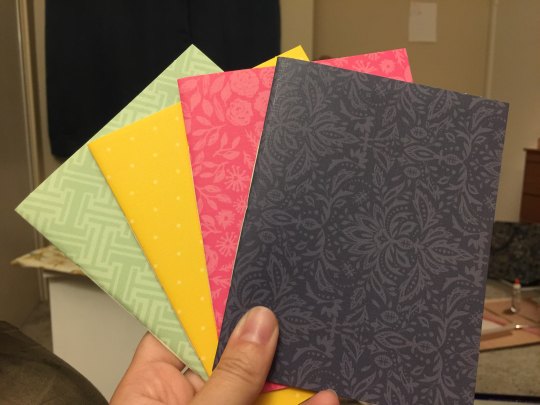
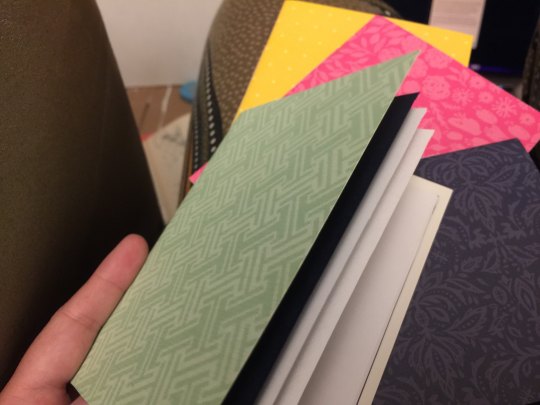
so fancy~
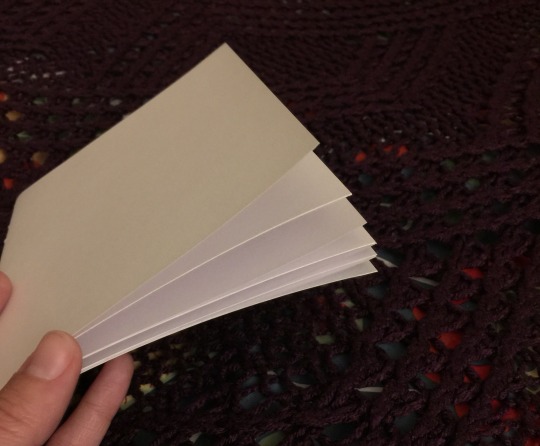
galvanized by this success, I ordered a stack of chipboard online to use for cover boards; and once I was confident that I could cut paper without making it look too stupid (getting that straightedge ruler sure helped lol), I made signatures out of the good paper, left them under some heavy books overnight since I don't have a book press, and then punched holes in them! (huzzah for this nice video on getting the holes right)
my sister's gift included good linen thread. it's unwaxed, but after some poking around on r/bookbinding it looks like that just means I'll have to be more careful to avoid tangles and keep good tension. I am fine with this. I can be extra attentive. (I considered just running it over a beeswax candle, but one commenter said if your wax has paraffin in it, it could melt in a hot car, ruining the spine. I can't guarantee my candle is 100% beeswax, I didn't make it, so maybe we just move on.)
I don't have good linen fabric to use for the tapes, but the important part there is that the fabric be thin, sturdy, and not stretchy. the probably-cotton I got from the thrift store fits the bill, so it'll do!

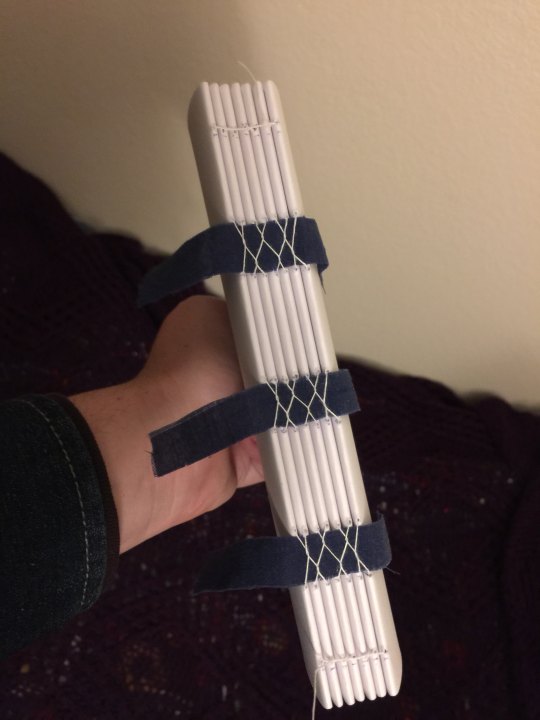
this is a french link stitch, which I got from this exceedingly good tutorial. apparently it's strong enough on its own that for a book of this size, I don't actually need tapes, but I'd already cut the things so eh here we are. and tapes plus french link will make it a stronger binding still (according to a friendly redditor on r/bookbinding), so we carry on.
specifically we carry on to the gluing step. now as I mentioned, I do not have a book press, and you....kinda need one for this step. you need to hold the book block in place with the signatures facing upwards, pressed together hard enough that the glue won't run down between them and stick the pages together (though you do want the glue to get between them just a little, just for like a 16th of an inch). you at least need some clamps and a couple boards to sandwich the book block with.
but you know what? I'm not a professional, this is my first ever book, if it's a little bit off it'll be fine. so we grab all the heaviest books off the bookshelf and improvise.
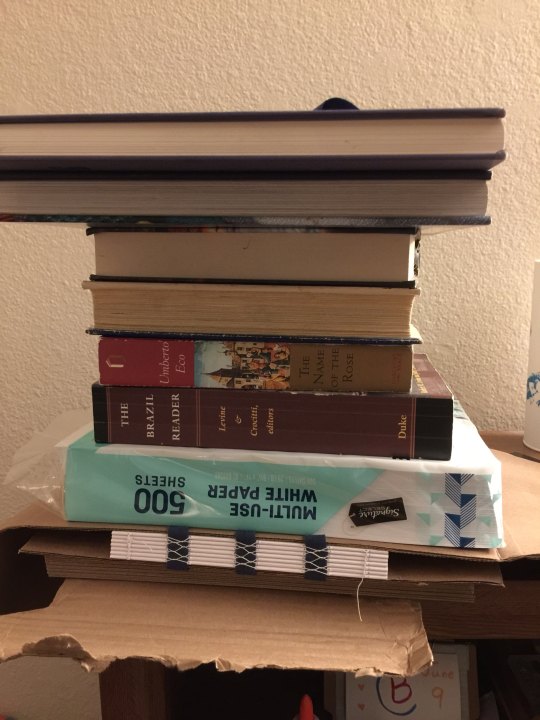
it's fine! I'm sure it's fine! and just in case it's not, I've tucked a bit of cardboard underneath to catch any glue that drips down so it won't land on the floor. see? I'm prepared! I'm acing this.
and actually, it really was fine. I used clear elmer's glue, applied with a flat paintbrush from the art supplies aisle at Michael's, and frankly I liked the way the flat paintbrush let me slip glue in between the signatures. I did poke around on a couple bookbinding sites to see what kind of glue I should use, and the gist is that although there are better options than this, elmer's glue is perfectly serviceable, and the main downside is it's not archival grade. but I don't need my first bookbinding attempts to last 200 years, that's fine.
the next step is to add the mull. mull is a specific type of fabric – extremely loose-weave linen – and the idea is to paste it down over the spine to essentially hold the tapes and signatures all in place in relation to each other.
but I don't have mull! so I'm using more of the thrift store probably-cotton, because it's thin enough and not really stretchy at all. I'm sure this will be fine too. I painted a layer of glue onto the spine, then left it to dry a bit while I measured and cut the fabric, then painted a generous stripe of glue down the center, where it'll affix onto the spine. then I added a bit more glue to the spine, just to be sure, and pressed the mull into place, rubbing it thoroughly to make sure it's firmly affixed to every signature, with no creases in the fabric or air bubbles beneath it.
honestly I might have overdone it on the glue. I've never done this before, I don't know! I think it's okay, though – I tried not to ever let it become a thick layer, just a slight coating, since the danger of too much glue is that it might crack once dry and weaken the spine.
and now we leave it in the press overnight to dry, and pick up the next step in the morning!
#finx rambles#bookbinding#finx makes stuff#technically this is the second hardcover book I've made#but it's the first I'm making using Approved Techniques™#instead of watching a handful of half-relevant youtube videos and making up the rest#which was fun!#but did mean that once I was done I didn't know where to go from there#and at the time I couldn't find better resources#(I really wanted better youtube videos! just didn't know how to find them idk)#(it was 2020 I was unwell. as I'm sure we all understand)#but now I have an abundance of good sources#and I'm determined
585 notes
·
View notes
Note
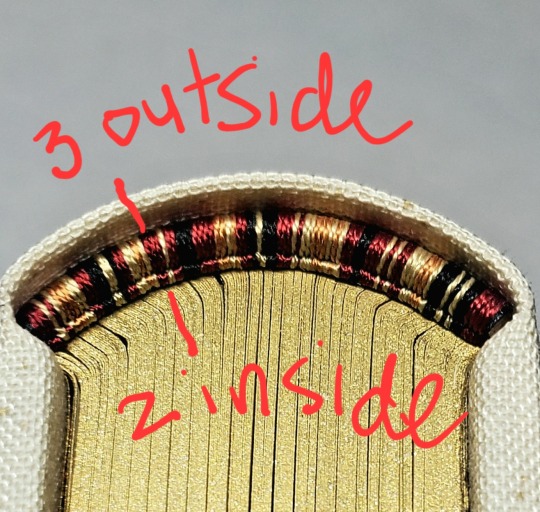
what kind/style of endbands do you usually do? they look so good 👀
hi!! sorry for taking a while to answer, I wanted to make sure I could give you my best answer.
I usually do what's called a "double core" endband. I use double core endbands over the "bead on front" method because bead on front style is not great for uneven distributions of color, irregular patterns, or using more than three colors. Functionally it works by having your extra threads wrapped up inside the thread that is showing, forming the smaller secondary core. Ultimately you are doing figure 8s around the main core & then your secondary core of thread. This keeps things pretty neat & tidy. The tutorial I first used was this one by DAS Bookbinding, though I don't think his endband tutorials are his best ones. Another binder I've spoken with endbands about a lot is maleeka, who recently did an endband tutorial herself.
maybe I should do one... but it takes a lot for me to get enough motivation to make videos. I'll take this opportunity to write up some tips I've shared when people ask instead:
1. Endband core material is the MOST IMPORTANT component. You need a core that is stiff but flexible - it should NOT be floppy because it wiggles everywhere under the tension of the thread, but still needs to flex with the opening & closing of the book. You want something that doesn't compress, to reduce tension shifts in thread creating a lumpy endband. Have a smooth core is less critical but helps to avoid snagging threads & allows you some leeway on sliding threads around for adjustments. My personal choice is smooth leather jewelers cord (link is just an example, I get mine from a local craft store).
2. Thread size. All your threads need to be the same size; it will be visible if you are using two different sizes, and mess with your front core. Additionally, I know lots of people will use larger twists of multiple strands of embroidery thread, which can work, but is more likely to compress & alter its size in unexpected ways. A single strand is preferable. If you want something thicker you can find some thread weights that are heavier twists intended to be used in a single strand, not pulled apart. I prefer smaller sizes because it works better for the gradient designs I like.
3. Silk thread is your friend (if you can spend the money on it). It reduces fuzz (no fuzz like you get with cotton/DMC embroidery thread), it's usually easier to manage, has a more compact twist, and a higher shine. I use Japanese silk hand sewing thread in size #9 (9号). There's multiple brands (Tire, Daruma, KNK/kanagawa, etc). Here's a wholesale listing (minimum 20,000¥ for international). A non-Japanese brand is Guterman silk (German brand). Both the Japanese & German threads come in a heavier weight (Japanese is #16, Guterman is buttonhole).
4. Thread tension is the most important part of the actual technique. You need to ensure the threads currently wrapped in the secondary core keep tension when you are working the thread around them.
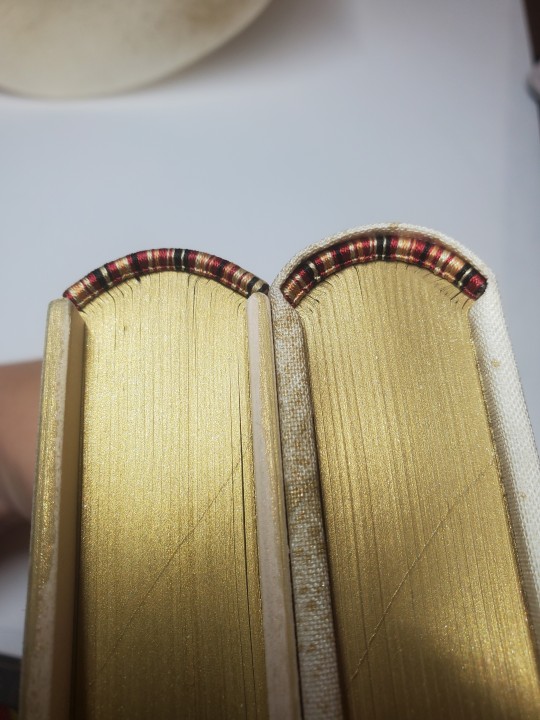
5. Working on a curve. This is only really relevant if you're doing an endband on a rounded book, but the circumference of the curve means there's more real estate on the outside vs inside of the curve. Sometimes this can cause bunching on the secondary core. My own solution to this is that sometimes I wrap the primary core but drop a wrap here or there around the secondary core (only between two wraps of the same color I'm dropping). I uh... don't know of anyone currently recommending this besides myself so I can't point to any pro endorsement for this method, it's just what works for me. Forgive my terrible writing:
6. Pattern management. I... don't really plan much how my patterns sit on the spine, which is not very helpful. HOWEVER you can do some pattern management on the fly, if you really want your pattern to end at a certain place. Thread can be packed more or less densely on the core, resulting in some pattern compression; you could also strategically drop wraps in less noticeable locations. An unintended example: I was replicating the pattern on this endband (left) when I realize I wasn't packing the thread as densely as I had the first time around (right), which resulted in the overall pattern taking up more space. You can do this on purpose, if you need to.
this was way more than you asked but it gave me a chance to put all this in one spot. Best of luck in vanquishing the dreaded EndWyrms.
#fanbinding#bookbinding#celestial sphere press#in progress review#ask des#i tend to shock ppl a big when i say i don't actually enjoy sewing endbands#i merely Tolerate it#all of this knowledge is 100% spite driven to reduce my own frustration
385 notes
·
View notes
Note
Can your beautiful mind provide some domestic Christmas Quinn thoughts?
well…i have been thinking about how quinn is 100% one of those men that can’t wrap a present to save his life. so when you’re out doing some last minute shopping one day, he brings all of your presents out of their hiding spot and tries his best.
he starts out on his own, watching youtube videos and tutorials to try and make sure he measures the paper right and creases it properly. but when he ends up with several…wad-looking wrapping jobs he facetimes his mom, recruiting her as a wrapping coach.
“mom, i’ve tried so many times and i just can’t get it right. she’s told me before how much she loved wrapped presents, so i don’t want to just put them all in bags, but i don’t know if i’m going to have much of a choice at this point.”
ellen laughs at her son, pulling out her own wrapping supplies and tries to show him again. she talks him through the whole process, and when he finally wraps a present right, he’s beaming from ear to ear. she stays on the phone and coaches him through the rest of your presents as he thanks his mom over and over again for her help.
just as he’s placed the last one under the tree (the poorly wrapped ones shoved in the back) he hears the door open and in you walk with a hoard of shopping bags on each arm.
when you walk into the living room, eyes glued to the now full space under the tree, your eyes light up.
“quinn, did you wrap all of these?”
he walks over to you, taking some of the bags from your hands. “sure did. all by myself,” he beams at you.
“excuse me, your mother had a hand in this too. where’s my credit?”
you hear ellen’s voice flowing through the speaker of quinn’s phone, the device still propped up on the coffee table, surrounded by wrapping paper.
quinn’s face turns bright red, forgetting his mom was still on the phone. you look at his embarrassed state, endeared more than anything that he cared about wrapping your presents so much, he called his mom as a reinforcement.
“is that true?” he nods his head.
“well, yeah. i kinda botched the first few, and the youtube videos weren’t helping, so aside from taking them all to a store to have someone professionally wrap them for me, mom was my last shot,” he shrugged, embarrassed about the fact his lack of wrapping skills has been outed.
“q, that’s so sweet oh my god,” you gush at him, batting your eyes and bringing your hand to rest over your heart.
“really? you don’t think it’s embarrassing i don’t know how to wrap a present?”
you balk at him, rolling your eyes. “quinn, the fact you went through so much trouble to wrap them, instead of putting them in a bag like every other guy i’ve ever dated, is the sweetest thing ever. why would i care if they’re perfectly wrapped or not?”
“see, quinn! i told you she wouldn’t care if they were perfect!” you hear from his phone, both of you having now forgotten about ellen.
“yeah, quinn. listen to your mother,” you playfully scold him, walking past him so you’re in frame on his phone. “thanks, ellen. what ever would these boys do without you?” you joke with her, earning a laugh.
“oh, you know, probably bug you a lot more than they already do,” she jests back, referencing how often not only your own hughes boy calls you about needing help with finding things around the apartment, or needing you to tell him what the brand name is of that certain kind of protein powder is he likes, but how often his two brothers call you with their own questions and advice requests.
“alright, mom, thanks for your help and all, but i have all the presents wrapped and i need help her put all this stuff away now. i love you, bye,” quinn interrupts the laughter ringing out between you and his mom, picking up his phone and pressing the end call button.
“quinn, you did not just hang up on your mom,” you scold him, gasping at his actions.
“i’d had her on the phone for hours already it’s fine,” he brushes it off. “plus, i don’t think she’d want to witness what i’m about to do,” he walks towards you, pointing up to the mistletoe strung high above your head.
you look back down just as he reaches you, grabbing your face and pulling you in for a very heated kiss.
dropping the bags in your hands, he walks the two of you over to the couch, all mention of gifts and wrapping forgotten.
#quinn hughes#hockey#nhl#quinn hughes fanfiction#quinn hughes fic#quinn hughes fluff#quinn hughes x reader#quinn hughes x you#quinn hughes x y/n
288 notes
·
View notes
Text
I've finished Etho's s7 hermitcraft so guess who's back with a slightly updated/slightly consolidated list of things about ethoslab I have noticed! or just enjoy!
(the previous list)
I have no idea when he learned to noteblock. I don't know if he knows. he knows how to noteblock tho. he's really good at it.
on that note, did you know that there is not a single piece of non-noteblock music in etho's s7 after the first episode? there might not even be any in the first episode. every single timelapse or montage is set to noteblock music
(he sang along to parts of his paper planes noteblock cover too. he was going shopping. I was entirely too delighted)
(also, there is some like...sitcom music theme that I don't know what show it's from. it's bothering me that I don't know. what you need to know is that throughout his s7 etho uses said sitcom theme as the transition before Shenanigans With Fellow Hermits clips play. his life is a sitcom. yes it is the noteblock version.)
I think that etho desperately needs minigames for enrichment. if he's not playing one he's working on one. he needs them and he will let them completely consume his life
the etho decked out 1 runs are hilarious, partially because it's funny to see him play it and realize how absolutely insane decked out 2 is, and how much of a madlad tango is. etho is still the same menace with great luck and skills. I had forgotten about the hole to the void in the middle out decked out 1 tho, that was a fun reminder
etho could make a career out of translating classic type games into minecraft. he kind of has, but it's a pattern.
he also keeps coming up with new games that are minecraft only and is good at figuring out how to balance them well.
again, king of minigames. he will in fact analyze them as much as possible. he caught on to the pattern of impulse's whack a mole game in like...2 rounds? maybe 3? he's good at pattern recognition and will put it to good use no matter the minigame
etho, I cannot stress this enough, is a little shit and enjoys being such. free glass is obviously an iconic moment, but I had forgotten about him scamming scar out of diamonds for "information" about the resistance, or about sneak-e-e's business model (you can't tax what you can't find!), or about how he kept being extremely ridiculous with beef in regards to record shop payments...the list goes on
etho is also very competitive. I mentioned this in the last list, but man...he joins like every single competition he can. he wants to win. he's not like, a sore loser, but he likes to win, and he'll get a little upset if he doesn't.
etho and beef have clearly known each other a long time and ngl I miss their interactions a bit. let them bother each other a bit more please. I want to see them trying to kill each other in ridiculous ways again please. or doing minigames together. they're so silly.
kind of similar, but etho loves getting a rise out of people and it is the best thing ever actually. it's fun watching him use dirty tricks to beat bdubs to sleeping for a prize. it's perfect actually.
that being said, I still really like when etho is just on his own working on stuff too. s7 has a lot of moments where etho will go "I'm gonna use this block palette!" and I will think "bro that's ugly" and then he will make an extremely cohesive build that I want to live in out of it. I think a good way to describe it is that for example bdubs is really good at detailed builds with texture and not much color, and a very realistic twist to them. etho is not afraid to use color at all, and embraces how the colors can work together or contrast. it's fascinating to watch and I love it.
he is also a redstone genius. I feel I am starting to understand how some things with redstone work. could I design something myself? absolutely not but I could work from a tutorial and not feel completely lost on why I have to use a dispenser and not a dropper now.
I think s7 etho is really experimenting a lot with style and how he wants to do things. he does a few more elaborate intros, for example, that are very planned out, but he also does a lot of the classic "hello everybody this is etho and welcome back to hermitcraft!" it's fun and it works, but I honestly feel he might be more confident in some ways now in s10, which is nice to see.
(side note—I think etho has some trouble with tone sometimes, where he really wants to make sure everyone's having a good time, but also he really wants to tease people. this works well with like Beef, who he's known a while, but especially in people he's known less he's quick to catch on if they take what he's saying too seriously, and clarify that he is teasing. it's nice to see tbh, just the clarity even with his audience)
speaking of llamas, I had not realized how recent some really big updates were. bamboo and pandas were new at the start of s7. the nether update came like halfway through?? I was more in the casual build side of mcyt at the time but man...I didn't realize how crazy that is to think about.
just...the way that etho visualizes builds is great. not just like, leaving space for farms, but filling in the spaces with a lot of details that make sense but also work with the space to cover anything it needs to AND to connect with the rest of the base. the sightlines thing is something I see a lot of other builders using but etho really uses them a lot in the Monstrosity in order to keep it from being Too Much as you walk through.
really just...he wants to have fun, and he wants to learn, and he wants to experiment and figure things out. if he can mess with some friends when he does it, that's a great bonus, yknow?
man. what a guy.
#ethoslab#hermitcraft#etho hermitcraft season 7#hm now do I watch his s8 now or rewatch s9.or do I write a fwhip analysis post because I caught up on his hardcore world recently.or do gem#...does this give me full ethogirl status now lmao
191 notes
·
View notes
Text
Amigurumi/Crochet Toy 101 + Resources
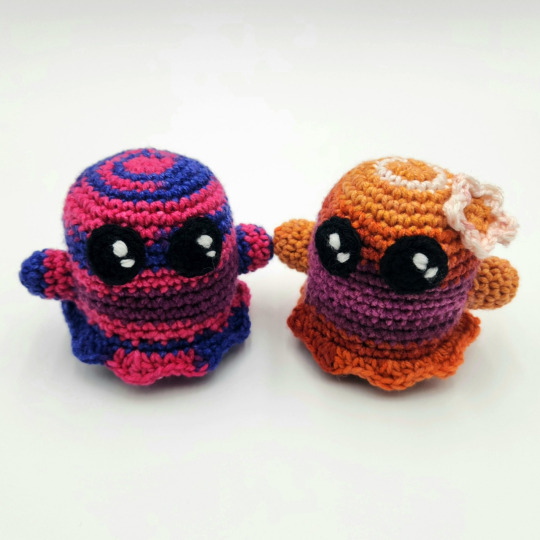
Noticed a couple folks in my tags mentioning that they wanted to learn or wished they knew how to crochet amigurumi. So here's a quick and dirty little how-to guide with resources I threw together? Hope it helps!
Tools + Materials
Crochet is one of those hobbies that is actually relatively cheap to get into. Here is a basic list of what you'll need to get started. You can find most of these at any craft store or even Walmart.
(1) Yarn (Required)
Yarns come in a variety of weights (sizes) and fibers. I recommend a soft, worsted weight acrylic yarn (indicated by a number "4" and "medium" on the yarn label) for your first few projects.
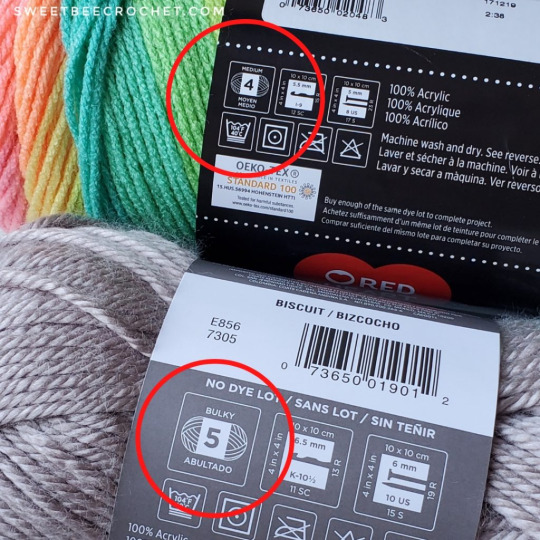
Image
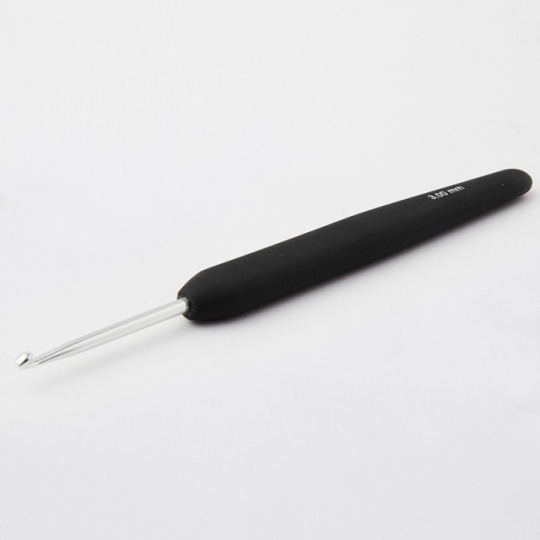
(2) Crochet Hook (Required)
These come in a lot of sizes and styles, and what size you'll use will depend on your yarn weight and how tight you want your stitches to be. I'd recommend buying just one hook to start with rather than a larger set. Metal hooks with ergonomic rubber handles are easiest for beginners (and on your wrists longterm, lol). A 5.0 MM/Size H or a 4.50 MM/Size G works best for making amigurumi with worsted weight yarn.
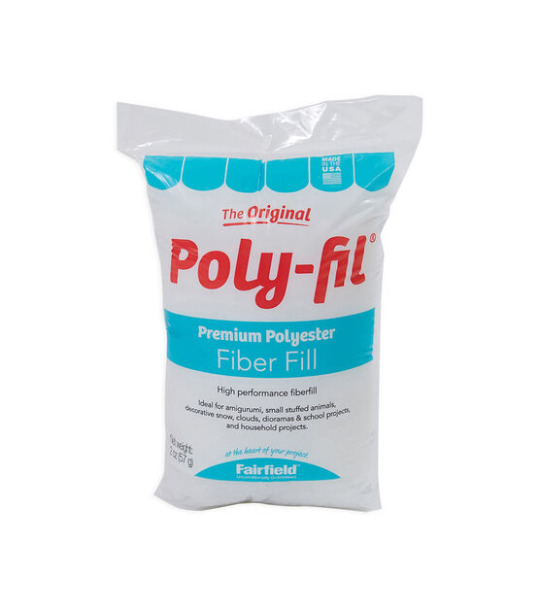
(3) Polyfil/Stuffing (Required)
For stuffing your project.
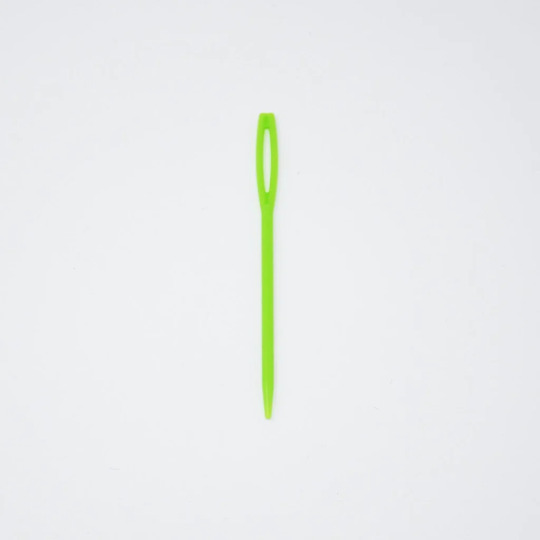
(4) Yarn Needle (Required)
Most crochet projects require sewing to one degree or another. Yarn needles are distinguished from regular sewing needles by their larger size, larger eye, and blunter tip. Yarn needles may be straight, or they may be angled at the tip (i.e. a darning yarn needle).
(5) Scissors (Required)
Any sharp, medium-sized pair of scissors will do for cutting your yarn.
(6) Sewing Pins (Recommended)
For holding parts in place as you sew them on.
(7) Stitch Marker (Recommended)
Many amigurumi projects are worked in rows of continuous rounds, and stitch markers can be used to mark the beginning or end of these rounds. They can also be used to mark areas of interest in your project or to secure your project to keep it from becoming accidentally unraveled. I strongly reccomend getting split ring ones. Scrap pieces of yarn also work in a pinch as stitch markers.

(8) Counter (Recommended)
For keeping track of your rows as you work a pattern.
(9) Safety Eyes (Recommended)
Most amigurumi will require eyes of some sort. Safety eyes (you can find these in various sizes in the doll section of any craft store) will give your project a polished look, but you can also use buttons, felt, or even embroider the eye details on your amigurumi.

(10) Stuffing Stick (Recommended)
For getting your stuffing into hard-to-reach spots. A chopstick or wooden skewer works very well for this.
Basic Crochet Stitches + Amigurumi Techniques
Most crochet patterns are built from a few basic stitches. Before attempting any larger project, I recommend getting comfortable with these stitches by making a few small, flat pot holders out of each basic stitch. A lot of crochet is pure muscle memory and practice, and this is a great way to start.
There are also a few techniques specific to making amirugumi that will be helpful for you to know. You can find any number of free videos/tutorials online. Below are links to a few videos that I found helpful when I was learning to crochet.

Image
How to Make a Slip Knot
Single Crochet (+ Starting Chain and How to Count Stitches)
Half Double Crochet
Double Crochet
Triple Crochet
How to Keep Starting Chain from Twisting
Magic Ring
Ultimate Finish
Invisible Finish
Invisible Decrease
Beginner Amigurumi Patterns
These were the first three patterns I learned in the process of teaching myself how to make amigurumi. I recommend working them in the order they are listed. The first two links have step-by-step instructional videos and will help ease you into learning to read amigurumi patterns. All of these patterns are free, and there are many more free patterns out there as well. Have fun!
Amigurumi Ball
Amigurumi Whale
Amigurumi Stegosaurus
3K notes
·
View notes
Note
Heyo! Do you have any tips for making comics? :)
I've been meaning to get back into the swing of it, but concentrating on such a commitment that takes so much time is tough sometimes haha.
How do you make it work? Are there things you avoid/make easier for yourself just to make the process more fun and do-able?
First of all, I’m very happy for you! I think it’s very exciting whenever we return to a craft we were once passionate about. I wish you the best of luck!
This is a big question and I don’t think there’s really one simple answer since all artists are different and have their own strengths and weaknesses.
One of the biggest issues I face is that I have a million ideas but I simply don’t have the time to do them all. I want to share all these ideas but if I gave each and every idea the same amount of attention and detail, I’d hardly get anything done. So here are some things I've learned through my own comic-making experience, but keep in mind it may not be what you're looking for. Also remember this is NOT career advice. I make comics for fun, not for a living. If you’re looking for professional advice I would suggest looking elsewhere 👍
1 - A comic doesn't have to be fully rendered to be entertaining. Although I love to draw and line and color my work, it’s not always necessary. If I feel a punchline is strong enough to stand on its own, I’ll just make it into a doodle comic. In fact, I’ve found that some of my doodle comics perform better than the fully rendered ones! The doodle comics are still very fun for me to draw and they also serve as gestural drawing practice, so in the end it doesn’t feel like I'm making a sacrifice. I'm still getting my ideas out there and I'm still drawing, I'm just prioritizing what gets more attention so I can better manage my time.
2 - Not every panel needs an illustrated background. You definitely need to show backgrounds for establishing shots and when characters are interacting with the scene. But sometimes the focus needs to be entirely on the character and/or what they’re saying. You can choose to have a solid color background and maybe add a few textures to keep it visually interesting. You're still putting in the effort to make your art pop, but you aren’t losing a ton of time by drawing dozens of backgrounds. Color is also a good way to convey mood. I do that a lot in my comics, like this bit from “My Gal”:

^ I was trying to show a progression in excitement here, so having the colors change from cool to warm does a better job portraying that than if I just had a standard, scenic forest background for all the panels.
3 - Use resources: That's what they're there for! Because I make all these comics by myself, I have had to find resources to help me get through some of the steps faster so I can focus more on the story writing and the artwork. For example, to help me save time on lettering, I use the Onomatopedia font and the Manero Panels, SFX and Bubbles brush set for Procreate. I’m still selecting the sound effects and choosing the appropriate bubbles and tails to suit the mood and scale of the text, but this has saved me a ton of time because I’m not drawing each individual element by hand over and over again. Personally, I purchased these resources but I'm sure there are plenty of free tools out there that you can use.
As far as making it more fun... Honestly, I just love comics as an art form so much that learning about all the 'rules' and techniques and 'SOP's behind comics makes it more fun for me to make them. I recommend checking out tutorials and tips (even if you think you already know it all) and you might be surprised at how much it might ignite more of your comic-making passion. For example, I've spent hours on Blambot's "How-To" page and on ComicDevices.com just to try and soak up as much as I can. They're full of fascinating reads that make me want to try out different things!
I hope this helps! Good luck with your comics!
102 notes
·
View notes
Text
Trey Clover Shared Lines
Tutorial: We should hurry, or it'll be off with our heads.
Level Up 1 / Buddy Level Up: Haha, it's not too terrible to have someone look after me for a change.
Level Up 2: It's all because you've been working alongside me.
Level Up 3: Yeah, this result feels good.
Level Max: I can't look bad in front of my underclassmen. I worked pretty hard, you know?
Vignette Level Up: I enjoy being with you. Haha, sounds like a lie? What can I say that'll make you believe me?
Spell Level Up: My magical power has grown even more than before. It's probably because of all the training we've done together.
Friendship Level Up: At first, when you said you wanted to extend your hospitality to me, I thought to myself, “what are they scheming?”, but… Haha, you’re always full of surprises.
Friendship Level Max: I need to give you proper thanks for always inviting me. …Eh? Hey, it’ll be troublesome if you ask for that much. Do me a favor and don’t expect too much, okay?
Uncapped: I know it's not really like me to ask, but... ... I kind of want to see just how far I can go. Will you help me out?
Groovification: This just means there's still room for me to grow. That's good to know.
Lesson Select 1: You're looking pretty sleepy. I won't wake you up even if you drift off to sleep in class, you understand?
Lesson Select 2: It'd be great if our freshmen could be just as diligent in their studies like you are...
Lesson Select 3: My best subject? If I have to pick something, I guess that'd be alchemy... Well, let's just say I'm average across the board.
Lesson Start: Alright. Time to focus.
Lesson Finish: Good job. Keep it up next time, too.
Battle Start: I don't really want to be too rough with you.
Battle Won: Getting so heated up isn’t really my forte.
Trouble 1: I wasn’t fighting or anyth… No, I guess it was good you stopped us.
Trouble 2: Phew, it’s finally over.
GIFT CALENDAR 2023: “How will you be spending the day?” It’s pretty cold every day now, so I think I’ll stock up on lemonade-ginger syrup. It’ll warm you right up if you drink some. What, according to the Queen of Hearts’ Laws, we can’t have lemonade after 8 o'clock? Well, this has ginger in it, so it’s a completely different drink, isn’t it?
Birthday Login Message 1: Haha, you're making me blush. Thanks. According to the Queen of Hearts' laws, on our birthday, we're allowed to be as selfish as we want. Now, what should should I ask of you...? Hey, c'mon, no need to shirk. Obviously, I'm just joking.
Birthday Login Message 2: Oh are you going to celebrate my birthday as well? Thanks. What do I want as a present…? I’m okay with anything. Hey, it’s not like I’m just saying that in order to answer your question. I’m just happy that you’re thinking of me.
Birthday Login Message 3: Hm? Do I like strawberry or chocolate tarts better? Hm, I think I like both. Are you thinking of making one for somebody? Oh, then let me help you. …Hahah, don’t look so panicked. I’m just kidding. It’d be bad if I helped you on today of all days, right? Well then, I can’t wait to see your finished tart. You can give me your birthday wishes after it’s done.
Birthday Login Message 4: Thanks for celebrating my birthday. But I have to say, I wasn’t expecting you to have my gift delivered to my dorm like that. You should have just handed it to me directly, since we were meeting up, anyway. Was I shocked? Well, yes… Ah, so it was supposed to be a surprise present! Haha, oh man. You’re always finding ways to startle me.
Birthday Login Message 5: You’re here for my birthday, huh? And this present… Oh, it’s honey! Thanks! It’s useful and honestly, easy to comprehend. What I mean is, we had a Science Club meeting today, and… Well, while the club members were wishing me a happy birthday, Rook gave me something. Look at this. According to Rook, it’s a “wondrously beautiful clover,” but… Is there any difference from a regular clover? I don’t really get it… What about you? If you can figure out the difference, let me know on the down low.

Requested by Anonymous.
82 notes
·
View notes
Note
Hello! Your IF story inspired me to start my own IF game
Im thinking of using twine
And I would like to ask you if you had any tips or advice
Thank you!
Also side note I’m really excited and very interested in how this story is going to play out I already love the cast and can’t wait to see the rest!
OOoo thank you so much! I'm very flattered the game inspired you!
Twine has many different story formats, each with their own pros and cons. I personally use Sugarcube (I think next to Harlow, it is the most popular) so all my tips will be for Twine Sugarcube:
Basic tips:
Bookmark the Sugarcube V2 Document. This is your bible. It will have everything you need to use Twine. It's a daunting read, but I use it to troubleshoot when I forget how Macros work. I always have tab open for it.
Download a Twine Template. If you are brand new to Twine and making IFs, I heavily suggest downloading a template or two. Most of them come with tutorials and examples on how they work. Sometimes they even provide more helpful resources on Twine. I use Vahnya's Template II that I modified myself afterwards.
Study from pre-exisiting Twine IFs. Might be controversial, but I personally believe that diving in and seeing how other authors code and structure their stories helps a lot. Eventually you'll figure out a system and structure that works for you. It might not work for all games, but most Twine games can be downloaded and opened up in the twine editior. If you're worried about spoilers or upsetting people, feel free to download my game and see whats inside. I make multiple copies of the game, so any build I have out in the public is not the original build and therefore have no spoilers. I know it will look insane when you open it, but there's a method to the madness.
Writing and Planning:
Making an IF is no joke! Plan your story out, know your big variables, your branching routes and at least some part of your ending!! Try to stay as organized as possible. These projects and can will spiral out of control if you're not careful. I suggest having a giant excel sheet with tabs for important variables, chapter/scene breakdowns, wordcount and characters ect. Updating it will be a pain (that I am guilty of not doing) but will make developing easier. Even if you don't make a big project, its still good practise to do it.
#Stylesheet:
All the code in here relates to how the game looks. You can fiddle in there to configure the game to look how you want it to look. If you even want to see what element is tied to what ID code, the best thing to do is playtest the game (build >> play) and then leftclick and select "inspect element" you browser will open up the developer window and you see what elements are tied to what and even play around with the contents to test out CSS elements you like.
This website is a great resource on using CSS and other coding language. I personally used it many time to modify my game.
Helpful resources and Macros:
Chapel has made a LOT of custom macros that you can add to your game. You can find the list here.
But the most important one is the Pronoun Template. It might be confusing at first but one you understand how it work, its a great tool to have. You can even add gendered titles so that they work with the pronoun template.
Idrellegame is a great resource on coding in Twine. You can find the list here. It helped me out when starting out.
Exporting to Itch:
I never see people talk about Butler when it comes to uploading If games onto itch.io, so i'm doing it now.
What is Butler? Its a command-line tool that Itch made to upload your game onto Itch.io quickly and reliably.
The documentation is here. And I suggest coping and pasting the export codes onto a doc so you can use them for every update afterwards.
Here is a youtube tutorial you can follow along as well: https://www.youtube.com/watch?v=_JCJa5iWREM
I personally have the Butler on the Itchio.app so that's its always up to date.
Thats all I can offer off the top of my head, if you or anyone wants some help on something specifically, feel free to DM me or drop another ask in the inbox. Always happy to help. Working in twine is very overwhelming for newcomers.
60 notes
·
View notes