#binder tutorial
Explore tagged Tumblr posts
Visit Tumblr Blog
Explore Tumblr blogs with no restrictions, modern design and the best experience.
Last Seen Tumblr Blogs


Fun Fact
Tumblr was named as a finalist in Lead411’s New York City Hot 125 in Aug 2010.
Text
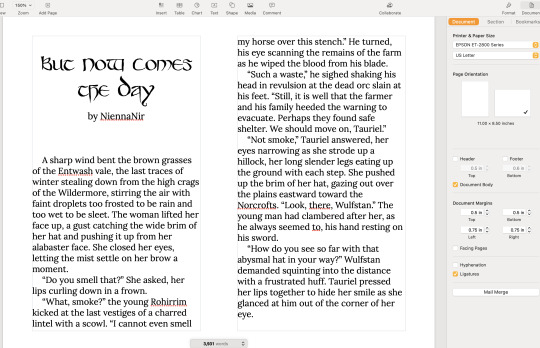
How to Make Your Own Binder that Fits Well and Looks Good
A while back I was in need of some new binders and thought hey, I bet I can make one way cheaper than buying it from somewhere (especially cus some of the ones I’ve bought in the past didn’t really fit right). Except when I started looking for a binder patterns online, I was very surprised that I really… couldn’t find many that looked very nice lol. Most of them had really wrinkled necklines, or didn't bind well, or just overall looked weird. A lot of the patterns also required a serger, which I don't have.
So I just said fuck it and made my own pattern! And it ended up being relatively easy! And the binders fit REALLY WELL and are comfortable to wear, even for long periods. The neckline doesn't show under shirts with loose collars, and the bottom hem doesn't gap or stick out. Here's me wearing one:
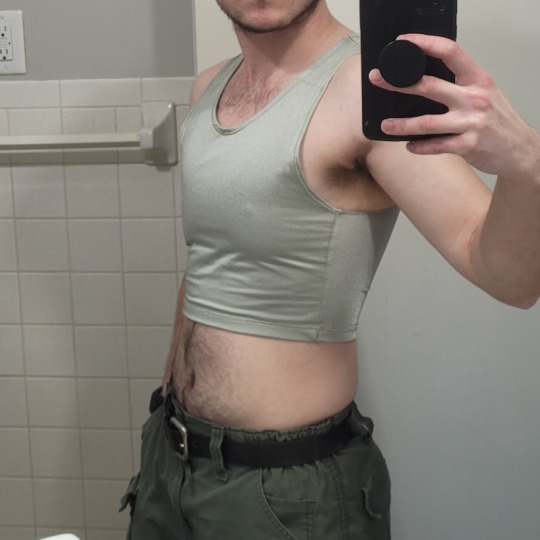
(plus I was able to make myself 5 of them for a total of like ~$50.)
So I figured I could throw together a guide to help out anyone else who wanted to make their own binder but was dissatisfied with the patterns available!
Disclaimer: This tutorial is going to assume a baseline level of sewing experience, and also will require access to a sewing machine. It is not a complicated pattern, but it will most likely require some tweaking and adjustments after you make the first one. Don’t be afraid to make alterations to make it fit better!
This tutorial is for a gc2b-style half-tank binder. It could be altered to be a full-tank binder, but all instructions will be for the half-tank design.
Materials needed:
Stretchy fabric, probably listed as 'athletic fabric' (I use this kind from Joann’s. Most athletic stretch fabrics should work, look for around 80% nylon/20% spandex blends)
Stiff fabric (I use this shirting cotton because I like how lightweight it is. If you want something a little stiffer with more structure, you can use a cotton or cotton/poly blend twill like this. gc2b binders use twill for theirs.)
Lightweight fusible interfacing (I use this kind) (get FUSIBLE not sew-in)
Fusible webbing like Pellon Wonder-Web (this is technically optional but it WILL make your life easier when you’re sewing - just make sure to get the kind with the paper backing!!!)
“But kiwisoap thats 4 whole kinds of materials, surely I don’t need that many!” Ok sure, you can probably get by without the fusible web and interfacing, but consider: they are both dirt cheap (im talking like $1-2/yard), they will make it much easier to sew the final product, and will give you an overall better-looking result. This tutorial is written with the assumption that you’ll use them.
"How much fabric will I need?" Measure the circumference of your chest below your armpits. Add 6 inches just to be safe. This is the yardage of stretch fabric you’ll need, and should give you enough material to make at least 3 binders without much excess left over. You will need around half as much stiff fabric.
Other supplies:
Big Paper (for drawing the pattern)
Flexible measuring tape
Sewing machine
Iron
Pins
Step 1: Measuring
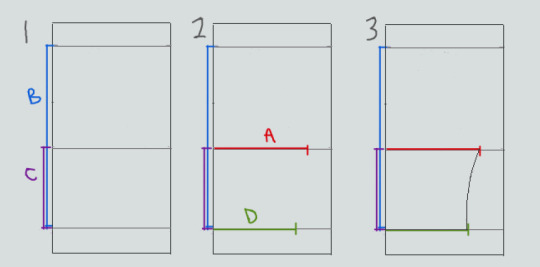
You will need 4 main measurements for this pattern.

A) Measure the circumference of your chest just below your armpits, then divide the number in half. This will be the widest part of the pattern.
B) Measure from the top of your shoulder down to where you want the binder to end. For most folks, this will usually be around the natural waist (narrowest part of the torso), about 3-6 inches above the belly button. This will be the overall height of the pattern.
C) Measure the distance from below your armpit to where you want the binder to end. This will determine where the arm hole starts.
D) Measure the circumference of your waist where you want the binder to end, then divide the number in half.
So for example, after dividing A and D in half, my measurements are 17", 15", 7", and 14.5".
Next:
Subtract one inch from measurement A - This will help provide some compression. You might need to take it in even further depending on how it fits, but one inch is a safe starting point. I take mine in around 1.5 inches.
Subtract half an inch from measurement D. This will help prevent the bottom edge of the binder from gapping. Again, you may need to take it in more or less, depending on your own body.
Add 1.5 inches to measurement B and one inch to measurement C. This is to account for the hems and armhole placement.
This makes my final measurements
A = 16"
B = 16.5"
C = 8"
D = 13.5"
From here on out, we are only going to be working with the measurements that we have added/subtracted to, NOT the ones we initially took.
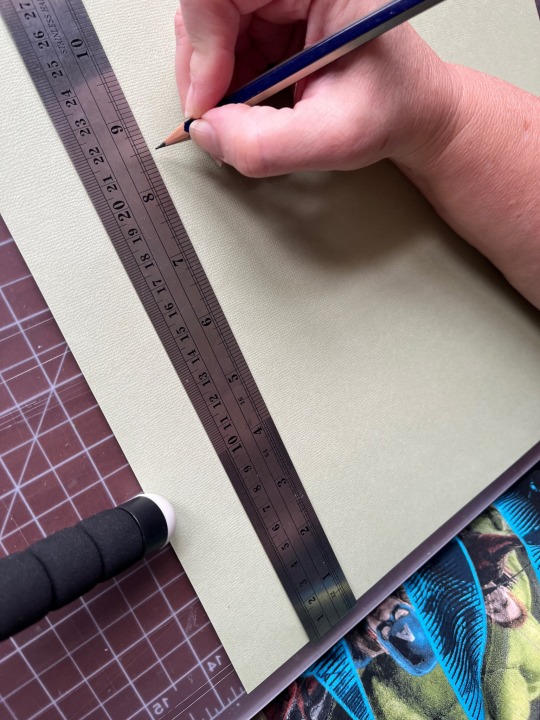
Step 2: Drawing the Pattern
You will need a piece of paper large enough to accommodate the entire pattern. This may involve taping multiple pieces together, or using a piece of newsprint, etc.
I recommend folding the paper in half to ensure that you get a symmetrical pattern. However, this means you will need to divide measurements A and D in half again, or else you’ll end up with a pattern that’s twice as wide as it should be!
Also note: the pattern is drawn with the seam allowance built in! You don’t need to add any seam allowance.
To draw the pattern:

Begin with your folded paper. Measure and mark B and C on the paper, and draw a line extending across the paper. These will be your guidelines.
Measure and mark A and D along the middle and bottom guidelines, respectively. Remember, the paper is folded, so you only use half of the measurement for A and D.
Draw a loose curve connecting the endpoints of A and D. If needed, you can also just draw a straight line between the two.
Mark the opening for the neck hole. Depending on your size, it will measure around 6-8 inches across at the top (remember to divide this in half for the folded paper) and about 5-6.5 inches deep. (mine is 6.5" across and 5.5" deep) Draw a curve to connect the two points. This part will take some tweaking and adjusting to get it to look right lol.
Measure the width of the strap - this should be somewhere between 2.5 - 4 inches wide. They will end up about 1/2” to 3/4” narrower once you sew them. Draw the line at a slight angle, as shown.
Connect the endpoint of the strap to the endpoint of line A with a curve like in the diagram.
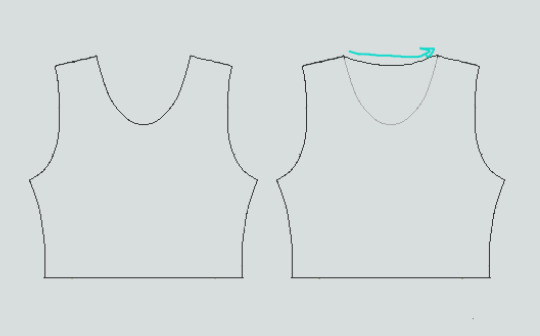
This will be the pattern for the front piece.
To make the back piece, trace the front pattern, but make a very shallow curve for the neckline instead of a steep one, as shown:
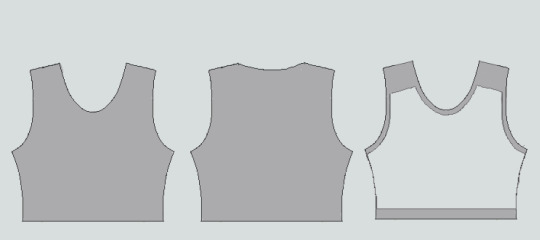
The last piece is the stiff front panel. This is what provides the flattening effect of the binder. To make the pattern, trace the front pattern again. Trim 3/8” in on the sleeves and neckline, and 3/4” to 1” along the bottom. This gives a flatter hem. Then trim the straps shorter by a few inches. This helps the binder lay flatter along the shoulders.
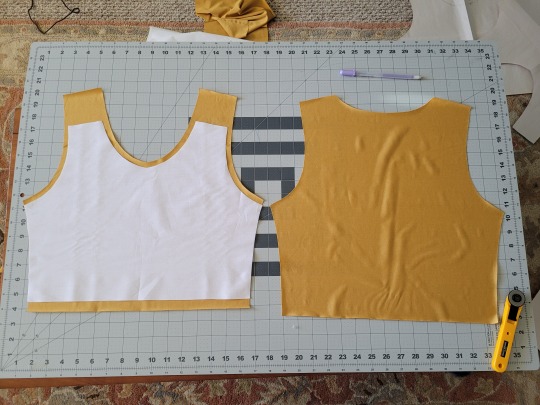
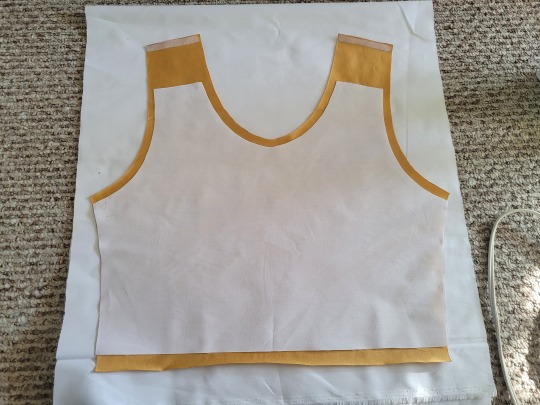
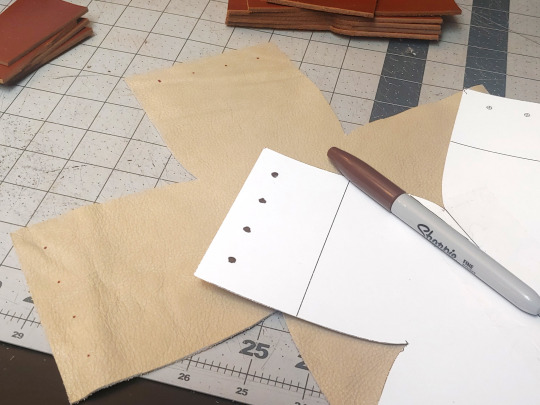
When you're done, you should have 3 pattern pieces that look approximately like this (stiff panel shown overlaid on the stretch fabric to show how it fits together).
NOTE: If you want more compression or just want to make it a bit sturdier, you can add a second panel of stretch fabric to the back piece. Just use the bottom half of the back pattern (from the widest part down to the bottom hem) to cut out another piece of stretch fabric. Attach it to the back piece with a strip of fusible webbing and a zig-zag stitch along the top.
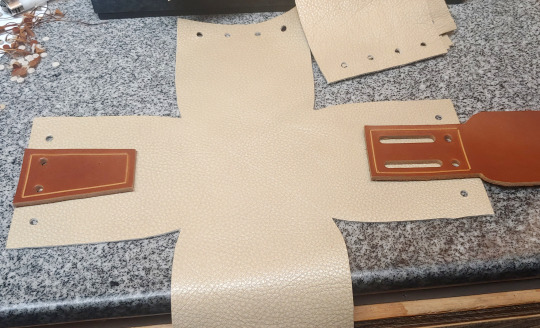
Step 3: Putting It All Together
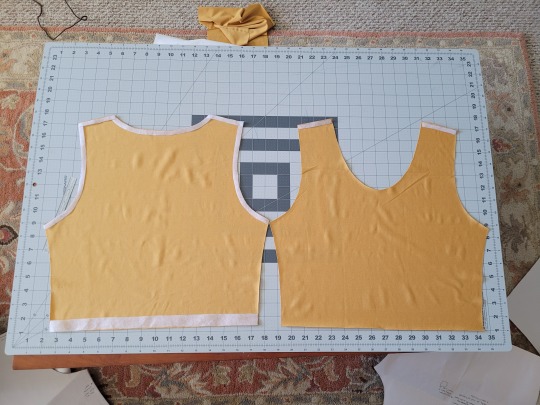
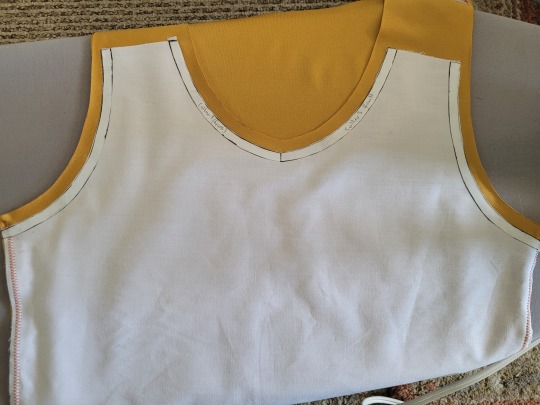
Once you’ve made the patterns and cut out the pieces of fabric, you should have something that looks like this:
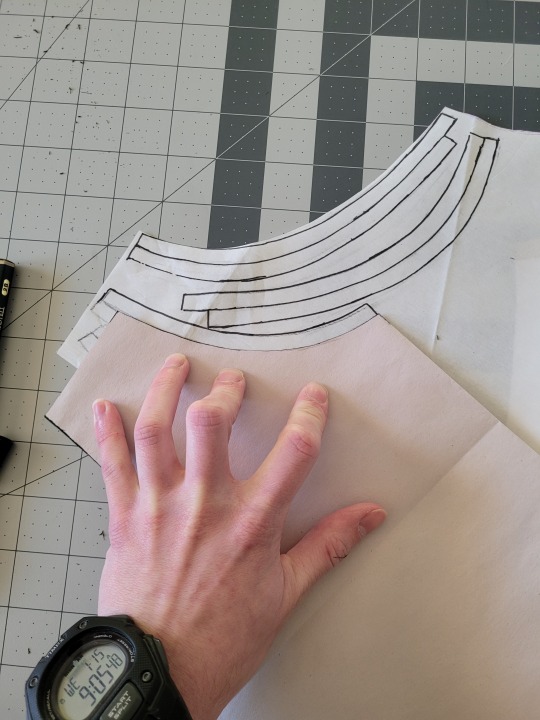
The next step is adding interfacing and fusible webbing. Use your pattern to cut out 3/8" strips to fit on the top of the straps for both pieces, and to the neckline, sleeves, and bottom hem of the back piece, as shown:
If you want to add it to the bottom hem of the front piece, it will help keep that hem flat when sewing it down later, but it's not essential.
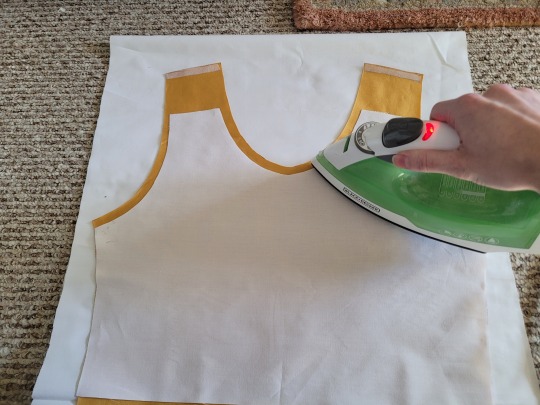
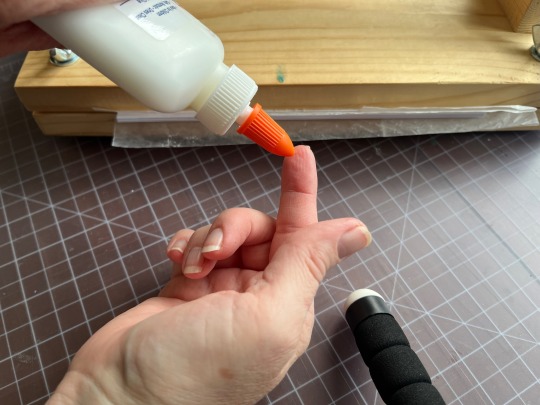
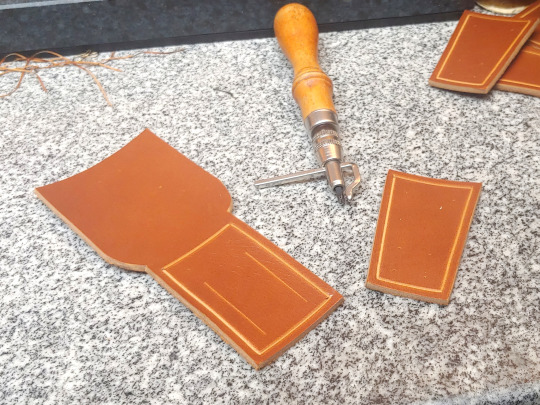
If you choose to also use fusible webbing (WHICH I RECOMMEND), you will apply it to the stiff front panel similarly to how the interfacing was applied, ~3/8” strips along the neckline, sleeves, and top of the straps. Cut out two strips for the neckline and sleeves, because we'll use those later too.
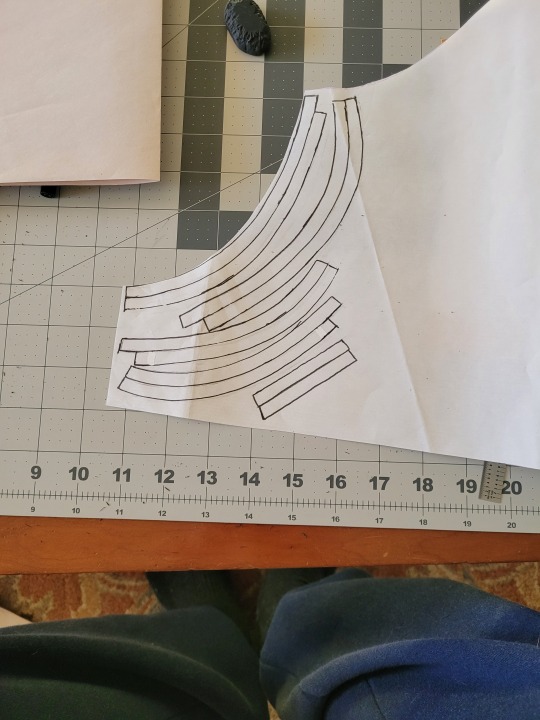
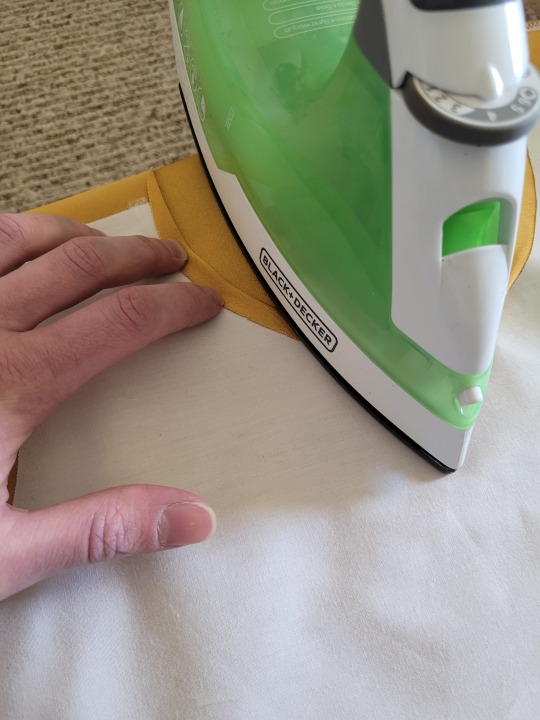
Iron the strips onto the front panel as shown:

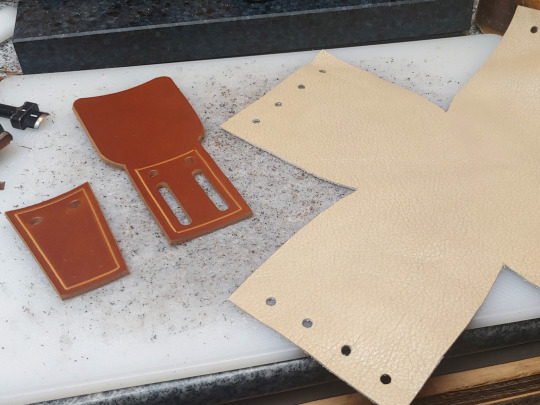
Once it's on, just peel off the paper, position it webbing-side down on the stretch fabric, and iron it to fuse the two pieces together so everything stays in place while you sew. THIS MAKES IT WAY EASIER TO SEW.
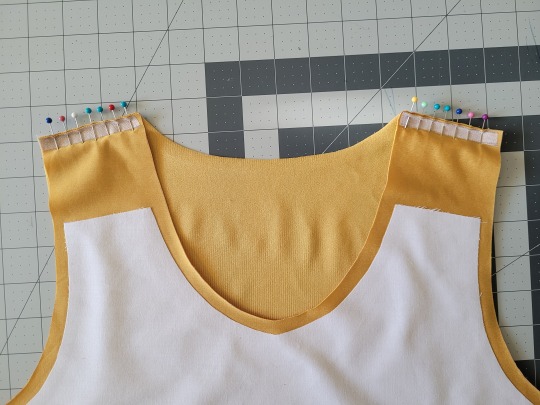
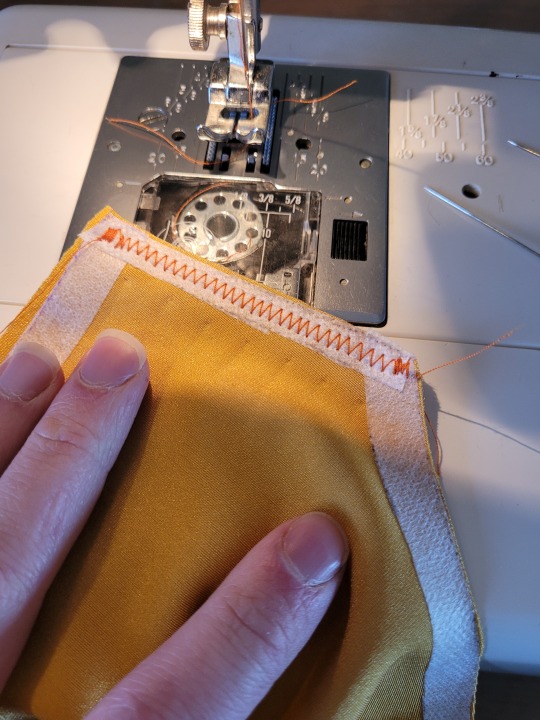
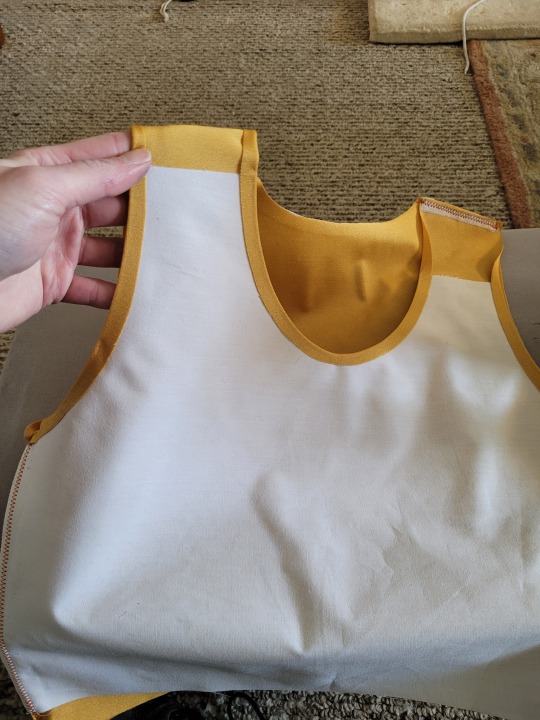
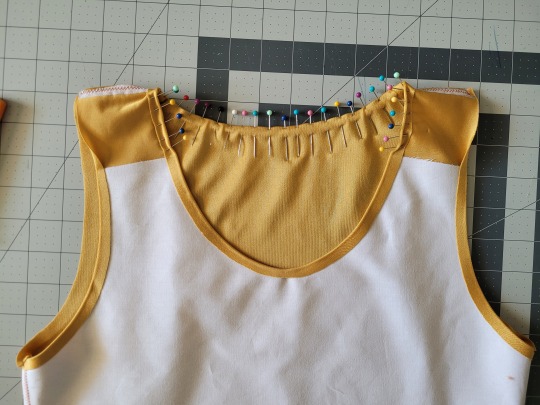
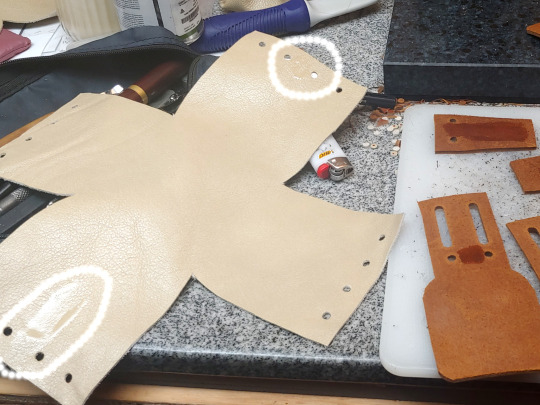
After the stiff front panel is fused to the stretch fabric, you’ll sew the straps of the front and back pieces together, then join the pieces along the sides. Pin the hell out of it to keep everything in place -this type of material is VERY prone to puckering.
When sewing, USE A ZIGZAG STITCH. A straight stitch will NOT WORK for stretch fabric. I adjust mine to 1.3mm long and 3.5mm wide which has worked well. If your machine doesn’t let you adjust stitch length or width, well. That sucks, I don’t really have any advice.
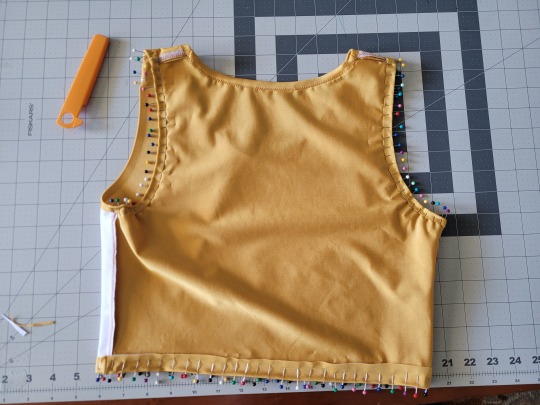
After you sew the front and back pieces together, you can add more fusible webbing to the front panel to help hold the hem down flat and prevent it from puckering while you sew it. Just add the strip, peel the paper off, then fold the hem over and iron it down. This part isn’t really necessary, but it does make the hems look nicer. If nothing else, I would recommend adding it to the neckline.
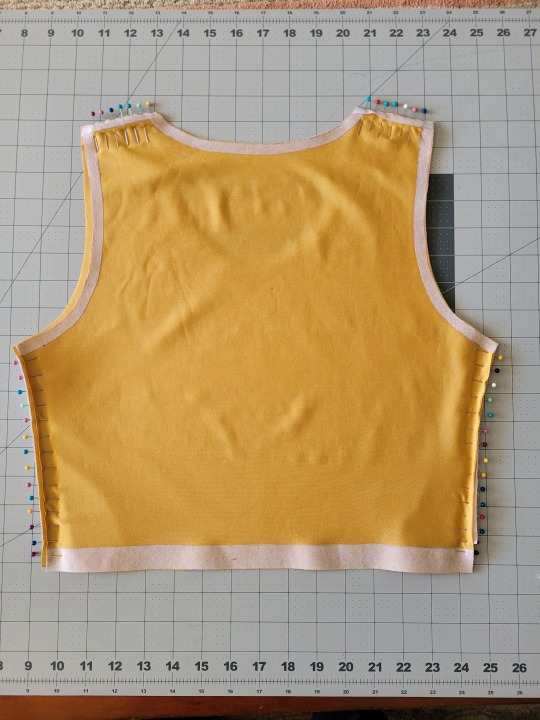
After that, you just fold & pin all the hems and sew them up with a zigzag stitch, then go over the raw edge at the top of the stiff panel (where we cut the straps shorter).
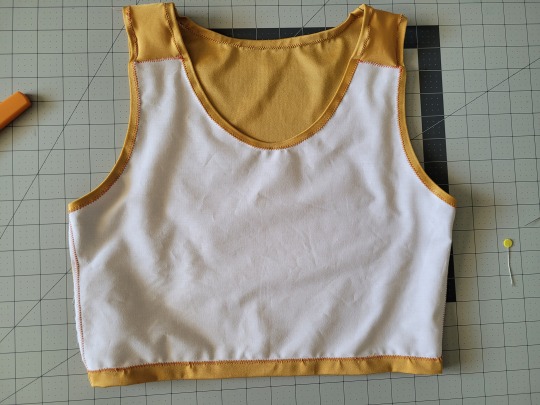
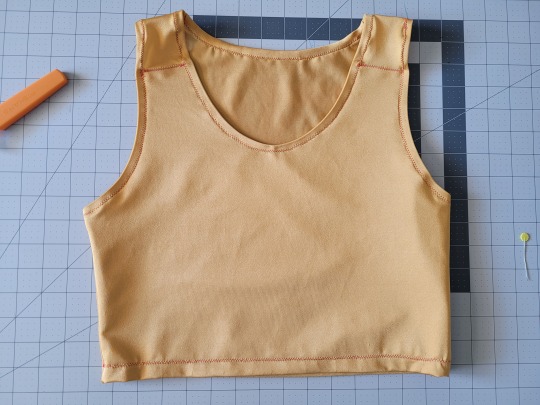
And that’s it! You’re done! And now you can make your own binders whenever you want!
And hey! If you used this tutorial and wanna throw me a dollar or two on ko-fi, I wouldn't complain.
1K notes
·
View notes
Text

▶ Flat Chest AXL Update
Introducing the new Flat Chest Detector (Thanks once again to Berdagon for the amazing script!)

Supported Garments will automatically adapt to the Flat Chest when worn
No need to re-equip garments
Can affect multiple garments simultaneously (T1 & T2)
Work with both the vanilla inventory and Equipment EX
My Stinky Racerback Set has been updated to support it!
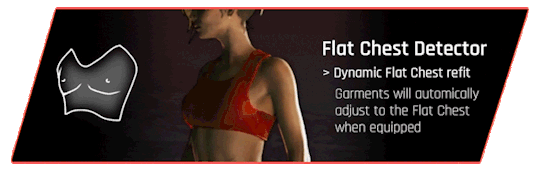
⚠ You NEED the latest Archive XL and Codeware versions!
#Cyberpunk 2077#Cyberpunk 2077 Mod#Mod#Mod Update#✨👄✨ IT JUST WORKS#The binder vision coming THROUGH#I'll work a tutorial soon - it works the same way as the bulge detector#both the flat chest and bulge detector now supports Dynamic Appearances btw#thanks to the new XL + Codeware update
52 notes
·
View notes
Text
youtube
I found this video and I thought I’d share. I’m not transmasculine nor do I desire a binder but I feel like this was an incredibly easy and helpful tutorial to follow! Especially if you don’t have easy access to a binder or means of buying one but you also happen to know how to sew!
#tarncore#transgender#binder#chest binding#diy tutorial#transmasc#gender nonconforming#tutorial#Youtube#transmasculine#trans masc#ftm
47 notes
·
View notes
Text
bf and i learned how to play pokemon tvg today!! i got the Pokemon TCG Battle Academy kit and it made learning the game SO easy omg. i spent years and years collecting the cards but no idea how to play. now im super hype to make my own decks!! like, SUPER excited!!
#im going to go through my big fat binder of cards tomorrow and make myself a nice deck or two or three or ten#like fr if you dont know how to play the battle academy board game makes it super easy!!#as in a step by step deck + booklet and everything#we had a lot of fun and played a few rounds w just the tutorial decks!#pokemon tcg#pools.personal
4 notes
·
View notes
Text
they should invent binders with like pocket dimensions in rhem. right now it's like incredible: binder lets u experience what life would be like with a c cup for the smal price of constant discomfort
#mine#nodding sagely at everyone else who tried to follow that diy binder tutorial when they were like 12#the one that like had you make one out of a tank top#and it didn't work and you got realyyyy sad forever
17 notes
·
View notes
Text
Want to learn how to save a fic? Bind it!
Listen to your elders
So last week I posted abut the importance of downloading your fic. And then three days later AO3 went down for 24 hours. No one was more weirded out by this than I was. But while y’all were acting like the library at Alexandria was on fire I was reading my download fic and editing chapter eight of Buck, Rogers, and the 21st Century. And also thinking about what I could do to be helpful when the crisis was actually over.
So first off, I’m going to repeat that if you’re going to bookmark a fic, you really need to also download the fic and back it up in a safe place. I just do it automatically now and it’s a good habit to get into.
But let’s talk about some other scenarios. Last October I lost power for over a week after hurricane Ian. Apart from not having internet or A/C I did find plenty to do, I collect books so I had plenty to read, but maybe, unlike me, your favorite comfort reads aren’t sitting on a bookshelf. So let’s do something about that, shall we?
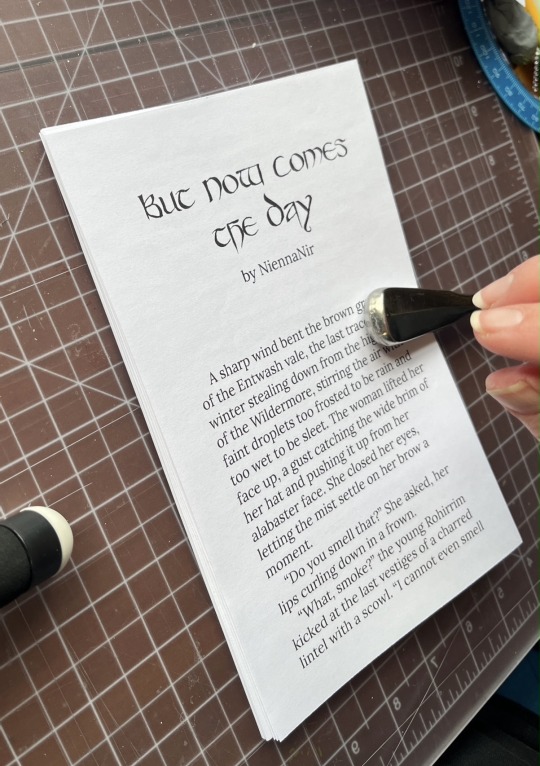
In olden times many long years ago around 1995 we printed off a lot of fic. It was mostly SOP to print a fic you planned to reread and stick it in a three ring binder. And that’s totally valid today too, but you can also make a very nice paperback with a minimum amount of skill and materials.
Let’s start with the download; Go to Ao3 and select your fic, we’ll be working with one of mine. This method works best with one shots, long fic tends to need a more complicated approach. Get yourself an HTML download

Open up the HTML download and select all then copy paste into any word processor. Set the page to landscape and two columns, then change the font to something you find easy to read, this is your book, no judgement. This is all you have to do for layout but I like to play a little bit. I move all the meta, summary, notes to the end and pick out a fun font for the title:
No time like the present to do a quick proofread. Congratulations, you’ve just created your first typeset. On to the fun part.
Now you’re going to need some materials: 8.5x11in paper ruler one sheet of 12x12 medium card stock (60-80lb) scissors pencil pen or fine tip marker sheet of wax paper white glue two binder clips 2 heavy books or 1 brick butter knife
You’ll also need a printer, if you’re in the US there is almost a 100% chance your local library has a printer you can use if you don’t have your own. None of these materials are expensive and you can literally use cheap copy paper and Elmers glue.
Print your text block, one page per side. Fold the first page in half so that the blank side is inside and the printed side out:
use the butter knife to crease the edge. Repeat on all the sheets. When you’ve finished, stack them up with the raw edge on the left and the folded edge on the right. I used standard copy paper, because you’re only printing on one side there’s no bleed to worry about. Take the text block and line everything up. Use the binder clips to hold the raw edge in place.
Wrap the text block in the wax paper so that the raw edge and binder clips are facing out. I’m going to use my home built book press but you don’t need one, a brick or a couple of books or anything else heavy will work fine.
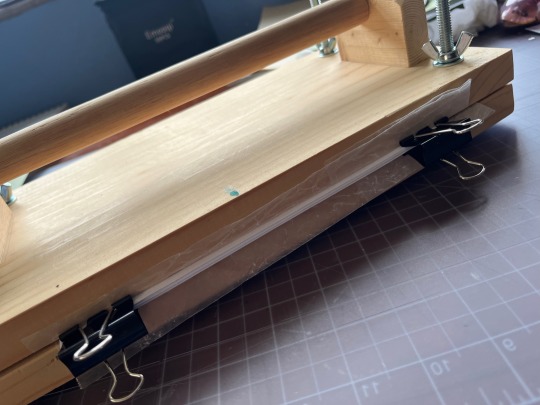
Once the text block is anchored down, take off he binder clips and get out the glue.
You can use a brush but you don’t need one, smear some glue on that raw edge.
Go make a margarita, watch The Mandalorian, call your mother. Don’t come back for at least an hour
In an hour smear some more glue on there and shift your brick forward so that the whole book is covered. This keeps the paper from warping. While glue part 2 is drying we’ll do the cover. Get out your 12x12 cardstock
Mark the cardstock off at 8.5 inches and cut it. Measure in 5.5 inches from the left and put in a score line with the butter knife (the back edge not the sharp edge)
Carefully fold the score line, this is your front cover. You have some options for the cover title, you can use a cutting machine like a cricut if you have one, you can print out a title on the computer and use carbon paper to transfer the text to the cardstock. I was in a mood so I just freehanded that beoch. Pencil first then in pen.
Take your text block out from under your brick. Line it up against the score mark and mark the second score on the other side of the spine
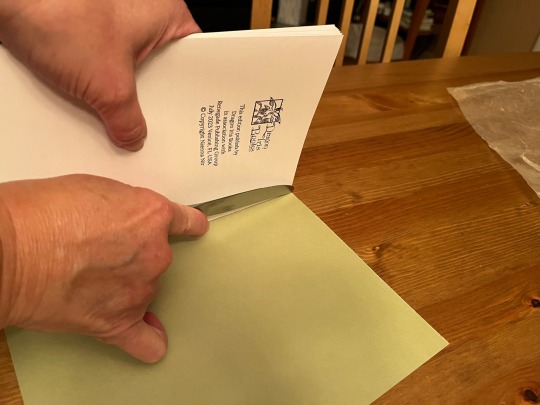
Fold the score and glue the textblock into the cover at the spine. Once the glue dries up mark the back cover with the pencil and then trim the back cover to fit with your scissors.
Voila:
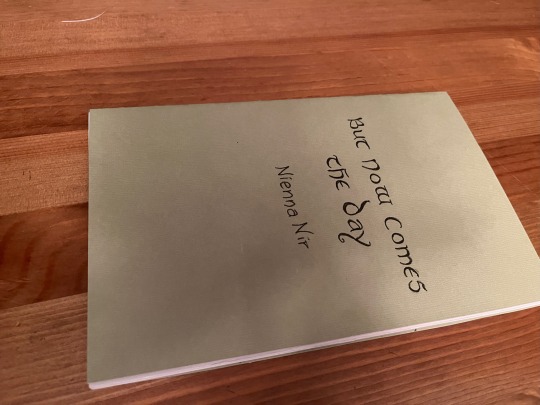
I’m going to put this baby on the shelf next to the Silmarillion.
The whole process, not counting drying time, took less than an hour.
If you want to make a book of a longer fic, I recommend Renegade Publishing, they have a ton of resources for fan-binders.
#fanbinding#ficbinding#pamphlet binding#bookbinding#diy bookbinding#diy#tutorials#fanbook#fanbind#fantastic ficbinders and where to find them#ficbook#fic books#fic book#fic binders#fic binding#fan book#fan binders
22K notes
·
View notes
Text
Still thinking about that one tiktok where that lady was like "trans women have to put on tons and tons of makeup everyday to be seen even a little bit as a woman and trans men just put on their "Going out flannel"
as if there isn't "masculinizing makeup" tutorials and trans men beefing up their facial hair rogaine and or makeup, and packers, and STPs and binders, and makeup for covering your scars, and and and it's like please speak trans men and stop making shit up oh my god. trans men/mascs put in so much work.
9K notes
·
View notes
Text
doll hand-book⋆.ೃ࿔*:・🎀

how to feel prettier, some visual interest tips, a beauty handbook and how to glow up without doing something big/extra, little habits and things that u can incorporate into ur life to make u glow up without even thinking about it ✨ (constantly being updated)


double cleansing every morning and night for clean and sparkling skin
BODY GLITTER
exfoliate ur skin weekly (2-3x)
incorporate pretty words into ur vocabulary
drinking enough water everyday to be healthy and beautiful
sweet smelling body butters and body oils to moisturize
posture is important so sit straight and stand straight
wear sunscreen on your face and body everyday bcuz spf is important
jewelry to decorate ur body
carrying lipglosses and hand lotions and perfumes in ur bag for touch ups throughout the day
meditate, say ur affirmations and journal for a pretty mind
for journaling, buy a cute journal and journal with scented glitter pens and stickers
for visual interest
glitter is very feminine, in makeup, clothing, nails, and on collarbones. when i wear glitter on my skin i feel like a fairy ✨
jewelry makes u glitter (nose studs, stacked necklaces and stacked earrings, rings, belly piercings, and nail gems)


know what ur undertone is, since i have a warm undertone (gold>silver)
LONG is the way to go (long nails, lashes, hair, flowy dresses and tops and skirts)
for the sleek and shiny look (shiny and silky hair, glossy skin and lips)
glowing up subconsciously
prioritize sleep (sleep 8-10 hours a night)
drink at least 1L of water a day
eat a fruit or veggie with every meal to glow from the inside out
use coconut oil/castor oil on ur lashes and brows every night
facial massage everyday and practice mewing
move your body in a way that feels natural (for example, i go to a school where we have to walk a lot bcuz the campus is big so subconsciously i do LOTS of walking without even thinking of it)
if ur wearing ur hair up/in a protective style, use a hair mask
to look polished and put together
chapped lips are unacceptable, use an overnight lip mask and a hydrating chapstick throughout the day. if u notice ur lips just peeling in general, use an exfoliating scrub/brush ur lips with a toothbrush.
neat hair = a polished look
keep ur nails trimmed, filed, and polished and if u wanna do a little extra get them manicured
address skin concerns so that then you can get glossy skin
make sure all ur metals match and color coordinate
keep it simple
details make a difference
shape ur brows
whiten ur teeth + maintain good oral health
color coordinate
fixing posture
HELPFUL RESOURCES
how to smell dreamy - @flirtygirl-coterie
feminine archetypes - @prissygrlsorority
beauty binder - @prissygrlsorority
maintaining a clean and fresh appearance - by yours truly
makeup tutorial in pics - by yours truly
"your glowing" - by yours truly
general hygiene secrets and tricks - by yours truly
#it girl#advice#becoming that girl#self care#self love#that girl#it girl energy#honeytonedhottie⭐️#resources💬🎀#glow up#pink pilates princess#dream girl tips#dream girl#diva#divalicious#princess#dolly#girlhood#girly#girl blogging#girl blogger#glowing effect#beauty tips#beauty
3K notes
·
View notes
Note
Patch making tutorials?
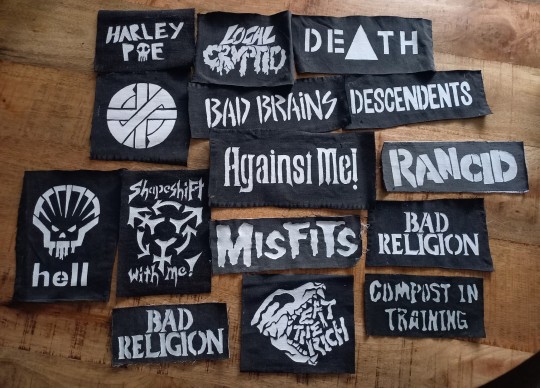
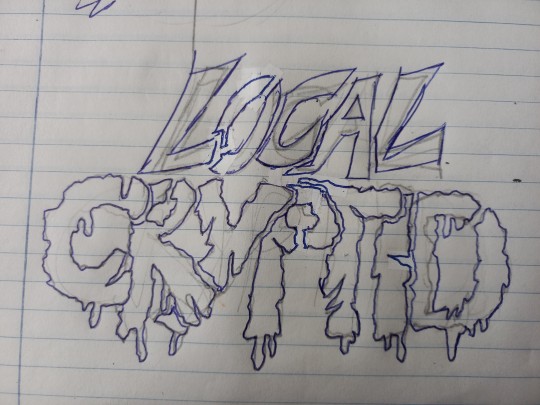
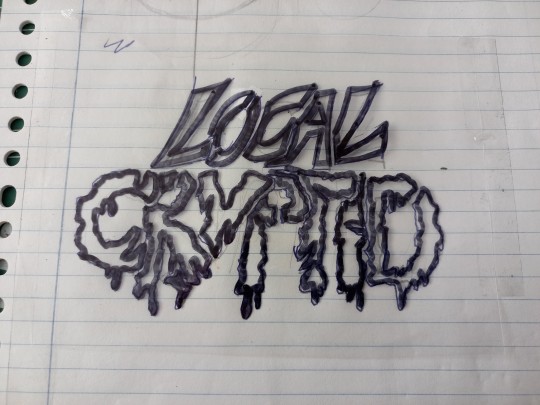
and here i am once again, with a patch making tutorial
how to make stenciled patches:
i'll post a part two in the future which will cover freehanding and stamping ur patches
-
first some general info that might be useful:
i get my patch design inspo from pinterest, etsy, and tumblr. if sell your patches make sure you arent ripping off another artists patch design when using etsy for inspo. anarchostencilism also has tons of stencils both on deviantart and reddit which are free to use.
i use acrylic paint for my patches, but if you can afford it id advise fabric paint. to seal paint into the fabric iron the patches, it helps em last longer. some acrylic paint survives very well in the washing machine, but wash your stuff by hand the first time to see how well it holds up.
if you make your patches multiple colors, dont first make the whole patch one color and then paint over it with the other colors. if the paint starts cracking the base color will show through. (if you like that however then dont mind this)
i paint my patches on jean fabric, cause it makes the patches sturdy yet flexible. but shirt fabric or canvas both work very well too. anything except really plasticy/slippery or textured fabric can be used
i pin my patches down with pins onto multiple layers of taped together cartboard, to prevent the fabric from moving around and distorting the print
-
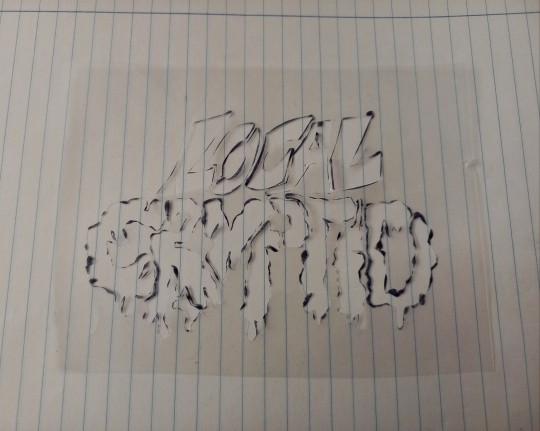
there's two ways in which i make my stencils
1. with paper covered in tape
2. with the plastic folder you put in your binders
-
option 1:
draw out your design onto some paper, make sure there arent any "loose" parts in the design that will get lost when cutting out the stencil

cover the paper in tape front and back, make sure you can still see your design through the tape
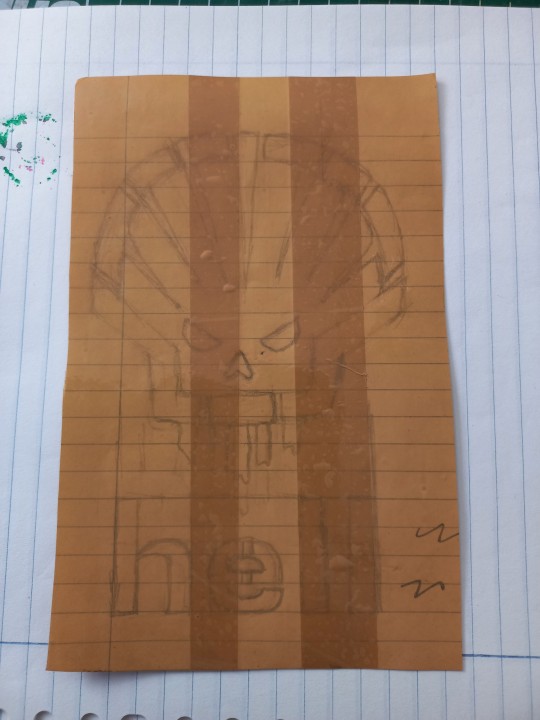
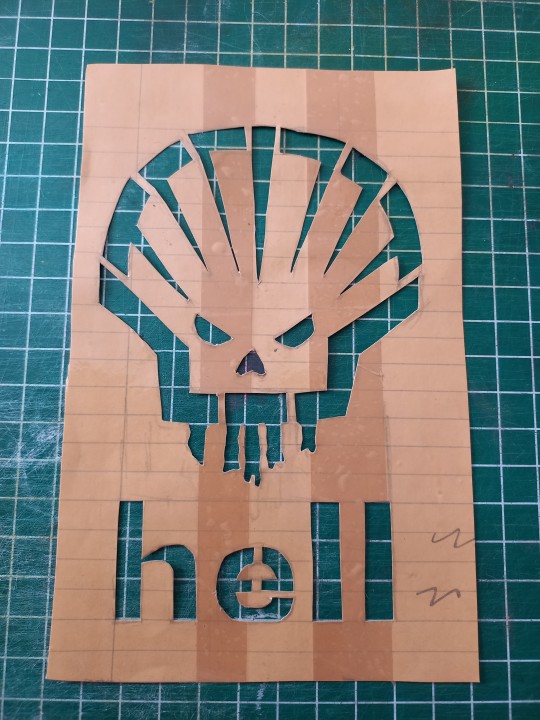
cut out your design, i use scissors and an exacto knife
-
option 2:
draw out your design (you can also draw the design directly onto the plastic folder)
cut a piece of plastic out of the folder big enough to cover your drawing and tape it down.
trace the design onto the plastic with pen or marker (any mistakes can be wiped out)
cut out your stencil
-
continuation from both option 1 and 2
after finishing your stencil you can pin them down on some fabric
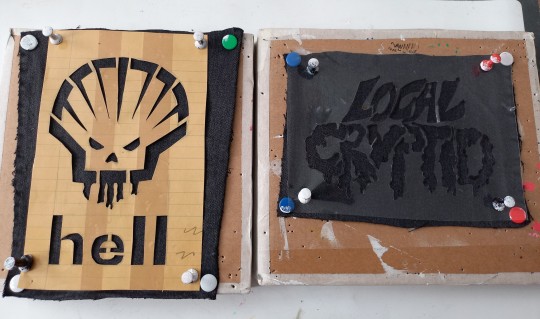
dap on your paint with the point of a big brush or a sponge, depending on the paint it'll take 2-3 layers.
make sure your previous layer dried completely before adding the next one

after the paint has fully dried you can carefully take off your stencil.
!!dont unpin the patch before it fully dried, or the drying paint may cause the fabric to warp!!

thats it, questions are always welcome, now go and make stuff!!
#punk diy#diy fashion#punk#queer punk#diy punk#punk clothes#punk style#punk patches#patches#tutorial#my stuff
2K notes
·
View notes
Note
what kind/style of endbands do you usually do? they look so good 👀
hi!! sorry for taking a while to answer, I wanted to make sure I could give you my best answer.
I usually do what's called a "double core" endband. I use double core endbands over the "bead on front" method because bead on front style is not great for uneven distributions of color, irregular patterns, or using more than three colors. Functionally it works by having your extra threads wrapped up inside the thread that is showing, forming the smaller secondary core. Ultimately you are doing figure 8s around the main core & then your secondary core of thread. This keeps things pretty neat & tidy. The tutorial I first used was this one by DAS Bookbinding, though I don't think his endband tutorials are his best ones. Another binder I've spoken with endbands about a lot is maleeka, who recently did an endband tutorial herself.
maybe I should do one... but it takes a lot for me to get enough motivation to make videos. I'll take this opportunity to write up some tips I've shared when people ask instead:
1. Endband core material is the MOST IMPORTANT component. You need a core that is stiff but flexible - it should NOT be floppy because it wiggles everywhere under the tension of the thread, but still needs to flex with the opening & closing of the book. You want something that doesn't compress, to reduce tension shifts in thread creating a lumpy endband. Have a smooth core is less critical but helps to avoid snagging threads & allows you some leeway on sliding threads around for adjustments. My personal choice is smooth leather jewelers cord (link is just an example, I get mine from a local craft store).
2. Thread size. All your threads need to be the same size; it will be visible if you are using two different sizes, and mess with your front core. Additionally, I know lots of people will use larger twists of multiple strands of embroidery thread, which can work, but is more likely to compress & alter its size in unexpected ways. A single strand is preferable. If you want something thicker you can find some thread weights that are heavier twists intended to be used in a single strand, not pulled apart. I prefer smaller sizes because it works better for the gradient designs I like.
3. Silk thread is your friend (if you can spend the money on it). It reduces fuzz (no fuzz like you get with cotton/DMC embroidery thread), it's usually easier to manage, has a more compact twist, and a higher shine. I use Japanese silk hand sewing thread in size #9 (9��). There's multiple brands (Tire, Daruma, KNK/kanagawa, etc). Here's a wholesale listing (minimum 20,000¥ for international). A non-Japanese brand is Guterman silk (German brand). Both the Japanese & German threads come in a heavier weight (Japanese is #16, Guterman is buttonhole).
4. Thread tension is the most important part of the actual technique. You need to ensure the threads currently wrapped in the secondary core keep tension when you are working the thread around them.
5. Working on a curve. This is only really relevant if you're doing an endband on a rounded book, but the circumference of the curve means there's more real estate on the outside vs inside of the curve. Sometimes this can cause bunching on the secondary core. My own solution to this is that sometimes I wrap the primary core but drop a wrap here or there around the secondary core (only between two wraps of the same color I'm dropping). I uh... don't know of anyone currently recommending this besides myself so I can't point to any pro endorsement for this method, it's just what works for me. Forgive my terrible writing:
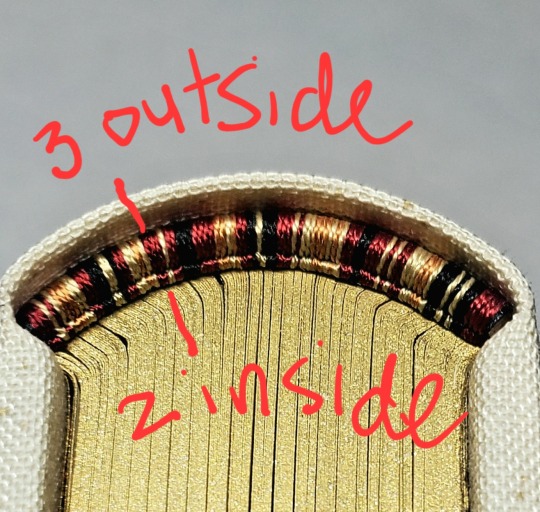
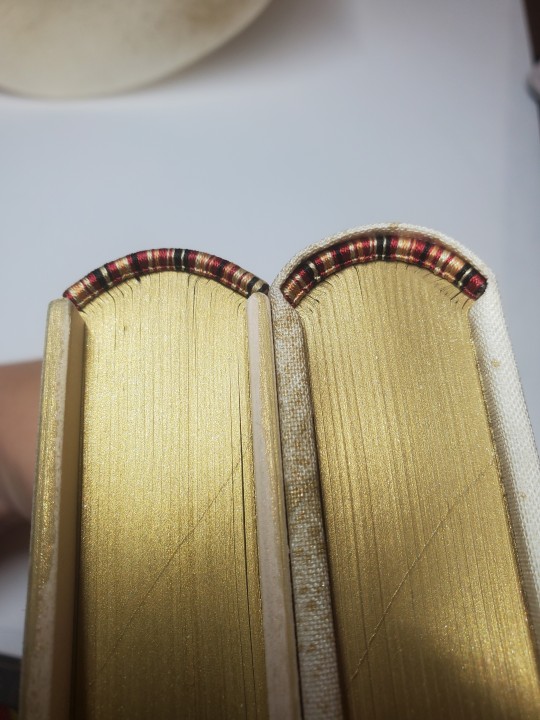
6. Pattern management. I... don't really plan much how my patterns sit on the spine, which is not very helpful. HOWEVER you can do some pattern management on the fly, if you really want your pattern to end at a certain place. Thread can be packed more or less densely on the core, resulting in some pattern compression; you could also strategically drop wraps in less noticeable locations. An unintended example: I was replicating the pattern on this endband (left) when I realize I wasn't packing the thread as densely as I had the first time around (right), which resulted in the overall pattern taking up more space. You can do this on purpose, if you need to.
this was way more than you asked but it gave me a chance to put all this in one spot. Best of luck in vanquishing the dreaded EndWyrms.
#fanbinding#bookbinding#celestial sphere press#in progress review#ask des#i tend to shock ppl a big when i say i don't actually enjoy sewing endbands#i merely Tolerate it#all of this knowledge is 100% spite driven to reduce my own frustration
380 notes
·
View notes
Text
COUCH POUCH!! Free Pattern & Tutorial
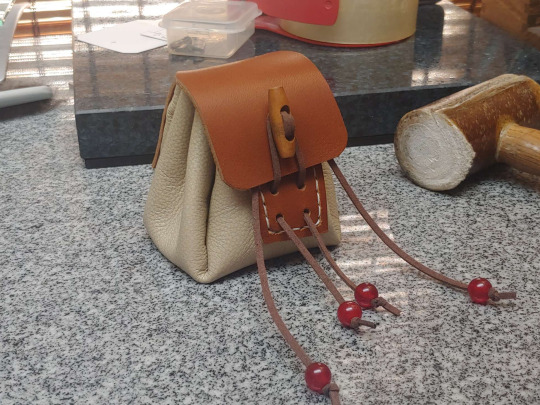
...called thus because they use upholstery-weight leather for the bag body, that in my case was in fact skinned off a couch. 🤣 Turns out they are relatively quick and easy to make, so I tidied up the pattern for printing and took pictures to document the process when I made another five of them.

First off, print your pattern, 100% scale:
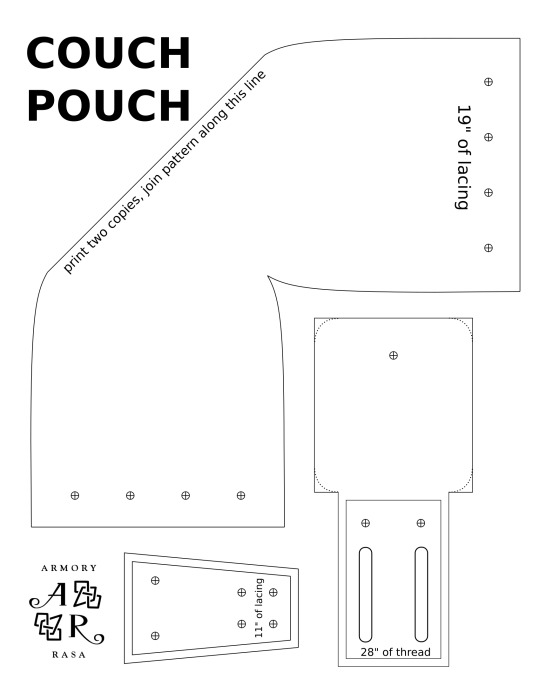
The bag shape was a modified version of the pattern I used for the Morpheus sandbag, but sized to fit in the roughly 11" squares that my couch skin came in. It makes a bag that sits very well on a tabletop, thanks to the flat base.
Though it turned out to not be the most efficient use of material, because that plus-shaped pattern tessellates well, if you're cutting them out of a full hide, but makes a lot of waste when you're cutting them out of squares of material. A more efficient design would have a half-rounded front and back, and a gusset between them, like so:
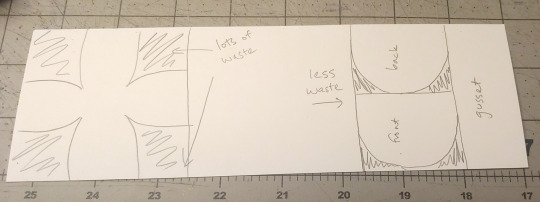
Ah well. It's not like I have any shortage of couch skin, though for the next round I'm going to experiment with a more efficient pattern.
First step, trace and cut out the bag body from your chrome-tan leather:
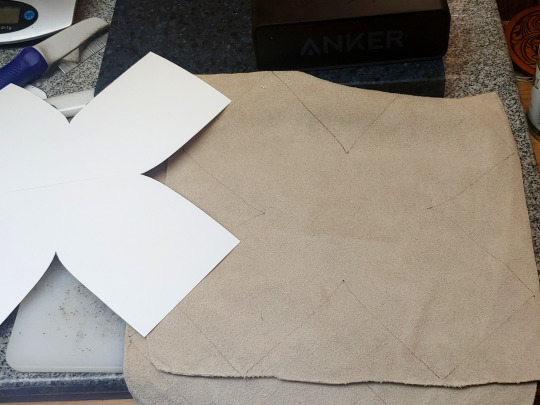
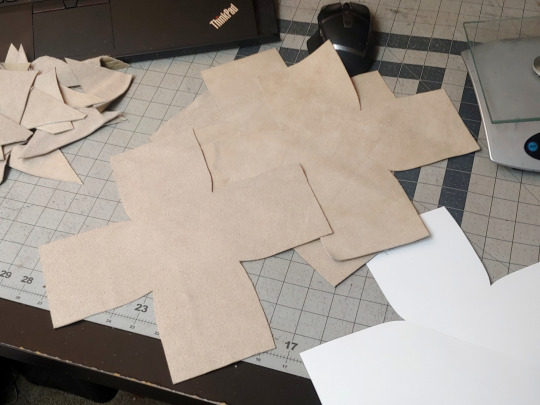
Like I said, this was upholstery leather, but anything that's flexible and ~1.5 mm thick will do.
The flap and front need to be a stiffer leather though -- I used 7 oz latigo, but veg-tan would work equally well. (And then you could ✨tool it!✨)
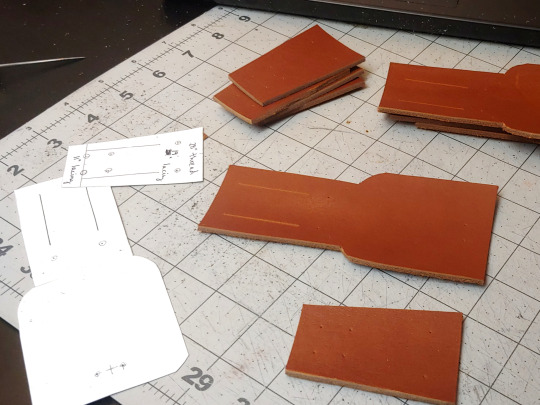
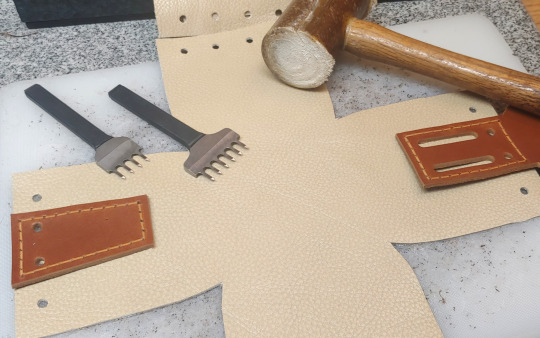
Cut them out, and then use the pattern to mark where your holes are going to be. Mark the holes on your bag body too:
The latigo pieces get hand-stitched to the bag body, so I used a stitching groover to carve out little channels for the thread -- it's not strictly necessary, but it makes your stitches lay a lot more neatly:
Punch the holes shown below:
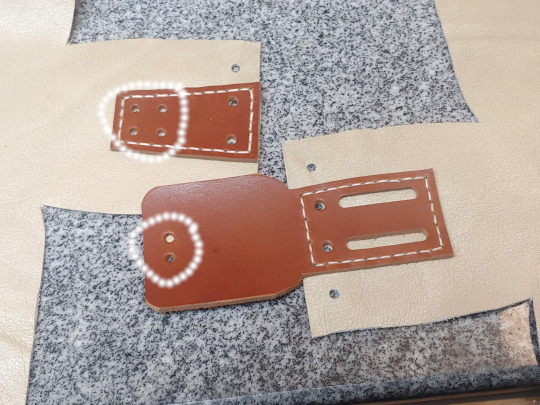
I used a ~5 mm hole punch for those, and a 1.5" slot punch for the belt loops. Some of the holes on the front piece you're not punching yet, because they need to go through both layers.
I put a dab of contact cement on the pieces (circled in white) to help hold them in place when I go to punch the stitching holes:
(Make sure you're not putting glue between the belt loops)
Wait fifteen minutes for the contact cement to dry until tacky, and then line up the holes and the edges and press the pieces together:
Punch stitching holes:
Saddle-stitch both pieces in place (takes 28" of thread per):
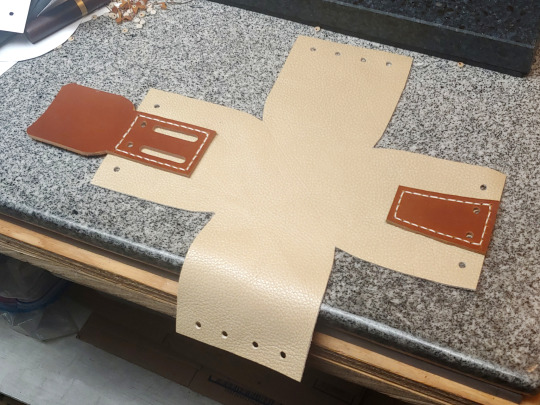
Now you can punch these holes:
(I used a slightly smaller hole punch than for the others, but it doesn't really matter.)
Now press the right sides of the leather together and sew up the seams from the inside:
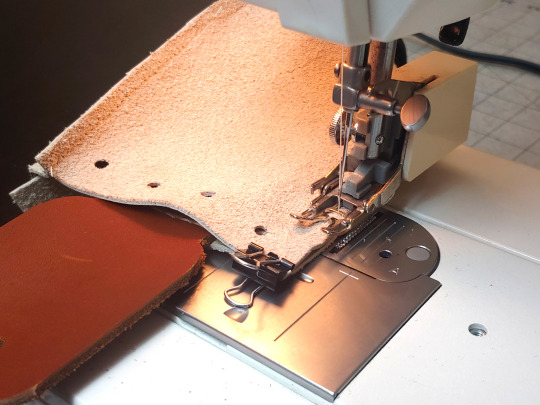
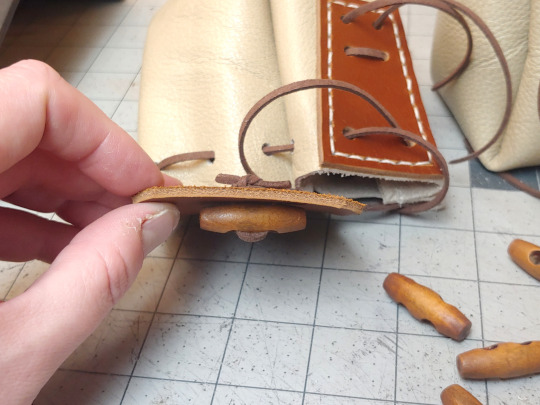
A regular sewing machine should be able to handle this, though you will need thicker thread, a heavy-duty leather-sewing needle, and a walking foot attachment. (If you don't have a walking foot attachment, it is SO WORTH getting one, even if you don't expect to sew much leather. Seriously, I use it for everything -- once you go walking foot, you don't go back. 💀) Because you can't pin leather without leaving permanent holes in it, tiny binder clips can be helpful for keeping your material lined up.
What they look like when you're finished sewing:
Cut 19" of lacing for the drawstring, and 11" of lacing for the toggle:
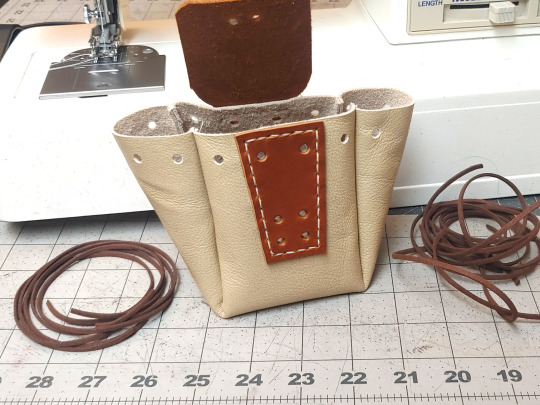
I use the 1/8" EcoSoft lace from Tandy, I think it's stronger than real leather would be at that thickness. The only important factor here is that you need something with a bit of texture and friction -- a silk cord isn't going to stay closed, it's going to slip open.
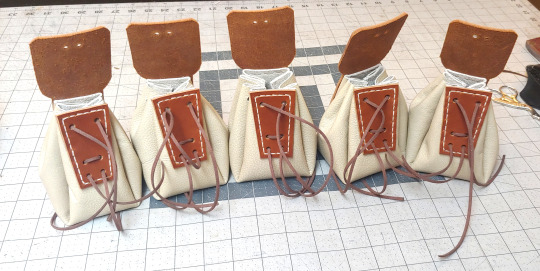
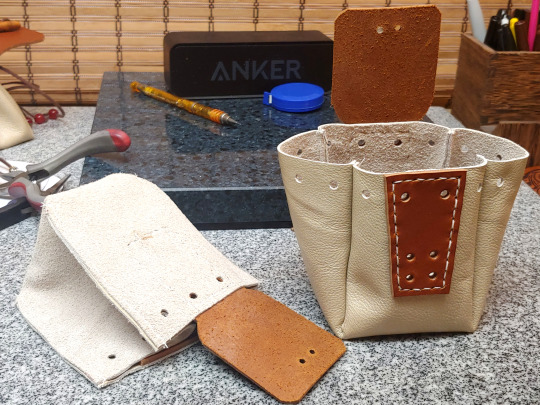
MANY BAGS.
For these I used a wooden toggle -- cut another 8" of lacing, looped it through the toggle twice, and then made a tight square knot on the back:
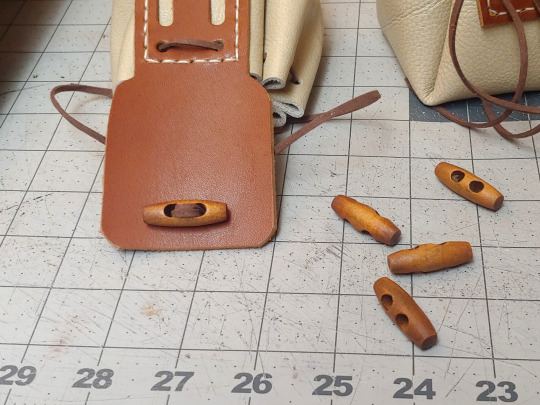
But another option is putting a concho or a large button on the flap. The bag I copied this design from, in fact, uses a concho toggle:

Thread some beads on the laces to keep the ends from getting lost, and you are DONE! 😁
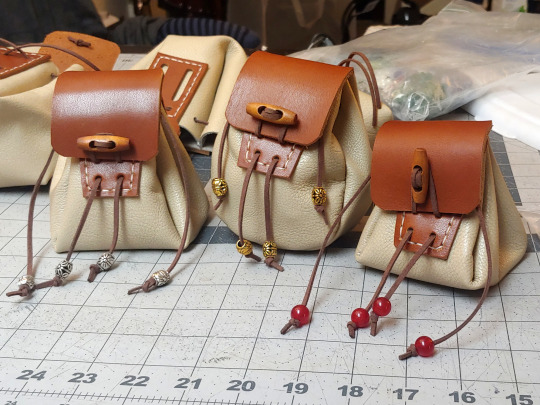
Happy Bagging!
714 notes
·
View notes
Text
The Coven and the things they collect:
Rio: plants. She has at least one of every kind of plant you could imagine. They don't all fit into the greenhouse or even the yard, so they spill into the house. She has names for each individual root. Not plant names. HUMAN names. Diana and Darius are her favorite. She baby talks them.
Agatha: vintage clothes. She doesn't complain about Rio's plants so long as Rio doesn't complain about her taking up three pocket-dimension closets with her clothes. She has fashion from every decade and century stashed away, all fitted to her. She also has some old-time suits specifically for Rio to wear because....reasons.
Jen: shoes. Also potion ingredients. Her kitchen is stocked with ingredients. Her pantry especially just has a shit ton of labeled ingredients, some that are poisonous. She has a binder of different potions, which she will add to whenever she finds or concocts a new one.
Alice: music and instruments. She collects sheet music from all over the world, of every single song known to man (and some that were almost lost to time) and learns how to play them. She also has at least one of every single instrument. Even the ones nobody has ever heard of. She teaches herself to play them via YouTube tutorials.
Lilia: tarot decks. She collects tarot decks from all over. She puts the prettiest ones on display all over her apartment. She also likes vintage crystal balls, but they're a lot more expensive and harder to come by.
Billy: knick knacks. We've all seen his bedroom. This twink collects whatever catches his eye, mostly Broadway and witchy memorabilia. He displays it all over his room.
61 notes
·
View notes
Text
dude im dressing up as a male character for halloween, so i was getting into costume and all that stuff, and i wanted to try trans taping for today, so i looked up a few tutorials and did it, and HOLY SHIT I CANNOT STOP LOOKING AT MYSELF IN THE MIRROR IS THIS GENDER EUPHORIA???? DO I WANT A BINDER NOW????? also i have a scar rn on my cheek because i accidentally burnt myself with a flat iron yesterday and its making me look cool af /hj
105 notes
·
View notes
Text
Ok as promised here is the tutorial for how I mend my binders so that they still stretch!
Supplies:
- binder (obv)
-needle and thread, I’m only using embroidery thread here so it shows up better
That’s kind of it, if you want you can also use a pen to mark the lines of the seam and an embroidery hoop to hold but but neither are really necessary

Like you can see here there are gonna be two lines you’re seeing on. Most seams already have two lines that you can follow especially on stretch fabric but if not then just mark it in
Now for the actual stitch pattern.


You move in kind of an “x” pattern, if you’re familiar with backstitch it’s a little like you’re working two lines at a time of back stitch.
When you’re done, the front should have two lines of something that looks like backstitch or running stitch, depending how close your stitches are to each other, and the back should have a pattern of crosses like this


And that’s it! It still stretches and is just as durable if not more than the machine stitched seams that the garment comes with.
If you have any questions or want more detail feel free to DM me or send me an ask :]
84 notes
·
View notes
Text


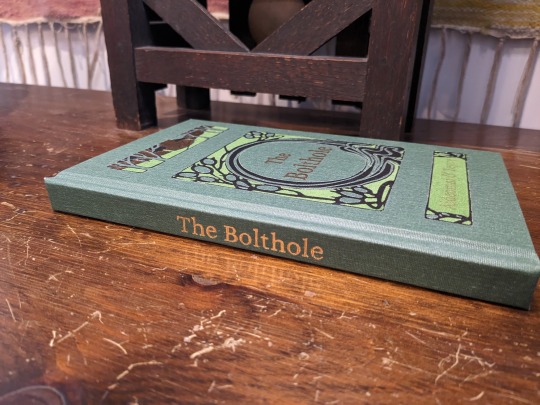
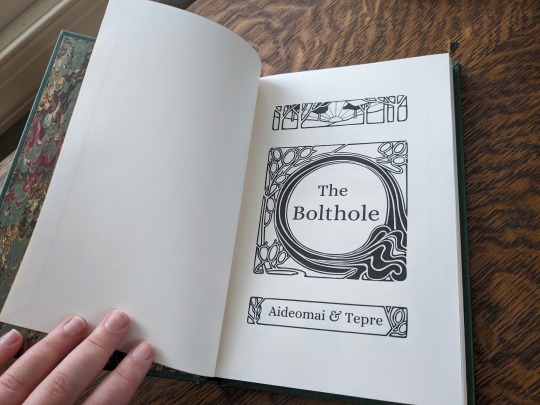
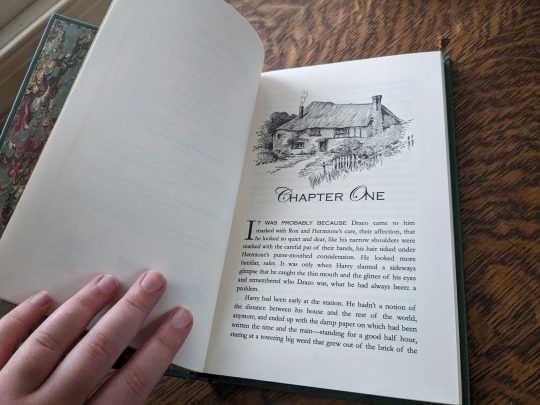
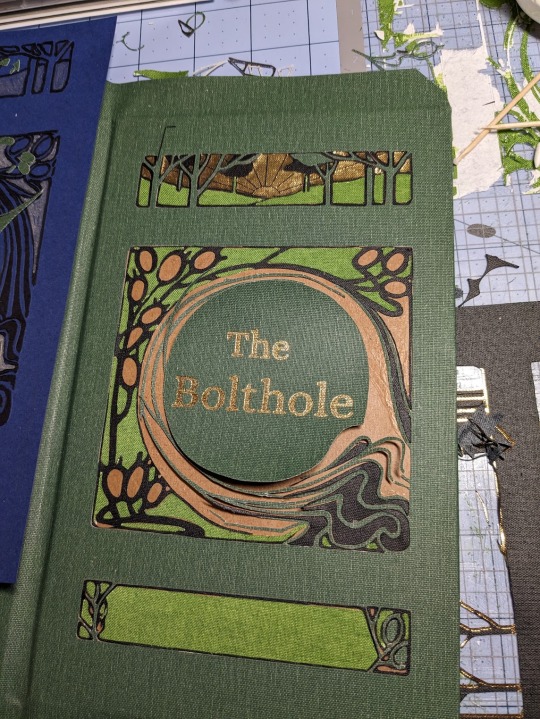
The Bolthole by aideomai, Tepre, and GallaPlacidia
I'm absolutely thrilled to finally share my first fic bind here on Tumblr! I completed this bind back in November, and it introduced me to so many wonderful people.
You can find pictures and detailed explanations of my process under the cut.
This is "The Bolthole" by Aideomai, Tepre, and (formerly) GallaPlacidia on Ao3. The cover design is adapted from "The Little Brother" (1902) by Josiah Flynt. The typeset is my own.

I fell in love with this cover the moment I saw it, and wanted to try to recreate it with book cloth. As a hobbyist book binder, I like to try to revitalize older designs from the public domain. There are so few copies of this book left in the world, so I thought it would be fun to give it new life as the cover of a contemporary story.
The cover is made out of three different colors of book cloth from the Allure and Verona lines. The book cloth and endpapers were bought from Hollander's.
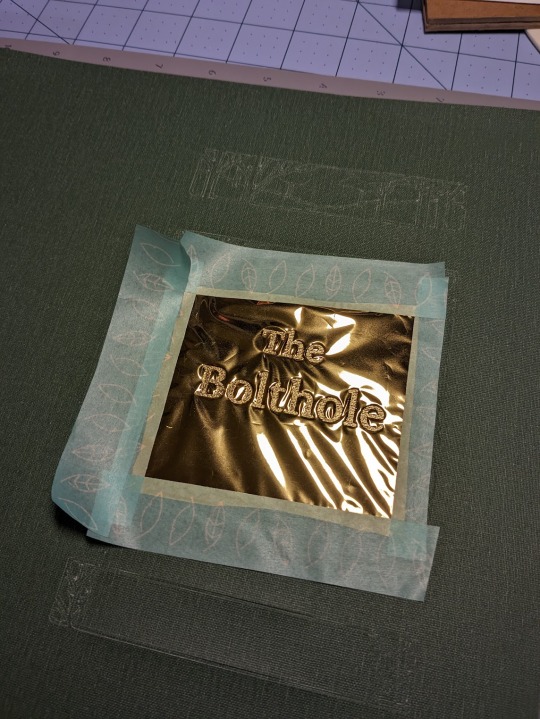
I used my Cameo 4 and a strong tack mat to cut the design out of each color of book cloth. I then assembled the pattern like a puzzle. It was MUCH harder than it sounds! Some of the pieces were incredibly thin and fragile, and they were difficult to keep track of.


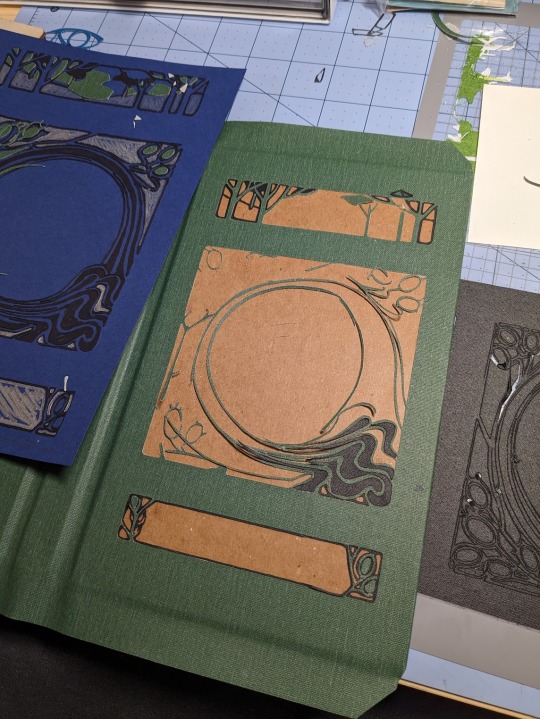

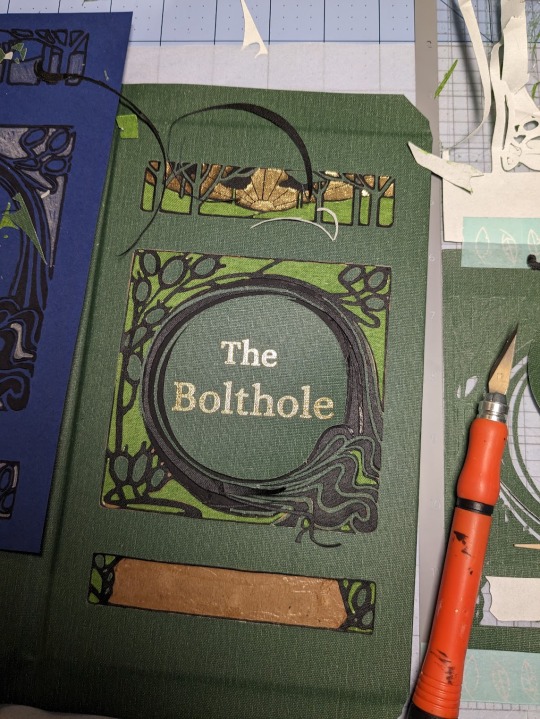
For the foiling, I used my Cameo 4 and the We R Memory Keepers fine tip foil quill for everything but the spine, which I did by hand. I foiled immediately after I cut, without removing my mat from the machine. This helped me line everything up. It did not, however, prevent me from sweating bullets as my machine worked.


This method was, frankly, torture, but I'm really glad that I tried it. Now that I've had a nice long break, I'd like to try it again soon. I love running my hands over this book, and the texture of the book cloth feels wonderful under my fingertips. I do, however, have a few words of caution. Do not try this out unless you have book cloth to burn! Here are some pictures of just a few of my failures.

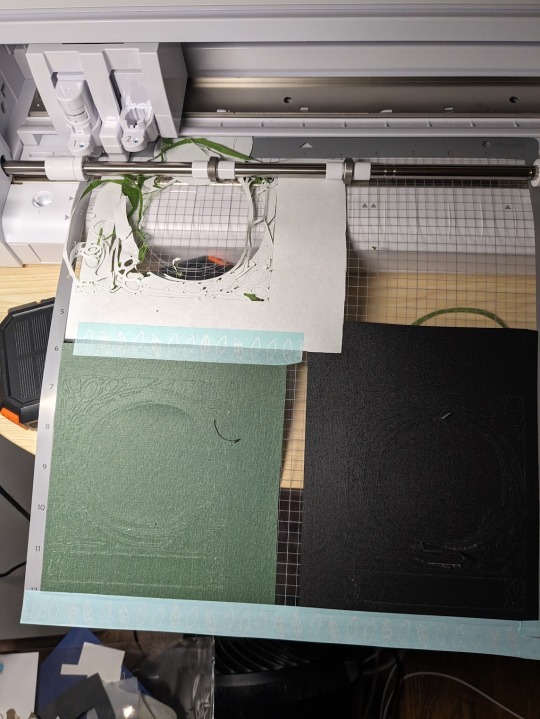

The Cameo 4 is not your friend. Your cut-outs can and will get fucked up for no reason. If the mat isn't sticky enough, or the blade isn't sharp enough, or the fabric doesn't adhere properly, your design could get completely shredded. I strongly recommend that you avoid Verona book cloth, or anything with a paper backing and loose fibers. It was absolute hell to work with. When it wasn't shredded by the machine, it was fraying like crazy. Acrylic coated cloth is the way to go if you want clean lines. And, you know, your sanity intact.
This was my most challenging bind to date, but I learned a lot! Aside from experimenting with book cloth, automated foiling, and my Cameo 4, it was also my first time formatting, printing, and sewing a text block. I'm incredibly grateful for all of the online tutorials and wonderful people who helped me make this bind a reality!
#book binding#ficbinding#fanbinding#fanfic binding#drarry#the bolthole#harry x draco#my binds#haxkattpress
332 notes
·
View notes
Text
Closet Witchcraft: How To Get Witchy When You Can't Come Out Of The Broom Closet
Some basic/general tips for being a closet witch. (If you are in a severely abusive household, be sure to scroll down to the end.)
Cultivate some skills
Many skills can be put to witchy purposes if you're determined. Consider gardening, cooking, sewing, crochet, scrapbooking, painting, drawing, calligraphy, woodworking, carving, or literally any craft skill you can start practicing. If you knit a scarf with colors chosen for their magical symbolism or make a little owl sculpture as a charm to help you retain knowledge, nobody but you has to know.
Study and learn about nature
Start learning about plants, animals, geology, ecology, or whatever catches your interest. Get into the habit of observing nature wherever you are, and observing how humans and nature interact and affect each other.
Use everyday items where you can
You can practice divination with poker cards or dice, and your phone can serve as a scrying mirror. You can use a pendant or metal washer for pendulum divination.
As for cleansing, a literal wash in water is fine for any object that won't get damaged. You can use literally any cleaning tool or method with magical intent.
You can use your fingers in place of prayer beads, using either whole fingers or individual knuckles.
You can also use your fingers to trace symbols and runes on stuff.
You can represent your deities using art or knickknacks representing their symbols, like a small cat statue for Bast.
On keeping witchy literature (grimoires, Books of Shadows, printed books, etc.)
Keeping an online grimoire/BOS and getting witchy books in ebook format is often a good option.
Certain methods of practice can also reduce the amount of literature you need to keep on hand. (For example, learning correspondence through observation, using this model of deity/entity work, or practicing energy work.)
If no one is likely to go through your things, keeping your grimoire/BOS in a plain three-ring binder may be enough to avoid detection. (Camouflage is a great friend when hiding things.)
More on hiding things
So you might want something a little fancy, like a tarot deck or a more witchy-looking piece of decor.
If people aren't likely to go through your stuff or come in without knocking, you can keep a lot of things in a drawer or small storage box when you have to. Simple padlocks will be enough to keep small children and the typical casual guest out of your things.
To hide small objects, you can also get an opaque vase and fake flowers, put your witchy stuff in the bottom of the vase, and put the flowers on top.
You can also place a toilet paper tube inside a glass jar and fill it with something like small rocks, seashells, beads, buttons, or candies. (There's a tutorial for this kind of here. Though you won't need to wrap the toilet paper tube in wrapping paper, of course.)
If the jar is higher than the tube, you can glue a circle of cardboard to the bottom of the tube so you can rest it on top a layer of your filling so that it comes up to the jar's mouth.
If you want to use something like a sauce jar and want to take the label off completely, remember that oil will dissolve the adhesive.
Stuffed animals can be turned into hiding spaces. There are many tutorials out there for this.
Pieces of paper can be slipped into books. Thus you can conceal witchy reference sheets.
If you are in a seriously unhealthy situation
I wrote the above with people who don't live in severely abusive homes in mind. Like maybe the people you live with would flip out if they discovered that you're practicing witchcraft and maybe then you might be in danger, but they aren't likely to go snooping through all of your stuff and aren't going to hurt you because you breathed wrong. If you do live in a highly abusive household, I recommend checking out my post "I'm in a bad place and need to get out, what can I do?" and checking out this thread of abusive home survival tips. (These aren't witchcraft resources - they're resources to help you survive and escape.)
96 notes
·
View notes