#rpg maker tutorials
Explore tagged Tumblr posts
Visit Tumblr Blog
Explore Tumblr blogs with no restrictions, modern design and the best experience.
Last Seen Tumblr Blogs


Fun Fact
The total number of visits Tumblr.com received during January 2021 is 327 million.
Text
Eventing a Loop Animation in RPG Maker MZ
Heyhey! This is a bit different from my usual posting, but I wanted to make a brief tutorial on how to make an animation in rpg maker mz using just the event system and pictures, no plugins required. I found some tutorials online that were kind of helpful, but nothing that had exactly what I needed, so it was a bit of trial and error. I hope this helps anyone looking to do the same thing.
So, once you know how to do this it's actually pretty simple. You make a loop event, then add however many pictures you want with the desired coordinates and sizing, then add a wait command for the desired number of frames in between each picture. To break the loop, there are a couple of really important pieces to know.
First, which command to use? There is a 'break loop' command, but what worked for me was creating a conditional branch. On page 4 of the conditional branch, there are options for 'button' and 'script'. You can use button for this ("button ok is being pressed") but if you do exiting the animation will require a long press. Not the end of the world, but not super clean either. Instead, use the Input.isPressed('ok') script, which will read it even if it's a short press. Have the condition set to wait, then jump to label (doesn't matter what the label is named, just make sure that jump to label and label are named the same).
Second, order is important. Duh. If you put the conditional branch at the end of the loop, it won't read a button press unless the loop had already completed once. If you put it before the first picture, you can press the ok button at any time and immediately exit the animation. Sweet.
Finally, the label. Jumping to a set label outside the loop will effectively break the loop by enabling the event page to start reading the rest of the commands. Just make sure to put the Label before the erase picture command and your good to go (on the topic of erase picture, make sure all the picture you show in the animation loop have the same number, and if you want a background image behind the animation the background number should be lower than the number assigned to the animation pictures).
3 notes
·
View notes
Text
youtube
#rpg maker#rpg#rpg maker mz#rpg maker mv#rpg maker tutorial#rpg creator#rpg maker tutorials#rpg maker mv tutorial#creator#rpg maker mistakes#rpg maker tutorial mv#torture rpg#rpg maker unite#rpg maker mz vs mv#rpg maker horror#rpg maker 3d#sai rpg maker#rpg maker sai#wolf rpg editor#rpg maker 2003#rpg maker 2000#rpg maker games#rpg maker vx ace#rpg maker unity#rpg maker (video game series)#rpg maker history#rpg maker streamer#rpgmaker#gamedev#synrec
1 note
·
View note
Text

A list of blogs where you can get free stuff. Please respect each blogger's terms of use!
https://www.tumblr.com/darklack-obscurite Free sprites for making RPG games!
https://www.tumblr.com/sonicfangamebot Many free Sonic fan games!
https://freegameplanet.tumblr.com/ Free PC games!
https://armorgames.tumblr.com/ Armor Games flash games can be played for free at the link in their bio!
https://rpgmakernetwork.tumblr.com/ Free RPG maker games!
https://obsidiandawndotcom.tumblr.com/ Free Art Resources!
#Krissies Blog Lists#tumblr#links#lists#the blogosphere#tumblr lists#tumblr links#tumblr blogs#free#free stuff#art assets#art tutorials#RPG maker#RPG maker games#free games#armor games#flash games#PC games#free PC games#sonic the hedgehog#fan games#sonic fan games#sprites#pixel art#RPG
133 notes
·
View notes
Text
Default Actions
Not sure how comprehensible this will be, but hopefully it helps
im not great with rm2k3 so this is pretty unoptimised ):
Things needed:
Default animation (sitting in this case)
Default Switch (called [USE]None in this tutorial)
Variable for the button input (called Use Effect in this tutorial)
If the action is toggled, you will also need:
Toggle Switch (called Is Sitting in this tutorial)
Sprites in the final state of the action (sitting and standing in this case)
This will be a common event with a parallel process trigger and no condition switch
Sprites needed (visual demo):
Sitting (Called: “Full Yoshika Sheet Three alt, 7”):
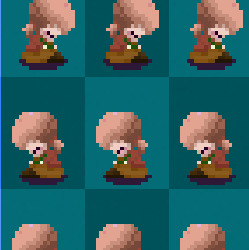
(this is the most space efficient way of fitting them, at first i had left and right directions separately)
Standing (Called: “Full Yoshika Sheet, 1”):

~~~~~~
First, you'll need to set up key input processing for the key you'll use for the action:

(this is found on page three)
You will need a conditional branch for when the input variable is pressed (in this case it's the 1 button, so the variable will be equal to 11)

(This branch doesn't need an else statement)
Inside this branch, you will need another conditional branch to check if the Default Switch is on

(This branch also doesn't need an else statement)
Inside this branch (sorry there are so many nested branches T-T) you will need a conditional branch for the player's direction (unless the direction doesn't matter)

(This branch also doesn't need an else statement)
The final nested branch is for toggle effects and it checks if the toggle switch is off

(This branch does need an else statement)
For sitting down, you need to:
Set move route to Wait (I did 3x)
Hide player character
Change player sprite to sitting (or whatever your default is)
Show animation
Unhide player character
Set move route to Wait (repeat) (So the player can't move while sitting)
Set the input variable back to 0
Turn on the Toggle Switch
What it should look like:

The else section is used for standing up, and you need to:
Set move route to Wait (I did 3x)
Hide player character
Change player sprite to standing
Show animation
Unhide Player character
Set input variable back to 0
Turn Toggle Switch off
What it should look like:

You need to copy/paste this for each of the directions (don't accidentally paste it into the previous direction, it won't break the code or cause an error, but it'll not work for that direction)
~~~~~~
And then you're done :D
Hopefully it was understandable :3
#yume nikki#yume nikki fangame#ynfg#indie dev#rpg maker 2003#yume nikki fangame tutorial#ynfg tutorial#ynfg help#rm2k3#rpg maker 2003 tutorial#game dev#tutorial
9 notes
·
View notes
Text
RPG Maker Resources: Forums
Here is a collection of RPG Maker forums! These are chock-full of resources, from graphics to tutorials and scripts.
RPG Maker Forums: The official forums! (English)
RPG Maker Net: This site is currently undergoing an overhaul and is only intermittently online right now, but you can sometimes catch it. When you can't, the Discord is still available in the meanwhile. (English)
Chaos Project (English)
RPG Maker Resource Kit: A retired, read-only forum that still has a bunch of resources available.
Mundo Maker (Spanish)
Save-Point: I've had especially good luck finding XP scripts on this site. (English)
As a heads-up, I'll be highlighting specific resources from these forums as well in the future.
46 notes
·
View notes
Text
youtube
How to Add Custom Characters to SNES RPG Maker Games
(This tutorial is also available at Neocities.)
The Super Famicom versions of RPG Maker did not have a sprite editor, meaning you were stuck with the medieval-looking default characters and couldn't make a game starring, say, Garfield. The second game (RPG Maker 2 / RPG Tsukūru 2), however, did have graphic packs that were downloadable via Satellaview, and those packs had extra characters. Characters that a sufficiently motivated nerd could, in theory, edit into other characters.
You see where this is going.
So here's a tutorial for adding not just custom characters, but custom character packs that basically amount to 16-bit era DLC. And yes, they work on a real console, if you're that motivated of a nerd.
Stuff you'll need:
Ryouma de Yuku, an RPG Maker 2 add-on game originally downloadable via Satellaview (preserved thanks to Satellablog)
BS-X Flash Manager, a program for editing Satellaview memory packs
YY-CHR, a program for editing graphics in a ROM
The sprite sheet for the character you want to insert into the game, no bigger than 16x24 pixels per sprite (the hundreds of A Link to the Past randomizer sprites available work, if you turn them into PNGs with ZSpriteTool and do some cutting and pasting)
RPG Maker 2 itself and a way to play it that allows loading Satellaview memory packs, such as Snes9x, bsnes-plus, FXPAK PRO, or the actual cartridge if you have an empty Satellaview memory pack and a way to flash it (NOTE: don't you fucking dare do this if you haven't dumped that pack already, even if it appears to be empty)
STEP 1: Extract the Ryouma de Yuku Graphics Pack
Launch BS-X Flash Manager and open the Ryouma file you downloaded from Satellablog (Ryouma De Yuku - Complete Set.bs). It should look like this:

Select the second file on the left (the one that says 2 blocks), then go to File and click Export. This will create another .bs file with only the graphics pack and not the other Ryouma stuff. NOTE: If you skip this step you'll still be able to change the sprites, but they won't actually work in the game. Why? No idea! Just accept the mystery and don't skip this step.
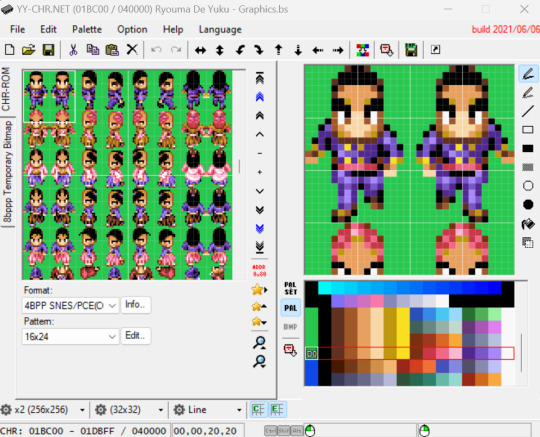
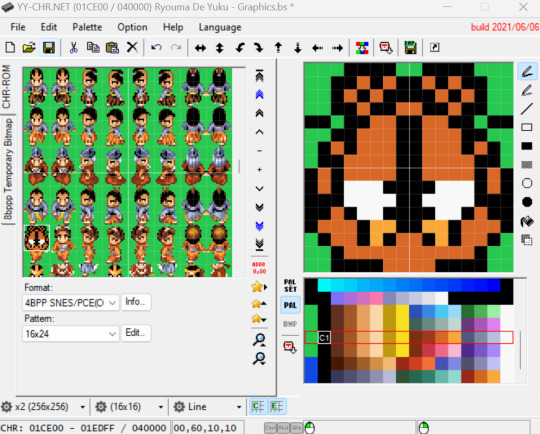
STEP 2: Edit the Graphic Pack Sprites
Before getting started, take a look at the Ryouma de Yuku characters below and pick one whose colors more or less match your desired characters' colors:

(That one lady in the second row has a pretty Garfield-esque dress, for instance.)
Now launch YY-CHR and open the graphics pack .bs file you extracted in the previous step. You'll see nothing but nonsensical graphics with weird-ass colors, until you change these settings:
Format: 4BPP SNES/PCE(CG)
Pattern: 16x24
Address (click the red "ADDR 0x80" icon): 0001BC00
There, now you'll see sensical graphics with weird-ass colors. It should look like this:

At this point, changing the colors is technically optional -- nothing here will change what the colors in the game itself will look like, but seeing them as you would in the game will make the next part a lot easier. To see the correct colors, you need to load a ZSNES emulator save state created within RPG Maker 2. No, this won't work with a save state made in an emu created this century, for, once again, some reason. Yes, this is kind of a pain in the ass, so here's an RPG Maker 2 save state we made just for you. You're welcome.
Anyway, go ahead and click "Palette," then "Load Emulator State" and pick the one we provided. Now the colors will look... worse?!

Ah, but notice that the color palettes available on the lower right are now different. If you scroll down that list, you should find a palette that makes each character's colors match the ones in the game.
Scroll down the window on the left to find the character you settled on at the start of this step, then pick the right palette for them. In our case, here's the Garfield lady with her right palette:

Now look at the sprites for the character you want to add. We're using this Garfield sprite sheet by Jon Gandee and Hansungkee from Spriters Resource, hastily adapted for this tutorial by someone who clearly isn't a pixel artist. (PRO TIP: you can easily add a grid over your image by opening it in Paint and pressing Ctrl+G. Take a screenshot to be able to zoom in all the way.)

Now use the drawing tools on the right of YY-CHR and the colors on the palette to replicate each sprite over the existing ones, always over its equivalent position ("walking right" over "walking right," and so on). Click the second cog icon on the bottom (the one that says 32x32 by default) if you want to zoom in. Heeeeeere comes Garfield!
When you're done with a sprite, you can click the Copy button on the toolbar above to copy everything currently being shown on the right window, the Paste button to paste it over another sprite, and lastly Mirror Horizontal (the double arrow pointing left and right reminiscent of Nickelodeon's Catdog) to mirror it.

Once you've finished all the sprites, you can go to File and pick Save as to create yet another .bs file, which takes us to the next step...
STEP 3: Load the Graphics Pack in RPG Maker 2
Assuming you're using an emulator, because you almost definitely are, we recommend Snes9x over bsnes, since save states don't seem to work for RPG Maker 2 on the latter and you'll be needing a shitload of those if you actually want to play this game. In Snes9x, go to File, Load MultiCart, and pick your legitimately obtained RPG Maker 2 ROM on Slot A and the last .bs file you just created in Slot B, then click OK. (You can ignore the BIOS part for this game.)


If you like living on the edge and insist on using bsnes, go to System, Load Special, Load BS-X Slotted Cartridge, and set the two files just mentioned as Base cartridge and Slot cartridge respectively. The game should start now. Press A to go to main menu, then go to the second option ("EDIT" if you're using the English translation patch).

Now go to the last option ("DAT" in English), then the last option again ("MEM-PAK IMAGE DATA"). Press up to select the memory pack and A to confirm (this part is untranslated in the patch).

Press B to go back to the previous menu and go to the second option there ("PARTY"). Press A twice and that will take you to the Character Maker screen. This is, astonishing as it might seem, where you make characters for your game.
The first option in this screen is where you can name your character, so go for it if you want. In the Japanese version, press R twice to use the Latin alphabet. In the English translation, you start with the Latin alphabet and pressing R once will let you use lower case letters (not available in the Japanese version).

Press start to save the name and A to confirm. Now, at last, the reason we're here: goddamn Garfield. Pick the second option in the Character Maker screen ("IMAGE") and use the D-Pad to select a character. Your character will be among the last ones, so you'll probably want to start by pressing down. There's our boy!

Press A to select the character, B three times to leave, and A to save and exit the Character Maker. At this point you can start playing with the other options to make a game for your character -- or, if you just wanna see what it looks like in action with little effort, simply load someone else's RPG Maker 2 game, like one of the 11 existing English language ones from the '90s preserved at rmarchiv.de. These are always in SNES save ram format (.srm), so simply rename the file to match the name of the ROM, put it in the "saves" folder for Snes9x or the same folder as the ROM for bsnes, and repeat the process above to replace one of the characters in the game with your own.

NOTE: You'll need to load both files via the "Load MultiCart" or "Load Special" option every time you want to use the custom characters, but you only need to do the in-game memory pack loading/character selecting process the first time. You'll know you forgot to load the .bs file if your character is suddenly invisible.
NOTE 2: Be aware that this game's English translation is somewhat unstable and can randomly crash during fights, so you'll either have to save a lot (we weren't kidding about this game requiring shitloads of save states) or get used to navigating Japanese menus.
And that's it! You are now 1/10th of the way to creating your own SNES RPG Maker 2 character pack. In the words of Garfield himself:

If you make any games in this thing, with or without custom characters, let us know and we'll play them in our channel (most likely in test mode because we suck at RPGs, but still!).
#nintendo#super nintendo#gamedev#rpg maker#homebrew#retro gaming#super famicom#sfc#RPGツクール2#RPGツクール#romhacking#garfield#goddamn mondays#tutorials#YouTube
5 notes
·
View notes
Text
the most frustrating thing abt learning smth new is that if youre having trouble & need to ask for specific advice, the best place to do it is usually some dedicated forum, which is great if you plan to use that forum often! i, however, dont wanna make accounts for sites ill barely use just to ask for help on a few specific things -_-
i merely want everything i need to know to be broken down for me in simple terms. tell me the code, why its formatted the way it is, what the pieces mean & do, & how to make it do what i want. i dont wanna learn the entirety of javascript just to figure out a couple functions grrr
#im not even sure if general tutorials will work bc im using it in rpg maker mv Specifically idk if anythings diffrent.... i must research#torch chatter
3 notes
·
View notes
Note
I would love a tutorial on sprites and/or parallax if you want to!! i just bought rpgmaker mv and i really like your games
thank you for answering before !! :D
That's so sweet to hear, I'm super happy that you like my games hehe <33 Also good decision on buying RPGM MV (I'm in love with that engine and the discount on it rn is so huge!!)
I tried putting sth together for walking sprites - I hope this is a lil bit helpful <33
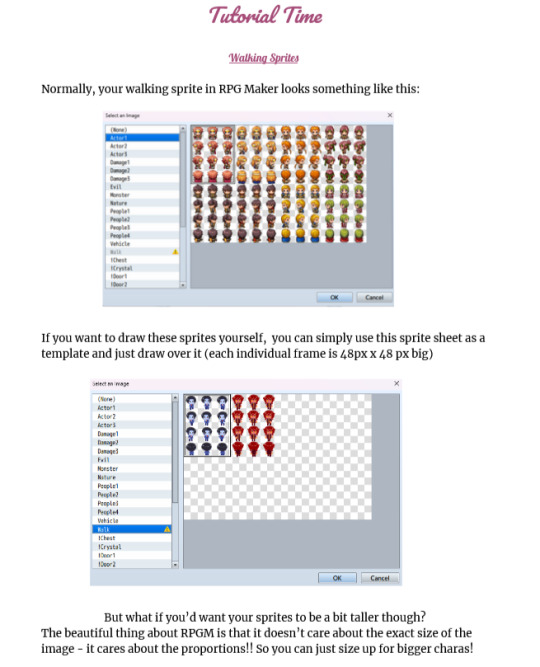

Sth I might add - normal walking sprites have toom for 8 character animations in total. (as you can see lol)
Also, the "!$"-filename has two functions: "$" tells the engine that it's just one character and "!" tells the engine to *not* put the image ~6px higher (this is a default setting in RPGM for character sprites haha)
I might do another post for parallax stuff later but tbh I'm not a pro at it 🫡💖
#I hope this is somewhat understandable lol#kathinka.txt#rpgmaker#tutorial#game#indiedev#rpg maker mv
5 notes
·
View notes
Text
i've almost finished with the coding on my first game! now i just need to finish making allll the sprites
#key speaks#i can't. think? of anything i still need to code???#that really doesn't mean there isn't anything#...i guess i'll have to mess with timings once i get the actual animations in#oh and also make Anemone constantly move#maybe turn to follow Ahli too?#i just need to figure out how to make an event have a permanent animation#and then i have all the sprites to make#Ahli's walk cycle#the slime#both the big in battle graphic and the animation of it emerging from the bushes#also Ahli eating the berries!#i think that's it?#i'm almost finished!#just gotta keep going in the art then make some final tweaks to the coding#i've set up the battle and other environmental interactions to the best of my ability tonight#i'm proud!#slowly but surely learning how to work RPG Maker XP#(it's a little annoying bc most tutorials are for the most recent versions of RPG Maker)#(but there's still a fair amount of RMXP tutorials out there)#are these tags coherent and/or grammatically correct?#i'm too tired to proofread
2 notes
·
View notes
Text
I want to play with RPG Maker more but I also want to learn Godot and I can't do both at once because that's not how time works...
#while I CAN absolutely alternate between them actually doing two at once is not gonna work#idk if anyone actually follows this sideblog regularly but if you do#feel free to interact with this post with input of what you'd want to see more of#i've only done rpg maker on the blog so far#but I am poking around at godot tutorials as well#so I'm thinking of either making one weekend for one and the next weekend for the other or just properly focusing on one
2 notes
·
View notes
Text
Once again feel the urge to make an rpg maker game
#ramblings#would ppl still care for a walking sim/puzzle game a la yume nikki or oneshot orrrr#i really need to get to actually learning rpg maker tho i still haven't done that#it feels a little overwhelming lol#also i've been. generally in a depressive rut still#i've been able to draw and write a decent bit recently but. everything else. just haven't been able to get myself to do#and it's really bogging me down#um. anywayssss if you know of any good tutorials for either xp or vx ace send me a link i'd greatly appreciate it#in the meantime i'll probably work on plotting it out and stuff. if i can
5 notes
·
View notes
Text
My experience in impulse buying game development software has given me great knowledge
#my knowledge....#rpg maker is THE tool for a simple rpg#you can go pretty far with it#not too far but enough for a simple rpg#specially if you are a beginner#Game Maker is good for people who know a little code but not enough to go all out#but it wants your money soo bad#the one that fnaf was made in is also pretty easy#Unity has everything youve ever dreamed of doing but it's difficult. for pros only#All Lua based software is in the middle ground. very code heavy#The golden rule: if you see a software that doesnt have an active and supportive community RUN AWAY#LOOK AT ANOTHER ONE#a lot of these tend to be very limited and cause you trouble down the line#trust stuff thats known to be used. like ren'py. Godot. Pico8 even#that also means theres a lot of tutorials out there
22 notes
·
View notes
Text
youtube
#srpg#srpg studio#rpg#rpg maker streamer#rpg maker tutorial#srpgstudio#tutorial sprites rpg maker#rpg maker tutorials#rpg maker streaming#rpg maker mv tutorial#rpg maker tutorial mv#rpg mv#free rpg maker#rpg maker 2003 tutorial#rpg maker 2000 tutorial#unreal#rpg maker vx ace tutorial#rpg maker tutorial video#stream#rpg maker unite tutorial#rpg maker review#rpg maker horror#rpg maker tutorial series#tall character generator rpg maker#rpgm2k3#rpgmaker#gamedev#synrec#coding#youtube
0 notes
Text
Does anyone know how to make lil pixel walking sprites for characters for RPG Maker? And if so could i please request a tutorial 👀 asking for reasons....
6 notes
·
View notes
Text
my vtuber persona will be a decaying robot at the bottom of the ocean with a coral reef growing out of her. this is what I wish to be so its what she shall be
#and since shes a robot i can redesign her periodically with different bits#i want to ise a voice filter thats robotesque#i worry that ittl be cringe but im gonna fuck around and see#i just hate my voice ya know i think with a filter i may be more confident#and i can use it in music too#fucked around with music making today too#so maybe soon ill get something going#aaaaand i was watching some rpg maker tutorials#sooooooooo
3 notes
·
View notes
Text
Aprende a traducir juegos RPG Maker de la manera más fácil posible
RPG Maker es una serie de programas que te permiten crear tus propios juegos de rol (RPG) de forma fácil y sin necesidad de saber programar. Con RPG Maker puedes diseñar mapas, personajes, batallas, historias, música y más, usando los recursos incluidos o importando los tuyos propios. RPG Maker MV es la versión más reciente de la serie, lanzada en 2015, y RPG Maker MZ es la versión más potente y actualizada, lanzada en 2020.
Algunos juegos creados con RPG Maker usan el cifrado de archivos para proteger sus recursos de ser copiados o modificados por otros usuarios sin permiso. El cifrado de archivos también puede servir para ocultar secretos o sorpresas dentro del juego, o para evitar spoilers o trampas. Sin embargo, el cifrado de archivos no es infalible, y existen herramientas como RPG Maker MV Decrypter que pueden revertirlo y acceder a los archivos originales.
(1) Downloads And Free Trials | RPG Maker | Make Your Own Game! https://www.rpgmakerweb.com/downloads. (2) RPG Maker MZ | RPG Maker | Make Your Own Video Games! https://www.rpgmakerweb.com/products/rpg-maker-mz. (3) RPG Maker MV on Steam https://store.steampowered.com/app/363890/RPG_Maker_MV.
Según el proyecto de GitHub, RPG Maker MV Decrypter puede desencriptar archivos de recursos de RPG Maker MV y MZ que están cifrados con el cifrado integrado del RPG Maker. Los tipos de archivos que se pueden desencriptar son:
Imágenes PNG (.rpgmvp o .png_)
Audio OGG (.rpgmvo o .ogg_)
Audio M4A (.rpgmvm o .m4a_)
Para desencriptar los archivos, se necesita la clave de cifrado, que se puede obtener del archivo rpg_core.js o system.json del juego. El proyecto ofrece una versión web y una versión Java del decrypter.
(1) Petschko/RPG-Maker-MV-Decrypter – GitHub https://github.com/Petschko/RPG-Maker-MV-Decrypter. (2) Petschkos RPG-Maker MV & MZ-File Decrypter https://petschko.org/tools/mv_decrypter/

Los archivos desencriptados son los recursos originales del juego, como imágenes, audio, mapas, eventos, etc. Puedes usarlos para:
Ver cómo está hecho el juego y aprender de él
Modificar el juego a tu gusto o arreglar errores
Extraer recursos que te gusten o te sirvan para tus propios proyectos (siempre respetando la licencia original)
Hacer copias de seguridad o restaurar tu proyecto si lo has perdido
Sin embargo, debes tener en cuenta que no puedes usar los archivos desencriptados para:
Robar o reutilizar recursos sin dar crédito o sin permiso del autor
Distribuir o vender el juego modificado sin autorización del creador
Violar los términos de uso del RPG Maker o de los recursos usados
2 notes
·
View notes