#sourcing video files
Text
TOOL TUTORIAL 6
How to download high quality videos onto iOS devices using Shortcuts
MOBILE GIF-MAKING SERIES
So you want to make GIFs or a fun little video edit for your fandom. The problem is, you don't have access to a standard desktop computer—just an iOS device that is not jailbroken (i.e., you're limited to apps in the Apple App store). You can always just screen record. But if you want something that gives you a clean file at its highest resolution, there's a pre-made shortcut for the Shortcuts app will allow you to download video files from hundreds of different websites at their highest available quality with a few clicks.
Operating systems: iOS (iPhones, iPads)
Difficulty: Easy
Required apps/tools: Shortcuts SW-DLT shortcut; A-Shell Mini (recommended) or A-Shell
Optional apps: VLC Media Player and Video Converter and Compressor.
Input: video links (compatible with links from hundreds of websites)
NOTE: If you have a desktop computer or an Android device, there are ready-made apps that will do this for you which you can download freely—for example, 4kVideoDownloader.

If you're unfamiliar, Shortcuts is an pre-installed Apple app that lets users make "shortcuts" that execute a series of operations across one or more apps on their device with the click of a button. You just need to add a community-made shortcut that does all the downloading for you to your Shortcuts app, and give it the free terminal app that it needs in order to do its thing.
NOTE: Shortcuts are, by nature, open source. This shortcut in particular is a "wrapper" for yt-dlp and gallery-dl which are also open source and hosted on GitHub.
1. Required materials
A-Shell Mini
You can download this terminal app for free in the app store. Don't worry—you don't have to type a single thing into it. All you need to do is download it.
NOTE: The full version, just called A-Shell will also work, but it's over 1 gb in size while A-Shell is a few hundred MB, so save yourself the bloat.
Shortcuts SW-DLT shortcut app.
The SW-DLT shortcut can be shared to your Shortcut app via this link on RoutineHub.
Select "Get Shortcut" to open the shortcut in your Shortcuts app. Then tap "Set Up Shortcut"
The following panel will open:
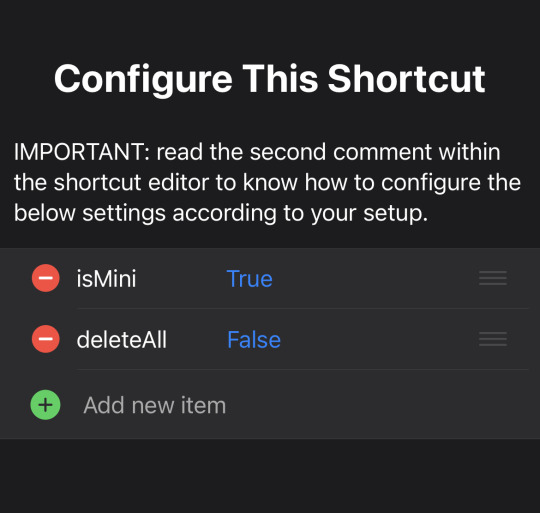
All you need to be mindful of here is the "isMini" line. If you downloaded A-Shell Mini, this line should read "True".
If everything looks how it should, select "Add Shortcut" and it'll be added to your shortcut library in the Shortcuts app.
2. Copy the video link you want
I'm going to copy a youtube video as an example, but you can download links from hundreds of sites. When you've copied your link, open your Shortcuts app, go to the "Shortcuts" view and select "SW-DLT".
A prompt like this should open (it'll automatically grab your link from your clipboard).
NOTE: Throughout this process, Shortcuts is going to ask you for a lot of different permissions. If you just click "Always Allow" for each one, going forward you shouldn't get those prompts a bunch).
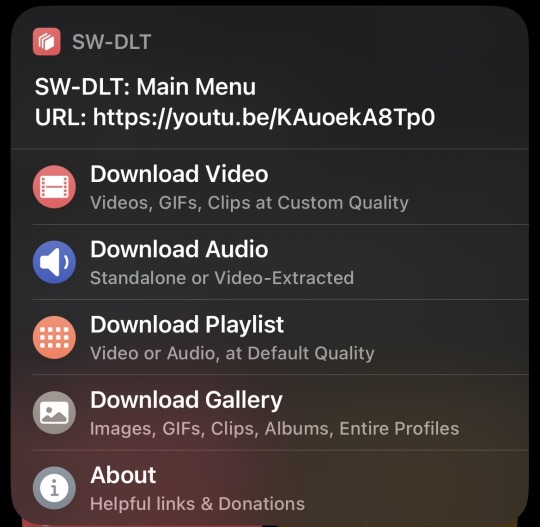
Select "Download Video" and two more panels will open. The first asks you to select your desired video quality/resolution and next asks you to select frame rate (choose 30FPS if it's a TV Show or a Movie).
After selecting your FPS, the shortcut will automatically open A-Shell Mini and begin running a script that downloads your file.
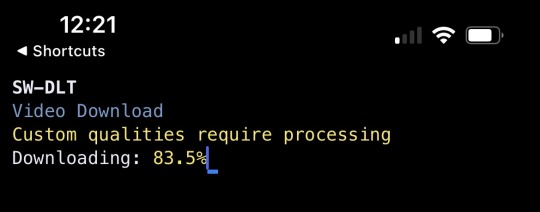
NOTE: The first time you ever use SW-DLT, A-Shell-Mini won't download the video—it's instead going to set up everything it needs to get videos downloaded from here on out then it's going to send you back to the Shortcuts app. Just go back through the process of clicking the SW-DLT shortcut and choosing the quality and FPS again. You won't have to do it twice anymore after the first time.
When your file is finished downloading, a share sheet will open.
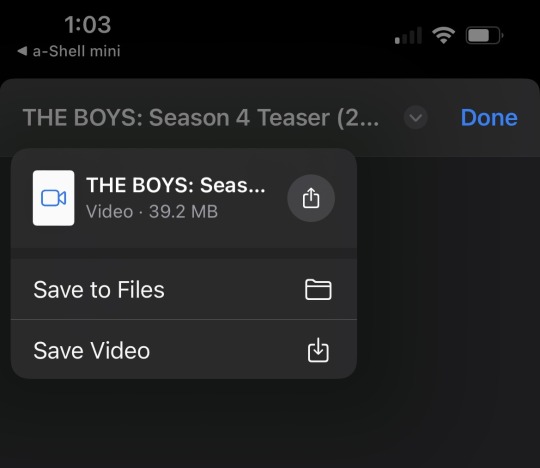
Select the drop down arrow at the top of the screen to select how you'd like to save your file.
DO NOT click "Save Video".
Hit "Save to Files" instead.
Selecting "Save Video" will result in your device trying to save the file to the Photos App, which can't load or save some video files because of their codec. A video's codec is different from it's container (file extension type). In other words, the MP4 file format of this trailer I downloaded isn't the issue. The way it was transcoded results in its codec being incompatible with the Photos app.
If I just want to play the video locally as is, I can download VLC Media Player and play the video there. But if I want to use it do edits on my phone... it'd be a hell of a lot better if it was in my Photos app, since a lot of apps only access media from there, right? So I need to re-transcode it.
3. Transcode the video so it can be moved to the Photos app.
Transcoding a video allows you to change its codec and its extension. I've come up with two free ways to do this on iOS so far.
Video-Converter.com
This is what I recommend you use. It's an online tool that converts videos up to 4GB in size to different video and audio codecs and file formats and can give them back to you at their original quality in just a few clicks. I was able to upload my 4K video in this tool on iOS and have it transcoded to the (default) H.264 codec, playing on my device still in 4K in a few minutes.
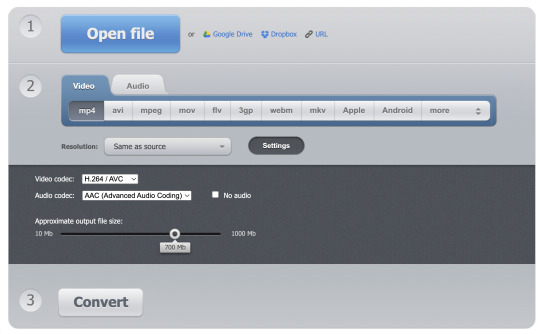
Hit "Open File" and select the video from your Files app. After it loads, you can choose your video and audio output options. However, I left everything at default and it worked.
If you open "settings", you can see the video codec that Video-Converter plans to use. If those codecs are H.264 and AAC for video and audio respectively (which should be the defaults), you'll get a file that plays back on your iOS device. Click "Convert" and it'll begin making the new video for you and will give you a download when it's done. You can save that new download to your Files app, and then share it to the Photos app by finding it in your Files app, holding down on it to open options, and selecting Share > Save video.
Video Converter and Compressor
I would only use this if you need something offline. It's slower, it has annoying ads, and it bugs you about a paid version you don't need. It will work though and it's the only one I found in the app store that doesn't paywall what you need or limit you to some kind of free trial. Select "Video Converter">Files/iCloud and select your video. The following panel will open:
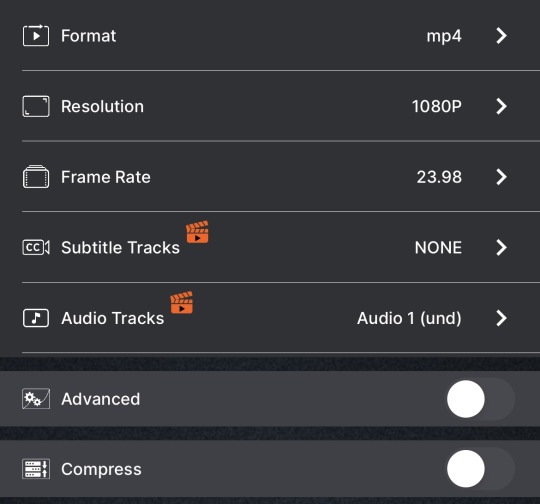
This is again—a lot of options. But if you toggle "Advanced" you should again see the H.264 and AAC video and audio codecs are the defaults, and those will play in Photos. Select "Convert" and it'll serve you an ad, but once its done, your video will begin downloading.
NOTE: While there is a 4K (2160p) resolution option, I had to stick with 1080p because the app crashed every time I tried to set the resolution that high. ymmv.
#sourcing video files#ios#mobile gif making#tool tutorial#shortcuts#a-shell mini#video-converter.com#video transcoders#video converter and compressor
1 note
·
View note
Text
JOHN: ok everyone, poll time. what gender are you?
JAKE: Silly little cowboy!
JADE: rabid werewolf :D
KANAYA: Emo Vampire With Trust Issues
VRISKA: Flam8oyant 8isexual pir8!!!!!!!!
ROXY: evil scientist but in a #girlboss way
ERIDAN: evvil scientist but in a cringefail wway
ARADIA: gh0st. gender is dead 0u0
SOLLUX: the entiire bee moviie 2criipt.
NEPETA: :33 < what the fuck is a gender?
GAMZEE: WhAtEvEr BuGs BuNnY's GoT gOiNg On, BrOtHeR :o)
#submission#source: tumblr user catboygirlboss's gender poll#oh oh i remember this poll. i chose ghost too#mainly cause my gender is. like. boy gender left none#its a boy but its got some kind of video file corruption#if some guy was made of static and the static was he / him#idk. tv static entityboys rise up#homestuck#incorrect homestuck quotes#quote#mod dave#john egbert#jake english#jade harley#kanaya maryam#vriska serket#roxy lalonde#eridan ampora#aradia megido#sollux captor#nepeta leijon#gamzee makara#e bugs.
174 notes
·
View notes
Note
This is so random but do you have the full image of the Ishmael CG from your pfp? The quality is so good and I’ve been searching for it
https://drive.google.com/drive/folders/1l3EAfUK_0NEr3DczUzHN8rED01mQQx7O
(All 4.5 cgs)
https://drive.google.com/file/d/1kLHyrI0tmtBuldd7v3aDAQvQ593KM9BN/view?usp=drivesdk
(Ishmael icon)
https://drive.google.com/file/d/10LUU8ePiqbNeC0sC-LKW1N44ZpxghQ5d/view?usp=drivesdk
(Header)
Bonus: all cgs in game so far
https://drive.google.com/drive/folders/1qcGPVtmvydVcsIqoBDRRJSgHjlLYjyaI
#im not the one who uploads the google drive so i hope im allowed to share it#however afaik these are directly ripped and datamined from.the game hence their quality#a screenshot would rely on your own graphics vs downloading directly from the assets allows for the closest and cleanest version#asks#anon#this is also the drive where i rip all of the shit for like. my stupid shitpost edits (especially for my goo post)#same for my liumael picmix edits. directly from the drive#this drive includes both cgs and background cgs. i however can provide the full drive link if wanted#(it includes bgm video and font assets along with art assets)#also a very good archive source incase they#yknow. remove and remake every cg#limbus company#ishmael limbus company#limbus company ishmael#THESE ARE NOT SCREENSHOTTED FROM GAME.THEY ARE DATAMINED#I DID NOT TOUCH THE GAME TO GET A SCREENSHOT OF EITHER OF THESE#AS IN MOST LIKELY THE GAME WAS NEVER OPENED TO GET THESE FILES.#AS IN MOST LIKELY RIPPED DIRECTLY FROM THE GAMES DATA AND NOTHING ELSE#please do not say im crossing a picket line these are not my files nor did i obtain them from opening the game
113 notes
·
View notes
Text
Ed, Edd n Eddy "Be smart. Stay in touch!" Flash eCard from the English version of the Cartoon Network Latin America website.
(Note: This eCard has no sound!)
#cartoon network#old web#cartoon network la#ed edd n eddy#ecards#video#i saved the url to wayback among others a month or more before the turner server went down after the discovery merger#hence the source link saying it was saved in 2022#i would've saved more cn la flash files and images that were broken on wayback if i was aware that was going to happen#i believe i saved all the ecards and copatoon highlights + misc content#you can find a post with more info on how i did it on my resources page
32 notes
·
View notes
Text
#song is closer by nine inch nails#airy#liam#backpack#liam plecak#hfjone#hfj one#i made this directly after the source files came out cos im insane#AIRY LIVED HE LIVVEEDDD#liam sleeps with his mouth open i wanna stick my finger in there#i need to animate with the source files more.... theres so much potential..#i can make my dreams a real
18 notes
·
View notes
Photo


Bang Chan ♡ KCON LA 2022 VCR
[remake of this post]
#skz#stray kids#bang chan#bystay#staysource#channiesnet#createskz#usersa#kiwitracks#staytay#userbeepls#dreamytag#usertsu#usersemily#cheekyuser#bitsforkitts#*mine#i had the file for this for months and now i'm just getting around to remake that post i did with the most awful video source ever: a twt#anyhoo. hims<3#flashing tw
273 notes
·
View notes
Text
No effects versus effects comparison for this video.
I sometimes feel like I'm at the point in my life where I can't learn any more new skills, but video editing always loves to prove me wrong. Just about every AMV I post involves trying something I haven't before, and this video is no exception. It's got glitching VHS effects, "expression shakes," eye-reflection zooms, and more—sometimes made without any tutorial to show me the way! Using what I know to apply effects I want to apply has been such a rewarding, powerful experience.
As a viewer, the highlight of the effects work in this video is likely the VHS look (which often involves actual VHS footage! That I... messed up with static recorded from my VCR and other filters to "look more like VHS footage"). But as an editor, my highlight is the amount of masking—the most I've ever done for any AMV thus far.
Two years ago, I never would have imagined putting together such an effects-heavy AMV, and it is beyond neat to me that creating this kind of fanwork is now in my toolbox. Video editing brings me so much joy.
English translation for the song, "Mohan Kaitou" by NormCore, is once again courtesy of blenderfullasarcasm!
#ramblings#shut up goop#video#amv#eye strain#blood#i just really love video editing 🥺#it took a while but i finally got my new computer and it is so nice to be able to video edit again!#working on a very neat collab (with more vhs aesthetic!) right now that i'm so excited to share!#and since i ran out of tags on the original post the detective conan sources for the vid are#episodes 49 118 142 174 188 191 263 293 490 522-523 and 928#plus movies 3 7 and 10 and tv special 6 (episode one: the great detective turned small)#and ova 3 and ops 27 and 56#and manga files 95 and 443#and voice clips are episode 118 (heiji) and episodes 49 and 54 (shinichi and conan)#that opening bit from 118 comes from my hd english dub mix! another project that's good to get back to#i'd really love to finish all 123 episodes before too much longer...#anyway#fancam friday!#(well not quite in my timezone but in most of them haha)#really wanted to do an amv for coai week but alas my broken computer set me so behind on projects... maybe very very late though!
36 notes
·
View notes
Text
When pirating websites are like "oh no! You have to pay us to watch more than 2 minutes!" it's just like bro this is already illegal what do you think you're doing. Half the time it's just a fake out and they don't even have the full movie
#sam speaks#seriously what is with that#anyways thats why you gotta check the video in the source files#i just grabbed that new camera recording of lisa frankenstein from a website that tried to do that#miss me with that shit dude
7 notes
·
View notes
Text
I think I might finally be (kind of) starting to understand some of the finer details of A/V concepts that have been a solid wall between me and troubleshooting tech-related vidding problems historically.
#I'm a very monkey-pulling-levers type vidder#and asking for help or trying to research things have not always aided my understanding At All#so I've just had to sort of try various solutions I encounter by rote and hope for the best#but I think I (kind of) get it better now??#I know what the difference between containers and codecs is#and what remuxing is and how it is not the same thing as converting#I'm ngl I am still very lost in the weeds regarding the difference between encoding and reencoding#and what the difference between reencoding something vs transencoding it is#and lots of other things#but like I think I know enough that it's easier to understand why things go wrong and how to fix them?#I had a problem with pretty narsty artifacting in my timeline playback and the audio track not getting added at all#and I tried a bunch of things before reencoding my source to a newer codec#and along the way learned how to find what bit depth and chroma subsampling a file was#which has always been pretty fucking mysterious to me and I've just winged it with default settings on my project properties#like it took an embarrassingly long time for me to realise I could see what the resolution of a video was in the metadata#and I think that only clicked because I was fucking around with the metadata of audio files for podfic#so this is all very basic stuff to people my age who have been vidding since the early 00s#but it's essentially dark magic to me#one of the many reasons I wish there were more vidding tutorials and primers in the 'fanwork research & reference guides' tag on ao3 tbh#because not everyone is on discord or brave enough to look a fool on discord
3 notes
·
View notes
Text
eh this is what I get for taking so long to finish a project
(rip that Dark Core Day video project from like two years ago now that has Chiyo's art and voice, which is now outdated, I guess. But that's just how sso is)
#/sso#I also just like... don't care?#like when I first played the games it was 3 Dark Generals#then it was surprise there are 4 dark riders and the 4th is Elise#but no we're not going to add her to the game anytime soon#now this is what she looks like and also a name change#now she's got a new look (except it's all just concept art anyway sO) and a new new name#I don't know how I'm supposed to care about a part of the Main Villain Squad who has yet to appear in game#and who doesn't even match name wise to what I heard that one time like ten years ago#I only know about her designs and name changes because of social media and that's honestly not a huge group of people#most people don't follow outside sources for their games they just... play the game and that's it#anyway as far as I'm concerned Elise Chiyo Whatever her name is going to be doesn't exist and never will#at least not in my fanon and fics#the whole 'sso changes lore every other year' thing as well as like#what am I supposed to wait 25 years for the story to be complete before I write anything? no thanks#don't mind me I'm talking#OH also I did the voice acting for her since it was my own video project#did voice acting for all the dark riders#not to confuse people and make folks think there were like files for her voice
10 notes
·
View notes
Text
Losing my mind trying to make this AMV and I haven’t even gotten to the video editing part
#I finally found all the episodes I needed without subs and was able to download them!!!!#after scouring a bunch of different sites#and was able to download the video editing software after trying like 50 times and calling customer support#and the video format works with the video editor#but now there’s some problem with how the file’s encoded and I can’t get it on the timeline!!!#without it being read as an audio file#or for one of the sets of files I can’t get it on there at all#which apparently means that even though it’s mkv which is supported it’s also mpeg1 or mpeg 2 which isn’t?#and this is true for videos from multiple sources meaning basically all of them are useless#so now I have to restart the process and find some new source to download them from#back to square one#I am going insane#personal
12 notes
·
View notes
Text
[tiktok version]
Sophie takes a walk in the woods.
CW: Spoilers + Horror/Potentially Disturbing Imagery (from the videos) + Animated Text
—
here’s one last TWF-sourced post (for now). had some footage Sophie recorded for us, and i wanted to make something with it :)
-Adam📹
#og#adam post#sophie (nyandela)#the walten files#video#link#tiktok#horror#angst#since sophie is working through things and learning to function as a person she’s been Here more over the past few days#so sorry for all the twf posting it is for coping and source stuff and bc the series is interesting#anyway enough rambling. *vanishes into the void*
5 notes
·
View notes
Text
Youtube: doesn't let creators swear, demonetized asexual videos constantly, don't allow five seconds of copyrighted song because what about the advertisers?!!?!
Also youtube: hello welcome to the default home page for new users would you like security camera footage of a man shooting people for trespassing. What about a man buying an entire storage locker full of guns. What about a 20 minute long offensive meme compilation. It's the tenth of a series of offensive meme compilations.
#all these videos are real source me i just opened a new tab 👍 corporate internet is hell#youtube#filed under: speaking
5 notes
·
View notes
Text
Unused Crash Team Rumble Voices (Season 2) | Tuesday, 12.26.2023
Found some in-game announcer (voiced by Roger Craig Smith) audio clips datamined by someone datamining Crash Team Rumble before Season 2 even started back around September.
Anyway, check them out for yourselves and follow him on X (Twitter).
This is part 1/4. I'll have part 2 available tomorrow.
#unused content#archived#audio files#voice clips#roger craig smith#crash bandicoot#crash team rumble#datamine#datamined#unknown source#video games#activision#activision blizzard#toys for bob#ps4 games#ps5 games#part 1 of 4#playstation 4#playstation 5#xbox one#xbox series x#xbox#december#december 2023#december 26#tuesday thoughts#x twitter#twitter#twitter x
2 notes
·
View notes
Text
Been watching some more video essays abt fnaf adjacent analog horror series today and it’s very like 🙈 I Am Stupit
#sinposts#cvents#kind of#but yeah it’s just like HCKFBSK… my saving grace is that it’s been broad daylight but honestly i shouldn’t be watching any of it at all </3#so many parts of harmony & horror and the walten files is just like ohhh ok this plays right into my biggest fears/paranoia sources#but it’s interesting 😁 so !#could never watch the series’ videos themselves tho. but reviews/analysis videos are a little better#i guess it’s not all been that bad because i haven’t gotten any white hot paranoid panic attack feelings HFKDKSK but i’m sure there will be#some effects on my psyche. etc#can kinda feel them already i fear
4 notes
·
View notes
Last Seen Blogs

aminkhosravi
Amin Khosravi

cooldrawsofficial
COOL

weirdboi
Lou's lover

cerezitax
cerezAAA

sannehvass-blog
Untitled