#tutorial rec
Explore tagged Tumblr posts
Visit Tumblr Blog
Explore Tumblr blogs with no restrictions, modern design and the best experience.
Last Seen Tumblr Blogs


Fun Fact
Tumblr was created by web developers David Karp and Marco Arment.
Note
oi dani, vc se importaria de me passar alguns tutoriais sobre blending? queria muito fazer também só que eu tenho mt dificuldade :(
ei, anjo!! não me importo não e olha é mais fácil do que parece, mas os tutoriais que eu tenho são em inglês se você não se importar - blending tutorial by linda-darnell - blending + coloring tutorial by kitconnor - double exposure + blending tutorial by yenvengerberg - blending tutorial by eddiediaaz outra recomendação é o usergifs, eles tem bastantes tutoriais e vários de blending. espero que te ajude! uma dica pessoal é tentar utilizar cenas escuras porque facilita bastante e no desespero use todos os modos de camada até você achar um que fique legal 🤣 mas dá uma olhada nos tutoriais que são bem legais e ajudam bastante.
1 note
·
View note
Text
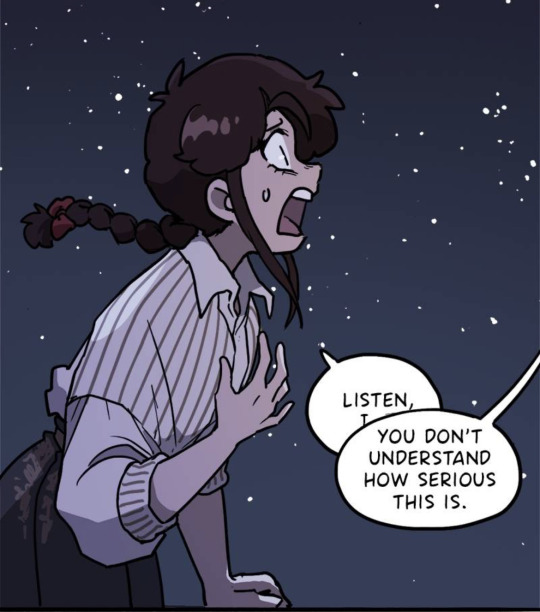
Note to Self - Speaking without Words with Word Balloons
Word gallons are for more than just words. They can be used to emphasis and even add emotions and to a scene
Feeling dizzy? About to pass out?
A lilting playful swirl (Time and Time Again by Deo I)

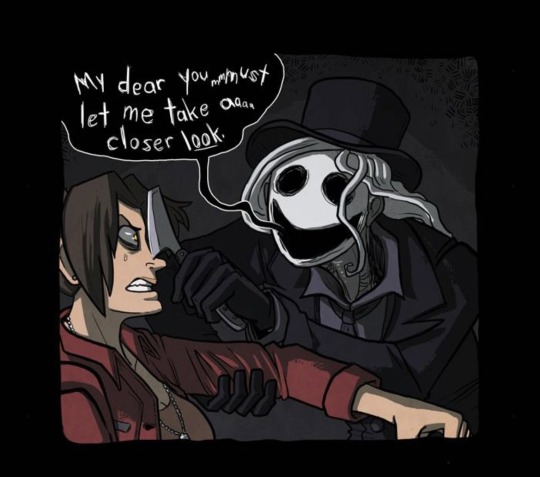
The white and black of the text has been replaced with a sinister black and the words are off tilter (Sword Interval by Benjamin Fleuter)
The voice is coming from a place deeper and more unsettling and the text is uneven and handwritten
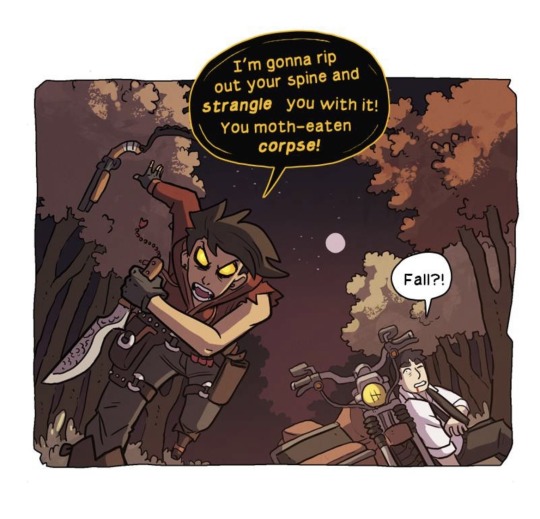
A dismissive comment literally (metaphorically) stabs someone (Marionetta by Míriam Bonastre Tur)

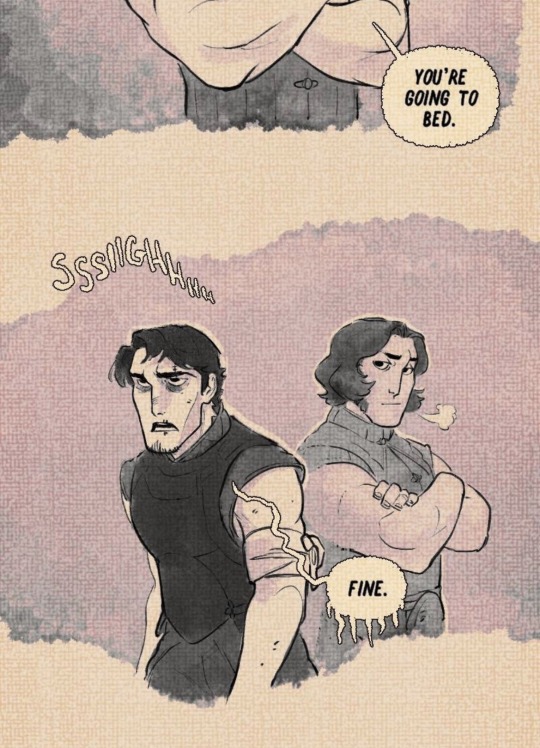
Being interrupted before finishing what is being said
A withering and icy reply (The Secrets of Soulford by the Quincil)
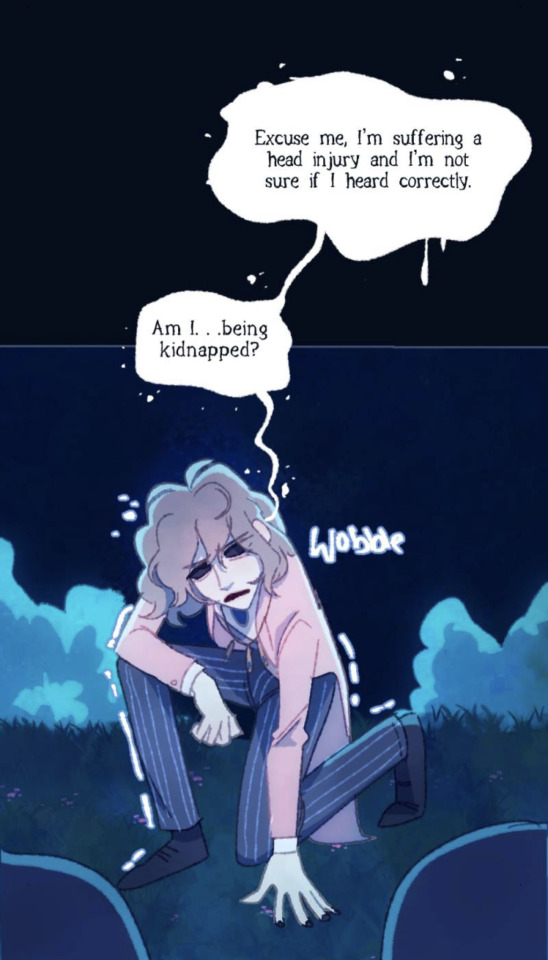
Wobbly uncertain bubbles that even break apart in some parts from dizziness (The Blind Prince by cozycroww)
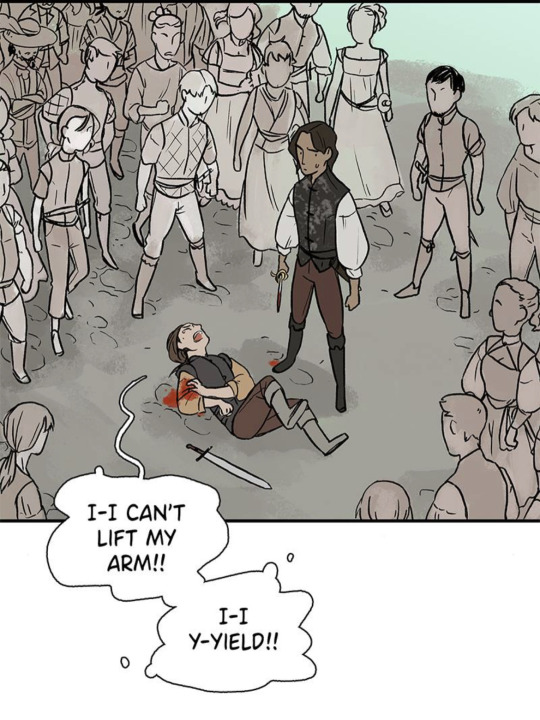
Pain almost appears to be breaking the usually round bubble into uneven and broken balloons. The little smaller balloons around it are reminiscent of sweat or tears (Heir’s Game by suspu)
#comics#art reference#note to self#comic tutorial#art tips#the secrets of soulford#time and time again#marionetta#comic recommendations#comic recs#the blind prince#heir’s game#Webtoon#webtoon tutorial#webtoon recommendation
6K notes
·
View notes
Text


#any plastic beach fans?#GUYS GIUYS EFwehseguhwe I FUCJKIN DID IT !#also IF U NEED A REC TO A TUTORIAL I GOT ONE FOR U IT MADE SO MUCH SENSE AFTER THAT#frances... ur real OMFGH AHHHHHHHHHHHHHHHHHHH#watch this look like caca on mobile wHO FUCKING CARES#for a first in wisp history:#ts4 render#sims 4 render#ts4#simblr#sims community#oc: frances
190 notes
·
View notes
Text

𐔌 ‧₊ᢉ𐭩˚ em's gif tutorial + atn 𐦯
what's going on friends ? here i am with a brand spankin' new gif atn for u all , with a brief tutorial and some tips under the cut . as always , pretty please give this post a like or reblog if u intend on using this code or if u just want to be a supportive hottie ! love u all bigly ; be sure to pet a cute animal today ! mwuah ! ♡♡♡
⟡⋆。⊹₊˚ this gif action is 100% free ! u can download it by becoming a free member on my patreon or via this dropfire link . enjoy !
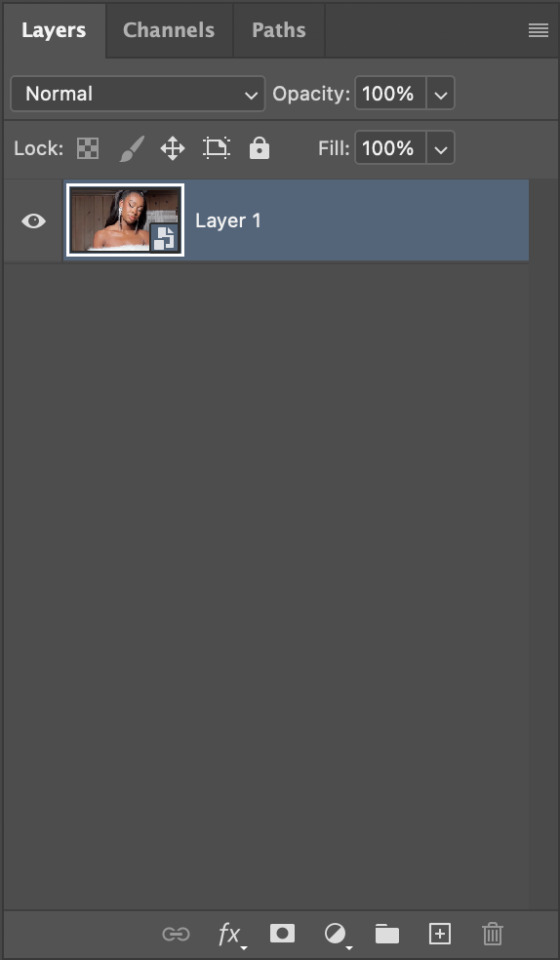
⚠️ remember if using my action to change ur layer name to layer 1 before applying the action or it will not work ⚠️
okay angels , let's get into the nitty gritty of making gifs ! keep in mind there are hundreds of methods of giffing and none of them are wrong ! it's all about what works best for u !
⟡⋆。⊹₊˚ step one : pick out ur video u are going to gif , section it into smaller segments , export via render video
if u are using a longer video such as a youtube vid or a tv show , i personally follow this process : i open up the file on photoshop , i adjust the speed to my liking , and then i start sectioning my content . using the 'split at playhead' option to cut my clips . make sure u have the section u are going to make into a gif selected bc it can get confusing once u start sectioning off more and more clips . u can combat this by breaking ur longer videos into chunks and repeat the sectioning as described . u don't have to resize ur canvas at this point but i like to do it now so i don't forget later on . i make my gifs 268px by 150px . once u have the clip u want to gif all sectioned off and sized ( if u are doing that at this point ) , u then have to render and export it by clicking file > export > render video .
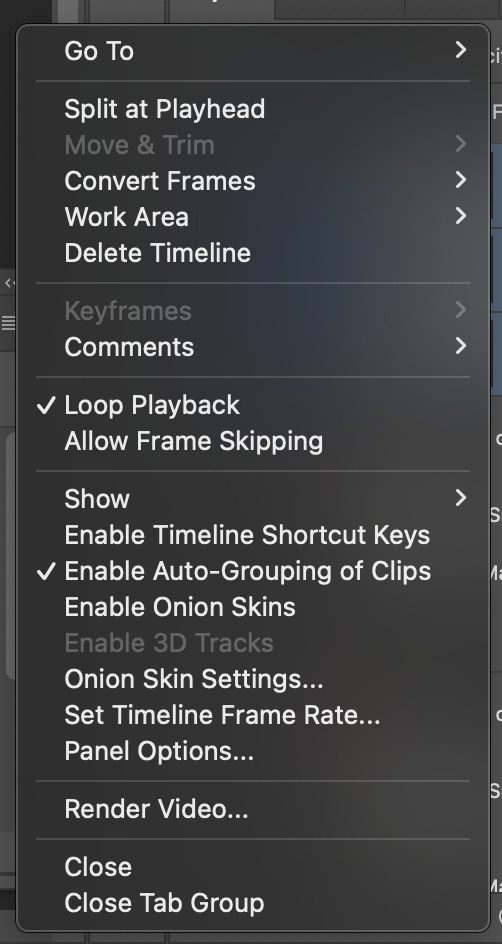
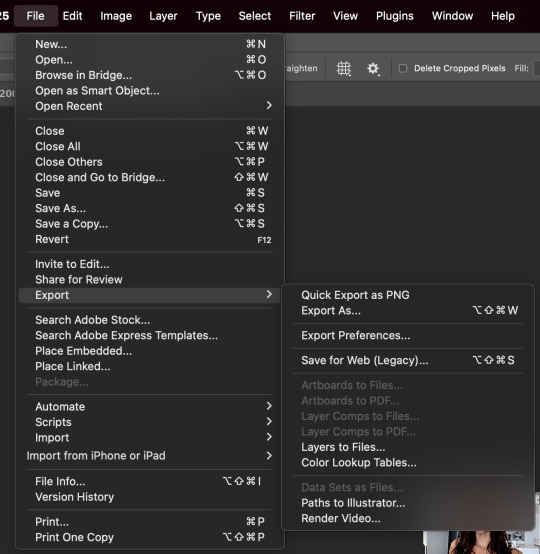
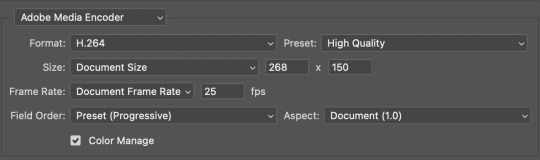
^ split at playhead visual & render video export , and rendering settings
⟡⋆。⊹₊˚ step two : import frames as layers , convert to video timeline , merge all layers into a smart object layer
next in my process , we will import the video we just rendered by clicking file > import > import video frames to layers . since u already sectioned off ur gif , u don't need to mess with sliders when the popup shows , just confirm everything and u'll have a video timeline in layers now ready for u . go ahead and open up ur timeline options and click 'select all layers' and once all ur frames are selected , click covert to video timeline . u will now be greeted with a bunch of layers on top of each other . turn ur focus to the righthand side and select all of the layers ... they are shaded in blue in the screenshot , make sure u have all of them selected and then click the option 'convert to smart object' . it'll condense all those layers into one singular smart object . ⚠️⚠️⚠️ if u are using my action here , this next step is very important ! ⚠️⚠️⚠️ ur only file will be named layer + a random number ( if u have forty frames , it'll be layer 40 and so on ... ) . u must rename this layer to layer 1 or my action will fail !

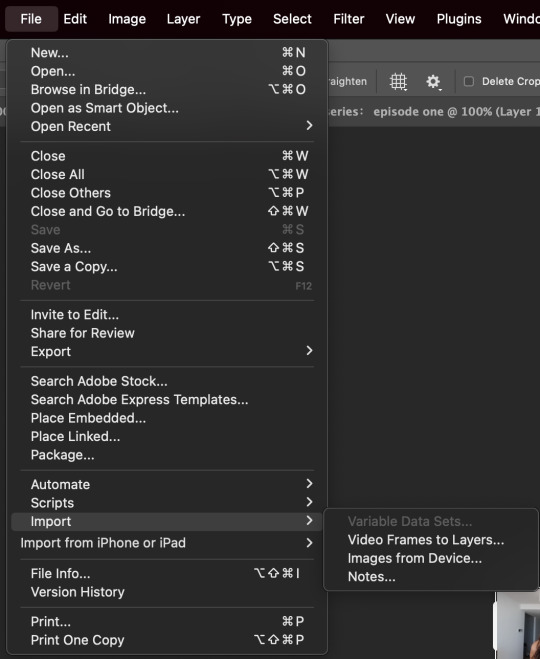

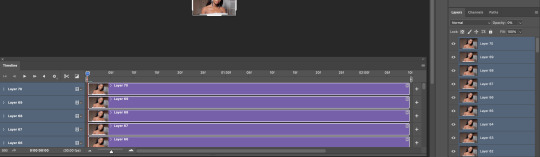
^ video layer as frames , importing video frames to layers , select all frames and convert to video timeline , a visual of ur new timeline , changing the name of remaining layer to layer 1
⟡⋆。⊹₊˚ step three : apply action , adjust as needed , add ur coloring
we're now on the home stretch ! it's time to apply the action ! go ahead and slap that bad boy onto ur video . depending on the quality of the base video of ur gif , u might have to make a few tweaks to the unsharp mask layer at the top ... it should be called 'layer 1 copy 2' . i would recommend adjusting the amount first and then tweaking with the overall opacity of the unsharp mask layer as needed if there is still some harshness surrounding the silhouette . now to add ur psd / coloring , add those layers to the very top so it'll be applied to all three layers of ur gif .
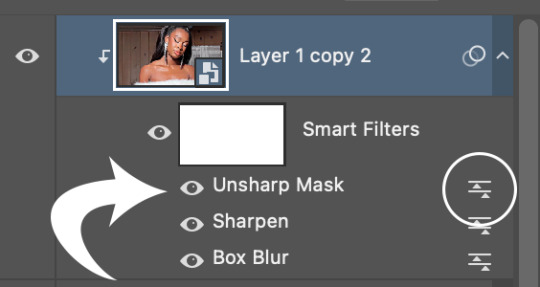
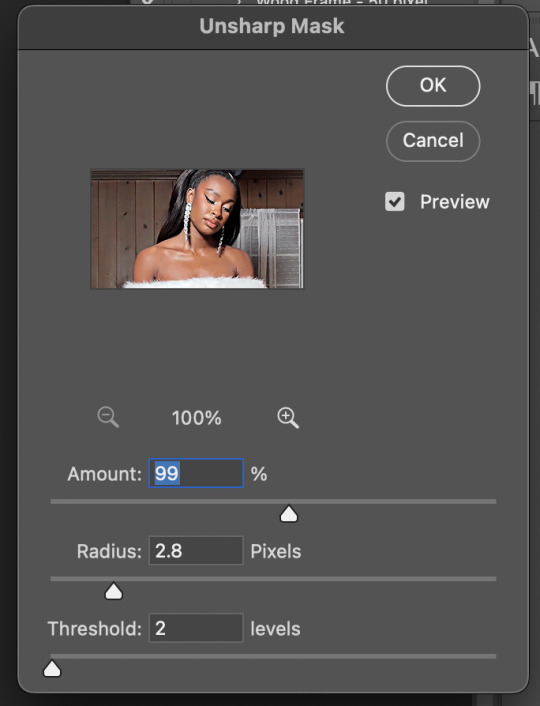
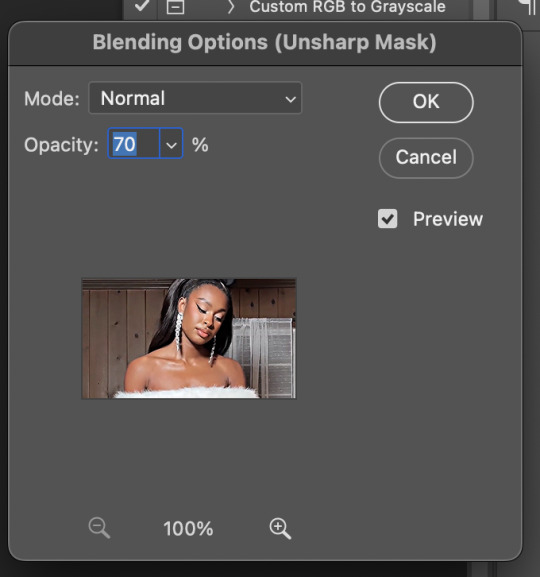
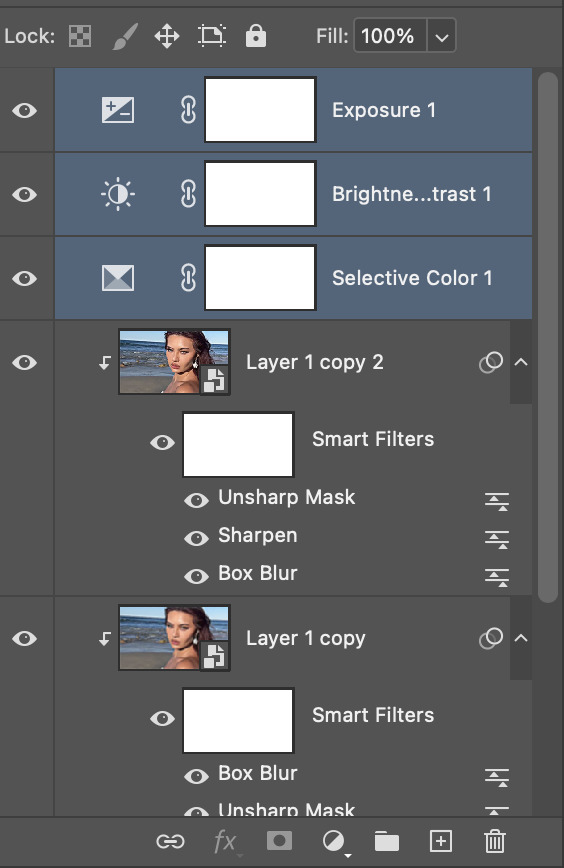
^ layer 1 copy 2 unsharp mask , editing the actual unsharp mask settings ( where the arrow is pointing ) , editing the blending options ( the circled icon ) , where to put ur coloring layers
⟡⋆。⊹₊˚ step four : saving ur gif
ur practically done now ! the last and most important part is exporting ur gif to use ! go to file > export > save for web . my typical settings are below but i do switch it up depending on the specific needs of the gif . for example , does the bg of ur gif look weird and splotchy after u saved it ? it's time to go back and re - save with a different setting .
the gif on the left was saved with my typical settings ... see how the background is splotchy and feels nosy and un - smooth ? this is because of the dither diffusion setting . if we switch to pattern instead as seen on the right , the difference is pretty staggering . u could also opt for the pattern dither setting to try and smooth out the blotchy background colors .

same gif with typical settings on the left compared to the same gif saved with the dither on pattern instead of diffusion . it's mainly up to ur personal preference !
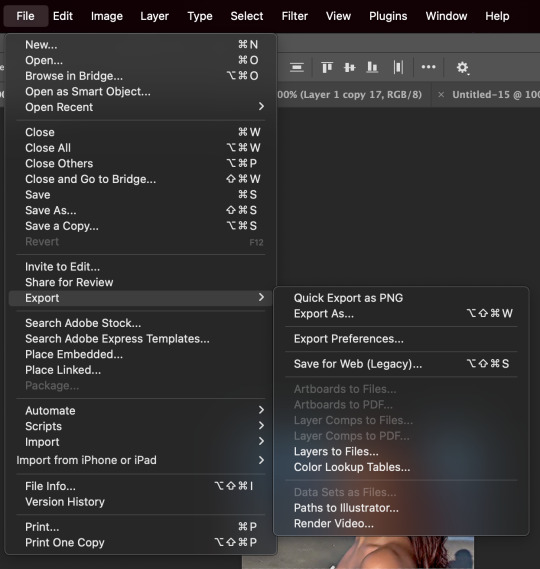
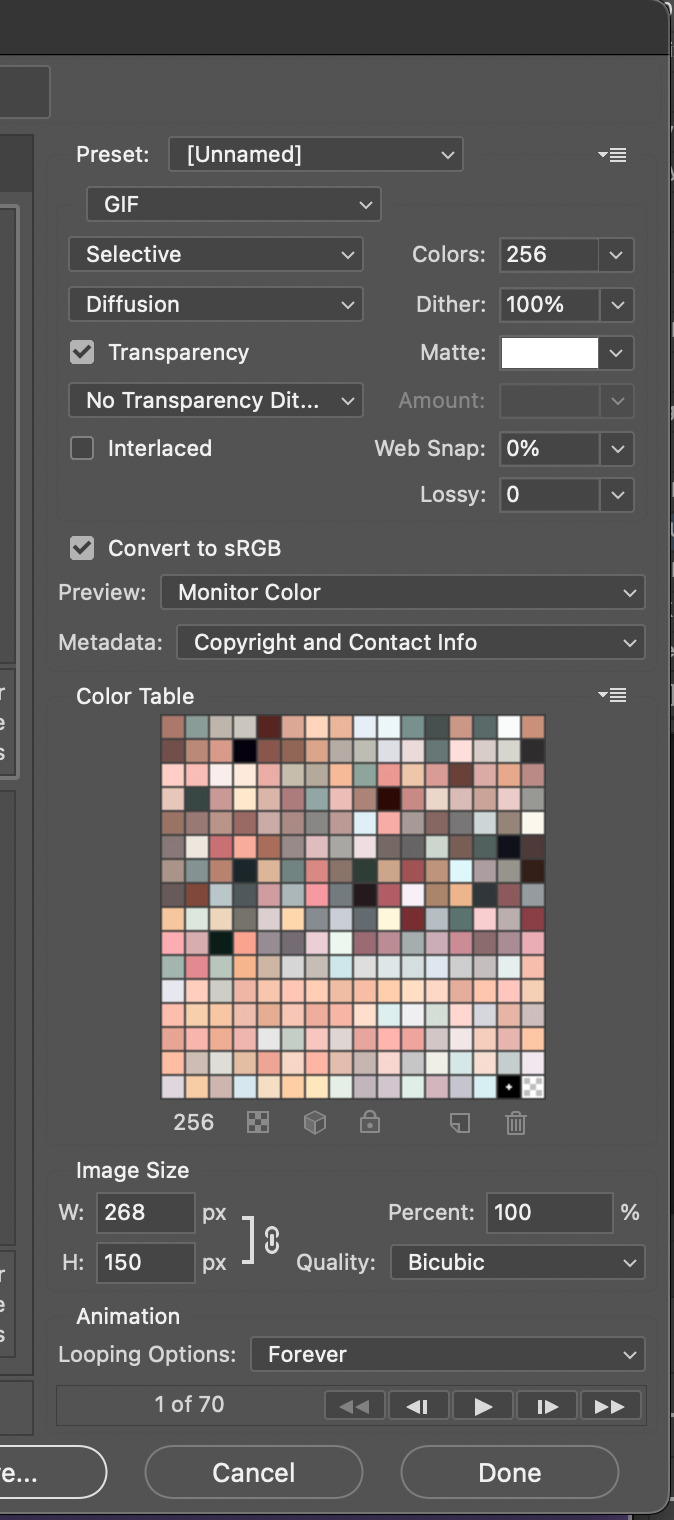
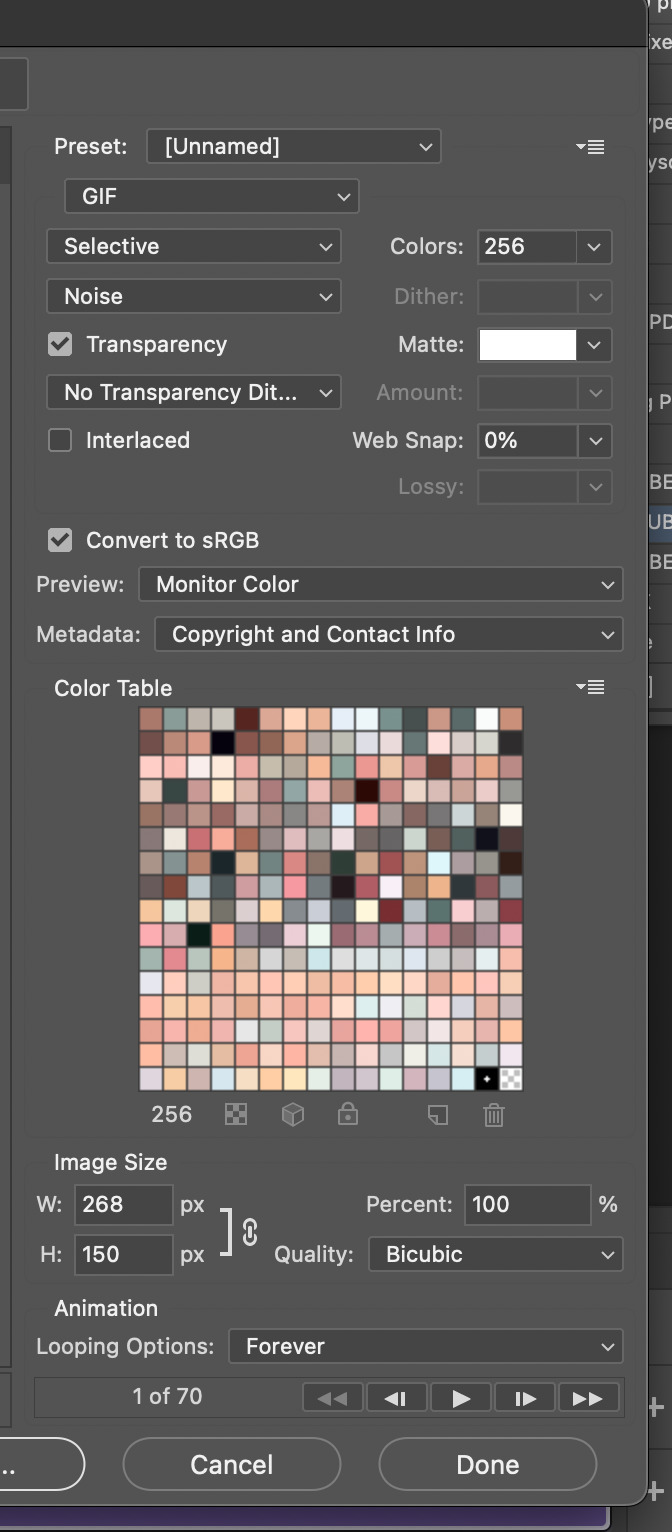
^ exporting with save for web , my typical settings , noise dither version
and that's it ! that's my current giffing process ... like i said , there is no one way to gif . it's a fluid , ever - developing process . don't be hard on urself and remember this is for fun ! if u have any questions or concerns please let me know !
67 notes
·
View notes
Note
hello! I’m looking for a fic that I read way back when. It was based on the show “ The Bachelor”. John is the Bachelor and Sherlock is one of the contestants. I think Sherlock was the only male contestant. One of the female contestants developed a crush on Sherlock.There was SO MUCH angst! I searched on AO3 with no luck. Thanks for any help you can give!
Hi Nonny!!
I KNOW THIS ONE!!!!!
I haven't read it, but it's been requested so often I just know which one it is! I believe that this is John Watson, Bachelor which sadly has been removed from AO3. BUT!!!! I have a tutorial how you can grab a copy off of the Web Archive HERE.
BUT double checking the link on that page, I SHOULD HAVE linked to this version of the fic, which is the "Entire Work" view of the fic so that you get, well, the entire work instead of just one chapter.
I hope that helps! <3
53 notes
·
View notes
Text

CAS UNDERWEAR OVERRIDE TUTORIAL!

faq/before you begin: This is a tutorial for personal use ONLY. If you use this tutorial DO NOT reupload your overrides unless it the original creator gives you permission to do so. reuploading a creator's custom content IS theft. I do not condone stealing cc from hard working creators, so please only use this as a tutorial for yourself! to get started, you will need: ꣑ৎ sims 4 studio ꣑ৎ the underwear you want to make your default ꣑ৎ and patience ( ,,◕ ̫ ◕,, ) this tutorial is aimed towards people who have never used ts4 studio before! so if it seems too hand holdy im sorry, i just want to make sure everyone can understand! If you don't understand something, please don't feel shy about reaching out! either through a dm or an ask! i'll be happy to help!
start by downloading TS4 studio. The process is fairly simple, but if you get stuck here's a great tutorial you can follow!
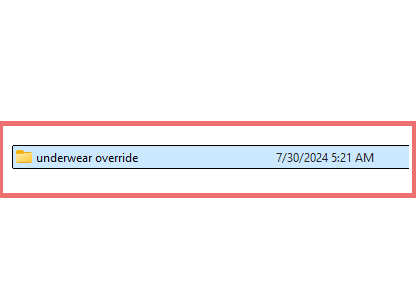
once you have it all installed, you'll want to make a folder on your desktop. This is just for organization purposes, to make digging for the files easier later on:
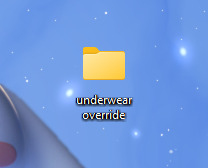
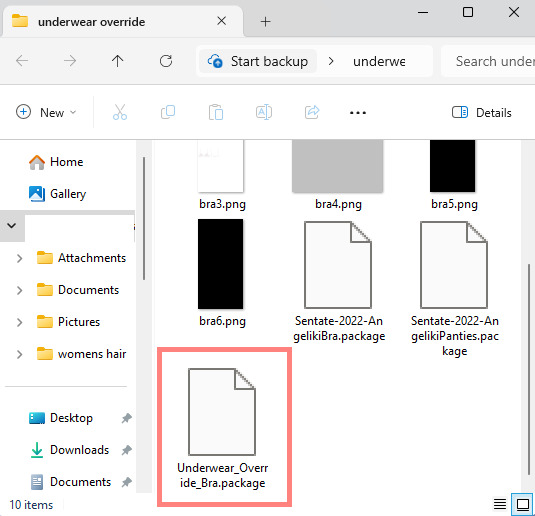
here's an example of what i named my folder! for simplicity's sake though, i'll be referring to the desktop folder as the "underwear override" folder, but you can name yours whatever you want! Just make sure its on your desktop~ ( ˶ˆᗜˆ˵ )
────୨ৎ────────୨ৎ────────୨ৎ────────୨ৎ────
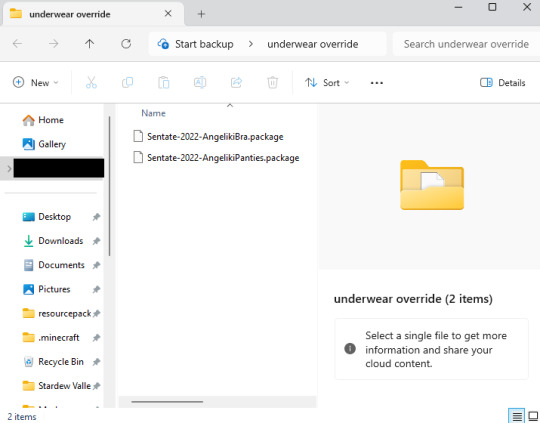
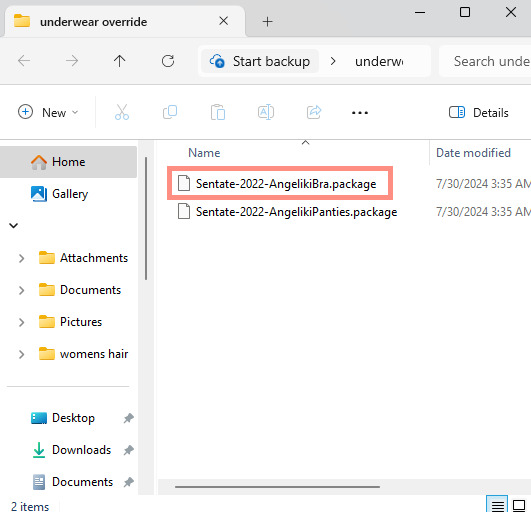
next you'll want to find the underwear you'd like to make a default replacement. I'm using the Sentate's Angeliki set (bra and panties) from their midnight collection found HERE. (Also a gentle reminder, this is for PERSONAL USE only. Sorry i keep repeating this, i'd just hate for people to use this tutorial for bad 。°(°.◜ᯅ◝°)°。 )
any underwear SHOULD work, unless the underwear you pick has 3D pieces. I wish i could explain why, but i honestly have no clue. Im a noob at this haha. Just make sure your mesh isn't 3D!
once you have the undies of your choice secured, go ahead and place both into the "underwear override" folder on your desktop! (photo below)
────୨ৎ────────୨ৎ────────୨ৎ────────୨ৎ────
now it's time for the fun part! You'll go ahead and open sims 4 studio, once in there, you'll want to click where it says "my projects" (photo below)
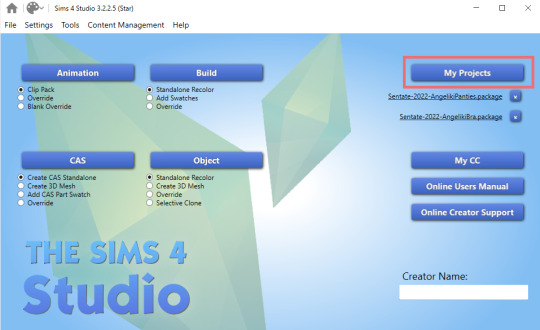
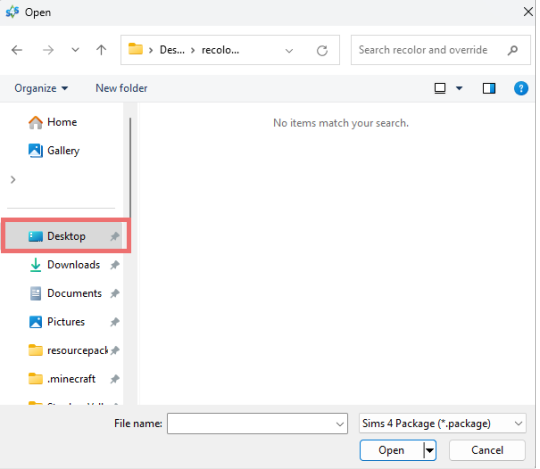
Once you do that, your files should all pop up. It doesn't matter where it takes you, you'll just want to find the "desktop" section of your file menu! Then, you'll find the "underwear override" folder and open that~ Now you'll just go ahead and open the package that you want. I'm going to start with the bra, but the process for the underwear is exactly the same! so it doesn't matter which one you choose to do first ദ്ദി ˉ͈̀꒳ˉ͈́ )✧ (photo below)
────୨ৎ────────୨ৎ────────୨ৎ────────୨ৎ────
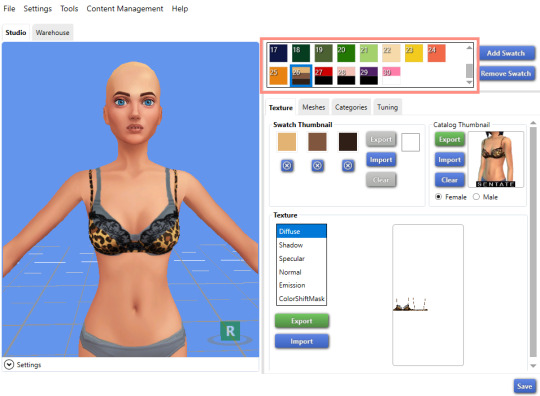
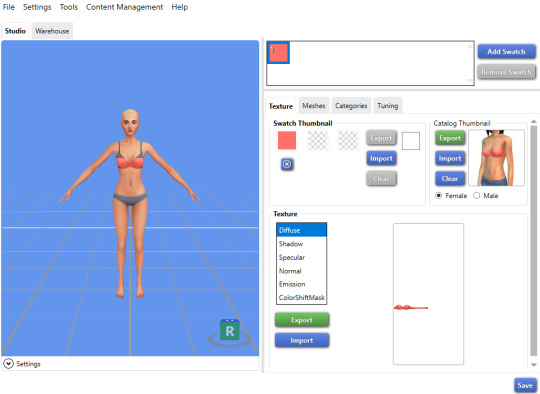
if you did it right, your screen should look similar to mine! ¡¡¡( •̀ ᴗ •́ )و!!! (photo below)
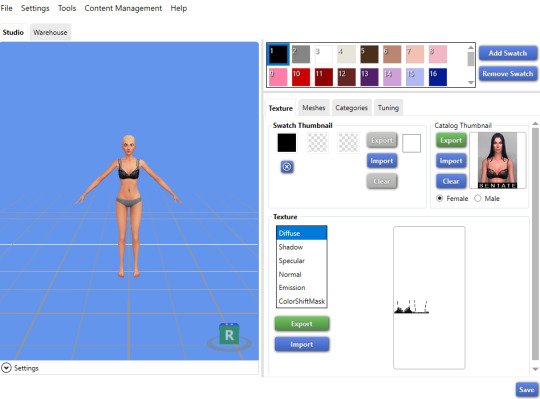
now, you'll just want to select the swatch you'd like at the top! (if you've never used the sims 4 studio before, you can use your mouse wheel and the right mouse button to control the camera in the blue area with the weird bald sim lol- that way you can see the swatch you're picking a bit better! (photo below)
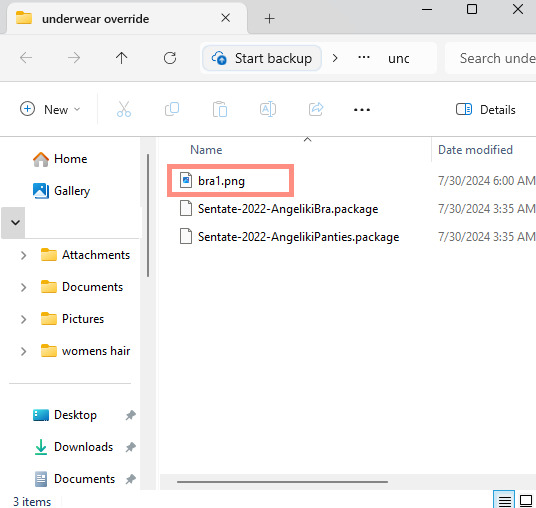
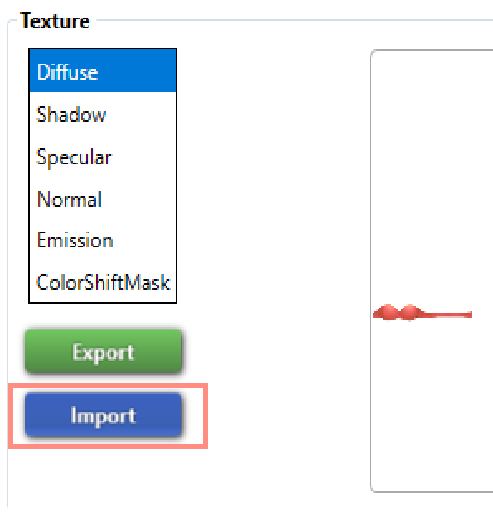
now that you have the swatch you like, in the texture setting, diffuse should already be selected. You'll want to go ahead and click "Export", then name the file "bra1". If you did it correctly, it should save as a PNG! (photo below)

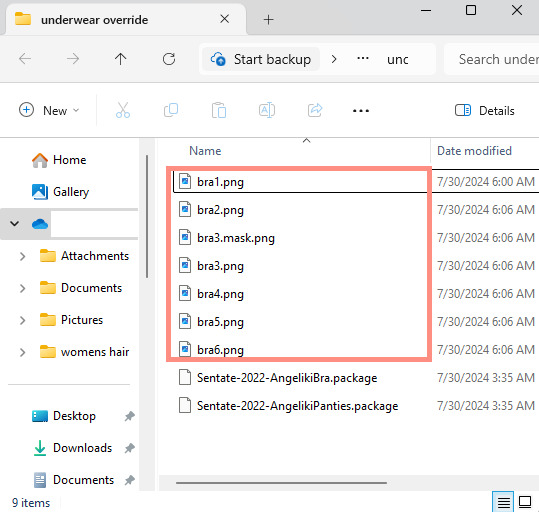
then, you'll want to go down the line of textures (shadow, specural, normal, emission, colorshiftmask) and continue to number them (EX: shadow is bra2, specural is bra3, ect ect) til your folder is full with each texture! It should look like this if you've done it right! (photo below)
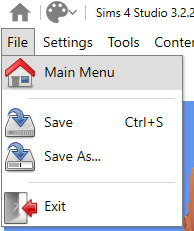
after you're done with that. You'll go ahead and click "File" and "main menu" in your sims 4 studio! (no need to save!) from here, you'll go ahead and select "Override" under the CAS section on the main menu then click the CAS button at the very top. (photo below)

the menu here might look confusing if you've never used sims 4 studio before, but just copy the way mine looks to make the process a bit easier! At the top drop down menus, you'll want to select "Gender: female, Age: Adult, Part Type: Clothing Top, Game Pack: base game" This should narrow down the menu a bit! (photo below)

then, you'll scroll til you find THIS exact bra. This is the bra the sims 4 uses as their default, and we're overriding this, so please be sure to select the exact one! (photo below)

once you select it, click "next", and it should take you to your files once more. You'll want to name THIS file something unique, that way there's no conflicts! I suggest something like: "Underwear_Override_Bra" just so you know which one you're working on, and you also know that this is an override (๑˃́ꇴ˂̀๑)
once you've named your package at the bottom, go ahead and click enter, and the studio should open back up~ (photo below)

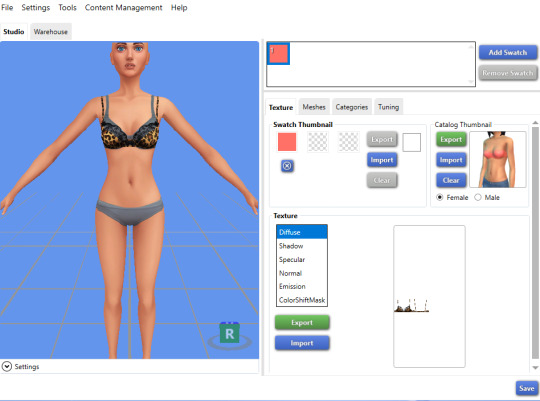
now, you'll want to repeat the same export process from before, but use import instead! Then, you'll import the pngs the same way you saved them. (EX: diffuse is bra1, shadow is bra2, ect). Once you've done that, you should immediately see the textures change (photo below)
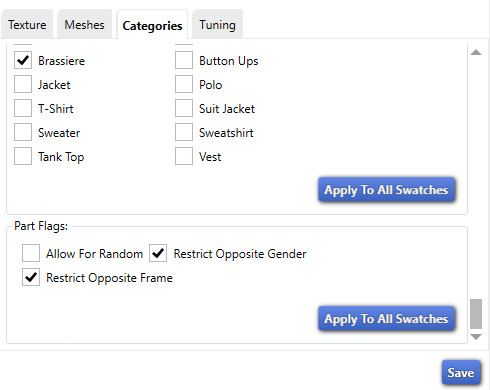
now that your textures are changed, you'll want to make sure to catagorize it properly, just to prevent your male sims from getting a bra when you take their shirt off as well. If you for some reason want your male sims to have an unremoveable bra, feel free to skip this step! if not, then you'll want to click the "catagories" tab right beside "meshes"
once there, you'll scroll all the way to the bottom til you hit "Part Flags", then you'll check "restrict opposite gender" and "restrict opposite frame" (i'm not sure if these mean the same thing, but i just checked both to be extra sure!) (photo below)

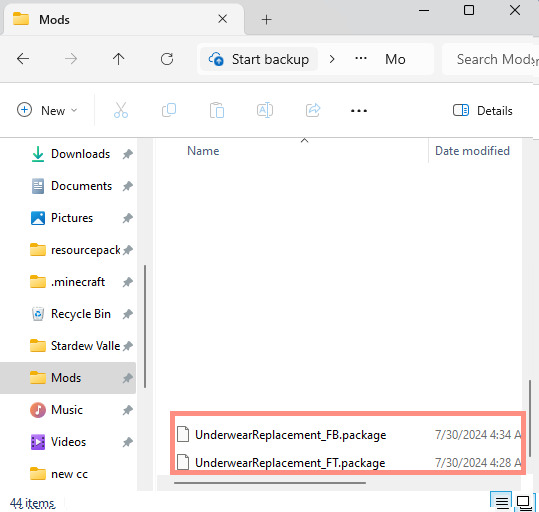
once you've finished replacing all the textures and catagorizing the override, you'll go ahead and click the save button at the bottom right hand corner, then open your "Underwear Override" folder. You should have your "Underwear_Override_bra" package now saved! yay! All that's left to do is repeat these steps with the panties of your choice, then drag both package files into your mods folder just like you would any other cc! (photo below)
(mine are named differently because i already made my own recolors + default replacements ( 〃..).. i'll try and upload a recolor tutorial later today for anyone curious!)
but now, you're done! all that's left to do is open your game and see your overrides in cas! If you did everything correctly, the undies should just appear when you take your sim's clothes off (⁄ ⁄•⁄-⁄•⁄ ⁄)
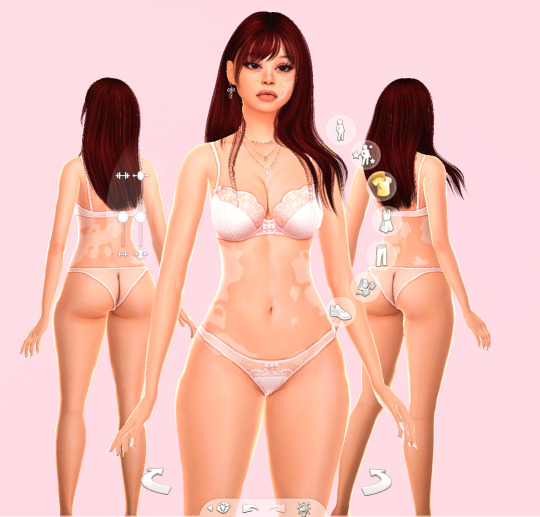
heres how mine turned out! (˵ •̀ ᴗ •́ ˵ ) ✧ im super proud of them!
it took me a few hours to get this tutorial together, so im a bit loopy signing off. If this is completely incomprehensible and confusing im so sorry, again if anyone has questions please do send an ask or message me! i'll do my best to answer any questions :) and also please remember; DO NOT REUPLOAD ANYONE ELSES CUSTOM CONTENT! this is for PERSONAL USE!
thank you for reading! (。•̀ᴗ-)✧
#the sims 4#ts4#sims4#maxis match#maxis mix#s4cc#sims 4 cc#ts4 cc#sims 4 custom content#cc tutorial#cc rec#cc cas#sims 4 cas#sims tutorial
91 notes
·
View notes
Text
A Guide To Searching Fics On AO3
I feel like i've seen a lot of people who didn't know how to search for fics on ao3, so today I'm going to try to make the most efficient guide to AO3
If you too feel like you have trouble searching fics for yourself when it's not a rec you've seen, this guide is for you!
First, how to get on the search page (this one is easy)

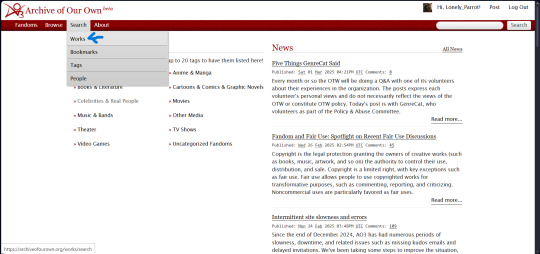
Now : this is what you see, and i'm going to detail everything for you guys
(those examples will be centered around my fandom (the marauders, so HP) but it applies for everyone)
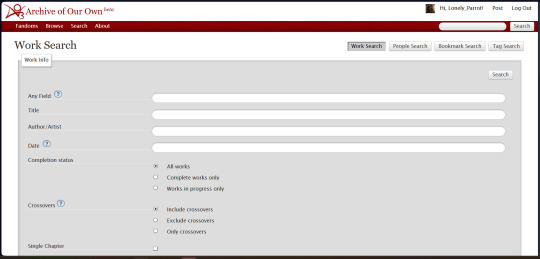
Okay, the first thing you see is: any field. This one is for like if you don't remember the name of the story or the author, but you know that there's this one striking tag, well, then you will find all the works with this tag. Of course, you can do a much more precise research, but we'll see that later.
Then Title and Author are pretty self-explanatory, you just have to know the name of either or both, and you'll find it rather easily.
I have to admit I don't use date much, but i think it can be more useful when you're in a small fandom/ or you like rareships, and you've already read everything, you can search. You can search for the exact way to use it with the interrogation point, if you're interested in that kind of feature!
Same goes for completion status. Don't forget loving WIPs is essential for a fandom to live <3 but we all get the urge to just dive and read a good fanfic on one sitting once in a while.
So on the first, you will have both wips and finished stories, the second is for only finished stories, and the last is only for wips :)
Crossovers: for those who don't know, a crossover is when two different fandoms gets mixed up. Maybe you want to see the marauders with other characters from another work of fiction you like: then you put only crossovers. But if you want a fanfiction like CR, it's not a crossover, because the OCs of Suzane Collins aren't there. It's an Alternate Universe - The Hunger Games, and that has to go into the tags field.
Single chapter is rather easy, you check it if you want a one shot
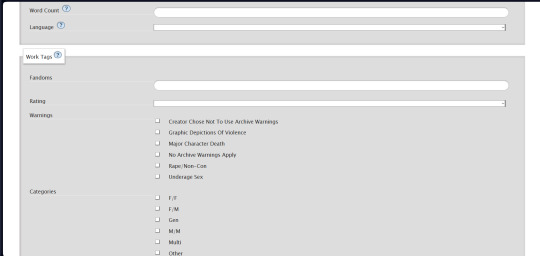
I'm bad with numbers, but word count is to choose the number of words you want. You can check with the little interrogation point and it precises how to find the good number. if you don't know how many words makes what lenghth of a fic, look around at your favourite fics. Crimson Rivers is 800k words, A Black Mass Over Highway Ninety has 250k words, Beneath a Big Blue Sky is 70k.
Language is just... well... language. They propose a whole range of language, but imma be honest, i only ever use english, even tho i'm not native.
Fandom is easy too, if you want a crossover, you put the name of the two fandoms you're interested in.
Then we have Rating and Warning.
Those are two different things.
Rating is more general, these are the five categories you can find:

Not Rated doesn't mean General Audiences. It means the author just doesn't want to rate their works, so look up to the tags to not trigger yourself.
Mature and Explicit kinda slip on the same field, but often, it's when there's hint of sex, or violence, or when they're completely there.
Then, we have the Warnings, which complete the rating, to say why it's rated that way.

Same as last time Choose Not To Use Archive Warnings doesn't mean No Archive Warnings Apply.
The first means the same, author doesn't like ratings, but generally, everything is tagged, so you got to check the tags if you fear being triggered by something.
The others are self explanatories, i think.
Then we have Categories. This one is for the kind of relationship your looking for, F stands for Female, and M for Male.
Gen means the work doesn't have a romantic relationship, or it's really not the main focus, so it's not tagged to not induce in error. And Multi is for if you have multiple relationships in the fic, or if you have a polyamory relationship.
Others is for... if you have other kind of relationship. Might be great for Queer Platonic Relationship, or things like that.
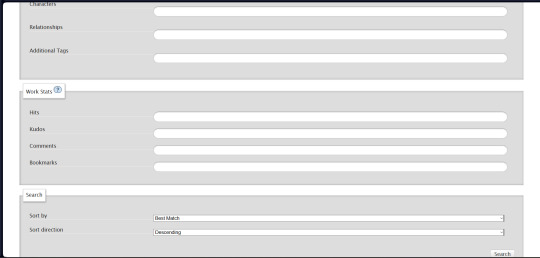
Relationship, now. So, two kinds of relationships are included in that tab, romantic, ofc, but ALSO platonic. And the tags are different depending on that.
If you want something romantic, you're going to write: Sirius Black/Remus Lupin. But if you want something platonic, you're going to write: Sirius Black & Remus Lupin.
Characters it is! easy, you type the name of the blorbo you want to read about, and you click on the propositions given to you!
Additional Tags: and here, you put the themes you want to see in the fic. You need fluff to lift your heart? type fluff and see aaaaaall of the types of fluff tags AO3 has. You're feeling bad and you want to see your favourite blorbo suffer too? Hurt/No Comfort is there for you.
You want a new universe to see your blorbos in? Alternate Universe - and then, look at all the type of AU you can read about!
And to have inspirations for tags, look at the tags of the fics you like to see the same themes :)
Then, last big bite, we have the Work Stats. So those one have the same system of > x number ; < x number, to get the number of hits, kudos, comments or bookmarks that you want.
Maybe, you're new in a fandom and you're searching for things that have been read a lot. Maybe you want to support some things less known, that don't have many interaction. Anyway, the work stats is there for you.
And finally, we're almost done, once you've searched for all the things you want, you got to decide the way the fics will appear on your dash.
Maybe, you want to have them by kudos ascending? so you have the less liked first? maybe, you don't have the time for comments, so you want comments descending, so you don't feel bad for not letting a big one this time.
You've read too much of that them, so you want last updated descending, so you can have the latest news of your favourite theme?
Anyway: an infinity of possibilities to find all the fics of your dreams!
Last word:
Don't forget to leave comments and kudos on the fics you like, it means the absolute world to the authors.
If you don't like, you don't read, and unless the author asked for it, don't say the things you didn't like in it. We understand why you can want to do it, but don't. We write for free and for community, not be reminded of the things we did badly.
Love you and hope this helps!!!! ❤️✨✨✨
#ao3 writer#ao3 author#ao3 advice#tutorial#fandoms#fandom things#fandoms etiquette#blorbos#kudos#comments#hits#archive of our own#fanfiction#ao3 reader#helpful post#fanfic#ao3 fanfic#fic rec
24 notes
·
View notes
Text
Html Tutorial Rec Wednesday
Twitter
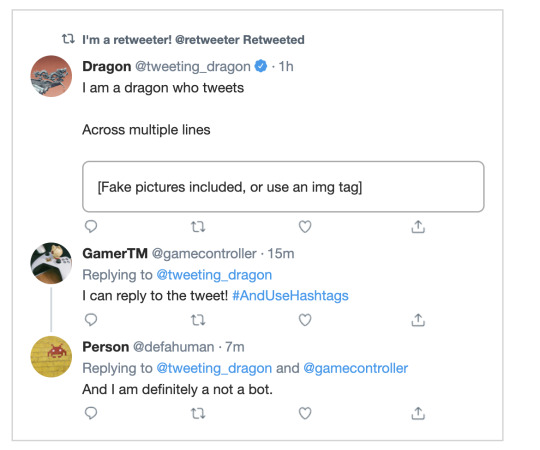
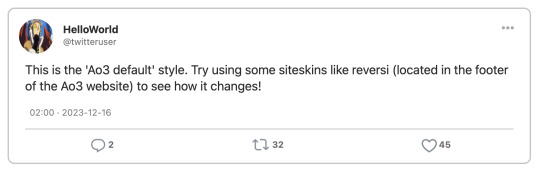
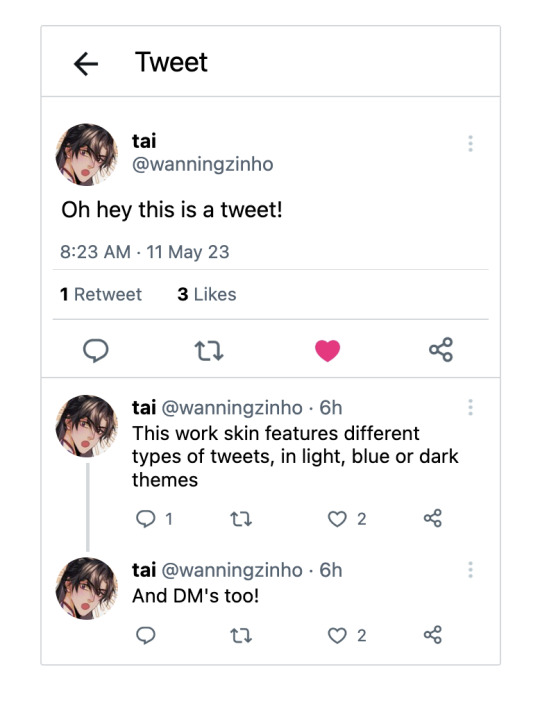
Do the characters in your works use Twitter? Would you like them to?

Are they posting thirst tweets? Long threads compiling information against a specific celebrity or politician? Are they regular people whose tweets accidentally go viral, or are they celebrities that people pay close attention to?
Either way, this tutorial by gadaursan makes it super easy to make tweets for your AO3 fanfictions! Gadaursan has also taken the time to make a code free html generator for any tweets you might want to embed into an AO3 fic!
The tutorial lets you embed images, show polls, and use quote retweets, all while explaining the HTML and CSS structure behind it all. Dark mode tweets are also available, if you prefer that!
Multiple AO3 users have created their own versions of twitter work skins, each with a slightly different look and feel; check them out!
[Ao3 Skin] Twitter with threads by oakleaf
Mimicking Twitter Posts for Fics - Some Twitter Workskins by Ultraviollett
Twitter Work Skin: Tweets & Profile (newest layout) by starskin

Twitter Work Skin Template by etc e tal (pe_pe_peperoncinocandy)
and so on!
These examples are just to show you how there are many different ways to convey the same information / achieve the same result. Hopefully it inspires you to incorporate twitter into your own fics!
#html#html reference#reference#html tutorial rec#twitter#we're not calling it x#fanfiction#ao3#it's actually wednesday this time!! im doing so good
23 notes
·
View notes
Note
do you have any tips for drawing dynamic poses? i always love the way you draw bodies!!
i know this has been said a million times but the way i draw bodies significantly improved after i started drawing more frequently from reference. if i cant find a reference for a pose on the internet, i'll just use myself or a friend. i spend an unfortunate amount of time just standing in front of my mirror looking at my own joints. pay attention to where your body curves!!
other than that though—honestly my anatomy/pose knowledge is a whack amalgamation of art tips i've accumulated over the years (i miss old school deviantart/tumblr style art tutorials). i also like to look at how artists i admire draw bodies—what details to they include, what anatomical short-hands etc
i think i'm still figuring out how to draw dynamic poses, but here are some cheats i've picked up (under the cut coz this got long again):
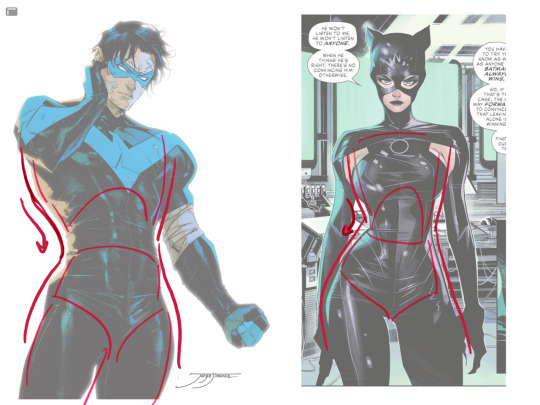
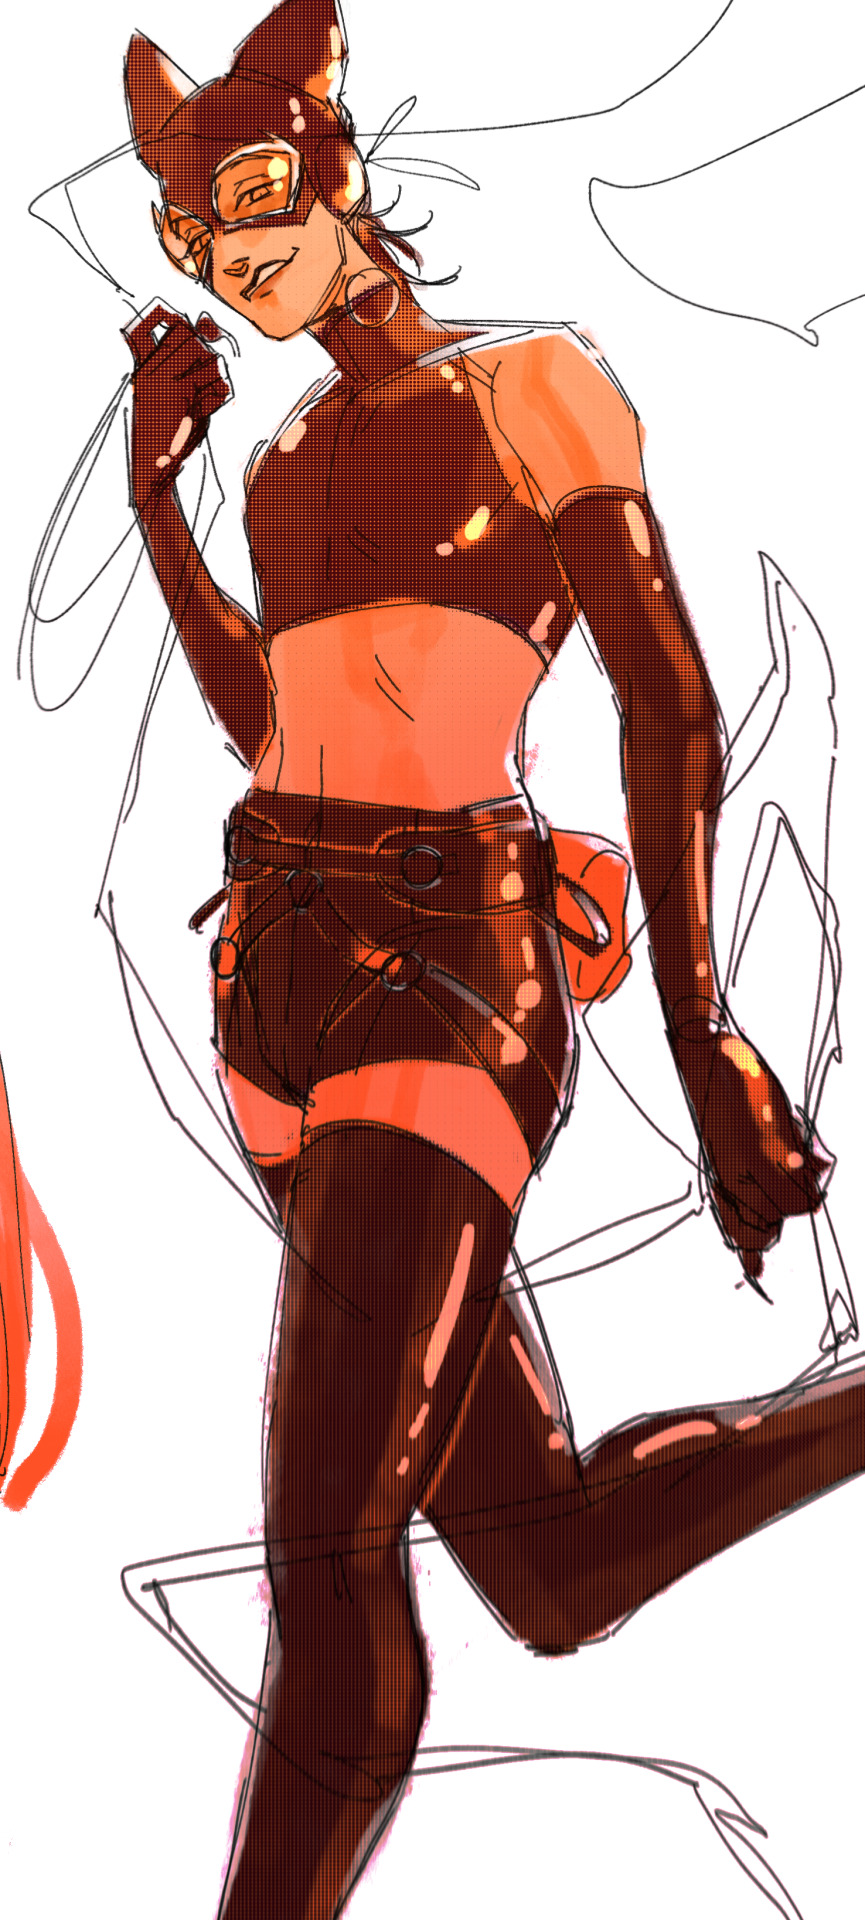
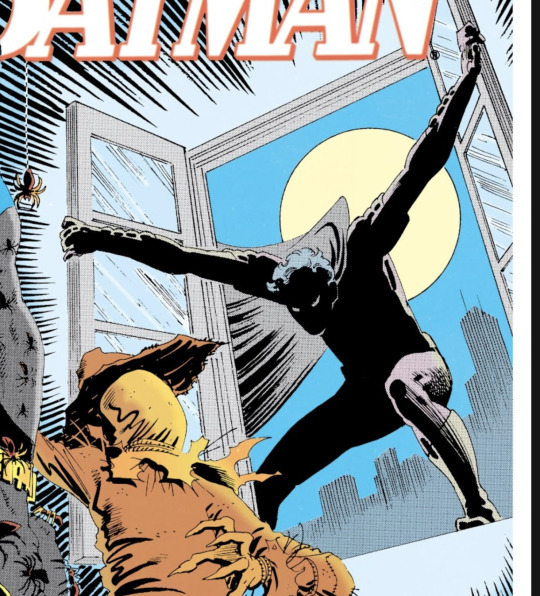
gonna use this stray!tim as a base
the easiest way for make up a pose is to start roughly with the head, collarbones, ribcage, and pelvis — you can build everything from there
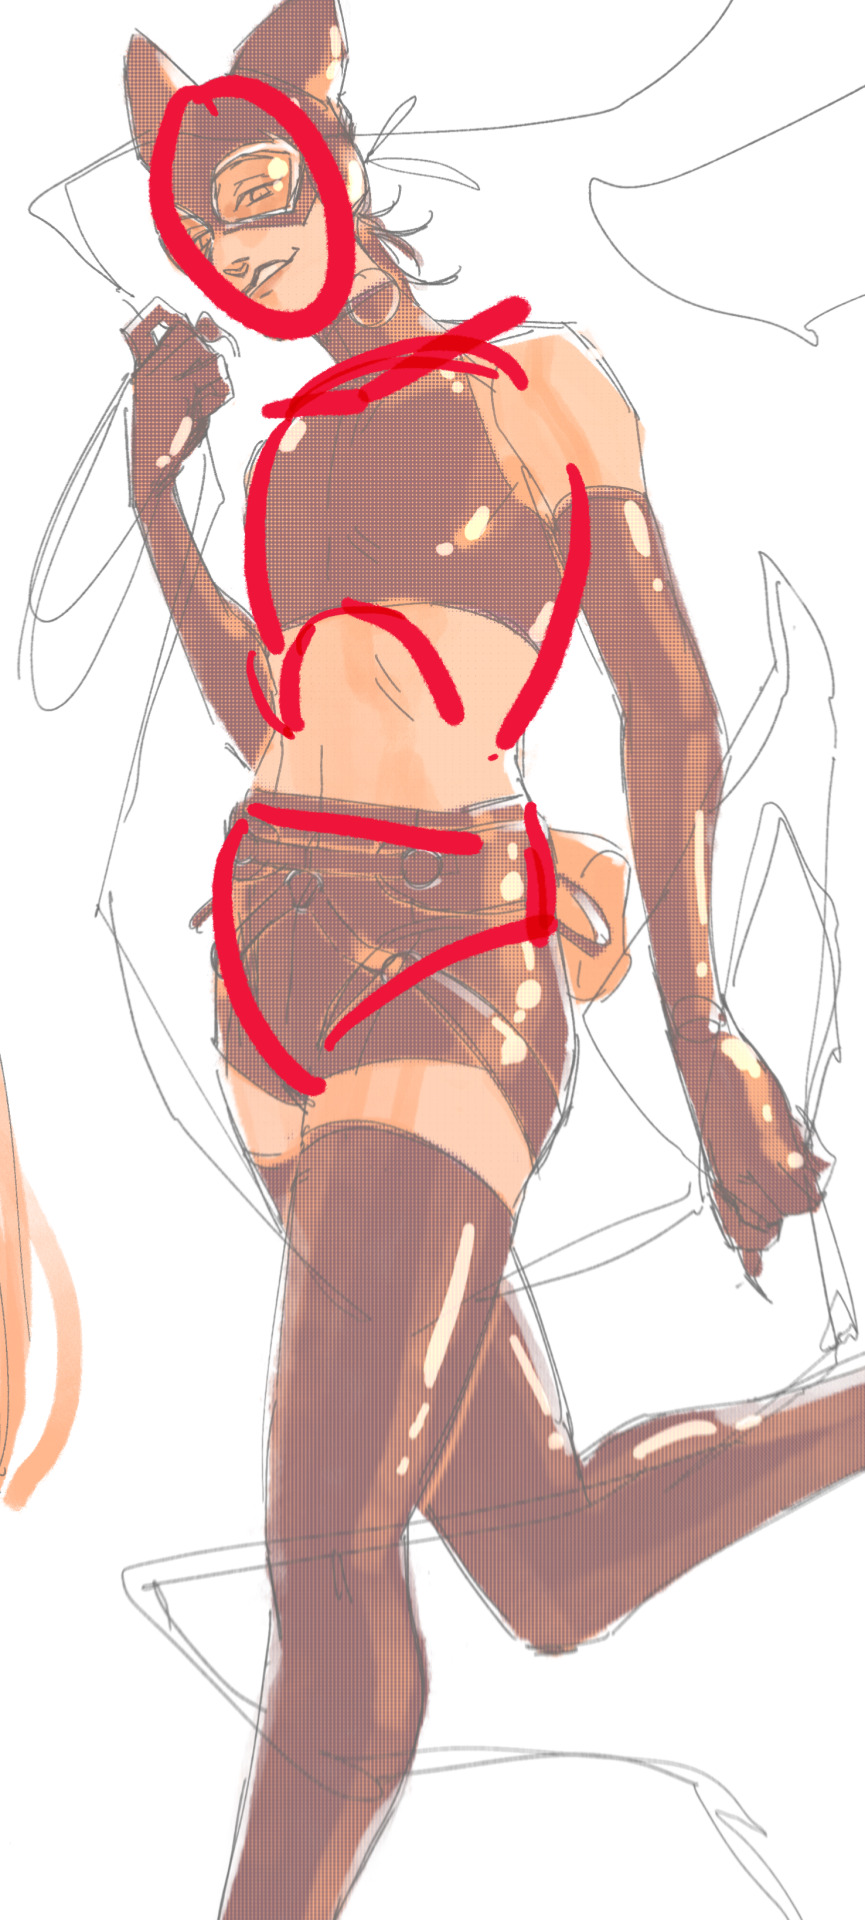
here's a couple more of what i mean by the ribcage-pelvis deconstruction:
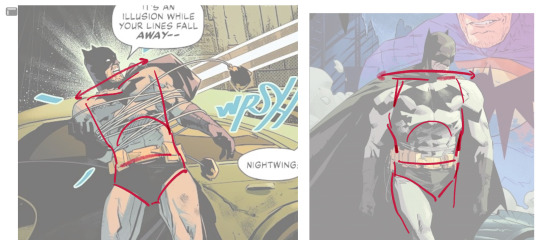
2. push your perspective a little!! imo things look more dynamic if you move your sight-line up or down—the horizontal orange line here. if you look at the panels above, the sight lines tend to be a little low, at around the character's torso or waist. i did the same below with stray!tim
to do this i usually try to get a sense of the space im working in by putting in some sloppy perspective grids
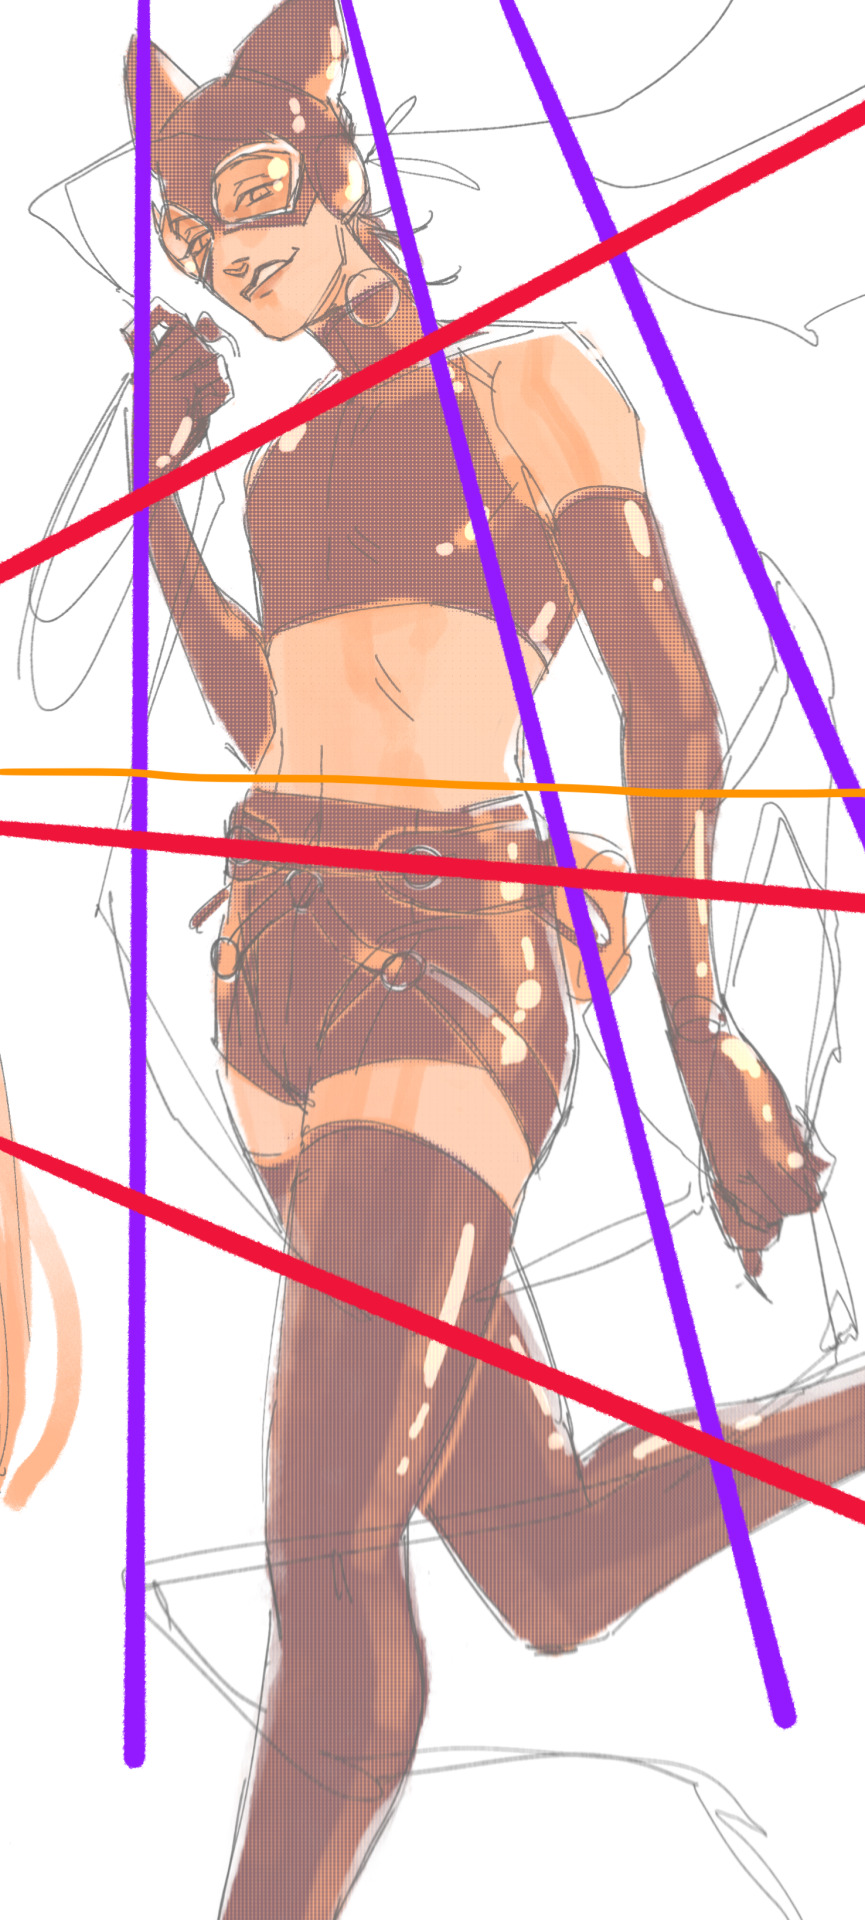
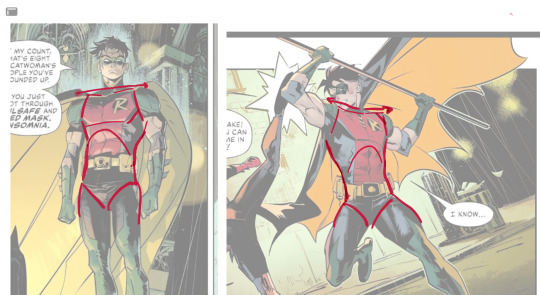
3. S curves!!! exaggerate the lines of the body. the body naturally has parallel horizontal lines—an easy way to get a body to look less rigid is to tilt those horizontal lines which in turn curves the vertical line of the body
this is what a mean by horizontal lines—usually i use the eyes, shoulders, and hips:
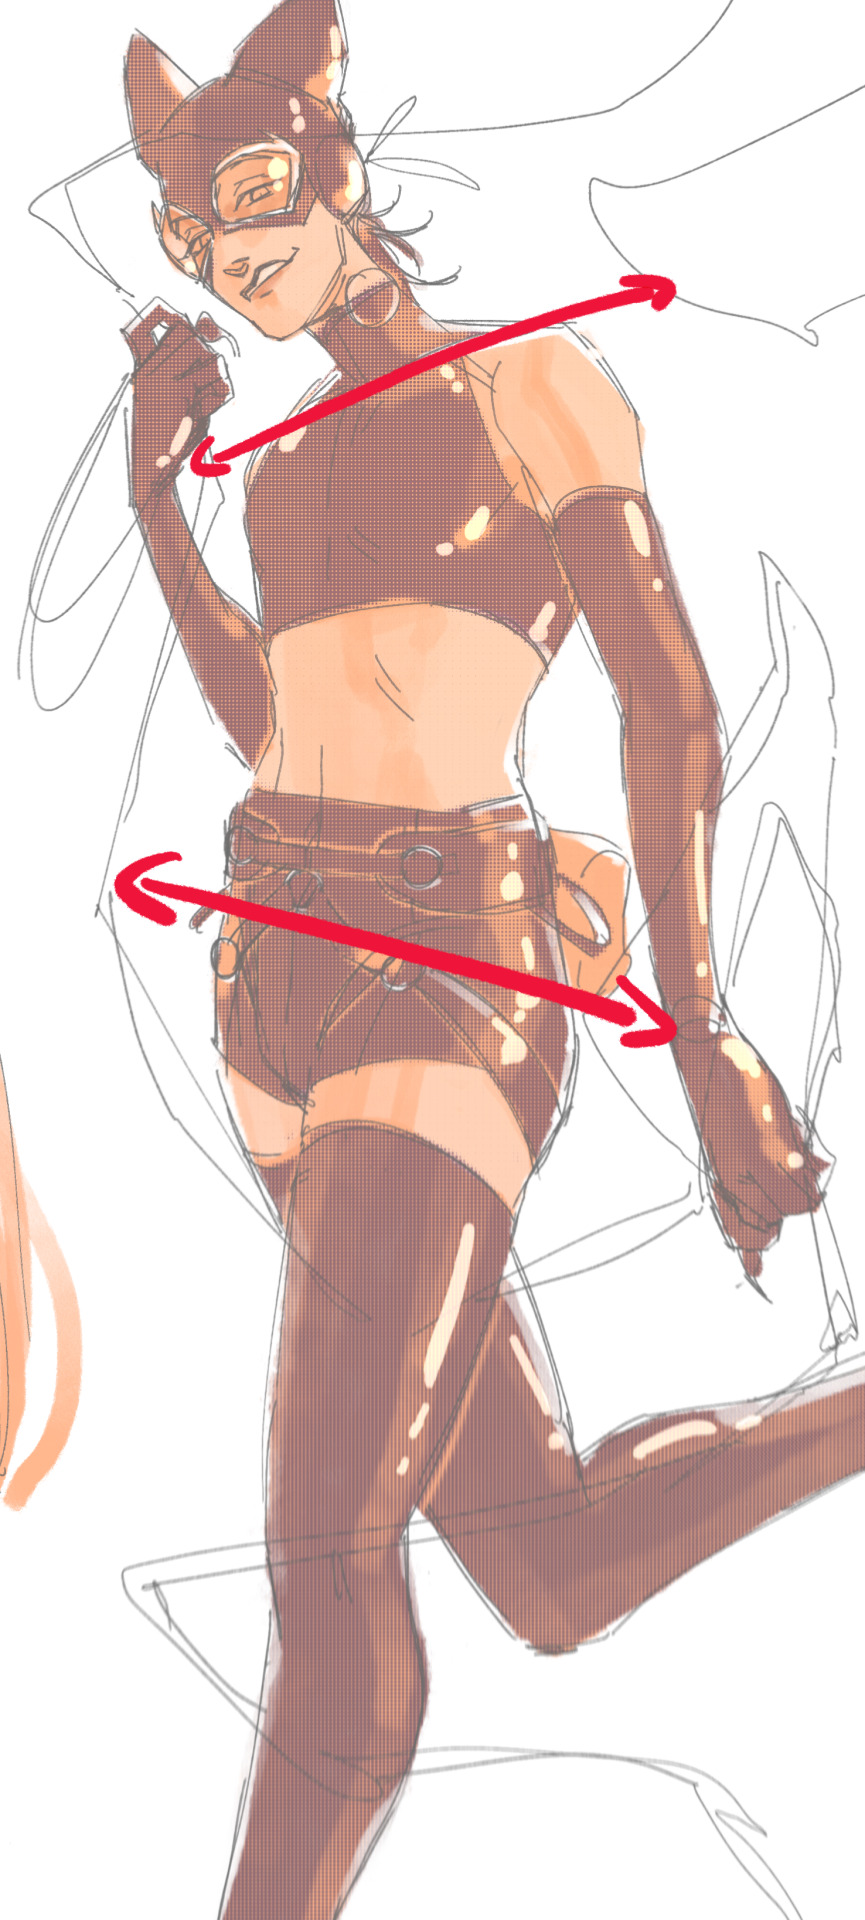
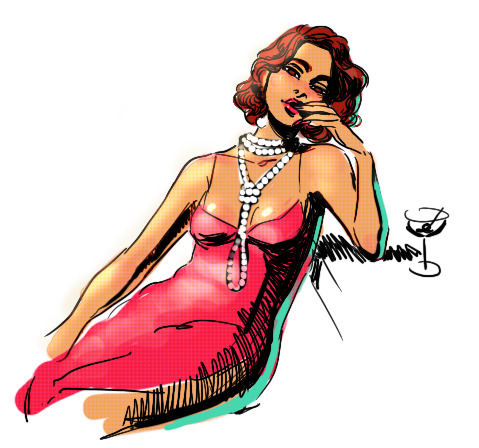
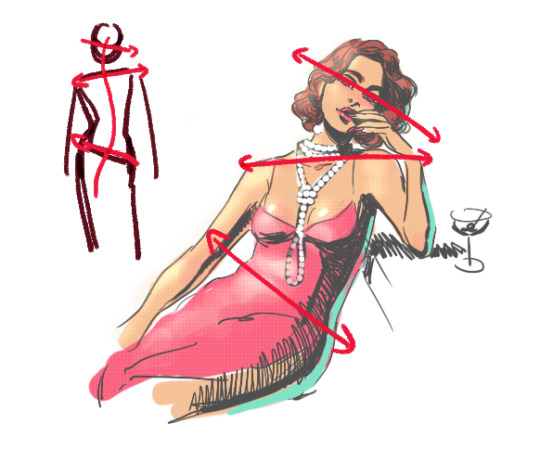
i'm gonna use caterina as a better example—usually you want the horizontal lines to sort of zigzag:
i've also picked up a couple visual tricks that don't exactly add dynamism to a pose? but they do give a static pose a little more oomph. a lot of this is done by visually highlighting one specific point of the body
for our purposes, i'm gonna make the focal point tim's face
motion blur! there are a couple ways to do this. i actually dont like working with traditional motion blur because you have to mess around with selections, so i usually fake motion blur using postional perspective blur:


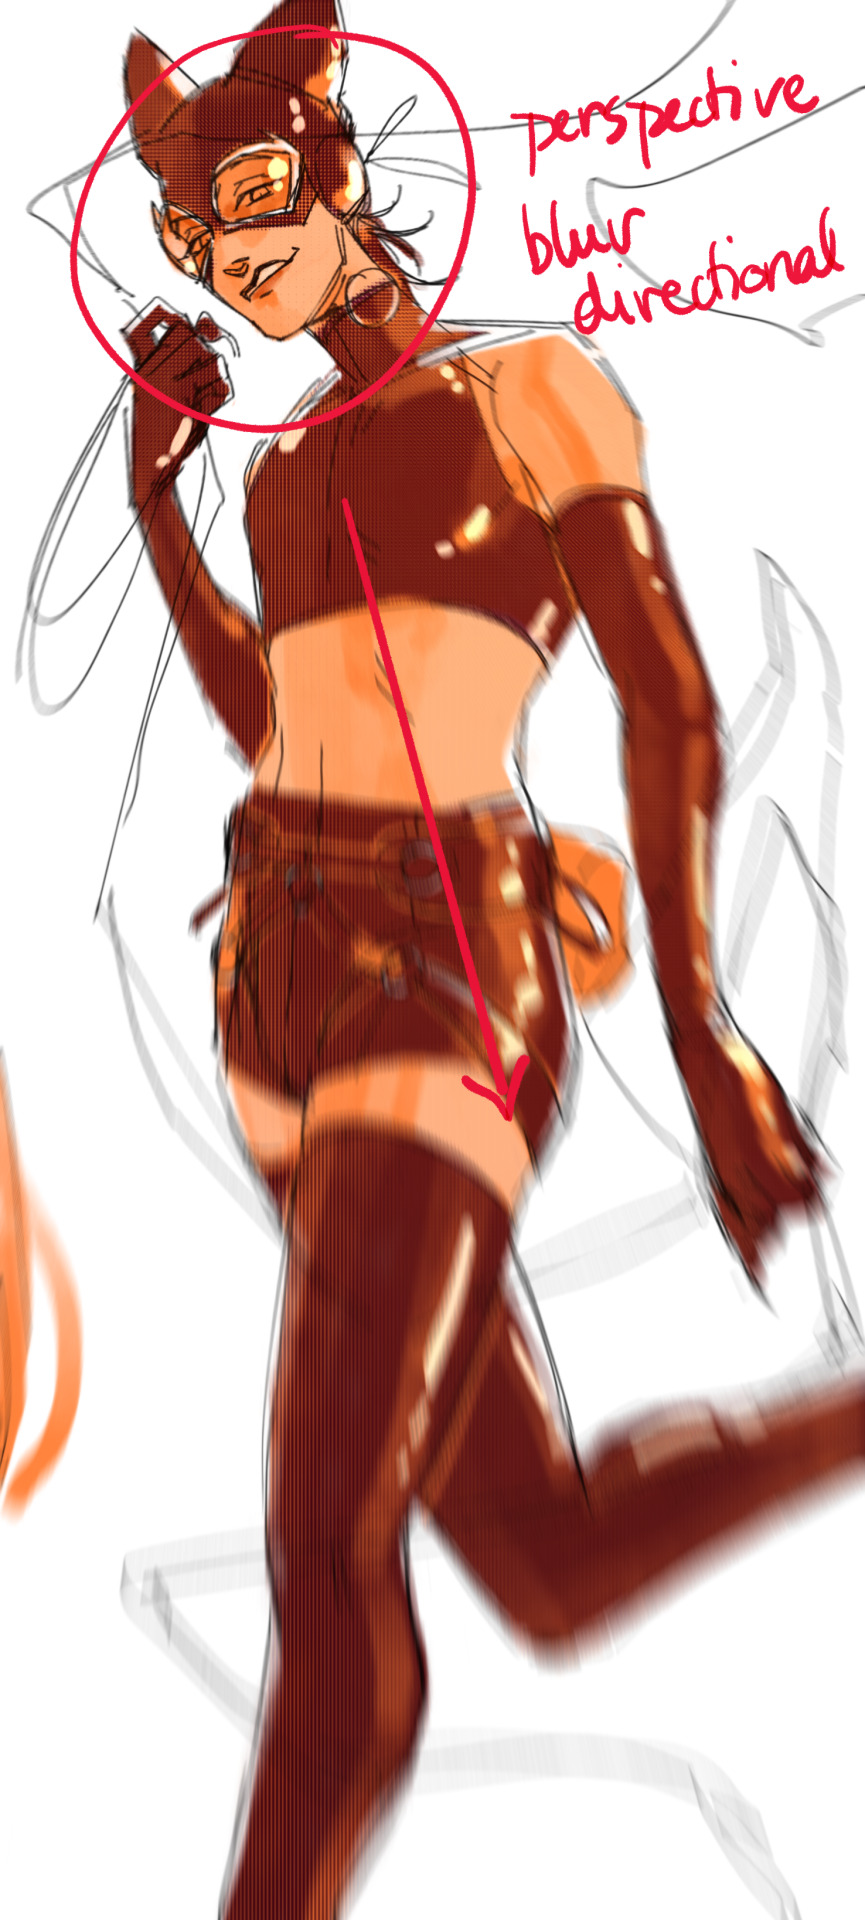
2. gradient lighting—you can add a lot of depth this way. usually i like setting the gradient in the direction of the focal point, e.g. tim's face
below, i added a layer above the base drawing, used an airbrush to get this gradient, and then set the layer to color burn and lowered the opacity. you can also clip the lighting layer to the base drawing and set it to multiply

below, i did the opposite—instead of adding a gradient shadow, i added gradient light. i set the layer to add this time (instead of color burn) and then lowered the opacity again.
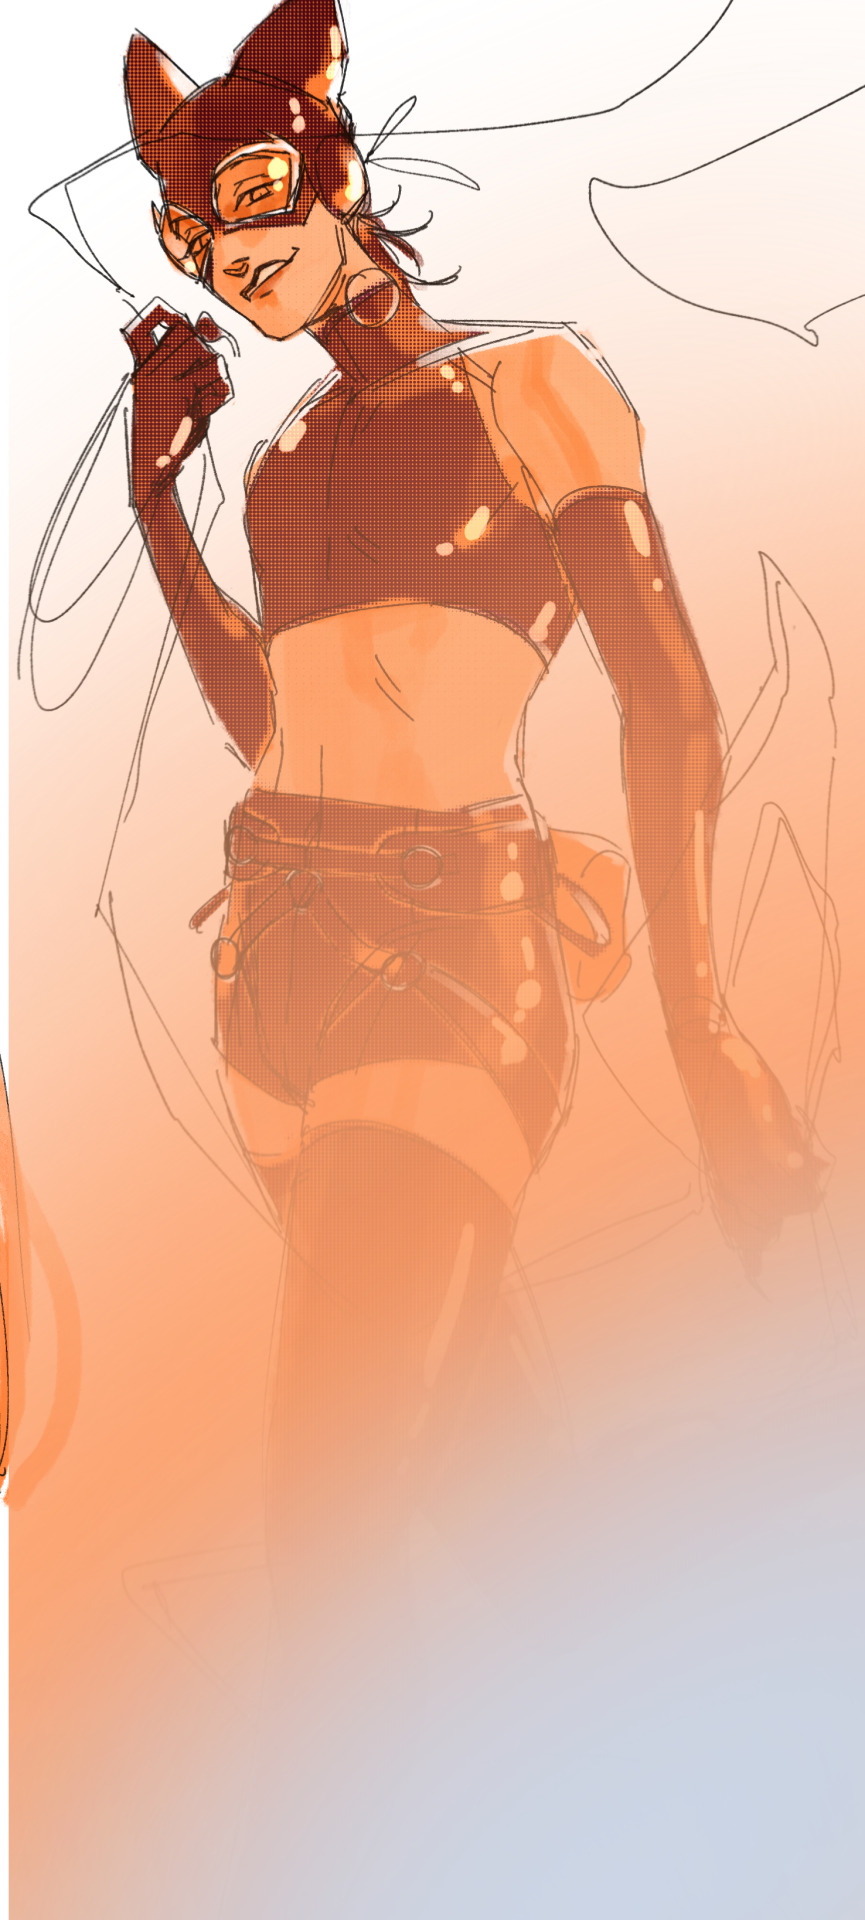
this kinda serves to desaturate the parts of the piece that are less important (ish i was kinda sloppy here), driving the eye to face—the most saturated. the motion blur does a similar thing, where the only thing "in focus" is tim's face
the gradient also sort of adds a directionality to the piece—it starts at the bottom right corner and goes up towards the upper left, causing your eye to follow that same path, which drags your gaze up tim's body
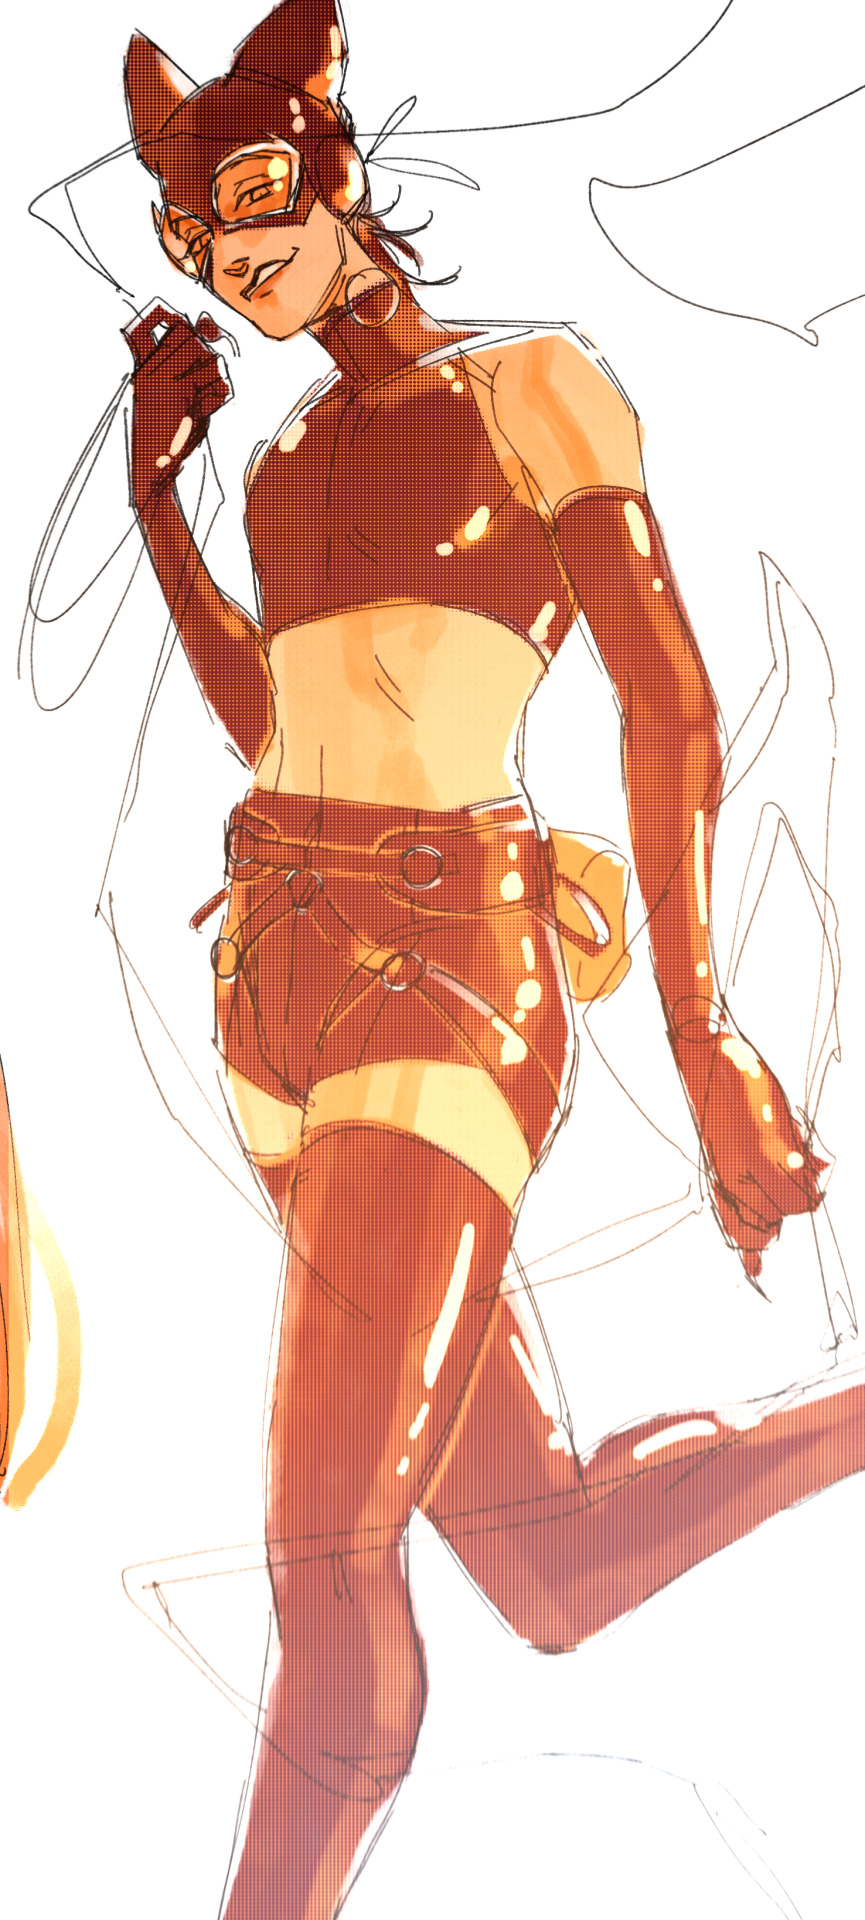
here's what it looks like when i combine 1 and 2:

3. chromatic aberration's been pretty popular recently. it does a similar thing as perspective blur but with more eyestrain (although i went with a really exaggerated version below just to show you what it does) but it looks cool!
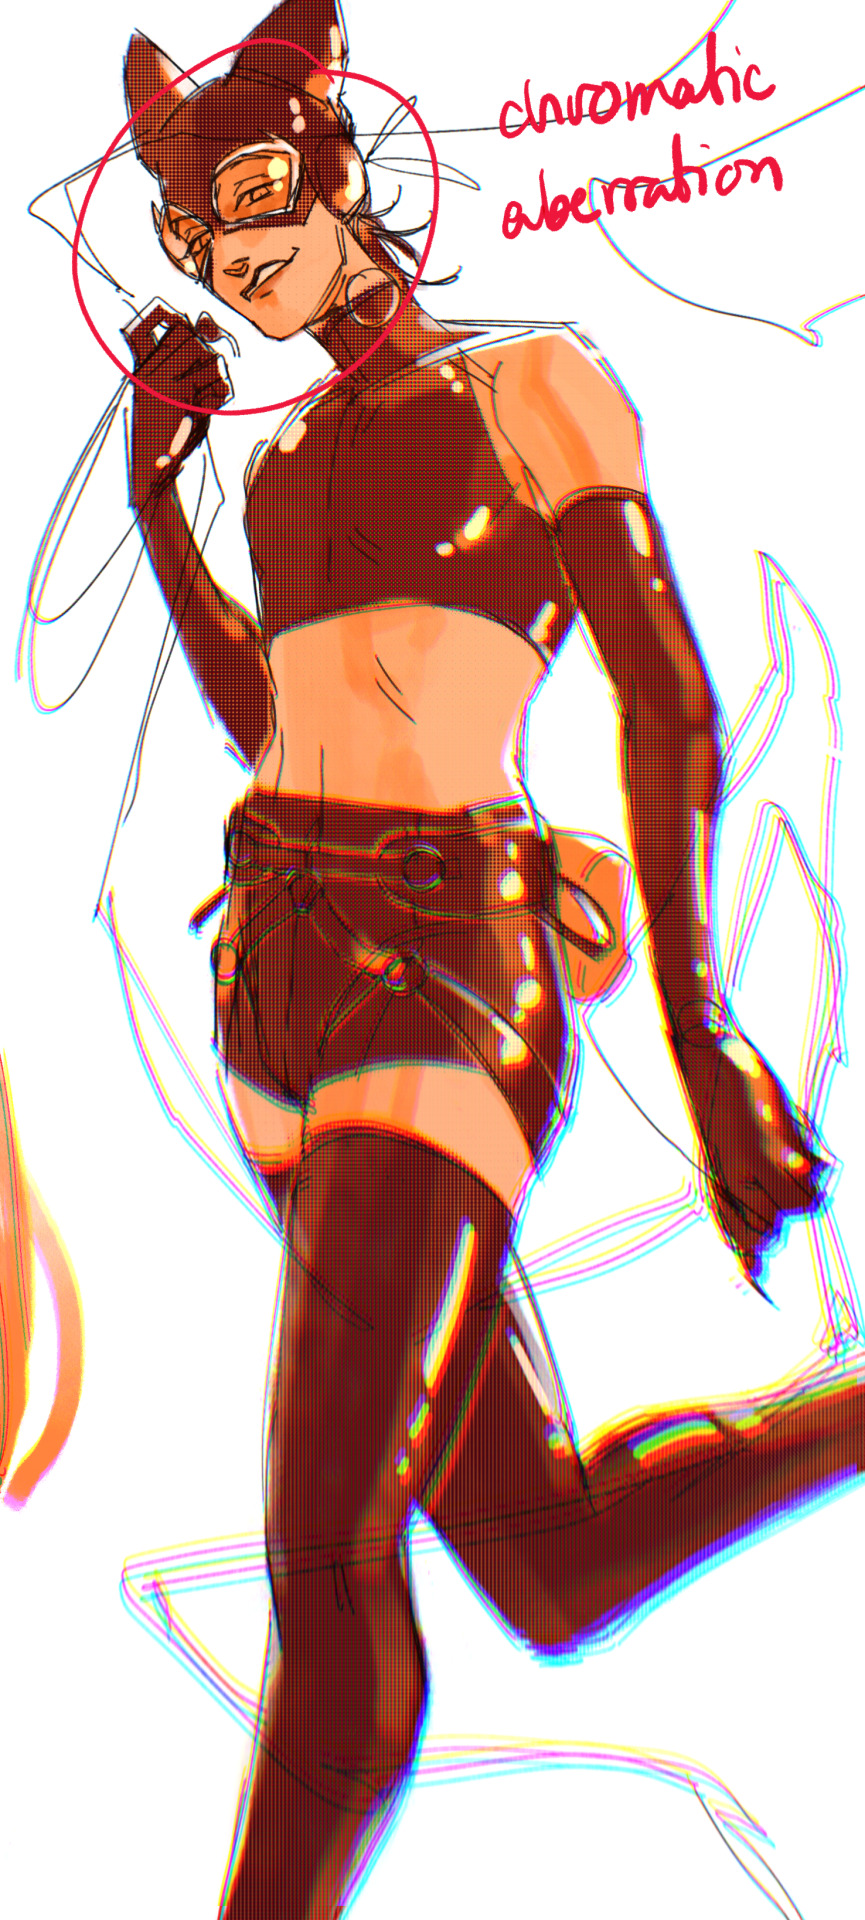
bonus cryptid tim as a reward for getting to the end :-)
#red talks#sart#art tutorial#YeAH UH this got long lmaooo i was on the bus for a Sec plotting this out so#also i am neck deep in a reincarnation/regression manhwa stress hyperfixation so i havent had the brain space to draw#so you get this instead!#if anyone wants recs lemme know lol#thank you anon :)))
68 notes
·
View notes
Text
FIC REC WEEK 14 – AUTHOR WEEK
AUTHOR SPOTLIGHT: La_Temperanza
If you've ever wondered how I and other writers create special work skins for certain fics, look no further! La_Temperanza has a whole library of tutorials for AO3 work skins and general tips and tricks. I've definitely made use of their code for a whole bunch of different projects, and I bet that you'll find something that'll help you in your writing journey.
Here's some of their tutorials that have helped me throughout the years:
Work-Skins:
How to Mimic Letters, Fliers, and Stationery Without Using Images
How to Mimic Author's Notes and Kudos/Comment Buttons
How to Mimic Email Windows
How to Make iOS Text Messages on AO3
How to Create Notebook Lined Paper on AO3
Sticky Notes on AO3 Without Using Images
How to Make Deadpool's Thinking Boxes on AO3
How to Make Newspaper Articles on AO3
Tips and Tricks:
How To Make Images Fit in Mobile Browsers
How to Make Linked Footnotes on AO3
How To Change Text on AO3 When the Cursor is Hovering Over It (Or Clicked on Mobile)
How to Wrap Text around Images
How to Make Customized Page Dividers
How to Make Invisible Text (That Can Be Highlighted)
34 notes
·
View notes
Text
i’ve wanted to learn how to paint digitally for years but i can never fucking grasp it. i’ve tried so many times and i’m not sure what i’m doing wrong, i’m sure there’s a fundamental i’m missing but every beginner digital painting tutorial i’ve used certainly isn’t covering it
#starscream.txt#i guess if y’all have advice for the building blocks i need or specific tutorials you’d rec#i’ll fuckin take em
16 notes
·
View notes
Text
After years of wanting one, but not being able to justify the price tag, I finally treated myself to a PS5. It's been an incredibly rewarding weekend getting to play Spiderman 2 for hours upon hours and not have to worry about work for a while. It's been a stressful year, especially these last few weeks, and I still have a ton of stuff to get done before our winter break, so this was a much needed respite to relax and recharge for the next couple weeks.
#between black friday deals and extra discover cashback#i just couldnt resist#i got the console and the 2 games i really wanted#after 3 pretty full days of play#im 80 percent through spiderman 2#probably wont play again till the weekend#need to catch up on shows after work#im hoping once were on break from work i can start ratchet and clank rift apart#ill have 2 weeks off so i can play as much as i want then!#oh and even the preloaded tutorial game is pretty fun!#i can finish that too#and even though i have all the uncharted games for ps4 im considering getting the remaster pack of 4 and lost legacy#mainly cause i really love the ps5 controler and i kinda want to be able to replay them with it#ill have to look up reviews to see if its worth it#ok im rambling too much#if youve made it this far an have any ps5 game recs i would appreciate it!#im a low effort player lol so i like to have easy/super easy modes#no racing or shooting (unless its an uncharted style game)#i just have awful coordination and cant aim or drive for shit lol#also no scary stuff like last of us#i dont care how good the story is i cannot look at something thag dark for that long#(i also adored Stray but fuck if that sewer level didnt almost kill me)
7 notes
·
View notes
Text
irt 2 someone’s tags on the comic— comic-making is something that i, while tangentially interested in for a while, have no knowledge in. no professional training, no serious experience, nada. i know absolutely nothing abt panel layouts or text sizing that i have not awkwardly gleaned myself from the few comics ive read over the years.
to that end, if u have advice for comic-making or see something i’ve posted and think “hmm that could maybe be better if you did xyz” PLEASE tell me if youre so inclined! really! i’m doing this for fun, yes, but i would love to get better. as long as you’re polite about it, im basically always accepting advice/critique on my artworks, especially areas im less experienced in like comics, 3d art, and so forth
#catboy this is dedicated to u i didn’t want to go bother you specifically but your points were very good and useful— thank you! genuinely!:]#i’d like a lot to improve in comics. i know i will once i start getting the actual comic of shr off the ground (soon god willing)#but i wouldn’t mind getting some basic understanding of things under my belt first#if anyone has youtube tutorial recs…. :pray:#sparks speaks
32 notes
·
View notes
Text
my wife (tik tok)…. shes gone(banned)…….
i got halfway through saving my fic res and fav edits….. nobody talk to me….
#tik tok#tik tok ban#my dc fic recs#MY FIC RECS#MY BOOKS RECS#MY MOVIE RECS#MY SEWING TUTORIALS AND CROCHET IDEAS#im in mourning#what the flip#im actually losing it#dc
5 notes
·
View notes
Text
⏾ ⬫。*₊ SHIMMERING STAR BG : a psd + tutorial .
hey loves ! i know this month i scheduled a tutorial for adobe fonts , but i felt that this tutorial and psd was more appealing ! consider this my halloween treat to u all !
required programs : photoshop ( any version but has only been tested on newer photoshop programs )
familiarity level : beginner to intermediate
disclaimer : i do not own the original gifs . i have edited them in accordance to fair use guidelines .
want access to these psds and the accompanying tutorial ? click the source link and consider becoming a patreon !
#rph#indie rph#rpt#photoshop tutorial#psd#stars background#mine#for patreons#for patrons#rec#tutorial
89 notes
·
View notes
Text
blog dedicated to categorizing and saving various posts i find helpful. main blog @venomgender ;
newly rbed posts almost definitely won't be tagged, but (in theory) they'll all be tagged within the month
tag explanations below cut:
#piracy - self explanatory. has both piracy tutorials and masterposts of pirated media
#digital privacy - posts dedicated to resources on digital privacy; has things ranging from browser extensions to google product alternatives
#cooking - cooking resources. both general how-tos and actual recipes
#trans - trans resources. more dedicated to transmasc than transfem posts just because im transmasc, but has several generalized posts as well
#art resources - self explanatory. has both tutorials and things like resource packs and stuff
#writing resources - self explanatory
#learning - learning resources, typically dedicated to masterposts about learning a specific "thing" (language, sewing basics, etc)
#media rec - media recommendations
#sewing - sewing resources. has both tutorials and sewing patterns
#tech - technology resources. stuff like removing windows 10 bloatware, switching to linux, improving pc performance
#video game resources - resources centered around making video games
#coding - coding resources. from basic language how-tos to how to make your own websites
#save - any other helpful post i see that doesnt easily fit into the above categories. typically has things that help with "adulting" but i dont like that word so im not making a tag for it.
#megathread - any post containing large amounts of links for different things. contains a variety of categories. mildly depreciated in terms of how often i actually tag things this...
#tutorial - posts that teach you things. normally will also be tagged with a more specific category. also mildly depreciated...
additionally anything tagged 'kinda' means it only sort of falls into the tagged category. i tag these things to in theory go through later and see if theres enough similar items to have them been grouped into a new one
#adding all these tags down here for ease of access on mobile if this post shows up in the main tags um. sorry#piracy#digital privacy#cooking#trans#art resources#writing resources#learning#media rec#sewing#tech#video game resources#coding#save#megathread#tutorial
4 notes
·
View notes