#without youtube compression?
Explore tagged Tumblr posts
Visit Tumblr Blog
Explore Tumblr blogs with no restrictions, modern design and the best experience.
Last Seen Tumblr Blogs


Fun Fact
Tumblr is used by 21% of adults online aged 18-29 years.
Text

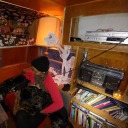
shout out to tango for sharing this old screenshot in stream today to remind me how much i miss lim life ;-;
#it was the first season i watched as it came out and i miss it#team bites my beloved#hermitcraft#life series#trafficblr#glitch talks#its also probably now one of the most high def screenshots???#without youtube compression?
53 notes
·
View notes
Text
The Urbz: Sims in the City opening. Ripped from its disc by me. :) I keep trying to upload this to YouTube, but YouTube keeps gutting its quality to 360px for some reason? So, I'm uploading it & the other cinematics to Tumblr which somehow doesn't let me down!
#the sims#sims#the urbz#urbz#the urbz sims in the city#playstation 2#ps2#2000s#my posts#sims console#video#i will figure out youtube later ...#'COS i wanna upload these to tcrf but. files are too big.#dunno how to compress 'em without losing quality
16 notes
·
View notes
Text
youtube
first run at fighting AI (battler) and i DID IT!!!
i had no idea what to expect going into this fight, so i just took in my current best all-rounder team & it all worked out great! Honestly in retrospect, Ayame wasnt really needed & i could have brought someone like Ren, but! she didnt let me down at all :)
you can see me check the familiars effects a couple times & discount them- sometimes i find that its worth taking them out depending on what they can do (usually give the boss buffs or just hit really hard) but i wasnt finding that the familiars were actually causing me issues in the battle, and they didnt break really easily, so i chose to just let them keep on hitting. with Sana & Yuma on my team, even the double turn wasnt really an issue.
i was kind of surprised by the lack of buffs/debuffa in this battle- considering what some of the previous witches do, this one was remarkably straightforward to get through. i wont complain though, im on Oktavia in nightmare mode right now and i am.... suffering
#idk if these are fun for other people but theyre fun for me! i like to talk about the things i do & why#im not really a serious player so i dont think about the strats the same way someone who Understands everything will do#my team is great & i love them & i dont care if its not The Most Efficient option always#magia exedra#im glad to finally me through battler. latria kept me held up for A While#nightmare is gonna keep me b u s y#(put it on youtube so i could actually upload it without compressing it soooo much! i did not remember to turn the streaming filter on tho)#(had to use youtubes editor to doctor the audio instead. pls excuse that!!! im not taking this seriously.)
0 notes
Text
how to build a digital music collection and stuff
spotify sucks aaaass. so start downloading shit!!
file format glossary
.wav is highest quality and biggest
.mp3 is very small, but uses lossy compression which means it's lower quality
.flac is smaller than .wav, but uses lossless compression so it's high quality
.m4a is an audio file format that apple uses. that's all i really know
downloading the music
doubledouble.top is a life saver. you can download from a variety of services including but not limited to apple music, spotify, soundcloud, tidal, deezer, etc.
i'd recommend ripping your music from tidal or apple music since they're the best quality (i think apple music gives you lossless audio anyway. .m4a can be both lossy and lossless, but from the text on doubledouble i assume they're ripping HQ files off apple music)
i also love love love cobalt.tools for ripping audio/video from youtube (they support a lot of other platforms too!)
of course, many artists have their music on bandcamp — purchase or download directly from them if you can. bandcamp offers a variety of file formats for download
file conversion
if you're downloading from apple music with doubledouble, it spits out an .m4a file.
.m4a is ok for some people but if you prefer .flac, you may wanna convert it. ffmpeg is a CLI (terminal) tool to help with media conversion
if you're on linux or macOS, you can use parameter expansion to batch convert all files in a folder. put the files in one place first, then with your terminal, cd into the directory and run:
for i in *.m4a; do ffmpeg -i "$i" "${i%.*}.flac"; done
this converts from .m4a to .flac — change the file extensions if needed.
soulseek
another way to get music is through soulseek. soulseek is a peer-to-peer file sharing network which is mainly used for music. nicotine+ is a pretty intuitive (and open-source) client if you don't like the official one.
you can probably find a better tutorial on soulseek somewhere else. just wanted to make this option known
it's bad etiquette to download from people without sharing files of your own, so make sure you've got something shared. also try to avoid queuing up more than 1-2 albums from one person in a row
tagging & organizing your music
tagging: adding metadata to a music file (eg. song name, artist name, album) that music players can recognize and display
if you've ripped music from a streaming platform, chances are it's already tagged. i've gotten files with slightly incorrect tags from doubledouble though, so if you care about that then you might wanna look into it
i use musicbrainz picard for my tagging. they've got pretty extensive documentation, which will probably be more useful than me
basically, you can look up album data from an online database into the program, and then match each track with its file. the program will tag each file correctly for you (there's also options for renaming the file according to a certain structure if you're into that!)
there's also beets, which is a CLI tool for... a lot of music collection management stuff. i haven't really used it myself, but if you feel up to it then they've got extensive documentation too. for most people, though, it's not really a necessity
how you wanna organize your music is completely up to you. my preferred filestructure is:
artist > album > track # track

using a music player
the options for this are pretty expansive. commonly used players i see include VLC, foobar2000, clementine (or a fork of it called strawberry), and cmus (for the terminal)
you can also totally use iTunes or something. i don't know what audio players other systems come with
i personally use dopamine. it's a little bit slow, but it's got a nice UI and is themeable plus has last.fm support (!!!)
don't let the github page fool you, you don't have to build from source. you can find the releases here
click the "assets" dropdown on the most recent release, and download whichever one is compatible with your OS
syncing
if you're fine with your files just being on one device (perhaps your computer, but perhaps also an USB drive or an mp3 player), you don't have to do this
you can sync with something like google drive, but i hate google more than i hate spotify
you can get a free nextcloud account from one of their providers with 2GB of free storage. you can use webDAV to access your files from an app on your phone or other device (documents by readdle has webDAV support, which is what i use)
disroot and blahaj.land are a couple providers i know that offer other services as well as nextcloud (so you get more with your account), but accounts are manually approved. do give them a look though!!
if you're tech-savvy and have an unused machine lying around, look into self-hosting your own nextcloud, or better yet, your own media server. i've heard that navidrome is a pretty good audio server. i unfortunately don't have experience with self-hosting at the moment so i have like zero advice to give here. yunohost seems to be a really easy way to manage a server
afterword
i don't know if any of this is helpful, but i just wanted to consolidate my personal advice in one place. fuck big tech. own your media, they could take it away from you at any moment
2K notes
·
View notes
Text
quinny's tips & tricks for sensitive littles !
[cg & no cg inclusive]

for littles with a cg,,,
💧 making your boundaries and needs clear from the start <3 this will help your caregiver understand what you need from them and lets them know that you need extra gentleness !
🐑 finding ways to make vocalizing your feelings less scary (i.e emotion flash cards, drawing sad/happy/scared faces, etc etc)
🫧 find and have your cg read affirmations for people with sensitive hearts (@/hopehealingarts on ig usually has a ton!!)
☁️ ice/cold compress for after tears!!

for littles without a cg,,,
💧 find agere-safe comfort media!! whether it be asmr, a book, a show/movie. anything to help distract your tears away! i personally like vooks on youtube !
🐑 journaling/coloring when you get big feelings can help the emotion feel less big !!
🫧 be patient with yourself <3 it's okay to just cry it out sometimes !
☁️ be gentle with yourself <3 it's totally okay if it takes you longer to do a certain activity or if you need a mental health break !! you are not a burden <3
[dividers by @saradika-graphics]
#agere#age regression#fandom agere#age regressor#age regression sfw#age regression blog#sfw agere#sfw age regression#agere blog#agere classroom#agere community#agere little#agere sfw#age regression community#age regression caregiver#age regression moodboard#agere moodboard#agere caregiver#safe agere#age regression info#agere info#boundaries#healthy communication#healthy coping mechanisms#sfw age dreamer#age dreaming#age re safe space#age re blog#petre#pet regressor
639 notes
·
View notes
Text
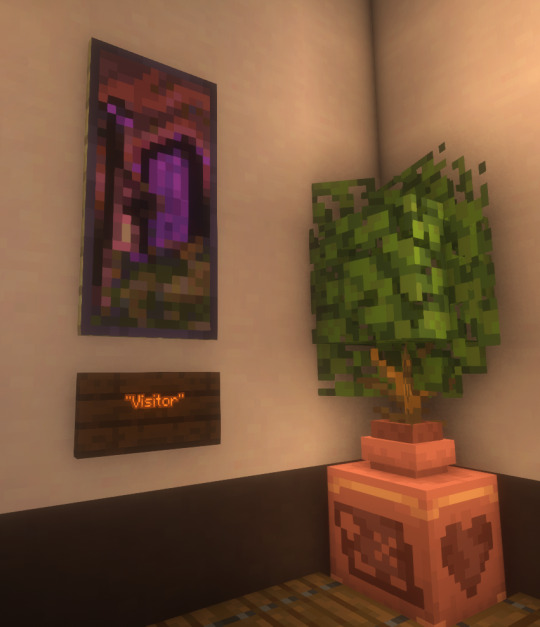
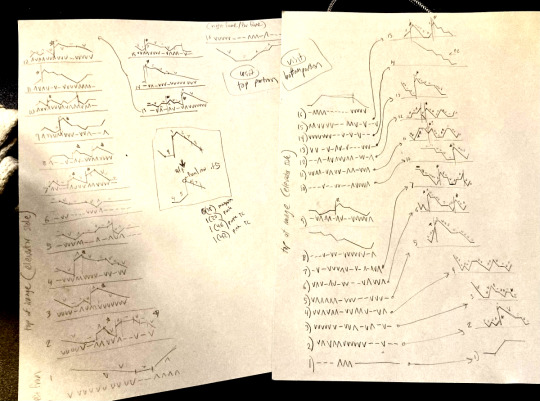
I finally finished a NEW CUSTOM MAP ART!!! "Visitor," a portrait of an enderman, is extra exciting because it's my first full-palette map painting, meaning I used block height to access all the highlight and shadow colours available!! More on the full process under the cut, but the short version of what this means is:
ITS A VERY COMPLICATED CONSTRUCTION. I created the art, then planned and built this manually, without any mods or schematics for construction. Huge props again to everyone else in the server for helping me gather all the materials to make this absurd thing possible!!!
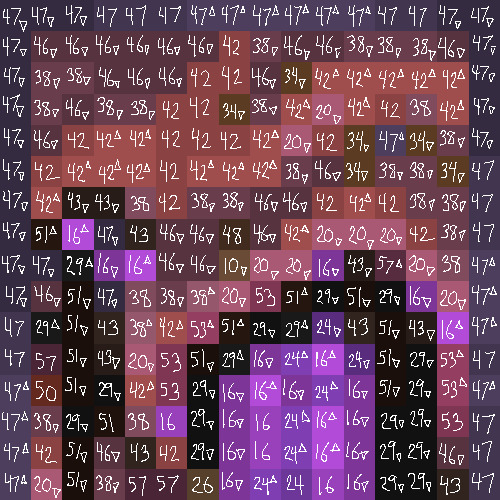
This was the original art I made for it! I'm a huge fan of the "compressed" look of the vanilla paintings, so I've been starting with a large image and shrinking it down, though there were a lot of pixel tweaks to get it to read well. After shrinking it to 16x32 (for an art made of two maps), I convert it to a limited palette that I've set up to match the colours minecraft actually has available:

The map palette is actually tremendously limited, so figuring out a painting that will still look good with that constraint is a challenge in and of itself!
Anyway, the way minecraft maps work, a block that is Taller than the block to the north of it shows up with a slightly lighter colour, and a block that is Lower than the block north of it shows up on the map with a slightly darker colour. So when making a key for this one, I marked all the squares with a little arrow if it's the lighter or darker version:
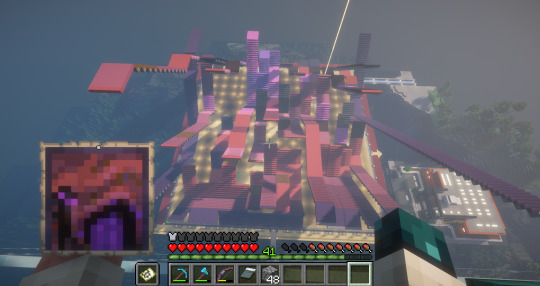
Each "pixel" here is a full stack of blocks on the mapped area: 64 blocks, 8 rows of 8. In order to achieve the affect of every block in a given pixel being taller or shorter than the block to the north of it, dark and light shades need to staircase either up or down. Because staircasing downwards in survival sounds even worse than this madness, I did some planning to make sure each of the "downwards" staircases would touch the ground, so I could simply staircase up from south to north instead. This involved figuring out how many up and down movements were in each individual column and planning out 32 little layouts:
It's worth noting that if you look up minecraft map art on Youtube, most of what you'll find is either, the simple realisation that placing blocks allows you to make custom map art, or an explanation of how to use a generator that will let you plug in any picture and then produce a schematic for you. It's very cool that these exist, but I wanted to do full palette art myself, without an auto-generated schematic, and at the time THERE JUST WEREN'T ANY TUTORIALS FOR HOW TO DO ALL THIS?? Now, having the experience of finagling all this, i think perhaps the reason is that this is a mad undertaking.
ANYWAY: PROGRESS SHOTS!!
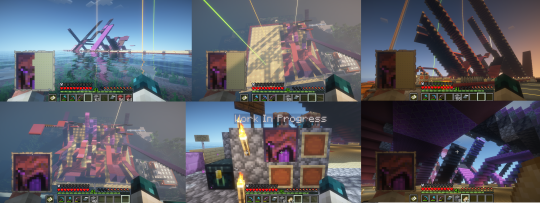
I actually love how the staircases look..... its like some kind of modern sculpture
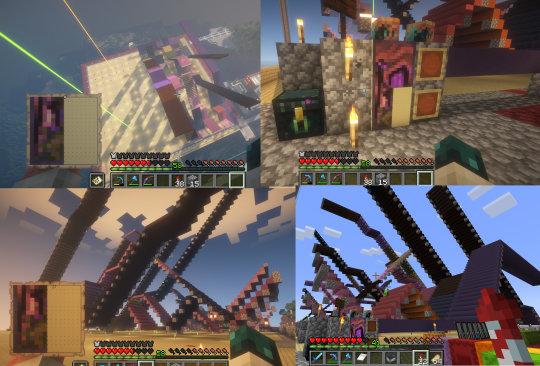
Fewer shots of the second half since I did it on call with friends; the last screenshot is one Thren took of me activating the new locked map to use for the gallery.
Once these paintings are done, I lock the finished maps, make copies, and stock them in the art gallery so other friends on our server can also put these paintings in their homes! It's a lot of work, but really rewarding to see my art decorating various buildings around the server. ;u;
I have one more custom full-palette painting I've done the art for and gathered all materials for; I still need to do the full key and plan staircasing for it before I can start, but HOPEFULLY if my resolve doesn't waver there'll be at least one more of these!!
#minecraft build#minecraft screenshots#minecraft#block game liveblogging#minecraft map art#GENUINELY SO PROUD OF THIS ONE#bsl shaders#im so tempted to make some sort of tutorial on doing this by hand sometime. you shouldnt do it by hand. but a tutorial should exist!!
485 notes
·
View notes
Text
HOW SHIFT USING THE GATEWAY TAPES (UPDATED)
Hey, I want start off to apologize. I'm so sorry for bringing awareness to the tapes and then not clarifying on what to do or how to start. I did try to answer every question I can. I did post a guide a while back but Im still remastering it
IMPORTANT VOCAB
F10- body asleep and mind awake
F12- having your consciousness in the universe and expanded
HOW TO START:
So first off you need click on drive. Once you open the drive you will see tapes.
Before staring the tapes you NEED read a MANUAL. So if you look at your bottom left corner. You will see a PDF and it will have a picture of a old man. He's name is Bob. The creator of the tapes. I love Bob.
Once you click on the tape. You scroll down and you see titles. These titles are the titles of the tape in the folders that your going to use. At the bottom of the titles, there going be a discription. These discription tell you what the tapes do but also how they work and what you need to do during those tapes. Once your done your ready to go
STEPS
Step 1: open the drive and you will see the folders of tapes. ‼️DO NOT USE ANY OTHER AUDIO EXPECTED THE DRIVE. YOUTUBE COMPRESS THEM AND MAKE THEM NOT WORK‼️
[GATEWAY TAPES DRIVE ](https://drive.google.com/drive/u/0/mobile/folders/1vZJg5oJvfYVwWryJh05pfkZTV0cnd026)
Step 2: click the bottom far left corner. It's a Manuel and has a picture of a old guy smiling (bob)
Step 3: find the title of the tape your going to use. Read it carefully and know what's going happened and what to do
Step 4: go to discovery and play the first tape. Don't fall asleep! Be awake during the tapes!
Great! Keep doing these tapes for each tape. Each tape you must do it 3 times or more. So you can get familiar with it. BUT MOST IMPORTANT IF YOUR NOT READY TO MOVE ON OR YOU FEEL LIKE YOU NEED KEEP DOING. THAT'S OKAY, SHIFTING IS ALWAYS GOING BE HERE SO DONT RUSH
‼️PAY ATTENTION TO THIS PART‼️
Once you reach Tape 3- advanced F10. There's a trigger that YOU MUST MASTER. The whole point of discovery is to train your brain to be awake and body asleep.
Now continues the normal steps like the other but this time. You need keep doing it until your able do It without the tapes. This is very important because when your trying reach F12(the goal). You need to be in F10 first and master It already
After that, you NEED to do the other tapes like the normal steps. Because the 4 tape is to have fear go away and if you blockages. The 5 is for awareness while you sleep and 6- free flow- is to freestyle
‼️Make sure to let go any expectations of these tapes because this will hold you back! Put your expectations and your needs in the energy box!‼️
But you can go to F12 tape.
F12 tape is next to discovery. Know as Wave 2. A lot of people ask why only that tape and not the others. Well! If you do F12 tape and in beginning bobs explains that after F12 tape. Those tapes are TOOLS. Those tools involved with manefisting, remote viewing, answering questions etc (I recommend you to check it out)
So the thing you need to do is master F12 and then shift!
Tips and questions
Q: what are gateway tapes?
A: here's some recourses that explains it way more better then I ever could
[gateway tapes ](https://youtu.be/46E_FX-KxZ8?si=yV8dqgoBdcNJXclD)
[Gateway tapes CIA EXPLAINED ](https://youtu.be/HOFq3ruef7I?si=JbwpcgnZ9rrbGyyz)
Q: can I shift at F10?
A: yes you can. It's possible but it's not really meant for that. Its more of SATS approach if that's what you're looking for because F10 is mind awake and body asleep
Q: how many times do I listen to it
A: as many times you feel like. I personally listen to it 3-4 times a day but only because I'm in summer break. Whatever works in your schedule
Q: how do I know I'm in F10?
A: your body is heavy and your limbs are numb. Your body is supposed to be asleep. Many people reported that the hear themselves snore. Me personally, my breath is non-existent and my chest is numb in away. Or like barely there. Trust me you will know. Ofc this doesn't mean you can't move you body at all. You can move your body in F10 but need the WILL to move your body. It can be different from everyone
Q: I tried it couple of days, why is it working?
A: first off, you need patience. This is practice. It's like a baseball player wanting to be the best pitcher in the world but they throw the ball couple of times and then when it's not right. They run and cry in there room. You need take the tapes seriously not half ass it and be PATIENT. Don't rush things. That's the worse thing you can do because you will miss important cues and it's going be all bad.
Q: I keep falling asleep why is that
A: your brain and body is not used to it. Your brain isn't normal active. Its active but it's going through your sleep cycles. So having your brain be in vibration state of being awake and your body being sleep cycle. It's going get confused because it's not used to it. That's why the tapes train it.
Q: do I need earphones or headphones when listening to tape
A: yes, you need ones that aren't noise cancelling and make sure that you hear bob in your right ear. Only because there certain sounds that play in both your ears for your brain to sync.
Q: are these tapes actually going make me shift
A: yes, I believe it will. The only reason why I personally believe that anyone can 1000 percent shift because these gateway tapes were run by scientist and actually doctor in fields to perfect it. Not only that CIA agents use these and it's approved by the CIA. There actually evidence and research done. It isn't like some random teenagers made a method up in there room. These tapes are designed to open the human mind and Bob himself even talked to alter version of himself with these tapes.
‼️MOST IMPORTANT TAKE‼️
Now, you gotta have open mind and believe it too. You cant go in the tapes with a negative mindset and expect a beautiful outcome. This is in every method you used..not only the gateway tapes. If you believe it won't work because whatever the case then obviously it won't work because your mind is going block everything and not letting it's self In general. This is life In general.
#reality shifting#shifting blog#shifting community#shifting antis dni#law of assumption#void state#shifters
1K notes
·
View notes
Text


Burps
Note: random lil blurb my brain thought of
Warnings:none!

You and Chris sat together on his bed you cuddled into his side as you both sip on large sodas Chris had brought home from 7/11. He was obviously drinking Pepsi and you were drinking sprite.
The YouTube video was all you focused on. You didn’t care about anything in that moment too caught up in the video.
After a few moments you went to yawn and as you did quite a rather large burp slipped past your lips. You immediately covered your mouth. “Chris I think there’s a ghost…” you tried to say without giggling.
Chris looks at you and slightly raises an eyebrow. “Mmm really..?” He asked playfully. You nod trying to compress your smile. “I’ll just have to call Sam and Colby to help..” he joked taking a sip from his Pepsi. You giggled slightly and nodded.
After about 5 minutes Chris smiles looking down at the top of your head and lets out a burp. “Wooow babe I’m really starting to get freaked out..” he giggled as you nodded laughing.
#sturniolo triplets#chris sturniolo#reqs open#sam and colby#chris x reader#christopher sturniolo#pepsi#sprite edit#request#big burps#fluff#chris sturniolo fluff
189 notes
·
View notes
Text
Going to the doctor for chronic pain in legs while fat
Me: hi my feet get really swollen and painful if I stand or sit with my feet down for longer then 30 seconds or if it's really humid or if the temperature drops or if the air pressure is wrong. And I will wake up like that and be unable to walk without excruciating pain. Please help.
Doctor: you need to move around more
Me: I would love to but I can't because of the pain. The pain is so bad it makes me want to throw up.
Doctor: okay you need to lose weight and move around more
Me: can you give me pain killers that will stop the pain so I can move around?
Doctor: no
Me: okay can you give me advice to deal with the pain without medication so I can move around more?
Doctor: yes! Lose weight :) and move around more :)
Me: why do I bother?
Anyway actual things that have helped me:
COMPRESSION STOCKINGS. You can find ones for fat people that aren't 50 quid if you look around enough
HYDROTHERAPY POOLS: just being in the water in general. If you can do an aquafit class all the better
SITTING EXERCISES: you can find youtube videos for gentle exercising if you need to
TENS MACHINE: YMMV if it works it is a blessing if it doesn't you spent 30 quid on something that doesn't work which sucks ass
140 notes
·
View notes
Note
More yandere jock?
Yan Jock x Girlfriend Reader HeadCannons
Here are some headcannons because I am feeling the WORST case of writers block

Jordan is the kind of boyfriend that will not only offer his hoodie at every chance he'd also leave them around your room with your permission. You will find his shirts, socks, and of course his boxers. He would go feral seeing you wear his boxers as sleep shorts.
Wants to learn all about your hobbies the cuter the more he is curious. You knit? He is watching YouTube tutorials. You write? He commissions a fic. And if you do make up he would offer to be your canvas. Jordan may be a masculine man but that will never stop him from letting the love of his life to show him what she can do.
Loves going on drives in his car. Letting you pick the playlists
"You have a magic touch when it comes to music babe"
Rolls down the windows and will sing along even if he has no clue the lyrics. If you put on classic rock he would drum his fingers on the wheel and Jordan would fall even harder in love with you.
Puts a decent amount of time into his appearance and for a long time was very confident in it...then he met you. Buying $600 colognes and learning what skin care is. Jordan needs you to admire him. If you compliment his hair one day he will style it that exact way for the rest of the week. His charming smile doesn't fade when you're around.
If you ever mention liking something expect it soon after. Oh you like that teddy? It's on your bed the next day. You really want to try a new flavour of your favourite drink? Jordan's outside with two he wants your thought on everything about it. Don't even with jewellery. It's in around your neck the next morning.
Like most yans he doesn't bother trying to hide his feelings for you. Has you saved in his phone as "Wifey" and is constantly referring to you as the wife much to his friends disgust.
"She's been with you for what a week?"
That friend oddly is missing a tooth and can't maintain eye contact with Jordan now but I'm sure it's nothing. You've never even seen Jordan raise his voice.
Despite being the most golden retriever type of boyfriend Jordan hates being called one. Sure he waits outside all of your classes and literally paws at you when you're busy not paying attention to him, but he's a man not a dog.
He will never say no to head scratched though
Send you pictures of him at the gym, asking for your opinion on how much he should lift or if you think he looks cute in his new compression shirt
"Sweetheart do you think the red looks good on me? Be honestttt"
If you answer no Jordan calls you and asks you why not and refuses to let you go without a proper answer. He needs to be perfect for you and wish washy answers will not do.
He is quite boring outside of school and as a result will follow you around. If you have work then he is outside in his car looking at photos of you and re-listening to voice notes you left him. If you have an extra curricular you better believe he's joining it to be with you.
Subtly asks for you to paint his nails. He doesn't want pink or anything...just maybe a navy blue. He would frame it as if it were your idea but you both know it was 100% his and that he wants to show you his feminine side!!
Peg him
Who said that.
Anyways I hope you all enjoyed these headcannons! If you'd like to see some more for my other characters let me know and I would love to <3
108 notes
·
View notes
Text
Binding
Binders
I found that Spectrum Outfitters worked best for me (prices range from $50-$39). I also have binders that are older and stretched out or that don’t work as well (like gc2b) that I use when I don’t need as flat of a chest because they are easier on my rib cage lol. If you do that, do NOT count that as a break!
Practice safe binding!
Don't bind for more than 8 hours
Don't sleep in a binder
Don't exercise in a binder
Get the right size
Try to only wear a binder for 5 or 6 days a week (this one is hard, I know)
If it hurts, take it off!
If you notice bruising, something is wrong! Your binder might be too small or you may be wearing it for too long.
TransTape
Wearing binders all the time is not too good for you so I recommend using a variety of different binding techniques. One is TransTape!
The reason Ace bandages are unsafe is because as you breathe it gets tighter and tighter and can really hurt you. But TransTape doesn't do that, it's like the tape athletes use when they sprain their ankle or something. It's safe as long as it is used properly. Plus, you can wear it for up to 5 days, exercise and sleep while wearing it, and it's water proof!
TransTape isn't the only brand of course, but they do have a lot of great resources.
Learn more at their website here. I recommend starting with this page and the FAQ.
KT tape is another option if you cant afford/arent allowed to order TransTape. You can find it at most drugstores and box stores for relatively cheap. The adhesive isnt as strong as TransTape, keep that in mind when applying.
Men's Compression Shirts *I have not used these myself (yet) but I hear they work pretty well*
Made for cis men with gynecomastia but hey we can use em. Obviously will work much better for smaller chests, but could still do something for bigger chests, maybe for under a hoodie?
They won't flatten you as well as binders but the goal is more to masculinize the shape of your chest than to completely flatten it. They are also safer than binders.
Other stuff
The color black will make you look flatter
Layers! Lots of layers! (don't overheat)
Sports bras
Compression bras
Button ups <3333
Resources
Pain-Free Binding Techniques | Youtube Video by Arthur Rockwell
Binding 101 - Point of Pride
Binding Safely - Spectrum Outfitters
How to Hide Your Chest (without a binder) | Youtube Video by Iris Olympia
Binder Care - Spectrum Outfitters
Please free feel to add!
#binders#chest binding#chest binders#trans tape#transtape#binding techniques#safe binding#ftm#transgender#trans#transmasc
546 notes
·
View notes
Text
Domestic Bucky Barnes Fluff
A/N: takes place after The Falcon and the Winter Soldier.
Picking out clothes was an ordeal, fashion has changed so much. Thankfully the Henley cut of shirt stayed in fashion. He tends to stick to classic styles and the muted less noticeable colors.
He has started reclaiming each room of the tiny apartment, the bedroom too daunting started with the kitchen. Learning how to cook the basics, from YouTube videos, cookbooks and trial and error he’s learned to cook the basics. Alpine sitting on top of the fridge watching as he cooks inspecting everything ingredient.
Grocery shopping is overstimulating at big stores so he avoids the big shops and sticks to small farmer markets and mom and pop grocery stores.
Bucky loves blankets. Like there is never enough blankets. The compression blanket Steve gifted him is his favorite made specifically for him by Stark Industry to actually weigh enough to provide compression therapy.
Some nights when the weather is nice Bucky goes out for walks when he can’t sleep, came across a late night pawn shop and found a record player. Sure he could buy a cheap one off amazon but this was vintage without all the Bluetooth shit. He snagged it up proudly carrying home, glad he remembered how to properly care for one.
During the cooler months before bed Bucky always puts in the sheet and blanket in the dryer to have them warm before bed. It’s a luxury he allows himself to keep his peace as the cold nights can be triggering.
The apartment always has white noise, it varies from tv shows, fan, dehumidifier, music on the record player as he collects any album he can find.
Bucky keeps a piece of his mother’s touch in the apartment and that is flowers. His mother taught him the language of flowers and it stuck with him. Lately he’s been picking flowers to help him with daily affirmations and so edelweiss, forget-me-nots, and zinnias.
The apartment has a zillion toys for Alpine to have when he’s not home and can’t bring Alpine along. Bucky often steps on toys in the night, sending him into a panic thinking he’s stepped on Alpine. Only to have the diminutive fluff ball toddle up behind him with a little trill, twining around his legs purring, safe.
#jin writes#my writing#james bucky barnes#Bucky Barnes#bucky barnes imagine#james buchanan barnes#mcu fandom#marvel#marvel bucky barnes#tfatws#the falcon and the winter soldier#fluff#bucky fluff#bucky barnes fluff
116 notes
·
View notes
Text
Hermit-a-Day May, day 7: Bdubs + shrink plastic

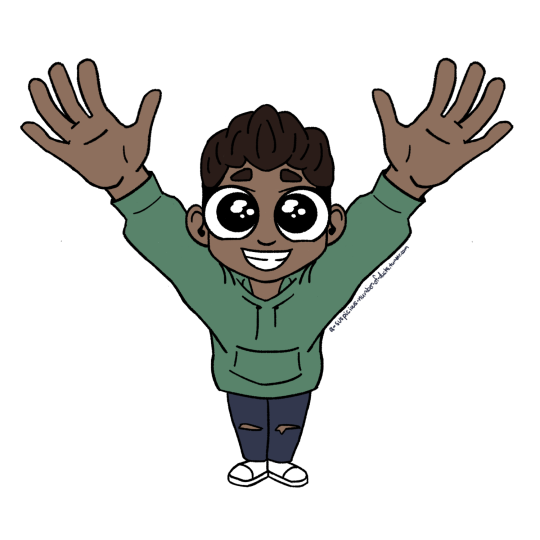
[Image ID: A photo of a small piece of plastic with a drawing of Minecraft YouTuber BDoubleO100 (Bdubs) on it. The drawing is from an angle that suggests the viewer is looking down at him, and his arms are raised above his head like a child asking to be picked up. His eyes are enormous and shiny, and he is smiling widely. He is wearing dark blue jeans with holes at the knees and a green hoodie with a fluffy moss texture. The piece of plastic is nestled standing up among red mulch and small green plants in a garden bed. ./End ID]
Today's style/medium is shrink plastic! Also known as shrink film, also known as shrinky dinks. For those unfamiliar, these are translucent sheets of thin plastic that, when heated to a high enough temperature in the oven, spontaneously shrink to about 1/3 of their original size. It's a ton of fun to watch! I chose this medium largely because of the "Bdubs is short" bit, especially Cleo's "life-size replica of Bdubs" from Permit Master. What could be more fitting than a medium that actually gets smaller as part of the creative process? It's not quite as ambitious as some of my other projects this month, but I'm still really happy with it. Give him uppies. He wants uppies. Details and more pictures below!
[Image ID: The same image of Bdubs with his arms raised, but drawn digitally. The colors are slightly duller than they were in the photo. The background of the image is transparent. ./End ID]
To start, I sketched, inked, and colored my design digitally in Krita on a canvas the size of my shrink plastic sheets, to ensure that the dimensions would be accurate. Then, I printed out the digital drawing, stuck my shrink plastic sheet on top of it, and traced everything onto the shrink plastic with colored pencils. Then I baked it, panicked because it didn't flatten out all the way after shrinking, and stuck it under a plate while it cooled to make sure it stayed flat. I think it turned out alright!
The colors are, of course, more saturated than they were at full size, because all that colored pencil has to be compressed into a third of the space. That's always a challenge with this medium, and though I still do like the unshrunk version better color-wise, I think I did a decent job of compensating for the concentration while drawing.

[Image ID: The same drawing of Bdubs on a piece of plastic, but the plastic is much thinner than in the earlier image. The colors are lighter, less saturated, and more translucent. The piece of plastic is lying on tray covered in aluminum foil. ./End ID]
He's currently drying on the porch from his protective topcoat (because without it, the colored pencil would smear right off), but I managed to take a few shots beforehand while it was still light out. Here's my favorite, other than the one in the garden:

[Image ID: A photo of the same drawing of Bdubs on a small piece of plastic, lying on a large gray rock that serves as the background of the photo. ./End ID]
Once the topcoat is dry, I'm planning to turn him into a keychain/backpack charm, but for now, he's just perfectly pocket-sized. He's just a little guy. Thanks for reading, and happy arting!
#hermitaday#hermit a day may#hermitcraft#hermitcraft fanart#bdoubleo100#bdoubleo100 fanart#bdubs#bdubs fanart#my art
34 notes
·
View notes
Text
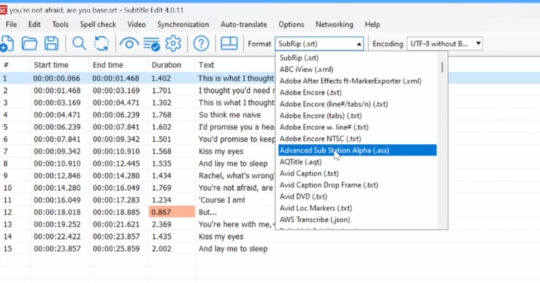
Subtitling AMVs! Make Plain and Karaoke Optional Captions for YouTube with Subtitle Edit, Aegisub, and YTSubConverter
This is a video I've wanted to make for a while. Though I'm in no way an expert—and suggestions and improvements are very welcome!—I was overjoyed when I learned that I did have the power to make optional karaoke captions, all with free tools, and I hope I can at least help others get started with them, too.
Programs used are Subtitle Edit, Aegisub, and YTSubConverter. I really recommend checking out YTSubConverter's page for more details about stylized captions on YouTube; it's very comprehensive. I'll also note that the kind of captions I make are merely scratching the surface of what's possible with YouTube captions—there's a lot more that the .ytt (YouTube Timed Text) file is capable of.
While focused on YouTube, subtitles created in Subtitle Edit and Aegisub can also be burned into the video or included as an optional subtitle track on the file itself. I use the free program HandBrake for this, a process I outlined briefly in the bottom "Compression" section of this post.
Songs used in the video are instrumental versions of "Lost & Found (The Midnight remix)" and "Los Angeles," both by The Midnight and both of which I've set AMVs to, so I thought it'd be fun to utilize the instrumentals in an AMV-subtitling video.
Timestamps
[00:00] Examples
[00:07] Overview
[00:28] Easy YouTube Captions
[01:08] Subtitling in Subtitle Edit
[02:44] Persnickety Timing (in DaVinci Resolve)
[03:01] Stylizing Subs in Subtitle Edit
[04:47] Karaoke Timing in Aegisub
[06:03] Additional Stylization
[06:41] Converting for YouTube with YTSubConverter
[07:08] Uploading to YouTube
[07:35] Adding Multiple Subs
Transcript under the cut!
Overview
This video will cover creating stylized and unstylized YouTube captions for AMVs. I'll outline both easy and persnickety methods of making basic captions for YouTube, how to use Subtitle Edit and Aegisub to stylize subs and time karaoke, and how to convert stylized subtitles for use on YouTube with YTSubConverter.
Easy YouTube Captions
Starting with easy YouTube captions, when uploading a video, there's an option to "Add subtitles" in the "Video elements" section. I can delete what's already there and press "Add" to add my own.
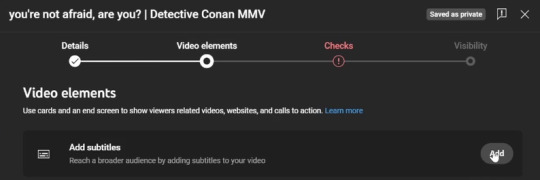
I'll hit "Upload file" and add a plain .txt without timing, just the song lyrics. It might take a moment, but YouTube will automatically sync the lyrics. And seems to do a pretty good job!
But YouTube also has options to edit and tweak the timings. That's really about it for this method!
Subtitling in Subtitle Edit
You can also make simple captions outside of YouTube. I like to use Subtitle Edit, a free program for timing and stylizing subs. In Subtitle Edit, I'll start by adjusting shortcuts to make timing easier.
I can do this by going to Options -> Settings -> Shortcuts. Scroll down to "Create/adjust"... And change the key for "Set start time" to Z. Make sure to hit "Update" so that the change sticks. Then, I'll change the key for "Set end and go to next" to C.
Now, I'm ready to sub. I go to File -> Import -> Plain text... And I paste in the song lyrics. I have them formatted so that one line is one subtitle. So, I have the "One line is one subtitle" option selected.
Then, I open my video by going to Video -> Open video file... And I click to add the waveform.
Time for timing. I first hit Z to start the first line. Then, I play the video and press C to end the line.
I continue this process, Z to start and C to end, for the whole video. When done, I can adjust the lines in the waveform to tweak the timing (if needed). I also like to eliminate gaps by going to Tools -> Bridge gaps between subtitles...
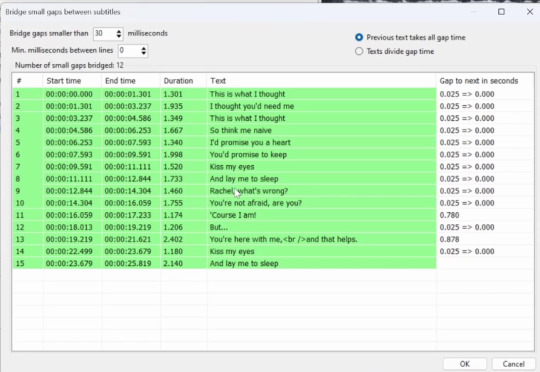
When satisfied, I can save the subs as a SubRip (.srt) file. .srt files are simple subtitle files with limited formatting. They can be directly added to YouTube; just select "With timing."
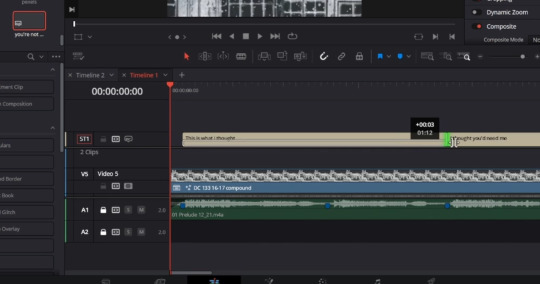
Persnickety Timing (in DaVinci Resolve)
But since AMVs are all about timing... And I clearly struggle with that method... I like to import the roughly timed .srt into a video editor. (I use the free DaVinci Resolve.) Then, I can adjust the subtitles to fit the markers I'd already created for the video.
And that's about it for simple AMV subs.
Stylizing Subs in Subtitle Edit
More elaborate subtitles can be achieved with another subtitle file type: Advanced Sub Station Alpha, .ass. (Yes, it's really called that.)
.ass files are capable of colors, fades, positioning, karaoke... And really a LOT more. The YTSubConverter page has a detailed breakdown, outlining .ass elements that can be utilized on YouTube.
I particularly like .ass files for their ability to create karaoke subtitles. To start styling for karaoke, I change the Format to .ass in Subtitle Edit.
Then, I can click the big "A" for "Advanced Sub Station Alpha Styles."
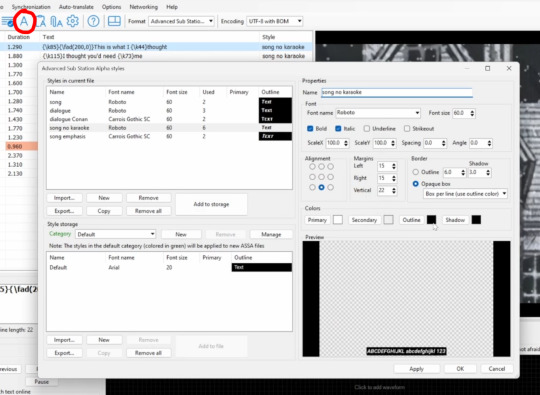
And adjust as desired. For this one, I imported and edited a previous AMV's .ass style. And deleted the original "Default."
For fonts, note that YouTube only allows seven fonts: Roboto (default), Carrois Gothic SC, Comic Sans MS, Courier New, Lucida Console, Monotype Corsiva, and Times New Roman.
Here, I set a "dialogue" style without the italics of the lyrics for the AMV's voice lines. For effect, I also created new styles for dialogue and lyrics with different fonts. I used both Outlines and Opaque boxes for different styles.
This video doesn't do it, but Alignment can be adjusted for different positions.
Note that for karaoke, the Primary color is the color AFTER the words are sung (white here). The Secondary color is the color BEFORE the words are sung. Here, Secondary is set to alpha for invisible words before being sung.
There are also Outline and Shadow options. I can now select the styles I want for each line. Highlight, right-click, go to "Set style," and select the desired style.
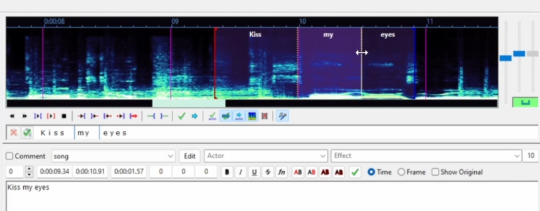
Karaoke Timing in Aegisub
Karaoke timing can be done in Aegisub. Aegisub is a free program with LOTS of ways to edit subtitles. In fact, subtitle styles can be set in Aegisub as well.
For karaoke creation, I'll start by opening my .ass file in Aegisub. I add the video by going to Video -> Open Video...
To apply karaoke, I press the "Toggle karaoke mode" button (the mic and music notes). Lyrics will be automatically cut up by word, but they won't be timed correctly. To fix this, I need to move the lines in the waveform. I can adjust the sliders on the side to maneuver.
To time, I click each area and hit SPACE to play it. I adjust the lines accordingly. When satisfied, I click the green checkmark.
I repeat the process for all the lines where I want karaoke. It's a lot of rinse and repeat! But if I want the karaoke to appear by letter, after I've done the initial timing, I add more splits by clicking between letters and adjusting the lines in the waveform.
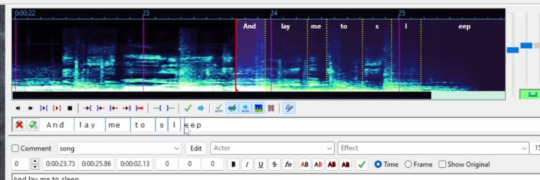
I can test each line individually by pressing the second play button.
Note that splits can also be deleted by clicking on them.
Additional Stylization
For any additional formatting, I return to Subtitle Edit. (Though it can also be done in Aegisub.)
I like to add fades by pasting the {\fad} tag at the start of a line. In parentheses next to the tag, there are two numbers separated by a comma. The first number is the fade-in value, and the second is the fade-out value.
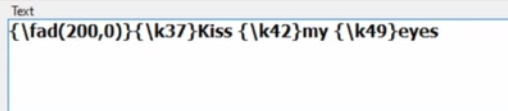
Here, I faded in and out 200 when there were gaps between the subtitles. And I adjusted some timing to accommodate the fades.
I also added a {\ytktGlitch} tag for a glitch effect. This effect only works on YouTube/Google Drive and won't preview elsewhere.
Converting for YouTube with YTSubConverter
I now have a stylized .ass file prepared, but .ass files can't be uploaded to YouTube. So, I need to convert the .ass file to a .ytt (YouTube Timed Text) file. The free YTSubConverter does this easily and instantly!
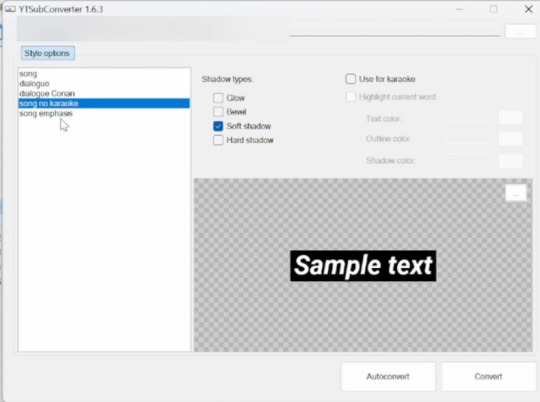
I first open the .ass file in the program. I can adjust the style; I like Soft shadow. Then, I press "Convert," and that's it!
Uploading to YouTube
Uploading stylized subtitles to YouTube is similar to uploading unstylized ones. But there are a few things to note.
First, stylized subtitles WILL display funny in the preview. But if you hit "Done" and don't touch anything, it should work fine.

That said, one way to test .ytt files is to upload them to Google Drive. They can also be previewed by watching the YouTube upload before making it public.
Adding Multiple Subs
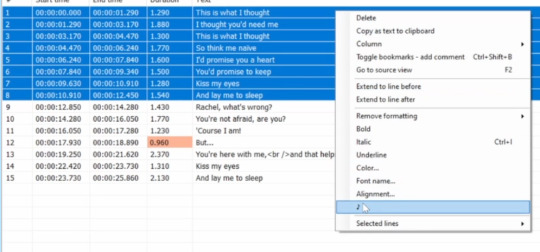
One other thing I like to do is add an unstylized subtitle track, too. For my unstylized subs, on a plain .srt. in Subtitle Edit, I add lyric music notes by highlighting, right-clicking, and selecting the note.
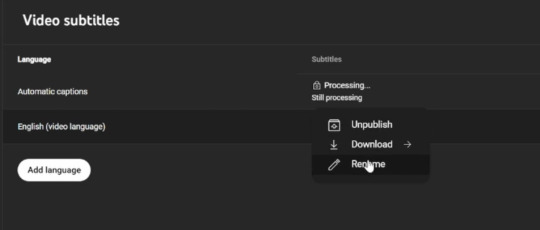
To upload multiple subtitles to YouTube, the video should be at least private or unlisted. Then, in the Subtitle tab, I can Rename my stylized track [by clicking the three dots for Options when hovering over the subtitle track in YouTube Studio]. This will allow me to add another subtitle file in the same language.
I go to "Add language" and add the unstylized file. I find I have to Publish and Unpublish several times to work properly.
And that's really it! Happy subtitling!
#video#eye strain#long post#amv#?#focused on subtitling amvs but of course these techniques can be used for other subtitling!#it's maybe a bit embarrassing to have this all laid out because i know i have methods that will make more experienced subtitlers cringe#(like copy-pasting tags)#but i hope this can at least be a starting point! making simple captions can be quite simple with tools now#and it's really fun to do more stylized ones!#i was seriously overjoyed when i learned i could make karaoke captions lol i was so excited#open to any questions or suggestions and etc.!#special thanks to hexfloog for the feedback!#this was a lot worse before and i wouldn't have fixed it without that feedback ^^;#amv talk
26 notes
·
View notes
Text
Binders with Bones
Binders suck ass and one of the reasons they suck ass is that they get sweaty and uncomfortable almost immediately in the summer. One of the reasons for this is because they are universally made of plastic fabric. Even if they include cotton in construction, the main panel that binds is always made out of spandex.
Before bras, women (and sometimes men, depending on the fashion) would use corsets (and earlier, stays) to support their bust, and create a fashionable shape. These articles of clothing predated plastic, and used a combination of natural fabrics and boning to achieve their shapes. Corsets and stays often emphasized the bust, but I see no reason why they couldn't be used to de-emphasize it. In fact, 18th century stays resulted in a shape that, while still showing cleavage, was otherwise remarkably flat.
I do not have the sewing skills (let alone the specific corset/stay making skills!) to experiment with how to use boning for binding, but there are a couple others who have:
This is a youtube video where someone has made a bra-shaped binder with bones to achieve a flat look. He emphasizes how this is better for him because it doesn't compress as much as a regular binder, which would certainly also be a bonus. I have some doubts about this particular design working on someone with as big a chest as me, but it's certainly good to have out there.
Here is a sewing pattern on etsy for a boned binder in the shape of a full vest. I have greater hope in this working on someone as big as I am, although I do find myself wondering if some fabric could be removed from the neck without destroying the structure, as its current form would show under nearly every shirt. It seems like the neck fabric is tense in the photo without boning, but that little stress is being placed on it in the photos with bones.
Making this post partly to make anyone else who may be interested in this aware, and partly as a reference post for myself. I'll add more as I run across anything.
21 notes
·
View notes
Text
There’s this unskippable Google AI ad on YouTube where this girl consults the robot about how to cancel dinner plans with the people across the table in the most annoying voice (likely because I have seen this ad now and had to listen to her asinine questions 20 times at least) and this ad, right here, speaks to my frustration around AI:
It disincentivizes critical thinking.
I know the ad is a joke and meant to be lighthearted and I’m only this annoyed because it’s unskippable and irritating af, but every time I see it all I can think is “if you can’t manage enough creativity and critical thinking to come up with your own excuse to cancel on your friends, maybe you shouldn’t have those friends.”
I have a relative who is firmly in the ChatGPT camp and, for example, yesterday I was trying to figure out how to compress a video file and was venting to them about it. They sent me back something I didn’t read from ChatGPT. Meanwhile, I looked up a YouTube video and figured out how to do the rest on my own, and getting the file compressed was immensely satisfying. Far more than mindlessly and thoughtlessly consulting the robot.
“It’s just like a YouTube video!” They’d told me.
No, a real person put time and effort into that video. That robot stole their content without their consent, didn’t credit them, and spat it back out. I used to patronizingly refer to ChatGPT as "the magic conch" and now I can barely do that anymore because that metaphor is becoming all-too real.
While I can understand the barriers it lowers—like if you struggle with writing the robot does it for you, or if you need a piece of art and are too poor, you can generate it for free. Mindless, repetitive tasks that eat up creative juices that can just be automated by a robot, too (even though everyone can tell when a response is canned and artificial and no one appreciates talking to a machine).
If you keep consulting ChatGPT for how to articulate what you want to say, or just straight-up having it do the hard work for you, you’re never going to learn. Yes it’s taken me 8 years to reach the quality and skill of writing I have but as another Tumblr post out there said: The time will pass anyway.
I can’t draw to the skill level that I’d like to. Doesn’t mean I’m not going to keep practicing until I get there. I thrive off that sense of accomplishment. There’s no little hit of dopamine from typing in a prompt and clicking a button and I certainly don’t appreciate the final product scalped without consequence from real artists.
Or, like when I had to fire a beta reader for flagrant abuse of AI in her work: I can copy-paste my manuscript into ChatGPT, too. I’d paid her for a human response, not garbage feedback that couldn’t understand what I was writing beyond that there were words on the page. I wanted so badly to ask her why she does a job in a creative field if she's just going to have a robot do all the fun parts? I beta read at a great loss of profit because I enjoy beta reading and it's a fiercely competetive market. Surely if she wanted to scam people, she could have done so in so many other ways. You don't need to know how to pen complex prose in your every day life, but by god, you do need to know how to effectively communicate, contextualize, and argue your perspective and this ridiculous ad joking about cancelling dinner plans sure is funny, until it isn't.
And I know the people who made AI probably did so with the best of intentions but people can be lazy and cheap and we love taking shortcuts to save money and I stand by this: "Your scientists were so preoccupied with whether or not they could, they didn't stop to think if they should."
So. Yeah. This is a writing advice blog and this post has almost nothing to do with it, but that ad annoys me to no end and I had to say something somewhere about it. Bottom line: Robots were supposed to make the hard jobs, the monotonous jobs, the overcomplicated jobs, the belittling jobs easier, not make us all into pudding-boned Wall-E people. If you want to write, learning is absolutely free - write on the back of your grocery receipts for all I care. If you want to draw, pick up a notebook and pack of pencils from the local dollar store and start drawing.
What you made will always mean more to you than something that didn't cost you time, effort, brain power, or even money to obtain.
62 notes
·
View notes