#Basic HTML tags explained
Explore tagged Tumblr posts
Visit Tumblr Blog
Explore Tumblr blogs with no restrictions, modern design and the best experience.
Last Seen Tumblr Blogs


Fun Fact
If you dial 1-866-584-6757, you can leave an audio post for your followers.
Text
Looking to master the basics of HTML? WebTutor offers a comprehensive guide to help you navigate the world of HTML with ease. From understanding tags to building web pages, this tutorial is perfect for beginners. Start your journey to becoming an HTML pro today at WebTutor!
#Basic HTML tags explained#Introduction to HTML elements#HTML basics#HTML tutorial#Master HTML#HTML tags#Web development#Learn HTML#HTML for beginners#HTML guide#HTML syntax#Building web pages#Basic HTML elements#Learn HTML elements
1 note
·
View note
Text
Clarification: you don’t need to know how to use them, you just need to know what they are vaguely
#my polls#polls#technology#html#css#Java#context in the tags because why not#basically during dinner my brother asked me if I knew what html was#and I said yes#he then explained that it was to figure what the average person knew about html and mentioned css#I told him I knew what css was and he was very shocked#also almost outed myself as chronically online lol
1 note
·
View note
Text
Finally, I Can Maintag This After Nine Months
Hello everyone! This post is about my very long (80k) Empires S1 fanfiction, (i'll tend to the flame, you can worship the) ashes.
Ashes has been nine months in the making, and the last chapter was just posted today. It is twice as long as my previous longest published work and I made a lot of it up as I went.
The premise is this: The Rapture was three months ago, and Gem and Fwhip are on their way out of the world. They land for the night on the edge of the desert, and stumble upon a certain emperor, who's been missing for eight years and long presumed dead. Which is great! They found him! But... he's strangely quiet.
More details and a general FAQ for the fic under the cut.
Why does this fic have the Graphic Depictions of Violence warning and the Author Chose Not to Use Archive Warnings ratings applied at the same time? What does that mean?
I explain my full reasoning in a post here, but basically, I wanted to let people know that there was violence while also implying that there were also some other things that needed to be handled carefully that aren't necessarily covered by an Archive warning.
Ashes has the Canon Compliant tag attached, but this is a scenario that I've never seen in canon before.
This is correct. When I started writing this, my tag for this fic was #ashes au because I was pretty sure that I was going against canon with some of the details I was including. I added that tag later after realizing that even though some of the specific details didn't line up, it counted to me. (The tag stuck because I've linked it everywhere by now and don't want to change it.)
As for the post-canon status of this work, Ashes was mainly started because I felt like Pixl's ESMP s1 POV (which ended early because he got busy with another project; this happens to everyone and i do not hold it against him) deserved to be finished and so I set out to write it. Pix later said in an Empires S2 livestream and then in his s2 finale that every interpretation of what happened to the Copper King was correct, so I just went with it.
If I wanted to make fanart or fanfiction of this fanfic, could I do that?
There is a section for that on the website I made for Ashes! (I learnt HTML at 12am for this. I couldn't sleep.) Any questions you have that aren't answered by that, send me a message or an ask and I'll be happy to answer.
#ray's tag#mcyt#empires smp#empires smp s1#pixlriffs#geminitay#fwhip#esmp s1#fanfiction#writing#lets fucking GO baby#ashes au#if you find this interesting and decide to check it out and you like it- please reblog this post! i put a lot of effort into writing this
102 notes
·
View notes
Note
Hiya! I found your blog through your neocities website! I was wondering if there’s any tips or things you read/watched that help you make your site. (Im heavily considering making one of my own neocities site it just seems fun)
hihi welcome !! i have quite a few pieces of advice, but the tldr is you should come up with an idea for what you want to make beforehand, and look up how to do each piece! your knowledge will start to fill in along the way :]
(this is probably gonna be long as hell so under the cut is all of the fun stuff /silly)
the way i personally started off was by sketching out what i wanted my site to look like! if you know what you want before you begin, you'll know where to look to figure out what you need to do. html+ css are extremely easy languages to read/write once you know what to look for!
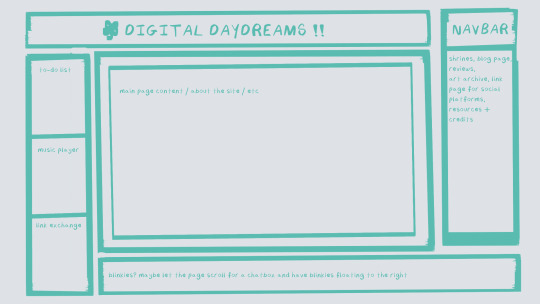
^ this was the original sketch for my site, where i planned out everything i wanted to include. it's a bit different from what actually ended up on the site, but that's alright! it's just about having an outline to work from. i think of it like outlining before you write, it feels like such a pain in the ass because u just wanna start working NOW but u will thank yourself later for taking the time to plan.
once you know what you want to make, start looking for tutorials and resources to make it easier! the grid for my homepage and some of my other subpages was made using a css grid generator, since its one of the more confusing bits of css. you can make grids without it, but its a very easy way to make a more asymmetrical design if ur using the generator!
thats linked here, it gives you some css to put in your head or css sheet, and then the html for the different boxes to slap in your main document. it can be easier to understand what itll look like if you give each one a border while you work, even if its just temporary!
when looking for information about css and html, w3schools is your best friend. its a pretty comprehensive database of every little piece of html + css you could ever need, with examples you can play with yourself to understand what each variable does! it's been a lifesaver for me, ive watched basically zero video tutorials because everything on there is explained so well and you can find basically Anything.
they even have code snippets for things that take more than one or two lines of code, which you can use and adapt yourself! (the tooltips on the official art + my art sections on the hinata shrine were adapted from a tutorial on there!)
in general, having a plan and working from there will make ur life so much easier. the pages that ive sketched out beforehand or ive had a very clear vision for have been WAYY easier to code than the ones i tried to come up with on the fly, and ive been much happier with how they've turned out as well. though i do also have some smaller, rapidfire tips as well that ill go thru now!!
— inline css (the style="" tag) seems so so useful but really should only be used when you're resizing images like buttons. when u keep all of your css in the head or in a seperate document, its way easier to debug and read later. i cleaned up my homepage recently by removing all of the inline css and looking at the code stresses me out WAY less because i can actually read it LOLOL ... plus cutting the css out and putting it in its own document made me realize that id accidentally wrote some really weird code in some places
— this is very much 'do as i say, not as i do,' but use an external editor (like visual studio code) instead of editing live on neocities! you can set up a live preview, and generally wont be pushing out 100 updates every single time you change or add something. i tend to code directly on neocities but its a bad habit and i want to break it eventually v_v
— if you really like an effect someone else has on their site, you can peek using inspect element i promise the coding police won't get you !! dont steal code line for line, but you can figure out what theyre doing and put your own spin on it. things like border images can be really cool, and i only figured out about them because i looked at what someone else was doing and figured out how to adapt it for my own site! check linkbooks and credit sections as well, a lot of people will include links to any effect they didnt make themself or got help with. (including me! the credits section of the linkbook has a ton of little things i got from other places, including a really neat little music player, the rss feed for my status cafe, and the wobbly text on the homepage!)
— most stuff in html and css basically just... says what it does in the tag. so looking stuff up for it is extremely easy! if you've used carrd before you honestly probably already know more abt html than u'd think just intuitively. when ur adjusting the margins or padding in carrd, you're adjusting the margin: and padding: properties in the css of the website it's outputting!
this is getting way too long but!! my best advice is to just get started. you'll never be able to learn without trying, and it genuinely is so fun to have something that's truly your own!
(if u have any specific questions im happy to answer anytime as well! i love talking abt neocities, its a super fun hobby and way easier to pick up than u would think!)
#originals.txt#inbox.txt#neocities.zip#god im so sorry abt how long this is i havent had time to work on the site for a while and its getting to my head /silly
6 notes
·
View notes
Note
Hellu))
I looked at your neocities thingy, and I just wondered how you did that with the text boxes and the background and stuff. If you are willing to share, if you aren't, then sorry for wasting ur time)
I'm very new to coding (I suck) and "Penelope the cat" doesn't really help much T-T
Hi! Don't worry about asking, I'm always happy to help and give info on anything I know to the best I can! (Though to be completely honest, I too don't know much of HTML so... lol)
I used a <table> tag and the other tags that come with it. I also used boarder, boarder style, and background color, which would be in the CSS part of the code. Makes the boarder that's around it, The style that boarder will be in, and the background color of that table.Here's a website that explains it better then I can and also helps me out A LOT.
I heavily recommend this site, it's a life saver and will explain everything.
Also here is some CSS to help with the boarder and background!
Some other extra tips I'll throw in here:
I recommend using "Visual Studios". It's a free program and you can get a plug-in that allows you to see how your website looks without having to edit, go to the website, refresh, over and over. It also helps with coding as well, overall I'm loving it!
Now, by no means am I saying you should copy somebody else code and steal it. That's wrong. However, if you see something you like and want to know how it works, inspect the page and look at the code! I've learned a lot from doing this and it's help me figure out how things work too. Once again, do not straight up steal lines of somebody else's code. By that point you're not coding, you're copying, pasting, and stealing.
I also think you should learn the basics of HTML, and if you really want to make things then I say take the time to learn HTML. Personally for me, I love the look of broken ugly websites. Just some basic CSS will do for me! But if you're not like me, then yes, I think you should learn more then just the basics.
I'm sure there's some HTML nerds that can explain this way better then what I can so like I always say when it comes to learning stuff, look it up! The internet has unlimited free information, somebody 12 years ago on reddit probably asked the same question you did and the answer will be in the comments of that post. Always search for things!
9 notes
·
View notes
Text
still day 1 - html
once again, technically not day 1, still doesn't matter,
common/basic html tags
<p> (closing </p>): creates a paragraph
<h1> (closing </h1>): creates a heading. this tag is used for the biggest headings in the page (example: a general, all encompassing title)
<h2> <h3> <h4> <h5> (closing </h2> </h3> </h4> </h5>): these four tags also create headings, each smaller than the next. h2 is bigger than h3 and so on (example: h2 can be used for a chapter title, and h3 for the title of each section of that chapter)
<h6> (closing </h6>): creates a heading. this tag is used for the smallest headings in the page
<strong> (closing </strong>): makes the text stronger, usually bolding it. this tag goes inside other tags, like <p> (example: <p>normal text <strong>bold text</strong> normal text</p>)
<em> (closing </em>): emphasizes the text, usually italicizing it. this tag goes inside other tags (example: <p>normal text <em>emphasized text</em> normal text</p>)
<a href="example"> (closing </a>): creates a clickable link. the link / path goes inside the quotes in the opening tag (in place of the word example that i put there for reference). the text you want to be able to click which directs to the link goes between the tags (example: <a href="link">text to be clicked</a>)
<br> (no closing tag): creates a line break inside a paragraph (since line breaks in the code are ignored). in other words, it sends the text after it to the next line, without creating a new paragraph, instead of having it stay in the same line as the text before it until it no longer fits
that was a lot but it's the basics i swear. also all these tags are used inside/between the <body></body> tags (explained in my "absolute basics" post which i will not link to right now sorry). that's it
26 notes
·
View notes
Note
Hey Hai, so I would like to know, how you did this https://xiacodes.tumblr.com/all-my-tags
This "All my tags". It's opening up like a webpage like a blog.
That's cool, can you teach me?

Hiya! 💗
Super for the late reply, I've been busy and I tried creating a proper answer for this too!
Just to clarify for anyone else, this is what @suzukasthings is referring to:
To achieve this, I made a little video, because I can also explain with words but it's also best to see how it's done also!
Go to your blog's theme creation page
Go to the bottom of the menu and click 'Add a page'
Create the ending of the URL, here I added 'new-page'. This is the URL link you will use to link to the new page.
The sections under is where you will customise the new page, so you can add anything really!
If you want to have a link generated to your theme, you can google the 'Show link to this page'. Tumblr will do the whole link HTML tag for you on your sidebar.
Click 'Update Pewview' to see your work
Click 'Save' to save the page so everyone can see the changes
The URL to the page will be your normal Tumblr blog URL + /[the name you added to the page] e.g. for my all tags page is https://xiacodes.tumblr.com/all-my-tags
Done!
In terms of customisation, I would recommend having basic HTML and CSS knowledge because I recommend using the HTML editor to customise your pages, like I did here:
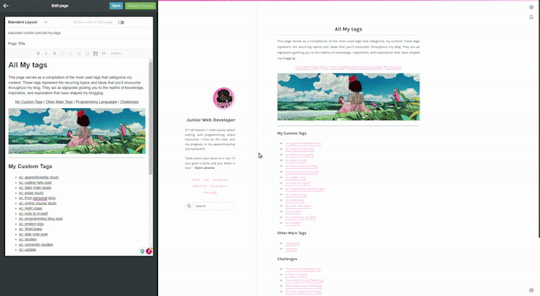
Hope this helps! 🤗🙌🏾💗
35 notes
·
View notes
Note
Oop, hello there! ^^ I remember you from DA, still think your art is so cool!! Still fond of the vintage characters and the world of Tessa n' Val! I'm currently testing the waters on Tumblr lol, hoping to get around a different vibe for documenting my projects n' chatting about stuff I like, and wanted to ask: as someone who's been on Tumblr for a while, what are your main tips for a starting artist in the platform? Wish ya a great day! Stay artful n' creative :]
HI!!!! i remember you too, i always get really excited when artists i like come here. tumblr is the only website i really use for myself and not just to post art, so it means i get to follow them and interact with their art 🥺 i ditched deviantart for everything that isn't posting art and bitching about the website via status updates lmfao, the new inbox and watched deviants tabs are so... out of the way and counter intuitive. hate it there.
anyway, I've written a general tumblr how-to post because there's been so many exoduses (exodi??) from other platforms over the last few years, but I don't think I've ever written one for artists? or at least I can't find it if I did. so here are some hot tips 😎👉👉
NUMBER ONE BIGGEST RULE: if you're an artist and you want to actively gain a following and curate your art, please have a separate art blog where you post exclusively or near exclusively art. it's ok to reblog a post here or there, but tumblr is a website About curating and having specific blogs! it's not that people don't want to see or hear about the artist behind the work, but they don't want 43289 unrelated memes and posts for fandoms they're not in 😅 admittedly i have skipped following some good artists here because their reblogs completely drown out their art and clog my dashboard. people really like curated blogs, almost every artist has a separate art blog 'round these parts. (it's completely fine to post WIPs and text posts discussing your art too, some people would like to see your process!)
speaking of curating: tags are your best friend! tumblr tracks the first 20 tags I believe, so use the first 20 tags to add your important search terms. this is where you put anything you'd want to turn up in the search. really you probably wont have more than 10 of these tags. after that you are welcome to ramble in the tags or use organizational tags for your specific blog.
not sure how to tag? search up what terms you'd use to try to find your own post if you were someone else, and see what tags popular posts in that tag used. you should ALWAYS use the #art and #artists on tumblr tags, as well as any relevant common trigger/content warning tags :D here's how i do it:
FOR FANDOM POSTS: where applicable, I tag Fandom, Fandom Acronym, Featured Characters, Featured Ships, and sometimes #[fandom] fanart and/or #[fandom acronym] fanart. FOR ORIGINAL POSTS: you can tag your art medium (digital art, traditional art, sculpting, etc), the general aesthetic or themes, time periods, and if it features your OCs you can use #oc and their names so if people want to see all your OC content they can find it. admittedly i mostly post fanart so i am very spontaneous with the tags i use on my original art posts lol
4. shorter captions seem to be preferred by the masses, I personally either dump my extra comments in the tags of the original post or I'll put them under a cut. unless it's extremely relevant to the post, like explaining ideas or headcanons
5. have all your handy links in your bio! you can use basic HTML coding to insert links with text and put in line breaks. you should have links to other socials (or something like a carrd that links them for you) and your support streams, like shops and tip jars and patreons. and ofc a little about you and what people can expect to see you draw!
6. have your inbox open! you don't have to take requests, but sometimes someone will throw a brilliant idea at you that you may Coincidentally be inclined to draw. it's also just fun to interact with people who like what you do! sweet comments go a long way
7. last one i can think of - do a seIf-reblog at some point in the day. people live in different timezones and not everybody finishes their dashboard. personally I schedule posts for 12 pm cst and then one seIf-reblog at 8 pm cst. it's also okay to reblog your older artworks for new followers to see, especially if you haven't posted in a while. TV airs re-runs and so can you B)
hope some of it helps!
#tumblr guide#tumblr how to#artists#ask#ninacti0n#will be following u from my main hehe#tumblr artists
28 notes
·
View notes
Note
Hnnnghh I was informed by tatp that u know about about coding wdgvbb any tips or whatever I’m trying to make a neocitys website or smthg
Since it's neocities website all you need is: HTML, CSS and maybe some graphics. As I said before I'm shit at explaining stuff but I will try my best. So here's "I want to make my own website" the basics!
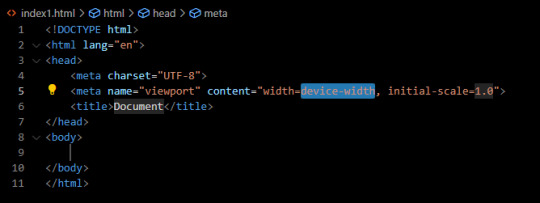
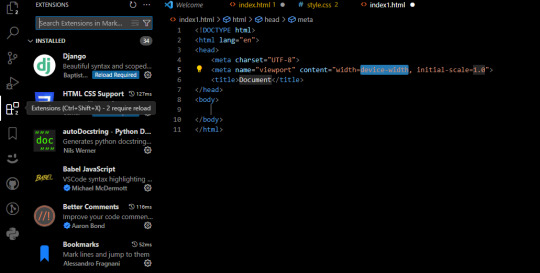
HTML - markup language, the base of your websiteCSS - style of your website, can change color of html elements, size, font etc. I linked w3schools website since it's pretty easy to understand.Do you need to learn all of this before coding? No. I think it's the best to just check things that you need for your website. If you need to change background color of your website just find a w3schools tutorial on it or simply search for "how to change background color in css". You just should know html tags and basic attributes: id and class and how to link your css in html file so your style actually works! Neocities has it's own tutorials on html and css so you could check them out too! Neocities also has it's own code editor. You can edit everything in browser. I personally like to code in Visual Studio Code then just paste the code into Neocities editor. VS Code has a lot of addons (some of them are there by default) that make coding way easier for example: autocorrection of syntax errors and giving you suggestions!
Example: If you type html in vs code html file you will get 3 suggestions:
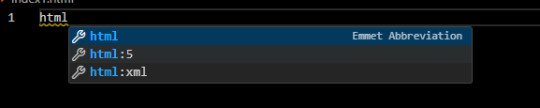
choose the html:5 one:
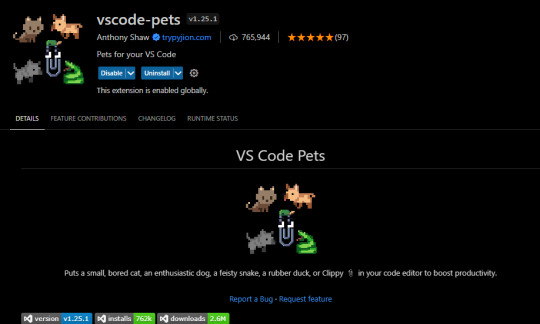
TAADAAAM!! VS Code just wrote the whole website structure for you! You can install more extensions here under extension section! There is this extension called vscode-pets it won't help you with coding but its really cute:
some yt tutorials: CINNIMANI (specifically for neocities), web coding playlist (this one is good for all websites in general); https://sadgrl.online if you were on neocities you probably saw her website. She has a lot of useful resources including image resources and also she made her own WEBSITE BUILDER or acutally layout builder! It's pretty simple website builder but still. If you are looking for premade layouts you can just search them on google or get sum from the website I linked ^__^ Uploading your website to neocities is really easy since all you need to do is to put all the files on there! I guess that's all for now. If you have any problems or questions just ask. I'm here to help ^^ websites with free to edit code: https://codepen.io, https://github.com
10 notes
·
View notes
Text
This Tumblr is primarily Writing/Fandom focused. All posts regarding my writing (updates, snippets, etc.) will have the '#my writing' tag, but I'll keep basic status info pinned and updated in this post. Writing resources at the bottom. Note: 18+ please! Smut, occasional gore, etc. within.
Ongoing/WIPs:
Modulation Missteps - (Chp. 28 coming soon!)
A Bad Guy's Guide To Success (Posted!)
Cherribang Event Fic
Retirement Plan (Vees)
Rhythm and Blue (RadioStatic)
Always the Bunny (StaticDust)
(Several Themed Oneshots)
Completed Works:
Enchanté - Rosie convinces Alastor to attend the annual VoxTek Halloween Bash as part of a ploy with Velvette to get the Radio Demon and Vox to reconcile... or something.
Iteration - Alastor is still missing, and Vox is haunted by sleepless nights and restless days that he can't explain.
Apple Appropriations - Vox makes a drunken wager during a night on the town with Alastor. Apples are stolen, hangovers are had, and pies are made. Not bad for a Saturday night in Hell!
Eighty Days Until The Fall - Victorian Era human au, dark. Alastor and Vox get in over their heads when Alastor summons a demon. Not just any demon, but the King of Hell himself. (Eggplosion collaboration!)
Just Aftercare - Three times Val cheered Vox up, and one time he missed all the signs.
Primary Ships for writing:
RadioStatic (Can't stop, Won't stop)
StaticMoth (Toxic, Evil, Fabulous)
RoseDoll (Crackship, Gossip Queens)
Resources:
Ao3 HTML
20's-50's Slang
And if you enjoy music for your reading/writing like me, my Spotify playlists are Here!
6 notes
·
View notes
Note
hi !! this might be an embarrassing, noob-y type question but i was wondering how one would link a specific tag/or create a tag page and link it in a post ?? saw it on a blog and thought it was pretty neat !!
hi there! it's not an embarrassing question at all! there are two parts to answering this though, let me explain.
how one would link a specific tag
the same way you add any link to text! just copy the url to the tag you want to link and then write any text you want to append the hyperlink.
create a tag page and link it in a post
this is where you have two options.
first option: you can add links from text posts. for instance i have often linked to other posts in my previous posts or included links to download pages for my resources. just to give an example, let's say i want to link you here to all the tutorials in my blog, you can click here.

you do this just by selecting the text and adding the link.
you can make a post with a list of links to various tags this way.
the second option: making a separate page is a little more involved and you will have to deal with html coding to some extent, although there are ways to do it very minimally.
the easy way:
open the theme customization panel and scroll down to the bottom of the column where you'll find "add a page" and "advanced options", click on add a page. there you can repeat the same steps as the first option! just write tags, link the url to the text and that's it. you can format and decorate this page the same way you would a text post.
the hard(er) way:
find a custom navigation code, you can search for this specific type of pages here. this is where you need to have a basic grasp on html that i don't think i could provide you with briefly in this post. it's not terribly difficult though, just looking at the code you'll find a lot of it is self-explanatory.
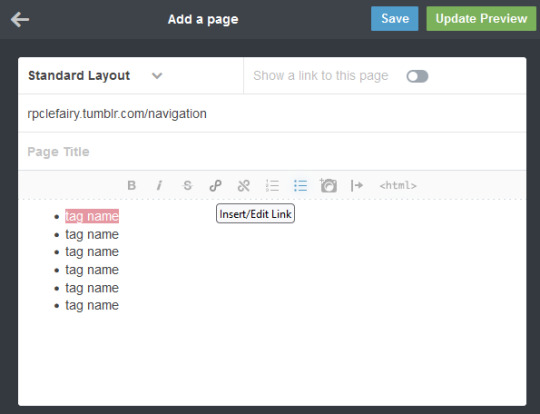
the gist of it is, you'll add a page same as in the easy option but click where it says "standard layout" and change it to "custom layout". there you'll paste the code of your navigation page. it should look like this:
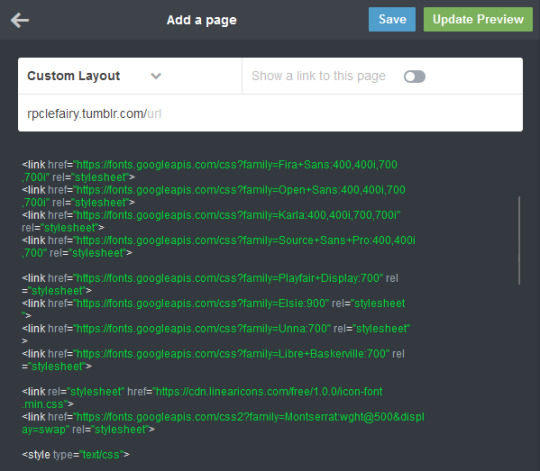
you can customize the code to your liking (colors, fonts, images) and add your links from there.
13 notes
·
View notes
Note
hi! i saw your ask to robin about making a website that involves a search/tag feature that works kind of like ao3's?
i was wondering if you'd mind explaining a little about how you're doing that, cause i've recently started trying to make a website that i want to have a similar function (but for photos of Queen because. autism) and i don't really know what i'm doing
no pressure obviously, i'll probably be able to figure it out on my own, but if you'd like to help that would be cool :)
Oh my god. You're asking for the autism to be unleashed
So! Basically, most of the magic is Javascript, and I know nearly nothing of Javascript -- I write, ask AI to help correct stuff, and rewrite lmfao (I personally use SheCodes AI but I'm sure any coding-oriented bot does the same thing. It was just the top result when I searched lmfao -- it also has classes embedded in the site and can recommend you classes based on what you're asking for help on)
Also, this is... not very good. But you have my complete and express permission to build on it lmfao (for example, you can't select more than one tag at once, which is... something that I've got to figure out how to do)
But! Here's the initial CSS (image-div being the class of all searchable images): .image-div { display: none; width: 100px; height: 100px; margin: 5px; border: 1px solid #ccc; background-size: cover; }
That's the easy part. It's just styling what you want to be shown -- but, if you do want the images to be visible before they've been searched, you can delete the display: none line (I THINK. I haven't messed around with this enough to be certain)
Aaaand the HTML:
<div id="tags"> <button onclick="showImages('silly')">Silly</button> <button onclick="showImages('city')">City</button> </div> <div id="image-gallery"> <div class="image-div silly" style="background-image: url('___');"></div> <div class="image-div silly" style="background-image: url('___');"></div> <div class="image-div city" style="background-image: url('___');"></div> </div>
I made the divs themselves be the images because I was trying to save on time lol. If you wanted to have more than just images inside each div, then just code as usual inside each div (you'll have to change the CSS a bit, too -- if you still want the CSS to apply to the images inside each div, then make the selector '.image-div > img' instead of just '.image-div'... I THINK. Either that or '.image-div 'img''. Maybe. I'll have to refresh my memory, sigh)
Now, Javascript:
function showImages(selectedTag) { const allDivs = document.querySelectorAll('.image-div'); allDivs.forEach(div => { if (div.classList.contains(selectedTag)) { div.style.display = 'block'; } else { div.style.display = 'none'; } }); }
Hopefully reading through that is... somewhat self-explanatory. All it does is change the display style of the selected tags to block instead of none.
If you're an actual beginner and this all sounds like gobbledegook to you, I will gladly teach you from the beginning if you'd like lmfao
2 notes
·
View notes
Note
how do you make your blog look so cool and good on computer screen thing?? :')
hello ! :] i'm not entirely sure i understand the question, but if you mean this,,,
,,,then that's just my custom theme !!
you have to be on desktop to enable it (go to your blog settings and turn on the "enable custom theme" thingy that's near the top). once you do that, tumblr gives you a default theme that looks a lot like the one you already have ~
for instance, this is what my default would look like :S
it works, but it's not the most appealing in my opinion :\
to change it, you need to once again go to the blog settings and click on the "edit theme" button. you are then taken to the customisation page, where you can make some adjustments to that default theme you're given,,,
,,,or you can change it to a completely different one ! :D
first, you need to find a theme you like. you can browse "tumblr theme" tag if you want, or go to theme-hunter and look around for stuff. there are a looot of themes with a lot of different styles to chose from, most of which are relatively easy to edit.
once you find something you like, you need to get the code. it's usually linked on the maker's post, near the top, and most of them take you to pastebin. you select the whole code and put it in your clipboard,,,
,,,and then add it to your blog. go to the customisation page i mentioned before, then click on this little button i've marked in the image.

once there, you just delete everything currently in there (at this point, the code for the default theme) and paste the code you picked instead.
update preview, save the changes, then go back to the main customisation page.
scroll down a little and you'll find the theme options and voilà ! you can edit the theme to make it into whatever you want :O for instance, the theme i have has a lot of colour options
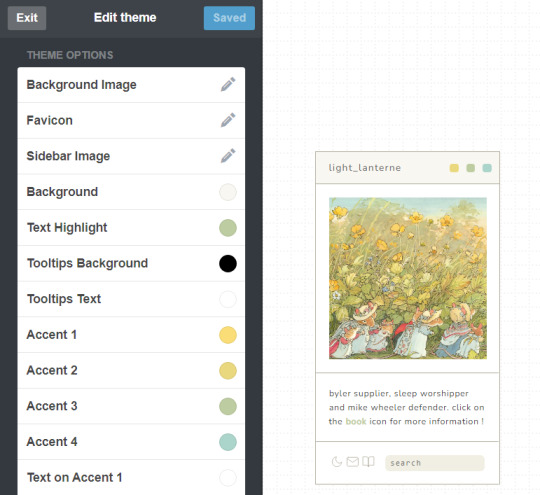
you can also change out the font,,, or the images,,, there are a lot of options available; it just depends on the theme you picked :]
if you have some css and / or html knowledge, you can also change out some stuff in the code :O the sky's the limit ~
so yeah,,, that was a basic breakdown of how to apply a tumblr theme :] hope it was helpful !! if you need any help please don't hesitate to reach out :D also, please forgive me if i misinterpreted your question altogether or if this was too confusing. i'm not great at explaining this stuff u.u
although, even if i misunderstood, i highly encourage picking a nice theme for your blog ! it's a nice option to make your blog a bit more you or go along with your aesthetic (for instance, here's the theme i picked for my dark academia-ish blog). it's also really fun to edit these themes, in my opinion, so that's a bonus !! :]
more than anything, please do enable the custom theme thing. even if you keep the default theme, it's important to have that on because it allows you to use the archive, a vital part of blog navigation in this site :O
11 notes
·
View notes
Note
Haii I checked out ur website for ashes and was bored so i modified like 3 things (in my browser) so if u want u can use the code!
<html><head> <meta charset="UTF-8"> <meta name="viewport" content="width=device-width, initial-scale=1.0"> <title>The Ashes Homepage</title> <meta name="color-scheme" content="dark light"> <style> body { font-family: Comic Sans MS, Comic Sans, cursive; display: flex; flex-direction: row; } body > * { display: flex; flex-direction: column; padding: 5px; } </style> </head>
<body> <section id="about"> <h1>Ashes, The Website</h1> <h2>(because i needed to organize the links or else shit would get out of hand real fast)</h2> <p> Welcome to this extremely barebones Neocities that my friend Quincy gave me the idea to make! I know there's a really low chance that anyone would ever try and make a duplicate of it but just in case, hello this is the official thing, the person typing this is tumblr user/ao3 author extraordinaire darubyprincxx, but you can just call me/us Keys or Six.</p> <h3>So, what is this for and why does it even exist?</h3> <p>About eight months ago at the time of writing this, I started writing a fanfiction titled "(i'll tend to the flames, you can worship the) ashes" <a href="https://archiveofourown.org/works/42601899">over on ao3</a>, named after the chorus of <a href="https://youtu.be/crq-qc_r6Jk">this The Longest Johns song</a>. The fic is set in the aftermath of the <a href="https://www.youtube.com/watch?v=qIh39HoDzao&list=PLehe4fdjKD0-jvHil8N_5hpLDnA-u85mW">Empires SMP Season One</a> apocalypse and features characters played by <a href="https://www.youtube.com/@GeminiTayMC">GeminiTay</a>, <a href="https://www.youtube.com/@fWhip">fWhip</a>, and <a href="https://www.youtube.com/@Pixlriffs">Pixlriffs</a>. The reason why I am up at 11:30 PM eight months later teaching myself HTML for this is because since then, I've talked about it a lot over on our Tumblr and done some things in other places as well. There's a whole ass playlist that can be found on two platforms, a dedicated tag for it on our blog, and even an unlisted YouTube video of us reading the first chapter of the fic.</p>
<p>Basically, the project has sprawled over quite a large portion of the Internet since we've started it, and I wanted to have a centralized place for all that external stuff for ease of access and also because the opening notes on the fic itself are getting really, <em>really</em> long.</p> <p>For now, this page will probably stay extremely bare-bones- just a couple of paragraphs of important shit, hyperlinks, and dark mode. I finally defeated dark mode. It is 12:45 AM and the site colors are successfully not flashbangy.</p> <div></div></section>
<section id="meta"> <h2>Links for Things About and Related To the Fic</h2> <ul> <li><a href="https://archiveofourown.org/works/42601899">Direct link to the fic on ao3</a> </li> <li><a href="https://darubyprincx.tumblr.com/search/ashes+au">Tag for the fic on our Tumblr blog</a> </li> <li><p>Fic Playlist </p> <ul> <li><a href="https://www.youtube.com/playlist?list=PLOPTPqrotfhU6ln39eg1pG_qCzegoM0Ub">(YouTube)</a> </li> <li><a href="https://open.spotify.com/playlist/2HzC6x58YiSxyCr9Na0d6N?si=9486aaa1cf9048e5">(Spotify)</a> </li> </ul> </li> <li><a href="https://youtu.be/amnh3xAr_vw">Chapter One Narration (Unlisted)</a> </li> <li><p>Masterdoc (where we explain the nuances and symbolism and shit in the fic) [Coming Soon]</p> </li> </ul> <h2>Use Cases</h2> <p>I, the author of this work, give permission for those who wish to do so to download this fic for noncommercial uses such as sharing between friends or backing up physically for archival purposes, to make art (whether visual or musical) of scenes depicted in the fic, and to share snippets of the fic via screenshot or use in a video or article with credit to me via link to the work itself and naming me as the author. I ask that no extensions or fic of this fic (theories do not count) be written, for personal preference reasons.</p> <p>I do not give permission for people to repost my work without my explicit permission, pass it off as their own, use the fic in A.I datasets or submit its content in any way, shape, or form to A.I machines, or use it for commercial use in any way, shape, or form. Any of the actions mentioned in this paragraph go against the author's word for how this fic may be used and some of these cases can have actions taken against the perpetrator.</p> <p>If you have any questions about the points mentioned above, please email me at <a href="mailto:[email protected]">[email protected]</a> or send an ask to <a href="https://darubyprincx.tumblr.com/">my Tumblr blog</a>. </p> </section> </body></html>
This one has a two column layout and automaticaly switches to light or dark mode based on the users preference!
If u wanna add the auto style switch (which is importiant for accesability) then you can just paste
<meta name="color-scheme" value="dark light">
into the head element if you want!! (dont forget to remove the background-color and color properties from the css or theyll override it)
this is all /nf so feel free to delete or ignore the ask :3
this just deleted the original colors. thanks though i guess
4 notes
·
View notes
Text
[post text: YOUR WEBSITE'S TITLE HERE
Going to put all this in its own post too by popular request: here's how you make your own website with no understanding of HTML code at all, no software, no backend, absolutely nothing but a text file and image files!
First get website server space of your own, like at NEOCITIES. The free version has enough room to host a whole fan page, your art, a simple comic series, whatever!
The link I've provided goes to a silly comic that will tell you how to save the page as an html file and make it into a page for your own site. The bare minimum of all you need to do with it is JUST THIS: /end ID]
[image ID: a creature explaining what to change after you save the html to make it your own website: “Guess what? The circled bits are all you ever need to change to make it your OWN PAGE” The sections circled in red are:
the text of the page's tab, between "head" and "title" tags. it says “YOUR WEBSITE'S TITLE HERE”; the full line is: <head><title>YOUR WEBSITE'S TITLE HERE</title><head>
a header for the page, between "h1" and "p" tags. it says “BIG, CENTERED TEXT”; the full line is: <h1><p style="font-size:40px">BIG, CENTERED TEXT</p><h1>
a link to the image files of the comic, between an "h1" tag and inside an "img." tag. it says “thisisntyourcomic.png”; the full line is: <h1><img src="thisisntyourcomic.png"></h1>
the three navigation links, each inside an "a" tag. the first link applies to the word “Previous”, the second applies to the word “Home”, and the third to the word “Next”; the first line is: <a href="001.html"><b>Previous</b></a> . the second line is: <a href="YOURWEBSITE.WHATEVER"><b>Home</b></a>&nps;&nps; . the third line is: <a href="001.html"><b>Next</b></a>
/end ID]
[post text: Change the titles, text, and image url's to whatever you want them to be, upload your image files and the html file together to your free website (or the same subfolder in that website), and now you have a webpage with those pictures on it. That's it!!!!!
.....But if you want to change some more super basic things about it, here's additional tips from the same terrible little guy: /end PT]
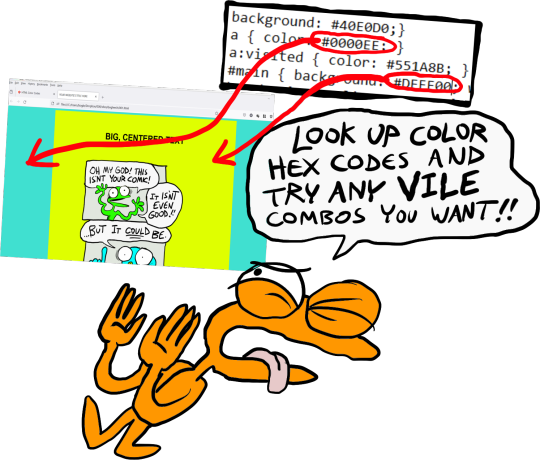
[image ID: the creature from before, explaining how to change the background colors: “AAH! It's extra stuff! Here's where you can change colors!” a few spots for hexcodes and code segments are circled and labelled. The lines of code are:
color: "#000000;" labelled “Font”
background: "#FFFFFF;" labelled “Background 1”
a { color: "#0000EE;" } labelled “Links”
a:visited { "color: #551A8B;" } labelled “Visited Links”
#main { "background: #FFFFFF;" width: 900…} labelled “Background 2”
The creature continues: “There's two different ones for "background" because the sample file has this nice middle column for your content!”
/end ID]
[image ID: a demonstration of the different background colors. Background 1 applies to the background of the webpage, and Background 2 applies to the background of the content column. The creature instructs: “Look up color hex codes and try any vile combos you want!” /end ID]
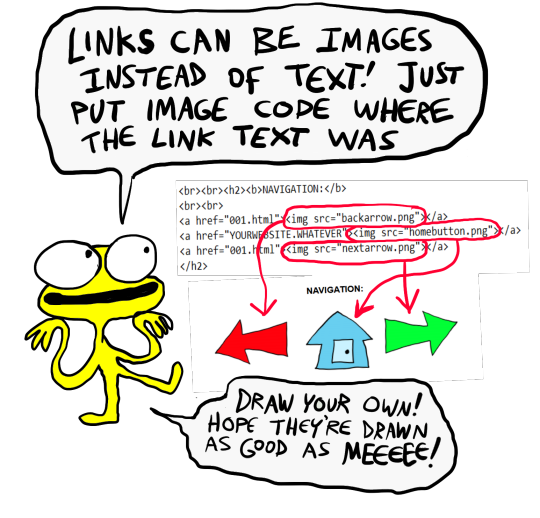
[image ID: the creature explaining how to change the navigation at the bottom: “Links can be images instead of text! Just put an image code where the link text was.” The code segment from the first image for navigation links except with the "Previous", "Home", and "Next" texts replaced with <img src="backbutton.png">, <img src="homebutton.png"> and <img src="nextbutton.png"> /end ID]
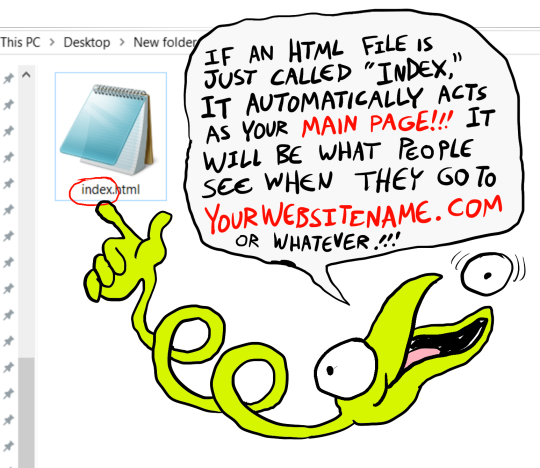
[image ID: a screenshot of the html code inside the computer's files, with the creature explaining: “If an html file is just called "Index," it automatically acts as your main page! It will be what people see when they go to yourwebsitename.com or whatever!” /end ID]
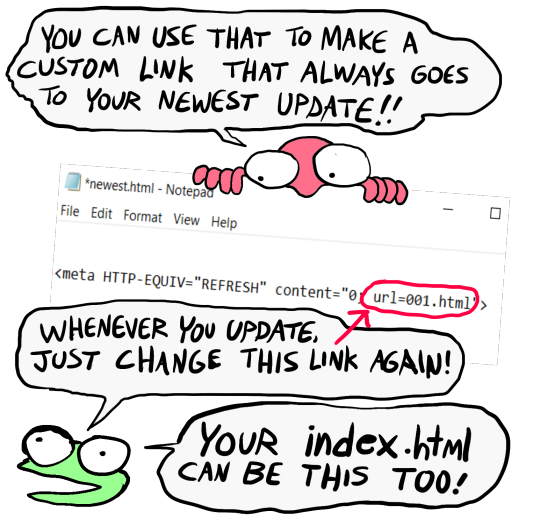
[image ID: a singular line of code: <meta HTTP-EQUIV="REFRESH" content="0; url=yourwebsite.com"> The creature says: “If you make a page with only this one line of code, anyone who goes to the page will be taken to whatever URL you put there!” /end ID]
[image ID: the creature further explains: "You can use that to make a custom link that always goes to your newest update! Whenever you update, just change this link again! Your index.html can be this, too!" There's an arrow pointing towards the "url=yourwebsite.com" in the code segment from the previous image. /end ID]
[post text: That last code by itself is:
<meta HTTP-EQUIV="REFRESH" content="0; url=001.html">
Change "001.html" to wherever you want that link to take people. THIS IS THE REASON WHY when you go to bogleech.com/pokemon/ you are taken instantly to the newest Pokemon review, because the /pokemon/ directory of my website has an "index.html" page with this single line of code. Every pokemon review has its own permanent link, but I change that single line in the index file so it points to the newest page whenever I need it to!
While I catered these instructions to updating a webcomic, you can use the same template to make blog type posts, articles or just image galleries. Anything you want! You can delete the navigational links entirely, you can make your site's index.html into a simple list of text links OR fun little image links to your different content, whatever! Your website can be nothing but a big ugly deep fried JPEG of goku with a recipe for potato salad on it, no other content ever, who cares! We did that kind of nonsense all the time in the 1990's and thought it was the pinnacle of comedy!! Maybe it still can be?!?! Or maybe you just want a place to put some artwork and thoughts of yours that doesn't come with the same baggage as big social media?
Make a webpage this way and it will look the same in any browser, any operating system for years and years to come, because it's the same kind of basic raw code most of the internet depends upon!
/end PT]
小い.> very useful guide~ thank you for making it!♡
게터.> neocities time〜 have fun everyone :]
ゆの.> web liberation W
additional useful things people added in the notes:
alternatives for making a link to the newest update, because the method privided by the guide above will break the back button
website for learning more html and css
how to make the text properly formatted and visible on mobile
Going to put all this in its own post too by popular request: here's how you make your own website with no understanding of HTML code at all, no software, no backend, absolutely nothing but a text file and image files! First get website server space of your own, like at NEOCITIES. The free version has enough room to host a whole fan page, your art, a simple comic series, whatever! The link I've provided goes to a silly comic that will tell you how to save the page as an html file and make it into a page for your own site. The bare minimum of all you need to do with it is JUST THIS:

Change the titles, text, and image url's to whatever you want them to be, upload your image files and the html file together to your free website (or the same subfolder in that website), and now you have a webpage with those pictures on it. That's it!!!!! .....But if you want to change some more super basic things about it, here's additional tips from the same terrible little guy:


That last code by itself is: <meta HTTP-EQUIV="REFRESH" content="0; url=001.html"> Change "001.html" to wherever you want that link to take people. THIS IS THE REASON WHY when you go to bogleech.com/pokemon/ you are taken instantly to the newest Pokemon review, because the /pokemon/ directory of my website has an "index.html" page with this single line of code. Every pokemon review has its own permanent link, but I change that single line in the index file so it points to the newest page whenever I need it to! While I catered these instructions to updating a webcomic, you can use the same template to make blog type posts, articles or just image galleries. Anything you want! You can delete the navigational links entirely, you can make your site's index.html into a simple list of text links OR fun little image links to your different content, whatever! Your website can be nothing but a big ugly deep fried JPEG of goku with a recipe for potato salad on it, no other content ever, who cares! We did that kind of nonsense all the time in the 1990's and thought it was the pinnacle of comedy!! Maybe it still can be?!?! Or maybe you just want a place to put some artwork and thoughts of yours that doesn't come with the same baggage as big social media? Make a webpage this way and it will look the same in any browser, any operating system for years and years to come, because it's the same kind of basic raw code most of the internet depends upon!
#chroma…#〖게타⎯⎯⎯ ʳᵉᵈᵃᶜᵗᵉᵈ : ⿻␘␇ ױ⸋⸋⸋𓐄𓐄𓐄⸋⸋⸋〗#id added#described#neocities#website#htmlcoding#html css#learn to code#indie comics#comics#website development#coding guide#website guide
12K notes
·
View notes
Text
best WordPress course in Jalandhar
TechCADD presents the best WordPress course in Jalandhar, Punjab. Excel in website development and management with expert support for all skill levels!
https://techcadd.com/best-wordpress-course-in-jalandhar.php
A WordPress course offers a comprehensive pathway for individuals interested in creating, managing, and optimizing websites without needing deep coding knowledge. As the world’s most popular content management system (CMS), WordPress powers over 40% of all websites on the internet, making it an essential skill for web developers, bloggers, entrepreneurs, and digital marketers. A well-structured WordPress course introduces learners to the fundamentals of website creation, beginning with domain name registration, hosting selection, and WordPress installation—either manually or through a hosting provider’s one-click setup tools. From there, students explore the WordPress dashboard, learning how to navigate menus, customize themes, and install essential plugins to enhance site functionality. These courses typically cover both WordPress.com (hosted) and WordPress.org (self-hosted), explaining the pros and cons of each so learners can choose the best option for their goals.
As learners progress, they’re guided through designing pages and posts using the block-based Gutenberg editor or classic editor, with hands-on exercises on formatting content, embedding media, creating menus, and using widgets for added interactivity. Understanding how to structure a website for both user experience (UX) and search engine optimization (SEO) is a core focus, with tutorials on permalinks, categories, tags, and metadata. Many WordPress courses also introduce learners to theme customization, where they can explore both free and premium themes, and learn to adjust colors, fonts, layouts, and logos to match their branding or design goals. Some advanced courses even include lessons on using page builders like Elementor or Beaver Builder for drag-and-drop website creation, making the design process accessible to non-designers.
Beyond design, a strong WordPress course dives into functionality—teaching students how to install and configure plugins to expand their site’s features. This includes plugins for SEO (like Yoast or Rank Math), security (such as Wordfence), backups (like UpdraftPlus), contact forms, social sharing, eCommerce, and analytics. By using plugins effectively, learners can add professional-level features to their websites without writing a single line of code. Additionally, courses often touch on performance optimization, covering techniques like caching, image compression, and mobile responsiveness to ensure websites load quickly and perform well on all devices.
For those interested in online business, many WordPress courses offer dedicated modules on setting up eCommerce stores using WooCommerce, the platform’s most popular online store plugin. Learners get step-by-step guidance on how to list products, set prices, manage inventory, configure payment gateways, calculate taxes and shipping, and manage customer orders. They also explore marketing integrations, such as email list building, customer reviews, coupons, and abandoned cart recovery—all crucial for building a successful online business.
Another important aspect covered in WordPress courses is website security and maintenance. Students are taught best practices to protect their websites from malware, spam, and unauthorized access. Lessons typically include how to keep WordPress, themes, and plugins updated, use secure passwords, install SSL certificates, and schedule regular backups. Additionally, students learn about GDPR compliance and how to ensure their sites meet privacy regulations by incorporating cookie notices, privacy policies, and data handling practices.
Many modern WordPress courses also address basic HTML, CSS, and even introductory PHP for those who want to move beyond pre-built tools and gain more control over customization. This allows learners to make specific changes to theme files or child themes, troubleshoot errors, and create custom functionality. While not mandatory, this knowledge enhances the learner’s confidence and opens the door to freelance web development or offering client services.
The flexibility of WordPress means that learners can use their skills in a wide range of projects, from blogs and portfolios to business websites, nonprofit platforms, and educational sites. A good WordPress course encourages project-based learning, where students build real websites from scratch, apply new concepts, and receive feedback. These hands-on projects not only reinforce learning but also help students build a portfolio they can use to showcase their skills to potential clients or employers.
In addition to technical skills, many WordPress courses offer guidance on launching and maintaining a career or freelance business. This includes tips on pricing web design services, managing client relationships, creating contracts, and using platforms like Fiverr, Upwork, or personal websites to attract business. With WordPress development in high demand, completing a course can be the first step toward a rewarding and flexible career in tech or digital entrepreneurship.
WordPress courses are available in various formats—self-paced video tutorials, instructor-led classes, bootcamps, or even university-affiliated certifications. Platforms like Udemy, Coursera, LinkedIn Learning, Skillshare, and local training centers offer a wide selection of WordPress courses catering to beginners through to advanced users. Some courses include certification upon completion, which can be added to resumes or LinkedIn profiles to validate one's skills.
In conclusion, a WordPress course equips learners with the tools and knowledge needed to build professional, functional, and attractive websites—without requiring deep programming experience. It covers everything from setting up a basic blog to launching a full-fledged online store, all while emphasizing usability, performance, and scalability. Whether you're a student, entrepreneur, freelancer, or career changer, learning WordPress opens the door to countless opportunities in the digital space, offering a valuable and future-proof skillset in an increasingly online world.
#WordPress#WP#WordPressSite#WordPressBlog#WordPressDeveloper#WordPressDesign#WordPressThemes#WordPressPlugins
0 notes