#Google Search Shortcuts
Text

#(disclaimer that i only use google search when yandex doesn't provide any good results... DDG is bad now as well so :/)#it is very annoying that there literally are no web browsers that don't suck :D GChrome i hate u & hope Google implodes. Safari I hate u &#hope apple implodes. MEdge... u do not even deserve mentioning. Opera... u improved since 2010s but still suck. Brave you also suck but#perhaps less? Tor... i love you Tor :) <3 <3#anyway i'm not a lexicographer but i feel like panopticon should just... be in the dictionary? why do i have to manually add everything#above an elementary grade reading level...? apple AC is so bad i turned it off & just individually enter all the words i commonly misspell#as text shortcut... otherwise it does nothing but change correctly spelled words for no reason & capitalize brand names. so useful!#like that is the opposite of what i want to be doing but somehow still less time consuming than the alternative#(affirmation) i love the future. technology advancements move us forward. technology simplifies my life. tech helps my productivity.#(screaming inside my head)#coming back to complain about how inferior the process for retreiving closed tabs/windows is on ff compared to chrome#and just managing browsing history in general. this browser is a fucking mess
1 note
·
View note
Text
Adding Google's "web" search to Raycast
If you want the "web" only version of Search
'''https://google.com/search?q={Query}&udm=14'''
#google #lifehack
I’ve added a quick link in Raycast with “gw” pointing to
https://google.com/search?q={Query}&udm=14
View On WordPress
0 notes
Text

Eye study (:
#I tried finding the source for the reference I used but reverse searching the image#just pulled up reposts from Pinterest#sowwy I literally just googled like aesthetic eye reference so#I love digital art dude the lil shortcuts make me feel like I’m actually talented#my art
1 note
·
View note
Text
jesus fucking christ Reddit hopped on the "let's turn our decent UI into a shitty Twitter clone" bandwagon
websites please stop fucking up the UI when nobody asked for it challenge, impossible difficulty
#reddit#twitter#social media#internet#my post#my posts#thank god for new.reddit.com#changed my shortcut to go to there but anytime I open a post from Google search it'll take me to the shitty version first#also the icon on mobile and on desktop tabs changed#Discord also did some mobile ui changes recently too#is there some secret meetings going on somewhere? can they just stop?
0 notes
Text
you don't need an AO3 app - round 2!!!
"AO3 is ugly and I hate the formatting!" -> you can download site skins. very gorgeous ones. and you can use them to change the aesthetics and visuals of AO3. just search 'AO3 skin' on Tumblr or even on google and you will be in A Whole New World. (and those searches should yeild tutorials on how to install the skins as well - it's not something I know a lot about, because I used to primarily use Quizilla and FFN, so I am more than used to Ugly Website. AO3 is very aesthetic and pretty compared to those.)
"AO3 is too bright!!! it hurts my eyes!!!" -> there is a dark mode. scroll down to the bottom. there is a heading that says 'customize'. under this heading, hit the button that says 'reversi'. that is their version of dark mode. and again, you can look for site skins that you like that have a darker background.
"I want to be able to make reading lists!" -> you can make bookmark collections on AO3. In your bookmarks, there is a button that says 'add to collection' beside each work. have fun. go ham. (Also, you can make private bookmarks if you are reading something with more controversial content that you don't really want others to know about - and please know, that any bookmark comments you make on public bookmarks can be seen by the author.)
(this last one made me laugh - because it seems like people are just coming up with bullshit excuses to 'need' an AO3 app when there is literally nothing that an app can go that AO3 can't.)
"my memory is really bad because of reasons sooo I remember to use things better by having them on my homescreen like an app!!!" -> create an AO3 shortcut on your homescreen. most mobile browsers have the capability to put a shortcut to a specific link or a specific website on your homescreen so that you can go straight there - like you would with opening an app. and it can be labelled 'the AO3 app' while simply having the icon of that browser. you can even do this with a link to a specific fic that you are in the process of reading (even down to the specific chapter that you were on). there is literally 0 reasons to have or use an AO3 app.
and remember kids!!! any and all apps with AO3 in their title are not associated with the real archiveofourown in any way, shape, or form - they are unofficial, and technically, they are illegal. and using them is putting all fanficition writers at risk legally (even if there is no active lawsuits right now) - just don't fucking use them. it is a threat to the entire fanfiction hobby just because you want 'the app experience'.
the archive is a non-profit website with 0 ads for a reason, and those apps are scummy scammers who put ads on our stories to make fast easy money when none of the people who made those stories ever consented to it.
#god#seeing people on tiktok say that they use ao3 apps drives me wild#sundrop speaks#archive of our own#ao3#fanfiction#spencer reid x reader#psa#daryl dixon x reader#ellie williams x reader#eddie munson x reader
456 notes
·
View notes
Text
downloading from the exchange without a registered game account lol
writing up this little "guide" both so that I remember how to do this & also for those of you who don't know this little trick yet. this isn't just for the crowd who illegally obtained their game; some of us registered our games when we were 12 years old, don't remember our passwords and no longer have access to the email address we used for the account teehee anyways guide under the cut
I use google chrome, things might look a bit different if you use another browser but it should be pretty similar across the board I would imagine.
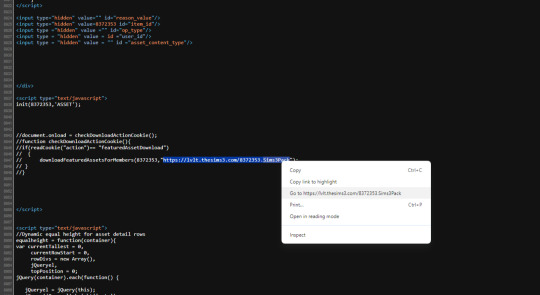
find what you want to download (this is a world. obviously), right click the page itself and press 'view page source' (or press ctrl + u if you're a shortcut gamer)

this opens a new page, next thing you're gonna do is press ctrl + f to bring up the search bar in the top right of the page. search sims3pack and it should bring back at least one instance (sometimes there are two, if there's multiple you can use either link; it's the same one I'm pretty sure)
highlight the link that ends in .sims3pack (don't include the quotation marks or anything else, you literally just want the link) and either copy + paste that into your address bar, or right click and press 'go to insert link here'. it should just start the download from there.
sometimes its a bit finicky and brings back an error page; usually switching users on google chrome or opening an incognito tab fixes this for me.
ok cool that's it. hope this helps
150 notes
·
View notes
Text

HOW TO: Make Animated Neon Text
Hi! No one asked for this tutorial, but this is one of my favorite typography effects as of late — so I thought I'd share how I do it. You can see this effect in the first gif of this *NSYNC Celebrity set and the last gif of this Anthony Bridgerton set. Disclaimer: This tutorial assumes you have a basic understanding of gif-making in Photoshop. It's also exclusively in Timeline and uses keyframes for the fading effect seen on the blue text.

PHASE 1: PREP YOUR BASE GIF
1.1 – Choose a dark scene.
This effect looks best contrasted against a dark background. You can definitely do it with a bright background, but just like a neon sign irl, you only turn it on in the dark/at night — so keep that in mind!
1.2 – Determine the length of your clip.
Depending on how much you want your text to flash or fade in, you'll want to make sure you have a scene long enough to also allow the text not to flash — reducing the strain it takes to actually read the text. For reference, my gif is 48 frames.
1.3 – Crop, color, etc. as you would.
New to gif-making? Check out my basic tutorial here!
PHASE 2: FORMAT YOUR TEXT
Before we animate anything, get your text and any vectors laid out and formatted exactly as you want them!
2.1 – Finding neon sign fonts.
It's easy as going to dafont.com and typing "neon" into the search bar!
2.2 – Fonts I used.
Neon Glow by weknow | Neon by Fenotype | Neon Bines by Eknoji Studio

And to not leave my fellow font hoarders hanging, the font for "tutorial by usergif" is Karla (it's a Google font) 🥰
2.3 – Group your text layers. (Conditional)
If you plan on having multiple text layers like I did and you want them to appear connected (like how the last letters of "NEON" and "sign" intersect with the wand icon), I suggest putting the layers into groups according to color (the shortcut to group layers is Command+G). If you don't group your text and just apply the outer glow settings to each individual layer, you'll end up with something like this:

—where you can see the glow overlap with the line, instead of the smooth connection you see in my final example gif. I'm using 2 colors for my text, so I made a group for red and a group for blue.
2.4 – Apply Outer Glow.
Right-click your text layer (or your group if you have several layers) and select "Blending Options" to open the Layer Style menu. Check "Outer Glow" and feel free to play around with the settings until you like the way your text looks!
Your outer glow color should be darker and more vibrant than the color of the text itself. The text should be within the same color family but much brighter and, sometimes, almost white (see Step 2.2 again for my text colors).
Here are the settings for the Red Glow (the glow color is #FF3966) and Blue Glow (#00F0FF):

These aren't always my exact settings but they're pretty close to my standard. I always set the blend mode to Hard Light and usually have the opacity at 100%.
For every gif I use this effect on, I like to play around with Spread and Size. Spread will make the glow look denser and "expand the boundaries" (source: Adobe) and Size will diffuse the glow and blow it out so it covers a larger area (Adobe says it "Specifies the radius and size of blur").
2.5 – Duplicate your text layer/groups and remove glow.
We're only going to be animating the glow on our text, and since doing this affects its opacity/visibility, we want to preserve the base text by creating a duplicate.
I just hit the Command+J shortcut to duplicate my groups and delete the Outer Glow effects, making sure that the "No Glow" version is above the "Glow" version:

I also put all these groups into one group called "Text" for organization and so I could apply a drop shadow to all the elements for better visibility.
PHASE 3: CREATE THE FLASHING EFFECT
This is for the effect you see on the RED text in my gif!
3.1 – The 0.03-Second Rule
If you've read any of my animation tutorials before, you're probably already familiar with this rule. In my experience (and for reasons I can't explain), Video Timeline pauses every 0.03 seconds (try clicking the forward button a few times, you'll probably find a "duplicate" or paused frame). So, keep all your layers a duration of 0.03-second increments (e.g. 0.06 or 0.09 seconds can also work) and align them on the Timeline at 0.03-second intervals. If you don't follow this rule, you'll get duplicate frames when you export, resulting in a choppy final gif.
3.2 – Trim and arrange your text layers.
Only on the layers/groups WITH the Outer Glow effect, trim them into several segments of varying lengths where the glow will be "on" (visible) and leaving spaces where the glow should be "off."
Typically, I'll have a mixture of 0.06 and 0.03-second text. That's when the glow will be visible. Between each "flash" of visibility, I've got a 0.03-second blank space, baby *pen clicks* and I'll write your name:

The layers shown above are arranged with a few flashes and two long segments of no flashing. This is the order and duration of each segment shown above (purple = visible segments):
0.06 blank, 0.06 visible, 0.03 blank, 0.03 visible, 0.03 blank, 0.03 visible, 0.03 blank, 0.24 visible (the long bit where "FLASHING" doesn't flash at all), 0.03 blank, 0.03 visible, 0.03 blank, 0.12 visible
(I only did this for the text that says "FLASHING" to give it a glitching effect. The other red text keeps the glow visible starting at the first long segment.)
PHASE 4: CREATE THE FADE-IN EFFECT
This is for the effect you see on the BLUE text in my gif!
4.1 – Animate using the Opacity Keyframe.
Again, we're only touching the layers/groups WITH the glow effect. If you only have one layer of text, you'll find the Opacity Keyframe by clicking the film reel icon:

If you're working with groups like me, you'll find it in the Timeline panel under the group when it's expanded:

As you can see, I already added my keyframes (lil diamond babies). And luckily, it's super easy to do!
4.2 – Add the ending Keyframe first.
We're starting at the end because our layers/groups are already at 100% opacity. Drag the playhead (the blue arrow attached to the red vertical line) to a spot where you want the glow to be 100% opaque — this is where the glow will be fully "on" or visible. [Again, follow the 0.03-Second Rule. You will get duplicate frames regardless when using keyframes (this will be explained in the note in Phase 5), but abiding to the rule will mitigate the amount of dupes you get.]
Then, click the clock icon by "Opacity" to place a keyframe:

4.3 – Add the starting Keyframe.
Go backward from the ending Keyframe you just placed (I went back 0.12 seconds — but you can play around with the duration of the fade, just keep it a multiple of 0.03):

And drop another keyframe, this time by clicking the diamond icon by "Opacity":

4.4 – Reduce the opacity on the starting Keyframe.
Keeping that keyframe you just placed selected, go to the layers panel and reduce your layer's/group's opacity to 0%:

Now, this Outer Glow will slowly fade from 0% to 100% opacity.
And just for a visual aid, here's where my fade-in keyframes are in relation to my flashing segments:

To refresh your mind, the 0% Opacity Keyframe starts when "FLASHING" is visible for 0.24 seconds (the first long segment of visibility).
With these keyframes, you'll get a smooth fade-in à la ✨light switch with a dimmer✨
PHASE 5: EXPORT
Yay, we're finished! Convert from Timeline back to Frames and export your gif!
NOTE: If you only did the flashing effect and followed my 0.03-Second Rule, you shouldn't have any duplicate gifs.
BUT if you included the fade-in effect using keyframes, you WILL have duplicate frames. 'Tis the nature of keyframes. 🤷♀️ I had 4 extra frames where the fade-in starts, which I deleted. So, as always, I recommend checking your frames when you convert from Video Timeline back to Frame Animation — and manually delete any duplicate frames.
Sorry this tutorial is so long 🙈 I over-explain so you're not just mechanically copying steps, but understanding the WHY behind each step! Thanks for bearing with me
If you have specific questions about this tutorial, feel free to send a message to usergif and I'll try my best to help! :)
More USERGIF tutorials • More resources by Nik • USERGIF Resource Directory
#typography#gif tutorial#completeresources#usershreyu#useryoshi#userelio#userzaynab#userives#usertreena#usercim#userrobin#userkosmos#usersalty#userhella#alielook#uservalentina#uservivaldi#*usergif#*tutorial#by nik#flashing gif
780 notes
·
View notes
Text
too many thoughts on the new hbomberguy video not to put them anywhere so:
with every app trying to turn into the clock app these days by feeding you endless short form content, *how many* pieces of misinformation does the average person consume day to day?? thinking a lot about how tons of people on social media go largely unquestioned about the information they provide just because they speak confidently into the camera. if you're scrolling through hundreds of pieces of content a day, how many are you realistically going to have the time and will to check? i think there's an unfortunate subconscious bias in liberal and leftist spaces that misinformation is something that is done only by the right, but it's a bipartisan issue babey. everybody's got their own agendas, even if they're on "your side". *insert you are not immune to propaganda garfield meme*
and speaking of fact checking, can't help but think about how much the current state of search engines Sucks So Bad right now. not that this excuses ANY of the misinformation at all, but i think it provides further context as to why these things become so prevalent in creators who become quick-turnaround-content-farms and cut corners when it comes to researching. when i was in high school and learning how to research and cite sources, google was a whole different landscape that was relatively easy to navigate. nowadays a search might give you an ad, a fake news article, somebody's random blog, a quora question, and another ad before actually giving you a relevant verifiable source. i was googling a question about 1920s technology the other day (for a fanfiction im writing lmao) and the VERY FIRST RESULT google gave me was some random fifth grader's school assignment on the topic???? like?????? WHAT????? it just makes it even harder for people to fact-check misinformation too.
going off the point of cutting corners when it comes to creating content, i can't help but think about capitalism's looming influence over all of this too. again, not as an excuse at all but just as further environmental context (because i really believe the takeaway shouldn't be "wow look how bad this one individual guy is" but rather "wow this is one specific example of a much larger systemic issue that is more pervasive than we realize"). a natural consequence of the inhumanity of capitalism is that people feel as if they have to step on or over eachother to get to 'the top'. if everybody is on this individualistic american dream race to success, everyone else around you just looks like collateral. of course then you're going to take shortcuts, and you're going to swindle labor and intellectual property from others, because your primary motivation is accruing capital (financial or social) over ethics or actual labor.
i've been thinking about this in relation to AI as well, and the notion that some people want to Be Artists without Doing Art. they want to Have Done Art but not labor through the process. to present something shiny to the world and benefit off of it. they don't want to go through the actual process of creating, they just want a product. Easy money. Winning the game of capitalism.
i can't even fully fault this mentality- as someone who has been struggling making barely minimum wage from art in one of the most expensive cities in america for the past two years, i can't say that i haven't been tempted on really difficult occasions to act in ways that would be morally bad but would give me a reprieve from the constant stress cycle of "how am i going to pay for my own survival for another month". the difference is i don't give in to those impulses.
tl;dr i hope that people realize that instead of this just being a time to dogpile on one guy (or a few people), that it's actually about a larger systemic problem, and the perfect breeding grounds society has created for this kind of behavior to largely go unchecked!!!
#hbomberguy#james somerton#idk if any of this is coherent it just needed to get out of me#misinformation#capitalism is hell!
236 notes
·
View notes
Note
hi, your latest edit for thgweek24 is absulutely stunning and i thought if i can ask if you can make a tutorial about the ripped gifs/paper effect? if not, that's okay! have a nice day <3
RIPPED PAPER EFFECT TUTORIAL

hi! thank u :D (thgweek set referenced)
below the cut are the steps that i took to create this effect. this tutorial is very screenshot heavy and assumes some basic knowledge of photoshop and giffing.
i do my best to try and explain my process so hopefully this is helpful! if you have any questions, please don't hesitate to ask.
STEP 1: Choose and arrange your two gifs
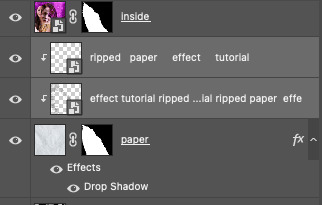
with this specific use of the ripped paper effect, there's one gif on the "outside" of the rip and one on the "inside." in this example, the outside is the b&w and the inside gif is the colored:
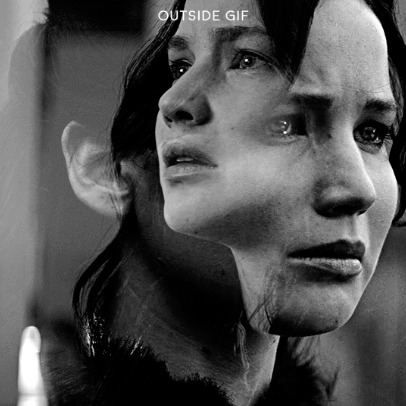

for me, the outside gif determined the positioning of the inside gif and the position/direction of the rip. as can be seen, outside gif has a lot of space on the left. therefore, i knew i was going to position the subject of the inside gif more on the right so i could create the rip without hiding too much of the b&w gif.
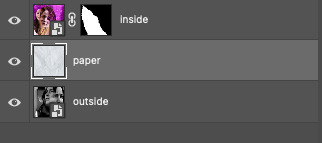
next, you want to arrange the inside gif on TOP of the outside gif. your layers panel should look like this:

STEP 2: Creating the ripped effect
here comes the fun part! in order to create this effect, you're going to need torn paper brushes. here and here are some packs you can download (w credit to owner).
next, create a layer mask on your inside gif. you're going to use the brush of your choosing as an ERASER. then, you can play around with the size and angle of the eraser to create the look you want. this is what the gif and the layers panel now look like:


STEP 3: Adding the paper
in order to add the paper around the edges of the inside gif (where the text goes), you now need to download a paper texture. i found mine on google by searching "paper texture png."
place the paper png IN BETWEEN your outside and your inside gif. this is what everything should look like:

now, similarly to what you did in the previous step with the inside gif, you are going to create a layer mask on the paper layer. using an torn paper brush as an eraser, you will erase the paper, creating the shape you want.
be sure to leave enough room for whatever text you want to be on the paper. also, i suggest making the rips of the paper different from the rips of the inside gif so it looks more organic.
here is what my gif looks like after erasing the paper:

optional: add a drop shadow on the paper layer (right click -> blending options... -> drop shadow)
STEP 4: Adding the text
first, you want to identify the space where you will have room to place your full quote within the paper. if there are no spaces, you can always use your brush/eraser to modify the layer masks.

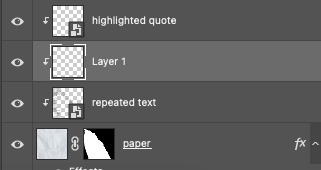
next, add a layer on top of the paper layer (and below the inside gif). select the text tool and start typing your repeated text!

because you can see which text is hidden by the inside gif and what is on top of the paper, a shortcut i use is the "tab" button and only type words that will be seen.
type the repeated words around the quote you want highlighted:

now, in order to contain the text within the paper, convert the text layers into smart objects. then, create a clipping mask on both layers (right click –> create clipping mask). this is what your layer panels should look like:
with that, your gif should now look something like this, with the text contained inside the paper:

STEP 5: Highlighting the quote
as you can see, it just looked like a bunch of words. so, in order to highlight the quote you carved out in the previous step, add a new layer below the layer of the quote you want highlighted:
now, use a round brush (softness around 10-15% and opacity at 70-80%) with the color of your choice to highlight the words you want.
and there you have it!
i hope that this made sense and was helpful! if you have any questions or clarifications, please don't hesitate to ask :)
185 notes
·
View notes
Text
LIST: iOS SHORTCUTS
• Spotify to MP3 | "Download Spotify tracks to MP3."
• All Media Downloader | "This shortcut helps you download content from social media apps."
• Web Services | "Customise the internet for you."
• Better GIF Maker | "Convert videos and live photos to GIFs at highest quality using ffmpeg"
• Water Eject | "Powerful water ejection system."
• Paywall and Cookie Bypass | "Bypass website paywalls and cookies."
• iUtilities | "The only shortcut you’ll need"
• Reverse Image Search | "Search by image instead of keywords"
• Google Translate | "Quickly translate using the Google Translate API"
• iTweak Final Version | "A Jailbreak Alternative With Multiple Features!"
...WHAT ARE SHORTCUTS?
for those unaware: the pre-installed Shortcuts app on iOS/macOS/iPadOS can potentially be a life-changing application in regards to digital productivity.
it's utilized as a hub for your collection of shortcuts and automations. shortcuts allow for just a single click—which many times is conveniently incorporated onto your "share" sheet option panel—to execute one or multiple actions; automations are chosen commands that run at specific/relative times of day without prompt.
people tend to overlook the Shortcuts app due to its available "gallery" of shortcuts being rather limited... with the only other option provided being to build these desired actions yourself, which requires the skill of digital coding. however! that's where RoutineHub comes in: it's a website allowing users to share their own complex shortcuts, free of charge, and has a large selection to choose from.
RoutineHub: Shortcuts {by Popularity}
#smart technology#digital productivity#life hacks#productivity#shortcuts#smart living#automations#iOS#macOS#iPadOS#technology#routinehub#g#link#text#ref
140 notes
·
View notes
Text
hey little one! do you have a PC and want a really cute way to listen to some kid-safe music?
well i have the best idea for you all! you're gonna play a game called Nick Jr. Radio! for all my bodily younger littles out there who are unfamiliar, this is a game that i grew up playing when i was little!
however, unfortunately, the game is inaccessible on the web due to the discontinuation of flash. but i'm gonna show you how you can play it! (safely!! never go to any websites that claim to have old flash games. they are unsafe!)
tutorial under the cut

- first, make sure you have a PC/laptop/etc. i don't believe this works on mobile.
- next, open up google and search for "Blue Maxima Flashpoint".
- click on the first link. it should be called "Flashpoint Archive". the website should look like this!
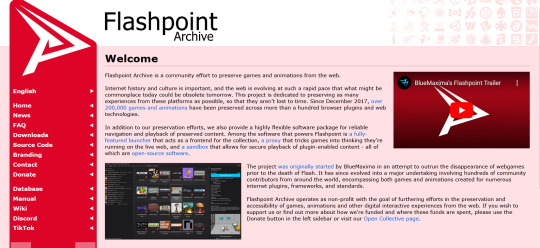
- scroll all the way down until you see the big red download button. this won't download anything automatically yet, but rather will take you to the download options! these are your options.
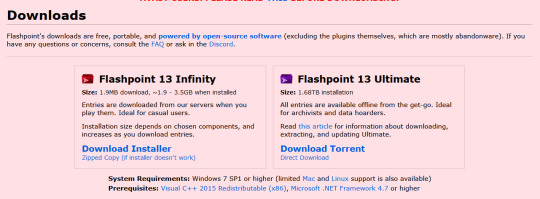
- DO NOT DOWNLOAD THE ULTIMATE VERSION. this will automatically download every flash game that has ever been made onto your pc. not only will it take HOURS to download, it could be illegal in your country or state to have certain games in your possession! stay safe and download Flashpoint 13 Infinity! this will allow you to pick and choose the games you wanna download or play.
- go through the process of installing it. i highly recommend making a shortcut on your desktop for it so it's extra easy to get to when you wanna play
- once everythings said and done, open it up! the interface will look like this

- congrats, you now have access to practically every lost flash game thats ever been archived! but for today we wanna focus on getting to Nick Jr. Radio! simply search for it in the search bar up top. this should pop up!
- this is the game we want! its nice because you don't need to download this one, whereas some games on flashpoint you do. so this game wont take up any space on your pc! simply click the thumbnail and then click play on the right hand side of the screen!
- and here it is!
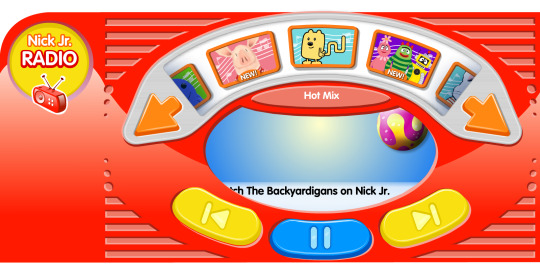
- this game allows you listen to tons of music from nick jr shows from the 2000s/2010s! i used to play this game all the time back in the day! and now that you have flashpoint, you can simply search up nick jr and play ALL the nick jr flash games! its the perfect regression activity!
- if you actually choose to go through with this, i hope you have lots of fun! theres so many fun games and toys to discover on flashpoint!!
#︶︶ ˚ fun#sfw age regression#age regression#agere#sfw agere#age regressor#noncom agere#agere blog#sfw littlespace#agere activities#agere games#agere game#nick jr#sfw regressor#safe age regression#age regression sfw#agere sfw#sfw age regressor#sfw little stuff#sfw regression
55 notes
·
View notes
Text
Japanese Q Speedround: Google Is Right There
Hi, it’s mod Rina. It’s time to speedrun some asks.
@troublsomeidiots asked:
I'm writing a character who is both black and Japanese and lives in japan in a primarily Japanese area and wanted some help in writing a person who is biracial who lives in primarily homogenous society? Like what kind of struggles she would face, especially as a person who has never met anyone who is black other than in passing?
Open Youtube. Hit search bar on Youtube. "being black in japan" "half black half japanese in japan" "black hafu in japan". Try different combinations of keywords. Bon voyage.
(neither Marika nor I are Black. We will not be speaking to experiences we do not have.) (we can outsource to some of our friends if you ask a specific question. These are not specific questions.)
(Black Japanese readers--please feel free to comment if there’s something you want OP to know!)
@layzeal asked:
Hello! I have a question regarding family/last names in Edo period Japan. My story takes place in 1816, my character was born in 1796 from a commoner family (that she gets separated from a few years later, and in a different country).
I've read that regular people in Japan didn't adopt the use of family names until Meiji restoration, but I'm not sure how true that is. Would a family of commoners in that period carry a family name, or would they only use their first names? And any idea if that family would have to present a last name when moving/passing by a different country that does use them?
It's important for me to know, since the existence of a last name or not would quite heavily influence how hard it'd be for the family to meet again, and which means would be used. Thanks in advance!
When I gave Google some keywords from your query, the second result explained how pre-Meiji commoners without family/clan names used bynames to distinguish themselves, and gives additional data on them. Maybe give it another Google?
@weavefeather asked:
Hello, I am a writer and I really need some advice. I am wotking on my book since a few years, maybe 2 or 3, and I finally got the points together how it could begin. My plan is that my MC (named Nanami Kudo) is an lawyer of the FBI and has to go to her homecountry Japan, beacuse they send her to foreign investigations about a syndicate of people..... And the some things happen, like her brother who still lives in jp doesn't really welcomes her, some complications with the police and so on...
But thats not the point! Im really struggling to take in words how she gets to the other country, leaving her home behind and her partner she worked with. Do you have any advice on it, maybe how to structure it, some words or scenarios that fit?
How she gets to the other country: …..She flies there.
How US government agents/workers relocate and what the experience is like: That's your job to google. We are not government agents. Try anecdata on reddit, reddit AMAs, and Quora.
It’s unclear what her relationship/proximity to Japan is. What kind of nikkei is she? Is she mixed race or monoracial? How much Japanese can she speak? So many unknowns. Go read our Japanese tag and appreciate just how many ways one can be a Japanese person. Until then, you are nowhere near close to being able to write a nikkei homecoming plot.
Lastly, you are the author. Give us scenarios yourself and come back to us.
In Conclusion
Guys, you all gots to google some more. It’s beneficial to both of us: not only do we get to help with more specific things and have enough info to do so, but you don’t have to wait months until your ask comes through the backlog only to receive an answer you could have researched in anywhere from a couple days to 3 minutes.
~ Rina
“But Rina, I don’t know how!”
You’re in luck!
First, try one of our own post on Google shortcuts.
Second, stay tuned for some very relevant posts...
COMING SOON: WWC’s A Beginner’s Guide to Academic Research
288 notes
·
View notes
Note
lol u dont handle condescension well bc ur a pseudointellectual who knows less than the people who are being "condescending". like u think bc u autistically google something for two hours and read the first three sentences of whatever article u come across ur an expert and u never touch the subject again. u just have a massive and deserved inferiority complex bc u lack the drive motivation and willpower to learn what other people do and u get mad that ur shortcuts dont work so you end up embarrassing urself when someone whos spent years learning about shit knows more than u do after ur little search spree. u have zero critical thinking and rationality skills. ur not nearly as smart as u want to be or think u are. just cope and seethe with that instead of trying to project ur shitty attitude on people who know what theyre talking about lmfao.
who the hell are you???
28 notes
·
View notes
Text
adults who don't talk to teenagers might think they're all like computer hackers -- but a lot of teens today actually have shockingly low computer skills, which is because they are mostly using their phones or pre-programmed things on chromebooks for school or whatever. i mentor teens and almost every teen i've mentored has been confused about how computer folders work, how to name files, where things go when you save them, let alone really basic html things (but why would they need to know that when everything is app-optimized?). they're used to googling websites instead of typing in the url. (and the only search engine they know about is google.) when they get search results they tend to just click whatever comes up first. they tend to get easily discouraged if something doesn't immediately pop up as instant information. this is for basic web research... library research feels even more onerous and confusing to them.
hmm. makes me feel sad for them but i dunno where they would even pick up these skills outside of like, AP classes, which are becoming increasingly draconian with stacks of homework and essays and etc ... all of which seems to just encourage finding more easy shortcuts and less actual research skills, computer literacy, etc.
there are multiple reasons why this is happening and a lot of different patchwork solutions we can apply to this...
my personal recommendation is to reach out to a teen in your life, show them how you work on your computer... i've blown kids' minds just by showing them how to save things in folders so it's more organized. and the key here is to not be didactic. teens hate when adults are like "let me explain something to you buddy." i mean, they're being explained to all day. the secret here is it's less about teaching skills, and more about providing them with a personal connection in a society that's giving them an increasing stack of demands with very little pay-off. man, i feel for teens today.
167 notes
·
View notes
Text
ChoiceScript Savepoint System Very Quickly
Hey guys,
@hpowellsmith made a great template for save points! It requires you to create another variable for every variable you have in your ChoiceScript game, so that it can store the old values to essentially "save"! This won't rely on third-party saving systems but is rather hard-coded into the game itself.
I realize that it can be a daunting task to create a whole other set of variables, especially if you already have many, many of them. (Looking at TSS' code, there are thousands!)
But I propose two super quick ways to automatically create all the variables you need for save points.
Find and replace.
Copy all your *create variables
Paste it into a Google Docs
On, PC, Ctrl+H to open up the dialog box for Find and Replace (link on how to find and replace on different platforms)
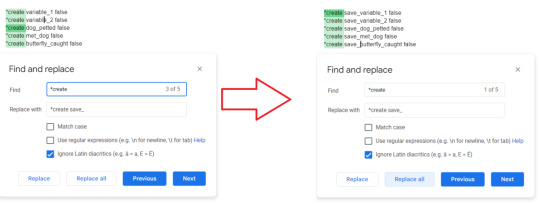
Search for "*create " (space included at the end) and replace it with *create save_
Hit "Replace All" and there you have your duplicated variables to paste into your startup (do so without replacing any of your old variables).
Bonus: you can instead replace it with *create save1_ , *create save2_ , etc. to have multiple save slots.
You can create all your needed variables in startup quickly with this, but there is still the issue of having to *set the variables to the new variables (when you're saving) or vice versa (when loading).
Hence the other way:
Save System Generator
I also made a program where, if you copy and paste all of your *create variables, it will automatically:
Give you code to put in your startup (the duplicated save variables)
Give you code that you use to save.
Give you code that you use to load.
I recommend you do it the way Hannah PS does in their template by calling a *gosub_scene.
Here are the step by step instructions on how to do this:
1. Prepare your *create variables. To clarify, you will only put in *create stuff into the program. Copy from your very first *create to your very last *create (the variables you want to save at least). Do not add any comments or additional code that is NOT *create. Do not have any additional spaces at the end (line breaks in between *create should be fine, but be more aware for potential errors).
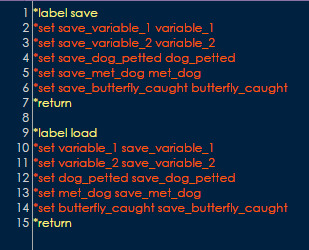
2. Create a .txt file. In Hannah's template, the file is called "savegame.txt". You will want to make a *label save and a *label load that each *return (as depicted above).
3. Load up the program. Here is the link.
4. Pasting in your code. Paste in your code and immediately after your last *create, press enter, press $, and press enter again.
Note 1: You cannot use Ctrl+V or shortcut keys to paste in the code. You have to right click and paste it. Do not do this on mobile.
Note 2: You might want to do this in segments, as the program might have difficulty parsing through it, and you will more easily find errors in case they happen. Maybe every 30-50 variables to keep them bite-sized. I've tested inputting up to 70 unique variables to success.

5. Startup variables. After reading your input, it will give you code that you then have to add to your startup. Copy it by highlighting and right-clicking on it (do not use shortcut keys or do this on mobile).
6. Save. If you press S and enter, it will give you the code that you need to put in your savegame.txt under your *label save .

7, Load. If you press L and enter, it will give you the code you need to put in your savegame.txt under your *label load .

8. Using it. As in the template, you'll want to call on this with a *gosub_scene savegame load (if you want to load) or *gosub_scene savegame save (if you want to save).
And that's it! Please let me know if the program works incorrectly! 💕💕
#choicescript#choicescript resources#cs coding resources#choicescript coding resources#choicescript saving#choicescript save system
130 notes
·
View notes
Text
In the last decade, cacti have exploded in popularity, becoming a mainstay of hipster decor around the world – from the homes of China’s growing middle class and the meticulous cactus gardens in Japan to the fashionable cafes of Europe.
In the US alone, sales of cacti and succulents surged 64% between 2012 and 2017; a market that is now estimated to be worth tens of millions. But rising demand has met a thorny problem: cacti are extremely slow-growing, with some species taking decades to grow from seed to full maturity. Hence, many opt for the shortcut: pulling them right out of the ground.
For land managers and scientists who work with cacti, the problem appears to be on the rise. While the precise scale is difficult to measure, and catching thieves red-handed in remote deserts is nearly impossible, major busts offer clues. In 2014, more than 2,600 stolen cacti were seized at US borders – up from 411 just a year before. But law enforcement officials and field scientists say that data represents only a tiny fraction of cactus actually being stolen.
“When I first started we rarely investigated cactus theft,” said one US Fish and Wildlife Service detective, who asked not to be named due to the undercover nature of his work. He has covered the south-west region for more than a decade and says the problem is increasing. “Now we are prosecuting cases involving thousands of plants at a time. The demand is so high that I fear we can’t stop the illegal trade going on.”
While many plants fall victim to underground cactus cartels, a seemingly more benign form of theft has become part of the problem, too. International visitors who come to the south-west specifically to view rare cactus in the wild sometimes take a souvenir home, and social media is exacerbating the problem.
“We’ve had Austrian, German and Italian collectors express strong interest on social media for these plants and they share GPS coordinates,” said Wendell “Woody” Minnich, the former president of the Cactus and Succulent Society of America. “Some of these people come to steal, especially when a new species is identified. They hide the plants in their suitcase and take them back to their greenhouse in Europe.”
Minnich, 71, has been a cactus grower and nursery operator in New Mexico for 50 years. He said the internet had significantly accelerated theft of rare, slow-growing cactus species over the last decade. A case in point: Sclerocactus havasupaiensis, which is native to one drainage at the bottom of the Grand Canyon, was being auctioned on eBay in early January by a seller in Ukraine. It was just one of more than 365 internationally protected plant species that are openly traded on Amazon and eBay.
“Do a Google search on Sclerocactus and you can find people in Russia selling them,” said Minnich. “I have been on public lands in Arizona, New Mexico and Colorado where years ago Sclerocactus were everywhere, and recently I found just a bunch of little holes in the ground.”
#environmentalism#ecology#botany#plants#cacti#national parks#crime#theft#smuggling#usa#saguaro#sclerocactus havasupaiensis
144 notes
·
View notes
Last Seen Blogs

descendantsageverified
descendantsageverified

georgecahill
George Cahill Music

impendingfascination
Impending
Fascination

nitemmdo
temmi tennis tennisball

howdidyouseeme
How Did You See Me