#Uninstall WordPress from cPanel
Explore tagged Tumblr posts
Visit Tumblr Blog
Explore Tumblr blogs with no restrictions, modern design and the best experience.
Last Seen Tumblr Blogs


Fun Fact
Tumblr is used by 21% of adults online aged 18-29 years.
Text

#WordPress site deletion#Delete WordPress website#Removing WordPress site#Uninstall WordPress from cPanel#Backup WordPress website#WordPress database deletion#Website platform migration#WordPress site management#cPanel tutorial#WordPress site backup#WordPress website security#Data backup and recovery#Website content management#WordPress maintenance#WordPress database management#Website data protection#Deleting WordPress files#Secure data storage#WordPress site removal process#WordPress website best practices
0 notes
Video
youtube
How to Remove WordPress from cPanel | Complete Guide to Uninstall
0 notes
Text
How to Delete Wordpress Site
Deleting a WordPress site should be done with caution, as it permanently removes all of your site's content, settings, and data. Make sure you have a backup of any data you want to keep before proceeding. Here's a step-by-step guide on how to delete a WordPress site:
Before you begin:
Backup your site: Use a WordPress backup plugin or your hosting provider's backup feature to create a backup of your site's content and database. This is crucial in case you change your mind or need to restore your site later.
Export Content: If you want to save any posts, pages, or other content, export it using the WordPress export tool. This will create an XML file you can import into another WordPress site if needed.

#how to delete wordpress site#how to delete wordpress site and start over#how to delete wordpress site hostinger#how to delete wordpress site from cpanel#how to delete wordpress site 2022#how to delete wordpress site from localhost#how to delete wordpress site godaddy#how to delete wordpress site 2023#how to delete your wordpress site and start again#how to delete a wordpress site on bluehost
1 note
·
View note
Text
youtube
Welcome to our step-by-step guide on effortlessly uninstalling WordPress from cPanel. In this informative video, we walk you through the process of removing WordPress from your hosting account, ensuring a seamless uninstallation experience. Whether you're looking to start fresh or switch to a different content management system, we've got you covered!
Throughout this tutorial, we provide clear instructions accompanied by visual demonstrations, making it easy to follow along even if you're a beginner. Our detailed approach guarantees that you won't encounter any hiccups during the WordPress removal process.
From accessing cPanel to locating the necessary tools, we cover everything you need to know. We emphasize simplicity and efficiency, allowing you to say goodbye to WordPress hassle-free. No technical jargon or complex procedures involved – just straightforward steps to uninstalling WordPress from cPanel.
Join thousands of satisfied viewers who have successfully uninstalled WordPress using our professional guidance. Save time and effort by following our tried-and-tested methods, ensuring that you can smoothly transition to your desired website setup. Don't let WordPress installation hold you back, unleash your potential!
#wordpress#uninstallation#cPanel#tutorial#stepbystep#guide#effortless#website#technology#webdevelopment#wordpresshelp#cpanelguide#wordpressuninstall#webdesign#wordpresswebsite#wordpressuninstallation#wordpressinstallation#wordpressblog#webhosting#wordpressplugins#Youtube
0 notes
Text
How to Uninstall WordPress From cPanel
Before uninstalling WordPress from cPanel, have you considered some ways to recover the blog? Or is the situation terribly that the only option you could think of is to delete the WordPress installation from the site? In many situations, how to uninstall WordPress from cPanel should be the last option. Unless you no longer need the blog or want to start from scratch, there are a few…
View On WordPress
0 notes
Link
Learn the steps to how Uninstall WordPress From cPanel.For any help you can call on:888-818-9916
0 notes
Video
youtube
How To Uninstall WordPress From Namecheap cPanel 🔥 | Delete WordPress!
1 note
·
View note
Photo

How to Uninstall WordPress from cPanel Easily
#bloggingtips#cpanel#howtouninstallwordpressfromcpanel#HowtoUninstallWordPressfromcPanelEasily#uninstallwordpress#wordpress
0 notes
Video
youtube
Easy Guide: Uninstall WordPress from cPanel
0 notes
Video
youtube
How to Uninstall WordPress Setup From cPanel Hosting | Step by Step Expl...
#wordpress#wordpress development#wordpress developers#wordpress download#wordpress web development company#wordpress webstories plugin#wordpress web hosting#wordpress website security#wordpress website design#wordpress website development
0 notes
Photo
How to Delete Your WordPress Account or Blog
Is it time to say goodbye to your WordPress website?
Maybe it’s time for a fresh start, or perhaps you want to distance yourself from the kind of content you used to create—whatever your reasons, you probably won’t want your abandoned website hanging around on the Internet forever.
In this article, I’ll show you how to permanently delete your WordPress website, regardless of whether you created your site via WordPress.com or WordPress.org. And, if you got carried away and created multiple WordPress.com websites, then I’ll also be showing you how to delete all of these sites simultaneously, by cancelling your WordPress account.
WordPress.com vs. WordPress.org: What’s the Difference?
The process for deleting your website will differ depending on whether it’s a WordPress.com or a WordPress.org site, so let’s start by clarifying the differences between the two:
WordPress.org, sometimes referred to as self-hosted WordPress, is where you download the free WordPress software and install it on your own server. With a WordPress.org website, you’re solely responsible for hosting and maintenance.
WordPress.com takes care of the hosting for you. Rather than downloading and installing the WordPress software, simply head over to WordPress.com, click Get started, complete a few forms, and WordPress.com will create your website for you.
The Internet Is Forever
In this article, I’ll show you how to delete your website, so it no longer appears at its URL or appears in Google search results. However, if your website has been archived by third parties then there’s a chance your content will still be accessible via these third-party services.
Deleting your website will make it less accessible, but there’s no guarantee that a determined third party won’t be able to recover some or all of your deleted content.
How Do I Close My WordPress.com Account?
Are you performing some admin and want to delete all the accounts that you no longer use? Or perhaps you want to delete your existing WordPress account, so you can re-register and start again from scratch?
When you close your account, WordPress will also delete all the websites associated with that account. If you got carried away and created multiple different websites, then cancelling your account may be easier than deleting each website individually.
To close your WordPress.com account:
Log in to your account, if you haven’t already.
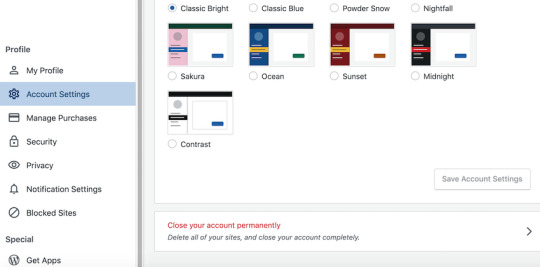
Head over to the Account Settings screen.
Scroll to the bottom of the screen and select Close your account permanently.
Review the list of content you’re about to delete, and if you’re happy to proceed then click Close account.
WordPress will now delete your username, all the sites you own, and all of your content.
Deleting a WordPress.com Blog From the Dashboard
If you created your website via WordPress.com, then you can delete it directly from the WordPress Dashboard. Note that when you delete your WordPress.com website, you’ll also lose access to your site’s URL unless you purchased the domain.
To delete your WordPress.com site, first log in to your WordPress account, if you haven’t already.
In the left-hand menu, select Manage > Settings. Now scroll to the very bottom of the screen and select Delete your site permanently.
At this point, you’ll have the option to export all of your posts, pages, and settings as a ZIP file. If you ever change your mind and want to reinstate your website, then you can upload this ZIP file to a new WordPress site and recover your content. This step is optional, but it’s also a one-time offer: if you don’t export now, then your content will be lost forever. If you do want to hang on to a copy of your content, then click Export all. Once the export is complete, click Back to resume deleting your website.
Review all the information about the content you’re about to delete, and if you’re happy to proceed, then click Delete site. When prompted, enter your website’s full URL for a final confirmation.
This is it! If you’re still determined to permanently remove your website from the World Wide Web, then click the Delete this site button and your WordPress website will be gone forever.
How to Delete Your Self-Hosted Website With cPanel
If you used cPanel to set up your self-hosted WordPress website, then you can also use cPanel to delete it:
Log in to your cPanel Dashboard.
Select the Hosting tab.
Find the website that you want to delete and click its accompanying Switch button.
On the subsequent screen, select WordPress.
Select Uninstall. After a few moments, you should see the following message: Software has been uninstalled.
Your WordPress website has now been deleted.
Delete Your Self-Hosted WordPress Website Manually
If you installed the WordPress software on your server manually, then you’ll also need to remove it manually. This process can vary depending on whether you have FTP or SFTP access, or you access your web server via a web-based file manager:
1. I have FTP or SFTP Access
If you have FTP or SFTP access, then you can delete your WordPress website using an FTP client:
Log in to your FTP server.
Locate your WordPress directory, and either Control-click or right-click it, depending on whether you’re running Windows or macOS.
When prompted, select Delete.
2. I Use a Web-Based File Manager
If you have access to a web-based file manager, then:
Log in to your web hosting dashboard.
Open your file manager application.
Navigate to the WordPress directory that you want to delete, and hit the Delete button.
Delete Your Website’s Database Using MySQL
After deleting your WordPress website, you may also want to delete your website’s MySQL database. You can remove this database using the following MySQL command:
$ mysql -h HOST -u USERNAME -p PASSWORD -D wordpress $ DROP wordpress
Note that you'll need to replace wordpress with the name of your WordPress database, which is located in your wp-config.php file. The process for locating this database will vary depending upon your hosting provider—for example, if you were using cPanel, then you would typically use the file manager to browse to your WordPress directory, which contains the wp-config.php file.
Delete Your Database Using cPanel
If you’re a cPanel user, then:
Log in to your cPanel Dashboard.
Scroll to the Databases section, and select MySQL Databases.
Select the MySQL database that you want to delete.
Find the Delete Database link, and give it a click.
Read the onscreen warning, and if you’re happy to proceed, then click Delete Database.
cPanel will now delete your website’s database.
Conclusion
In this quick tip, I showed you how to permanently delete your WordPress.com or WordPress.org website, and how to optionally delete your site’s MySQL database.
Are you deleting an outdated WordPress website with the intention of starting again from scratch? If you’re creating a brand new WordPress website, then be sure to check out some of our other WordPress tutorials, as they contain all the information you need to create a modern, professional, and engaging WordPress website.
The Best WordPress Plugins on CodeCanyon
Explore thousands of the best WordPress plugins ever created on CodeCanyon. With a low-cost one time payment, you can purchase these high-quality WordPress plugins and improve your website experience for you and your visitors.
Here are a few of the best-selling and up-and-coming WordPress plugins available on ThemeForest for 2020.
WordPress
17 Best WordPress Slider & Carousel Plugins of 2020
Daniel Strongin
WordPress
20 Best WordPress Calendar Plugins and Widgets
Esther Vaati
WordPress Plugins
20+ Best Popup & Opt-In WordPress Plugins
Nona Blackman
WordPress
20 Best WPBakery Page Builder (Visual Composer) Addons & Plugins of 2019
Nona Blackman
by Jessica Thornsby via Envato Tuts+ Code https://ift.tt/34SpHb9
0 notes
Text
7 Quick and Easy Ways to Make WordPress Load Faster
People's' attention spans seem to be forever getting shorter and shorter, the internet and our endless phone notifications, with more and more things drawing our attention, this isn't surprising. It's said that the average attention span has gone down from 12 seconds in the year 2000 to just 8 seconds now. If this is actually true, at this rate, we might not be much better than a goldfish in just a few years. This 8 second rule is the reason why you need to take all of the steps necessary to make your WordPress load faster! Whether shorter and shorter attention spans is really in our future or not, what we can certainly say is that people don't like to wait for websites to load and will move on quickly when they can. This is more evident when it comes to the internet and WordPress based websites, which unless optimized correctly, can potentially take more than the dreaded 8 seconds to load. If your website is slow, visitors could be bouncing away, never to return, before your website has even loaded! You really need to make WordPress load faster to prevent this and also to improve your site's SEO at the same time. Google knows well that people don't like to wait, so they have taken this into consideration when deciding ranking factors. Not only that, but WordPress maintenance is also critically important to keep it running smoothly. Our list of easy methods to make WordPress load faster below should improve your site's speed and help your search engine visibility, too.
1. Upgrade to PHP 7+
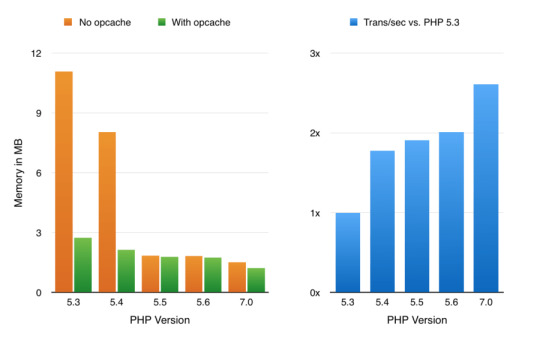
If you want to improve the speed of your WordPress site, it isn't a bad idea to make sure you are using the latest version of PHP. The latest versions of this server-side programming language are considerably faster than earlier releases, and if you are stuck using one of these older builds, you are slowing down your site unnecessarily. PHP 7 is a marked improvement over the previous release PHP 5.6. Some benchmark tests show the more recent build executing WordPress requests twice as fast as the 5.6 version. They also show that PHP 7 is using far fewer server resources to execute these requests, it uses 25 million CPU instructions for one request, while PHP 5.6 takes around 100 million instructions to complete the same action.
It's easy to find out which PHP version you are using. Just download the plugin called Display PHP Version and the number will be displayed on the dashboard. If you are running an older version, the next step is to check compatibility before you upgrade to a faster build.
2. Enable GZIP Compression
One way to speed up your site is to send smaller files when a visitor makes a request. The smaller the size of files your server sends to the visitor, the less time they will have to wait. The reason why GZIP is great at this is that all current browsers support this compression automatically, requesting the smaller files when available and decompressing them. All this, without the user noticing anything different, apart from a more responsive website. Often GZIP is already activated on hosting accounts, but it doesn't hurt to check. Go to www.giftofspeed.com/gzip-test to find out, if it is active on your site. If it isn't used on your site, you can activate it in cPanel by editing your .htaccess file or through a plugin.

3. Enable HTTP2
HTTP/2 is the newer, more efficient, safer, and faster update to the Hypertext Transfer Protocol standard and is the first major upgrade since 1997. The increased speed benefits are achieved through a number of different ways; the overhead is reduced by compressing the header, multiple requests can be dealt with simultaneously through a single connection, faster-encrypted connections, servers can push information to the visitor's cache, and reduced round trip data times.
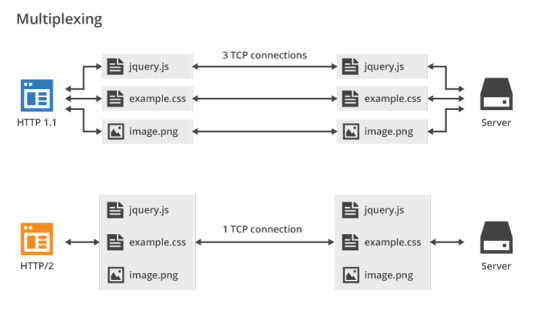
To find out, if HTTP/2 is working on your site, you can use this site: tools.keycdn.com/http2-test. If your site doesn't have HTTP/2 active, it is down to your hosting provider to activate it on the server. Get in touch with the hosting company and ask them to enable this for you or what steps you need to take to set it up.
4. Set up a CDN on your Site
Content Delivery Networks are the answer to the problem of server distance from the visitor. The further away the visitor is from the physical server location, the slower his or her website will appear to the viewer. A CDN achieves speed improvements for your WordPress site by using different server locations around the world. The static content of the site is copied to these different locations, allowing a visitor to receive data from the nearest location giving them a fast loading and more reliable site. Your site's CSS file, images, and JavaScript could be located closer to your visitor improving their experience using your website.

Implementing a CDN for your WordPress site could be a great way to improve speed for larger sites which have customers all over the world. It will not produce many benefits, if most of your visitors are located in the same country, however. You can read more on options including premium and free options in this post: 15 Free CDN WordPress Services to Boost Your Website Speed - CollectiveRay.
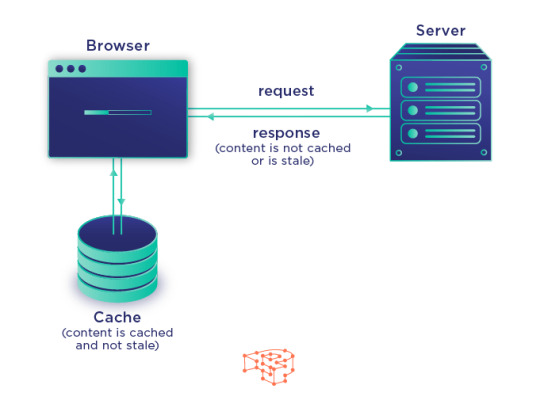
5. Install a Caching Plugin
A cache is a temporary source of data which is available to be quickly accessed, when needed. It allows for a reduced load on the server resources and enables data to become available for the visitor faster than asking the server to process a new request. Installing a caching plugin is a quick task that will be helping WordPress load faster within a few clicks, and for free. There are many popular plugins to choose from including WP Rocket, WP Super Cache, and W3 Total Cache.
6. Remove Extra Plugins
It can be very tempting to download plugins to increase the capabilities of your WordPress installation. With many sites, blogs, and author's showcasing and promoting plugins to fix site problems, offering functionality, and solving your visitors needs, it isn't surprising that the list of plugins running on your site starts to balloon. Before too long you can find that you've ended up with a host of plugins that you don't really need or may not even remember the reason why you installed them. These plugins, regardless of their features, do have a downside, however. The more plugins you have running on your site, the greater the pressure on the server and the slower your site will naturally run. The answer to this problem is, of course, very simple. Deactivate and uninstall the plugins you don’t need any longer. Additionally, if you are using a fully featured plugin for only one of its features, it may be better to find a plugin which specializes in that particular task. Do these simple things and you will reduce the workload of your server in no time at all.
7. Upgrade to a VPS
A Virtual Private Server has the advantage over shared hosting when it comes to speed, because your site can draw upon greater processing resources when they are needed most. This has the benefit of making sure your site doesn't slow down when it gets busy.
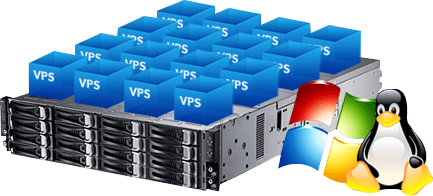
It also makes sure that you aren't affected when another website, on the same server as your site, hogs the available processing power. You will also avoid the problem of the server going down, because of the sharing of resources. The VPS hosting option provides your site with most of the benefits of a dedicated server without the high costs attached. You could see the loading times of your WordPress install drop by several seconds when you upgrade from shared hosting.
Conclusion
There really isn't an excuse not to put at least a few of these speed improvements into action to make your WordPress load faster. Doing so could provide a very noticeable benefit to your WordPress website and along with it your profits. Read the full article
0 notes
Link
Get help for Plugin Installation, upload & uninstallation errors in your WordPress website. Call 8886061808 (US Toll free) to get urgent help for WordPress plugin issues.
#woocommerce installation failed#wordpress plugin install update failed#wordpress installation failed#destination file already exists wordpress#wordpress uninstall plugin hook#can't delete plugin wordpress#how to remove elementor from wordpress#delete wordpress plugin from cpanel#wordpress all plugins deactivated#how to activate wordpress plugin from cpanel#how to remove plugin from wordpress#uninstall wordpress plugin command line#Troubleshooting for wordpress plugin#wordpress plugin installation failed destination folder already exists
0 notes
Text
How To Install Webmin, nginx on Ubuntu 16.04 or 18.04
Webmin is a web-based control panel for any Linux machine which lets you manage your server through a modern web-based interface. With Webmin, you can change settings for common packages on the fly, including web servers and databases, as well as manage users, groups, and software packages.
In this tutorial, you’ll install and configure Webmin on your server and secure access to the interface with a valid certificate using Let’s Encrypt and Apache. You’ll then use Webmin to add new user accounts, and update all packages on your server from the dashboard.
Prerequisites To complete this tutorial, you will need:
– One fresh Ubuntu 16.04 or 18.04 server , including a sudo non-root user and a firewall. – A Fully-Qualified Domain Name (FQDN), with a DNS A record pointing to the IP address of your server. – Certbot installed by following Step 1 of How To Secure Apache with Let’s Encrypt on Ubuntu 16.04 or 18.04. You’ll use Certbot to generate the TLS/SSL certificate for Webmin.
Step 1 — Installing Webmin First, we need to add the Webmin repository so that we can easily install and update Webmin using our package manager. We do this by adding the repository to the /etc/apt/sources.list file.
Open the file in your editor:
sudo nano /etc/apt/sources.list
Then add this line to the bottom of the file to add the new repository:
/etc/apt/sources.list
deb http://download.webmin.com/download/repository sarge contrib Save the file and exit the editor.
Next, add the Webmin PGP key so that your system will trust the new repository:
wget http://www.webmin.com/jcameron-key.asc sudo apt-key add jcameron-key.asc
Next, update the list of packages to include the Webmin repository:
sudo apt update
if server ask for dependencies, just run this command: add-apt-repository universe Then install Webmin:
sudo apt install webmin
Once the installation finishes, you’ll be presented with the following output:
Webmin install complete. You can now login to https://your_server_ip:10000 as root with your root password, or as any user who can use `sudo`.
Now, let’s secure access to Webmin by putting it behind the Apache web server and adding a valid TLS/SSL certificate.
Step 2: Accessing Webmin Now that Webmin is installed, you can access the interface by opening your web browser and browsing the the server hostname or IP address followed by port 10000. ex. https://localhost:10000 If you’re coming from a remote location, you must add the IP address to the allowed list… you can do that by running the commands below to open Webmin default configuration file. sudo nano /etc/webmin/miniserv.conf Then adding a new line to allow a specific IP or subnet. allow=192.168.X.X Save the file… you should be able to access Webmin
Step 3: Installing Virtualmin Virtualmin only supports Ubuntu LTS versions. If you don’t have those versions of Ubuntu, Virtualmin will fail to install… If you do, then continue below. Now that Webmin is installed, go and install Virtualmin.. Virtualmin allows you to manage nginx virtual hosts and DNS, just like you have with cPanel and other hosted packages. I’m going to assume that you already have a VPS with root access. If you don’t, you can get one from a unmanaged VPS provider I recommend. Logged in to Ubuntu 16.04 server as root user, run following command to check your server’s hostname. hostname -f If the output is anything other than your domain name or a sub-domain, you should change it before you install Virtualmin with nginx. Refer to change Ubuntu 16.04 hostname from command line tutorial and change it now. Let’s start by updating apt cache, apt update This part is similar on all Linux distributions. Download the Virtualmin installation script to your server, wget http://software.virtualmin.com/gpl/scripts/install.sh Then make the script executable sudo chmod +x install.sh Finally, run the commands below to install Virtualmin sh install.sh -b LEMP or sh install.sh --bundle LEMP in case, you want to uninstall: sh install.sh --uninstall Accept the default setting and install. When that’s done, you should have Virtualmin module enabled for Webmin and begin configuring your systems. For ubuntu 16, in case, this error appears: The repository ‘cdrom://Ubuntu-Server 16.04.5 LTS _Xenial Xerus_ – Release amd64 (20180731) xenial Release’ does not have a Release file. just edit : sudo nano /etc/apt/sources.list and comment or remove lines that include cdrom. eg: deb cdrom:[Ubuntu-Server 16.04 LTS _Xenial Xerus_ - Release amd64 (20160420.3)]/ xenial main restricted
INSTALLING MULTIPLE PHP VERSIONS There are few major PHP versions out there such as PHP 5.6, PHP 7.0, PHP 7.1 and PHP 7.2. We should always try to use latest version of the software, sometimes we have to stick with an older version due to compatibility issues with the application we are running. If you’re in a such situation, this post will show you how to use multiple PHP versions with Virtualmin and Nginx server. Why use multiple PHP versions with Virtualmin and Nginx? I was in a such situation recently. I wanted to have WordPress and CPVLab installed on the same VPS. WordPress is compatible with PHP 7.2 but CPVLab isn’t. Only version of PHP CPVLab supported was PHP 5.6. While I could have both WordPress and CPVLab installed with PHP 5.6, that isn’t optimal solution. So I decided to install PHP 7.2 for WordPress and PHP 5.6 for CPVLab. While my reason to use multiple PHP versions with Virtualmin and Nginx only involves PHP 5.6 and PHP 7.2, I’ll list instructions for all four major PHP versions mentioned earlier. These are the PHP versions with ongoing support at the moment of writing. And before we begin, I’m going to assume you have built your Ubuntu 16.04 server with Virtualmin and Nginx and have created at least one virtual server to host a website. Adding Ondřej Surý Repo to the server: Ubuntu 16.04 doesn’t offer newer versions of PHP than PHP v7.0.30 yet. We can get around this by adding ondrej/php PPA to the server. No matter which PHP version you’re planning to install, you should start by adding ondrej/php PPA to be able to use multiple PHP versions with Virtualmin and Nginx. add-apt-repository ppa:ondrej/php Update apt cache apt update Server is now ready to have multiple versions of PHP running at the same time. Let’s start with PHP 5.6. Note that Virtualmin, by default use latest version of PHP available on the server for new virtual servers. This can be changed within the virtual server settings itself after creation or you can specify a default PHP version for new servers from Virtualmin settings. More on that later on this tutorial. Install PHP 5.6 and PHP 7.0 with Virtualmin and Nginx We already have PHP 7.0 running on the server. Let’s install PHP 5.6. Following command will install PHP 5.6 and all essential PHP 5.6 modules. apt install php5.6-cgi php5.6-mysql php5.6-curl php5.6-gd php5.6-imap php5.6-mcrypt php5.6-tidy php5.6-xmlrpc php5.6-xsl php5.6-mbstring php5.6-zip php5.6-cli Install PHP 7.1 and PHP 7.0 with Virtualmin and Nginx If the version of PHP you want is PHP 7.1, following command should take care of it. apt install php7.1-cgi php7.1-mysql php7.1-curl php7.1-gd php7.1-imap php7.1-mcrypt php7.1-tidy php7.1-xmlrpc php7.1-xsl php7.1-mbstring php7.1-zip php7.1-cli Install PHP 7.2 and PHP 7.0 with Virtualmin and Nginx And if you want latest version (PHP 7.2) on your server, following command will do the magic. apt install php7.2-cgi php7.2-mysql php7.2-curl php7.2-gd php7.2-imap php7.2-tidy php7.2-xmlrpc php7.2-xsl php7.2-mbstring php7.2-zip php7.2-cli You can run one or more of above commands and have one or more extra PHP versions running on your server. If you run all three commands above, you’ll have all four version of PHP available to you on the server. Configure Virtualmin to use a Specific PHP Version Virtualmin will use latest available version of PHP for new virtual servers. Old virtual servers will not be affected by above commands. If you need a different version of PHP for existing virtual server, you can go to Virtualmin > Domain Name > Server Configuration > PHP Version and select the PHP version you want from the list. use multiple PHP versions with Virtualmin and Nginx And if you want to change default PHP version for new virtual servers to other than the latest version available on the server, you can change it from Virtualmin > System Settings > Server Templates > Default Settings > PHP Options. A drop down list of available PHP versions will be shown to you. virtualmin-change-php-version Select the version you want and click save. Selected PHP version will be used for all newly created servers. Option to change PHP version from virtual server settings will also be available to all newly created servers. Set Default PHP Version for Command Line When you have multiple php versions on your server, system will use latest version to process PHP commands. Although you can change this on Virtualmin as shown above, it doesn’t change default PHP version for command line. phpinfo page on your browser might say PHP 5.6 but PHP -v command on Putty might say PHP 7.2. This can lead to conflicts in some cases. Especially if your application need to run cronjobs. Solution will be to change default PHP version for command line to match what your application is running. This command will display PHP versions available to you with paths, update-alternatives --list php Following command should change default php version to PHP 7.1. update-alternatives --set php /usr/bin/php7.1 Change the path to PHP as your needs. For configuring with nginx. go to: sudo nano /etc/php/7.2/fpm/php.ini edit the next file: cgi.fix_pathinfo=0 finally, restart php service sudo systemctl restart php7.2-fpm For getting php.ini file dir: php -i | grep 'php.ini' INSTALLLING CLOUDMIN this ony worked on ubuntu 16.04 and it is only for managing cloud virtual server inside your server. In order to install it, just follow the next: wget http://cloudmin.virtualmin.com/gpl/scripts/cloudmin-kvm-debian-install.sh Then make the script executable sudo chmod +x cloudmin-kvm-debian-install.sh Finally, run the commands below to install Virtualmin sh cloudmin-kvm-debian-install.sh Useful commands Just run this command from the command line and it will bring the webmin service up again fresh. # /etc/init.d/webmin restart file configuration for webmin sudo nano /etc/webmin/config sudo nano /etc/webmin/miniserv.conf For adding allow Ip, just edit: sudo nano /etc/webmin/miniserv.conf and edit: allow = localhost 192.168.0.197 # /etc/init.d/webmin restart some virtual configurations here: https://github.com/webmin/webmin/issues/420 installing FPM support Currently, there is no official PHP-FPM support in Virtualmin, so you need to download and install a third-party Virtualmin plugin to create Nginx and PHP-FPM powered websites for domains.Currently, there is no official PHP-FPM support in Virtualmin, so you need to download and install a third-party Virtualmin plugin to create Nginx and PHP-FPM powered websites for domains. cd /opt git clone https://github.com/Real-Gecko/virtualmin-nginx-fpm.git tar -zcf virtualmin-nginx-fpm.tar.gz virtualmin-nginx-fpm Open https://your_server_IP:10000 , click on the Webmin icon >> select ‘Webmin configuration’ from the Webmin menu >> Mebmin module >> Install Module >> From local file >> enter /opt/virtualmin-nginx-fpm.tar.gz >> click ‘Install Module’. Then, click on the Virtualmin icon >> go to ‘System Settings’ >> Features and Plugins >> click configure next to ‘Nginx PHP-FPM website’ feature and set:
Full path to php-fpm command /usr/sbin/php-fpm7.2 Command to start PHP-FPM service php7.2-fpm start Command to stop PHP-FPM service php7.2-fpm stop Command to reload PHP-FPM service php7.2-fpm restart Path to pools configuration directory /etc/php/7.2/fpm/pool.d
Then, click on the Virtualmin icon >> go to >> System Settings >> Features and Plugins >> check ‘Nginx PHP-FPM website’ feature, and disable the ‘Apache website’ , ‘SSL website’, ‘AWstats reporting’ and ‘DAV Login’ and features. That is it. Virtualmin with Nginx and PHP-FPM support has been successfully installed on your server. Add swap Disabling unnecesary services from webmin In my case, I have another email provider so I will disabled some services related with email:
sudo /etc/init.d/clamav-daemon stop systemctl disable clamav-daemon ADDING SWAP MEMORY Before we begin, we can check if the system already has some swap space available. It is possible to have multiple swap files or swap partitions, but generally one should be enough. We can see if the system has any configured swap by typing: sudo swapon --show If you don’t get back any output, this means your system does not have swap space available currently. You can verify that there is no active swap using the free utility: free -h Output total used free shared buff/cache available Mem: 985M 84M 222M 680K 678M 721M Swap: 0B 0B 0B As you can see in the Swap row of the output, no swap is active on the system. Step 2 – Checking Available Space on the Hard Drive Partition Before we create our swap file, we’ll check our current disk usage to make sure we have enough space. Do this by entering: df -h Output Filesystem Size Used Avail Use% Mounted on udev 481M 0 481M 0% /dev tmpfs 99M 656K 98M 1% /run /dev/vda1 25G 1.4G 23G 6% / tmpfs 493M 0 493M 0% /dev/shm tmpfs 5.0M 0 5.0M 0% /run/lock tmpfs 493M 0 493M 0% /sys/fs/cgroup /dev/vda15 105M 3.4M 102M 4% /boot/efi tmpfs 99M 0 99M 0% /run/user/1000 The device with / in the Mounted on column is our disk in this case. We have plenty of space available in this example (only 1.4G used). Your usage will probably be different. Although there are many opinions about the appropriate size of a swap space, it really depends on your personal preferences and your application requirements. Generally, an amount equal to or double the amount of RAM on your system is a good starting point. Another good rule of thumb is that anything over 4G of swap is probably unnecessary if you are just using it as a RAM fallback. Step 3 – Creating a Swap File Now that we know our available hard drive space, we can create a swap file on our filesystem. We will allocate a file of the swap size that we want called swapfile in our root (/) directory. The best way of creating a swap file is with the fallocate program. This command instantly creates a file of the specified size. Since the server in our example has 1G of RAM, we will create a 1G file in this guide. Adjust this to meet the needs of your own server: sudo fallocate -l 1G /swapfile2 We can verify that the correct amount of space was reserved by typing: ls -lh /swapfile2 -rw-r–r– 1 root root 1.0G Apr 25 11:14 /swapfile2 Our file has been created with the correct amount of space set aside. Step 4 – Enabling the Swap File Now that we have a file of the correct size available, we need to actually turn this into swap space. First, we need to lock down the permissions of the file so that only the users with root privileges can read the contents. This prevents normal users from being able to access the file, which would have significant security implications. Make the file only accessible to root by typing: sudo chmod 600 /swapfile2 Verify the permissions change by typing: ls -lh /swapfile2 Output -rw——- 1 root root 1.0G Apr 25 11:14 /swapfile As you can see, only the root user has the read and write flags enabled. We can now mark the file as swap space by typing: sudo mkswap /swapfile2 Output Setting up swapspace version 1, size = 1024 MiB (1073737728 bytes) no label, UUID=6e965805-2ab9-450f-aed6-577e74089dbf After marking the file, we can enable the swap file, allowing our system to start utilizing it: sudo swapon /swapfile2 Verify that the swap is available by typing: sudo swapon --show Output NAME TYPE SIZE USED PRIO /swapfile2 file 1024M 0B -2 We can check the output of the free utility again to corroborate our findings: free -h Output total used free shared buff/cache available Mem: 985M 84M 220M 680K 680M 722M Swap: 1.0G 0B 1.0G Our swap has been set up successfully and our operating system will begin to use it as necessary. Step 5 – Making the Swap File Permanent Our recent changes have enabled the swap file for the current session. However, if we reboot, the server will not retain the swap settings automatically. We can change this by adding the swap file to our /etc/fstab file. Back up the /etc/fstab file in case anything goes wrong: sudo cp /etc/fstab /etc/fstab.bak Add the swap file information to the end of your /etc/fstab file by typing: echo '/swapfile2 none swap sw 0 0' | sudo tee -a /etc/fstab Next we’ll review some settings we can update to tune our swap space. Step 6 – Tuning your Swap Settings There are a few options that you can configure that will have an impact on your system’s performance when dealing with swap. Adjusting the Swappiness Property The swappiness parameter configures how often your system swaps data out of RAM to the swap space. This is a value between 0 and 100 that represents a percentage. With values close to zero, the kernel will not swap data to the disk unless absolutely necessary. Remember, interactions with the swap file are “expensive” in that they take a lot longer than interactions with RAM and they can cause a significant reduction in performance. Telling the system not to rely on the swap much will generally make your system faster. Values that are closer to 100 will try to put more data into swap in an effort to keep more RAM space free. Depending on your applications’ memory profile or what you are using your server for, this might be better in some cases. We can see the current swappiness value by typing: cat /proc/sys/vm/swappiness Output 60 For a Desktop, a swappiness setting of 60 is not a bad value. For a server, you might want to move it closer to 0. We can set the swappiness to a different value by using the sysctl command. For instance, to set the swappiness to 10, we could type: sudo sysctl vm.swappiness=10 Output vm.swappiness = 10 This setting will persist until the next reboot. We can set this value automatically at restart by adding the line to our /etc/sysctl.conf file: sudo nano /etc/sysctl.conf At the bottom, you can add: vm.swappiness=10 Save and close the file when you are finished. Adjusting the Cache Pressure Setting Another related value that you might want to modify is the vfs_cache_pressure. This setting configures how much the system will choose to cache inode and dentry information over other data. Basically, this is access data about the filesystem. This is generally very costly to look up and very frequently requested, so it’s an excellent thing for your system to cache. You can see the current value by querying the proc filesystem again: cat /proc/sys/vm/vfs_cache_pressure Output 100 As it is currently configured, our system removes inode information from the cache too quickly. We can set this to a more conservative setting like 50 by typing: sudo sysctl vm.vfs_cache_pressure=50 Output vm.vfs_cache_pressure = 50 Again, this is only valid for our current session. We can change that by adding it to our configuration file like we did with our swappiness setting: sudo nano /etc/sysctl.conf At the bottom, add the line that specifies your new value: vm.vfs_cache_pressure=50 Save and close the file when you are finished. Some tweaks to mysql add the next lines to mysql configuration:
sudo nano /etc/mysql/mysql.cnf
[mysqld] max_allowed_packet=500M sql_mode = STRICT_TRANS_TABLES,NO_ZERO_IN_DATE,NO_ZERO_DATE,ERROR_FOR_DIVISION_BY_ZERO,NO_AUTO_CREATE_USER,NO_ENGINE_SUBSTITUTION it will allow to import large file sql files.
then restart mysql service mysql restart Tweaking nginx file: sudo nano /etc/nginx/nginx.conf
user www-data; worker_processes auto; pid /run/nginx.pid; include /etc/nginx/modules-enabled/*.conf; events { worker_connections 768; # multi_accept on; } http { ## # Basic Settings ## sendfile on; tcp_nopush on; tcp_nodelay on; keepalive_timeout 65; types_hash_max_size 2048; # server_tokens off; server_names_hash_bucket_size 128; # server_name_in_redirect off; include /etc/nginx/mime.types; default_type application/octet-stream; ## # SSL Settings ## ssl_protocols TLSv1 TLSv1.1 TLSv1.2; # Dropping SSLv3, ref: POODLE ssl_prefer_server_ciphers on; ## # Logging Settings ## access_log /var/log/nginx/access.log; error_log /var/log/nginx/error.log; # Log format set_real_ip_from 127.0.0.1; real_ip_header X-Forwarded-For; log_format main '$remote_addr - $remote_user [$time_local] $status ' '"$request" $body_bytes_sent "$http_referer" ' '"$http_user_agent" "$http_x_forwarded_for"'; # Hide the Nginx version number server_tokens off; # Timeouts client_body_timeout 30; client_header_timeout 30; send_timeout 30; client_max_body_size 20M; reset_timedout_connection on; ## # Gzip Settings ## # Gzip module configuration gzip on; gzip_disable "MSIE [1-6].(?!.*SV1)"; gzip_vary on; gzip_comp_level 3; gzip_proxied any; gzip_buffers 16 8k; # gzip_vary on; # gzip_proxied any; # gzip_comp_level 6; # gzip_buffers 16 8k; # gzip_http_version 1.1; # gzip_types text/plain text/css application/json application/javascript text/xml application/xml application/xml+rss text/javascript; ## # Virtual Host Configs ## include /etc/nginx/conf.d/*.conf; include /etc/nginx/sites-enabled/*; }
save changes and restart service: service nginx restart
0 notes
Link
How to delete wordpress theme from cpanel - Step by Step For any help visit : www.outsource2bd.com How To Delete A Theme Using FTP & CPanel You can also delete a theme using the CPanel or an FTP client. First, make sure the theme you’re about to delete is inactive. Then follow the steps below. Step 1: Login to CPanel. Open the File Manager and navigate to WP-Content Themes. Step 2: Select the folder of the theme you want to delete and right-click. Then select Delete to delete the theme. If you’re using an FTP client, open the app and log in using your FTP login details. Step 1: Navigate to WP-Content Themes folder. Step 2: Right-click on the theme you want to remove and select Delete. how to uninstall wordpress from cpanel, delete wordpress theme and start over, reset wordpress theme, delete in wordpress #wordpresstutorial
0 notes