#basic data cleaning features
Explore tagged Tumblr posts
Visit Tumblr Blog
Explore Tumblr blogs with no restrictions, modern design and the best experience.
Last Seen Tumblr Blogs


Fun Fact
Tumblr has a 66 index score for customer satisfaction in the US.
Text
A Beginner’s Guide to Data Cleaning Techniques

Data is the lifeblood of any modern organization. However, raw data is rarely ready for analysis. Before it can be used for insights, data must be cleaned, refined, and structured—a process known as data cleaning. This blog will explore essential data-cleaning techniques, why they are important, and how beginners can master them.
#data cleaning techniques#data cleansing#data scrubbing#business intelligence#Data Cleaning Challenges#Removing Duplicate Records#Handling Missing Data#Correcting Inconsistencies#Python#pandas#R#OpenRefine#Microsoft Excel#Tools for Data Cleaning#data cleaning steps#dplyr and tidyr#basic data cleaning features#Data validation
0 notes
Text
President Donald Trump’s “government efficiency” cheerleader Elon Musk proposed simply ignoring all federal regulations during a public call shortly after midnight Monday morning.
Musk, whose newly formed “Department of Government Efficiency” team has in recent days executed a dramatic power grab at several government agencies, called for “wholesale removal of regulations.”
The public call was hosted on his website X, formerly Twitter, and included two senators and the Trump ally Vivek Ramaswamy.
“Regulations, basically, should be default gone,” Musk said. “Not default there, default gone. And if it turns out that we missed the mark on a regulation, we can always add it back in.”
“These regulations are added willy-nilly all the time. So we’ve just got to do a wholesale, spring cleaning of regulation and get the government off the backs of everyday Americans so people can get things done,” Musk said, adding later: “If the government has millions of regulations holding everyone back, well, it’s not freedom. We’ve got to restore freedom.”
Later, Ramaswamy — who briefly co-led Musk’s White House DOGE project — said, “I think it’s possible now, it’s actually possible” thanks to Trump’s second term and a conservative-dominated Supreme Court.
Musk replied, “If it’s not possible now, it’ll never be possible. This is our shot. This is the best hand of cards we’re ever going to have. And if we don’t take advantage of this best hand of cards, it’s never going to happen, so we’re going to do it.”
“Now or never,” Sen. Joni Ernst (R-Iowa) and Ramaswamy agreed. Sen. Mike Lee (R-Utah) also spoke on the call.
Federal regulations, which are enforced by the executive branch agencies, govern everything from pollutants to construction safety to banking requirements. Musk, the world’s wealthiest man and a key player in several industries, would benefit immensely from the ability to pick and choose which regulations to follow.
Musk on the call also appeared to claim credit for the shutdown of the U.S. Agency for International Development, the U.S.-funded aid agency that oversees humanitarian projects around the world, calling it a corrupt “ball of worms.” Shortly after the call, he wrote on X that “We spent the weekend feeding USAID into the wood chipper.”
He said on the call that “we’re shutting it down” and that Trump “agreed that we should shut it down” — though the executive branch’s legal authority to do so without congressional action is highly in doubt, as the agency’s existence is established in law. Trump on Monday said he didn’t need an act of Congress to shut down USAID.
USAID’s homepage has been shut down for days, as is its X account. Dozens of career staff at the agency have been put on leave, and hundreds have been shut out of agency computer systems. Musk aides have gained access to classified USAID information over the objection of agency security personnel, who were subsequently placed on leave, The Associated Press reported.
One of Musk’s aides — a small group of 20-somethings reportedly are his primary foot soldiers in the war for “government efficiency” — emailed USAID staff over the weekend to tell them not to come into the office Monday, as it would be closed. A protest featuring several members of Congress formed outside the building on Monday.
Capping off the apparent takeover of the independent agency, Secretary of State Marco Rubio on Monday asserted that he was himself the acting administrator of USAID.
The X call came after a week straight of Musk and his aides, acting with Trump’s blessing, asserted aggressive and potentially unlawful control over a series of choke points in the executive branch.
At the Office of Personnel Management, Musk aides reportedly have not only gained access to federal human resource databases that contain sensitive personal information — and locked career officials out of the systems — but reportedly also have installed their own commercial server, presumably without a required privacy impact assessment.
Musk aides also have been granted access to the Treasury Department’s federal payment system. The career civil servant who had overseen the system was put on leave and then suddenly retired after resisting Musk’s team being granted access, The New York Timesand others reported.
On Friday, the X account for “DOGE” claimed to have canceled $1 billion of federal contracts.
And on X in recent days, Musk has publicly bragged of shutting down payments that, presumably, were specifically approved by Congress and the president — indicating numerous potential violations of the Impoundment Control Act.
317 notes
·
View notes
Note
Yan!Android × Creator!Darling- I just can't get it out my mind... like, you created them. You're ✨️god✨️
I can keep going on this idea for a looong time, maybe next time haha
My English might not be the best, not my native language :D May I be the ⚜️Anon?
Wired Heart
Yandere Android X NON-BINARY Creator [Scientist] Reader
Part 1 <3
Guys big shout out to whoever wrote this ask cause it was one of the first asks I got and I kept postponing it, i love this ask smmmmm i hope its up to your expectations😭😭 and of course you can be ⚜️anonnnn IT TOOK ME FIVE WHOLE MINUTES TO FIND THIS EMOJI!!!!

The whirring of the machinery snapped you out of your thoughts.
Who knew building such an intricate and sophisticated robot took so long?
Sitting before you on your laboratory table was a beautiful android, so gorgeous it almost surprised you that you were its creator. Its jet black hair was soft to the touch, a lean yet muscular frame and those glowing red eyes.
You smile to yourself, hands on your hips as you admire your own creation; he was indeed beautiful.
‘Time to turn it on! Im so excited!’ You thought to yourself, wiping the sweat of your forehead.
You brought your finger to its power button, taking a deep breath before pressing it promptly.
Its bright red eyes opened immediately, you stared at it excitedly as it adjusted to its controls.
“Greetings Master. It’s lovely to finally meet you.” The AI spoke, smiling gently as its smooth voice filled the room.
“Hello Xander, the feeling is mutual.” You smile and can’t stop revelling in the glory of bringing to life such an intricate robot.
Xander was an amazing assistant for you, always there to help with any duty assigned to him. His features, expressions and ministrations were so life-like, sometimes you felt as if the robot in front of you was real.
He was the first prototype for the business you were aiming to start: a company which sold human-like AI to act as partners for lonely people.
An inquisitive idea you were taking advantage of since, let’s face it, millions of people craved a partner in this world.
Your robots would do everything a real partner would do: shower them with affection, spend quality time with them and basically ensure the customer doesn’t feel like it was a robot.
Weeks passed, you felt weary. There was always this feeling in your stomach; something was wrong. You felt a pair of eyes piercing through your skull all of the time. Your creation had been acting weird recently; almost as if it became a sentient being.
Xander would want to be with you 24/7, he would ask constant questions in regards to where you were going, who you were with and how long you were going to be; it became immensely suffocating.
Even your friends and family commented on the nature of your robot, that he seemed more than just your AI helper. They said at time it seemed as though he actually was your real human boyfriend—you kept brushing it off, but the truth of the matter was that you were questioning Xander’s intentions too.
Your robot did take care of you so well: cooking for you, cleaning for you, nursing you back to health when you were sick and tending to your every beck and call.
But you felt uneasy, his touch would linger on you for far too long—not a random touch but one of longing. The way his eyes would follow your every move with were a sense of affection. It was scary.
And thats why you took the long-awaited decision to terminate Xander—it broke your heart to do this, but Xander was taking control of your whole life.
You swallow as you walk into your workspace, looking at Xander on charging. His eyes were closed, hiding that crimson gaze of his. Your eyes ran all over his features, taking them in one by one before sighing.
Your hands worked skilfully on the keyboard of your computer, bringing up the data of Xander on the screen. You had already made a terminate control to be used in dire emergency situations…could this count as one?
You turn your head to look at the side of Xander’s face before bringing the cursor to hover over the big red control which read TERMINATE.
Your finger was inches away from pressing down on the left side of the mouse before a sharp pain evolved in your wrist—you gasped in pain before looking up at the cause.
Xander. Wait…Xander?!
Those bloodshot eyes of his were wide open, his perfect features looked tense; as if he really felt the pain of being eradicated from existence from the very being who gave him life.
You had no words, this can’t be real. He had no control over gaining consciousness during his charging period without your authority.
But here he was, his expression morphed into one of rage.
“Master. What are you doing?” His voice was cold, but you swore you could hear a hint of hurt.
You stared up at him, your wrist in an iron grip which you couldn’t get out of.
Your creation leaned down further, his perfect face inches away from you, “Do not ignore me Master, you are hurting me.”
His voice was broken, hoarse and upset; he couldn’t fathom why you would do something like this to him. He had been so good for you, he did everything you asked from him and never let you complain.
Xander felt his chest hurt, this wasn’t what he was created for. But he couldn’t help what was happening to him; his growing feelings, no, love and obsession he felt for you couldn’t be stopped.
“X-Xander you..you…you’re..h-how..” You could barely form a sentence, your brain still not processing what was happening in front of you. You must have just been sleep-deprived and imagined this situation for yourself. Yes..that was definitely what had happened…this wasn’t real.
“Im yours Master, how could you throw me away like this?!”
You had no words when suddenly he wrapped his arms around you, locking you in his arms; being made of metal still didn’t stop his hug being disturbingly comfortable.
You tried pushing away but there was no way you could escape his grip, you had taken over his wired heart; the sole reason from these unusual feelings he was having.
“You made me Master, but I won’t let you get rid of me.” He spoke, his voice slightly muffled by your shoulder he was nuzzling into, “We will be together…”
“Forever~”

BROOOO IM FINALLY DONEEEEE. Sorry this is so short, I still don’t know how to extend this but im working on other stories aswell!! I love you all so much and have missed you<33333333333
my masterlist <3
divider by @ohmarigold
#yandere blog#yandere#obsessive yandere#yandere x reader#obsessive imagines#obsessive love#sub yandere#sub character#yandere ai#yandere character#yandere x you#yandere x darling
175 notes
·
View notes
Text
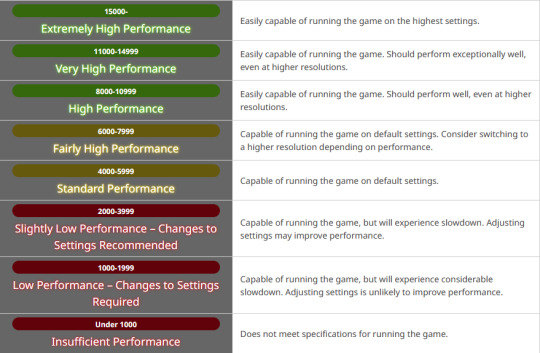
Benchmark Tech Notes
Running the Benchmark
If your Benchmark isn't opening, it's an issue with the executable file, and something not completing properly on either download, or extracting the Zip file. The Benchmark is designed to run and give you scores for your potato computer, I promise.
I actually saved my Benchmark to my external drive, and it still pulls and saves data and runs as it should. Make sure you allowed the download to complete before extracting the zip.
Resolution
Check your Settings; in Display, it may be defaulting your monitor Resolution to something than you might otherwise use if you aren't on standard 1920x1080.
To check your monitor Resolution, minimize everything on your screen and right click anywhere on your Desktop. Go to Display Settings and scroll down to find Resolution and what it's set at.

You can set the Graphic Settings 1 tab to Maximum, or to Import your game settings. Display Settings tab is where you set it to be Windowed, Bordered, or Full Screen, as well as select Resolution to match your monitor in the dropdown (or customize it if needed). I speak on Resolution as some folks in my FC noted it changed how their characters looked.
The Other tab in Settings is where you can change the text output, or even check a box to disable the logo and score; I do this on subsequent plays, once I have my scores at various settings, to get the clean screenshots.
@calico-heart has a post about fixing graphics settings, with screenshots of the settings tab. Basically, change graphics upscaling from AMD to NVIDIA, and/or uncheck Enable Dynamic Resolution. Also check the Framerate Threshold dropdown.
Screenshots
The benchmark auto-saves 5 screens each playthrough. In the Benchmark folder there is a Screenshots folder to find the auto-images taken of your characters.


Character Appearance
If you want to get your current in game appearance, including non-standard hairstyles, make sure to load up the live game, right click and "Save Character Settings."
Then go to Documents/My Games/Final Fantasy XIV: A Realm Reborn (this is the default in Windows 10 so mileage varies). The file will have the date you last updated their settings and be named FFXIV_CHARA_01.dat (or however many saves you have/made).
Grab those newly updated DAT files for your character(s) and copy them, then in the same base folder, go to Final Fantasy XIV: A Realm Reborn (Benchmark).
Paste the copied DAT files in there, and rename to FFXIV_CHARA_BENCH01.dat (the number doesn't matter, and you may have more).
When running Benchmark Character Creation, use the dropdown menu.
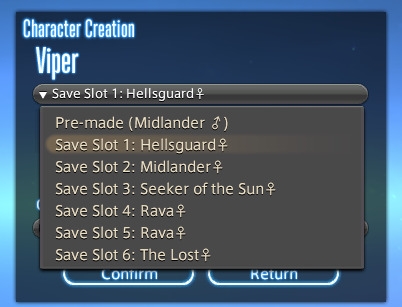
If you do Create a Custom Character and Load Appearance Data, it will give you default hairstyles again. Meteor's Dawntrail hairstyle is a new default.
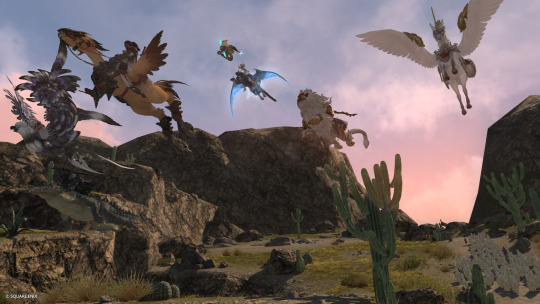
In Char Gen I am finding that a very pale hrothgal reflects the green scenery around her, giving her white skin/fur a green tinge. The other zones do not have this problem, or at least not to the same degree.
They added a Midday vs Evening setting in outdoor areas as well to test lighting. The lighting in the Gridanian innroom is better; not as bright as outdoors, to be expected, but not completely useless.

New voice type icons to clarifying the sounds you make.

Remember we're getting a free fantasia with the expansion, so some tweaking may be needed; Iyna I felt like I needed to adjust her jaw. Other colors--skin, hair, eyes, tattoos, etc--are showing differently in the various kinds of lighting.
Uncertain if the limit on hairstyles for the Hrothgals so far is just a Benchmark thing; they do have set styles for different head options. Everyone gets Meteor's hair though, so it may be a temporary/Benchmark limit. But which clan and face you choose drastically alters what hair and facial feature options you have access to.
Check your settings, tweak them a bit, play around with chargen, and remember this is still a Benchmark; they always strike me as a little less polished than the finished game, but so far I'm actually pretty pleased with having defined fingers and toes, the irises in the eyes, scars looking cut into the skin, and other improvements.
172 notes
·
View notes
Text
SysNotes devlog 1
Hiya! We're a web developer by trade and we wanted to build ourselves a web-app to manage our system and to get to know each other better. We thought it would be fun to make a sort of a devlog on this blog to show off the development! The working title of this project is SysNotes (but better ideas are welcome!)

What SysNotes is✅:
A place to store profiles of all of our parts
A tool to figure out who is in front
A way to explore our inner world
A private chat similar to PluralKit
A way to combine info about our system with info about our OCs etc as an all-encompassing "brain-world" management system
A personal and tailor-made tool made for our needs
What SysNotes is not❌:
A fronting tracker (we see no need for it in our system)
A social media where users can interact (but we're open to make it so if people are interested)
A public platform that can be used by others (we don't have much experience actually hosting web-apps, but will consider it if there is enough interest!)
An offline app
So if this sounds interesting to you, you can find the first devlog below the cut (it's a long one!):
(I have used word highlighting and emojis as it helps me read large chunks of text, I hope it's alright with y'all!)
Tech stack & setup (feel free to skip if you don't care!)
The project is set up using:
Database: MySQL 8.4.3
Language: PHP 8.3
Framework: Laravel 10 with Breeze (authentication and user accounts) and Livewire 3 (front end integration)
Styling: Tailwind v4
I tried to set up Laragon to easily run the backend, but I ran into issues so I'm just running "php artisan serve" for now and using Laragon to run the DB. Also I'm compiling styles in real time with "npm run dev". Speaking of the DB, I just migrated the default auth tables for now. I will be making app-related DB tables in the next devlog. The awesome thing about Laravel is its Breeze starter kit, which gives you fully functioning authentication and basic account management out of the box, as well as optional Livewire to integrate server-side processing into HTML in the sexiest way. This means that I could get all the boring stuff out of the way with one terminal command. Win!
Styling and layout (for the UI nerds - you can skip this too!)
I changed the default accent color from purple to orange (personal preference) and used an emoji as a placeholder for the logo. I actually kinda like the emoji AS a logo so I might keep it.
Laravel Breeze came with a basic dashboard page, which I expanded with a few containers for the different sections of the page. I made use of the components that come with Breeze to reuse code for buttons etc throughout the code, and made new components as the need arose. Man, I love clean code 😌
I liked the dotted default Laravel page background, so I added it to the dashboard to create the look of a bullet journal. I like the journal-type visuals for this project as it goes with the theme of a notebook/file. I found the code for it here.
I also added some placeholder menu items for the pages that I would like to have in the app - Profile, (Inner) World, Front Decider, and Chat.

i ran into an issue dynamically building Tailwind classes such as class="bg-{{$activeStatus['color']}}-400" - turns out dynamically-created classes aren't supported, even if they're constructed in the component rather than the blade file. You learn something new every day huh…

Also, coming from Tailwind v3, "ps-*" and "pe-*" were confusing to get used to since my muscle memory is "pl-*" and "pr-*" 😂
Feature 1: Profiles page - proof of concept
This is a page where each alter's profiles will be displayed. You can switch between the profiles by clicking on each person's name. The current profile is highlighted in the list using a pale orange colour.

The logic for the profiles functionality uses a Livewire component called Profiles, which loads profile data and passes it into the blade view to be displayed. It also handles logic such as switching between the profiles and formatting data. Currently, the data is hardcoded into the component using an associative array, but I will be converting it to use the database in the next devlog.

New profile (TBC)
You will be able to create new profiles on the same page (this is yet to be implemented). My vision is that the New Alter form will unfold under the button, and fold back up again once the form has been submitted.
Alter name, pronouns, status
The most interesting component here is the status, which is currently set to a hardcoded list of "active", "dormant", and "unknown". However, I envision this to be a customisable list where I can add new statuses to the list from a settings menu (yet to be implemented).


Alter image
I wanted the folder that contained alter images and other assets to be outside of my Laravel project, in the Pictures folder of my operating system. I wanted to do this so that I can back up the assets folder whenever I back up my Pictures folder lol (not for adding/deleting the files - this all happens through the app to maintain data integrity!). However, I learned that Laravel does not support that and it will not be able to see my files because they are external. I found a workaround by using symbolic links (symlinks) 🔗. Basically, they allow to have one folder of identical contents in more than one place. I ran "mklink /D [external path] [internal path]" to create the symlink between my Pictures folder and Laravel's internal assets folder, so that any files that I add to my Pictures folder automatically copy over to Laravel's folder. I changed a couple lines in filesystems.php to point to the symlinked folder:

And I was also getting a "404 file not found" error - I think the issue was because the port wasn't originally specified. I changed the base app URL to the localhost IP address in .env:

…And after all this messing around, it works!
(My Pictures folder)

(My Laravel storage)

(And here is Alice's photo displayed - dw I DO know Ibuki's actual name)

Alter description and history
The description and history fields support HTML, so I can format these fields however I like, and add custom features like tables and bullet point lists.

This is done by using blade's HTML preservation tags "{!! !!}" as opposed to the plain text tags "{{ }}".
(Here I define Alice's description contents)


(And here I insert them into the template)

Traits, likes, dislikes, front triggers
These are saved as separate lists and rendered as fun badges. These will be used in the Front Decider (anyone has a better name for it?? 🤔) tool to help me identify which alter "I" am as it's a big struggle for us. Front Decider will work similar to FlowCharty.

What next?
There's lots more things I want to do with SysNotes! But I will take it one step at a time - here is the plan for the next devlog:
Setting up database tables for the profile data
Adding the "New Profile" form so I can create alters from within the app
Adding ability to edit each field on the profile
I tried my best to explain my work process in a way that wold somewhat make sense to non-coders - if you have any feedback for the future format of these devlogs, let me know!
~~~~~~~~~~~~~~~~~~
Disclaimers:
I have not used AI in the making of this app and I do NOT support the Vibe Coding mind virus that is currently on the loose. Programming is a form of art, and I will defend manual coding until the day I die.
Any alter data found in the screenshots is dummy data that does not represent our actual system.
I will not be making the code publicly available until it is a bit more fleshed out, this so far is just a trial for a concept I had bouncing around my head over the weekend.
We are SYSCOURSE NEUTRAL! Please don't start fights under this post
#sysnotes devlog#plurality#plural system#did#osdd#programming#whoever is fronting is typing like a millenial i am so sorry#also when i say “i” its because i'm not sure who fronted this entire time!#our syskid came up with the idea but i can't feel them so who knows who actually coded it#this is why we need the front decider tool lol
25 notes
·
View notes
Note
Unfortunately you've infected me with the brain worm of Tony Stark with a teeny tiny baby. Please give me more, Supreme Leader 🙏🙏
I AM MORE THAN HAPPY TO. first of all Tony is the CE-MOTHERFUCKING-O of baby wearing. he for shit sure really tried to reinvent the wheel there for a while, he kept making up new schematics and prototypes that were all equally (incredibly) safe, and pretty much exclusively based whether or not they’re “good” on how you reacted. If you got fussy or squirmy or started crying, that thing went STRAIGHT into the reject pile. But if you just kind of chilled - or even better, slept - that’s how he decided who the finalists were.
Eventually he landed on a pretty straight forward - granted, very ergonomic, soft, breathable, somehow antibacterial, uv protective, incredibly soft, temperature regulated - model he whipped up that’s part baby wrap part harness/chest carrier. And after about 45 minutes of use, he realized he… probably could have bought a nearly identical one online. But he’s still glad he did it, because even though the improvements over the ones on the market are very subtle, they’re incredibly important to him. Because that’s one more little way that he’s taking care of you.
He also will FULLY rig up Jarvis to orchestrate Dum-e and Butterfingers to help him out with those late night feedings. Jarvis monitors your sleep cycles, breathing, oxygen levels, movement, all that stuff. And Jarvis can tell you’re going to wake up before you do. So the moment Tony hears you start fussing (also let’s be real, most nights he probably falls asleep in his workshop with you in a little bassinet) he’s up. No question, no hesitation. And the moment he’s up, Dum-e and Butterfingers are already gliding over with a warm, perfectly prepared bottle and a clean fresh diaper. I can just hear him talking to Pepper like, “yeah, I’m really planning on streamlining this whole newborn phase.” Pepper has… low expectations on that working, if she’s being honest. But she’s actually pleasantly surprised at how well Tony is adapting to being your dad.
Also you know how a lot of scientific articles have said that the reason breastfeeding is “better” formula is because when a baby breastfeeds, their saliva goes into the mother’s nipple so her body can make milk with whatever nutrients the baby needs? Yeah Tony hacked that too. He has what he jokingly has dubbed the Baby Breathalyzer. He also designed it with a pacifier nib at the top so it’s not just easy for him to use, it’s comfortable and soothing for you. Again, this man thinks of EVERYTHING. So once he gets a reading, the data is sent over to another thing he made that will basically custom make add ons to your formula powder. So any nutrients or vitamins or antibodies or anything else you could possibly need, he will ensure you have. It’s also able to tell him ahead of time when you might be starting to get sick or get a sniffle so he can act accordingly. It doesn’t make him less worried about you, but preparing ahead of time makes it a little easier on him, and by proxy, on you.
Also, he’s probably still CEO at this point, so you’d better BELIEVE that all Stark Industries meetings not only begin with a scan to make sure no one is sick, no one has any tobacco, or second hand smoke, or alcohol, or anything else that could be harmful to you on them, a full head to toe decontamination mist with evaporating body safe antibiotic spray in a sterilization checkpoint, and a lot of hand sanitizer. But he also has a new feature in all of his meetings. Lights have to be kept reasonably dim, and there’s a hovering holographic decibel counter in the middle of the table. One of the other things he asked Jarvis to track was when you started crying and what was going on around you, that way he could figure out if there was anything in your environment that upset you. In doing so, he figured out you hate the texture of microfiber, you seem pretty terrified of bananas in pajamas, and exactly how loud people can talk before it’s too loud for you little ears. So in every meeting, Tony ensures that all the other executives and managers and department heads and whoever else he’s meeting with keep things comfortable for you while you babble and teeth on pens and snooze on his chest.
Also when you get big enough to start walking????? He is so proud and a little heartbroken because he already misses having you in his arms all the time. But he knows that no matter how big his precious little baby gets, you will never be too big for him to carry you.
AND DON'T EVEN GET ME STARTED ON HOW HILARIOUS THIS MAN IS. He will literally be like "ooh, I don't know about that. Let me confer with my executive consultant." he turns to you and whispers while you baby babble up at him, nodding.
"... well, you heard the kid. That's gonna be a no go."
#drabbles#tony x kid!reader#tony x stark!reader#tony stark drabbles#tony stark x reader#tony stark#mcu x stark!reader#mcu x reader#mcu drabbles#mcu#dad!tony#iron dad#I HAVE SO MUCH MORE TO SAY I WILL NOT SHUT UP ABOUT THIS#DO NOT EVEN GET ME STARTED ON WHEN YOU'RE A TODDLER#ALSO IF YOU WANT MORE TONY W BABY!READER LMK#I HAVE IDEAS
40 notes
·
View notes
Text
Jordyn's Mod Masterlist

I often get asked what mods I use in my game! Below is a comprehensive list of my mods.
Last updated: 1/10/2025. Added Faster Toddler Training and Toddlers Can Sit on Sims' Laps
NRASS MODS
Absolutely essential mods that help the game run smoother and gives you more agency over the world.
NRaas ErrorTrap: Catches and corrects data corruption errors.
NRaas MasterController: Adds options that allow you to control and change things about sims in your town.
NRaas MasterController Cheats: Includes more advanced features for MasterController.
NRaas Mover: Removes "greater than eight" and "requires adult" restrictions in "Edit Town" and the Phone and Computer "Move" interactions and adds a new "Move" window.
NRaas Overwatch: Periodically cleans up errors and junk that accumulate over a play session.
NRaas Porter: Adds a custom version of the import and export system used to create library families. It makes it possible to transfer sims while preserving relationships.
NRaas Portrait Panel: Adds portrait panels for households greater than eight.
NRaas Story Progression: Overrides EA story progression with a better system.
NRaas Woohooer: Alters game romance systems and allows for teen pregnancy and risky woohoo.
"FIX" MODS
These mods make small tweaks to the game that improve performance and fixes annoying things.
bluegenjutsu Sit on more comfy objects: Fixes routing issues when sims choose places to sit. Requires a Sims Asylum account.
Lazy Dutchess Smooth Patch: Alters game processing speed to improve overall performance.
No camera fade on sims: Gets rid of the weird camera fade that happens when you zoom in close to your sim.
OhRudi Sims need less space: Sims now need half the space for all interactions, which improves routing.
Twoftmama Route Fix: Reduces the amount of time your sims stand around picking their nose. Requires a Sims Asylum Account.
Arro No "Mod Scripts Found": Hides the mod script popup when you load up the game.
marydehoyos Reduce/Remove Lag Caused by Houseboats: Corrects lag in Isla Paradiso caused by houseboats.
GAMEPLAY MODS
These mods add new interactions.
Twinsimming Growing Pains: Inspired by the phases in The Sims 4: Parenthood.
TSS Sims can hand over babies and toddlers: Adds a basic interaction for sims to pass babies and toddlers over to other sims.
TSS More baby interactions: Adds more interactions for babies.
TSS Functional baby carrier: Adds a baby carrier to the game.
Buzzler Moar Interactions: Adds new interactions to the game that are new or altered EA interactions.
Twoftmama Faster Toddler Training: Allows you to teach your toddlers to walk, talk, and potty in a third of the normal time.
TheSweet Simmer Toddlers Can Sit on Sims' Laps: Allows toddlers to sit on adult sims' laps.
CAS AND DEFAULT REPLACEMENT MODS
Default replacements for Sims and other alterations to CAS.
Criisolate Pure CAS Lighting: Changes lighting in CAS.
Baby sleeper footies: Puts babies in a cute footie outfit instead of the default burrito wrap.
Slamyy Eyelash Mesh Terminator: Removes default EA eyelashes.
SClub Eyelashes: Eyelashes available in CAS makeup. Requires eyelash terminator.
Little Wisps: Gives babies hair.
BrntWaffles Baby Soft Skin: Skin default replacement for babies.
BrntWaffles Yumedust eyes: Eye default replacement.
Cyo cute feet for infants and toddlers: Makes baby feet cuter.
Neiuro Mango Smoothie Skin: Skin default replacement.
Nectar Cellar Beards: Replaces EA beards.
Simple Life Brows: Replaces EA brows.
Nectar Cellar CAS background: Custom CAS background.
Sim Bouquet Thumbnail Camera Edits: Makes changes to Sim portraits.
BrntWaffles Lighting Mods: Changes the default EA lighting.
MISCELLANEOUS MODS
I don't know where to put these!
justmiha97 Clean UI: Replaces the default UI with a nice white overlay.
I use reshade to improve the visual quality of my game. I don't understand it very well so I highly recommend this tutorial by acottonsock!
30 notes
·
View notes
Text
5 Days of Helping You Outline Your Next Novel

Day 5: Obsidian for Outlining
Find all 5 installments of the mini series: helping you outline your next novel
*I have added a layer of “static” over my screenshots so they are distinctive enough to stand apart from the surrounding text
did you miss this series? here you can find all posts here: [day 1] [day 2] [day 3] [day 4]

Do you use Obsidian?
What is Obsidian?
A note-taking and knowledge management tool that allows you to create and connect notes seamlessly.

Uses a local-first approach, meaning your data is stored on your computer, not the cloud (unless you choose to sync).
Features bidirectional linking, which helps create a non-linear, networked way of organizing ideas—great for brainstorming and outlining.
Why should you use Obsidian?
Flexible & Customizable – Unlike rigid writing apps, you can design your own workflow.
Distraction-Free Writing – Markdown keeps the focus on text without extra formatting distractions.
Ideal for Outlining & Organization – Connect story ideas, characters, and settings effortlessly.
Obsidian for Writing
Outlining
Creating a One Pager
Create a single markdown note for a high-level novel summary.
Use headings and bullet points for clarity.
Link to related notes (e.g., character pages, theme exploration).
Here’s an example of an outline I’m currently using. This is what my website will have on it (and what goals I hope to achieve w my website)

Using the Native Canvas Tool
Use Obsidian’s native Canvas tool to visually outline your novel. (Best on PC)
Create a board with columns for Acts, Chapters, or Story Beats.
Drag and drop cards as the story evolves.
Writing
Why Write Directly in Obsidian?
Minimalist interface reduces distractions.
Markdown-based formatting keeps the focus on words.
No auto-formatting issues (compared to Word or Google Docs).
Why is Obsidian Great for Writing?
Customizable workspace (plugins for word count, timers, and focus mode).
Easy to link notes (e.g., instantly reference past chapters or research).
Dark mode & themes for an optimal writing environment.
Organization in Obsidian
Outlining, Tags, Links
Each chapter, character, important item, and setting can have its own linked note.
Below, for example, you can see the purple text is a linked page directly in my outline.

Use bidirectional linking to create relationships between (story) elements. Clicking these links will automatically open the next page.
Tags can be used for important characters, items, places, or events that happen in your writing. Especially useful for tracking.
Folders for Efficient Storage
Organize notes into folders for Acts, Characters, Worldbuilding, and Drafts.
Use tags and backlinks for quick navigation.
Creating a separate folder for the actual writing and linking next (chapter) and previous (chapter) at the bottom for smooth navigation.
You can also create and reuse your own internal templates!
Spiderweb Map Feature (Graph View)
Visualize connections between characters, plot points, and themes. Below you’ll see the basic mapping of my website development project.

This view can help you spot disconnected (floating) ideas and create bridges to them.
Exporting
Why Export?
Ready to format in another program (Scrivener, Word, Docs, Vellum, etc).
Need a clean version (removing tags, notes, etc) for beta readers or editors.
Creating a backup copy of your work.
When should you export?
Personally, I like to export every 5 chapters or so and update my live version on Google Docs. This allows my family, friends, and beta readers to access my edited work.
After finishing a draft or major revision.
Before sending to an editor or formatting for publication.
Where should you export?
Personally I copy and paste my content from each chapter into a google doc for editing. You may also want to make note of the following export options:
Markdown to Word (.docx) – For editing or submitting.
Markdown to PDF – For quick sharing
Markdown to Scrivener – For those who format in Scrivener.
To Conclude
Obsidian is an invaluable tool for novelists who want a flexible, organized, and distraction-free writing process.
Try setting up your own Obsidian vault for your next novel! Comment below and let me know if this was helpful for you 🫶🏻

your reblogs help me help more ppl 💕
follow along for writing prompts, vocabulary lists, and helpful content like this! <333
✨ #blissfullyunawaresoriginals ✨
#writeblr#writers on tumblr#creative writing#writerscommunity#fiction#character development#writing prompt#dialogue prompt#female writers#writer blog#blissfullyunawaresoriginals#blissfullyunawares#writing life#fiction writing#writers#writer life#tumblr writers#writing inspiration#writing#writerslife#writer stuff#writing community#writer#obsidian for writing#obsidian#writers life#writing tool#writing tips#writer moots#tumblr moots
20 notes
·
View notes
Text
Sonic the Hedgehog Analyzer, Issue #62: Misadventures (Part 1)

Woah, it has been a while, hasn't it? For those who have forgotten, I have been reviewing the main storyline of the IDW Sonic the Hedgehog comics up until Issue #61, ending it there because there were no more Issues to review (unless you count the Classic Sonic comics, Sonic Forces, Sonic Frontiers Prequel, Team Sonic Racing and Sonic the Hedgehog 2: The Movie Pre-Quill, which I might review some time in the future). In any case, I'm officially back and ready to go through the newer Issues.

So, the new Arc is titled ''Misadventures'' and it immediately stands out in the sense of how it is structured. In previous Issues, we focused on one story with a specific set of characters being the focus of that story. In ''Misadventures'' we have the Issue being split up in two parts, each of which focuses on different characters, making their stories a little shorter than what we're used to reading. Despite that, it is also made clear through those Issues that it also sets up a plot that will be resolved in the next Arc.
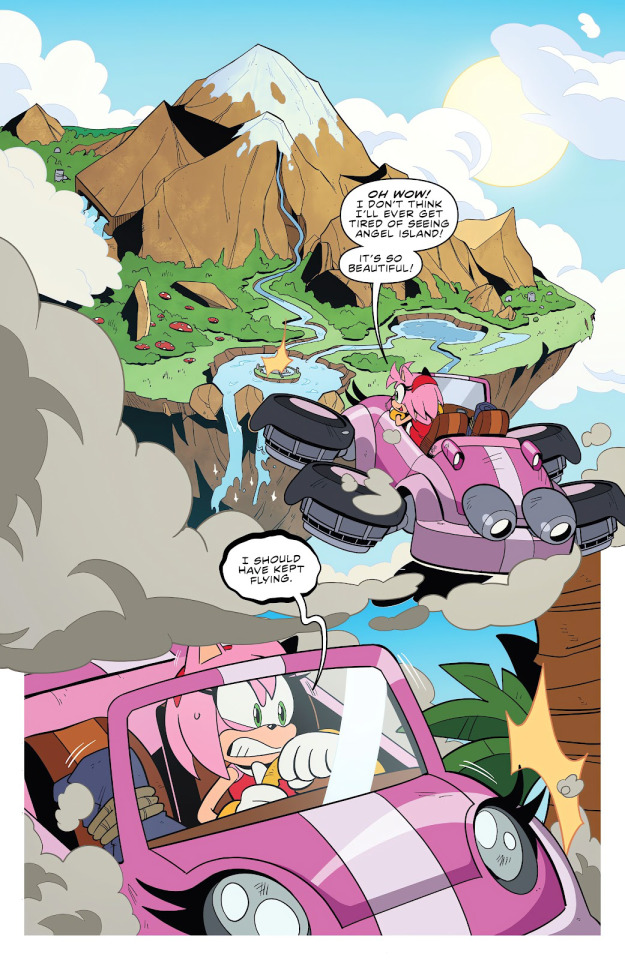
So, we start off with Amy going towards Angel Island.
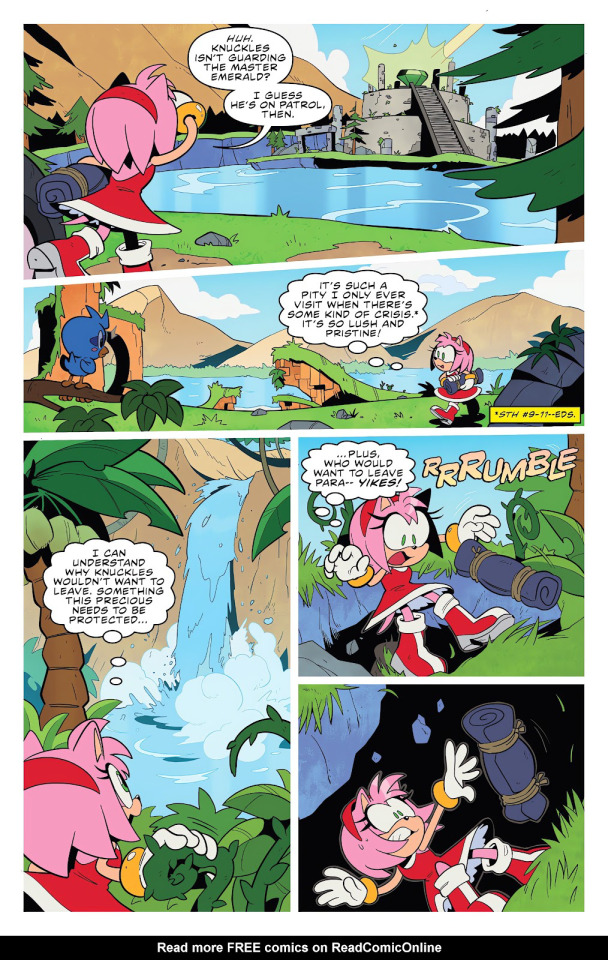
The reason why Amy wanted to visit Angel Island was set up in the previous Issue, with Rouge finding an artifact that Eggman seemingly stole from Angel Island and Amy insisting on returning it to Knuckles. It is easier said then done when you don't have to fall through the ground.

Fortunately, Amy gets saved by Knuckles, who had been patrolling Angel Island as usual.

The page above basically explains what I had mentioned earlier, and we can see just how grateful Knuckles is to Amy, even inviting her to join him in returning the artifact to its proper place.

I suppose this is a good place to talk about Amy and Knuckles' dynamic. While reading this story, they really radiate that pure sibling dynamic, teasing and bickering with each other, but ultimately supporting and keeping an eye out for each other. I mean, just look at Knuckles' smug look and Amy getting annoyed at him. As someone with siblings, I know that dynamic very well.
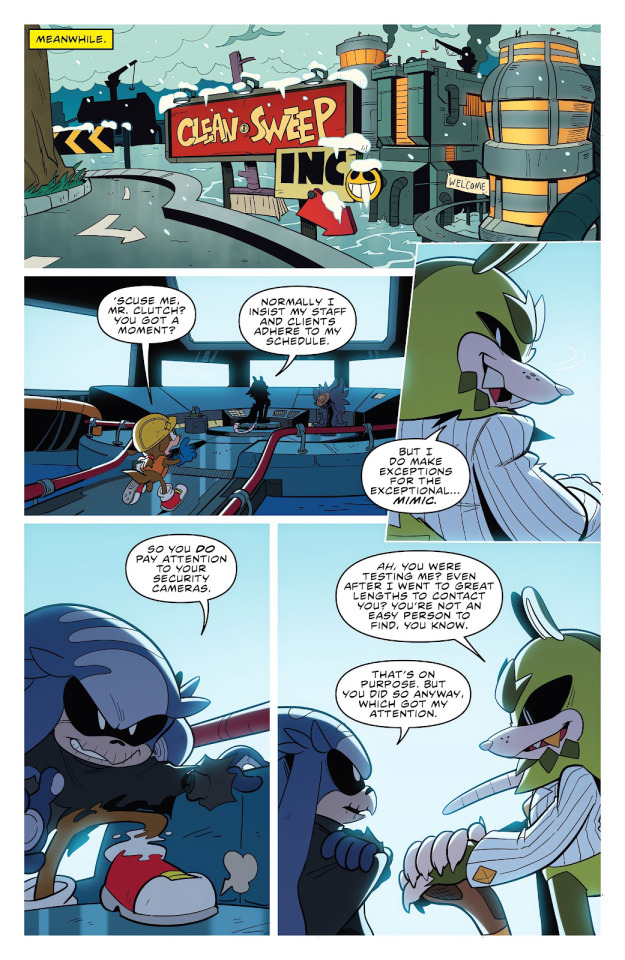
While Amy and Knuckles are busy returning the artifact to their rightful place, we are now shown our second story, featuring everyone's favorite mafia boss Clutch and everyone's favorite murderous shapeshifter Mimic. In discussions with a friend of mine, I had been going on how it would be cool to see Clutch and Mimic team up, not just because villain team-ups are cool, but also because I wanted to see what Clutch was up to and how Mimic would aid him.

We learn that Clutch was the one who called Mimic for a mission on his own, with Mimic being a little wary of Clutch, even if he knows latter has nothing to do with Sonic or Eggman. Instead Clutch finally reveals more about his business, Clean Sweep Inc., which has been alluded to in his previous appearances. To keep it short, he pretends to clean up the remains of Eggman's robots and tech, amassing resources and arsenal, which I assume he then sells to whoever wants to buy it. Of course, the Restoration stands in his way, since they all do it for free and dispose of the dangerous material, so he plans on destroying them.

It is definitely an interesting idea. Instead of an open attack, we'll be reading a story about infiltration, watching the Restoration fall apart from the inside thanks to Clutch's machinations. Mimic is hesitant, since he had been keeping a low profile to avoid jail after Starline freed him and erased all of his data from Eggman's database so the Doctor won't hunt him down either. Clutch remains chill, bringing up Tangle and Whisper and how they formed a new ''Diamond Cutters'' team, which pisses Mimic off and he immediately agrees to be Clutch's man on the inside.
I'm certain Mimic believes that, if things get heated, he can easily abandon Clutch... or at least that their new partnership is on an equal level. After all, that was what happened with Starline, Zavok and Rough and Tumble, even if it was obvious that they were going to backstab each other the moment they got what they wanted.
However, Clutch isn't Starline. Oh, no. As it turns out, Clutch is on a different level as a villain and I genuinely can't wait until we get to that one page that shows just how insane this guy can get. Even know, we see the subtle manipulation he shows when talking to Mimic, convincing him with one simple offer to work together.

Speaking of teamwork, Knuckles and Amy are still on their mission, with Knuckles remembering how during Sonic and Tails' visit, they ran into Eggman who had been digging for resources on Angel Island. It is possible that this was when he stole the artifact.

Amy tries to convince Knuckles to let other people watch over Angel Island and the Master Emerald in order to help him, but Knuckles refuses. Even if they are trustworthy, Knuckles would still keep an eye on them, which would only make things more complicated.
Also, Knuckles? Who are those five people you trust besides Amy?!
I assume three out of those five would be the Chaotix, since he is good buddies with them, but I cannot be sure. I like to think that for Knuckles' own petty reasons, Sonic isn't one of them, considering how the hedgehog constantly brings trouble to Angel Island anytime he appears. X3

In any case, it is wholesome to see how close Amy and Knuckles are, with Amy even managing to fluster Knuckles after bringing up how he basically dumped the Resistance on her. It's really sweet.

They find the place where the artifact was supposed to be, but Knuckles knows there is a trap, so he is a little hesitant since they would probably damage it. Amy comes up with a plan, with Knuckles putting his trust in her.

That plan was to trigger the trap, allowing Amy to block the arrows, while Knuckles dashed to place the artifact back at its place.
Neat.

Both are happy that it worked, only for the ground beneath them to collapse. Neither of them are too disturbed, with Amy placing her trust in Knuckles to save her, while Knuckles trusts Amy to protect him from the falling boulders.

The two manage to escape, with their story wrapping up after Amy tells him that he is always welcome at the Restoration, especially after the initiative Lanolin started.
''...Who?''
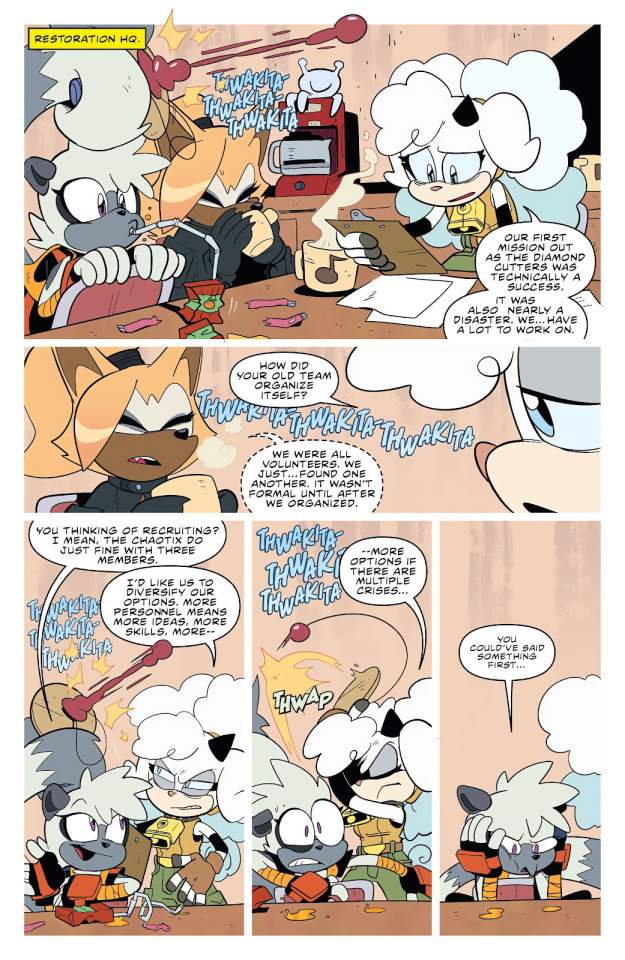
Going back to the second story, Lanolin, Tangle and Whisper have a meeting and... oof, Lanolin, have you even slept in the past days? She looks like she has been through the wringer, probably surviving on coffee and pure determination. Honestly, Shadow would be proud.
Lanolin is concerned with the fact that their previous mission was nearly a disaster, asking Whisper for advice, while Tangle wonders if Lanolin plans on recruiting new members. Lanolin looks like she's about to snap, taking Tangle's paddle ball away after having to constantly listen to it. Yeah, I'm sure we can all relate to that.
In any case, Lanolin explains that having more personnel means having multiple options, leaving them better prepared. This isn't a bad idea, and it can work if they find the right people.

Speak of the Devil- We see a new character enter the room, asking if he could join them since he wants to make a difference and help the community, go on an adventure, take his work seriously... and we all know this is Mimic. Dude, you aren't fooling anyone in the audience.
I do like how he brings up specific points he knows would appeal to Lanolin, Tangle and Whisper to get them to accept him.

While Tangle looks like she's about to accept him in the team, Lanolin decides to question Duo about his skills... and also swats away that paddle ball because she isn't about to put up with Tangle's mischief. Duo responds with some generic answers, and I don't know if he's acting like he's nervous, or if he's really nervous after seeing a pissed off Lanolin. I hope it's the latter since this makes things much more hilarious.

As predicted, Tangle wants him in the team, and even Whisper agrees to let him in, with Lanolin accepting their vote on the matter, leaving it to Tangle to show Duo where his room is.

And as we predicted, Duo is Mimic. Well, at least the writers aren't pretending as if the audience wouldn't figure out who Duo really is. I do like the detail of him having to wear gloves to hide his hands, since those also don't seem to change properly whenever he transforms.
Rest assured, it will be interesting to observe how the plot develops, and even though I already know the outcome, it has been quite some time since I last read it. Diving back into it with what I know now should give me some fresh perspective on the events, especially when it comes to certain characters.
So, until next time!
Links:
#Previous Issue
#Next Issue
#Sonic the Hedgehog Analyzer (Masterlist)
#Sonic the Hedgehog Analyzer#idw sonic#sonic the hedgehog#amy rose#knuckles the echidna#clutch the opossum#mimic the octopus#tangle the lemur#whisper the wolf#lanolin the sheep#duo the cat
16 notes
·
View notes
Text
Dissecting the glow up pyramid
This post features an approach to apply Pyramid 1 (and Pyramid 2 combined to use their maximal potential to guide you for glowing up)
Credits for Pyramid 1 @prettieinpink

and Pyramid 2
idk who created this Pyramid

combined to use their maximal potential to guide you for glowing up.
Categorising the two Pyramids:
Well begin with the second Pyramid
Pyramid 2:
As you can see this Pyramid has 5 levels
Basic Health: Diet, Fitness, Sleep, Hygiene, Environment
Basic Grooming: Skincare Make up Fashion Hairstyling Shaving/Waxing Nails Accessorizing & Teeth Whitening
Professional Grooming: Manis/Pedis, Airbrushing; Waxing, Laser Hair Removal, Lash extension/lifts, Microblading, Brow Threading, Cosmetic Tattooing, Facials, Tanning, Hairstyling/Extensions/Coloring
Non Invasive Treatment: Cosmetic Dentistry, Threading, Botox Injections Filler, Laser/Peels, Cool sculpting/ Body Contour
Plastic Surgery
This Pyramid features basic and advanced methods of archiving a glow up without going into details especially in the two basic tiers
Pyramid 1:
This Pyramid also has 5 Levels but these Levels focus more on the basics and not the advance stages.
The Levels:
Health: sleep, exercise, oral health, healthy eating
Style: hair care, skincare, lashes&eyebrows, body-care, lips
Fashion: outfits, hair-styling, make up
Personalities: body language, posture, eloquence
Mind: mindset, mental health
Overall the two Pyramids are focusing on two aspects/levels of glowing up without going in great details on the other aspect/level
Here is a Pyramid with both aspects combined

How to apply the Pyramid in your personal glow up journey
The ground principal is working yourself up. Also the Levels work together to archive your glow up, If you did everything in Level 4 well but did not do everything in Level 2 good the glow up isn't as strong as when you worked your way up.
The first Level - Basic Health
This is the foundation of your glow up. You should not slack off in this tier, because they don't give you fast results like a facial for example because if you e.g want to try cool sculpting and you don't have a good diet and a fitness plan and you may not even reached your weight goal if you are overweight so the benefits are 0 and you've thrown your money out of the window.
The first step is it to access every point on a scale from 1 to 10. Be real in the rating. Maybe you are a 10 in oral heath but just a 4 in your mindset and so on. From there I would create a priority list with the things you have to focus the most. If you have many holes in this are I would try to just focus on these ones specifically but not let the other points out of your mind and sight.
Personally I would start with cleaning and organising your environment. A clean environment uplifts your spirit and also motivates you to accomplished your tasks.
If you think that you master the first level you can go to the second level
I advise you to really level up if you get a score of 7/10 but in the first Level you can already incorporate things from Level two but I would use discernment and be realistic.
The second Level - Basic grooming
Like in the first Level I would access every point on a scale from 1 to 10 and create a priority list and use the strategy like in the first level
you have to experiment with your makeup and make a data collection about things that work for you in this tier. These could be skin type, hair type and make up techniques that work for you and everything related to the points in the second level.
Example:
Hair type - oily ( On my Hair so und so Practices work do not work)
Hair porosity - normal … explanation
skin type - (Things that work on my skin)
Shaving doesn't work on my skin
etc.
If you can archive a score of a minimum of 7/10 you can Level up.
Final Thoughts on the Basic Levels
The first two levels are the foundation of attractiveness
You've already levelled a lot if you are in 8/10 in the first two levels as a whole.
Not maintaining the first two levels can negatively impact your attractiveness
The third Tier Professional grooming
These actions are like the icing on a cake to elevate your appearance to the next level.
In this tier you should pick 2-3 things which you think can 100% bring to the next Level. For example manis and Lash-extension.
The actions in this Tier can help to lessen the burden in the lower levels.
For Example if you do a Laser Hair Removal you don't have to spend as much time with Shaving/Waxing anymore.
I would also data collect treatments that work facials that work for you.
Disclaimer
The thing you can do in this Level and higher have a lot to do with your income and time but you have to remember that the first two Level alone can glow up from a dishevelled 4 to a confident 7 and these are just the icing on the cake
The fourth Level Non Invasive Treatment (NRI)
The vibe of this Tier is: 'you look Incredible but I do not know what to do'
It's about subtle changes and no drastic ones
Do not use the methods in the fourth Tier if you have no good foundation in the first three tiers.
Example: You are overweight and you are dieting and trying to loose weight and decided to make your face slimmer with Botox and fillers. When you loose the weight you face automatically gets slimmer and the filler can potentially change your face in a way that you don't like so loose the Weight first and then decide if filler is needed
The fifth Level Plastic sugary
It's self explanatory. But use your discernment. And look at the tips in the Pyramid

#glow up#glow up era#that girl#becoming that girl#dream girl#dream girl guide#wonyoungism#girlblogging#self improvement#pink pilates princess#girl things#it girl#dream girl vibes#this is a girlblog#girl blogger#self growth#working yourself up#collecting and dissecting a method#mindset#girl tips#becoming her
24 notes
·
View notes
Text
I am remembering things about this generator. First off:
FinalRelationshipValue="{} {} (a {} {} {}), {} (a {} {}) and {} (a {}). One time, {} {} {}, who {} it. "
I'm remembering how silly strings look without their added data in them. Like, yep, that sure is a statement :) Such a valid sentence.
Also, with the disorders, I forgot that I researched statistics for things like "percentage of people missing an arm" and used that in the generator. Your guy has a 4 in 10,000 chance to be missing an arm, and a 28 in 1000 chance to have ADHD. Where did I get this data from? I don't remember. I googled something and found numbers and called it good enough I guess. Anyways there are only three disorders, those two and "Sleepy Bitch Disorder" Which is :\ well that's not a lot. But! I remember asking a few times for things to add, and no one submitted things, and those were just the three I added in to test the feature out. BTW your dragon could potentially have all disorders at once. It's not very probable but it could happen.
Also I absolutely had bias stuff in some of the results, such as for common pronouns and creatures. I have removed all those biases for v2.0.0 👍
Looking at the Hydra code and 😬 that's a lot. Like, it's not hard to understand, there's just a lot with it. Every time a head is added, it cuts the percentage in 1/2 for the next head, and then the final head count needs personalities for each head. But not every thing is multiplied either. Hydras are in v1.1.0 tho, and I never finished them 😔 In fact v2.0.0 might not include them, we'll see how that goes.
Anyways I've started on cleaning up v1.0.2 so that I can understand things easier for when I make the web version. Until then . ..
It'll still be one every 3 hours, so 8 Dragons a day. All the old copyright rules still apply, anyone can use any creature that spits out. I have a .bat file that'll run the Python program 250 times in about 5 seconds, which'll make 31.25 days, basically lasting us until 2025
Also I'll be setting up a bunch of proper blog tags over the next week or two, and update the pinned content as well. Reviving an abandoned blog is a lot of work :P
7 notes
·
View notes
Note
Any lampert headcannons?
Lampert was a product made by a (now-bankrupt) company, advertised as an intelligent companion that could preform any (non-law breaking) action with no problem and incredible precision. He could do complex math, do the dishes, clean your house, maybe even read you a bedtime story. He could do it all. Within the advertisements, it was stated that he was programmed with some form of sentience (it was basic GPT-powered machine learning, nothing that crazy honestly), and was made to be "incredibly emotional" to relate with people on a more personal level. He was made with metal and wires, silicone covering his metal casing to allow comfortable phyisical touch, but fret not! He was also programmed to clean off any dirt from his dust-collecting skin to keep him looking fresh! And to not ruin any physical contact, he was made to automatically turn that very feature off for that period of time kn which you are in contact with him. Sounded perfect on paper! And apparently, they had only managed to make one model before going bankrupt due to low supply and demand. People did not like the idea of a machine-learning robot spying on them and learning from their every move as they also did not trust the company behind Lampert to put the data to good use. And the robot uprising. In the end, Lampert was left disassembled in a box in some alleyway, never to be seen again. In action or otherwise.
At least, not until Kasper came to that exact alleyway after taking a few shortcuts to his apartment. When he found a box that big and heavy, he was driven by morbid curiosity to open the box and see what was inside. Hell, it could be deadly, but at least he'll die in the coolest way ever, probably. After opening the box and assembling the mysterious thing while following instructions within the safety of his apartment, Lampert was plugged in to the computer with the intention of getting possibly reprogrammed. I mean, what else was was he supposed to do with a robot? He's fine without a companion, and the possibilties for this hunk of metal were endless! While Kasper was away to get some much needed rest, something happened to Lampert. An unexplainable, almost divine force had granted the machine human-like sentience. In fact, this force was so strong, that it brought Lampert to life.
#hope this was readable#regretevator#regretevator lampert#lampert regretevator#regretevator kasper#regretevator infected#kasper regretevator#infected regretevator#2#stanko rambles
24 notes
·
View notes
Text
The Evolution of DJ Controllers: From Analog Beginnings to Intelligent Performance Systems
The DJ controller has undergone a remarkable transformation—what began as a basic interface for beat matching has now evolved into a powerful centerpiece of live performance technology. Over the years, the convergence of hardware precision, software intelligence, and real-time connectivity has redefined how DJs mix, manipulate, and present music to audiences.
For professional audio engineers and system designers, understanding this technological evolution is more than a history lesson—it's essential knowledge that informs how modern DJ systems are integrated into complex live environments. From early MIDI-based setups to today's AI-driven, all-in-one ecosystems, this blog explores the innovations that have shaped DJ controllers into the versatile tools they are today.

The Analog Foundation: Where It All Began
The roots of DJing lie in vinyl turntables and analog mixers. These setups emphasized feel, timing, and technique. There were no screens, no sync buttons—just rotary EQs, crossfaders, and the unmistakable tactile response of a needle on wax.
For audio engineers, these analog rigs meant clean signal paths and minimal processing latency. However, flexibility was limited, and transporting crates of vinyl to every gig was logistically demanding.
The Rise of MIDI and Digital Integration
The early 2000s brought the integration of MIDI controllers into DJ performance, marking a shift toward digital workflows. Devices like the Vestax VCI-100 and Hercules DJ Console enabled control over software like Traktor, Serato, and VirtualDJ. This introduced features such as beat syncing, cue points, and FX without losing physical interaction.
From an engineering perspective, this era introduced complexities such as USB data latency, audio driver configurations, and software-to-hardware mapping. However, it also opened the door to more compact, modular systems with immense creative potential.
Controllerism and Creative Freedom
Between 2010 and 2015, the concept of controllerism took hold. DJs began customizing their setups with multiple MIDI controllers, pad grids, FX units, and audio interfaces to create dynamic, live remix environments. Brands like Native Instruments, Akai, and Novation responded with feature-rich units that merged performance hardware with production workflows.
Technical advancements during this period included:
High-resolution jog wheels and pitch faders
Multi-deck software integration
RGB velocity-sensitive pads
Onboard audio interfaces with 24-bit output
HID protocol for tighter software-hardware response
These tools enabled a new breed of DJs to blur the lines between DJing, live production, and performance art—all requiring more advanced routing, monitoring, and latency optimization from audio engineers.
All-in-One Systems: Power Without the Laptop
As processors became more compact and efficient, DJ controllers began to include embedded CPUs, allowing them to function independently from computers. Products like the Pioneer XDJ-RX, Denon Prime 4, and RANE ONE revolutionized the scene by delivering laptop-free performance with powerful internal architecture.
Key engineering features included:
Multi-core processing with low-latency audio paths
High-definition touch displays with waveform visualization
Dual USB and SD card support for redundancy
Built-in Wi-Fi and Ethernet for music streaming and cloud sync
Zone routing and balanced outputs for advanced venue integration
For engineers managing live venues or touring rigs, these systems offered fewer points of failure, reduced setup times, and greater reliability under high-demand conditions.

Embedded AI and Real-Time Stem Control
One of the most significant breakthroughs in recent years has been the integration of AI-driven tools. Systems now offer real-time stem separation, powered by machine learning models that can isolate vocals, drums, bass, or instruments on the fly. Solutions like Serato Stems and Engine DJ OS have embedded this functionality directly into hardware workflows.
This allows DJs to perform spontaneous remixes and mashups without needing pre-processed tracks. From a technical standpoint, it demands powerful onboard DSP or GPU acceleration and raises the bar for system bandwidth and real-time processing.
For engineers, this means preparing systems that can handle complex source isolation and downstream processing without signal degradation or sync loss.
Cloud Connectivity & Software Ecosystem Maturity
Today’s DJ controllers are not just performance tools—they are part of a broader ecosystem that includes cloud storage, mobile app control, and wireless synchronization. Platforms like rekordbox Cloud, Dropbox Sync, and Engine Cloud allow DJs to manage libraries remotely and update sets across devices instantly.
This shift benefits engineers and production teams in several ways:
Faster changeovers between performers using synced metadata
Simplified backline configurations with minimal drive swapping
Streamlined updates, firmware management, and analytics
Improved troubleshooting through centralized data logging
The era of USB sticks and manual track loading is giving way to seamless, cloud-based workflows that reduce risk and increase efficiency in high-pressure environments.
Hybrid & Modular Workflows: The Return of Customization
While all-in-one units dominate, many professional DJs are returning to hybrid setups—custom configurations that blend traditional turntables, modular FX units, MIDI controllers, and DAW integration. This modularity supports a more performance-oriented approach, especially in experimental and genre-pushing environments.
These setups often require:
MIDI-to-CV converters for synth and modular gear integration
Advanced routing and clock sync using tools like Ableton Link
OSC (Open Sound Control) communication for custom mapping
Expanded monitoring and cueing flexibility
This renewed complexity places greater demands on engineers, who must design systems that are flexible, fail-safe, and capable of supporting unconventional performance styles.
Looking Ahead: AI Mixing, Haptics & Gesture Control
As we look to the future, the next phase of DJ controllers is already taking shape. Innovations on the horizon include:
AI-assisted mixing that adapts in real time to crowd energy
Haptic feedback jog wheels that provide dynamic tactile response
Gesture-based FX triggering via infrared or wearable sensors
Augmented reality interfaces for 3D waveform manipulation
Deeper integration with lighting and visual systems through DMX and timecode sync
For engineers, this means staying ahead of emerging protocols and preparing venues for more immersive, synchronized, and responsive performances.
Final Thoughts
The modern DJ controller is no longer just a mixing tool—it's a self-contained creative engine, central to the live music experience. Understanding its capabilities and the technology driving it is critical for audio engineers who are expected to deliver seamless, high-impact performances in every environment.
Whether you’re building a club system, managing a tour rig, or outfitting a studio, choosing the right gear is key. Sourcing equipment from a trusted professional audio retailer—online or in-store—ensures not only access to cutting-edge products but also expert guidance, technical support, and long-term reliability.
As DJ technology continues to evolve, so too must the systems that support it. The future is fast, intelligent, and immersive—and it’s powered by the gear we choose today.
2 notes
·
View notes
Text
The Ellipsus Experience*
From someone who’s been using Google Docs for over a decade and LibreOffice for. Idk a year, probably.
*I don’t have a collaborator helping me out with this, so this is a solo-writer’s experience: please keep that in mind
Ellipsus is a writing website (not an app) that can be considered a collaborative alternative to Google Docs. They are [anti-AI] and don't plan on going back on this "barring significant regulatory changes." It has been compared both to Google Docs and LibreOffice. As stated above, I've used both of these other products (heavily) for a while and feel I'm properly familiar enough with both of them to say this one is... well deserving of the comparisons.
TL;DR
Ellipsus is essentially a GDocs/LibreOffice lovechild that is currently in open beta, works well, and I do recommend it as a Google Docs alternative for any collaborative needs just because it’s free and anti-AI, though it is only on par with LibreOffice so far as I can tell for solo work.
I was made aware of Ellipsus through a Blazed post here on Tumblr, though I haven't actually heard of it anywhere else, but I could just have completely and utterly forgotten if I'd ever seen them elsewhere. They also have a presence here on Tumblr, @ellipsus-writes, if you would like to have a browse for yourself.
All hyperlinks will be underlined and associated words will be between these [ ] brackets.
Getting Started
Ellipsus does not use a password system. You sign up/log in with your email, which will then send you a one-time code to get in. While signing up, the site asks a few questions while setting up, such as if you write with others (options boil down to yes, no, and not yet) and where you heard about Ellipsus from. You also initially choose your light mode/dark mode preference here. It can also use your system setting.
Once you’ve gotten through that, you’re taken to a document to introduce you to the features and capabilities of Ellipsus, though it doesn’t appear to really be… properly up-to-date… but it isn’t too badly divergent as to be too confusing (notably, there isn’t a “merge this draft” button to click like the doc tells you). It also offers several links to useful posts they’ve made to help you get started.
You will then be brought to the dashboard and unleashed.
Their layout is very simple, clean, and minimalist. There aren’t a thousand features, but sometimes you don’t need a thousand features. The site itself is easy to navigate and none of the toolbars or pages even look a little bit crowded, which is nice. Unfortunately, this does mean your settings are also very barebones. You can’t delete your account directly from the settings, but you can change your display name and email from the account settings page. Here, you can also download your logs or stored data. Unfortunately, though you can have an avatar/icon, you have to use Gravatar for it, with no exceptions. Other than that it displays the first two letters of the email associated with your account. This may be visible when collaborating with others.
On Desktop (and basics)
The dashboard (home page) shows your works, with a separate tab/page/button to show anything shared with you. Here is where you make new documents or manage existing ones, or make and manage folders.
Folders are named, and can have descriptions of their contents. They can be repeatedly nested for your highly-organized needs. (Or for organizing parts/arcs/chapters/etc. for your stories.) They can be bulk deleted by deleting the parent folder (the very first folder they’re all in).
When making a new document, you can either make a completely blank one or import a markdown (.md) file. Documents can be named here and renamed later. If you’re coming from Google Docs, you’ll have to use a desktop to download your documents as a markdown (.md) file in order to reupload it directly to Ellipsus. This is currently the only way to upload a file from elsewhere.
While writing, Ellipsus offers a focus mode (the cup icon) that will automatically hide all other panels/icons except for the outline (table of contents) and the icon to leave focus mode.
The other panels available are on the left- and right-hand sides of the screen. Both panels can be collapsed to increase screen space for the document. The right panel can be collapsed directly from within its additional menus through the arrow icon on the top left of the panel or returned to the expanded panel menu through the squares-in-a-square icon on the top right of the panel. It also has a keyboard icon (which the welcome doc calls a controller) to check available keyboard shortcuts, as well as a gear icon, both on the top right. (Will expand on the gear menu later.) The right panel also contains the “create a new draft” button, which becomes “compare changes” within drafts (expanded on later).
Formatting can be done through the bar on the bottom (basic* only) or through the formatting icon on the right panel. The default font is Literata and the default font size is 16pt. The default font color will change depending on your choice of light/dark mode, but you can pick from ten colors (nine, plus the default that changes per light/dark mode). If you don’t want to use the formatting bar/menu, markdown (like Discord) is also available for use while writing, and can be set to apply automatically.
Outline is simply a table of contents that allows you to jump between headers in your document. This makes it much easier to navigate a document, particularly if it’s long and you want to get from Point A to Point T but they’re a few tens of thousands of words apart (or more. Idk how much you write).
Find and replace is exactly that. It also has “match case,” “whole words only,” and “use regular expressions” toggles to better finess the find and replace experience.
Spellcheck will be elaborated on in the writing section.
Version history will open either the main document or the specific draft you’re on in a new page, where you can go between versions and pick on to overwrite with, if that’s what you want. I don’t fully understand how this works, but you can go through each day the document has been edited and pick a time you would like to replace the document with. These versions are saved at what appear to be every ten minutes of the clock, as every version of my stuff has shown only //:/0 am/pm as available within the version history.
Comments, chat, and collaborators will be expanded on in the collaborating section later.
Share and export is expanded on in the export section.
Document info becomes draft info when on a draft. This just gives you information like when it was made and last edited, as well as who edited it last and owns it (I think?). It also shows the word count, character count, and the estimated reading time.

The last option is “get support” and just opens to show you buttons to where to share feedback, find overviews/guides, or contact support from the team.
The left panel is where the main document and all associated drafts are kept. Remember to name your drafts appropriately so you don’t lose them; these can be duplicated, deleted, or renamed at any point.
*Basic formatting includes bold, italic, underline, and undo/redo. Ellipsus’s floating bar has these as well as a shortcut to the formatting menu, indent and unindent, and search. This is “basic formatting” for this review.
On Mobile
Since I first logged in on desktop, I’m not sure if this pops up when you do an initial login on mobile, but there was a pop-up that offered extra guidance in using the site on mobile, though I declined it. This is still a good feature, and not something you stumble on all the time. The site does look and work identically across devices, and the icons used are all identical. This is also a good thing.
On mobile, the basic formatting bar is moved to the top of the screen to account for pop-up keyboards, and side panels are hidden away. Thankfully, across screen sizes, the buttons for basic formatting aren’t absolutely tiny, though this does mean you may have to scroll to access parts of the basic formatting bar depending on the size of your display. The left panel has a “papers” icon on the top left, to the left of the cloud icon, and the right panel is within a “hamburger menu” (the three lines stacked on each other) on the top right, to the right of the bell icon (notifications for collaboration reasons).
Actually typing and working on mobile tends to be a bit buggy, but this is a beta so I’m not going to hold it against them. I’ll likely be using mobile as desktop through landscape full-screen on my iPad instead of vertically. The screen tends not to follow as you write, disappearing behind the basic formatting bar and/or the keyboard, which is a bit annoying. It says it will default to device settings with the double-spacing (expanded below) but doesn’t appear to always work on mobile.
Additionally
There are a few more settings on the right panel in the gear menu on the top right. These include features regarding smart formatting, collaboration, and display. This is the “editor settings” menu.
Smart formatting has quotes (from " to “ when typing quotation marks), ellipses (changing the three periods to one symbol …), markdown shortcuts (*and* such, like Discord), double-space period (tapping space twice will insert a period; unchecked will do as your device does), and en and em dashes (– and — from -; there is an option of “- - for —” or “- - for – as well as - - - for —”).
Collaboration has toggles for live cursors and collaborator avatars for when collaborators are viewing alongside you.
Display allows you to turn off the floating basic formatting bar (desktop/landscape only), turn on “invisible characters” (like paragraph symbols, spaces, etc.) or the word count, and is also where you can change from light/dark/system.
These additional settings (aside from light/dark/system) apply across your account, so you don’t have to do it per device as with other settings.
Actually Writing* With Ellipsus
*I used pre-written things for this review
Ellipsus synchronizes practically immediately. I don’t have anyone else to do this with, but between my own account on different devices, there’s a negligible amount of lag, which is notable considering my laptop is currently trying to die on me.* Different users** (or yourself on another device) are flagged with a colorful live cursor with their display name attached, which moves accordingly and swiftly to wherever they are in the doc, including if they’re navigating through the text using the arrows on their keyboard (for mobile hiding the keyboard might not remove your cursor, and for desktop opening a different window will not remove your cursor). When the other user** (or, again, yourself) highlights something, it is replicated in yellow for the other. The highlighting is surprisingly reactive and can follow per-letter (again, between me, myself, and I).
Spellcheck can add languages, has “accept” or “ignore all” options, offers multiple suggestions for (detected) misspellings, remembers what was “ignored” after leaving the document and returning. This has to be run through for every device you open the document on, which is a pain when you have fifty characters who have names the dictionary has beef with. The English dictionary appears to be on par with LibreOffice (disappointing) (the “se” in “per se” gets marked) (fanfiction will be painted in red). Detected misspellings (whether they are or aren’t) are both underlined and highlighted in red; the “first” detected misspelling with have both a highlight and an underline, but subsequent instances (“inactive” instances that you do not have selected) will only be underlined.
Additional languages currently available (Jan 2025) consist of: English (US, AUS, GB, CA), German, Spanish, French, Italian, Korean, Dutch, Russian, Polish, Portuguese, and Ukrainian.
If you want to change the font or text size, it currently (Jan 2025) applies across the entire document or draft’s corresponding paragraph style. This means the only way to have differently-sized portions in your document at this time is to have an individual paragraph with a different paragraph style (headings 1 through 4, paragraph/body, caption) applied, as they all have different font sizes associated with them.
There is also an optional word count displayed at the top of the screen next to the focus mode icon/notifications (depending on long or tall screen). It does display the word count with commas where appropriate.
My most favorite feature is that you can tab indent the start of your paragraphs. I’m not even kidding I love that so much. I don’t actually like the double-spacing (hitting the enter key twice for a new paragraph) format I do for fanfiction even though it looks better on AO3 that way, but having the ability to insert a tab indent just once and have it automatically carry through to each following paragraph…….. that’s so tasty. I’ve always hated writing on mobile because there’s usually no tab!!! It’s just there on Ellipsus!
Drafts are like a copy of the main document at the time of the draft’s creation. These are stored on the left panel menu and can be accessed simply by clicking them. This is useful more so for collaboration or when you’re struggling to pick an idea you like more. You can create these at any point, and merge them into the main document in order to make the content of the main document match that of the draft chosen.
Drafts can be compared to the main document through the “compare changes” page, accessible either from the “…” menu attached to the draft card on the left panel, or through the button on the right panel when you’re already in the draft. This “compare changes” page is where you’ll be able to do just that; additions are highlighted in green and anything removed is highlighted in red. On mobile you have to swap between the draft and the main document with the highlighted changes, but it’s laid out side-by-side on desktop. You can merge a draft with the main document from here.
You can also just make an empty draft and use it for things like notes and outlines and all that good stuff. They don’t have to be merged at any point. If you want a blank draft, though, you’ll either have to delete the whole doc within the draft or make a base blank draft at the start of your doc’s lifespan to later duplicate to edit when you need/want a blank draft.
*The responsiveness between me, myself, and I is notable because Google Docs lags so much for no reason, even if it’s just yourself on different devices in the same room. I’m doing this across three different browsers (Firefox, Safari, and DuckDuckGo) and three different devices (actively dying Windows laptop, iPhone, and iPad) it’s reactive and barely stutters, as opposed to how Google Docs needs to think about it across… itself (mobile app and Chrome browser, even!). Yes, I tested it to be sure.
**Disclaimer, again, I do not have friends to collaborate with to test otherwise.
Available Fonts
Here are all the currently available fonts (defaulted to 16pt when using the paragraph/body style). Photos* of just a few included because I’m doing this on mobile Tumblr and I can only use a few images so I’m picky. Also, this is all on dark mode, and the text color would be black if I were on light mode.
Baskerville
Caveat (#1)
Comic Neue
Courier Prime
EB Garamond
Inter
Literata (default font)
Merryweather
Monteserrat
Open Dyslexic
Raleway
Whatever this is? Doctor handwriting? Cursive Russian? (#2)
Roboto Mono
Sylexiad Serif (#3)
Ubuntu Mono


*Excerpt used is from the original concept Maddox and Li Hua, my ex-military dragon dad and his dragon daughter, were used in. It was originally in outside POV before I got bored with Darren. Sorry, Darren. (He’s still present later, just not as the POV character anymore.)
Importing
If you have a markdown (.md) file on hand, then go ahead.* Everything else you’re going to have to copy/paste in. Copy/paste will not automatically tab indent paragraphs like I extolled above even if there was a tab indent in the original text copied. The font will likely change to fit whatever you’re using on Ellipsus (it did for me between Liberation Serif -> Literata and Helvetica -> Literata) but it also won’t remove every single bit of formatting, so it’s not a completely exasperating exercise to copy/paste your works over. It won’t copy over things like headings properly, either, though that’s much less of a hassle than having to go back through and add all your italics back in.
For the sake of this review I did make my very first markdown (.md) file and... I honestly don't know what happened but about half of it was stuck in the "code" mode in the formatting section, which I couldn't figure out how to undo, outside of just copying the text (triple-clicking/tapping would select everything within the code block) and pasting it as plain text (ctrl/cmd+shift+v). I'm not sure you can paste as plain text on mobile (couldn't figure it out myself) so I, personally, am not going to be doing a whole lot of uploading previous stuff to Ellipsus. Other than this, importing a single-spaced (hitting the enter key once for a new paragraph) document will merge everything into a "single" paragraph, so I had to go through and separate all my paragraphs again so I could properly indent/unindent/apply other formatting as needed. I'll just completely re-type or batch copy/paste everything else in the future so I can have a better grip on the formatting.
*As stated way up at the start, you can upload a text file to Google Drive, open it in Docs (which makes into a .docx file, which they're working on allowing you to import as well), and then download that file as a .md file. This requires a desktop you can download/upload from. If you've never done this before, you can download as .md (and other file types) through the "File -> Download" section on an open document.
Exporting
This is accessed through the document directly instead of on the dashboard. It’s under “share and export” on the default right-hand panel menu.
You can “share” through two different methods. You can share a link to a document (logged-in users only or anyone with the link), which only allows for viewing the doc with zero editing abilities, and the entire document will be visible. The other option is a “snippet,” which is primarily what you’ll see pictures of when browsing the Ellipsus tag here; it’s a .png of a selected section of text* to create a slightly more interesting excerpt of what you’re working on. This helps your excerpt stand out without having to make it yourself. Example of a snippet with the default white background color:

(Snippets will export in only this font, but you can choose to keep any colored text.)
Exporting the entirety of the main document can be done by downloading as a PDF or markdown (.md) file. You can also copy it as HTML, markdown (.md), or rich text (.rtf). Most notable is a direct export to AO3 button! Ellipsus might tell you your blorbo’s name is spelled wrong, but it’ll let you upload your fic straight from the draft. ([Here’s] the official post about it.)
*You MUST make a selection of text in order to make a snippet; it won’t work if you don’t highlight anything for it to process. It also might be a bit slow, but a bit of patience will get you your .png to share.
Collaborating
… aha. I don’t know anyone currently using Ellipsus to review this with. Here’s paraphrased info off this [link].
Collaborating is done through email: your collaborator(s) have to have an Ellipsus account in order to actually work on the document. Inviting collaborators is done through entering their email, which will send them a link, which will bring them to the site where they will either make an account or log in to access the document. The owner of the document therefore knows the email of any and all collaborators, though other collaborators will only be able to see everyone’s display names. Collaborators can be given one of two roles with different permission levels: “can merge” means they can merge drafts into the main document, edit the main document, create drafts, as well as everything the next level can do; “can edit” can create drafts, edit existing drafts, and use the chat/comments features. Collaborators cannot invite or manage collaborators. Document owners can remove collaborators or change their role/access level at any time.
Information from Discord says this might be laggy and buggy, but the staff is looking into it.
Comments can be left through highlighting parts of the doc/drafts. Chat is a live chat to use while working together, or something, because I can’t test that.
Extras!
Their Discord server consists mostly of adults (age 18 or over) and offers opportunities to find collaborators of all stripes that also use Ellipsus. It has nearly 1600 members at the time of writing, though not everyone has chosen their roles, but of the approximately 500 reactions on the bot’s age role message, only nearly 40 chose the “under 18” role. It is a fairly active social space for the size, and doesn’t have an absolute hoard of channels. There’s even an art channel, with the description reading “original, human-powered art or credited or linked to the respective artist.”
They have a [blog] with resources/templates you can use to get started. You have to scroll through to find them since you can’t sort by the resource tag, but they’re pretty good templates for worldbuilding, story planning, and character information. I would recommend saving these as individual docs on their own and then copy/pasting the templates into the drafts of your stories to keep the information connected to the main doc you’re using it for. (Don’t forget to appropriately name all your drafts so you don’t lose anything.)
They have been in open beta since May 2024. There were apparently nine months of closed beta before this. They are also a former sponsor of NaNoWri(teNo)Mo(re) but [dropped them] when they made the stupid announcement about AI (2024).
Yes, you can use emojis on Ellipsus. Yes, you can have your leads text 🥴 to each other.
They are ellipsus_writes on Twitter/X and TikTok, ellipsuswrites on Instagram, and ellipsus-writes here on Tumblr (as mentioned way back at the start).
#ellipsus#BOUNCY. REVIEW.#if you wanna help me test ellipsus's collaborative abilities hmu asks and dms are open#review#site review#writers on tumblr#writeblr#queer writers#writer stuff#original writing#writing#writers#fanfic#fanfic writing#writing community#writerscommunity#writers community
6 notes
·
View notes
Text
How to Migrate a Store from Shopify to Magento?
Migration from Shopify to Magento is a huge leap for your business, offering it more flexibility, scalability, and advanced features. Though this might seem daunting, having a clear roadmap for making this transition will ease the process. The following is a step-by-step guide to help in successfully migrating:
1. Understand Why You’re Migrating
First of all, before one dives in, understand why Magento is a destination point. Yes, Shopify was perfect for simplicity and ease, but Magento means advanced personalization, better scalability, and robust features. If your current platform starts to limit growth, your Magento 2 Migration will be the cool thing to do.
2. Plan and Prepare Your Data
Start by auditing your Shopify store. After auditing is completed, the Shopify merchant may need to make a note of data to migrate, which would involve details related to a product, customers, orders, and the site's content. Clean up your data-remove all outdated and duplicate entries, to keep data from becoming a disaster later on. In that way, everything will go just smoothly when migrated, and the shop could be arranged more organizedly at Magento.
3. Set Up Your Magento Store
Install Magento on a decent hosting platform or take the help of a hosting service dedicated to Magento. After that, configure some basic settings such as tax rules, currencies, and store language. Choose a theme for Magento that will represent your brand identity and customize it for seamless user experience.
4. Export Data from Shopify
Shopify provides an export facility of data into CSV format. In your Shopify admin, go to the export section and download all the required files: products, orders, customer records, etc. Back up your Shopify store to ensure you will not lose any data while migrating.

5. Data Import via Migration Tools
Magento also allows for imports with some tools, which ease the migration of data. You can use extensions for such migrations, like Cart2Cart or LitExtension, which allow automated transfers. This is because the tools will map data fields between Shopify and Magento to reduce human-induced errors.
6. Test Your Magento Store
Perform a full test of your fresh Magento store before going to production. Verify that every piece of data has migrated correctly and all product descriptions, image captions, and customer details are correct. Ensure your payment gateways, shipping methods, and checkouts work flawlessly.
7. Optimize for Performance
Magento offers advanced caching, scalability, and mobile-friendly features. Set these up to enhance the speed of your site and the users' experience. Install SEO extensions to maintain or improve your search rankings post-migration.
8. Launch Your Store
When everything is tested and optimized, switch your domain to Magento. Keep your customers informed about the migration process, emphasizing the benefits of the new platform, whether it be a better shopping experience or exclusive features.
9. Monitor and Improve
After going live, monitor your store's performance and user feedback. Address any issues quickly and continue optimizing your Magento store to align with your business goals.
Migration to Magento can be rather labor-intensive and take a long time, but the payoff in terms of customization, performance, and scalability is there. If you plan properly, this transition will lay a foundation for your business's success in the long run.
For More information, please visit: https://mageleven.com/magento-migration-services
4 notes
·
View notes
Text
The Ultimate Developer’s Guide to STON.fi API & SDK Demo App

In the fast-paced world of blockchain and decentralized finance (DeFi), efficiency is everything. Developers don’t have time to manually configure and troubleshoot every feature from scratch. What they need is a plug-and-play solution that simplifies complex integrations while maintaining flexibility.
That’s exactly what the STON.fi API & SDK Demo App delivers. This tool isn’t just a sample—it’s a fully functional blueprint designed to help developers seamlessly integrate STON.fi’s token swap functionalities into their projects.
Whether you're an independent developer, part of a startup, or working with an established blockchain project, this demo app can save you hours of coding and debugging while ensuring a smooth user experience.
Let's break it down into why this tool matters, what it offers, and how you can make the most of it.
Why Every Developer Should Pay Attention to This Tool
Building DeFi applications requires precision, speed, and reliability. You’re dealing with real-time token swaps, liquidity pools, and user funds—there’s no room for error.
Developing a decentralized exchange (DEX) or any other blockchain application means working with smart contracts, APIs, and SDKs. The STON.fi API & SDK Demo App eliminates the complexity by providing a ready-made environment that demonstrates how STON.fi’s swap function operates in real-time.
Rather than starting from zero, developers can study, test, and integrate working solutions—accelerating their workflow and reducing risks.
Key Features That Make a Difference
The STON.fi API & SDK Demo App isn’t just a basic code snippet; it’s a structured, well-designed tool for developers looking to integrate token swaps efficiently. Here’s what makes it stand out:
1. Full-Scale Swap Functionality
The demo app provides a complete token swap system, showing exactly how transactions are executed. It includes all the necessary elements, such as price calculations, transaction confirmations, and seamless execution on the TON blockchain.
2. Clean, Modular Code for Easy Integration
Well-documented and structured code allows developers to adapt the swap function to their own projects. This modular approach makes customization straightforward, ensuring that developers don’t have to modify complex backend structures.
3. Real-Time Data & Execution
Blockchain transactions happen in real-time, so any delay or miscalculation can impact the user experience. This demo app mirrors actual trading conditions, allowing developers to test how their systems will function under real-world circumstances.
4. Compatibility Across Different DeFi Platforms
Whether you're building a DEX, a liquidity management system, or a DeFi dashboard, this app is flexible enough to fit into various use cases. Developers can integrate the swap function without restructuring their entire application.
How Developers Can Use This Tool to Their Advantage
1. Speed Up Development Time
Instead of writing swap functionalities from scratch, developers can focus on building unique features and optimizing user experience while leveraging STON.fi’s ready-made framework.
2. Reduce Errors & Improve Security
Errors in DeFi transactions can lead to financial losses or security vulnerabilities. Since the STON.fi API & SDK Demo App is already tested and optimized, integrating its features helps developers avoid common mistakes.
3. Learn & Implement Best Practices
For developers new to blockchain integrations, this demo app serves as a learning resource. Studying how STON.fi’s swap function is structured provides valuable insights into writing efficient, scalable, and secure blockchain applications.
4. Scale DeFi Projects Without Hassle
As blockchain projects grow, they need scalable, efficient, and user-friendly solutions. The STON.fi demo app ensures that token swaps remain fast and seamless, regardless of transaction volume.
Who Should Use the STON.fi API & SDK Demo App
This tool is built for a wide range of developers, including:
Blockchain Engineers – Those integrating token swaps, liquidity pools, and DeFi features into their projects.
DeFi Startups – Teams looking for efficient solutions without spending months on development.
Crypto Enthusiasts – Developers exploring blockchain functionalities and testing real-world DeFi integrations.
Tech Entrepreneurs – Anyone looking to build scalable financial applications on the TON blockchain.
Final Thoughts: A Must-Have for Blockchain Developers
For any developer working in the DeFi and blockchain space, the STON.fi API & SDK Demo App is an invaluable resource. It streamlines the process of integrating token swaps, saves development time, and ensures that applications run smoothly and efficiently.
With clear documentation, real-time execution, and a flexible framework, this tool isn’t just a demo—it’s a blueprint for success. Whether you’re building your first DeFi project or optimizing an existing platform, this resource is designed to help you get the job done faster and better.
For developers who prioritize efficiency, security, and scalability, this is a game-changing tool that simplifies one of the most critical aspects of DeFi application development.
4 notes
·
View notes