#beginner's tutorial
Explore tagged Tumblr posts
Visit Tumblr Blog
Explore Tumblr blogs with no restrictions, modern design and the best experience.
Last Seen Tumblr Blogs


Fun Fact
Tumblr’s reach among the 26-to-35-year-olds in the US is 11%.
Text

holy shit is that an Evbo 360™️
#parkour civilization#evbo#my art#decided to try out animating#immediately let my hubris get the better of me#every beginner animation tutorial: start by trying to animate a bouncy ball#me: no
8K notes
·
View notes
Text
youtube
Insights Sequential and Concurrent Statements - No More Confusion [Beginner’s Guide] - Part ii
Subscribe to "Learn And Grow Community"
YouTube : https://www.youtube.com/@LearnAndGrowCommunity
LinkedIn Group : https://www.linkedin.com/groups/7478922/
Blog : https://LearnAndGrowCommunity.blogspot.com/
Facebook : https://www.facebook.com/JoinLearnAndGrowCommunity/
Twitter Handle : https://twitter.com/LNG_Community
DailyMotion : https://www.dailymotion.com/LearnAndGrowCommunity
Instagram Handle : https://www.instagram.com/LearnAndGrowCommunity/
Follow #LearnAndGrowCommunity
This is the Part ii of last Video "VHDL Basics : Insights Sequential and Concurrent Statements - No More Confusion [Beginner’s Guide]", for deeper understanding, and it is very important to have deeper insights on Sequential and Concurrent statement, if you are designing anything in VHDL or Verilog HDL. In this comprehensive tutorial, we will cover everything you need to know about VHDL sequential and concurrent statements. Sequential statements allow us to execute code in a step-by-step manner, while concurrent statements offer a more parallel execution approach. Welcome to this beginner's guide on VHDL basics, where we will dive into the concepts of sequential and concurrent statements in VHDL. If you've ever been confused about these fundamental aspects of VHDL programming, this video is perfect for you. We will start by explaining the differences between sequential and concurrent statements, providing clear examples and illustrations to eliminate any confusion. By the end of this video, you will have a solid understanding of how to effectively utilize sequential and concurrent statements in your VHDL designs. This guide is suitable for beginners who have some basic knowledge of VHDL. We will go step-by-step and explain each concept thoroughly, ensuring that you grasp the fundamentals before moving on to more advanced topics. Make sure to subscribe to our channel for more informative videos on VHDL programming and digital design. Don't forget to hit the notification bell to stay updated with our latest uploads. If you have any questions or suggestions, feel free to leave them in the comments section below.
#VHDL basics#VHDL programming#VHDL tutorial#VHDL sequential statements#VHDL concurrent statements#VHDL beginner's guide#VHDL programming guide#VHDL insights#VHDL concepts#VHDL design#digital design#beginner's tutorial#coding tutorial#VHDL for beginners#VHDL learning#VHDL syntax#VHDL examples#VHDL video tutorial#VHDL step-by-step#VHDL Examples#VHDL Coding#VHDL Course#VHDL#Xilinx ISE#FPGA#Altera#Xilinx Vivado#VHDL Simulation#VHDL Synthesis#Youtube
1 note
·
View note
Text


Here are some painting tips, as promised. I hope they will help beginner artists!
Composition
Position of characters on the sheet
Choose the location of your character to be beneficial to the appearance of the art in general, you can accentuate the important places where the viewer should look first by using perspective and composition.
Tone sketch
Set the lights based on references, but adjust to your own, favourable lighting.
Contrasts come in many forms. Contrast in color (warm and cold), values (dark and light), shapes soft and hard, straight and curve, etc.
Less is better. Work on the details of the most important part of your work while cutting down everything else. If you do strong detail in one place, don't forget to add looser detail in another so the viewer's eye can rest. For example: If you are detailing a portrait, don't detail the background as much. Next to a place of high detail, there should be a place of low detail so that the picture does not look overloaded.
All in all, you can twist and break perspective, anatomy and shapes to convey your idea better. No rules are made of steel, they should support your imagination, not restrict it
Anatomy
Break down objects into simple shapes to arrange them in space.
Check references! plasticity comes first, then structure (muscles are important, but proportions and line of movement come first).
Take a photo of yourself, you will be able to understand how to perform your pose naturally. Color/light.
Light is part of the composition, put it in a way that highlights the important things. Air perspective
General rules of composition. From the general to the particular, first prepare the general scene, correctly place contrasts and accents, make everything important in contrast, and take the unimportant into an aerial perspective. (aerial perspective, or atmospheric perspective, refers to the technique of creating an illusion of depth by depicting distant objects as paler, less detailed, and usually bluer than near objects.)
When all the points are ready we can start working out the details.
When all the details are finished again it's back to the overall picture, looking at it from a distance. Check if the accents you wanted to draw attention to are working. They should have the highest contrast. Check if the contrast is not created by objects on the edges, where you don't want the viewer to pay attention. For example, if you are painting a portrait then the focus should be on the face and not on the details of the clothes or details in the background. (You can always convert the image to black and white and check the contrast)
Save the stages of your work to check against the initial idea and see what things have changed for better or worse!
#digital art#art tips#beginner artist#small artist#digital artist#art advice#art tutorial#art guide#step by step#drawing basics
753 notes
·
View notes
Text

just a little tip for digital artists.
Follow for more ☕🌿
#art blog#artistsupport#art help#beginner artist#artists on tumblr#art tips#art tutorial#art tumblr#artist spotlight
2K notes
·
View notes
Text
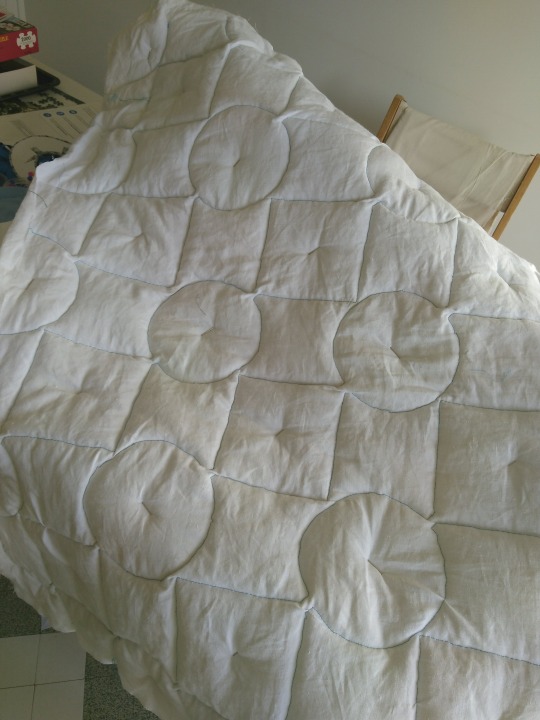
First Quilt!
It has been a lot of fun and a lot of trial and error but it's done!!!

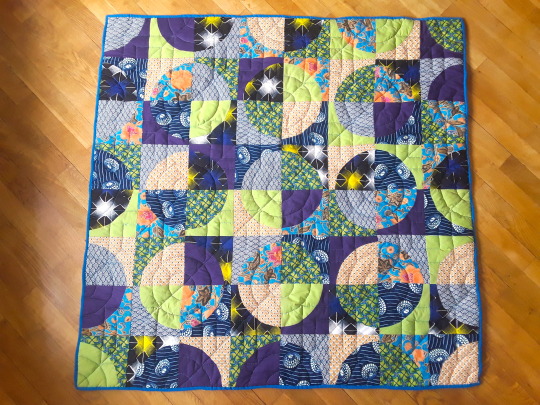

It's roughly 1.20 x 1.20m (which is a number of feet I can't be bothered to look up but let's say it's about child sized and it'll be great to chill on the couch).
I want to thank @langdon813 who I've never talked to (sorry if you hate being tagged) but whose gorgeous Drunkard path quilts made me wanna do it too :)
I had never done any quilting before (but I did sew), so here's what I've learned, if any beginner is interested in jumping off the deep end the way I did and wants advice from someone who has freshly acquired experience but will also not use any confusing technical terms (with pictures!) :
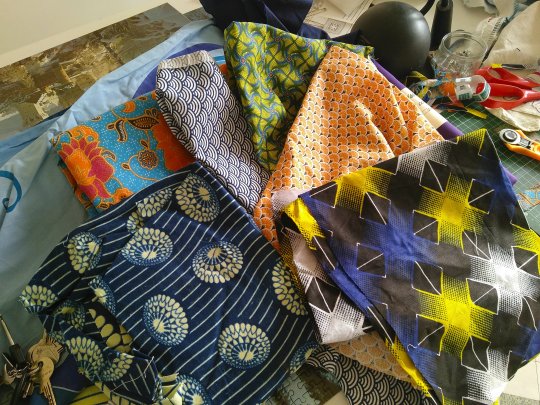
Fabric picking : so most advice I read was to go for pre-selected bundles of fabric that already go together, but I'm contrary and like to do my own thing so I used wax fabric (the blue ones on top the pile) I had laying around, which I strongly recommend: it's very easy to cut due to it being waxed, and I added a few fat squares from the shop, plus I also had the orange and blue floral and I based the coulour scheme on it. One thing that's true is it would have been easier to work with fabric of the same thickness, and the floral was givne to me by my ma who got in on trip to Thailand and it was alot thinner than the rest which didn't help.
Cutting: I got a rotary cutter for the occasion and it's great! Do not maybe push too hard on it and give yourself nerve damage the way I did (temporary but still), it's actually ery sharp and easy to use, so long as your template doesn't slip you're fine
Piecing :Yes you can do curved piecing even if you have zero experience, you just gotta make a template and
pin it a lot.
1/4 inch margins is the standard so I rolled with it because I don't like converting, but when you're strictly metric it is kind of annoying but doable because my machine does have a 1/4 inch mark and if you stick a length of tape along it it's pretty easy to follow, even for curved piecing.
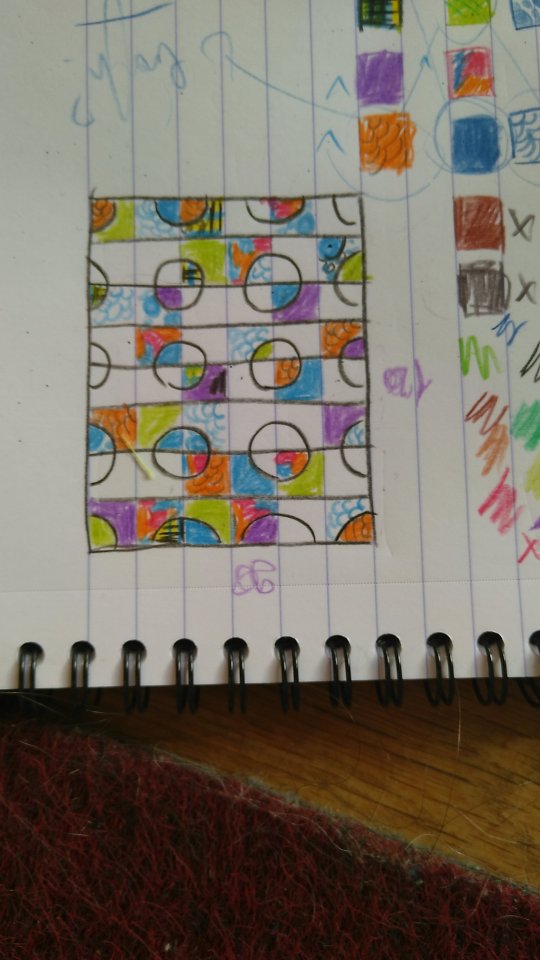
Layout: At some point you've got to decide the layout is done, because I've re-arranged the blocks at least 6 times and it's a very good way to go insane. (For rough reference, my plan was to have no repeat fabrics in any of the circle-in-a-square blocks, and I only made one mistake which I clocked too late to change)
Chain piecing!! Meaning you pile your blocks together in a specific order (that I personnaly wrote straight up on each piece with a very sophisticated letter/numbers down/across system) and then just sew them together in a line without having to cut the thread between each pair. Looks a little like a fanion banner and at some point it feels like you'll be forever tangled into it but then it's magic :) It's not that hard actually and will save you a lot of time + there's a lot of online tutorials you can use.
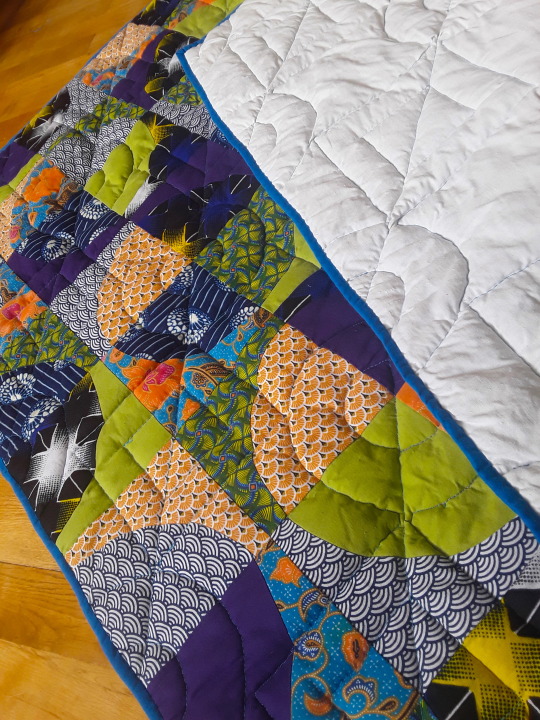
Basting! (which it took me while to understand is the part where you attach the backing, the fluff and the quilt top together) : you need more safety pins. Safety pins will save you from the wrinkles and the unfortunate oopsies of realising you've caught your backing double folded into your quilting stitch, which I did a good three times and was not fun to undo. Also, I forgot to tape the backing to the floor and it probably would have helped with the wrinkling...
Backing : I used an old linen table cloth I got for 10€ at a charity shop, and I've still got about 2/3 of it left, so I recommend that, it's sturdy but soft enough, doesn't thread easily and can be washed at very high temps, if that's a thing you do.
Quilting! Well, my machine came with a quilting foot for free motion quilting (which means you're the one moving the fabric along in whichever direction and you can sort of draw with your stitches) and it seemed fun so I did that, and here's what I learned : curves are hard but doable, also my machine doesn't like to go back (kept skipping sitiches for some reason) so it involves a lot of shifting the quilt around, which isn't easy considering the bulk. And also, drawing the quilting pattern you want so you can follow it while quilting actually does help, I used an iron/heat-erasable pen and it worked just fine. Check your stitch tension, mine was too loose and I realised too late so there's spots where I could pull on the thread and it looped, had to stitch back over that.
Quilitng pattern : I wasn't sure what to do, supposedly your batting (aka: the fluff) comes with instructions on how tight you should quilt to avoid it coming apart through use but I got mine cut at the fabric shop and forgot to ask so I just rolled with a rough 10cm maximum distance in between stitching lines but tried to do less in most places. According to many blogs : the tighter your lines the stiffer your quilt, so I kept it loose for comfort. (Picture is halfway done, I added a smaller square/circle inside each square/circle and if you look at it you'll see it's actually diagonal lines form one end of the fabric to the other.)
Binding is boring, and there's nothing to it. I got a length of pre-cut bias binding, machine-sewed it front to front to the quilt top side of the quilt and the folded it back and secured it by hand to the back with a ladder stitch. Took me roughly and entire rewatch of the Last Of Us. There's a trick to doing the corners that's fairly simple but I've lost the tutorial...
Overall : I got myself a quilting book with techinques and such and it helped, but there's a ton of stuff online, and once you get over the very Christian American mum vibe of most of the blogs, it's all very helpful (and gorgeous!) (no offense meant to Christian American mums, it's just a bit of a culture shock from where I'm standing).
#quilting#quilters of tumblr#quiltblr#quilt tutorial#quilt pattern#quilt#drunkard path#home sewing#sewing#sewing project#beginner's quilt#beginner quilting
181 notes
·
View notes
Text
youtube
Today's cosplay post is a tutorial! I sat down and put together a full breakdown on how I use fabric painting to get my cosplay details. In this world where it seems like everyone on the big social media pages has an embroidery machine, a desktop laser cutter, and a heat-transfer vinyl workflow, I feel like sometimes we need to get back to basics and understand how to achieve clean finishes without a $2k overhead.
Video is fully captioned using the script I read from (not auto-generated captions!) And includes timestamps for different parts of the process. I recreated Marcille's t-shirt from one of Ryoko Kui's illustrations in this video, but it's useful for way more than just shirts!
I've never tried my hand at video tutorials before so I hope this is helpful!
#cosplay tutorial#cosplay how to#fabric painting#painting tutorial#beginner tutorial#cosplay reference#cosplay ref#reference#dungeon meshi#delicious in dungeon#cosplay#my posts#Youtube
136 notes
·
View notes
Note
I just got your art class and I’m so excited!!!!! I was wondering (a) if there was any music/playlists you like to listen to while you draw and (b) what are your thoughts are on us postingg/sharing any art we make during it? I LOVE ur art I’m so excited to start :DDDD
ajdbsjs THANK YOU FOR YOUR SUPPORT!!
Also if anyone else was interested, you still have LESS THAN A DAY to sign up for my Beginner Character Course!
92 notes
·
View notes
Text

Easy Cherry Keychain, a beginner-friendly amigurumi video tutorial designed by Tatiana Didichenko on Ravelry.
#crochet#full pattern#crochet pattern#free crochet pattern#fiber art#fiber crafts#beginner friendly#keychain#cherries#fruit#food#video tutorial
70 notes
·
View notes
Text
Playing Dwarf Fortress, and so are a few of my friends now, so I figured I’d document some common pitfalls I know of, and how to avoid them.
Strange Moods:
-Best way to handle these?
First, build one of each of the following workshops: Craftsdwarfshop, Carpenter’s, Stoneworker’s, forge (either kind), jewelers, glass kiln (any kind), kiln (any kind), bowyers, mechanics, leatherworks, & clothiers. This is all the different types of workshops a dwarf may claim. Don’t worry about fueling a workshop, moods don’t need fuel.
Second, ideally try to keep a supply of at least one of the following items: A boulder, a log, a block, a bone, a cloth, metal bar, an uncut gem, a tanned hide, raw glass, and a cut gem. This is roughly all materials a dwarf may demand for their artifact. Tbh, you *can* cut gems (or polish stones) when a mood occurs, but it’s easier to keep a few on hand prior. Generally they need one item based off the workshop type they claim, then the rest seems to be somewhat random/based on their likes. Each time they collect an item for their artifact, it resets the timer for insanity. Generally in my experience dwarves really tend to grab boulders a LOT. But that’s based off my total experience, my recent experience has been a lot of bars, so it depends on what the dwarf’s workshop chosen is. I’ve been having a lot more metal required because most of my artifacts have come from my metalsmiths
If they’ve been standing at the workshop for a while, bring up their menu and see if they’re crafting the object, or shouting. If they’re shouting, it will cycle through hints or outright stating what the dwarf wants for their artifact. Generally artifacts are WORTH getting a hold of because it gives the dwarf a significant skill boost & a high value item. Worst case you put it in a display case somewhere to boost room value
Animals:
-My animal starved to death!
This only happens to grazers. You need to set up a pasture somewhere with some kind of growth on the soil. At the beginning you’re going to be limited to the green surface grass. If you want to keep them underground, you’re going to have to dig into one of the caverns, which will trigger some sort of fungal growth on underground natural tiles within your fort. Surprisingly as it may seem, this is perfectly safe for your farm animals to eat. Generally a rule of thumb is, if it is egg laying, or smaller than a dog, it is not a grazer, and does not need soil/some grass like substance to survive.
-My animal starved to death in a cage. Why won’t my dwarves move it!
So, going with the above, a pasture zone must be marked, and then animals must be assigned to those areas. After setting up a pasture, click the icon with a plus over a horse to assign animals to it. Any semi-domesticated animal can be assigned to a pasture.
-Why won’t my chickens lay eggs
They need a nest box to lay eggs in. Generally place a pasture somewhere (I like to do it underground as I have yet to find a grazing egg-layer) and build nest boxes there. Dwarves will automatically harvest eggs from the boxes, including fertile ones which may make farming for leather/meat harder. You can seal the room and forbid entry until the eggs hatch, and then forbid them, or have no stockpiles accepting eggs. Then eggs will only be taken by cooks, and only when they’re cooking.
Migrants:
If you are struggling attracting migrants, a major factor is your exports. Basically fortress wealth, and wealth exported are two of the factors that determine your migrant waves, the last factor is the health of your civilization, which is basically just the population. Weirdly enough, migrants are built different, as I’ve played in dying civs (one SURFACE fort with 20 dwarves, this was the only NPC settlement for my Civ) and had migrant waves of 30+ dwarves. Basically the more high value goods you make, and the more you trade them, particularly with the home caravan, the more migrants you’ll get.
Children:
Dwarves only produce children if they’re married, and the parents have time to… get intimate. Fortunately the getting intimate is more “having idle time in a bedroom together” at which point, if it’s a married male/female pair, the female will become pregnant. The game does not display information on pregnancy at all, and all pregnant creatures will just carry on their normal business until they give birth, at which point a dwarf will abandon her current task to “seek infant” at which point they will pop out a baby, you will get a notification of this, and they will pick the child up and go back to doing tasks. Dwarves are capable of having multiples, and I have seen twins, triplets, and even a very weird case of quadruplets… which is its own story.
Trading:
Of the four types of civilizations that exist, you can trade with 3 of them. Elves trade in the spring, humans in the summer, and dwarves in the autumn. Each offer different advantages… mostly… to trading with them.
-Elves:
Generally the most annoying and least useful trading partners. Trading them anything made from wood or an animal product upsets them, instantly ending the trades, and sending them home. If this happens enough, they will declare war and begin sieging your fort. Generally elves are great for selling low-quality stone, (green) glass, or metal objects to. Silk and cloth can be safely traded, but yarn cannot. Generally it’s best practice to only trade rock, green glass, and metal objects to avoid offending them. Due to elves not sending merchant nobles to negotiate, they have no export requests for better trading, and you cannot request imports from them. Despite this, they can make an excellent source of exotic animals, cheap barrels, or offer a way to trade rock crafts for food.
-Humans
Humans know a good deal, and actually care about trade. Humans tend to reach out among the first outsider civs to trade with you. They don’t always send a merchant nobles, but once you have a baron or higher, they tend to much more frequently. Humans are amazing trading partners as they offer unique trading resources from dwarves. They have no offendable rules either, but they actually do defend their goods. They can be reliable for exporting in rare crops, seeds, or other materials, and they will happily trade you pretty much anything they have access to. So while you can’t get steel from them, you can get surface crops, more varied animals, and bladeweed dye and other fabrics.
-Dwarves
Without player intervention, you will only usually receive a Dwarven caravan from your home Civ. You can by contacting other Dwarven civs get other civs to send merchants to your fort as well. Dwarven caravans are much like human caravans, but carry steel. They also only carry crops and items unique to their Civ, which is usually pretty much exactly the same as yours. Dwarves do also send merchants to negotiate import/export deals as well, notably the outpost liaison being your factions representative.
-Getting new trading partners
Send a squad out to an uncontacted Civ and set the mission to “demand one-time tribute” civs either pay the tribute, or reject it, and it seems to have little impact on the civ’s opinion of you/your fort. Once this is done, they can start, and often do, sending caravans your way when the correct season starts.
-Getting better trade goods/merchant nobles
Traders bring more goods the more profitable trading was with you historically. So the more you trade, the more they bring. So if a trader brings nothing of interest to you, you buy nothing, and they leave, next year, they are likely to bring even LESS. So to prevent this, it can be a good idea to buy things even if they aren’t that useful. I commonly try to buy all the food I can from the merchants, as I can usually use it, and it encourages the merchants to take more items, which can end up being items like codexes/scrolls that I really want. Likewise the more successful the trades are, the more likely they are to send a noble for trade agreements. They don’t always send them though, so it is possible to miss them for a few years, even when trading seems to be going fine.
Hospitals:
-You will need a hospital before you think you do. But you do not need a Good one really. A basic hospital is something like a few beds & tables in a room together. You should also have a water source, some buckets, a textile industry, and some splints/canes. The only specialty thing you really need is a single traction bench. Just make a table, rope and mechanism, and combine them for a traction bench at a mechanics. Soap isn’t strictly necessary early on, nor is having security in the hospital. Bleeding out on the hospital floor is a major improvement to bleeding out anywhere else.
-Soap
It reduces infections and will lower mortality rates, but generally a hospital itself will do a more significant job at that. Still if you need to make it, you need at least 5 buildings roughly. Soap needs lye, which needs ash and needs to be made in an Ashery and a wood furnace respectively. Soap also needs either an oil, or a tallow. Oil is made at a screw press from certain plants, tallow is made at a kitchen from roasting fat. Fat is gathered at a butcher from butchering (animal) corpses
This is it for part 1. If there’s other questions or tips, I can do a part 2
63 notes
·
View notes
Note
hey mindy mindy its me again (after that chaotic love poem lmaolmao) mwah mwah can u do like a notion guide post ?? like what would be helpful to add and also how you set yours up?? that would be so so helpful ilyily have the best day and sleep tight mwah mwah kiss kiss love xoxo, emily
hey emily! ✧
omg hi again!! (the love poem chaos was iconic btw, never apologize for that) you truly are my biggest fan (and i'm yours <3)
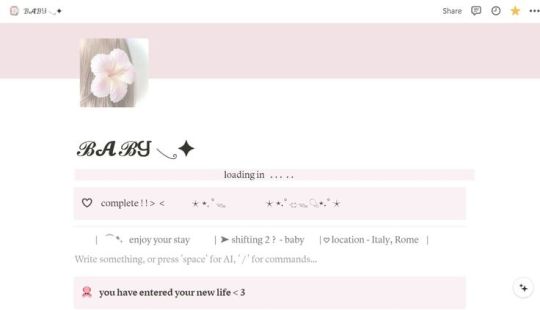
✧・゜: my notion setup: organized chaos but make it cute :・゜✧:・゜✧


so you asked about my notion setup and i'm soo excited to share because i've gone through approximately 500 iterations before finding what actually works for me! and by "works" i mean i've stuck with it for more than 3 weeks which is honestly a personal record.
the thing with notion is that it's so customizable it can be overwhelming?? like, i spent more time watching "perfect aesthetic notion tour" videos than actually using the app for the first month. classic me behavior.
⋆.ೃ࿔:・ getting started (without spiraling) ・:࿔ೃ.⋆
first things first - don't try to set up your entire life system at once! i made this mistake and abandoned notion for 2 months because it felt too overwhelming.
start with ONE area that's currently chaotic in your life. for me it was school assignments because i kept forgetting deadlines until 11pm the night before (and then panicking while eating peanut butter straight from the jar… not recommended).
my biggest tip is to not get caught up in making it pretty right away. i know that's like, counterintuitive coming from me, but functionality first, then we make it cute!
⋆.ೃ࿔:・ my actual setup ・:࿔ೃ.⋆
homepage: i have a super simple homepage with links to my main dashboards (school, blog, personal) and a little daily quote that changes. also a tiny photo of my cat judging me for motivation.
school dashboard: this is my most used section! i have a calendar view of assignments, a database of all my classes with linked notes, and reading tracker. the best part is the assignment database where i can filter by due date and subject.
blog dashboard: where i keep all my post ideas (like this one!), content calendar, and stats tracking. i also have a section for brands i want to work with someday (manifesting!).
personal dashboard: this has my habit tracker, journal prompts, and goals. i also keep recipes here because i was tired of screenshots getting lost in my camera roll.
reading nook: where i track books i've read/want to read with little ratings and notes. sometimes i write embarrassingly emotional reactions to plot twists that no one else will ever see.
⋆.ೃ࿔:・ the actually helpful stuff ・:࿔ೃ.⋆
okay so beyond the basic setup, here are things that have made notion actually useful for me:
templates!! i have templates for everything - blog posts, class notes, weekly planning. it saves so much time not starting from scratch.
linked databases are literally magic. i can have the same information show up in different places filtered different ways. like my assignments appear on my homepage as "due this week" but in my school dashboard i can see everything.
embeds are underrated. i embed my spotify playlists, google calendar, and pinterest boards so everything's in one place.
toggle lists for anything lengthy. they keep things looking clean but you can expand when needed.
color coding that actually means something. i used to just pick pretty colors but now each color has a purpose (red = urgent, blue = school, pink = blog, etc).
⋆.ೃ࿔:・ making it pretty (because we still care) ・:࿔ೃ.⋆
once the functionality is working, THEN we make it cute:
i use a consistent color palette across all pages (mostly soft pinks, lavender, and sage green)
custom icons for each page (there are free packs online or you can use emojis)
cover images that are cohesive (i use pinterest)
font consistency! i stick with the same headings and text styles
little decorative dividers between sections (just search "aesthetic dividers" and you'll find tons)
⋆.ೃ࿔:・ my honest thoughts ・:࿔ೃ.⋆
the truth is my notion isn't instagram-perfect all the time. some sections get messy when life gets busy, and that's fine! the beauty of it is you can always clean it up later.
the pages i actually use daily are pretty simple. it's the ones i rarely visit that look the most aesthetic (because they're not battle-tested with real life, lol).
start simple, find what actually helps you, and then make it pretty enough that you want to use it. that's the real secret!
let me know if you want more specific details about any part of my setup! i could literally talk about this forever (as you can probably tell from this novel of a response).
sending you the most organized vibes! hope this helps!!
xoxo, mindy 🤍
p.s. sleep tight to you too! currently writing this at 1am because i have no concept of proper sleep schedules
#notion setup#notion guide#notion tips#notion organization#notion for students#notion tutorial#notion templates#notion dashboard#notion aesthetic#notion for beginners#notion productivity#notion planning#notion school#notion blog#organization tips#digital planning#productivity system#student organization#notion layout#aesthetic organization#notion for bloggers#digital organization#notion workflow#notion hacks#productivity tips#organization system#digital planner#notion tour#study organization#study tips
41 notes
·
View notes
Text
youtube
VHDL Basics : Insights Sequential and Concurrent Statements - No More Confusion [Beginner’s Guide]
In this comprehensive tutorial, we will cover everything you need to know about VHDL sequential and concurrent statements. Sequential statements allow us to execute code in a step-by-step manner, while concurrent statements offer a more parallel execution approach. Welcome to this beginner's guide on VHDL basics, where we will dive into the concepts of sequential and concurrent statements in VHDL. If you've ever been confused about these fundamental aspects of VHDL programming, this video is perfect for you. We will start by explaining the differences between sequential and concurrent statements, providing clear examples and illustrations to eliminate any confusion. By the end of this video, you will have a solid understanding of how to effectively utilize sequential and concurrent statements in your VHDL designs. This guide is suitable for beginners who have some basic knowledge of VHDL. We will go step-by-step and explain each concept thoroughly, ensuring that you grasp the fundamentals before moving on to more advanced topics. Make sure to subscribe to our channel for more informative videos on VHDL programming and digital design. Don't forget to hit the notification bell to stay updated with our latest uploads. If you have any questions or suggestions, feel free to leave them in the comments section below.
Subscribe to "Learn And Grow Community"
YouTube : https://www.youtube.com/@LearnAndGrowCommunity
LinkedIn Group : https://www.linkedin.com/groups/7478922/
Blog : https://LearnAndGrowCommunity.blogspot.com/
Facebook : https://www.facebook.com/JoinLearnAndGrowCommunity/
Twitter Handle : https://twitter.com/LNG_Community
DailyMotion : https://www.dailymotion.com/LearnAndGrowCommunity
Instagram Handle : https://www.instagram.com/LearnAndGrowCommunity/
Follow #LearnAndGrowCommunity
#VHDL basics#VHDL programming#VHDL tutorial#VHDL sequential statements#VHDL concurrent statements#VHDL beginner's guide#VHDL programming guide#VHDL insights#VHDL concepts#VHDL design#digital design#beginner's tutorial#coding tutorial#VHDL for beginners#VHDL learning#VHDL syntax#VHDL examples#VHDL video tutorial#VHDL step-by-step#VHDL Examples#VHDL Coding#VHDL Course#VHDL#Xilinx ISE#FPGA#Altera#Xilinx Vivado#VHDL Simulation#VHDL Synthesis#Youtube
1 note
·
View note
Text

Mayblade 2025: Eyes + Galaxy 🌌👀
I found this super helpful tutorial on how to make Chibi faces on Procreate, and followed it to make this cute little Tyson. Added some starry vibes to his eyes and the background to fit the prompts 😆
Tutorial Link
#mayblade#mayblade 2025#takao kinomiya#tyson granger#beyblade#bakuten shoot beyblade#the tutorial super east for beginners like me to follow#i'm making a few more chibi charas as well#maybe will be up in 2nd half of the event#my art#art stuff
33 notes
·
View notes
Text
Follow for more tips and tricks 🌿☕️Stay healthy.
#art blog#artistsupport#art help#beginner artist#artists on tumblr#art tutorial#art tips#artist spotlight#art tumblr
1K notes
·
View notes
Text
i spent maybe 2 hours animating this, and then 2 hours trying to export it... before downloading an entirely new animation program that lets me do it with one click

NEVER download a program called opentoonz, download tahoma2d instead and save yourself the headaches
#you all have to look at this now because of the pain i went through to make it export#shout out to alan becker on youtube also for his walk cycle tutorial! very informative and beginner friendly#myart#opentoonz#tahoma2d#animation#myanimations#gif
26 notes
·
View notes
Text
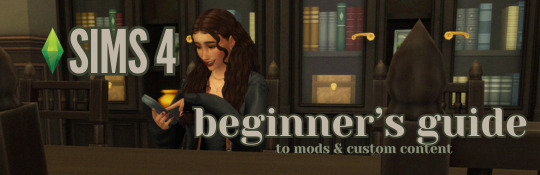
this guide is specifically for my friend mel <3 but of course anyone is free to reference it x
𖡡 you've downloaded the game, played around a little bit, and now you're looking to add mods and custom content (cc) into your game
────୨ৎ────
this game is basically nothing without mod and cc creators, so all credit and love to them ♡
step 01: setting up your mods folder
open file explorer, go to documents, and find the folder labeled electronic arts. then click on the sims 4.
you'll see a folder labeled mods - pin it to quick access [this will make accessing it easier]
step 02: downloading mods and cc
you can find cc and mods so many ways!! tumblr, youtube, pinterest, instagram, etc. there are a lot of blogs on tumblr specifically for cc finds too
make sure you're downloading things from a reliable source. for example - a creator's patreon/tumblr or website, simfileshare.net [often linked as sfs], google docs, curseforge, itch.io, and *unanimously hated* thesimsresource.com → the sims resource is hated because of all of the fucking ads lmaooo
you'll be downloading package files and zip files. you'll find them in your downloads in file explorer
step 03: installing mods and cc
navigate to downloads in file explorer
package files can be simply dragged into the mods folder
zip files need to be extracted, then you can drag and drop the unzipped folder into your mods folder → whatever you put into your mods folder can only be one extra folder deep or it won't show up in your game
when it comes to mods [not cc], creators will often have instructions for you. follow those exactly
step 04: mods + game updates
sometimes mods break when there's a game update. it's just a very annoying part of the game at this point lol
some mods will have a pop-up in the game letting you know it needs to be updated. but if it doesn't and you notice something is fucked up, you can google 'broken mods' and usually someone else will be having the same problem and can let you know to update it
if a mod is broken, remove it from your mods folder and go download the new version from the creator → a lot of mod creators update very quickly [like the same day or within a couple days] but sometimes they don't. just be patient and check for updates periodically
recommended: the sims 4 mod manager // dl here → the mod manager will allow you to see and deactivate or remove mods and cc from your game [it's automatically connected to your mods folder and can be helpful when you can't find broken mods or cc]
gameplay mods i recommend
mccc by @deaderpoolmc // dl here ✧ gives a you a lot of control of your game
tool by @twistedmexi // dl here ✧ place and size things however you want
better build/buy by @twistedmexi // dl here ✧ gives you easier access to things in build/buy that you'd normally have to use cheats for
relationship and pregnancy overhaul by lumpinou // dl here ✧ more realistic gameplay [this one is essential!!]
lgbtqia+ by lumpinou // dl here ✧ gender identity, gender affirmation and transition, self-discovery, coming out, dating apps and lot traits [i love this mod so much!!]
healthcare redux by adeepindigo // dl here ✧ adds illness, injury, chronic conditions, allergies, medical emergencies, etc
childbirth mod by @pandasamacc // dl here ✧ good for family gameplay
snbills by @simrealist // dl here ✧ bank accounts
also want to mention milk thistle & sunblind by @softerhaze ✧ the lighting with these mods is *essential* pls check them out!!
create-a-sim [cas] mods i recommend
cas backgrounds // you can download mine here but i also love vyxated ✧ these are just extra fun!! you can find a lot on tumblr or youtube to download. it's a super easy drag and drop into your mods folder. but when you want to change it, make sure you remove the current one or it won't work!!
gentle cas lighting by northerin siberia winds // dl here ✧ replaces the ea lighting in cas with a softer glow and shadows
any cas lighting by helgatisha // dl here ✧ i like the colors they have!!
custom content [let's make your sims hot!!]
cc creators i love: @kumikya @dogsill @aladdin-the-simmer @arethabee @imvikai @jius-sims @northernsiberiawinds @oakiyo @its-adrienpastel @daylifesims @twisted-cat @madlensims @miikocc @obscurus-sims @evoxyr @powluna @pralinesims @simandy @sentate @simstrouble @christopher067 @aharris00finds @bluecravingcc @crypticsim @gorillax3-cc @gegesimmer @frzrbunny @greenllamas @lisatrait @joshseoh @liyahsim @thatonegreenleaf @trillyke @waterlily0210 @clumsyalienn @johnnysimmer @lamatisse
────୨ৎ────
anyways mel, i really enjoyed making this for you and i hope you enjoy the game!! <3
#sims4guide#sims 4#the sims 4#ts4#gameplay mods#cas mods#create a sim mods#sims 4 mods#sims 4 cc#sims 4 guide#cas#simblr#cc finds#sims 4 game mods#sims 4 beginners guide#ts4 beginner guide#mod tutorial#cc tutorial#sims 4 cc creators#sims 4 mod creators#where can i find sims 4 cc#the sims community#sims community#create a sim#cas lighting#cas backgrounds#lumpinou mods#pandasama mods#adeepindigo mods#mccc
26 notes
·
View notes
Text
Got today's video up a bit early compared to the last few! 😅
youtube
#onionart#🧅 art#beginner artist#small artist#small youtuber#small account#small creator#small channel#small youtube#youtubevideo#youtuber#youtube channel#youtumblr#youtube#diy projects#diy craft#diy#tutorial#recycling#recylcing#upcycling#upcylced#art storage#art supplies#organization
34 notes
·
View notes