#but with the ea app? no such option
Text
the way i wish my game was in english so i could do cute gameplay posts using its notifications etc. 💔
#no way am i trying my luck and reinstalling the whole fucking game just to see if ea app asks me what language i wanna use#ppl dont get the popup at all and that would be the biggest waste of time given how heavy the game is#really wishing i changed my game language through origin back when it worked 💀#because apparently you could do that then#but with the ea app? no such option#the fact that ts4 doesnt have an in-game option to change languages… i’m not even gonna comment on that lmao annoying shit!!!!!!!#text#i saw a workaround that requires changung some scripts but it was posted 9 years ago when the game was first introduced soooo#i have no trust for that#😭#if u have any experience with this issue pls tell me your solutions
8 notes
·
View notes
Text
mass effect legendary edition? more like mass effect no big nose edition what da hell :(
#op#mass effect#mass effect legendary edition#they hate my ass#in the og games you had at least 2 good nose options. one licherally just like mine and one a bit bigger and now it has neither :((((#the biggest nose is still so small comparatively#someone tell me there's a mod out there for that#or if i can like somehow port my reg shepard to this version#also what da hell i have to have the ea app again??? i licherally just uninstalled it last month augh#pain suffering#least it was only like $13
1 note
·
View note
Text
everyone: The Sims 3 is the best one, although the loading screen takes so long to actually load...
ea app: Hold my beer
#ea app#the sims#sid talks#i had to open the game from the epic games app and THEN it loaded the ea app#it took me half an hour#and do you think it downloaded the update of doors and ceilings?#of course not!#there's not even the option#i'm glad i got all of the packs for free
1 note
·
View note
Text
ea app blease i am begging let me play offline when your servers are down
#*goes offline*#ea app: we couldn't connect to our servers lmao we will keep trying i guess#then why do you have the go offline option????
5 notes
·
View notes
Text
TS4, DirectX 11, and ReShade
Patch notes today say that finally (finally!) The Sims 4 is moving over to use the DirectX 11 rendering api. Until now TS4 has used DirectX 9, which has given us some limitations when using ReShade.
They're bringing the official rollout sometime in the future, but for now you can opt in to switching to DirectX 11 on a voluntary basis.
You don't need to uninstall your game or install a new version. To switch to using DirectX 11, update your game with today's patch, and then click on Manage > View Properties from the The Sims 4 game page on EA App and enter -dx11 in the advanced launch options box. You can remove this at any time to go back to using DirectX 9.
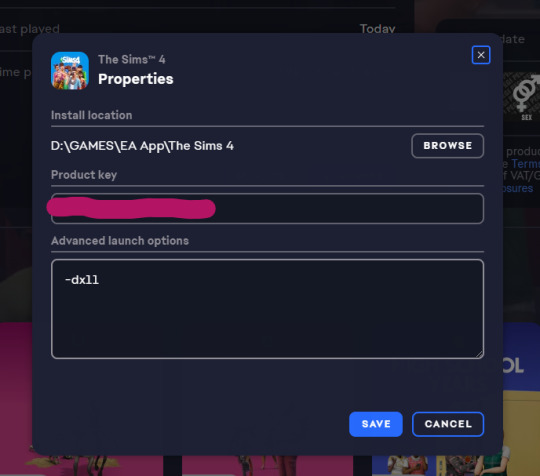
Note: the game developers have warned in the patch notes that some mods may have visual glitches until they are updated to accommodate dx11, so it may be advisable to wait until your mod authors have confirmed everything works okay
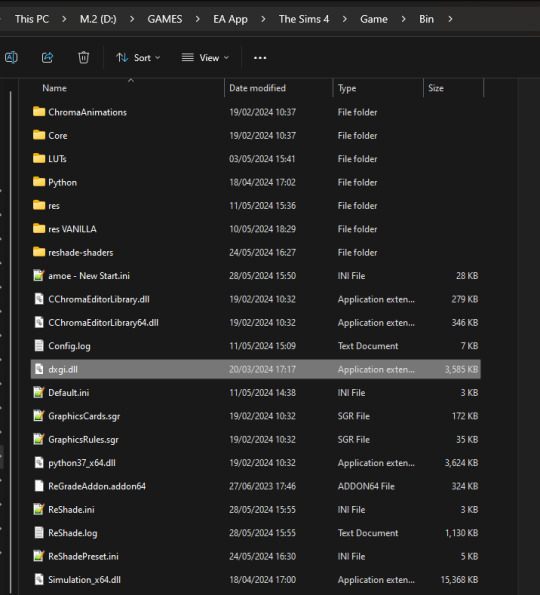
If you have ReShade installed currently for DirectX 9 you can make it start using DirectX 11 instead by finding the d3d9.dll inside your Bin folder and changing its name to dxgi.dll. No need to uninstall and reinstall ReShade, that's all you need to do. If you want to go back to using dx9, just revert the name back to d3d9.dll.

The main benefit of using ReShade under DirectX 11 is that you'll have access to more shaders than usual. You've probably noticed a lot of red errors (also known as compiling errors) -- those are more often than not these days caused by DirectX 9 limitations.
#reshade faq#reshade for ts4#ts4 reshade#reshade tutorial#reshade installation#reshade help#reshade tips
927 notes
·
View notes
Text
Mod Udpates
As always delete old Mods Files and the localthumbcache, when updating my Mods!
+++
All Bug Fixes, Random Small Mods, and Other Mods are now checked as well for the Group ID Issue. Every Mod that did not get an Update yesterday/today, does not need one. See below for an important Info regarding one of my Mods though!
All Mods that needed an Update:
(Random Bug Fix) Gardening Workaround Fix
(Random Bug Fix) Resume Writing Workaround Fix
(Random Bug Fix) Weather NPC Deaths
(Random Small Mod) Auto Brush Teeth
(Random Small Mod) Auto Grab Drink when Eating
(Random Small Mod) Better Quality Food MarketStalls
(Random Small Mod) Better Saddle Control
(Random Small Mod) Buy Horse Treats via PC
(Random Small Mod) Buy more Upgrade Parts
(Random Small Mod) Buy Spells and Potions Tomes via PC
(Random Small Mod) Change into Everyday when inside
(Random Small Mod) Check Skills of NPC Horses
(Random Small Mod) Craft More Nectar Bottles and more
(Random Small Mod) Faster Run To University Class
(Random Small Mod) Feathers around Bird Feeder
(Random Small Mod) Feral Run Lowers Fury
(Random Small Mod) Guests Only Order Drink When Not Busy
(Random Small Mod) Horse Jump Parkour
(Random Small Mod) Improved VIP Rope
(Random Small Mod) Lead Horse
(Random Small Mod) Livestream For Everyone
(Random Small Mod) No Aging Trait
(Random Small Mod) No Shoes at Home
(Random Small Mod) Phone App Free Homescreen and optional Background Overrides
(Random Small Mod) Purchased Items delievered via Mail
(Random Small Mod) Release all Ghosts & Get Urn for
(Random Small Mod) Spar with Sim
(Random Small Mod) Special Paddock Gate & Stable Stall Door
(Random Small Mod) Toddler Don't go to Daycare
(Other Mod) Allowance
(Other Mod) Online Utilities System
+++
A possible new Game Bug broke the Choose Leftover Mod, which is not fixable by me. Please remove that Mod until EA fixes the Issue that affects my Mod. Read more about that here: https://answers.ea.com/t5/Bug-Reports/Give-Food-from-Inventory-to-toddler-causes-last-Exception-Error/m-p/13525645
+++
My Site with all possible Download Links: lms-mods.com
Support Questions via Discord only please!
524 notes
·
View notes
Text
How to use DXVK with The Sims 3
Have you seen this post about using DXVK by Criisolate? But felt intimidated by the sheer mass of facts and information?
@desiree-uk and I compiled a guide and the configuration file to make your life easier. It focuses on players not using the EA App, but it might work for those just the same. It’s definitely worth a try.
Adding this to your game installation will result in a better RAM usage. So your game is less likely to give you Error 12 or crash due to RAM issues. It does NOT give a huge performance boost, but more stability and allows for higher graphics settings in game.
The full guide behind the cut. Let me know if you also would like it as PDF.
Happy simming!
Disclaimer and Credits
Desiree and I are no tech experts and just wrote down how we did this. Our ability to help if you run into trouble is limited. So use at your own risk and back up your files!
We both are on Windows 10 and start the game via TS3W.exe, not the EA App. So your experience may differ.
This guide is based on our own experiments and of course criisolate’s post on tumblr: https://www.tumblr.com/criisolate/749374223346286592/ill-explain-what-i-did-below-before-making-any
This guide is brought to you by Desiree-UK and Norn.
Compatibility
Note: This will conflict with other programs that “inject” functionality into your game so they may stop working. Notably
Reshade
GShade
Nvidia Experience/Nvidia Inspector/Nvidia Shaders
RivaTuner Statistics Server
It does work seamlessly with LazyDuchess’ Smooth Patch.
LazyDuchess’ Launcher: unknown
Alder Lake patch: does conflict. One user got it working by starting the game by launching TS3.exe (also with admin rights) instead of TS3W.exe. This seemed to create the cache file for DXVK. After that, the game could be started from TS3W.exe again. That might not work for everyone though.
A word on FPS and V-Sync
With such an old game it’s crucial to cap framerate (FPS). This is done in the DXVK.conf file. Same with V-Sync.
You need
a text editor (easiest to use is Windows Notepad)
to download DXVK, version 2.3.1 from here: https://github.com/doitsujin/DXVK/releases/tag/v2.3.1
Extract the archive, you are going to need the file d3d9.dll from the x32 folder
the configuration file DXVK.conf from here: https://github.com/doitsujin/DXVK/blob/master/DXVK.conf.
Optional: download the edited version with the required changes here.
administrator rights on your PC
to know your game’s installation path (bin folder) and where to find the user folder
a tiny bit of patience :)
First Step: Backup
Backup your original Bin folder in your Sims 3 installation path! The DXVK file may overwrite some files! The path should be something like this (for retail): \Program Files (x86)\Electronic Arts\The Sims 3\Game\Bin (This is the folder where also GraphicsRule.sgr and the TS3W.exe and TS3.exe are located.)
Backup your options.ini in your game’s user folder! Making the game use the DXVK file will count as a change in GPU driver, so the options.ini will reset once you start your game after installation. The path should be something like this: \Documents\Electronic Arts\The Sims 3 (This is the folder where your Mods folder is located).
Preparations
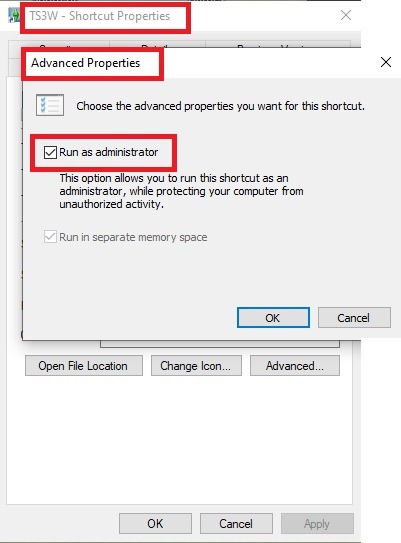
Make sure you run the game as administrator. You can check that by right-clicking on the icon that starts your game. Go to Properties > Advanced and check the box “Run as administrator”.
Note: This will result in a prompt each time you start your game, if you want to allow this application to make modifications to your system. Click “Yes” and the game will load.
2. Make sure you have the DEP settings from Windows applied to your game.
Open the Windows Control Panel.
Click System and Security > System > Advanced System Settings.
On the Advanced tab, next to the Performance heading, click Settings.
Click the Data Execution Prevention tab.
Select 'Turn on DEP for all programs and services except these”:
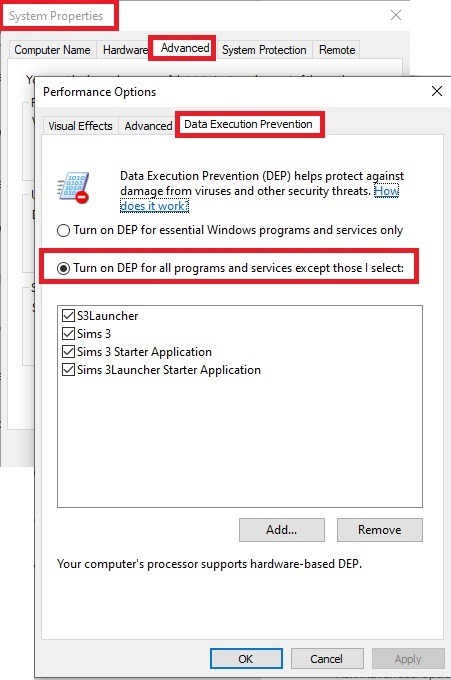
Click the Add button, a window to the file explorer opens. Navigate to your Sims 3 installation folder (the bin folder once again) and add TS3W.exe and TS3.exe.
Click OK. Then you can close all those dialog windows again.
Setting up the DXVK.conf file
Open the file with a text editor and delete everything in it. Then add these values:
d3d9.textureMemory = 1
d3d9.presentInterval = 1
d3d9.maxFrameRate = 60
d3d9.presentInterval enables V-Sync,d3d9.maxFrameRate sets the FrameRate. You can edit those values, but never change the first line (d3d9.textureMemory)!
The original DXVK.conf contains many more options in case you would like to add more settings.

A. no Reshade/GShade
Setting up DXVK
Copy the two files d3d9.dll and DXVK.conf into the Bin folder in your Sims 3 installation path. This is the folder where also GraphicsRule.sgr and the TS3W.exe and TS3.exe are located. If you are prompted to overwrite files, please choose yes (you DID backup your folder, right?)
And that’s basically all that is required to install.
Start your game now and let it run for a short while. Click around, open Buy mode or CAS, move the camera.
Now quit without saving. Once the game is closed fully, open your bin folder again and double check if a file “TS3W.DXVK-cache” was generated. If so – congrats! All done!
Things to note
Heads up, the game options will reset! So it will give you a “vanilla” start screen and options.
Don’t worry if the game seems to be frozen during loading. It may take a few minutes longer to load but it will load eventually.
The TS3W.DXVK-cache file is the actual cache DXVK is using. So don’t delete this! Just ignore it and leave it alone. When someone tells to clear cache files – this is not one of them!
Update Options.ini
Go to your user folder and open the options.ini file with a text editor like Notepad.
Find the line “lastdevice = “. It will have several values, separated by semicolons. Copy the last one, after the last semicolon, the digits only. Close the file.
Now go to your backup version of the Options.ini file, open it and find that line “lastdevice” again. Replace the last value with the one you just copied. Make sure to only replace those digits!
Save and close the file.
Copy this version of the file into your user folder, replacing the one that is there.
Things to note:
If your GPU driver is updated, you might have to do these steps again as it might reset your device ID again. Though it seems that the DXVK ID overrides the GPU ID, so it might not happen.
How do I know it’s working?
Open the task manager and look at RAM usage. Remember the game can only use 4 GB of RAM at maximum and starts crashing when usage goes up to somewhere between 3.2 – 3.8 GB (it’s a bit different for everybody).
So if you see values like 2.1456 for RAM usage in a large world and an ongoing save, it’s working. Generally the lower the value, the better for stability.
Also, DXVK will have generated its cache file called TS3W.DXVK-cache in the bin folder. The file size will grow with time as DXVK is adding stuff to it, e.g. from different worlds or savegames. Initially it might be something like 46 KB or 58 KB, so it’s really small.
Optional: changing MemCacheBudgetValue
MemCacheBudgetValue determines the size of the game's VRAM Cache. You can edit those values but the difference might not be noticeable in game. It also depends on your computer’s hardware how much you can allow here.
The two lines of seti MemCacheBudgetValue correspond to the high RAM level and low RAM level situations. Therefore, theoretically, the first line MemCacheBudgetValue should be set to a larger value, while the second line should be set to a value less than or equal to the first line.
The original values represent 200MB (209715200) and 160MB (167772160) respectively. They are calculated as 200x1024x1024=209175200 and 160x1024x1024=167772160.
Back up your GraphicsRules.sgr file! If you make a mistake here, your game won’t work anymore.
Go to your bin folder and open your GraphicsRules.sgr with a text editor.
Search and find two lines that set the variables for MemCacheBudgetValue.
Modify these two values to larger numbers. Make sure the value in the first line is higher or equals the value in the second line. Examples for values:
1073741824, which means 1GB
2147483648 which means 2 GB.
-1 (minus 1) means no limit (but is highly experimental, use at own risk)
Save and close the file. It might prompt you to save the file to a different place and not allow you to save in the Bin folder. Just save it someplace else in this case and copy/paste it to the Bin folder afterwards. If asked to overwrite the existing file, click yes.
Now start your game and see if it makes a difference in smoothness or texture loading. Make sure to check RAM and VRAM usage to see how it works.
You might need to change the values back and forth to find the “sweet spot” for your game. Mine seems to work best with setting the first value to 2147483648 and the second to 1073741824.
Uninstallation
Delete these files from your bin folder (installation path):
d3d9.dll
DXVK.conf
TS3W.DXVK-cache
And if you have it, also TS3W_d3d9.log
if you changed the values in your GraphicsRule.sgr file, too, don’t forget to change them back or to replace the file with your backed up version.
OR
delete the bin folder and add it from your backup again.
B. with Reshade/GShade
Follow the steps from part A. no Reshade/Gshade to set up DXVK.
If you are already using Reshade (RS) or GShade (GS), you will be prompted to overwrite files, so choose YES. RS and GS may stop working, so you will need to reinstall them.
Whatever version you are using, the interface shows similar options of which API you can choose from (these screenshots are from the latest versions of RS and GS).
Please note:
Each time you install and uninstall DXVK, switching the game between Vulkan and d3d9, is essentially changing the graphics card ID again, which results in the settings in your options.ini file being repeatedly reset.
ReShade interface
Choose – Vulcan
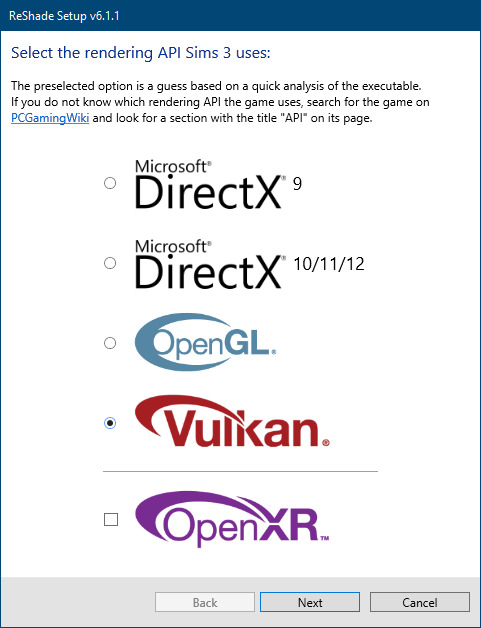
Click next and choose your preferred shaders.
Hopefully this install method works and it won't install its own d3d9.dll file.
If it doesn't work, then choose DirectX9 in RS, but you must make sure to replace the d3d9.dll file with DXVK's d3d9.dll (the one from its 32bit folder, checking its size is 3.86mb.)
GShade interface
Choose –
Executable Architecture: 32bit
Graphics API: DXVK
Hooking: Normal Mode
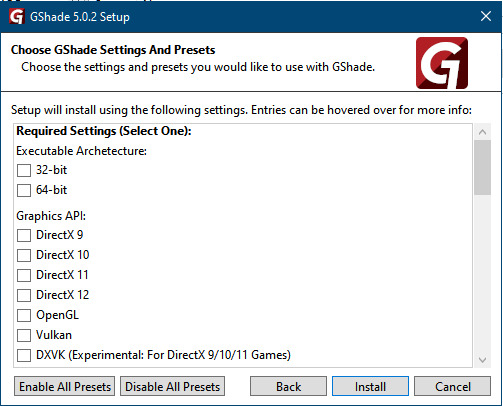
GShade is very problematic, it won't work straight out of the box and the overlay doesn't show up, which defeats the purpose of using it if you can't add or edit the shaders you want to use.
Check the game's bin folder, making sure the d3d9.dll is still there and its size is 3.86mb - that is DXVK's dll file.
If installing using the DXVK method doesn't work, you can choose the DirectX method, but there is no guarantee it works either.
The game will not run with these files in the folder:
d3d10core.dll
d3d11.dll
dxgi.dll
If you delete them, the game will start but you can't access GShade! It might be better to use ReShade.
Some Vulcan and DirectX information, if you’re interested:
Vulcan is for rather high end graphic cards but is backward compatible with some older cards. Try this method with ReShade or GShade first.
DirectX is more stable and works best with older cards and systems. Try this method if Vulcan doesn't work with ReShade/GShade in your game – remember to replace the d3d9.dll with DXVK's d3d9.dll.
For more information on the difference between Vulcan and DirectX, see this article:
https://www.howtogeek.com/884042/vulkan-vs-DirectX-12/
259 notes
·
View notes
Text
How to install TS3 for the ✨chronically TS4✨

Getting back into TS3 posed a challenge for me as compared to TS4. It's a 10+ year old game and of course requires some extra TLC as compared to TS4. So I hope this guide will help y'all to get everything set up cleanly and smoothly! It took me three separate tries and if I can help the next person struggle less, then that's great. Happy simming!
You'll need a copy of TS3 and these resources:
The Sims 3 Performance & Bug Fix Guide 2023 by anime_boom
This lovely post from TS3 community extraordinaire @nectar-cellar
How Use CCMagic YouTube video by @florydaax
No Intro mod edited for 2023 (original by retired creator EllaCharmed)
The original mod from Ella does not work for current patch 1.69. I fixed it in s3pe with the help of some commenters on MTS so that it does actually remove the intro. If the creator happens to see this and would like this modified version removed, let me know.
How to clear cache by Carl's Guide
Got everything pulled up? Great! You're ready to start.

1. Download a FRESHLY INSTALLED copy of TS3 to your computer. If you're able, I'd highly recommend having all the packs you're wanting to own already so you don't have to do all of this again.
If you are redownloading the game for any reason (like me bc I was struggling lol), remove the existing TS3 folder in your documents and save it somewhere so you can keep all of your mods or worlds there. Back up any reshade stuff from the bin folder. Completely uninstall the game through the EA app/Steam. You may lose your saves and sims due to a change in script mods through this tutorial. This cannot be avoided, trust me I tried. But it's worth it for a smooth game.
2. Do a test launch so that the game generates a new TS3 Folder in your documents. DO NOT, I REPEAT DO NOT INSTALL ANY SIMS 3 PACKS THROUGH THE LAUNCHER! NO WORLDS, NO CLOTHES, NO HAIR COLORS, NOTHING. This will be very important later on when you merge your CC using CCMagic. If you need worlds or other CC there are alternative ways to obtain them.
3. CLEAR THE GENERATED CACHE
4. If you use EA and open to test anywhere between steps (which you shouldn't really need to after step 1 of the Bug Fix Guide) or after playing at any point, open up task manager and ensure that you end the tasks "EA" and "EA Background Services" before continuing. It doesn't really use much memory but I noticed that it caused stutters if it's open when launching using your shiny brand new Smooth Patch. It will look like this:

5. Begin following the steps in the Performance & Bug Fix guide. The first thing you'll do is set up your mods folder. Follow those steps exactly as they are in the guide, except use the No Intro mod I linked above instead of the one you get in that folder if you actually want the intro removed.
6. Continue to FOLLOW ALL REQUIRED STEPS IN THE GUIDE UNTIL YOU'RE DONE. I mean it, all of them one by one. Heck, if you're open/able to do the bonus and optional ones, I'd suggest doing those too.
7. Once you've completed that, go check out nectar-cellar's excellent post for tips and a fix to make the smooth patch to compatible with Master Controller. I will not be providing an edited version of this as LazyDutchess who created the Smooth Patch is still active and I want to respect their work.
8. If you've made it this far, you're doing great sweetie. Do another test launch through the patcher and if everything runs correctly it means you've done everything RIGHT. You're ready to start playing or downloading mods if you want!
If you do start downloading mods merging them will 100% be a must do if you want to maintain any sanity. You can use CCMagic to do so. I linked that handy lil video above!
Keep in mind script mods, overrides, patterns, and CC counters should NEVER be merged. Always check the creator's notes, yada yada. And always clean up your cache on a regular basis. Have fun y'all!

437 notes
·
View notes
Text


I received the codes from the EA Creator Network for the latest kits, Urban Homage and Party Essentials, and I finally got a chance to check them over. Short version: these kits really aren't for me. I don't dislike them, they either aren't my style or designed for an activity I just don't enjoy.
Urban Homage is nice that it was a Collab with Ebonix to give sims of colour some clothing that feels authentic for the style it's delivering, but for me, I just don't have many sims that would benefit from it for telling their story. The fit is nice and neutral (not too baggy or fitted), nice variety of colour, and a bit of personality too. I would have liked to see more then just clothing though. A new set of boots such as a combat or timberland-esque would have been nice, or a new hairstyle or two. I don't know if I am just conditioned to think that is what a CAS kit should include, or if the kit feels unfinished because it lacks those items. The jeans are definite favourites, even if i wish it had a better bootleg cut. The tee is also lovely with the graffiti prints. I would love to see more kits like this though. There are many regions, ethnicities and demographics thats aren't represented much in regular packs that kits could cater for so although it's just not really my style, I would love to see more.
Party Essentials did feel incomplete until I started looking at it like a decor kit, then it came together. Can't say I am a fan of the colour palette though. My favourite was the pastel rainbow, and I kind of wish it had more of that swatch style. The golds, bright pinks and blues just felt a little... overwhelming to me. Given time I could probably make them work. I am thankful the bar was designed as a standalone object though. The curse of regular bars is they often look unfinished if not integrated with island counters and they are already too large as it is. This item strikes that right balance. I still desperately want a drinks tray so i can avoid having to huge a 2x1 object just to have access to bar drinks. The lights definitely needed a medium wall height option at a minimum, same with the streamer items. The new record player is a nice addition too. I just can't see myself using this kit much because it's relatively niche category. I don't like the party mechanic of TS4 so I doubt i will use most of these items much, if at all apart from the table, bar and record player.
Anyway, those are my thoughts. If you do want to grab them, because you like throwing parties or really dig the Urban homage look, remember you can use my code PEACEMAKER at checkout to directly support me as a creator via thesims.com or EA App.
147 notes
·
View notes
Text
How to fix Frosty Mod Manager to work with the stupid new EA App for Dragon Age Inquisition
Make sure you have the most up-to-date version of Frosty Mod Manager (1.0.6.1) - you can download this HERE.
Next, get the DatapathFix Plugin by Dyvinia for Frosty - you can download this HERE. (Click on the DatapathFixPlugin.zip under Assets of the latest release.)
Extract the contents of the ZIP into the FrostyModManager Plugins folder.
Run Frosty and under Tools > Options > Launch Options, disable Platform Launching.
Check your Installed Plugins to see that the DatapathFix is installed correctly.
Exit Frosty.
Run the EA App as Administrator. Then run Frosty Mod Manager as Administrator, and launch the game.
That's it! I got all my mods to work this way.
690 notes
·
View notes
Text
how to reset residential rental lots and fix off-lot TOOL modifications
first and foremost, prepare your game. this is essential!
move active households living in residential rentals to non-rental lots. save builds you have placed in tomarang to your library. edited tomarang residents you'd like to keep should also be saved to your library. you can replace these when we're done.
load into your active household's new lot and sell the residential rental property (or properties) using the business tab at the bottom right corner of the UI. repeat this step for every household that owns a residential rental property.
save as. i recommend creating a new save here (i labeled mine no rent) so you can keep your previous save intact if you need it later for whatever reason. exit the game.
in the EA app, disable the For Rent pack. select the sims 4 from your game library, click manage, then view properties. type into the advanced launch options -disablepacks:EP15 and hit save.
launch the game without EP15. you will be asked to select which save you want to load and receive a message saying you are missing a pack. load into your no rent save. the game will say you're missing data because you had a residential rental and by disabling the pack it has now reset those lots and removed bb/cas items you were using. from map view you'll see that now all previously residential rental lots have been changed to generic.
load each of those lots and switch them to residential manually to be on the safe side. you'll notice that all of the items placed off-lot using the TOOL mod have reappeared. save your game. if you're like me, you'll save as and label it accordingly in case you want to backtrack later.
you can continue playing this way without EP15 or exit. to enable For Rent, go back into your EA app game library, manage, view properties, delete -disablepacks:EP15 and save.
84 notes
·
View notes
Text
RISE OF THE TMNT: HOMECOMING - STEP-BY-STEP INSTALL GUIDE - UPDATED!
Like promised, I've retraced my steps and the post here is a full guide on how to download and play TMNT homecoming for Android device.
Here below I've compiled a series of steps and useful links in case you might need to play the game:
(Edit: The guide's updated now:)
Step 0: First things first...
First thing first, you'll need an Android device to download and play this game.
UPDATE! - The game now also works on Bluestack!
Second thing you'll need (unless you know chinese) is a picture Translator app.
I've used translation apps that take pictures of the screen and translate it to english and followed the instructions to set up my username and password.
Step 1: Downloading the APK
Unless you live in China, or you can get the game legit in some way I don't know, APK downloading sites might help. However, be careful, for some may be scam sites. Use a VPN to help block unwanted visitors.
I've used this site here to download the APK for the game and seems pretty legit (based on bitdefender, the apk is safe) compared to others I've tried. While the picture is from the beta version in 2022, the update is the most recent from 2023.
If you have another apk downloading site you'd prefer to try download the apk from, try looking up for TMNT Homecoming (it will not show as Rise or ROTTMNT despite being the same characters)...
Or if that fails too, try searching for 忍者龟: 归来 apk if you can't find it in english.
STEP 2: Installation
Once you download the game, install it on your device. Phone might ask for permission due to being considered an unknown APK from an outside source.
STEP 3: Username and Password
If everything has gone smoothly, then it's time for the username and password.
A window will show with MUZHI written on it. Here, you must write your username (top) and your password (bottom). -ps: ignore the writing below. It was my bad 😅-
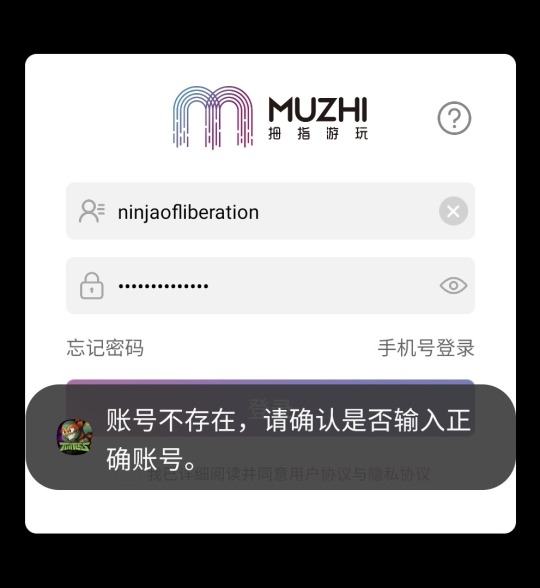
You shouldn't have any issues with this step as it accepts western keyboard characters.
Just remember to write the ID and PW down somewhere so you won't forget them. Or take a snapshot of it before proceeding.
UPDATE! - It seems there are issues with the western keyboards and won't accept them anymore. So, if this step doesn't work, click the button that says: Quick Registration (the button in red) and proceed to step 4!

Step 4: THE DREADED
A new window opens
It requires that you put a name (top) and ID number (below) in order to play the game.
To bypass this, this helped me:
You can pick any of the codes shown (I used the very first one and it worked like a charm).
Let's use this for example: As you can see, there is a series on numbers first, and chinese characters at the end.

Careful with this step as the name goes on the top bar, and should be only chinese characters.
Like this: 刘剑丽
The ID is only numbers, and they go in the bar below.
Like this: 220283198306236235
It must be like this:

STEP 5: Selecting A Game Name
If you've reached this point, and if you're able to play the game at long last, then CONGRATS! You've made it! But it's not over just quite yet.
The game, eventually, requires that you add a GAME NAME. It can be anything you want it to be, but MIND YOU! THIS IS VERY IMPORTANT!
IT WILL NOT ACCEPT Western Keyboard characters. Only chinese characters!
This is, however, much, much easier to bypass than step 4. Here, you have 2 options:
Option 1: If you want your very own original game name to play, you can go to google translate and simply write down and translate it to chinese.
Example:

Just copy the chinese characters and paste them in the bar. Then proceed.
Option 2: If you don't care about what name you use to play, just generate a complete random name by pressing the dice button right next to the name bar. The game will insta-generate a completely random name for you to use.
STEP 6: Have fun!
If you followed each step of the way without too much hassle and managed to get through the apocalypse that is bypassing this, then CONGRATS! YOU'VE FINALLY MADE IT!

I'm so, so proud of you! Now you're free to play this Rise of the tmnt game as much as you want! Keep your translator close just in case, and have plenty of fun with the features this game offers.
If you're looking to send me a friend request, You'll find me as Ninja of Liberation (or 解放忍者 ).
In case there’s issues, DM me and I’ll see to try help and update the guide.
#tmnt#game#tmnt homecoming#rottmnt#rise of the tmnt#riseofthetmnt#rise of the teenage mutant ninja turtles#save rottmnt#saverottmnt
116 notes
·
View notes
Text

A week later and here I am after my "kind of an announcement".
I got the PC back up, because I had to. And as the stubborness and adhd hyperfixation had already kicked in (and the electricity costs were close to normal! For real 😲), I spent five days more fighting with the game with the help of some lovely people in Creators Cave, and it works now. Thank you so much! 💗 Even CAW's EiG is working, for the first time ever! I'm over the moon! 😍 I might get at least one world ready finally 😭 (SuperCAW does not work though, Windows refuses to install it). And I got rid of EA App and the remnants of Origin.
I got carried away while almost Vanilla game and created a loner pet and plant lover. I came across a flower arraging mod I had no idea about, and now she has a huge garden and a flower shop. I'm still missing Seasons, but a friend of mine has a copy, but I don't trust the Finnish Post to delivered it safely, so it might take a while to get it.

When taking pictures I realized I have forgotten how to! 😂 I found nothing with Google, but I'm sure there was a way to have the camera move freely without being stuck on the current floor level, which was able to zoom super close and even inside objects. It wasn't a mod? Some button I have to press? How have I forgotten? 🤔
I still have all Store content to install. It's waiting for my decision about how. Via Launcher as ment, as packages or as decrappified versions, or what. I have to study the options. I may even make a poll, because I use heavily Store items on my uploads and would like them to be as easy as possible to download and use.
25 notes
·
View notes
Text
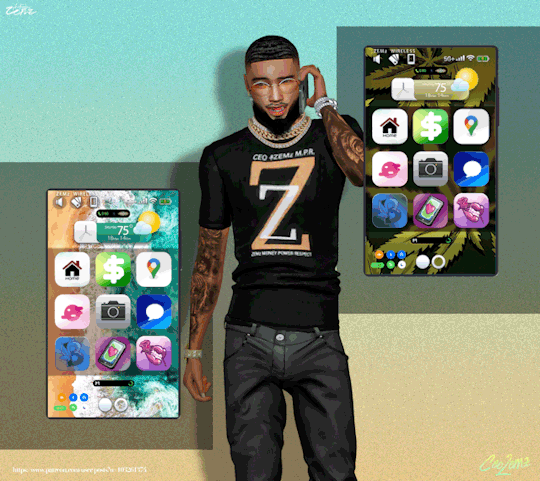
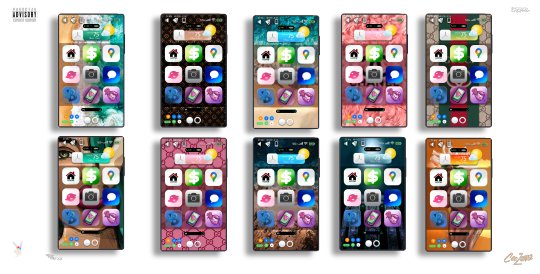
WallPaper Override - ZEMz PhoneBackgrounds V.1

Now Released FOR PUBLIC for anyone !!
ZEMz PhoneBackgrounds V.1 - Wallpaper's
🖼️ - 18 Wallpapers options
Works with your Phone APP 📲 overrides
PleaseSupport/ReblogAndGiveMeShoutOUT
Rules when using ZEMz PhoneBackgrounds V.1
do not- claim them as your own
do not- upload them anywhere (for download)
please tag/mention my name if posted anywhere online!
also if any problems occur please lmk! and support Me
This is a WallPaper Override replaces your EA phone backgrounds
Choose from 18 different styles of wallpapers backgrounds for your phone make your phone 🤭 less boring and MORE 😲 sleeker, modern, and perfection 💆🏼
Now Released FOR PUBLIC for anyone !!
📱ZEMz PhoneBackgrounds V.1 - Wallpaper's Make Your PHONE MORE ALIVE🌱

WHERE TO INSTALL MODS/CC –
All .package files that you have downloaded can be moved to the following folder:
Documents > Electronic Arts > The Sims 4 > Mods.
WILL NOT WORK WITH OTHER WALLPAPER OVERRIDES IF YOU HAVE A WALLPAPER OVERRIDE ALREADY PLEASE RMOVE THAT OUT YOUR MODS FOLDER AND REPLACE IT WITH THIS ONE
From here on Now on ZEMz Sims Dumps AND CC Will Only Be Available join Members and will get Early access to SIM Dumps AND CC and Exclusive Sims Dumps WILL ONLY BE FOR PAID MEMBERS
⬇️ ⬇️ DOWNLOAD LINK ⬇️ ⬇️

#art#design#the sims cc#ts4 mods#video games#cas backgrounds#modding#mods#sims 4#sims 4 mods#red carpet#comics#computer science#celebrities#cute#crafts#celebs#christmas#original character#cars#sexy content#the sims 4 build#thesims4#artists on tumblr#the sims community#the sims 4#the sims#sims 4 cc#sims 4 gameplay#simblr
38 notes
·
View notes
Text
Sims 3 Installation question
I have a new laptop. And I'm setting everything up now. Installing all Sims 3 EPs and SPs again. I'm old school, so everything is on discs. It was smooth sailing (though a test of patience) until the installation of Showtime. I ran into a cyclic redundancy check. So I did a little search, but the only work around I found was downloading the EP through Origin and installing it using the registration key from the disc. But, Origin is now replaced by the EA app for windows, which doesn't have that option.
So, who has the answer? Is there any other way to solve the CRC error? Or anywhere else I can download this EP? I obviously have a registration key. I don't really want to go through something like Steam, since I installed all the others from disc.
33 notes
·
View notes
Note
Hi! Would you ever consider uploading your 36 𝘉𝘢𝘺𝘢𝘯𝘪 𝘗𝘭𝘢𝘤𝘦 build to the gallery? It's SO cute.
Back when I built the lot, I originally intended to share it out. I didn't know if anyone would want it, so I'm glad you asked :)
I don't have gallery access at the moment, I'm in limbo between Origin and the EA App, and it won't let me online, so I hope tray files work ok for you.
overview:
tray files:
download here on sfs
please open thread below for more information
pack recommendations:
I have every EP and GP (minus Crystal Creations), so I'm unfortunately using many of them at once. I apologize. Of the packs, these are the ones I find most useful:
high school years for the windows (totally optional, plenty of good options out there)
growing together for the siding
eco lifestyle for the grass on the terrace
cottage living for the big pink flowers
custom content (brass tacks/optional) :
build mode:
carpet
wood floor
tile
wall panels
starboard walls add-on
growing together add-on
sunroom door
chalk set tiles
terrain paint
garage door
buy mode:
"boat"
cabinets (upper)
cabinets (lower)
house numbers
outdoor lights and woodfire oven
9 notes
·
View notes
Last Seen Blogs

victor-d-antonelli
Victordlli

faerieoffi
FAERIE

bestfriendszinebatsu
Super Best Friends Zine-batsu

katerinakozlova
♥ Be a Lady not a bitch

yoobzie
Abbacchio...