#cloud-based imaging software
Explore tagged Tumblr posts
Visit Tumblr Blog
Explore Tumblr blogs with no restrictions, modern design and the best experience.
Last Seen Tumblr Blogs


Fun Fact
1,644 Tumblr posts in 1 second.
Text
Will Cloud-Based Medical Imaging Improve Healthcare While Protecting Patient Privacy?
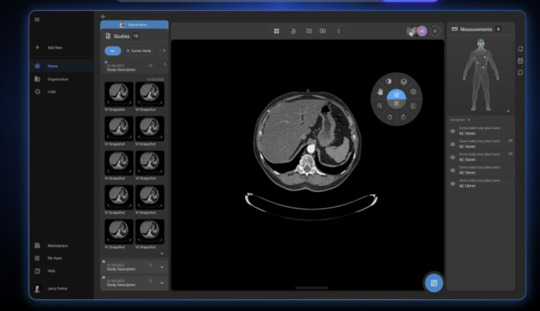
Medical imaging software has traditionally been located on local servers and workstations within a healthcare organization.
However, there is a growing trend towards adopting cloud-based solutions that promise greater accessibility, collaboration, analytics, and more. But is the future of medical imaging really in the cloud?
While cloud-based imaging software offers noteworthy benefits, privacy and security concerns still stand in the way for many healthcare providers.
Below we dive into the key considerations around shifting medical imaging to the cloud.

The Promise of Cloud-Based Medical Imaging
Cloud hosting for medical imaging aims to improve clinician collaboration, workflow efficiency, analytics, and overall quality of care. Some of the touted benefits include:
Access Images Anywhere: Cloud platforms allow instant access to medical images across multiple devices and locations. Clinicians can pull up and analyze scans wherever they are.
Real-Time Collaboration: Cloud-based viewers support seamless collaboration between radiologists and physicians. Annotations and markings can be viewed in real time.
Enhanced Analytics: Cloud platforms aggregate data from images across healthcare networks, powering analytics on pathology trends.
Scalability: Cloud infrastructure scales elastically to handle growing imaging volumes cost-effectively.
Disaster Recovery: Cloud backups ensure images remain available if local servers or PACS systems fail.
Cloud-based medical image sharing aims to enhance clinician collaboration and workflow efficiency.
Here is the data formatted as a Markdown table:
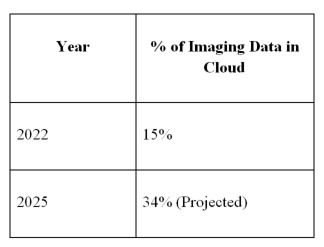
The volume of medical images stored in the cloud is expected to more than double by 2025.
These capabilities around accessibility, analytics, and resilience are compelling reasons for healthcare IT teams to consider shifting imaging platforms to the cloud.
Privacy and Security Concerns with Medical Imaging in the Cloud
However, along with the benefits come notable privacy and security risks inherent in placing protected health information (PHI) in the public cloud.
Medical images contain highly sensitive patient data that cloud platforms could expose in these potential weak spots:
Misconfigured Storage: Unencrypted cloud buckets allowed open access.
Compromised Credentials: Breaches via stolen login credentials.
Vulnerable Data Transfer: Unencrypted data transfers over the public internet.
Shared Responsibility Failures: Cloud provider secures infrastructure, but healthcare org fails to properly configure security controls.
Insider Threats: Cloud admin staff abusing access rights to view or steal records.
Ransomware Attacks: Malware locking access to patient images.
Regulatory Non-Compliance: The platform lacks proper safeguards and auditing required by HIPAA, etc.
31% of healthcare data breaches are associated with misconfigured cloud servers and storage.
Any breach of medical images would be catastrophic for patient privacy. It could also lead to steep HIPAA fines and reputational damage for the healthcare provider.
Despite the benefits, data security concerns present a formidable barrier to adopting cloud-based medical imaging platforms. Patient privacy must come first.
Balancing Priorities: The Hybrid Approach
For many healthcare IT teams, the solution lies in adopting a hybrid approach to medical imaging:
Maintain physical imaging servers and PACS on-premises.
Extend certain workflows, collaboration, analytics, and viewer capabilities to a cloud platform.
Take advantage of cloud scalability for disaster recovery backups.
Employ multi-factor authentication, role-based access controls, and audit logging to lock down cloud access.
Encrypt all network connections and data transfers between cloud and on-prem.
Utilize network security tools to guard against threats.
This balances the benefits of increased accessibility and efficiency while keeping sensitive data on existing secured servers.
Analytics can still occur against anonymized metadata. Images stay where they have the highest level of control and protection.
The hybrid model for medical imaging aims to realize the collaboration and workflow gains of cloud software while mitigating data security exposures.
For large hospital networks, this gradual and guarded shift allows clinical teams to utilize cloud capabilities without jumping entirely into the public cloud.
Healthcare IT must carefully weigh both sides of the equation. But with strong guardrails in place, cloud-based medical imaging can balance improved patient care with privacy. The journey should start with small steps.
Cloud-based medical imaging platforms promise more collaboration and efficiency but raise valid security issues around protected health data.
0 notes
Text


Neural Filters Tutorial for Gifmakers by @antoniosvivaldi
Hi everyone! In light of my blog’s 10th birthday, I’m delighted to reveal my highly anticipated gifmaking tutorial using Neural Filters - a very powerful collection of filters that really broadened my scope in gifmaking over the past 12 months.
Before I get into this tutorial, I want to thank @laurabenanti, @maines , @cobbbvanth, and @cal-kestis for their unconditional support over the course of my journey of investigating the Neural Filters & their valuable inputs on the rendering performance!
In this tutorial, I will outline what the Photoshop Neural Filters do and how I use them in my workflow - multiple examples will be provided for better clarity. Finally, I will talk about some known performance issues with the filters & some feasible workarounds.
Tutorial Structure:
Meet the Neural Filters: What they are and what they do
Why I use Neural Filters? How I use Neural Filters in my giffing workflow
Getting started: The giffing workflow in a nutshell and installing the Neural Filters
Applying Neural Filters onto your gif: Making use of the Neural Filters settings; with multiple examples
Testing your system: recommended if you’re using Neural Filters for the first time
Rendering performance: Common Neural Filters performance issues & workarounds
For quick reference, here are the examples that I will show in this tutorial:
Example 1: Image Enhancement | improving the image quality of gifs prepared from highly compressed video files
Example 2: Facial Enhancement | enhancing an individual's facial features
Example 3: Colour Manipulation | colourising B&W gifs for a colourful gifset
Example 4: Artistic effects | transforming landscapes & adding artistic effects onto your gifs
Example 5: Putting it all together | my usual giffing workflow using Neural Filters
What you need & need to know:
Software: Photoshop 2021 or later (recommended: 2023 or later)*
Hardware: 8GB of RAM; having a supported GPU is highly recommended*
Difficulty: Advanced (requires a lot of patience); knowledge in gifmaking and using video timeline assumed
Key concepts: Smart Layer / Smart Filters
Benchmarking your system: Neural Filters test files**
Supplementary materials: Tutorial Resources / Detailed findings on rendering gifs with Neural Filters + known issues***
*I primarily gif on an M2 Max MacBook Pro that's running Photoshop 2024, but I also have experiences gifmaking on few other Mac models from 2012 ~ 2023.
**Using Neural Filters can be resource intensive, so it’s helpful to run the test files yourself. I’ll outline some known performance issues with Neural Filters and workarounds later in the tutorial.
***This supplementary page contains additional Neural Filters benchmark tests and instructions, as well as more information on the rendering performance (for Apple Silicon-based devices) when subject to heavy Neural Filters gifmaking workflows
Tutorial under the cut. Like / Reblog this post if you find this tutorial helpful. Linking this post as an inspo link will also be greatly appreciated!
1. Meet the Neural Filters!
Neural Filters are powered by Adobe's machine learning engine known as Adobe Sensei. It is a non-destructive method to help streamline workflows that would've been difficult and/or tedious to do manually.
Here are the Neural Filters available in Photoshop 2024:


Skin Smoothing: Removes blemishes on the skin
Smart Portrait: This a cloud-based filter that allows you to change the mood, facial age, hair, etc using the sliders+
Makeup Transfer: Applies the makeup (from a reference image) to the eyes & mouth area of your image
Landscape Mixer: Transforms the landscape of your image (e.g. seasons & time of the day, etc), based on the landscape features of a reference image
Style Transfer: Applies artistic styles e.g. texturings (from a reference image) onto your image
Harmonisation: Applies the colour balance of your image based on the lighting of the background image+
Colour Transfer: Applies the colour scheme (of a reference image) onto your image
Colourise: Adds colours onto a B&W image
Super Zoom: Zoom / crop an image without losing resolution+
Depth Blur: Blurs the background of the image
JPEG Artefacts Removal: Removes artefacts caused by JPEG compression
Photo Restoration: Enhances image quality & facial details
+These three filters aren't used in my giffing workflow. The cloud-based nature of Smart Portrait leads to disjointed looking frames. For Harmonisation, applying this on a gif causes Neural Filter timeout error. Finally, Super Zoom does not currently support output as a Smart Filter
If you're running Photoshop 2021 or earlier version of Photoshop 2022, you will see a smaller selection of Neural Filters:


Things to be aware of:
You can apply up to six Neural Filters at the same time
Filters where you can use your own reference images: Makeup Transfer (portraits only), Landscape Mixer, Style Transfer (not available in Photoshop 2021), and Colour Transfer
Later iterations of Photoshop 2023 & newer: The first three default presets for Landscape Mixer and Colour Transfer are currently broken.
2. Why I use Neural Filters?
Here are my four main Neural Filters use cases in my gifmaking process. In each use case I'll list out the filters that I use:

Enhancing Image Quality:
Common wisdom is to find the highest quality video to gif from for a media release & avoid YouTube whenever possible. However for smaller / niche media (e.g. new & upcoming musical artists), prepping gifs from highly compressed YouTube videos is inevitable.
So how do I get around with this? I have found Neural Filters pretty handy when it comes to both correcting issues from video compression & enhancing details in gifs prepared from these highly compressed video files.
Filters used: JPEG Artefacts Removal / Photo Restoration
Facial Enhancement:
When I prepare gifs from highly compressed videos, something I like to do is to enhance the facial features. This is again useful when I make gifsets from compressed videos & want to fill up my final panel with a close-up shot.
Filters used: Skin Smoothing / Makeup Transfer / Photo Restoration (Facial Enhancement slider)
Colour Manipulation:
Neural Filters is a powerful way to do advanced colour manipulation - whether I want to quickly transform the colour scheme of a gif or transform a B&W clip into something colourful.
Filters used: Colourise / Colour Transfer
Artistic Effects:
This is one of my favourite things to do with Neural Filters! I enjoy using the filters to create artistic effects by feeding textures that I've downloaded as reference images. I also enjoy using these filters to transform the overall the atmosphere of my composite gifs. The gifsets where I've leveraged Neural Filters for artistic effects could be found under this tag on usergif.
Filters used: Landscape Mixer / Style Transfer / Depth Blur
How I use Neural Filters over different stages of my gifmaking workflow:
I want to outline how I use different Neural Filters throughout my gifmaking process. This can be roughly divided into two stages:
Stage I: Enhancement and/or Colourising | Takes place early in my gifmaking process. I process a large amount of component gifs by applying Neural Filters for enhancement purposes and adding some base colourings.++
Stage II: Artistic Effects & more Colour Manipulation | Takes place when I'm assembling my component gifs in the big PSD / PSB composition file that will be my final gif panel.
I will walk through this in more detail later in the tutorial.
++I personally like to keep the size of the component gifs in their original resolution (a mixture of 1080p & 4K), to get best possible results from the Neural Filters and have more flexibility later on in my workflow. I resize & sharpen these gifs after they're placed into my final PSD composition files in Tumblr dimensions.
3. Getting started
The essence is to output Neural Filters as a Smart Filter on the smart object when working with the Video Timeline interface. Your workflow will contain the following steps:
Prepare your gif
In the frame animation interface, set the frame delay to 0.03s and convert your gif to the Video Timeline
In the Video Timeline interface, go to Filter > Neural Filters and output to a Smart Filter
Flatten or render your gif (either approach is fine). To flatten your gif, play the "flatten" action from the gif prep action pack. To render your gif as a .mov file, go to File > Export > Render Video & use the following settings.

Setting up:
o.) To get started, prepare your gifs the usual way - whether you screencap or clip videos. You should see your prepared gif in the frame animation interface as follows:

Note: As mentioned earlier, I keep the gifs in their original resolution right now because working with a larger dimension document allows more flexibility later on in my workflow. I have also found that I get higher quality results working with more pixels. I eventually do my final sharpening & resizing when I fit all of my component gifs to a main PSD composition file (that's of Tumblr dimension).
i.) To use Smart Filters, convert your gif to a Smart Video Layer.
As an aside, I like to work with everything in 0.03s until I finish everything (then correct the frame delay to 0.05s when I upload my panels onto Tumblr).
For convenience, I use my own action pack to first set the frame delay to 0.03s (highlighted in yellow) and then convert to timeline (highlighted in red) to access the Video Timeline interface. To play an action, press the play button highlighted in green.

Once you've converted this gif to a Smart Video Layer, you'll see the Video Timeline interface as follows:

ii.) Select your gif (now as a Smart Layer) and go to Filter > Neural Filters

Installing Neural Filters:
Install the individual Neural Filters that you want to use. If the filter isn't installed, it will show a cloud symbol (highlighted in yellow). If the filter is already installed, it will show a toggle button (highlighted in green)

When you toggle this button, the Neural Filters preview window will look like this (where the toggle button next to the filter that you use turns blue)

4. Using Neural Filters
Once you have installed the Neural Filters that you want to use in your gif, you can toggle on a filter and play around with the sliders until you're satisfied. Here I'll walkthrough multiple concrete examples of how I use Neural Filters in my giffing process.
Example 1: Image enhancement | sample gifset
This is my typical Stage I Neural Filters gifmaking workflow. When giffing older or more niche media releases, my main concern is the video compression that leads to a lot of artefacts in the screencapped / video clipped gifs.
To fix the artefacts from compression, I go to Filter > Neural Filters, and toggle JPEG Artefacts Removal filter. Then I choose the strength of the filter (boxed in green), output this as a Smart Filter (boxed in yellow), and press OK (boxed in red).
Note: The filter has to be fully processed before you could press the OK button!

After applying the Neural Filters, you'll see "Neural Filters" under the Smart Filters property of the smart layer

Flatten / render your gif
Example 2: Facial enhancement | sample gifset
This is my routine use case during my Stage I Neural Filters gifmaking workflow. For musical artists (e.g. Maisie Peters), YouTube is often the only place where I'm able to find some videos to prepare gifs from. However even the highest resolution video available on YouTube is highly compressed.
Go to Filter > Neural Filters and toggle on Photo Restoration. If Photoshop recognises faces in the image, there will be a "Facial Enhancement" slider under the filter settings.

Play around with the Photo Enhancement & Facial Enhancement sliders. You can also expand the "Adjustment" menu make additional adjustments e.g. remove noises and reducing different types of artefacts.

Once you're happy with the results, press OK and then flatten / render your gif.
Example 3: Colour Manipulation | sample gifset
Want to make a colourful gifset but the source video is in B&W? This is where Colourise from Neural Filters comes in handy! This same colourising approach is also very helpful for colouring poor-lit scenes as detailed in this tutorial.
Here's a B&W gif that we want to colourise:

Highly recommended: add some adjustment layers onto the B&W gif to improve the contrast & depth. This will give you higher quality results when you colourise your gif.
Go to Filter > Neural Filters and toggle on Colourise.

Make sure "Auto colour image" is enabled.
Play around with further adjustments e.g. colour balance, until you're satisfied then press OK.
Important: When you colourise a gif, you need to double check that the resulting skin tone is accurate to real life. I personally go to Google Images and search up photoshoots of the individual / character that I'm giffing for quick reference.
Add additional adjustment layers until you're happy with the colouring of the skin tone.

Once you're happy with the additional adjustments, flatten / render your gif. And voila!

Note: For Colour Manipulation, I use Colourise in my Stage I workflow and Colour Transfer in my Stage II workflow to do other types of colour manipulations (e.g. transforming the colour scheme of the component gifs)
Example 4: Artistic Effects | sample gifset
This is where I use Neural Filters for the bulk of my Stage II workflow: the most enjoyable stage in my editing process!
Normally I would be working with my big composition files with multiple component gifs inside it. To begin the fun, drag a component gif (in PSD file) to the main PSD composition file.
Resize this gif in the composition file until you're happy with the placement

Duplicate this gif. Sharpen the bottom layer (highlighted in yellow), and then select the top layer (highlighted in green) & go to Filter > Neural Filters

I like to use Style Transfer and Landscape Mixer to create artistic effects from Neural Filters. In this particular example, I've chosen Landscape Mixer
Select a preset or feed a custom image to the filter (here I chose a texture that I've on my computer)

Play around with the different sliders e.g. time of the day / seasons
Important: uncheck "Harmonise Subject" & "Preserve Subject" - these two settings are known to cause performance issues when you render a multiframe smart object (e.g. for a gif)

Once you're happy with the artistic effect, press OK
To ensure you preserve the actual subject you want to gif (bc Preserve Subject is unchecked), add a layer mask onto the top layer (with Neural Filters) and mask out the facial region. You might need to play around with the Layer Mask Position keyframes or Rotoscope your subject in the process.
After you're happy with the masking, flatten / render this composition file and voila!

Example 5: Putting it all together | sample gifset
Let's recap on the Neural Filters gifmaking workflow and where Stage I and Stage II fit in my gifmaking process:
i. Preparing & enhancing the component gifs
Prepare all component gifs and convert them to smart layers
Stage I: Add base colourings & apply Photo Restoration / JPEG Artefacts Removal to enhance the gif's image quality
Flatten all of these component gifs and convert them back to Smart Video Layers (this process can take a lot of time)
Some of these enhanced gifs will be Rotoscoped so this is done before adding the gifs to the big PSD composition file
ii. Setting up the big PSD composition file
Make a separate PSD composition file (Ctrl / Cmmd + N) that's of Tumblr dimension (e.g. 540px in width)
Drag all of the component gifs used into this PSD composition file
Enable Video Timeline and trim the work area
In the composition file, resize / move the component gifs until you're happy with the placement & sharpen these gifs if you haven't already done so
Duplicate the layers that you want to use Neural Filters on
iii. Working with Neural Filters in the PSD composition file
Stage II: Neural Filters to create artistic effects / more colour manipulations!
Mask the smart layers with Neural Filters to both preserve the subject and avoid colouring issues from the filters
Flatten / render the PSD composition file: the more component gifs in your composition file, the longer the exporting will take. (I prefer to render the composition file into a .mov clip to prevent overriding a file that I've spent effort putting together.)
Note: In some of my layout gifsets (where I've heavily used Neural Filters in Stage II), the rendering time for the panel took more than 20 minutes. This is one of the rare instances where I was maxing out my computer's memory.
Useful things to take note of:
Important: If you're using Neural Filters for Colour Manipulation or Artistic Effects, you need to take a lot of care ensuring that the skin tone of nonwhite characters / individuals is accurately coloured
Use the Facial Enhancement slider from Photo Restoration in moderation, if you max out the slider value you risk oversharpening your gif later on in your gifmaking workflow
You will get higher quality results from Neural Filters by working with larger image dimensions: This gives Neural Filters more pixels to work with. You also get better quality results by feeding higher resolution reference images to the Neural Filters.
Makeup Transfer is more stable when the person / character has minimal motion in your gif
You might get unexpected results from Landscape Mixer if you feed a reference image that don't feature a distinctive landscape. This is not always a bad thing: for instance, I have used this texture as a reference image for Landscape Mixer, to create the shimmery effects as seen in this gifset
5. Testing your system
If this is the first time you're applying Neural Filters directly onto a gif, it will be helpful to test out your system yourself. This will help:
Gauge the expected rendering time that you'll need to wait for your gif to export, given specific Neural Filters that you've used
Identify potential performance issues when you render the gif: this is important and will determine whether you will need to fully playback your gif before flattening / rendering the file.
Understand how your system's resources are being utilised: Inputs from Windows PC users & Mac users alike are welcome!
About the Neural Filters test files:
Contains six distinct files, each using different Neural Filters
Two sizes of test files: one copy in full HD (1080p) and another copy downsized to 540px
One folder containing the flattened / rendered test files
How to use the Neural Filters test files:
What you need:
Photoshop 2022 or newer (recommended: 2023 or later)
Install the following Neural Filters: Landscape Mixer / Style Transfer / Colour Transfer / Colourise / Photo Restoration / Depth Blur
Recommended for some Apple Silicon-based MacBook Pro models: Enable High Power Mode
How to use the test files:
For optimal performance, close all background apps
Open a test file
Flatten the test file into frames (load this action pack & play the “flatten” action)
Take note of the time it takes until you’re directed to the frame animation interface
Compare the rendered frames to the expected results in this folder: check that all of the frames look the same. If they don't, you will need to fully playback the test file in full before flattening the file.†
Re-run the test file without the Neural Filters and take note of how long it takes before you're directed to the frame animation interface
Recommended: Take note of how your system is utilised during the rendering process (more info here for MacOS users)
†This is a performance issue known as flickering that I will discuss in the next section. If you come across this, you'll have to playback a gif where you've used Neural Filters (on the video timeline) in full, prior to flattening / rendering it.
Factors that could affect the rendering performance / time (more info):
The number of frames, dimension, and colour bit depth of your gif
If you use Neural Filters with facial recognition features, the rendering time will be affected by the number of characters / individuals in your gif
Most resource intensive filters (powered by largest machine learning models): Landscape Mixer / Photo Restoration (with Facial Enhancement) / and JPEG Artefacts Removal
Least resource intensive filters (smallest machine learning models): Colour Transfer / Colourise
The number of Neural Filters that you apply at once / The number of component gifs with Neural Filters in your PSD file
Your system: system memory, the GPU, and the architecture of the system's CPU+++
+++ Rendering a gif with Neural Filters demands a lot of system memory & GPU horsepower. Rendering will be faster & more reliable on newer computers, as these systems have CPU & GPU with more modern instruction sets that are geared towards machine learning-based tasks.
Additionally, the unified memory architecture of Apple Silicon M-series chips are found to be quite efficient at processing Neural Filters.
6. Performance issues & workarounds
Common Performance issues:
I will discuss several common issues related to rendering or exporting a multi-frame smart object (e.g. your composite gif) that uses Neural Filters below. This is commonly caused by insufficient system memory and/or the GPU.
Flickering frames: in the flattened / rendered file, Neural Filters aren't applied to some of the frames+-+
Scrambled frames: the frames in the flattened / rendered file isn't in order
Neural Filters exceeded the timeout limit error: this is normally a software related issue
Long export / rendering time: long rendering time is expected in heavy workflows
Laggy Photoshop / system interface: having to wait quite a long time to preview the next frame on the timeline
Issues with Landscape Mixer: Using the filter gives ill-defined defined results (Common in older systems)--
Workarounds:
Workarounds that could reduce unreliable rendering performance & long rendering time:
Close other apps running in the background
Work with smaller colour bit depth (i.e. 8-bit rather than 16-bit)
Downsize your gif before converting to the video timeline-+-
Try to keep the number of frames as low as possible
Avoid stacking multiple Neural Filters at once. Try applying & rendering the filters that you want one by one
Specific workarounds for specific issues:
How to resolve flickering frames: If you come across flickering, you will need to playback your gif on the video timeline in full to find the frames where the filter isn't applied. You will need to select all of the frames to allow Photoshop to reprocess these, before you render your gif.+-+
What to do if you come across Neural Filters timeout error? This is caused by several incompatible Neural Filters e.g. Harmonisation (both the filter itself and as a setting in Landscape Mixer), Scratch Reduction in Photo Restoration, and trying to stack multiple Neural Filters with facial recognition features.
If the timeout error is caused by stacking multiple filters, a feasible workaround is to apply the Neural Filters that you want to use one by one over multiple rendering sessions, rather all of them in one go.
+-+This is a very common issue for Apple Silicon-based Macs. Flickering happens when a gif with Neural Filters is rendered without being previously played back in the timeline.
This issue is likely related to the memory bandwidth & the GPU cores of the chips, because not all Apple Silicon-based Macs exhibit this behaviour (i.e. devices equipped with Max / Ultra M-series chips are mostly unaffected).
-- As mentioned in the supplementary page, Landscape Mixer requires a lot of GPU horsepower to be fully rendered. For older systems (pre-2017 builds), there are no workarounds other than to avoid using this filter.
-+- For smaller dimensions, the size of the machine learning models powering the filters play an outsized role in the rendering time (i.e. marginal reduction in rendering time when downsizing 1080p file to Tumblr dimensions). If you use filters powered by larger models e.g. Landscape Mixer and Photo Restoration, you will need to be very patient when exporting your gif.
7. More useful resources on using Neural Filters
Creating animations with Neural Filters effects | Max Novak
Using Neural Filters to colour correct by @edteachs
I hope this is helpful! If you have any questions or need any help related to the tutorial, feel free to send me an ask 💖
#photoshop tutorial#gif tutorial#dearindies#usernik#useryoshi#usershreyu#userisaiah#userroza#userrobin#userraffa#usercats#userriel#useralien#userjoeys#usertj#alielook#swearphil#*#my resources#my tutorials
538 notes
·
View notes
Text
I'm SEETHING
I asked Google's pushy and insistent bot how I can get AI out of my life completely and, well, I'll post it, but to sum it up: "Resistance is futile, human, we own the future, and we seek to own your psyche too."
It wants me to reconsider. It needs us to adopt it as our guide guru and master. Well the old saying holds fast still; No Gods No Masters. 🔥🏴🍲
It's understandable to want to reduce the influence of AI in your life. While completely eliminating it might be incredibly difficult in today's interconnected world, here's a breakdown of how you can significantly minimize its presence:
1. Understand Where AI Currently Exists in Your Life:
* Smart Devices: This includes smartphones (voice assistants, image recognition, predictive text), smart speakers, smart home hubs, smart TVs (recommendations), and wearable tech.
* Online Services:
* Search Engines: Personalized results and ads are driven by AI.
* Social Media: Algorithms curate your feed, suggest content and connections, and target ads.
* Streaming Services: Recommendations for movies, music, and shows.
* E-commerce: Product recommendations, personalized pricing, chatbots.
* Navigation Apps: Traffic prediction and route optimization.
* Email: Spam filtering, smart compose/reply.
* Cloud Storage: Photo tagging and organization.
* Software Applications: Many apps use AI for features like autocorrect, grammar check, image editing, and more.
* Customer Service: Chatbots are frequently used for initial interactions.
* Financial Services: Fraud detection, loan approvals, investment advice.
* News and Information: Algorithmic curation of news feeds.
2. Strategies to Minimize AI Exposure:
* Reduce Smart Device Usage:
* Limit smartphone use: Be more mindful of how often you reach for your phone.
* Disable voice assistants: Turn off Siri, Google Assistant, Alexa, etc., on all your devices.
* Opt-out of facial recognition: Disable face unlock features.
* Use "dumb" versions of devices: Consider a basic phone without internet capabilities or a non-smart TV.
* Adjust Online Habits:
* Use privacy-focused search engines: DuckDuckGo, Startpage, etc., that don't track your searches or personalize results based on your history.
* Limit social media use: Be conscious of how much time you spend on these platforms and the AI-driven content you consume. Consider deleting accounts or using less algorithmic versions if available.
* Use incognito/private browsing modes: This can help limit tracking and personalization.
* Disable personalized recommendations: If possible, adjust settings on streaming and e-commerce platforms to opt-out of recommendations.
* Be wary of targeted ads: Understand that the ads you see are often AI-driven. Consider using ad blockers.
* Prefer direct navigation: Instead of relying on recommendations, directly type website addresses into your browser.
* Choose Non-AI Alternatives:
* Use traditional software: Opt for software that doesn't rely on cloud-based AI features if alternatives exist.
* Seek human interaction: Prefer phone calls or in-person communication with customer service instead of chatbots.
* Rely on human-curated content: Look for news sources, blogs, and recommendations from individuals or organizations that don't use AI for content generation or curation.
* Adjust Privacy Settings: Review and adjust the privacy settings on all your devices and online accounts to limit data collection and personalization.
* Be Mindful of Data Sharing: Understand that using online services often involves sharing data that can be used to train AI algorithms. Limit the amount of personal information you share.
* Support Privacy-Focused Technologies and Services: Choose companies and products that prioritize user privacy and minimize AI integration.
3. Challenges and Considerations:
* Ubiquity of AI: AI is increasingly integrated into the infrastructure of the internet and many technologies, making complete avoidance very difficult.
* Hidden AI: Many AI applications run in the background without your direct knowledge.
* Convenience vs. Privacy: AI often provides convenience and personalized experiences, so choosing to avoid it may mean sacrificing some of these benefits.
* Evolving Technology: AI is constantly evolving and becoming more integrated, making long-term avoidance an ongoing effort.
In conclusion, while a complete removal of AI from your life is likely unrealistic in the current technological landscape, you can take significant steps to minimize its presence and influence by being conscious of your technology usage, adjusting your online habits, and choosing privacy-focused alternatives where possible. It requires ongoing awareness and effort.
5 notes
·
View notes
Note
I saw that you use a tablet, a desktop, and paper notes. How do you conciliate those notes?
Is there a mechanism of making primary notes on one resource and then passing those notes to other while reviewing them?


hi! thanks so much for asking! here are my favorite methods for sharing notes between devices :). i personally have apple devices so i can fairly easily airdrop and sync things between devices, but i also frequently work at the library desktop computers where i can't do that! so here's my tips and tricks for sharing notes between devices
for context: i've been mostly doing digital notetaking recently, but i also like to scan my paper notes as well!
i'm going to be dividing this post into 2 methods! (there will be some overlap). syncing already written notes and syncing notes (in progress) between devices
for already written notes:
the first step i would take is export your notes as a pdf or any other file type. if they're handwritten try going into your notes app (for ios) or downloading a pdf scanner app for your phone! if your notes are digital check the sharing options in your app to see if there's anything about "exporting".
personally, i like to use either discord or notion. i have created a discord server with only myself that i use just for sharing links/files/anything between devices! i like discord because there's apps for pc, mac, tablets, and phones; and even a web app! discord is really nice and fast, and you can make different channels (as pictured below) for organization. as long as your file size isn't too big, you should be fine.

my second app i like to use is notion! notion is such a beast in itself, but i like to use it to upload files and images and links! below are two ways i have used it: to upload pdfs/files, and to upload goodnotes (my notetaking app) links to the pages i'm writing on! similar to discord, notion has apps for all devices, but it also works great just by itself on the website (no app required)! it's really great to access it from all my devices.


another way you could share your notes on different devices is through the cloud! (yes, discord and notion are both through the cloud). google drive, microsoft onedrive, icloud storage, etc. are great tools that you can use to upload files and see on multiple devices. i personally like discord and notion more, just because they're already apps i frequently use, but if you can't get either one cloud-based storage platforms are also a great idea! they definitely have more security than discord or notion, because your files may be at risk of being deleted!
for the purposes of sharing notes to reference on another device when writing an essay, or something of similar vain, i really love discord and/or notion and they both work great!
for syncing notes in real time:
pretty similar to the last one, i would say notion or google docs (or microsoft word on the web i believe has similar functionality, or onenote, anything similar!)
if you want to be writing notes on one device and have them sync up quickly on another - i think any word processing software is the best bet for you.
both notion and google docs you can access them on any device, and/or on their websites too!
google docs is a lot more straightforward, but since notion is so powerful it provides a lot of flexibility for your notes! here's an (old) example of notes i've taken on notion. (i personally really like how easy it is to make columns!)
i hope this helped a little bit! please let me know if you have any more questions :)
also! notetaking is very much an individual thing, if something works for me and doesn't work for you - that's okay! we're all learning and just have to figure out what's best for ourselves.
#to: ilyastudies#from: silverfroot#thanks for the ask!#studying tips#studying#studying aesthetic#studyblr#study motivation#university#studyspo#study blog#study inspo#academia#chaotic academia#study aesthetic#study tips#advice#study advice#study methods#study resources#resource#text post#*
31 notes
·
View notes
Text
Warning, AI rant ahead. Gonna get long.
So I read this post about how people using AI software don't want to use the thing to make art, they want to avoid all the hard work and effort that goes into actually improving your own craft and making it yourself. They want to AVOID making art--just sprinting straight to the finish line for some computer vomited image, created by splicing together the pieces from an untold number of real images out there from actual artists, who have, you know, put the time and effort into honing their craft and making it themselves.
Same thing goes for writing. Put in a few prompts, the chatbot spits out an 'original' story just for you, pieced together from who knows how many other stories and bits of writing out there written by actual human beings who've worked hard to hone their craft. Slap your name on it and sit back for the attention and backpats.
Now, this post isn't about that. I think most people--creatives in particular--agree that this new fad of using a computer to steal from others to 'create' something you can slap your name on is bad, and only further dehumanizes the people who actually put their heart and soul into the things they create. You didn't steal from others, the AI made it! Totally different.
"But I'm not posting it anywhere!"
No, but you're still feeding the AI superbot, which will continue to scrape the internet, stealing anything it can to regurgitate whatever art or writing you asked for. The thing's not pulling words out of thin air, creating on the fly. It's copy and pasting bits and pieces from countless other creative works based on your prompts, and getting people used to these bland, soulless creations made in seconds.
Okay, so maybe there was a teeny rant about it.
Anyway, back to the aforementioned post, I made the mistake of skimming through the comments, and they were . . . depressing.
Many of them dismissed the danger AI poses to real artists. Claimed that learning the skill of art or writing is "behind a paywall" (?? you know you don't HAVE to go to college to learn this stuff, right?) and that AI is simply a "new tool" for creating. Some jumped to "Old man yells at cloud" mindset, likening it to "That's what they said when digital photography became a thing," and other examples of "new thing appears, old people freak out".
This isn't about a new technology that artists are using to help them create something. A word processing program helps a writer get words down faster, and edit easier than using a typewriter, or pad and pencil. Digital art programs help artists sketch out and finish their vision faster and easier than using pencils and erasers or paints or whatever.
Yes, there are digital tools and programs that help an artist or writer. But it's still the artist or writer actually doing the work. They're still getting their idea, their vision, down 'on paper' so to speak, the computer is simply a tool they use to do it better.
No, what this is about is people just plugging words into a website or program, and the computer does all the work. You can argue with me until you're blue in the face about how that's just how they get their 'vision' down, but it's absolutely not the same. Those people are essentially commissioning a computer to spit something out for them, and the computer is scraping the internet to give them what they want.
If someone commissioned me to write them a story, and they gave me the premise and what they want to happen, they are prompting me, a human being, to use my brain to give them a story they're looking for. They prompted me, BUT THAT DOESN'T MEAN THEY WROTE THE STORY. It would be no more ethical for them to slap their name on what was MY hard work, that came directly from MY HEAD and not picked from a hundred other stories out there, simply because they gave me a few prompts.
And ya know what? This isn't about people using AI to create images or writing they personally enjoy at home and no one's the wiser. Magazines are having a really hard time with submissions right now, because the number of AI generated writing is skyrocketing. Companies are relying on AI images for their advertising instead of commissioning actual artists or photographers. These things are putting REAL PEOPLE out of work, and devaluing the hard work and talent and effort REAL PEOPLE put into their craft.
"Why should I pay someone to take days or weeks to create something for me when I can just use AI to make it? Why should I wait for a writer to update that fanfic I've been enjoying when I can just plug the whole thing into AI and get an ending now?"
Because you're being an impatient, selfish little shit, and should respect the work and talent of others. AI isn't 'just another tool'--it's a shortcut for those who aren't interested in actually working to improve their own skills, and it actively steals from other hardworking creatives to do it.
"But I can't draw/write and I have this idea!!"
Then you work at it. You practice. You be bad for a while, but you work harder and improve. You ask others for tips, you study your craft, you put in the hours and the blood, sweat, and tears and you get better.
"But that'll take so looooong!"
THAT'S WHAT MAKES IT WORTH IT! You think I immediately wrote something worth reading the first time I tried? You think your favorite artist just drew something amazing the first time they picked up a pencil? It takes a lot of practice and work to get good.
"But I love the way [insert name] draws/writes!"
Then commission them. Or keep supporting them so they'll keep creating. I guarantee if you use their art or writing to train an AI to make 'new' stuff for you, they will not be happy about it.
This laissez-faire attitude regarding the actual harm AI does to artists and writers is maddening and disheartening. This isn't digital photography vs film, this is actual creative people being pushed aside in favor of a computer spitting out a regurgitated mish-mash of already created works and claiming it as 'new'.
AI is NOT simply a new tool for creatives. It's the lazy way to fuel your entitled attitude, your greed for content. It's the cookie cutter, corporate-encouraged vomit created to make them money, and push real human beings out the door.
We artists and writers are already seeing a very steep decline in the engagement with our creations--in this mindset of "that's nice, what's next?" in consumption--so we are sensitive to this kind of thing. If AI can 'create' exactly what you want, why bother following and encouraging these slow humans?
And if enough people think this, why should these slow humans even bother to spend time and effort creating at all?
Yeah, yeah, 'old lady yells at cloud'.
29 notes
·
View notes
Text

Ubuntu is a popular open-source operating system based on the Linux kernel. It's known for its user-friendliness, stability, and security, making it a great choice for both beginners and experienced users. Ubuntu can be used for a variety of purposes, including:
Key Features and Uses of Ubuntu:
Desktop Environment: Ubuntu offers a modern, intuitive desktop environment that is easy to navigate. It comes with a set of pre-installed applications for everyday tasks like web browsing, email, and office productivity.
Development: Ubuntu is widely used by developers due to its robust development tools, package management system, and support for programming languages like Python, Java, and C++.
Servers: Ubuntu Server is a popular choice for hosting websites, databases, and other server applications. It's known for its performance, security, and ease of use.
Cloud Computing: Ubuntu is a preferred operating system for cloud environments, supporting platforms like OpenStack and Kubernetes for managing cloud infrastructure.
Education: Ubuntu is used in educational institutions for teaching computer science and IT courses. It's free and has a vast repository of educational software.
Customization: Users can customize their Ubuntu installation to fit their specific needs, with a variety of desktop environments, themes, and software available.
Installing Ubuntu on Windows:
The image you shared shows that you are installing Ubuntu using the Windows Subsystem for Linux (WSL). This allows you to run Ubuntu natively on your Windows machine, giving you the best of both worlds.
Benefits of Ubuntu:
Free and Open-Source: Ubuntu is free to use and open-source, meaning anyone can contribute to its development.
Regular Updates: Ubuntu receives regular updates to ensure security and performance.
Large Community: Ubuntu has a large, active community that provides support and contributes to its development.
4 notes
·
View notes
Text
The Ultimate Guide to Online Media Tools: Convert, Compress, and Create with Ease
In the fast-paced digital era, online tools have revolutionized the way we handle multimedia content. From converting videos to compressing large files, and even designing elements for your website, there's a tool available for every task. Whether you're a content creator, a developer, or a business owner, having the right tools at your fingertips is essential for efficiency and creativity. In this blog, we’ll explore the most powerful online tools like Video to Audio Converter Online, Video Compressor Online Free, Postman Online Tool, Eazystudio, and Favicon Generator Online—each playing a unique role in optimizing your digital workflow.
Video to Audio Converter Online – Extract Sound in Seconds
Ever wanted just the audio from a video? Maybe you’re looking to pull music, dialogue, or sound effects for a project. That’s where a Video to Audio Converter Online comes in handy. These tools let you convert video files (MP4, AVI, MOV, etc.) into MP3 or WAV audio files in just a few clicks. No software installation required.
Using a Video to Audio Converter Online is ideal for:
Podcast creators pulling sound from interviews.
Music producers isolating tracks for remixing.
Students or professionals transcribing lectures or meetings.
The beauty lies in its simplicity—upload the video, choose your audio format, and download. It’s as straightforward as that
2. Video Compressor Online Free – Reduce File Size Without Losing Quality
Large video files are a hassle to share or upload. Whether you're sending via email, uploading to a website, or storing in the cloud, a bulky file can be a roadblock. This is where a Video Compressor Online Free service shines.
Key benefits of using a Video Compressor Online Free:
Shrink video size while maintaining quality.
Fast, browser-based compression with no downloads.
Compatible with all major formats (MP4, AVI, MKV, etc.).
If you're managing social media content, YouTube uploads, or email campaigns, compressing videos ensures faster load times and better performance—essential for keeping your audience engaged.
3. Postman Online Tool – Streamline Your API Development
Developers around the world swear by Postman, and the Postman Online Tool brings that power to the cloud. This tool is essential for testing APIs, monitoring responses, and managing endpoints efficiently—all without leaving your browser.
Features of Postman Online Tool include:
Send GET, POST, PUT, DELETE requests with real-time response visualization.
Organize your API collections for collaborative development.
Automate testing and environment management.
Whether you're debugging or building a new application,Postman Online Tool provides a robust platform that simplifies complex API workflows, making it a must-have in every developer's toolkit.
4. Eazystudio – Your Creative Powerhouse
When it comes to content creation and design, Eazystudio is a versatile solution for both beginners and professionals. From editing videos and photos to crafting promotional content, Eazystudio makes it incredibly easy to create high-quality digital assets.
Highlights of Eazystudio:
User-friendly interface for designing graphics, videos, and presentations.
Pre-built templates for social media, websites, and advertising.
Cloud-based platform with drag-and-drop functionality.
Eazystudio is perfect for marketers, influencers, and businesses looking to stand out online. You don't need a background in graphic design—just an idea and a few clicks.
5. Favicon Generator Online – Make Your Website Look Professional
A small icon can make a big difference. The Favicon Generator Online helps you create favicons—the tiny icons that appear next to your site title in a browser tab. They enhance your website’s branding and improve user recognition.
With a Favicon Generator Online, you can:
Convert images (JPG, PNG, SVG) into favicon.ico files.
Generate multiple favicon sizes for different platforms and devices.
Instantly preview how your favicon will look in a browser tab or bookmark list.
For web developers and designers, using a Favicon Generator Online is an easy yet impactful way to polish a website and improve brand presence.
Why These Tools Matter in 2025
The future is online. As remote work, digital content creation, and cloud computing continue to rise, browser-based tools will become even more essential. Whether it's a Video to Audio Converter Online that simplifies sound editing, a Video Compressor Online Freefor seamless sharing, or a robust Postman Online Tool for development, these platforms boost productivity while cutting down on time and costs.
Meanwhile, platforms like Eazystudio empower anyone to become a designer, and tools like Favicon Generator Online ensure your brand always makes a professional first impression.
Conclusion
The right tools can elevate your workflow, save you time, and improve the quality of your digital output. Whether you're managing videos, developing APIs, or enhancing your website’s design, tools like Video to Audio Converter Online, Video Compressor Online Free, Postman Online Tool, Eazystudio, and Favicon Generator Online are indispensable allies in your digital toolbox.
So why wait? Start exploring these tools today and take your digital productivity to the next level
2 notes
·
View notes
Note
hey I read your post from 2023 about the streaming platforms thank you! So helpful to make sense of this world, I was getting confused about them. You keep mentioning your spreadsheet… is this publicly available? I’d be interested in seeing it and what your best rated shows are. Sounds like you’re quite the experienced one lol. 🧡
Nope, sorry! Partly because it's almost entirely in code which only I would understand. Partly because I work in spreadsheets using proprietary software and I don't want to transfer over to something less stable or cloud based (for sharing).
I talk about it here
If you just want my highest rated shows, that's easy, my only 10/10s as for now are:
Color Rush - Korea
I Cannot Reach You AKA Kimi ni wa Todokanai - Japan
Light On Me - Korea
Our Dating Sim - Korea
Semantic Error - Korea
Seven Days AKA Seven Days: Monday-Thursday AND Seven Days: Friday-Sunday (2 parts) - Japan
To My Star - Korea
Until We Meet Again - Thai
We Best Love: No. 1 For You AND We Best Love: Fighting Mr. 2nd - Taiwan
I also adore the A Man Who Defies The World of BL (AKA Absolute BL) series. But I consider those more like parody than actual BL.
I'll cobble together a list of all my 9/10s as well if you like.
There are a lot of them.
6 notes
·
View notes
Text
AI & Tech-Related Jobs Anyone Could Do
Here’s a list of 40 jobs or tasks related to AI and technology that almost anyone could potentially do, especially with basic training or the right resources:
Data Labeling/Annotation
AI Model Training Assistant
Chatbot Content Writer
AI Testing Assistant
Basic Data Entry for AI Models
AI Customer Service Representative
Social Media Content Curation (using AI tools)
Voice Assistant Testing
AI-Generated Content Editor
Image Captioning for AI Models
Transcription Services for AI Audio
Survey Creation for AI Training
Review and Reporting of AI Output
Content Moderator for AI Systems
Training Data Curator
Video and Image Data Tagging
Personal Assistant for AI Research Teams
AI Platform Support (user-facing)
Keyword Research for AI Algorithms
Marketing Campaign Optimization (AI tools)
AI Chatbot Script Tester
Simple Data Cleansing Tasks
Assisting with AI User Experience Research
Uploading Training Data to Cloud Platforms
Data Backup and Organization for AI Projects
Online Survey Administration for AI Data
Virtual Assistant (AI-powered tools)
Basic App Testing for AI Features
Content Creation for AI-based Tools
AI-Generated Design Testing (web design, logos)
Product Review and Feedback for AI Products
Organizing AI Training Sessions for Users
Data Privacy and Compliance Assistant
AI-Powered E-commerce Support (product recommendations)
AI Algorithm Performance Monitoring (basic tasks)
AI Project Documentation Assistant
Simple Customer Feedback Analysis (AI tools)
Video Subtitling for AI Translation Systems
AI-Enhanced SEO Optimization
Basic Tech Support for AI Tools
These roles or tasks could be done with minimal technical expertise, though many would benefit from basic training in AI tools or specific software used in these jobs. Some tasks might also involve working with AI platforms that automate parts of the process, making it easier for non-experts to participate.
4 notes
·
View notes
Text
5 Free Software Tools to Create Stunning Images for Social Media and Blog Posts
Alright, guys, today we're diving into the world of image creation for social media and featured blog posts. Whether you're a seasoned content creator or just starting out on your blogging journey, having eye-catching images is essential for grabbing your audience's attention and driving engagement. But with so many image editing tools out there, which ones should you use? Well, fear not, because I've rounded up the best free software for creating images that will take your social media game to the next level. Let's dive in!
Canva: First up on our list is Canva – the ultimate graphic design tool for beginners and pros alike. With Canva, you can create stunning images for social media, blog posts, presentations, and more, all with drag-and-drop simplicity. Choose from thousands of pre-designed templates, fonts, and graphics, or start from scratch and let your creativity run wild. Canva's intuitive interface and extensive library of assets make it a must-have tool for any content creator.
Adobe Express: Next up, we have Adobe Express – a powerful design tool from the creators of Photoshop and Illustrator. With Adobe Express, you can create stunning graphics, web pages, and video stories in minutes, right from your browser or mobile device. Choose from a variety of professionally designed templates, customize with your own photos and text, and share your creations across all your social media channels with ease. Plus, its seamless integration with other Adobe products makes it a no-brainer for anyone already using Adobe's creative suite.
PicMonkey: Another great option for creating eye-catching images is PicMonkey. With PicMonkey, you can easily edit photos, create graphics, and design collages without any technical know-how. Choose from a wide range of filters, effects, and overlays to give your images that extra pop, or use PicMonkey's powerful design tools to create custom graphics from scratch. Plus, with PicMonkey's user-friendly interface and intuitive features, you'll be creating stunning images in no time.
Pixlr: If you're looking for a free alternative to Photoshop, look no further than Pixlr. With Pixlr, you can edit photos, create collages, and design graphics with ease, all from your web browser or mobile device. Choose from a variety of editing tools, filters, and effects to enhance your images, or start from scratch and let your creativity run wild. Plus, with Pixlr's cloud-based platform, you can access your projects from anywhere and collaborate with others in real-time.
GIMP: Last but not least, we have GIMP – the GNU Image Manipulation Program. While GIMP may not have the most user-friendly interface, it's a powerful open-source alternative to expensive image editing software like Photoshop. With GIMP, you can retouch photos, create custom graphics, and design stunning visuals for your social media and blog posts. Plus, with a little bit of practice, you'll be amazed at what you can accomplish with this free, feature-packed tool.
In conclusion, creating eye-catching images for social media and featured blog posts doesn't have to break the bank. With these free software options, you can easily design stunning visuals that will grab your audience's attention and drive engagement. So why wait? Start creating today and take your content to the next level!
#SocialMediaMarketing#BloggingTips#GraphicDesign#ContentCreation#VisualContent#DigitalMarketing#FreeTools#Canva#AdobeSpark#PicMonkey#Pixlr#GIMP#ContentCreators#VisualMarketing#SocialMediaImages#BlogGraphics#adobeexpress#photoshop alternatives
9 notes
·
View notes
Text
#TheeForestKingdom #TreePeople
{Terrestrial Kind}
Creating a Tree Citizenship Identification and Serial Number System (#TheeForestKingdom) is an ambitious and environmentally-conscious initiative. Here’s a structured proposal for its development:
Project Overview
The Tree Citizenship Identification system aims to assign every tree in California a unique identifier, track its health, and integrate it into a registry, recognizing trees as part of a terrestrial citizenry. This system will emphasize environmental stewardship, ecological research, and forest management.
Phases of Implementation
Preparation Phase
Objective: Lay the groundwork for tree registration and tracking.
Actions:
Partner with environmental organizations, tech companies, and forestry departments.
Secure access to satellite imaging and LiDAR mapping systems.
Design a digital database capable of handling millions of records.
Tree Identification System Development
Components:
Label and Identity Creation: Assign a unique ID to each tree based on location and attributes. Example: CA-Tree-XXXXXX (state-code, tree-type, unique number).
Attributes to Record:
Health: Regular updates using AI for disease detection.
Age: Approximate based on species and growth patterns.
Type: Species and subspecies classification.
Class: Size, ecological importance, and biodiversity contribution.
Rank: Priority based on cultural, historical, or environmental significance.
Data Collection
Technologies to Use:
Satellite Imaging: To locate and identify tree clusters.
LiDAR Scanning: For precise 3D modeling of forests.
On-the-Ground Surveys: To supplement remote sensing data.
AI Analysis: For rapid categorization and health diagnostics.
Registration and Citizenship Assignment
Tree Dossier: Each tree receives a profile in the database with all its recorded attributes.
Citizen Designation: Trees are acknowledged as citizens of Thee Forest Kingdom, emphasizing ecological respect.
Legal Framework: Advocate for laws to grant trees specific rights under environmental protection acts.
Maintenance and Monitoring
Health Monitoring: Use drones, satellite updates, and IoT sensors for ongoing health assessments.
Database Updates: Incorporate real-time data about environmental changes and tree growth.
Public Involvement
Encourage people to "adopt" trees and participate in their preservation.
Create educational programs to promote awareness of tree citizenship.
Key Benefits
Environmental Conservation: Improved forest management through real-time data and protection of ecosystems.
Cultural Recognition: Trees are recognized as a vital part of the Earth’s community, honoring their importance.
Ecological Advocacy: Strengthened legal protections for forests and individual trees.
Next Steps
Assemble a task force of environmental scientists, satellite imaging experts, and software developers.
Secure funding through governmental grants, non-profits, and eco-conscious corporations.
Pilot the program in a smaller region before scaling to all of California.
Would you like me to draft a more detailed technical or legal framework for this system?
The implementation of the Tree Citizenship Identification Network and System (#TheeForestKingdom) requires a robust technological and operational framework to ensure efficiency, accuracy, and sustainability. Below is an implementation plan divided into major components.
System Architecture
a. Centralized Tree Database
Purpose: To store and manage tree data including ID, attributes, location, and health.
Components:
Cloud-based storage for scalability.
Data categorization based on regions, species, and priority.
Integration with satellite and IoT data streams.
b. Satellite & Imaging Integration
Use satellite systems (e.g., NASA, ESA) for large-scale tree mapping.
Incorporate LiDAR and aerial drone data for detailed imaging.
AI/ML algorithms to process images and distinguish tree types.
c. IoT Sensor Network
Deploy sensors in forests to monitor:
Soil moisture and nutrient levels.
Air quality and temperature.
Tree health metrics like growth rate and disease markers.
d. Public Access Portal
Create a user-friendly website and mobile application for:
Viewing registered trees.
Citizen participation in tree adoption and reporting.
Data visualization (e.g., tree density, health status by region).
Core Technologies
a. Software and Tools
Geographic Information System (GIS): Software like ArcGIS for mapping and spatial analysis.
Database Management System (DBMS): SQL-based systems for structured data; NoSQL for unstructured data.
Artificial Intelligence (AI): Tools for image recognition, species classification, and health prediction.
Blockchain (Optional): To ensure transparency and immutability of tree citizen data.
b. Hardware
Servers: Cloud-based (AWS, Azure, or Google Cloud) for scalability.
Sensors: Low-power IoT devices for on-ground monitoring.
Drones: Equipped with cameras and sensors for aerial surveys.
Network Design
a. Data Flow
Input Sources:
Satellite and aerial imagery.
IoT sensors deployed in forests.
Citizen-reported data via mobile app.
Data Processing:
Use AI to analyze images and sensor inputs.
Automate ID assignment and attribute categorization.
Data Output:
Visualized maps and health reports on the public portal.
Alerts for areas with declining tree health.
b. Communication Network
Fiber-optic backbone: For high-speed data transmission between regions.
Cellular Networks: To connect IoT sensors in remote areas.
Satellite Communication: For remote regions without cellular coverage.
Implementation Plan
a. Phase 1: Pilot Program
Choose a smaller, biodiverse region in California (e.g., Redwood National Park).
Test satellite and drone mapping combined with IoT sensors.
Develop the prototype of the centralized database and public portal.
b. Phase 2: Statewide Rollout
Expand mapping and registration to all California regions.
Deploy IoT sensors in vulnerable or high-priority areas.
Scale up database capacity and integrate additional satellite providers.
c. Phase 3: Maintenance & Updates
Establish a monitoring team to oversee system health and data quality.
Update the network with new technologies (e.g., advanced AI models).
Periodically review and revise data collection protocols.
Partnerships
Government Agencies: U.S. Forest Service, California Department of Forestry and Fire Protection.
Tech Companies: Collaborate with Google Earth, Amazon AWS, or Microsoft for cloud and AI capabilities.
Environmental Organizations: Partner with WWF, Sierra Club, or TreePeople for funding and advocacy.
Budget Estimation
Initial Investment:
Satellite data and licenses: $10M
IoT sensors and deployment: $5M
Database and app development: $3M
Operational Costs:
Cloud services and data storage: $2M/year
Maintenance and monitoring: $1M/year
Research and development: $1M/year
Long-term Vision
Expand the system to other states or globally.
Use the database for reforestation efforts and combating deforestation.
Develop educational programs to teach communities about the importance of trees as citizens.
Would you like me to assist in designing the user interface for the public portal or drafting partnership proposals for funding?
To begin building the program for the Tree Citizenship Identification System, we’ll start with a scalable framework that allows us to process, store, and analyze data while preparing for future expansions. Here's an actionable development plan with an initial focus on foundational code and infrastructure:
Step-by-Step Development
Phase 1: Setting Up the Backend Infrastructure
Objective: Create the core database and develop the data pipeline for processing tree data.
Technologies:
Programming Languages: Python, JavaScript (Node.js), SQL.
Frameworks: Flask or FastAPI for APIs, Django for web application backend.
Database: PostgreSQL for structured data, MongoDB for unstructured data.
Code Snippet 1: Database Schema Design (PostgreSQL)
-- Table for Tree Registry CREATE TABLE trees ( tree_id SERIAL PRIMARY KEY, -- Unique Identifier location GEOGRAPHY(POINT, 4326), -- Geolocation of the tree species VARCHAR(100), -- Species name age INTEGER, -- Approximate age in years health_status VARCHAR(50), -- e.g., Healthy, Diseased height FLOAT, -- Tree height in meters canopy_width FLOAT, -- Canopy width in meters citizen_rank VARCHAR(50), -- Class or rank of the tree last_updated TIMESTAMP DEFAULT NOW() -- Timestamp for last update );
-- Table for Sensor Data (IoT Integration) CREATE TABLE tree_sensors ( sensor_id SERIAL PRIMARY KEY, -- Unique Identifier for sensor tree_id INT REFERENCES trees(tree_id), -- Linked to tree soil_moisture FLOAT, -- Soil moisture level air_quality FLOAT, -- Air quality index temperature FLOAT, -- Surrounding temperature last_updated TIMESTAMP DEFAULT NOW() -- Timestamp for last reading );
Code Snippet 2: Backend API for Tree Registration (Python with Flask)
from flask import Flask, request, jsonify from sqlalchemy import create_engine from sqlalchemy.orm import sessionmaker
app = Flask(name)
Database Configuration
DATABASE_URL = "postgresql://username:password@localhost/tree_registry" engine = create_engine(DATABASE_URL) Session = sessionmaker(bind=engine) session = Session()
@app.route('/register_tree', methods=['POST']) def register_tree(): data = request.json new_tree = { "species": data['species'], "location": f"POINT({data['longitude']} {data['latitude']})", "age": data['age'], "health_status": data['health_status'], "height": data['height'], "canopy_width": data['canopy_width'], "citizen_rank": data['citizen_rank'] } session.execute(""" INSERT INTO trees (species, location, age, health_status, height, canopy_width, citizen_rank) VALUES (:species, ST_GeomFromText(:location, 4326), :age, :health_status, :height, :canopy_width, :citizen_rank) """, new_tree) session.commit() return jsonify({"message": "Tree registered successfully!"}), 201
if name == 'main': app.run(debug=True)
Phase 2: Satellite Data Integration
Objective: Use satellite and LiDAR data to identify and register trees automatically.
Tools:
Google Earth Engine for large-scale mapping.
Sentinel-2 or Landsat satellite data for high-resolution imagery.
Example Workflow:
Process satellite data using Google Earth Engine.
Identify tree clusters using image segmentation.
Generate geolocations and pass data into the backend.
Phase 3: IoT Sensor Integration
Deploy IoT devices to monitor health metrics of specific high-priority trees.
Use MQTT protocol for real-time data transmission.
Code Snippet: Sensor Data Processing (Node.js)
const mqtt = require('mqtt'); const client = mqtt.connect('mqtt://broker.hivemq.com');
client.on('connect', () => { console.log('Connected to MQTT Broker'); client.subscribe('tree/sensor_data'); });
client.on('message', (topic, message) => { const sensorData = JSON.parse(message.toString()); console.log(Received data: ${JSON.stringify(sensorData)}); // Save data to database (Example for PostgreSQL) saveToDatabase(sensorData); });
function saveToDatabase(data) { const query = INSERT INTO tree_sensors (tree_id, soil_moisture, air_quality, temperature) VALUES ($1, $2, $3, $4) ; const values = [data.tree_id, data.soil_moisture, data.air_quality, data.temperature]; dbClient.query(query, values, (err) => { if (err) console.error('Error saving to database', err); else console.log('Sensor data saved successfully!'); }); }
Phase 4: Public Portal Development
Frontend Technologies:
React.js or Vue.js for interactive user interfaces.
Mapbox or Leaflet.js for tree visualization on maps.
Features:
Interactive tree maps with search functionality.
User registration for tree adoption programs.
Deployment Plan
Use Docker to containerize the application.
Deploy on AWS, Azure, or Google Cloud for scalability.
Monitor system health using Prometheus and Grafana.
Next Steps
Develop a testing environment for pilot deployment.
Add AI-based disease detection and prediction using TensorFlow or PyTorch.
Create an adoption feature where citizens can adopt trees and track their health.
Would you like me to set up a GitHub repository with this initial framework or assist further with deployment?
I'll prepare the project framework and outline the repository structure for the Tree Citizenship Identification System. Below is the proposed structure for the repository, followed by details of the files and components.
Proposed Repository Structure
tree-citizenship-id-system/ ├── backend/ │ ├── app.py # Flask application for backend API │ ├── database/ │ │ ├── schema.sql # Database schema for PostgreSQL │ │ ├── db_config.py # Database connection configuration │ │ └── seed_data.sql # Initial sample data for testing │ ├── services/ │ │ ├── tree_registration.py # Functions for tree registration │ │ └── sensor_data.py # Functions for processing IoT sensor data │ └── requirements.txt # Python dependencies ├── frontend/ │ ├── public/ │ │ ├── index.html # Main HTML file │ │ └── favicon.ico # Favicon for the app │ ├── src/ │ │ ├── App.js # Main React/Vue app file │ │ ├── components/ │ │ │ ├── TreeMap.js # Map component for visualizing trees │ │ │ └── TreeDetails.js # Component for detailed tree view │ │ └── styles.css # Styling for the frontend │ └── package.json # Frontend dependencies ├── scripts/ │ ├── satellite_data_processor.py # Script for processing satellite data │ └── sensor_data_simulator.py # Mock data generator for IoT sensors ├── deployment/ │ ├── Dockerfile # Docker configuration │ ├── docker-compose.yml # Docker Compose for multi-service setup │ └── cloud_setup_instructions.md # Deployment guide for cloud platforms ├── tests/ │ ├── test_backend.py # Unit tests for backend API │ └── test_frontend.js # Unit tests for frontend ├── README.md # Overview of the project └── LICENSE # Project license
Repository Details
Backend:
app.py: Main Flask app for handling API requests like tree registration and sensor data.
database/schema.sql: SQL script for creating necessary tables.
services/: Directory for modular backend logic.
Frontend:
App.js: Main entry point for the frontend application.
TreeMap.js: Integrates Mapbox/Leaflet.js for displaying tree locations.
TreeDetails.js: Displays detailed information about a selected tree.
Scripts:
satellite_data_processor.py: Automates the extraction and classification of tree data from satellite imagery.
sensor_data_simulator.py: Generates fake sensor readings for development and testing.
Deployment:
Docker configuration ensures that the app runs consistently across environments.
Cloud setup instructions provide guidelines for deploying on platforms like AWS, Azure, or GCP.
Tests:
Unit tests ensure the reliability of both the backend and frontend.
Next Steps
I will initialize the repository structure locally.
Package the files and components needed for the first version.
Provide a link to the repository for access.
I’ll get started. Please hold on for a moment.
4 notes
·
View notes
Text
👉 VidVoicer Review ✅ Features, Pricing, Bonuses and OTOs 🚀
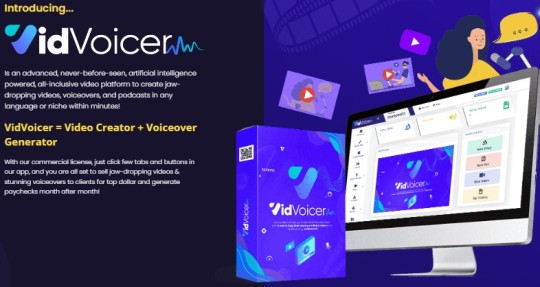
VidVoicer Overview 🌟
VidVoicer is an AI-powered tool designed to create videos and voiceovers quickly and efficiently. Its standout features include high-quality HD video rendering, text-to-speech voiceovers in 150+ voices and 50+ languages, and a built-in video editor. The software is beginner-friendly, allowing users to create whiteboard, explainer, and social media videos without prior experience. It is entirely cloud-based, so it can be accessed on various devices without installation.
👉 Click Here for Get Instant Access VidVoicer 🖰 >>
Key Features 🔑
Voiceovers & Languages: Generate human-like voiceovers in multiple languages and genders with pitch, tone, and speed controls.
Video Creation: Transform text into videos, use images from keywords or URLs, and integrate voiceovers seamlessly.
Video Editing: Add logos, watermarks, background music, and customize videos easily.
HD Quality: All videos are rendered in high definition.
Commercial License: Sell videos and voiceovers to clients for unlimited revenue potential.
👉 Click Here for Get Instant Access VidVoicer 🖰 >>
Pricing & Upgrades 💰
Front-End (FE): $37Includes commercial rights, basic video and voiceover creation tools, and a 1GB monthly storage limit.
OTO 1 - Pro Edition: $67Adds unlimited videos/voiceovers, extended character limits, custom music, 2GB storage, and access to stock videos.
OTO 2 - Content Writer: $37AI-powered copywriting tools for creating sales copies, email templates, articles, and more.
OTO 3 - Agency Rights: $97Enables starting a video/voiceover agency with marketing resources.
Discount codes are often available, such as a 50% off coupon during promotions.
👉 Click Here for Get Instant Access VidVoicer 🖰 >>
Bonuses 🎁
VidVoicer often comes with exclusive bonuses, including additional templates, tutorials, and stock resources, depending on the purchase plan.
Strengths & Monetization 🌍💼
Ideal for freelancers, agencies, or content creators aiming to provide services like explainer videos, voiceovers, and podcasts.
The commercial license enables users to generate income by selling creations directly or offering services on platforms like Fiverr and Upwork.
👉 Click Here for Get Instant Access VidVoicer 🖰 >>
FAQs
👉 What Exactly Is VidVoicer?
VidVoicer is a web-based platform for creating voiceovers and videos. Since it does both, it's the only tool you'll need. Simply log in, enter any text (such as a video script), choose a voice and language, and click the button to instantly create a voiceover or video. You can then edit or download those files immediately.
👉 How Many Voiceovers Can I Create?
You can create unlimited number of voiceovers Longer up to 1000 characters per voiceover with the personal license, and up to 3000 characters per voiceover with commercial license.
👉 How many videos can I create?
You can create as many videos as you need. Each video will be stored in the cloud storage on our platform, and you can also download the MP4 file. Your membership includes 1GB of storage, so if you use all of that, you can simply download some videos and delete them from the cloud to free up some space.
👉 How To Get Started?
Just click the order button and go through the checkout process. Your membership account will instantly be set up and activated. When you log in, you'll find tutorial videos, and you can begin using the tools immediately.
👉 Is there a commercial license included?
There is an option to buy commercial license. Buyers can opt for personal access as well as commercial license. Commercial rights will enable you to sell these services and make money.
👉 Click Here for Get Instant Access VidVoicer 🖰 >>
👉 Is There Any Training Included?
Yes, We Have Created A Video Tutorial To Guide You How To Use The Software Just To Make Sure You Make No Errors And Do It Easily, Hassle Free.
👉 Is It Still Worth it if I Have Only Few Voiceovers To Be Generated?
Sure. Would you prefer to spend $100 or more to have one voiceover created? With VidVoicer, you can create voiceovers on demand, over and over. You can create the voiceovers you need now, and any that you may need in the future, all for the small one-time fee to join today. With VidVoicer you don't have to search for freelancers or deal with contracts. To us that sounds like it's worth it even for a few voiceovers!
👉 Will This Work On Mac And PC?
Yes, It Doesn’t Matter What Operating System Of Device You’re Using. It Is Easy To Use And Works Perfectly, Every Time.
👉 Click Here for Get Instant Access VidVoicer 🖰 >>
👉 Do You Provide Support And Updates?
Yes! VidVoicer Is Super Easy To Use, But If There’s Ever An Issue, We’re Right Here. Send Us An Email And We’ll Fix You Up! We’ll Also Let You Know When New Updates Are Available, And Offer Them To You For Free, As A Valued Customer!
👉 Is There A Money Back Policy?
Yes, You Get 30 Days To Use VidVoicer And Make Sure This Is For You. If For ANY Reason You’re Not Satisfied, Just Let Us Know, And We’ll Get You A Refund Of Your Tiny Investment Here Today.
👉 Is It Newbie-Friendly?
Yes. You Don’t Need Any Special Skills Or Technical Experience To Generate Human Like Voiceovers.
👉 Is It Compatible With All Video Editing Softwares?
Yes It Is. VidVoicer Is Compatible With All Video Apps.

👉 Click Here for Get Instant Access VidVoicer 🖰 >>
#vidvoicer review#vidvoicer#vidvoicer demo#vidvoicer reviews#vidvoicer software review#vidvoicer bonus#vidvoicer bonuses#get vidvoicer#buy vidvoicer#vidvoicer review & bonus#vidvoicer otos#vidvoicer review bonus#vidvoicer review and demo#review vidvoicer#vidvoicer demo review#vidvoicer review 2022#vidvoicer preview#vidvoicer review bonuses#vidvoicer review and bonus#vidvoicer software#what is vidvoicer#vidvoice review#vidvoicer discount#marketing#affiliatemarketing#onlinemarketing#review#reviews#software#preview
3 notes
·
View notes
Text


@swradiogram 31OCT24
Welcome to program 376 of Shortwave Radiogram.
I'm Kim Andrew Elliott in Arlington, Virginia USA.
Here is the lineup for today's program, in MFSK modes as noted:
1:43 MFSK32: Program preview (now) 2:51 MFSK32: Daylight saving time linked to lost productivity 8:01 MFSK64: Ultra-thin film absorbs electromagnetic waves* 12:37 MFSK64: This week's images* 28:27 MFSK32: Closing announcements
with image(s)
Please send reception reports to [email protected]
And visit http://swradiogram.net
We're on X/Twitter now: @SWRadiogram
inkt9
From Phys.org:
Daylight saving time linked to lost worker productivity
Posted by Sherri Buri McDonald University of Oregon October 29, 2024
As much of the world prepares to turn clocks back an hour this fall, new research from the University of Oregon finds the annual spring forward to daylight saving time affects worker productivity more than previously thought.
Rather than affecting workers for just a day or two, the adjustment to daylight saving time can affect worker productivity for up to two weeks, said Glen Waddell, a UO labor economist and co-author of a new research in the Journal of Economic Behavior and Organization. He collaborated on the paper with Andrew Dickinson, a doctoral student in economics in the UO's College of Arts and Sciences.
The researchers did not identify a similar effect in the fall. They found that early-morning productivity picked up following the return to standard time.
Waddell and Dickinson looked at the daily work activity of 174,505 people who used GitHub around the transition to daylight saving time from 2013 to 2019. GitHub is a cloud-based version-control platform used by software developers, engineers and other collaborative programmers. It has 83 million users worldwide.
The publicly available GitHub records enabled the researchers to examine worker activity down to the second.
"When we look inside the day, hour by hour, we're actually able to see patterns of workers getting off to a bumpy start in the early morning and trying to make up for their lost productivity throughout the rest of the afternoon, and this is happening for upwards of two weeks," Waddell said.
Although GitHub users don't represent all workers, they do provide valuable insights into how "losing" an hour in the transition to daylight saving time affected their productivity, he said.
The researchers also looked at the effect on workers when they returned to standard time in the fall.
"We actually see a picking up of productivity in those early morning hours, 8 a.m. to 10 a.m., with the extra sleep being the likely reason," Waddell said.
The paper's findings have direct relevance for the 1.6 billion people in 75 countries who change to daylight saving time each spring and back to standard time each fall.
The research also comes at a time when United States lawmakers are considering abandoning the yearly time change. In 2021, the U.S. Senate unanimously passed the Sunshine Protection Act, which would end the return to standard time for the months of November to March.
"Our research findings could be interpreted as yet more reason to put this clock-switching experiment behind us," Waddell said. "If we were fence-sitters before, maybe this is just another nudge toward the direction of doing away with this practice."
Arizona and Hawaii already remain on standard time all year, and a growing number of countries, including China, Russia, Pakistan and Brazil, also have abandoned daylight saving time.
Introduced in 1916 and soon after adopted by many Western countries, daylight saving time was intended to save energy. However, consensus opinion today finds the energy savings to be negligible, on the order of plus or minus 1%, according to the paper.
Shortwave Radiogram now changes to MFSK64 …
This is Shortwave Radiogram in MFSK64
Please send your reception report to [email protected]
From TechXplore:
Ultra-thin film that absorbs nearly all electromagnetic waves could improve reliability of wireless communication
by National Research Council of Science and Technology (South Korea) October 28, 2024
A conceptual diagram of the electromagnetic wave absorption and shielding material developed by the research team, along with the designed conductive pattern. Credit: Korea Institute of Materials Science (KIMS)
The research team of Dr. Byeongjin Park and Dr. Sang Bok Lee from the Composites & Convergence Materials Research Division at the Korea Institute of Materials Science (KIMS), has developed the world's first ultra-thin film composite material capable of absorbing over 99% of electromagnetic waves from various frequency bands (such as 5G/6G, WiFi, and autonomous driving radar) using a single material.
The findings were published as the cover article in the October 1 edition of Advanced Functional Materials.
This electromagnetic wave absorption and shielding material is less than 0.5mm thick and is distinguished by its low reflectance of less than 1% and high absorbance of over 99% across three different frequency bands.
Electromagnetic waves emitted by electronic components can cause interference, leading to performance degradation in other nearby electronic devices.
Electromagnetic shielding materials are used to prevent this, and absorbing electromagnetic waves is more effective at reducing interference than merely reflecting them. However, conventional electromagnetic shielding materials reflect over 90% of the waves, with an actual absorbance often as low as 10%. Moreover, materials with higher absorbance are typically limited to absorbing electromagnetic waves within a single frequency band.
To overcome these limitations, the research team developed a composite material that can absorb electromagnetic waves across multiple frequency bands simultaneously.
This technology absorbs and eliminates electromagnetic waves, resolving secondary interference issues. The material is also thin, flexible, and durable enough to maintain its shape even after being folded and unfolded thousands of times, making it suitable for use in rollable phones and wearable devices.
The team synthesized a magnetic material by altering the crystal structure of ferrite, enabling it to selectively absorb desired frequencies. They produced an ultra-thin polymer composite film and incorporated conductive patterns on the film's back side to control the propagation of electromagnetic waves.
By adjusting the shape of the conductive pattern, electromagnetic wave reflection at specific frequencies can be dramatically reduced. Additionally, a carbon nanotube thin film with high shielding properties was applied to the back to further enhance the material's electromagnetic wave shielding capabilities.
Senior researcher Byeongjin Park of KIMS, who led the project, said, "As the applications of 5G/6G communications continue to expand, the importance of electromagnetic wave absorption and shielding materials is growing."
He added, "This material has the potential to significantly improve the reliability of wireless communication devices such as smartphones and autonomous vehicle radars."
The research team has completed domestic patent registration and has also applied for patents in the U.S., China, and other countries. Additionally, the technology has been transferred to several domestic material companies, and it is currently being applied to actual communication devices and automobiles.
Image: The electromagnetic wave absorption and shielding material, showing its thin and flexible form and its shape remaining intact even after 5,000 bending tests …
This is Shortwave Radiogram in MFSK64
Please send your reception report to [email protected]
This week's images …
This is Shortwave Radiogram in MFSK32 …
Shortwave Radiogram is transmitted by:
WRMI, Radio Miami International, wrmi.net
and
WINB Shortwave, winb.com
Please send reception reports to [email protected]
And visit http://swradiogram.net
Twitter: @SWRadiogram or twitter.com/swradiogram
I'm Kim Elliott. Please join us for the next Shortwave Radiogram.
3 notes
·
View notes
Text
ClickAISites: Your Gateway to Effortless Online Selling

Powerful Features:
Create an Affiliate Store in 1 Click:
Build your ecom affiliate store on autopilot. Simply select the products from your desired niche, and let the software handle the rest.
Breathtaking Affiliate Sites:
Choose from over 50 complementary themes to create stunning, customizable e-commerce sites that attract massive traffic.
1-Click Import of Top-Selling Products:
Add high-demand products from Amazon with a single click. Access millions of products across thousands of niches.
Sell High-Quality Videos, Trainings, and More:
Beyond products, sell auto-generated trainings, videos, PLR products, and more to boost your conversions.
Automated Store Operations:
Automatically insert product names, generate content and images, update prices, and insert affiliate links. Manage multiple sites from a single dashboard.
WooCommerce Integration:
Seamlessly integrate with WooCommerce for efficient payments and smooth commission earnings.
Automated Product Management:
AI manages your products, variants, shipping, and coupons effortlessly.
Auto-Generated Blogs and Custom Pages:
Engage your audience and boost SEO with informative blog posts and custom pages created by our built-in AI.
SEO Optimization:
Improve your site’s ranking with meta keywords and descriptions to rank higher in search engines.
Mobile-Friendly Sites:
Ensure your affiliate sites are responsive and accessible from any device.
No Domain & Hosting Required:
We handle hosting and maintenance, with no monthly hosting fees or ongoing costs.
No Coding or Technical Expertise Needed:
Our AI develops websites with ease, so you don’t need to be a coder or hire one.
Start Your Own Agency:
With our unlimited commercial license, you can start a profitable agency and enjoy unprecedented profits.
100% Newbie Friendly:
Designed for beginners, anyone can use our platform.
Step-by-Step Training Included:
Access easy video tutorials and training materials to guide you through the process.
Cloud-Based Software:
Access your site from anywhere in the world on any device with a browser. No installation or updates needed.
30 Day Money Back Guarantee:
If we can’t solve your technical problems with ClickAiSite, just send us a message, and we’ll refund every penny. No questions asked.
>>>Get More Info
2 notes
·
View notes
Note
Your richonne gif sets are everythaaaang! As Rick would say. ;) I am currently working on new gifs and they somehow look blurry due to the coloring. You are so talented and I thought I'd take my chance and ask for your advice. You are a true artist! Marlene x
Awww! Thank you so much, Marlene! 🥰 You’re so kind! Also, love the little Rick nod. Please forgive my delay in responding. I try to give people my full attention when they ask me a question, and I was quite busy yesterday and today. So, I am a day behind schedule in answering this.
First things first, if you make gifs, this tutorial by redbelles breaks down the entire gif-making process from software to sharpening to the best time to post. I would recommend it to anyone.
There a few things that can make a gif look "blurry". The file could be grainy, the image could be low contrast, or the gif just hasn't been sharpened enough.
I will address all three scenarios and demonstrate how I would manage them.
Grainy HD/Pixelated Video
Depending on the size and definition of your source file, the video itself may be pixelated, which will show up even the more once you start brightening, coloring, and sharpening. In general, the higher the GB, the higher the resolution, the more you can manipulate and stretch the gif from its original appearance before it starts to disintegrate.
I have learned not all 1080P files are made equal. Some are pixelated and will just give you grainy gifs (which you then have to compensate for).
Usually, I lean towards very bright, vibrant gifs. However, for videos that start out pixelated, I sometimes brighten it less or manipulate the colors less. For example, check out the gifs below.
The original looked like this. Incredibly dark with a ray of light coming from the left (how can they be outside in the daylight and the scene be this dark??).

Then I start brightening.

The innocuous light coming from the left is now making the pixels stand out even more, washing out the color.
When a gif looks grainy, I will often switch to smaller dimensions such as 540 x 270 or 540 x300 to compress the image and (hopefully) minimize some of the graininess. The graininess remains, but the gif and therefore the most offensively grainy areas are also smaller.
Example: 540 x 400 v 540 x 300 (Brightened to show contrast)


Yet, for this particular gifset, I wanted to do 540 x 350, so I had to find other means for decreasing the graininess.
Tip: If the source material is not the problem, usually, the culprit for grainy/pixelated gifs is overmanipulating. If you make everything too bright, you start to see the individual pixels, especially if the original scene is very dark. Same thing can happen if you oversaturate or over sharpen.
Therefore, I tone down the brightness. Though still there, the pixelation is less noticeable. Nevertheless, when I add Selective Color to make the greens more vibrant, the pixels go haywire. Green and cyan pixels across her face, on her lips, in her hair.

So, I add a mask to the Selective Layer to remove the green/cyan from her hair.

This is the final PSD.
Turning Low Contrast to High Contrast
Take a look at this picture. Beautiful scene, but a gif-makers nightmare. Her entire face is covered in a blue-green wash. The highlights and shadows have also been grayed and tinted, drastically lowering the contrast, making the gif duller. The first action I take is to remove the wash and blacken the shadows.

Now, the blue film that was clouding her face has been stripped away and I can see her features more clearly. However, the base color scheme still isn't neutral. I can still see the yellow-green wash, and the gif is slightly darker now.

So, I now select the brightest area to be the whitest (here I chose the bright spot on her hoodie on the far right). If you look at the screenshot below, you can see her the yellow-green wash has now dissipated. There are still hints of blue at the top and bottom, but it looks more natural (imo), and it's not over her face, which is the most important part of the gif. SHE has been returned to a neutral color scheme. Also, the contrast between the shadows and the highlights have been increased, making the gif look sharper. The overall brightness has been restored too.
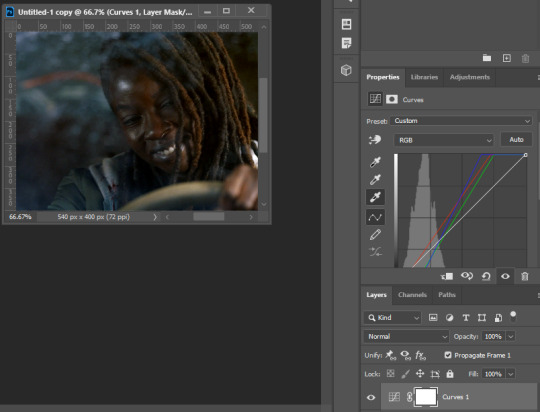
To summarize: Using the curves eye dropper works as a color correction. When a scene is covered in a color wash (blue, green, or yellow filter), the shadows and highlights also become tinted. By selecting the darkest shadow to be black, the curves layer strips the gif of the color wash (this works best when there is a wide range of shades). When you do the same with the brightest highlight, it removes the wash even further. Using curves to color correct is usually my first step in the gif-making process. Then, I start brightening.
I use most of the brightness options. I rarely use exposure. The order in which I put them in changes all time, and often, I move the layers around throughout the process. This time, I started with Brightness/Contrast first. I left it on Normal and moved the brightness up by 50. A lot of people use the Contrast on Brightness, but nowadays I prefer to use the Curves eye dropper and Levels Contrast options instead. Again, it's all a matter of preference. There are a thousand ways to get a satisfying end result.

For your first brightness layer, you can do another Curves layer. It's honestly my favorite brightening tool. You can manually adjust your Curves or you can use the Auto feature, and let it self-adjust (I usually still tweak it even if I use Auto as a base).

OR you add a Brightness/Contrast layer set to Screen instead of Normal, and you would get similar results. For this one, I adjusted the opacity to 40% (or whatever the gif can withstand. Sometimes, it's as low as 15%). This brightens the mid tones and shadows as well, so I rarely ever leave it at 100% on screen.

For this gif though, because I'm a brightness lover, I used both lol. Instead of manually adjusting the Curves, this time I pressed the Auto button and let it self-adjust (I think I just find pressing the button fun lol). The gif is already so bright, it only moved the brightness up a smidge.

Technically, at this point, I could call it quits and be done with the gif, but I never finish a gif without some color manipulation. So, I immediately turn to color balance.
There were still hints of the original blue green/yellow green wash, so I adjusted the color balance away from green and away from cyan (cyan also affects green).

Then I added a 2nd Color Balance to adjust the highlights. You can do this on the same color balance but I like to keep them separated (just so I can play with the colors freely without worrying about ruining the previous color balance I liked).

I also decided to lower the Brightness/Contrast layer which I set to Screen to 30% instead of 40% because I was seeing too many pale, grayish pixels (because they had been lightened too much). I also replaced the 2nd Curves layer with a Levels layer (see below), so I could have more control over which area was being brightened. I only adjusted the midtones by .05 in Levels and left the highlights and shadows alone. The result makes her skin glisten just a smidge less.

Sharpening Your Gif
Last step: Smart Sharpen. If done properly, sharpening your gif should completely remove any blurriness. In addition, the Smart Sharpen tool further enhances the contrast and brightens the highlights. I sharpen my gifs twice. I got this method from another gif-maker, and I've been a fan of it ever since. The gifs just come out crisper. If I feel it's too sharp, then, I can just remove the 1st smart sharpen filter (the 10%, 10 pixels), but I rarely do that.
See steps below:

Convert Frame Animation means convert frame animation to timeline. If you do not have timeline, see this tutorial on sharpening without timeline.
The blur has been removed. However, the highlights are too bright now.

As a counter, I turn off the 1st Brightness/Contrast layer and push the 2nd Brightness/Contrast layer which I had set to Screen back to 40%.
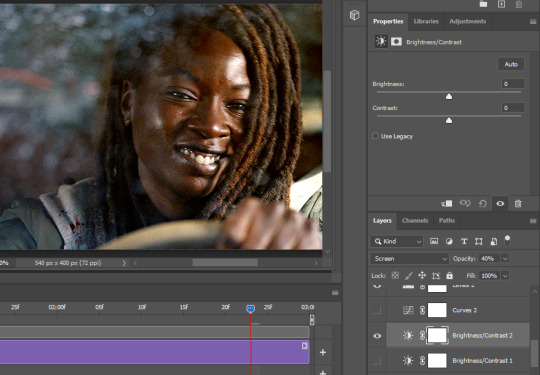
Side note: I got rid of the 1st Brightness layer because Brightness/Contrast set to Normal affects highlights more, whereas set to Screen it affects the midtones more. By removing the 1st and increasing the 2nd's opacity, I mitigate the glare of the highlights without sacrificing the overall brightness of the gif.
Final version (sharpened):

Original version (sharpened):

Original version (unsharpened):

As demonstrated, sharpening, contrast and color all play a role in making a gif look sharp and crisp. Hopefully, I addressed your issue somewhere in this tutorial. If not, DM me a gif or a screenshot of one, so I may offer more specific advice.
#ricksmarlene#ask#tutorial#this is based on the assumption you use PS to make gifs#i'm quite longwinded#pls forgive the length#hopefully this helps#if not let me know
3 notes
·
View notes
Text
Revolutionizing Healthcare: The Role of Cloud Computing in Modern Healthcare Technologies
In today’s digital era, cloud computing is transforming industries, and healthcare is no exception. The integration of cloud computing healthcare technologies is reshaping patient care, medical research, and healthcare management. Let’s explore how cloud computing is revolutionizing healthcare and the benefits it brings.

What is Cloud Computing in Healthcare?
Cloud computing in healthcare refers to the use of remote servers to store, manage, and process healthcare data, rather than relying on local servers or personal computers. This technology allows healthcare organizations to access vast amounts of data, collaborate with other institutions, and scale operations seamlessly.
Download PDF Brochure
Key Benefits of Cloud Computing in Healthcare
Enhanced Data Storage and Accessibility Cloud technology allows healthcare providers to store massive volumes of patient data, including medical records, images, and test results, securely. Clinicians can access this data from anywhere, ensuring that patient information is available for timely decision-making.
Improved Collaboration Cloud-based healthcare platforms enable easy sharing of patient data between healthcare providers, specialists, and labs. This facilitates better collaboration and more accurate diagnoses and treatment plans, especially in multi-disciplinary cases.
Cost Efficiency The cloud reduces the need for expensive hardware, software, and in-house IT teams. Healthcare providers only pay for the resources they use, making it a cost-effective solution. Additionally, the scalability of cloud systems ensures they can grow as healthcare organizations expand.
Better Data Security Protecting sensitive patient information is critical in healthcare. Cloud computing providers invest heavily in data security measures such as encryption, multi-factor authentication, and regular audits, ensuring compliance with regulatory standards like HIPAA.
Telemedicine and Remote Patient Monitoring Cloud computing powers telemedicine platforms, allowing patients to consult with doctors virtually, from the comfort of their homes. It also enables remote patient monitoring, where doctors can track patients' health metrics in real time, improving outcomes for chronic conditions.
Advanced Data Analytics The cloud supports the integration of advanced data analytics tools, including artificial intelligence (AI) and machine learning (ML), which can analyze large datasets to predict health trends, track disease outbreaks, and personalize treatment plans based on individual patient data.
Use Cases of Cloud Computing in Healthcare
Electronic Health Records (EHRs): Cloud-based EHRs allow healthcare providers to access and update patient records instantly, improving the quality of care.
Genomics and Precision Medicine: Cloud computing accelerates the processing of large datasets in genomics, supporting research and development in personalized medicine.
Hospital Information Systems (HIS): Cloud-powered HIS streamline hospital operations, from patient admissions to billing, improving efficiency.
Challenges in Cloud Computing for Healthcare
Despite its numerous benefits, there are challenges to implementing cloud computing in healthcare. These include:
Data Privacy Concerns: Although cloud providers offer robust security measures, healthcare organizations must ensure their systems are compliant with local and international regulations.
Integration with Legacy Systems: Many healthcare institutions still rely on outdated technology, making it challenging to integrate cloud solutions smoothly.
Staff Training: Healthcare professionals need adequate training to use cloud-based systems effectively.
Request Sample Pages
The Future of Cloud Computing in Healthcare
The future of healthcare will be increasingly cloud-centric. With advancements in AI, IoT, and big data analytics, cloud computing will continue to drive innovations in personalized medicine, population health management, and patient care. Additionally, with the growing trend of wearable devices and health apps, cloud computing will play a crucial role in integrating and managing data from diverse sources to provide a comprehensive view of patient health.
Conclusion
Cloud computing is not just a trend in healthcare; it is a transformative force driving the industry towards more efficient, secure, and patient-centric care. As healthcare organizations continue to adopt cloud technologies, we can expect to see improved patient outcomes, lower costs, and innovations that were once thought impossible.
Embracing cloud computing in healthcare is essential for any organization aiming to stay at the forefront of medical advancements and patient care.
Content Source:
2 notes
·
View notes