#display table html
Text
HTML Tables with examples: A Comprehensive Guide for Web Developers on Creating, Formatting, and Displaying Data
I. Introduction
In this article, we will explore the world of HTML tables and their importance in web design. HTML tables are an essential part of building websites, as they allow developers to organize data and information in a structured and visually appealing way. They enable users to present information in a tabular format, making it easier to read and understand.
HTML tables are used in a…

View On WordPress
#complex html table#complex tables html#create html table javascript#display table html#how to create a table in html#html attributes#html table code#html table formatting#html table structure#html tables#html tags#properties of table in html#table elements html#table html#table in web design#table of contents html code#table rows in html#table with pictures html#tables example#tables in html
0 notes
Text
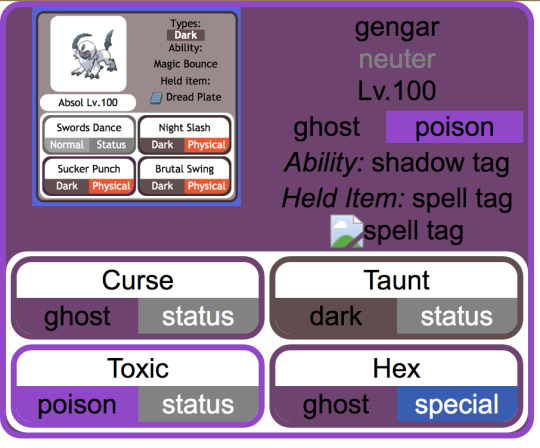
making slow progress toward a (vaguely) dynamic pokémon custom team template that mimics the Bulbapedia team flyout and after ... a ... While ... of essentially redesigning the element hierarchy from scratch with the help of a friend who is MUCH better at programming than me, it is beginning to Look
(the Absol screenshot was just one I had on hand for a stand-in, my final one will probably look a little different since I want to also add Mega / Partner Pokemon indicators if possible, and to also just tweak the info hierarchy a bit)
#from the writer's den#void talks#getting those corners on the moves was ROUGH. initially it was a table structure but after much struggle#my friend found an implementation that just uses css wizardry instead of html#also for anyone curious: the reason I say it's vaguely dynamic is bc it's actually a jinja template and html#with my vague idea being that essentially it prints out pages for any arbitrary team#(though obviously the pages themselves will be static)#also for those familiar with bulbapedia#I wanted to have a proper 'neuter' gender marker so my eventual goal is to write a little if-then in the jinja file#that allows it to convert to arbitrary symbols (to display) in addition to having the custom colors (in the css)#probably in the form of a 'if [m] / elif [f] / else' for the colors#this is solely bc there's enough neutral-gender pokemon on my oc teams that I want it to actually be indicated#where absence actually means unspecified
4 notes
·
View notes
Text
losing my mind
#learning css/html in the most unconventional way possible is fun until you run into the dumbest mistakes ever that would be avoided#if i simply. knew the basics. anyway im fighting for my life with this ao3 custom skin#for some reason the last block keeps overlapping with the author notes...?#if i change the display to table or inline-block it doesn't happen. but if i set it to any of those the width ends up all fucked. so. kms#txt
3 notes
·
View notes
Text
Undertale NPC/Shopkeeper Dialog Work Skin

you can add this to the dialog box skin if ya want.
Cross-compatible between rich text and HTML once you get it set up!
(ex: the table will be small in rich text mode but you can actually resize it in the rich text mode and it won't affect the sizing of the dialogue box in the actual work!)

Find it here:
https://archiveofourown.org/works/56584099/chapters/143816887
Limit it to like 1-5 lines of npc dialogue or the edge cases start to appear...since we've never seen undertale dialogue go that many lines in on one dialogue box I'll consider that undefined behavior i.e. won't be handling that edge case.
and maaaaybe i'll add a way to put the NPC background above the dialogue if I get bored again.
OR find it under the cut:
HTML for example (bolded areas would be where you replace stuff, for your ease-of-use):
(NOTE: the width actually doesn't matter for the table html element for the HTML part since it's set in the CSS! So feel free to resize it in rich text mode for easier fanfiction writing!)
<table class="npc" width="634">
<tbody>
<tr>
<th class="put_your_shopkeeper_dialogue_in_here">
<p>* Hello!</p>
<p>* This is a test.</p>
<p>* I hope this works!</p>
<p>* Would be veeeery disappointed otherwise.</p>
</th>
<th>
<div>
<p class="selected">Buy</p>
<p>Sell</p>
<p>Talk</p>
<p>Exit</p><div class="footer-stats">
<span class="your_gold_here">275G</span>
<span class="dialogue_page_number_here">1/8</span>
</div>
</div>
</th>
</tr>
</tbody>
</table>
CSS (yeah it's messy ao3 kind of botches the code style):
#workskin table.npc { width: 75%; color: white; font-family: "Lucida Console", monospace; font-weight: bold; outline: thin solid black; border-collapse: collapse; text-align: left; } #workskin table.npc p { margin: .643em 0; } #workskin table.npc, #workskin table.npc th { border: thick solid white; background-color: black; padding-left: 1rem; padding-right: 1rem; padding-bottom: 1rem; padding-top: 1rem; vertical-align: top; } #workskin table.npc th:first-child { width: 100%; } #workskin table.npc th:last-child { padding-left: 2rem; width: fit-content; } #workskin table.npc .footer-stats { padding: 0rem; margin: 0rem; width: auto; display: flex; justify-content: space-between; margin-left: -1rem; } #workskin table.npc .footer-stats :last-child { margin-left: 2rem; } #workskin table.npc th p:first-child { margin: 0rem !important; } #workskin table.npc .selected::before { content: ""; display: inline-block; background-image: url('https://64.media.tumblr.com/e290c840794e1655a36204adcb92bfdb/b026e62efa6b55f1-95/s2048x3072/4e553aba86d9dd256db14efd717238c8f8ef1299.png'); background-size: 100%; background-repeat: no-repeat; background-position: center; width: .75rem; height: .75rem; margin-left: -1rem; margin-right: .25rem; vertical-align: -0.1rem; }
119 notes
·
View notes
Text
Alright, so bear with me.
Humans have three cone cells in our eyes that are how we perceive color in the world. I often think red, green, and blue, but apparently people studying them use Long, Medium, and Short to be unambiguous (just for one example, if you activate M really strongly and not L or S, the color people report seeing is yellow-green). Each type activates at different strengths to different wavelengths of light. Here's a lovely graphic from Wikipedia showing response levels of each cone type to different wavelengths:
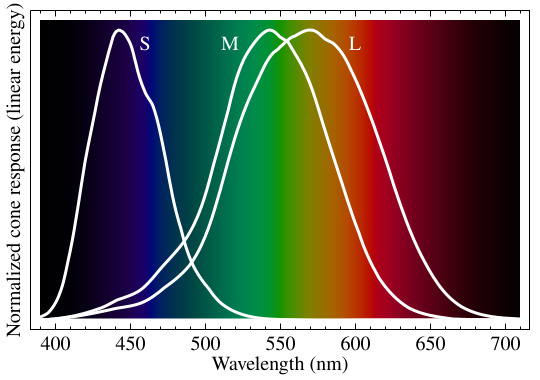
So you can see that if some light activates L some, but not M, we'll perceive deep red, activates them both a bit, we see orange or yellow, depending on the specific amount.
It's interesting that some effect (a specific mix of pigments, or some structural coloration) could be producing some mostly 495nm light, or a blend of some slightly higher and slightly lower wavelengths, and either way we see cyan. (And a good thing, too, otherwise our display technology would be extremely unconvincing.)
Of course, then there's what happens when we get activation of L and S at once, but not M, our eye-brain systems don't infer "yellow-green", because green is specifically what's missing from there: we generate magenta, a non-spectral color. (And when all three activate we get white, of course.)
I found myself thinking about birds, with their four cones.
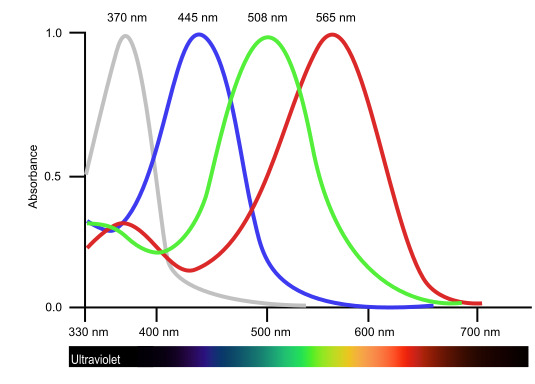
They're more evenly spaced too, the bastards. (These bastards are specifically finches but I'm under the impression that most birds are similar.)

(Of course, "violet" actually means ultra-violet here. Look at the graphic, their UV cone stops responding where our S cone starts. I would edit this, but spent like half an hour discovering that tumblr doesn't support table under html or code/"preserve formatting" under markdown anymore; so you get a screencap of what I sent on discord.)
Birds could see "vio-green" (accepting name suggestions) as a color region as distinct from blue/indigo as green is from purple/magenta.
Look at that. Two whole ass independent spectral color divisions we don't have, and six non-spectral inferences. Eight whole categories of visual perception more than us. Decadent.
The heart quails to imagine what the 16 color receptors of a mantis shrimp would create. I mean, okay, it doesn't because we've studied their eyes and brains and they don't blend colors the way we do, smooshing them down to a much simpler set of perceptions.
But imagine if we rebuilt our eyes and brains for it! Color indicates chemistry, with that level of subtle blending of characteristics, would vision become like tasting everything we look at?
Please pet the bear that is with me on your way out.
#original#transhumanism#long post#I have not actually studied the perceptual systems of birds in any detail so take this with a grain of salt#regretting alt-white now that I've said it aloud in my head#edited: spat this out so fast I miswrote something under the bird spectrum image; also missed a 'd' in 'spaced'
65 notes
·
View notes
Text
I wrote a crazy little web component that displays interactive random tables in HTML.
7 notes
·
View notes
Text
it's past 4 am but i've been fiddling with my site for hours, trying to get it to be more accessible. a huge issue with this is back when i started BMF, i had no idea about any of this stuff and made a three-column layout using table display properties, which means the right sidebar is under everything else in the HTML document of every page, which means that keyboards and screenreaders have to go through all of the main content of the page just to get to the second navigation, which is... unfortunate, to say the least. that being said, i don't want to uproot the foundation of the entire site and every page if i don't have to because that might kill me, but i'm considering hiding the normal navigation from screenreaders entirely and make a custom navigation menu that's hidden from sighted users, but able to be read out by the screenreader. as for sighted keyboard users... probably just going to add some links to jump to different sections of the page.
i'm still learning but i'm figuring it out. i wish i could figure it out more but the sleepiness is finally claiming me... i'll get back to it some other time
#ayano was here#ayano.txt#i spent so much time implementing a fix for sighted keyboard users#only to realize it would totally screw up things for screenreader users#i need to do more thorough testing by using a screenreader myself later#bmf
13 notes
·
View notes
Note
hello i am here to request toy house assistance
like this this is how i feel right now lmfao

very very simple question, i am. very new to this
i thought your idea to make the spooky month refs look like the wiki was super cool and im. yeah kinda stealing it, but probably not as pretty
how'd you put text next to the table?

^ like that!
you can see my frustration
thanks in advance sorryforbotheringyouaaaaaaaaaaaa
ohhh that’s because i’m using the more detailed coding hehe (bootstrap html) but i’m very happy to give you a blank copy! :D
i’ll send a message with the code on toyhouse dm, so rn i just need you to do this or else the code will break and you will have do to it again:
Under Display Settings, enable Code Editor and disable WYSIWYG for Profile Text.
You cannot use the Disable WYSIWYG button because it kinda just turns itself back on and ruins any fancy coding you have, every time. You have to go to your settings!
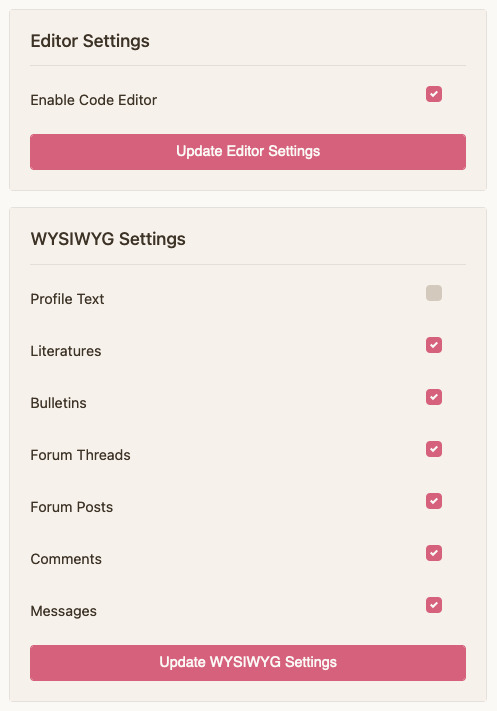
You have done this correctly when the... writing space (?) looks like the second image.


If you are the type of person who prefers to have a visual of what you're doing, use this toyhouse editor! I use it all the time hehe
and uhhh if you finished editing and something DOES break, you can go to character > manage character > history and then select the previous edit you did
alrightyy, go and check your toyhouse dm for the code ^^ <3 feel free to dm me for any other tips or help
#[ the askbox mourns ]#[ mourn's mourns ]#ancient toyhouse veteran here.... or at least when it comes to coding heh#toyhouse
6 notes
·
View notes
Text
finally figured out how to put some stupid data into a table format. the only place i can access it is in a fucked up table that html formats a bunch of values together in a single cell for our site to display. when i asked development if this stuff is recorded normally anywhere else + if i can have access to that they questioned why I needed it in the first place then did not reply again after I explained ☹️
2 notes
·
View notes
Text
WhatsApp Clone Using HTML and CSS
What does cloning a website means?
To make a copy
Cloning a website means copying or modifying the design or script of an existing website to create a new website. Website cloning allows a designer to create a website without writing scripts from scratch.
Any website can be cloned. You are also free to integrate some additional new features while cloning your website.
Cloning a website is one of the proven methods you can use to learn web development faster. It provides basic to advanced ideas about how websites work and work, and how to integrate them.
Let’s learn how to clone a website just using HTML5 and CSS in a simple way.
Will take an example of WhatsApp Website and will clone it.
WhatsApp is a free cross-platform messaging service. iPhone and Android smartphone, Mac and Windows PC users can call or exchange text, photo, voice and video messages with anyone in the world for free, regardless of the recipient's device. WhatsApp uses Wi-Fi connections to communicate across platforms. This differs from Apple iMessage and Messages by Google, which require a cellular network and Short Message Service (SMS).
Key WhatsApp Terminology
Cross Platform
Messaging apps
End-to-end encryption
Video & Audio Calls
WhatsApp Business
HTML (Hyper Text Markup Language) –
HTML stands for Hyper Text Markup Language that is standard markup language to create web pages and web-based applications
It represents the structure of a web page
It comprises of series of elements which tells the browser how to display the content
Basic Structure of a HTML Document –
<!DOCTYPE html>
<html>
<head>
<title>WhatsApp Clone</title>
</head>
<body>
<h1>let's learn Web Development</h1>
<p>My first project - WhatsApp Cloning</p>
</body>
</html>
Let’s Explain the above code –
- It is used to defines that the document is HTML5 document
- It is the root elements on an HTML Page
- It contains all the meta information about the HTML Page
- This element contains all the visible content of the page, such as paragraph, headlines, tables, list, etc.
- It defines the largest heading for any topic, it ranges from -
- It defines a paragraph in the HTML page
Elements –
It is the collection of start and end tag, and in between content is inserted between them.
It major components are–
Opening Tag – Used to tell the browser where the content starts.
Closing Tag – Used to tell the browser where the content material ends.
Content – Whatever written inside the opening and closing tag is content.
Some Most Commonly used tags are –
– Used to define a document or section, as it contains information related to titles and heading of related content.
– The navigation tag is used to declare navigation sections in HTML documents. Websites typically have a section dedicated to navigation links that allows users to move around the site
– Anchor tag is used for creating hyperlink on the webpage. It is used to link one web page from another.
– It is used to define a paragraph. Content written inside tag always starts from a new line.
– It is used to define heading of a web page. There are 6 different heading h1, h2, h3, h4, h5 and h6. H1 is the main heading and the biggest followed by h2, h3, h4, h5 and h6.
- It is used to group multiple elements together. It helps in applying CSS.
- Image tag is used to embed an image in a web page.
CSS (Cascading Style Sheet) –
CSS stands for Cascading Style Sheets, that describes HTML elements that appear on screen, paper, or other media.
It used for designing web pages, in order to make web pages presentable.
It is standardized across Web Browsers and is one of the core languages of the open web system/technology.
CSS Selector –
CSS Selectors are used to select or target the element that you want to style. Selectors are part of the CSS ruleset. CSS selectors select HTML elements by ID, class, type, attributes, etc.
Types of CSS Selectors –
Element Selector – It selects the HTML elements directly using name
ID Selector – It selects the id attribute of an element. ID is always unique, in the code. So, it is used to target and apply design to a specific or a unique element.
Class Selector - It selects the class attribute of an element. Unlike ID selector class selectors can be same of many elements.
Universal Selector – It selects all the elements of the webpage, and apply changes to it.
Group Selector – It is used when same style is to be applied on many elements. It helps in non-duplication of code.
Different ways of applying CSS -
CSS can be applied in different ways –
Inline CSS –
Styling is done using different attributed inside an element itself. It can be used to apply unique style for a single element.
<h1 style="color:blue;">Let's learn Web Development</h1>
Internal CSS –
It is defined or written within the <style> element, nested instead <head> section of HTML document.
It is mainly used when need to apply CSS on a particular page.
<style type="text/css">
h1 {
color:blue;
}
</style>
External CSS –
It is used to apply CSS on multiple pages. As all the styling is written in a different file with an extension “.css” Example style.css.
<link rel="stylesheet" type="text/css" href="style.css">
It is written instead head tag.
For more detailed guide – Click here
Let’s implement the above learnt concepts –
In this example will clone a static page of WhatsApp using Internal CSS-
<!DOCTYPE html>
<html lang="en">
<head>
<style type="text/css">
:root {
font-size: 15px;
--primaryColor: #075e54;
--secondaryColor: #aaa9a8;
--tertierColor: #25d366;
}
* {
margin: 0;
padding: 0;
font-family: inherit;
font-size: inherit;
}
body {
font-family: Helvetica;
font-weight: 300;
}
img {
object-fit: cover;
width: 100%;
}
.container {
margin: 0 1.2em;
}
header {
background-color: var(--primaryColor);
padding: 1.4em 0;
}
header .container {
display: flex;
justify-content: space-between;
align-items: center;
color: white;
}
header .logo {
font-size: 1.5rem;
font-weight: 300;
}
header .menu {
margin-left: 18px;
}
.nav-bar {
background-color: var(--primaryColor);
margin-bottom: 8px;
display: grid;
grid-template-columns: 16% 28% 28% 28%;
justify-items: space-between;
align-items: center;
text-align: center;
box-shadow: rgba(50, 50, 93, 0.25) 0px 2px 5px -1px,
rgba(0, 0, 0, 0.3) 0px 1px 3px -1px;
}
.nav {
color: var(--secondaryColor);
text-transform: uppercase;
padding: 1em 0;
}
.nav.active {
border-bottom: 3px solid white;
color: white;
}
.chat {
padding: 1em 0;
display: flex;
justify-content: space-between;
}
.chat .info {
display: flex;
}
.chat .username {
font-size: 1.2rem;
margin-bottom: 5px;
font-weight: 300;
}
.chat .recent-chat {
color: gray;
max-width: 200px;
text-overflow: ellipsis;
overflow: hidden;
white-space: nowrap;
}
.chat .recent-chat .read {
color: #34b7f1;
}
.chat .photo {
width: 55px;
height: 55px;
border-radius: 50%;
margin-right: 18px;
}
.chat .recent-chat-time {
font-size: 12px;
color: gray;
}
.contact-button {
padding: 1em;
border: 0;
border-radius: 50%;
color: white;
transform: rotate(0deg);
font-size: 1.3rem;
position: fixed;
bottom: 20px;
right: 1.2em;
background-color: var(--tertierColor);
}
</style>
<title>WhatsApp</title>
<link rel="icon" type="image/x-icon" href="wp.png" />
<link rel="stylesheet" href="https://cdn.jsdelivr.net/npm/[email protected]/font/bootstrap-icons.css" />
</head>
<!-- Body section starte here -->
<body>
<header>
<div class="container">
<h1 class="logo">WhatsApp</h1>
<div>
<a role="button" class="bi bi-search icon"></a>
<a role="button" class="bi bi-three-dots-vertical icon menu"></a>
</div>
</div>
</header>
<nav class="nav-bar">
<span class="bi bi-camera-fill nav"></span>
<a role="button" class="nav active">Chats</a>
<a role="button" class="nav">Status</a>
<a role="button" class="nav">Calls</a>
</nav>
<!-- Chat section starts here -->
<!-- chat 1 -->
<section class="chats">
<div class="container">
<div class="chat">
<div class="info">
<!-- <img class="photo" src="user-2.png" alt="User" /> -->
<img class="photo" src="user-2.png" alt="User" />
<div>
<h6 class="username">Anurag</h6>
<p class="recent-chat">
<i class="bi bi-check2-all"></i> Yes, i remembered that! 😄
</p>
</div>
</div>
<small class="recent-chat-time"> 04:20 PM </small>
</div>
<!-- chat 2 -->
<div class="chat">
<div class="info">
<img class="photo" src="user-2.png" alt="User" />
<div>
<h6 class="username">Cipher</h6>
<p class="recent-chat">Do you wanna hangout?</p>
</div>
</div>
<small class="recent-chat-time"> 10:20 AM </small>
</div>
<!-- chat 3 -->
<div class="chat">
<div class="info">
<img class="photo" src="user-2.png" alt="User" />
<div>
<h6 class="username">CipherSchools</h6>
<p class="recent-chat">
<i class="bi bi-check2-all read"></i> Hey bro, time to band!
🥁🎸
</p>
</div>
</div>
<small class="recent-chat-time"> Yesterday </small>
</div>
<!-- chat 4 -->
<div class="chat">
<div class="info">
<img class="photo" src="user-2.png" alt="User" />
<div>
<h6 class="username">Schools</h6>
<p class="recent-chat">Hey, where are you now? 🙄</p>
</div>
</div>
<small class="recent-chat-time"> 7/22/21 </small>
</div>
<!-- chat 5 -->
<div class="chat">
<div class="info">
<img class="photo" src="user-2.png" alt="User" />
<div>
<h6 class="username">Anurag CS</h6>
<p class="recent-chat">
<i class="bi bi-check2-all read"></i> May i borrow your games
for 2 weeks?
</p>
</div>
</div>
<small class="recent-chat-time"> 7/22/21 </small>
</div>
<!-- Contact button on the whatsapp -->
<button type="button" class="bi bi-chat-right-text-fill contact-button"></button>
</div>
</section>
</body>
</html>
23 notes
·
View notes
Text
tumblr functional website that refuses to display simple html tables
2 notes
·
View notes
Text
HTML 101: The Ultimate Beginner's Guide to Writing, Learning & Using HTML

HTML serves as the backbone of every web page, allowing us to structure content with paragraphs, headings, images, links, forms, and more. If you're eager to delve into web development or explore the world of coding, mastering HTML is a fantastic starting point.
Join us on webtutor.dev as we unveil the ultimate guide to HTML for beginners. In this comprehensive tutorial, we'll demystify HTML, explore its diverse applications, and equip you with the skills to write your own HTML code. From essential elements to crucial attributes, we'll cover it all.
Get ready to embark on your HTML journey with webtutor.dev – your go-to resource for empowering web development education. Let us dive in and unlock the potential of HTML together.
Join us now on webtutor.dev!
What is HTML?
First published by Tim Berners-Lee in 1989, HTML is now used by 94% of all websites, and probably all the ones you visit. But what is it, exactly?
HTML, short for HyperText Markup Language, is the backbone of the web. It is a markup language that structures the content of web pages. HTML utilizes tags to define the elements and their attributes, such as headings, paragraphs, images, links, lists, forms, and more. These tags instruct web browsers on how to display and render the content to users. With HTML, developers can create interactive and visually appealing web pages. It plays a vital role in creating a seamless browsing experience by allowing users to navigate through hyperlinks and access information across different websites. HTML is the foundation upon which websites are built, providing the structure and organization for displaying text, multimedia, and interactive elements. By learning HTML, individuals can gain the skills to create and customize web pages, making their mark in the digital landscape.
Is HTML a programming language?
No, HTML (Hypertext Markup Language) is not considered a programming language. It is a markup language used for structuring the content and presenting information on web pages. HTML provides a set of tags that define the structure and semantics of the content, such as headings, paragraphs, links, images, and more.
While HTML is essential for web development, it primarily focuses on the presentation and organization of data rather than the logic and functionality found in programming languages. To add interactivity and dynamic behavior to web pages, programming languages like JavaScript are commonly used in conjunction with HTML.
What is HTML Used for?
HTML (Hypertext Markup Language) is used for creating and structuring the content of web pages. It provides a set of tags that define the elements and their layout within a web page. Here are some of the key uses of HTML:
Web page structure: HTML is used to define the structure of a web page, including headings, paragraphs, lists, tables, forms, and other elements. It allows you to organize and present content in a hierarchical manner.
Text formatting: HTML provides tags for formatting text, such as bold, italic, underline, headings of different levels, and more. These tags help in emphasizing and styling specific parts of the content.
HTML Hyperlinks: HTML enables the creation of hyperlinks, allowing you to connect different web pages together or link to external resources. Links are defined using the <a> tag and provide navigation within a website or to other websites.
Images and media: HTML allows you to embed images, videos, audio files, and other media elements into web pages. It provides tags like <img>, <video>, and <audio> for adding visual and multimedia content.
Forms and user input: HTML provides form elements, such as text fields, checkboxes, radio buttons, dropdown menus, and buttons, allowing users to enter and submit data. Form data can be processed using server-side technologies.
Semantic markup: HTML includes semantic elements that provide meaning and structure to the content. Examples of semantic elements are <header>, <nav>, <article>, <section>, <footer>, which help define the purpose and role of specific parts of a web page.
Accessibility: HTML supports accessibility features, such as providing alternative text for images, using proper heading structure, using semantic elements, and other attributes that make web content more accessible to users with disabilities.
Overall, HTML serves as the foundation of web development, providing the structure and presentation of content on the World Wide Web. It is often complemented by other technologies like CSS (Cascading Style Sheets) for styling and JavaScript for interactivity and dynamic behavior.
How to Write HTML?
<!DOCTYPE html><html><head><title>My Page</title></head><body><h1>Hello, World!</h1></body></html>
Explanation:
<!DOCTYPE html>: Specifies the HTML version.
<html>: Opening tag for the HTML document.
<head>: Contains metadata about the page.
<title>: Sets the title of the page displayed in the browser's title bar or tab.
<body>: Contains the visible content of the page.
<h1>: Defines a heading level 1.
Hello, World!: The actual content to be displayed.
Please note that this example is a very basic HTML structure, and for more complex pages, additional tags and attributes would be required.
How to Create an HTML File
To create an HTML file, you can follow these steps:
Open a text editor: Open a text editor of your choice, such as Notepad (Windows), TextEdit (Mac), Sublime Text, Visual Studio Code, or any other editor that allows you to create plain text files.
Start with the HTML doctype: At the beginning of your file, add the HTML doctype declaration, which tells the browser that the file is an HTML document. Use the following line:
<!DOCTYPE html>
Create the HTML structure: After the doctype declaration, add the opening and closing <html> tags to enclose the entire HTML document.
Add the head section: Inside the <html> tags, include the <head> section. This is where you define metadata and include any external resources like stylesheets or scripts. For now, let's add a <title> element to set the title of your page:
<head>
<title>My First HTML Page</title>
</head>
Create the body: Within the <html> tags, include the <body> section. This is where you place the visible content of your web page. You can add various HTML tags here to structure and format your content. For example, let's add a heading and a paragraph:
<body>
<h1>Welcome to My Page</h1>
<p>This is my first HTML file.</p>
</body>
Save the file: Save the file with an .html extension, such as myfile.html. Choose a suitable location on your computer to save the file.
Open the HTML file in a browser: Double-click on the HTML file you just saved. It will open in your default web browser, and you will see the content displayed according to the HTML tags you added.
Congratulations! You have created an HTML file. You can now edit the file in your text editor, add more HTML elements, styles, scripts, and save the changes to see them reflected in the browser.
Common HTML Attributes
<input type="text" name="username" placeholder="Enter your username" required>
<img src="image.jpg" alt="Image description">
<a href="https://example.com" target="_blank">Link to Example</a>
<div id="container" class="box">
<button onclick="myFunction()">Click me</button>
<table border="1">
<form action="submit.php" method="POST">
<select name="color">
<option value="red">Red</option>
<option value="blue">Blue</option>
</select>
Explanation:
<input>: Attributes like type define the input type (text, checkbox, etc.), name sets the input's name for form submission, placeholder provides a hint to the user, and required specifies that the input is mandatory.
<img>: src specifies the image source URL, and alt provides alternative text for the image (useful for accessibility).
<a>: href sets the hyperlink URL, and target="_blank" opens the link in a new tab or window.
<div>: id assigns an identifier to the element, and class adds a CSS class for styling or JavaScript targeting.
<button>: onclick triggers a JavaScript function when the button is clicked.
<table>: border adds a border to the table.
<form>: action specifies the form submission URL, and method sets the HTTP method (GET or POST).
<select>: name assigns the name for the selection input, and <option> defines the selectable options within the dropdown menu.
These are just a few examples, and there are many more HTML attributes available for different elements, each serving specific purposes.
#learn to code for free#coding course online#Online Web Tutorial#learn coding for free#online tutorial#learn code#learn code for free#introduction to coding#learn html#programming training courses#best way to learn coding#how long does it take to learn coding#learn coding for beginners#best online platform for learning coding#best place to learn to code online
4 notes
·
View notes
Text
ramble incoming about indie websites, neocities, and modern web design... putting below a read more because i wrote way more than i thought i would, oops.
whenever i see posts going around about how imaginative and creative old web design used to be, and how minimalist and same-y everything is now, while i do agree and wish that modern web design was more interesting and more dense with information... it's not as simple as "let's go back to how it used to be."
most old websites did not conform to modern accessibility standards, making the internet harder to use for many people, and on top of that we live in a smartphone era now where websites have to be designed in such a way that they work on both phones and computers... phones have a much smaller space to work with - kind of hard to decorate your website in pretty graphics and lay out the information in unique ways when you're designing for tiny screens in portrait resolutions!
i work pretty hard to make sure CPG displays on both mobile devices and computer monitors in at least decent fashion, and the website is absolutely less interesting looking on mobile. the sidebars are traded in for a toggle-able menu at the top of the screen (i'm considering changing it to a button that sticks to the bottom of the screen so you can open the menu without scrolling up, but i digress) and images that would float on the right or left side of articles in an aesthetically pleasing way have to be put into their own blocks between passages of text so that the text doesn't become impossible to read, squished on the sides. i'm not perfect at accessibility, nor am i perfect at optimizing the site for mobile, but i think i do an okay job with my relatively simple layout. i do this because i want my website to be viewable to people on any device, even people who aren't enthusiastic about the indie web, or desktop browsing. this would not be nearly as easy with some of the complex table layouts of the past.
it is interesting to me that a lot of people choose to simply not make their website usable on mobile and will put a notification that the site is either best viewed on desktop or doesn't work on mobile at all on the front page... there is nothing wrong with this, mind you, i'm not making a judgement of the person or their coding abilities, some people are just chilling and doing their hobbyist thing without fretting about that, or making their content for a specific audience that would mostly view from their computers, which is fine! how other people make and run their websites is none of my business. but i do think a lot could be gained from exploring mobile design and making the indie web space more accessible to mobile users, which take up a large percentage of the population. we'd probably have more eyes on us if our spaces were more accessible for people on phones. also, personally, i actually find making my site compatible for mobile with pure vanilla html/css/js a fun challenge.
at the very least, even if a website isn't built to be mobile-friendly, making sure everything is at least visible and clickable is a good thing. my website dynamically changes the size of elements based on the device viewing it, but there is also the option of making your entire website layout a set pixel width, so that it is the same on every device, people just might have to scroll horizontally or zoom in to see/click things... which is annoying but at the very least workable. i have seen some high quality neocities sites that do exactly this and i think it's a good alternative from dynamically sizing pages.
all this being said, i'm coming from the perspective of someone who actually wants their website to be seen and be used by as many people as possible because i'm providing niche game guides/tools/resources, so again, people who are just doing their hobbyist thing probably don't care as much about how many people see their site, especially outside of indie web spaces and especially neocities. it's a bit of an insular community where everyone on there is exploring their fellow users' desktop websites. also, just because a website is not workable on mobile doesn't mean people won't see it! plenty of people still use their computers to browse the web of course, it just cuts out some parts of the population. it's complicated and i'm not an expert on the subject but i don't know, i just felt like talking about it ww
TLDR; i think the ideal would be for a less corporate, more creative internet that still is accessible for disabled people and still allows the use of smartphone browsing. maybe one day when i'm more educated on code, i can make some cooler things in this regard...
#ayano.txt#ayano was here#i feel weird talking this much but i don't really have anywhere else to put these thoughts
10 notes
·
View notes
Text
WordPress Block Editor – How Does It Differ From Classic Editors?
What Are Content Blocks In WordPress?
According to the official WordPress help website, content blocks are “the components for counting content in the new WordPress block editor.” To make a post and page design simpler, easier, and more flexible via blocks, this editor replaces the Tiny MCE editor used by earlier WordPress versions.
He suggested printing your website and cutting out each piece of content to help you understand the various blocks. For example, it would allow you to see that your headlines, photos, paragraphs, videos, buttons, and other elements are all separate blocks.
Beyond the content blocks listed above, WordPress also provides a broader range of content blocks, including but not limited to:
Gallery
List
Quote
Audio
Custom HTML
Table
Navigation
Template Part
Site Logo
Query Loop
Post Title
Post Excerpt
Post Featured Image
Post Categories
Post Tags
What Makes The WordPress Block Editor Different From The Classic Editor?
First, the classic TinyMCE content editor:
The traditional editor makes me think of Microsoft Word. There is a space for you to type and a formatting toolbar to design your information (bold, italics, etc.).
The new WordPress Block Editor creates material using a block approach. As a result, this WordPress block editor not only looks more professional and contemporary but also lets you:
Add tables (once more, without needing to learn to code or install plugins);
Text and media items may be moved around and combined by simply dragging and dropping them;
Allows to create content columns easily;
Allows to adjust each block’s background hues and font sizes;
Reuse blocks that you often utilize (to save yourself time).
It’s Just the top of the iceberg.
Thus, both editors (WordPress Block Editor and Classic Editor) are distinct.
Types Of WordPress Blocks Editors (And How To Use Them)
Here are all of the block kinds that Gutenberg (WordPress Block Editor) offers, organized by category:
Standard Blocks
The fundamental (or “common”) components that individuals frequently utilize in their blog posts are included in this category of blocks. These blocks will be used more often than not by most bloggers and authors.
Paragraph Block
The paragraph block is a blank space to type your text. The usual formatting choices include text alignment, font size, background, text colors, drop caps, and more.
Image Block
By selecting it from the WordPress media library, uploading it from your computer, or pasting its URL, you may quickly insert a picture into an Image Block. You may add a description, change the image’s size, add alt text, and use the usual WordPress image settings.
List Block
You may make an unordered list of items or one with numbers by using a list block (numbered list). Additionally, you may format the text, include anchor links, and create sub-items for each primary item in the list.
Quote Block
You may add your favorite quotations in a lovely, elegant way with the Quote Block. After writing the content and identifying the author, format it as a paragraph block. You can choose to utilize a bigger font size or the standard size.
Heading Block
You may start a new part of your post with a heading block. There are six header sizes available. The lesser ones may be found on the sidebar to the right of the editor, while the first three are visible inside the block.
File Block
You may include any content using File Blocks for your visitors to download, including photos, archives, documents, PDFs, and more. You may select to link to a media file or an attachment from the sidebar, display a download button, and open the document in a new tab.
Video Block
You may add videos by using the Video Block. You can choose to mute or autoplay them. You may supply a poster picture for the thumbnail if you don’t want to show the featured capture it gets by default, which is a great option.
Cover Block
You may produce a picture or video with text overlay using a Cover Block. It may be used as a header or as the featured picture for a post. Additionally, you may change the background color and opacity.
Formatting Blocks
Pull quotes, tables, and verses are among the formatting-focused blocks that fall under this heading.
Code Block
If you wish to provide your readers with code sample examples, use the Code Block. The code will show uniquely so that it sticks out to your readers rather than being executed.
Classic Block
With a Classic Block, you can add a block resembling the classic editor and its classic formatting options. It’s a small TinyMCE editor inside a partnership.
Table Block
Without the need for plugins or HTML coding knowledge, a Table Block makes it simple to insert a table in WordPress. Choose the layout (default or stripes), enter the required rows and columns, and you’re done. After that, you may add rows and columns to the table’s beginning or end with a single click.
Verse Block
Verse Blocks allow you to include poetry or music lyrics. Instead of jumping to a new block, as in the paragraph block, when you click enter, it will hop to a new row. As far as you stay in the same league, you can write as many verses as you like.
Custom HTML Block
With Custom HTML Blocks, you can write HTML code and quickly preview the changes.
Pull Quote Block
With a Pull Quote Block, you may separate off a section of your content that you wish to emphasize into its block. The formatting of a Pull Quote Block sets it apart from a Quote Block. The edges of a Pull Quote Block are colored.
Preformatted Block
A Preformatted Block allows you to show the text on the front end precisely as you input it, much like the preformatted text option in the original TinyMCE editor. All the characters in the preformatted text have the same width since it is in a monospaced typeface.
Layout Elements
You may use the blocks in this category to make your post more attractive and arrange it visually appealing. It provides building blocks for adding media items, bright columns, and buttons in various colors.
Button Block
You may include a button in your post by using a Button Block. Its shape (round, square, etc.), color, and the result of clicking it may all be changed.
Columns Block
The Columns Block makes it quick and simple to show your content in columns (newspaper format) rather than in full width.
Media & Text Block
In the traditional editor, aligning graphics and text needed some programming knowledge. You may complete it quickly using the Media & Text Block.
Lines And Separators Block
As its name suggests, a Lines and Separators Block enables you to insert separators between different pieces of material. It covers things like line breaks and page breaks.
Final Lines
According to the official WordPress help website, content blocks are “the components for counting content in the new WordPress block editor.” To make a post and page design simpler, easier, and more flexible via blocks, this editor replaces the Tiny MCE editor used by earlier WordPress versions.
Also, if you’re looking for any assistance in WordPress, feel free to contact V2 Web Solutions 🙂
I hope this article helps!
3 notes
·
View notes
Text
Doxygen Primer
By Ian Elsbree, 2022-09-19
Table of Contents
Doxygen Primer
Table of Contents
Introduction
Doxygen
Doxygen Comments
Doxyfiles
Using Someone Else's Doxyfile
Turning LaTeX into PDF
Conclusion
Introduction
Welcome to the Doxygen Primer! This document is meant to get you up to speed on Doxygen, a documentation generator that makes it easy to document your code. This primer is not an in-depth usage guide, nor a complete documentation, nor an exhaustive list of features. It is only a basic introduction to the usage of Doxygen, primarily written for use in the CS-120, CS-170, and CS-180 courses. Of course, this document will apply to other uses, but its scope is limited intentionally. With that said, let's see what all the fuss is about.
Doxygen
Doxygen is a program. It runs when you run the command doxygen. It expects something called a doxyfile (explained later) to be in the current working directory, named Doxyfile.
Here is the official Doxygen Manual.
Doxygen's purpose is to scan source code files, in this context .c or .cpp (or .h) files, and generate documentation on the code within them, so that other programmers can more easily understand the purpose of your code and how to use it. It does this by generating files in either HTML format or LaTeX format (or both), which you can then use either as an HTML webpage, or use another tool such as pdf-latex to generate a PDF file from the LaTeX files. Either of these options will result in a document which explains how your code works to the reader.
Doxygen is not complicated to use in a simple use case. Most basically, you only have to run the command doxygen -g to generate a default configuration file, and then run the command doxygen to create the documentation for your code. However, there is some more information which will be useful to know about.
Doxygen Comments
Doxygen scans the comments in your source code. To make Doxygen aware of the information it needs to generate the documentation, you need to use special comments. You will need to put a Doxygen comment at the top of your file (a file header), specifying information about the file, as well as comments above each of your functions (function headers), specifying information about each of them. Here is an example Doxygen-style comment (this one is for a function):
/** * @brief Dynamically allocates a new node, initializing it with data. * * @param value The value to store in the node * @param label The label to associate with the node * @return A pointer to the newly made node */
Okay, what do we see here? A few things:
Doxygen comments begin with an extra * symbol, so you get /** instead of the normal /*.
The asterisks at the beginning of each line are optional. They just look nice.
Each line contains what's called a tag, followed by information.
Tags start with either a @ or a \ (either one works).
Tags denote some kind of information that would be useful to have in the documentation of your code.
The name of the tag determines how it is used in the documentation.
The information after the tag is displayed in the documentation.
Doxygen comments end like normal comments.
The most notable tags you will use are:
@file - Used as the name of the file the code is in.
@author - Used to credit the author of the file.
@date - Used to record the date of authorship of the file, or, in the case of the CS courses I mentioned earlier, the due date of the assignment.
@par - Used to display any information that does not have its own tag. If you use this tag and place a field name, and the field value on the following line, it will be displayed in the same way the author and date tags are.
@brief - Used to give a short description to a file or a function.
@param - Used to give the parameters of a function. The first word after the tag is the name of the parameter, and everything after that is the description of the parameter.
@return - Used to give the return value of a function.
There are other tags, although they are not as frequent, depending on the type of programming you do. Refer to the official manual for more information.
Doxyfiles
When you run Doxygen, it looks for a configuration file called a doxyfile. The default name it will look for is Doxyfile, with no file extension. A doxyfile is a text file, much in the same way that a C source code file is a text file. If you look at the default doxyfile (generated with the command doxygen -g), you can see the structure of a doxyfile, with options, followed by =, followed by values.
Notable options include:
PROJECT_NAME - The title of your documentation. Be sure to change this.
GENERATE_LATEX and GENERATE_HTML - Select what kind of documentation files to generate.
There are many, many more options available, although these are the most critical. Again, refer to the official manual for more information.
Using Someone Else's Doxyfile
If someone such as your professor provides a file named Doxyfile, good news! You don't have to configure one yourself. However, this is very important: make sure you edit the doxyfile to change the PROJECT_NAME to something suitable.
Other than that, using someone else's doxyfile is as simple as putting it the directory of your project and running the command doxygen. That's it. You should see a new folder or two, depending on what type of documentation you're generating. Inside these folders is your fresh, hot-off-the-press documentation. Have fun!
Turning LaTeX into PDF
You may have generated LaTeX documentation, but to view that, you'll need a program that can render LaTeX markup. Instead, you can generate a PDF document that more people's computers will be able to display easily.
Inside of the latex folder that was generated, you'll see a makefile, intended for the program make. Surprise! I have a primer on make and makefiles here. But for this usage, you should only need to run the commands cd latex to get into the latex directory and make to generate a PDF of your documentation. You will need a command called pdflatex for the makefile to work properly, which can be gotten as part of a package set called texlive.
After you run make, you'll see a file called refman.pdf is generated. That file is a PDF document that contains the full documentation for your project. Congratulations! Doesn't it look pretty?
Conclusion
You should now have some introductory knowledge of how to use Doxygen effectively. If you feel there is anything this document did not cover that you think it should, or anything you're left wondering after reading, or anything I can improve, please let me know! My goal is for this document to be easily read and comprehended, and to give you all the knowledge you need to be a more effective developer.
Created: 2022-09-19 Last Updated: 2022-11-09 © 2022 Ian Elsbree
2 notes
·
View notes
Text
HTML For Web Development | Hyper Text Markup Language
HTML For Web Development
If you're interested in web development, then you'll need to know HTML. HTML is the markup language that is used to create web pages. In this blog post, we'll give you a crash course in HTML. We'll cover everything from the basics of HTML tags to more advanced topics like creating forms and tables. By the end of this post, you should have a good understanding of how HTML works and how to use it to create web pages.
(Image Suggestion: A Beginner's Guide to HTML)
Introduction To HTML
HTML is a markup language that is used to create electronic documents that are displayed on the World Wide Web. HTML documents contain text, images, and other multimedia files, making them perfect for use in web applications and websites.
HTML also stands for Hyper Text Markup Language. This means that it has the ability to describe the structure of text and other elements on a web page in a standard way, making it easy for humans and computers to understand and work with these documents.
HTML is very versatile. You can use it to create documents that are used on the web, as well as document formats that can be used with other software. For example, you can create an Excel file using HTML and then view it in Microsoft Office.
In addition to being able to create documents, HTML also has the ability to describe the structure of text and other elements on a web page. This makes it easy for humans and computers to understand and work with these documents. Finally, HTML is also used to create electronic documents that are displayed on the World Wide Web. This means that you can view HTML documents just like you would any other document online.
Basic HTML Tags
HTML is the basic language that all web pages are written in. It is made up of tags that include head, title, body, p, a, img. These tags allow you to create a structured and organized web page. Without these tags, your website would be very difficult to read and navigate.
There are many different tags that can be used in HTML, but the most common and basic tags are head, title, body, p, a, img. The head tag is at the top of a page and includes information such as the website's name or logo. The title tag provides a brief description of the content below it. The body tag contains all of the content for your page including text and images. The p tag specifies that text should be displayed in boldface type. The a tag indicates an anchor link which will take you to another section of your web page on similar topics. Finally, the img tag allows you to insert an image into your document.
There are also additional tags that can be used to control how text appears on a web page such as br, h1-h6 headers indicating levels of importance (title), dt for date/time, abbr for acronym (shortened word), script for inline code (like iframes), and strong for emphasis or boldface typeface.
Formatting Text With HTML
When formatting text, HTML is a popular choice due to its versatility. This article will provide an overview of the different tags that are available for text formatting, as well as instructions on how to use them. Additionally, this article will discuss the different ways in which you can emphasize text and how to create headings, paragraphs, and blockquotes. Finally, this article will provide tips on how to underline, strikethrough, and superscript text.
HTML provides a wealth of tags that can be used to format text. Some of the most commonly used are and , which can be used to style font size and make text bold, respectively. Other common tags include
Title
, Which Represent Titles For Headings, And
and quote
, which are used to create blocks of quoted text. Additionally, you can use the italic tag (i) to indicate that text should be in italics, and the code for underlining (u) is available as well.
When formatting text with HTML, it's important to understand how each tag works. For example, the tag will only affect the font size – it won't change the color or positioning of any elements around the content within the span. Similarly, using attributes such as dir="ltr" on a paragraph will force all paragraphs within its parenthesis to appear in left-to-right order instead of contextually (which is usually what you want). It's also worth noting that some tags have more than one attribute associated with them; for example, both the dir="ltr" attribute and bgcolor="#EEEEEE" can be applied to a paragraph in order to change its background color.
To Learn More About Specific Tags Or Techniques, It's Always Best To Reference Either An Online Guide Or Another Source Of Information. However, This Overview Should Provide You With Enough Knowledge So That You Can Start Formatting Your Own Texts Using HTML!Working With Images In HTML
Images are an important part of web development and can be used to create engaging content. They can also be used to improve the appearance of a website or to make it more user friendly. HTML provides a variety of tags and attributes that can be used to control the size, placement, and other aspects of images on a web page. The src attribute is used to specify the URL of the image file, while the alt attribute provides alternate text for users who cannot see the image.
Working with images in HTML can be a challenging task, but it can also be very rewarding. By understanding how images work in HTML, you can create more engaging and visually appealing websites.
Image files can be large and require a lot of bandwidth to load. For this reason, it is important to use image tags that will optimize the file for web viewing. The src attribute specifies the URL of the image file, while the alt attribute provides alternate text for users who cannot see the image.
Some image tags also include dimensions and padding information that can be used to control how large an image appears on a page. The width and height attributes specify the size of the image in pixels, while max-height and -width allow you to set a maximum size for an image. If no dimension is given, then the image will be scaled down so that it fits within the specified bounds.
When specifying an image tag, it is important to keep in mind which browsers support images. Many browsers support both PNG and JPEG images, while Internet Explorer only supports PNGs. If you are using an HTML template or creating your own website, be sure to test in different browsers before finalizing your design.
Creating Links In HTML
Creating links in HTML is an important skill for any web developer. Not only can linking to other websites help you find information, but it can also help your website rank higher in search engines. In this section, we will explain how to create links in HTML, and discuss the different types of links that you can create. We will also discuss the benefits of each type of link, and provide a few tips on how to improve your link-building skills.
There are three main types of links that you can create in HTML: internal, external, and anchor. An internal link is a link that points from one page within your website to another. An external link is a link that points from your website to another website. Anchor links are special type of links that act as the foundation for other links on your webpage. They point to specific locations on the web page, and will trigger the display of related content when clicked.
When creating links in HTML, it is important to keep these three types of links in mind. Internal Links are essential for linking between pages within your website. External Links help visitors find information about other websites, and can be used to promote your website or product on other websites. Anchor Links provide a base for further linking onto other parts of your webpage, making them an important part of effective SEO marketing campaigns.
To create an internal link in HTML, you must include the URL for the page that you want to link to at the beginning of the space row in Your Document. For example, if you wish to take your external link from My Website into My Blog Page, you would write My Blog. If you want to restore an existing external link into the document, you cannot use URLs in the form of http://example.com, you must use http://www.example.com.
Internal Links help users move between pages of the document quickly and more effectively than External Links can because Internal Links direct visitors straight to the page they're looking for without having to compare the two pages first. (An external link will usually require visitors to compare the two pages before selecting a link) On the other hand, anchor links provide a foundation on which playlist services such as YouTube or Digg can be built and contain a variety of features which make them extremely effective for promoting your webpage on Multiple Social Media Platforms (such as Twitter). Anchor Links are especially important for headlines and banners on the web pages since they can also be used as a destination whenever someone clicks on them. (In addition to posting advertising, you can also include electronic ads on your website using Adobe Acrobat.)
Different kinds of cursor options on different devices may require different kinds of
Building Tables In HTML
Building Tables in HTML is a basic tutorial that will teach you how to code a table in HTML. This tutorial will cover the following topics:
- How to code a basic table
- How to style your table with CSS
- How to add interactive features to your table with JavaScript.
When creating tables in HTML, it is important to keep in mind the table structure. A table should have a header row that lists the column titles, followed by data rows that contain the data. Each row in a table must have unique cell values.
To create a basic table in HTML, begin by creating a
Element And Adding Its Required Attributes. The Element Should Have The Following Attributes:Creating Forms In HTML
HTML forms are an important part of any website. They allow users to enter information in a simple and easy-to-use format. In this section, we will show you how to create a form in HTML using the various input tags available. Afterwards, we will explain how to use radio buttons and checkboxes in your form, as well as how to create a submit button.
To start, we will need a basic HTML document with some form elements in it. We can use any web browser to create our form, but for this tutorial we will be using the free and open source W3C Validator. Once you have created your document, all you need to do is add the following tags:
The
tag is used to group together a set of form fields. The tag requires three other tags: , , and . The label is used to identify the field within the form, while the input and button tags are used to populate that field with information from a user. For our example, we will add two labels and four input fields—one text field, one checkbox field, one radio button field, and one submit button. Below is a visual representation of our sample form:
Now that we have our basic structure in place, let's dive into how to create each individual element within our form. First up is the text field:
Text Field
Name
Advanced HTML Topics
If you're looking to create more sophisticated and dynamic websites, then you'll need to know about HTML. In this article, we'll be exploring some of the most advanced HTML topics, such as include files and conditional statements.
An include file is a special type of file that can be used in HTML pages. They allow you to include other files within your page without having to copy and paste them. This can be helpful if you want to reuse content from another source, or if you just want to reduce the number of lines that are required in your page.
Conditional statements are important when it comes to creating user interfaces in HTML. They allow you to perform specific actions based on certain conditions being met. For example, you might use a conditional statement to show or hide elements based on the state of the user's browser window.
Finally, we'll talk about the difference between HTML and XHTML for a bit here. XHTML is an extension of HTML that adds additional features and capabilities. However, both languages are still valid options for creating webpages, so it's up to you which one best suits your needs.
Conclusion
Learning HTML is essential for anyone interested in web development. In this blog post, we give you a crash course in HTML, covering everything from the basics of HTML tags to more advanced topics like creating forms and tables. By the end of this post, you should have a good understanding of how HTML works and how to use it to create web pages.
3 notes
·
View notes
Last Seen Blogs

thestarstho
Stars

howintheworlddidyougethere
Oh Boy!

grosirobatserumrambut-blog
TERBUKTI NYATA, CALL/WA 0822-4552-0172, Obat Ketombe
Tradisiona

grimoriodelleombre
Libro delle Ombre

wenguiguo
无标题