#glass tutorials
Explore tagged Tumblr posts
Visit Tumblr Blog
Explore Tumblr blogs with no restrictions, modern design and the best experience.
Last Seen Tumblr Blogs


Fun Fact
1,644 Tumblr posts in 1 second.
Text

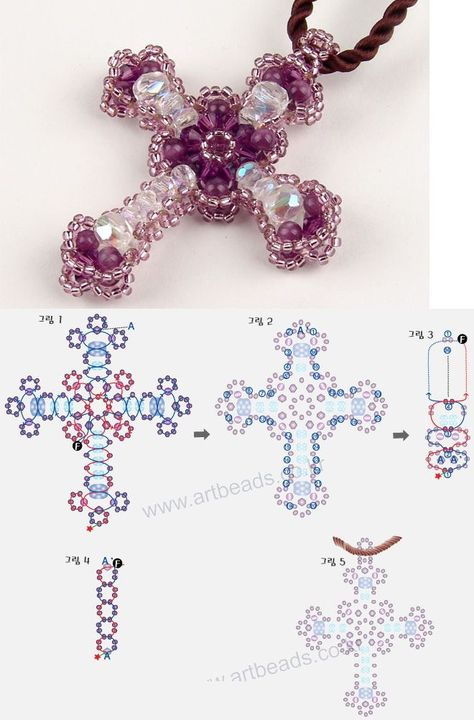
@thedragon-and-hisboy got me into httyd & I just got a bullet notebook so… here is a simple common-build body tutorial (for a medium-to-large size dragon in borosilicate glass)
#excuse the weird-ass formatting lol#this is for the glass community on tumblr PLEASE what if we all got into httyd and perfected processes for the dragons… TOGETHER#also for the httyd folks out there ✌️☮️🐉#pls keep ur expectations low 😗❤️#mypost#glass art#tutorials#lampworking#flameworking#glass flameworking#glass tutorials#glass tutorial#toothless#httyd#myart#glass#miniatures
14 notes
·
View notes
Note
Not sure if it can be done but a tutorial on glasses (like with Azul) would be fantastic. Also one on the nightmare that is Azul's hair. Please and thank you in advance.
One tuto for glasses!
I will do Azul's hair in another post :3
Warning: I don't have the vocabulary for glasses at all. I did my best to make it understandable but don't hesitate to ask for clarifications if you need TwT

Here's our two glass boys. I looked for mostly similar glasses online to use as reference.
Azul has thin frames, rectangle glasses. Trey has heavy frames, square glasses with rounded edges.
Glasses have a LOT of different shapes. Don't hesitate to look online for references on round/oval/etc glasses to help yourself. Website that sell them tend to have pics of the glasses under several angles, which is very practical when you draw anything that isn't front facing.

Step 1: drawing zone
The most important thing to figure is where to place your glasses. Anything else can be yolo-ed and still work, but badly placed glasses will make everything look weird (though it can be used for comedic effect).
Simply put: the higher part of your glasses should reach right below your eyebrows (on realistic proportions). Otherwise, use your eyelids as ref. Place your frames a bit above your eyelids. The sides of the glasses will (usually) reach the sides of the face. That's the case for both Azul and Trey.
The bottom part is where you get to choose the size of your glasses. That's where you decide to elongate them to get square/round glasses instead of rectangle ones.

Step 2: Tracing the glasses
Within the drawing zone, simply draw the general shape of the glasses. A rectangle, a square, a circle. Keep about a finger-width size gap between your two glasses.

Step 3: Details
Draw your main shape first (rectangle, square, oval). Then remove space for your nose. The glasses will tend to leave a triangular zone free in most shapes to make space for the nose (except on round glasses). Here you can add the bridge and where the arms of your glasses connect with the actual glasses.

Step 4: Frames width
Now that you have your elements placed, you only need to draw the actual frames. In most glasses the upper side will be slightly wider than the rest. Don't hesitate to only draw one side and simply copy paste and flip it to get the other side. Glasses are symmetrical so it can be a hassle.
Once there you can decide to add the thingies that keep the glasses secured on the bridge of the nose. This step can be optional if you don't go for hyper realistic glasses.

3/4 and side view
3/4: The same steps from before can be used here. Put your drawing zone first, upper frames right under the eyebrows. The side farthest from us should reach the bridge of the eyebrow (for realistic proportions). Otherwise, leave about a finger-wide space between the face and the glasses. The side closest to us will depend on how much the character looks to the side. On regular 3/4 views you can place it right on the side of the eye. For the center part, follow your nose and place the triangular hole on top of it. Part of your glasses will be hidden by the nose.
You can decide to draw your glasses in front view on another layer first to get the symmetry right, and then to move and stretch your layer until it fit in front of the eyes. It's a perfectly valid strategy!
Side view: Here the only thing you need to draw is the side of the frames and the arm reaching to the ear. You can place the arm first, mostly parallel to the ground. The frames should be put right in front of the eyebrow bridge and at least cover the whole size of the eye. For bigger glasses, add volume on the bottom.
And that is mostly that? Glasses are mostly about where you put them and giving the illusion of symmetry.
After that you can have fun with the shapes (personally I love drawing round glasses), the size, you can decide to draw the thingies that hug the nosebridge or not, you can decide to draw the arms or not, you can add accessories, etc.
You can even decide not to draw parts of the glasses to keep a clear view on your eyes. Yana has a note for Azul and Trey that the glasses should always be full even if they hide the eyes. For me it depends on my mood and what is most important in the current art.

As you might see here, I tend to add a white edge to give actual presence to the lenses and separate the eyes (or hair) from the frames. It's your choice whether you want to erase anything to make things clearer or to keep it all as is to make it realistic.
And I guess the last thing I have to say is... look at refs online. I think that's how I finish most of my tutos lol
#hopefully that's not too messy#I haven't done tutos in a while I forgot how hard it was to explain things properly in another language#mello's drawings#twisted wonderland#twst#azul ashengrotto#trey clover#original characters#glasses#tuto#step by step#tutorial#art tips#drawing tutorial#ask me anything
336 notes
·
View notes
Text


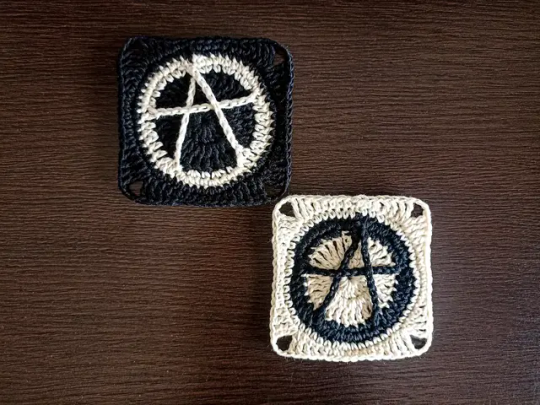
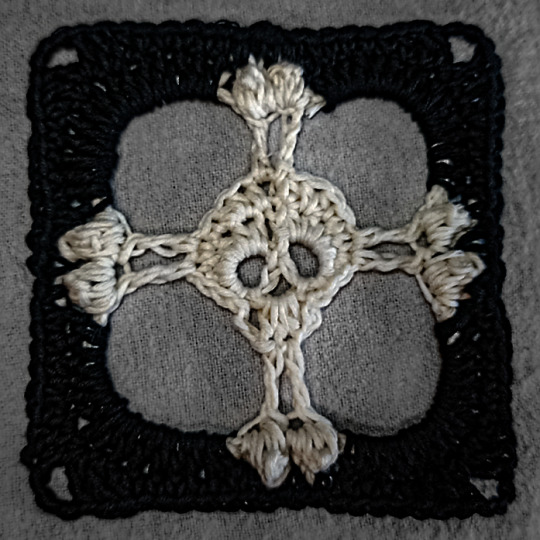
Alternative/Goth/Punk/Fairycore crochet patterns on my Etsy, RoseOfMayGreece!
#goth#punk#crochet#pattern#tutorial#pentagram#stained glass#fairycore#anarchy#patches#granny square#alternative#RoseOfMayGreece#etsy#forest#easy crochet#intermediate#beautiful#witchy#pagan#dark#moon#moon phases#night#elven
201 notes
·
View notes
Text
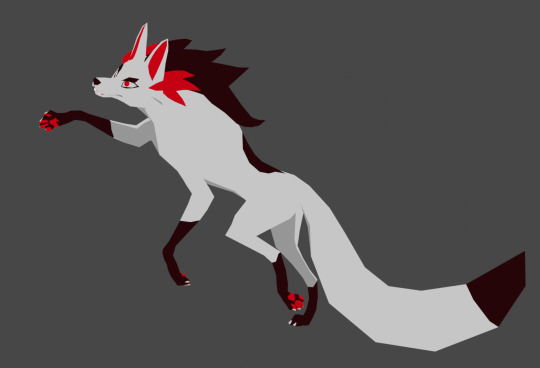
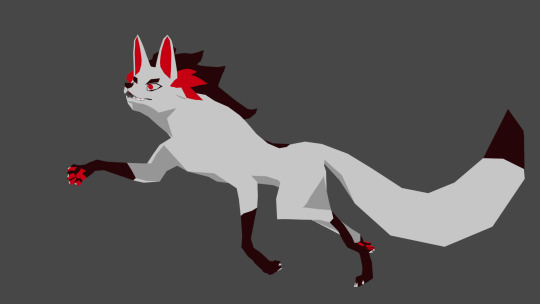
Low Polys your Mystery
#I wanted to do more with this but I can not for the life of me figure out shader and setting up a good animating rig#Im following tutorials and nothing it working#I might say screw it and just do the shading and animating in unity cause at least I can just use poiyomi#Shader nodes make me want to eat glass#Mystery skulls#Mystery skulls animated#3d model
200 notes
·
View notes
Text

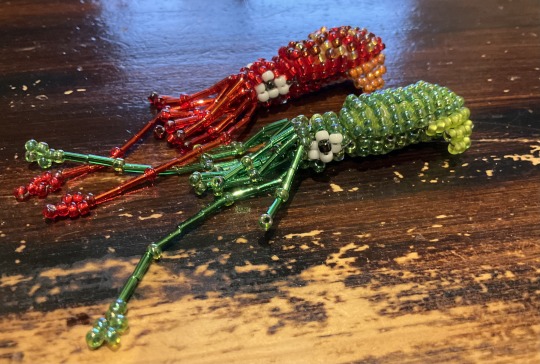
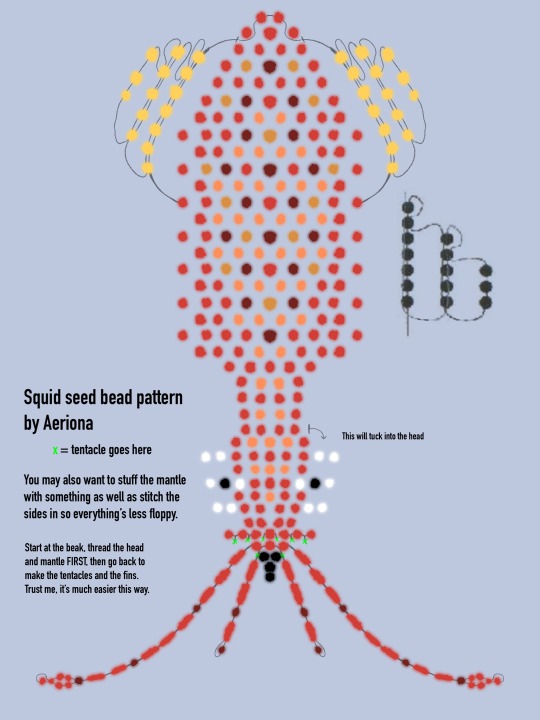
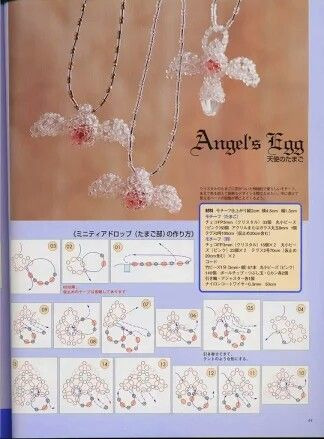
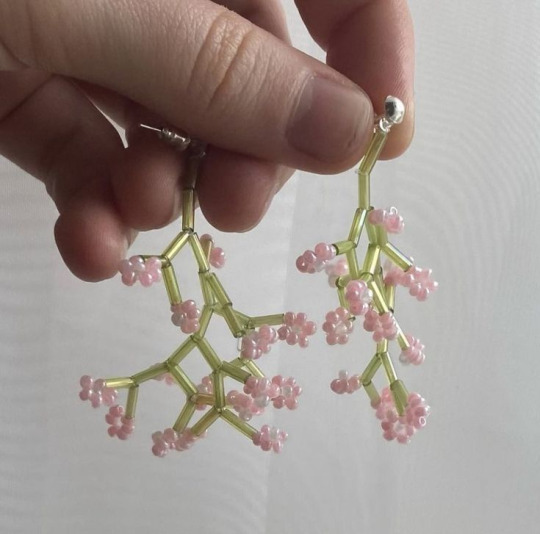
Made a pair of lil squid fellas to sit on my desk :)
I didn’t like any of the squid patterns I found on the internet so i ended up making my own, and after some trial and error I ended up with these little guys. They’ve both even got little beaks! I’ve attached the pattern I made below if anyone wants it haha.
I used size 8 miyuki rocaille/round beads, some bugles and 0.28mm thread, but pretty much any size or shape should work. Hell, you could even use pony beads if you’re crazy enough.
If your thread’s long enough you can even do the whole thing in one go, I’d personally recommend that as it means you have less knots to tie up :).
#Surprise craft tutorial jumpscare#I love these little guys so much i had to share them with the world#My art#squid#beadwork#glass beads#seed beads#pattern#bead pattern#tutorial#crafts#craftblr
307 notes
·
View notes
Text
🎭Ori redesign 🎭
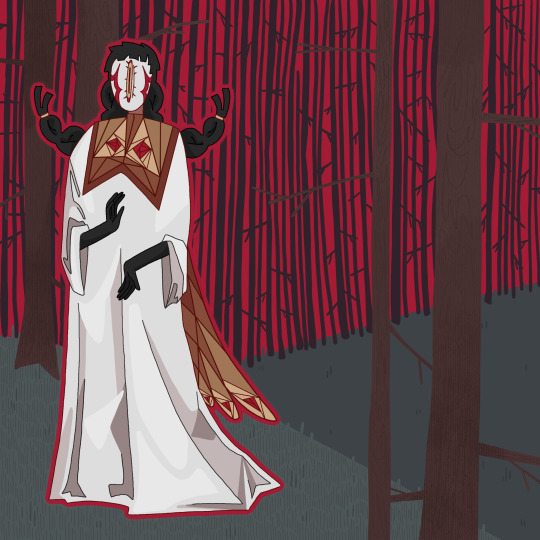
I’ll be messing around with Ori designs for a bit. It’ll probably be forever changing tbh
#I dunno anymore#was trying to go for a cool stained glass on the clothes???#honestly this was a rough doodled that I ended up just adding more details too#also wanted to redesign Marium but I might actually just like my original design#Ori#Night Out#but you know I do like the background a lot so it’s a win I suppose#artists on tumblr#art#my art#illustration#digital art#finished piece#my oc art#2025 art#Saw everyone’s inboxes and yes I will be answering them!!!#the fish request might take me a bit as it would be my first tutorial and I want it to be comprehensible
46 notes
·
View notes
Note
Thank you Soapy for your art tips, (im the one who send that art ask lol 🌞)
because of your advice i actually started drawing again and while it's not "Good" it's not bad either, i used to hate the way i draw and i compare myself with other artists now? I'm actually kinda learning how to like my own style... it's not the best like others but it's mine and i think i can learn to love it. What you say actually sparks something in me and now I'm drawing properly again (who woulda thought that huh?) (maybe u reignited my love and passion for art soapy) all in all thx u soapy ilysm ur the best 🙏🏻 (can u pls share how u color/shade soapy??? pretty pls 😿)(permission to use ur art as reference too??)
anon you don’t understand this made me tear up 😭😭😭 GOD you have no idea how happy it makes me to hear that you’ve begun to love your art again!! i am so so proud of you anon and i hope you’ll continue to find joy in art! ily2 anon ur also the best and thank u as well for enjoying my work so much 🩵🩵 and ofc u can reference my art go on ahead!! now here’s a rundown of my colour/shading process! sorry in advance if this is hard to understand LMAO 😭😭


feel free to ask any more questions!!!
#asks#🫧#art tips#art tutorial#is this a face reveal?!?!!?!!! i realise ive never showed any hint of what i look like on here LOL#there was a drawing of myself on that post abt teeth but it wasnt very apparent#a friend once told me i looked like the emo boy wojak but with glasses 😭😭😭😭 almost crashed out
47 notes
·
View notes
Text

Looking Glasses Page 67
<- Prev First Next -> Website
A world in a well, let's call it a "well-world"
[I find that sometimes I am too steeped in my own comic's lore. If you have questions about how well-worlds work so far, comment on this page and I'll see if I can address them in the comic soon.]
#looking glasses#deltarune#utdr#deltarune comic#ralsei#lancer deltarune#ferrousart#The face of a boy who always wants to deliver exposition#and the face of a boy who just discovered his friend has been lying for years#technically doesn't qualify for sadboytax cause Ralsei's having a great time#Temporarily distracted from ~everything~ by the opportunity to be a tutorial character#omg 1 year anniversary tomorrow :o
143 notes
·
View notes
Text


#i want to put him in a little glass box <3#the amazing spider-man#the amazing spiderman#tasm#peter parker#andrew garfield#filmedit#cinematv#dailytvfilmgifs#gif#gifset#spiderman#spider-man#ok I didnt follow ALL the advice in my prev post. only the 'add noise' part but look at me boy!#gonna explore the rest of the tutorial in a mo :3#dailyflicks#live action
333 notes
·
View notes
Text

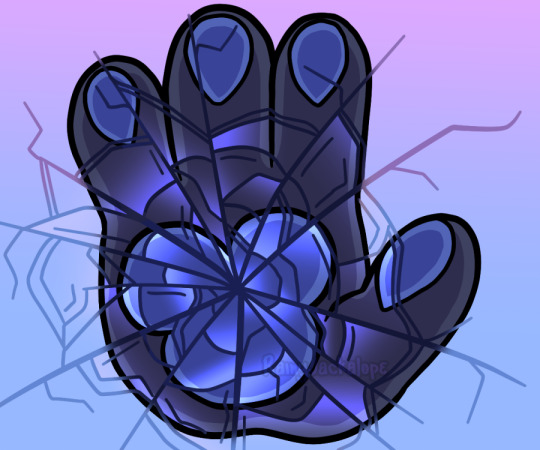
when I super boop you this is what happens btw
#I spent..........way longer on this than intended#first time drawing cracked glass I think.........shout out to tutorials#anthro#furry#fursona#jackalope#bunny#rabbit#boop#boop o meter#april fool's day#my art#sona tag#sonas: rainy
70 notes
·
View notes
Note
Hi! Apologies if this is stated somewhere in your about and I overlooked it, but I was wondering what tools you use for gifmaking lately? I personally use to use FRAPS + Photoshop way waaaaaaay back in the day, which probably isn't as efficient anymore. I'm happy to learn new techniques but figured I'd ask as I always admired the quality of the edits you make
TYSM!! I started with FRAPS and PS too back in the day
I use OBS and Photoshop; here is a tutorial I made last year for the process, which has changed slightly since then.
I use different sharpening settings mostly, plus a few other upgrades for when I went to PS 2025 and of vital importance, I am now wearing my glasses at my desk... turns out I couldn't see the monitor for shit lmao.
#anon#replies#misadventures with aes#no I am not kidding about the glasses#I play FPS games with spouses IRL friends and UHHH night and day difference with my glasses ON#-_- my visionnnnn#I should link the tutorials in my about huh will do.... later
9 notes
·
View notes
Note
do you think you could make some users with the songs from the band big thief? thank you anyway 🫶🏻

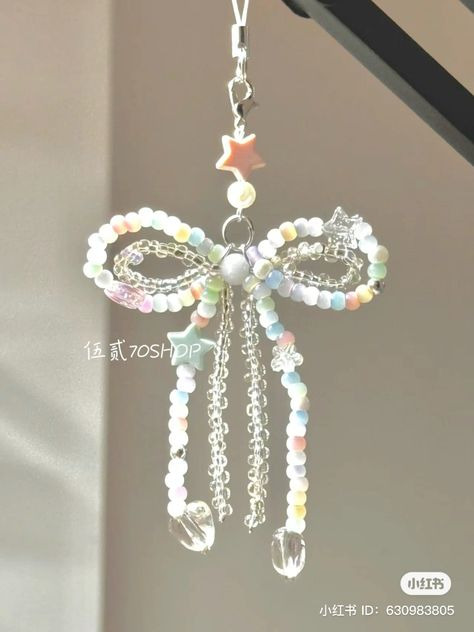
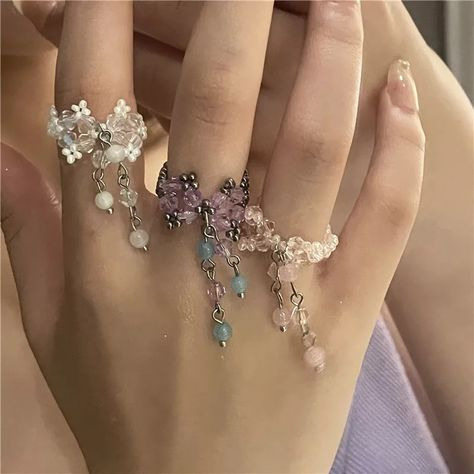


𖦁ׅ ࣪ ׂbeaded
#beaded jewelry#beaded bracelet#glass beads#perler beads#beadwork#inspo#fave ever#save#waow#art inspo#muse inspo#outfit inspo#rentry inspo#nail inspo#carrd inspo#fashion inspo#tutorial#pink#pink tumblr#pink vibes#pink pilates princess#pink pink pink#pink packs#pinkcore#soft pink#pastel#hot pink#flowers#hydrangea#roses
13 notes
·
View notes
Text

Orange Sun Granny Square crochet pattern, now available on my Etsy, RoseOfMayGreece! Easy instructions in US terms with photos of every step!
#crochet#sun#sunburst#solar#sunbeam#granny square#crochet tutorial#easy crochet#gothic#goth#pagan#witchy#stained glass#orange#beautiful#whimsical#whimsigoth#symbol#sunny#applique#patch#square#tutorial#RoseOfMayGreece#etsy#ravelry#onewomanbusiness#small business#forest#diy
86 notes
·
View notes
Text
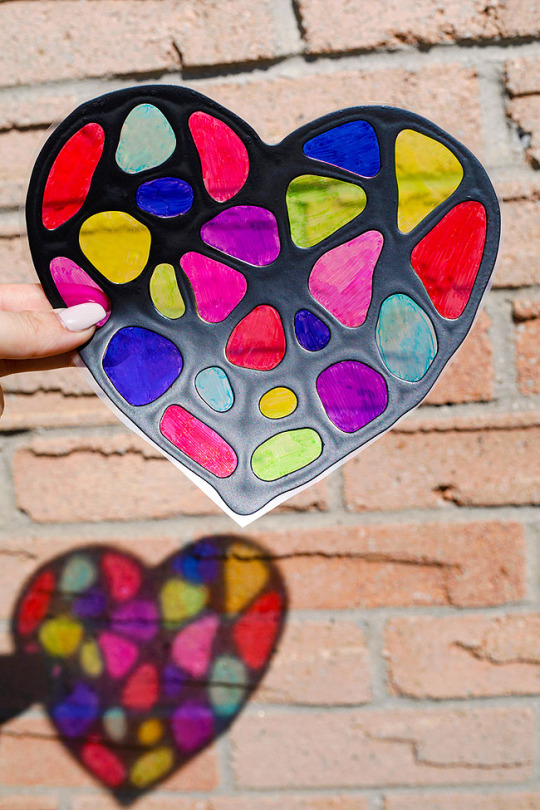

DIY Stained Glass Suncatcher Craft
This stained glass suncatcher craft is so easy and fun to make! Both kids and adults will love the colourful reflections these DIY suncatchers make.
✖✖✖✖✖✖✖✖
sew-much-to-do: a visual collection of sewing tutorials/patterns, knitting, diy, crafts, recipes, etc.
24 notes
·
View notes
Text
doing a crochet kit and it accidentally came with 3 safety eyes so it's getting 3 eyes
#hopefully i'll have it done by tonight it isn't crazy complicated or anything#i loooooove crocheting but i still need tutorials and stuff to do them so i like getting simple kits :)#i'd like to eventually do more complicated stuff but for now i like making little guys#i hate stitching 2 pieces together tho 👍 idk why it's so hard for me but it makes me wanna eat glass#sassy speaks
8 notes
·
View notes
Text

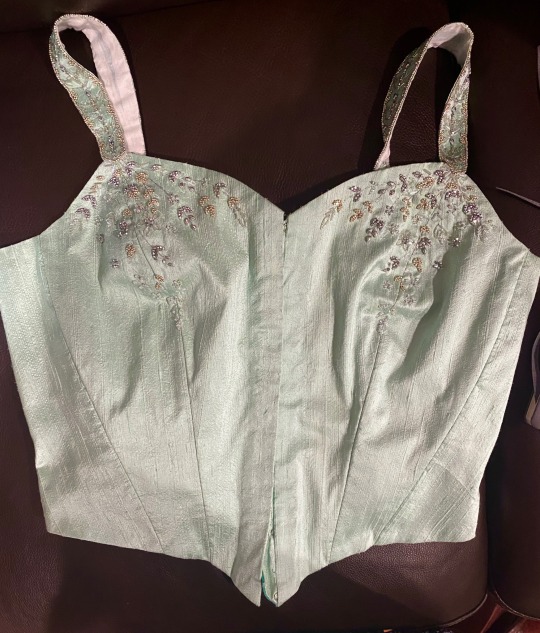
Bodice embellishment is 95% done, and the Glass Gown is starting to live up to its name! I’m finishing up the silver embroidery right now, using a very long chain stitch for most of it. I found that to have the best impact and fluidity for the long stems.
The silver embroidery thread is Sajou ‘Fil au Chinois’ in metallic silver. The beading thread is Kinkame 50wt silk in color #10.
The beads are:
2mm Czech fire-polished in Crystal AB, Crystal w/ Silver AB, and Silver.
mini Gem-duo beads in silver
3mm and 6mm Miyuki smooth bugle beads in Crystal AB
6mm Dyna-mites twist bugle beads in opaque ceylon rainbow white
15/0 Toho “3-cut” seed beads in silver (these have a very warm, nearly gold tone but this added some nice variety).
I actually bought so many other beads for this project but none of them ended up working out. This combo ended up giving me the texture and color variety I wanted while remaining cohesive and restrained. I especially love working with the fire-polished beads. The facets give them so much sparkle and texture while not being chunky or tacky. I will definitely be getting more in more colors for future projects (and also these colors again because they’re so versatile).
#pancake makes the glass gown#pancake talks textiles#the fun thing with ‘crystal’ beads is that they take on a lot of ambient color due to their transparency#the bugle beads look almost ivory in their container but with the blue thread and fabric they look like an icy seafoam#i’ll make a small beading tutorial for the leaves in the future#they’re super simple but really effective#and they have that wonderful victwardian feel
42 notes
·
View notes